| Author |
Message |
 |
|
|
|
|
Advert
|
Forum adverts like this one are shown to any user who is not logged in. Join us by filling out a tiny 3 field form and you will get your own, free, dakka user account which gives a good range of benefits to you:
- No adverts like this in the forums anymore.
- Times and dates in your local timezone.
- Full tracking of what you have read so you can skip to your first unread post, easily see what has changed since you last logged in, and easily see what is new at a glance.
- Email notifications for threads you want to watch closely.
- Being a part of the oldest wargaming community on the net.
If you are already a member then feel free to login now. |
|
 |
2013/03/07 04:37:09
Subject: Stormtalon conversion, WIP
|
|

Grizzled Space Wolves Great Wolf
|
G'day all,
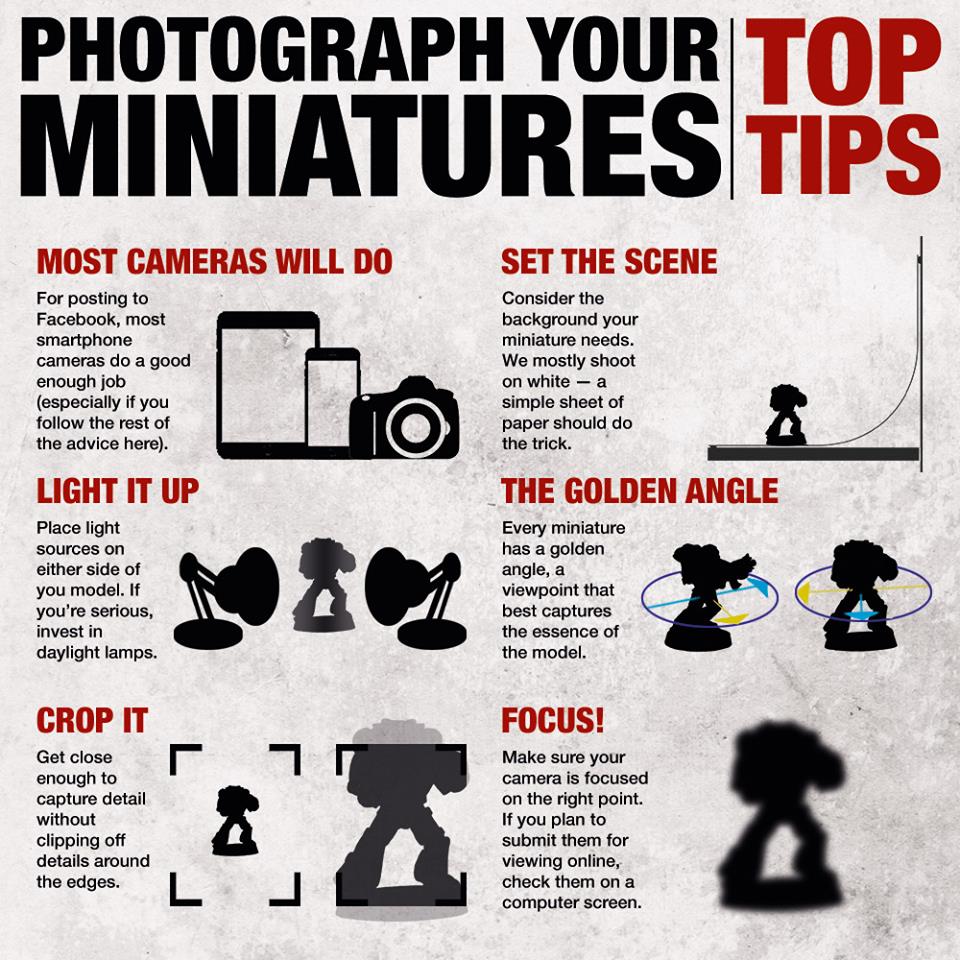
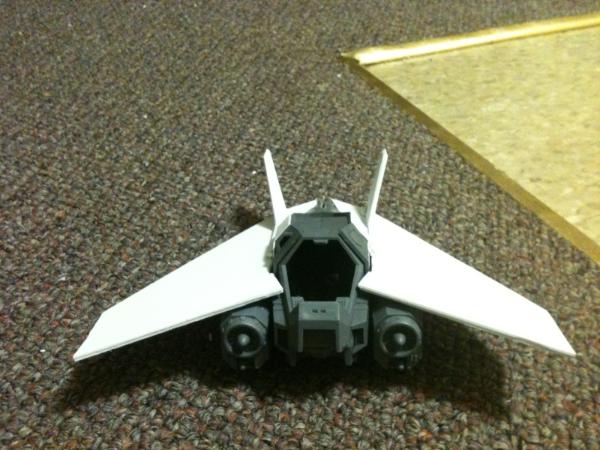
I thought I'd try and put together a Stormtalon conversion. I really dislike Space Marine flyers, they 1. Look like they're better suited as submarines than planes, 2. Don't look like they could fly, 3. If they could fly, they don't look like they could withstand the aerodynamic loads.
I've seen a few Stormtalon conversions, frankly I haven't liked any of the ones I've seen (the helicopter one looked ok, but looked out of place in a 40k Imperium). So I thought I'd give it a crack. It's heavily inspired by the 40k Lightning fighter, not the new ugly Forge World one, this one...
http://www.forgeworld.co.uk/Epic-40000/Epic_40,000_Imperial_Navy/AERONAUTICA-IMPERIALIS-LIGHTNING-ATTACK-FIGHTERS.html
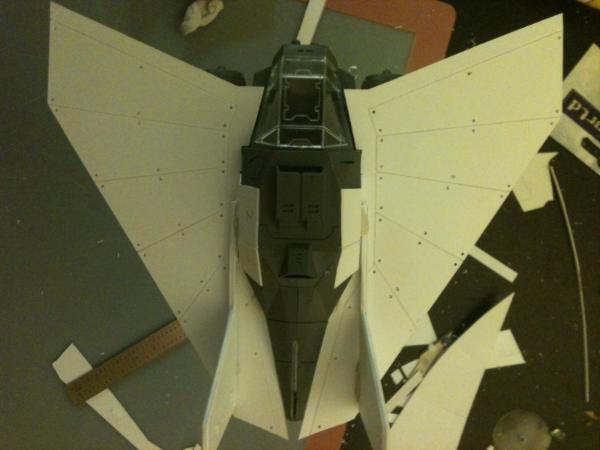
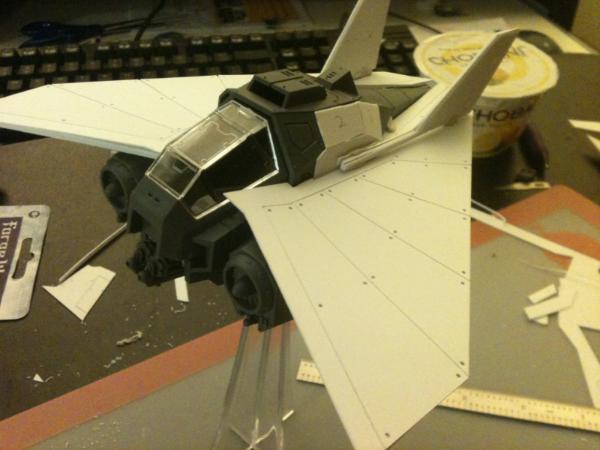
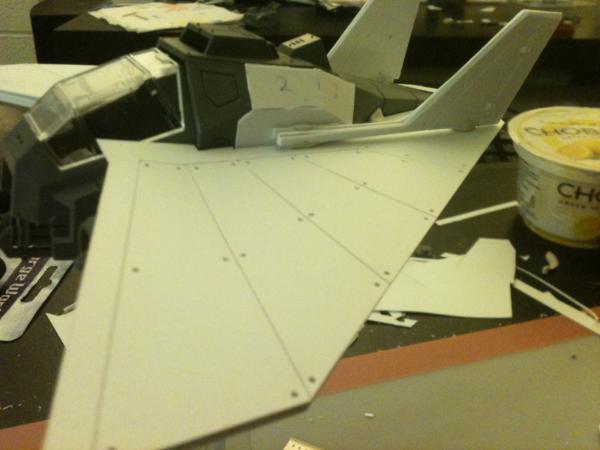
This is just a mock up. I'm trying to figure out the shape of wings, the proportions, location of weapons and so on. The final version I'll use the cardboard wings to make templates for plasticard ones instead and I'll add details like rivets, panels, hoses for the lascannons, etc.
I'm really looking for peoples' thoughts on the overall shape and concept and if you have any cool ideas on what to change or things to implement, let me know!
The assault cannons will be mounted in the nose (rather than under the chin) and will just stick out ever so slightly. I didn't include them in the mock-up because it requires me to cut them to length and I didn't want to do that until I had heard peoples' opinions. Lascannons will be magnet mounted to the wing tips as shown, and can be removed and to mount the missiles under the wings (the other weapons variant).
So what do you think....
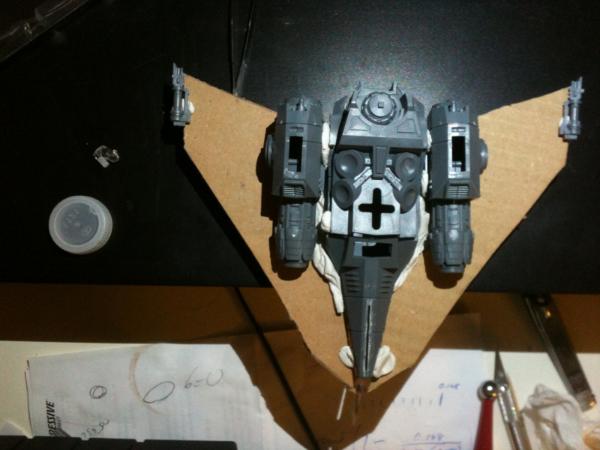
So there's a lot of work to do obviously, emphasizing this is a proof of concept mock up! I'll remove the big round things from the sides of the engines and fuselage where the engines previously mounted and cover them with plasticard panels, I'm unsure about the vertical tails, but I will integrate the wings better with the fuselage at the rear, I'll make the wings from plasticard with typical 40k style paneling and rivets, and I'll cover random holes and such. It's held together with a ton of blutac, so of course things are a bit skewed, I'll square them up properly when they're glued.
I'm also tossing up removing the random bulge on the bottom of the engines. It'll be a lot of work, but they look a bit silly to me.
I'm also tossing up changing the design slightly by extending the nose, making the wings larger and mounting them slightly further forward.
Since it looks a lot like a Lightning, I might make the pilot removable and swap in a Cadian and use it as a Lightning in my Guard army as well.
Thoughts?
|
|
This message was edited 2 times. Last update was at 2013/03/15 03:36:54
|
|
|
 |
|
2013/03/07 06:33:43
Subject: Mock up of Stormtalon conversion, ideas needed!
|
|

Road-Raging Blood Angel Biker
Welwyn Garden City, England
|
Looks good, bit like the new DA Nephilim fighter.
|
 5th Boudican Mechanised - 2300 points W:0 D:4 L:3 5th Boudican Mechanised - 2300 points W:0 D:4 L:3
 Iron Bloods - 4000 points W:1 D:5 L:6 Iron Bloods - 4000 points W:1 D:5 L:6 |
|
|
|
|
2013/03/07 06:53:02
Subject: Mock up of Stormtalon conversion, ideas needed!
|
|
Grizzled Space Wolves Great Wolf
|
Yeah, when I first saw the DA fighter I thought "oi! they stole my idea!"  But I prefer the flying wing look of my one anyway and was aiming more for the look of the Aeronatica Imperialis Lightning fighter. I would have used the DA fighter as a base rather than the Stormtalon if it weren't for the fact it costs 65% more and I would still intend to modify it heavily. Even the DA fighter looks far too much like a guppy for my likings.
|
|
This message was edited 1 time. Last update was at 2013/03/07 06:53:56
|
|
|
|
|
2013/03/07 07:01:44
Subject: Mock up of Stormtalon conversion, ideas needed!
|
|

Mutilatin' Mad Dok
|
Looks bloody good, finish it up.
|
|
|
|
|
|
2013/03/07 08:14:11
Subject: Mock up of Stormtalon conversion, ideas needed!
|
|
Hacking Proxy Mk.1
|
Looks better than the Nephilim, imo.
The Nephilim's wings are angled down much more and the tail makes it a bit iffy. That looks a lot more like a marine version of the old thunderbolt, which is awesome and how the thing should have looked to begin with.
|
 Fafnir wrote: Fafnir wrote:Oh, I certainly vote with my dollar, but the problem is that that is not enough. The problem with the 'vote with your dollar' response is that it doesn't take into account why we're not buying the product. I want to enjoy 40k enough to buy back in. It was my introduction to traditional games, and there was a time when I enjoyed it very much. I want to buy 40k, but Gamesworkshop is doing their very best to push me away, and simply not buying their product won't tell them that.
|
|
|
|
|
2013/03/07 20:59:01
Subject: Mock up of Stormtalon conversion, ideas needed!
|
|
Grizzled Space Wolves Great Wolf
|
Cool, well if no one has any ideas for improvements then I'll get started. It will take me a while, as I'm living away from home I don't have any of my modelling supplies and tools and need to source some plasticard and modelling putty and such, we'll see how it goes.
Anyone know somewhere to get some plasticard in the eastern part of Pennsylvania? 
|
|
|
|
|
2013/03/15 03:33:47
Subject: Re:Mock up of Stormtalon conversion, ideas needed!
|
|
Grizzled Space Wolves Great Wolf
|
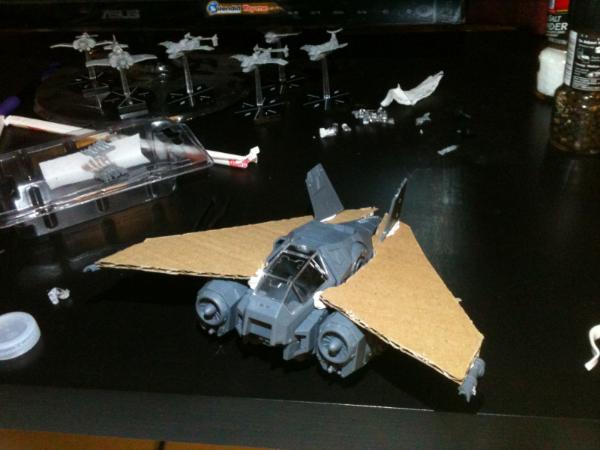
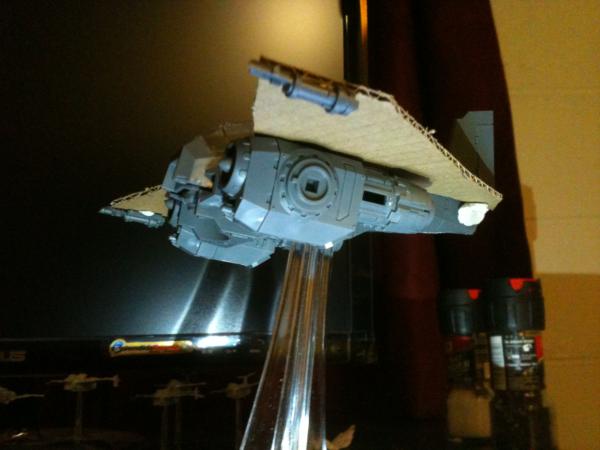
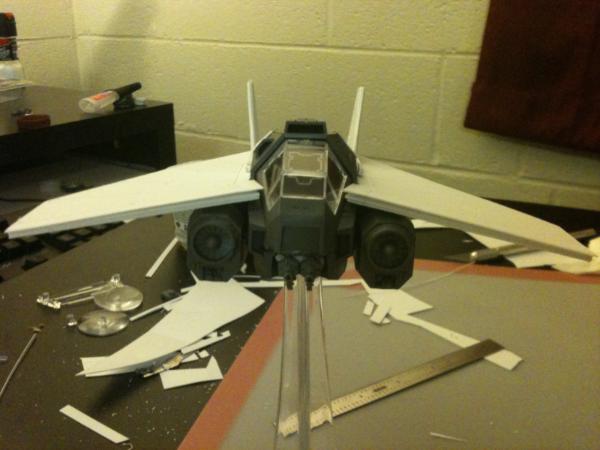
Alrighty. She still ain't done, been a bit too busy to dedicate time to it. But I spent some time on it tonight and thought I'd give an update.
The wings are still held on with blutack and I haven't done the wing paneling yet. Those are the two biggies, as I want the wing completely finished before I glue it on so I can remove it and use it as a template for future aircraft (it takes a lot of time trimming to line it up and create a wing from nothing compared to having a template!).
I have, however, glued on the engines, removed the old engine mounting surfaces from the fuselage and engines themselves and paneled up the holes. This was quite time consuming simply because I have no reference on where to glue the engines, a little bit off and the whole thing will look skewed and strange, so I spent quite a lot of time test fitting and marking locations.
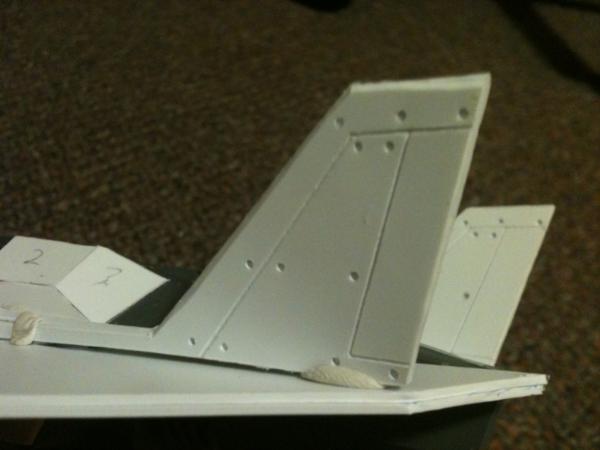
I also completed the tail sections. Originally I was going to convert the vertical fin of the Stormtalon in to my creation's tail, but I decided it was too fiddly and I didn't like the look of them so I just made my own.
This is my first attempt with plasticard, so I figured it was a good idea to test my paneling/detail work on the tail before moving on to the wings themselves. I've definitely learned certain things which end up wasting time!
|
|
This message was edited 2 times. Last update was at 2013/03/15 04:20:52
|
|
|
|
|
2013/03/15 04:18:30
Subject: Stormtalon conversion, WIP
|
|
Bounding Dark Angels Assault Marine
Midwest,United States
|
First attempt you say? much better than any of my failures! keep it up!
|
 ~5000+ pts (95% Deathwing ) ~5000+ pts (95% Deathwing )
 ~1500 pts ~1500 pts
"Uncertainty is an uncomfortable position. But certainty is an absurd one" - Voltaire
"You have to learn the rules of the game. And then you have to play better than anyone else." -Einstein |
|
|
|
|
2013/03/15 05:31:41
Subject: Stormtalon conversion, WIP
|
|
Grizzled Space Wolves Great Wolf
|
Yes, first attempt, bought my first pack of plasticard last week... though my floor is now littered with scraps of plasticard as I tried to figure out ways to do rivets/holes/panels to look the same as GW/ FW models
|
|
|
|
|
2013/03/15 09:22:58
Subject: Stormtalon conversion, WIP
|
|
Tough Tyrant Guard
|
Nice job with the plasticard. Edging look much better than anything I produce lol
|
It's my codex and I'll cry If I want to.
Tactical objectives are fantastic |
|
|
|
|
2013/03/15 12:43:43
Subject: Stormtalon conversion, WIP
|
|

Slaanesh Chosen Marine Riding a Fiend
|
It looks very good especially for a first attempt. Clean lines and fitting additional details.
And there are different ways of creating rivets. For veicle sized rivests you could use plasticard round rods and cut them into slices. Or do the same with GS rolled rods.
For smaller sizes you can drill a hole and glue wire in.
You could use tiny glue drops as round bolts (never done it myself but others have.)
And on larger more orky sized round rivets a hole puncher works quite well.
|
|
|
|
|
|
2013/03/15 12:58:40
Subject: Stormtalon conversion, WIP
|
|
Grizzled Space Wolves Great Wolf
|
My biggest challenge is cutting straight lines and to a lesser extent grooving straight lines. Doing that is a lot harder than I thought it would be, lol. I'm using a steel ruler and a hobby knife, but I can't get a perfectly straight line, it's always a bit wonky and far too often the blade wanders away from the ruler or the ruler shifts while making the line. Grooving straight lines is a bit easier, as the tool doesn't seem to wander as much, but still there's a few grooves I've done which have been a bit wonky.
The way I'm working with it now is to sketch up a template on paper then use the tip of a compass as a scribe to punch small holes at the ends of each line, remove the paper template then gently scribe in the lines themselves by joining the dots using the compass (I could buy an actual scribe tool but the compass was $3 cheaper ).
For the rivet holes I'm using a 0.2mm styrene panel for "details" and marked their position with the compass before drilling with a 60 gauge drill which seems to match the hole size GW uses. I do that before gluing the detail panel down so I can clean up the back of the panel and have consistently 0.2mm deep holes with flat bottoms (rather than tapered bottoms you get from a drill).
I've discovered one way of doing the tiny little protruding rivets you see on a lot of GW vehicles is to take the compass and press from the back of the 0.2mm detail panel and it pushes out a small protrusion. It is a bit tricky because if you do it on a hard surface it doesn't work (the plasticard gets pushed sideways instead of outward) and it's easy to push too hard and push the compass tip all the way through the panel. I need to play around with that more.
|
|
This message was edited 2 times. Last update was at 2013/03/15 13:00:23
|
|
|
|
|
2013/03/16 14:02:44
Subject: Stormtalon conversion, WIP
|
|
Hurr! Ogryn Bone 'Ead!
The Frozen North
|
A good way to scribe panel lines is using your exacto blade, just reversed. Hold the point against the plastic gently with the edge of the blade pointing up away from the plastic. Lightly scribe against the straight edge a few times to establish a groove before pressing harder. This will allow for a much crisper line that does not have that tendency to wander. It will take practice but it will serve you well with the tools that you already have.
The reverse method you discovered for pressing rivets from the back side is a modeling staple. A good way to make riveted strips is to find a pinwheel (used for transferring patterns for sewing) and run it along a straight edge. This will give you strips of rivets with even spacing ready for use.
On another note, your conversion rather looks like the old Lightning from Forge World. Would you mind sharing the templates?
|
|
This message was edited 1 time. Last update was at 2013/03/16 14:04:07
You say that I am crazy. I say that you are right! |
|
|
|
|
2013/03/16 14:10:38
Subject: Stormtalon conversion, WIP
|
|
Grizzled Space Wolves Great Wolf
|
Yeah I snapped the top of an exacto blade to do the grooves. I tried using the back of the knife but it was still too sharp and was pushing material to the sides instead of actually removing it, also tried using the tip of a compass and it was ok but not very clean. So I just snapped off the top 3 or 4mm of a blade and use the back of that which is a bit thicker and tends to pull out material instead of just pushing it to the side. It works ok, but sometimes I still mess it up, though cutting a straight line is harder than grooving one.
Yeah, I did use an old Lightning as inspiration, I don't have any templates, I started from scratch When I finish the wings I intend to trace them out to make some templates for future use. Once I've done that I can scan them and upload them, but unfortunately I don't have any templates to make the Lightning itself, just my Stormtalon mutation
|
|
This message was edited 2 times. Last update was at 2013/03/16 14:12:21
|
|
|
|
|
2013/03/27 04:29:53
Subject: Re:Stormtalon conversion, WIP
|
|
Grizzled Space Wolves Great Wolf
|
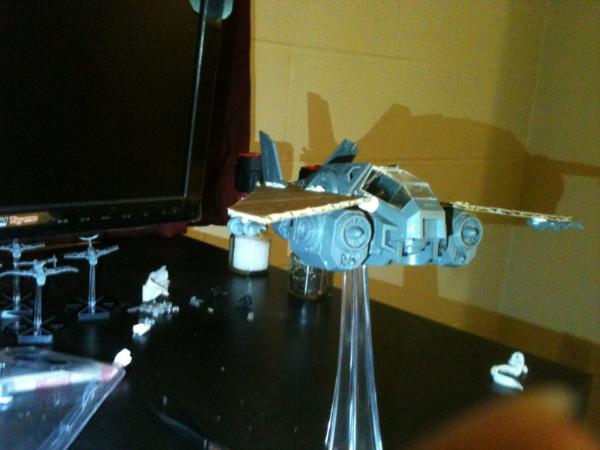
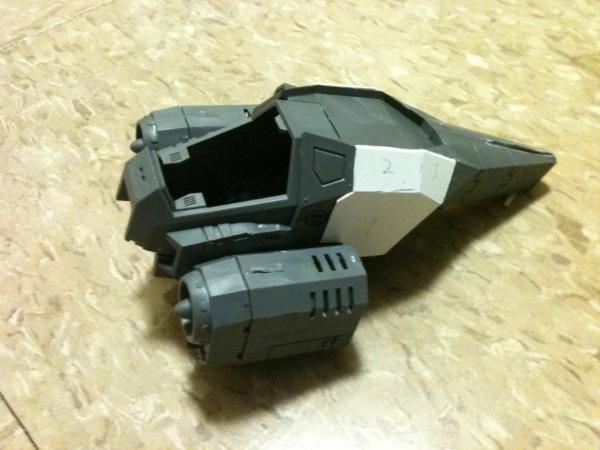
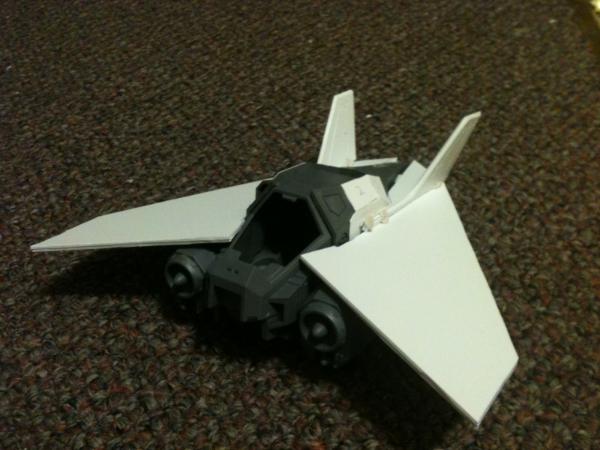
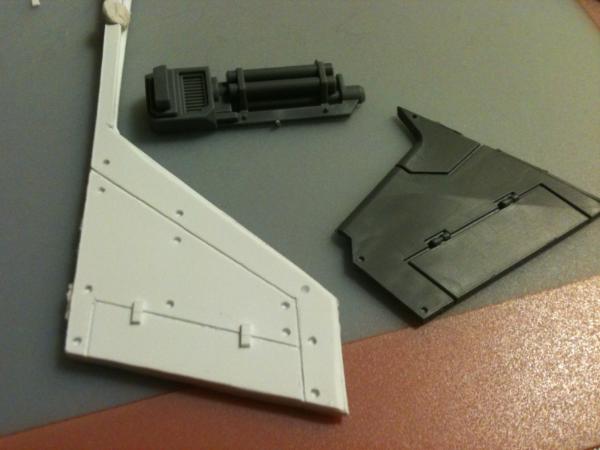
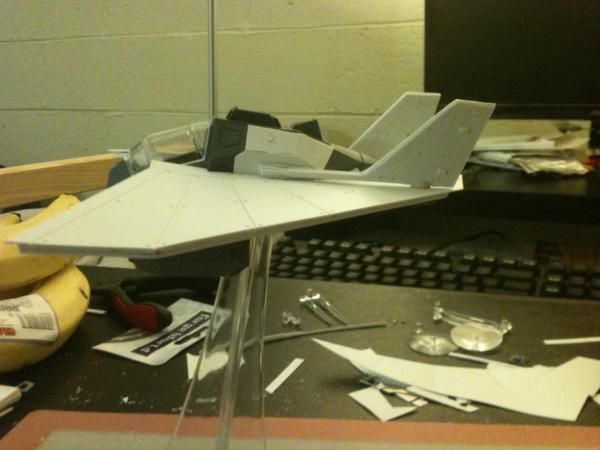
Alright, not a lot of progress, but I thought I'd give an update because I've done the wing paneling and it took me far longer than I was expecting!
I think the wings are pretty much the shape I want, they still look a bit plain and boring though, I dunno. At this point all that's left to do is glue it together and start filling the gaps and smoothing the joins with some putty.
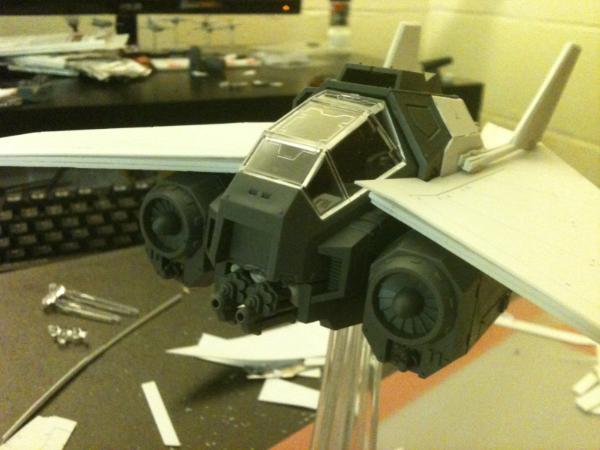
I've positioned the assault cannons under the nose in the gap that previously held the pivoting mechanism, I'm not sure whether or not I like it, I feel like it looks a bit too low. Overall I'm pretty happy, she still looks a bit too fat around the middle, but that's the Stormtalon for you, not much way of fixing it without a full rebuild.
Planning to put another intake/vent in the nose where the random square gap is at the moment..
I feel like it's a big improvement over the standard Stormtalon, but it's taking me longer than I was expecting to complete!
I have learned two ways to make straighter lines, one is to just make your first pass with the knife lighter and faster and hope for the best, then do a couple more passes to actually cut through, or if you need a really straight line, cut a line slightly larger than it needs to be (~1mm) and then trim off the excess 1mm once you've removed it from the larger sheet. Since it has less material to bend in order for the knife to pass through, it'll tend to make a cleaner cut.
|
|
|
|
|
2013/03/27 04:39:32
Subject: Stormtalon conversion, WIP
|
|
Three Color Minimum
|
That looks amazing, much more fighter - less fisher-pykel!
Can't wait to see more.
|
Swan-of-War wrote:And Jesus said unto the Pharoahs, "Thine army is cheese!" and flipped the table into the sea. And this was good.
Judges 4:21
|
|
|
|
|
2013/03/27 05:34:49
Subject: Stormtalon conversion, WIP
|
|
The Hive Mind
|
I'm not a huge fan of the two corners of the wing that stick up next to the cockpit but other than that it looks really good.
|
My beautiful wife wrote:Trucks = Carnifex snack, Tanks = meals.
|
|
|
|
|
2013/03/27 05:43:10
Subject: Stormtalon conversion, WIP
|
|
Grizzled Space Wolves Great Wolf
|
rigeld2 wrote:I'm not a huge fan of the two corners of the wing that stick up next to the cockpit but other than that it looks really good.
Yeah me either to be honest, I'm trying to figure out how best to deal with it because I don't want to modify the shape of the wings as they sit quite nicely. I'm thinking I might be able to shave the thickness of the wings down near where they rest on the engines and against the fuselage (they're currently about 3mm thick) and hopefully those edges will line up with the bottom edge of the canopy when that's done. I hope! Those corners are also sticking up a bit more than they should because the detail panel on the wings isn't glued down yet (want to finalise the position of bolt holes first since once it's glued down I can't add any more bolt holes and remaking the wings will take me several hours, so want to get it right the first time).
|
|
This message was edited 1 time. Last update was at 2013/03/27 05:45:49
|
|
|
|
|
2013/03/27 10:23:27
Subject: Re:Stormtalon conversion, WIP
|
|
Regular Dakkanaut
|
This looks brilliant, the finished product will definitely be worth the effort. With the two wing corners near the cockpit, could you shave it down, put in GS, let it dry then cut/file it to make a smooth finish?
|
|
|
|
|
2013/03/27 10:36:52
Subject: Stormtalon conversion, WIP
|
|
Grim Dark Angels Interrogator-Chaplain
|
Don't try and cut all the way through the plasticard in one go. Put the steel rule right on the card, instead of cork side down if it has one. Use light pressure and several strokes. After a point you can bend and snap if using a straight line.
Having said that, this looks FANTASTIC. Great conversion.
|
 Stormonu wrote: Stormonu wrote:For me, the joy is in putting some good-looking models on the board and playing out a fantasy battle - not arguing over the poorly-made rules of some 3rd party who neither has any power over my play nor will be visiting me (and my opponent) to ensure we are "playing by the rules"
|
|
|
|
|
2013/03/27 15:46:50
Subject: Stormtalon conversion, WIP
|
|
Grizzled Space Wolves Great Wolf
|
Yeah, I'm doing what you describe already, I was never trying to get all the way through in one slice, I think my problem is that I want REALLY straight lines as if they were machine cut. Even if you cut a straight line the act of bending it back and forth to snap off the last little bit will make the line not straight because it'll never snap along a perfectly straight line. My problem is I'm a perfectionist, lol. I think realistically to get it the way I want I need to sand it down later, maybe even build up a layer of putty and sand the putty smooth.
|
|
|
|
|
2013/03/27 15:55:18
Subject: Stormtalon conversion, WIP
|
|
Grim Dark Angels Interrogator-Chaplain
|
It is possible, you just have to be super, super patient! I agree it's a pain.
I'm about to start some scratchbuilds of my own so you soon can howl 'Ooooohhhh... HYPOCRITE!' at me when I post pics of my wonky cutting. :-)
|
Stormonu wrote:For me, the joy is in putting some good-looking models on the board and playing out a fantasy battle - not arguing over the poorly-made rules of some 3rd party who neither has any power over my play nor will be visiting me (and my opponent) to ensure we are "playing by the rules"
|
|
|
|
|
2013/03/27 16:01:40
Subject: Stormtalon conversion, WIP
|
|
Long-Range Land Speeder Pilot
|
what thicknesses of plasticard do you guys use? and where do you buy it?
I saw this site, which I'm going to order some reaperesque/vallejoesque paint dropper bottles from and they sell sheets/rods/shapes... but I'm not sure which plastic compound to go with or at what thicknesses would be useful. This Site
|
|
|
|
|
|
2013/03/27 16:46:48
Subject: Stormtalon conversion, WIP
|
|
Using Inks and Washes
|
In England http://www.ema-models.co.uk/ are the people I use. They also have a handy panel sriber to indent panel lines into the plasticard rather than add on more layers to get a panelled appearance. I've used that to cut through thick sheets as it removes a thin 'hair' of the sheet with each pass.
Edit: If you want to carve panel lines on something like a cylindrical fuselage, dymo tape can be very good for givin you a straight edge to run the panel scriber along, it works both fore and aft along the fuselage, and around the circumference of it.
|
|
This message was edited 1 time. Last update was at 2013/03/27 16:51:06
"Ask ten different scientists about the environment, population control, genetics, and you'll get ten different answers, but there's one thing every scientist on the planet agrees on. Whether it happens in a hundred years or a thousand years or a million years, eventually our Sun will grow cold and go out. When that happens, it won't just take us. It'll take Marilyn Monroe, and Lao-Tzu, and Einstein, and Morobuto, and Buddy Holly, and Aristophanes…then all of this…all of this…was for nothing. Unless we go to the stars." Commander sinclair, Babylon 5.
Bobtheinquisitor wrote:what is going on with APAC shipping? If Macross Island were real, they'd be the last place to get any Robotechnology.
|
|
|
|
|
2013/03/27 18:27:44
Subject: Stormtalon conversion, WIP
|
|
Grizzled Space Wolves Great Wolf
|
JWMarines wrote:what thicknesses of plasticard do you guys use? and where do you buy it?
I saw this site, which I'm going to order some reaperesque/vallejoesque paint dropper bottles from and they sell sheets/rods/shapes... but I'm not sure which plastic compound to go with or at what thicknesses would be useful. This Site
I bought mine from a hobby shop that specialised in model trains. You can get it a lot cheaper online or from a plastics supplier, I just wanted to see it in the flesh before I bought it. For $15 I got enough plasticard to do about a dozen of my Stormtalon conversions.
As for type, I'm using Polystyrene Sheet.
As for thickness, that was partly due to what the shop had in stock. I got large sheets of 0.060" for thicker parts and 0.020" for detail work and thinner panels. I also bought some 0.015" as well, the reason I bought both 0.020" and 0.015" is simply because they only had small sheets of the 0.015" which was more expensive, so I only got a couple of them and bought the much larger and cheaper sheet of 0.020" as well.
I'm stacking sheets depending on the thickness and detail that I want. The tail sections I did one layer of 0.060" sandwiched between layers of 0.02", the wings are 2 layers of 0.060" sandwiched between layers of 0.02". I wanted the wings really thick so there is less chance they'll bend over time.
 Conrad Turner wrote: Conrad Turner wrote:In England http://www.ema-models.co.uk/ are the people I use. They also have a handy panel sriber to indent panel lines into the plasticard rather than add on more layers to get a panelled appearance. I've used that to cut through thick sheets as it removes a thin 'hair' of the sheet with each pass.
I'm just using an exacto knife which I clipped the tip off as a scriber. It works really well and it's how I did those panels. I still use separate detail panels though, because it's simply easier to deal with and to do the small holes I've drilled all the way through the detail sheet before gluing it down, ensuring I have consistent hole depth and the bottom of the hole is perfectly flat instead of tapered as if you'd simply drilled part way through a thicker sheet. So the panel lines I scribed the 0.020" sheet but didn't go all the way through, then the holes are drilled all the way through and it's glued to a 0.060" sheet.
|
|
|
|
|
2013/03/27 19:55:09
Subject: Stormtalon conversion, WIP
|
|
Ruthless Rafkin
|
This is a great build so far. Keep it up!
|

-Loki- wrote:
40k is about slamming two slegdehammers together and hoping the other breaks first. Malifaux is about fighting with scalpels trying to hit select areas and hoping you connect more. |
|
|
|
|
2013/03/27 20:54:38
Subject: Re:Stormtalon conversion, WIP
|
|
Long-Range Land Speeder Pilot
|
As for type, I'm using Polystyrene Sheet.
As for thickness, that was partly due to what the shop had in stock. I got large sheets of 0.060" for thicker parts and 0.020" for detail work and thinner panels. I also bought some 0.015" as well, the reason I bought both 0.020" and 0.015" is simply because they only had small sheets of the 0.015" which was more expensive, so I only got a couple of them and bought the much larger and cheaper sheet of 0.020" as well.
Awesome, thanks for the info. I actually found a link to eStreetPlastics here on dakkadakka with a little searching. Looks like some good prices. I've got a ton on my plate before I start doing any scratch building, but I really like the direction this piece of yours is going and it's giving me ideas. Looking forward to seeing it done.
|
|
|
|
|
|
2013/03/28 02:40:50
Subject: Stormtalon conversion, WIP
|
|
Grizzled Space Wolves Great Wolf
|
Thanks for all the compliments everyone, seeing as I don't have a lot of time to work on my miniatures they do motivate me to keep going ( FYI I'm sure I could have done this thing in a day if I had a full day to dedicate to it).
The thought that some random people I've never met want to see it completed strangely enough gives me motivation to actually complete it.
|
|
|
|
|
2014/02/21 10:34:13
Subject: Stormtalon conversion, WIP
|
|
Grizzled Space Wolves Great Wolf
|
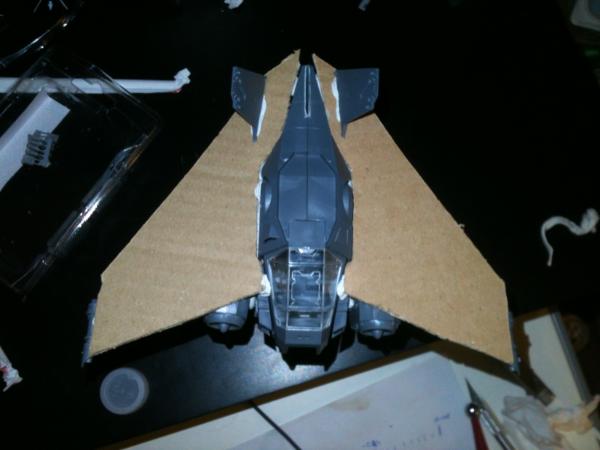
Hey all, I haven't had a chance to finish this thing yet. Moved houses and it got thrown in a box, lol. Someone asked me about it, so I scanned the wings in case anyone else wants to make the same conversion. The wings was really the only hard part about this conversion, so here they are! If the left and right wings aren't perfectly symmetrical, it's probably because they aren't, I couldn't easily mirror it when making the first set, so they probably aren't perfectly symmetrical. This template will give you wings that rest on the back of the fuselage where the vertical tail used to be, and it should rest neatly on the edges next to the cockpit. You can then mount the engines under the wings at a height that gives you the anhedral you want (the downward tilt). The ruler is included in case you want to print it off to check that the scale is correct before you go cutting any plastic, I can send you some PDF's if you want, just PM me. 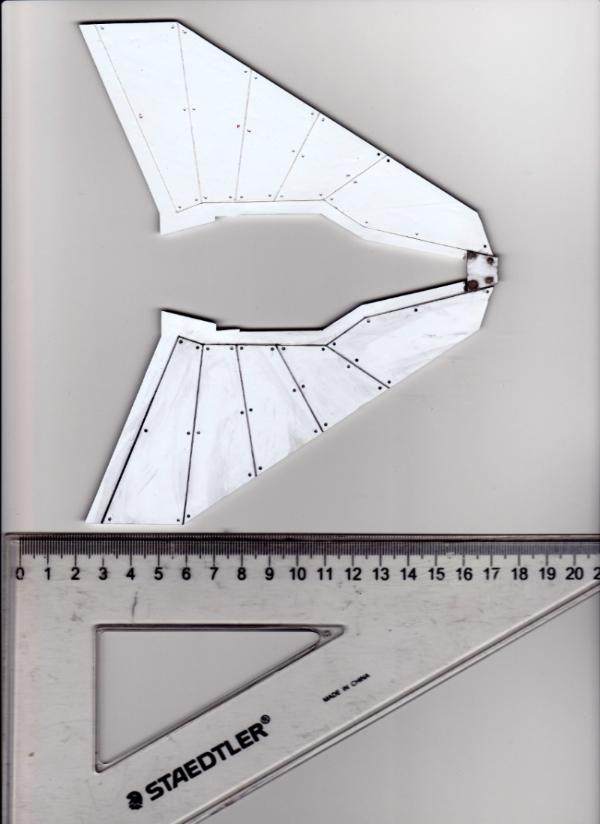
|
|
This message was edited 1 time. Last update was at 2014/02/21 10:36:17
|
|
|
|
|
2014/02/21 15:11:43
Subject: Stormtalon conversion, WIP
|
|

Judgemental Grey Knight Justicar
|
AllSeeingSkink wrote:rigeld2 wrote:I'm not a huge fan of the two corners of the wing that stick up next to the cockpit but other than that it looks really good.
Yeah me either to be honest, I'm trying to figure out how best to deal with it because I don't want to modify the shape of the wings as they sit quite nicely. I'm thinking I might be able to shave the thickness of the wings down near where they rest on the engines and against the fuselage (they're currently about 3mm thick) and hopefully those edges will line up with the bottom edge of the canopy when that's done. I hope! Those corners are also sticking up a bit more than they should because the detail panel on the wings isn't glued down yet (want to finalise the position of bolt holes first since once it's glued down I can't add any more bolt holes and remaking the wings will take me several hours, so want to get it right the first time).
I'm not sold on those corners sticking up either.
I don't know if it's been suggested yet, but could you cut part way through those corners (making a small triangle at that point) and bend it down in line with the bottom of the cockpit perhaps? This would leave the wings shape entirely intact and add another angled surface for visual impact, all while getting rid of that corner sticking up in front of the window.
|
|
|
|
|
|
|