| Author |
Message |
 |
|
|
|
|
Advert
|
Forum adverts like this one are shown to any user who is not logged in. Join us by filling out a tiny 3 field form and you will get your own, free, dakka user account which gives a good range of benefits to you:
- No adverts like this in the forums anymore.
- Times and dates in your local timezone.
- Full tracking of what you have read so you can skip to your first unread post, easily see what has changed since you last logged in, and easily see what is new at a glance.
- Email notifications for threads you want to watch closely.
- Being a part of the oldest wargaming community on the net.
If you are already a member then feel free to login now. |
|
 |
2021/02/19 16:13:33
Subject: Dungeons and Dragons Blog - Simple Pit Trap tiles - spiked!
|
|

Battlefield Tourist
|
Slinky: Cheers! I'm hardly going to win any prizes but it definitely communicates what I want.
Gwyn: It would probably work a couple of times and then my eagle eyed players would notice the very minor height difference. Same thing happens on virtual tabletops when they notice the outline of the trap on the map I make. I just tend to put the trap elsewhere when that happens!
|
|
|
|
 |
|
2021/02/19 16:34:34
Subject: Dungeons and Dragons Blog - Simple Pit Trap tiles - spiked!
|
|

Near Golden Daemon Caliber
|
The angles are nice, definitely evokes a drop and then murderous pokes.
Just swap it out when the time comes, no need to have your party looking for meta clues, but definitely useful for once it's sprung!
|
|
|
|
|
|
2021/02/20 13:04:50
Subject: Dungeons and Dragons Blog - Simple Pit Trap tiles - spiked!
|
|
Battlefield Tourist
|
Cheers!
I'm doing them double sided, so bare pit on one side and spiked on the other. Also doing a couple of acid pits and a 4 tile big bottomless pit that is single tile bottomless pits on the other side.
It's quite fun. If anyone is trying this though for sure prime these bases first. The paint really doesn't want to stick in some places. Gonna have to be sure to seal these really well and not sure if the paint will hold even after sealing.
|
|
|
|
|
|
2021/02/20 16:01:14
Subject: Dungeons and Dragons Blog - Simple Pit Trap tiles - spiked!
|
|
Near Golden Daemon Caliber
|
I think my players would cry if I had so many traps, but if we are honest the are more of the day spa owning type then the classic delving type.
That's tough when you have uncooperative materials, it always sucks to go back and redo work just because something was stubborn.
|
|
|
|
|
|
2021/02/20 16:44:08
Subject: Dungeons and Dragons Blog - Simple Pit Trap tiles - spiked!
|
|
Battlefield Tourist
|
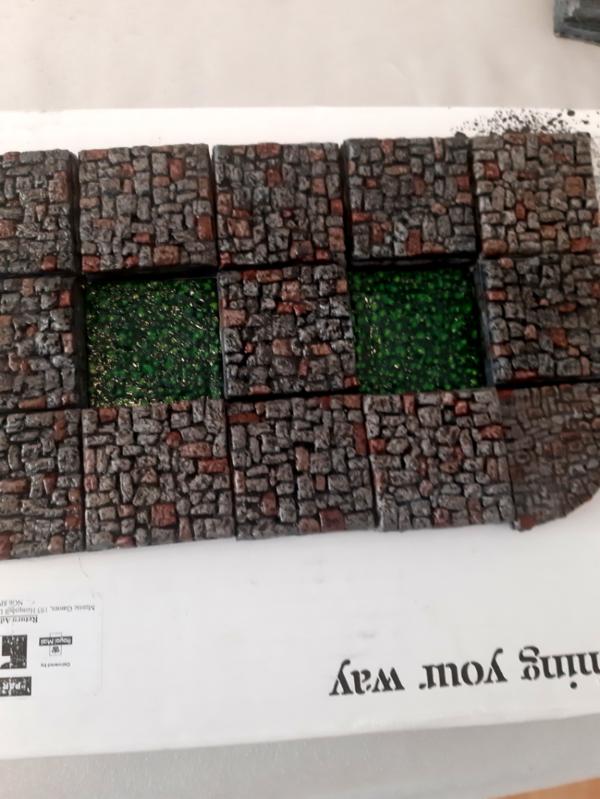
Yeah, I'm definitely more in the dungeon delving mode these days. But I also use pretty reasonable DCs for traps, so usually anyone with a decent wisdom and perception proficiency will spot them as they move around, so generally they just end up another tactical feature on the battlefield than a gotcha, or contribute to an atmosphere of danger without actually doing much to the players. Many a baddie has been thunderwaved into a pit trap in my games! My acid pits are drying but I took a couple of snaps: 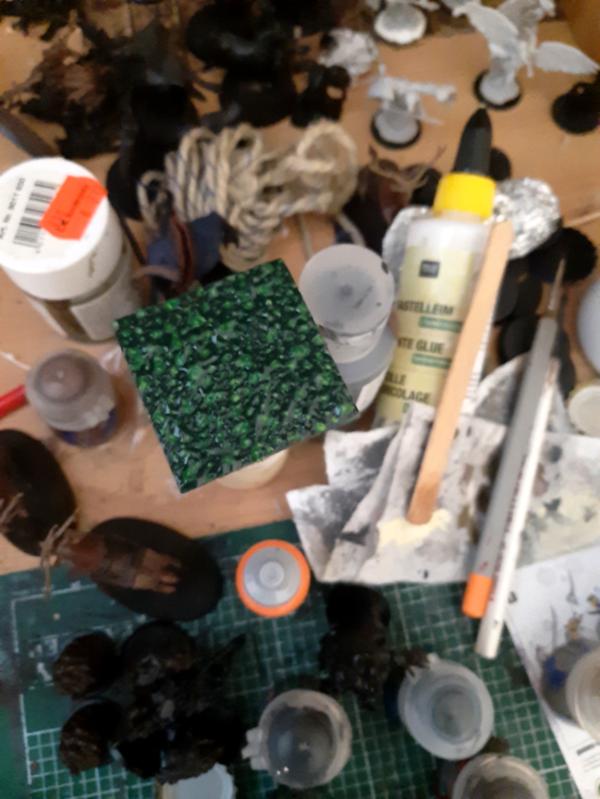  Obviously, as a science teacher I'm aware acid is not vibrant green and bubbling IRL, but it certainly is in Fantasyland!
|
|
This message was edited 1 time. Last update was at 2021/02/20 16:52:52
|
|
|
|
|
2021/02/20 17:04:37
Subject: Dungeons and Dragons Blog - Simple Pit Trap tiles - acid!
|
|
Near Golden Daemon Caliber
|
Fantasyland definitely has bubbling green acid!
Throwing enemies into hazards is one of the best things 
|
|
|
|
|
|
2021/02/20 18:04:24
Subject: Dungeons and Dragons Blog - Simple Pit Trap tiles - acid!
|
|

Longtime Dakkanaut
|
Acid looks suitably sizzling 
|
|
|
|
|
|
2021/02/21 15:22:47
Subject: Dungeons and Dragons Blog - Simple Pit Trap tiles - acid!
|
|
Battlefield Tourist
|
Cheers! Here it is in context now that the caulk is dry:
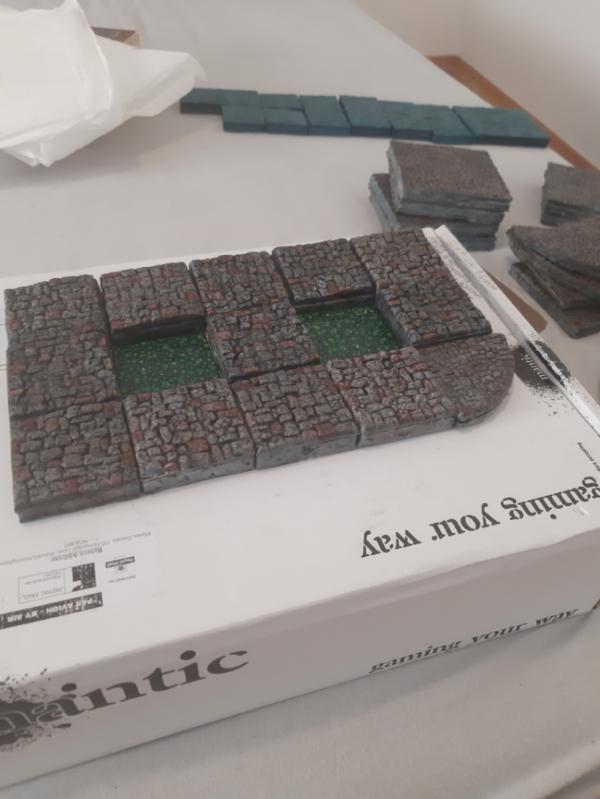
The slight illusion of depth does a lot for these I think. One of my favourite dungeons Rappan Athuk has an entire room full of acid like this with narrow walkways, and the temptation to make enough for that did hit me, but I think it would be overkill!
Any while I was in a mopey mood last night I tried out some contrast paint on these two. I can't really see the difference between contrast and inks, but I think it looks nice anyway. Will be using this orange for my skinks when I get round to them.
I probably could have done a better job on these but sticking with my mantra of "painted is better than not"

|
|
|
|
|
|
2021/02/21 16:51:36
Subject: Dungeons and Dragons Blog - Simple Pit Trap tiles - acid!
|
|
Near Golden Daemon Caliber
|
Those tiles look great all assembled. Question though: how do you keep them from getting jostled around? Seems like with that small size it would be easy for them to get displaced?
I'm not sure contrasts are really all that different from inks, they basically all fall into the same category as watered down paint when applied over light colors, which is a brand of speed/quick painting that I have come to vastly appreciate. All of the different kinds just have slightly different properties. I've liked contrasts so far, but I haven't applied them en masse yet. As soon as I decide on a kind of space marine... then I can make a full report!
Painted is probably better than not. Those minis look great from over here! I think for D&D especially, with the tiles and minis for pcs and monsters and everything else going on... paint at all greatly lends to the overall spectacle and only a jerk is gonna get hung up on details. My warhammer minis are ashamed of my D&D stuff, but my players never complain
|
|
|
|
|
|
2021/02/21 18:17:14
Subject: Dungeons and Dragons Blog - Simple Pit Trap tiles - acid!
|
|
Battlefield Tourist
|
On the table, they hold together magnetically!
Each tile has a resin base like this:
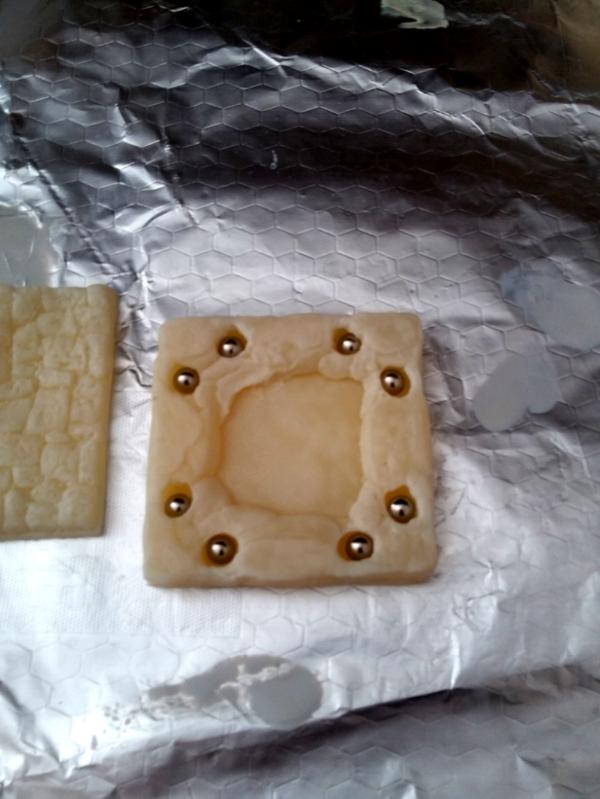
Those 8 magnets rotate to find their polarity and stick to the tile next to them, so they form into one interconnected unit. So it's very stable on the table. The little space sections have two magnets in them and so they also clip on and stay in place. This also makes them really stable if you stack them, because they form magnetic links with the tiles above. My pillars also have magnets in the bottom so they sit very happily on the tiles and never fall over.
For storage, I put them in a mantic box that fits 8 tiles across very snuggly. After a bad experience with my tiles sticking too much and losing some paint, I've put a layer of kitchen paper in between each layer of tiles and that is keeping them nicely protected. They still stick together as basically a big brick held together by all the magnets, but they don't come into physical contact on the tops. The box I have fits them very snuggly with exactly enough space at the front to fit the stair tiles and spacers. I put the water tiles and trap tiles on top. The trap tiles probably will rattle a bit in the box but not too much I expect, and I can pack them in a bit better if I need to.

It was a bit expensive getting all the magnets, but well worth it. It makes it so much easier to use on the table and the storage is easy because of how they hold together.
|
|
|
|
|
|
2021/02/21 22:38:18
Subject: Dungeons and Dragons Blog - Simple Pit Trap tiles - acid!
|
|
Near Golden Daemon Caliber
|
Oh, heck yeah. I've always avoided the magnets in my tiles because I'm lazy, but those spherical magnets self-aligning... That's really swanky.
|
|
|
|
|
|
2021/02/22 07:34:03
Subject: Dungeons and Dragons Blog - Simple Pit Trap tiles - acid!
|
|
Battlefield Tourist
|
Yeah I saw it on a 3D printing channel and figured I could could make something similar out of milliput and mcdonalds straws for casting. It increases the cost per tile a good chunk, but the gain in utility at the table is well worth it. I have loads of cardboard dungeon tiles and stuff but the slipping and sliding meant I never really used them and usually just fell back on sketching on a battlemat. These with the magnets are pretty similar in ease of use to a battlemat so I actually use them in games.
|
|
|
|
|
|
2021/02/22 14:13:03
Subject: Dungeons and Dragons Blog - Simple Pit Trap tiles - acid!
|
|
Near Golden Daemon Caliber
|
That's pretty darn often.
|
|
|
|
|
|
2021/02/25 10:01:38
Subject: Dungeons and Dragons Blog - Simple Pit Trap tiles - acid!
|
|
Longtime Dakkanaut
|
Wow, those magnetic tiles are very swanky!
|
|
|
|
|
|
2021/02/25 10:28:48
Subject: Dungeons and Dragons Blog - Simple Pit Trap tiles - acid!
|
|
Battlefield Tourist
|
Cheers! Yeah, I wanted to go through the extra effort to make them pleasant to use so I would actually use them this time. My previous experiences with tiles tended to be that I didn't end up using them and they sat in a cupboard somewhere.
|
|
|
|
|
|
2021/05/11 21:46:04
Subject: Dungeons and Dragons Blog - Simple Pit Trap tiles - acid!
|
|
Battlefield Tourist
|
As usual, March and April were a complete bust due to my crazy workload. I'm really getting fed up of this pattern!
Anyway, I did my first bit of painting in ages today, getting some Goblin Town platforms painted up. I might just chuck the poop-throne. Lovely detail, horrible idea and really weird how the rock at the back is unfinished.
The goblin town stuff is okay. Makes for a pretty nice DIY blight town and I can see uses for it in D&D games. I want to make some platform "legs" myself to make them a bit taller because the ones that come with the set are all quite stubby.
And I finally cracked and cleaned up my work area, and the entire room it was in. Everything is reorganised and tidied, and I'm feeling a lot better about sitting at the Desk of Shame now. And my wife is also MUCH happier, which is probably the more important thing!
|
|
|
|
|
|
2021/05/11 23:41:04
Subject: Re:Dungeons and Dragons Blog - Simple Pit Trap tiles - acid!
|
|

Krazed Killa Kan
|
It's so hard to have time for anything but teaching when you are a teacher. Sorry to hear that you have had so little time, lately. Nice work on the tidy up, Mrs. Boss must be quite happy.
|
|
|
|
|
|
2021/07/16 11:43:45
Subject: Re:Dungeons and Dragons Blog - Simple Pit Trap tiles - acid!
|
|
Battlefield Tourist
|
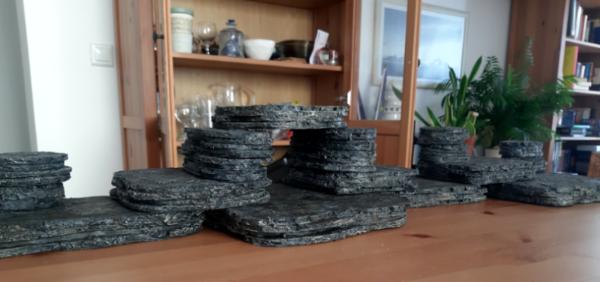
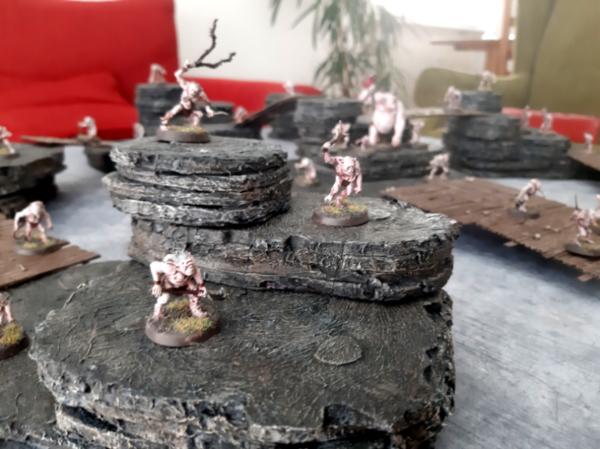
As usual I went into radio silence from March til the summer holidays. First week of holidays though I got quite a bit done! I've seen a bunch of different tables using generic crags made from XPS foam in 1 inch steps. I think there's a ton of practical reasons to use something like this for elevations in your games. Mostly gameplay, but these sorts of crags look believable enough in that format.
Most of the tutorials I've seen make the crags as huge single pieces. There's a lot of advantages to that - you can blend the edges together, it's stable at the table, you can put little rubble piles and stuff to sell the effect. But the downside is they're a pain to store and you're stuck with whatever set up you chose. So I decided to use my love of spherical magnets to make a set that would stick together and be stable, but would also be modular and allow for a huge variety of set ups, and could also double as "cavern" tiles for games of dungeons and dragons or Frostgrave.
I'm going to make them out of foamboard because it's what I have easy access to. Layers of foamboard textured will look good enough as sedimentary rock layers, and I can put magnets in the top and bottom of them easily.
I think a form factor based around 75mm diameter areas is the best because it allows most miniatures to stand on it easily. So I first gridded out a huge slab of foamboard with 75mmx75mm squares. Given the extra height from the cardboard base, texture and hot glue, 4 5mm slabs make a height difference of 1 inch, which is useful for all sorts of reasons - it translates to 5 feet in D&D, it's 1 increment of movement in most games, and it means 2 slabs will block LOS to a normal sized mini.

After that I planned out which slabs I wanted to make. I have basically 1x1, 2x1, 2x2, 2x3, and 3x3 slabs. I was going to make some 4x4 and 4x2 slabs but I think that's overkill having seen the 3x3s.

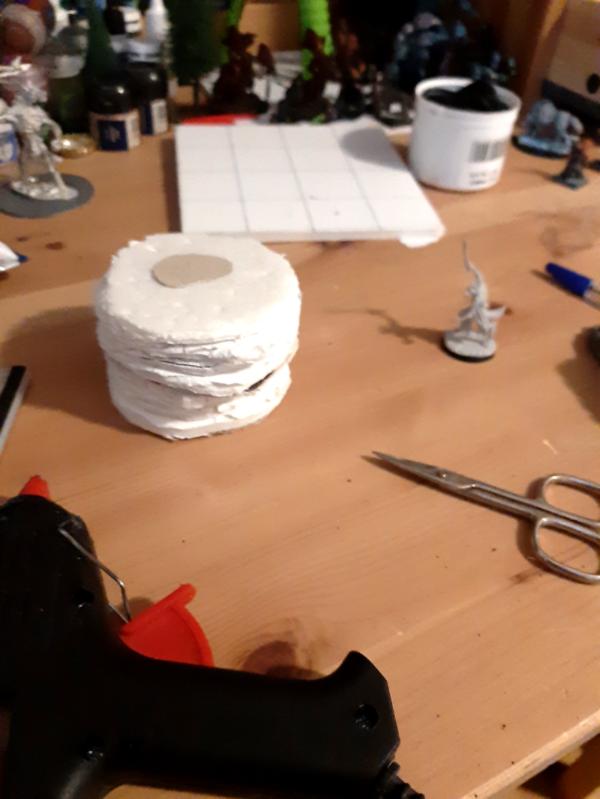
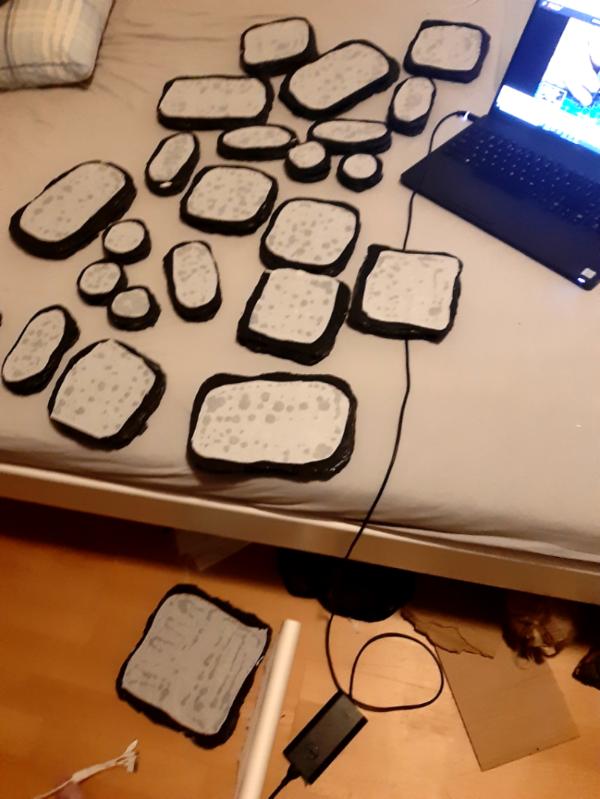
Then I marked the middle of each of the squares where the magnet would go in the top and bottom layer. A ball point pen forced through the centre point makes a hole big enough for a 5mm spherical magnet. A cut out of thin card for the bottom and an irregular shape of card for the top seal the magnets in. Hot glue it all together and then texture with tinfoil and hack at it with a knife at the edges and rasp with a metal ruler for a nice rocky texture.

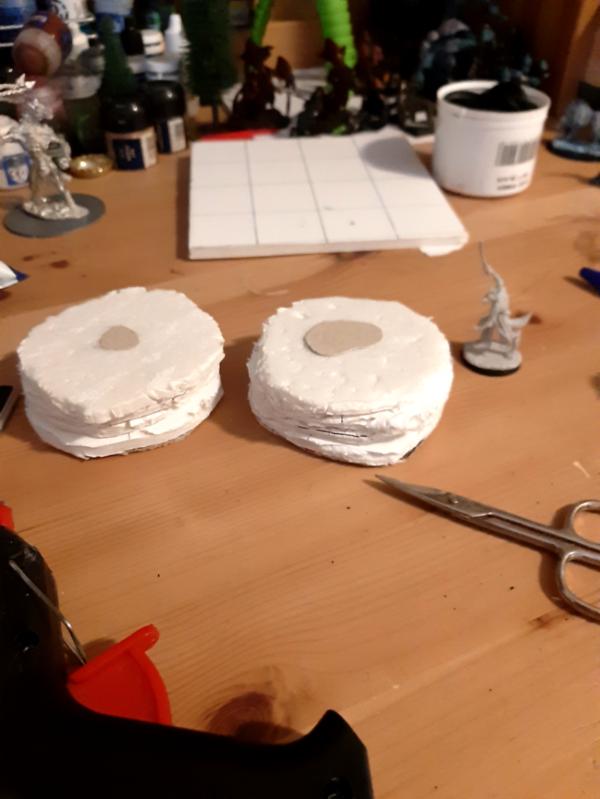
You can see here how they magnetically hold together because of the magnets in the top and bottom layers. If you didn't have spherical magnets (I had a bunch left over from my dungeon tiles) you could also do this by always aligning the magnets so the north or south side faces up, and then they'd click together just the same. With the spherical ones you don't have to worry about gluing or orientation so I was happy to use them.


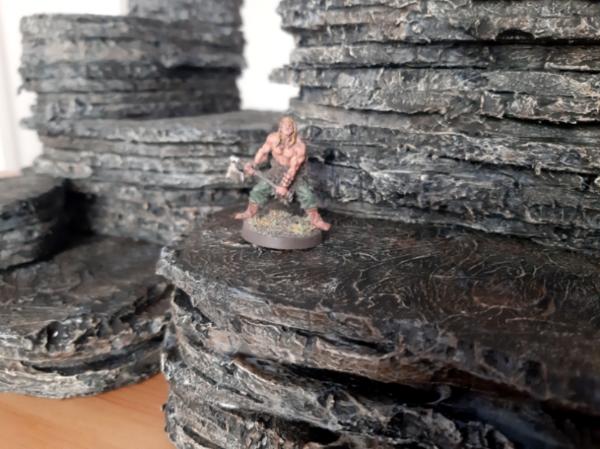
You can see here how the form factor allows for lots of places for models to stand. This Slaad is on a 50mm base.

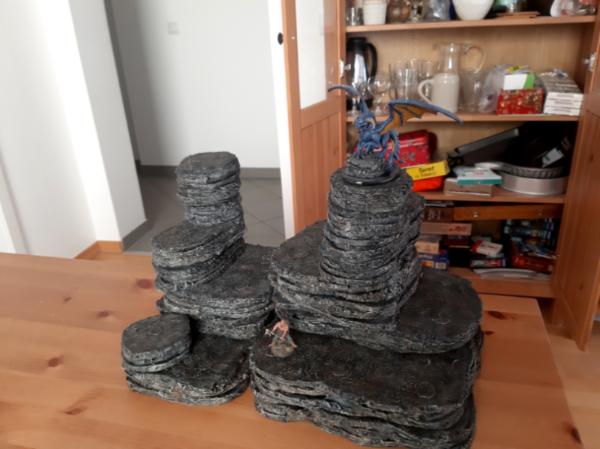
Then I made a mixture of acrylic caulk, baking soda and black paint and slathered it all over the piece, particularly on the sides. This helps join the layers together for a more realistic look and also textures the top. I'm not 100% pleased with the effect on the top of the slabs, it's a bit "stringy" but it's alright.


Then I painted any missed parts with black paint, drybrushed dark grey, light grey, tan brown in spots, and then an off white. Washed with Earthshade (tried making my own but it didn't work for some reason). I think the final product looks pretty good! I'm going to make some more 6x2, 2x2 and 2x1 pieces and then I think it'll be enough. I'll be able to use it for hill terrain in grassy battlefields, for rocky crags in ash wastes, mountains, underdark caverns and the whole lot. When I've finished the last few pieces I'll post some more set ups on some mats to show the versitility. I think they look pretty good and the flexibility and easy of storage really makes up for the small hit to the look from making them 100% modular. The magnets mean they are very stable, so they don't slip and slide around in play and you can confidently place models on them.

Hope to eventually get some games in with all this stuff!
|
|
|
|
|
|
2021/07/16 14:15:39
Subject: Dungeons and Dragons Blog - Modular rocky crags/cavern tiles
|
|

Grisly Ghost Ark Driver
|
Modular rock formations! That's clever.
|
|
|
|
|
|
2021/07/16 14:43:24
Subject: Dungeons and Dragons Blog - Modular rocky crags/cavern tiles
|
|
Battlefield Tourist
|
Thanks! I'm happy to finally have made them, had the idea ages ago but never had the energy to tackle it.
|
|
|
|
|
|
2021/07/17 11:04:33
Subject: Dungeons and Dragons Blog - Modular rocky crags/cavern tiles
|
|
Longtime Dakkanaut
|
That's really cool, well done
|
|
|
|
|
|
2021/07/21 11:31:04
Subject: Re:Dungeons and Dragons Blog - Modular rocky crags/cavern tiles
|
|
Battlefield Tourist
|
Cheers!
I finished the last few rock formations and got them painted, but ran into a problem. The tops of them are quite tacky because of the caulk, and they stick to each other, particularly in the spots where the magnets are. So I'm storing them between layers of parchment paper and I've glued a bit of parchment paper to the bottom of each of them, covering the spots where the magnets are. This seems to have mostly solved the problem.
Now a simple set up. I have a "concrete" mat but I picked it because it's generic and doesn't have streets on it. So I can use it for cityscapes, ash wastes or caverns. Here's a simple set up with the crags.
The board is 3' by 3', so on a full sized table I'd need some extra terrain to fill it out. I'm considering whether I want to go through the hassle of making just one more set of crags to bulk the set out even more, but I kinda think that's overkill.
I recently painted up the walkways from Escape From Goblin Town, so I've added those to make this a bit more interesting.

And here's some shots with the Escape From Goblin Town minis hanging out.
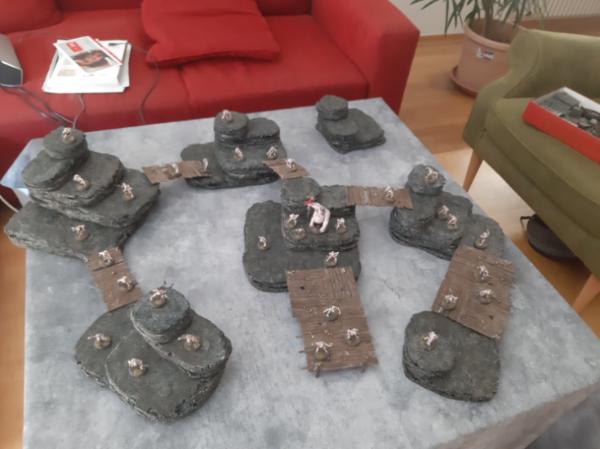


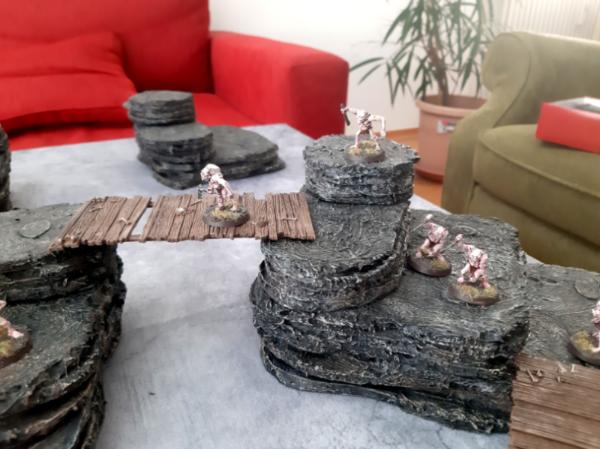

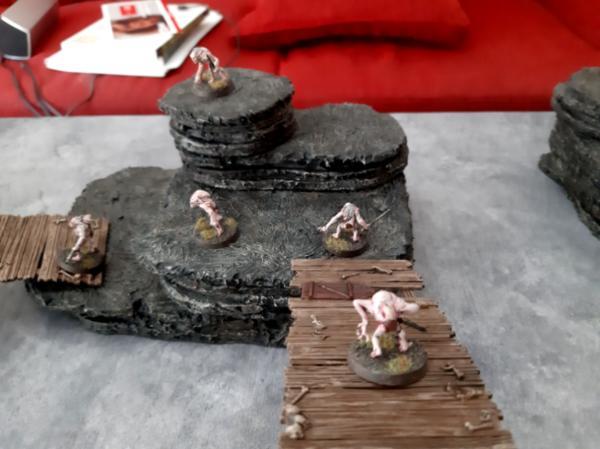
Quite happy with how the bridge form factor fits with the crags. Easy "mordor" style terrain that flatpacks, or you could have this being a dungeon layout with the mat representing a chasm or rock walls. Going to do a jungle set up with the crags soon, and will also be making some ash waste "junktown" modular pieces to fill out an ash wastes table.
|
|
|
|
|
|
2021/07/22 01:01:28
Subject: Re:Dungeons and Dragons Blog - Modular rocky crags goblin town set up
|
|
Krazed Killa Kan
|
I really like the look of the bridges with the rock crags together. Looks really good. Even better with all the goblin town goblins running around on it. 
|
|
|
|
|
|
2021/07/22 14:09:26
Subject: Dungeons and Dragons Blog - Modular rocky crags goblin town set up
|
|
Battlefield Tourist
|
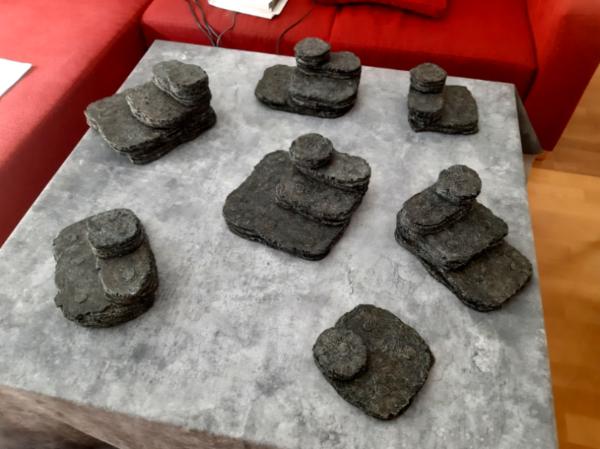
Thanks! They're really versatile pieces, I'm pretty happy that I finally painted them up.
I was playing around with my tiles today and built a stepped temple. I have always wanted to make one for my Lizardmen and realised that I can put one together from my tiles so I don't have to. I might make a bespoke door portal but I think this is pretty nice. Also, spawning pools at the entrance!
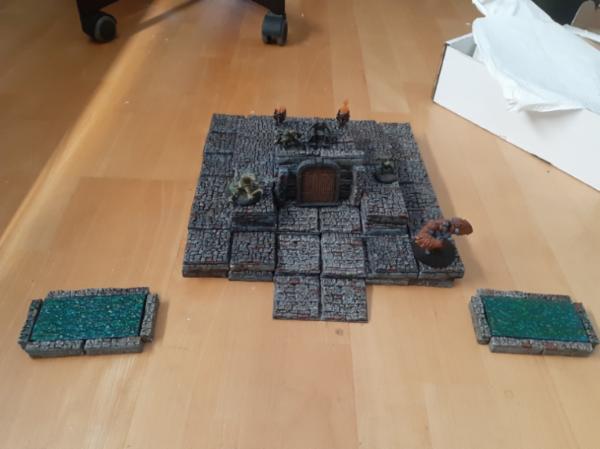


Will try it out in a jungle set up some time. But it's a nice "hill" alternative or would make a cool entrance to a dungeon.
|
|
|
|
|
|
2021/07/22 15:11:56
Subject: Dungeons and Dragons Blog - stepped pyramid set up
|
|
Grisly Ghost Ark Driver
|
Very cool terrain!
|
|
|
|
|
|
2021/07/22 18:38:37
Subject: Re:Dungeons and Dragons Blog - stepped pyramid set up
|
|
Longtime Dakkanaut
|
Very nice - A more suitable door would really bring out the best in it, though
And the Goblin Town terrain is good, I have a set somewhere I should dig out!
|
|
|
|
|
|
|
|


