| Author |
Message |
 |
|
|
|
|
Advert
|
Forum adverts like this one are shown to any user who is not logged in. Join us by filling out a tiny 3 field form and you will get your own, free, dakka user account which gives a good range of benefits to you:
- No adverts like this in the forums anymore.
- Times and dates in your local timezone.
- Full tracking of what you have read so you can skip to your first unread post, easily see what has changed since you last logged in, and easily see what is new at a glance.
- Email notifications for threads you want to watch closely.
- Being a part of the oldest wargaming community on the net.
If you are already a member then feel free to login now. |
|
 |
2017/12/19 17:14:24
Subject: I need tips on how to paint chipping effect on chaos black.
|
|

Longtime Dakkanaut
|
So, i will in the future have an iron hand dread army but i do not mutch care for the various black highlight methods that are out there as grey or blue subtle highlights simply aint black in my book!
However, flat black is dead boring to look at so the idea of paint chipping sprung up in my head.
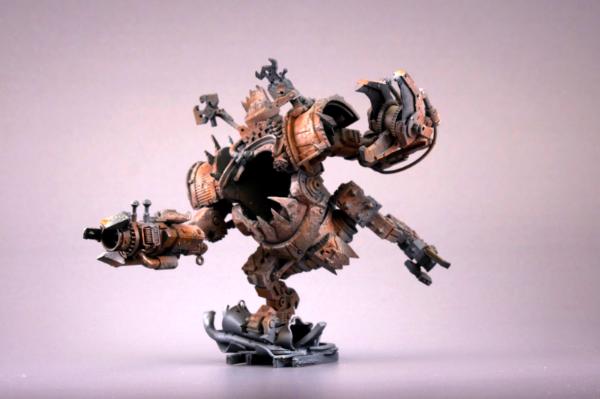
this is the chipping style that i want to replicate
BUT how would i achive that effect when my dread is chaos black? how can i get that 3d depth chipping effect when i cant use a dark colour?
|
|
This message was edited 1 time. Last update was at 2017/12/19 17:14:59
darkswordminiatures.com
gamersgrass.com
Collects: Wild West Exodus, SW Armada/Legion. Adeptus Titanicus, Dust1947. |
|
|
 |
|
2017/12/19 17:18:50
Subject: I need tips on how to paint chipping effect on chaos black.
|
|

Regular Dakkanaut
|
Hi FrozenDwarf, check this tutorial out. It will work with every basecoat color.  https://www.youtube.com/watch?v=lAQ5T9VQYVE
|
|
|
|
|
|
2017/12/19 17:33:14
Subject: I need tips on how to paint chipping effect on chaos black.
|
|

Fresh-Faced New User
|
Here is my preferred method of chipping:
1. Prime in lead belcher spray
2. stipple layers of brown , red, and orange
3. cover areas you want chipped with masking fluid
4. paint model in desired color
5. hit model with a stiff bristle brush to rub off masking fluid and expose rust layers.
6. highlight and add finishing details as you see fit.
|
|
|
|
|
2017/12/19 17:42:41
Subject: I need tips on how to paint chipping effect on chaos black.
|
|
Legendary Master of the Chapter
|
 CR1MS0NJ1HAD wrote: CR1MS0NJ1HAD wrote:Here is my preferred method of chipping:
1. Prime in lead belcher spray
2. stipple layers of brown , red, and orange
3. cover areas you want chipped with masking fluid
4. paint model in desired color
5. hit model with a stiff bristle brush to rub off masking fluid and expose rust layers.
6. highlight and add finishing details as you see fit.
Entirely doable this way. though airbrush may be required (not sure how well spray primers work against hairspray or masking fluid)
alternatively you can spray prime black,
then add steel color with a sponge in the chip areas.
|
 Unit1126PLL wrote: Unit1126PLL wrote: Scott-S6 wrote: Scott-S6 wrote:And yet another thread is hijacked for Unit to ask for the same advice, receive the same answers and make the same excuses.
Oh my god I'm becoming martel.
Send help!
|
|
|
|
|
2017/12/19 20:33:47
Subject: I need tips on how to paint chipping effect on chaos black.
|
|
Longtime Dakkanaut
|
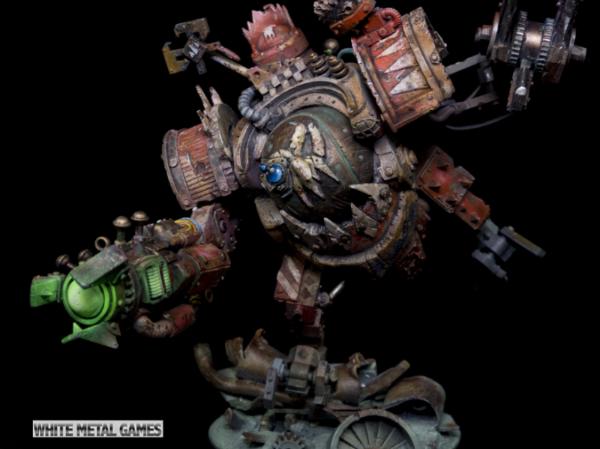
Thanks for the tips everyone =) Automatically Appended Next Post: ok, so i tryed the spunge method whit leadbelcher on an allready painted black dread (first time trying it).
personly, i am happy whit both the amount and size of the chipping, but idk how i would give this some deapth.
while the above video is great for general learning of chipping, the painter uses blue as basecolour on hes tank and thus can apply darker chipping.
any tips/suggestions?
|
|
This message was edited 1 time. Last update was at 2017/12/19 21:41:48
darkswordminiatures.com
gamersgrass.com
Collects: Wild West Exodus, SW Armada/Legion. Adeptus Titanicus, Dust1947. |
|
|
|
|
2017/12/20 00:46:11
Subject: I need tips on how to paint chipping effect on chaos black.
|
|

Leader of the Sept
|
To get a bit more 3dness you could go back over the larger chips with a touch of a very light silver. Mithrill, or whatever the current equivalent is. You could also do a touch of hard edging on the corner chips. A black or dark wash over the chips and then the highlight would add more depth again.
|
Please excuse any spelling errors. I use a tablet frequently and software keyboards are a pain!
 Terranwing - w3;d1;l1 Terranwing - w3;d1;l1
 51st Dunedinw2;d0;l0 51st Dunedinw2;d0;l0
 Cadre Coronal Afterglow w1;d0;l0 Cadre Coronal Afterglow w1;d0;l0 |
|
|
|
|
2017/12/20 01:47:17
Subject: I need tips on how to paint chipping effect on chaos black.
|
|
Ollanius Pius - Savior of the Emperor
Gathering the Informations.
|
Get a mechanical pencil and run it along the edges. It adds a metallic chipping without being too crazy eyecatching.
|
|
|
|
|
2017/12/20 02:00:16
Subject: I need tips on how to paint chipping effect on chaos black.
|
|

Enigmatic Chaos Sorcerer
|
 Kanluwen wrote: Kanluwen wrote:Get a mechanical pencil and run it along the edges. It adds a metallic chipping without being too crazy eyecatching.
Cool. You have pics of something done that way?
|
 BlaxicanX wrote: BlaxicanX wrote:A young business man named Tom Kirby, who was a pupil of mine until he turned greedy, helped the capitalists hunt down and destroy the wargamers. He betrayed and murdered Games Workshop.
|
|
|
|
|
2017/12/20 08:03:11
Subject: I need tips on how to paint chipping effect on chaos black.
|
|
Longtime Dakkanaut
|
Kanluwen wrote:Get a mechanical pencil and run it along the edges. It adds a metallic chipping without being too crazy eyecatching.
intresting idea, but wont the graphite easily smear off?
|
darkswordminiatures.com
gamersgrass.com
Collects: Wild West Exodus, SW Armada/Legion. Adeptus Titanicus, Dust1947. |
|
|
|
|
2017/12/20 09:41:38
Subject: I need tips on how to paint chipping effect on chaos black.
|
|

Scouting Shade
|
You could put some dots or shapes painted with Rhinox Hide inside the metal chippings, to represent rusted and worn metal. It adds a lot of depth.
|
|
|
|
|
2017/12/20 11:53:53
Subject: I need tips on how to paint chipping effect on chaos black.
|
|
Longtime Dakkanaut
|
 Adam Spielmann wrote: Adam Spielmann wrote:You could put some dots or shapes painted with Rhinox Hide inside the metal chippings, to represent rusted and worn metal. It adds a lot of depth.
i`ll try that later today, as depth is all i am missing now.
i tryed the pencil way this morning.
it is prolly the best way to apply controlled chipping(way better then fine detail brush) as it is looks like grey, but for randomised natural patterns the spunge has the edge. (plus the pencil can get to areas the spunge cant)
|
|
This message was edited 1 time. Last update was at 2017/12/20 11:54:25
darkswordminiatures.com
gamersgrass.com
Collects: Wild West Exodus, SW Armada/Legion. Adeptus Titanicus, Dust1947. |
|
|
|
|
2017/12/20 12:22:03
Subject: I need tips on how to paint chipping effect on chaos black.
|
|

Dakka Veteran
|
I would make the surface underneath the black be a bright colour, so either metal or an intense orange that would represent rust. You could also combine the two.
|
|
|
|
|
|
2017/12/20 12:24:04
Subject: I need tips on how to paint chipping effect on chaos black.
|
|
Ollanius Pius - Savior of the Emperor
Gathering the Informations.
|
 Eldarain wrote: Eldarain wrote: Kanluwen wrote:Get a mechanical pencil and run it along the edges. It adds a metallic chipping without being too crazy eyecatching.
Cool. You have pics of something done that way?
 That's a close-up of pencil weathering on the leg of a Tarantula Sentry Gun. It's subtle without being overpowering and blends well with other weathering techniques.  And here it is on an infantry sized model. This was over an old brass color(I can't remember what and I don't have the Wight King anymore to get new pictures--Sorry!). FrozenDwarf wrote:intresting idea, but wont the graphite easily smear off?
It can...but that's why you seal it with hairspray afterwards. Hairspray is something you'll find used for a lot of weathering techniques in scale models since it can be applied over varnished models without ruining the varnish or the paint job. For randomized natural patterns, you can still use a pencil. Take the lead out and shave it with a hobby knife into a palette. Put your pinky finger into the lead and use that to apply it to the area in question. The whorls of your fingerprint actually will tend to make it look like randomized scratches like a sponge would but you can control the intensity a bit better since you are using your finger and can feel how hard you're pressing.
|
|
This message was edited 1 time. Last update was at 2017/12/20 12:26:27
|
|
|
|
|
2017/12/20 16:37:23
Subject: I need tips on how to paint chipping effect on chaos black.
|
|
Legendary Master of the Chapter
|
Doesnt hairspray desolve in water. so eventually the moisture will do a thing?
if you are worried about it you could always just seal it i with a spray varnish.
iv done graphite powder as well.

shave some pencil lead or get graphite powder (used to lube keyholes apparently) get it on your finger and you can smear it over rust colors and even black for a metallic sheen.
pretty cool tech
|
Unit1126PLL wrote: Scott-S6 wrote:And yet another thread is hijacked for Unit to ask for the same advice, receive the same answers and make the same excuses.
Oh my god I'm becoming martel.
Send help!
|
|
|
|
|
2017/12/20 17:47:23
Subject: Re:I need tips on how to paint chipping effect on chaos black.
|
|
Sneaky Kommando
|
Firstly, Nice work on your first sponge effect! It definitely adds a lot more character than a flat black coat. Just don't forget your washes to add in more depth!
I like to use heavy weathering on just about all of my models and have played with tons of different techniques. At the end of the day, I always come back to my trusty sponge.
If you want to get something closer to the original image you posted, I would recommend using grey's rather than metallics. The artist goes back in with a fine brush and highlights areas where light would hit the raised edges in order to create a more 3 dimensional effect. It's a tedious effect and better used ( imo) with the aforementioned masking fluid since you'll get larger patches of chipping. Even without this effect, I tend to lean toward flat greys as i've had more luck adding rust when dealing with black basecoats. Below is a link giving more detail on this particular technique.
http://thebrushbrothers.blogspot.mx/2010/05/battle-damage-tutorial.html
Conversely - I like to do heavier weathering and typically base my models in rust / worn metals first. Using a sponge, I'll then go back and start applying the "original" paint over the rusted areas. This gives a cool effect when you start using various tones to the original paintjob in order to simulate color bleaching (example below).
Hope this helps! I'd love to see more as you play around with different effects.
- Nova
|
|
|
|
|
|
2017/12/20 20:04:43
Subject: Re:I need tips on how to paint chipping effect on chaos black.
|
|
Longtime Dakkanaut
|
hehe, yea was was supprised by the sponge myself.
i had painted that dread some months ago so it was kinda past the stage of doing chipping first then add the base colour, and to be quite honest, i prefer to add the chipping as last stage. it may not look as good but i have never aimed for anything better then tabletop standard, and as mentioned; the goal is to make the flat black less boring.
i did finish it today, the only thing i deffo need more practice whit is adding dark browns to straight scratch lines. as it is, the straight line scratches looks like anything but chipped to me.
but for my first ever attempt im happy. battle used dreads comes in may different shades ^^
some of you may think i have overdone it and that could be true, but i like how it looks now. the rest of my dread army will be in a simmilar style!
so in order of what i did: boltgun metal on a sponge - pencil - scorched brown on a fine detail brush.
( ,sorry for bad img quality. all i have is an iphone and a cheap desk lamp, plus it is pitch dark outside as early as 16:00)
|
darkswordminiatures.com
gamersgrass.com
Collects: Wild West Exodus, SW Armada/Legion. Adeptus Titanicus, Dust1947. |
|
|
|
|
2017/12/21 13:03:53
Subject: I need tips on how to paint chipping effect on chaos black.
|
|
Storm Trooper with Maglight
|
I think it turned out really well, lots of good advice in this thread and it looks like you put it to excellent use on that dread.
|
|
|
|
|
|
2017/12/21 14:07:08
Subject: Re:I need tips on how to paint chipping effect on chaos black.
|
|
Douglas Bader
|
One piece of supplemental advice: you should never use chaos black for an entire model. Pure black never really exists in the real world, and it doesn't look right when you use it on models. Outside of very small sections (the darkest shadows on a dark area, tiny details where you can't really make out the color and using black is an easy shortcut) you should always use a very dark gray.
|
There is no such thing as a hobby without politics. "Leave politics at the door" is itself a political statement, an endorsement of the status quo and an attempt to silence dissenting voices. |
|
|
|
|
|
|