| Author |
Message |
 |
|
|
|
|
Advert
|
Forum adverts like this one are shown to any user who is not logged in. Join us by filling out a tiny 3 field form and you will get your own, free, dakka user account which gives a good range of benefits to you:
- No adverts like this in the forums anymore.
- Times and dates in your local timezone.
- Full tracking of what you have read so you can skip to your first unread post, easily see what has changed since you last logged in, and easily see what is new at a glance.
- Email notifications for threads you want to watch closely.
- Being a part of the oldest wargaming community on the net.
If you are already a member then feel free to login now. |
|
 |
2009/05/17 09:26:13
Subject: How to make an modular artillery emplacement/landing pad with protective bunkers,
|
|

Hardened Veteran Guardsman
|
Ok, this is my first effort at doing a tutorial but as Dakka is running a competition and I got some positive feedback from the pics I posted in my gallery, here goes:
How to make an modular artillery emplacement/landing pad with protective bunkers.
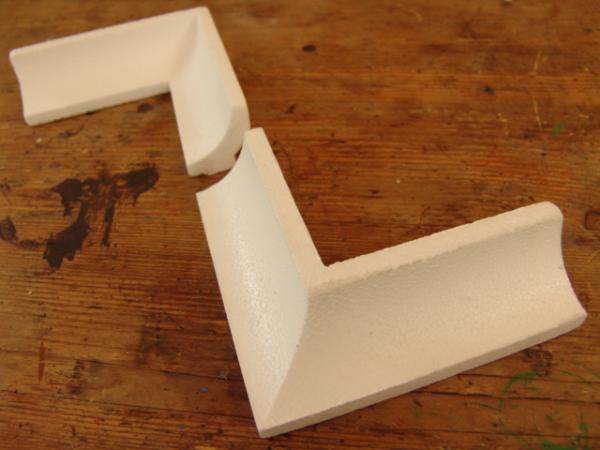
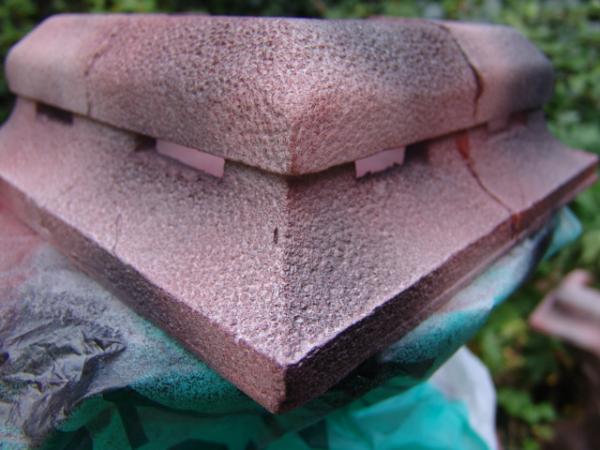
Step 1) Make the bunkers. I used polystyrene ceiling cove corners piecesfrom my lacal DIY shop. They come in packs and there are two basic types, internal and external corners. To make 4 bunkers I bought 12 of each type, (3 internal, 3 external for each bunker) While you are there it would be good to get a few polysyrene ceiling tiles and some glue that works on expended polystyrene.
(I actually use a small "low temperature melt" glue gun which surprisingly does not destroy the polystyrene if used sparingly and sets really fast and strong. It also works with just about any material so once you have one it will be used again and again). Three cans of spray paint are good too, I got a rusty red, a black and a grey but you could use whatever you have to hand like acylics or emulsion. (The spray can disolve your polysyrene a bit but I found it just added to the battered look of the bunkers, just take it slowly and observe the results). Here is a pic of the two types of coving needed:
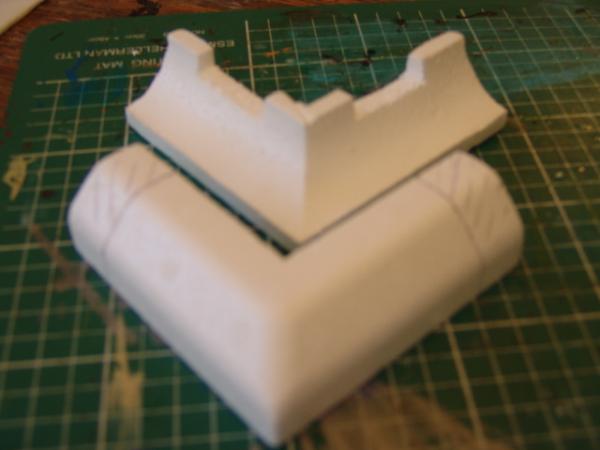
To make your bunkers you need to put firing slits in the lower sections of your bunker walls. I used a hobby knife and just cut away a section to suit a guardsman standing. Larger vehicles can use the bunker by firing over the top, heavy weapon teams will also use the firing slits so check size and position of these against the models you intend to use. Here is a pic of one section with slits cut out:

The coving is being used "inside out" to how it was intended, as it is in the next stage, making the top section. Here it will need to be measured and marked, then cut to fit on top of the first section. (Photo is a bit blurred but you can see the pieces I need to trim marked off). Note, when I fitted the top piece on I let it overhang the lower piece to give a more defensive style to the gun slits. Do this with care as you make the area for glueing them together smaller, the bigger the overhang is).
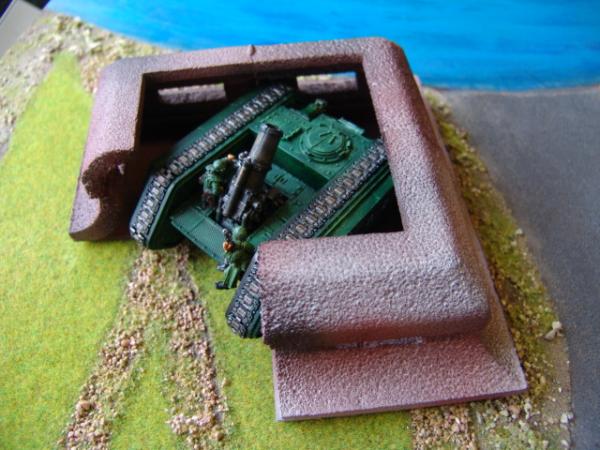
Make some more of these corner bunkers untill you have used up your supply or have enough of them to do what you want to do. (I made 12 of these corners from what I had). You now need to fix them together onto a base. I used 3 corners per base but I suppose you could use 4 and make it self contained (would need a door though). I did think about adding a broken section of wall that can be swopped with an unbroken section for those (inevitable) moments when your bunkers are breached but adding some cotton wool is probably a lot easier.
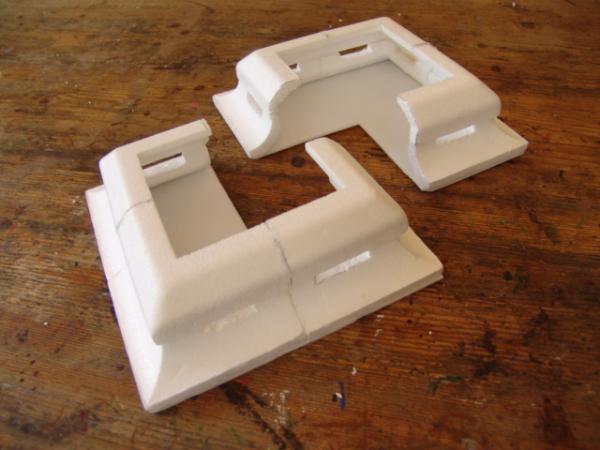
My base was thin polysyrene sheet I had but you could use ceiling tiles, plasticard, MDF, foam board or old cereal packets. I cut a corner out of the base to make it easier to fit the bunkers on to other buildings. This means you can use them on there own or with other things to "protect" them, as in the orbital gun or landing pad.
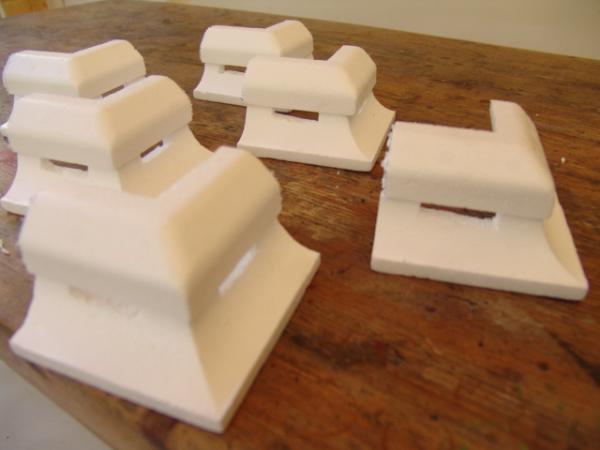
A finished bunker will need painting to match your existing terrain. I stick to black, red, grey and white on all my buildings so they look OK when I put them all togerher.
They can be used for small vehicle emplacements, or around buildings.
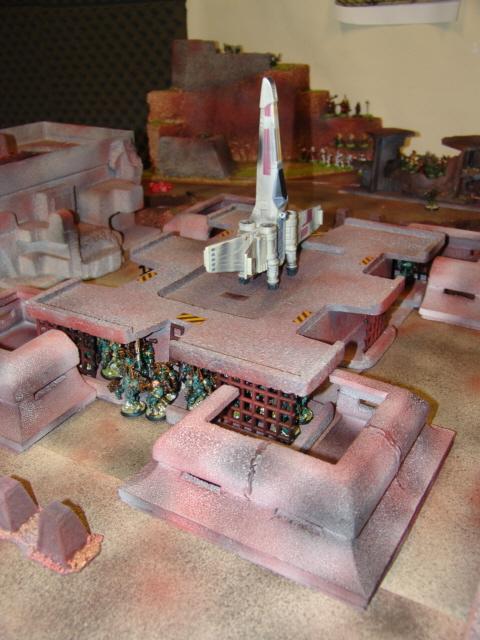
The "landing pad is made from old packaging, specifically, two protective polysyrene sheets from A3 clip frames and an A4 card box from a ream of paper. The A4 box was glued between the two A3 sheets to make the basic platform you see in the photo.
I had these to hand but you may not so I would say use the polysyrene ceiling tiles recommended earlier and any convenient size box you can find. The railings, ladders and other bits are cut from plastic gutter guard (about 1 cm square grids that keep leaves out of your gutter. Cut it with your plastic cutters, makes great 40K ladders etc!)
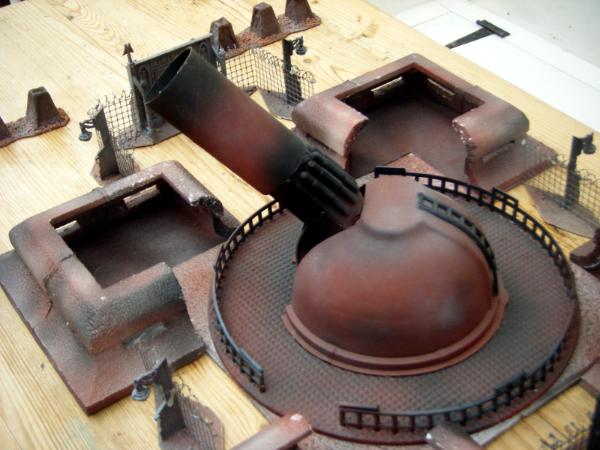
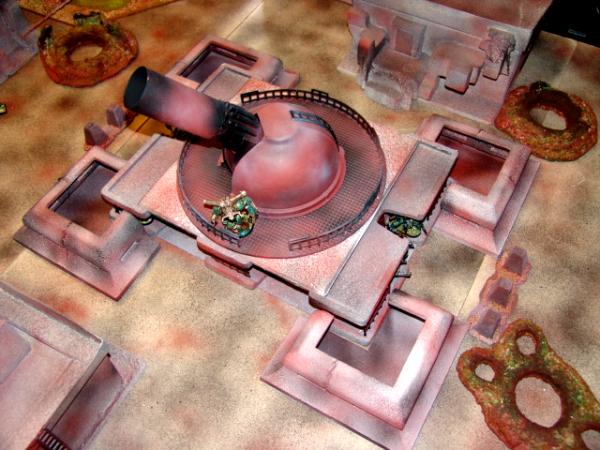
The orbital cannon just sits on top of the landing pad giving me an extra way of using my terrain. I based it on a 12" ceiling tile that just grips inside the picture frame packing (not planned, just luck!) It also has a 12" circular pizza base and a plastic salad "bowl" glued on top. The salad packaging is cut up one side to make the gun slit. More gutter guard makes more ladders and railings, what is cool about this stuff is it is soft enough to easily bend into curves if you want it to.
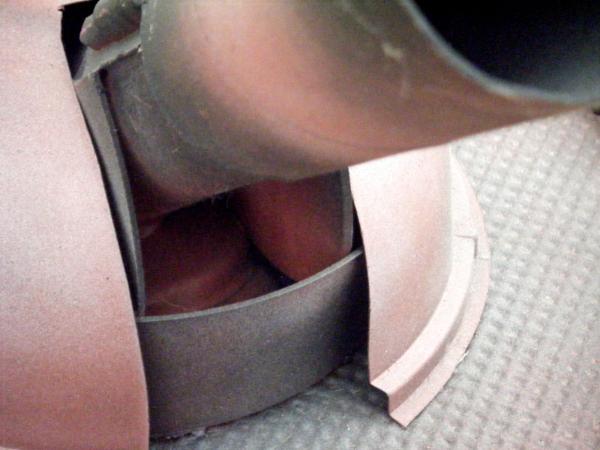
The over sized artillery gun is a toilet roll centre with some random other bits of packaging glued on to make it look a little bit more "techno". I made a support from more bits of box and plastic packaging, just look around for what fits and stick it together with the glue gun.

A bit of spray disguises most things and "ties it all together". For my textured bases I have a large pot of mixed sand, cat litter and odds of static grass which I either dip or sprinkle, depending on size of base, with a bit of watered down PVA to fix it firmly on.
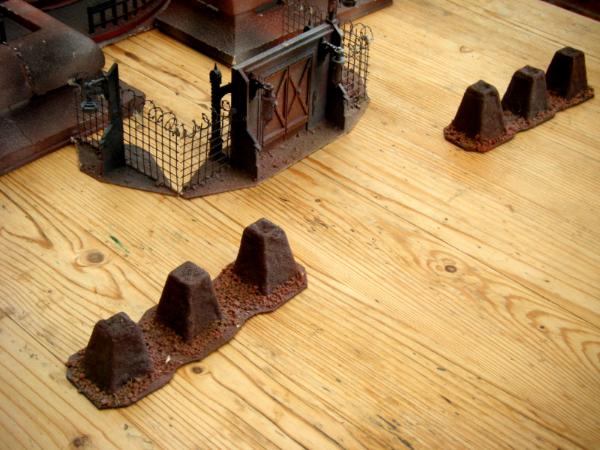
The bunkers also work well with these sections of wire I made from some wire mesh, card and some "cities of death" spare parts. I made my own barbed wire on the top of the fences by cutting a length of the mesh very close with snips before winding it onto a pencil. Carefully pull it off the pencil and glue it onto tthe top of yopur fence.
I hope Dakka readers find this tutorial useful, let me know how you get on. (Thinks.. this stuff could be good with the forthcoming planet strike rules..Enjoy!)
|
|
This message was edited 2 times. Last update was at 2009/05/17 09:53:42
|
|
|
 |
|
2009/05/17 10:43:04
Subject: How to make an modular artillery emplacement/landing pad with protective bunkers,
|
|

Pyromaniac Hellhound Pilot
|
Bitchin'
|
It's better to simply be an idiot, as no one can call you on it here. -H.B.M.C.
Cap'n Gordino's instant grammar guide:
"This is TOO expensive." "I'm going TO the store, TO get some stuff."
"That is THEIR stuff." "THEY'RE crappy converters."
"I put it over THERE." "I'll go to the store THEN."
"He knows better THAN that." "This is NEW." "Most players KNEW that." |
|
|
|
|
2009/05/17 16:56:48
Subject: How to make an modular artillery emplacement/landing pad with protective bunkers,
|
|

Imperial Agent Provocateur
|
I love the unique look of the bunkers. I'm gonna have to go look for ceiling cove corners at the hardware store today.
Excellent tutorial btw. It's simple and easy to follow, and you wind up with a quality product in the end. Great job.
|
die all, die merrily |
|
|
|
|
2009/05/18 04:37:29
Subject: How to make an modular artillery emplacement/landing pad with protective bunkers,
|
|
Servoarm Flailing Magos
|
I have a lot of cove wood trim laying about... I may have to use it to get similar results! Thanks for the great tutorial!
|
http://www.teun135miniaturewargaming.blogspot.com/ https://www.instagram.com/teun135/
Foxphoenix135: Successful Trades: 21
With: romulus571, hisdudeness, Old Man Ultramarine, JHall, carldooley, Kav122, chriachris, gmpoto, Jhall, Nurglitch, steamdragon, DispatchDave, Gavin Thorne, Shenra, RustyKnight, rodt777, DeathReaper, LittleCizur, fett14622, syypher, Maxstreel |
|
|
|
|
2009/05/18 04:37:58
Subject: How to make an modular artillery emplacement/landing pad with protective bunkers,
|
|
Servoarm Flailing Magos
|
EDIT: Double post of doom!
|
|
This message was edited 1 time. Last update was at 2009/05/18 04:38:20
http://www.teun135miniaturewargaming.blogspot.com/ https://www.instagram.com/teun135/
Foxphoenix135: Successful Trades: 21
With: romulus571, hisdudeness, Old Man Ultramarine, JHall, carldooley, Kav122, chriachris, gmpoto, Jhall, Nurglitch, steamdragon, DispatchDave, Gavin Thorne, Shenra, RustyKnight, rodt777, DeathReaper, LittleCizur, fett14622, syypher, Maxstreel |
|
|
|
|
2009/05/19 11:25:48
Subject: How to make an modular artillery emplacement/landing pad with protective bunkers,
|
|

Guard Heavy Weapon Crewman
Antwerp, Capitol of the Universe
|
Great idea, i've got a lot of leftover ceiling thingy and now I can use it in a more fun way.
|
Nemo me impune lacessit
|
|
|
|
|
2009/05/19 11:31:15
Subject: How to make an modular artillery emplacement/landing pad with protective bunkers,
|
|
Battle-tested Knight Castellan Pilot
|
Nice tutorial, any tips on how to make it stronger? Any time I use polystyrene it gets broken and damaged. Do you coat yours in PVA glue or varnish?
|
Stick to the shadows - Strike from the darkness - Victorus aut Mortis - Ravenguard 1st Company |
|
|
|
|
2009/05/19 12:15:26
Subject: How to make an modular artillery emplacement/landing pad with protective bunkers,
|
|
Tower of Power
|
I woudl be interested in knowing how the polystyrene is made to be stronger, is it given some kind of coat to reinforce it?>
|
warhammer 40,000 tactica and hobby blog - www.imperiusdominatus.com
Want list feedback and advice? e-mail imperiusdominatus@live.co.uk
 Blood Angels - 2000 Blood Angels - 2000  Iron Warriors - 2000 Iron Warriors - 2000  Orks -2000 Orks -2000  Imperial Guard - 2000 Imperial Guard - 2000
 Eldar - 2000 Eldar - 2000  Hive Fleet Krakken - 2000 Hive Fleet Krakken - 2000  Dark Eldar - 2000 Dark Eldar - 2000  Necrons - 2000 Necrons - 2000  Grey Knights - 2000 Grey Knights - 2000  Daemons - 2000 Daemons - 2000  Ravenwing - 2000 Ravenwing - 2000 |
|
|
|
|
2009/05/19 21:29:51
Subject: Re:How to make an modular artillery emplacement/landing pad with protective bunkers,
|
|
Bounding Assault Marine
|
Fantastic use of everyday stuff. The bunkers are very inspiring, great tutorial.
|
|
|
|
|
2009/05/21 19:14:38
Subject: How to make an modular artillery emplacement/landing pad with protective bunkers,
|
|
Fixture of Dakka
|
This is exactly the sort of excuse I was giving my wife for wanting to buy a mitre table saw (the proper name of which eludes me). Now I want to go to Lowes and get a bunch of crown moulding, and a big honking power tool. Well done sir 
|
|
|
|
|
|
2009/05/25 10:04:46
Subject: How to make an modular artillery emplacement/landing pad with protective bunkers,
|
|
Space Marine Scout with Sniper Rifle
UK
|
Great stuff! where did you purchase the coving?
|
|
|
|
|
|
2009/05/26 08:28:07
Subject: How to make an modular artillery emplacement/landing pad with protective bunkers,
|
|
Skink Chief with Poisoned Javelins
Belgium, political ass-end of the old continent
|
Phe4r my toiletroll cannon!
No, seriously, this is kick-backside, my only gripe is the colours...
|
I can bend minds with my spoon... 
KingCracker wrote:PanzerSmurf, you win the trophy for most accident posts ever. Dear lord man!
|
|
|
|
|
2009/05/26 16:36:51
Subject: How to make an modular artillery emplacement/landing pad with protective bunkers,
|
|

Perturbed Blood Angel Tactical Marine
|
It looks good. Easy, nice terrain ^^
|
May the mass*acceleration be with you
Irony - means sort of like Iron |
|
|
|
|
2009/05/27 09:58:49
Subject: How to make an modular artillery emplacement/landing pad with protective bunkers,
|
|

Longtime Dakkanaut
|
Excellent work.
Great recycling too !
|
"Dakkanaut" not "Dakkaite"
Only with Minatures, does size matter...
"Only the living collect a pension"Johannes VII
"If the ork codex and 5th were developed near the same time, any possible nerf will be pre-planned."-malfred
"I'd do it but the GW Website makes my eyes hurt. "Gwar
"That would be page 7 and a half. You find it by turning your rulebook on its side and slamming your head against it..." insaniak
MeanGreenStompa - The only chatbot I ever tried talking to insisted I take a stress pill and kept referring to me as Dave, despite my protestations.
insaniak "So, by 'serious question' you actually meant something entirely different? "
Frazzled[Mod] On Rule #1- No it literally means: be polite. If we wanted less work there would be no OT section.
Chowderhead - God no. If I said Pirates Honor, I would have had to kill him whether he won or lost. |
|
|
|
|
2009/05/28 07:09:26
Subject: How to make an modular artillery emplacement/landing pad with protective bunkers,
|
|
Hardened Veteran Guardsman
|
I got the coving packs from Focus DIY but I think most similar places wil have some. You can give it a coat of PVA to touhen it up, in fact, taking on board that and the comment about colour I think I might try a coat of PVA, a bit of sand sprinkled on, and a repaint.
|
|
|
|
|
2009/05/31 15:08:19
Subject: How to make an modular artillery emplacement/landing pad with protective bunkers,
|
|
Regular Dakkanaut
|
whenever you finish painting them, you should deff post some pics
|

Current Projects: Pre-Heresy Dreadnaught / Blood Ravens Honor guard / Rhino / scratch built drop pod / |
|
|
|
|
|
|
