Molding Equipment:
We'll first run through the equipment that required as well as sources and equipment costs. Most of the items detailed below can be purchased through the mail with little effort.
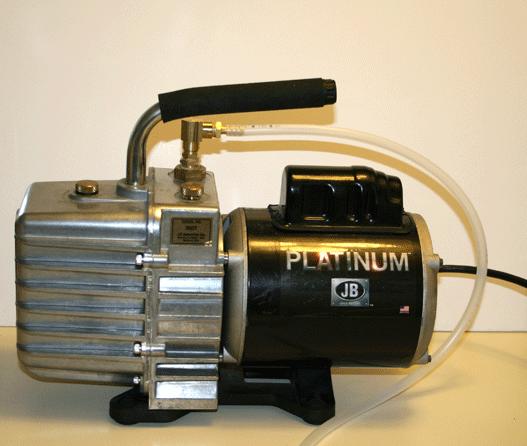
Vacuum Pumps:
You will need a vacuum pump, this will be you most expensive purchase and the most difficult to acquire. The best source is e-bay. Just perform a search for the "Robinair SPX 6 CFM" vacuum pump. It may take a couple of weeks to find a suitable pump at a price you can afford, but it can be done. My pump was purchased new on e-bay for $187 shipped, and retails normally for $700. Re-ferbished models are another cheap option. Vacuum pumps are very robust pieces of equipment, and short of extreme miss use are virtually impossible to damage beyond repair. From the vanes, to the electric motor, to the various bolts most everything can be easily replaced. So, don't be afraid to get one used. I've even picked up a couple of "broken" ones and gotten them cheaply repaired. So keep and eye out.
There are several important features to selecting a good vacuum pump:
1. Your vacuum pump must be able to draw 28 - 30 inches of mercury, or 1 Bar. The closer you can get to 30", the better. Most likely, your gauge won't ever get to 29" unless you have a serious air compressor with a Venturi Generator or a super vacuum pump. However, 27" or 28" is sufficient; you'll just have to run the pump a little longer.
2. You want to get a 3 CFM pump at the minimum. I have a 7 CFM pump, but 5 CFM is sufficient and 3 CFM is fine for mold making and casting. CFM stands for cubic feet per minute. This is how much air the pump can displace, the lower your pumps CFM rating the longer you will have to run it to
de-air your silicon rubber. Since most rubbers have a short pot life (pot life - is how much time you have to mix,
de-air, and pour it into molds before it starts to harden) of 30-45 minutes. Most pumps that your will find on line will be 0.25 to 1.5 CFM pumps, while cheap avoid these as they will take forever to
de-air silicon. I vacuum my rubber twice, after mixing and again after its been poured into the mold box. I do this to remove any air that may have been trapped against the model when the rubber was poured. My 7 CFM pump takes ~ 90 seconds to achieve vacuum with my Belart desiccators.
Cost:
$180 + $43.25 S&H (Re-furbished / E-bay)
$600 new (you can find them on sale for ~ $300.00)
Availability:
http://cgi.ebay.com/Vacuum-Pump-Robinair-15600-6-CFM-2 stages_W0QQitemZ130305048904QQihZ003QQcategoryZ53300QQssPageNameZWDVWQQrdZ1QQcmdZViewItem
http://www.wescotools.com/p-138-robinair-15600-6-cfm-2-stage-vacuum-pump-r-12r-134a.aspx
Note: My pump and most others come with male "Flare" style hose fittings. These fittings are only found on heating and refrigeration fill/purge hoses. These as expense hoses made to exacting government standards and cost anywhere for $35-60. You DO NOT need this type of hose! You can buy perfectly workable plastic tube for $0.40 per foot at any hardware store. The problem is connecting it to your pump. My advise get a pair of vise grip pliers and remove the factor hose fixture from your pump and replace it with as simple hose barb fitting like this:
IMAGE
Trust me you will not be able to find a female flare to barb adapter at anything other than a specialty online store. Please save yourself the frustration and just swap out the whole thing out. You have been warned...
Vacuum Chambers:
The vacuum chamber is used to remove air from the silicone on a molecular level, this makes the rubber very dense, and allows it to withstand the pressure of pressure casting of the resin. I use a vacuum desiccator chamber purchased from The Belart. It is a device designed for medical laboratories and it of far higher quality than most of the chambers found online. Also because its a common piece of lab equipment it allot cheaper that the a chamber designed specifically for casting. Mine was purchased new for $113.75 + $12 S&H, but they can be found on eBay for about $80. I would but this new as the price difference is negligible, and you'll have the manufacturers three year warranty to protect you.
There are several important things that make this chamber the best choice in my opinion. First it has a Neoprene O-ring that offers a secure seal, which does not require grease. You can use grease, but if you do only use silicon grease; it can be found in the plumbing section of any large hardware store. It has glass transparent, shatter resistant polycarbonate upper and lower sections offer unobstructed viewing of contents. This is important, polycarbonate is several thousand times stronger than glass and thus far safer; and also you need to be able to see into your chamber. It has a polypropylene stopcock plug that controls airflow into the chamber. The stop cock is a valve attachment, kind of an on off switch that redirects the air. This is how you will engage the vacuum and release the pressure of the chamber. You need a plug so that you can gently release the vacuum or the in rushing air will flip over your
de-aired rubber, and coat the inside of your chamber with expensive rubber. When purchase your desiccator make sure is has a stopcock on it, they come without them and will usually be somewhat cheaper.
Here's my chamber: 420270000 Space Saver Vacuum Desiccator 230mm Clear
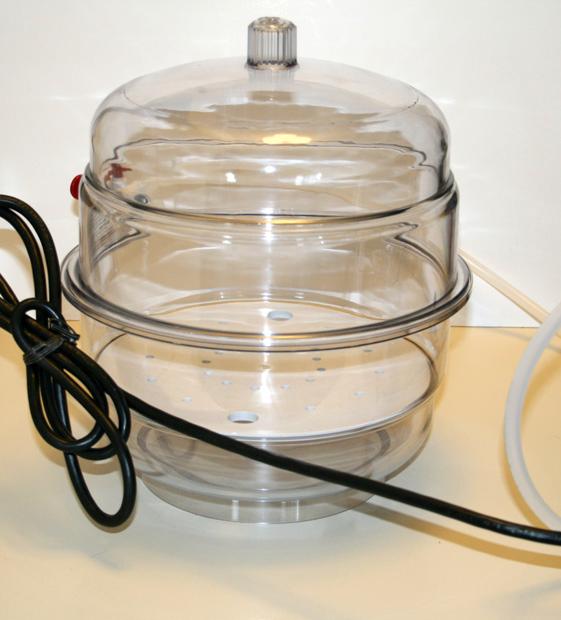
This it the largest chamber of this particular line, with an Overall Height: 12-1/8". The chamber has a removable interior plate, with an above plate clearance of 7-3/4". I just took the plate out and use the full 10" of interior space. When degassing your RTV rubber, remember to have a container that is much taller than the amount of RTV you’re mixing. When the vacuum starts to pull the air out of the mix, its rise quite a bit and could spill out over your container. This is why having a tall container like a pitcher is important. Even better is to have a transparent chamber with a stopcock installed, so you can break the vacuum if needed and let the volume collapse and then tighten it and let the RTV rise again. You can vacuum your rubber more than once. Of course, if you can avoid that situation altogether, you're better off; especially with quick setting materials.
Cost:
$60-80 (E-bay)
$113.75 (Belart.com)
Availability:
http://www.belart.com/shop/420270000-space-saver-vacuum-desiccator-230mm-clear-p-420270000.html?y=5&x=29
Mixing Pots:
I use a cheap pitchers purchased at Walmart to mix and
de-air my rubber in their perfect as they are tall and prevent the rubber from overflowing as it rises. As a rule of thumb you should use a container at least 3x the volume of the rubber to give it sufficient room to expand without spilling. They also have the advantage of being reusable and costing about a $1 each. Buy several of theses that way you can do multiple pours without having to wait 24 hours for the residual rubber in the pitcher to cure.
Cost:
$1-2
Availability:
Walmart, dollar stores, etc.
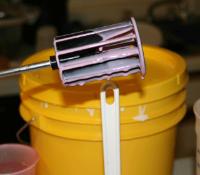
Squirrel Mixers:
This is paddle wheel attachment for an electric drill that is used to mix paint. It also works great for mixing silicon rubber. Silicon is very viscous which makes it very difficult to mix by hand; and if not mixed properly the rubber will never harden. Avoid the risk and save your hands at the same time.
 Cost:
Cost:
$2-3
Availability:
Can be found in the paint department of most large hardware stores such as: Home Depot, Lowes, etc.
Plastic Mixing Spoons & Spatulas:
These are used to scrap the sides of your mixing container. You do this one to ensure proper mixing as even the squirrel mixer will not hit the sides and very bottom of the container adequately. Second you used them to scraper the sides of the container. Silicon rubber is not cheap at ~$80 a gallon, so don't waste any. Make sure you get plastic, wooden spoons are porous and after curing the rubber will bond to them. Plastic mixing bowls and tools however are completely reusable, just let the rubber harden and peel it off.
Cost:
$1-2
Availability:
Walmart, dollar stores, etc.
Pressure Pots:
Now we have taken the air out of the rubber, because we are now going to apply pressure to the finished mold, with resin in it, to help the resin attain its ultimate properties. Clear resin in most cases has to be pressured to attain clarity. But regular resin will come out for the most part bubble free, and difficult to fill parts, like slender thin parts will fill with proper venting. The difference from non- pressured pours and pressured pours is quite amazing. If you do not remove the air from the silicone, then you will get some really funky looking castings if you pressure the molds upon doing resin pours. The air trapped in the silicone molds will try to implode, and deformed surfaces will be the result. Pressure casting is done in a paint pressure pot that is adapted to hold molds. Basically you seal off a paint port at the top, and you remove a paint reservoir tube that feeds to it. A paint pot is like a giant air brush bottle in effect. the are used to hold gallons of paint, for say, painting cars, boats or houses. You would attach a hose to a paint gun, from the nozzle that we would in our case, be removing.
So basically a big metal can, with a metal lid, which gets clamped on top, it has a rubber seal in the lip to hold the pressure in. The lid has a pressure gauge, and an in port nozzle with shut off valve, as well as a release valve. And the lid has an emergency blow off valve just in case too much pressure enters the tank; this keeps the tank from exploding should it exceed pressure. You only need to pressure your materials from 35 to 60 PSI, if need be. Typically 40 PSI is all you will ever need.
My pot is a Central Pneumatic 2-1/2 Gallon Pressure Paint Tank, Item# 93119-0VGA. Purchased from the Harbor Freight online store. at the time I got mine the were overstock as going for $39.99. Essentially, a Paint pot is a large industrial-sized spray paint can that is charged with compressed air.
 Cost:
Cost:
$80
Availability:
http://search.harborfreight.com/cpisearch/web/search.do?keyword=pressure+pot&Submit=Go
Next: Choosing the right Silicon

