| Author |
Message |
 |
|
|
|
|
Advert
|
Forum adverts like this one are shown to any user who is not logged in. Join us by filling out a tiny 3 field form and you will get your own, free, dakka user account which gives a good range of benefits to you:
- No adverts like this in the forums anymore.
- Times and dates in your local timezone.
- Full tracking of what you have read so you can skip to your first unread post, easily see what has changed since you last logged in, and easily see what is new at a glance.
- Email notifications for threads you want to watch closely.
- Being a part of the oldest wargaming community on the net.
If you are already a member then feel free to login now. |
|
 |
2009/07/01 16:55:22
Subject: Painting camo on small stuff , such as : Pants , helmets or guns...
|
|

Thunderhawk Pilot Dropping From Orbit
|
Ok , so i read the Get Your Teach On toutorial on camo , and i found it very informing . But when i tried it on smaller stuff , it didnt work for me ... so heres my quick toutorial on how to paint it on smaller stuff , like pants or helmets , maybe even guns !
1.Ok so first of , you need to paint the whole area in one colour ! I like to paint it black for darker camos , and any bright colour will work for the brighter ones . Make sure not to put lighter colour on very dark camos , becouse that will make that one colour pop out a lot , maybe even to much. Which might aswell ruin your camoflouge !
2. Choose a scecond colour , for this camo , im gonna go with Camo Green. Take an old , non-pointlike brush and stuble it on here and there on the area . make sure not to let them tuch , and have them a little seperate from each other
3. The third colour , do the same , with another type of colour . I'm gonna be using snot green . Stubble that on nicely and dont worry if it stubbles on the Camo Green , it will jsut make it look better.
4. Ok , the fourth colour . I usally whant to go with something thats brown on these , and my favorite browns are snakebite leather and sorched brown , both very uselful and good . Stubble those on , and make sure that they are pretty big spots .
5. Do the same thing with Graveyard Earth , vermin brown and so and on until you have covered up the whole area your painting .
6. Gife it a wash of ogryn flesh , then devlan mud .
I know this is basicly just : Stubble on the paind an there you go , but i just wanted to put this out !
Sorry for no example pictures , but my camera and models are at home while im traveling , so i just put this little thing up in paint 
Gretar
Ps. Heres a list of paints that are good for forest-like camo :
Camo Green
Bestial Brown
Sorched Brown
Chaos Black
Scorpion Green
Snot Green
Dark Angels Green
Vermin Brown
Other than that , you can use whatever you like , its all about finding what suits your style , not mine or others !
|
|
|
|
 |
|
2009/07/01 17:16:09
Subject: Painting camo on small stuff , such as : Pants , helmets or guns...
|
|

Elite Tyranid Warrior
|
Thanks for the info gonna try this on my scouts!
|
"I hope they can fight without their commmander because he's lost his head."
Alatair, Vindicare Assassin of the Blood Dragons.
Emperors Faithful wrote:Assassin: One shot is all it takes...
Slaneesh: Bow chika wow wow!
|
|
|
|
|
2009/07/02 01:01:51
Subject: Re:Painting camo on small stuff , such as : Pants , helmets or guns...
|
|

Deadly Dire Avenger
|
This can be done similarly in blues for Alaitoc Eldar, which I'm currently working on. I bought a brush about the size of the citadel detail brush that had a round tip and cut off the end of the bristles, so it was flat tipped. The colors I used were the common alaitoc ones: Regal blue (dark), 50/50 mix of regal blue + enchanted blue (mid tone), and enchanted blue (light, used much less than the others). Also I highlighted the edges of the models in enchanted blue. This was all done over a black base coat and looks very nice when you get the hang of it. Examples of this can be seen in both the 40k 5th ed. rule book and the Eldar 5th ed. codex.
Recently, I found this on the GW website. http://www.games-workshop.com/gws/content/article.jsp?categoryId=400035&pIndex=3&aId=1100014&start=4
|
Silly Mon-keigh, tricks are for Eldar....
 + +  - 2000pts - 2000pts
 - Coming soon to a table near you! - Coming soon to a table near you! |
|
|
|
|
2009/07/04 19:58:26
Subject: Re:Painting camo on small stuff , such as : Pants , helmets or guns...
|
|

Calculating Commissar
|
Got any pics of the technique you describe? I saw something similar done with a frayed Toothbrush before. Came out really nice.
|
|
|
|
|
|
2009/07/05 03:17:49
Subject: Painting camo on small stuff , such as : Pants , helmets or guns...
|
|
Lieutenant General
|
|
'It is a source of constant consternation that my opponents
cannot correlate their innate inferiority with their inevitable defeat. It would seem that stupidity is as eternal as war.'
- Nemesor Zahndrekh of the Sautekh Dynasty
Overlord of the Crownworld of Gidrim |
|
|
|
|
2009/07/05 14:58:13
Subject: Painting camo on small stuff , such as : Pants , helmets or guns...
|
|
Thunderhawk Pilot Dropping From Orbit
|
Sorry , but i dont have any pictures , im traveling and my camera got left at home :( I'll make sure to post some pics of my cadians and perhaps a fire warrior or an Tac marine
Gretar
Ps. i hate when people post something thats "better" than someting else , just couse they dont like it or something
|
|
|
|
|
|
2009/07/08 00:58:22
Subject: Painting camo on small stuff , such as : Pants , helmets or guns...
|
|

Sinister Chaos Marine
|
gretar wrote:Ps. i hate when people post something thats "better" than someting else , just couse they dont like it or something
And by the way, the GW links don't always seem to work for everybody. I'm always being redirected to the German GW page, which doesn't have all articles, and I can't find a way to access the UK or US sites.
|
Space_Potato wrote:Just Dave wrote:Simple Question Really, how do you think things would be different if Guilliman hadn't created the Codex Astartes?
Rape and pillage! Orks roaming the countryside, raping our churches and burning our women!
|
|
|
|
|
2009/07/08 06:13:57
Subject: Painting camo on small stuff , such as : Pants , helmets or guns...
|
|
Ollanius Pius - Savior of the Emperor
Gathering the Informations.
|
You have to clear out your cache, or look for the country selection in the lower right hand corner.
|
|
|
|
|
2009/08/10 15:48:11
Subject: Re:Painting camo on small stuff , such as : Pants , helmets or guns...
|
|
Fresh-Faced New User
|
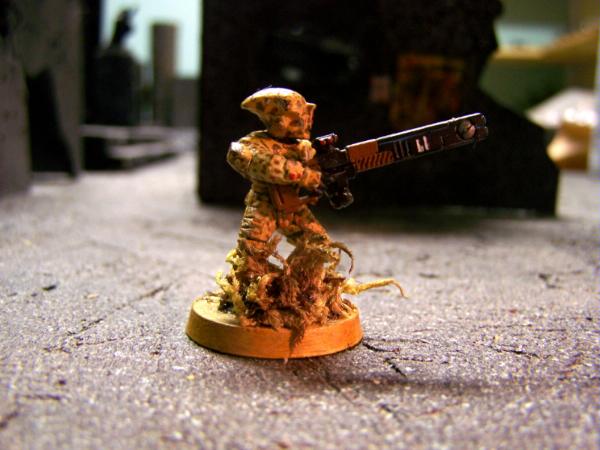
My Tau (Sept Tau C'Mia) are done in camo.
I started with a base (desret yellow), then added blobs of the green mix (catachan green and desert yellow mix), then catachan green (usually on the lighter blobs).
Then the brown mix (graveyard earth and desert yellow), then the earth as per the green.
I then used a non GW brown (revell, dark leather I think), and spots of bleached bone.
The whole thing was then inked black.


It doesn't take as long as people think, the base coating is by far the longest and most tedious process
|
|
|
|
|
2009/08/10 16:30:46
Subject: Painting camo on small stuff , such as : Pants , helmets or guns...
|
|
Thunderhawk Pilot Dropping From Orbit
|
Using my tech , or some other ?
I appreciate it if you used mine 
|
|
|
|
|
|
2009/08/10 17:56:27
Subject: Re:Painting camo on small stuff , such as : Pants , helmets or guns...
|
|
Fresh-Faced New User
|
I did mine a year ago, long before I saw yor post, but yip, pretty much the same. Starting lighter and going darker is the way to go.
The mud wash might be better, but I will hold off until I do my pathfinders to give it a go.
|
|
|
|
|
2009/08/11 21:09:52
Subject: Re:Painting camo on small stuff , such as : Pants , helmets or guns...
|
|
Calculating Commissar
|
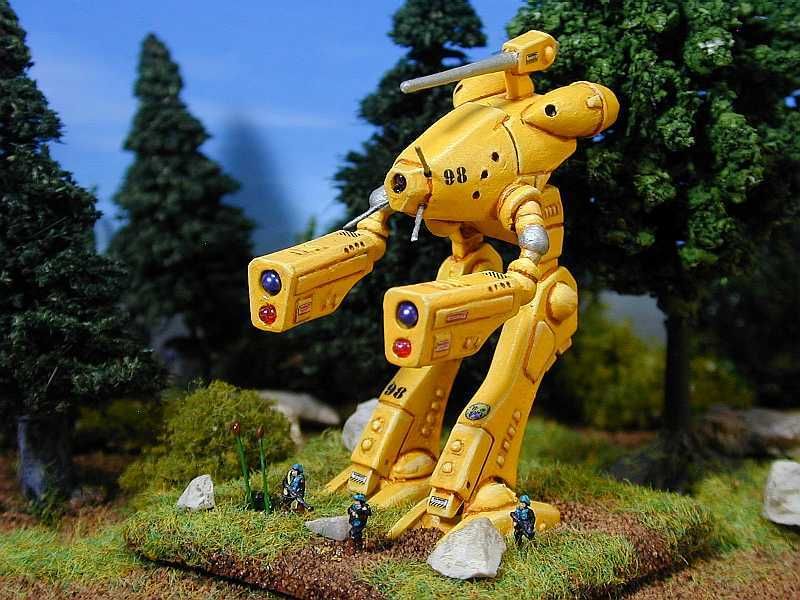
Tau in Desert Flektam. No washes/inks. Just the base test scheme.
|
|
|
|
|
|
2009/08/15 01:15:06
Subject: Painting camo on small stuff , such as : Pants , helmets or guns...
|
|
Guard Heavy Weapon Crewman
|
on GW site there is articles on warhammer 40k section and when you click on painting great tut on imperial guard camo but works on all troops,
hope help!
|
|
|
|
|
|
2009/08/25 21:40:28
Subject: Re:Painting camo on small stuff , such as : Pants , helmets or guns...
|
|
Calculating Commissar
|
We already got a link to that tutorial. Read the rest of the comments on the page.
|
|
|
|
|
|
2009/08/25 23:15:47
Subject: Re:Painting camo on small stuff , such as : Pants , helmets or guns...
|
|
Tail Gunner
|
For an approximation of modern US digital camo, I've used the following on my own IG:
Paint list:
Model Color/Vallejo 70887 (Brown-violet)...this is actually an Olive Drab ala US forces in WWII
Model Color/Vallejo 70886 (Green-grey)
GW Graveyard Earth
Black
GW Flesh Wash (if available) or Ogryn Flesh
1) Start by painting essentially the entire miniature in Brown-Violet (the armor, helmet and all the fatigues you can see).
2) Wash with Flesh Wash/Ogryn Flesh
3) Highlight with Green-grey
4) Decide the areas you want camo'd. On my Cadians, I leave the armor as basic Olive Drab (highlighted, of course), and camo the fatigues.
5) Take a fine sponge (the foam that pads the minis inside blister packs works great) and cut it to a square tip about 1/8" wide.
6) Dip the sponge in Green-grey and then work off most of the paint on a paper towel. Then, stipple the fatigues lightly with G-G.
7) Repeat the sponge treatment with Graveyard Earth and finally with black, being careful to use less of each color, successively. You shouldn't have any blotches of Graveyard Earth or black, just fine dots all over the fatigues.
Then finish the figure at your leisure. The camo from about 6" away or further ends up being a good middle ground in color between US Army and US Marine digital schemes, and is actually fairly effective on a well-terrained battlefield. It could easily be expanded (by making the Graveyard Earth a little more blotchy) into a very close analogue of WWII German Fallschrimjaeger (paratrooper) camo. What's best, once you get a pattern down, you can camo an entire squad in an evening's worth of work, easily.
|
|
|
|
|
2009/08/25 23:20:54
Subject: Re:Painting camo on small stuff , such as : Pants , helmets or guns...
|
|
Avatar of the Bloody-Handed God
|
Swordguy wrote:For an approximation of modern US digital camo, I've used the following on my own IG:
Paint list:
Model Color/Vallejo 70887 (Brown-violet)...this is actually an Olive Drab ala US forces in WWII
Model Color/Vallejo 70886 (Green-grey)
GW Graveyard Earth
Black
GW Flesh Wash (if available) or Ogryn Flesh
1) Start by painting essentially the entire miniature in Brown-Violet (the armor, helmet and all the fatigues you can see).
2) Wash with Flesh Wash/Ogryn Flesh
3) Highlight with Green-grey
4) Decide the areas you want camo'd. On my Cadians, I leave the armor as basic Olive Drab (highlighted, of course), and camo the fatigues.
5) Take a fine sponge (the foam that pads the minis inside blister packs works great) and cut it to a square tip about 1/8" wide.
6) Dip the sponge in Green-grey and then work off most of the paint on a paper towel. Then, stipple the fatigues lightly with G-G.
7) Repeat the sponge treatment with Graveyard Earth and finally with black, being careful to use less of each color, successively. You shouldn't have any blotches of Graveyard Earth or black, just fine dots all over the fatigues.
Then finish the figure at your leisure. The camo from about 6" away or further ends up being a good middle ground in color between US Army and US Marine digital schemes, and is actually fairly effective on a well-terrained battlefield. It could easily be expanded (by making the Graveyard Earth a little more blotchy) into a very close analogue of WWII German Fallschrimjaeger (paratrooper) camo. What's best, once you get a pattern down, you can camo an entire squad in an evening's worth of work, easily.
any examples of product done that way?
|
Paused
◙▬▬▬▬▬▬▬▬▬▬▬▬▬
◂◂ ► ▐ ▌ ◼ ▸▸
ʳʷ ᵖˡᵃʸ ᵖᵃᵘˢᵉ ˢᵗᵒᵖ ᶠᶠ |
|
|
|
|
2009/08/25 23:36:01
Subject: Re:Painting camo on small stuff , such as : Pants , helmets or guns...
|
|
Tail Gunner
|
LunaHound wrote:any examples of product done that way?
Gah - I knew as soon as I posted it people'd ask for pics. Lucky for you, I've got a nice new camera and no idea how to use it. Check back in a few hours, whien you'll either have pics of IG, or Swordguy complaining about a broken camera...
|
|
|
|
|
2009/08/25 23:42:34
Subject: Painting camo on small stuff , such as : Pants , helmets or guns...
|
|
Avatar of the Bloody-Handed God
|
Click the flower button ( macro )
make sure the light source is behind you over your shoulder
Give atleast 1 feet distance away from the subject
perfer white back ground for camera to focus on
point and click , ( should be perfect if you followed the steps )
|
Paused
◙▬▬▬▬▬▬▬▬▬▬▬▬▬
◂◂ ► ▐ ▌ ◼ ▸▸
ʳʷ ᵖˡᵃʸ ᵖᵃᵘˢᵉ ˢᵗᵒᵖ ᶠᶠ |
|
|
|
|
2009/08/25 23:59:34
Subject: Painting camo on small stuff , such as : Pants , helmets or guns...
|
|
Tail Gunner
|
LunaHound wrote:Click the flower button ( macro )
make sure the light source is behind you over your shoulder
Give atleast 1 feet distance away from the subject
perfer white back ground for camera to focus on
point and click , ( should be perfect if you followed the steps )
Oh, THAT much I've got. I had a decent camera and light rig before, as evidenced by:
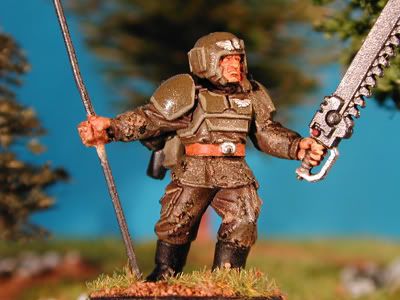
These controls are just buried in a new menu system, the manual focus is a bit tricky (I don't like autofocuses), and I don't know how to use the timer so I've removed myself completely away from the camera when it shoots (to avoid vibration). Futher, I'm having trouble finding my flash card reader so I can get the pics OFF the damn thing. We're mostly packed up to move, you see... Automatically Appended Next Post: OKay, here we go - two quick images. This is a WIP mini as part of a larger commission for somebody else; I've got about 30-45 minutes of "paintbrush on mini" time with this (doesn't include drying times), but it illustrates the principle behind the camo scheme. No photoshop work (sharpening, etc) which normally makes pics look good - all I did was resize it to a saner resolution.

|
|
This message was edited 1 time. Last update was at 2009/08/26 00:16:13
|
|
|
|
|
|
|
 My blog

