Forum adverts like this one are shown to any user who is not logged in. Join us by filling out a tiny 3 field form and you will get your own, free, dakka user account which gives a good range of benefits to you:
No adverts like this in the forums anymore.
Times and dates in your local timezone.
Full tracking of what you have read so you can skip to your first unread post, easily see what has changed since you last logged in, and easily see what is new at a glance.
Email notifications for threads you want to watch closely.
Being a part of the oldest wargaming community on the net.
If you are already a member then feel free to login now.
2009/10/31 13:47:54
Subject: How to make wooden display trays/ boards for magnetic bases [pics & Videos]
If you don't want to read this entire post, just scroll down & watch the second video.
A few months ago I went to a tournament & realized that I needed a display board for my Orks army. I made some display trays using metal from Home depot. Here's how:
Step #1 go shopping
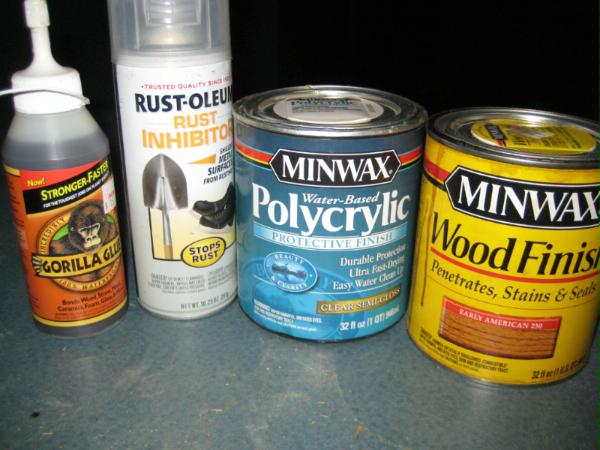
buy: magentic bases from Gale Force Nine.
Gorilla glue, don't bother with wood glue- get the good stuff; Gorilla Glue!
wax paper
Wood stain in the color you want
wood sealer
metal sealer
metal tray MAKE SURE you bring a magnet to the store with you to be sure it IS magnetic (I speak from experience HA HA)
wood to the length of the four sides of the metal tray (metal might vary in size depending on your local hardware store)
http://www.homedepot.com/h_d1/N-5yc1vZ1xr5/R-100396941/h_d2/ProductDisplay?langId=-1&storeId=10051&catalogId=10053 more wood to make frame (2x4s) & a half sheet of plywood
straps to strap tray together
screws to make frame
metal clamps***
drillgun to screw in screws***
table saw***
miller AKA miter saw***
***hopefully you already have some of this stuff or you know someone who does. If not, just PM me & I can make one to your specifications.
Step #2 Cut grooves in boards
This is kind of tough if you don't have a table saw. Doing this step by hand would be a BIG mistake. For those of you unfamiliar with a table saw, I would be careful with this project.
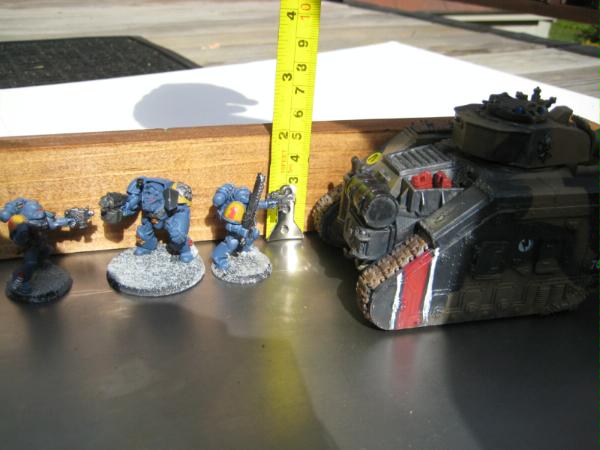
Lower the blade on your table saw so it only makes a small cut into the entire length of your board. Do this step BEFORE cutting your board into the 4 sides to ensure that the groove is the same exact height on each side of the tray. By height I mean how much of it will show on each side.
The metal should fit into the groove like this:
Step #4 Stain the entire board length. Do this now because if you glue it together with the metal tray inside and then stain it, then stain will drip onto the metal tray and look messy.
Step #5 Seal the metal tray. I would spray on sealer & then wipe down. I would do this as soon as you get home from the store because the first tray I ever made, I stored in the basement with my army on it. A month later I moved some models and found little rust rings on the metal tray. No big deal for me, but you might want to keep your tray looking snappy & new.
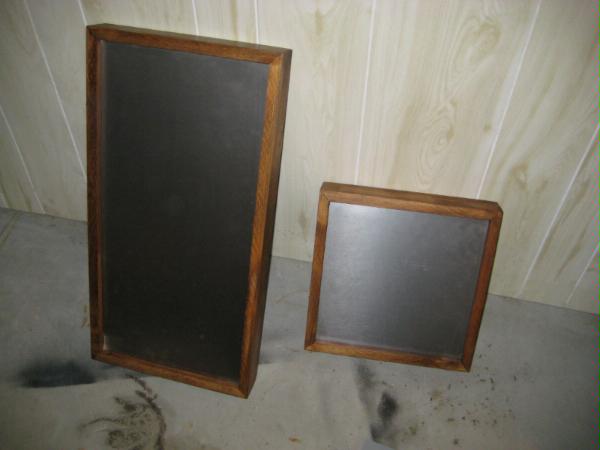
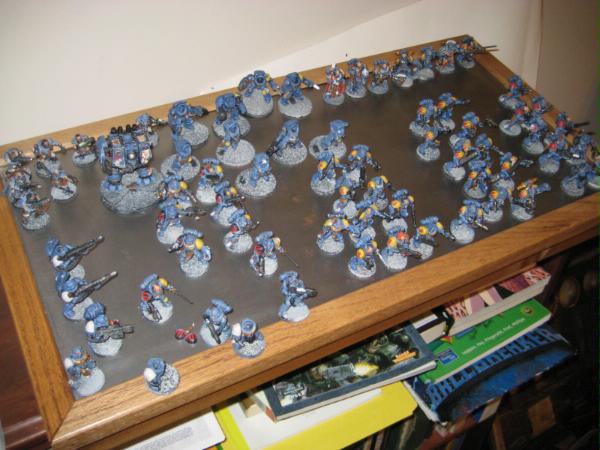
Step #6 Cut boards to correct length using a miter saw. Ask someone with experience to help or else you might cut them too short & have to start all over! The length of your four sides will be LONGER than the metal tray because the sides fit around the tray. The measurements will be different depending on the size of the metal tray. I made two trays; one for 40K and another for my Flames of War army:
The smaller tray also fits my 2000 pts of Ravenwing/ Deathwing which is pretty awesome compared to my 2000 Ork army that barely fits in two GW BIG cases.
My four boards turned out being about 13 5/8 inches and 24 7/8 inches, but YOURS WILL BE DIFFERENT so measure CAREFULLY. Use a miller saw to cut 45 degree angles like this:
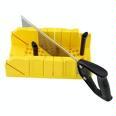
A miller saw lworks great or you can use a miter box too that looks like this:
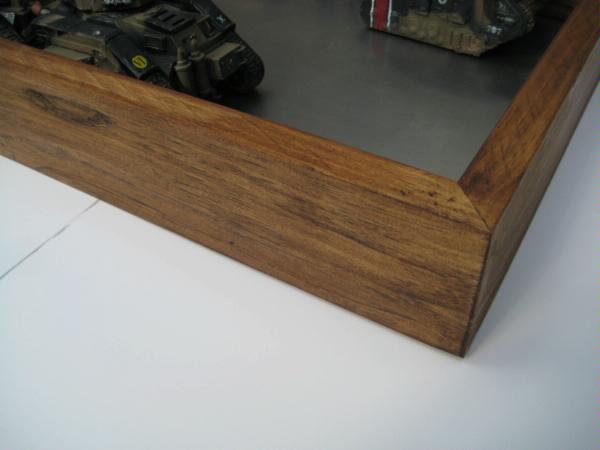
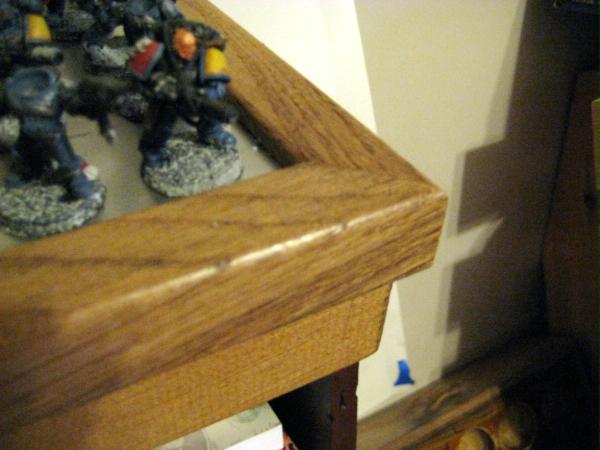
WARNING: Don't even consider trying this just by hand without a miller saw or miter box; you need to make 8 cuts that will fit together nicely. Screw that up & your tray looks like crude. You want a nice tight fit like this:
When I made my first tray, I was convinced it was going to be too weak so I messed around with biscuits but that was more work than it was worth.
Then I spoke to a friend who is a picture frame maker and he was like, "Don't bother, Gorilla glue will hold that together just fine!"
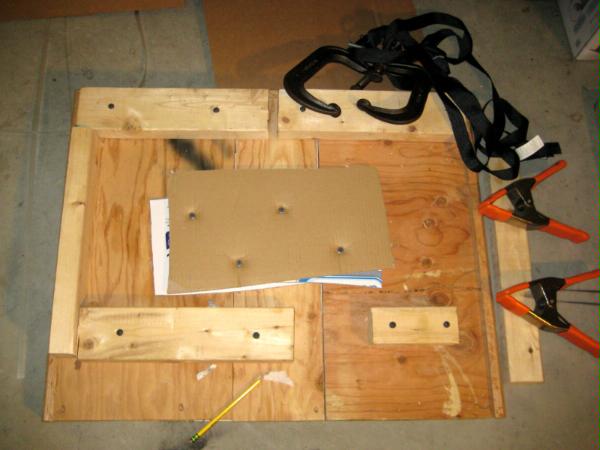
Step #7 The hard part: making the frame that the tray fits into.
At first, I thought I could just strap the tray together and that would let the glue dry, but Gorilla glue expands as it drys. One strap will not create a tight, seamless seal. The frame is the way to go:
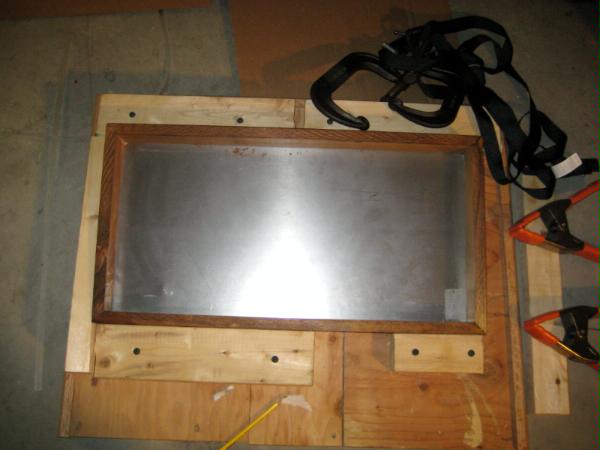
Get a few scraps of 2x4s or 2x3s to make the sides. Use plywood as the base. Only screw on three out of the four sides. Use your tray & wood sides as the template for the size. Notice the "island" of cardboard screwed into the middle. This island creates a pedestal for the metal tray to rest on as you slide in the wooden sides. The cardboard should allow the metal to not fall to either side as you slide in the wooden sides.
The fourth side of the frame will be clamped on using your metal clamps (see photo) after the tray & metal have been assembled.
Step #7 Check that everything is going according to plan. Next step will be the point of no return. Try steps #8-11 without glue so that you're sure you know what you're getting yourself into.
Step #8 Place scraps of wax paper on the corners between the tray & frame so that when you glue your seams you don't turn out gluing your tray to the frame.
Step #9 Slide one short side & both long sides & metal tray into frame. Leave a small gap between corners so that you can squirt some glue in there.
Step #10 Squirt glue into corners. Gorilla glue is super sticky so DON'T spill any!
Step #11 Glue on last side & clamp shut.
Step#12 Wrap straps around portion of tray not held by frame (the upper inch or so).
Step #13 wait 24 hours
Step #14 take tray out. Sand any areas that glue got onto. Restain & reseal as needed. I'd suggest sealing metal again at this point.
Step #15 Apply magnetized models & enjoy!
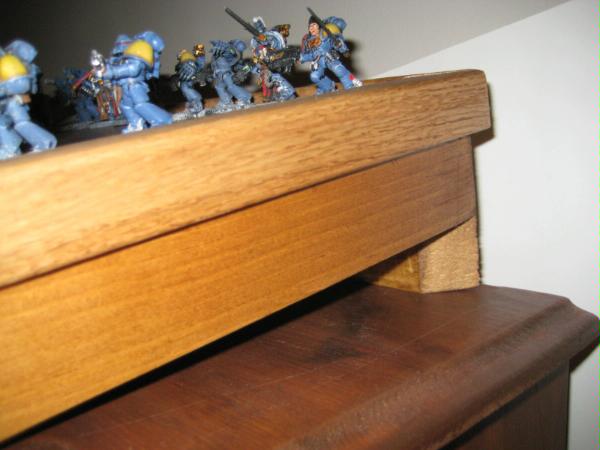
On one of my trays I wanted the tray to sit at an angle so that it "presented" the models better so I had one side wider than the rest:
I also used moldings along the edge before I cut grooves:
Automatically Appended Next Post:
If this whole process is too much work for you, just PM me & I can make one for you.
This message was edited 6 times. Last update was at 2010/07/03 18:47:39
Holy cow, man, I did not know it was so involved. I love the two you made for me, they rock! You can basically take your army with you wherever without a fancy padded carry case. Just slap 'em down and they stay put.
One idea: What about spraying the whole thing black so the models really pop on it? Lots of wargaming stuff is black and it makes a nice "frame" for models. Some will like the seeing the grain of the wood and others will prefer the simplicity of black?
Don't set your mind to one side. -Nevermore
2009/10/31 16:36:16
Subject: How to make wooden display trays/ boards for magnetic bases
scarab wrote:One idea: What about spraying the whole thing black so the models really pop on it? Lots of wargaming stuff is black and it makes a nice "frame" for models. Some will like the seeing the grain of the wood and others will prefer the simplicity of black?
Tailor made for specific armies with matching colours and themes? Sounds good to me!
Excellent how-to, InquisitorMack, thank you! We'll see how handy I feel when I need to get cracking on mine...
DoW
"War. War never changes." - Fallout
4000pts
3000pts
1000pts
2500pts
2009/10/31 16:44:36
Subject: How to make wooden display trays/ boards for magnetic bases
Wow! This is awesome. I just destroyed a TV-tray last night to get the top part of the tray to hold my models. But to have one that's magnetic... sheer genius!
The only problem would be for my lizardmen army, the models are magnetic, but they have movement trays with metal in them already. So I'd have to take them out of the movement trays to have them stick to the larger carrying tray... hmmm...
2009/11/06 18:24:13
Subject: How to make wooden display trays/ boards for magnetic bases
RiTides wrote:Wow! This is awesome. I just destroyed a TV-tray last night to get the top part of the tray to hold my models. But to have one that's magnetic... sheer genius!
The only problem would be for my lizardmen army, the models are magnetic, but they have movement trays with metal in them already. So I'd have to take them out of the movement trays to have them stick to the larger carrying tray... hmmm...
as long as your lizards magnetic polarity is uniform you should be able to have the board's match up and have them stick with the movement tray inbetween.
I am quite tempted to buy one off you however I am broke... this would really fix the problem of me running my green tide of 150 or so orks in tournies and having a hard time moving tables (the limited trays they have in the store just sucks D: ) Great idea, and if I ever get around to it and theres some left, Ill have to buy one... If not I guess Ill have to make one
2009/11/07 12:22:35
Subject: Re:How to make wooden display trays/ boards for magnetic bases
if I ever get around to it and theres some left, Ill have to buy one...
I've made three batches at this point & making more is no problem; just PM me whenever you have money & I can make another. Now that I have the frame ready to go, they only take about a week or so to make. Getting to my father-in-law's house to use his saw is what takes so long; the rest is easy.
PM some time & we can do the $$$ stuff through Paypal. Shipping is $14 to anywhere in the US and $40 per tray. Just tell me what color stain or paint to use.
I'm working on a pair of deeper trays for RiTides, the first of which is this one:
The mitre sawblade was too small to cut all the way through the thicker wood so I had to finagle the cut on the corners. I also used wood screws this time because the glue wouldn't hold 6 inches of wood on the corner. Then I used matching wood putty to fill in the screw heads. I also needed to use hard wood so that the screws would not just crush the grain.
In retrospect, smaller (shallow) trays have better cut corners because the mitre saw can accommodate the size of the wood.
The deeper trays can probably use handles on the side, but I'm going to leave that up to RiTides so he can pick out a style he wants.
( And so that I can fit the trays securely in a box to ship)
I also bought wood that had no knots in it which looks pretty sweet.
This message was edited 1 time. Last update was at 2009/11/14 14:31:35
I am super excited about the trays . This looks really, really good! And I'm not worried about perfect corners (they look great from what I can see!).
I also PM'ed you with two ideas for additions (one you mentioned here, the handles) which I would pay for, of course!
Now I just have to get really strong magnets for the models that aren't yet magnetized! Do you have a good suggestion? I'm sure I can find it by searching the forums, though
This message was edited 1 time. Last update was at 2009/11/14 16:27:44
2009/11/14 19:45:47
Subject: Re:How to make wooden display trays/ boards for magnetic bases
EDIT: After playing a friend last night who uses Rare Earth magnets on all of his bases, my opinion changed. His rare earth magnets were too strong for the plastic models. Everytime he tried to move models in tight quarters, such as the assault phase, the models would pair up by having the models' bases stick to each other. It was kind of a pain. I still think you need to use rare earth magnets on big metal models though (like metal termies, Njal, etc.) See first post on next page for more discussion.
Anyone out there got a cool idea for a lid that would fit between two trays?
This message was edited 2 times. Last update was at 2010/07/03 18:48:30
Hmm, are the pics not showing up in this thread anymore? I think a lot of your pics and also text is missing right now, InquisitorMack... not sure what happened! I checked this thread a few hours ago and everything was fine.
I don't have any new ideas for the lid... it doesn't have to be fancy, though . Although your craftsmanship looks really good, this doesn't have to be up to the same level, since it's something I asked you about after the fact! I was hoping for two, one for each tray, to keep away the grubby fingers when they're sitting unattended on the table...
2009/11/16 23:50:57
Subject: Re:How to make wooden display trays/ boards for magnetic bases
The two deep trays are done except for some sanding of the wood putty over the screws & then touch up with wood stain & sealer.
I went to the hardware store today and got plexi-glass & wood molding to make the lids. I also got the four handles. Before I send them all out though- it got expensive for the lids: $75 = 2x11 for plexiglass, 4x$5 for the handles, $30 for the wood. Let me know if you really want the lids.
If so, the question is how to do the lids:
The plexi-glass is the dimensions as the metal tray so it doesn't fit all the way into the wood molding so I might need to make the cover half wood & half plexi-glass. Is that ok?
The lids don't work with hinges because if you open the lid, the weight might make the tray tip over. So the lids would be more like tupperware lids; they come on & off but are not attached.
Where i.e. how high do you want the handles mounted?
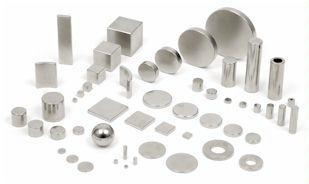
With the lids, I don't know how you would stack the trays in such a way that the top one doesn't slide around. Still trying to figure that one out. You might want a strap of some sort to hold the two trays in place. I was also thinking about magnetizing them, but I don' t think magnets are that strong. Maybe some of these?
But then the lid would get in the way...
OH WAIT! Something JUST occurred to me when I previewed the photos! Should I permanently attach the wooden molding to the top of the tray so that you can just slide the plexiglass in?
But then the molding would still get in the way of the latch...hmmm.
Anyhow, I'm hoping to cut the lids & stain them this week & get this out to you soon (Saturday?) hopefully.
This message was edited 2 times. Last update was at 2009/11/17 00:03:49
For the height of the handle, I think the middle would be good. That is on the short side of the tray, right? I can't tell from the pic.
As far as the lid goes- Wow, that is really neat looking! But did I read the cost of the plexiglass right- $75 for the two pieces? Is there a cheaper material? I didn't realize plexiglass was so expensive! I had just been thinking a sheet of wood!
The sliding idea or the tupperware idea both sound good. I had been thinking the tupperware idea (the lid just comes off). I definitely think hinges are a no-go. The latch also seems like it would get in the way, so I'd say the sliding or the tupperware are the best options, and either works for me
Thanks for putting so much thought into it! Like I said either idea (sliding or tupperware) sounds good! The only inhibitor is the cost of the plexiglass... it seems like there must be an option that's a little more cost effective (doesn't have to be transparent)? But if you already bought it and can't return it, I understand that, too!
Looking awesome . I'll keep checking the thread!!
Oh, and it's OK if the trays slide around on top of each other I think. I'm only going to store them stacked, and that will be carefully; I probably won't have them stacked anywhere else.
2009/11/17 10:56:54
Subject: Re:How to make wooden display trays/ boards for magnetic bases
Yeah, the plexi-glass was $22 for 2 sheets plus the wood for $25 more.
The handles were $20 for four. If you want, just pay for the handles & I can use the plexi-glass on some other project. I'm always getting involved in some random building stuff project anyhow.
Oh! I misunderstood: I thought the $75 was JUST for the plexiglass. That's the total for the materials for the extra materials (handles, plexiglass, wood), right? I knew I was reading it wrong!
In that case, the cost is just fine! And I would like you to use the plexiglass
It's still up to you whether you make it sliding or tupperware, though!
This message was edited 1 time. Last update was at 2009/11/17 11:36:13
2009/11/22 00:47:36
Subject: Re:How to make wooden display trays/ boards for magnetic bases
The plexi-glass trays are great because they have a sliding cover, but the depth of the tray makes it difficult to cut the corners with a mitre saw. I turned out having to flip the piece of wood over and cut twice which takes away from the quality of the corners.
Any more trays that I make, I will not be making them as deep because I'm just not a good enough carpenter.
The other problem with the deeper trays is that I don't have deep enough cardboard boxes to ship them in. The one set I made needed to be shipped from a UPS store in Nashua which is 45 minutes from my home and cost $36 to ship the pair. With that much added to the cost, I would just tell people to find someone to make a tray for them; dad or grandpa if he has wood working tools.
The next time I make a tray with a lid, I will cut a "slot" just like I did for the metal tray. The second slot will run along the top and allow the plexi-glass to slide back & forth. This will save the cost of buying molding to glue along the top. The molding also requires more cuts with the saw which increases the chances of bad cuts which lead to messy workmanship. The less cuts I can make, the higher the quality.
I'm also thinking of cutting holes for handles to save money too. RiTides ordered the handles by picking them out on the HomeDepot website & PMing me the link.
If you have more questions about the trays, PM Scarab, DrJekyll325, asugradinwa, or RiTides; they've all bought one at this point. RiTides bought the pair with the lids & handles.
If anyone else would like a tray, just PM me. If you live anywhere near MA or NH we can probably meet up at the Whiz store by Worcester or Games Castle in Londonderry to save you money on shipping.
This message was edited 1 time. Last update was at 2009/11/22 19:11:06
I like the comment "The cadillac of metal movement trays"
Those are some good ideas to make it more cost-effective! I really appreciate you trying out all the ideas we came up with. The final product looks Awesome! I'll update when I've received them (should be tomorrow ).
2009/11/25 03:00:09
Subject: How to make wooden display trays/ boards for magnetic bases [pics & Videos]
I'll post pics once I've got the rest of my army magnetized to put in it! I'm hoping the magnets will arrive later this week; but due to Thanksgiving it may end up being next week.
I am very, Very pleased with the workmanship and the final product that InquisitorMack put together for me
2009/11/25 16:40:03
Subject: How to make wooden display trays/ boards for magnetic bases [pics & Videos]
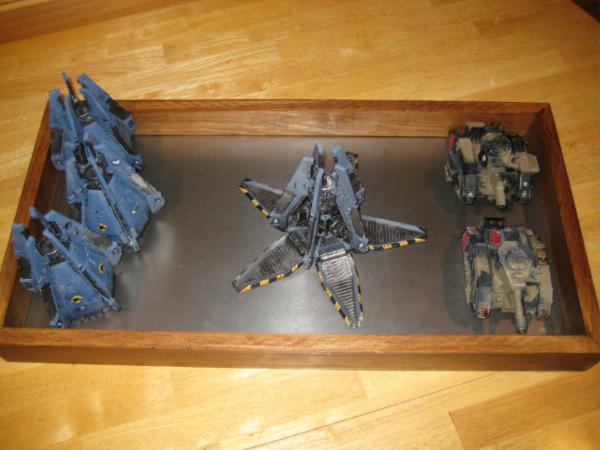
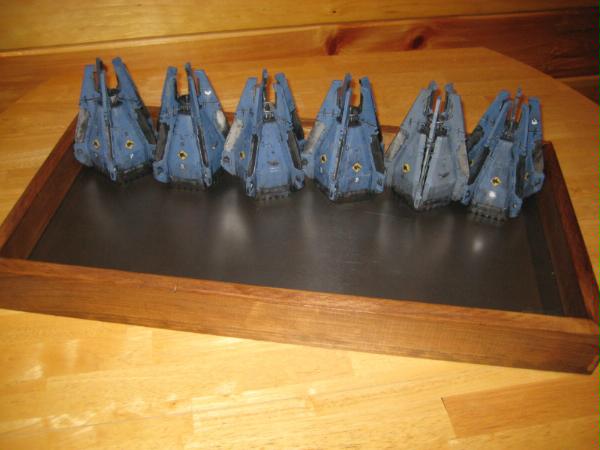
I'm impressed! Goodbye cruddy foam boxes where your models fall all over the place anyway. Hello awesome magnetized travel box! Packing is a big pain, too - seems like a breeze with this magnetized carrying case.
Here's some pics of the trays InquisitorMack made for me
Inside are my 3000 point high elf and 3500 point lizardmen armies . Of course that's focusing on the elite units and not lots of blocks of troops, and these aren't horde armies... but still, these things hold a LOT!
I'll take some pics of me holding them at a 45 degree angle once I've magnetized all my models. Right now I've only got a few squads magnetized, but they stay on really well! I'll probably also be putting magnets under the movement trays so I can keep the models together in their units.
Also, these pics were taken without the plexiglass in place, since it makes for a blurry pictures. But I am really loving the plexiglass on mine
2009/12/04 18:11:40
Subject: Re:How to make wooden display trays/ boards for magnetic bases [pics & Videos]
I went to home depot to find the metal only to find that they did not carry it in anything under 36" (even thought the website said that store did) I did find a nice variety of sizes in the hardware section of Orchard Supply and Hardware (OSH). I picked up a sheet of 12" x 24" for $11.99
Hopefully I will have a nice looking board soon. Thanks again for the tutorial!
2009/12/10 21:54:04
Subject: Re:How to make wooden display trays/ boards for magnetic bases [pics & Videos]
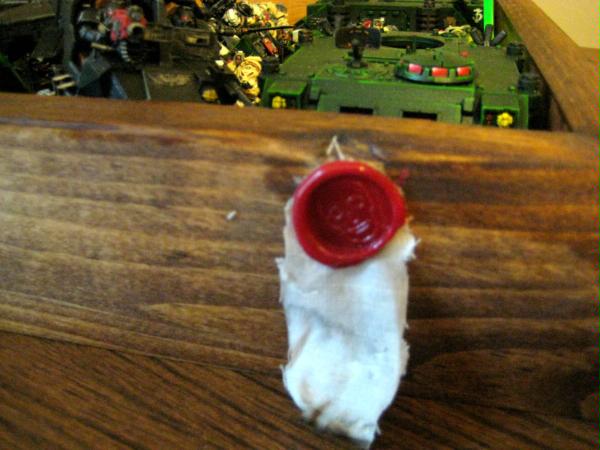
As a goof I tried sticking on a "Purity Seal" with my wax gun:
I used these seals last year for a campaign some of us had. I used them to seal the mission papers:
For those of you ordering the trays, I can add these seals on free of charge ('cause they just look cool), but tell me where and how long you want the cloth sticking out. I use mine as a name tag.
This message was edited 1 time. Last update was at 2010/07/03 18:49:23
What glue do you use to adhere the models to the Force 9 bases? A poster in another thread said he had trouble making the models stick.
Also, I found magnetized sheets around the web, including ebay and I'm wondering if I can just cut that stuff and stick it into my existing bases... Any thoughts?


 4000pts
 1000pts
 2500pts


 . This looks really, really good! And I'm not worried about perfect corners (they look great from what I can see!).


 Orks is never beaten.