Switch Theme:

Demon/Daemon Prince Wings from Sprue  [RSS] Share on facebook Share on Twitter Submit to Reddit
»
Author Message
Advert


Forum adverts like this one are shown to any user who is not logged in. Join us by filling out a tiny 3 field form and you will get your own, free, dakka user account which gives a good range of benefits to you:
  • No adverts like this in the forums anymore.
  • Times and dates in your local timezone.
  • Full tracking of what you have read so you can skip to your first unread post, easily see what has changed since you last logged in, and easily see what is new at a glance.
  • Email notifications for threads you want to watch closely.
  • Being a part of the oldest wargaming community on the net.
If you are already a member then feel free to login now.


Made in us
Blood-Raging Khorne Berserker


I couldn't bring myself to pay the $15 or so to get wings from Ebay or GW, so I decided I would take a crack at making a set. This is the first time I've done anything like this (I've never used epoxy, much less sculpted it), but I feel the results are adequete for table-top quality, so I thought I'd share my methods. These are a prototype and I learned a fair bit on the way, which I'll share with you so you can avoid my mistakes.

Materials:

Sprue - Free (I would think)
Lok-tite Epoxy (Blue and White cylinder I got at Lowe's - cost about $4. Project took about 80% of the tube)
Dremel or files to sand
Razor Knife/Saw


First thing you'll have to do is hunt through all your sprue frames for a structure you want. I used the sprue from a basic Chaos Marines box. Make sure you can find a duplicate or mirror image of the sprue somewhere as you need to make two wings.

It took me a few minutes of staring and visualizing to spot the right pieces for wings, but I would think just about every sprue has something usable as a frame.

When I first picked my pieces I actually cut out an addition section with the intent of giving the wings a severe bend. I was afraid that they'd be too flat otherwise. When I cut the extra pieces though they simply felt too massive. My fears on flatness were unfounded too as sculpting the epoxy gave it plenty of relief.


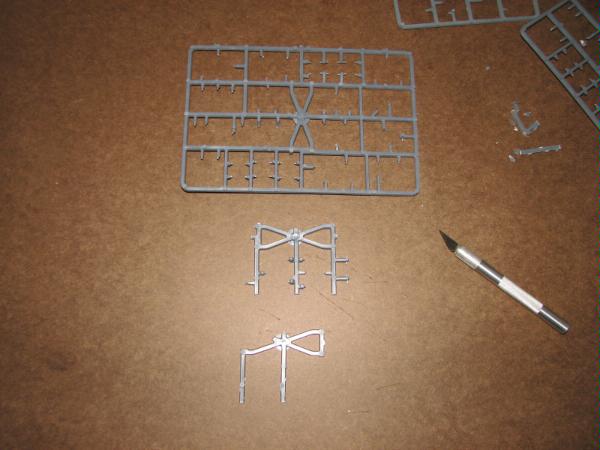
Cut and trim to make it right. I initially rounded everything with the dremel with the idea that I'd have exposed bone. In hindsite I think I'd cover everything with epoxy and not worry too much about it.


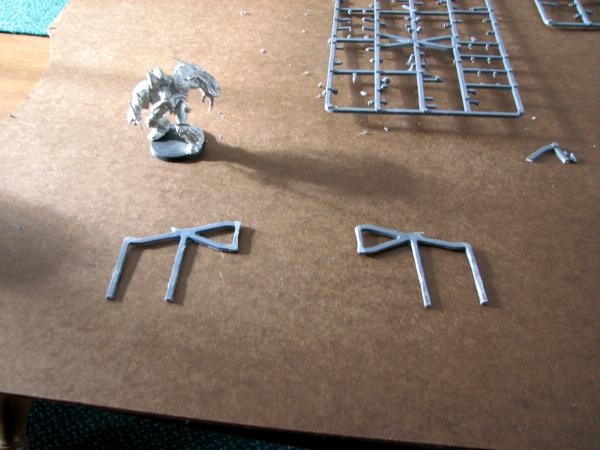
Once you have your frames more or less together, it's time to pull out the epoxy. I used Lok-Tite stuff from Lowes because it was cheap and readily available from their paint dept. Greenstuff would probably work better, but meh. I first took about a coin's thickness worth of the stuff to knead it and get a feel for how it works. It was very sticky and kinda crappy to work with at first, but after 30 seconds or a minute it starts to set a little and becomes pretty decent to manipulate. Note it has a hardening time of about 5 minutes. It didn't sound like long to me but I have to say I never felt rushed while doing this.

Take about 30% or so of your tube (for one wing) and knead it together into a flatish square. Using the frame as a skeleton, bend and mold it around the sprue to create your wing membrane. While I used some nail manicure stuff to sculpt, I honestly found I had the best, most "Organic" results by using my fingers and thumb to rub and pinch things. It will tear quite easily the first minute or so of working, but it's easy to repair and it toughens up as the epoxy sets. Don't worry too much about muscles and whatnot yet - we'll add those later. Just get a nice wave and wing shape to them.


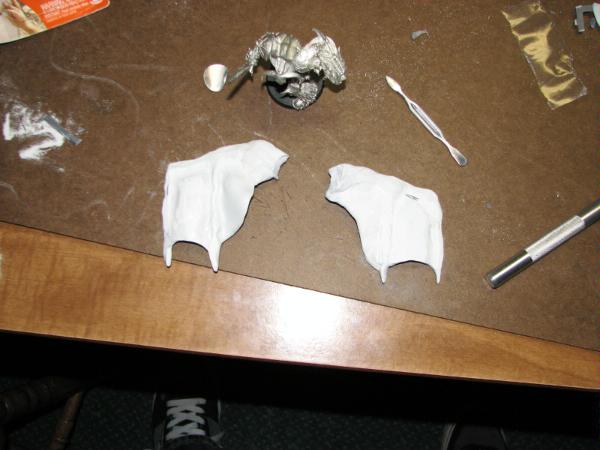
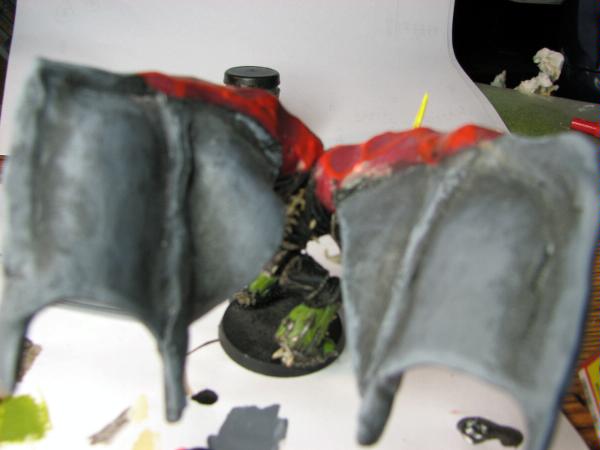
Once you have more or less what you want, do the other wing and walk away for 40 minutes or so (could be less, but the directions say 40). When you come back it will be rock hard. This stuff was AWESOME to work with once set. It sanded and filed really well and feels super solid. I used a dremel to remove all the finger prints and get better wing-shapes.

Now cut off another small chunk of epoxy - a little goes a pretty long way. Use it to bulk up the top portions of the wings where you think the muscles should be. Try to anticipate how it will fit with your model. If you screw up, don't worry too much, you can sand or add to fit later.

Once you're happy, sand the crap out of it to smooth any junctions or goofy spots.

I chose to pin my wings because they end up being pretty hefty. First pinning job and I'm only vaguely aware of the concept mechanically, but basically I took a finish nail, ground it to the size I needed, drilled holes in the model and wing, and called it good. To attach the wing I added a thing roll of epoxy and molded it into one piece. I forgot to take a pic of it naked, but you can see the black priming (I had painted the wings to get a feel for how they would turn out if you're wondering.). You will need something to smooth out the junction of the model to the epoxy since it's going to be a bear to sand in those tight quarters - I actually used a hobby knife to smooth things out pretty effectively. Used the flat of the blade and it was thin enough to squeeze in pretty effectively.


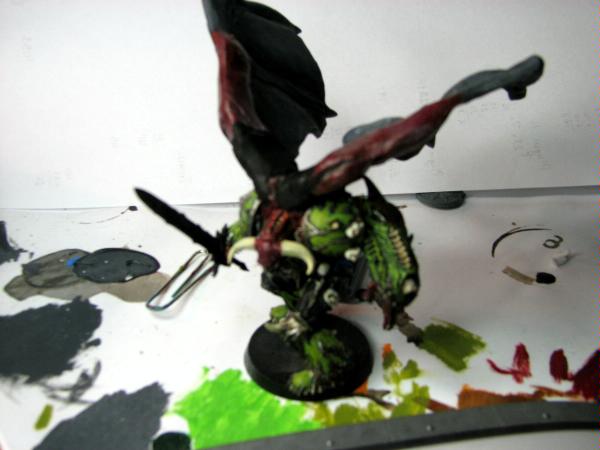
Sand again, then throw some paint on!


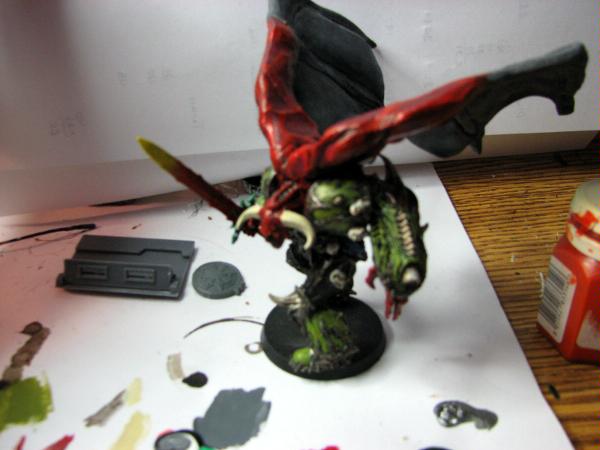
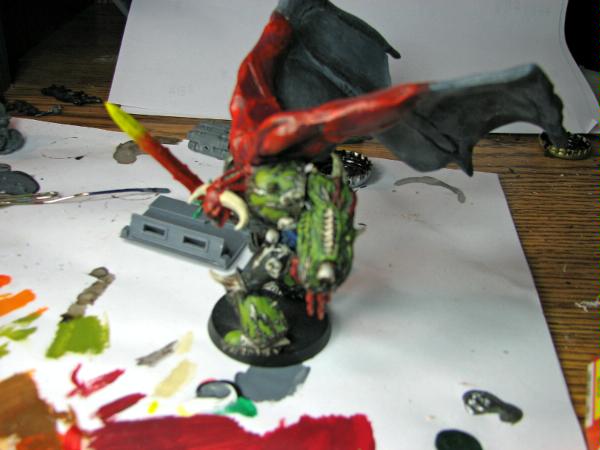
Sorry that the images are a bit out of focus. Photography is another thing I'm an amateur at.


This message was edited 2 times. Last update was at 2010/01/16 19:28:58


I'm not like them, but I can pretend.

Observations on complex unit wound allocation: If you're feeling screwed, your opponent is probably doing it right. 
   
Made in us
Furious Raptor


Earth

Is it just or, can no one else see his pics?

1500 vs 1500 -40k
2500 vs 2500 -fantasy


Made in us
Blood-Raging Khorne Berserker


Sorry, used the wrong "system" to link them. Got it right now.

I'm not like them, but I can pretend.

Observations on complex unit wound allocation: If you're feeling screwed, your opponent is probably doing it right. 
   
Made in us
Furious Raptor


Earth

Nice tut, way to make wings, no offence but the end product could have been a little cleaner but nice job and nice "recycling" with the sprues

1500 vs 1500 -40k
2500 vs 2500 -fantasy


Made in in
[MOD]
Otiose in a Niche


Hyderabad, India

The look a little thick and melty but as you said it's more than fine for a tabletop.


Made in us
Warplord Titan Princeps of Tzeentch


Pat that askala, O-H-I hate this stupid state

Thats actually pretty good for first time building out of scratch and sculpting maybe next time if you build with wire next time and you add a little extra towards the base for pinning all you will have to do next time is drill one hole into the model and not the wings. Another thing it will do is not come out as bulky like the sprues do when adding the epoxy.


Automatically Appended Next Post:
Another thing with the wire it will allow you to bend the frame work of the wings to whatever position you want.

This message was edited 1 time. Last update was at 2010/01/16 23:26:43


Then it comes to be that the soothing light at the end of your tunnel, its just a freight train coming your way!
Thousand Sons 10000
Grey knights 3000
Sisters of battle 3000
I have 29 sucessful trades where others recommend me.
Be sure to use the Reputable traders list when successfully completing a trade found here:
Dakka's Reputable Traders List 
   
Made in au
Snord


Australia : SA

Wow, the things people can do these days o_o


Kreig - 2850 pts
Skaven - 3450 pts
Orks - 1950 (pro painted)


Made in us
Savage Minotaur


Chicago

Looks cool mate.

Again, too many people think that they're minis need to be art worthy of saying Picasso painted them.

They really just need to not look not painted.
   
Made in us
Warplord Titan Princeps of Tzeentch


Pat that askala, O-H-I hate this stupid state

@Karon. All anyone on here has said is constructive criticism. Yes it is very tabletop worthy all we were telling him was next time when he makes them is just to streamline them a little because alot of people do want to get better at painting and modelling.

Then it comes to be that the soothing light at the end of your tunnel, its just a freight train coming your way!
Thousand Sons 10000
Grey knights 3000
Sisters of battle 3000
I have 29 sucessful trades where others recommend me.
Be sure to use the Reputable traders list when successfully completing a trade found here:
Dakka's Reputable Traders List 
   
Made in us
Blood-Raging Khorne Berserker


Thanks for the C&C - the tips and advice are greatly appreciated.

It's a prototype and I was aware it was on the crude side when I put it up, which is why I'm thankful for any and all comments, compliments, and advice. I feel relieved that folks DO think it's good enough for tabletop to be honest. I mean, I thought it looked acceptable or I wouldn't have posted it, but it's nice to be reaffirmed through somebody else's eyes.

I never thought of using wire as the base - it will probably help with the thickness a few folks have pointed out. Next time I have to make a pair I'll give it a shot to see if I like it better. The nice thing about the sprue was it was pretty forgiving for a newbie to work around - that rigid frame takes a lot of abuse and fumbling.

I'm not like them, but I can pretend.

Observations on complex unit wound allocation: If you're feeling screwed, your opponent is probably doing it right. 
   
Made in us
Brain-Dead Zombie of Nurgle


wisconsin

Thats cool i thank that I'll try that with my DP

4000points
1-5-2 
   
Made in gb
Fresh-Faced New User


Also if you want to vary the shapes of the wing 'frame' a little try lighting a candle and slowly move the sprue close enough that you can start to bend it. With patience you can get alot more 'natural' curve in your frame that way.

Though not too close to the flame mind of you'll end up with alot of nice thin plastic (Ariels anyone?)
   
Made in us
Regular Dakkanaut


Holy gak thats an old old 10+ year fiery orange paint or ruby red!

   
Made in us
Blood-Raging Khorne Berserker


rlsquared2 wrote:Holy gak thats an old old 10+ year fiery orange paint or ruby red!


Haha, yeah, definitely a mid-late 90's vintage. Don't remember if I bought it in middle or high school.

What can I say? I make 'em last

I'm not like them, but I can pretend.

Observations on complex unit wound allocation: If you're feeling screwed, your opponent is probably doing it right. 
   
Made in us
Happy Imperial Citizen


United States

Looks pretty neat, might have to try this when I get a daemon prince.

Chaos Undivided: 2000 points


Made in au
Spawn of Chaos


Melbourne, Australia

Thats really clever, I would have never thought to do it like that.

Iron Within! Iron Without!  
   
 
Forum Index » Painting & Modeling Tutorials
Go to: