
+++++++++++++++++++++++++++++++
Friday Quick Tip: Grime Streaks
By: grey_death

With one of my
latest projects, I've come to realize that I haven't gone over this very simple, yet very effective little bit of weathering, grime streaks. I have been making good use of them for a long time now, hearkening back to the
pre-GW wash days. Luckily, with the advent of the wash in a pot, the process is much simpler, and in my view, better looking.

For the sake of this step by step tutorial, I've used the tank from the
masked white wash tip. You'll also need a sharp tipped brush with a nice sized belly to allow for continuous painting. I used a standard round brush in this instance. You'll also need a pot of Gryphonne Sepia. You might find a different color more acceptable for your scheme though, so don't be afraid to think outside of what's presented in this tut. Any color would be acceptable so long as you feel it fits to the desired effect.

When starting, look for spots that would have rust marks or water streaks. I stick mostly to rivets, armor joins and battle damage for much of my grime. But feel free to explore a variety of locations. Keep in mind any place that water could accumulate or run over. These spots will make the model come alive with use, wear and tear.
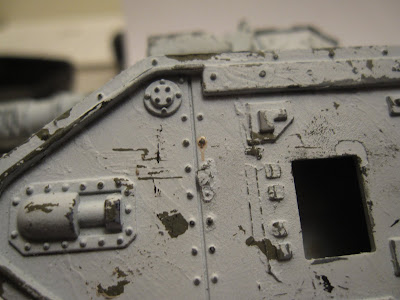
Here you can see a single rivet with one quick layer of grime streaking down. I go lightly for any first layer. You always want to be sure that your brush isn't overburdened with wash, so be sure to test your brush on a paper towel or palette to keep from blobbing the wash on the model.
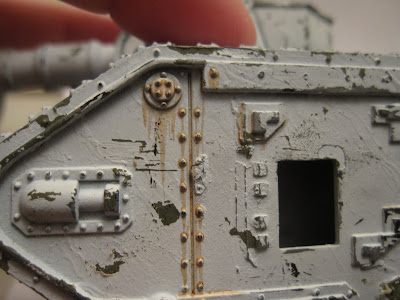
Your first layer is key so take your time, and place your brush strokes where you want them. Just don't be too afraid of messing up! This is weathering! It's supposed to get a little bit messy! You can see that the lines all go (roughly) vertical, starting from a rivet or join of some sort. If you happen to paint some battle damage onto the model as well, be sure to use those spots as starting points as well.
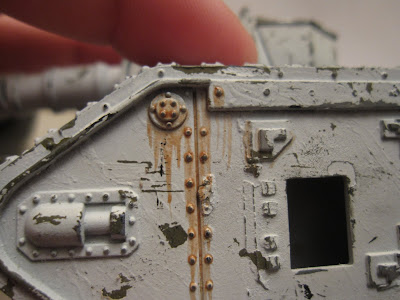
In this final photo you can see what another coat of wash will give you in terms of effect. Keep in mind that any successive layers of wash will be FAR heavier than the first application. It's up to your eye to decided whether or not another layer is necessary or not. I also highly recommend giving this technique a go on a test piece, maybe just a scrap armor plate from your bits box. It will save you much more time using that piece instead of messing up on a near finished model and having to correct your mistakes!
There are a lot of different ways you can go about this effect. This just happens to be one of the easier ways I've found so far with very little time and effort being invested for a very satisfying result! If you've got another method, we'd love to hear about it! Leave a comment or shoot us an email at ThePaintingCorps@gmail.com!


 1500 vs
  1500 -40k
 2500 vs
  2500 -fantasy
