Forum adverts like this one are shown to any user who is not logged in. Join us by filling out a tiny 3 field form and you will get your own, free, dakka user account which gives a good range of benefits to you:
No adverts like this in the forums anymore.
Times and dates in your local timezone.
Full tracking of what you have read so you can skip to your first unread post, easily see what has changed since you last logged in, and easily see what is new at a glance.
Email notifications for threads you want to watch closely.
Being a part of the oldest wargaming community on the net.
If you are already a member then feel free to login now.
2017/07/31 20:32:42
Subject: Painting Space Marines with limited painting skills
After my girlfriend gave birth to our daughter 6 weeks ago i reconnected with 40k online, after a 20yr break! I got really into
To thinking about lore and began writing a chapter history when my daughter slept on me. As I have poor hand and eye co-ordination I settled on the chapters main colour scheme being black and was wondering what paints, techniques and brushes you would recommend I use? I have a lot of patience but free hand will be terrible.
2017/07/31 21:13:14
Subject: Painting Space Marines with limited painting skills
Welcome back to the hobby! I'm posting a quick reply here and will be posting a more detailed/thorough post immediately after this one, once I've had a chance to do some research and post up some pictures for you. Stand by for further.
Take it easy.
-Red__Thirst-
You don't know me son, so I'll explain this to you once: If I ever kill you, you'll be awake, you'll be facing me, and you'll be armed.
2017/07/31 21:38:43
Subject: Painting Space Marines with limited painting skills
The technique I use (because I'm horribly lazy) is prime the models with car paint, base them using a medium brush (inch long, bushy brush) just to cover the whole model in the base coat for the armour (you could probably skip this step if you just want to prime black), then go over the trim, sigils, etc. with Gold, Silver, etc., wash the whole thing in Nuln oil and dry prush with white. You can make it better for characters, etc. with layering, highlights, etc. but the base technique is the same.
Takes maybe an hour per model, compared to say a week, and looks pretty nice for TT quality. (I could probably find a photo of the product of this technique if you'd like)
This message was edited 1 time. Last update was at 2017/07/31 21:41:28
Ghorros wrote: The moral of the story: Don't park your Imperial Knight in a field of Gretchin carrying power tools.
Marmatag wrote: All the while, my opponent is furious, throwing his codex on the floor, trying to slash his wrists with safety scissors.
2017/07/31 21:58:29
Subject: Re:Painting Space Marines with limited painting skills
Firstly, congrats on the new addition of your daughter to your life!
Now, as for the hobby, it's a great time to get back into the game with 8th edition only just releasing recently!
Black is a very good and easy paint scheme to paint. I suggest following this tutorial for highlighting black:
That's a good basic way to paint and highlight black power armor quickly and effectively. You can also opt to do dry brushing, and then going in to clean up any heavy areas of paint you might have accidentally gotten on the model when drybrushing. I use this method on my black models (death Company) and then once I clean up I also go in and use Nuln Oil to help define the edges a bit more. here's an example of a Death Company marine of mine painted black with grey drybrushing and then Nuln Oil shade paint (wash, really) on the black sections to help darken them back down and define the edges of the armor with the drybrushed grey highlight (Dawnstone is what I prefer for highlighting, personally).
Beyond that, as for colors, the tutorial video above has most everything you need, Dawnstone and/or Eshin Grey are both very useful, and Abaddon black is a must. Past that, some Leadbelcher and possibly some brighter silver like Ironbreaker to highlight it up. Nuln Oil shade paint is also HIGHLY recommended.
Brushes are something I recommend you do some research on. I go to my local Michaels or Hobby Lobby (large hobby/craft stores) to purchase brushes as I need them. The Games Workshop/Citadel brushes are also quite good and I recommend the Drybrush specific brushes for doing drybrush work. They're quite good quality, though are somewhat pricey. Still, they're worth it for the quality. I've had nothing but good results from the few GW brushes I've purchased so far.
Beyond that, get some fine detail brushes, (fine point, small size) and one large 'tank' brush (a larger, flat brush) for painting any vehicles or larger models with lots of surface area/flat surfaces.
The great thing about free hand is you don't have to do it. Decals are your friend! Just get some MicroSol and MicroSet (available online) to help your decals lay flat. The instructions for how to use these things are on the bottles and they're super easy to apply, and one bottle of each will last you ages.
My suggested method for decals is get a small bottle of gloss clearcoat, apply a thin layer of it to where you're going to be placing a waterslide decal, then apply the mircosol to the area once the gloss clearcoat is dried. Apply the waterslide decal to the area with the gloss and dab a tiny amount of MicroSol onto the decal to get it into the proper/correct position, let it dry for a bit, then apply some MicroSet. Once everything is completely dry, go over the entire decal and area around it with a dullcoat/matte clear coat to help 'blend' the edges of the decal and surface it's applied to together. Once that dries, you'll have what looks like a painted on decal on your model. It's a little time consuming, but the end results are amazing to behold.
I hope this information is helpful, and welcome back to the hobby sir. If you need any other advice, or help, please feel free to send me a PM and I'll do what I can to offer any assistance I'm able to. I don't know everything and I'm FAR from the best painter on Dakka, but what I lack in talent I hope I make up for in helpfulness and enthusiasm.
Take it easy for now.
-Red__Thirst-
You don't know me son, so I'll explain this to you once: If I ever kill you, you'll be awake, you'll be facing me, and you'll be armed.
2017/08/01 06:04:29
Subject: Painting Space Marines with limited painting skills
Thanks for think very very helpful. In th. keep redthiret posted think the highlighting looks quite hard (taking into
Account by above mentioned spaitial awareness) and wondered if i could get a similar effect with drybrushing? This guys video maybe looks easier:
https://m.youtube.com/watch?v=PjjO78ayDq8
What do people think?
2017/08/01 06:20:03
Subject: Painting Space Marines with limited painting skills
Well, you could allways use some sharpie markers.
they are expencive but you can get them in more or less all colours. covers the parts in 1 layer.
Hell, if you buy the snap fit marines that comes prepainted blue, all you need is some sharpies(gold,black,silver,brown and red), a pot of black shade and a brush to apply the shade.
This message was edited 1 time. Last update was at 2017/08/01 06:22:34
darkswordminiatures.com
gamersgrass.com
Collects: Wild West Exodus, SW Armada/Legion. Adeptus Titanicus, Dust1947.
2017/08/01 06:21:31
Subject: Painting Space Marines with limited painting skills
A quick easy paint - get 2 cans of spray - black and blue or grey; basecoat black, direction spray (eg top down) grey or blue, pick out guns and bits with colour choice (metal/red), wash nuln oil, light drybrush with light grey or white. Other dteails you can go back and pick out if you want later. Not golden demon quality but a good tabletop paint job for play.
2017/08/01 06:32:02
Subject: Painting Space Marines with limited painting skills
S.e.r.a.p.h.i.m wrote: A quick easy paint - get 2 cans of spray - black and blue or grey; basecoat black, direction spray (eg top down) grey or blue, pick out guns and bits with colour choice (metal/red), wash nuln oil, light drybrush with light grey or white. Other dteails you can go back and pick out if you want later. Not golden demon quality but a good tabletop paint job for play.
Thanks for this Seraphim - why would I do the second coat in grey or blue if I want the marines to be black?
Thanks to everyone for helping me out. I do want to paint them so will avoid sharpies and pre-painted miniatures. As I said I have lots of patience just not much in co-ordination!
2017/08/01 07:07:47
Subject: Re:Painting Space Marines with limited painting skills
The dark grey or blue gives the nuln oil some depth; I just went and did a quick paint to show you as I didn't have any on hand (remember this is a very quick effort (I dried the wash with the hairdryer to show you lol).
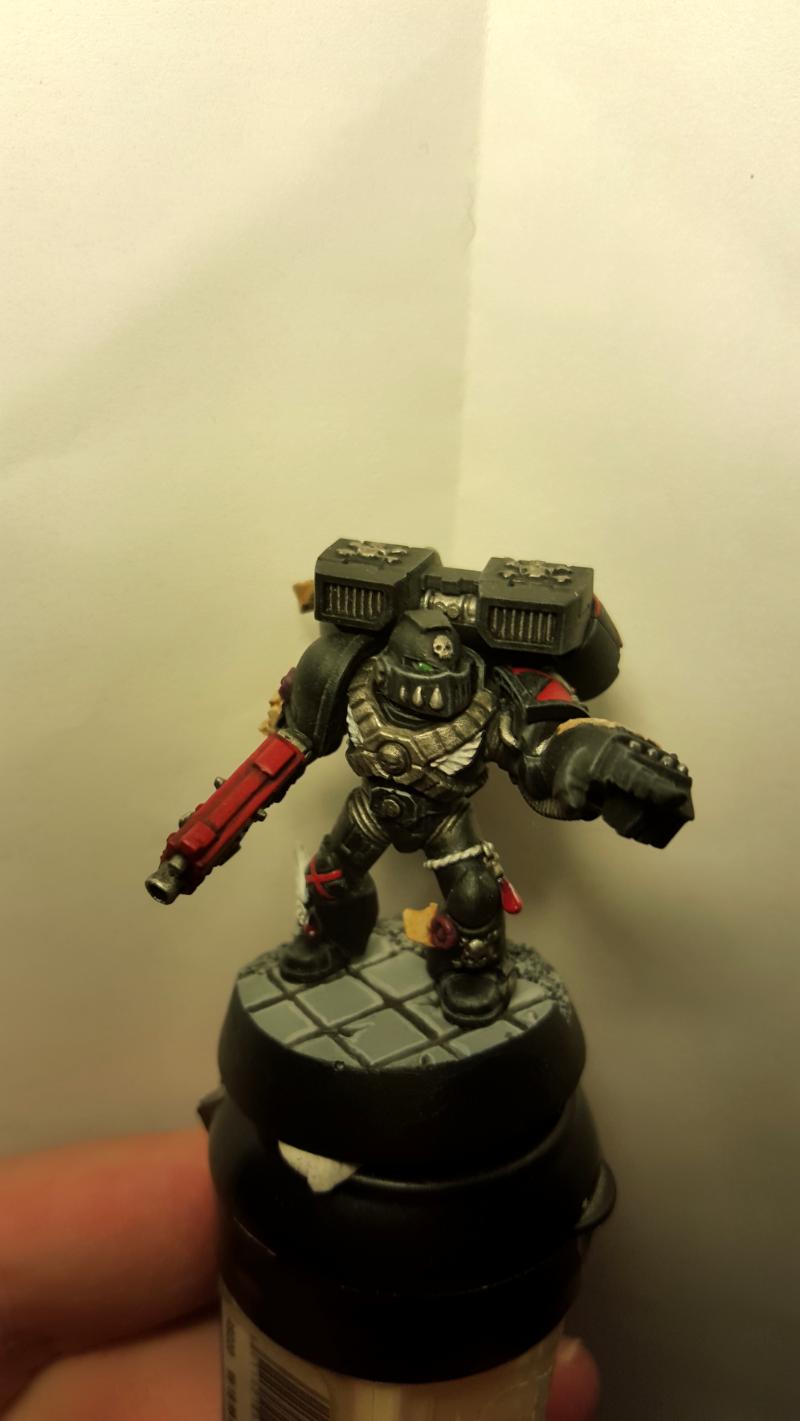
Thanks so much Seraphim. Those techniques look perfect to me. For the sprays would you recommend just using Mechanicus Standard Grey and Chaos Black?
A nice looking miniature as well. What it is?
2017/08/01 08:49:58
Subject: Painting Space Marines with limited painting skills
Congratulations on making your own, miniature human!
Note you can do the top down grey coat with drybrushing if you don't want to spray. Just gotta keep that brush close to a vertical incline, to emulate the angles you would be spraying from. If you do this the black wash to soften the transition of the grey becomes even more important.
This message was edited 1 time. Last update was at 2017/08/01 08:50:40
2017/08/01 09:02:53
Subject: Painting Space Marines with limited painting skills
This is a similar model, however instead of drybrushing I painted the highlights using blue. The model also shows how to bring out basic detail on the model to finish it. Just some ideas for you.
2017/08/01 09:19:12
Subject: Painting Space Marines with limited painting skills
nareik wrote: Congratulations on making your own, miniature human!
Note you can do the top down grey coat with drybrushing if you don't want to spray. Just gotta keep that brush close to a vertical incline, to emulate the angles you would be spraying from. If you do this the black wash to soften the transition of the grey becomes even more important.
I am so impressed with how friendly this forum is! If I wanted the marines finish be slightly darker than Seraphims do people think I should spray down with the grey or use a drybrush? Does anybody know if there is a tutorial online for directional spraying?
And thanks for the congratulations all on the miniature human she is wonderful.
2017/08/01 09:24:50
Subject: Painting Space Marines with limited painting skills
A couple of options; just try a drybrush over the black (try Fang and see what you reckon); or you can double wash the Nuln Oil to get it darker. Experiment on one model to get the look you like
2017/08/01 09:40:23
Subject: Re:Painting Space Marines with limited painting skills
Going to read over this thread now on my lunch. I've ordered the MKIII tactical marines - I am considering get a few forge world bits and pieces of eBay to customise them. As I really want to make the building of each model special...
2017/08/01 12:20:36
Subject: Painting Space Marines with limited painting skills
Black is oddly difficult to paint well/easily. Other colours would be much easier (mainly because you can spray/dip them and be done with 85% of your mini w/ little to no work). Black however, that'll take some work. Find a few tricks from above and take a crack at them.
2017/08/01 12:47:11
Subject: Painting Space Marines with limited painting skills
Have you thought of a metallic themed force? Doom Eagles perhaps? you can prime silver from the can and use washes to get your shades, bright metal to add scratches and highlights and then it's just some reds on the trim and chest eagle! easy and different!
Flesh Eaters 4,500 points
" I will constantly have those in my head telling me how lazy and ugly and whorish I am. You sir, are a true friend " - KingCracker
"Nah, I'm just way too lazy to stand up so I keep sitting and paint" - Sigur
"I think the NMM technique with metals is just MNMM. Same sound I make while eating a good pizza" - Whalemusic360
2017/08/01 13:22:36
Subject: Painting Space Marines with limited painting skills
nerdfest09 wrote: Have you thought of a metallic themed force? Doom Eagles perhaps? you can prime silver from the can and use washes to get your shades, bright metal to add scratches and highlights and then it's just some reds on the trim and chest eagle! easy and different!
A very much want to create my own chapter - but the idea of priming silver and then using washes to darken- is an interesting one. IS the consensus this would be a lot easier than painting them black, in the ways the first people to reply suggested?
I will! I think your technique looks pretty close to what I want to do I think I will need to buy a red for the eyes as well. Of topic question can I equip the MKIII tactical marines with close combat weapons so I can use them as an assault squad? Would this be a straight forward kit bash? IS there anything else I would need to do?
This message was edited 1 time. Last update was at 2017/08/01 13:33:16
2017/08/01 13:54:02
Subject: Painting Space Marines with limited painting skills
Yes. absolutely easier for a much more detailed look with next to no technical skill required! :-) https://www.dakkadakka.com/dakkaforum/posts/list/7860/356350.page if you scroll down, you can see my finished Minotaurs space marines and on the next page I think the Dreadnought is lurking! these were done with just washes over silver primer and a bright silver paint. then just the details!
Flesh Eaters 4,500 points
" I will constantly have those in my head telling me how lazy and ugly and whorish I am. You sir, are a true friend " - KingCracker
"Nah, I'm just way too lazy to stand up so I keep sitting and paint" - Sigur
"I think the NMM technique with metals is just MNMM. Same sound I make while eating a good pizza" - Whalemusic360
2017/08/01 14:06:05
Subject: Re:Painting Space Marines with limited painting skills
Re your basing question.. easiest way to base for beginners; Agrellan badland, (there are other colour texture paints if you prefer) followed by Agrax earthshade wash, drybrush and then add a tuft or two..
Automatically Appended Next Post: Directional spray is called object source lighting OSL. Search utube there is heaps. For this basically stand over top of models about 30cm away and spray
This message was edited 1 time. Last update was at 2017/08/02 00:05:38
2017/08/02 00:08:00
Subject: Painting Space Marines with limited painting skills
nerdfest09 wrote: Have you thought of a metallic themed force? Doom Eagles perhaps? you can prime silver from the can and use washes to get your shades, bright metal to add scratches and highlights and then it's just some reds on the trim and chest eagle! easy and different!
A very much want to create my own chapter - but the idea of priming silver and then using washes to darken- is an interesting one. IS the consensus this would be a lot easier than painting them black, in the ways the first people to reply suggested?
I will! I think your technique looks pretty close to what I want to do I think I will need to buy a red for the eyes as well. Of topic question can I equip the MKIII tactical marines with close combat weapons so I can use them as an assault squad? Would this be a straight forward kit bash? IS there anything else I would need to do?
Could also prime the silver and use glazes over that to make an irredecent armor type.
2017/08/02 00:11:43
Subject: Painting Space Marines with limited painting skills
S.e.r.a.p.h.i.m wrote: A couple of options; just try a drybrush over the black (try Fang and see what you reckon); or you can double wash the Nuln Oil to get it darker. Experiment on one model to get the look you like
I'll second this recommendation. For those with limited hand-eye co-ordination, this is the easy road to decent black armor.
Alternatively, you can basecoat in grey and then thin down some black paint with water (about 50/50) and wash over the grey. I did this on my Tau for cloth and mechanicals, followed by a very light drybrush of the same grey as the basecoat to pick out the edges.
I usually paint black by beginning with a grey basecoat and applying a fairly heavy black ink wash.
This will give you a natural black look.
'True' black miniatures often look wrong because nothing really is 'true' black.
Painting models by the coat and wash methods mentioned above is one of the easiest, and best looking methods avaliable to you.
The MK3 kit doesn't contain close combat weapons and bolt pistols, but with some small work, they can be added with forge world's expansion parts.
DaemonJellybaby wrote: I usually paint black by beginning with a grey basecoat and applying a fairly heavy black ink wash.
The MK3 kit doesn't contain close combat weapons and bolt pistols, but with some small work, they can be added with forge world's expansion parts.
The sprues seam to come with a few i assuming to the sergeant I was going to do a Three or four with those then get some more bits of eBay... anyway got my Marines... got paints and tools coming in the post today... have a week of work to look after my daughter... very excited..
2017/08/07 07:19:14
Subject: Painting Space Marines with limited painting skills
Also, have a look at Luke APS on youtube. He shows off a few simple but effective ways to paint a miniature in a short space of time, with minimal techniques.
You have the advantage you've chosen a black colour scheme so you can prime the models in black and then just do details with dry brushing / a few simple colours.
You could also prime white or grey and then do washes of Nuln Oil to darken those bases down to the desired blackness. This method will potentially make your dry brushing more effective rather than the stark contrast of dry brush vs black base.
The one area I really recommend you focus all your attention and 'steady hand' would be the eyes of the marines. You'd be amazed at how effective an even half decent pair of eyes are on a model. They give a directional look and more complete feel to a model that people will notice (basic psychology as people tend to look for a face on everything as it's what we're programmed to do from birth.)
2017/08/08 05:59:18
Subject: Re:Painting Space Marines with limited painting skills
Just saw this thread. If you have not started painting your minis black yet. I wanted to share a pic. This from Paul Norton who works at GW. The model looks amazing but what is clever is that the silver is not highlighted at all. It is just primed silver with a wash with a mix of Matt and gloss nuln oil (GW black wash.)
Another helpful thing is sub assemblies. If you can leave the helmet, guns and shoulder pads off, you can spray them a different colour. Give them a wash well thinned with water so it sinks into the crevices and does not darken the main colour too much. Then just pick out the details like the eyes and the trim in another colour and you are finished. A very nice looking model with no highlighting necessary.
This message was edited 1 time. Last update was at 2017/08/08 05:59:48


 Flesh Eaters 4,500 points