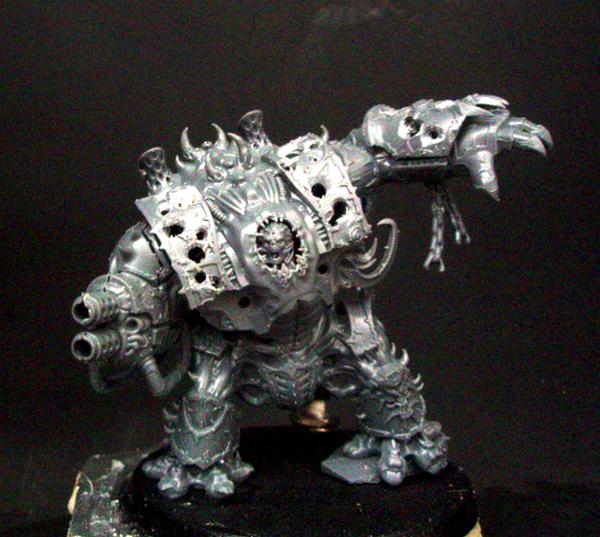
Okay, several of you asked me how I did this. Sadly I do not have another hellbrute model from the Dark Vengeance set, so I am going to do my best with stock photo etc. Please note, I have some training as an electrician so am familiar with soldering etc, but am in no way an expert. Anyone who can create a better circuit, go for it! I warn you this was NOT an easy conversion. If you have never worked with these before it can be done following these steps, but isn't easy.
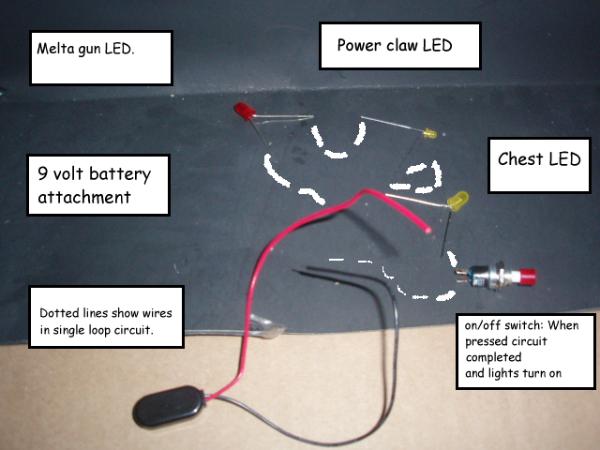
I bought all of the needed material at Radio Shack here in the USA. I suspect there are many places selling the same things. Anyway, this requires: (See the image below as well)
A single 9 volt battery lead (I have found my 9 volt gives the brightest bulbs, and in this case did not need a resistor for the string. I tried a 3 volt watch battery, and it barely lit the three. If you are good with electronics etc, you might experiment, as the 9 volt requires a bigger base to hide)
One Small red LED bulb (I bought an assorted pack of LED's: It came with these sizes; 3mm, 20mA, 2.4 V AND 5mm, 20mA, 2.4 V
One small green LED bulb 3mm
One Larger Green LED bulb 5mm
One standard on/off interrupter switch. (when pressed down, this switch completes the circuit and lights them up)
You can buy pre built LED strings from railroaders etc. I did not because I needed to fit my LED's INSIDE the brute, so they had to be unconnected when I did so. You could also use a premade one using the above items, and find a different way to get the wires where they need to be.
Here is a picture showing the parts, and how I simply looped them. DO NOT loop them yet. The LED's must be placed and threaded through the holes before being soldered. Yes, this was very tricky...
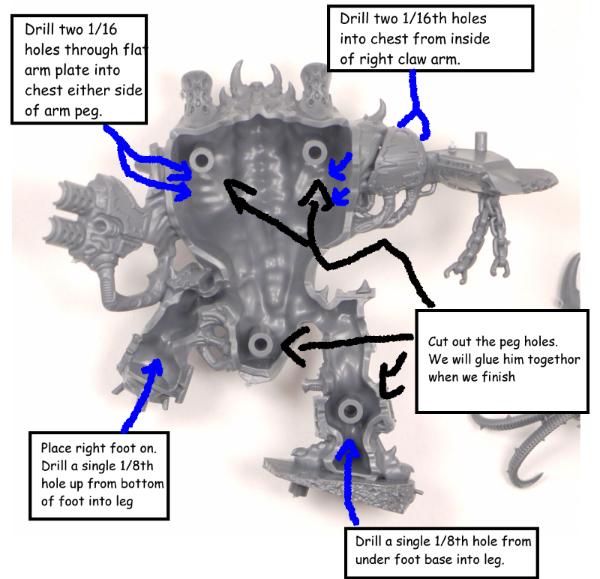
OK: my steps. Below is a picture showing the hellbrute back and where I drilled etc. BEFORE YOU DO ANYTHING, it has been suggested the Hellbrute be spray primered now! Once you make holes and place LEDS in it will be very hard to do without ruining it.
Step 1: I took the backplate of the Hellbrute and used my knife to remove the circular holes for the front plate spikes. Now the hellbrute is no longer snap fit, and I have more room (I also removed the spikes.)
Step 2. Glue the right foot on. I drilled several holes using my power drill (I do not recommend a hand drill as portions of the plastic are very thick and hard) The image below shows where I did this. Please look closely at the arm spots, and make your holes in the flat portions that are INSIDE where the arm goes on, and therefore invisible. Do the same with your feet, and to make it easier, Peg his feet to the base and drill all way through. Note, I did not do it this way, as I wanted to mark where the wires came out of the foot in relation to the peg before I drilled. In either case, you want the feet to cover these holes as well AND these holes must be drilled before you solder or connect anything togethor.
Step 3: I Dry fit the LED's into the arms (the small red and green), by pushing each of the wire leads through the holes drilled (they must be seperated, one in each hole) and then, using my hobby knife to cut away portions of the inside of both back and front pieces so the light would fit. This is tricky and no real advice beyond my Melta LED fit at the turn of the elbow so the bulb was just past the crook (Do not try to fit it INTO the melt gun, you might but then you need 2...one at this angle lights both. The claw arm light also went just past the crook, where I found I could cut a sizable portion of the flat bit away. The claw arm required a bit of shaving on both parts to make sure the glow could reach the hand. The chest light needs no shaping, it fits loose. It is important you keep working at this until the two halves of each arm fit together snug without pressure on the LEDs.
Step 4: Once the LED's fit and the arms can be put together, it is time to connect your circuit (Do NOT glue arms yet, you will want to work on them later). DO NOT plug the battery in please. BE warned, this step is fidgety and a pain. This takes a bit of work, because the circuit runs one direction, and so do the LED's. Okay, the problem is, with only one LED, the 9 volt will most likely burn it out. So, on the side, dry connect your circuit by using a stripped wire to connect the three LED's. once done, connect your battery and touch the two ends of your circuit to it. If it lights you are good, MARK the leads with a sharpy pen, each side that goes to Black lead, YOU MUST RECONNECT THEM IN SAME ORDER ONCE IN THE HELLBRUTE!!! If it does not light, take turns spinning each LED and switching the direction of the leads until it does. Once you have them working, follow suit with the switch so you know it works correctly.
(There is a way to simplify this. Buy a resitor at Radio Shack, connect it to a lead, and now you can test each LED on its own, it shouldn't burn out.)
With the LED's marked you can now put them inside connect your circuit in this way: The red battery lead runs up through the base, through the left leg, and into chest where it connects to the LARGE yellow LED. The Large yellow LED connects to one branch of the small Yellow LED in the arm, which connects across chest to the small red. Then run a wire down from the other leg of the red LED into the right leg, out the foot and through the base. MAKE sure all of these connections can be untwisted. Now, connect the wire from the red LED that is out the base to one side of the switch. Then connect the OTHER battery lead to the switch. Connect your battery, this is fine, with the switch in the circuit, it will be dead. Press the switch an hope it works. IF it does not, you have wired something backward or have a dead LED.
If it works. You are set and may solder the connection where they are (I did which was hard) or simply twist them mega tight, and then glue over them to make them stay (solder is always better)only left with how you want to make him glow. I drilled a hole for the switch (it has a twist off nut and screw) and attached it to the base. The battery goes underneath in a pocket I made by gluing base to foam, shaping it and making pocket (now you see why the wires need to go out bottom of base).
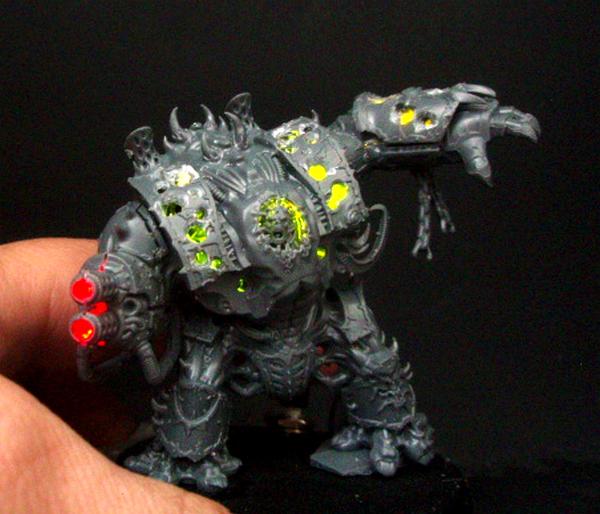
I shaved around the face, leaving only the peg sticking out to create the halo glow. I drilled various sized holes in arms and shoulders, then used my knife to scrape them out and create my holes. You should be done and have an angry Hellbrute who glows...glue him together and whoop some....well you know. I also had to use
GS to fill in the cracks (where the seperate pieces glued together) around the lights, so the glow was only where I wishes.
I did warn you this is a pain... and I apologise for the limited pictures. I just can't buy another one right now, I blew my budget on the rest of my Deathguard...
Anyone who has far better camera/electrical skills....please make a better tutorial!!
Edited a few times for clarification