| Author |
Message |
 |
|
|
|
|
Advert
|
Forum adverts like this one are shown to any user who is not logged in. Join us by filling out a tiny 3 field form and you will get your own, free, dakka user account which gives a good range of benefits to you:
- No adverts like this in the forums anymore.
- Times and dates in your local timezone.
- Full tracking of what you have read so you can skip to your first unread post, easily see what has changed since you last logged in, and easily see what is new at a glance.
- Email notifications for threads you want to watch closely.
- Being a part of the oldest wargaming community on the net.
If you are already a member then feel free to login now. |
|
 |
2018/03/05 18:44:01
Subject: Annirak paints Salamanders (Now with LEDs)
|
|

Regular Dakkanaut
|
This will be my first WH40k painting project in about 15 years... I haven’t played a single game since 2nd edition and bought my last model during 3rd edition.
I’ve decided to switch away from the ultra marines that I used to paint and to move to Salamanders. For my first project, I’m doing a tactical squad. I never liked flocking bases and I always used to leave them to last, which meant it was always an afterthought. To fight that problem, I’m using resin industrial bases. My first set will be from dark art miniatures ( https://www.darkartminiatures.com/32mm_Sci-fi_Deck_bases_10/p1768314_14301023.aspx) I’ve just ordered them today.
I also didn’t like using water-slide transfers on curves shoulder pads. To deal with that, I have ordered some forgeworld Salamanders shoulder pads. I think this combination will make these models much more fun to paint.
I’m planning to magnetise the sergeant and special weapons marine. I’m considering also magnetising the heavy weapons marine. My concern about the sergeant and the heavy weapons marine is that I only have enough FW shoulder pads to do 10 arms, so to use both powerfist and regular arm, I’ll need to work out how to magnetise the shoulder pad itself as well as the arm. Any ideas?
I’ve ordered a multimelta to go with the squad since it seems more in keeping with the Salamanders doctrine than the missile launcher.
I’ll post the initial pic of the sprue a little later. I haven’t received the FW shoulders, the multimelta or the resin bases yet, so more to come soon!
|
|
This message was edited 3 times. Last update was at 2019/02/20 12:59:52
|
|
|
 |
|
2018/03/05 22:23:15
Subject: Re:Salamanders Tactical Squad
|
|
Regular Dakkanaut
|
Here are the unassembled sprues
|
|
|
|
|
2018/03/06 17:41:39
Subject: Salamanders Tactical Squad
|
|

Damsel of the Lady
|
Best of luck! it sounds like a fun project, and i always like seeing some salamanders around.
|
realism is a lie
|
|
|
|
|
2018/03/06 19:43:18
Subject: Re:Salamanders Tactical Squad
|
|
Regular Dakkanaut
|
Cleaning these mould lines off sure is slow going...
Automatically Appended Next Post:
I've finished removing mould lines from the last backpack!
| Filename |
image.jpg |
![[Disk]](/dakkaforum/templates/default/images/icon_disk.gif) Download
Download
|
| Description |
Parts I’ve cleaned up |
| File size |
2591 Kbytes
|
|
|
This message was edited 3 times. Last update was at 2018/03/06 21:15:17
|
|
|
|
|
2018/03/07 22:43:26
Subject: Salamanders Tactical Squad
|
|
Regular Dakkanaut
|
The multimelta arrived today. Sadly, I haven’t had enough time to do any more cleanup.
|
|
|
|
|
2018/03/07 22:44:56
Subject: Re:Salamanders Tactical Squad
|
|
Regular Dakkanaut
|
Here’s the multimelta...
|
|
|
|
|
2018/03/09 19:45:07
Subject: Re:Salamanders Tactical Squad
|
|
Regular Dakkanaut
|
The drop ship from forgeworld flew over today with some shoulder pads for my Salamanders!
|
|
|
|
|
2018/03/12 12:37:51
Subject: Re:Salamanders Tactical Squad
|
|
Regular Dakkanaut
|
The Dark Art Miniatures bases have arrived. Looks like they’ll need some cleanup too.
I’m making progress otherwise... I only have these mould lines left to remove. I don’t think I’m going to finish painting 5 miniatures this month h for the unofficial painting challenge.
|
|
|
|
|
2018/03/27 21:49:20
Subject: Re:Salamanders Tactical Squad
|
|
Regular Dakkanaut
|
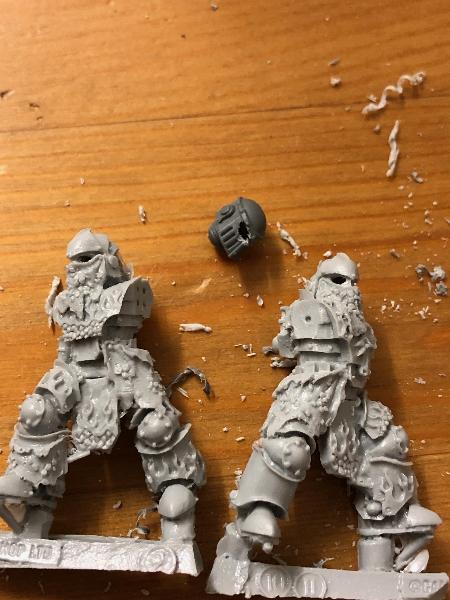
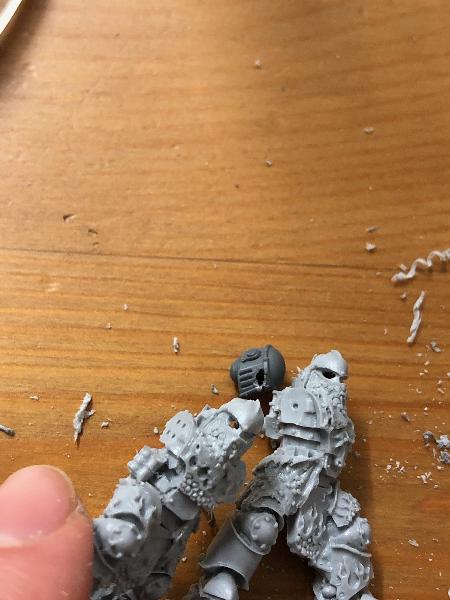
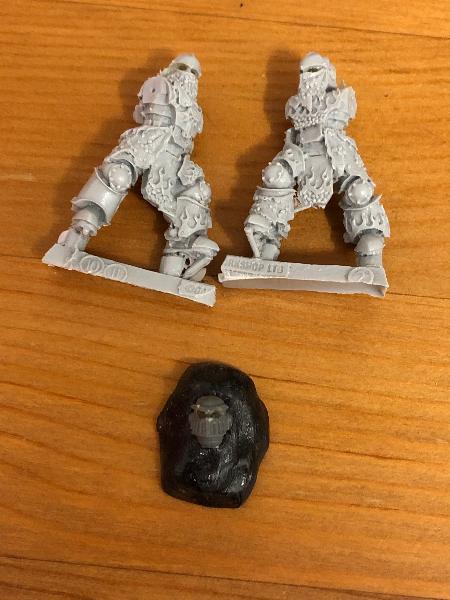
I have now cleaned the majority of my tac squad’s mould lines. I’ve decided to try using pyroclasts as the bodies for my sergeants, since they should lend some extra interest. I picked them because I wanted drakescale tabards for the sergeants and slightly different helmets. I’m going to just be using the bodies and the left arms, so they should be somewhat distinct from the pyroclasts I plan to use for sternguard later.
I’ve finished cleaning up my forgeworld shoulder pads and run into a bit of a problem: the sprue attaches right over top of a bit of detail (see image). On the left is the forgeworld shoulder pad with a missing slot. On the right is a normal plastic shoulder pad. Do I try to carve the resin away to make an equivalen slot? Or do I leave it as-is?
I’ve run into anothe problem with magnetising the combiweapons for my sergeants: they look too narrow to accept a 2mm magnet. If I don’t get the hole absolutely perfect, it’s going to destroy some detail. I may need to look into smaller magnets. The attached photo is just set down, not installed.
Otherwise, I’m making slow, but steady progress. I’ve started assembling marines now!
|
|
This message was edited 2 times. Last update was at 2018/03/27 22:35:23
|
|
|
|
|
2018/04/03 22:04:12
Subject: Re:Salamanders Tactical Squad
|
|
Regular Dakkanaut
|
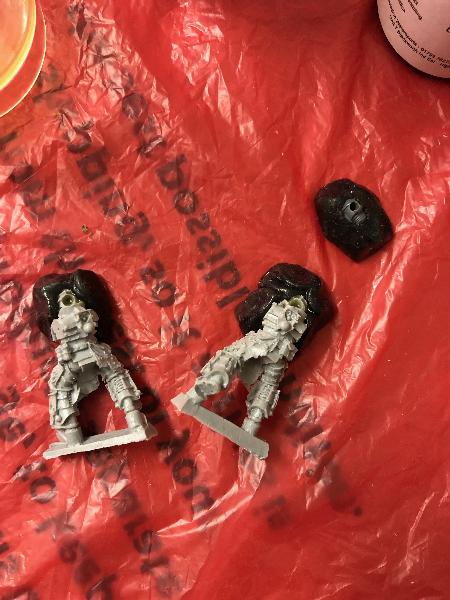
Today I did a lot of gluing. I had to order some more magnets. I tried a 2x1 mm cylinder magnet and I couldn’t get it into the arm of my special weapons marine. So, I’ve ordered some 1x2 mm magnets hopefully they will work better. If my combiweapon test works for the first sergeant, I’ll take more photos for the second.
In the meantime, here’s the progress so far:
|
|
|
|
|
2018/04/03 22:33:20
Subject: Salamanders Tactical Squad
|
|
Jinking Ravenwing Land Speeder Pilot
|
Great start! Looking forward to seeing your progress.
Moulding lines are the bane of the modeling hobby. Looks clean so far!
Nice addition of the Pyroclast for the sgt!
|
|
|
|
|
|
2018/04/04 12:43:23
Subject: Re:Salamanders Tactical Squad
|
|
Regular Dakkanaut
|
A blu-tac test-fit of Sergeant #1
|
|
|
|
|
2018/04/04 18:19:44
Subject: Salamanders Tactical Squad
|
|
Damsel of the Lady
|
Nice! i like the hammer, hope to see more soon
|
realism is a lie
|
|
|
|
|
2018/04/05 22:07:31
Subject: Re:Salamanders Tactical Squad
|
|
Regular Dakkanaut
|
Well, I seem to have run into a nasty hitch: the decorations on my FW shoulder pads seem to only hang down. This means that they do not fit well with the poses natural to a tactical squad. I think my best bet here is to get a different set of FW pads and save these for other models with less dynamic poses.
|
|
This message was edited 1 time. Last update was at 2018/04/05 22:12:12
|
|
|
|
|
2018/04/09 08:52:47
Subject: Salamanders Tactical Squad
|
|
Regular Dakkanaut
|
Unfortunately, with the shoulder-pad setback and some circumstances beyond my control, I won't be doing any more on my salamanders for the next 2 weeks.
|
|
|
|
|
2018/04/09 14:31:16
Subject: Salamanders Tactical Squad
|
|
Jinking Ravenwing Land Speeder Pilot
|
I agree, save the FW pads. You could also checkout shapes ways, there's a shop there called popgoesthemonkey I use a lot of his pads and items, they are fantastic. Not the same level of detail as FW, but might want to check it out
|
|
|
|
|
|
2018/04/24 19:39:22
Subject: Annirak paints Salamanders
|
|
Regular Dakkanaut
|
The moratorium is lifted! New FW shoulder pads are on their way along with several other bits and pieces that will really make these guys shine.
I've made a bit of a change to my plan with the sergeants. Instead of using pyroclasts, I'm going to use Mk III legs & arms, with FW Salamanders torsos. For heads, I'm going to use the heads from Firedrakes, which share the pyroclast aesthetic without the Drakescale hanging below the eyes.
This allows me to save the more ornate pyroclasts to use in three other places:
* Lieutenants
* Chapter Champion
* Veterans
Conveniently, this also means that I now am painting:
* 2*MSU tactical squads
* 2*Lieutenant (one with jump pack)
* 1*Chapter champion with relic blade and thunder hammer.
I'm going to need some more bases!
|
|
|
|
|
2019/01/29 20:41:03
Subject: Re:Annirak paints Salamanders
|
|
Regular Dakkanaut
|
It sure has been a long time since I've been able to work on my Salamanders!
However, I've made some major progress!
I have finished my first sergeant, my first heavy weapons marine, and all the bolter marines are ready for priming!
I'm really happy with how the sergeant's combiweapon magnets worked out. The heavy weapons marine's magnets are pretty good too, but I still have to work on his multi-melta cable.
Here's some shots of the sergeant
|
|
|
|
|
2019/02/19 19:27:18
Subject: Annirak paints Salamanders
|
|
Regular Dakkanaut
|
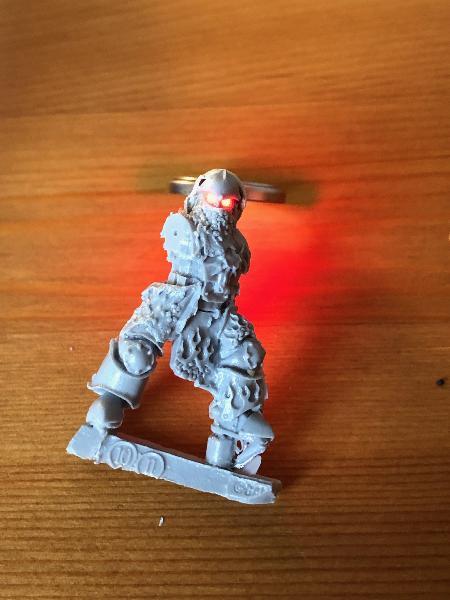
I was about to basecoat my squad when I suddenly realised: their eyes don’t glow red. I’m pretty sure that Salamanders are supposed to have eyes that glow red. Well, after some pretty extensive research on led lighted miniatures, I have a plan. I’m trying my first testmarine head tonight. Hopefully, I’ll have some test shots in a day or two.
|
|
|
|
|
2019/02/20 10:41:22
Subject: Re:Annirak paints Salamanders
|
|
Regular Dakkanaut
|
Here's the first test head. I made it from a FireDrakes head. I really didn't like masking the eyes with white-tac. It tore the paint around the eye-sockets, and it was a huge pain getting it all off. It looks like the basecoat wasn't thick enough. I think that's probably because I spray coated with Caliban Green in 5C with high humidity. Given the base coat thickness problem and the white tac problem, I'm going to have to try paint-on primer and base coating by brush.
I only had warm white LEDs in the appropriate size, so that's what I've used. Obviously, it needs to be red for Salamanders, so I'll need to use different LEDs going forward. The LED looks like it's a bit too bright. I'm going to have to turn it down, going forward. That should also help with the light shining through the paint.
Any suggestions on how to do this better without getting any paint on the eyes?
|
|
This message was edited 2 times. Last update was at 2019/02/20 10:43:39
|
|
|
|
|
2019/02/21 13:08:30
Subject: Re:Annirak paints Salamanders (Now with LEDs)
|
|

Fixture of Dakka
|
Lovely Sallies, Annirak. Nice use of the FW kits as well.
If you're OK with using non GW/FW bits, there are a few 3rd party manufacturers that make Salamander based bits. Scale cloaks/tabards, heads and bodies. Would help personalise your force more.
|
|
|
|
|
|
2019/02/23 09:38:41
Subject: Re:Annirak paints Salamanders (Now with LEDs)
|
|
Regular Dakkanaut
|
Well, I wanted to do better than the last test head and I wanted a solution for plastic and resin characters with fixed poses on their heads. A while back when I got Pyroclasts from a bits breaker, two of them came with significant casting defects and were replaced, so I've had the miscast Pyroclasts sitting around. They seemed like a perfect test for lighting up the eyes in-situ, without slicing up the whole model.
The plan was to replace the eyes in the Pyroclasts with clear resin. I would drill out the eyes and a hole in the back of the head to form a "Y" so that a chip LED can be inserted from the back, then tiny wires could be run either through holes drilled in the body or innocuously down the outside of the body. More on that in another post!
For my test pieces, I took two mis-cast Pyroclasts and one MkIII space marine helmet.
First, I had to make something that would hold the resin in the eyes in the correct shape. To do that, I used Oyumaru modelling plastic.
I put each blob of Oyumaru down on a table, then pressed the model face-first into it, being careful to wrap it around to the back of the model so that it would hold well.
Once dry, I popped the models out of the Oyumaru and started drilling the eyes out. I started with a 0.55mm drill bit, gradually working up to the maximum diameter I could fit in a space marine eye lens, For the Pyroclasts and Mkiii power armour, that's about 1.2mm. For Mkviii power armour (the current boxed tacticals), it's about 0.9mm. I drilled the back hole to about 2mm. It really needs to be more like 3mm.
At each step, I tried to make that "Y" form, with all three holes meeting up in the middle of the marine helmet.
Once done, I used my hobby knife to widen out the holes to encompass the whole eye lens. Then, I ran the drill from the back one more time to clear out any chips of resin/plastic. You can tell that I got a little overzealous with the drill on the Mkiii helmet.
The next step is to get the helmets back into their moulds, then pour some resin in.
I got the Mkiii just right. There's the tiniest bit of resin that's worked its way down to the front of the helmet.
On the two Pyroclasts, I got a little too much resin in there and it overflowed, which resulted in quite a bit of cleanup afterwards.
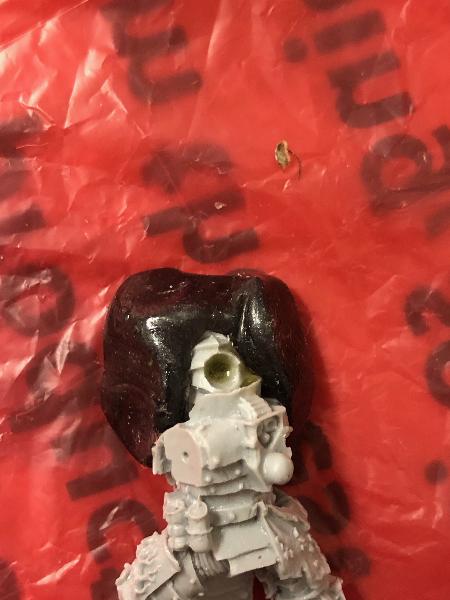
Finally, I had eye lenses made from resin.
Here's a shot with an LED:
|
|
This message was edited 1 time. Last update was at 2019/02/23 09:42:32
|
|
|
|
|
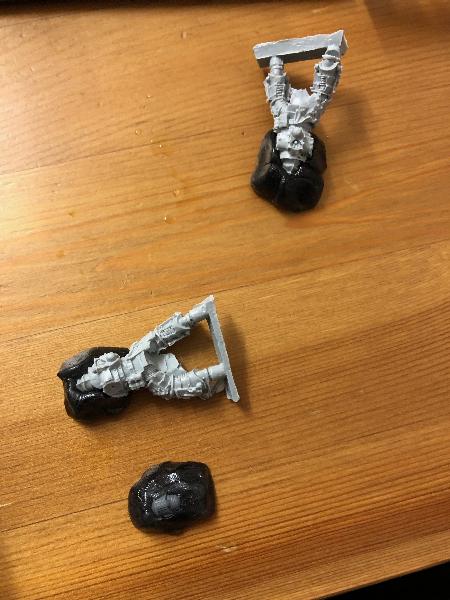
2019/02/23 19:19:31
Subject: Re:Annirak paints Salamanders (Now with LEDs)
|
|
Regular Dakkanaut
|
I have started modifying my first tactical marine. Unfortunately, I had mostly assembled all my marines before I started thinking about LED eyes. This makes wiring far more difficult.
I started by casting the eye lenses exactly as I did with the Pyroclasts, but unfortunately there was some slip in the face mould, which meant I spent ages chipping resin off my marine’s face. Once that was done, I drilled a 0.5mm hole down from inside the resin hole all the way through the torso, exiting right next to the leg. Then, from there through the leg to just above the knee, then from there to the heel.
It took some doing, but I managed to thread two strands of 0.1mm magnet wire through those holes.
The next step is to get a chip LED soldered onto the wire.
|
|
|
|
|
2019/02/24 19:04:54
Subject: Re:Annirak paints Salamanders (Now with LEDs)
|
|
Regular Dakkanaut
|
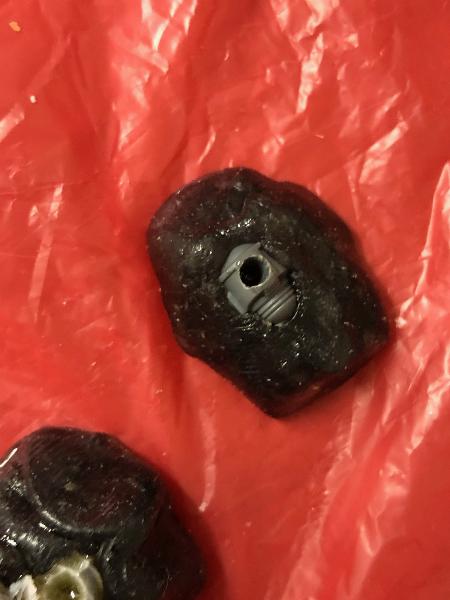
Well, it took a couple of tries; but I worked out a method for soldering the 0805 chip led to the 0.1mm magnet wire. I’ll write that up in a tutorial if there’s any demand for it.
After getting the led working, I placed it into the rear hole of the marine’s head. Then, I sculpted the head back together with greenstuff. I also covered the other holes I had to drill to run the wires.
Automatically Appended Next Post:
A base coat applied and here’s the same marine, pretending to be a Dark Angel.
|
|
This message was edited 2 times. Last update was at 2019/02/24 19:28:14
|
|
|
|
|
|
|