Hi everybody,
here I wanted to share an easy tutorial to make some nice looking engraved shields, if you are not a master of freehanded painting and don't have good decals at hand. In my case specifically I wanted some shields for my Tallarn style rough riders, so something with arabic looking letters and decor. So what I did was basically this:
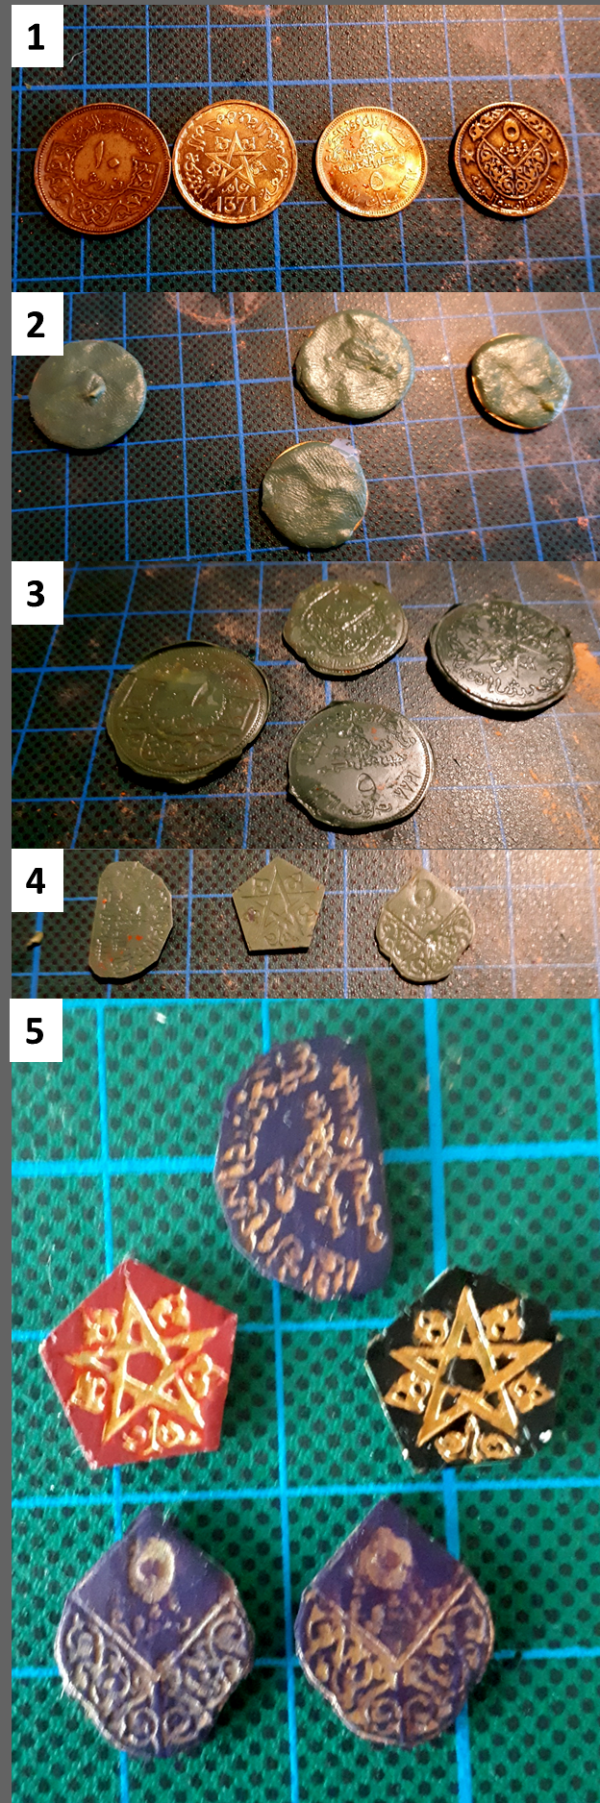
1: get some coins with nice looking engravings. A good adress are a bit bigger flea markets, The four coins here were 1 € each but I'm pretty sure you can get them much cheaper if you look around and haggle a bit. Especially since they have very little real value. The first seems to be an egyptian 10 milliemes coin, the second is a moroccan 10 franc coin, the third and forth are egyptian 5 milliemes coins. When looking for interesting motives keep in mind that guardsmen for example are really small. A fitting shield might only have the diameter of a 1 cent coin, so the motives you want to copy should not be too big.
2: form a smooth ball of green stuff, put in in the middle of the coin and flatten it out. since it is not easy to burnish it thinner afterwards keep the layer as thin as you later want your shields. If you have problems getting the dried green stuff off the coin, try applying a tiny drop of olive oil on the coin before the green stuff.
3. After a day or so, you should be able to easily remove the green stuff.
4. Cut it in your desired shape. As you can see I had to really cut them down, since they were much to big for my riders. But the most interesting details remain.
5. Paint any colour you like. One quick and easy way to do it is basing in Retributor Armour and then heavy drybrushing with a darker colour like Abadon Black or Nagaroth Night. You might not get every detail standing out that way, but especially if there are a lot of tiny lines (as in the upper shield) and they are only for some standard troopers, it saves a lot of nerves.
And thats about it. Note that of course you will have much more impressive results if you are a talented free hand painter or have some cool decals at hand, but if you just started the hobby like me and want an easy way to get your guys some stylish shields, it is well worth it.
Also the mints of a lot of countries did a really great Job with their designs. If you look for african coins you can find a lot of great animal and plant engravings, Mexico has some cool artwork with an aztec style and (older) european coins often show beautiful coats of arms.


 ~9200 build and painted
 1312 build and painted
 1200
1200 
 For the Emperor and Sanguinius!
