Forum adverts like this one are shown to any user who is not logged in. Join us by filling out a tiny 3 field form and you will get your own, free, dakka user account which gives a good range of benefits to you:
No adverts like this in the forums anymore.
Times and dates in your local timezone.
Full tracking of what you have read so you can skip to your first unread post, easily see what has changed since you last logged in, and easily see what is new at a glance.
Email notifications for threads you want to watch closely.
Being a part of the oldest wargaming community on the net.
If you are already a member then feel free to login now.
2020/10/15 23:02:33
Subject: Paradigm Prints- One Week With The Photon (and finally pics!)
With my Photon finally due to arrive in the next couple of days (of course it's the last thing to be delivered, after the resin, safety gear and a Wash and Cure machine ) I figured I'd start a consolidated thread for my many questions, the inevitable post-failure rants/cries for help and maybe, just maybe, some actual progress and photos of such down the line...For the foreseeable, I'll be printing with a standard Photon, Nova3d Water Washable resin and the Anycubic Wash&Cure machine for post processing.
So first off. the probably really,dumb questions.
1) Lots of advice on support removal says a dunk in hot water is the way to go. Can I wash the mini in the same hot water and remove the supports as it comes out, or should I wash cold and then do the supports after a dip in a separate tub of hot water? I'm assuming in the latter case that the second tub would need the same disposal precautions as the washing water, as it's in contact with cleaned but not cured resin.
2) How long can I leave resin in the vat for? If I'm going to be running multiple prints over, say, three days, can the same resin stay in the printer or should I remove it daily? And once properly filtered, can it go back in the bottle from the tank, or do I need an empty opaque container for it?
3) I'm planning to start with presupported and/or supportless minis while I learn the ropes. Can I just slice these in Chitubox and go, or is there still something else I should be doing to the files first?
4) The resin comes with recommended settings for the printing itself, but not for the wash and cure cycles. I've seen 3-5 mins for each suggested, does that seem right? And possibly a really, really dumb one, does the size or shape of the print affect how long it needs to cure?
That'll do for now. though please do bombard me with any other unsolicited beginner tips, pitfalls to look out for, anything else I need to know for resin printing. At the very least, it comes assembled, so unlike the Ender I can't stick an entire axis on backwards because the instruction video skipped that bit...
This message was edited 5 times. Last update was at 2020/10/23 21:24:54
I've never used water washable resin so I cannot answer the first question.
2) I've left resin in the vat for 4-5 weeks without printing, keep it covered (if it has a custom vat cover) or make sure the lid is always on the printer. Just gently stir it to remix the pigments and you're good to go. Some people filter the resin after every print with like oil change filter funnels. I only do that on a failure or when I see lots of bits in the resin between prints though. I always run the plastic scrapers that come with the printers (as they're worthless for removing prints) through the resin between each print looking for partially cured bits. These can ruin your FEP sheet and potentially crack your screen. If you've filtered the resin well when storing it you can always add it back to the original bottle, I've been doing it for well over a year with no issues. if you're not filtering it for quick storage I don't recommend doing that.
3) There's really no such thing as supportless for resin (and supportless for FDM does not translate to SLA at all). Always add supports as they're also the raft that adheres the print to the build plate. Printing directly on the build plate isn't something that benefits most things in our hobby.
As to dropping supported minis into chitu and slicing. Yes, you can do that just fine. No other work is needed.
4) again, not used water, but being over on both of these won't hurt. Especially the cure cycle. Curing really depends on how thick the piece is. 32mm figure I generally do 30 min but I have a custom made rig with LED strings I bought off amazon that aren't as strong as a lot of the curing stations use. I double that time for about every extra human volume the print has. But again, this won't hurt the print if you leave it longer then it should.
As for things you need. Resin is messy and even the water washable stuff probably isn't super safe for handling. Get a lot of disposable gloves and paper towels. The resin will always get places you don't want it too.
Before your first print check to see if the build plate looks like someone ran a low grit sandpaper over. If it doesn't do it yourself. I've seen lots of reports of recent printers not having this done from various manufacturers. If you don't you'll get a lot of adhesion issues.
This message was edited 3 times. Last update was at 2020/10/16 07:27:00
I would also add that I haven't had much luck with presupported models and often they are oversized (35ish mm to the eye seems to be the standard for 3d) and if they use the needle thin supports that are all the rage these days you can't safely scale them down to 28mm.
Frankly I find Prusa slicer and Lychee Slicer both far easier to work with for placing supports, once you are done export as STL and slice in Chitubox. Sadly you can't mix and match supports between slicers as they all use different standards, you have to do all supports in one slicer and save it as a basic STL with supports included as part of the sculpt for slicing in Chitubox.
Posters on ignore list: 36
40k Potica Edition - 40k patch with reactions, suppression and all that good stuff. Feedback thread here.
Gangs of Nu Ork - Necromunda / Gorkamorka expansion supporting all faction. Feedback thread here.
Thanks for the advice, folks, nice t know I'm at least vaguely on the right lines in places. I hadn't realised that FDM-style supportless mini would still need supports, so that's probably saved me a disaster or two...
The scale issue doesn't bother me too much, as I'm mainly printing for DnD so I don't need everything to be completely uniform, and for painting I prefer 35mm to 28mm anyway. I've worked through some of those videos already, they have certainly been handy so far.
I would also add that I haven't had much luck with presupported models
Similar. Not that I've had any model fail that was pre-supported, just that a lot of people adding pre-supports do a worse job then freaking autosupports and cover a lot of detail that don't need to have supports. Or add 10x what they should as people that don't understand supports expect a lot of supports so they get added just to help sell the figure.
This message was edited 1 time. Last update was at 2020/10/16 16:13:17
Well, the Photon is now doing what it does... after months of overzealously watching my FDM prints build up on the Ender, this 'Schroedinger's Cat' situation of not being able to see what's actually happening is slightly unnerving... There's no loud bangs, horrible crunching sounds or errant sparks so far though, so I shall hope for the best...
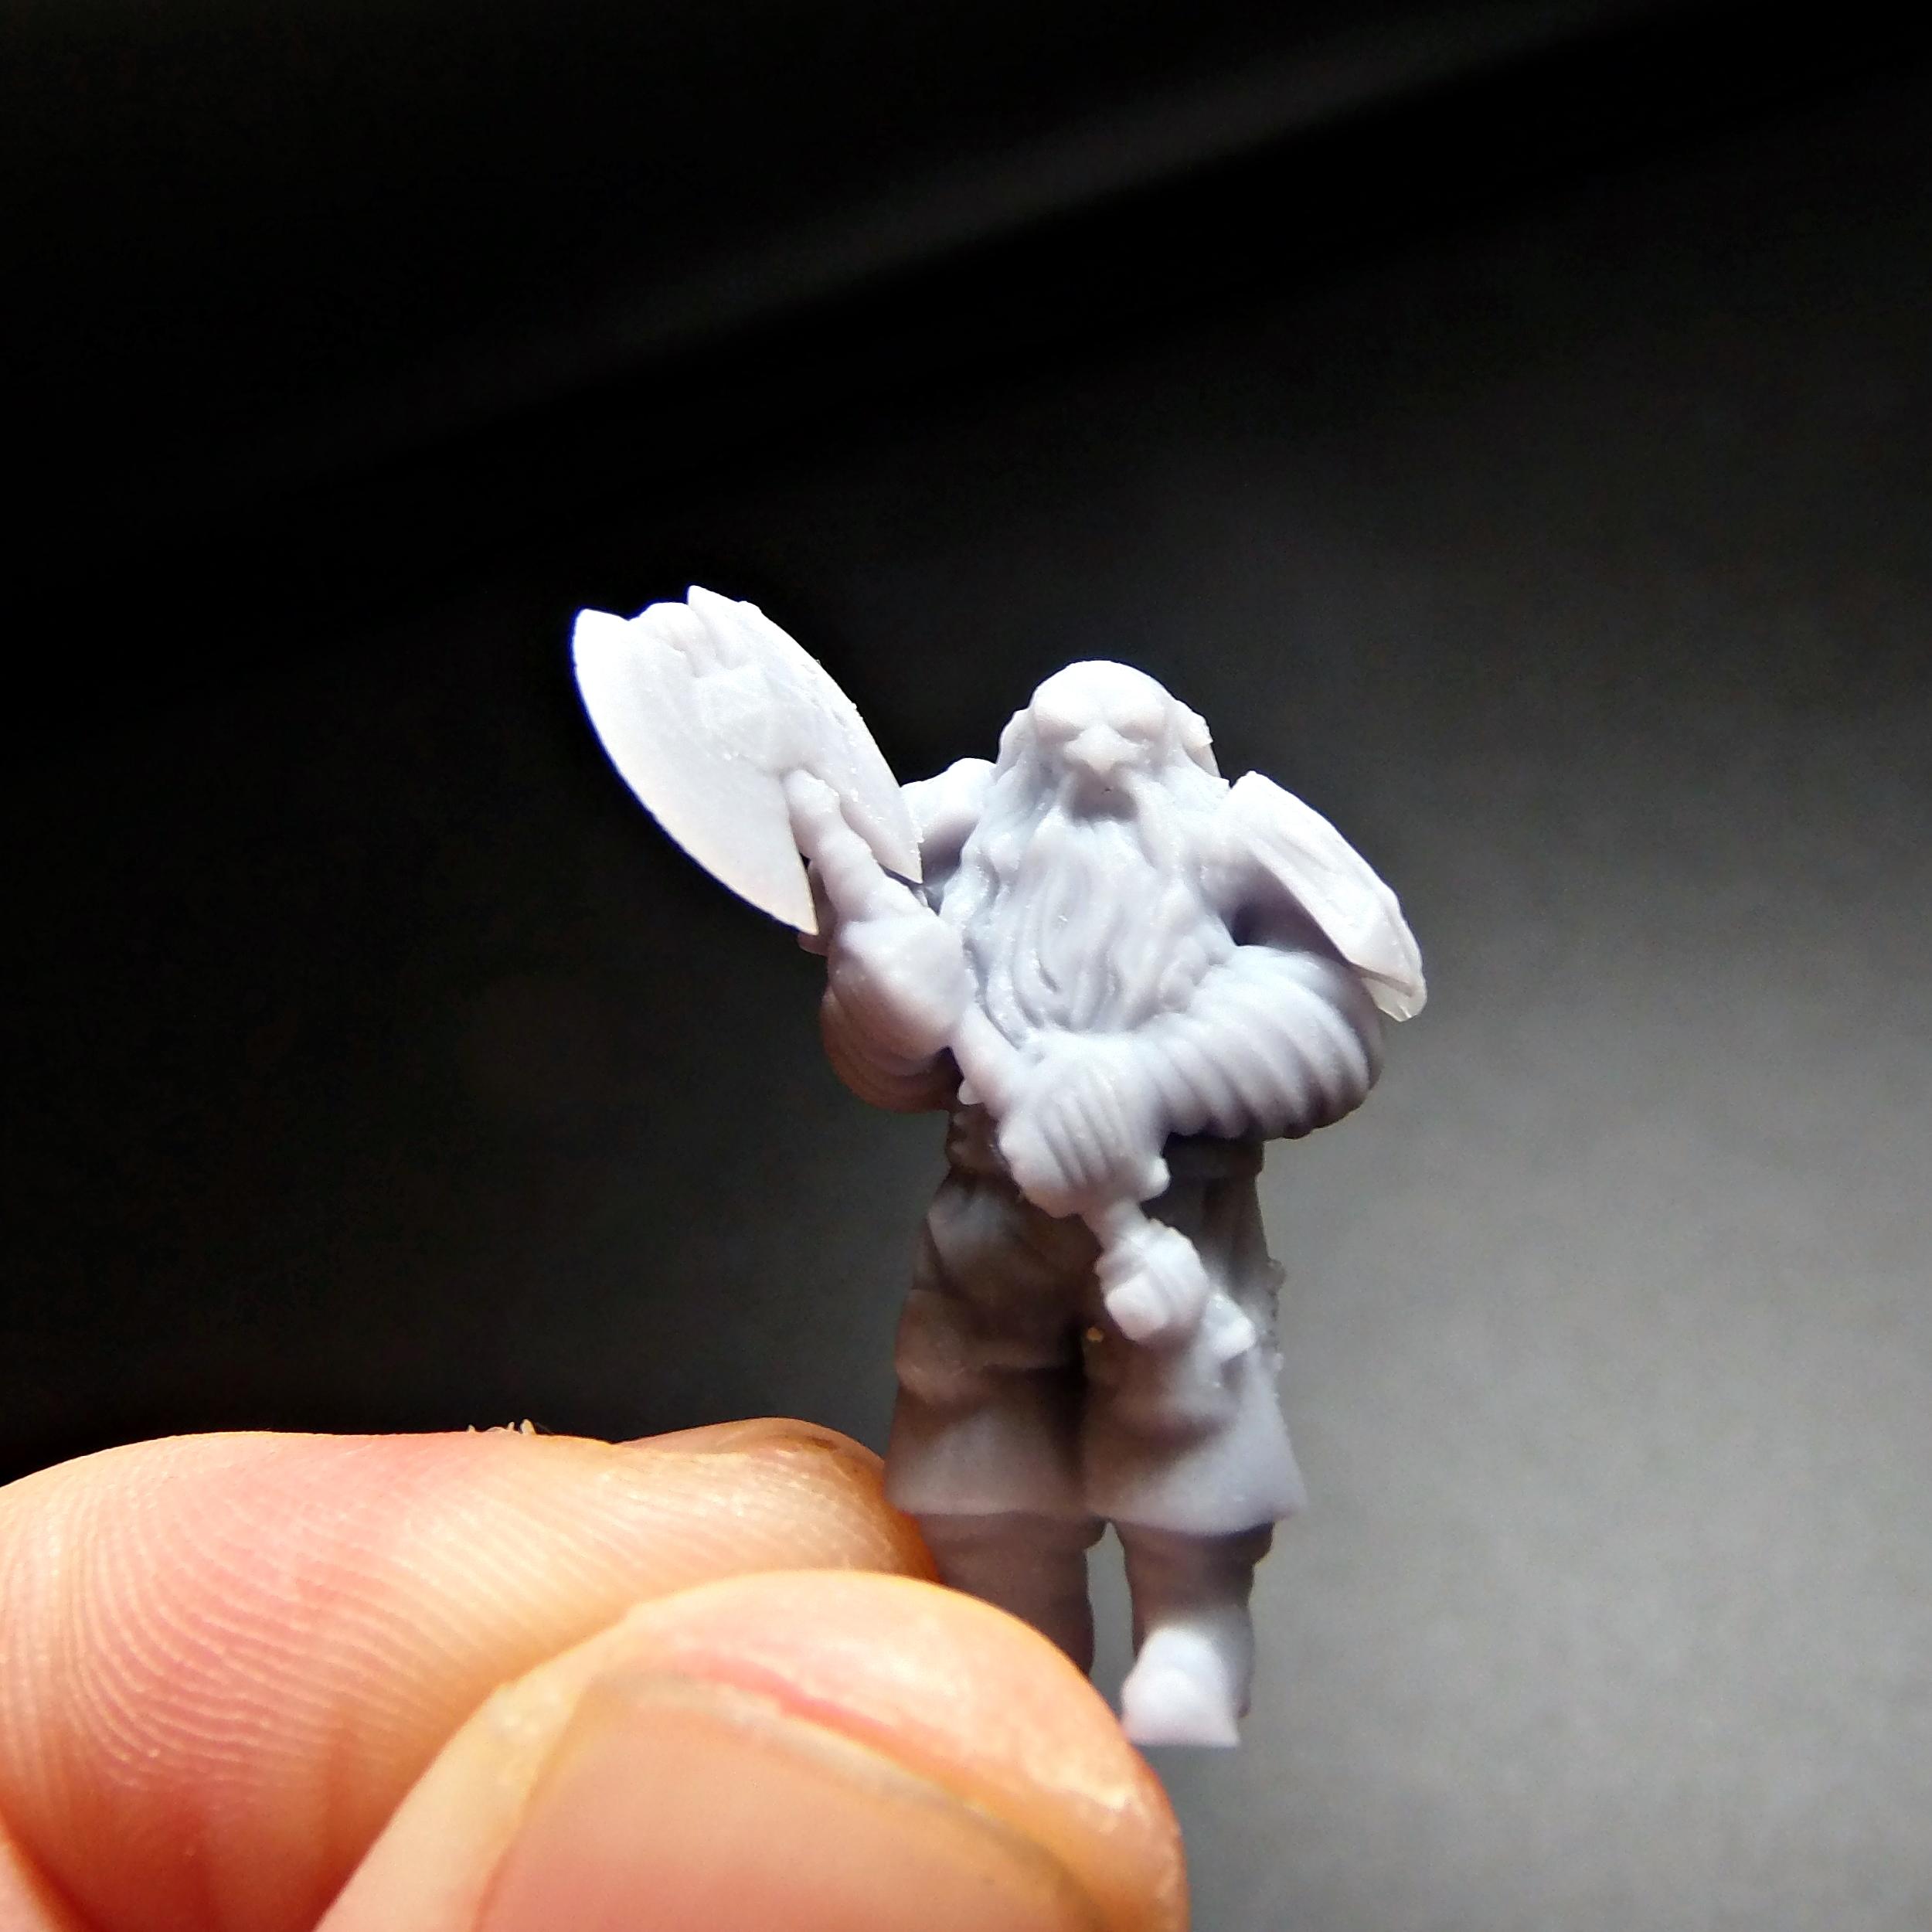
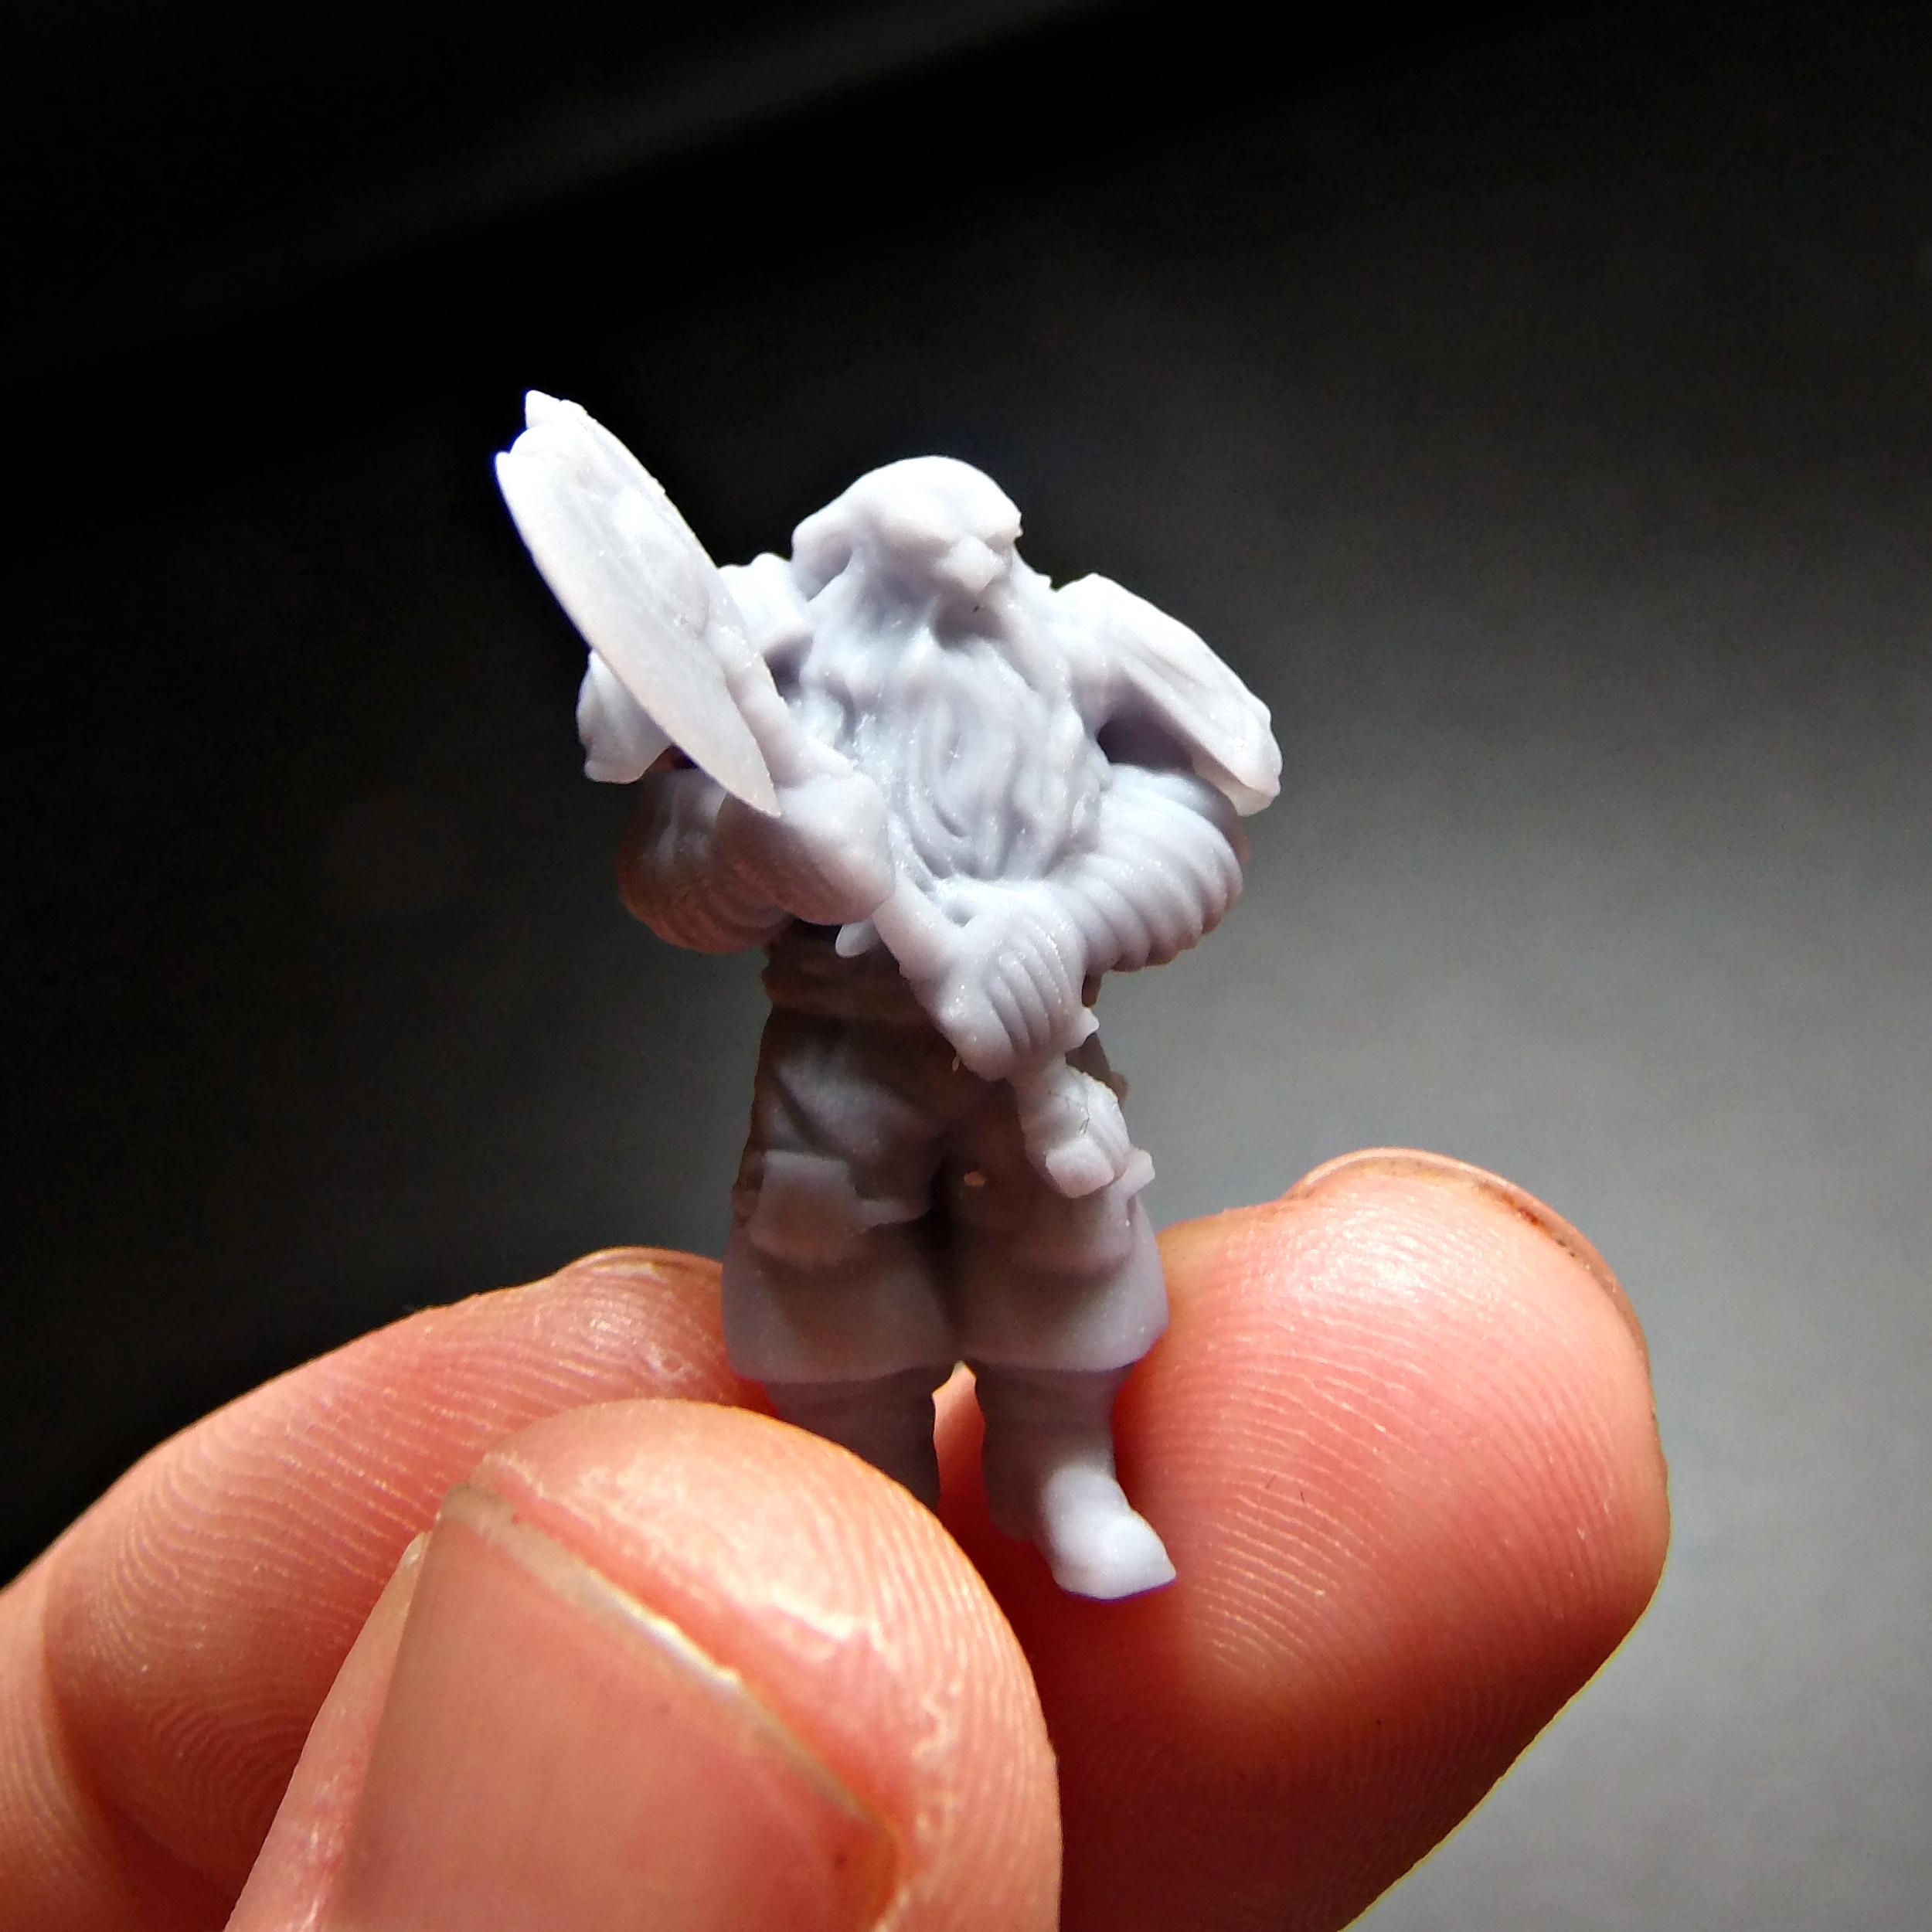
Automatically Appended Next Post: And we have the first printed mini, with far less faffing around than the Ender took, a Dwarf fighter from Heroes and Beasts. Printed at 0.05mm height, and while I will still try 0.02, I'm more than happy with this level of detail.
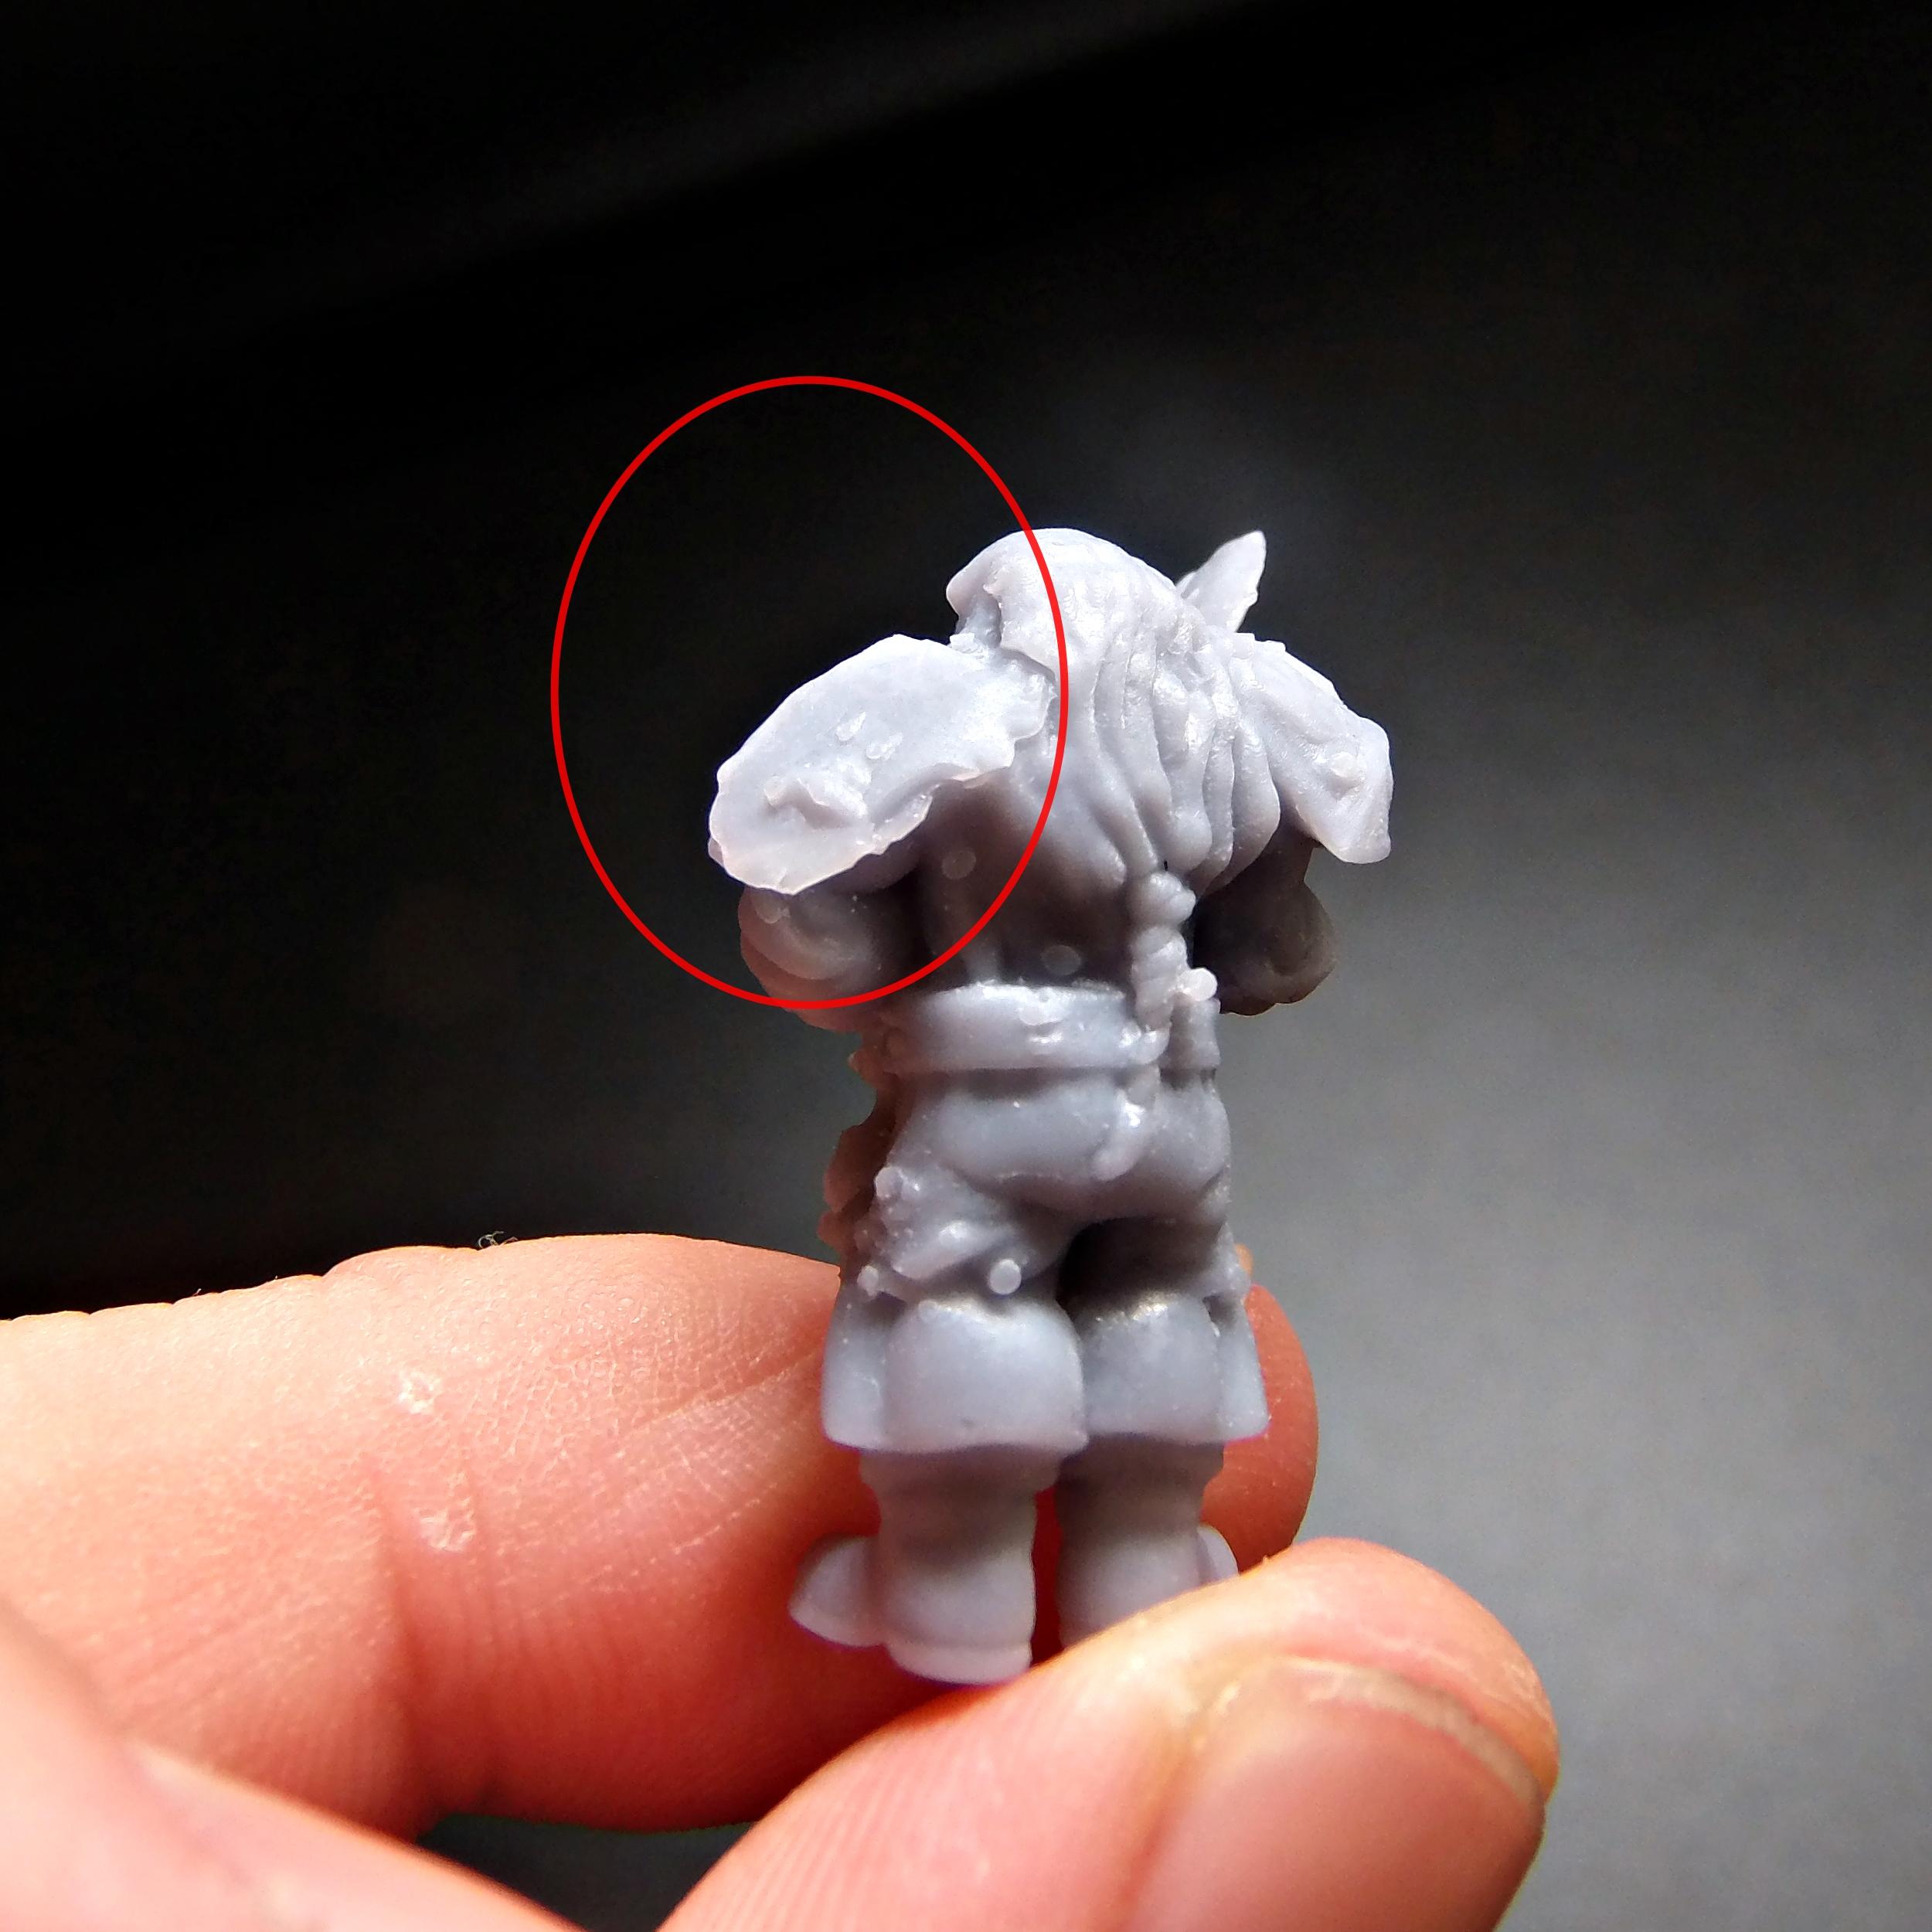
It's certainly not perfect, the left shoulder pad has come out flat and I'm not quite sure why, (it would have been the first part to print after supports. if that helps?) but other than that, I'd call it a pretty great success for round one. Just noticed a couple of leftover support nubs, the benefit of photos... Already so much neater than the same mini printed on the Ender though, and should look fine after a lick pf paint.
And with that, I'm off to go and slice a day's worth of LotR minis for tomorrow...
This message was edited 2 times. Last update was at 2020/10/16 21:49:25
2020/10/17 18:58:25
Subject: Paradigm Prints- First Photon Print Is A Success (Mostly!)
Flat detail usually means a failed or missing support. It can also mean something got in the way of the print too causing less light to reach the resin. Surface tension can also cause it but that shouldn't be an issue with a print of this size and shape.
2020/10/17 19:16:51
Subject: Paradigm Prints- First Photon Print Is A Success (Mostly!)
Yeah, I think it was a missing support. I ran the 'presupported' file through the Photon File Validator and it returned a bunch of errors around that area, so I'm guessing that was the issue.
Had a major fail on my second attempted print, 5 models of which 3 never even stuck to the plate and the other two came off the supports...After lots of cleanup, I adjusted to a longer base layer exposure and slower lift speed, and got a perfect print on my first self-supported model, so pretty pleased with that, I'll throw some pics up later. Another one's in now, so I'll see if it was fluke or genuine success...
Still though, even off just two prints the difference is still blowing me away... now the risk is that I'll go and spend far too much on all the stores and patreons that weren't an option while I was printing minis in FDM...
2020/10/18 16:47:49
Subject: Paradigm Prints- First Photon Print Is A Success (Mostly!)
1) Lots of advice on support removal says a dunk in hot water is the way to go. Can I wash the mini in the same hot water and remove the supports as it comes out, or should I wash cold and then do the supports after a dip in a separate tub of hot water? I'm assuming in the latter case that the second tub would need the same disposal precautions as the washing water, as it's in contact with cleaned but not cured resin.
You haven't suggest this but, since you're brand new to resin 3d printing, I figured I'd mention it just in case. Unless you get a specific water washable resin, the hot water treatment is NOT a replacement for chemical washing of residual resin via alcohol or other chemicals. I soak for a minute and swish multiple times in alcohol, dry/evaporate the alcohol for a few minutes, and then rinse in hot water while scrubing lightly with a very soft bristle toothbrush. After I remove the supports, I then rinse/brush it again lightly to remove any tiny support nubs that remain loose on the model as they can cure onto it afterwards.
Automatically Appended Next Post:
Paradigm wrote: Well, the Photon is now doing what it does... after months of overzealously watching my FDM prints build up on the Ender, this 'Schroedinger's Cat' situation of not being able to see what's actually happening is slightly unnerving... There's no loud bangs, horrible crunching sounds or errant sparks so far though, so I shall hope for the best...
Automatically Appended Next Post: And we have the first printed mini, with far less faffing around than the Ender took, a Dwarf fighter from Heroes and Beasts. Printed at 0.05mm height, and while I will still try 0.02, I'm more than happy with this level of detail.
Spoiler:
It's certainly not perfect, the left shoulder pad has come out flat and I'm not quite sure why, (it would have been the first part to print after supports. if that helps?) but other than that, I'd call it a pretty great success for round one. Just noticed a couple of leftover support nubs, the benefit of photos... Already so much neater than the same mini printed on the Ender though, and should look fine after a lick pf paint.
And with that, I'm off to go and slice a day's worth of LotR minis for tomorrow...
Have you run one of the free resin fine tuning prints? I prefer to use one called the XP2 resin validation tool that I found on github. There are other more complicated ones that involve flashing the printer firmware (I'm not comfortable with that personally) but this one is easy to print and read. The model details look a bit blurred. Some of that may be due to the photography but it feels a bit like it's either overexposed and/or your anti-aliasing is a bit too aggressive.
This message was edited 1 time. Last update was at 2020/10/18 16:50:23
We Munch for Macragge! FOR THE EMPRUH! Cheesesticks and Humus!
2020/10/18 17:01:53
Subject: Paradigm Prints- First Photon Print Is A Success (Mostly!)
Yeah, I'm using water-washable resin from NOVA3d, and so far the Wash and Cure machine is doing the job, though it sometimes needs a couple of cycles of each. Still far less hassle than it'd be otherwise.
I think it may be the photograph that's washing out the details there, they're pretty sharp to be honest. The resin is a darker grey than how it looks there, so I imagine it's just the lamp/camera. Printed another, much more detailed mini and it came out great, everything nice and crisp. I shall experiment with other exposure times once I'm consistently getting prints, but for now the 7.5s recommended is doing the job.
Had another failure today where supports printed but the models broke away from them, I'm getting the feeling the presupports on these minis are just a tad on the thin side (even though I've seen plenty of examples of them working)... anything I can do to give them more of a grip and prevent this issue? Short of scaling the whole STL up a bit, which I'm honestly not against if it comes to it, I do enjoy minis closer to 35mm size.
I'll look up a tuning print soon, once I'm a little more familiar with the process.
This message was edited 1 time. Last update was at 2020/10/18 17:02:56
2020/10/18 17:09:33
Subject: Re:Paradigm Prints- First Photon Print Is A Success (Mostly!)
I wouldn't use autosupports unless you're going to go through manually to double check where islands pop up in addition to the manual placement. Which slicing software are you using? I recommend Chitubox but admittedly I don't have much experience with others. I just updated to the newest version myself and it's got some nice new features. I tried using the photon validator and autofix but found the results less than satisfactory; unfortuantely, that was for my first couple of prints so I don't know if the majority of the fault is with my own inexperience or the program but I haven't used it since.
For the resin validation tool, this is the one I was referring to at the four minute mark. It's a very quick print as it's only a few mm tall.
Are you printed pre-supported minis from a patreon or kickstarter? Or are you referring to ones you autosupported via the slicer function? If you haven't tuned your resin, the presupported files may not work optimally for you. There is a youtube called 3dprintingpro that gives excellent advice on supports but I've seen people who follow his advice go WAY to light on their supports and expect whole sections of models to be supported by only hair thickeness light supports. If you've got a relatively large section of a model, you need at least one if not more solid medium to heavy supports to anchor it and then use lights to support minor details that may stick out. For example, if you've got an outstretched hand then you put a medium or heavy on the palm but then custom lights on the fingertips to preserve the details. The common mistake I see is that people think those tiny custom light support settings will be enough for the whole hand.
This message was edited 1 time. Last update was at 2020/10/18 17:13:45
We Munch for Macragge! FOR THE EMPRUH! Cheesesticks and Humus!
2020/10/18 17:25:46
Subject: Paradigm Prints- First Photon Print Is A Success (Mostly!)
Oh yeah, I'm not trusting autosupports*, it's all either manual supports (which have so far worked fairly well with stock Chitubox settings) or Patreon presupports, which have yet to work. I've been using Photon File Validator and again, it's been mostly successful, though admittedly my eyesight is not perfect so if there are tiny imperfections I'm possibly missing them.
*Admittedly, I am currently trying one mini that used a combo of PrusaSlicer autosupports and Photon File Valiadtor fixes (both manual and automatic) that says it's error free, just as a test to see how well it works in practice. Don't expect it to work as well as manual supports, but I figured there's only a few pennies' worth of resin to try it once. Much like in FDM, my gut instinct with manual placement is to oversupport rather than risk underdoing it, both for the printer's safety and the print quality.
2020/10/18 22:20:10
Subject: Paradigm Prints- First Photon Print Is A Success (Mostly!)
I use pruasa auto supports all the time. If it's a more mechanical thing I rarely have to change the supports but usually with organics I may have to add a few supports in some places or move some that are too close to detail I'm worry about. Overall they save me a lot of time as it really only takes me a minute or two of mine time to adjust what their algorithm decides is needed.
2020/10/19 13:27:54
Subject: Paradigm Prints- First Photon Print Is A Success (Mostly!)
How many seconds did you do each layer for your dwarf? Even at .05 he should have come out a little crisper, but that does depend on the sculpt.
Try going to .04 or .03 and reducing the layer time by 1 second or 1.5 seconds with your AA turned off and see how he comes out. I find all pre-applied supports totally overkill, too thick and placed in a lot of un-needed places. You will also start to get the hang of your own supports and the best settings and spot the low areas that need a support, but I do the overall in light and them add a number of medium supports in the critical spots to secure it to the plate.
I do not think you can overdo using light supports, and if proper settings are used for the connector, they will all just peel right off. I will only clip if on a really delicate area to avoid breaking. When I first started I carefully clipped each support, but now I rip off 99% of them and they come off like butter. I do all my rinsing and after the final alcohol bath I let it sit for about 10-15 minutes to dry and then pull off all supports. If I let it sit for a day or so the supports do cure a bit more and are a bit harder to get off.
I cut a styrene plastic card to place over my resin vat between printings and just as previously mentioned by Monkeysloth, I will keep the resin in the vat and just stir with the plastic scraper for weeks, adding resin as needed and never really cleaning it out unless a failed print or changing color.
The dwarf was done at a 7s layer time as recommended on the bottle, with no AA... honestly, I was slightly surprised that a couple of you have said the detail looks soft, as I thought it was really rather great, but perhaps that's just my brain still focusing on the improvements over FDM, rather than the Photon's actual potential.
So I went and did some validation tests as recommended above, and got the best results with 6.0s exposure, the file coming out pretty much perfect. Still didn't stop my next go at the pre-supported minis failing, but I then went on to manually support one of the models I was going for and it's come out perfect, at least in terms of having no missing details or unprinted areas. The presupports just look way too thin to be honest, even with the exposure corrected they just failed to hold anything up. For reference, they weigh in at about a third to a quarter of the default Chitubox lights in terms of width, so I'm sure they'd clean off really nicely if they ever actually worked...
Which leaves the current scores thus; Presupports: 0.5/4 prints successful with three complete fails and the above Dwarf with the missing shoulder pad. Prusa Autosupports: 0,5/1 print successful. The mini actually came out largely okay, save for a sword that came completely off. I thought it looked undersupported, but I wanted to test them without any modification just to see. Manual supports: 3.5/4 prints successful. One model had an undersupported arm holding a book, which came out bad, but three others have printed with no real flaws (save some slight damage where the supports came away too roughly, but easily fixed).
So yeah, manual supports will be what I stick with, even though I find the process so very boring and fiddly. Getting ever so slightly faster at it, though, and understanding Chitubox a bit better, so hopefully it'll soon be slightly less of a burden.
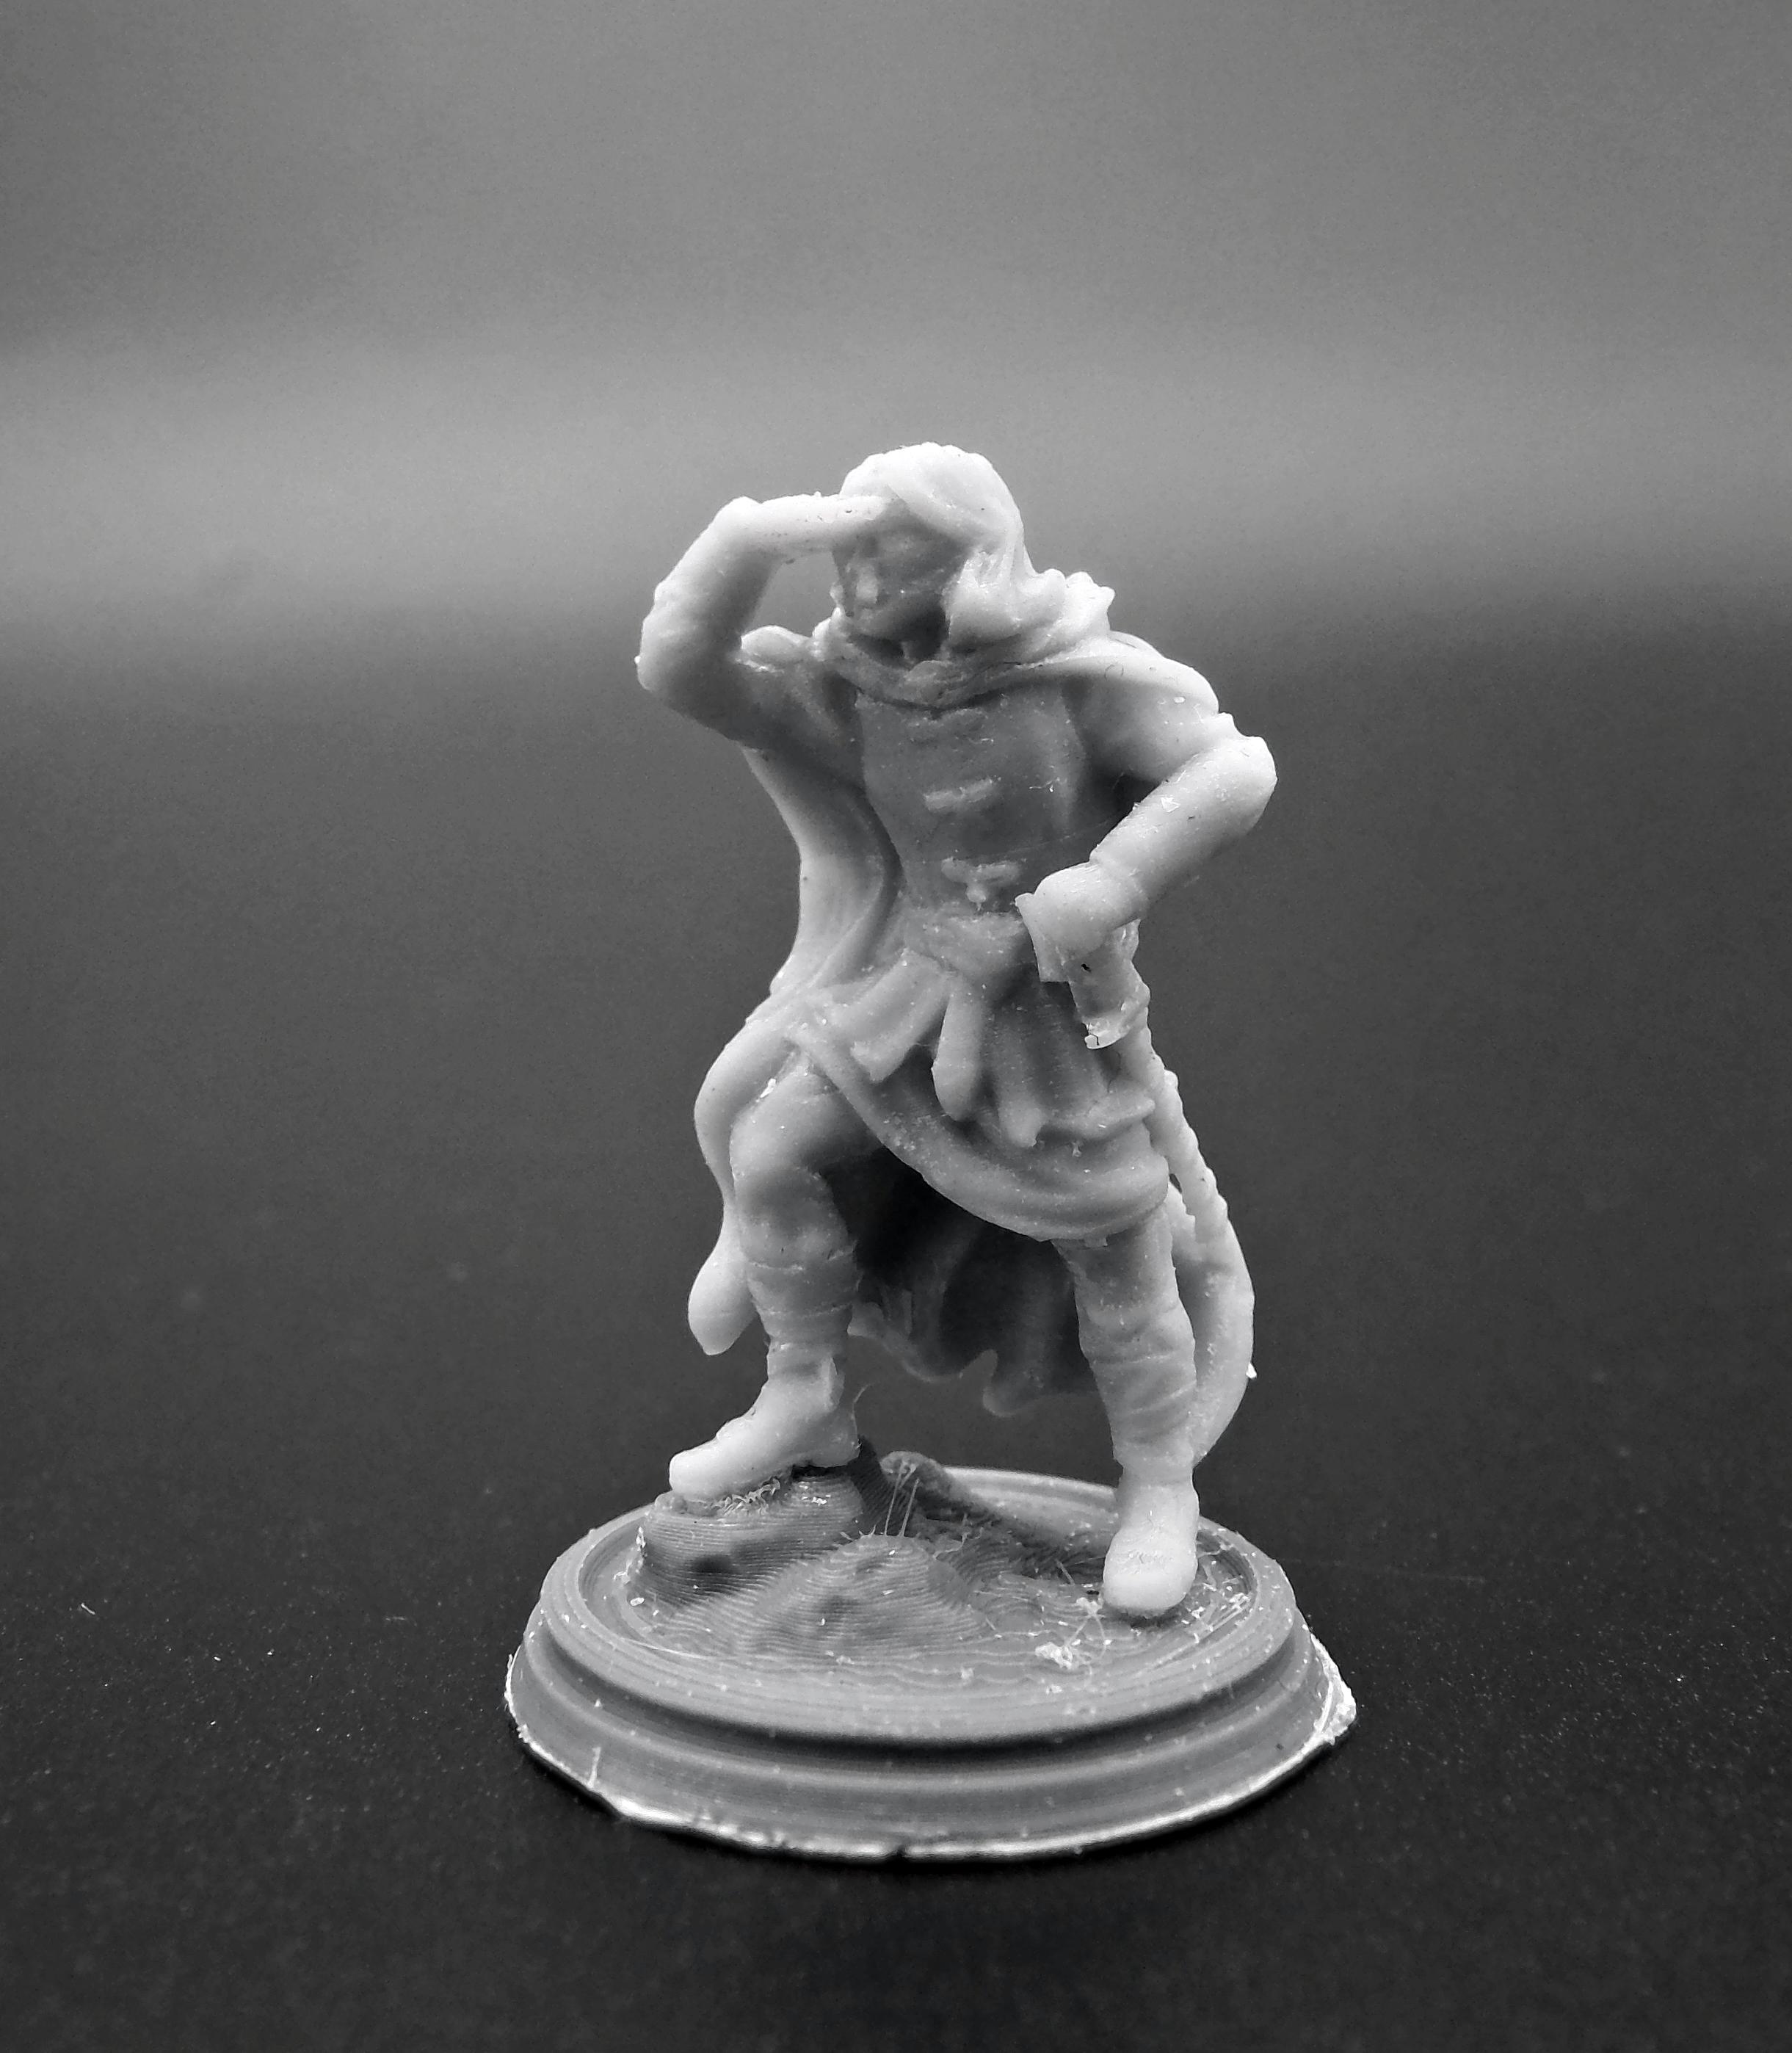
As for actual results, here's the latest print, manually supported, 0.5 layer height, 6s exposure, no AA. Kind of hard to photograph as the resin immediately looks brighter than it is in the lightbox, but I've set these to black and white and upped the contrast a bit to help with that.
Spoiler:
I'm pleased enough with it, though I'm not sure it's actually any sharper than the dwarf was (though going from heroic to true 28mm minis is not a good like-for-like comparison in that regard, I concede). At the very least, nothing failed, it's not covered in deep support scars and should paint up just fine. Still not sure if there's something else I should be doing in the settings, because so far I'm focusing on just getting consistency rather than every drop of quality, but
This message was edited 1 time. Last update was at 2020/10/19 20:48:32
2020/10/19 21:00:22
Subject: Paradigm Prints- First Photon Print Is A Success (Mostly!)
Congrats! As long as the model printed without errors, the lower exposure time should at a bare minimum at least extend the lifespan of your LCD even if you don't see a visible difference. I recently found out that I personally can't judge softness as well on naked resin with my own photography and found better results looking at pics of primed figs FWIW.
How tall/what scale is that figure btw? I'm getting the hint that it might be a true 25mm scale but figured I'd ask.
We Munch for Macragge! FOR THE EMPRUH! Cheesesticks and Humus!
2020/10/19 21:06:49
Subject: Paradigm Prints- First Photon Print Is A Success (Mostly!)
Good call on the priming, I shall stick a white coat on it and photograph it again if there is a notable improvement. The mini the Definitely-Not-Aragorn from The Printing Goes Ever On , and their stuff tends to be around true 28mm in scale, maybe a tad taller. In this pose, it's 34mm from the bottom of the lower foot to the top of the head, on a standard 25mm width base.
2020/10/20 13:24:11
Subject: Paradigm Prints- First Photon Print Is A Success (Mostly!)
I find a combo of light supports and a number of strategically placed medium supports do the trick for me. If you use all light supports it will pull away sometimes and all medium are just more difficult to remove or leave large blemishes.
So, who's up for a round of 'How's My Support'? Had a number of failures today, on manually supported models that consistently printed the full support structure but with nothing (or very little) on top of it, the rest just stuck to the FEP. The models in question were Star Wars Legion scale, and multi-part models, so both bigger and smaller parts than I've done before, but from what I can tell they were no less supported than my successful prints so far. Across 2 prints runs, of around 10 parts total, only 4 came out successfully, two of them only on the second attempt.
Given that the build plate adherence was fine and the support structures printed fine, I'm assuming it wasn't a levelling or bottom exposure issue, which to my mind means it was regular exposure, support placement or orientation that failed...
Exposure time- I lowered from 7.5s to 6s after the validation prints yesterday, and got a very crisp result (turns out the priming trick really helped tell that, but then I got carried away and just painted the whole mini before photos... ) but would lowering the exposure time have affected the support-to-model connection strength at all? Would I be served by bumping it back up a little?
Support placement and orientation- I guess this one's the biggie. I've attached some pics below of the models as supported and sliced, to my mind they look pretty well supported with a good mix of heavy and light supports, and are island free after a pass through PFV. Do I just need to pepper the lower surfaces with more to get a strong grip on these larger pieces? As for orientation, I tried to angle so that supports would be on the least visible areas, though with parts such as the lightsabers I figure that's a losing battle anyway. For reference, all the support sizes are the Chitubox standards. Pics:
Spoiler:
So, any glaring undersupported models there? To me, it seems that everything, and especially the small parts, should be printing okay given the previous successful prints, and yet I get support structures with nothing on the end of them... Any ideas?
On a related note, I'm curious what people's thinking is on supporting small, thin objects like that lightsaber in general? My gut says that straight up is going to be impossible and just not print, but sideways is going to need tons of support, hence the slight angle. But that didn't work either, so I'm not sure what the best approach is.
This message was edited 3 times. Last update was at 2020/10/20 23:14:17
Yea you dun goofed on exposure imho. You need at least 10% over what's best for detail if you want such minimal supports to hold. I'd also add way more on the feet.
Posters on ignore list: 36
40k Potica Edition - 40k patch with reactions, suppression and all that good stuff. Feedback thread here.
Gangs of Nu Ork - Necromunda / Gorkamorka expansion supporting all faction. Feedback thread here.
ya it does look like it's overexposed. I'm lazy and only use the resin that my printer manufacturer produces as it's pretty affordable ($35/liter) and all the settings are provided by them for their printers. Never get a bad result.
For the Rey supports. You're a bit overkill on the figure itself but look fine for everything else but it's no big deal--just more cleanup and you'll learn as you go what's actually needed. Long round/flat things like the lightsaber need lots of supports or will warp as do flowing things like the cloak (though you probably have a bit more then needed there) but they'll all sand/clean up very well.
Well now I'm confused, one of you says minimal supports and one says it's too many if anything... Either way, ran the print again with a higher exposure time (6.5s), and aborted half way through as while the cloak was printing okay, Rey had lost a leg and none of the small parts had printed at all. In mindsight, maybe I should have left it running to see if the cloak at least would do, but I didn't really want to waste more resin than I already had.
So, back to the drawing board. I'm going to try the smaller parts all together without the two bigger pieces and see if that helps; at a minimum, it's less wasted time and resin if/when they fail. Not sure how many more supports I can add to the saber and blaster, they're already pretty dense and I worry that more wold give me completely mangled parts after cleanup. Still, I shall reorient and resupport and see where it gets me..
I can say in my experience when I know the print is supported well and I got all looking good (I think your combo of light and medium supports looks good) that when I do have a failed print I will re-level my build plate and that fixes 95% of the issues.
The other 5%? Well, throw on a few more supports and that will do it, as long as your plate is level. It never fails when I remove a print from the plate that is a little stuck I will shift it, so I have to be careful when removing prints to avoid re-leveling every time.
Your exposure time has a lot to do with your layer setting, as I will go as high as 10 seconds when using .08 to .1 layers and 5.5 when using .02 to .03 layers. But, this is after having some experience with the resin you are using.
Also, I have never had to change it 'cuz the pre-set was good on mine, but maybe you might need to slow down the lift speed?
This message was edited 1 time. Last update was at 2020/10/21 13:19:12
Also the anycubic facebook support page has a spreadsheet of all the different resins and their settings that the community maintains. Probably worth a gander if you haven't already.
Well, I think together we've cracked it. A relevelled bed, an additional half second of exposure, more heavy supports on high-strain areas and I've got successful prints of the two minis I was working on, including lightsabers that are at least passably straightt. I definitely ended up oversupporting the cape and it has a few nasty divots in, but nothing that can't be fixed easily enough.
@MDSW: Yeah, I lowered the lift speed from 65 to 40 after my first failures, that did seem to be causing an issue. Not rush printing anything, so a little slowdown for the sake of consistency isn't an issue. I do intend to try some 0.03 layers at some point, but at the moment 0.05 is giving plenty good enough results. Only a few layer lines on tiny parts, and they disappear after primer.
@Monkeysloth: The resin I'm using (NOVA3D Water Washable Grey) isn't on there sadly, they've only got the regular NOVA grey and that has a listed time of 12s or something, which given I was losing quality at 7.5s feels way too high. Couldn't tell you why there was a such a gulf between regular and WW from the same brand in the same colour, must be some sciencey thing...
Random question on something that is either a clever hack or a terrible idea: I have a massive tub of paper towels that I've been using to clean the plate and prints ect, can't throw them away obviously because they're contaminated and at the minute the sun isn't out enough to reliably cure them outside... would sticking a handful at a time into the curing station and blasting them for a few minutes do the job, or am I just, as The Boss said, waiting on a sunny day?
Just throw them away. You're not pouring pure resin down the drain to be treated and released back into the supply. If you're really worried, just dry them outside even if its cloudy (just for longer) as long as its not raining and don't worry about it. It's resin, not left over U-235.
We Munch for Macragge! FOR THE EMPRUH! Cheesesticks and Humus!


 ) I figured I'd start a consolidated thread for my many questions, the inevitable post-failure rants/cries for help and maybe, just maybe, some actual progress and photos of such down the line...For the foreseeable, I'll be printing with a standard Photon, Nova3d Water Washable resin and the Anycubic Wash&Cure machine for post processing.