Switch Theme:

The Yncarne, yee gods.  [RSS] Share on facebook Share on Twitter Submit to Reddit
»
Author Message
Advert


Forum adverts like this one are shown to any user who is not logged in. Join us by filling out a tiny 3 field form and you will get your own, free, dakka user account which gives a good range of benefits to you:
  • No adverts like this in the forums anymore.
  • Times and dates in your local timezone.
  • Full tracking of what you have read so you can skip to your first unread post, easily see what has changed since you last logged in, and easily see what is new at a glance.
  • Email notifications for threads you want to watch closely.
  • Being a part of the oldest wargaming community on the net.
If you are already a member then feel free to login now.


Made in us
Fixture of Dakka


Los Angeles

Anyone have experience with this model and made adjustments?

Spoiler:
For the 3rd or 4th edition players, the metal hurricane bolters on the Land Raider Crusader rank as one of the fiddlier (an actual word?) pieces to put together in the GW line.

Now I have the Yncarne.

Gluing his body to his hair piece places him in my ranking system right next to the LRC's hurricane bolters. I had to eye-ball and reposition after using both plastic solvent and a 'super glue'.

Now, to you my dakka peeps:

TL - DR
I have the last 'ring' of 'fire/energy' to glue onto the body piece, which is still detached from the base and its 'Fire/Energy' column and wrap around.
Dilemma:
It occurs to me to paint the pieces before final assembly, which will be a first for me. Once painted, I think I ought to rub off paint, and be sure to bare the surfaces where I'm going to glue, that is, plastic solvent (Testors) and then a cyanoacrylate super glue.

Any other tips?

How to make these bands of Fire/Energy more secure? Gads, they look super fragile.

Apply green stuff? Smear some on over (on the inside) the 'joints' and then 'sculpt' holes and such? I wonder if the added weight will counter balance the benefit. And my green stuff skillz are nooB at best.

I am excited to use the model in games, but I'm not looking forward to its maintenance. Anecdotal experiences are welcome.

Here are the pieces:

This message was edited 1 time. Last update was at 2021/06/15 16:14:13


"You can bring any cheesy unit you want. If you lose. Casey taught me that." -Tim S.

"I'm gonna follow Casey; he knows where the beer's at!" -Blackmoor, BAO 2013

Quitting Daemon Princes, Bob and Fred - a 40k webcomic 
   
Made in us
Dakka Veteran


Yeah, he is a challenge.

Try Hellions. You need tweezers to hold bits to glue on.

Consummate 8th Edition Hater.  
   
Made in ca
Regular Dakkanaut


Oh Canada!

Big oof.
Is there room for pinning any of those bits on? I'm not sure I'd trust glue alone to hold it down. 'specially if that's the "non-toxic" plastic cement, which I don't find bonds as well as, say, Tamiya extra thin or even regular Testors.

As an aside, how the ever loving fluff is one supposed to transport that without damage? It's like a cactus!
   
Made in fi
Dakka Veteran


I have no experience of the model in question but the fact that he connects on both the magical effect and the hair at different locations should reduce the overall stress. The end result is probably more stable than it appears at this point.

Many GW models feature thin long bits such as hair, chains or cloak but they are usually designed so that the joint itself is not the weak part. You can sometimes use contents of the bits box to support such details. My Nighthaunt army features several "tactical tombstones" or small ghostly trees for this purpose. The more connecting points to base the model has, the more stable it is, even if the connection points themselves were tiny.

That place is the harsh dark future far left with only war left. 
   
Made in de
Huge Bone Giant


I haven't finished painting mine, but I assembled it fully before painting and could reach every part of it with a brush easily enough. I don't think subassemblies are necessary. Perhaps desirable depending on how you prefer painting and how well you can control your brush, but definitely not necessary. If you do subassemblies, yeah, you should probably leave the contact surfaces clear or clean them up after painting.

As for durability issues, the model doesn't stand out in my experience. Frankly I'd be more worried about his feeble arm or thin space elf sword breaking during transportation than the swirly crap causing any trouble. Every part of it is either thick or has several connection points and once fully assembled is sturdier than it looks. I used Revell plastic cement in fair amounts if that makes a difference.

The comparison to the metal hybrid Crusader? Yeah. I don't want to assemble either model again. But the Yncarne once finished never gave the impression that I needed to handle it with extra care. Unlike those hurricane bolters.

Nehekhara lives! Sort of!
Why is the rum always gone? 
   
Made in us
Fixture of Dakka


Los Angeles

 Geifer wrote:
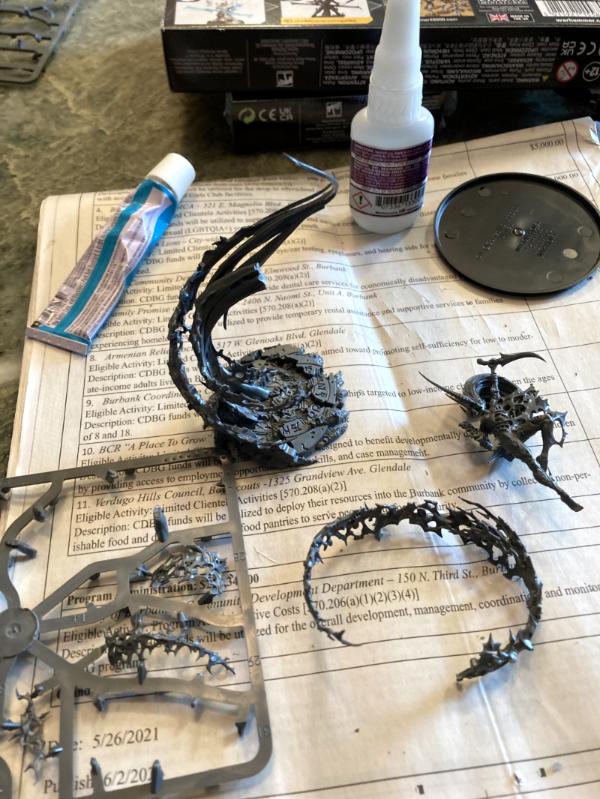
I haven't finished painting m[spoiler]ine, but I assembled it fully before painting and could reach every part of it with a brush easily enough. I don't think subassemblies are necessary. Perhaps desirable depending on how you prefer painting and how well you can control your brush, but definitely not necessary. If you do subassemblies, yeah, you should probably leave the contact surfaces clear or clean them up after painting.

I have already primed the separate pieces, but your advice is still welcome. Thanks.


 Geifer wrote:
As for durability issues, the model doesn't stand out in my experience. Frankly I'd be more worried about his feeble arm or thin space elf sword breaking during transportation than the swirly crap causing any trouble. Every part of it is either thick or has several connection points and once fully assembled is sturdier than it looks. I used Revell plastic cement in fair amounts if that makes a difference.[/color]

Good to know. I chose the smaller sword that is pointed down as it will decrease the overall height. Matching what you pointed out.

 Geifer wrote:
The comparison to the metal hybrid Crusader? Yeah. I don't want to assemble either model again. But the Yncarne once finished never gave the impression that I needed to handle it with extra care. Unlike those hurricane bolters.


Someone above pointed out hellions. Yeah, I have a 5 pack of those, and thankfully, somewhere in 5th edition, the memory is buried and I can't recall how I assembled those. Tweezers or needle nose pliers were needed, no doubt.

Pinning: Most of the Fire/Energy "joints" are 1 millimeter thick. Maybe 2. Pinning, unless the pin is visible as a ... 'joist'? 'strap'? well, it'd have to be that.

The good joke I earned out of all this came from a guy on FB:
For durability's sake, he said to encase it in a clear resin cylinder. I had never heard of such a thing**, but the other, more experienced, hobbyists had a laugh on my ignorance. Han Solo carbonite punchlines and such.


I still like the idea, though, since that cylinder would be a 'Monstrous Creature, heavy resin, cylinder of death ... which could double as a weight/sap in case of a throw down.'.

I have learned:
1. I have been reassured that the model isn't that fragile, thanks Geifer,
2. Painting it won't be as bad as I thought, from multiple sources, thanks again, Geifer.
3. To take a complicated model like this, and use the box's picture as well as GW's 360 degree web feature to really, really, eyeball where the damned pieces go.

Since it is 'subassembled' (and that's a new term for me, thanks, Geifer, dang. I owe you a beer!) I'll just go ahead and paint the pieces separately anyway, and really eyeball and look over pix when the final put-together comes along.

Next week? I'll post photos.

Thanks all.


**
My thoughts went to clear resin coffee tables, Legos and 40k dioramas that the 'artist' then covered in clear resin. But for a 40k model?!?! I really thought this could be a viable option.
... still kinda do.

"You can bring any cheesy unit you want. If you lose. Casey taught me that." -Tim S.

"I'm gonna follow Casey; he knows where the beer's at!" -Blackmoor, BAO 2013

Quitting Daemon Princes, Bob and Fred - a 40k webcomic 
   
Made in us
Fixture of Dakka


Los Angeles

I am soooo happy to have painted in separate pieces. Man, it went very nicely.

That said, I'm really near sighted, so a lot of the close up gem work I need to pull off my glasses. With serendipity, my wife asks what we are gonna do with a magnifying stand/light, and I happily state, 'Put it here.' But whoa, that's gonna take some getting used to. Best use was to see what I need to do there, and then pull away and paint using naked eye. The Mag glass's depth is gonna take a lot of time to use effectively, even with using my fingers as a gauge where the brush's tip is ending up. I miss calculated a lot and had some quick wipe-offs with assorted cursing. As you do.

After painting, full assembly went very well, with only the 2nd to last, counter clockwise Fire/Energy piece coming off once in handling (in the photo, it's the piece coming off her left knee, fading from right back to center). The main column of hair went into place with the Testors solvent, after scraping off a little primer paint. It did slide a half millimeter off true align, so I added some super glue. It's still a teeny bit off. I gotta remember a buddy & master class painter's advice; toss super glue after 6 months as its speed and effectiveness drops off.

Here she is:


Thanks for the advice, folks.

"You can bring any cheesy unit you want. If you lose. Casey taught me that." -Tim S.

"I'm gonna follow Casey; he knows where the beer's at!" -Blackmoor, BAO 2013

Quitting Daemon Princes, Bob and Fred - a 40k webcomic 
   
 
Forum Index » Painting & Modeling
Go to: