Alright boys, this is a pretty broad article on a few different techniques I wanted to try out.
Things specifically covered will be:
1. Zenithal Airbrushing
2. OSL (object source lighting), both with airbrush and by hand
3. 2 different ways to apply snow
4. How to make quick and easy Icicles using a hot glue gun.
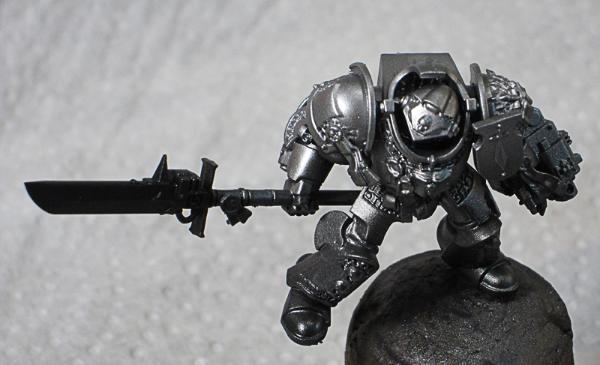
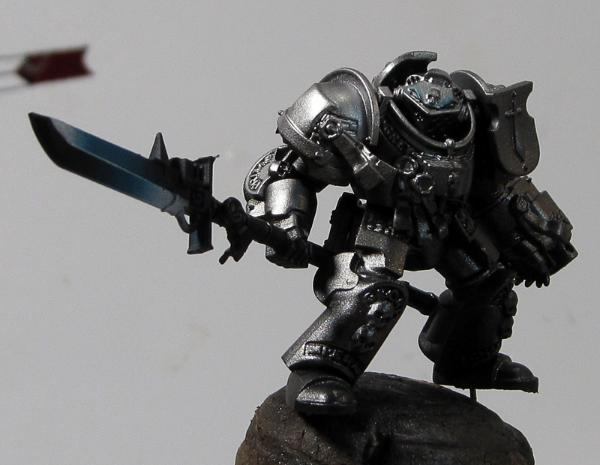
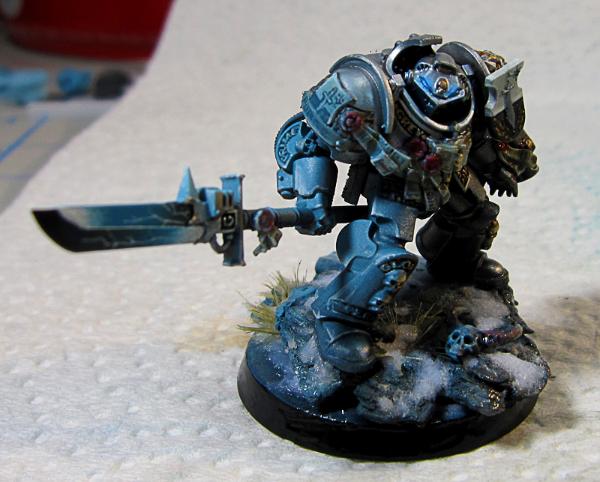
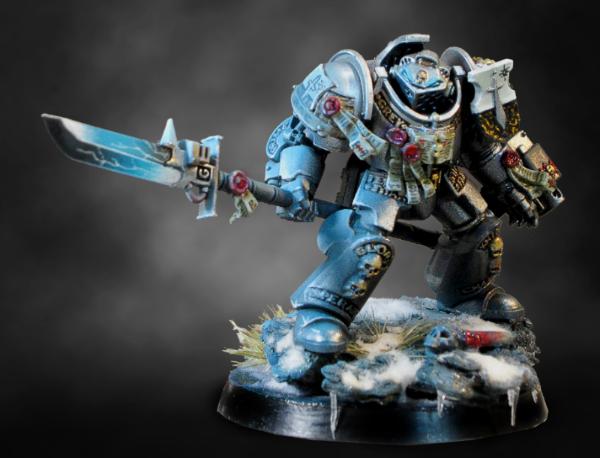
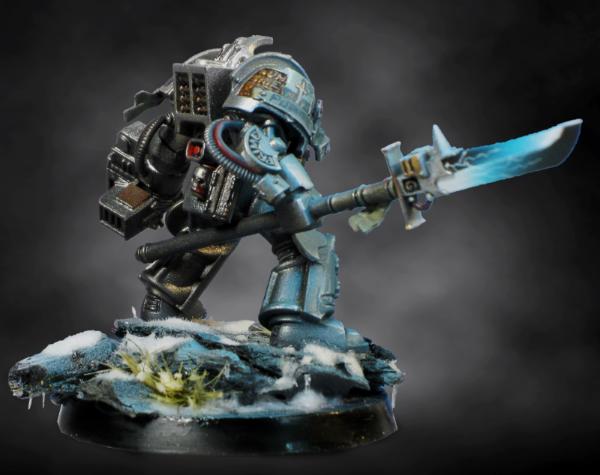
This will be all wrapped into the same piece, one of the new Grey Knight Terminators (kindly donated to for this tutorial by the very generous btemple0).
Originally, my intent was do do a darker more gunmetal version of a Greyknight, with less red used in order to keep the darker look. It ended up up being quite silver in the end, but I am pleased with it none the less. I do like the minimizing of red in the scheme, for some reason, I find toning down the competition between the reds and blues of the GW scheme helps one focus more, and makes it feel a little less 'cartoony'.
Basecoating
Zenithal Lighting - What does that mean?
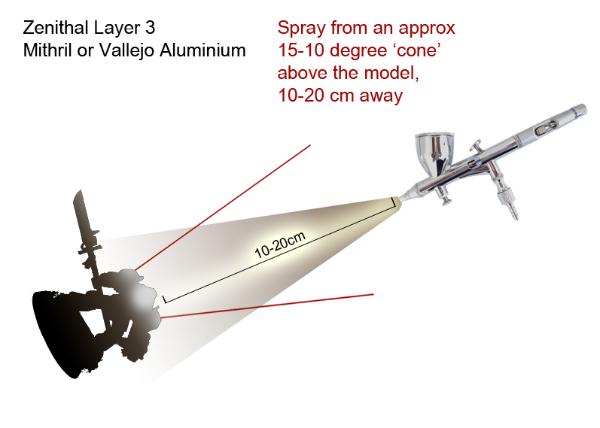
Zenithal highlighting is one of the newer techniques in the hobby world, at least with minis (most people would be quite surprised how advanced the military modelling scene is compared to ours!). It involves faking a source light, usually above or slightly to the side of a mini, creating high saturation, bright colors nearer the light source, and also darker, shaded and muted areas away from it.
The airbrush is the best way to achieve this, as it allows you a lot of fine control over the fading of colors. You choose the direction of your light source and simply begin layering paint, always from the same direction! This creates very accurate lighting, as you are spraying highlights, the areas occluded by other objects will automatically become shadowed. I.e - If I am spraying from above a minis head, the area under the chin will not receive paint, creating a shadow.
Let's see it in action!
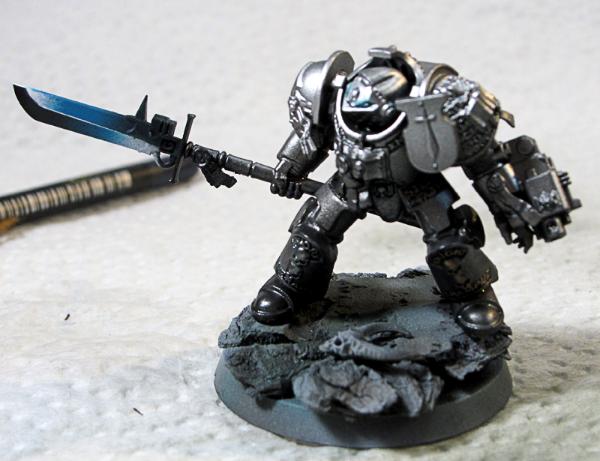
Step 1: Prime Black
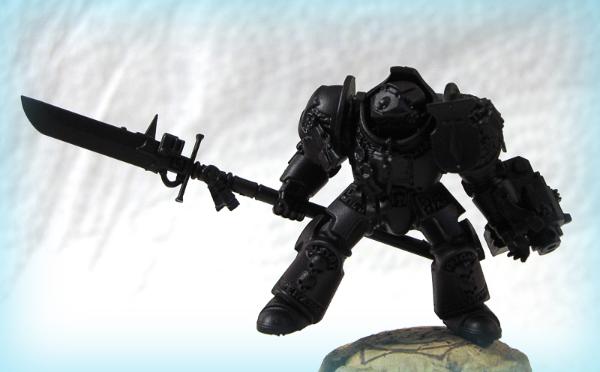
Simple enough, construct your mini, stick it to its base or a cork and base-coat with black primer of your choice. I used GW primer in this case.
Step 2: Zenithal coat 1
For the first coat, I used Vallejo Model Air Rust, which looks quite a lot like Tin Bitz. I put a few drops in the feed cup, added a few drops of thinner (about 1 for every 4 drops of paint) and mixed it in the cup with an old brush. You don't need to fill the cup, a little goes a heck of a long way!
I put a latex glove on the hand holding the mini, and, deciding not to go too fancy, chose an above the head light-source direction. So, angling the mini appropriately with my hand, I began spraying, starting the paint flow while aimed away from the mini, and then moving across the mini in long, even strokes. This minimizes the risk of clumping the paint and ensures, a nice, even coat. The airbrush was between 10 and 20 cm away from the mini, and I sprayed in a 40-45 degree 'cone' from above the mini, alternately moving the mini in my hand and the position of the airbrush in order to get a slightly more generalized coverage. This is the first layer after all.
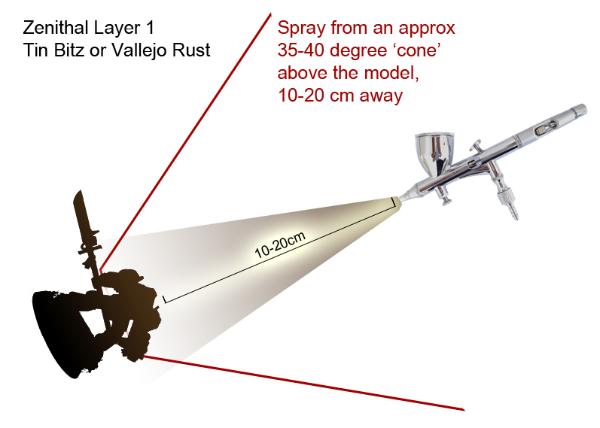
As you can see, most of it got covered, however it fades towards the feet. Had I been smarter though, I would have taken a picture from underneath, where you would see that everything facing 'downwards' was still black. * See the end of the article to see pics of the still black parts on the finished mini*
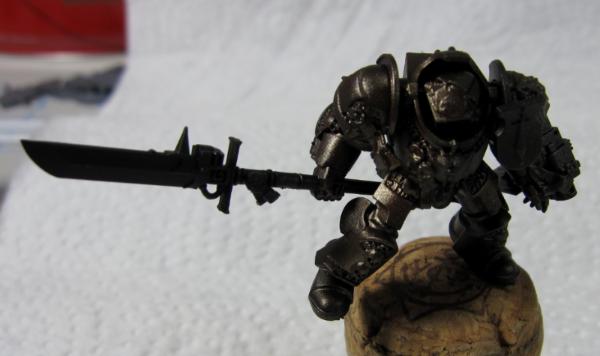
Step 3: Zenithal coat 2
Same as above, but we constrict the 'cone angle' to the focuses the color\lighting into a more obvious effect. Paint used was Vallejo Model Air Steel (Gunmetal type color) I was careful to start spraying at the wider angles, and then finish spraying on the tightest. This is so that the heaviest deposits of paint were on the higher areas of the model, like the upper thighs, chest head and shoulders. I tried to keep everything from the knees down with much less of a coat on them.
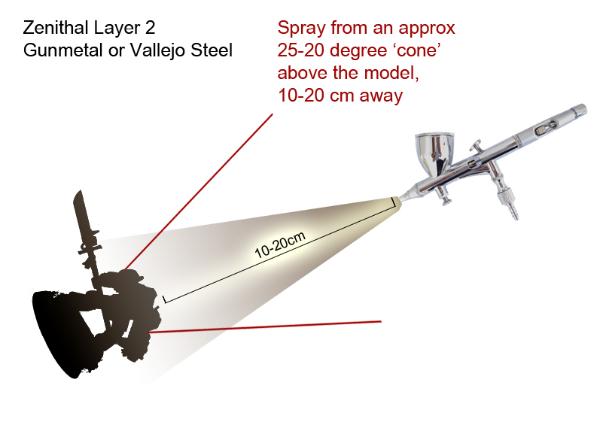
Step 4: Zenithal coat 3
Final Zenithal coat using Vallejo Model Air Aluminium (Mithril is the closest 'normal' paint I can think of, but honestly, the pigment count and smoothness of the airbrush paint is really on a different level). Same as before, but very, very confined to spraying from above without much latitude for angle shift. Once I was satisfied the head and shoulders were the brightest points of the model, Zenithal was done!
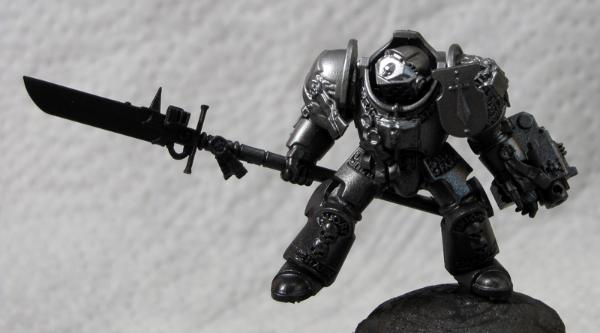
As you can see, the effect is quite convincing. Bear in mind there is no recess inking or washes here, and no biased lighting (it is lit from multiple lamps to the sides and top) so everything you see, and the impression of real lighting on the model is purely the result of the Zenithal technique. [Clarification] No other silver metallics have been applied to the areas which were not sprayed by the zenithal coats - they remain chaos black.[/clarification]
Weapon Blade
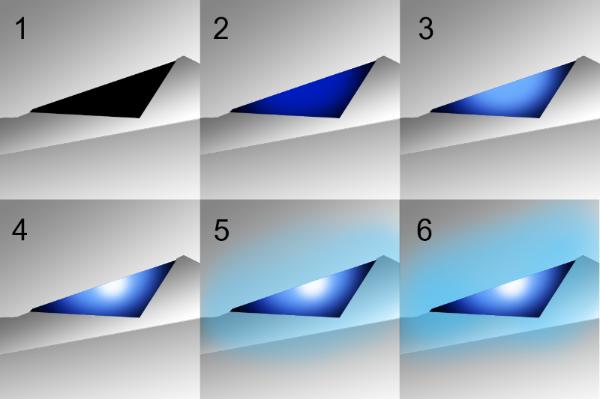
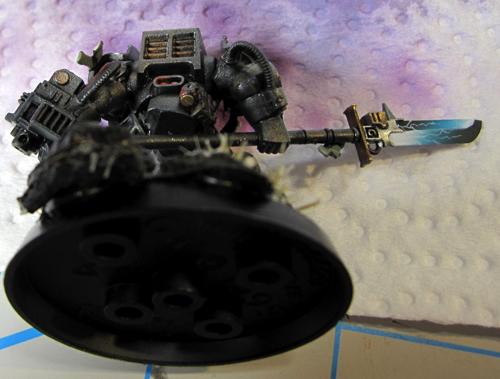
Step 5: Airbrushed Power Weapons
This step, is best illustrated by Mr. Les Bursley of awesomepaintjob.com, who you should definitely check out if you don't know who he is already!
http://www.youtube.com/awesomepaintjob#p/u/10/AImKoB10ans
You want to be at around 2.45 to see the sword specifically, but the entire thing is more than worth a watch don't get me wrong!
Basically though, just as a summary, you paint the entire blade white with the airbrush, next, you tape up 1 half of the blade along the bevel between the edge and the body. You choose one 'end' to start, blade tip or base, and you paint in turquoise with the airbrush, leaving about 1/3 white on one end only, and then a gradient to the turquoise all the way to the end on the opposite side of the white. Then, when that is dry, paint the other extreme away from the white black, with about the same area of white as black. Not vital, it doesn't have to be perfectly identical. As below -
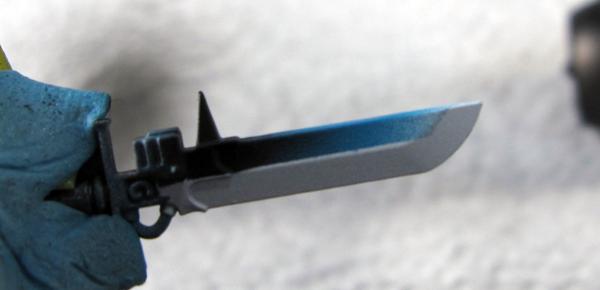
And finally, simply repeat the exact same process in reverse on the other side, and you are left with the desired effect.
Detailing
Step 6: Eye OSL
The eyes were done in 'normal' marine style. The only difference is that the mid highlight is a bit larger than usual, and the white 'dot' goes in the center of the eye as opposed to an upper corner. So you start with a black lens, then you apply a medium/dark blue like ultramarine, then you blend up to and 1:1 Ultramarine and Iceblue, then apply the white dot in the middle.
Now, the OSL. take your mid color, in this case the ultramarine-icyblue 1:1 mix. You need it nice and thinned, like a glaze. Then you have to use the push/pull paint technique, starting the brushstroke where you want the paint least intense, and then dragging the brush to where you want the most intense color. In this case, it would start mid forehead and dragged towards the lens edge.
Step 7: The base
I won't go into too much detail here, the base is made from tree bark (you can buy bags of it in gardening stores, some people use it to cover up the dirt in their gardens to prevent weed growth). Simply break up the bark and stick it to the base with a little GS and superglue. I used zenithal airbrushing again here, using greys and khakis primarily, and touches of wolfgrey too.
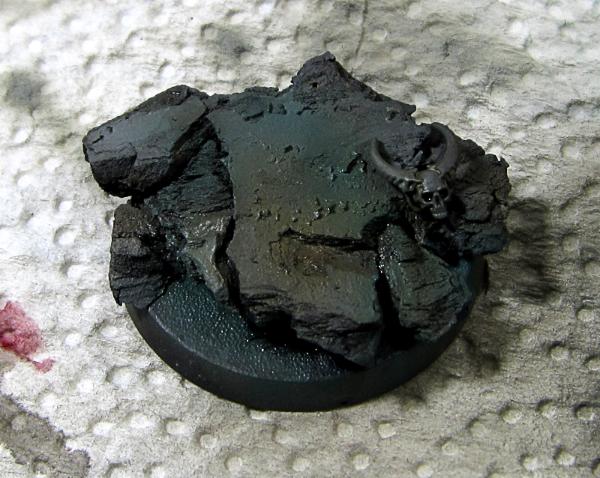
Right after this pic, I also sprayed some light white onto the edges of the top of the rocks, to give a frosty look. In retrospect, this would have been more successful on a darker base. Live and learn!
Step 8: Mounting the mini on the base
The mini had pins drilled into both feet for mounting on the cork used to airbrush it so far. I pulled the mini off the cork, applied a small glob of GS to the underside of one foot, and then applied superglue to both feet and pushed it into the base. The bark in this case was soft enough to simply press it in, but you should check first of course, otherwise drilling pilot holes would be necessary. The GS helps to keep the mini in place and secure while the Super Glue sets. In this case I used Zap a Gap.
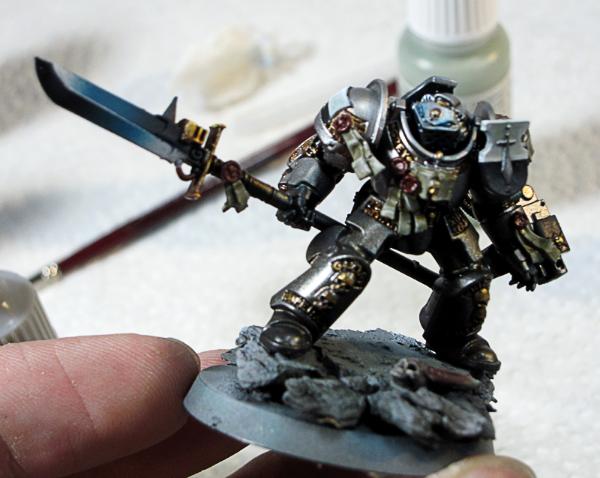
Step 9: Traditional painting elements, seals, parchments, gold and black/white
Now it was time to paint in the other elements. I kept in mind Zenithal values as I worked, adding more highlights the further up I went.
Gold: Gold areas were based in the same Rust/Tinbitz color as step 1. The first highlight was burnished gold, the second was vallejo model air bright gold, which looks like 1.1 burnished gold and mithril. These were applied only to the raised areas of the letters. As I went higher up the model, more and more of the highlights were used. For instance, on the lower legs, only the first burnished gold layer was used, and only on the upper parts of the letters. As we move up, more more was used, once it was halfway down the letters, I began using the bright gold highlight too. By the time you get to the top of the shoulders, the top 75% of the letters are bright gold, and the entire bottom part is burnished gold, leaving only tin in the recesses. Once done, a Devlan mud or Chestnut ink wash is used in the recesses.
Seals: Seals were based with Vallejo Model Color Burnt Cadmium, and highlight with Vallejo Model Color Vermillion. These colors are translucent, so the transition is quite smooth despite only using 2 colors. Seals higher up on the models received a watered purple ink wash. Seals lower down were washed with sepia ink, to darken them overall and not just shade them.
Parchment: Based with Vallejo Panzer Color Canvas, highlighted with khaki, highlighted again with bleached bone, and a final highlight of ivory. Same idea as the gold and seals, use less of the highlights the further down you go, to the point of omitting some highlight colors altogether near the bottom. Devlan wash to shade again.
Black: Chaos black base, highlighted with a 1:1 Black and Vallejo Panzer Model Dark Rubber and then highlighted with pure Dark Rubber.
White: Base, a 1:1:2 mix of wolfgrey, khaki and white. Successive highlights were built up by adding more white and a tiny touch of wolfgrey, until finally reaching pure white along upwards facing surfaces.
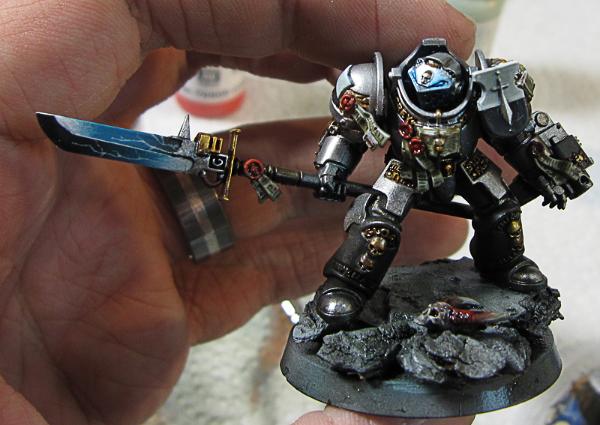
Step 10: Script, Base Wash and lightning energy effect
Scripts:I used a very fine brush, 000, and 1:1 black paint and water to write all the script and parchment lines. I like to add in some larger elements, like letters, inquisition symbols, hearts etc to parchments to break up the endless squiggly line syndrome. I also added in some reds with the same water mix again to break things up a touch.
Base wash: I black washed the base along the sides and recesses to darken it up a bit and accentuate the topography.
Lightning Energy Effect: Just as with the parchment, a 000 brush was used along with watered white paint. I used the push/pull brush technique again, starting my strokes higher up and dragging them towards the base in order to concentrate the brightest whites near the field emitters.
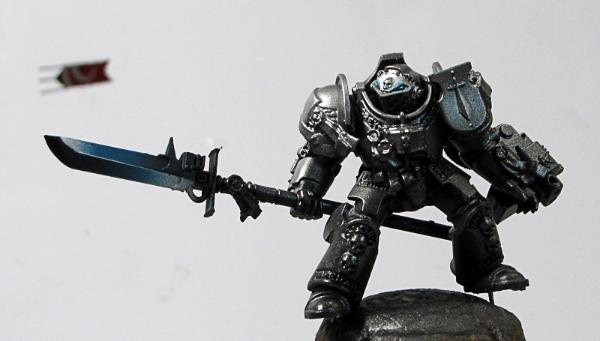
Step 11: Airbrush OSL lighting from the halberd blade
Now, the moneymaker. I wanted to try doing an airbrush OSL, and the halberd provided the largest, most likely source. I covered up the blade with silly putty (a very good masking agent I might add!) to protect the work already done. Then, facing right down the halberd, I sprayed a 50-50 iceblue/turquoise mix, diluted with thinner also about 1:1, and sprayed gingerly. I then added in white, and sprayed again, even less than the first time. This reproduces the Zenithal effect, using the Halberd as the source. This was the result:
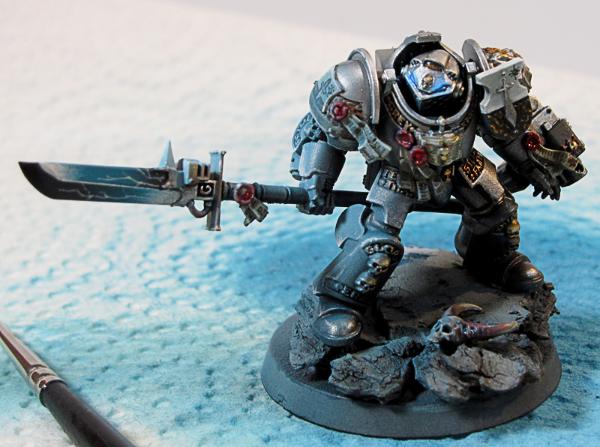
I freehanded in some white areas with very watered whites, to create specular hotspots, since I figured the surface was metallic it should look a touch shinier than OSL on a matte surface. If you look closely at the lower leg and forearm, I think this is the most visible place to see it in the photos.
Snow and Ice
Step 11: Snow
Now, I goofed here and didn't take pictures of the process. However, it is quite simple. I used 2 methods, one involving mixing GW snow flock (although apparently baking soda works quite well!) in with water effects, the other dropping unmixed flock on PVA glue.
The snow mixed in to water-effects gives you a thickish paste. When dried, it looks like slush or half melted snow. The more flock, the more snowish it looks, the less, the more slushish. I used this in the cracks between rocks, under the rocks, and also on the flat areas of the base under the rocks. I painted the flat areas (the actual base top) with a wet blended swirl of wolf greys, black and ultramarine. I wanted it to looks like slush on ice.
The other method is to use watered PVA glue painted in patches on the surface of the rocks. While still wet, you sprinkle snow flock into it, much like you would apply grass flock. The snow will stick to the glue, but remain powdery and matte. The result looks like fresh, un-melted snow.
I stuck some small Army Painter winter grass clumps in before applying the snow, and used the wet snow mix into it and over it, to make sure they looked integrated into the base theme.
Step 12: Icicles and Final Shots
The tiny little icicles you see along the underside of the rocks are made from hot glue. What I did was simply drag the glue gun directly along the surface of an old plate while slowly depressing the trigger. This left long rows of stretched, thin translucent glue. I allowed the glue to cool, and then got out the scalpel, looking for thin parts with a slight taper. When I found likely candidates, I simply sliced them off and moved them into pile to the side. Finally, I popped out a drop of plastic glue on a little piece of discarded plasticard and using tweezers, dipped the fat ends of the icicles into the glue drop and stuck them to the underside of the rocks... And... That's it! Instant, scale accurate Icicles!
The final shots, not the greatest photos, it actually looks better in some of the WIPs but you get the idea lol, feel free to give me a vote on cool mini too if you can spare a moment :)
http://www.coolminiornot.com/276277

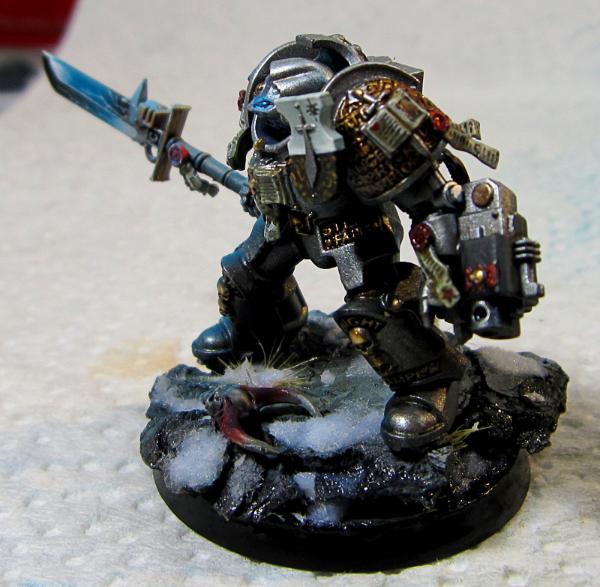
A quick last look underneath the mini
Many asked if the mini was still in fact black underneath as I described, here are the shots showing the final state of the mini when viewed from underneath -
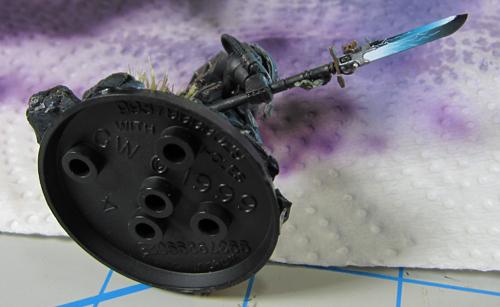
Doesn't look that same at all from that angle eh? Still black!
A little extra info; what I've got for equipment, where I get inspiration and advice
Links
Mistress of minis airbrush tactica thread: http://www.dakkadakka.com/dakkaforum/posts/list/244602.page
My first airbrush thread: http://www.dakkadakka.com/dakkaforum/posts/list/60/289941.page#2675420
Eggroll's BA airbrushing thread, the thing that really started me off: http://www.dakkadakka.com/dakkaforum/posts/list/313003.page
Lbursley's free video coolness: http://www.awesomepaintjob.com
He has a youtube channel as well: http://www.youtube.com/user/awesomepaintjob
http://www.miniaturementor.com/painting_tutorials.html
- Mathieu Fontaine Rust and Weathering techniques, Dreadnaught, about halfway down, pic of a white rusty dread. Teaches good basic airbrushing, particular modulation style and masking, also oil washes.
- Thomas David, Art of Speedpainting, 3 quarters of the way down, teaches zenithal techniques.
MIG Faq vids, both excellent, modulation one is particularly good!: http://migproductionswebshop.com/index.php?cPath=21&osCsid=a7aa590d68a8e74b2bee07aa8e1a19dd
And finally our good friend Brandon, from GMM studios just put out a new tutorial disk on CMON: http://www.coolminiornot.com/shop/dvds/the-7-day-army-painter-with-Brandon-Palmer-Elysian-dropship-troopers.html
Other than that, just go to youtube and start searching airbrushing, weathering, pigments etc etc, there is tons of stuff on there. Most of it is from military modelers, who have been doing this far longer than the 40k community. They really, really know what they are doing and achieve stunning results!
The March 2012 issue of FineScale Modeler has an extremely, extremely comprehensive set of articles about airbrush maintenance and how to address specific problems both with the airbrush itself and how to assess your paint mix... has visual examples too along with the cause and solution.
I find this very useful and I have a bit of experience, for a beginner it could be a life-saver...
Check it out!
http://www.finescale.com/en/The%20Magazine/Current%20Issue.aspx
My equipment:
2 Master G44/PS900 airbrushes, gravity fed. Clone of Iwata brushes made in china, dirt cheap and so far work well!
http://www.amazon.com/Air-Pro-Tools-PS900-Decorating/dp/B0013DSONI/ref=sr_1_1?ie=UTF8&qid=1302747192&sr=8-1
http://www.amazon.com/PRECISION-DUAL-ACTION-AIRBRUSH-Detail-Graphic/dp/B001BY8FWE/ref=sr_1_11?ie=UTF8&s=arts-crafts&qid=1302747235&sr=1-11
NOTE: I have been getting more and more negative feedback on the Master Airbrush... looks like the quality from the manufacturer is on the slide.
http://www.secretweaponminiatures.com/index.php?main_page=product_info&cPath=95_96&products_id=481
I also own an Iwata Eclipse Sidefeed and an Iwata Custom Micron C+, but these airbrushes, although awesome, are way expensive and not neccesary for miniatures, I can still do everything I want with my Master G44's no problem with great results. If you really get into airbrushing, and get the experience you need to appreciate the pro- brushes, you may find it worth it, but without that experience the difference is almost impossible to notice. Like giving a really expensive, rare wine to a kid who never tasted wine before, they have no clue what they are tasting, no point to compare, and may or may not have the pallet they need to even tell the difference later on.
Based on more recent reviews from friends, I suggest checking out the Badger Renegade Krome. A little more expensive, but comes with extra needles and is a very good brush according to those I know who own it, and they are experts so I'll take their word!
Sparmax TC 610 dual action aircompressor with 2.5 litre tank. Same company that manufactures the actual compressors for Iwata, but cheaper. Same deal.
http://www.sparmax.com.tw/air_compressors_2.html
Paints and washes, liquids and mediums
Vallejo Model Air Metallics -
Vallejo Game Colors, full set -
Vallejo Model colors, a limited selection of reds and greys -
Vallejo Panzer colors, a limited selection of khakis -
GW paints, a selection from many generations -
GW inks, old school -
Vallejo inks -
GW washes -
GW black primer -
Distilled water -
Liquitex, various items, flow aid, retarder, matte medium, gloss medium, airbrush thinner -
Airbrush related misc.
- Quick release kit on each airbrush
- airbrush cleaner
- ring of various sized bristle brushes
- various plastic squeeze bottles
- Ultrasonic cleaner
- double filter mask
Final tips/tricks
Make your own thinner
Take 2 parts Isopropyl Alcohol to 8 parts distilled water to make your own airbrush thinner
Make your own airbrush cleaning fluid
Use dilute simple green and distilled water to make your own airbrush cleaner. Follow recommended instructions for light duty mix -
Wear a mask
Goes without saying for solvent based paints, but acrylics also produce a lot of dust, which occasionally has nasty stuff in it. Even when it doesnt lung fulls of atomized acrylic isn't good for you. Always wear a filtered mask, or, better yet, invest in a spray booth, or build your own
Clean clean clean
Clean your brush by emptying the pot and rinsing and spraying distilled water a few times and then running airbrush cleaner through it as well. This is what you should do every once in a while to begin with, even if you are still in the middle of airbrushing. When you are done though, you absolutely MUST clean your airbrush thoroughly. This means taking it apart, soaking it in cleaner for at least 15 20 mins, (better yet buy a cheapie ultrasonic cleaner and let it soak in that for a few cycles), pull it out, clean each piece with a toothbrush and make sure you buy yourself airbrush cleaning brushes too, there are 5 or 6 metal wire pipecleaners on a key ring, they fit in all the tight spaces where the needle goes. Reassemble, and store.
NOTE- Learned lately
If your AB is sputtering and clogged, angle it down so the nozzle is steeply pointed at the floor (not straight down, just point it as far down as it will go without spilling paint and leaving enough room for your hand to shake without spilling paint). Unscrew the back of the AB, and unscrew the locking nut. Slide out the needle, and wipe it down with a damp cloth to get the gummy gak off the end of it.While the needle is out, send a few blasts through the AB itself to clear it. Without the needle in, there is nothing to stop paint coming out so don't expect just air! This is also the reason you angled the AB nozzle itself towards the floor earlier, as without the needle in to stop it, the paint would be able to run backwards into the chucking assembly too. Re-insert needle and try it out, it should be working a bit better now. If not, time for a full disassembly, wash and pipecleaners.
Thanks for reading!