I've always been a big fan of Necrons, ever since the first metal Necron that came free with my copy of White Dwarf (a long time ago).
And since the release of the latest range of models I've once again been drawn back to them, and when I saw the latest addition to the list,
The Tesseract Vault, I started dreaming up ideas for what i'd do if I ever got my hands on one.
Well I need not dream anymore, as I now have one, and am planning on converting it into something bigger, and a lot more dynamic than the standard kit.
One of my favorite parts on this model are the Canoptek Leach's (the bug things on the side of hull),
but they seem way to static to me, so I'm going be to cutting all eight Leach's from the hull, and converting them into separate models,
which will be crawling in, out, and around the Vault when it's finished.
The other main part to this conversion will be centered on the C'tan, who will be transformed into the the Nightbringer (big hooded creepy C'tan looks like death)
He will still be located at the center of the vault, but will be held there by a huge Necron bug (will think of better name later), which I plan to build using 3 Canoptek Wraiths,
and a Canoptek Spyder.
I will be doing a lot more to this kit, but I've yet to finalize all my idea's, so for now I'll be sticking with the main two,
and this will be a long term project, something for me to do in my spare time, so I'm sure they'll be a lot more happening with this project as it progresses.
If anyone has any questions, quires or feedback to give on this project, please comment below.
Here are a few pics of the actual kit (before I start cutting holes in it),
and I will be adding more pics and updates as I go.
I've made a start by first removing all the Canoptek Leaches from the hull, which was a little tougher than I thought it would be,
but I managed it without causing any major damage to the hull or the leaches.
I also trimmed all the energy pieces off the C'tan, as I didn't much like that part of the model, and they wouldn't of worked with what I've got planned anyway.
Next job is to clean up all the rough edges on the leaches and the hull, quite a tedious process, as it took me 20 minuets just to do one leach,
but as soon as its done I'll share the result in another update.
I haven't done much work on this project since my last update, but once I've taken some pics, I will post what little progress I've made so far.
In the mean time though, I can show you the collection of Necron bits that just arrived at my door,
all of which i'll be using on the Tesseract conversion.
I haven't had the chance to work much on this project yet, but here's what I've done so far.
After cutting the leaches from the hull, I cleaned them all up (which took longer than I imagined), Attached the heads and the pincers,
then started designing the legs, which have been cut from 1mm plastic card.
Each finished leg Is made from two plastic card pieces, with the cables sculpted from a mix of green stuff and milliput.
I've got 8 legs done so far, only 56 more to go.
@ Pekel: Thank you for the comment.
As far as paint goes, It might sound a little boring in contrast to what over people have done with Necrons, but I'm planning on a mix of light and dark metals, for the Canoptek leaches, with details picked out in black.
And for the Hull of the Tesseract Vault, a black, kind of like obsidian, with glyph's, details etc picked out in a collection of greens.
But its probably going to be a long time before any paint touches this project, which is great, as it gives me plenty of time to practice my painting (which isn't great) , and learn some new techniques.
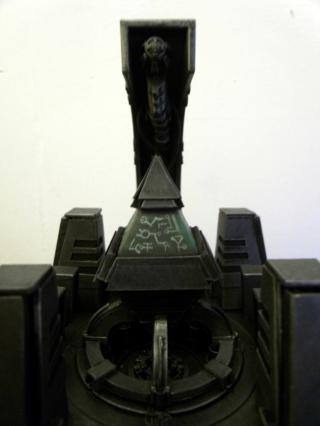
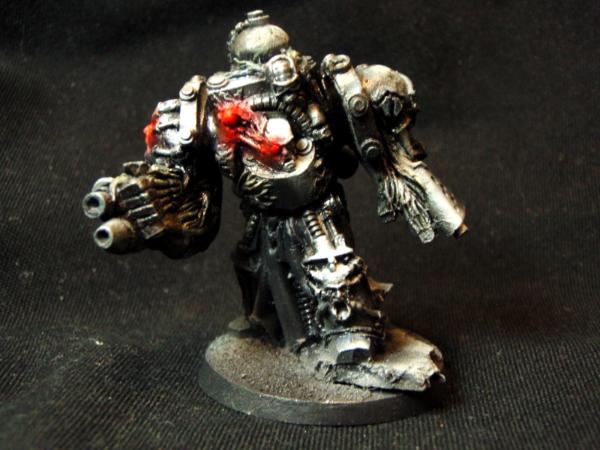
On the subject of color, I thought I'd share these pics of my old monolith conversion,
as it shares a similar color scheme to what i'll be using on the Tesseract Vault.
I've also included a pic of my old Nightbringer, as he'll be making a return in this project,
when I convert the Tesseract vault C'tan in to my own version of the Nightbringer.
@ ShinyFind: I mainly just use a sharp knife to cut the plastic card, but i do use a technique where you score the plastic first, then carefully bend and snap it,
this gives you a much cleaner edge, especially when working with the thicker stuff (around 1mm).
When making curved pieces I'll use a thinner plastic card (0.5mm), wrap it around a tube or something to give it a curve,
then glue a second piece on the inside to make sure it keeps it shape.
I've divided this project up into 3 smaller projects, to help me manage it a bit easier.
one is the Tesseract Vault itself, which will form the top of a buried Necron pyramid.
Next are the Canoptek Leaches, as shown in my early post, they will be crawling in, on, and around the vault and pyramid.
Last but not least is the C'tan at the heart of the vault.
The C'tan is what I've been working on recently, converting it into the Nightbringer, as you'll see in the pics below.
I've also started building the Construct that will hold the Nightbringer in place,
I call it the Canoptek Guardian (WIP pics below)
Loving the look of this conversion work, that C'tan is absolutely stunning!
I've also considered removing the energy effects if I got one which I am considering, so I'm curious to know how difficult and how long did that process take?
Proiteus wrote: Loving the look of this conversion work, that C'tan is absolutely stunning!
I've also considered removing the energy effects if I got one which I am considering, so I'm curious to know how difficult and how long did that process take?
Thank you for your comment, and to answer your question,
trimming the energy bits of the C'tan only took 2 or 3 hours to do, and its worth taking your time to make sure you don't damage any detail on the model.
I cut of all the energy pieces roughly with a pair of wire cutters first, then went close with a knife to trim of all the excess (think of it like a giant mold line)
before sanding it all smooth.
It was a bit tricky in places, but I think it looks so much better without those bits on.
i have to say i am not usually a fan of the Necrons.... models or fluff..... ( not too sure why... just something about them)....
But this project is definetly turning my head! The C'Tan is awesome!... The base figure from the Vault is really impressive on its own and the effects of the robes and swirls really capture movement and some power!
Im not sure what they are or called but the "scarab" units with the added legs look great! ..... did you cut them all individually..... or have some kind of cutting machine... tool???
@ MagosBiff90: Thank you very much, I just hope my meager painting skills are up to the task, when it comes to painting the C'tan, and picking out all that detail.
As for the "Scarab" units, their called Canoptek Leaches, And yes I have had to cut out all the pieces by hand,
I still have more to do, and I'll need just under 200 of them in order to do all 8 Leaches.
A precision cutting machine or bench would be great, but that's one piece of kit I think I'll have to wait for .
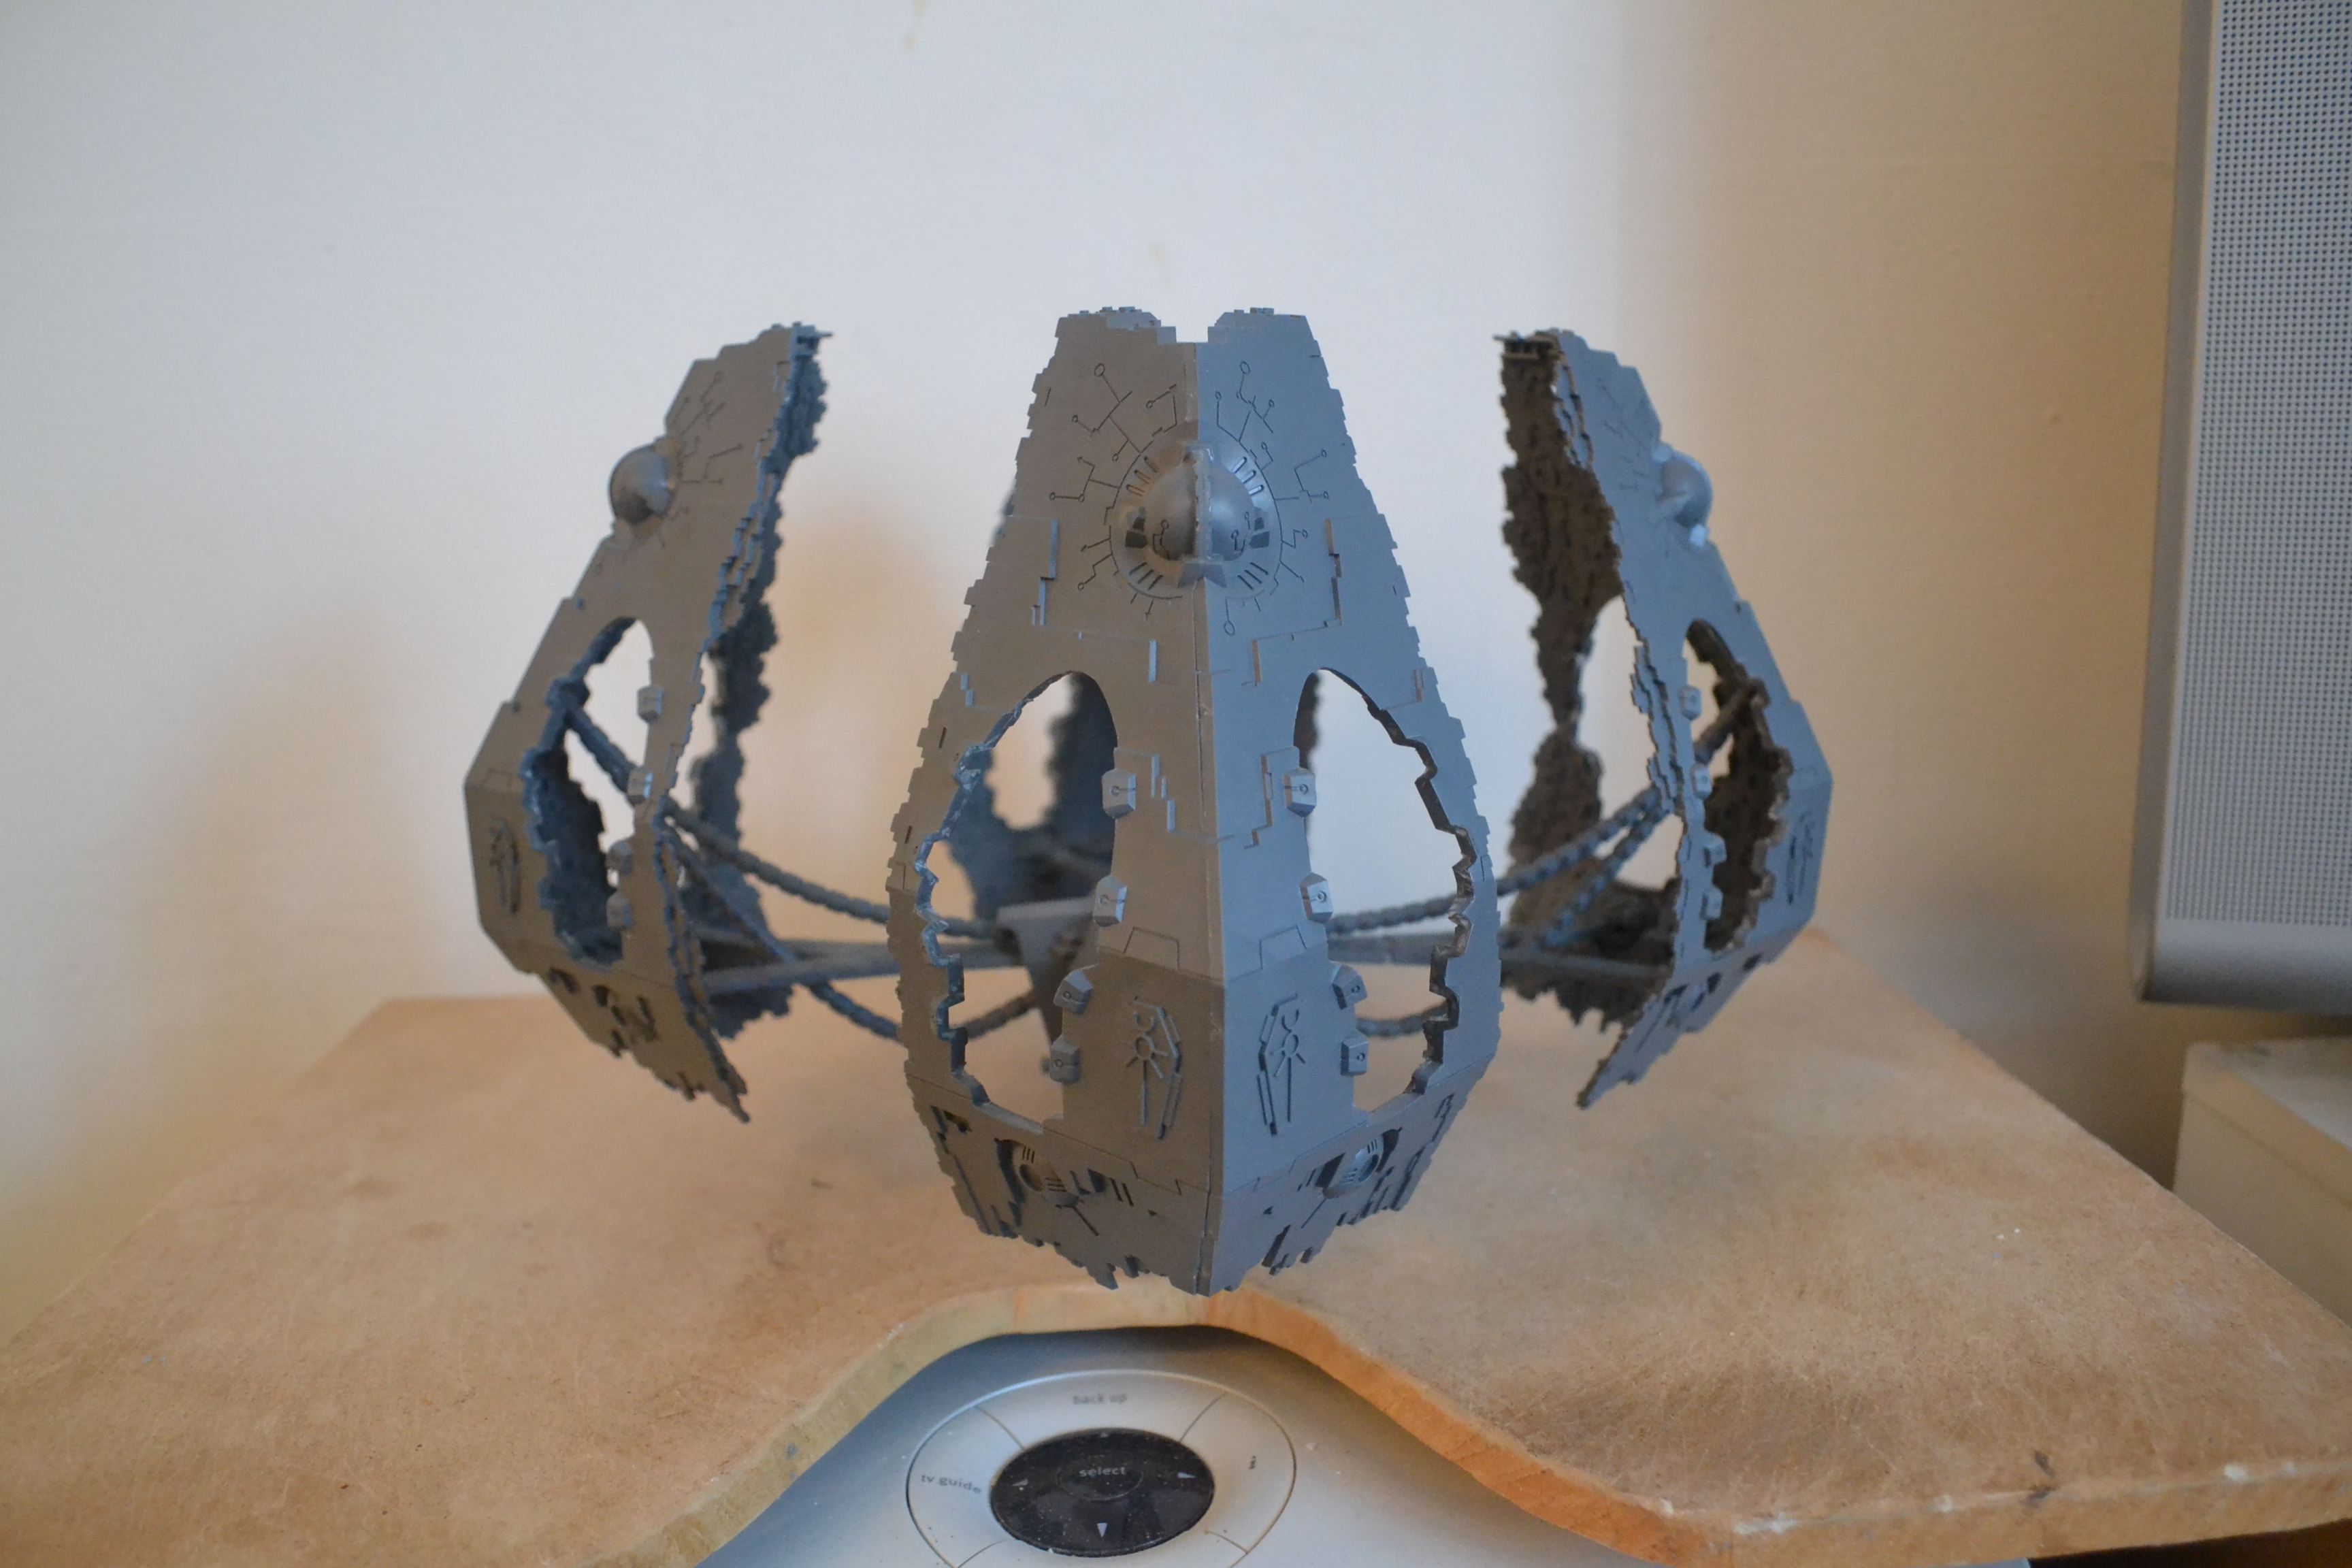
While I take a break from making dozens and dozens of legs for the Canoptek leaches, I thought I'd Start on the Tesseract vault itself.
After cleaning up the space's where the leaches used to be, I assembled the vaults 4 Corner pieces, plus the main center piece that holds it all together.
When the Tesseract vault is all finished it will sit into a stand come terrain piece, made in the shape of a Necron Pyramid,
which has been lost to time, and is mostly buried in the sand.
The idea is I'll be able to remove the vault whenever I want, and store it back on the Pyramid when it's not in use.
I've created a very rough mock up out of some foam board, just to give me an idea of how the Pyrmaid might look,
And also help me work out where on earth I'm going to put it when its finished .
What size are he spheres in the tops of the pyramid? I picked up some clearance toys at goodwill that come in translucent colored balls that might be about the same size. Would be awesome if they were the right size to put in there, then you could light them up as well
Red Corsair wrote: Oh god I just watched Zardoz again the other night lol
Yeah that was a weird movie and Sean Connery sure made some strange career choices with that role running around in a red diaper after Charlotte Rampling in Zardoz and giving a pass to the part of Gandalf in LOTR to play Alan Quartermain in the 'League of Extraordinary Gentlemen!' plus making a hash of a remake of his best Bond ever 'Thunderball' which BTW 'Never Say Never Again' featured the career debut of Rowan Atkinson in a supporting cast role as a low level spy.
Thank you everyone for your comment's, their most appreciated .
@ The_Blackadder: Work has ground to a halt on the Tesseract Vault, as I've been busy working on other things,
in an attempt to reduce the number of unfinished projects that have been screaming at me for attention.
So of course I've done the only logical thing, and started two more .
I do however have a few early WIP pics of my Canoptek Guardian, the large mechanical construct that binds the Nightbringer to the Vault.
There's still a ton of work left to do, but this should give you an idea of the direction I'm heading.
One more thing I forgot to mention, was that I'm thinking of starting some Tutorials in the new year,
these will include various techniques on sculpting and modeling, and I'll be starting a new thread to cover them all.
So what I'd like to know is what kind of tutorials would you all like to see, is there anything from this or any of my other threads,
that you think could be useful to yourself or others.
I already plan to do one on basic sculpting, covering tools, clay types etc.
And another on Plastic card basics, as I've talked to many people who didn't even know plastic card existed.
So please feel free to bombard me with as many ideas as you like, and I'll see what I can do .
It's been awhile since I posted anything on here, so I think this project deserves an update,
even though I haven't made much progress, I have started working on some additional extra detail.
Included on some of the Tesseract Vault sprue's are these tiny versions of the Necron Scarab,
now I always imagined having hundreds and hundreds of tiny scarabs swarming and crawling in and over the Vault,
and pouring fourth from the pyramid upon which it sits.
To get the number of scarabs I'll need, I decided to make a mold and cast some copy's in resin.
So far I've only cast 68 Scarabs, so I've still got some way to go .
Speaking of scarabs and also of potential tutorials, I'm interested in knowing what the undersides of those scarabs look like. Did you use a simple press mold? What products do you use most often? Do you buy online or from supply stores? I'm really interested in a tutorial on how to use greenstuff well. What about 2 part molds? Also, I love the idea of scads of tiny scarabs swarming everywhere. And the last bit is that I am hoping the pyramid is going to get a lot more detail. I know it's likely only a mock up as yet, but my biggest issue with so many necron conversions out there is that the add on pieces people tend to make look so plain by comparison to the necron models.
@ Solar_lion: Here's the mold I made to cast the Scarabs,
It's made from silicon (left over from another project).
I left the Scarabs on a piece of sprue so they'd be easier to handle,
It also created some nice air channels in the silicon, you probably don't need them in an open one piece mold like this,
so its mainly for convenience.
I've recovered the photo from the alternate dimension that is the internet, so it should now appear on the post above .
@ Warboss_waaazag: Because these small Scarabs sit flush with the floor and there's not much underside detail on them,
I've only done a simple one piece open mold, so the underside of my copy's is just blank.
The two products I mainly use for casting are from a company called Polycraft,
one is the Silicon Rubber I use for the molds, Its extremely durable once set, and great for picking out every little detail.
The other is the Resin, Its a fast cast polyurethane resin and as the name suggests it cures very quickly,
once mixed you have about 30 seconds to a minute to pour it, then 20 to 30 minute's before removing it from the mold.
A long life version of this same resin is available and gives you more time to work with it,
but I haven't used it myself.
I buy all my supply's online now, it's easier and a lot cheaper,
also the option to buy in bulk is very useful and that too can save you some money.
Here's a link to the eBay page I buy my casting supply's from: http://www.ebay.co.uk/sch/grp_supplies/m.html?_nkw=&_armrs=1&_ipg=&_from= And here's another called Green Stuff World, who do some very useful item's for sculpting etc: http://www.ebay.co.uk/usr/greenstuffworld?_trksid=p3984.m1423.l2754 These are good sellers, but I would always recommend shopping around,
you never know who's selling the same item for less.
Tutorials for terrain, sculpting and mold making are something that I really want to do, unfortunately at the moment I just don't have the time to work on them.
But It is something I will get around to eventually.
Last but not least is the pyramid, and I completely agree with you about conversions not matching the detail of the original model.
It's something that's really important to me when building a project like this, that everything ties together and works together.
My plans for the pyramid are to mirror some of the design work from the Tesseract Vault on to the pyramid,
it will also feature Stasis alcoves for Necron Warriors who have yet to awake, and small vents and openings giving a small glimpse as to what lies within.
I have loads more insane ideas for the pyramid, but they need to be tested first before I start building anything.
I hope that answers your questions,
and if anyone has any more please feel free to ask .
Pretty cool Idea, one piece molds make life so much easier for somethings.
BTW: What putty do you use for your 2 part molds, I used to use the plasticine that, that store sells but I found it a real pain to work with not just because of stiffness (I'd been heating it up in the oven) but also cleaning the stuff off the master model, any advice?
@ OneManNoodles: For the two part molds I've made in the past I used a cheap air drying clay, which seemed to work ok.
But recently I've started experimenting with another quicker way of making two part molds.
Rather than casting both half's of the mold separately and adding in your channels as you go,
I build a framework of tubes around my master model, and then cover the whole thing in silicon.
Once dry I then cut through the silicon, making sure to line up you cut with the channels,
but only cutting about a third of the way down, so the mold can be stretched open just enough to remove the master,
and any future casts.
This technique isn't without its difficulties, and I'm still refining the process,
but at the moment it seems to be working quite well.
This is an awesome thread, can't wait for more update on the vault.
I have yet to start mine, and you are inspiring me to do more than the basic kit ...I have done a lot of minor conversions before...but nothing compared to this.
@ davethepak: Thank you very much, I'm pleased to hear there's someone else out there converting a Vault,
and I look forward to seeing you progress at some point.
Not sure when my next update will be, but there will be one eventually (when I find some spare time ).
Thanks very much for the tip on molding, I've just given it a try with something, good results so far and it leaves a very familiar mold line to anyone who has bought FW products also gives lots of mold slip if your not careful ... like FW
I'll be following this and saving many bits of it for later, to help me with both BFG & WH40K projects. Two of which do use the Tesseract Vault's bits.
Sorry it's been such a long time since my last update, but I'm finally back on this and am determined to get at least one
of my unfinished projects finished before Christmas.
Whether or not I manage it is another matter entirely, but I'll do my best .
As for actual progress, I still need to take photos of most of the new pieces I've been building,
but for now heres a pic of the six legs I recently finished for the Canoptek Guardian,
the large mechanical construct that keeps the C'tan Nightbringer confined within the Tesseract Vault.
I have already attached the legs to the Guardian, so expect a pic of that, and more coming tomorrow .
As promised here are some pics of the Canoptek Guardian, with the Nightbringer contained within.
Plus a few shots of the Canoptek Leech tail section's, and the press mold I used to make them.
Both models still need a lot of work, which is today's task,
so I should have more to show you tomorrow
Haven't made much progress on the Tesseract Vault today, but I did get a few delivery's, of what will
hopefully be all the bits and materials I need to finish this project.
That is until I have to buy more super glue
So I now have a nice stockpile of plastic card, pipes and tubes,
as well as a box of 3 Canoptek Wraiths, and one Triarch Stalker.
Thanks for all the comments guys, there most appreciated .
Progress on the Canoptek leech's has moved on quite a bit since my last update, as those of you who saw the start of this project know,
the Canoptek leech's are the large Necron bugs that I cut out and removed from the hull of the Tesseract Vault (see pics below).
As you can see from the photo there wasn't a lot of detail on the underside of the leech's, so I decided to add my own.
This turned out to be a lot more time consuming than I imagined, but I think it was worth it.
Here's one of the almost complete Leech's for you to look at,
now all I have to do is finish off the other seven .
Just a quick update to show off the finished Canoptek Leech's.
I've made 7 crawling leech's, and 1 sleeping leech,
the sleeping one will be attached somewhere on the Tesseract Vault, in some kind on stasis or self repair mode.
While the the others scurry about repairing and maintaining the vault itself.
Thank you everyone for your comments, they really do help motivate me to get this project finished .
Now the Canoptek leech's are finished I'm now moving on to the Tesseract Vault itself,
and after a conversation with one of my brother's, who pointed out that the pyramid like vault looked way to bulky,
and didn't really go with the detailed work I'd done so far, and maybe a more fluid and open design would work better,
I straight away realized he was right, and got to work redesigning the vault.
So what I've done is dramatically cut down the size of the four vault corners to create this open centered platform,
which will eventually hold my Canoptek Guardian and Nightbringer.
This is only the basic shape right now, and still needs a lot of work and detail.
But as you'll see from the pics I have made a start.
Just for comparisons the first pic is what the vault originally looked like,
followed by my version below.
I never did really like the very obvious open/closed vault being two different units. This makes the vault look much different, and it seems like the c'tan will be more of a focal point. Bravo!
Progress On this project might slow down a little now, as I start designing and building the platform section of the Vault.
I've already made a start by referencing pieces from other large Necron models,
this helps me work out the shape of each piece, so it fits with the aesthetic of other models in the range.
I have the first four platform pieces done, although at the moment their just basic shapes and need detailing.
Eventually their will be a second set of smaller pieces, which will form the center of the platform.
I've also started detailing the interior of one of the Vault corner sections,
Featuring the remains of damaged or deactivated Necrons.
Knightley wrote:That is so awesome, love having the broken Necrons stuffed into the corners, really adds a ton of detail that I felt the larger model overall lacked.
Your right, even though they tried to add some interior detail with the original model, it just ended up looking at bit flat and feeling like a missed opportunity.
Kepora wrote:Oh, you gotta add some of the little scarabs crawling over them!
That's the plan Scarabs everywhere.
xXWeaponPrimeXx wrote:
Kepora wrote: Oh, you gotta add some of the little scarabs crawling over them!
OSL in the eyes will add an extra creepy effect to them too.
I've never tried OSL, but from seeing examples I know that it can be tricky to get right, and easy to make a mess of.
But it's something that I do want to try, as your right, it will make a big difference to the finished model.
Ask Meade for some tips maybe? I think most of his stuff has OSL done to them.
I haven't been able to get too much done this week, as RL has a nasty habit of interrupting you just when your getting started .
I did manage to complete most of the interior detailing for the four Vault corners,
and have continued with the theme of damaged of deactivated Necrons being stored in the Vaults alcoves,
and although quite time consuming, it has been one of the most fun parts of this project so far.
I still have a few more bits and pieces to add like extra cables and wiring, some Scarab Hive's, and of course lots of Scarabs.
I'm also working on a background story for the Vault which will explain many things,
including the reason for the Necron Corpse's, why this particular Vault was constructed and by who.
I haven't been able to get too much done this week, as real life has a nasty habit of interrupting you just when your getting started .
I did manage to complete most of the interior detailing for the four Vault corners,
and have continued with the theme of damaged of deactivated Necrons being stored in the Vaults alcoves,
and although quite time consuming, it has been one of the most fun parts of this project so far.
I still have a few more bits and pieces to add like extra cables and wiring, some Scarab Hive's, and of course lots of Scarabs.
I'm also working on a background story for the Vault which will explain many things,
including the reason for the Necron Corpse's, why this particular Vault was constructed and by who.
Sorry for the temporary break down of this thread, and for the multiple copy's of the same post But it should all be working fine now, and I hope to have another update for you soon
Yawser - this is truly amazing stuff. Expect me to steal at least 100 ideas for my AdMech.
Those stash/graveyard corners are simply breathtaking - and we even got to enjoy them several times
My apologies for the lack of updates recently, been working on sculpting the Canoptek Gaurdain a new tail,
and it's slow going .
In the meantime I thought I'd show you the Canoptek Drones I've just finished.
You could call them repair drones or maybe just really big Scarabs, either way they'll be scuttling about the vault
Doing whatever it is Canoptek Drones do .
The Four Drones where built almost entirely out of the parts from three Canoptek Wraiths,
with maybe enough parts left over to build a fifth, which I'm not sure I'll need yet, but you never know.
Well the big thingy is AMAZING, and will be one of those pieces we all ogle at for years, saying" Just amazing man!"
But I do love these little bits you keep throwing out on the side, they look great. You are the first to get me interested in a Crony army. ( Must resist.) These guys look brilliant, and fun, and scary all at once.
OneManNoodles wrote: looks like they released a new version not long after I bought mine (the shape of the pieces is the same just clear plastic).
Drones look very nice! that's a cool use of the wraiths, what are you going to use them as?
Also isn't there a lot more to the wraith kits than that?
The Drones are just for decoration, something to add a little more detail to the vault.
Yes there are still quite a few bits left over, the wraith tails for one plus a few extra body panels,
which I'm sure I'll find a use for eventually.
Update:
As for progress on the vault I have spent the last few days sculpting a new tail for the Canoptek Guardian,
as I just didn't like the way the other one looked.
The new tail is basically a scaled up version of a canoptek Wraith Tail, and still needs a few finishing touches.
Now so far you've only seen individual pieces of this project, but soon I'll be doing some mock assembly's
and tacking everything together so I can work out the next phase of the build.
When I do this I'll post some pics, so you can get a rough idea of what the Vault will look like when finished .
It's a sign of things to come, and actually fits with the theme of my next project, a Nagash Diorama with the rising of undead legions.
Dr H wrote:Good work on the tail, hk. Is that "just" strips of GS around miliput? Did you use any helpful tricks?
Thanks, and yes it is green stuff around milliput, but i think if I had to do another one I'd use a different technique, as this was quite time consuming. Next time I'd try sculpting the tail in one piece, sanding it smooth, cutting it into sections, then glue them all back together with small plastic card spacers in between each of the sections.
Thanks, and yes it is green stuff around milliput, but i think if I had to do another one I'd use a different technique,
as this was quite time consuming. Next time I'd try sculpting the tail in one piece, sanding it smooth,
cutting it into sections, then glue them all back together with small plastic card spacers in between each of the sections.
As promised here are the first shots of the assembled Vault, it's only tacked together so far and no where near finished,
Plus there's still a lot more pieces to add, but at least it gives you some idea .
the shrouded lord wrote:I expect a lot more scarabs. A LOT.
Boba Fett wrote:This looks great! And yes: scarabs!
Don't worry there will be a lot of scarabs, two or three hundred at least
xXWeaponPrimeXx wrote:I look at this and imagine some kind of energy field or projections coming off those guardians.
The Guardian is actually the big guy in the middle, the smaller ones are the leech's,
but I like the energy field idea, I imagine that the Guardian creates a field that holds the C'tan in place
and the Leech's keep it maintained and at full strength.
My apologies for the lack of updates these last few months, but I'm back on this project now and determined to get it finished .
I've even got myself a copy of the new codex to help me right a back story for the vault, and build a new Necron army themed around the Nightbringer.
As for Project updates, I have done a little more work on the Vault Platform, where the Canpotek Guardian and Nightbringer will eventually stand.
I'm waiting on a few extra bits to arrive, but I hope to have more to show you soon .
How did you do the grooves in the white plastic parts?
I marked all the lines in pencil first, then scored them with a craft knife. This gives me a guide I can use
to run a pointed sculpting tool down in order to widen them slightly. After that you just need to clean up
the edges of the grooves with a knife.
That is so cool! The flow of scarabs looks really natural and organic(apart from the fact they are metal death machines obviously) and as soon as I saw it I was reminded of the Mummy and its beetles. Which I assume is the imagery you want to evoke no?
How did you do the grooves in the white plastic parts?
I marked all the lines in pencil first, then scored them with a craft knife. This gives me a guide I can use
to run a pointed sculpting tool down in order to widen them slightly. After that you just need to clean up
the edges of the grooves with a knife.
See, whenever I try that I always end up with wonky lines. must try harder... or maybe be more gentle...
Apart from a few more extra details, and a lot more Scarabs, this projects almost finished .
Of course I still have to paint it, which will be a project in it's self.
I've test fitted all the pieces as you'll see below, and made a few changes with the placement
of the Canoptek Leaches, which have been moved from the Vault corners to the sides of the center platform.
I also removed the Leaches tails, which just didn't look right.
I still have four more leaches to add, which will either be attached to the underside of the vault
or used on the vaults display base, which I've yet to build.
Sorry if the pics are a bit rough, I will take some better ones soon.
I haven't said much but I've been watching every step of this with great interest. It looks huge! Really looking forward to seeing it painted as well, well done!
Could make new tails for the leeches, either coming inwards towards each other and down - or similar to that, but all 'intertwining' without actually touching?

 .
.

 .
.
 everything of yours is truly original.


 .
.


 must try harder... or maybe be more gentle...