A Beginners guide to painting
By Ifalna
Getting your first models and trying to work out what you need to get started is a very confusing time for new painters, and has been as far as a lot of people have gotten before giving up! There are so many paints available in thousands of shades, varieties, and brands and it can be extremely overwhelming.
This is a very simple guide to show how little you actually need to start painting mini's, and how to utilize basic techniques to get the best finish you can out of very few paints!
We are going to paint up a tabletop standard Goblin using highlighting, shading, and drybrushing techniques, and also try out some paint mixing.
Do's and Don'ts for the new painter
- Don't bite off more than you can chew. If you have never painted mini's before or are still gaining confidence in it, for your own sake please don't start off with a forgeworld resin Dread and end up frustrating yourself while being unhappy with the job you are doing on a very expensive detailed model.
- Do start off nice and easy. Some Gamesworkshop stores have practice 1 piece miniatures they can give out for painters to experiment on, the little Goblin in this article is one such mini! Start off small and easy, go for miniatures that do not have extreme detail and that are not crazy pricey. Basic Space Marines, Orks, Tyranids are all great models to start off on as long as you go for the bog standard models and not expensive and detailed characters.
- Don't spend huge amounts of cash on paints you are very unlikely to actually use, or invest in brushes that aren't that likely to last more than a couple of months. Synthetic brushes are a bit cheaper but are going to end up in the bin even if you try to keep them as well as possible. Hooked tips and forked ends are nearly impossible to prevent, and will tend to be affecting your painting even before you notice the brush needs replacing.
- Do think ahead about the colours you are going to need. Don't worry about buying 8 shades of red for instance when all you really need is a basic red, a yellow, a brown, and a blue. Combining paints will get you a huge amount of shades and you won't have to pay for an entire bottle you are unlikely to ever finish!
- Don't give up! I can promise you that no, you are not the worst painter ever, and yes, you are totally going to improve. If your first few mini's are getting you down, don't worry about it. Take a break, have a rest, and come back fresh and ready to try again. There are huge amounts of free articles for you to read out there, and they really do help if you are struggling with a specific aspect.
Never feel like you are not going to reach your goal, keep practicing and learn from your mistakes and you will be putting out fantastic work sooner than you would think.
What you need to start painting

Brushes
There are 2 basic brushes that are fantastically useful and should be owned by everyone who wants to start off painting with the right tools. The first is a brush that is going to serve you well for both detailing, and laying on base colours, which is a size 0 Series 7 by Winsor and Newton. This is a great sable brush that will last you years if you don't abuse it, and gives fantastic detail results while being able to hold enough paint to easily and quickly lay down colour!
One of these bad boys will cost you about €7-€10 euro from any art supply store, but is really worth it. Not having to replace it every few weeks/months and getting superior results will leave you with a lot more confidence than using a terrible little cheap synthetic that will cause you problems.
The second brush is what is known as a drybrush, which can be any cheap bristly brush, even one from a bargain bin. The reason this does not have to be a high quality brush is because its whole point is to abused, you are going to fray the bristles in all directions and wipe it all over tissue and generally be horrible to it, so don't worry about spending a lot on this kind of brush :)
Water
2 glasses of water may seem strange, but there is method to this madness.
By keeping one of the glasses for only cleaning the brush when you have metallic paint on it (which I marked with an M as I am clearly a genius) you will stop your cleaning water ending up with tiny specks of floating metals which can show up in your colour coats if you accidentally use the water to thin some paint. Always take water to thin with from the normal glass, and leave the metal glass to the side so you won't use it instead. It is a great way to avoid nasty mistakes.
Cleaning agent
There is a white brick in this photo also, which is a block of "The Masters brush cleaner and conditioner". I have had this block a couple of years now and you can see how little of it gets used, bar the chunk I cut off to give to a friend. This stuff will not only completely clean your paintbrushes for you if you massage it into them when you are done painting, but will also prolong their life span if you use it to work them into a point with it before putting them away. It is dirt cheap and lasts, well, a long time!
Wet palettes
A wet palette will take only a few minutes to make from items you will likely have laying around the house, and will stop your paint from drying out as you use it. Super handy! There is a great article on how to make one here Click
Some tack
Some good old blue-tack stuck on top of a pot or dowel will let you move your mini around without touching it directly. This means less smudging fingerprints or oily marks getting onto the paint and is a great habit to get into.
The paints required to paint this mini
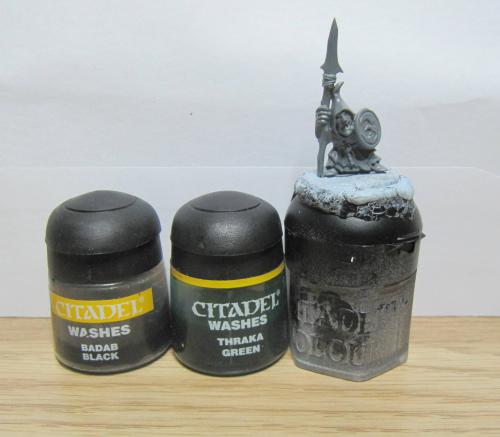
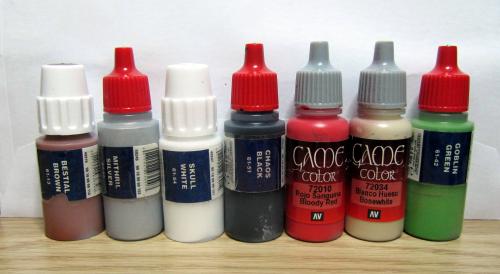
Not too many! When I painted this mini I specifically used some really basic colours and stuck to them. Nothing else was used bar these 7 paints and two washes.
Bestial brown - A really rich brown that takes Badab black perfectly and can also be mixed with a small amount of Bleached bone for a perfect highlight colour.
Goblin green - Can be mixed with Skull white or Bleached bone for a lovely highlight colour, and gets a very rich finish when overcoated with Thraka green.
Mithril silver - Can be mixed with black to create Boltgun silver or Chainmail, takes Badab black wonderfully.
Blood red - The staple red. Can be mixed with Black, White, Brown, Yellow, or Blue to create a myriad of great shades, and is very easy to both highlight and shade.
Bleached bone - Great for teeth, and also fantastic for mixing with browns and reds for a highlight. Mixing white directly into these will alter their shades entirely and so can look strange if used to highlight.
Skull White and Chaos Black - Staples, can be mixed into any paints to shade or highlight. I use them with everything.
There are two washes here as well, and washes are something definitely worth buying. Start off with Badab black for easy shading, and then depending on your preferences and what you are painting, it is a good idea to grab some of the coloured washes to help you out too. Painting Orks? Get Thraka Green. Painting Ultramarines? Get Asurman blue. Whatever the main colour you are painting is, it is a good idea to get the wash to match. They really, really work wonders.
As with all paints, make sure you carefully close them when you are done so they do not dry out quickly. I have gone ahead and transferred my citadel paints into dropper bottles you can get for a few cents in drug stores. This lets me drop out very small amounts of paint while keeping them very well sealed :) Definitely worth the few pennies I paid.
Painting step by step
Priming
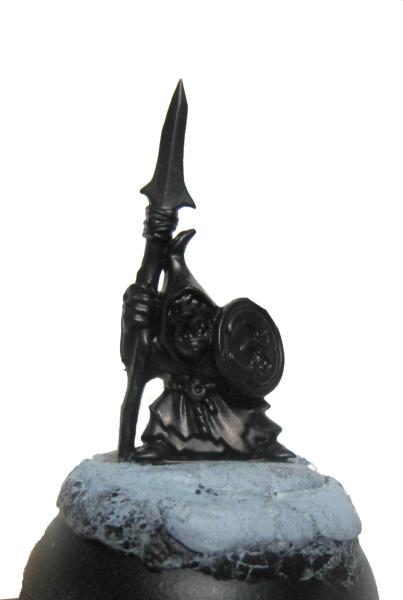
Start off by basecoating your mini. You can do this either by spraying on primer, or simply painting on your base coat for plastic models.
White basecoats are a little more challenging to use, so we will go with a black basecoat for this Goblin as he will be wearing black clothing anyway.
Teeth and eyes
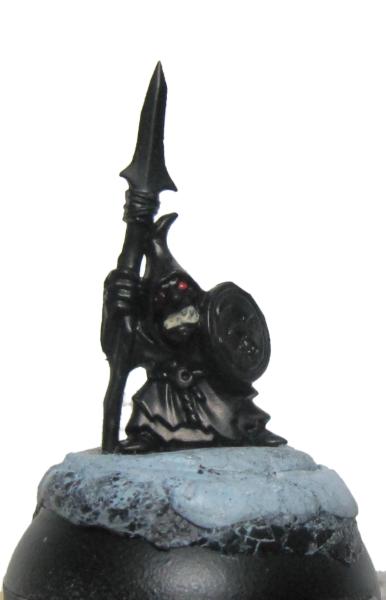
Let's start off with the teeth and eyes, because they will be very hard to paint in later if we paint the skin first.
Simple layering on some Bleached bone for the mouth is absolutely fine, and some dots of red give him some evil little peepers. Don't worry if these are messy, because we are going to be painting over all that black anyway and can tidy it right up.
Base colours
Make sure to water your paints a little before you start adding colour. If the paint is not thin enough it will be very hard to use, so swirl the tip of your brush in the paint before you use it and see how it feels. If it feels thicker than full fat milk, add a tiny amount of water from your brush and mix it in. This takes trial and error but the earlier you start, the quicker it will become second nature.
Watering your paints is a very important thing to try out, any painter who has gone a year or two without doing so will preach it to you :)
Brown and red will give him some nice colour. Let's paint his shoes, his little belt, his shield and his staff pole Bestial Brown, and then paint on the moon symbol red. If you are having trouble not getting the brown onto the moon symbol, then you can just carefully paint on the moon on after the brown. It is all down to which you find easier. Some people find it easier to paint raised areas, some people find it easier to paint lower areas. Try it out and see which works better for you.
Make sure to paint the belt at the back too! I was silly and totally forgot.
He is going to look very messy now, but don't worry! A mistake many people make is to only add one layer of colour, and it looks spotchy and sad like this poor guy. As we continue I am going to show you how to highlight with more layers, and he will have lovely solid colour by the end.
Shading layer
Time to cover all the painted areas in Badab Black wash! He looks even worse now, but this wash will make highlight super easy for you and give him some simple shading.
For this layer we won't water the wash, just add it straight from the pot and make sure to give it time to dry.
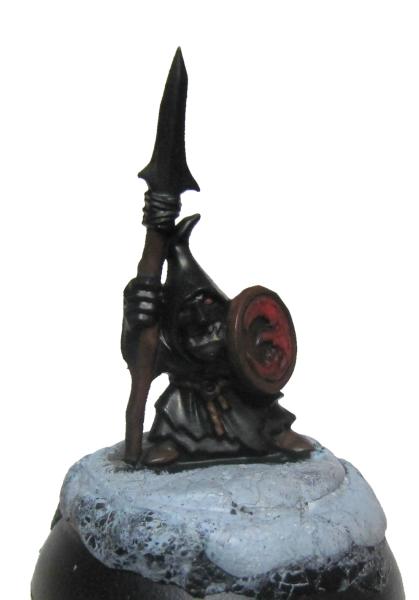
First highlight layer
Now we get to the part where he starts to look a little better.
The Badab black has added shadow for us, so now we need to paint on the light.
That term can be very daunting, so lets look at it simply. The black has pooled where there will be shadow on the mini. Think of it as liquid shadow. There are parts where it is not as dark because the black has not pooled there, and that is where we need to paint on the light.
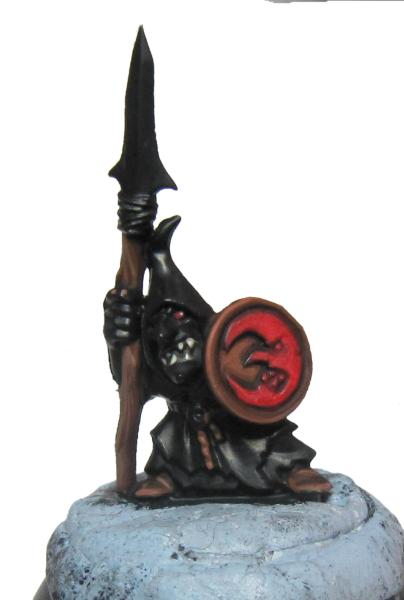
We can use the exact same colours as before because the black darkened them enough for us, so you can highlight by simply painting both Bestial brown and Blood red straight back on! If you look at his shield you can see the super dark recesses I left alone, and the flat areas I painted the brown and red back over.
Make sure your paints are still being watered correctly, and wipe any excess off the tip of your brush, you just want enough that you can control it nicely, not lots heaped up on the brush making it hard to lay down.
His belt, eyes, and teeth can be painted by just spotting the tip of the brush on them. Don't worry about brush strokes here, they are not really needed! Little drops of paint can do the job just as well. His staff is wood, so if you simply make lines of bestial brown down it you will get a simple wood effect that looks really nice and was not at all hard. A fun little thing to try out.
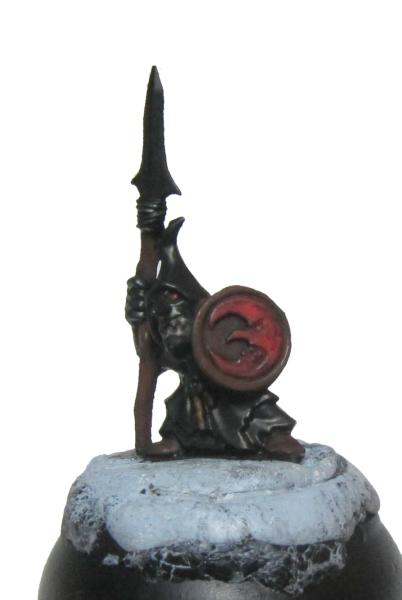
Second highlight layer
You don't have to do this step, but it will really help finish off the mini and is great practice!
You can make a final brown highlight by mixing a a small bit of Bestial brown and Bleached bone in a 1:1 mix, and a red highlight by mixing a tiny bit of Bleached bone with some Blood red. Make sure to thin them! ( I will keep heckling about this)
If you apply the brown highlight using the side of your brush along the edge of the shield, it will finish it off nicely. You can also add a teeny bit in the center brown area if you want to try it out. Painting it in thin lines over the lines you already painted on the staff will give that a nice finished look too.
The red mix can be applied to the edges of the moon to give it a little kick, and you can spot a very tiny drop of skull white onto the teeth and corner of the eye if you keep a steady hand. He looks far better now than he did with just one colour layer down, it really makes a huge difference.
Skin base layer
Now for his skin. This is nice and easy, just use the Goblin green with a tiny bit of water to thin it. Lay it down carefully making sure to not paint it over any areas you already painted, but it is fine if it gets on the unpainted black as you can clean this up easily.
Skin shading layer
Once the skin is done, apply a layer of Thraka Green wash over it and leave it to dry. This will darken it for you and make the green nice and rich, letting you highlight it easily.
Now is a good time to get the metals down. As we are only using Mithril silver, you can mix it with a little black to get a nice dark metal for his weapon. Remember to rinse your brush in the water for metal use only!
Skin highlight layer
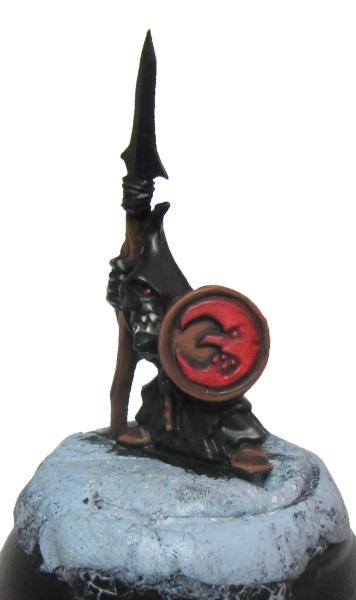
Your first highlight will be normal Goblin Green again, and you perform the same actions as you did when highlighting the other colours. Leave the areas the thraka pooled in clear, and paint the rest with the green again. This is quite subtle but looks lovely. You can see the grooves of his fingers are still shaded, and under his lip and cheekbones.
I have also added Badab black over the metals which will shade them for us. It really is a great paint.
Skin final highlight
You can go ahead with a tiny additional skin highlight if you like now, just mix a very small amount of Skull white into the Goblin green to get a minty colour and make sure to thin it. If you stroke this carefully on the highest points of skin which are his upper nose, tops of fingers, cheek bones and chin, it will really help them get some depth and be great practice for you too.
Now is the time to drybrush the silver too, which is a lot of fun. Get your drybrush and dab it in some Mithril silver, then get some kitchen roll or tissue and wipe the brush on it till there is barely any paint coming off. By then brushing it across the silver weapon parts, it will leave a very thin layer of silver on the raised edges and give a nice metallic effect very quickly.
You can drybrush any highly textured areas as a bonus, it is really great for fur and hair.
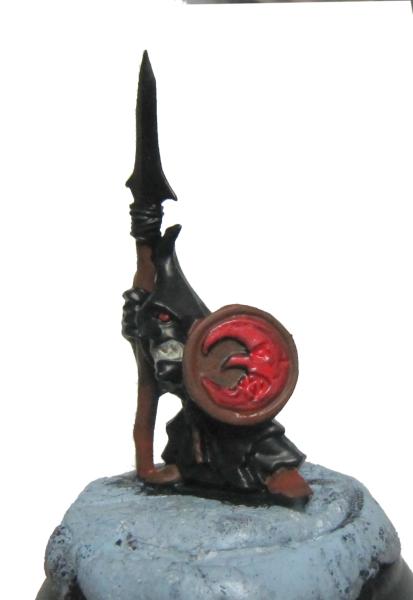
Black cloth highlight
Black is very tricky and something that everyone finds a bit difficult to get right, but don't worry too much. The more subtle you make this, the better it will be.
Black can be highlighted with different shades, browns, blues, even reds. But for this mini we will stick with the colours we started with and just mix a very small amount of Skull white into some Chaos black. Make sure to thin this carefully or painting it on will be difficult.
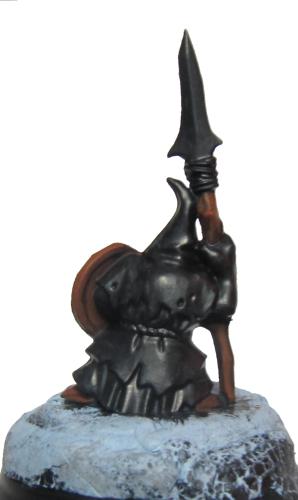
The first thing to do is paint this very dark shade of grey onto the bottoms of the cloth around his legs, and leave the upper folds black. This will give it nice shading.
You can then carefully paint the grey along the raised folds of the cloth which the light will be reflecting off more, helping you to spot them. By leaving the darker recesses black, it will add a lot of depth to him for you. You can really see this along his back.
His hat can be nearly entirely this dark grey as long as you leave black in the creases. You may have noticed I left his belt black on the back, which is me being silly and forgetting. Hopefully you saw my note to remember it earlier!
Black cloth second highlight

You can skip this if you like, but it is great practice for controlling your brush and can give a lovely final result!
Add a little more white to your grey mix, just a tiny bit is enough, remember that subtle is always better for black.
Make sure it is nice and thin as this will help it not stick out too much over the grey, and then carefully paint it along the most raised folds on the black cloth, and along the bottom of the cloth too.
You can see where I painted little fine lines of this to add a bit of extra texture, this is lots of fun to do and you should definitely try it out if you are feeling up to it!
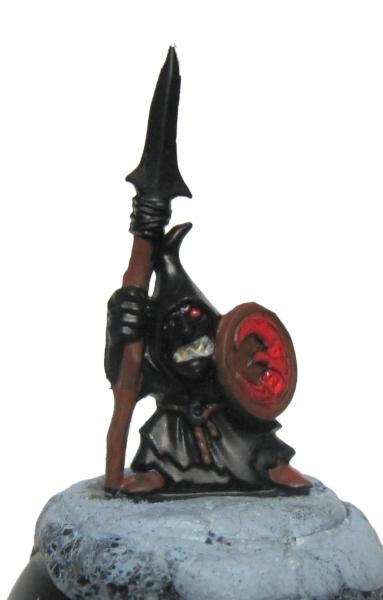
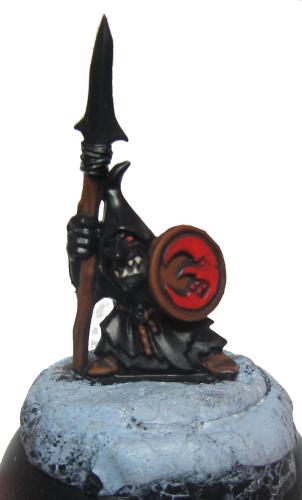
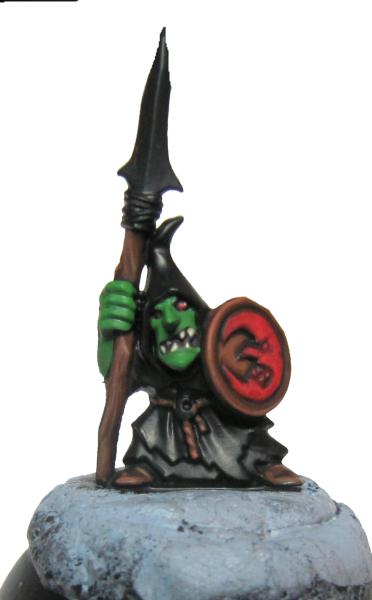
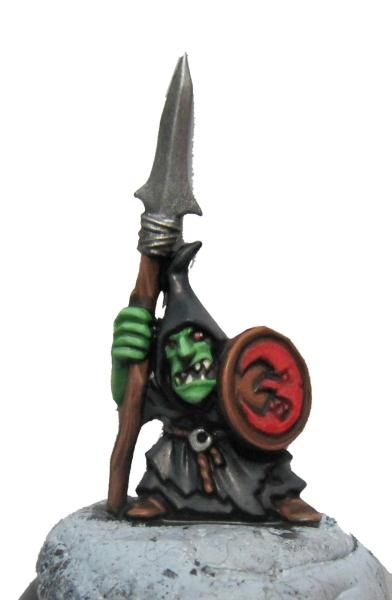
Final result

And that is the mini all finished.
If you followed the steps you not only practiced highlighting, shading, and drybrushing, but you also did it with very few paints! These are techniques that will really help you move forward as a painter and also leave you with much nicer mini's than if you painted on the usual one layer of colour and left it at that.
This Goblin would look very nice in a unit painted to the same standard, and once you get used to the techniques involved will not take long to paint at all. This little guy only takes about 15 minutes work bar drying time once you are confident and able to highlight with practice.
Hope you enjoyed the read-
Ifalna