99
Post by: insaniak
I don't normally show off commission jobs until they're completely finished, but in this case the buyer (Dakka's own Yakface) thought it might be interesting to show the process from start to finish. So, I'll be detailing the conversion process as I go, and then once Yakface receives the finished model, he'll take over the blog as he paints it. Should be fun, if only because I very rarely get to see my work painted...  So, the project: Yakface wanted a winged Hive Tyrant with a little battlefield presence. What we settled on is a combination of Hive Tyrant and Carnifex parts, which will be modified as we go to blend them together and to keep it looking sufficiently 'Tyrant' rather than blocky and 'fexey. I'll be using Tyrant legs, with a Carnifex torso and head. We decided the larger torso fit in nicely with the increased chest muscle and lung capacity needed by a flying creature, while the proportionately slimmer legs represent the fact that he doesn't need to run too far. 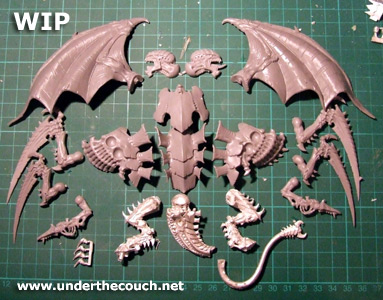 The first job is to modify the Carnifex head to look more Tyrant-ey. I started this off by shaving off all but the first of the head-plates, and adding new, slightly smaller plates with green stuff, leaving the large, bulbous cranium area at the rear. 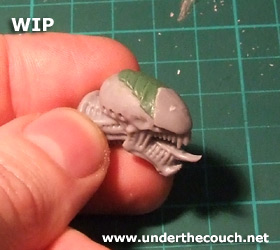 The plates need a little smoothing down, and then I'll add the row of spikes (including the Tyrant's signature massive nose spike) to the plates, and some exposed veins on the cranium. Weapon-wise, I'll be magnetising a couple of sets of arms: two sets of Scytals, and two sets of twin-linked Devourers. Since the wings take up an arm socket, the remaining arms need to have two weapons each, which will mean a slight rebuild. I started with the Scytals, by slicing off the hand at the wrist and turning it sideways. I then added two Scytals as fingers. 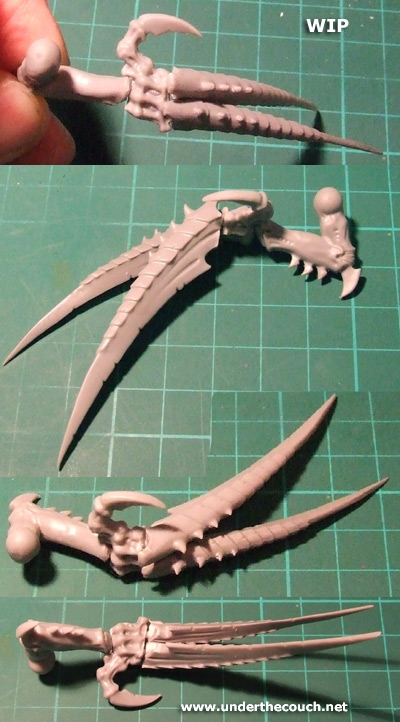 These are just pinned in place at this point. Assuming Yakface doesn't hate them on sight, the next step will be to glue them and then fill the gaps with green stuff. Next episode: The head gets spikey with it, devourers get linked, and Doctor House initially thinks it's one thing before deciding it's actually something else, and then discovers that it was the first thing all along, but they missed it because they forgot to stand on one leg while doing the MRI... .
3197
Post by: MagickalMemories
Dude!
That's it?
No!
Work faster.
Must...
See...
More...
<G>
Nice work.
...and, if he doesn't like the scytals, I LOVE 'em! Maybe we could work something out!
Eric
436
Post by: 2.0
love the concept so far... except for the hands It may be a case of seeing it on the model, but I'm just not sure about Edward Scissortyrant 
60
Post by: yakface
The fingers look great to me (just what we discussed), and I'm glad you're going to be putting the veins on the head. I really like the idea that the Tyrant is always thinking really hard (focusing his Warp Field and passing on Synapse) to the point where the veins are popping out of his head.
The one thing about the claw fingers: you say that you're going to fill in the gaps, can you also build some sort of tendon big enough that it looks like it could power such a massive "finger" blade? Perhaps you were already planning on that, but right now it doesn't look like there is a big enough muscle in the hand to power such large claws.
Overall the head plates look great and I like the overall look of the hand/claws.
Looking forward to the next update. . .
550
Post by: Clang
I like the Eddy Scissorshands look and may well steal the idea - I've been looking for some unusual conversions using the standard Carny sprues
3499
Post by: DylantheVillian
Those hands are friggin sweet!
513
Post by: Symbio Joe
Looks prommissing, I am really looking forward the outcome.
2776
Post by: Reecius
Yes, that looks like it will be a great model when completed, please post more works in progress shots.
609
Post by: SirNotInThisFilm
am I the only one who can't see the pics?
609
Post by: SirNotInThisFilm
oh there they are.
Also House rocks.
695
Post by: Drake_Marcus
So good that I wish I had one of them under my couch. 
1214
Post by: Gen_eV
Yay Yakface for requesting WIP shots!
Have to say I'll be watching this with great interest, as I'm in the planning stages of a winged HT conversion myself. The idea for the head is one I'll have to have a go at with a spare 'fex head, looks like it'll really make the difference in stopping it look like a flying Carnifex.
99
Post by: insaniak
Yakface: "you say that you're going to fill in the gaps, can you also build some sort of tendon big enough that it looks like it could power such a massive "finger" blade? Perhaps you were already planning on that, but right now it doesn't look like there is a big enough muscle in the hand to power such large claws." The tendon is an excellent idea. The actual muscles driving the claws would presumably be in the forarms, but the hands are a little too skeletal for the tendons to be internal... So, here's what we end up with: 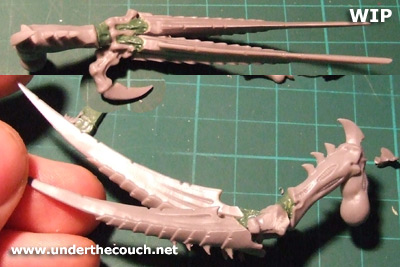 Still need to do the backs of the hands, which will have another tendon running from just under the rear armour plate back into the hand. Meanwhile, the head got spikey: 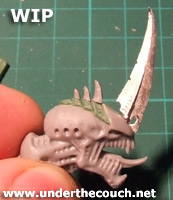 Still needs gap-filling around the base of the spikes. After a look at how this fits into the torso, I may also wind up having to remove the neck and reposition it, but we'll see how that goes once I have enough of the body assembled to settle on a pose. And, I started on the Devourer arms: 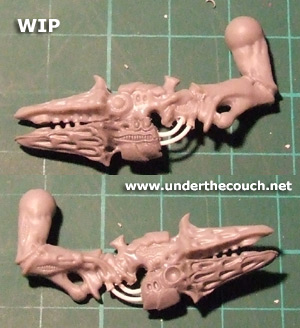 Again, no putty yet. I'll add a little detail around the tubes at the rear, fill in the hand socket on the bottom devourer, and possibly join up the three spines in between the two 'barrels' of the weapons. My magnets arrived yesterday as well, so once I start assembling the torso I can get that bit sorted as well. Gen_eV: "Yay Yakface for requesting WIP shots!" I actually always send out WIP shots to the buyer over the course of the conversion. The only real difference here is that they're being posted publicly rather than just emailed directly to him. Although with the Blog format, there are admittedly a few more WIP shots than I would normally take... A note on the pics: I have been having some sporadic troubles with my server lately... The host company assures me that it's been fixed, but I'm not convinced. If you can't see the pics, leave it a minute or two and try again... It' appears to generally not go down for longer than that. Next Episode: Fun with magnets, Building a better torso, and Agnes shows us how to feed a family of 4 with a coconut, a stopwatch, and the neighbour's garden gnomes.
695
Post by: Drake_Marcus
I'd love to see you reposition the two devourer "barrel" pieces so the bottom of the top one and the top of the bottom one are touching and meet in the same plane. In other words you'd be tilting them slightly so the fronts touch as well as the backs and you'd be removing some of the details in the middle. Know what I mean? I think it would make it look even less like two devourers tacked together I'd also take the little armoured piece off the bottom gun because they nid weapons only have those plates on the tops. It would also be cool to move the two guns up more so the hand enters the guns in the exact centre. Wow, so that's a lot of suggestions, but I think they'd help none-the-less.
60
Post by: yakface
Posted By Drake_Marcus on 10/03/2006 4:49 PM I'd love to see you reposition the two devourer "barrel" pieces so the bottom of the top one and the top of the bottom one are touching and meet in the same plane. In other words you'd be tilting them slightly so the fronts touch as well as the backs and you'd be removing some of the details in the middle. Know what I mean? I think it would make it look even less like two devourers tacked together I'd also take the little armoured piece off the bottom gun because they nid weapons only have those plates on the tops. It would also be cool to move the two guns up more so the hand enters the guns in the exact centre. Wow, so that's a lot of suggestions, but I think they'd help none-the-less.
Those are some good suggestions. However, if the two "barrels" were completely flush with each other the weapon might look more like a "super" devourer rather than a twin-linked one.
Right now, I think it looks like a Devourer slung on a Devourer, which is exactly what I'd imagine a Tyranid's twin-linking would (or could look like). I guess what I'm saying is that while I'd would like to see what it would look like if the two Devourer barrels were flush with each other, I'm not bothered at all by the current design (quite the opposite really). As for the armor plates on the bottom, again you make a very good point, I just don't know that they personally bother me. I could take or leave the bottom plates. I definitely don't think I'd care for the hand to be repositioned. I really like the "underslung" look of one of the Devourers and altering the hand position would change this feel. So Insaniak: I like the claw hands quite a bit. For the devourers I think I agree with Drake a bit that I'd prefer if the barrels of the weapons were more flush (parallel to each other) with each other, rather than the "body" of the guns. If you can pull that off (maybe by puttying up a gap between the bodies of the guns so the barrels are flush) I think you should go for it, even if it means losing a bit of the spikes that are in between the barrels.
695
Post by: Drake_Marcus
I'm glad I could contribute to that beautiful model if only in a small way
2877
Post by: upliftingprimer
so what kit did you loot the wings from? maby you can replace the feet to look like the eagle talons prehaps from gaunts talons other then this looks cool
60
Post by: yakface
Posted By upliftingprimer on 10/04/2006 3:58 AM so what kit did you loot the wings from? maby you can replace the feet to look like the eagle talons prehaps from gaunts talons other then this looks cool
Those are the basic Warhammer Dragon wings. GWUK even sells them as part of a online "winged Tyrant" bundle (check out the online store). No talons. In my mind, winged Tyrants, like winged warriors, retain their feet for ground attacks. That's why he's putting two claws/Devourers on each arm.
609
Post by: SirNotInThisFilm
where are the wings going to attach?
374
Post by: Strangelooper
I did something similar for my MC devourers, but I filed the bottoms flat and glued the two devourers together. Mounted both on the end of a meaty Crushing Claw arm. I like using that arm since it looks big enough to support the two weapons.
They're only 1/3 painted, but I'll post a pic later tonight.
572
Post by: kendoka
Nice.
Perhaps bending the thumb part slightly towards the middle of the hand, making it look less flat??
60
Post by: yakface
Posted By SirNotInThisFilm on 10/04/2006 9:24 AM
where are the wings going to attach?
I asked for the wings to replace on of the arms (and Insaniak agreed). I'm not sure which socket he's going to use, though I'd be shocked if it wasn't the top ones.
374
Post by: Strangelooper
Here are pics of some MC twinlinked devourers made out of Crushing Claw arms. I found some unpainted ones:   Obviously they need a little trimming and gap-filling, but you get the idea.
60
Post by: yakface
I'm really glad you posted those pics.
They've made me realize I definitely don't want the two Devourers fully fused together like that. Don't get me wrong, your arm looks great, its just not the look I was thinking of.
I definitely prefer the "underslung" look of one weapon on the other.
So Insaniak, I'm not sure what point you're at, but I'm back on board with your original idea: connect the "spikes" in between the barrels of the two weapons and I think the Devourer arms will look great.
695
Post by: Drake_Marcus
Boooo Yak! And here I thought I'd made a difference 
3197
Post by: MagickalMemories
If it isn't too late, here's something to think about on the scything hands...
There should probably only be tendons on the OUTSIDE of the hands & not the inside.
The idea here is that these tendons are what is used to "open" the hand. It's natural position would be tightly "closed."
This way, the inward motion of a scything attack would be that much more vicious.
As the tendons are released from holding the talons "open," the talons snap powerfully inward, returning to their closed position.
KWIM?
Eric
374
Post by: Strangelooper
Heh, to each his own! Another point about the filed-flat devourers - leaving the 'wrists' on doesn't work due to the angles. Notice how in Insaniak's pic, the wrists are touching but the devourers are splayed apart at about 15 degrees. If you cut the devourers flat and fuse them, then the wrists splay apart at the same angle - making them too far apart to look good, IMHO. That's why I cut the 'wrists' off of mine. I suppose you could alway cut and reattach the wrists at a new angle, but I'm a lazy converter.
1214
Post by: Gen_eV
You'd need Tendons under tension to cause the talons to scythe inwards, MagickalMermories, otherwise, what's making them move? They don't need a muscle stretching the inner tendon, but they would need two sets of tendons to actually move the limbs.
Have to say I agree with Yakface on the twin Devourers, although mounting them on Crushing Claw limbs could actualy work for my nefarious purposes. Just cut the entire of the fleshy front part of the claw arm offff, leaving the devourers with more than simply the gun elements exposed.
993
Post by: xenite
Cool stuff! I can't wait to see more.
1840
Post by: NYCowboy
When I did my MC TL-dev. I used four devours and the crushing claw because I felt that two were just not enough to give it the size it would need to look right on a MC. I filed all the devours flat then, using a piece a spru I glued one to the top flat side and one to the bottom then one on each side so they formed a circle. I then green stuffed it to a crushing claw and mounted that on my MC. I am not trying to criticize your it is just a suggestion. I will try and post pics if you want.
374
Post by: Strangelooper
NC_Cowboy, I'd definitely like to see those quad-devourers...especially a shot looking 'down' the barrel from the front. But I'll start an " MC TwL- Dev conversions" topic - I feel like we're threadjacking the Tyrant blog
99
Post by: insaniak
Ok, quick post just to resolve a few things before moving on... The wings: They'll be going in the top socket. Seems the most balanced way to do it, with the Tyrant's generally upright-ish pose. If they got about on 4 legs, dragon-style, the centre arm socket would be the way to go. The Devourer: I had a bit of a look at this when Drake Marcus first mentioned it, but only just got a chance to post, so just to shut the hatch after the squig has already bolted: I did a quick prototype based on gaunt arms, with the Devourer barrels slung together, thusly: 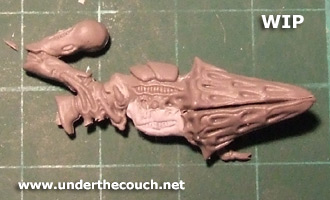 While I think this style looks pretty nasty, I'm inclined to agree with Yakface that this looks more like a 'mega-devourer' than a twin-linked weapon. Since he's already said he would prefer the original version, that's what we'll be going with. Just thought it was worth posting this version as well, since I went to all the trouble of putting it together On the Tendons: As Gen_eV pointed out, regardless of how the muscles actually work, it would still need tendons on both sides to have movement in both directions. We're out and about for the weekend, with a family funeral on Monday, but I'll get the next update together as soon as possible...
695
Post by: Drake_Marcus
I love the Drake Marcus version of the devourer! Love love love it! If I played nids I'd hire you to make me some of those
3197
Post by: MagickalMemories
You'd need Tendons under tension to cause the talons to scythe inwards, MagickalMermories, otherwise, what's making them move? They don't need a muscle stretching the inner tendon, but they would need two sets of tendons to actually move the limbs. ::slaps self:: Duh. Sorry. It was, like 1:30 in the morning. I wasn't thinking straight. LOLEric
60
Post by: yakface
Posted By Drake_Marcus on 10/06/2006 6:09 PM I love the Drake Marcus version of the devourer! Love love love it! If I played nids I'd hire you to make me some of those
Ah yes, personal taste. What a great thing that different people enjoy different things (life would be pretty boring otherwise).
To me, the fused uber-devourer looks like a giant ice cream cone. 
695
Post by: Drake_Marcus
Posted By yakface on 10/06/2006 9:24 PM Ah yes, personal taste. What a great thing that different people enjoy different things (life would be pretty boring otherwise). To me, the fused uber-devourer looks like a giant ice cream cone.
Oh yeah, well.... um... err... You look like a giant ice cream cone! BURN!
374
Post by: Strangelooper
3 dakkafexes with 4 cones each = CHEESE-flavoured ice cream, yo!
Yak, I am planning on putting 4 arms on my fexes/tyrants with a double-dev cone each - I was exactly thinking mega-devourer. Makes sense at the higher MC strength shots.
The putty work looks great on that one Insaniak, but I still think it would look end-heavy on anything but a crushing claw arm. Unless you fuse two arms together, but that kind of defeats the purpose when you're trying to save sockets on a winged tyrant I suppose. My winged tyrant (WIP) is based off of a Red Terror, who has no legs and three arm sockets per side, so I don't need to worry about that.
99
Post by: insaniak
Back again... Continued work on the Scytals this week, assembling the second arm, and adding the tendons on both sides of each. Also added magnets to the shoulders, although these still need a little filling around the sides yet... 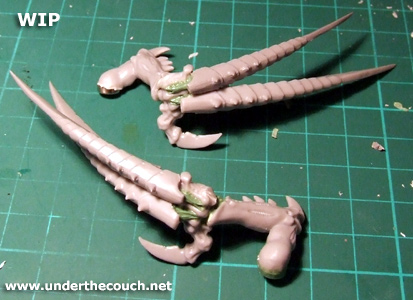 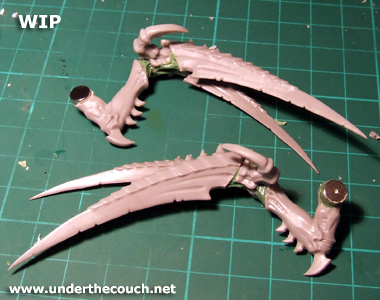 Also continued with the Devourer arm, adding some putty on the sides to start filling in between the two weapons, and added magnets on the shoulders of both arms to match the scytal arms. 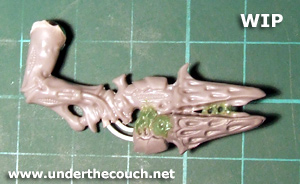 And started work on the torso. The Tyrant Torso is shorter than the Carnifex one, with fewer ribs, plates instead of spikes down the breastbone, and flesh hooks running down the sides... so there was a bit to do here. I started by drilling out the second arm socket and adding magnets for the weapon arms to link to. Then, I sliced off the spikes on the breastbone, and removed the bottom 2 ribs (which makes it a closer match to a regular Tyrant torso configuration, and allows a broader range of movement at the waist), and the tops spike of the collarbones (to allow a broader movement range for the head). Finally, added some green stuff plates to the breastbone. 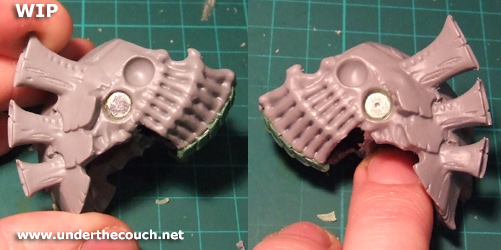 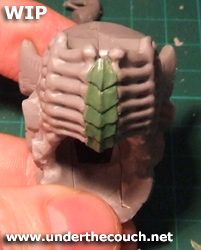 Next Episode: Adding Flesh hooks, a weight on his shoulders, and masses of people completely fail to care about 4 new Neighbours moving into Ramsey Street...
60
Post by: yakface
Everything's looking great. I'm very pleased with everything you've added.
99
Post by: insaniak
Continuing right along... One of the noticable differences between a Carnifex and Tyrant torso is the spines/stacks/breathing tubes/whatever the heck they're supposed to be on the back carapace. The Carnifex has three pairs, the Tyrant has four, with the front set armoured. So, I hacked the front set off a Tyrant, and pinned them in place on the Carnifex's front carapace section. They'll have some GS added around the bottom to blend them into the existing carapace. Also added the flesh hooks on the chest, which are again just waiting for some detail and filling around their stems. So, as of this point, our little Tyrant looks like this: 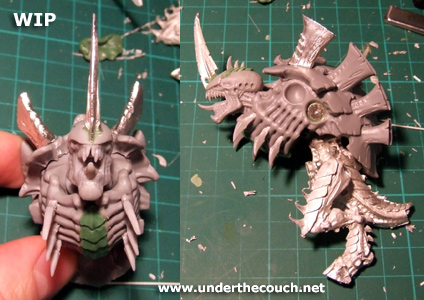 Obviously, a Winged Tyrant isn't much good without wings... and now seems like a good time to make a start on them. One of the problems with using Dragon wings for a Tyrant is that they don't look like Tyranid wings... With that in mind, I started making a few changes. I reshaped the shoulder, so that it will fit into the Tyrant's arm socker, and shaved off all the little patches of scales. Also removed the large claw at the 'wrist' joint, to be replaced with a Scytal hand. The outer edge of the wing can then be sculpted over with GS to look like a modified Scytal blade, with the wing membrane connected to it. I'll also be adding GS over the forearm, to give it the standard Tyranid carapace look, and adding a couple other little details to mesh it in. 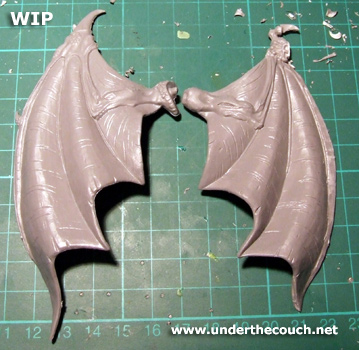 And that's where it's at. Next episode: lots of filling, getting some leg, and Melinda is confronted by an angry, scary ghost that appears to be trying to kill every living creature in the town, but is actually just looking for its long lost spoon.
513
Post by: Symbio Joe
The changes on the wings are a pretty good idea looks great also.
60
Post by: yakface
Okay, here goes:
1) The Vent Stacks. Something doesn't look quite right about it, but I'm not sure its something that can be fixed. The problem is the shape of the Carnifexes back carapace is totally different from that of the HT, and so they've sculpted the vent stacks on the two creatures in slightly different shapes.
On the HT model, the big stack (that you've used) is sitting right at the top of the carapace while the top of it is parallel to the ground. If you just stuck the vent onto the Carnifex as is, I think there would be far too much space between the added stack and the next actual Carnifex stack.
So what it appears that you did was to trim the bottom of the vent stack so that it fits in line with the rest of the stacks and the top of it pretty much matches the same angle as the rest of the vent stacks. However, in order to accomplish this the added vent stack almost looks like its "falling backwards" rather than progressing forward as the rest of the stacks would lead you to believe it would.
Also, each of the stacks gets wider in progression until you get to the last one which, because its from the HT, is suddenly skinnier.
It certainly doesn't look horrible, but it just doesn't look quite "right". That said, I have no idea how you could fix it beyond completely creating a vent stack out of GS or to completely GS over the HT stack to make it have the same shape and proper width to match the rest of the natural vents.
I'd also love to see a shot from the back highlighting how the vent is going to fit into the carapace on the back.
In the end, I could most definitely live and enjoy the vent stack as you've pictured it, and as I've already said I don't know how you could reasonably fix it. If you can think of something, let me know but otherwise I'll just be happy with it.
2) The flesh hooks. They are considerably larger than the HT's, and they look much more like blades while the original model looks closer to hooks or talons. However, neither of those things necessarily bother me much as long as you putty up the base of them so they look more like little carapace arms with blades on the end (similar to the original model) rather than just blades jutting out of the HT's chest.
However, if it isn't very hard for you I do think I'd prefer it if you altered them a little to match how the actual model looks: cut the end of the blades off, GS tiny little carapace arms, and then put the blades on the end pointing much more down towards the ground. That way they look more like hooks or thumb-claws rather than just blades or spikes.
3) The wings. Looking good so far. I have a question though: Are you going to make spines that run down the length of each fold in the wing with a claw at the end of each, or were you only going to make a single spine/carapace arm on the very outer edge?
I'm just aksing because the FW style is to make each fold in the wing into a claw of sorts, or in the case of warrior wings to make each fold into a little bony carapace arm with a little claw at the end of each arm. I'm curious to know which direction you are going with the middle folds of the wing.
Also, I absolutely hate the upward swing of the Dragon wings at the very back corner. I'm very pleased to see that you've cut almost all of it off. Would it be possible (possibly by heating up the plastic?) to get rid of that outward bend at all and make the wings only bend back in towards the creature?
Again, if its not possible, or a pain I can live with the alterations you've already made (since you cut most of the upturn off anyway), but if it is I would most definitely appreciate it.
As always, great, great work and I can't wait to pain the damn thing!
99
Post by: insaniak
After another look at the Tyrant torso, the difference in the vents seems to come largely from the fact that the Tyrant's vents have a wider angle between them, due to his more upright pose. So, the easy fix is to rip the front one off again, replace it a little more upright, and then slice off the first two plastic ones and reattach them at more appropriate angles. End result is something like this: (quick photoshop hackjob) 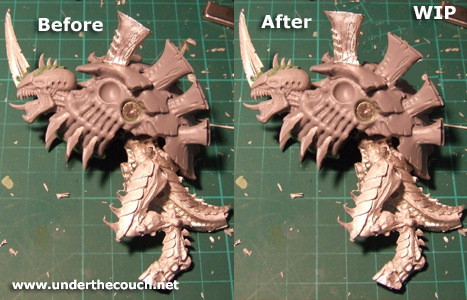 So far as the first vent being more slender... that's something I was looking to fix with GS. When I fill underneath it, I can bulk it up a little around the sides as well. The flesh hooks: yup, carapace arms were what I was going for... That's part of the upcoming GS work. So far as the blades go, that's an easy fix. I'll just cut off the blades and reattach them to the arms facing more downwards. The larger size was just to keep them consistent with the larger torso. I considered just hacking the hooks off the Tyrant torso, but thought they would be a little small. The wings: I had planned to just do the blade on the edge for starters, to see how it looks. From there. we can decide whether to carry it through to the other vanes, or just leave it at that. I'll see what I can do about the rest of the outer curve... it should pretty much disappear once the blade is in place.
60
Post by: yakface
I like the look of that photoshopped vent stack much better. If you make it a little "wider" with some GS I think it wil be absolutely perfect!
Also good to hear the flesh hooks will be an easy fix. One thing: On the HT body, the flesh hook army progress naturally out of the carapace joints (look at the side of the original HT model), while on your HT model the hooks (so far) are coming out of between the carapace.
Obviously on the Carni torso there are a whole lot more carapace veins, but I think I'd prefer if the flesh hook arms attached to a carapace joint rather than come out from in between them.
Let me know if that doesn't make sense.
609
Post by: SirNotInThisFilm
I see what you're saying yakface, but I like the way insaniak has done these better than the normal fleshhooks. it's like they grew out of the body when the HT decided she needed them. consider this idea stolen.
99
Post by: insaniak
I was looking at adding a joint where the flesh hooks go into the ribs. Putting them in between was really just a way to space them out a little with the extra ribs, but it also allows (after a little GS work) them to have their own joint, whereas the corner of a rib, like the Tyrant model has them, just seems like a weird place for a movable joint.
What I would suggest is that I GS one of the claws up so you can see how they will look once they're properly detailed, and you can have another look and decide if you still want them moved...
60
Post by: yakface
Posted By insaniak on 10/24/2006 2:06 PM
What I would suggest is that I GS one of the claws up so you can see how they will look once they're properly detailed, and you can have another look and decide if you still want them moved...
Sounds good.
99
Post by: insaniak
A bit of a grab bag of updates this time around. First up, the reshaped torso, complete with one puttied Flesh Hook. Also started adding the veins to the back of the head. 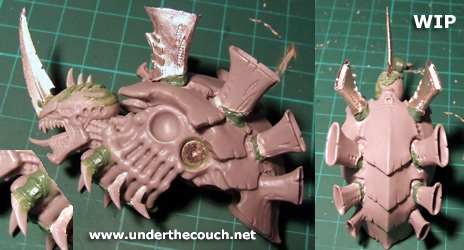 The gaps under the vents are only rough filled at the moment. They'll be smoothed down and filled properly next. Here's a comparison shot with the vents before and after moving them: 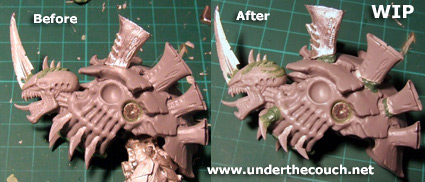 The flesh hooks are still a little 'bladey' rather than 'hookey' so I'll shave down the insides of the blades a little to make them a little more curved. Also started work on the base: 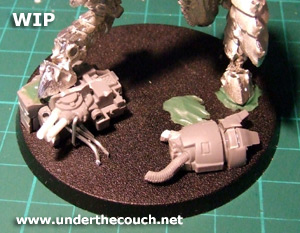 I'll be adding in some rocks, and a nice skid-trail where the dreadnought arm has slid along the grounb for a bit after being torn off. And finally, started the putty work on the wing. 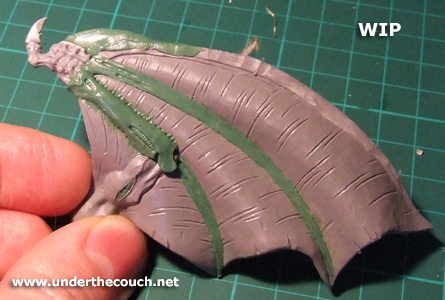 I had originally intended to just do the outermost vane as a scyth blade at first, to see how that looked before deciding if the others should be done the same. But once I got the forearm puttied up, the existing wing vanes just looked wrong. So I started on the scyth-vanes as well. Still need to do the outer one, and fill in where they meet the hand. Next episode: Feeling vane, waisting away, and the Turtles discover the true meaning of teamwork when Raphael's temper gets them in a bit of a jam...
60
Post by: yakface
Man, I *love* it all; especially the wing arms so far.
I also like what you did with the vents, and the flesh hooks look great: I don't see any need to file down the "blade" on the flesh hook anymore unless you feel like it should be. As is, having the blade tipped downward has made all the difference to me.
Great work!
550
Post by: Clang
I'm loving those wing conversions; wish I could GS like that. You've done a great job of matching the look of the wings on the Forgeworld flying megabeasties.
99
Post by: insaniak
Well, after a bit of an enforced delay for health reasons, I've finally got another update here... Warning: This one's a little picture intensive Lots of little bits and pieces this time, as parts are beginning to be finished off. For starters, I put the finishing touches on the weapon arms, which included filling in the rest of the spaces on the devourers, and puttying around the shoulders where the magnets join on. I also repositioned one of the scytal arms at the shoulder, as with both scytal arms pointing directly forwards, it looked like he was blowing a raspberry... 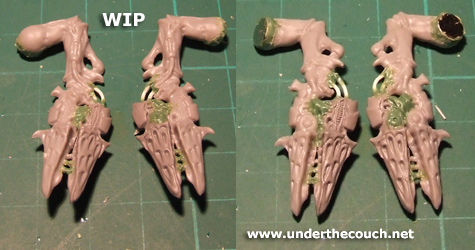 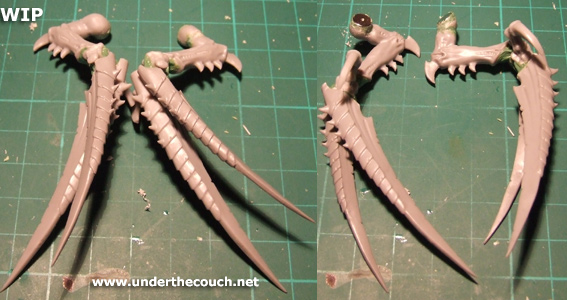 Next up, I finished repositioning and puttying up the fleshhooks, and finished filling and smoothing the lower back vanes (Still need to bulk out the frontmost vanes) . I also drilled a couple of 2mm holes under the second arm socket, glued in a small magnet, and then puttied over the hole... 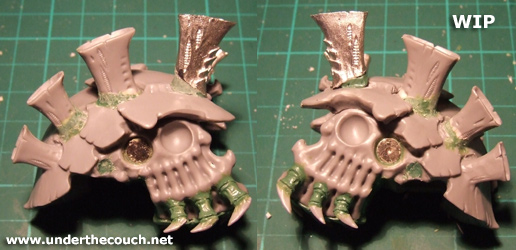 Then, I grabbed a couple of monstrous creature Toxin Sacs, drilled a 1mm hole in the underside, and glued a small piece of steel wire in there, cutting it off flush with the plastic and adding a little putty to neaten it up... Clicky image link So, when you place the Toxin Sacs against the sides of the torso, the steel inside the sacs is grabbed by the magnets, and you have a set of Toxin Sacs that can be added or removed as needed, for use with whichever arms the Tyrant is currently wearing. 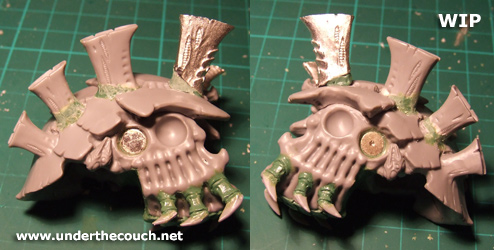 To fit onto the Tyrant legs, the torso needed a pin. So, as well as filling on the bottom of the ribcage, I drilled a hole in the Tyrant waist, and added a pin on the bottom of the torso. This will be filled in and detailed to match the texture around the waist. Clicky image link So now, he goes together looking like this:  Click here for another shot Click here for another shot 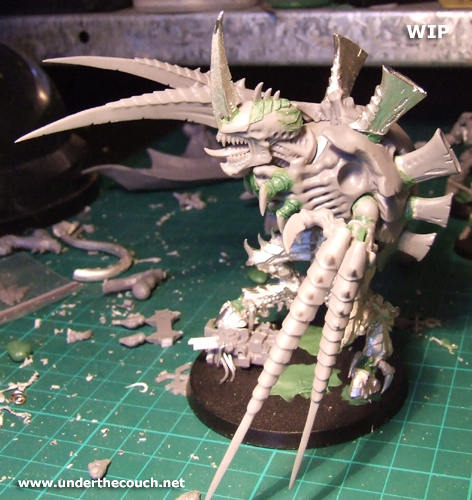 Click here for another shot Click here for another shot And finally, did a little more on the wing, smoothing down the outside vane, and adding some detail to the 'hand': 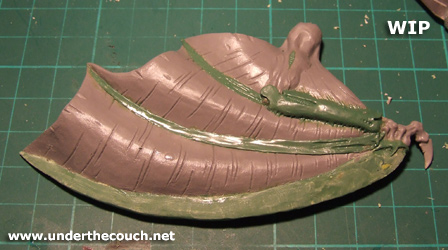 The outside vane still needs to be smoothed down a little more, and then I can start on the underside. Still debating whether to add armour plates along the outer edge to match the monstrous creature scyths, or leave the edge smooth like the Gaunt ones. Any thoughts? And that's about it for now. Still to be done: attaching the head and puttying some detail in around the base of the neck, the underside of the wing, filling and smoothing the foremost back vane, attaching the body to the legs, finishing off the base, and coming up with something sexy (and removable) for Adrenal Glands and an Implant Attack.
3618
Post by: fourganger88
Looking very awesome.
I'd give the wings plates if you can, but they look fine without.
268
Post by: Mosg
Sorry Insaniak... I thought the whole thing looked awesome as hell until I saw the near-complete images of him standing up. Even with the repositioning of the forward stack, he still looks like a giant turtle to me. I think it's because the new tyrant and carni models have kind of a shelf that shelters the back of their head... Without that look it just looks like a galapagos to me :/
Still love the arms and wings though--Top notch.
60
Post by: yakface
I'm curious as to how "thin" that wing blade is (when viewed horizontally). Perhaps its just because it hasn't been fully smoothed down, but right now it looks a bit big and bulky for a wing blade.
As for the armor plates, I think having like 3 near the top would be pretty cool. I certainly don't think you need them running halfway down the blade like with the scything talons. But even if you left the blades without any plates it looks pretty good right now.
I'm really curious to see what it looks like with the wings on, especially because you have the uper torso standing much more upright than I thought you were going to.
I thought you were going to keep a bit more of the Carnifex's body tilt in there to give the impression of a flying beast, rather than the more upright walking Tyrant. Isn't that why we went with the Carnifex body in the first place? Because I know the head isn't in place yet, but if you keep the body angle as you have it now, the torso is going to run right up into his chin like a turtleneck sweater, which is kind of what the mock-up here looks like, or you're going to have to putty up inside the head socket and really make his head 'stick out' to clear the torso.
Either of those solutions don't sound very appealing to me, although perhaps you have something grand in mind?
I guess I had envisioned more of a body tilt where the top of the final chimney stack on his back (the one closest to his head) was essentially parallel to the ground, pretty much like the WIP shots you have of just the upper torso on its own.
What do you think? Is it too late to do that? Is are the legs/lower torso of the Tyrant model incompatible with this tilt? Will it look lame? What say you?
Besides those points, I like everything I see. The toxin sacs looks good and the arms look great.
Edit: I think Mosg may be onto something, perhaps that's what is looking a bit wierd to me. The armor plates on the back are stopping short, leaving the head sticking out (as he puts it) like a Turtle. I think that's one of the reasons I was suggesting the body tilted back more down, because then the head would be able to sit in the recess a bit more naturally.
2889
Post by: Jin
While I'm quite impressed with the conversion as a whole, I'm gonna have to agree with the turtle-comments.
In fact, first thought that sprung up in my mind were "Teenage Mutant Ninja Turtle". I'm pretty sure it's due to tilt of the body in the mock-up pic and the general curvature of the carnifex back - the carnifex's back is just relatively too flat (with respect to the rest of the torso) compared to the Tyrant model.
Still, everything else looks great (and makes me seriously want to borrow some of these ideas for a conversion of my own). I especially like the idea of the modular toxin sacs. Can't wait to see this thing finished.
463
Post by: CaptKaruthors
Totally rad. I have to say that is some serious modelling work there..hehe.
Capt K
99
Post by: insaniak
Posted By yakface on 11/20/2006 6:39 AM
I'm curious as to how "thin" that wing blade is (when viewed horizontally). Perhaps its just because it hasn't been fully smoothed down, but right now it looks a bit big and bulky for a wing blade.
Yup, it's a little chunky at the moment, but will slim down once I finish filling the other side and can sand it down properly. What do you think? Is it too late to do that? Is are the legs/lower torso of the Tyrant model incompatible with this tilt? Will it look lame? What say you?
Nope, more of a tilt should still be doable... I had written off the more upright pose to just being from the front foot being raised, tipping him back a little. But now that you mention it, he does seem a little too upright for what we originally discussed. I'll have a tinker...
374
Post by: Strangelooper
Looking good! I love how the devourers came out, and the scytals too. Your gs work on the wings is amazing.
I agree with the consensus on the tilt.
I've got a question about magneting up Fex bodies. I'm about to magnet up some pre-assembled Fexes I bought - I've never actually assembled one. I'm wondering how deep you can drill into the arm sockets to seat the magnets? I don't want to punch through into the center body cavity.
It kind of looks like you didn't do any drilling at all, but just seated the magnets (presumably with putty behind for strength) in the sockets...is that right? Is the plastic so thin that any drilling would punch through? Is it considerably thicker down where you drilled out the hole for the toxin sac magnet? (great idea BTW)
Thanks for any help!
99
Post by: insaniak
There was a bit of drilling involved, as I wanted the magnets to sit completely inside the sockets.
I used 6mmx2mm magnets. To get these to sit right, I drilled right through the socket, glued the magnet in place, and then filled over the back with putty.
The body where the Toxin Sac magnets are sitting is a little thicker, so could be just drilled out to the required depth.
550
Post by: Clang
insert obligatory Tyranid Mutant Ninja Turtle joke here:
but seriously, I think the pose looks fine.
(must resist sudden urge to build turtle-themed nid army...)
99
Post by: insaniak
Ok, after a quick spinal adjustment (ie, drilled a new hole in the waist for the torso pin) our Tyrant is now wearing a spiffy new hunch. At this point, to try to give a bit of an idea of how he's going to look, I have pinned the wings in place and tacked the tail on. The tail has also been re-bent to curl around to the front, rather than sticking out to the side. I'm looking at drilling into the end of the tail and adding a magnet, so I can do up some sort of spike that can be added to the end as an Implant Attack. 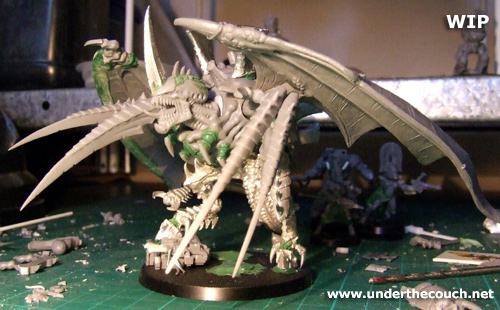 Other angles, linked to avoid freaking out people on lower bandwidth: I am Spartacus! No, I am Spartacus! No, I am Spartacus, and so's my wife! And a size comparison shot: 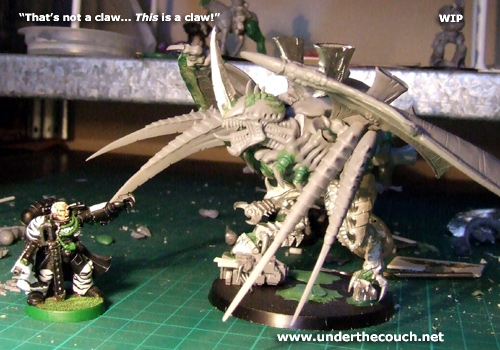 And, finally, a quick shot without the arms, for a better look at how the body goes together: 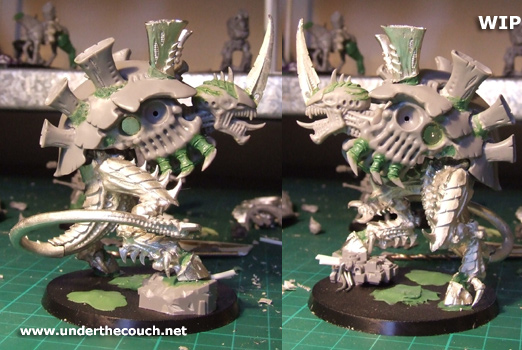 So that's where it's standing right now...
2889
Post by: Jin
Oo...suitably hunchier...and the wings look very nice.
60
Post by: yakface
Okay, I'm not just saying this because this is going to be my model, but that looks freakin' AMAZING! Can I paint it yet? The re-posing of the body makes all the difference in the world. I still can't get a clear view of what the bladed wing edge looks like from an outside horizontal (not top-down) view, but it doesn't really matter as I am officially very, very, very pleased with this model. Edit: Okay, I found the pic where I can see the outside of the wing blade, and I'm going to stick with what I said before: like 3 (or so) armoed plates at the top of the wing blade would look cool, but I would also be okay without them if you don't want to bother.
268
Post by: Mosg
I agree with Yak, it looks much much better like that. Get it painted
688
Post by: lord_sutekh
I want one... *drool*
374
Post by: Strangelooper
Thanks for the magneting tips! And I agree with the others, the hunch looks much better.
695
Post by: Drake_Marcus
Very, very, cool.... although I can't help but think the wings still look too much like they're from the dragon model... maybe altering the actual profile would help? I'd also like to see the finger claws a bit thinner so they don't seem as heavy...
60
Post by: yakface
Drake,
If you're looking at the left wing (the one facing the camera in the above pics) then you're looking at the wing that hasn't been altered much at all yet.
Take a look at the clicky pictures or some of the previous ones for the alterations he's going to eventually do on both wings.
I personally think that they look quite Tyranid-y when all is said and done.
99
Post by: insaniak
Well, we're entering the downhill run now... right into the 'finishing off the little details' stage. I finished off a bit of gap filling around the hips, and then made a start on the tail. I wanted a different way of showing the Implant Attack to the Genestealer tongue version, as it needed to be removable... Yakface wanted the Toxin Sacs, Implant Attack, Flesh Hooks and Adrenal Glands to be optional if possible for different configurations. The Flesh Hooks became permanent, because they're such a prominent feature of the normal Tyrant model and helped to add detail to the Fex's bland chestplate... but I wanted to keep the others removable if at all possible. So, here's what I came up with: I took a small piece of plastic (the bottom of a Marine standard pole, actually) cut it into an organic spike sort of shape, with an angled and hollow end, like a syringe. I drilled a 1mm hole in the other end, and then a countersink hole with a 1.5mm drill bit. Then I cut the pointy end off a pin, and glued it in the hole so that the pin head sits flush with the bottom of the spike: 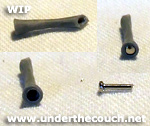 Next, I grabbed the Tyrant's tail, drilled a hole in the tip, glued a small magnet in there, and puttied over it. The end result being a normal looking tail to which the spike can be attached. So now, he has a nice pointy bit that can be rammed into his target, with the claws on either side to hold it in place while he injects whatever unpleasantness he has stored up in there. 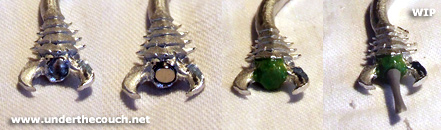 On the model, looks rather a lot like this: underthecouch.net/images/couch/comm/tyrant/wipimplant3.jpg Then, onto the Adrenal Glands. Yakface didn't like the standard humongous Monstrous Creature Adrenal Gland. I've also always disliked the idea of just slapping it onto the back carapace... it seemed like it should be somewhere a little more functional. So, I took a couple of standard Gaunt Adrenal Glands, sliced off the connecting tubes on the sides and flattened down the bottoms. Then, I added a couple of pins in the same way as I did on the Implant Attack spike:  Then I took the Tyrant's head, and inserted a magnet on either side of the neck, puttied over in the usual fashion. This allows the glands to be attached on both sides, and removed when not in use. It's not as huge and silly looking as the normal MC version, but should still be enough to show that they're there. 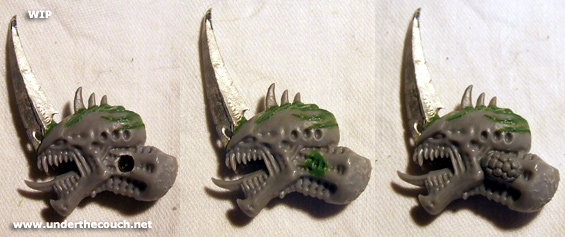 Next up, the vent/vanes on the torso needed bulking up a little. I smoothed a layer of putty on around the back of the vent, and then when set, added a second ring off putty around the top to add a little height and extra bulk where it was needed. The left side is finished, the right is still awaiting the ring around the top... 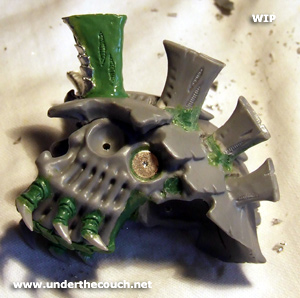 And finally, I added more putty on the wings. One more internal vane to go on the underside of one wing, and then it's just the outer vanes and the wrist detail to go. underthecouch.net/images/couch/comm/tyrant/wipwings4.jpg underthecouch.net/images/couch/comm/tyrant/wipwings5.jpg So, still to come: Finish off the second back vane, glue on the head and putty some detail in behind it, finish off the wings, and add some sand to the base. Almost there...
60
Post by: yakface
Looking great. I'm geting very anxious.
Love the glands, love the vent work; the implant attack isn't what I'm used to thinking of for an implant attack, but I think the idea is growing on me.
As for the wings, is the one on the right effectively "finished"? Because it looks to me like the green-stuffed outer "blade" is still very ripply looking. Is that just the picture and when I actually paint it it'll be fine?
99
Post by: insaniak
No, the blade still needs a little smoothing and shaping. The underside in particular is still quite rough.
99
Post by: insaniak
Back again finally, now that Christmas and whatnot is all out of the way... The outer scythe blades on the wings just weren't working out... with them sitting in place, it was too hard to work on them without damaging the wing membranes as well. So, I sliced them off, and started from scratch. This time, I rolled out a layer of GS and sliced the shape of the scythe blades out while it was still soft, let it set, and then (after a little smoothing and filling where needed) simply glued them in place on the outer edge of the wing and filled in any gaps between blade and membrane. 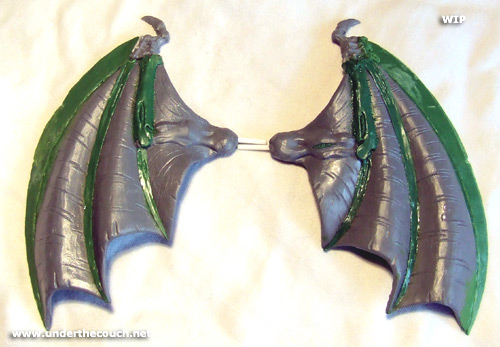 While the blades as is worked out fine on the top sides, where they're partially buried in the folds of the membrane, on the underside they were looking a little 'tacked-on'... so I thought I'd try adding some connecting tissue both to integrate the blades into the wing better, and to move them one step further from looking like modified dragin wings. End result on the first wing looks like this: 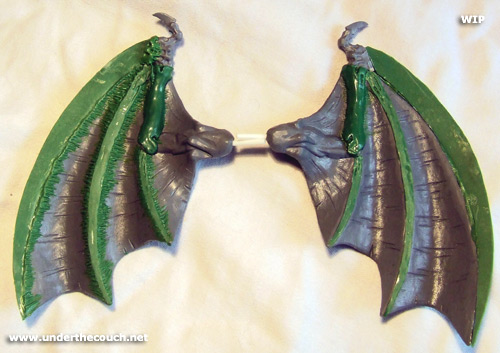 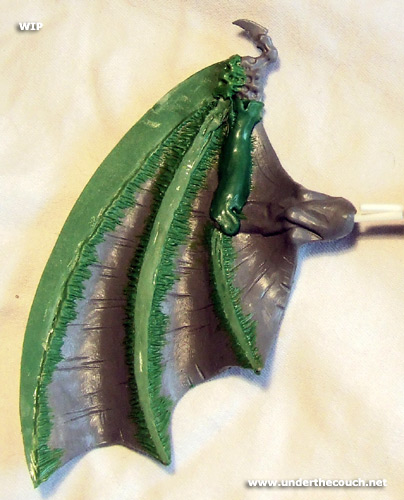 Assuming Yakface likes it, I just need to add the connecting tissue on the other wing, finishing puttying up the wrists and upper arm on the left wing, and texture the base, and that'll be the job about done...
3679
Post by: torealis
phat. very, very sexy. when can you work for me again?
60
Post by: yakface
I like the membrane tissue a lot.
The outer blades look much, much better now.
In short: finish the other wing up and let's see how it all looks together!!!
99
Post by: insaniak
Ok, here we go... Finished off the second wing, and a few minor bits and pieces here and there. The finished wing undersides look like this: 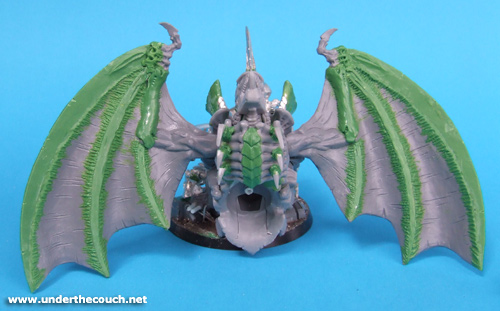 So, with all the icky finishing bits out of the way, he's all done... Time for some all-together pics 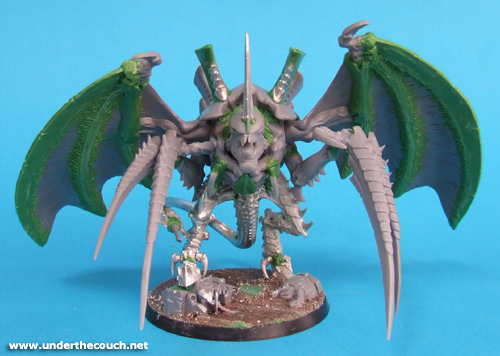 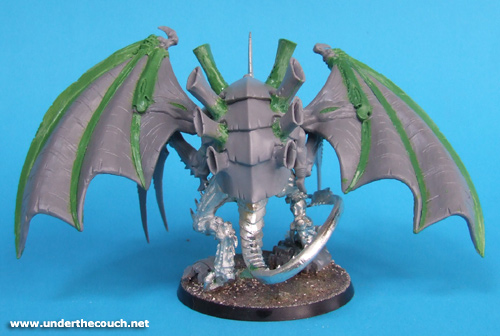 underthecouch.net/images/couch/comm/tyrant/finished/scytals1.jpg underthecouch.net/images/couch/comm/tyrant/finished/scytals2.jpg underthecouch.net/images/couch/comm/tyrant/finished/scytals3.jpg underthecouch.net/images/couch/comm/tyrant/finished/scytals5.jpg underthecouch.net/images/couch/comm/tyrant/finished/scytals1.jpg underthecouch.net/images/couch/comm/tyrant/finished/scytals2.jpg underthecouch.net/images/couch/comm/tyrant/finished/scytals3.jpg underthecouch.net/images/couch/comm/tyrant/finished/scytals5.jpg 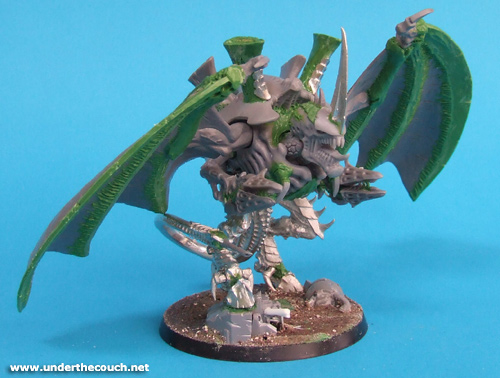 underthecouch.net/images/couch/comm/tyrant/finished/devourer1.jpg underthecouch.net/images/couch/comm/tyrant/finished/devourer2.jpg underthecouch.net/images/couch/comm/tyrant/finished/devourer1.jpg underthecouch.net/images/couch/comm/tyrant/finished/devourer2.jpg The removable biomorphs: 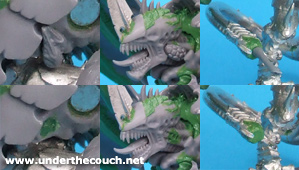 And that's about it. At this point, the wings and waist are just held in place with pins, to make shipping a little easier. They can just be glued in place when they arrive. The wings might need a little gap-filling around the shoulder when they are glued in... All up, it breaks down like this: underthecouch.net/images/couch/comm/tyrant/finished/bits.jpg So, Yak, if there's anything you're not quite happy with, let me know and we'll get it ironed out. Otherwise, we can get the postage sorted out and you can get painting
3618
Post by: fourganger88
Sweet. I prefer the Devourer arms, and personally I think it'd look better without the head spike, but it still rocks. I like the way it looks as though its legs have atrophied because it uses its wings instead. Unintentional maybe, but still good.
99
Post by: insaniak
Posted By fourganger88 on 01/15/2007 5:07 PM
I like the way it looks as though its legs have atrophied because it uses its wings instead. Unintentional maybe, but still good.
No, that was precisely what we were going for
463
Post by: CaptKaruthors
Totally rad. Can't wait to see it painted, Yak.
Capt K
60
Post by: yakface
Everything looks spectacular. I'm completely pleased and I can't wait to get ahold of it.
339
Post by: ender502
Wow, that is some lovely work. Yak, I don't know how much you had to pay for that monster but it must have been worth it. Absolutely magnificent. ender502
2297
Post by: gurkmannen
Thank you very much for this lovely blog!!! It's been very nice and rewarding to follow how you have planned and converted the tyrant. It has given me some new things to figure out on how to go about converting stuff. Hopefully we get an even as good blog for the painting process!
60
Post by: yakface
So I finally got mr. hive tyrant today in the mail and he looks very tempting to paint, let me tell you. Here's a quick shot of him posing with the bugs I've painted so far: 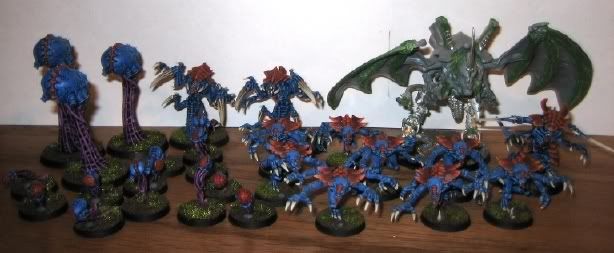 I have a little dilemma moving forward with painting him: how the heck do I paint the wing membranes? If you want some more shots of fleet's color scheme, check out this thread:
http://www.dakkadakka.com/Forums/tabid/56/forumid/8/postid/123678/view/topic/Default.aspx Basically, my scheme is this: Skin: blue Carapace: red/orange Inner squishy bits: purple/pink Claws/spikes: bleached bone Teeth: white Tongue: red/pink Eyes: yellow Now, my first inclination would be to paint the wing membranes a light 'tan' type of color, bu the membranes are anchored to very 'bladed' looking talons (see the pics at the top of this page for a good shot of the wings). I was going to paint these wing 'claws' with my typical bleached bone scheme (for claws), but if I do that a tan membrane would look way too monochromatic against the bone colored blade. So what should I do? Purple/pink (that I do for the squishy bits and the Spore mine tendrils) seems to bright for such a big surface. Should I just paint the membranes the same blue skin tone? Some new color entirely? I need everyone's help!
3618
Post by: fourganger88
He fits in well. I'd say for the wings, go with pink, but maybe darken it up or add a little blue highlight to it.
99
Post by: insaniak
I initially thought pink, but it would possibly look a bit wishy-washy with the bone wing talons. I would think that the membranes are just extruded skin, so would probably go for the blue. He's going to have a lot more red/orange than the rest of the army, due to having a lot more carapacy-bits, so I think going with a colour outside your regular scheme would be overkill... would probably just make him not fit with the rest of the army as well. He looks quite imposing at the back there Looking forward to seeing some paint on him.
550
Post by: Clang
I'd go for a darkershade of the same blue
514
Post by: Orlanth
I would go for a lighter shade of blue as its thinner membranous skin, some bat wings can be almost transluscent. You might add a tint of the purple/pink you use for exposed 'muscle'
Are you the same Clang from CBT?
731
Post by: Davian
Just trying to picture it in my head, I'd say go with a pinkish-purple color... Mostly blue in the cracks and crevices, getting a little more pinkish with the highlights.
Maybe the best way to go about it would be for you to paint the parts that you know the colors for, and see if that gives you any idea of what color would look best alongside everything else.
Best of luck. I look forward to seeing it finished.
60
Post by: yakface
Well, just getting started here, but I thought I'd post updates in blog style as the Tyrant gets painted. If anyone is interested as to how I paint my minis the way I do, this will give you the whole scoop. I decided to paint the body of the Tyrant seperately from the rest of the components as there are just too many limbs covering too much of the body to attempt to paint the whole thing assembled. I'm not going to bother showing you pics of the wings and weapon arms until they are complete (or near completion). FYI, I use GW paints. Anyway, here goes: (posted 1/31/07) Step 1: whole model: black undercoat (not pictured) Step 2: skin: regal blue basecoat 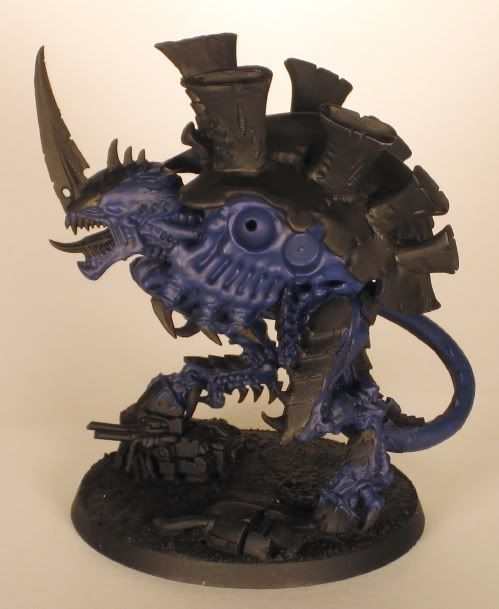 Step 3: skin: blue ink over all the skintone 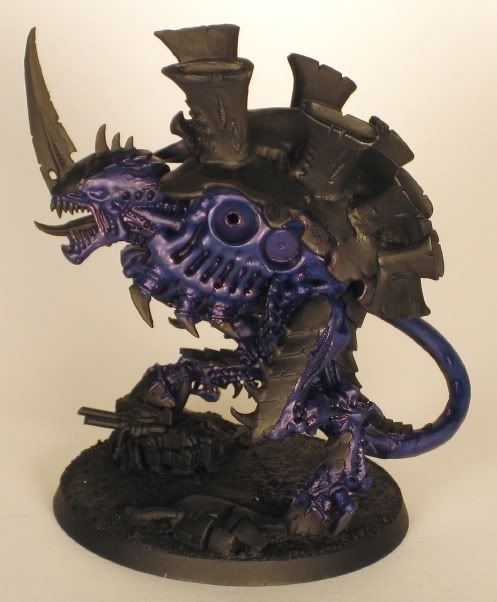 Step 4: squishy interior bits: liche purple (not pictured) Step 5: squishy interior bits: purple ink Step 6: skin: regal blue highlight over all the skintone except for the crevices 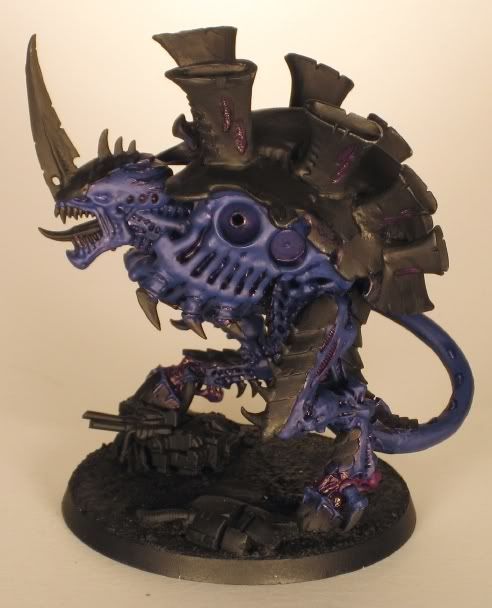 Step 7: skin: highlight skin with 50/50 regal blue & ultramarine blue 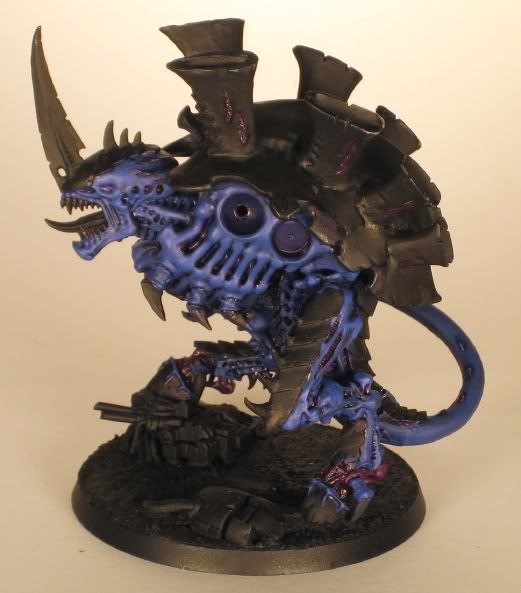 Much more to come!
99
Post by: insaniak
Looking good so far!
270
Post by: winterman
Very nice. Painting is coming along and I look forward to seeing this bad boy finished.
As far as the wing dilemna, I like the look of your tentacles and think that'd be the way to go. Use a darker tone near where it connects to the blades (almost bluish-purple to better match the main body color) faiding to the purple-pink near the center. If you also shade the texture in a similar manner (ie. darkish colored in the textured line of the wing membrane) the overall look of the wing will be darker then the tentacles.
So essetially what Davian said. Although a lighter blue would be ok too.
Hope that helps and makes sense.
60
Post by: yakface
Today's update (2/1/07): Step 5: interior squishy bits: (I'm jumping back to step 5 from yesterday's post to show a close-up of the interior bits after the purple ink was applied) 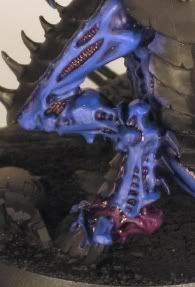 Step 8: interior squishy bits: (jumping back to step 8, I complete the interior bits before I get too far on the skin tone, that way any mistakes I make I can cover up with further highlighting of the skin), 50/50% Liche purple/ Warlock purple highlight 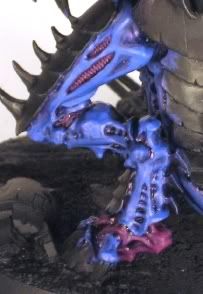 Step 9: interior squishy bits: Warlock purple highlight 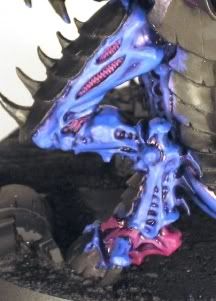 Step 10: interior squishy bits: 50/50% Warlock purple/Tentacle pink highlight 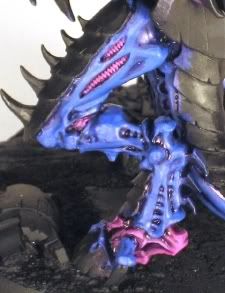 Step 11: interior squishy bits: Tentacle pink final highlight (and the interior squishy bits are done!) 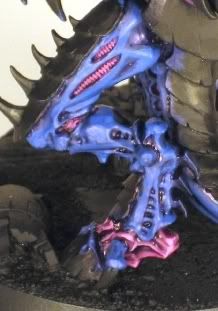 Step 12: skin: (back to the skin now) Ultramarines blue highlight 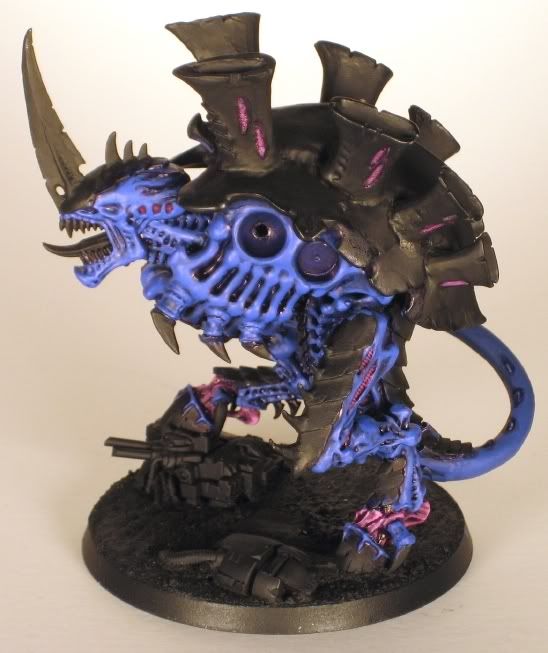 Step 13: skin: (specifically the tail) heavy blending from Regal blue up to Ultramarine blue  Before I get to the really top highlights of the skin, its time to move onto the red Carapace (coming soon).
105
Post by: Sarigar
Very, very sharp work. I like being able to follow on the progress of this army.
195
Post by: Blackmoor
Do you like to use a lot of Regul Blue?
1528
Post by: Darrian13
I think Yakface should should trademark the "regul blue" name.
Also, Blackmoor should get Yakface to paint his Nidz, that way he will not get such poor painting scores with his Nidz.
BTW, great painting Yakface!
Darrian
513
Post by: Symbio Joe
GO, YAKFACE!
3618
Post by: fourganger88
Nice. You paint all your models in such depth? I barely have enough time to give mine 3 minimum colours Edit: decided on the wings yet?
60
Post by: yakface
Fourganger: I've used pretty much this same painting method for all of the Tyranids I've painted. I'm doing a few more steps of highlighting on this model but it's 90% the same. As for the wings, I've pretty much decided on the same blue for the wings as for the skin since the model is already got so much red on it. I might make it a slightly lighter blue, but I haven't gotten to that yet. Anyway, here's the update for today. Posted 2/3/07: Step 14: Carapace: Scorched brown basecoat 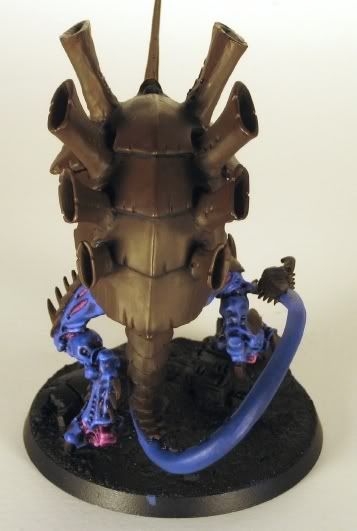 Step 15: Carpace: 75/25% Scab red/Scorched brown highlight 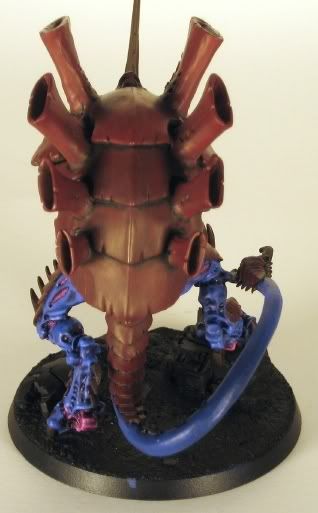 Step 16: Carpace: Scab red highlight 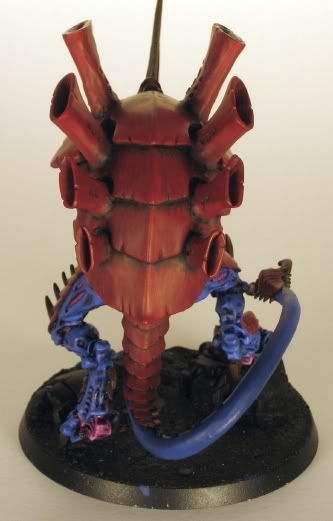 Step 17: Carpace: 50/50% Scab red/Red gore highlight 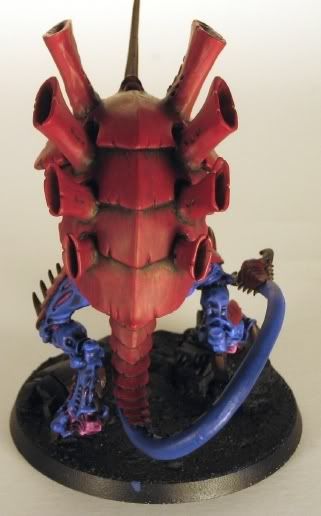 Step 18: Carpace: 50/50% Red gore/Blood red highlight 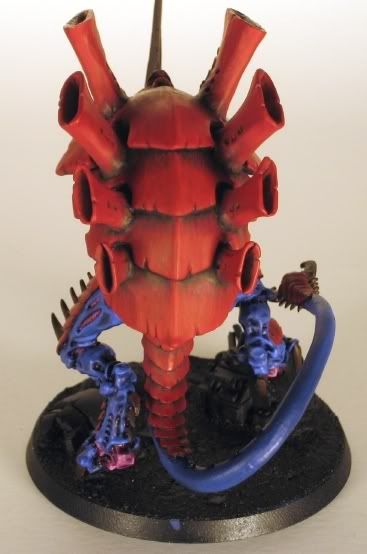
514
Post by: Orlanth
Not a complaint, or even a disagreement; I just want to know:
This painting style looks lengthy and over complicated, even for a showpiece miniature.
What would happen if you missed out the first two stages or browns/red? Say painted it scab red, inked it brown in the recesses and highlighted with scab/blood red? What would be missing?
3618
Post by: fourganger88
The ink would give the carapace a very different look, and there would be less texture and depth to the colour.
Looking good. I miss painting big models...though ym old Nids could do with a few additions. Edit: Curse the unholy alliance of Insaniak and Yakface. After swearing off buying any new models for at least half a year, your skills now make me look at my old 3rd Edition Flyrant and sigh. Oh well. I always knew I'd go back to my Nids at some point...it may as well be now.
173
Post by: Shaman
man that red looks snappy!
60
Post by: yakface
Orlanth: A one stage red with ink over it and then a highlight would be a rather different look than what I've done. The thing about red is that it doesn't completely cover whatever you put underneath it (at least not with one or two coats), so what color you have underneath shows through and can be used to create a subtle (hopefully) layering effect. The thing you can't see all that well in the pictures is that with each stage of red I add, Ieave a little bit of the last color showing near the cracks. So when all is said and done, the cracks go from black to brown to scab red to red gore to blood red. Removing all those steps is certainly do-able, its just the red won't seem as red (because it doesn't have enough coats to build up a good red color), and you won't have those subtle shades in the recesses. Anyway, I'm now finished with the Carapace. Here are the pics: (posted 2/5/07): Step 19: Carpace: Blood red highlight 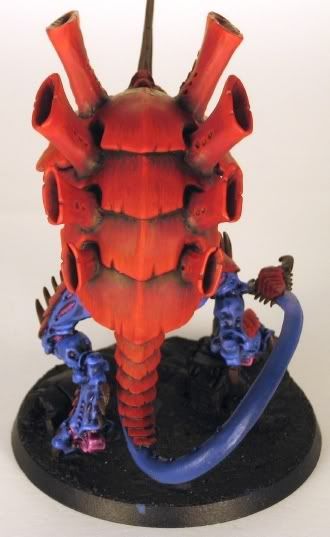 Step 20: Carpace: 50/50% Blood red/Blazing orange highlight  Step 21: Carpace: 50/50% Blazing orange/Fiery orange (final carapace) highlight 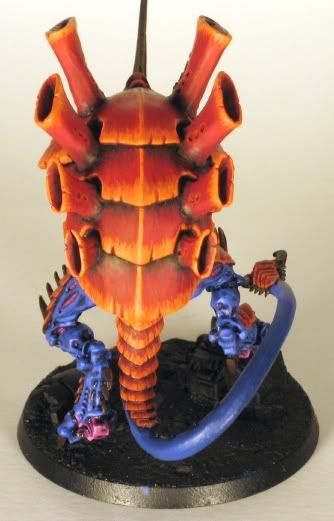 Step 22 & 23: Carpace: 50/50% Red gore/Scab red in select touches to break up the orange highlight & black wash in armor cracks to make them stand out 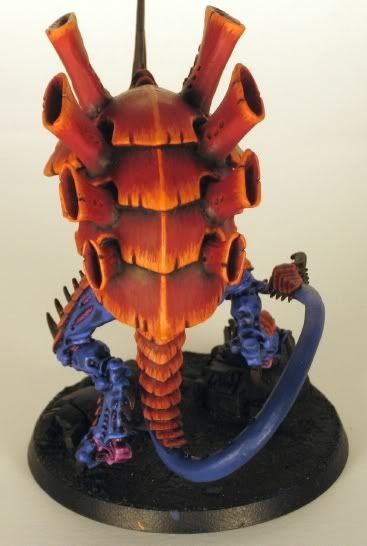 (final carapace from the profile): 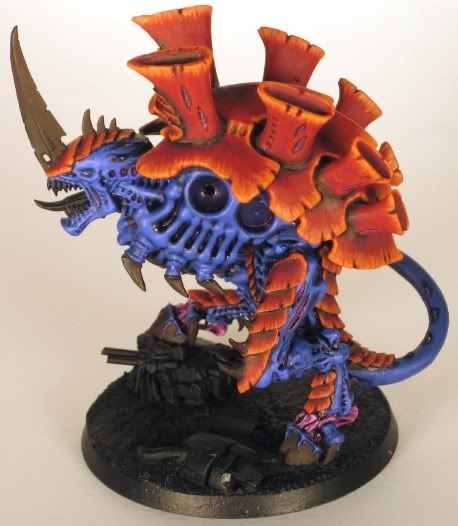 Next up: Eyes and the final blue skin highlights!
2889
Post by: Jin
This step-by-step painting guide both makes me want to finish up my Nids and makes me cry that I can't get remotely near this quality.
Good work so far! Can't wait to see this bad-boy finished!
99
Post by: insaniak
Wow... That carapace really pops!
60
Post by: yakface
Posted By insaniak on 02/05/2007 7:35 PM
Wow... That carapace really pops!
Is that 'pops' in a good or bad way? I must say that I was so focused on painting the layers that I didn't stop to think that the fact that I have so much more Carapace to work with than any other model I've done so far meant that there would be so much more red than ever before. When I got to the second to last stage of the Carapace I was starting to get a little depressed that it wasn't looking like I had imagined it would. But once I put on the final touches I must say that am now rather pleased with it, despite the fact that the model is much, much more RED than any other model in my army. So what do you honestly think? Too red?
1915
Post by: Odd the Quiet
I don't think there is such a thing as too red. (I like red armies.)
He's the biggest baddest bug of the lot and it should show in more than his size.
Of course, a picture of him with the rest of the brood would help.
1002
Post by: Wayfarer
I like the red, it's very striking without being over the top. It contrasts well with the blue and honestly, given the fact that it's a tyrant, it deserves to stand out more than anything else in the army.
99
Post by: insaniak
Posted By yakface on 02/05/2007 9:18 PM
Is that 'pops' in a good or bad way?
Definitely a good way! He's much more red than the rest of the army, but that's part of what's going to make him stand out. I think an entire army painted with the same would be a little too much, but on the one model, as a way of saying 'Look at me, I'm special!' it works superbly. Should make him a perfect centrepiece.
60
Post by: yakface
Okay, here's a question: Any votes for what chapter of Space Marine the Dreadnought remnants on his base should be painted? I've ruled out Ultramarines (too bad because I hate them the most) and Blood Angels because I already have too much blue and red on the model. That leaves as my front runners: Dark Angels (green) Black Templars (black) Space Wolves (grey) & Imperial Fists (yellow) In terms of personal history, I used to have to play Space Wolves like every 2 out of 3 games (two of my friends both played Space Wolves) so I kinda hate 'em. Now that the Templar codex nuetered 'em I don't have the irrational hatred towards them anymore (and I think black would be kind of boring). Imperial Fists (yellow) sound like fun, but I do have the orangish trim already on the model. . . So really it's Space Wolves (grey) or Dark Angels (green) with Space Wolves being the personal favorite for vindictive (rather than aesthetic) purposes. Any votes or other suggestions? Here's today's update. I'm now finished with the eyes and (blue) skin. All that's left is the claws/spikes and teeth/tongue (plus the base and of course the arms/wings I have yet to do). Posted 2/6/07: First off, the eyes just with the black undercoat 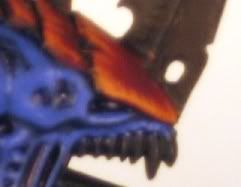 Step 24: eyes: Golden yellow basecoat 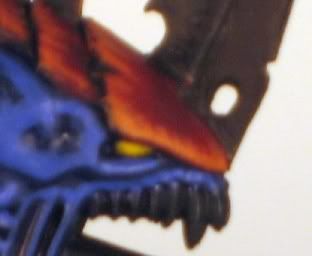 Step 25: eyes: yellow ink (not pictured) Step 26: eyes: Sunburst yellow highlight 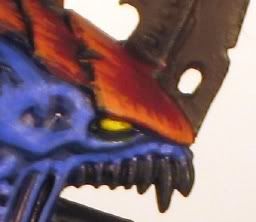 Step 27: eyes: 50/50% Sunburst yellow/Skull white final eye highlight 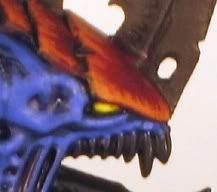 Step 28: skin: (back to the blue skin for the final highlighting steps) 50/50% Ultramarine blue/Space Wolves grey highlight 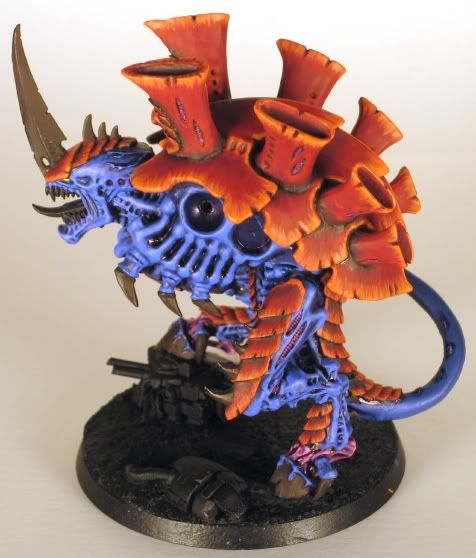 Step 29: skin: 25/75% Ultramarine blue/Space Wolves grey highlight 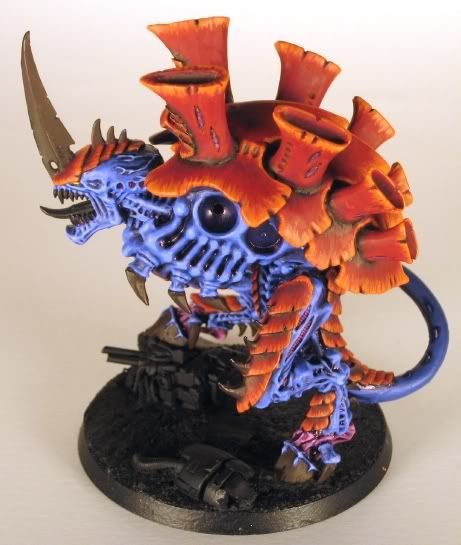 Step 30: skin: Space Wolves grey final skin highlight 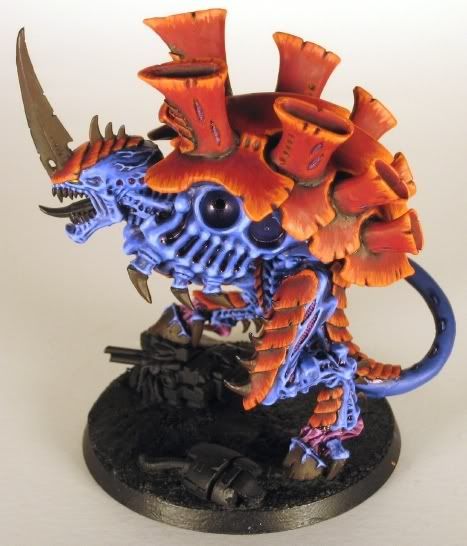 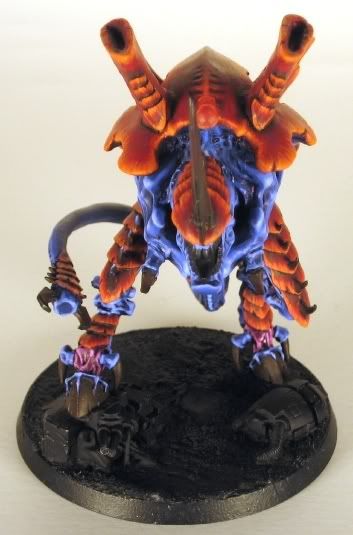
2175
Post by: Chaplain Pallantide
Wow...Just wow...That is awsome...I love your paint scheme...My vote would be Space Wolves...My brother is a huge Dark Angel Fan...so on my Tyranid bases I painted the various marine bits in DA colors...he liked it, but not much!
Keep it up...I can hardly wait to see this guy done.
Chappy P!
1795
Post by: keezus
Yak... your model is very bright, so I'd go with a Salamanders dreadnought... as I think Snot Green would stand out from the model. Looks fantastic. I wish I had that kind of patience.
60
Post by: yakface
I tend to just want to keep painting as I get near completion on a model, and this one is no exception (I just decided to skip sleeping). Yet another update: Posted (2/6/07) Step 31: spikes and claws: (I'm just going to show pics of the head spike to give you an idea. Also, when I took these close-up pics my white background no longer worked as a white balance point. That means my colors in some of these pictures varies) 50/50% Scorched brown/Graveyard earth basecoat  Step 32: spikes and claws: Graveyard earth highlight 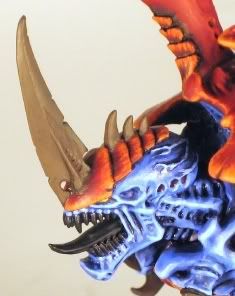 Step 33: spikes and claws: 50/50% Graveyard earth/Kommando Khaki highlight  Step 34: spikes and claws: Kommando khaki highlight 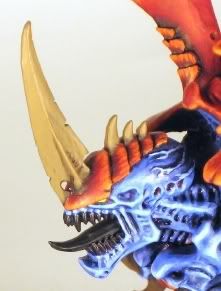 Step 35 & 36: spikes and claws: 50/50% Kommando khaki/Bleached bone highlight. Tongue: Red Gore basecoat 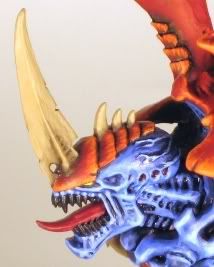 Step 37: spikes and claws: (big head spike only) blending between Kommando khaki, Bleached bone and Skull white 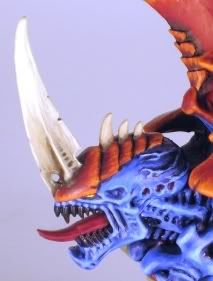 Step 38: spikes and claws: (small spikes only) Bleached bone highlight 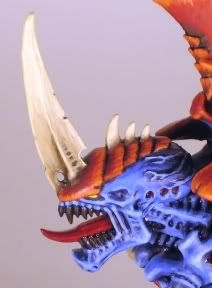 Step 39: spikes and claws: (small spikes only) 75/25% Bleached bone/Skull white final highlight 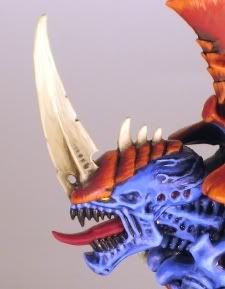 Step 40: tongue: red ink (not pictured) Step 41: tongue: Blood red highlight 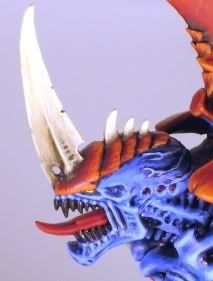 Step 42: tongue: 50/50% Blood red/Tentacle pink highlight 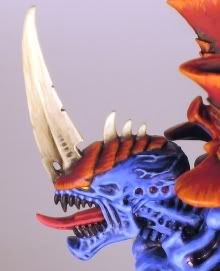 Step 43: tongue: 25/75% Blood red/Tentacle pink highlight 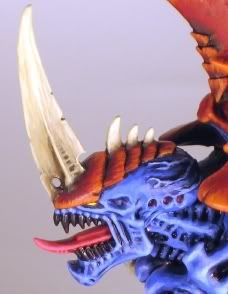 Step 44: tongue: Tentacle pink highlight 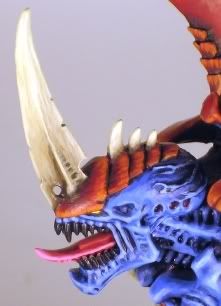 Step 45: tongue (final step): light red ink (to mute the pink a bit and to create a 'wet' look for the tongue) 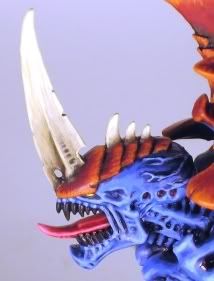 Step 46: teeth: Graveyard earth basecoat 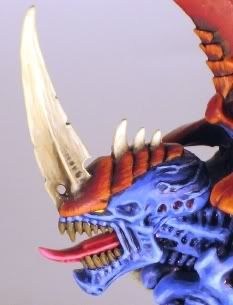 Step 47: teeth: black wash (not pictured) Step 48: teeth: Bleached bone highlight 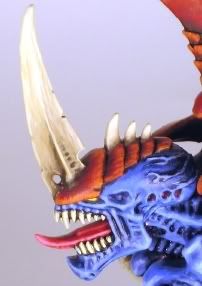 Step 49: teeth: Skull white final highlight 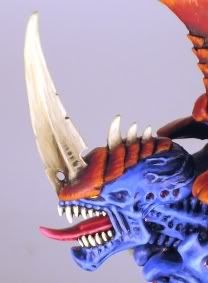 So there you go, principal painting of the model is done. 49 easy  steps! So here's where the guy stands without his base painted and without any arms: 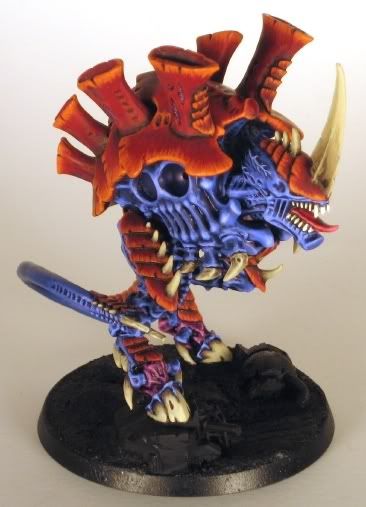 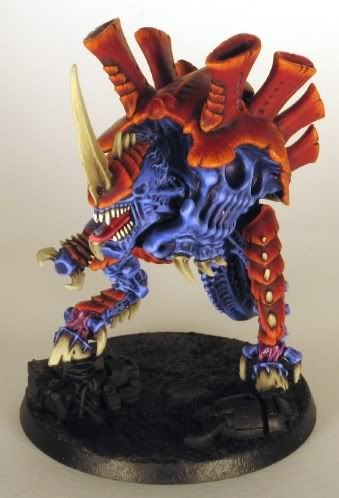 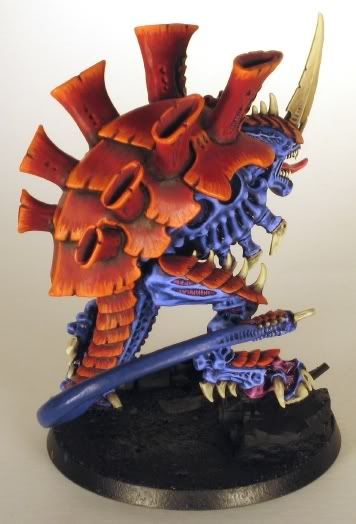 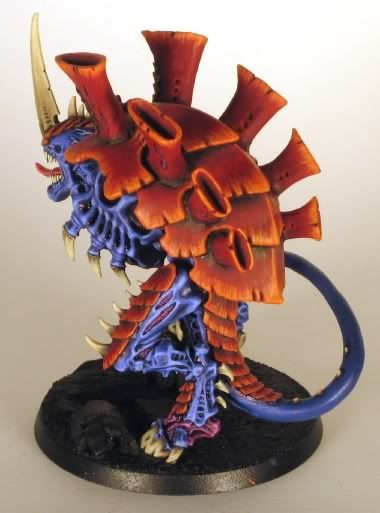
99
Post by: insaniak
Wow.
Just... wow.
For the Dread, I'd probably lean towards Space Wolves... DA green would clash a little with the colours you already have. SW grey is a little more neutral, but the slight blue tinge to it would help it mesh with the model.
3618
Post by: fourganger88
I'd hate to face this on the table.
*inferiority complex*
514
Post by: Orlanth
On your dreadnought victim:
1. What coloour will the rest of the base be, grass, snow, sand or ash? It might be worth doing the base before the dread, it might choose the colour for you.
2. These are dreadnought bits, so the standard colour will be scratched and twisted metal, not paintjob.
3. Any reason why the dread is definately loyalist. I cant see from the pics. Also do you hate Iron Warriors enough.
40
Post by: nyarlathotep667
Awesome work Yak! You're one of those people that can paint now too!  My vote for Dread color is go with the Space Pups + rusty ruination. I'm not sure how the rest of your army is based, but any green flock and what not will act as a natural counter balance to the big nasty himself, no need to make the the dread green too (nor yellow, which would be too much). Great looking paint job!
60
Post by: yakface
The Tyrant will be based essentially the same way as the rest of the fleet (brown dirt & static grass): www.dakkadakka.com/Forums/tabid/56/forumid/8/postid/123678/view/topic/Default.aspx @ Ortlanth: 2) I know it will be badly dinged, but I stilll plan on having a bit of paint on the Dread. 3) I do hate Iron Warriors quite a bit, but I don't really care for their color scheme. The bits are pretty small and could be Chaos, but they don't have any spikes or mutations (which most Chaos Dreads are covered with).
2776
Post by: Reecius
That is brilliant, it has been great watching this come to life. That will be a fantastic centerpiece model, well done. and the step by step is really helpful, i will deffinately use some of your techniques in my own painting,
173
Post by: Shaman
space wolves
40
Post by: nyarlathotep667
Ah, then definitely the Space Pups. If your friends are still playing them, they'll chuckle at the reference, and it will also be more visually appealing (overall) without distracting the beastie above. Good stuff!
60
Post by: yakface
Okay, I think Space Wolves it is.
I'm not sure how much I'll get done tonight. I only got 3 hours of sleep before heading into work today, but I'm so jazzed about finishing this model I actually can't wait to get some more painting done! If only I could somehow magically have all my models immediately near finished, I enjoy painting so much more when the end is in sight (where your hard work really starts to take shape into something you can really see).
I guess that means I'd probably like painting those AT-43 prepainted minis, because I could just jump right into highlighting them. . .
445
Post by: frenrik
Looks good. Can't wait to toss some plague marines at it.
PS, all my marine trophies are space puppies.
60
Post by: yakface
Okie-doke. The base is done. I didn't take any WIP pics of the base, but oh well. I'm currently working on the arms and biomorphs now. 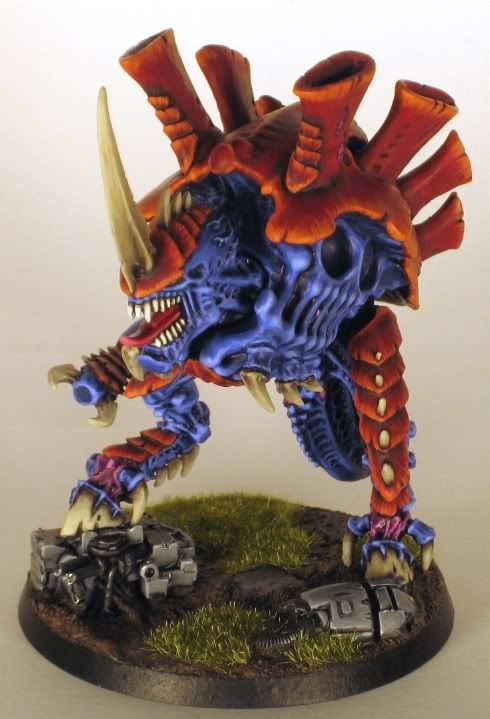 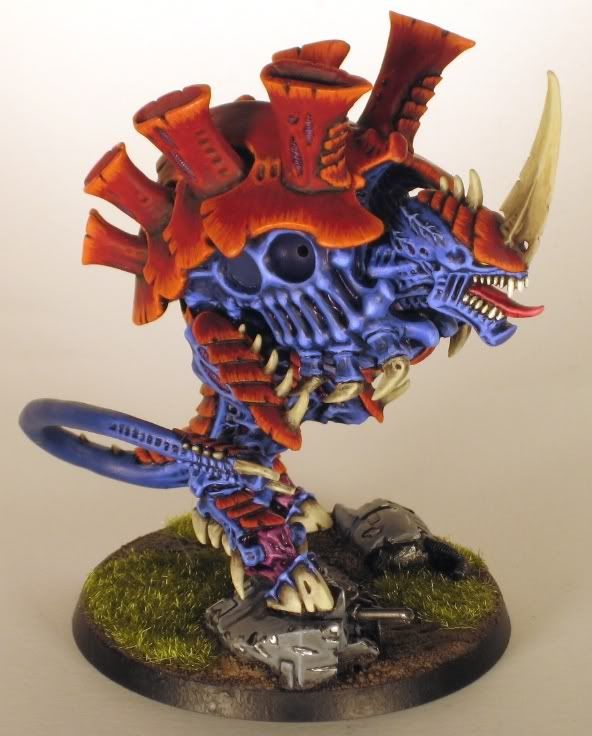
514
Post by: Orlanth
I dont think that looks really Space Wolves Grey, which has a blue tone to it. however a flat grey looks better in my opinion.
The problem with the dread is that you have only metal painted the gouge marks, whereas there would be heavy scratchin on the edges and probably surface scratching too as thin 'lines'. I would keep the left dread bit it as is, but add more scratchesto the 'front' piece where you have an accumulation of talon marks before the right foot.
3979
Post by: Lemmingspawn
Dude, that's nice! I love the depth you have to the colours without going to extreme highlights. Very nice! And the colour choice works quite well.
99
Post by: insaniak
Hmm... the grey does look more '13th Company' than regular Space Wolf... but I like it.
60
Post by: yakface
Posted By Orlanth on 02/08/2007 7:11 AM
I dont think that looks really Space Wolves Grey, which has a blue tone to it. however a flat grey looks better in my opinion.
The problem with the dread is that you have only metal painted the gouge marks, whereas there would be heavy scratchin on the edges and probably surface scratching too as thin 'lines'. I would keep the left dread bit it as is, but add more scratchesto the 'front' piece where you have an accumulation of talon marks before the right foot.
The thing is, I originally painted up the dread with really nice shading, then I went in and painted on a bunch of scrapes and dirt. At which point I found that all of the damage made the bits look too busy and (I felt) distracted from the Tyrant model rather than complimented it.
So I went back and essentially re-painted most of the grey back on to the point it is now. Although it may not be as 'realistic' looking as a really damaged piece of a vehicle is, I think it compliments the Tyrant better, so I'm happy with it. I do appreciate the feedback, though!
40
Post by: nyarlathotep667
Awesome Yak, that big beasty will be the terror that your yiffing Space Pup opponents will come to greatly fear!
695
Post by: Drake_Marcus
Wow. I had no idea you were such a good painter. I'm really impressed Yak. Just fantastic work.
60
Post by: yakface
Bit of an update. The arms have been taking me longer than I thought (especially the wings). However, I'm 99% done with the Devourer arms and all the magnitized biomorphs, so here's some pics ( posted 2/13/07): Again, all these biomorphs are magnitized and removable. One of two Adrenal Glands (one on each side of the neck): 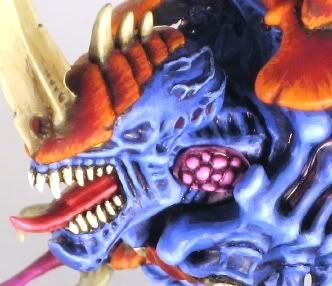 Toxin Sacs (that fit behind the weapon/claw back arm): 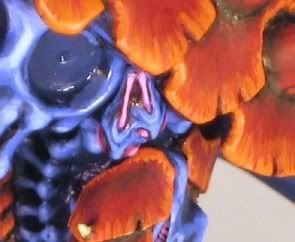 The Implant attack (which attaches to the end of the tail, and this really isn't a very good angle of):  Finally, two pics of the Devourer arms (and with all the biomorphs in place): 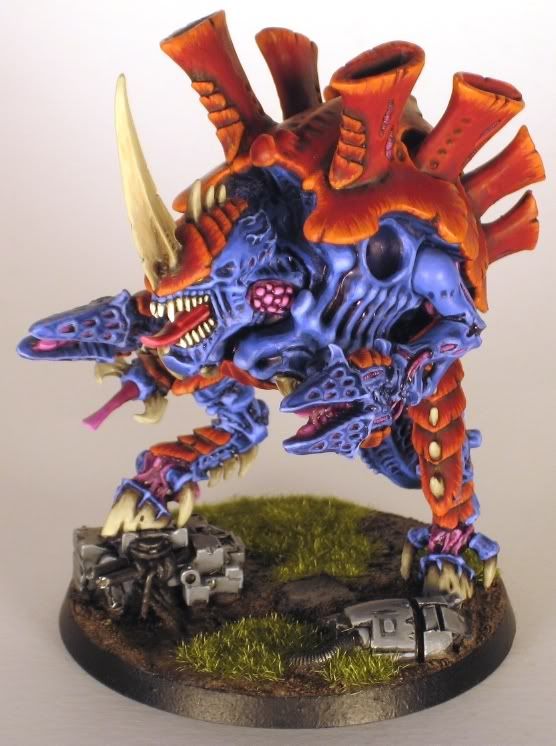 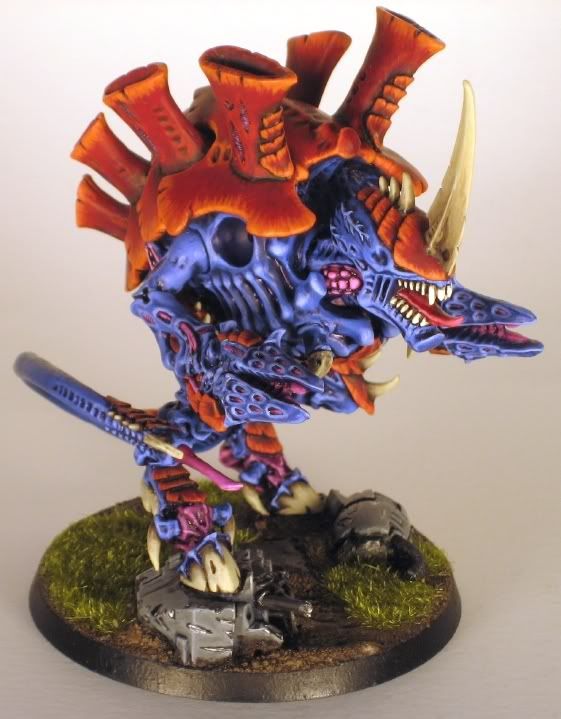
3935
Post by: Gereth
Hey Yak! This question may seem weird but here it goes anyway... How did you add the static grass on the base? It seems to bemore upright then what i normally get here.
Cheers
3618
Post by: fourganger88
For every picture I see of this, I put a pound in my "Tyrant fund".
247
Post by: Phryxis
The painting is very good. It's not the totally amazing blending work that some guys do, but when you combine it with a great model, great color choice, a very clean, convincing base, the overall effect is really nice.
60
Post by: yakface
Posted By Gereth on 02/13/2007 12:16 PM
Hey Yak! This question may seem weird but here it goes anyway... How did you add the static grass on the base? It seems to bemore upright then what i normally get here.
Cheers
No problem, I simply put blobs of white glue on the base and then dump a bunch of static grass on it. Seriously.
Perhaps the fact that I'm always doing it on top of already textured bases helps the grass stand more up? I don't know, but it does it on its own. Phryxis wrote:
The painting is very good. It's not the totally amazing blending work that some guys do, but when you combine it with a great model, great color choice, a very clean, convincing base, the overall effect is really nice.
Well, If I was going for a Golden Demon I do believe I would take the six months needed to really blend every shade nicely. Unfortuantely I don't have the time to spend to do that sort of quality.
Man, to think of how much time I would spend on one model if I was painting to that level really boggles my mind. I already feel pretty overwhelmed (time invesment-wise) just painting at this level of detail.
759
Post by: dumbuket
Yak, normally I wouldn't post something so irrelevant, but there seems to be a problem with my account. The forum won't let me start threads or poles or pm users (which is why I'm posting this here to bring it to your attention. Could you have somebody look into this?
Also, great paintjob and lovely model.
1915
Post by: Odd the Quiet
Now that the arms are closer to finished and the bio morphs are done, do you still think he looks "too red"?
60
Post by: yakface
Posted By Odd the Quiet on 02/13/2007 9:14 PM
Now that the arms are closer to finished and the bio morphs are done, do you still think he looks "too red"?
Oh, I was over that as soon as I finished the rest of the model (sans arms). It was just without the final skin highlights and all the claws and base being black, my eyes were just drawn to the red. Now that there are competing things to look at (including the fairly bright highlights on the blue skin and the bleached bone claws/spikes) the red seems well balanced and I'm very happy with it.
@ Dumbucket: I'll PM Russ to check out your account, but in the meantime can you recieve PMs? I'll try sending you one. What happens if you try to start a thread or send a PM (what does the screen say)?
306
Post by: Boss Salvage
Such a pretty big bug, and gets better and better with each update. Keep up the great work, and the steps you showed through the carapace and skin were especially informative. Thanks!
- Boss Salvage
759
Post by: dumbuket
I can receive pms, but I can't send them. I get the same message of "a critical error has occurred - imput string was not in correct format" deal.
60
Post by: yakface
dumbuket:
I spoke with Russ and he said that what you describe is a known issue with the Opera browser. Are you, by chance using Opera?
If so, you're going to need to utilize another browser when you want to perform those actions on Dakka.
If you're not using Opera, lemme know.
1309
Post by: Lordhat
Yak.... you are my Hero. Insaniak..... you sculpt GS WAY too well to be my Hero.... so I guess that makes you a well-respected Nemesis. Great Job, both of of you. Now to go look at my paintjobs and conversion attempts and have a bulemic fit..... 
60
Post by: yakface
Hopefully this will be the last update before I'm totally finished with this bad boy. All that's left now are the wing arms (which are about 1/2 finished right now). Here are the final pics of the x2 Scything Talon arms ( posted 2/16/07): 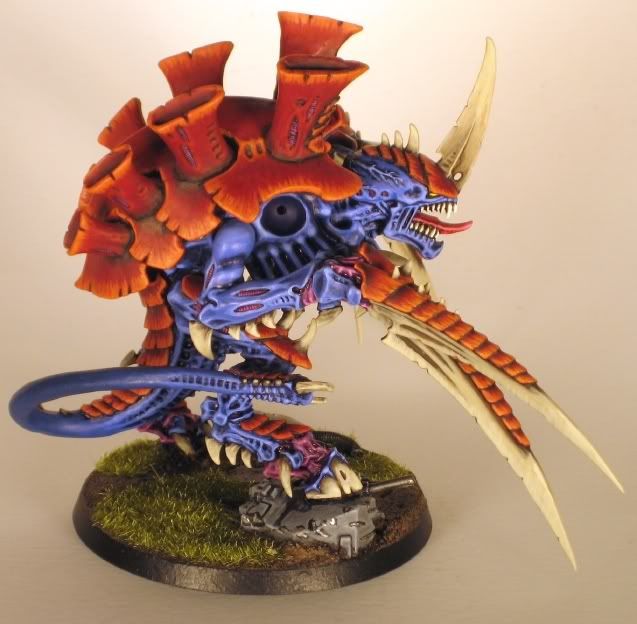 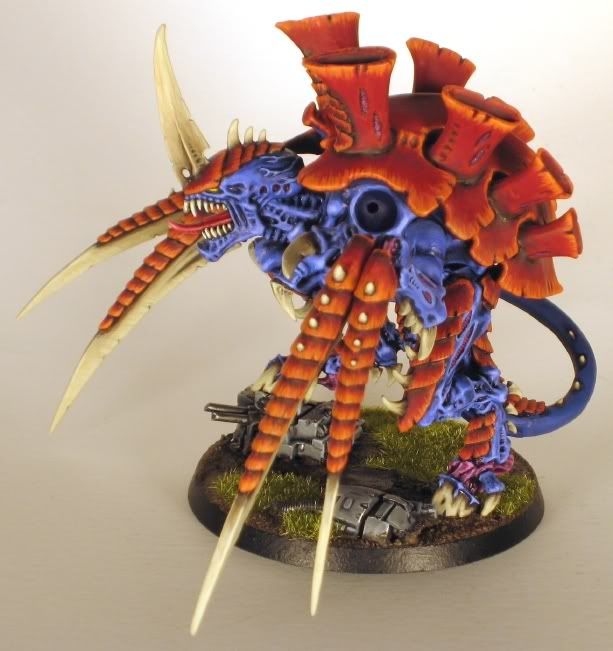  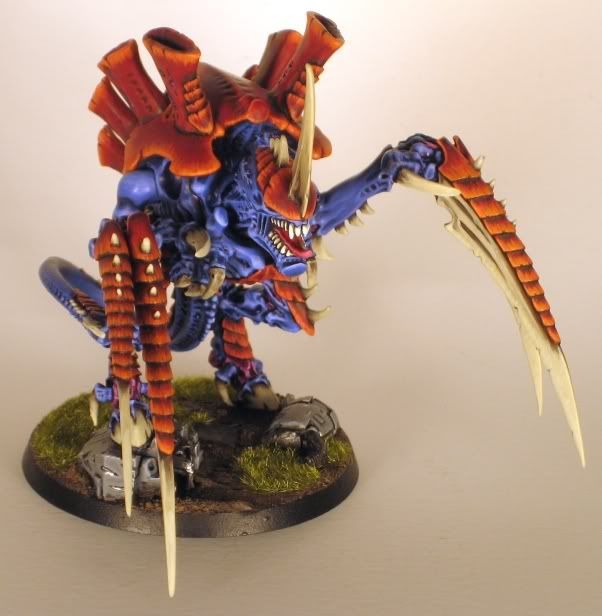
3618
Post by: fourganger88
I wasn't sure about those arms, but they look good now they are painted.
105
Post by: Sarigar
Fantastic looking model. Folks will have a grin on their faces looking at him as he tears through their army.
60
Post by: yakface
Okay question: I'm trying to figure out exactly how I'm going to finish the wings, and I used a bit of Ice blue to give the membrane a slightly more light bluish look than the normal flesh. Is it too much? You'll have to imagine that the claws in the wings are the bleached bone color the rest of the blades on the model are. The actual skin of the arm is done, so that can give you a reference of how much lighter the membrane color is: 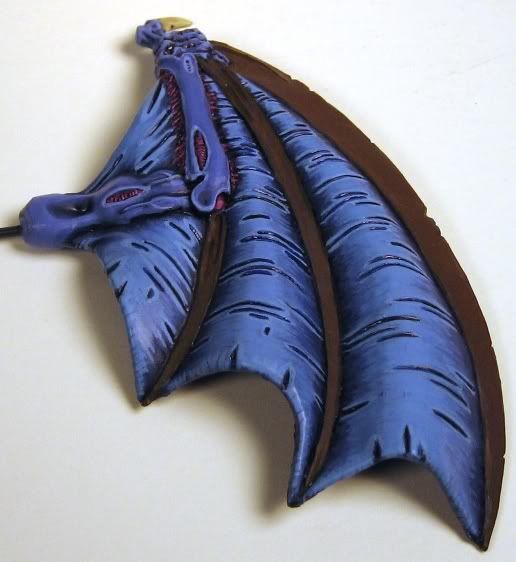 Too bright? Should I lay a light blue ink over it to cut it down a notch? Please lemme know what you all think.
40
Post by: nyarlathotep667
Don't do a thing you worrying ninny! Those are fecking awesome! Stop now and do the dang talons/bones the membranes attach to, as the wings are perfect.
486
Post by: Elnicko5
I have to second nyarlathotep, fecking awesome, or perhaps frelling awesome.
759
Post by: dumbuket
I've been using safari. I use a little macbook. I just downloaded mozilla back on my home computer, so I might get different results.
Also - great work on the wings. And insaniak, you've really gotten pretty slick with the tyranid sculpting. I might just have to contract you again...
3564
Post by: Brother Bartius
I wouldn't do a thing more on the blue for the wings they look fantastic.
Concentrate on the bone areas and move this along so we can all see it finished.
ps can't wait
excellent work
247
Post by: Phryxis
The wing membrane itself is great. If you want to improve anything, do some blending of the highlights around the vent hole in the arm chitin.
The color looks very good on its own, but I'd have to see it next to the model to say if it's too light. I don't know if I'd mess with it regardless, you've really got nowhere to go but down from where it is now.
Just make sure to paint the bony parts brightly enough to match the wing membranes.
60
Post by: yakface
The time has come: Beastie McWingsalot is finally finished. Hooray! Below are the final pics, but I want to thank everyone who gave me suggestions and support. I wish I had the time to thank you all for the nice things you've said, but I've just been too busy painting. Now, onto my next bug. . . With x2 Scything Talons (no biomoprhs): 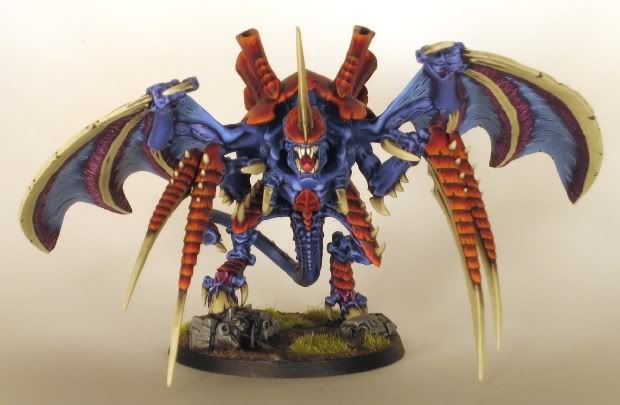 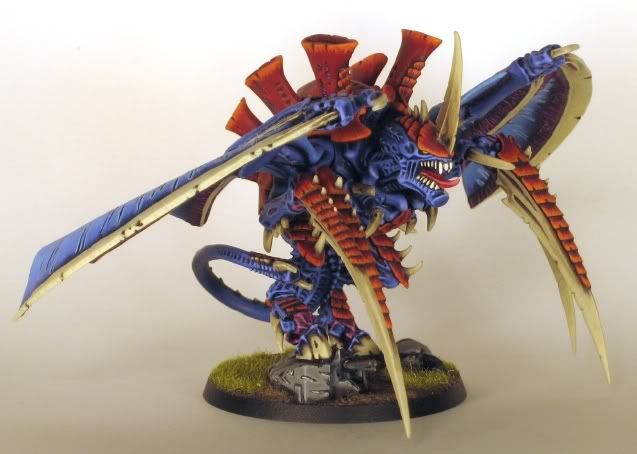 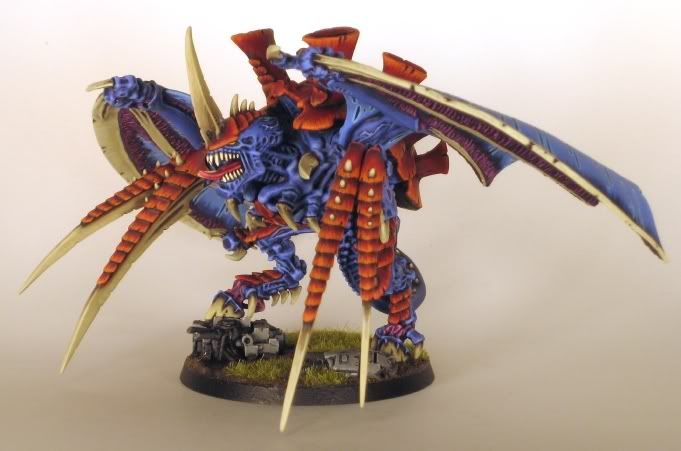 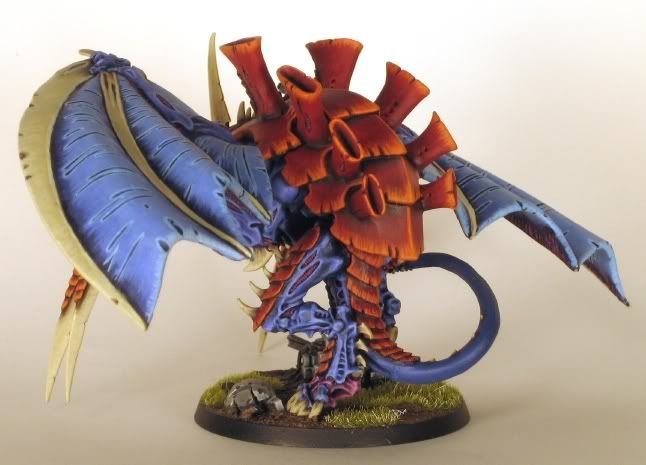 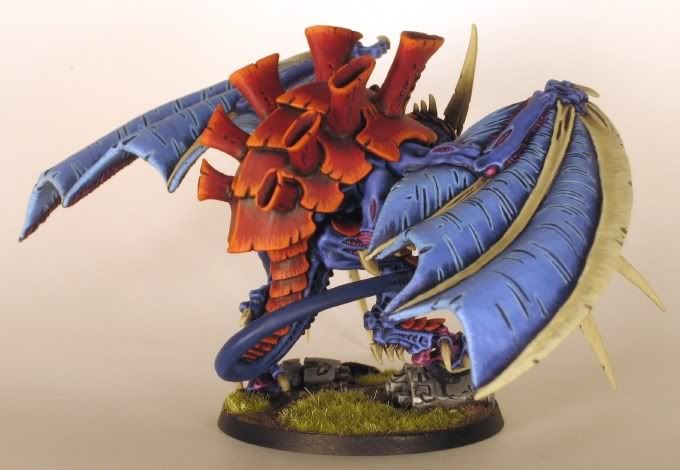 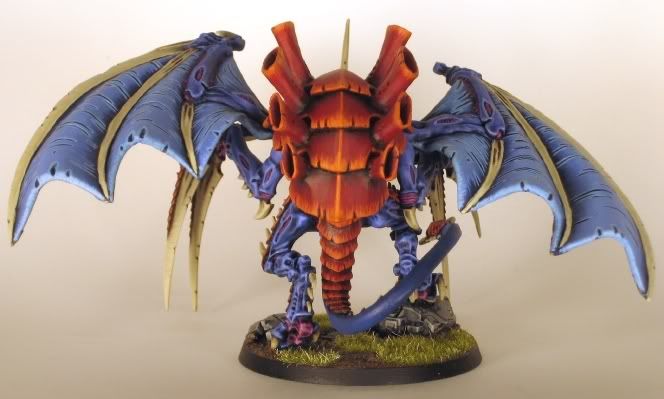 With x2 Twin-linked Devourers (no biomorphs): 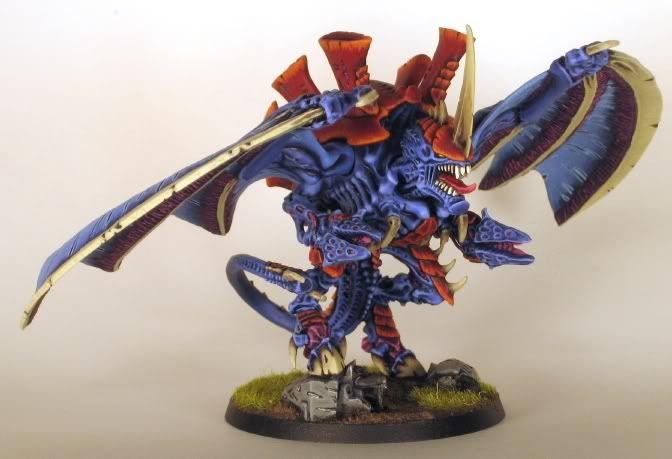 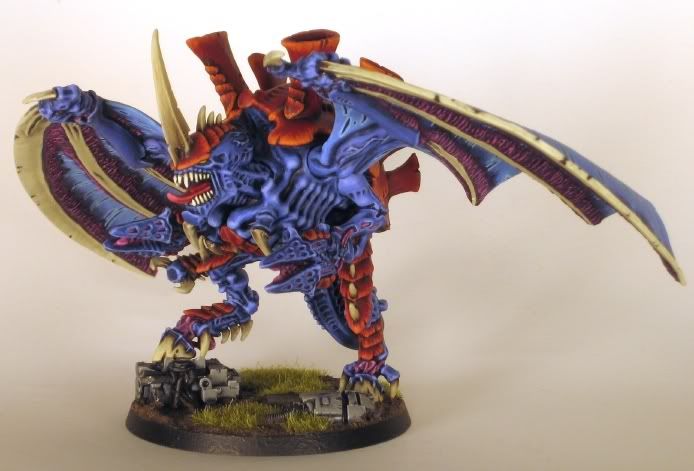 Posing with some of the fleet: 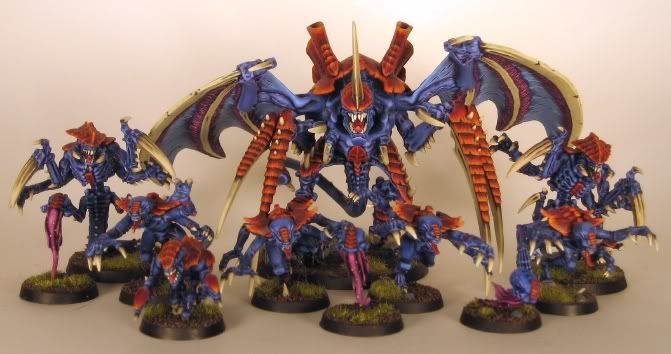
3154
Post by: the_cavalcade
It looks abselutely stunning!
I especially love the way you painted the connections on the wings between the talons and the membranes.
It really is a most impressive model!
99
Post by: insaniak
Wow.
The pink under the wings was a little startling at first, but it does fit with the rest of the colour scheme. Love the blue on the membranes... just makes the wings stand out that little bit more.
You've done an outstanding job on him, and it's been a heck of a lot of fun seeing him come to life.
3935
Post by: Gereth
Congratulations to both of you guys... seeing this monster evolve from scratch to a fully painted model was nothing short of amazing. Not only Insaniak managed to create a truly unique piece but Yak's stunning paintjob did it justice effectively bringing it to life... Amazing guys!
611
Post by: Inquisitor_Malice
Great job Yak. We look forward to playing this from across the table at AdeptiCon.
40
Post by: nyarlathotep667
Awesome work Yak! Ready your flame throwers and heavy bolters boys, there's a horde of Nidzillas coming your way!
118
Post by: Schepp himself
Somehow the Tyrant doesn't scream "TYRANT", but heck, it's an absolutely cool model and far from anything I could accomplish.
Greets
Schepp himself
2776
Post by: Reecius
that thing is just awesome! I have really enjoyed watching this progress, great job.
1309
Post by: Lordhat
This whole thing from start to finish should be an article!
Get to it RUSS!
748
Post by: ForceVoid
Wow, those wings really turned out stunning, very, very nice.
305
Post by: Moz
Looks absolutely awesome. Very well done to both of you.
Yak would you consider brightening the blue highlight of the tail now that the model is finished? It's the only thing that jumped out at me.
1589
Post by: Construct
Who's a pretty boy, den? Yes, you are! Yes, you aRGHHH!<strong />
7597
Post by: Kirbinator
Simply amazing. I've been fiddling with the idea of doing my own flyrant, and this whole article takes the cake for any "this is how it should be done" references, both in the modeling and the painting. Now the eternal question... what wings to use. >.<
8210
Post by: Barthonis
WOW!
All I can say is amazing work mate!
8272
Post by: FlammingGaunt
it looks ferakin awesome good job 
5164
Post by: Stelek
Hmmm never noticed this before, sadly.
Don't really dig the devourers, they look like little mouths still chewing up some meat.
I think the claws would look better on the top of the arms pointing out. They look like lee press-on nails.
Why didn't you modify the 'chimneys' and his shoulder area? He looks like a flying superfex.
Well, very nice paint job--do you not like green rings on your grass bases? A bit unusual, no?
60
Post by: yakface
Stelek wrote:Well, very nice paint job--do you not like green rings on your grass bases? A bit unusual, no?
It's just a personal preference of mine. I really dislike when the sides of a base are painted a color.
IMHO, no matter what color you paint the sides of a base it still always looks like a base so making it match the color doesn't help to camouflage it but rather helps to make the actual textured and painted top of the base look less distinct just like if you have a well-painted miniature with one area that is just painted a flat color. . .that area really stands out and makes the whole model look worse.
A black ring on the base is obviously a neutral color and it acknowledges, yes there is a base on the model, but makes the textured and painted top stand out.
In other words, my eyes ignore the black base and just look at the model from the top of the base up. Just like a good basing 'frames' the model, I think a black ring helps to 'frame' the work you've done on the top of the base.
99
Post by: insaniak
Stelek wrote:Why didn't you modify the 'chimneys' and his shoulder area? He looks like a flying superfex.
The 'chimneys' were modified. He has the Hive Tyrant's 4 instead of the Carnifex's 3, with the front set having the Tyrant's plated style, and the original 3 have been re-angled to fit the new position of the torso.
8372
Post by: motowookiee
Nice mitts Send more pics when you are done!
-Wook
514
Post by: Orlanth
I diont find black a neutral colour for basing normally, it is too strong and clashes with the terrain and the model. Particularly with the PP bases.
I am still torn as to what to use. Goblin gren works with flock bases, but I am yet to find anything satisfactory with sand. I use a brown, but it is so hard to get it right.
221
Post by: Frazzled
Those are really really sick. I am not worthy!
5164
Post by: Stelek
insaniak wrote:Stelek wrote:Why didn't you modify the 'chimneys' and his shoulder area? He looks like a flying superfex.
The 'chimneys' were modified. He has the Hive Tyrant's 4 instead of the Carnifex's 3, with the front set having the Tyrant's plated style, and the original 3 have been re-angled to fit the new position of the torso.
Hmmm I can't see it from the pics versus my Tyrants, but if ya say it is it is.
5164
Post by: Stelek
yakface wrote:Stelek wrote:Well, very nice paint job--do you not like green rings on your grass bases? A bit unusual, no?
It's just a personal preference of mine. I really dislike when the sides of a base are painted a color.
IMHO, no matter what color you paint the sides of a base it still always looks like a base so making it match the color doesn't help to camouflage it but rather helps to make the actual textured and painted top of the base look less distinct just like if you have a well-painted miniature with one area that is just painted a flat color. . .that area really stands out and makes the whole model look worse.
A black ring on the base is obviously a neutral color and it acknowledges, yes there is a base on the model, but makes the textured and painted top stand out.
In other words, my eyes ignore the black base and just look at the model from the top of the base up. Just like a good basing 'frames' the model, I think a black ring helps to 'frame' the work you've done on the top of the base.
Ah. Well I appreciate your viewpoint.
Personally I like brown or green, black always sucks my eyes to it.
Especially if it's not given a dullcoat, in a fluorescent lighted room it tends to reflect the light badly off the gloss.
Part of why I try to avoid black on anything I can't break up with other colors, and I haven't figured out how to do that on bases yet.
If you had a mech base feel it'd make more sense, and flow better.
Have you thought about doing this?
Put on a brown ring, and make sure all the static grass is not on the edge anywhere.
Then in random spots, use the same highlight color you used and flick gently along the rim edge to tie in the base color of your brown with your ring color?
Man that sentence does not sound right. Well, I hope you get the meaning.
I find using a very light wash randomly stippled also helps blend the color in.
Blending fools everyone's eyes, not just your own. That's why I suggest it.
60
Post by: yakface
Stelek wrote:
Ah. Well I appreciate your viewpoint.
Personally I like brown or green, black always sucks my eyes to it.
Especially if it's not given a dullcoat, in a fluorescent lighted room it tends to reflect the light badly off the gloss.
Part of why I try to avoid black on anything I can't break up with other colors, and I haven't figured out how to do that on bases yet.
If you had a mech base feel it'd make more sense, and flow better.
Have you thought about doing this?
Put on a brown ring, and make sure all the static grass is not on the edge anywhere.
Then in random spots, use the same highlight color you used and flick gently along the rim edge to tie in the base color of your brown with your ring color?
Man that sentence does not sound right. Well, I hope you get the meaning.
I find using a very light wash randomly stippled also helps blend the color in.
Blending fools everyone's eyes, not just your own. That's why I suggest it.
Can't say I've ever tried that nor do I think I've seen an example of what you're talking about. Do you have any pics (or links to pics) that show-off what you're describing?
Ultimately, since I prefer a black ring on my bases, I doubt I'd change it but I'm always looking for new techniques and who knows maybe once I see it I'll change my mind (unlikely in this case. . .I'm hardened in my ways on this one, but you never know).
5164
Post by: Stelek
In a month I think I will have something to show. I can't now most armies are out on loan for ard boyz and vegas. lol
9268
Post by: 3ff3ct
Awesome conversion, awesome paintjob. I gotta make me one of those!
9780
Post by: Khorny
woah that is awesome I only just saw that then took my about two hours and when I had finished I went for little snooze
PLUS! CAN SOMEONE TELL ME WHAT HIGHLIGHTING IS AND HOW U DO IT, IM SO CONFUSED
please pm me
Sorry for the outburst
10203
Post by: lolzman
sweet........................thats all i can say (awed)
7010
Post by: enmitee
Jesus Christ. can you look how old this thread is.
EDIT maybe as old as you? a year or 2?
10784
Post by: adielubbe
NICE!!!!!!
10942
Post by: !?
Oh, HBMC, HBMC, HBMC! I summon thee to shut down this thread!
11580
Post by: tomlowbridge
Awsome job, love the paint scheme
9813
Post by: LBursley
necro
11516
Post by: deadly chicken
wow looks do amazingly great!!!!!!!!!!!!!!!!!!!!!! i want, no i NEED it!!!!!!! GIVE IT TO ME!!!!!!!!!!!!!!!!!!!!!!!!!!!!!!!!!!!!!
15456
Post by: tobi-nid-guy
HOLY  dude you both worked really hard on that flyrant
and i think its amazing but i have one question...
were can i get one
15647
Post by: Beastmaster
This is all really cool. 
14936
Post by: Goodge
wow...
15979
Post by: i am meatshield
all new stuff is great but a few plasma cannons neva go astray =)
10890
Post by: Deff Dread red Edition
Wow,really nice.
|
|
