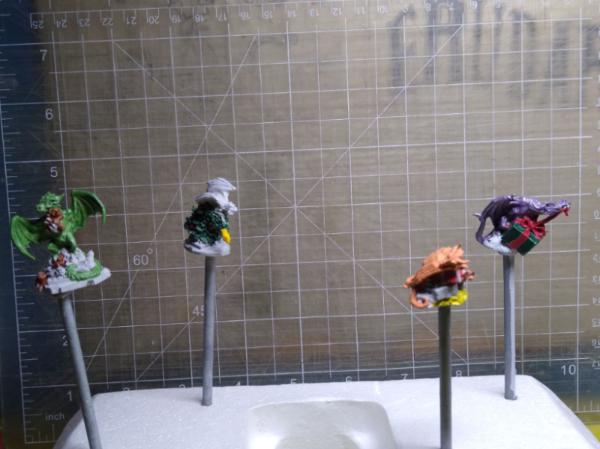
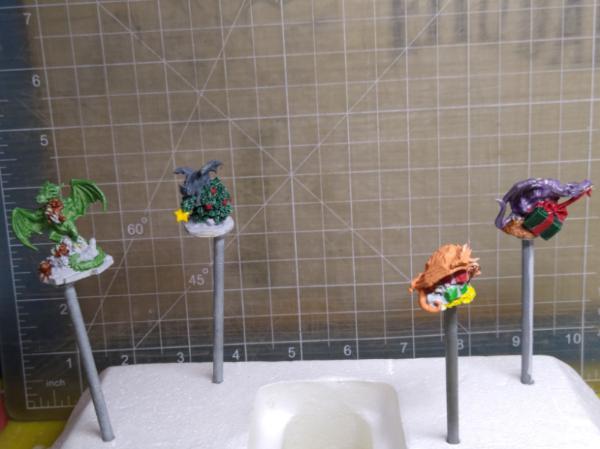
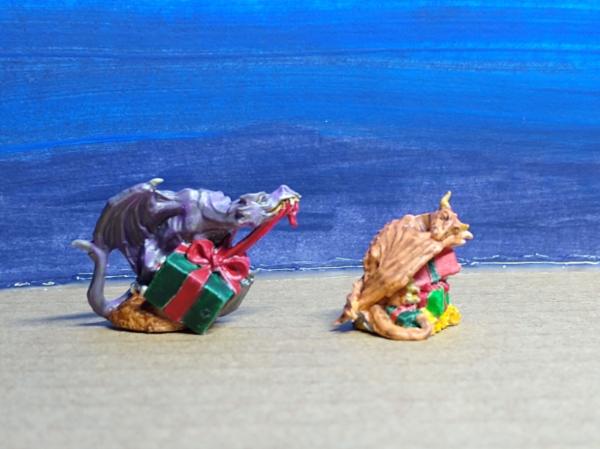
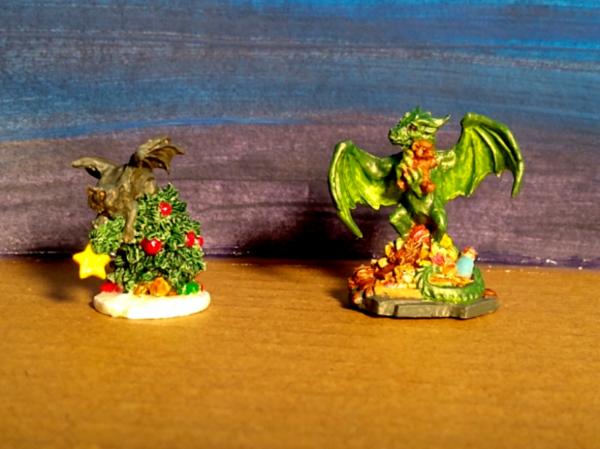
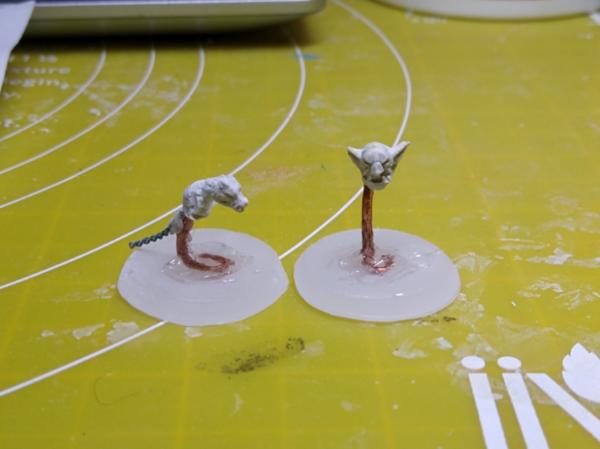
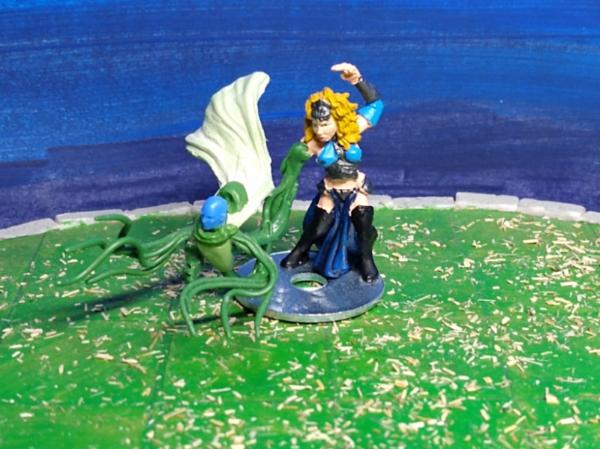
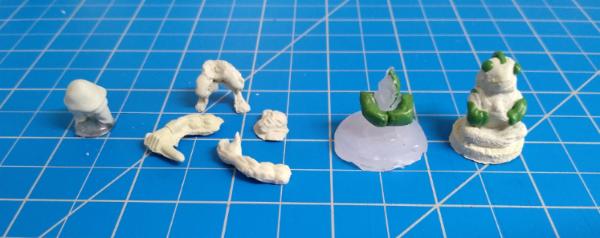
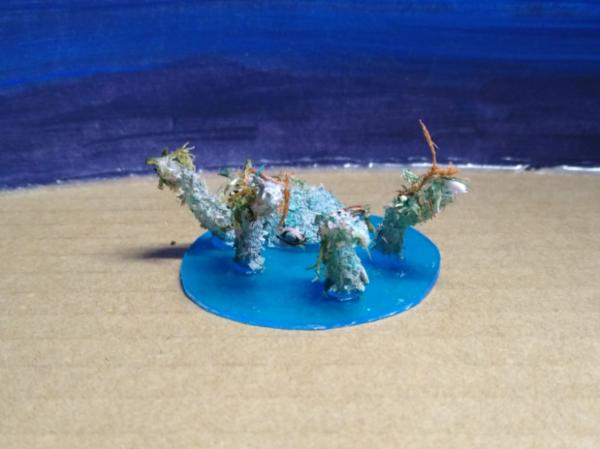
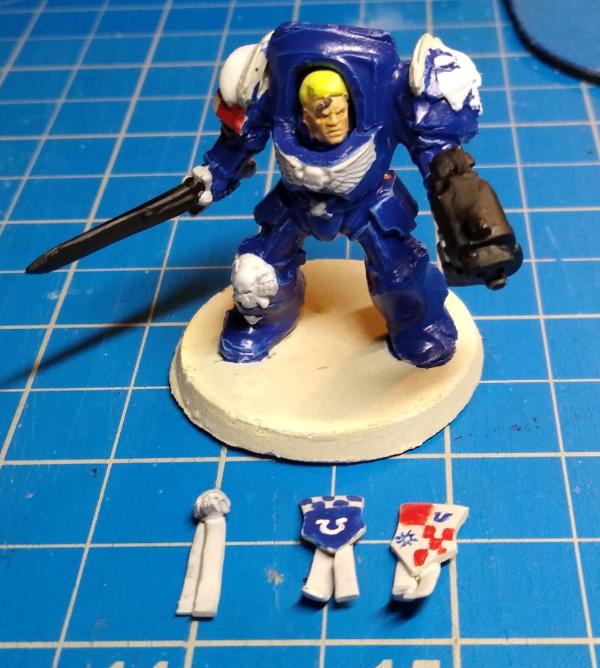
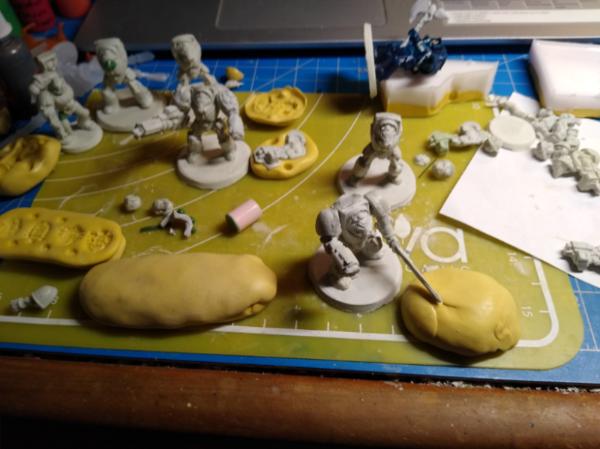
Thanks theCrowe, the little tree creature is a fun mini The Christmas dragons are part of a custom advent calendar that I am making for my sister-in-law. She likes and collections dragon figurines, and plays Dungeons and Dragons.
Here are two of the Christmas dragons, finished:
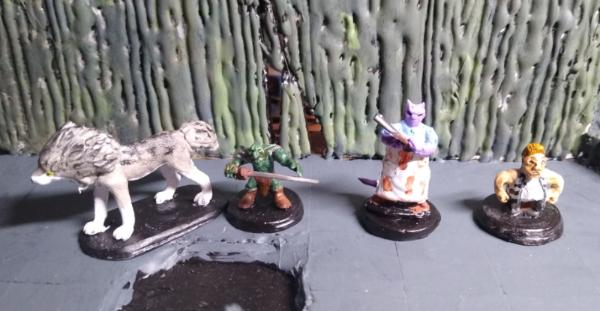
I also made this cat statue from a dollar store bag on animal figures.
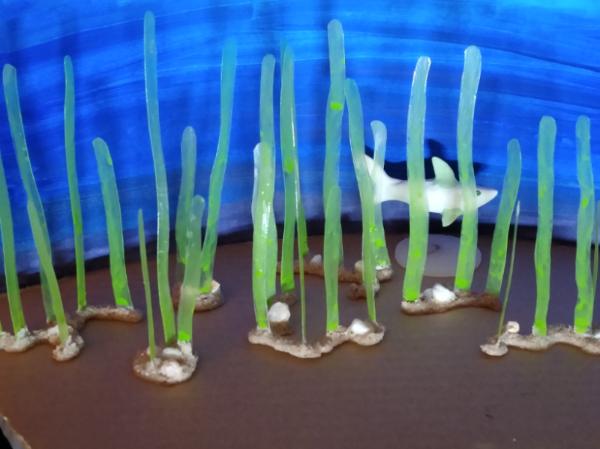
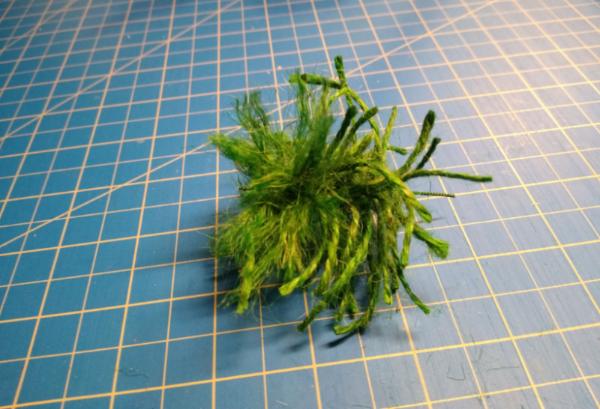
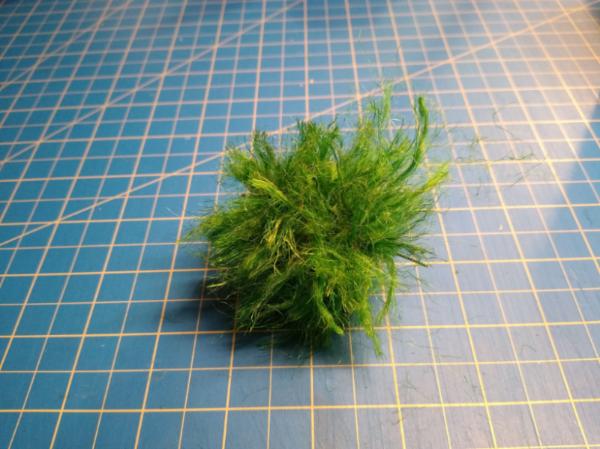
The kelp bed scatter is brilliant- I'm stealing that!
I've been saving some of those bits of green plastic foil-looking decoration that come in sushi orders- I guess they're supposed to look like bamboo leaves, perhaps? They measure about 1 1/2 inches by three inches long. I was thinking they might could be clipped into strips and left attached at the bottom and could be eel grass.
Viterbi's not the only one with Sebastian singing in his ear, either.
Viterbi wrote: Great, now I'll be working all day with "Under the sea" in my ear .
Viterbi's not the only one with Sebastian singing in his ear, either.
Heh heh, yeah, it's be getting stuck in my head quite ofen as I work on this terrain too
@Viterbi: And thanks. The dragon cuddling the teddy bear was the hardest to paint and the most work, so I'm glad it is liked.
@aku-chan: Thanks! @Meer_Cat: That's great I hope to see your version of the kelp bed scatter terrain and what you can do with that eel grass idea. I like your idea too, for a long time I have wanted to do something with that fake grass in the sushi packages too
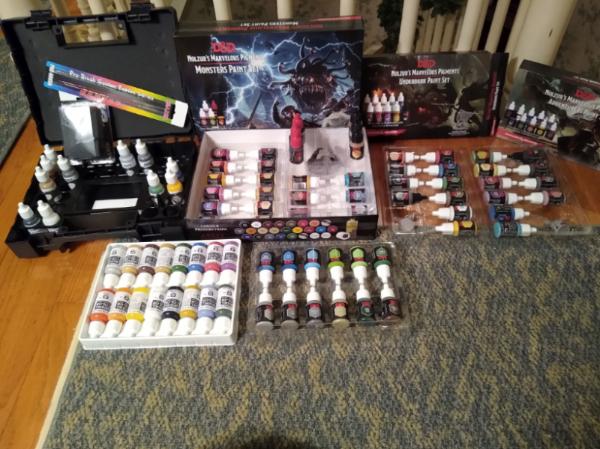
Happy holidays everyone! I have been lazy about uploading, but I have been busy with hobbying once Christmas break began. This post is more about the generosity of my family and all the hobby stuff I got.
I was given all this paint, which is exciting for me. I received 78 new paints and 3 new washes. Before this Christmas I owned 42 miniature paints and 6 washes. My miniature paint collection is effectively three times the size that it was.
Here is my entire miniature paint collection: 120 paints, 8 inks, and 9 washes.
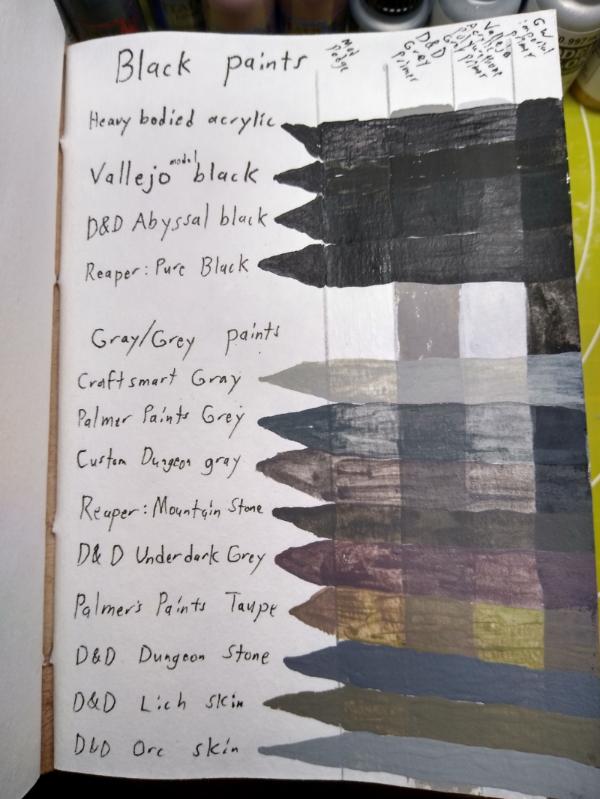
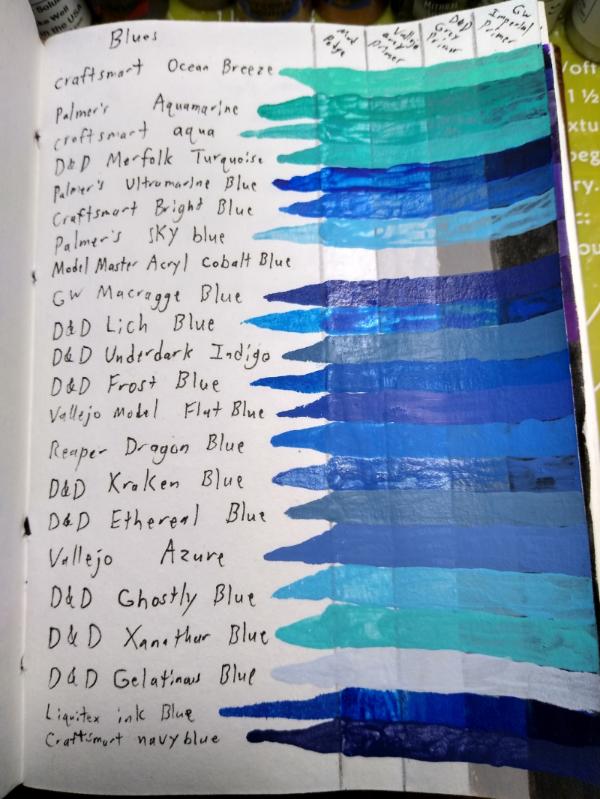
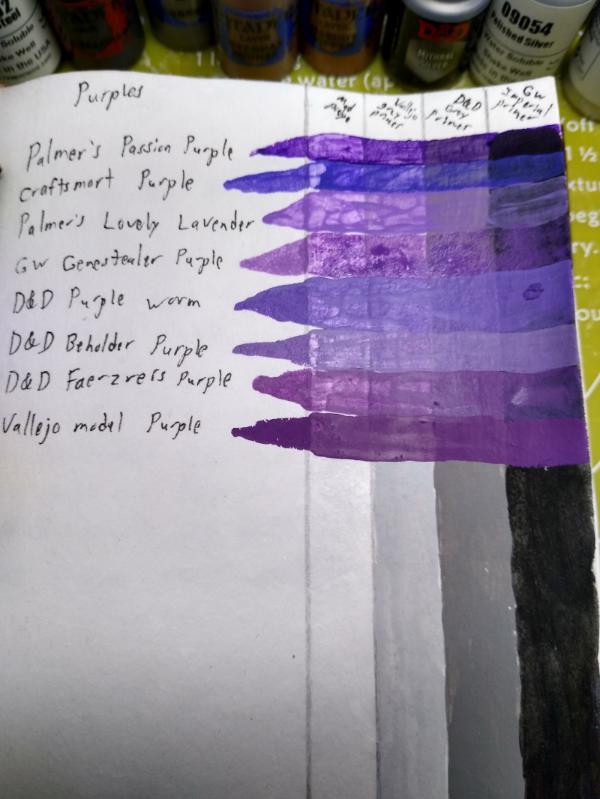
I've never had this problem before, but now I tried out every paint in a journal with different primers to know what the paints look like:
Spoiler:
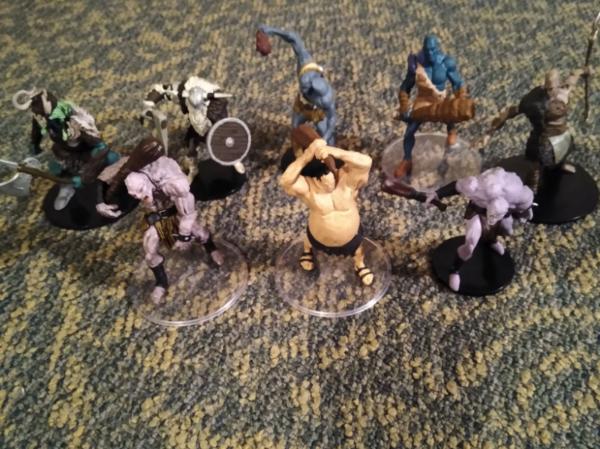
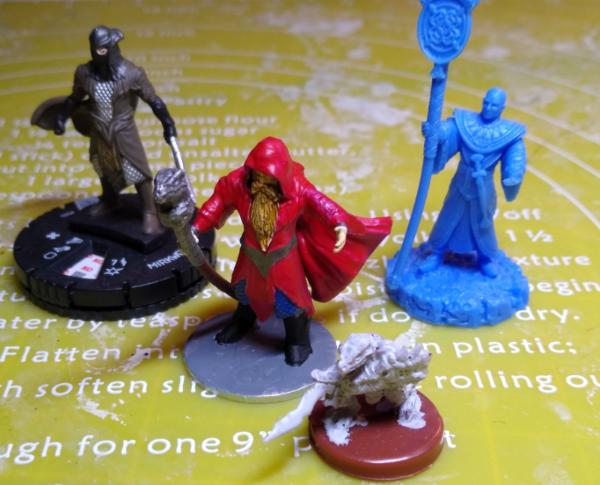
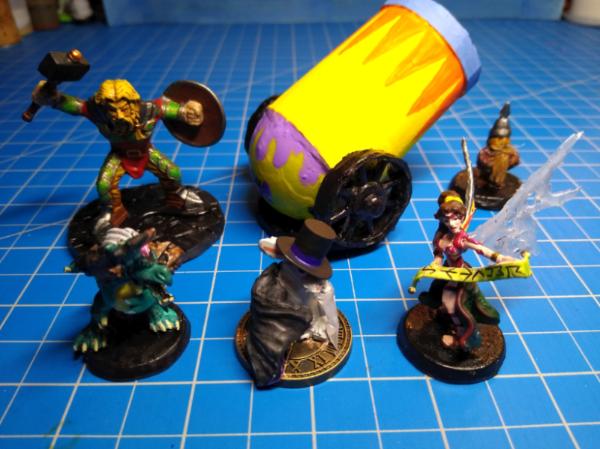
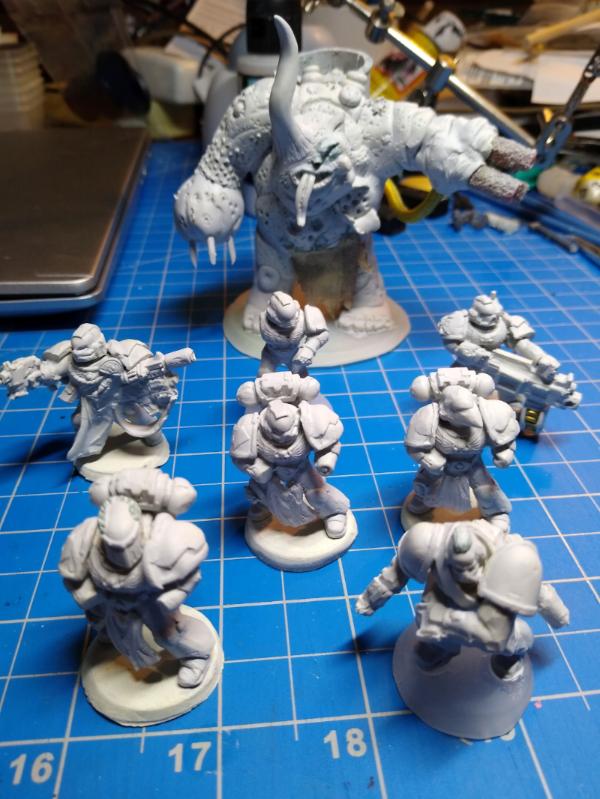
I also received new Dungeons & Dragons miniatures
A lot of giants (I want to try Storm King's Thunder)
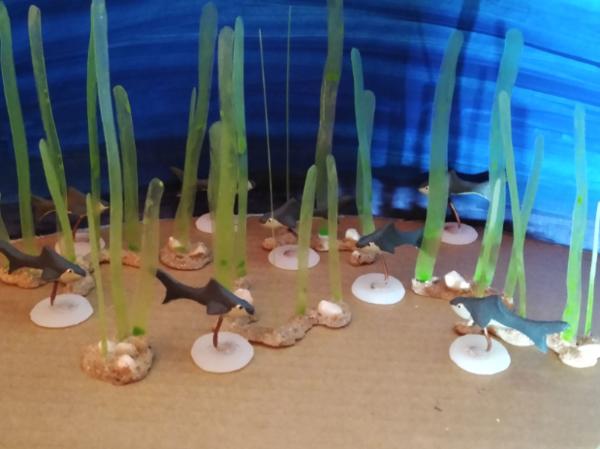
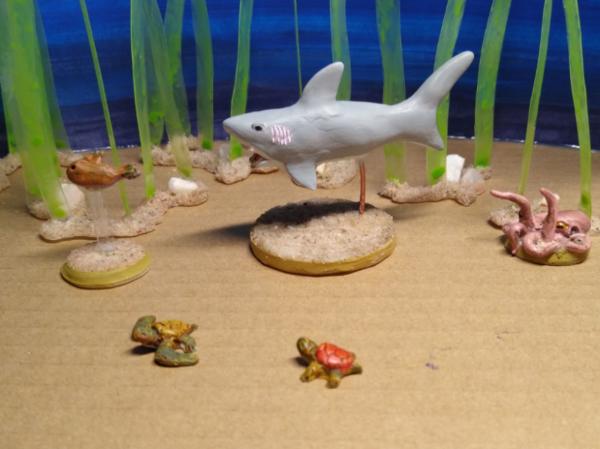
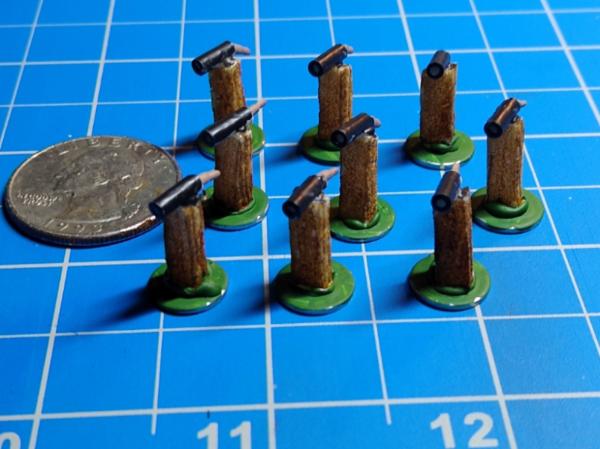
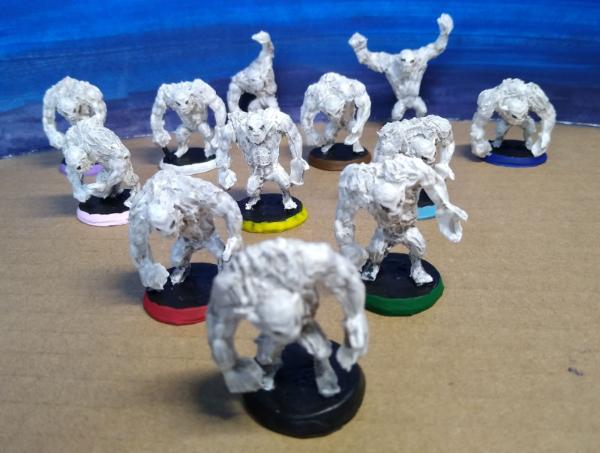
I am continuing my under sea encounters with 8 reef sharks.
not only do i love loot drops shown here but i really love your scientific approach to the new choice problem with the cornucopia of paints!!!! merry christmas indeed and a happy new year!!
Thanks Vik! Merry Christmas and a happy new year to you too.
2021 Retrospective: It's hard to believe how long ago the beginning of this year feels. I was living in a different country, with a different job, and working on making a board game. I was also sculpting and crafting for Dungeons & Dragons (This part hasn't changed much). Since then I have also come home, started enjoying my miniature purchases, painted more miniatures, and picked up some old projects.
I have sculpted more miniatures and painted more miniatures this year than I ever have before.
Total sculpted miniatures this year = 54
Total painted miniatures this year = 181
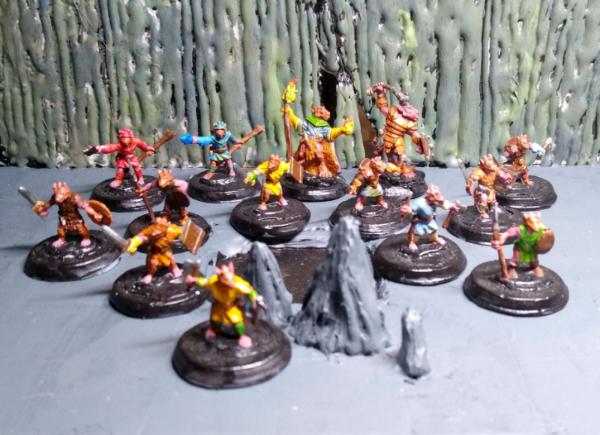
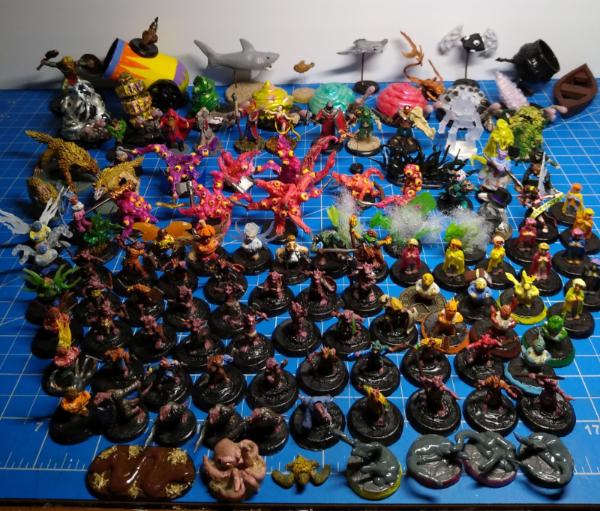
Here is a picture of most of my hobby accomplishments for this year
not pictured above: the 4 christmas dragons, cat statue, 48 ork boyz, a goblin tank with goblins, and two snowmen.
Spoiler:
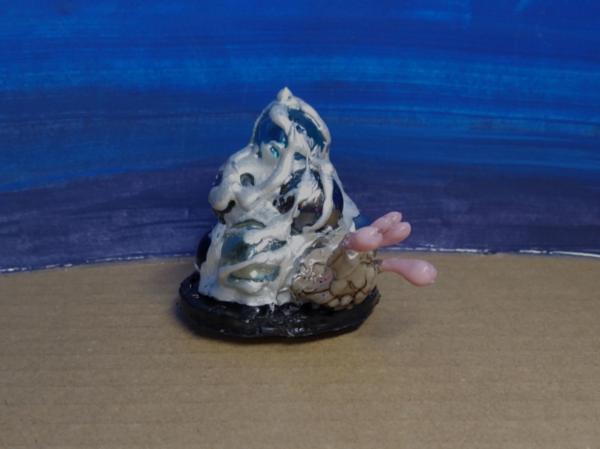
The newest finished sculpture is this giant seahorse that I finished today
Great paints haul you good there and love the 2021 overview pic (even if incomplete). Very cool mix of different stuff and am excited to see what you will bring on here in 2022!
Wow! You certainly have been busy last year!
That is an impressive amount of minis sculpted & painted. And all that between having so many big life events. Hats off to you!
Hard to pick a favorite, so I'm going to be boring and say... all of them
Your paint collection has certainly grown That journal is such a good idea. I would never have the patience to do such a thing, really good work.
And thank you for sharing it, so we can get some idea how they look compared to each other.
One can always learn so much browsing this thread. Thank you for that. Keep on being awesome!
Great round-up with loads of different things. Love all the underwater items and the game pieces. (How did the game development go?)
But my favourite has to be that massive cabbage monster. Such a great piece. And the big Halloween pumpkin vine fella is a very close second.
@Viterbi: Thanks Viterbi! At least the beginning of 2022 will hopefully bring the completion of my undersea encounters project. After that, who knows.
@Ezki: Thanks Ezki, and I can understand about difficulty with having patience to finish the paint journal. I was working on that for 4-5 days with all the drying times. I'm happy to hear that you like so much of what I'm doing @theCrowe: Thanks theCrowe As for the game development, I'm hoping to get some more progress on it soon. When I moved back home from Hong Kong, I threw away the molds and the cards to save on weight, but kept the masters and painted miniatures I made for it. I've been so busy with work ever since I got back, that I haven't made much progress beyond writing maybe two new cards. I just ordered some blank playing cards that I hope to get back to testing the game with. Thanks for asking.
Here's the first finished sculpture of 2022:
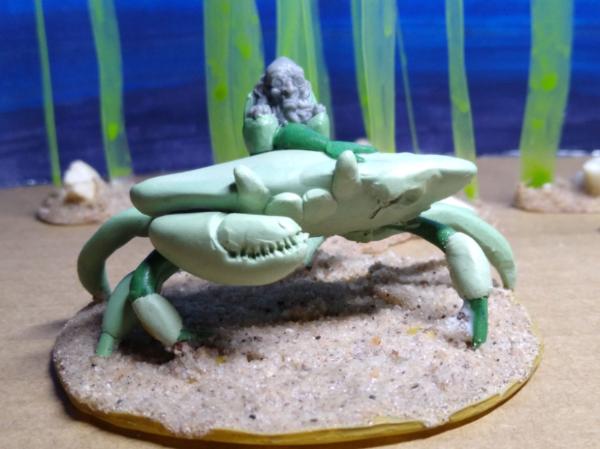
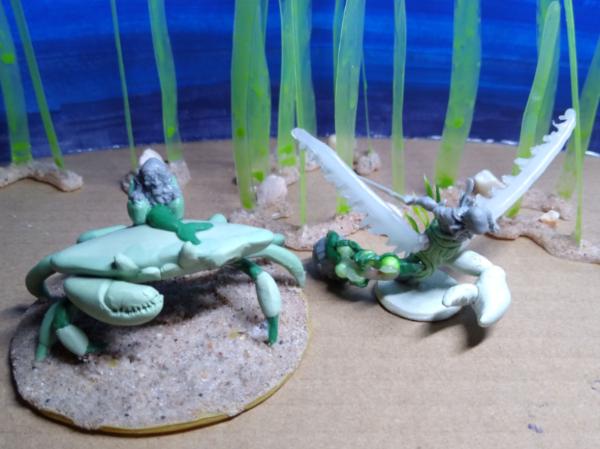
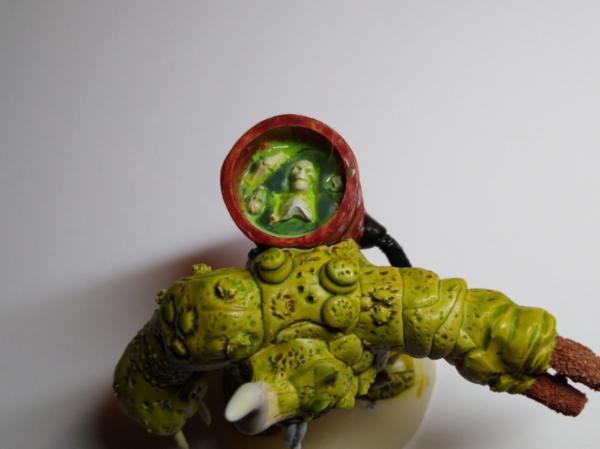
Here's the one armed crab without the rider (with attachable arm)
@theCrowe: Thanks theCrowe, I'm glad you like them. Is it more the sculpt or the paint job that you like about the turtle? It's funny, the turtles took by far the least effort to paint.
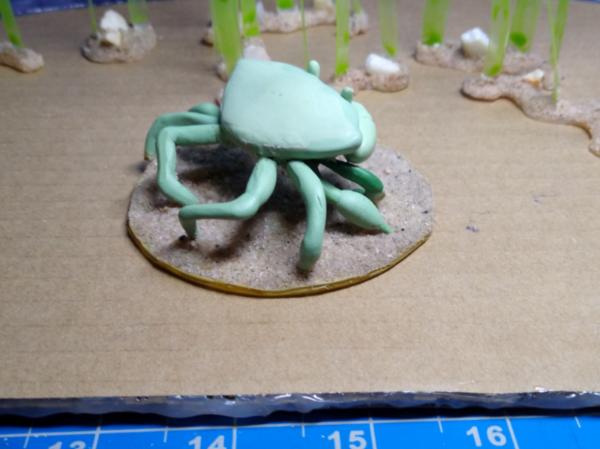
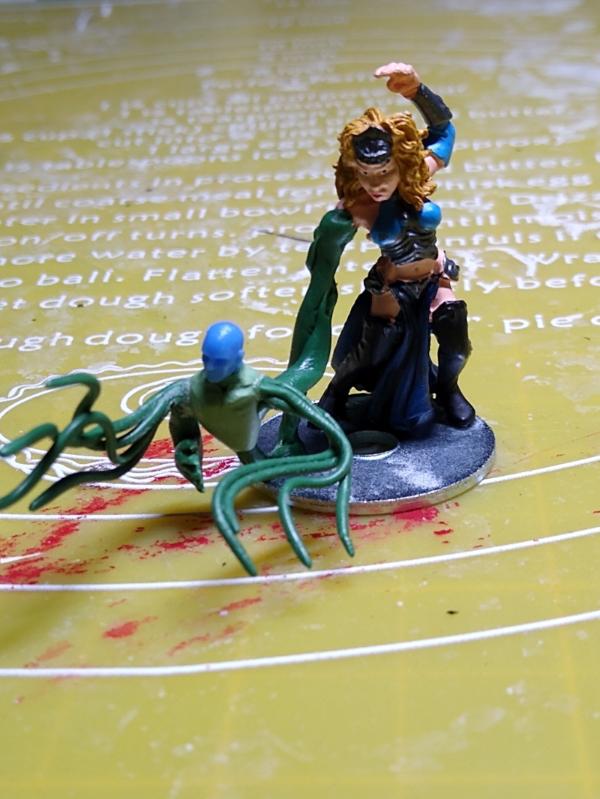
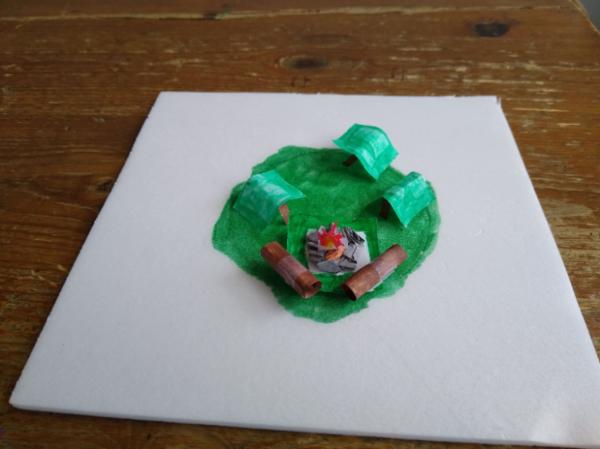
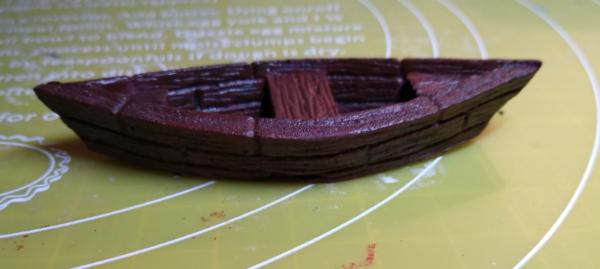
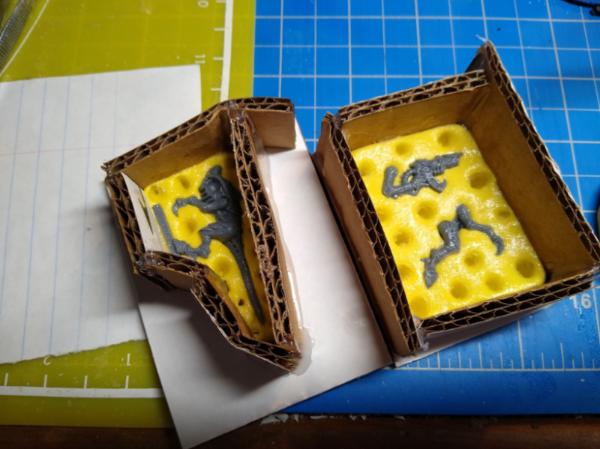
@Ezki: Thanks Ezki I have been making so much underwater stuff that I decided to make an underwater background to photograph them in (though I should really finish it). The kelp scatter terrain is for Dungeons and Dragons, but I like how it looks, so I have been leaving it in the background.
@Guardling: Thank you. Did you notice I was going for a bit of a Super Mario color scheme?
@Meer_Cat: Thanks Meer, it's funny that nearly everybody gets an underwater themed song stuck in their head when visiting my blog lately. Usually "Under the Sea" and now "Octopus's Garden" (And finding Nemo songs) Does that mean I'm doing something right? Or just torturing my visitors? I've never heard "Octopus's Garden" before, but it is surprisingly catchy.
@Theophony: Thanks Theo I hadn't planned on sea cucumber or urchin, but now I may try to add it because of you.
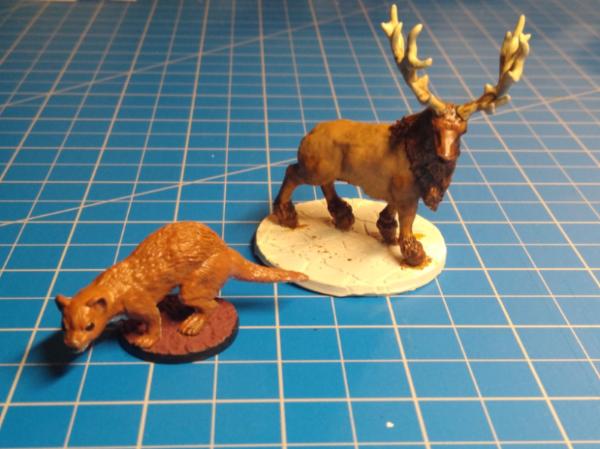
I'm taking a little break from the sea. I painted up this giant weasel and Elk from Reaper Bones Kickstarter 5.
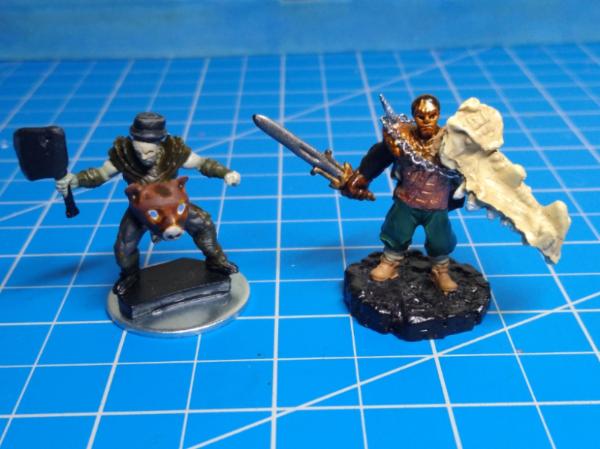
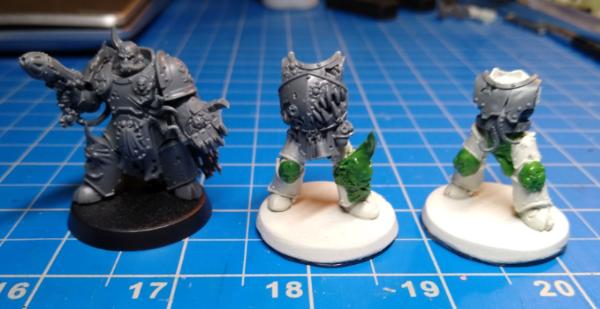
I've started converting an old MageKnight figure into a cleric for D&D. I've made him a lot taller, given him a war hammer (and a not yet attached tower shield), and just recently sculpted on a chain mail coif that I am happy with. His twin is there for comparison.
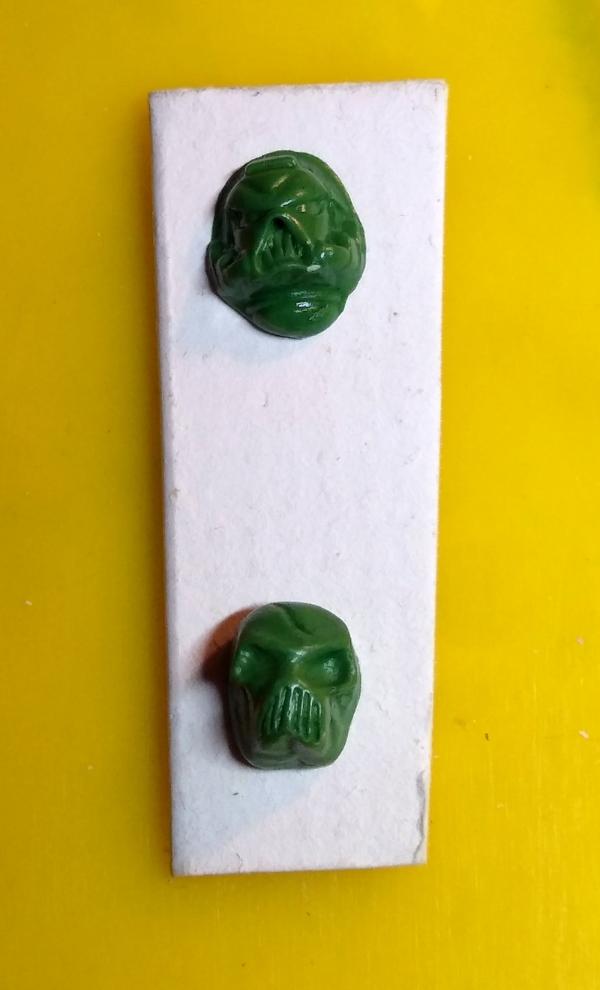
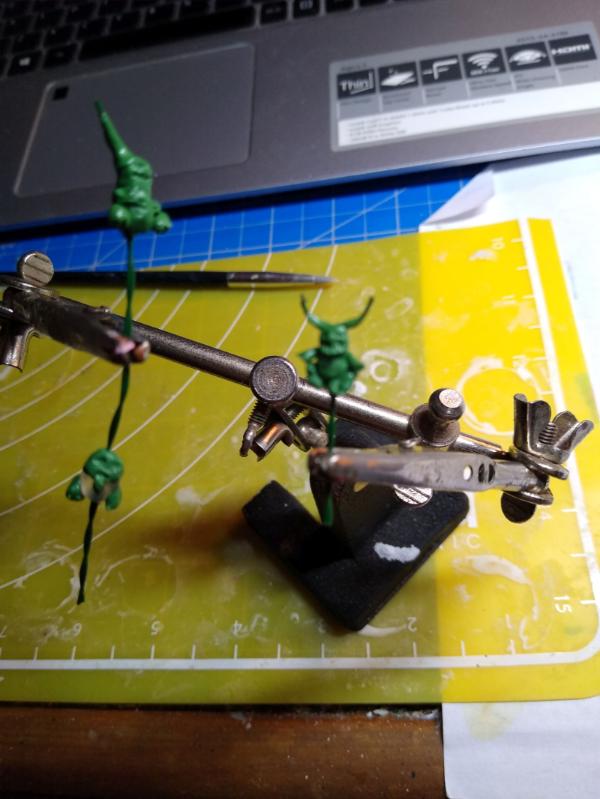
Even with going outside multiple times to shovel snow, I had a productive hobby day of sculpting. I decided my cleric's legs looks to thin and close together, so I tried sculpting a wider stance of his robe. I'm relatively happy with how it turned out. I have also started sculpting a Kobold sorcerer and goblin rogue. There are a few more thinsg that I haven't photographed yet.
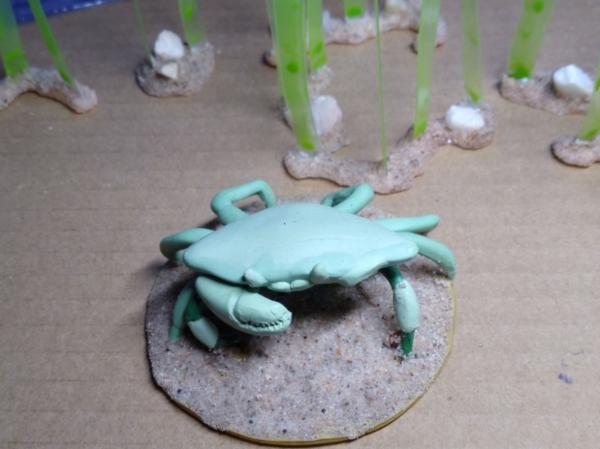
I love the recent sculpts, I think the crab is my personal favourite. All hail that mighty painting journal, I am impressed at your dedication! That would be a great idea for me but I lack your focus I fear
Lovely painting efforts already this year, here’s to a good one!?
@Viterbi: Thanks Viterbi I've finished one more undersea creature, so the undersea scene is back.
@Ragsta: Thanks Ragsta, I'm glad you like the giant crab. I really should get him painted, but can't decide on the color. I'm hoping for a good year of painting, thanks.
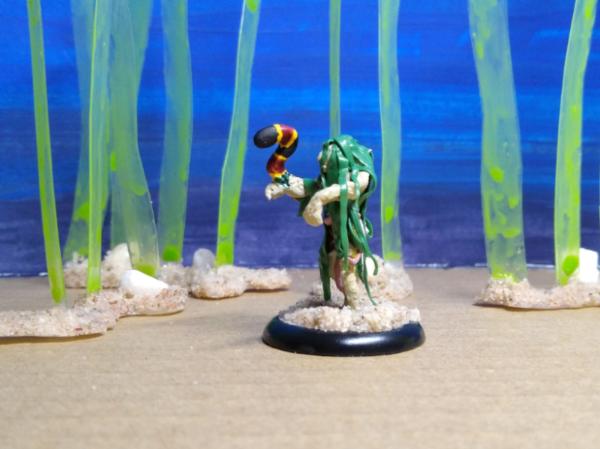
I have finished painting the sea hag that I made for D&D
If you are curious what pieces make her up:
Spoiler:
The arms are from two different "zombies" from Sedition Wars: The Battle of Alabaster, and the body is a Hadross Deepman from Wrath of Kings
The coral snake, face, and seaweed is sculpted on
@youwashock: Thank you youwashock @Wirecat: Thanks Wirecat. Are you thinking I should paint the crab similar to the crab from Moana?
@Theophony: Thanks Theo @Viterbi: Thanks Viterbi I'm close to finishing everything from the chart.
@monkeytroll: Heh heh, thanks monkeytroll
Wow, youwashock, good eye. Did you play Mage Knight? It's been so many years since I played. I mostly used Black Powder Rebels, the Steam Golem was my favorite.
I have finished painting the last of the custom wizards that I designed.
If you are curious, I made him from a molded copy of the Murkwood Guard LotR Heroclix (I love the look of this mini), with the arms of a cultist from the Cthulhu Wars miniature game, and the molded head of a D&D kobold for the staff. I sculpted the hood and beard.
Thanks so much Viterbi! I really enjoy the whole process of creating something new from kit bashing and sculpting.
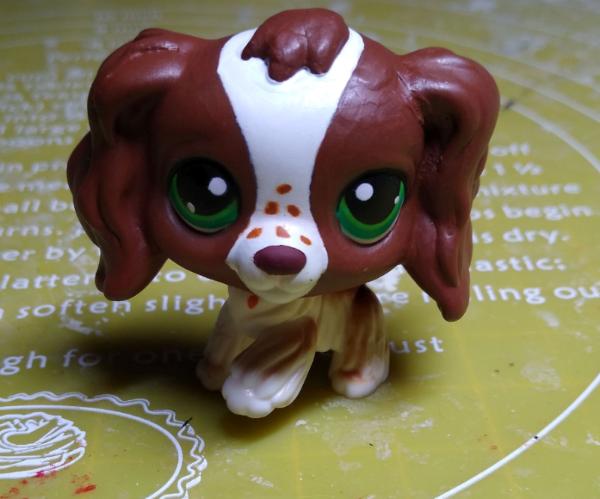
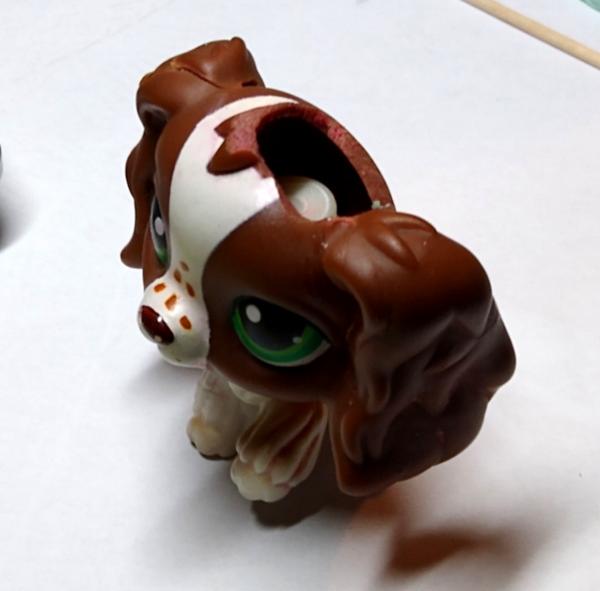
This is something a little different, but I have been using my crafting skills on this Littlest Pet Shop toy.
This little LPS toy belongs to one of my students. She has a big collection of them, but this is one of her favorites. It was "murdered" by a squirrel, and was looking like this:
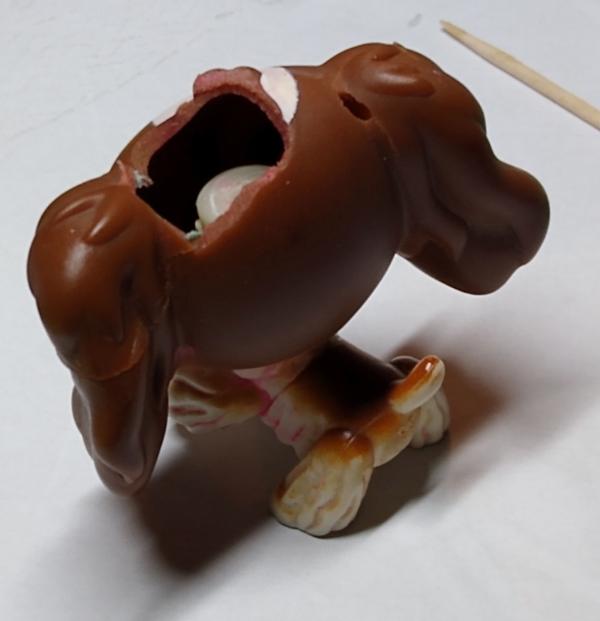
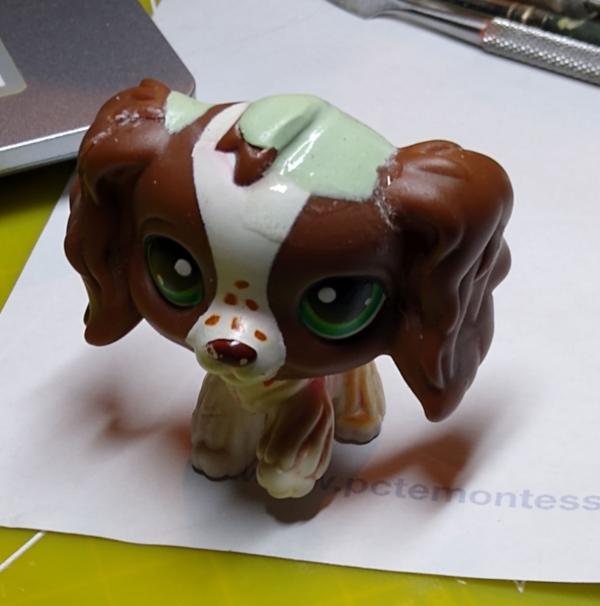
It was along the the huge hole in its head and the smaller hole by the ear, it was full of chips and cracks. It was close to falling apart into multiple pieces. I wanted to try to make the toy whole again, and I am very happy with how it turned out. In the spoiler section is the rest of the process for those of you who want to see the step by step.
Spoiler:
After super gluing the major cracks back together, I hot glued a chunk of XPS foam into the head cavity to build off of.
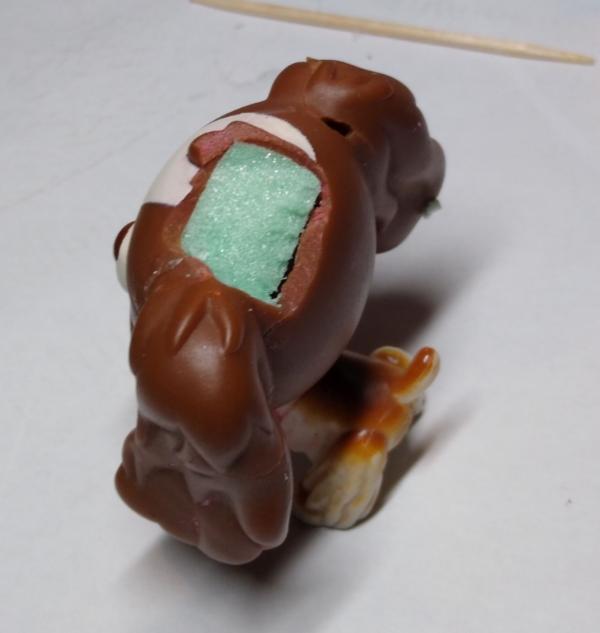
I then gap filled and rebuilt the shape of the head and basic hair style.
I researched and found out that the hair style actually had three points, so I altered that and finished smoothing and gap filling. I then painted the white pattern on the head that it was supposed to have, and finally mixed a custom brown and blended it as close as I could to the original head.
I am also nearly done with a very strange idea I had for a mutated wild magic sorceress.
And have been batch painting all of my kobold minis. (It is taking a long time)
Congratulations on successful cranial surgery, Syro! Thumbs up!
And that very strange idea is actually very neat. Don't know whether ghost-summoning would work better than mutation, but figures have a nice dynamic to them!
Thanks Wirecat, thanks Josh. I'll have to remember to take one more picture of the sorceress to share before painting her. I did a little work on her. I'm glad you both like her, my "head-cannon" is that the sorceress is a minor noble and the weird little arm man used to be a separate person who was her bodyguard and confidant. They fell in love, the noble family tried to separate them. She tried to cast some magic to protect them and got the wild magic surge "the next thing the speaker says becomes true" on a wild magic surge table. Without knowing this she proclaimed to her family "You can't separate us! We will always be together!" (Maybe also "he is my right hand man" but that may be too corny).
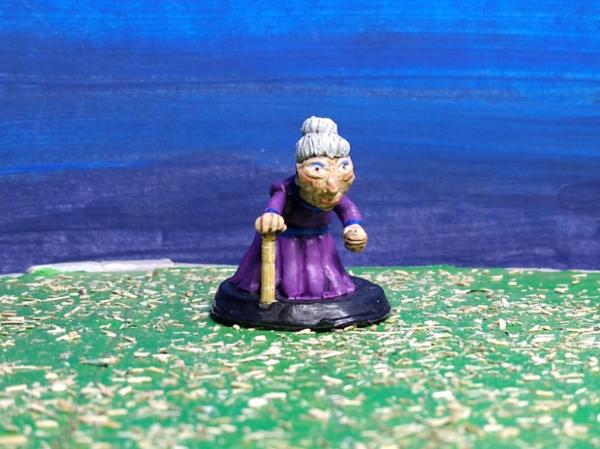
I have finished painting the old lady I sculpted for the Dakka Monthly Painting Challange:
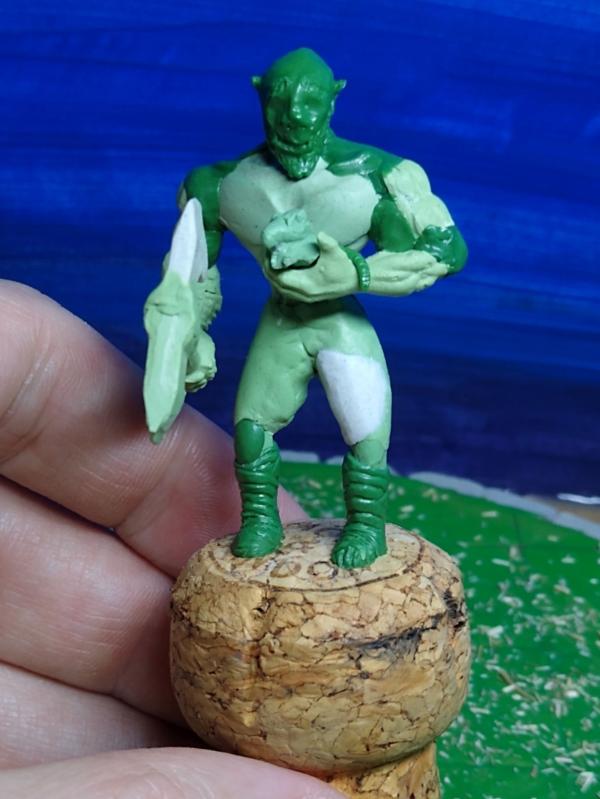
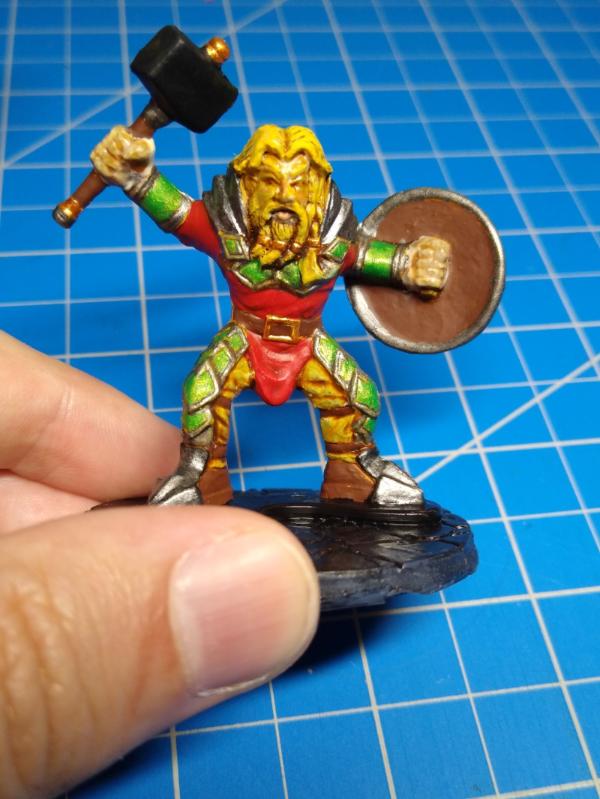
I am incredibly proud of how this gentle orc barbarian sculpt turned out.
I also really like how this nearly finished WIP Halfling barbarian brawler is coming out. I'll share the inspiration for him when I'm done.
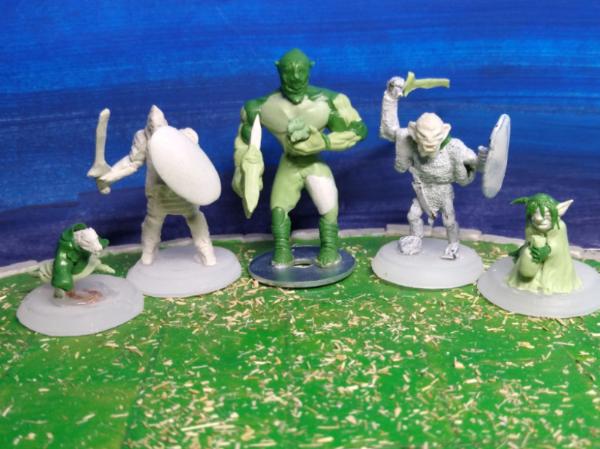
Thanks theCrowe Yes, my students were absolutely amazed They were excitedly talking about how it looked brand new. And thank you for the reminder about those two little fellas. I had forgotten I had posted them. I was waiting until I finished the fifth and final member of their group before "introducing" them, heh. That fifth member is the gentle orc barbarian I tried to post about last time and used the wrong picture (fixed now).
I have been sculpting and modeling the five player characters from the free Dungeons and Dragons adventure "Misfit Maggot Five" by Matt Rauscher
WIP
Spoiler:
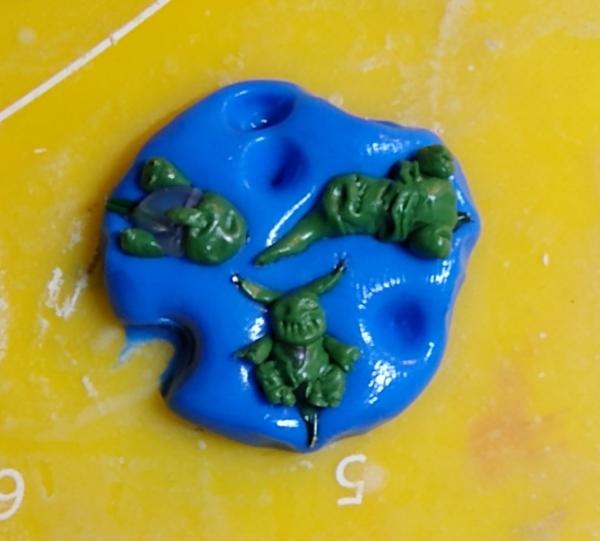
The startof the kobold sorcerer and goblin rogue were a molded head of kobold and a grot on simple armatures.
For the short bugbear, I started with this Mage Knight Demolishing Ape and removed its head and base.
I sculpted chainmail on the bugbear and tried to make it look too big. I later make a quite mold of a bugbear head and then attached it sculpting in the neck and hair (but didn't take a picture.
The hobgoblin is pretty basic, I just lengthened the torso and made him a shield.
The orc took the most work, but I am also the most proud of him.
wire armature
After skinning the armature and bulking it up, I sculpted the back muscles
Then I moved onto the chest muscles
I bulked out the legs more, tried to make it look like pants, and sculpted the lower legs to look like martial arts wraps
The arms and ax from from Warhammer 40 orks, but cut up and heavily modified.
Here is the finished mutated wild magic sorceress as well.
@youwashock Looking up Wicked City, I can definitely see similarities. The model is based heavily on the anime Parasyte. I still have more Mage Knight figures than I should either, and have been getting more for conversions. I have trouble cutting up my original Mage Knight collection just in case I pay it again too
Late to the party, but great surgery on that puppy. If the Paw Patrol ever is in trouble, they know where to turn to Ragtag fantasy group is coming along nicely as is the sorceress!
Sorry for not posting in so long, work and life have been exhausting me too much.
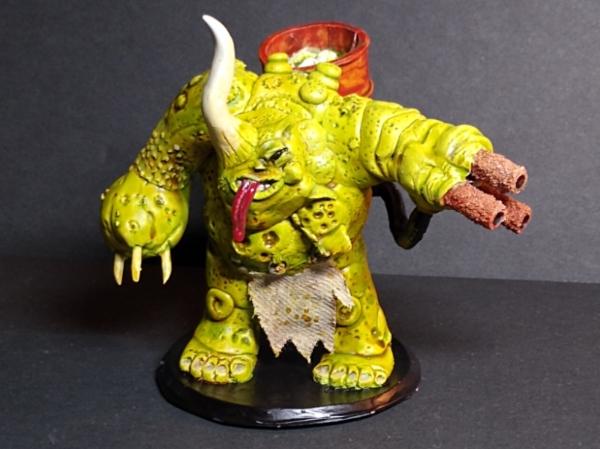
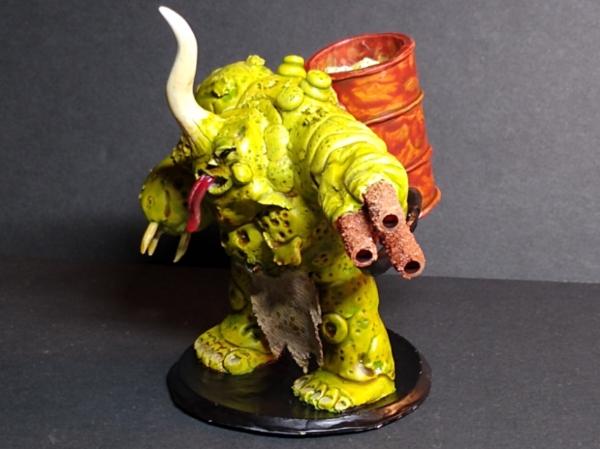
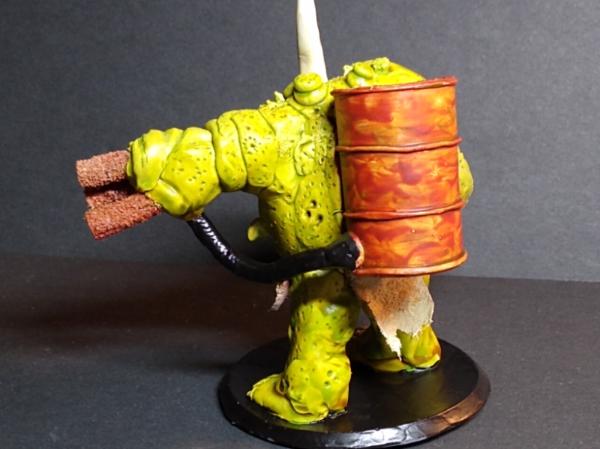
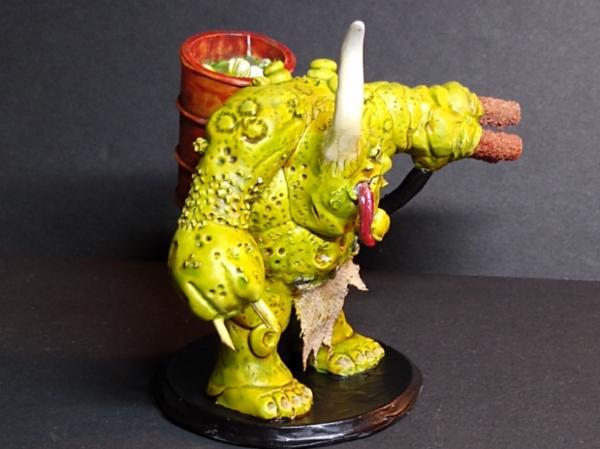
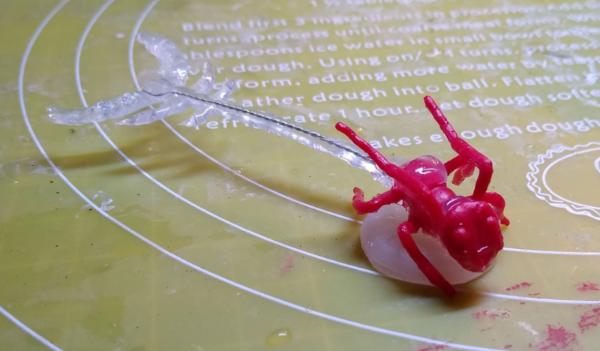
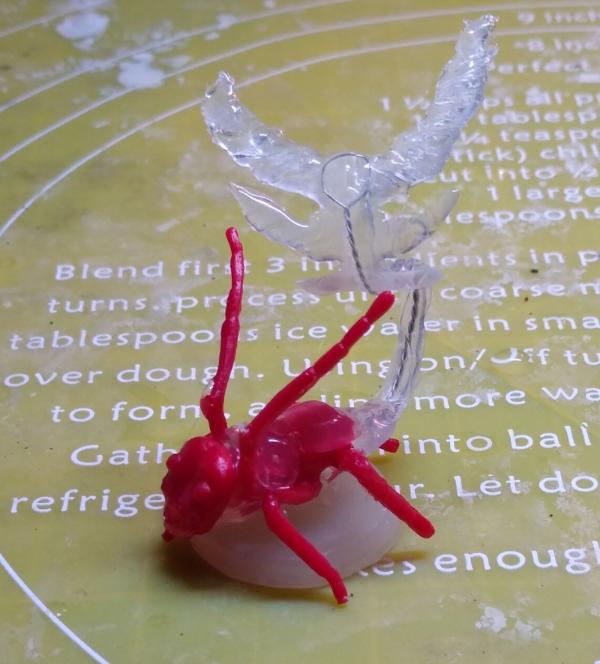
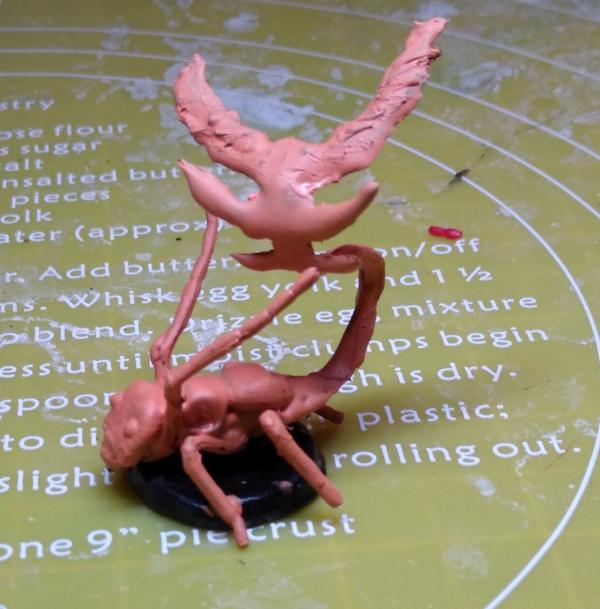
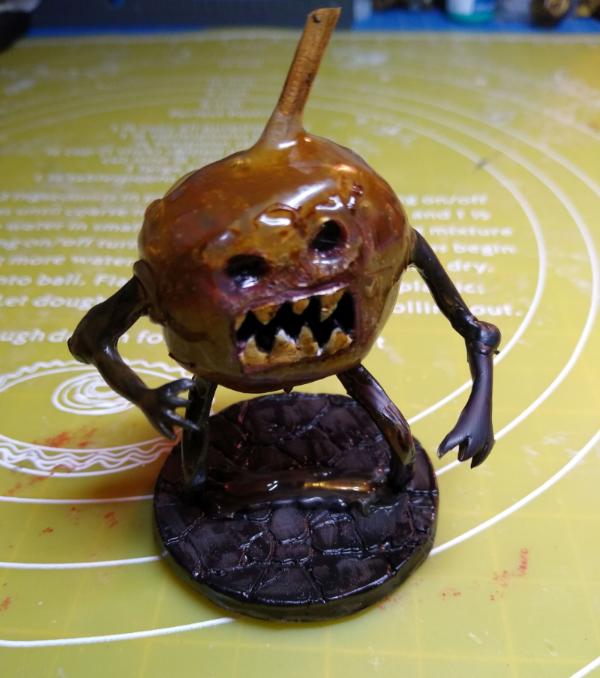
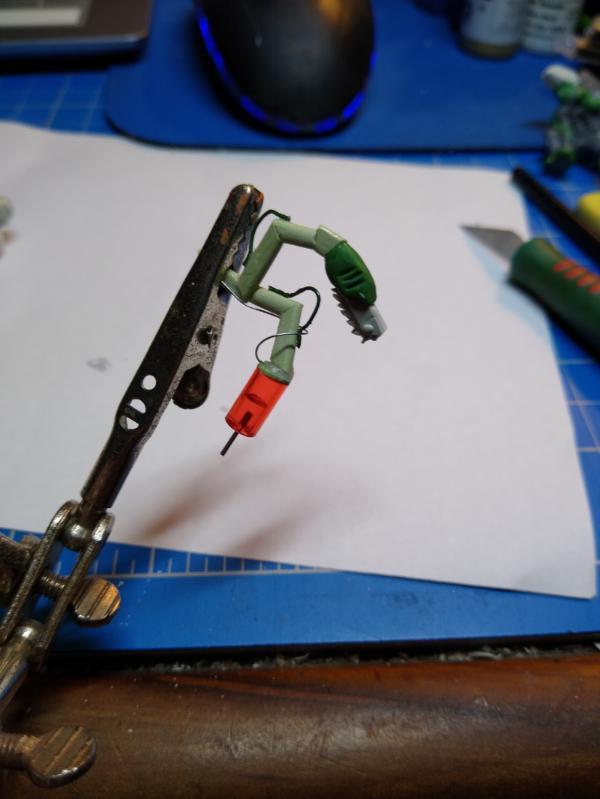
I am happy to say that I did some crafting over the weekend, and I wanted to see if I could make a rust monster quickly. This took almost exactly 20 minutes to craft (and much longer for its simple paint job).
I started with a toy ant from a dollar store pack and clipped it up.
The tail is what I think really sells it, and that was very quick to make with some wire and hot glue. Then I built up the body with a bit more hot glue.
Then I just had to pose it and paint it. The wire made it easy to pose the tail, other parts I heated with the tip of the hot glue gun and then dipped in water to pose.
The whole body is painted with a mixture of "Flat Flesh" and "Clear Orange" from the Vallejo model color range. Then a splash of agrax Earthshade and D&D "Grung Green for the eyes.
Well done! I hadn't thought of rust monsters since the old D&D days, frankly, never saw a picture (shows how long I've been out of it) and never knew what they looked like! Now I do. Great work.
Syro_ wrote: Thanks Meer_Cat Yeah, it's interesting that such a famous monster is barely in any adventures. An adventure I want to play has one, so now I made it.
After reading the adventure again, I actually need 4 rust monsters so I may try to sculpt a more permanent good looking version to make a mold of, we'll see.
There haven't been many posts because I have been so busy and tired with work, but hopefully I will get some hobby fun done this week since I am on vacation.
I have really lost momentum on batch painting my pile of kobolds, but I have finished these 5.
I also finally went back and sculpted my halfling barbarian brawler's hair, so now he is complete and ready for paint.
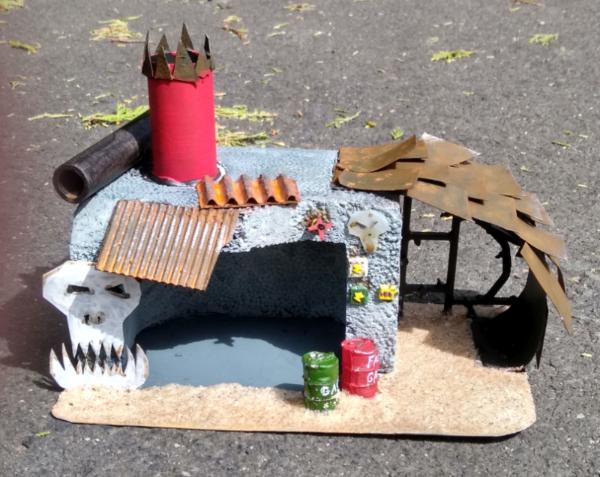
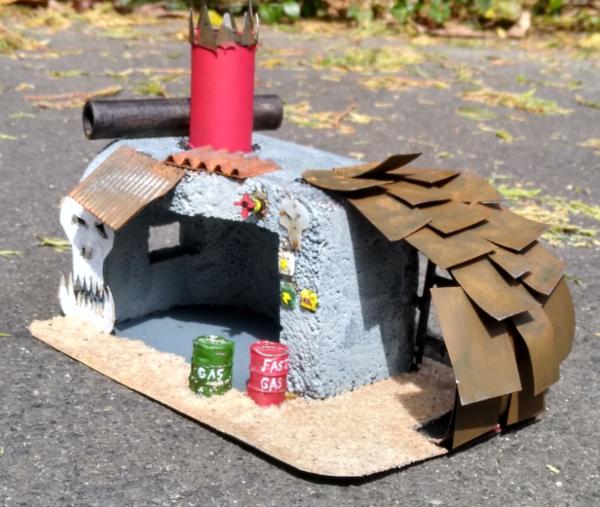
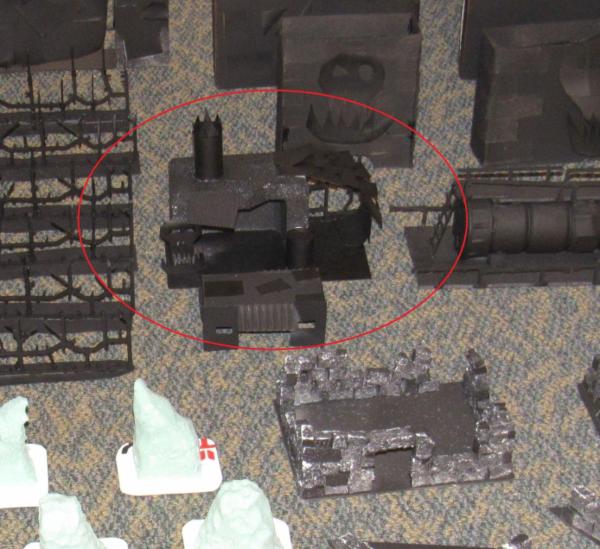
After bringing out an old simple piece of ork terrain to show my students, for an art lesson, I decided to paint it before putting it back into storage. It has been sitting primed but unpainted since years before I started my blog in 2017. As I was painting, I kept adding little details, since it was pretty plain.
You can see the original building on the very first page of my blog in the picture of all my unfinished terrain:
Love that Orky building. Super job! Feels properly in the era where my mental Ork space is. Those fun and rambunctious hoodlums in their makeshift shacks. Not the extreme bloodthirsty barely sentient violence machines in their… makeshift shacks…
It’s fun, it looks like a fun little shack is all I’m saying.
I like that building also- nice look to it (Mental Ork Space, indeed!) and highly playable. Gotta tell ya- I thought it was the sawn off end of a cinder block when I first saw it and I remember thinking: "Now there is a hardcore Ork player."
Some of you may remember my smoke mephits for a year or so ago, I decided to make a new mold of the master sculpt and used it to make a magma mephit this time.
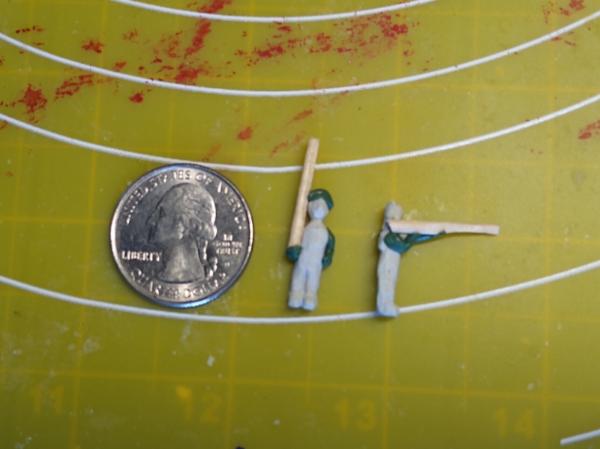
Also something completely different from my usual work, I've started trying to sculpt some 15mm historic figures for person use in playing games of the 7-Years War and the American War of Independence. Still WIP
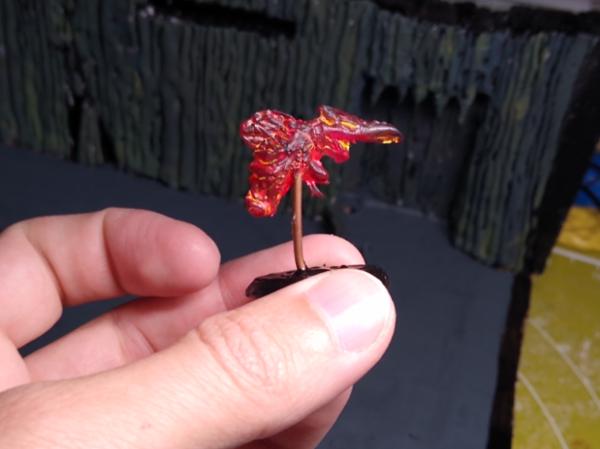
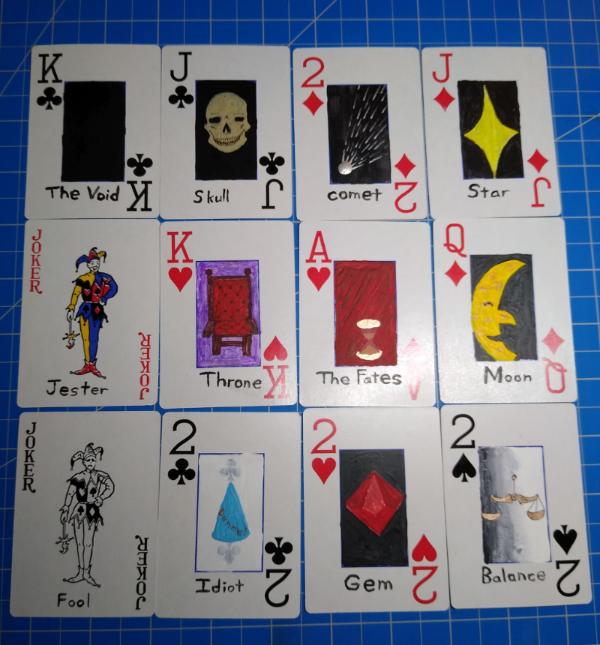
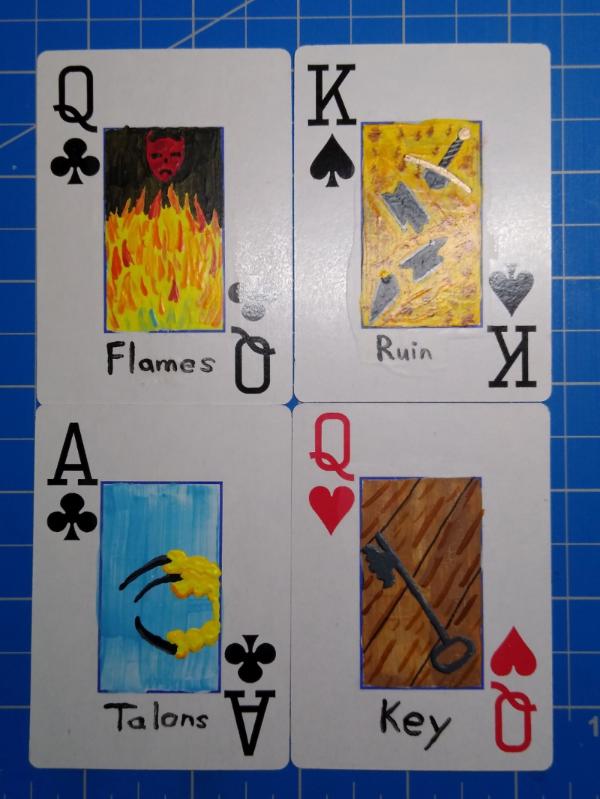
I realize I am jumping around all over the place, but I have been feeling creative and enthusiastic this week, so I just go where the interest takes me. I have been painting up playing cards to make my own Deck of Many Things for Dungeons and Dragons. I made these today. They are of varying quality, but I think not bad for one evening. Skull, The Fates, and Gem are my favorites.
Sorry for the blurry picture, I couldn't get all of them to be in focus at once. I am happy to say that I have finished painting the last of my kobold miniatures ( at least until my Kickstarters arrive). It's a relief to finally have them off of my painting area.
Man 15mm, that's getting small to be working- leave me to 28mm! These came out great- painted they are very realistic and hard to believe they came from the bits and bobs in your 'before' picture. Well done!
Thanks Meer_Cat , yeah working and especially sculpting in 15mm isn't easy. But when working in 15mm I don't feel as bad when something doesn't have much detail
Also I'd like to share a proud teacher moment:
Spoiler:
I think I mentioned that I have been making these 15mm historic minis to use with my students. We have been studying American history, and most recently the French and Indian War (North American part of 7 Years War), The American Revolution, and The American Civil War.
I decided a fun way to end the school year, and celebrate the history we have been studying would be with some historic war gaming. With the bonus that children who scored the highest on our quizzes getting to be the famous people and commanders in the game.
Several of my students have been so into the idea that they have been helping make everything for the games:
Fort Necessity (Battle of Fort Necessity - French and Indian War)
Jumonville's campsite (Battle of Jumonville
And using the molds I made of my sculpts they have produced and color coded the soldiers.
This has been an extremely productive weekend for me so far, I finished painting 17 minis today. They aren't all the best paint jobs, but it still feels good to be making that kind of progress.
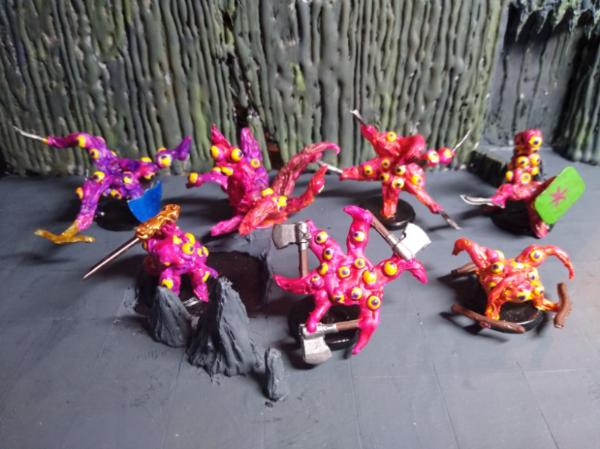
Up first is 7 custom obryth demons I made up, sculpted from hot glue, and then painted. They are basically six-legged starfish monsters covered with eyeballs.
Next up is six make are basically Tielfling gnomes for D&D (In the lore I believe Tieflings can only come from humans). They are siblings, and I made them for an adventure I am writing.
Last is an extra wolf, a goblin barbarian, a Tiefling butcher, and I finally finished paiting Duke my halfling brawler.
Well truly tons of magnificent work here. Excellent sculpting, and finishing up plenty of painted projects. You have been busy. Certainly busier than me.
@Camkierhi: Thanks Cam It comes in bursts and then fades. But I am hoping to break my previous record for painted miniatures in a year. I am at half of last year, about halfway through the year. Try not to be hard on yourself, also. We all have different circumstances and should only see how we compare to our past selves, not each other.
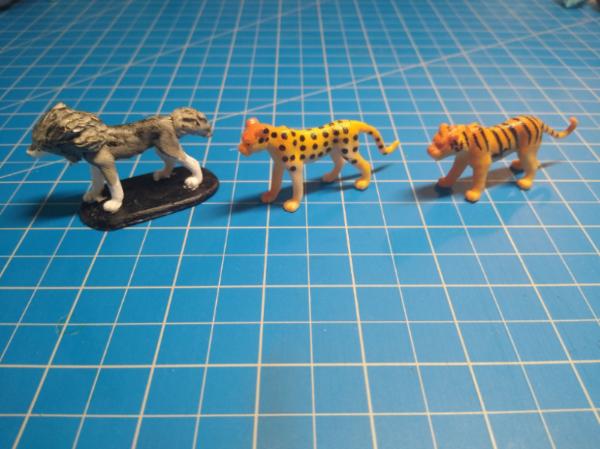
@Wirecat: Thanks Wirecat, the new wolf is definitely more leggy and thinner than the others I made. I was hoping it wasn't too obvious. I didn't notice until you mentioned it, but it really does look dragony I used a cheap cheetah toy for this wolf body, when all the others had been lions and tigers.
It's been a while since I posted, I've been really busy with real life. I have spent a few days crafting that I forgot to upload, so here it is.
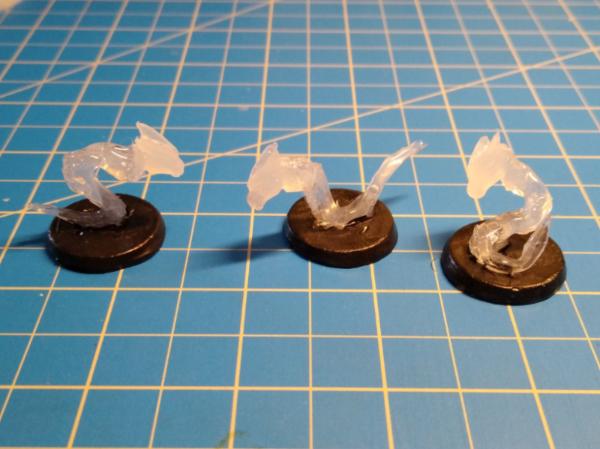
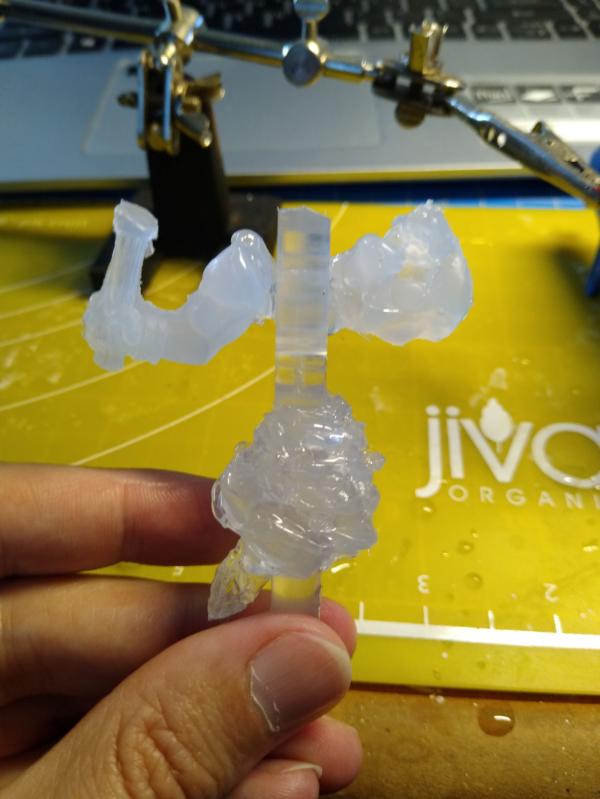
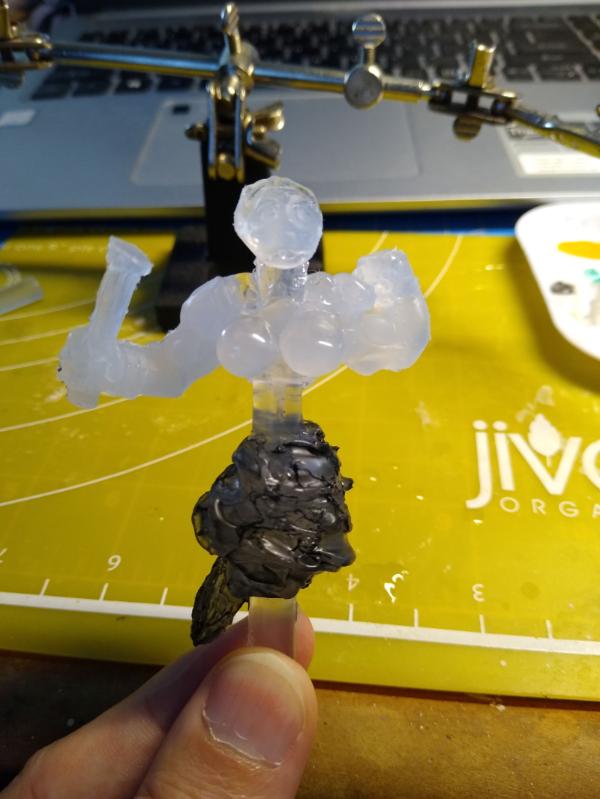
I started and finished three fume drakes for D&D today. There's no art for them that I can find. The are described as looking like small legless dragons formed from green smoke. This is how I decided to represent them.
The steps of making them
Spoiler:
Molded Hobby Lobby dragon head and hot glue squiggles.
attaching the heads and bulking up and positioning the bodies
on bases
trying different paint to find the best translucent effect.
finished with fiber fill
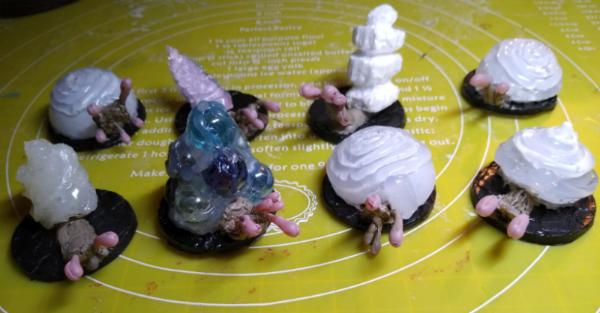
I have also made 8 giant snails that can also be used as flail snails for D&D. They still need to be painted.
I have an armless female Mage Knight miniature that I gave a quick conversion to a dryad.
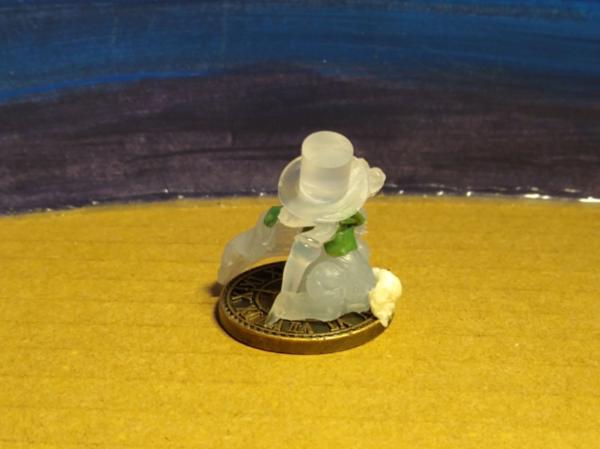
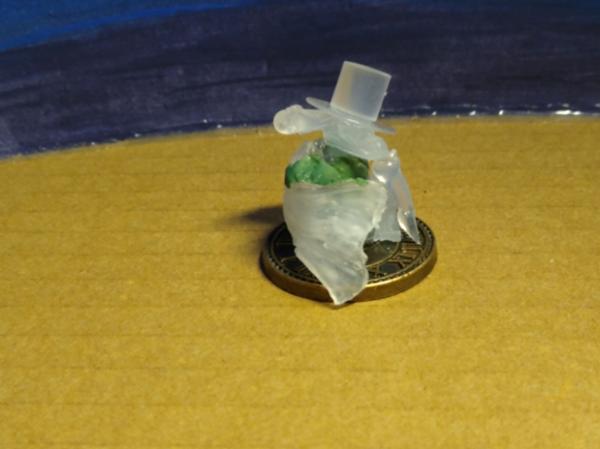
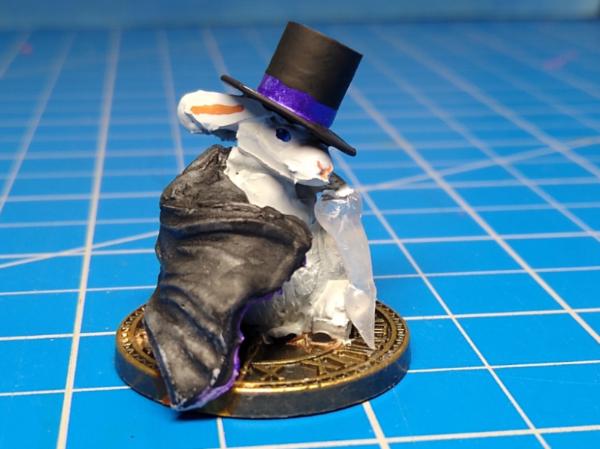
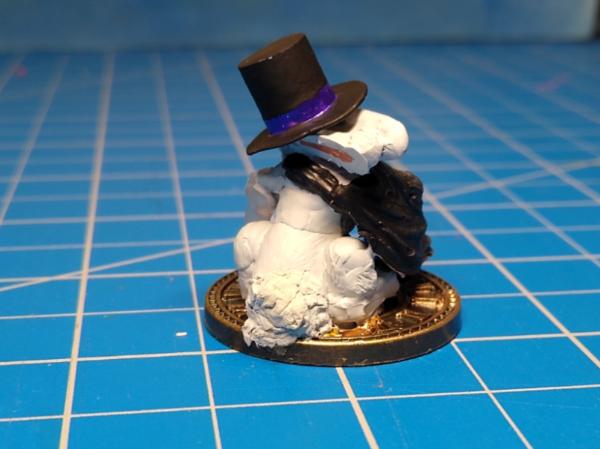
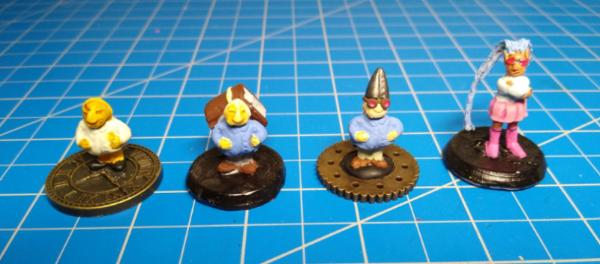
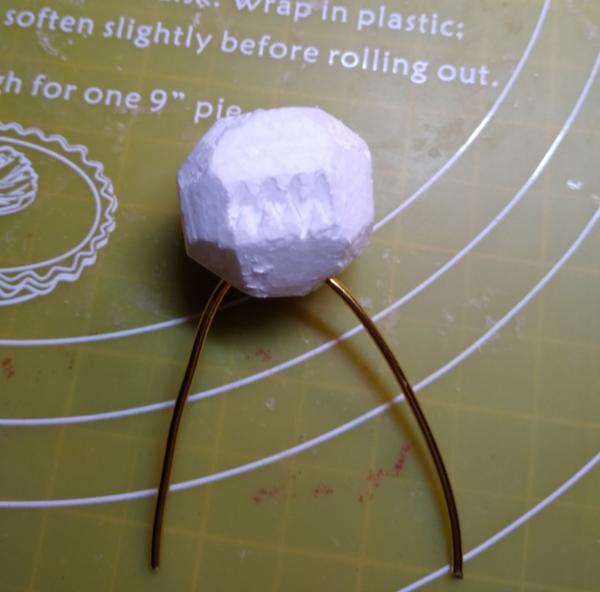
And finally I have made a D&D rabbit person (Harengon) standing on a clock face for a base, wearing a top hat and cape. (still needs painting as well)
Harengon is amazing sculpting- cn't wait to see it with paint!
The snails are cool and you certainly are hitting some obscure entries in the DnD Bestiary.
My vote is for vapor dragon #2, although if they travel in packs maybe a bit of a mix of colors would bring more identity to them, whilst still being part of the greater whole?
That dryad conversion made me laugh. Comedy stuff.
The fume dragons are looking great. Simple but effective. And the rabbit and flail snails are looking very interesting too. You’re a hot glue wizard. Now there’s a character. A Glue Wizard!
Looking forward to seeing the snails and the rabbit with paint on.
@Camkierhi: Thanks Cam, I'm surprised and pleased with how well they are turning out.
@Meer_Cat: Thanks Meer I was originally just going to make a single flail snail for fun, since they are quite obscure like you said. But then I started musing about different techniques to make them, and ended getting started on three. I didn't touch them for about half a year, and now I'm reading an adventure that has a giant snail race with eight snails. I don't think you actually need miniatures for it, but I decided to go hog wild and make eight anyway And thanks, I think vapor dragon #2 turned out as my favorite also.
@theCrowe: Thanks theCrowe, I might have to try to make a hot glue wizard mini now I've primed the rabbit and started painting the snails. I'm glad you enjoyed the super lazy dryad conversion
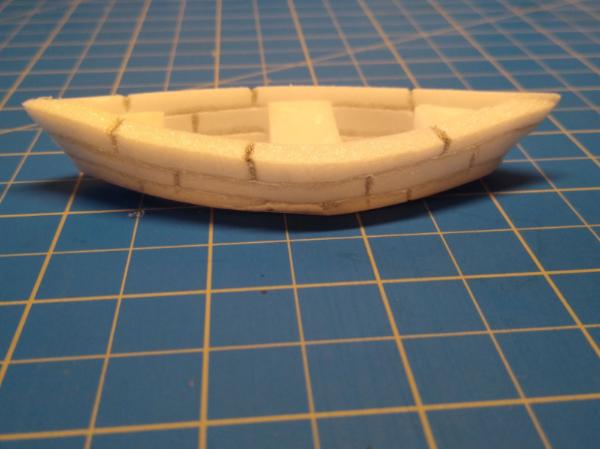
In the adventure, the heroes are traveling by rowboat when they meet the vapor dragons/fume drakes. So, I made this:
Thanks Cam, I'm not familiar with Bugman's work. Does it have anything to do with the GW miniature and paint "Bugman's Glow"?
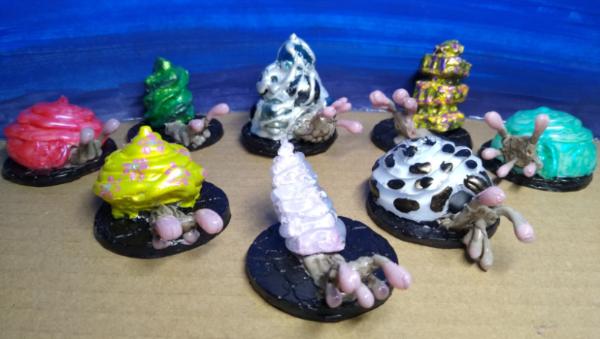
I'm happy to say that I have finished my snails.
I made this one with a stripped down electric tealight inside.
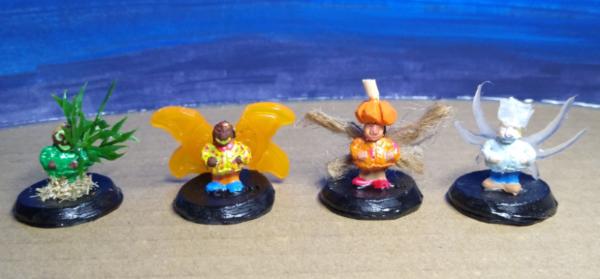
I have also finished making and painting four fey gnome clowns representing the four seasons.
Thanks so much Meer And perceptive question about which is doubling as a racing snail.
Spoiler:
All eight of them were actually made to double as the eight racing snails from the D&D adventure "Wild Beyond the Witchlight".
I didn't know about racing snails from Neverending Story, maybe that's where D&D lifted the idea from. You are more likely to know than me where the original fantasy racing snail idea is from.
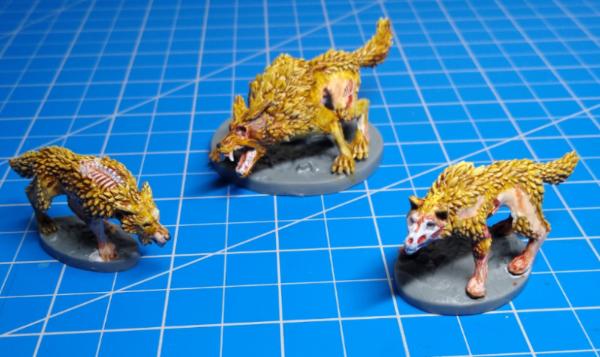
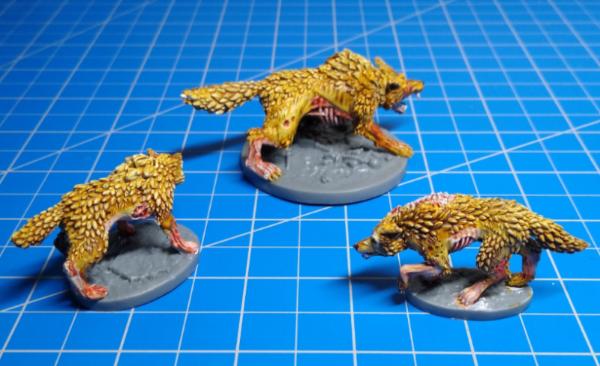
I painted my three zombie/undead wolves from Reaper Bones V Kickstarter, today. I'm happy with how they turned out, and I really like the sculpts on these.
And thank you. I'm quite happy with how they came out. These particular ones seem hard to find, but Reaper calls all its zombie and undead wolves "dread wolves".
Talking with you also made me realize that I haven't painted that many of my miniatures from Reaper Bones V yet.
Love the snails turning out amazing.
Those wolves are cool. Always wish I had bothered with Reaper, but probably a good thing, cus I would have even more unpainted stuff.
Thanks so much Cam I admit the amount of Reaper miniatures can be intimidating/over whelming. But they are fun to have.
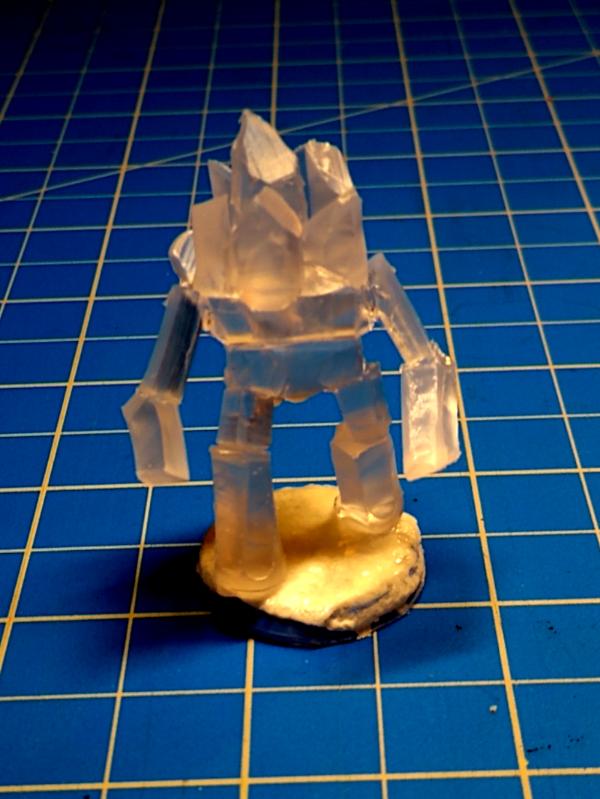
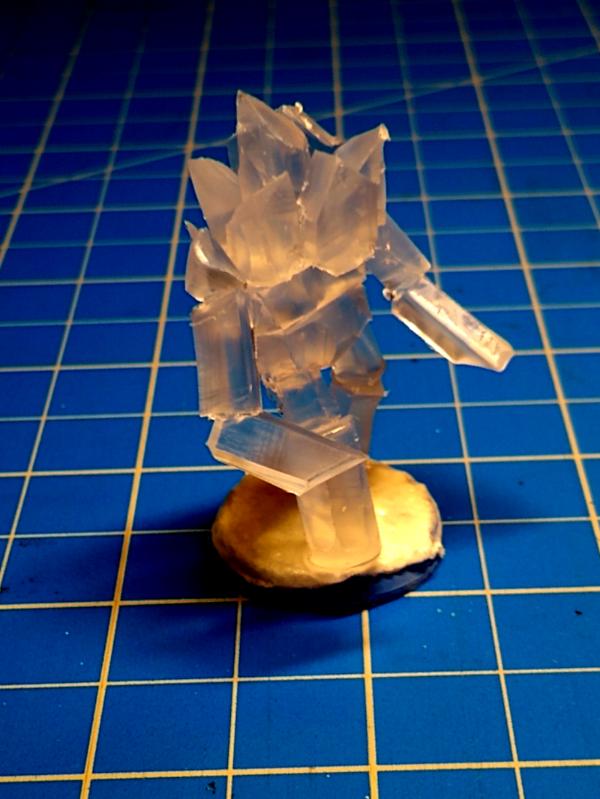
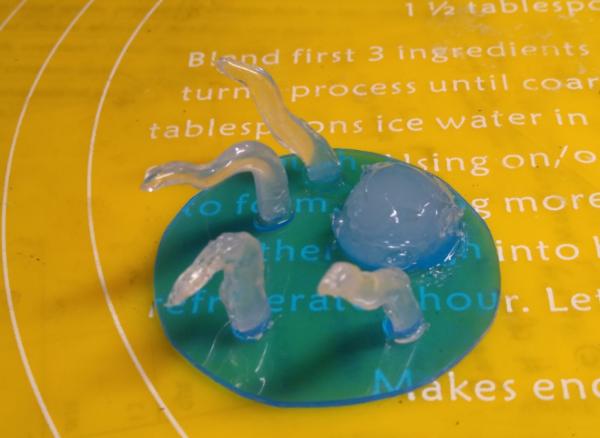
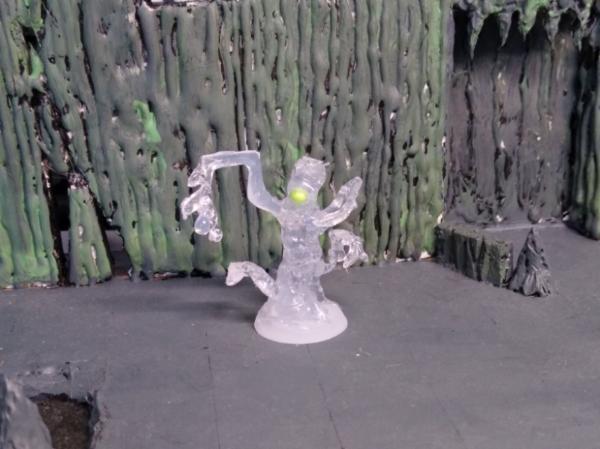
I realized that my new hot glue sticks are much more clear than the ones I have had in the past. This made it the perfect time to try to make an ice elemental. I love how it turned out.
I also made and finished making this slime monster.
Very cool elemental !
Did you experiment with how different types of varnish (matte, gloss) interact with hot glue ? I've seen people doing nice things with clear resin+transluscent ink+gloss varnish, might work as well with such material.
@Camkierhi: Thanks Cam, I've been wishing I had some clear/translucent paints. I'll check those Tamiya paints out.
@theCrowe: Thanks so much
@KernelTerror: Thanks I was tempted to try a gloss varnish on the ice elemental, but it turned out so well I was terrified I would mess it up if I tried anything else. I did put a gloss coat on the base though. I should go back and experiment. Maybe make an extra elemental if it works well.
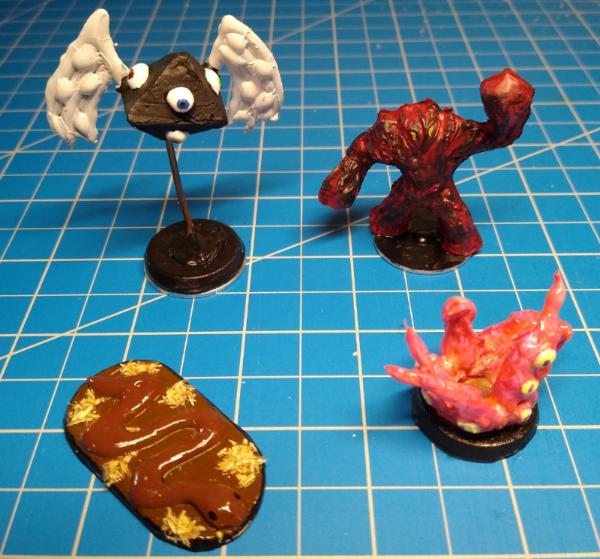
These aren't as impressive as what I was recently showing, but I've finished these four models. Some kind of celestial D8 creature, a copy of a Magic the gathering tangleroot elemental painted up as a magma elemental, a real quick mud snake elemental, and another chaos starfish since they are fun to make.
Some WIP: I'm making a mini shambling mound, a sun fish, and I've finished filling the holes in the rabbit guy.
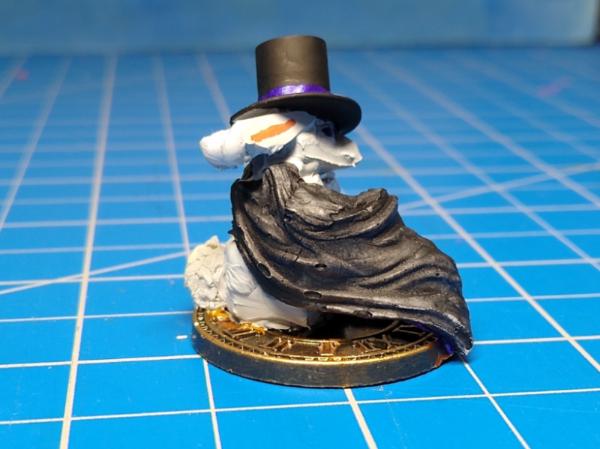
I have finally finished painting up my rabbit magician. The flash around the face is bothering me, but to my eye without the camera it wasn't too noticeable. I really like it over all.
Two simple monster place holders: A tentacle beast and a mini shambling mound
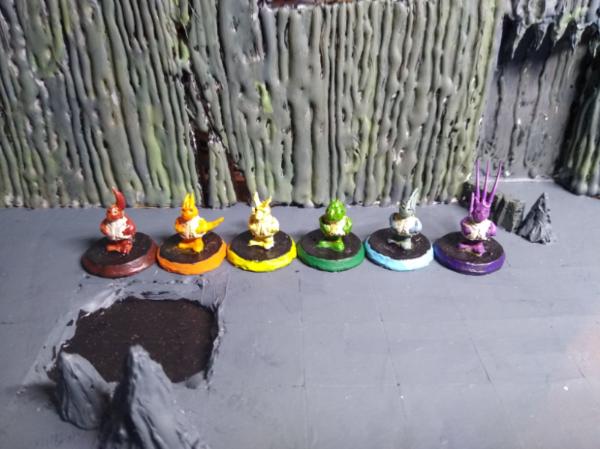
And so many gnomes
four tinker gnomes
Six gnomes representing elements (Greek: fire, air, earth, water & Chinese fire, metal, wood, earth, and water)
Thanks so much Meer I really like the look of the hat and cape too. It's funny how the easiest part can sometimes look the best. You probably remember how the top hat was cut a section of hot glue stick cut off with some flattened hot glue for the brim.
It's hard to believe the rabbit magician started off as a cast of my giant rat sculpt that I chopped into sections and crudely stacked up like a snowman. I originally wasn't putting much effort into it, but as I worked, I liked it more and more, and put more effect and skill into making it.
I'm glad you like the gnomes, and the mini shambling mound. Not bad for the latter basically just being a chunk of styrofoam that I rolled through the spice rack I'm hoping and expecting that my full sized shambling mounds will look better. I piked them up and started working on them again after stopping part way through 3-4 years ago, but have gotten distracted again
I have finished the last of my Fey Wild D&D adventuring team: The circus cannon that fires the dwarf and the lizardman. I have re-sculpted the lizardman to be clutching a pot-belly because he has been spending the entire carnival visit only participating in and winning the cupcake eating contest.
Snails are surprisingly realistic, Syro! And Your glue experiments keep amazing me. I'd also comment Your rabbit magician, flash and bubbles are annoying but hopefully not really noticeable in gaming environment. Keep up and push on!
All looking fantastic, love the cannon, just pure fun. Rabbit looks OK. And like you say in game no-one will notice. Or as I often say..."a blind man on a galloping horse at midnight would be lucky to see it!"...
Thank you both. And luckily, I don't think all the imperfections in the rabbit are noticeable on the tabletop. Hopefully in the future I will learn to hold my self to a higher standard to start with. The school year has started, I'm so tired and busy that it's hard to know when I will have time for a hobby update. But, I will continue to enjoy your blogs
Wow. You've been a production machine on these models. The ice elemental is brilliant and very well done. The entire collection is inspired. I was in a D&D group from '18 to '20 and I painted all the miniatures for the group (the DM would give me 3-5 different models for next session so I would not know exactly what we might encounter) and even with frugal shopping it gets quite expensive to compile a complete bestiary for an adventure. That, plus there are some creatures that don't have any models.
I hope the school year settles in and you have more time for yourself soon.
Thanks Skalk, it's good to see you back I hope the school year settles soon too, it would be good to get some more hobby time in. Last weekend I made some nonsense demons, but I haven't started painting them yet, so they're not much to look at. Buying just the models needed for D&D is a smart way to do things, but you're right it does get expensive fast. I don't know if my way of buying unpainted D&D miniatures in bulk and then sculpting my own instead of painting the ones I bought is the best way, but it's working for me The creatures without models can be my favorite part
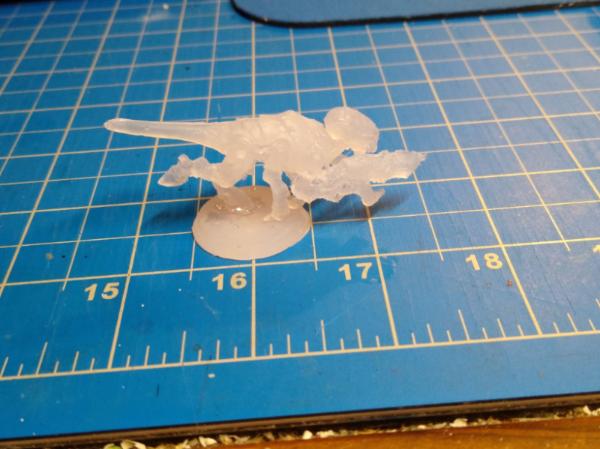
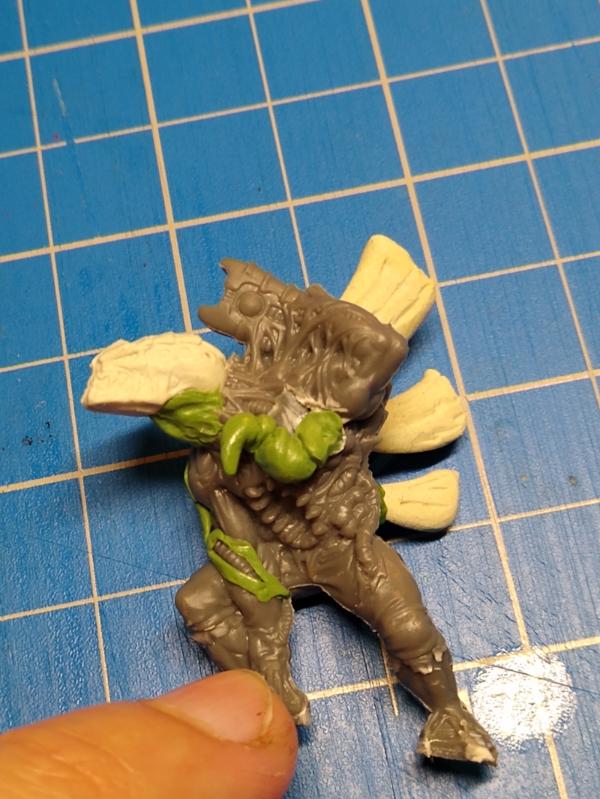
I made this hot glue octopus reaching out of the water to be a fungus infested spore servant octopus for D&D
I also made this dragon wyrmling out of hot glue. The head is from a mold, and the wings are from a mold of something I made, the rest is just made with the glue gun tip.
I don't know when I will be posting again and have hobby time. My wife has a created a miniature for us that is so much more wonderful than anything I can sculpt from putty or hot glue. So I will be busy experiencing fatherhood.
Take care everyone, I will still try to enjoy your blogs during my downtime.
I definitely have less time now with a baby, but I can't stay away from crafting completely. Especially since so many of my students are so interested in Dungeons & Dragons. This will probably be my last post with new stuff before the end of the year recap.
During rainy days some of my students play D&D with me since we can't go out to recess. They recently played "Accused Apple Twists". I made the apple monster from that adventure:
Making it:
Spoiler:
Started with some aluminum wire and styrofoam
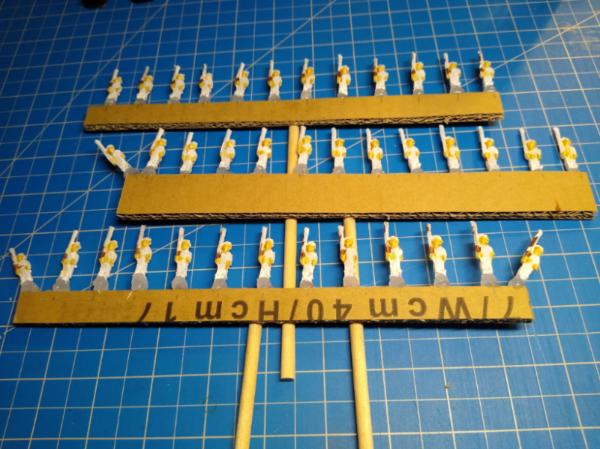
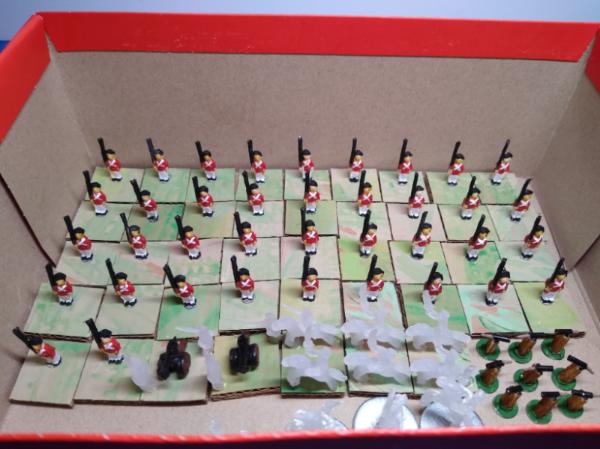
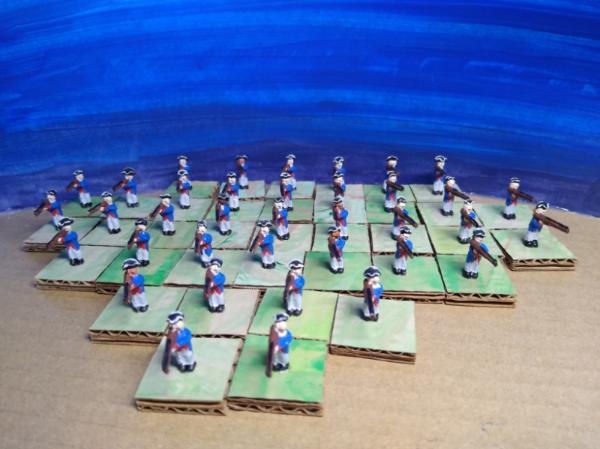
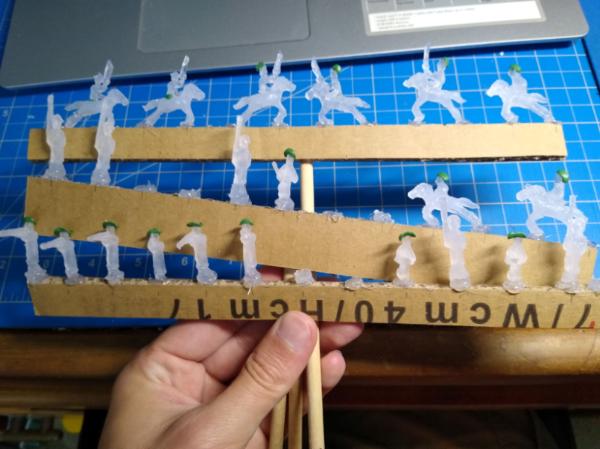
I have also painted 38 cast copies of the 15mm British soldier I sculpted for American War of Independence battles.
WIP
Spoiler:
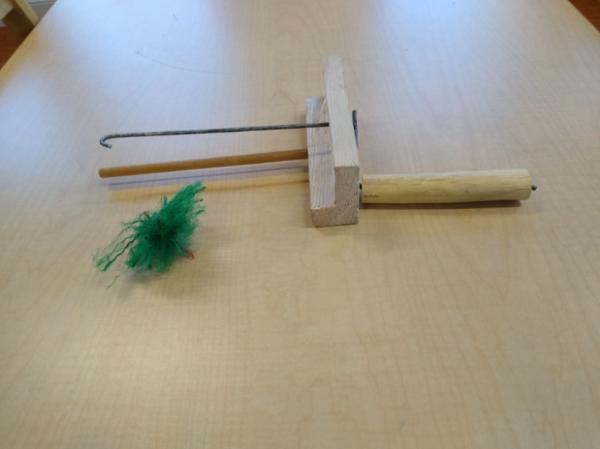
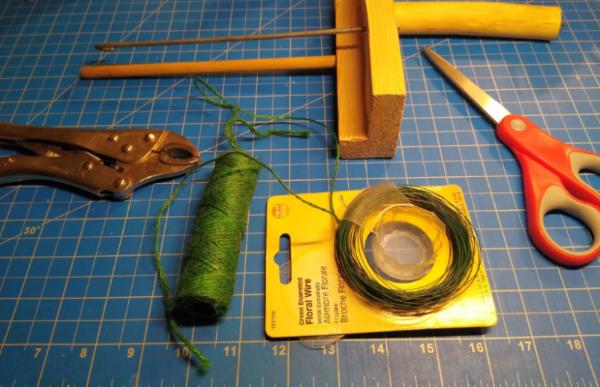
I have also constructed a model spruce tree making jig. My students have mad fun with it.
With such a productive summer, and now painting 38 little British soldiers, this year I have both sculpted and painted more miniatures than I have before.
I am happy to say that I have sculpted more minis and painted more minis in 2022 than any other year since getting into the hobby and starting this blog I finished sculpting 84 miniatures and finished painting 207 miniatures, this year. I also painted one old piece of terrain. Nearly all of this happened before the end of September when I became too busy
Most of the 84 sculptures:
Most of the 207 painted minis:
What I've painted up for 15mm historical wargaming:
The one piece of terrain that I painted over the summer:
I also received some fun hobby related gifts for the holidays:
That's all for this year, everyone. I hope everyone has a wonderful 2023.
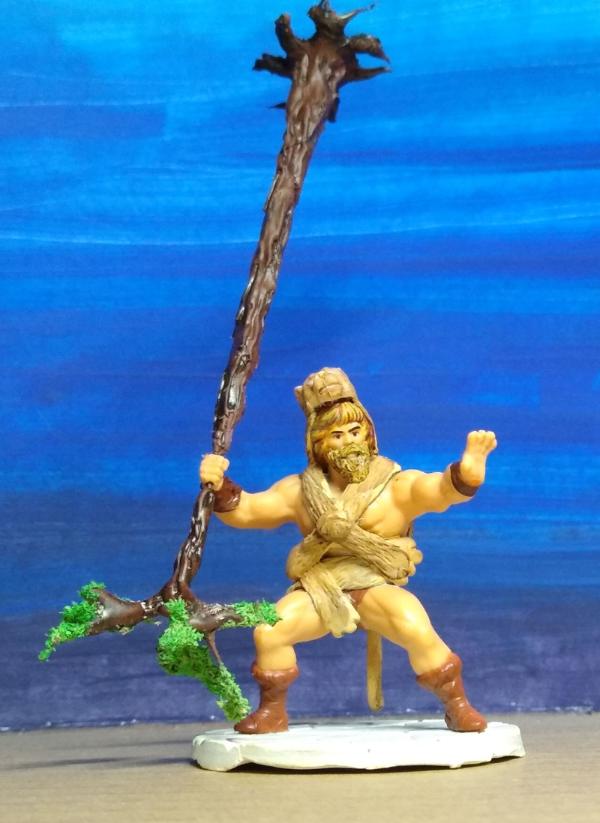
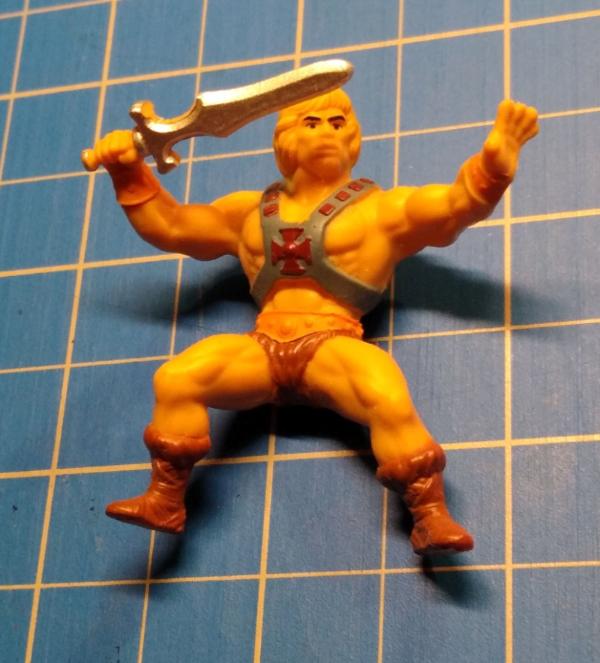
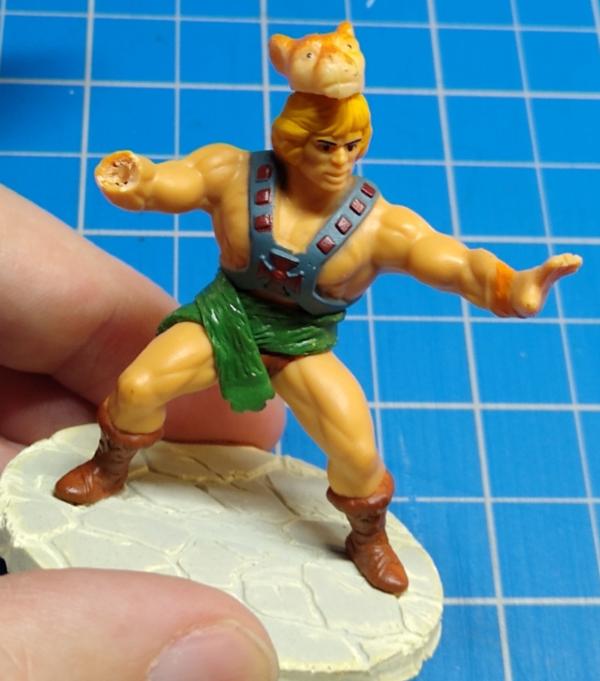
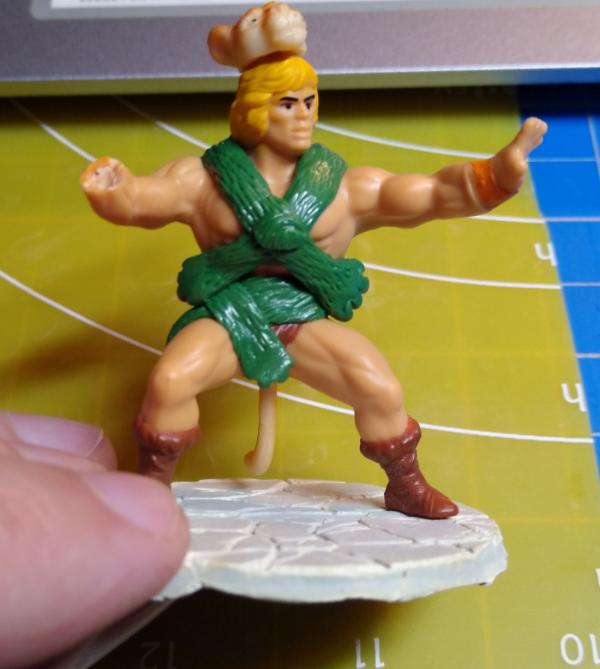
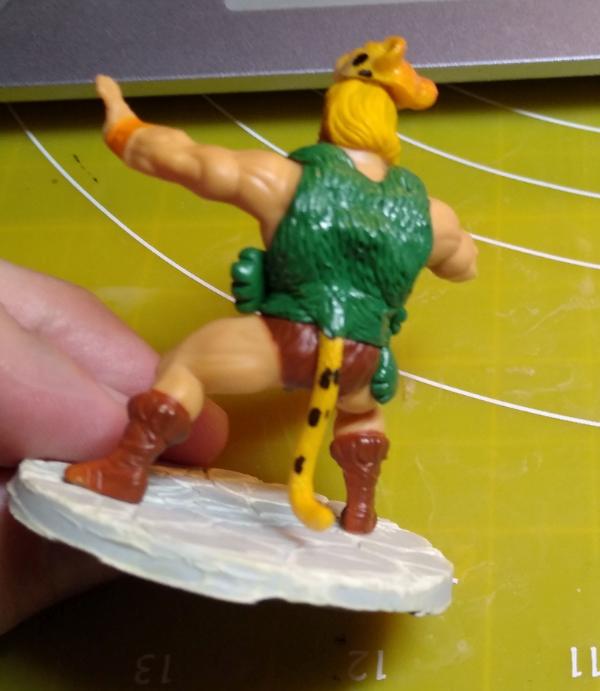
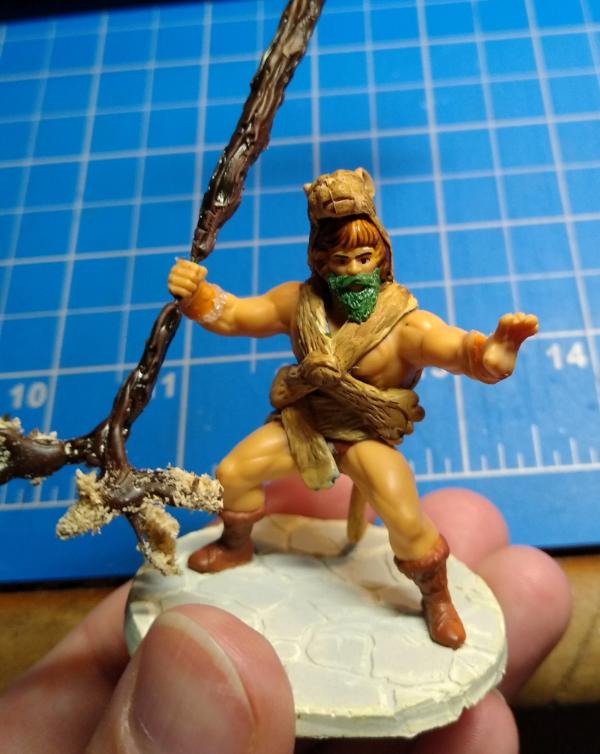
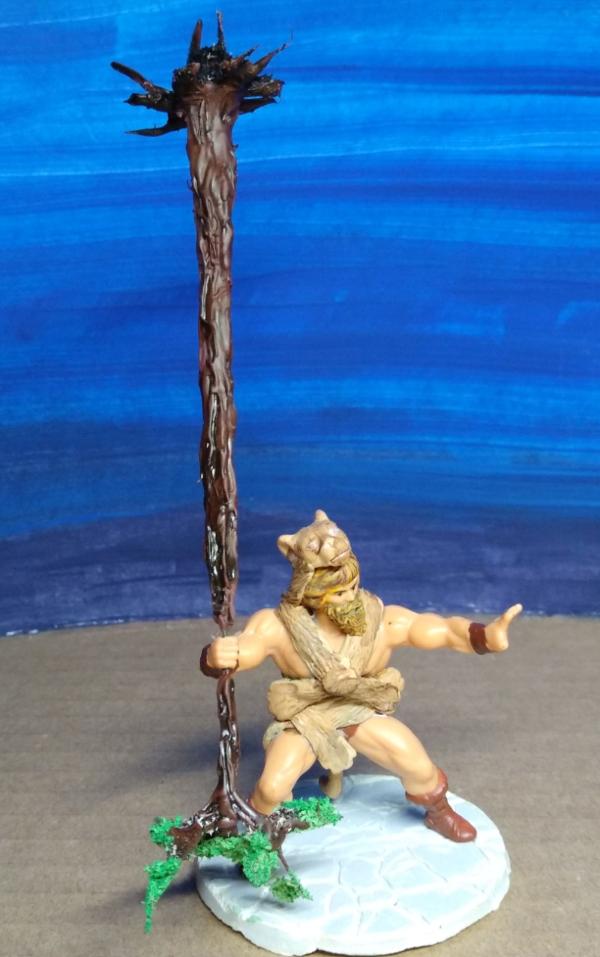
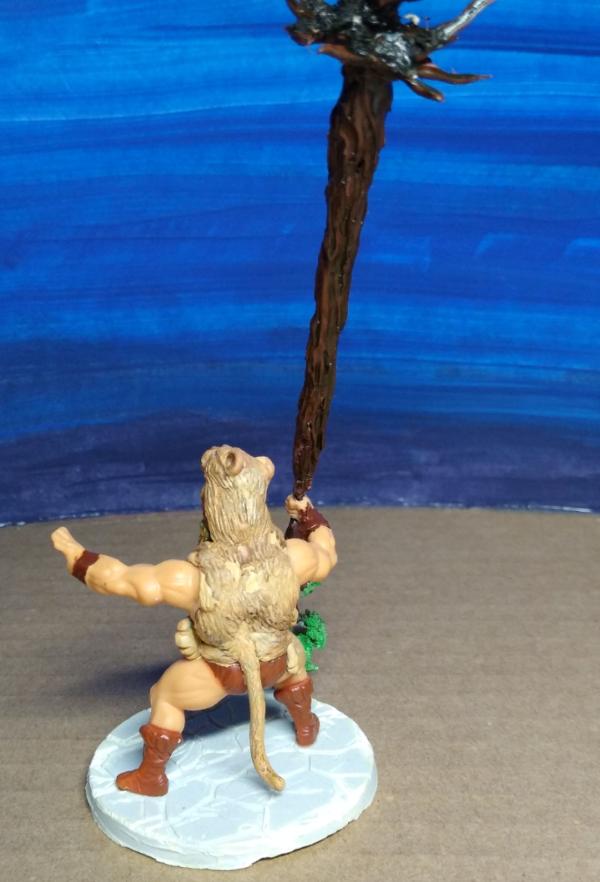
First mini of the year is done! I converted a He-man figurine from the dollar store in Heracles/Hercules from Greek mythology for the D&D game I play at school.
The process:
Spoiler:
Started with He-man that I was originally considering making into a statues or stone golem.
Adding the Nemean Lion skin:
Giving him a beard and an uprooted tree for a club
Plenty of imperfections in the paint, but calling it done.
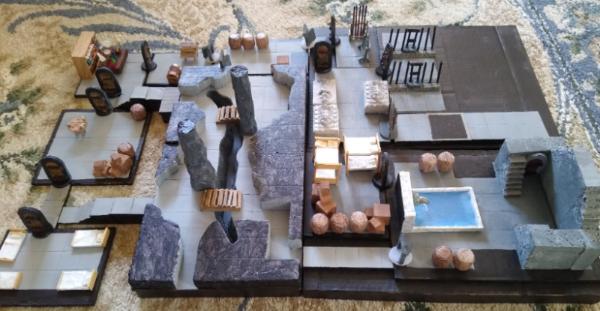
Thanks for stopping by, I'm close to finishing a set of terrain. Should be posting it soon.
Syro_ wrote:
I have also constructed a model spruce tree making jig.
Ooh. How does that work?
Thanks for asking, I should go into more detail on that.
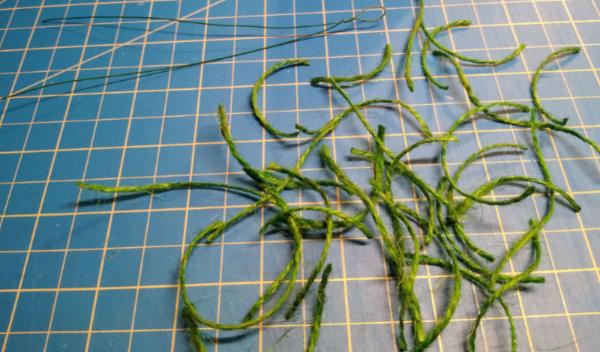
These are the different materials to make a model spruce tree with the jig I made. Wire cutters help too.
You start by cutting the jute twine into small sections (2-3 inches) and prepare the wire with a twisted loop to hook onto the jig.
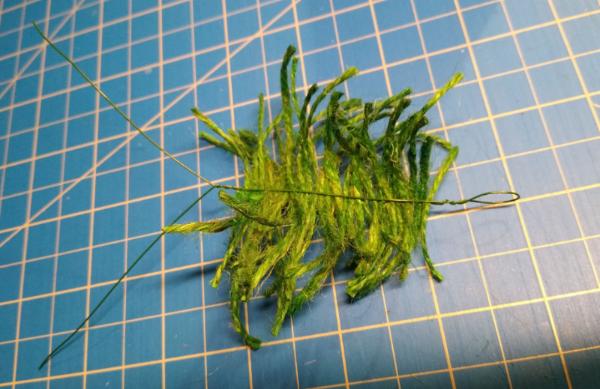
You place the twine pieces between the two halves of the wire in a single layer, making a twist in the wire at the end to help hold them in. All twists are in the same direction the jig will twist the wire. I have found it's better to twist them into the wire before unraveling the twine.
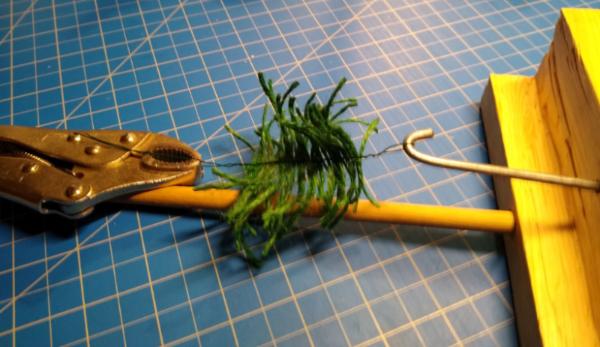
I like the use locking pliers on the other end of the wire, and then hook the loop of wire onto the jig and start twisting my rotating the handle.
Keep rotating until the wire snaps, and the twine will be securely held by the wire, and sticking out in different directions.
Then the long part of unraveling the twine
When finished you have something that looks like a green pompom.
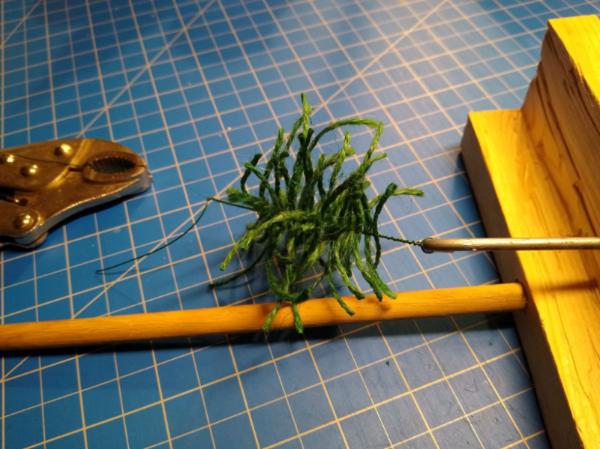
Then you just give it a haircut in a somewhat conical shape. You can also use some spray glue and flock to make it look even better.
Holy cow that's brilliant! That's a pretty darn realistic little tree.
There's a pliers out there called 'lacing pliers'- they're intended to apply a wire safety to anything that might need it, like bolts that might work their way out of their seating in a machine from vibration and need a safety wire run through the head to keep them from turning.
The jaws clamp on the wire ends, much like you're using the vice grips and one handle has a spiral threaded rod run through the end- you pull on the rod and the pliers spin, tightening the wire nice and tight- but really, no better than you've done with your jig. You might see them at a junk/thrift/antique store for a good price one day though, and they might speed your production if you wanted to knock out a big batch of trees (a forest, one might say? )
@Meer_Cat: I think I've heard of these pliers before, they seem cool. Any suggestions on how to speed up the unraveling of the twine? That's by far the most time consuming part. I think someone used a comb, but I haven't tried it.
Yeah, not sure what to recommend for the unraveling, that may be stuck needing a 'brute force' approach. A comb sounds workable, but probably not a plastic hair comb; we have metal undercoat rakes for our rescue ponies- you can get them pretty cheap from any pet supply store or on-line service. The teeth might be fine enough to separate the strands.
Or, you know what might work- a wool carding brush! Separating fine fibres and orienting them alongside each other is what they're designed for and you might can find one inexpensively in a thrift/junk store or even new-bought.
@KernelTerror: Heh heh, they aren't nuns, but now that you mention it it does look like that. The adventure has a mother and teenage daughter in the cell. The are Reaper townsfolk minis.
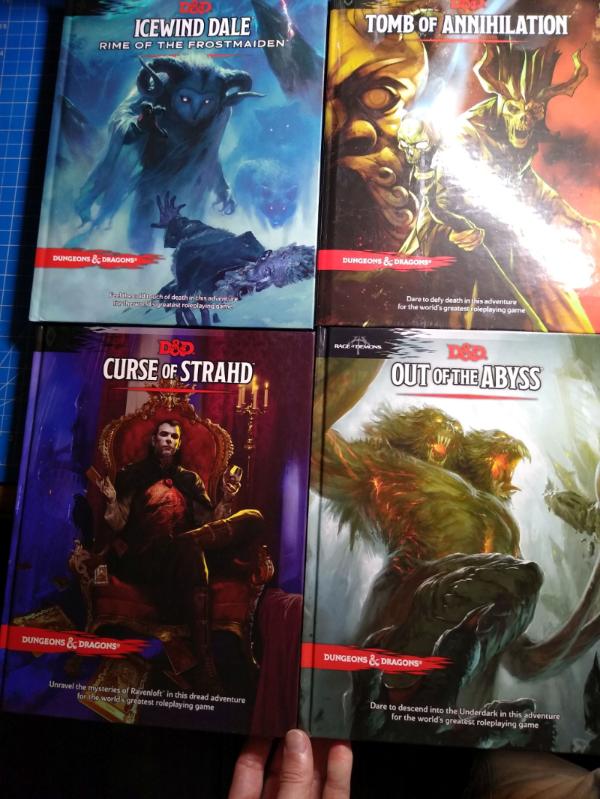
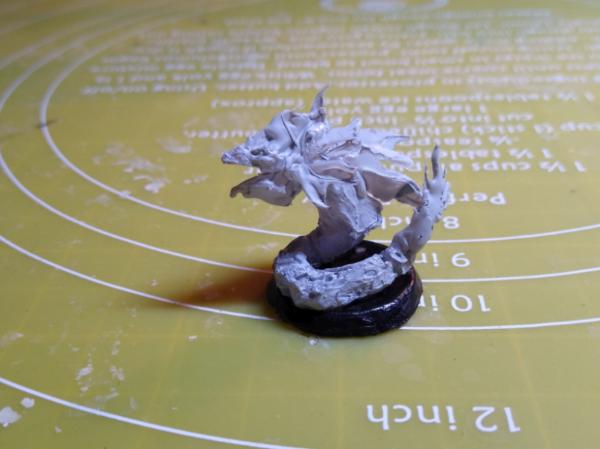
I have been doing some sculpting lately, and been in the mood to play "Out of the Abyss"
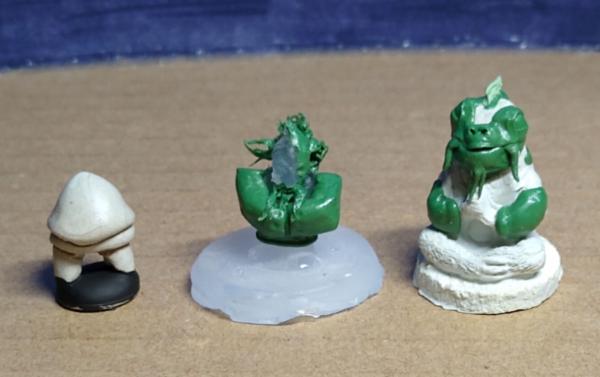
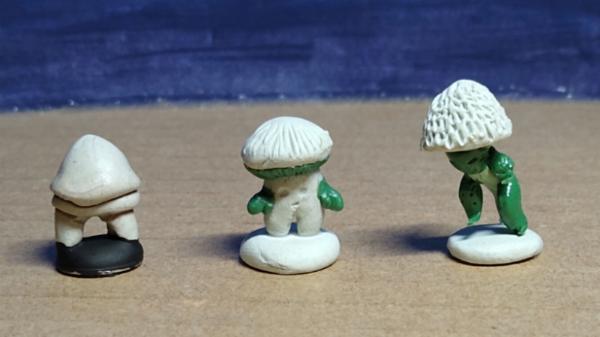
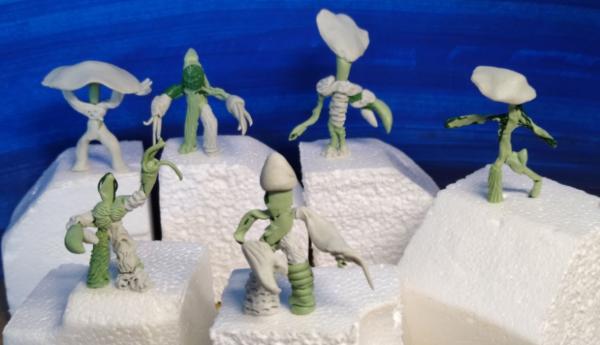
I have sculpted three of the prisoners from the start of the adventure: Stool the myconid sprout, the crazy derro, and the peaceful meditating fishman.
I also sculpted Stool two sprout friends
Here's an earlier progress pic of the first group:
I have also begun sculpting six myconid adults
It felt good to relax with some sculpting for a few days. Thanks for stopping by.
Also, I realized that I forgot to photograph and post other things that I finished recently. I thought I had.
This sculpt/conversion has been nearly finished for close to a year, but I never finished it until about two weeks ago. I converted this mer-man figurine from Dollar Tree into an actual merman. That's the end of my He-man figures for conversion.
I also made these simple quaggoths for "Out of the Abyss" before making the myconids and other characters for that adventure.
Spoiler:
The quaggoths aren't anything special, but I made them relatively quickly from hot glue using molds of animal jpointed zombie legs, a bugbear head, ork boy arms, and a ork nob body. I then textured with the tip of the glue gun to get rid of ork textures and try to make fur instead. They aren't a terribly important monster, I think they match the official art surprisingly well, and the official miniatures aren't that great looking either , so I'm satisfied.
These two are going to be Topsy and Turvey for my D&D "Out of the Abyss" figures.They're not great, but I'm satisfied with them over all. I made them in a short number of sculpting sessions. I made the heads first, second I added the hair and sculpted the feet seperately. Once cured, I glued the feet on the stick and made the rest of the bodies in a single go.
And this is another "Out of the Abyss" character I am working on. A well dressed quaggoth prisoner that speaks like a high elf.
I have finished the last two NPC prisoners that I will be sculpting for "Out of the Abyss", since I already have orcs, elves, and dwarves.
Jimjar the deep gnome gambler is built on top of the gnome I sculpted and made a gnome of. Prince Derendil uses the same molded pieces I used for the other quaggoths (except using putty), with xps foam for the torso and sculpted additions.
I am also still adding parts to my myconids. They are great for let over putty.
I spent a week off from work because of Covid, but a combination of taking care of my family members and fatigue kept me from doing anything in the hobby during that time. I was so frustrated about that, that I went wild this weekend with hobbytime.
This Yochlol seemed appropriate to make with all the drow and Underdark stuff I have been making.
It only took 25 minutes to sculpt using hot glue.
I have been converting old sometimes broken Mage Knight figures (and one Heroclix) into Drow.
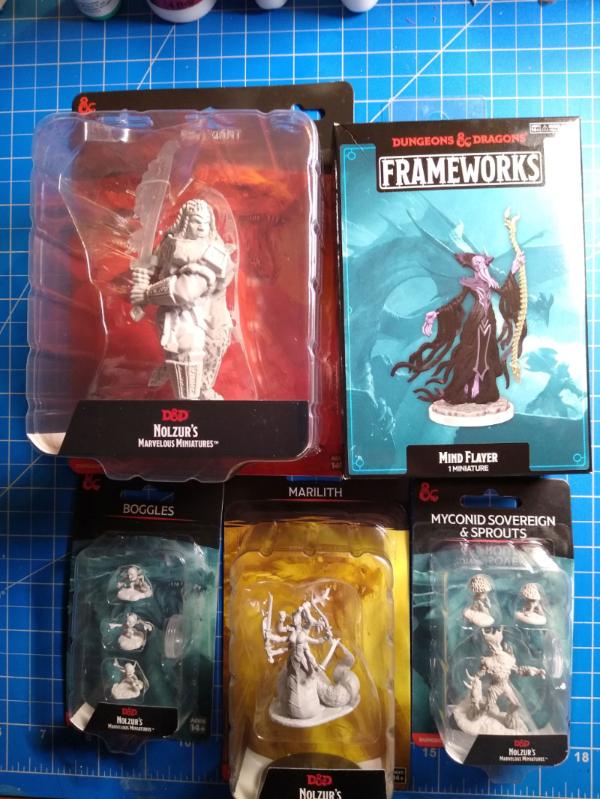
Since I was already painting purple, I opened up my Nolzure's Marvelous Miniatures: boggles.
I've also primed and begun painting the prisoners for Out of the Abyss, they should be easier to see clearly now.
You missed one word in that first sentence: "only took you 25 minutes to sculpt"; I know of no one else who does so much shaping hot glue. They need to add a new elemental mage category just for you: Glue Bender.
The Mage Knights make perfect Dhrow- slim, but with good definition suggesting wiry strength.
Thanks so much Meer I do enjoy sculpting with hot glue.
I'm mostly done painting the prisoners, but work is getting so busy I won't have time to paint the other two until the weekend at the earliest.
I'm in love with the Myconids!
Been thinking about using them in upcoming adventures.
Will surely draw inspiration by yours if I get around making miniatures for them!
The Drow and the Prisoners are looking ace as well!
Thanks so much Ezki Your comment on the myconids got me working on them again. They probably don't look that different from previous pics, but each had some work done. I think most of them willonly need one or two more sculpting sessions before being done. They are surprisingly easy to sculpt, not having to worry about proportions of the body, just lots of random patterns in layers.
Looking very good!
Been thinking of going the lazy route and just buying the models and painting them, but if I were able to make them THAT COOL, I definitely would haha!
Should start by buying a set of sculpting tools...
Syro_ wrote:Thanks so much Ezki Your comment on the myconids got me working on them again.
Thanks so much Ezki They're not too hard to sculpt if you do want to give it a go. It's a fun rabbit hole to go down. I guess it also depends on how many you want. The Nolzur's Marvelous Miniatures of the Myconids are really nice in my opinion and with your painting skills they would look amazing. If you need more than two sprouts, two adults, and and sovereign, then you might want to go the sculpting route for varity.
A strange change of pace, but this weekend I sculpted 37 tricorn hats for 15mm American War of Independence soldiers to make them look better.
And sculpted new faces/noses and gnomes that didn't come out of the mold properly.
I've started making something unusual to use in the "Tales from the Yawning Portal" D&D 5e adventure book too.
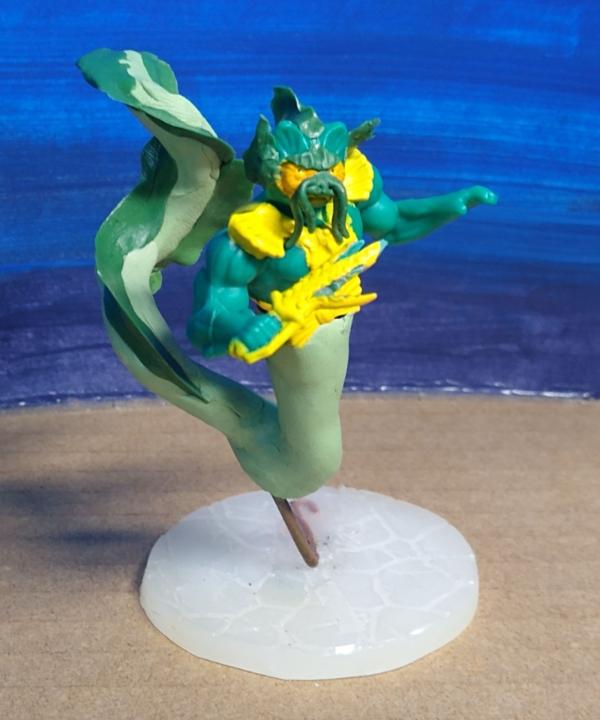
I've finished one of the strangest miniatures I have ever made. I have been reading the Classic D&D module "Hidden Shrine of Tamoachan" and all I could think of was how Tamoachan sounds like a Japanese anime girl. So using the cover art for the adventure, some molds, and some sculpting, I made Tamoa-chan:
Being an anime girl moster she needed to have greatly exaggerated proportions
Cover art for the 5e version of the adventure, I think the monster looks like an evil djinni:
Size comparison with Djinni miniature:
WIP pics
Spoiler:
I started by cutting up some hot glue stick and gluing it to another
I used the tip of the glue gun to melt the glue into a swirl to be the genie swilling wind lower body. The jacked arms are from a mold of the old Battle Masters ogre.
Gap filling, adding an anime girl face from Super Dungeon Explore, and working on the body.
Painted the whirlwind
I must have forgotten to take pictures of the rest of the process. I used jewelry chain super glues to greenstuff for the silver bikini. I used greenstuff for gap filling, sculpting missing body parts and hair. And I used a bead for her mace.
I have also finished one more myconid adult, only two left to finish.
Being that I researched 10 common anime girl love interest personality types and will be rolling a d10 each day to determine Tamoa-chan's behavior, death by snu snu might be a possiblity
@Meer_Cat: Thanks Meer
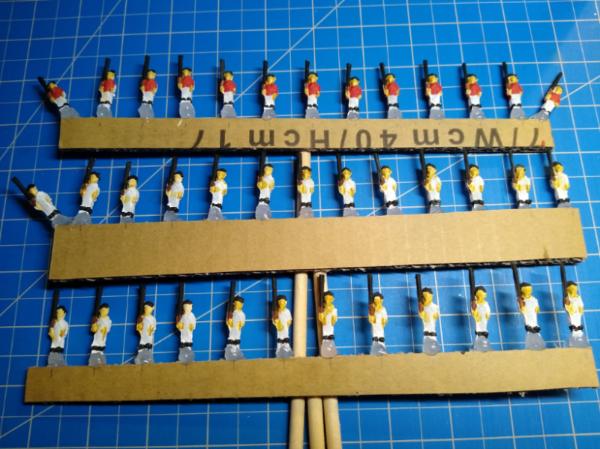
I have finished painting 37 little Continental Army soldier for 15mm American War of Independence war gaming. I just have to paint up 3 bases of cavalry, 4 leaders, and two bases of cannons, plus make terrain, and I can finally have my first full size game of "Live Free or Die".
15mm is fun- it lends itself to massive armies and/or very large scale operations. I saw a game at Sabre in Harrogate once where the recreated 'The Great Locomotive Chase' from the American Civil War; the game terrain covered (at scale) nearly 100 miles.
Thanks Meer and that Great Locomotive Chase sounds amazing. I think you will like what I made today.
I'm amazed how well it came out, since it only took me 20 minutes to make. My original plan was to make this to be able to play sooner, and then when I have time to sculpt a better one out of putty. I like this one so much that I don't plan to make the putty one anymore.
Fire snake for D&D
Wip of the fire snake
Spoiler:
I started with a mold of a troglodyte head that looks kind of draconic and the left over hot glue "sprue" from my 15mm soldiers clipped and melted together. I also drew the fire fins with hot glue on my silicone mat.
I also cut the troglodyte head in half and melted parts and added on to it.
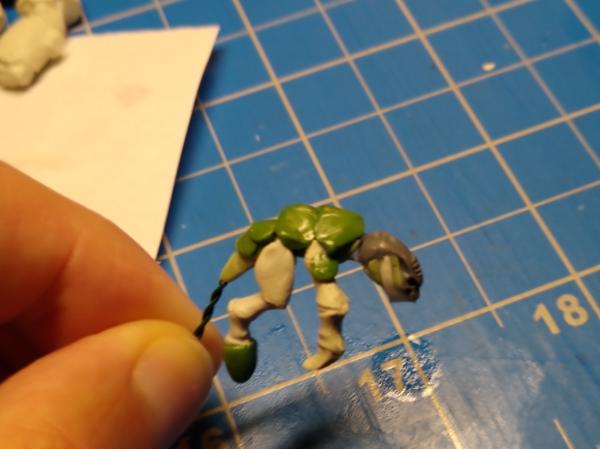
I'm not as happy with how this turned out, it looked better before painting. A spore servant octopus for D&D. basically a dead octopus that is completely covered with fungus which is controlling it.
Syro_ wrote: Thanks so much Ezki They're not too hard to sculpt if you do want to give it a go. It's a fun rabbit hole to go down. I guess it also depends on how many you want. The Nolzur's Marvelous Miniatures of the Myconids are really nice in my opinion and with your painting skills they would look amazing. If you need more than two sprouts, two adults, and and sovereign, then you might want to go the sculpting route for varity.
Those are the exact models I've been eyeing!
But I agree, that there is not much variety if I want a few of them.
Haha, the "anime girl monster" is definitely one of the weirdest minis you have sculpted like you said, but it looks really awesome!
No real hobby updates, real life has been keeping me too tired and busy. But, something that might be of interest is a question my nephew asked me. "Which miniatures, that you didn't make, do you think you painted the best?". I told him I would have to check my collection at home and get back to him. I considered this question to mean I shouldn't have altered or sculpted on top of the miniature either. I came to the realization that it feels like I barely paint any minis that I haven't made myself in someway. It kind of makes me wonder why I keep buying miniatures
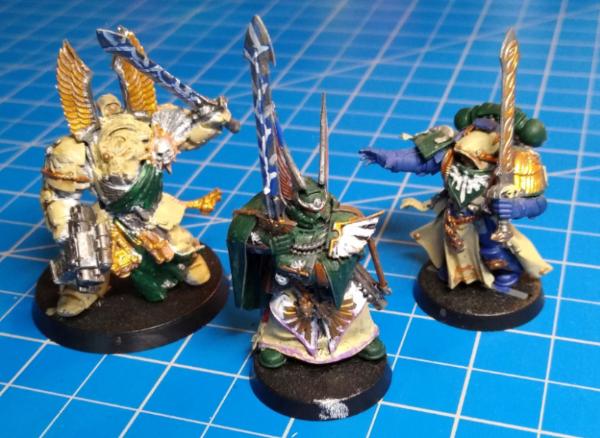
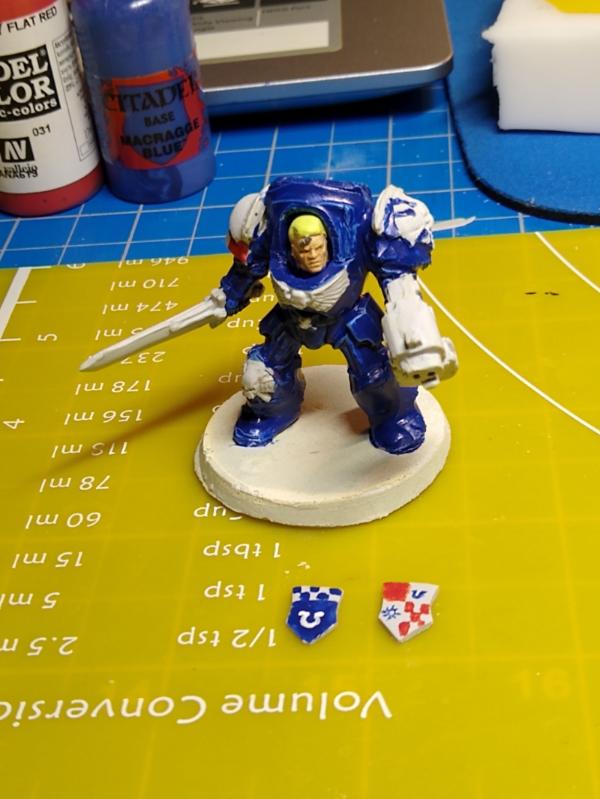
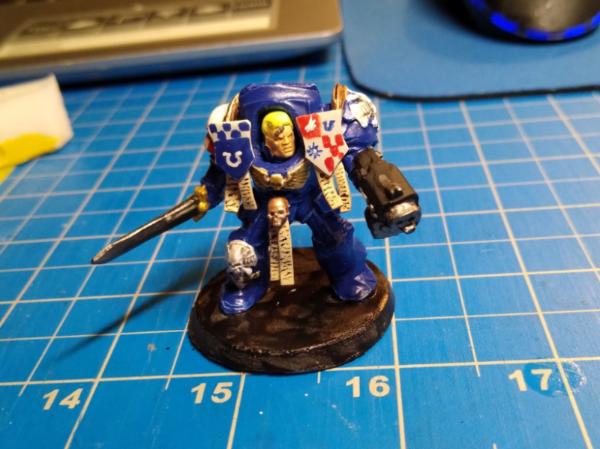
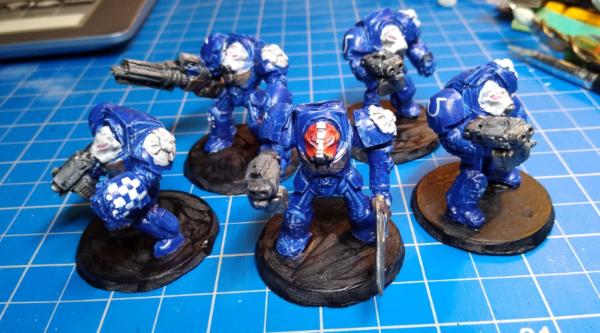
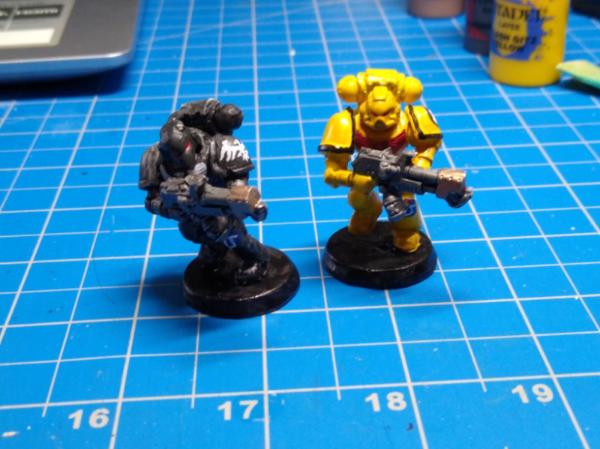
I decided on seven minis as what I am most proud of: The 3 Reaper zombie wolves I painted in 2022, the Reaper Overgourd that I painted in 2021, and the three leaders for my Dark Angels 40k army from around 2017.
If you're curious:
I've painted 101 miniatures so far this year, and 16 of them haven't been made or altered by me.
Last year I painted 207 miniatures, and 41 weren't made or altered by me.
In 2021 I painted 181 miniatures, and 19 weren't made or altered by me.
Thanks tzurk I'm glad you like the contrast between the living and rotten pumpkins, I was trying for that. The pumpkin beholder is a Reaper miniature that I got in Reaper Bones V Kickstarter.
And good eye seeing the homemade dread, I have made a few and also modify all my my helbrutes. I don't have any actual dreads.
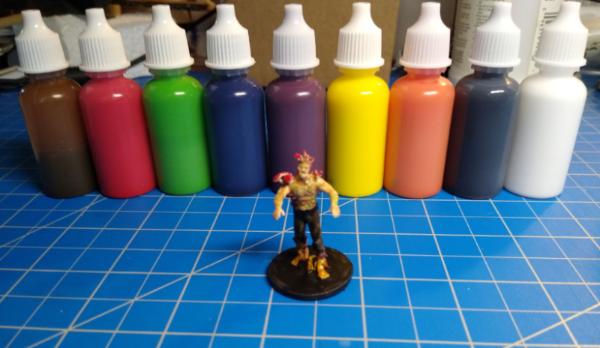
I made all of the paint in this picture, and five of them within the last few days. The spore servant (mushroom zombie) is painted only using homemade paint.
Sorry, I should have explained more clearly and I probably made it sound more impressive than it actually is. I just add or mix artist inks to acrylic matte medium in dropper bottles to make the miniature paints. (Sometimes thinner and flow improver too)
For effort, it's actually pretty easy once you have all the materials. For cost, it's probably easier and not much more expensive to buy actual miniature paints which will likely work better too. But when learning about doing it, it seemed too fun to try. I was already moving all my GW paints out of pots and into dropper bottles at the time.
It's about $10 for the mixing balls
$15 for dropper bottles
$20+ for matte medium
$40 minimum for the ink
That's all that's needed
But
$13 for flow aid
$13 for thinner
So $85-$100+ US dollars. So about 79-93 Euros if the prices are the same. That's for about 16 bottles of 15ml paint before the $20 of matte medium runs out, but the rest of the materials are for 50 bottles of paint.
and i have yet another question I recently bought a pouring medium in a sale... is it in any way comparable to any matte medium that you used or like the stuff army painter and the likes sell? I am by far a chemist... so the whole endeavor is kind of intriguing for a mere painter like me... making stuff yourself is probably very satisfying , I mean the filled dropper bottles look alone quite aesthetic already!!!
@Meer_Cat: Thanks Meer I only have the primary colors, white, black, and browns in inks. So the purple, orange, and green paints were secondary colors mixed from the red, yellow, and blue. Those three needed a 5:1 ratio because of the different strengths of the pigments. I also made a not very impressive ketchup color when trying to mix my own fake blood paint (red and brown). I haven't done any mixing more impressive than those very basic ones, but I plan to experiment more.
@Viktor von Domm: Thanks Vik Unfortunatly, I'm no chemist either, and have never heard of pouring medium. My guess is that pouring medium is more like a thinner than matte medium. You could probably make thick acrylic paints from tubes more like miniature paints from bottles? But like I said, this is just a guess.
Hey Ragsta, great to see you again. It has been a while, but no need to apologize. Real life will do that to you. And thanks.
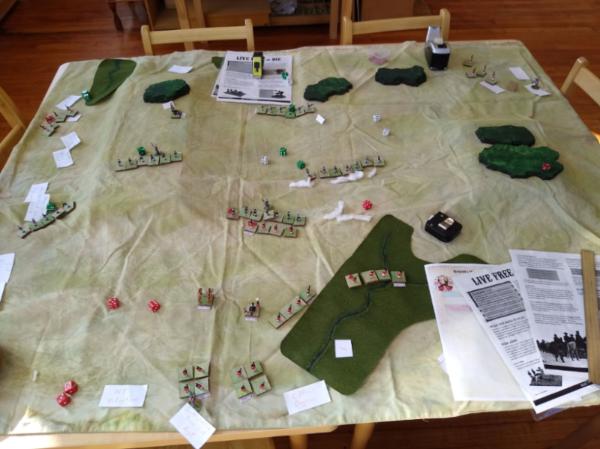
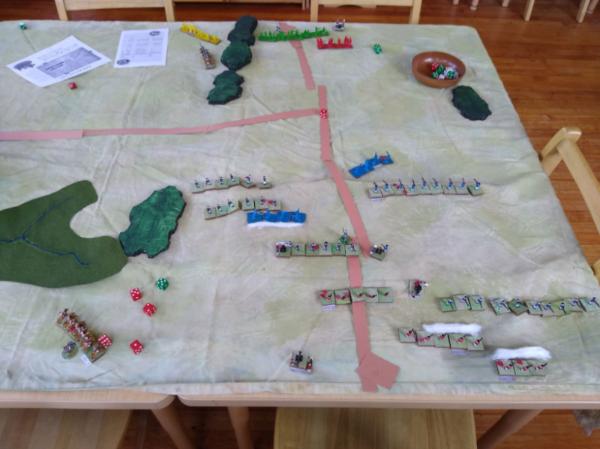
With the school year coming close to the end, for the second to last history class I set up the Battle of Hobkirk's Hill for my students who were interested in playing. This is a small battle from the American War for Independence. We are using casts of my sculpted 15mm soldiers, and using the war game rules "Live Free or Die". I think my students were really enjoying it, even though we kept getting interrupted by the weird schedule that day. We got through about half the game.
Happy Memorial Day to my fellow Americans. This weekend I cast, touched up, and painted 22 more American War for Independence soldiers. These additions to the army should let me play two more scenarios: The Battle of Princeton and The Battle of Camden.
We got through the rest of the Battle for Hobkirk's Hill on Monday. It looked like it would be a British victory, and I even announced them as the winners until a player pointed out a single base of militia still contesting the objective that would have given the British a minor victory, so instead it was American victory.
I also started playing the Battle of Camden, another larger battle in the southern theater. The Americans set up a massive amount of troops right in front of where the British deploy. There are very heavy casualties early on compared to last game. After a successful British bayonet charge, the Americans immediately caused the entire British regiment that had charged to flee the table. The next two turns the British have been pushing the Americans back with cascading low morale.
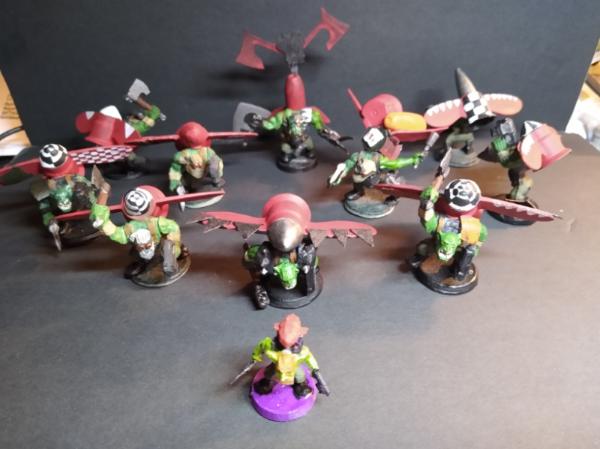
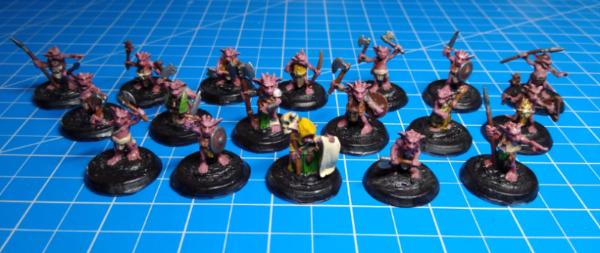
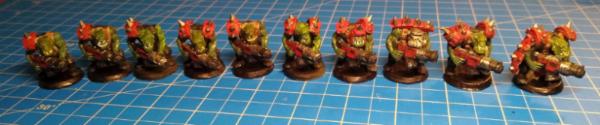
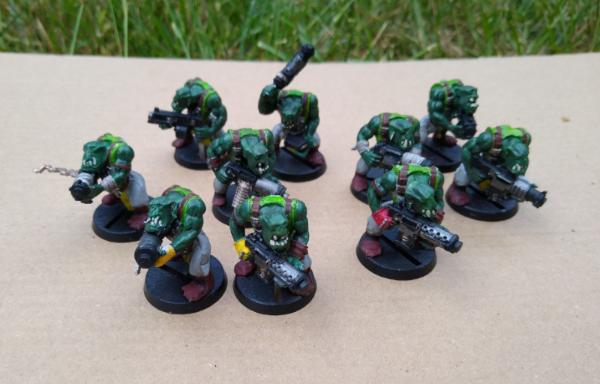
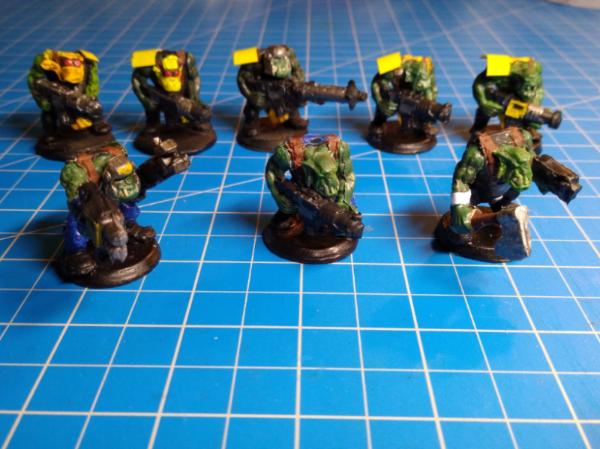
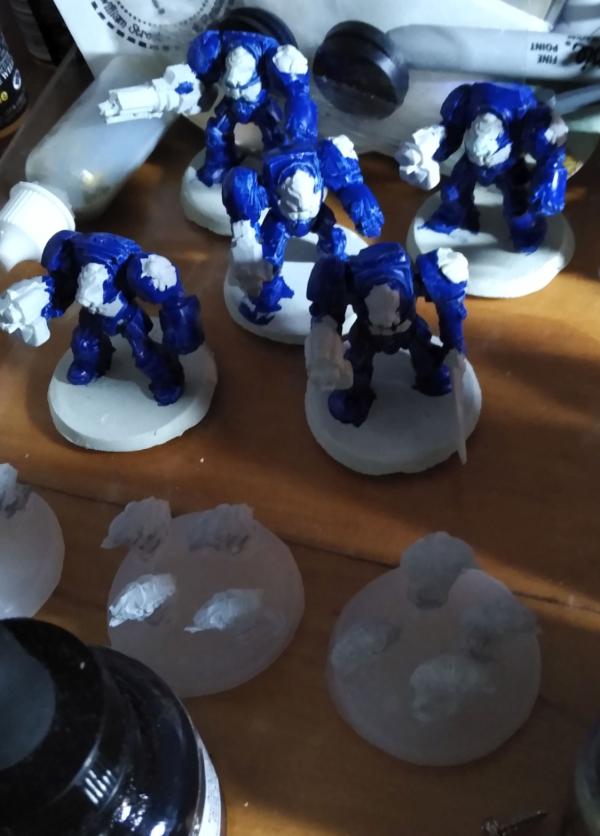
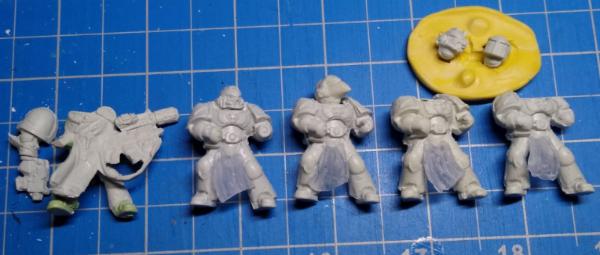
I have been missing Warhammer 40k lately. I made eight new ork shoota boyz to match two I already had to look like a coherent unit of 10. I like how they turned out.
I painted up 10 more shoota boyz over the last two days. These have been built, unprimed, and unpainted since near the very beginning of when I started 40k.
Thanks Graven I'm happy with how much the group is enjoying this historic wargame. I'm also happy that this particular battle I'm actually playing, the last three I spent the whole time helping the players with rules. This battle is nearing an end, We are about to start turn 8 of 10. The British have managed to push the Americans back across the board, inflicting more casualties than they took, but I don't think there is enough time for the British to achieve either victory objective before time runs out. The biggest upset was last turn when the American cavalry completely destroyed the superior British cavalry which had been dominating.
I have finished painting eight more orks to complete color schemes for squads of ten. These eight bring my total of painted ork boyz (basic infantry) and nobz (sergeants) to 138.
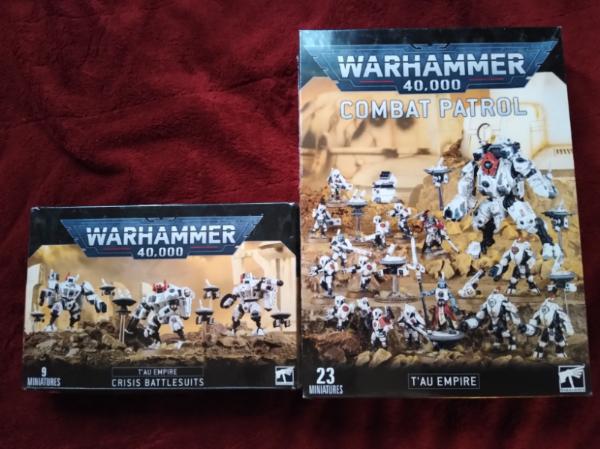
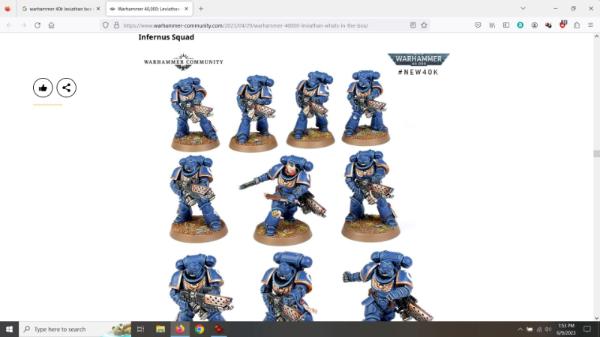
Thanks Josh I'm basically out of unpainted ork boyz now (7 left, but I want to make the other three that would go with them first). I had planned to move onto ork stormboyz, burna boyz, and tank bustas, next. Instead, I have gotten distracted by the hype of the Warhammer 40k 10th edition starter box, Leviathan. I'm curious to try out 10th edition, and the starter box seems like a good way to do that. But, I don't like most of the minis that come in the box, and don't really want to spend the $250 +shipping either.
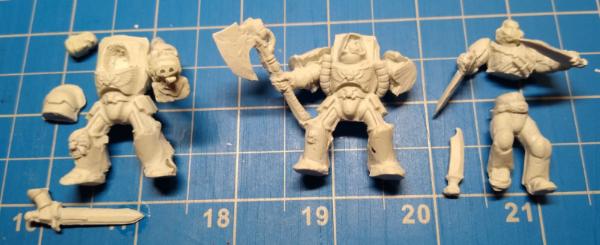
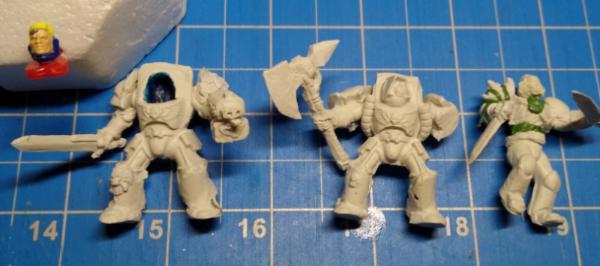
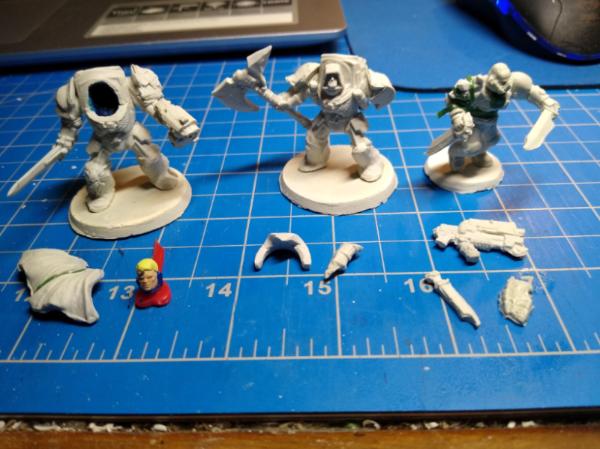
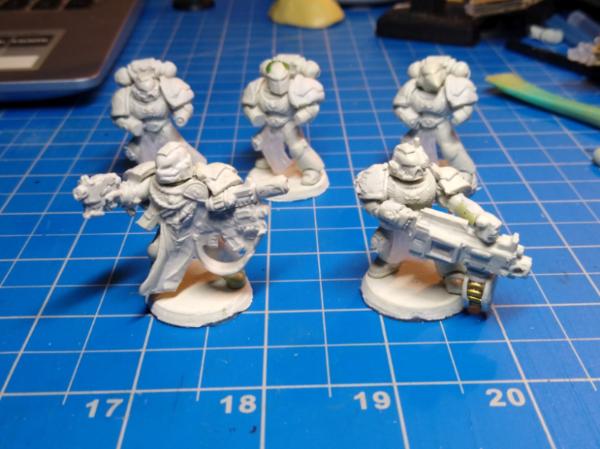
So I have come up with the crazy idea to try to recreate the contents of the Leviathan box using my molds and sculpting to make an old style space marines and tyranids Leviathan starter set. I'm starting with the space marines first
Of the marines, I'm focusing on the 4 character-like models to be completed first. The now faceless terminators in the bottom right of the picture will be the librarian and captain, both in terminator armor.
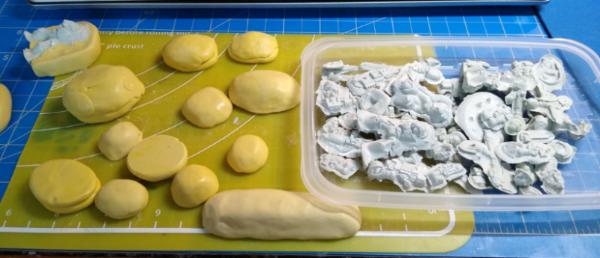
Good point, thanks Vik, I was focusing too much on knife guy being in lighter armor than all the others. I've sliced him and am switching him to space marine legs. Also I'm using "Alumilite Amazing mold putty" for the molds, and casting using "Aves Apoxie Sculpt" epoxy putty.
Here's the progress on the three space marine characters for my homemade Leviathan box set.
Cheaphammer FTW! I remember building WHFB armies using Prince August molds we ordered from an ad in Dragon magazine. The lack of variety was easily compensated for by the cost.
@JoshInJapan: wow, Ordering molds from Dragon magazine to grow your army sounds amazing. I would totally have done that @Viktor von Domm: Thanks Vik I'm happy how it turned out too.
I've been working on accessories for our heroes. There's lots of fiddly bit to sculpt on to them.
I also made the mold for making my termagants for Leviathan. I think the mold will be cured enough to start mass producing tomorrow.
Thanks for catching that Vik. I think a small part of it was just the lighting catching some of the edges of less than completely smooth conversion work. I may have diluted the paint too much when transferring it to a dropper bottle, but the main reason for streakiness is probably just that I didn't paint it that well in places. I've touched up the blue now as I worked on him.
The librarian is close to done now too, just need to add the finished helmet, the storm bolter, and some purity seals.
I forgot that I hadn't added the combi-weapon on knife guy, but now i think he is really done. I also normally don't do scenic or diorama bases because I think it's weird that a figure is bringing that dead body, chunk of building, lamp post, etc around the battlefield with them. Knife guy seems like he should have a scenic base, and had a dead gaunt with a knife sticking out of it.
way better blue now, I hope I wasn´t too harsh on you, my main reason for asking was the blue pot i saw in the background... citadel base color... and I was suspecting that this might be the cause for the paint behavior...
you´ve now created ol knife guy as a true heavy hitter!!!
by the way, the blue termy reminds me of a superhero... the lock on his forehead says supes but the blonde says cap...
It didn't seem harsh at all to me Vik, I really appreciate all the feed back. And you're right, that citadel base color in the background was what I used. Until getting more work done on the termie captain, knife guy had become my favorite. Now the terminator is again. That's funny about super hero, I'm leaning more towards cap
The terminator captain is almost completely done, all that's left is the cape (I'm not going to attempt the iron halo like decoration). This guy is so fragile now that it kind of scares me.
I'm also getting ready to work on some tyranids as I slowly cast the marines I need. The molds for the termagant finished curing enough to use, so I made one to test how it looks with paint.
I also cast hot glue ripper swarms
I'm trying to convert a monster with a gun growing out of it's back (Sedition Wars: Battle for Alabaster) into a barbgaunt: a tyranid with a gun growing out of it's back.
the termagant cast looks awesome... you´ve probably seen the tau conversions done with stealth suits from clear resin only have painted? with your method you could be doing something similar with nids...
also now that we´ve settled with cap... he has a strong resemblance of the rob liefeld cap version...
and the backgun dude is kind of a scout version of pyrovores ... (dunno if that´s the right name...)
You have perfect timing with talking about stealth suits, Vik. Look what I just got for a combination of Father's day and using my end of the year gift cards
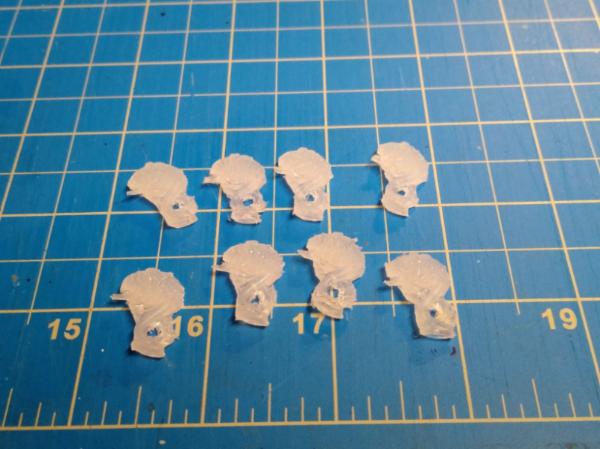
I have also finished casting more than enough space marine bodies for the Leviathan forces. I was a little slow, but just made a mold for space marine heads. Still need backpacks.
my personal favorite backpack is that of the khorne berserker, it looks so rustic, old fashioned... imo way better than the std of the loyal marines...
tau is always a cool choice, I have a ton of them, pathfinders and regular firewarriors... and their look is something I want to work with soonish too^^
The terminator captain is finally done, with his cape now added (he barely looks different). The main work has been working on sculpting the master to mold a mold of neurogaunts.
I'm working on other things too, in this chaotic scene
@Viktor_von_Domm: Thanks Vik, I started this project right at the beginning of a vacation and I'm excited about it. So I'm really pushing myself. Every spare moment I work on them, so that a few hours each day.
@Skinflint Games: Thanks! But maybe next level cheapness If I got a part time job for as much time as I'm putting into this, it would probably be simpler to buy Leviathan. But there's something really satisfying to me about making molds, casting copies, and then kit bashing and sculpting additions to make them the way I want.
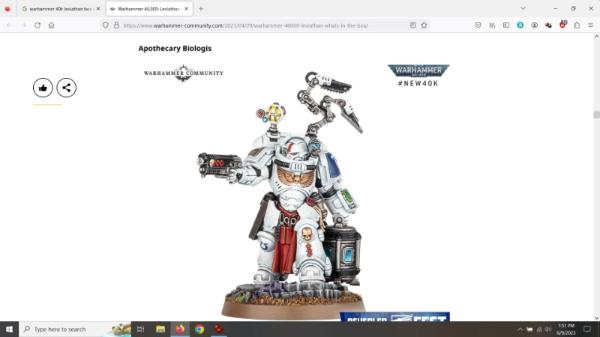
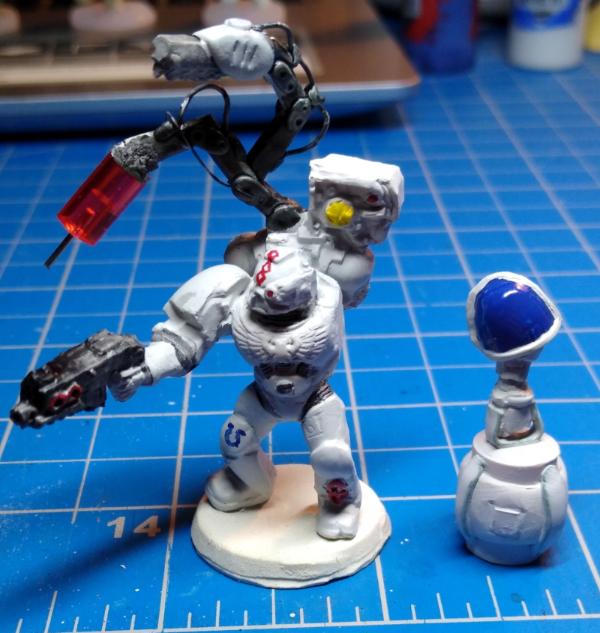
I worked some more on the apothecary. I'm nearly done. I just need to bulk out the one leg a bit more and make the robot arm tools coming off his back.
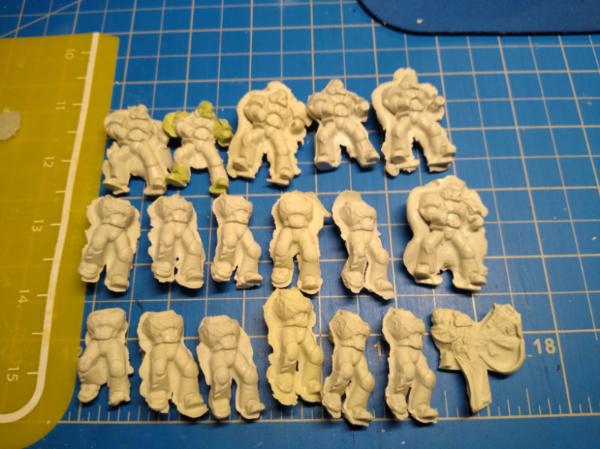
I have also finished cleaning all the mold lines and building the terminators.
@Viktor_von_Domm: The honestly, I'm not entirely sure what the apothecary is carrying. I think it's some kind of container to put a specimen. I'm just basing it off of the official mini. In the last pick of mine, I realize it looks more like an old fashioned honey pot than a high-tech container. I've worked more on it today.
@youwashock: Thank you The terminators just need paint now, though I am tempted to go back and shorten the sword and arm of the leader.
I've finished sculpting the mold-master of the neurogaunt, now I just have to make a mold of it.
Viktor von Domm wrote: your productivity sure needs quite the discipline... probably the very thing I´m lacking currently..
I've never known you to lack discipline on a project. Also, I don't know if that's really needed for something we are doing for fun. If the accomplishment at the end is the most fulfilling part, then yes. There might not be anything exciting you enough right now to create the way you used to?
You´re partly right...tho I am currently in a depressive episode... no joke here.
there are plenty of cool things to do... the backlog of cool miniatures is probably in the millions...(felt...)
current project is getting a whole bunch of dungeons and lasers stretch goal minis build and painted... alone the preparation of their bases took ages...
Automatically Appended Next Post: If you ever get a hold on some of these... worthwhile is the least I can say...!!!
I'm sorry to hear that Vik, and thanks for the heads-up about Dungeons and Lasers.
I slept poorly, and was very busy with my baby today, so basically no hobby time. I have finished casting enough heads for the flame thrower marines (still need 9 more backpacks). And worked a bit of the toold coming out of the apothecary's backpack.
So I have come up with the crazy idea to try to recreate the contents of the Leviathan box using my molds and sculpting to make an old style space marines and tyranids Leviathan starter set.
that certainly is a crazy idea, and you have a great start on bringing that madness to reality. Godspeed, Syro!
@thumpingbear: Thanks! I'll keep pushing
@Viktor_von_domm: Hang in there Vik! My baby has two teeth, and it looks like two more are close to breaking the surface, so you could be right. He's not too bad about sleeping anymore except for getting up so early. It's more the constant supervision that's wearing me out
I finished the long process of cleaning all the flash off of the heads and bodies for the flame thrower marines and realized I don't have nearly enough arms for them. oops
I have been working on the mechanical arm of the apothecary. Both the arm and the apothecary are nearly done now. I also primed my terminators and rippers.
ups sorry for misgendering If his temperatureis slightly higher you can be pretty sure a new tooth is coming... there is a correlation between temperature rising and teeth that show up... a bit like hen and eggs... it´s still not clear what comes first...
extensive mold cleaning... the price for not buying the new set
Clearly aliens have kidnapped our usual, normal, glue-bending sculptor Syro and replaced him with this original art carving, mold making, casting wargaming figure designer!
Awesome work, man. Awesome work.
Good enough to wonder when the Kickstarter campaign is going to come out to make these p[ieces available to a broader audience.
@Camkierhi: Thanks so much Cam @Viktor_von_Domm: No worries and nothing to apologize for. Thanks for the advice.
@Meer_Cat: heh heh, thanks so much Meer. And no worries it's still me, the horde tyranids are being mass produced with hot glue in molds after all
I am finally done building and sculpting the apothecary! He was a lot of work, but I am happy with the result. I'm leaving his honey pot carrying arm detached for ease of painting.
I have also started base coating the terminators.
And I am working on creating the sternguard veterans.
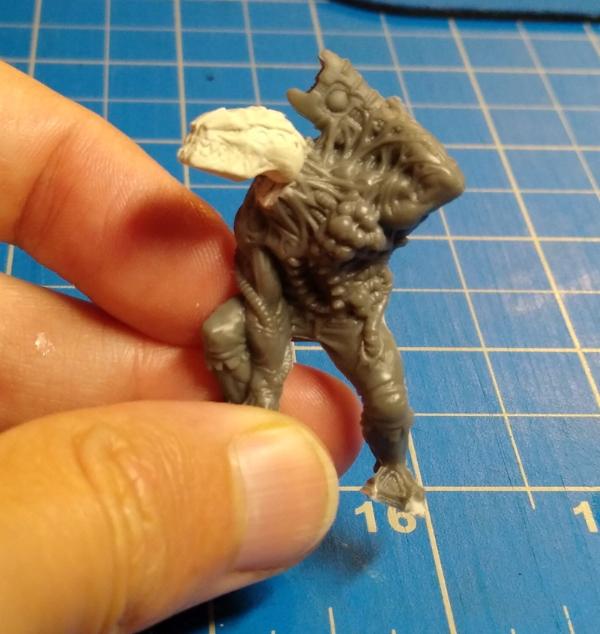
I didn't have much hobby time yesterday, but my baby son thoughtfully left me get in some sculpting by keeping himself entertained. I think my sculpt of the barbgaunt to use as a mold master is done.
I just had to have a look at the original models.... and I think yours looks way better... the GW sculpt somehow looks very disgusting in my opinion....and not in a good way...
Thanks Vik, that really means a lot to me. I am making changes when I think I would like something to be different from the original models. I'm not a huge fan of the barbgaunt model either, I think they sculpted it to look the the weapon has taken control of the gaunt body, leaving it brain dead and controlled like a puppet.
My barbgaunt is now in a curing silicone mold. One of the largest molds I have made.
I spent a lot of time today with my beloved removing of mold lines/flash Plus, making pauldrons and removing weapon hands.
I have also come up with an exciting but time consuming and slightly difficult idea that I would be happy to hear your opinions on. I'm not sure if I will ever have a need for a team of 10 flame thrower Ultramarines, I just want to be able to try out the Leviathan box without getting it. I'm not sure if I will even like tenth edition or if I will return to playing 6th/7th. There are 9 troopers with flamers in the squad, and I was thinking it could be fun to make each one from a different first found chapter of the original loyalist space marine legions.
Thanks Meer This is the last time the members of the infernus squad will look identical. I am I thinking about the different ways to change them to represent the different chapters. Even though I have already cast and cleaned 9 maximus pattern heads, I think a good start will be some head swaps (after all the Ravenguard marine should have a beakie helmet).
Team diversity for the win... much like order demon slayer (forgot the correct name,,,) where only the best get drawn...
That idea I get, you make different schemes and you have no abundance of smurfs with flamers...
I think they sculpted it to look the the weapon has taken control of the gaunt body, leaving it brain dead and controlled like a puppet.
totally that... it is a hive force... but something makes me cringy about that to such an extent...
@Viktor_von_Domm: Yeah, I was thinking of something similar to Death Watch too. My head cannon is flamers are so useful for clearing nids that each chapter has sent some flamer specialists to help the Ultramarines finish clearing the area of Hive Fleet Leviathan.
I started painting the apothecary today
And as we have been talking about, I started converting the all going to be the same infernus squad into a squad where each marine is from a different chapter.
Official art and models for them:
How they started with plans to make the official squad:
The progress from today:
Excellent idea! Some already have plans for both shoulder pads, so I'm thinking they can all have a special knee pad to show they are part of this special flamer force. What do you think? I've put it on the Raven Guard's knee as a test, but it's hard to see.
I think I've finished both the librarian and apothecary now. (I had hoped to finish the entire space marine part before July, but still a ways to go)
And the progress on the special flamer watch force of each first founding chapter
I think I know what you want to do... the red circle with the white bolt? creative idea...
looking at the lower pic i think you either need to thin extremly the paints of yours or try to fix loss of detail with fine highlight... both disciplines i suck on too
Thanks, but that's GW's idea. That one is a squad or company marking for the White Scars that I looked up. And you're right I do struggle with thinning my paints and edge highlighting. I've painted the special unit badge on the Imperial Fist, thinking it will be easier to see.
Added some more arms on the squad
And am mostly done building the sargent, just need to sculpt on some detail.
I thought I already posted this, but it looks like I forgot. I'm calling the white scar marine done (And wow, the camera is always good at picking up sins that my eyes don't notice).
Iron hands marine is now done (sorry, it's blurry)
I've also decided to join the Dakka monthly painting challenge for the first time. It seemed perfect to revisit my daemon prince Mamon sculpt for the Siege of Vraks. I think this is one of the earliest minis I sculpted for use in 40k, but after all these years, and having improved as a sculptor, I still really like how it turned out. Only people like Camkierhi who have been visiting my blog from the very beginning will probably remember this guy.
Nothing to feel bad about my friend, he is from the very first page pf my blog and hasn't appeared since. You certainly don't have low commitment. I think you and Cam have commented on this blog more than anyone else, which I really appreciate.
As for the sugar coated gun barrels, I just used a flocking technique of brushing on some glue and then sprinkling sand on top. I'm hoping that it will look like some extreme rust once painted.
I wanted them to stop taking up so much space in my painting area, so I finished up the terminator squad for Leviathan today.
I've also touched up Mamon a bit, by adding some flesh to his gun barrel arm, shortening his claws, and smoothing the transition of his horn. I'm trying to decide if I want to sculpt in extra detail to his face.
I'm trying to decide if I want to sculpt in extra detail to his face.
hard to decide... it is already quite detailed...and the Picasso-esque features might totally overflow then...
what I would consider tho is to, once the cannon arm is fully cured... go over it with a rotary tool or a wire brush and make little groves lenghthwise...if I made myself clear ...hopefully... to get a more organic look... a bit like stretchmarks and so on...
I've heard many times that when painting yellow on miniatures you should undercoat with pink. I think it's supposed to make the yellow look better, or be more vibrant or something. Hopefully it's true.
from what I remember it was a dark brown... it serves the same purpose as the pink... to give a warmer base to the yellow... many roads that lead to rome...
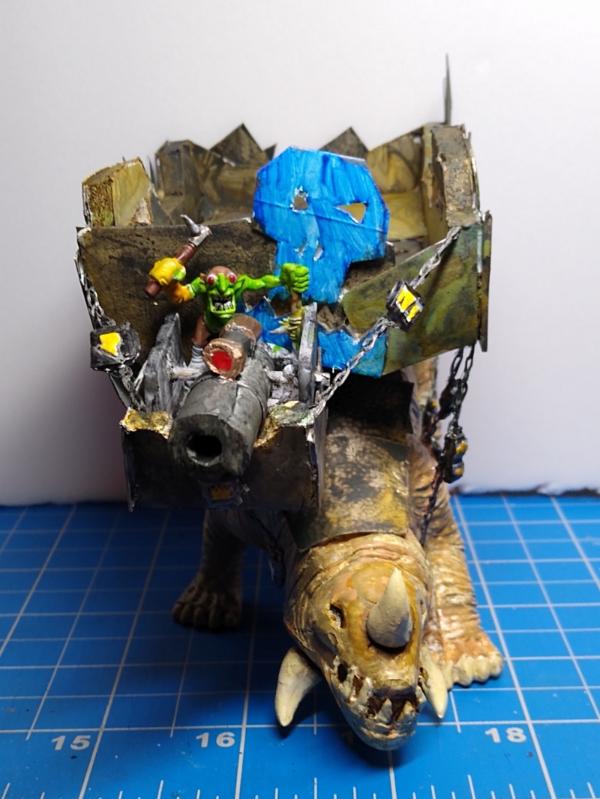
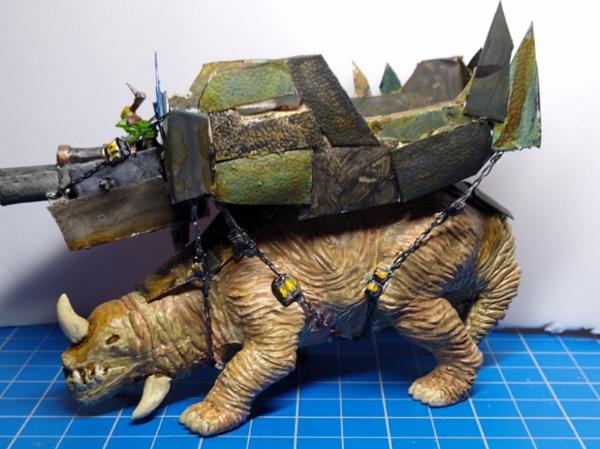
Also, I don't realize posting those two marines would get me to page 50 of my blog. It seems like it should have been a more important post. But that will be this one instead. I'm now on page 50 of my blog and I still hadn't finished the very first thing I posted on page 1, about six years ago. So, I pulled it out of storage and painting my big squiggoth made from a dollar store dinosaur. (My gallery has a folder of the pictures of the big squiggoth making or you can go to page 1 to have a look).
Heh heh, thanks Vik If you and I keep up this pace, the second 50 pages will go a lot faster than the first 50. I didn't have any hobby time today, but at least I came home tonight to some fun mail. Three new Horus Heresy novels to add to my collection, and this:
I guess I was making too much progress on painting minis and needed to add to my collection of unpainted/unbuilt ones
Definitely!
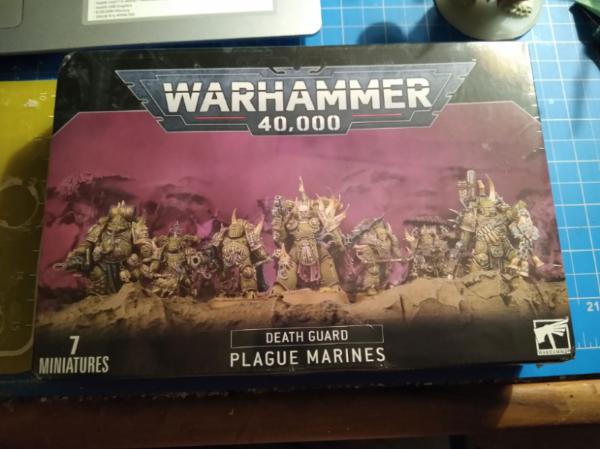
They look really fun to part though, and a friend's son asked me to help him part his plague marines. It's my own problem that I feel I need to do something about there being 17 heads for a kit for 7 guys if I counted correctly.
Yep, I can't wait. The molds for the extra Mark III armor pieces aren't ready yet, so I'm waiting on making the plague marines. Hopefully soon. I also finally took your advice and cut into the gun arm a bit for some extra detail,as well as sculpting additions to the face and body, plus finishing the barrel of slime. The face is stark right now because of the green stuff, but here's hoping it will look good once primed.
Here is a comparison to the official Forge World model
The sarge and the space wolf both have hair now (plus added the sarge's gun)
And lastly, I just finished reading the Horus Heresy novel "Betrayer". In honor of that, I thought it would be cool to make myself a Kharn the Betrayer miniature. I've just started with altering a space marine head to look more like his.
once the GS is out, wonderful things can happen!...
face looks way better... I am still at a loss on what exactly you did to the arm... but I might add I just noticed the cord/pipe for the first time... seems I am not that good at noticing things...
as for the Kharn head... 100% selfmade or a pressmould for a starter mount to go from there? If the former WELL done... if the later good luck!
@KernelTerror: Thanks! The plan is to get it down in the next two weeks.
Viktor_von_Domm: Thanks Vik. For the gun arm it could be the lack of contrast is making it too hard to see, or my cuts are too small. The Kharne head is press mold, and then altered while still soft. I'm flattered that you considered it possible that I made it from scratch. Maybe I should give that a try, since the angry mouth grill probably isn't big enough for Kharne anyway.
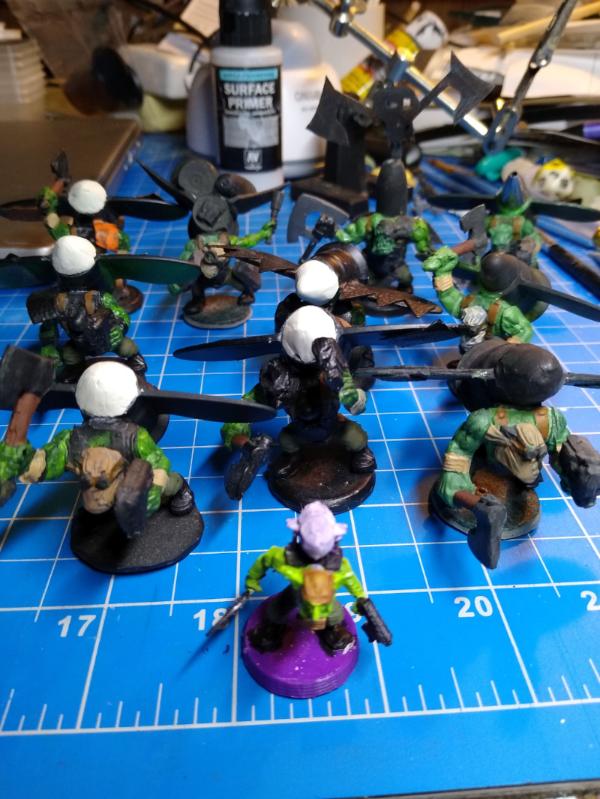
Not too much got done the last two days. I've partway through painting my ork stormboyz
The rest (except knife guy) of my Ultramarines are primed and ready to be painted. Mamon is primed now too.
Thanks so much Vik Because of your encouragement, I decided to try sculpting Kharn's head from scratch. I like this new one better, so I plan to use it for my Kharn mini (sorry the picture isn't too clear)
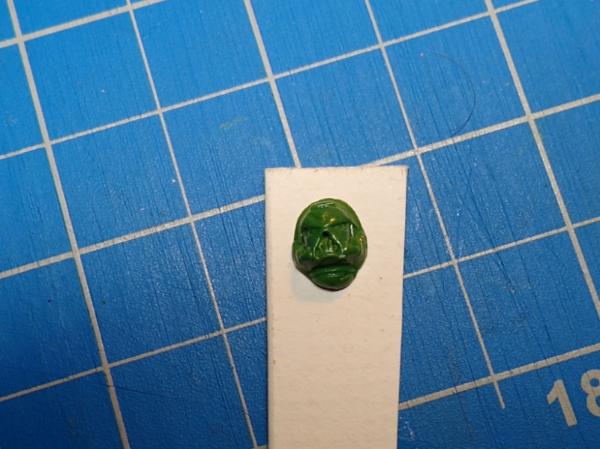
I also sculpting three nurglings. They are still curing so I couldn't get a clear picture of them.
Heh heh, that's a really good point Graven And thanks Vik.
I've started putting down a base coat on Mamon, a brown wash will be next.
I mixed up a custom paint for his skin:
30 drops liquitex yellow, 3 drops liquitex blue, 1 drop liquitex red, 5 drops liquitex white, and 2 drops Daler Rowney FW Burnt Umber.
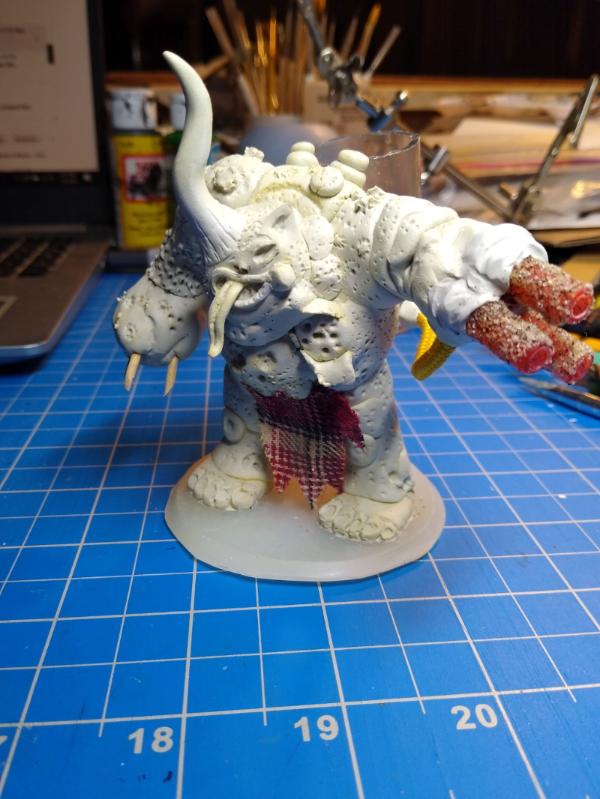
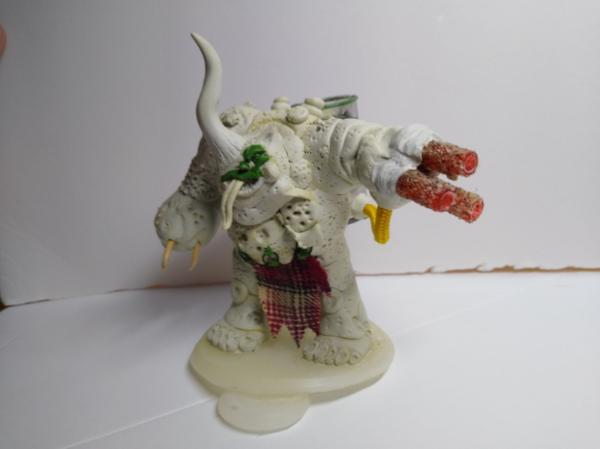
I made what I think is a Herald of Nurgle that seems to also only appear in "The Siege of Vraks". I made it around the same time of Mamon, years ago. I decided to paint it up today.
No need to leave Graven, I'm enjoying your putrid puns
I'm happy to say that I finished painting Daemon Prince Mamon today. Maybe one day he can terrorize Vraks on my tabletop. He's also the 175 miniature I have painted this year.
I admit that I miss the plaid loincloth too. It's been his outfit for close to 10 years, so it's how I am used to seeing him. But I am glad that I finally got him painted, and I wanted to look like the official art.
Not much hobby time lately, too much going on. But I also realized I have been forgetting to update all of you as I slowly build my Deathguard plague marines. I have made eight so far.


 Love the pumokin beholder, and I salute your painted model levels too.


 I'll see myself out...