36
Post by: Moopy
Haven't painted for a long time so doing a blog might keep me going more. Not to mention all the feedback (good & bad).
Colors First.
I needed to figure out a color scheme and after looking at IA:5 I went with a Black/Blue theme.
Trench coat: Cool deep blue/grey/black. Hight lights will be a cool gray chosen at a later time. This MUST be interesting since this will be what people see the most, across the whole army.
Armor: Flat black
Gloves, boots, mask: Warm tans/brown. These should really stand out next to the cools of the great coat.
Metal parts and bits: Warm brass. Again creating areas that pop.
Base: Magnetic base and resin bits from the first OOP Cities of Death terrain set.


To do this I picked up the Grey Primer Duplicoat. This is pure awesome in a can. Not only that, the color matches P3's paint "Greatcoat Grey".
Mediums: Liquitex's Matte Medium and Flow-Aid. These do well with any paint I've used.
Warms: P3's Molten Bronze, Menoth White Base & White Highlight. I will also use Bootstrap Brown.
Cools: P3's Umber Brown, Greatcoat Grey and Coal Black. Reaper's Blue-Black (a MUST to own!).
The first mini was a Jr Officer because of all the extra things to paint. I chose to make his colors a little more blatant which is militarily stupid (hello! Shoot ME!) but stands out really nicely on the table.
 (Note- the picture seems to have compressed badly: too much specks that look like the brass ran. I will have to fix this next time around)
Primed with the Duplicoat and base colors put on. Looking at the picture I can see it's still pretty sloppy and I need to tighten up the areas. Need more lights!
Red cuffs and collar were done with Citadel's Mechandrite Red Foundation and Mordian Blue for the Sword. The mud on the base was painted in P3's Umber Brown, and Menoth White Base for the bones.
All armor was done with the Bronze including the shoulders. My idea will be to make all JR officiers Bronze, Midlevel will be Silver and Sr Officiers will be Gold. Very easy for everyone to tell the rank. Not sure if there is too much Bronze right now, that will be determined after the shading is put in to help mute it. Maybe a different color for the body of the pistol.
The tans did look good next to the greys! However, the tubing for the rebreather, doesn't look that good, so it's going to be repainted black.
The legs were pretty safe to try some experimentation so I tried washing them with with the new black wash from Citadel. Disappointing results as the result looked really harsh and unnatural. I'm going to use the Reaper Blue-Black to create the shadows and build up. Ah well.
Next up:
1. Tighten up the basic color areas.
2. Add darks
3. Add highlights
4. Add interest points spot colors/dirt
7291
Post by: Ebullient
This looks like a neat thread to watch grow. I'll try and be constructive here, and maybe I can learn a thing or two! First, if it's a blog, maybe place it in the P&M Blog forum? Looking forward to more in this thread. I like the organization of your paint desk, that won't last long. Love the pants on your IG, maybe add a little mud and dust to his boots, dirty him up.
5463
Post by: skavenfreak
I really like that white base, P3 you say? They might stand out more with a super watered down brown ink to shade em up a bit more.
36
Post by: Moopy
Doh! yes. P3 not P4. Will have to edit it. Menoth colors come in a set so you'll get all the base, highlight and boostrap.
Ebullient: There's A P&M blog? Woops.  And yes, All dust and dirt comes on the end after all colors are added/worked up.
7291
Post by: Ebullient
Ooops, of course, my bad. The P&M Blogs is the Forum right below this one. 
36
Post by: Moopy
Onward!
Camera update: I've found that the camera likes to push anything that's really shiny. The ink wash left several surfaces glossy and that gave me the little pin pricks of light all over the place. I'm going to have to mix it with matte medium if I do further work.
I tightened up the Jr Officer's Basic color areas with some better results

As I go through the figure I keep finding areas that I didn't think about in my original planning. Most specifically: Straps. These things hide all over the place (chin strap for helmet, etc) and I find myself looking at areas I wasn't ready for. After consulting with IA:5, I've chosen to go with P3's Bootstrap Brown color that I was using for the boots. This is good since it drags the color through the figure. More about this later. Even though the rebreather chest box is depected as being in a leather case, I'm going to paint it Bronze to help push that color on the basic troops. All buttons will also be bronze.
Next up was prepping the next group to work on. I've chosen 3 lascannons and their crew.

Guns were placed on the base and flocking attached with empty spaces for the crew. I want to paint the crew separate since it will be impossible to reach certain areas if I assemble it all together. The exception is the LC team with the running figures. I'm not a fan of these as they're hard to assemble and confusing on the table- team faces one way but gun faces another. I try to avoid stuff like this to make for smoother games. The model themselves are also very fragile, connecting to the tripod on a single small U piece. One of these broke already.

I made the choice to fill that area with glue to reinfoce it. It's going to be very hard to see it, and if I paint it uniformly, it will look like a gray block. Don't tell anyone.
After priming the bases with the Duplicoat gray primer, I noticed many hairs stuck all over the place. This is because my cat DEMANDS to drink my paint water every time I get a new batch. There is NO stopping this, and leads to extra clean up. : /
 Paint water:
 I like to use rather warm water to get the paint off my brushes. Cold water congeals paint (somewhat) while hot water melts it (somewhat). I've found it makes for cleaner brushes. Drawback is warm water will leach out the oils from your brushes faster as well. So you will have cleaner brushes with a (somewhat) shorter lifespan.
Crew starts to get their paint. Colors look good moving through the figure.
 Moving color through the figure:
 When you repeat a color through an area (through the base if you can), it naturally draws the eye across it, allowing it escape and creates flow. This makes the viewer like the piece, even if they don't know why. Examples of the Tan and Bronze:

Remember in the last post, how I wasn't sure if there was too much Bronze in the Jr. Officier? Looking at this view I can see it's working well. so I'll keep it.

More soon!
5463
Post by: skavenfreak
Im diggin the furry titan.
36
Post by: Moopy
Since the weather is finally turning nice, it's time to start painting outside.
Natural Light: This is, hands down, the best thing to use because you get the get the purest colors. Just about all lights distort colors in one way or another. They sell "daylight" bulbs to get around this, and OTT lights are really good white light, but still, if they mimic the real thing, you might as well use the real thing when you can. Direct sunlight is too bright, so find a place that is very close to direct light and paint in the shade.

Since the last post, I've chosen to get rid of the Coal Black since it wasn't giving me anything I couldn't get from the Reaper Blue-Black. I added P3's: Iosan Green, Underbelly Blue and Frostbite to the pallet. Green for the eye glasses, U. Blue to mix with Greatcoat Grey for the highlights and Frostbite to mix with the Mordian Blue on the sword.
After some experiments with the Blue-Black, I found that it wasn't as deep as I wanted but was great for doing the build up. So to get the depths, I added some of the Thamar Black. Grond looks like it might need some more work too.


Most of the shading is in, but from the photos I can see that I need some touch ups. Shadows were done with Citadel's Devlan Mud and Gryphonne Sepia on the tans and ground. Black Scarab wash and a mix off watered down paint. The helmet is a pain in the butt and I'm not sure if the Aquella wings will turn out clean. We will see but it doesn't look good at this point.
6473
Post by: Mephistoles1
Looking good. my first impression of the gold was "Ack!" but its good to see that it was just your camera. Your color scheme is tightening up nicely. Lookign forward to seeing more of these guys as they get finished.
Meph
5463
Post by: skavenfreak
Wow, you obviously are doing something right. That is a mighty improvement when you compare the first and last pics. Good work so far.
36
Post by: Moopy
Thank you! The first picts look a bit underwhelming but you have to start somewhere.
I've also found that taking pictures of the minis and looking at them REALLY points out the areas that I've missed. It's weird but great at the same time.
6098
Post by: ghostmaker
Looks Really good with the Washes....real good.
I'd Picture them being Darker and Gritter IMO.
But great work keep it up.
Could try painting Mortis,Skull's, and death on them.
36
Post by: Moopy
It's a rough call. Admittedly this guy is very bright- he's got reds and bronzes all over the place on him due to his command. Regular troopers won't have this. Bright points like these makes the army stand out as a whole.
I'm often torn between looking really dark, but that often looks muddy (aka bad- everything looks the same) as a whole. So, I add in things that might not make tactical sense (bright or livid) to make things more visually pleasing.
Then again the real mud should help things but that's the very last step.
36
Post by: Moopy
Two picture update: Shadows are in and highlighting has begun.
Pictures taken at midnight and don't look that great; I think they would look better in daylight. I'll paint more on Saturday and update again. Some shadows still look too harsh and will have to be blended out. Don't want my highlights to be TOO bright, so we'll see if I can find a nice medium.


6005
Post by: Death By Monkeys
I'm totally impressed by the progression this particular model has taken. When I saw the first pic with just the base colors, I was a little scared - that brass really freaked me out. But the detailing, shading and highlighting have smoothed out the colors and the model looks really great now!
36
Post by: Moopy
Thank you! Every piece of art (drawing or painting) goes through the "awkward teenage years" and for minis, it's the base colors stage.
I also was worried that I had pushed the figure into the "too colorful" range. However, with all the grime, I think I dodged that bullet.
36
Post by: Moopy
Picture taken during the day. You can see the difference in the quality of color real light gives. White spots are glossy bits caught by the camera. Gloves need to be muddied up a bit as it's confusing if it's flesh or cloth right now. The power cell on his hip looks aweful so I'll have to look into this. : /
Highlights have started with the help of Liquitex Slow Dry medium. I'll post more when they're finished. Krieg transfers have been ordered from Forgeworld.

6005
Post by: Death By Monkeys
I love the effects on his mask, helmet, and collar. Very nice. The red contrasts really nicely with the rest of the paintjob and really makes it visually interesting.
36
Post by: Moopy
Time for another update.
First off, the lascannon squads continue to be worked on. Slowly but surely.


Now, only 90+ more troopers after this. My free time and wallet are crying.
The Commander is almost done. Front picture is a bit blurry so I apologize for that but you get a good feel for the colors.


Colors used: P3's Underbelly Blue to build up the highlights on the clothing. Frostburn was used to do the sword. Up a light layer on and if it's no good, wash it with the darker blue- it smooths it all out.
Stuff left to do on him:
1. Fix the shading on his right butt
2. work on the sword.
3. Finish the base. Gotta figure if I want the rocks to be the same color as him.
4. Mat seal the figure.
5. Apply the dirt. If I don't like it I can wash it off thanks to the sealant.
6005
Post by: Death By Monkeys
I like the color you highlighted his goggle lenses up to - very bright - makes it pop. I'm continuing to watch this space with interest!
36
Post by: Moopy
Done done and done! Finally the Jr Officer is done!
Basing was done with some P3 Brown Ink and GW Gryphon Sepia. Follow that with drybrushing on GW Snakebite Leather and P3 Rucksack Brown. Also put on some directional lighting gold on various high points on his armor to really make them stand out. Some strange whitish areas appeared after I hit it with dull coat so I had to paint over them.


Sadly I found that the Armory brushes I had were all beginning to splay out badly after a short period of time so I won't be buying them again.
Here are the next Krieg that are in the works.


3197
Post by: MagickalMemories
I owe you an apology.
I am absolutely sorry.
I just started viewing this thread today. When I saw the image of the commander (Sgt...whatever) that you posted on 6/10, I thought you were wasting your $$ on FW stuff because you were ruining it. The way it looked, I just didn't see how it could be saved.
Oh, me of little faith.
You've done stellar work on him! Kudos.
Eric
6005
Post by: Death By Monkeys
Your Junior Officer is tremendous - you've certainly done those FW models the work they deserve!
7632
Post by: Ghost in the Darkness
I agree with MagickalMemories I first thought that you were wasting your money, but you sir have proved me wrong and painted one heck of a beautiful minature.
36
Post by: Moopy
Thank you! I was someone in the same mind frame when I took the first pictures. "Did I just throw away $40?" ran through my mind more than once.
For the rest of the command squad I'm going to keep the red collar and cuffs, but make the rest of the armor black like a standard trooper. Highlights will make him stand out and will follow the shoulder "C" plate through various parts of the figure.
The armor plates are so small I'm debating on if I want to do weathering on them (paint chips). You can do it with marines or vehicles because the areas are larger, but these little tiny slivers of armor... hmmm... it might just look too busy.
5463
Post by: skavenfreak
Holy crap!!! thats awesome, compare pic 1 with the final.
Outstanding work,
-Skavenfreak
6633
Post by: smiling Assassin
Holy moly.
I'm feeling nervous if I'm gonna' post my DK on here soon! These live up to a standard I couldn't really think of.
*Sprints off holding half done Command Squad, for fresh highlights.*
6887
Post by: Greebynog
I have to admit to being in the 'argh! this guy's ruined them!' camp early on too. You have a rare ability to make a mini look like total cack, then take it right back to ace!
36
Post by: Moopy
smiling Assassin wrote:Holy moly.
I'm feeling nervous if I'm gonna' post my DK on here soon! These live up to a standard I couldn't really think of.
Thank you! Honestly there are many standards that DK could go for and they would all work. I'm pushing my colors/brights now because for a long long time my figures were way too dull looking, and nothing stood out. Now they do. However subtle also works. Take a look at the DKoK combat engineer colors. Very muted pallet that feels more natural, and (in all honesty) is more realistic. It took me a long time to make the choice between the bold colors or the realistic colors. I went with bold.
@ Greebynog. Every time I post the picts of things I just start working on I think the same thing. Ung!
Now, to get cracking on the command squad so I have some new picts to look at. 
36
Post by: Moopy
More done on the troopers. Works been kicking in so I haven't had as much time.
Lots of missed spots here and there. Kept finding unpainted straps, gun butts, and other what not. This ate a lot of effort since it was never consistent so I had to swap back and forth between paints. Not to mention other miscast skulls that look little more than lumps, etc...
Areas I'm still not sure on:
Bayonets- sliver? Right now they don't look good. Maybe black.
Spade head. Silver still doesn't look that good. We'll see.
Lascannon body. barrel is black, so a black gun may make too it too heavy.
I'm intimidated as hell with vehicles. Soooo many plates, but if you do them all differently, you'll look like a clown show.
Areas I'm still feeling out:
Guns bodies are black. Most gun muzzles will be brass. Gun stocks and hand grips will be brown.
On to the other mildly inspiring pictures!
In the grim future, pointing is serious business. Some inks have been applied. Areas still need to be cleaned up.


Heavy weapons team in the ink phase. The handle back is only partly painted because that's where I'll be gluing it to the main weapon. Don't want the glue to be attached to only the paint.

Heavy weapons operator that I put inks on. This was slowed since I didn't finish the base coat in some areas. Got too quick and now I'll have to be extra careful when touching up those areas. Don't make this mistake.

Command Squad base coating is about finished. Still have to work on the small areas on the radio operator.

Special weapons. Still have to work on the extra details on the weapons. I would really like to get some black and bronze around their feet since both colors just stop half way through the figure.


3197
Post by: MagickalMemories
Man!
This guy is just RUINING these ForgeWorld models...
Oh...
Wait...
Nevermind.
I look forward to seeing them finished. Keep up the hard work.
Eric
3468
Post by: Xanthos
Nice job on these models. Are you using the new GW washes for shading? I´ve used them and feel that theey´ve worked brilliantly.
About the grenadiers. I put the arms on them first, and was happy to have done so. Main reason for that being that the cables for their hellguns have given people a lot of trouble.
I found that their arms weren´t as much in the way as with the normal krieg infantry, since they don´t have the rebreather boxes on their chest.
Anyway, just my .02$.
36
Post by: Moopy
Thank you for that bit of info.
Yes, I'm using the GW washes and I love them. I'm using the mud first on the tans, then I put on the sepia next. I find that warms up the area nicely.
The washes help define the areas of interest on the great coats. However most of the blending is done with paints. Working up and down, using the wash for staking out the areas.
36
Post by: Moopy
Small updates! The job has kicked in and I'm going to be busy busy making Dark Void until the end of the year. Ung. But still...
The highlighting has begun!

Several Krieg have bits and pieces done on the brights. Too many areas are still too start- need more blending. We'll see.
Oh! And can anyone describe what this is?

If you answered, "An ogyrn about to be killed by a Kriegsman." then you would be right. However it's also my new objective locater! he's going to be fun painting up.
6633
Post by: smiling Assassin
Aww. Nice Death korps.
Also, nice Ogryn. Those FW Chaos ones are pretty damn crazy.
~sA
8266
Post by: Wolf
Wow you had me scared for a moment !
i thought yo were completely ruining the models
but hey the final product is superb keep it up
and post pleanty of photos
36
Post by: Moopy
Thank you! I fool a lot of people into thinking I'm ruining them. All part of my clever plan. 
More pictures will be posted when there's more to see. Probably this weekend.
5164
Post by: Stelek
Love it.
36
Post by: Moopy
Small update:
I am currently out of a job. Being in the video game industry has it's ups and downs, and this is a down. As much as I would like to capitalize on a lot of free mini painting time, I must spend it finding a new job. And that takes a lot of energy. Updates will continue, although I don't know how rapidly.
So, on with the show!

Several areas need more blending and maybe a little reinking here and there. I put a black border around the flag, but.... I'm not liking it, so I'm going to have to repaint.
36
Post by: Moopy
Well, it's been a little while. I'm still looking for a job and it's taking a lot of my time. ALL this free time still isn't so "free" to work on my projects. Ah well.
I've finished the grays on a couple of characters (photos show me I missed a few spots) and begun to work on the tans/browns. Building up the lighter areas with glazes.
2 drops of Liquitex glaze medium
1 drop of Liquitex flow aid
1 drop of water
1-2 thick paint brush scoops of pigment.
When the color is about what I want I will go back over it with another ink wash to take the edge off of it and solidify the cracks that I might have painted over. Right now I'm not happy with the gas masks. : /
One again, my camera likes to pick up the highlight areas and make they look speckly. Not so.
Started the ogryn off with some prison orange colors

More pointing


And holding. Looks like I missed some spots on him.

Command squad special weapons


And someone to watch over them. I'm debating if I want to give him a plasma pistol arm from the Commander upgrade pack, since he's one of the few I actually WOULD give a plasma gun. Not sure yet.

36
Post by: Moopy
Artillery sighted! Why have a wormy little basilisk when you can have a Medusa siege gun?

9538
Post by: The Thousandth Son
Jesus Christ! Your cat looks exactly like mine.
10890
Post by: Deff Dread red Edition
Nice,the GW washes are great,aren't they?Well anyway nice job!
36
Post by: Moopy
Have you seen your cat lately? ;D
DDrE: Thank you! I really do like them, and they mix well.
10906
Post by: VictorVonTzeentch
Very, very nice.
10765
Post by: Trevy the Great
Wow, like to many others I cringed at the sight of the first picture, but something beautiful came out of it in the end. Keep up the good work and I look forward to seeing your big tanks completed.
10942
Post by: !?
Thought this was going to be another one of those threads where you get some new person to 40k hurriedly painting and posting all his 'work' online - but the end results are marvelous. Keep it up!
6370
Post by: Develain
can you make pictures of the models without flash?
because now i can barely see depth in the models, which is a shame because i think the models will look really good without flash
Develain
36
Post by: Moopy
As per request, here are the figures in sunlight.


8666
Post by: Joyous_Oblivion
I hated you...for ruining the models...
Then I loved you...for doing them justice...
Now I hate you again...damn beautiful models...
1084
Post by: Agamemnon2
Oh, I hate to be the bearer of bad news, but the tail fin on the Marauder is the wrong way around.
36
Post by: Moopy
Thats so you can tell the difference between your Marauder and mine.
8666
Post by: Joyous_Oblivion
Oooh...I didn't notice that at first glance...It does look kinda funny, might wanna take it off and reposition before it gets painted 
36
Post by: Moopy
I'll try, but it's glued on pretty good. I didn't notice it was backward before it was too late and I might be stuck with it.
36
Post by: Moopy
Tanks! The backbone of every guard army is the armor. First off A Hellhound with extra armor and track guards:

Next we have tanks. I have a Demolisher and a Vanquisher assembled. The Vanquisher is waiting for it's trench rails before being primed, and they have yet to arrive. Both tanks have rare earth magnets keeping the sponsons on, so if the vehicle is hit, I can just take it off. This includes the front guns as well (except for the Hellhound). Thankfully it worked out because I spent way too long gluing my fingers together in the process.


Next we have the turret and various other pieces. A Cyclops and a Heavy Mortar. Looks like I need to do another round of priming. I don't mind missing some of the areas (like in the hell hound, since ink and paint will take care of those, but there are too many large areas on the Heavy Mortar to go undone. The top hatch doors on the Turret are barely kept on by the clue and it's going to be really challenging to transport that one around.

6005
Post by: Death By Monkeys
Cool stuff - any chance we can get some pics with the sponsons on? I'm planning on magnetizing the sponsons on my Russes and I'm interested to see how other folks have done it and the end results.
9875
Post by: Ethald
I think I would break up the gold on the officer's chestplate by doing a little drybrush of mithril silver. Looking good so far!
36
Post by: Moopy
As per request here is the Demolisher without it's sponsons/armorments. Originally I was using the magnets from radio shack had- they were larger and had a better hold. However, they were also a pain to drill in and I found I didn't need a massive magnet for what I wanted to do. Oh, please enjoy too much flash.

Next picture is with the guns attached. Originally I was going with two magnets on the far side, but as you can see, there is just A LITTLE bit of dipping in the front. So I changed that with one on the back and one on the top. Now there is none. For all intents and purposes this looks like a regular tank with lots of heavy bolters.

Here's the shot of the same Demolisher with a lascannon instead of heavy bolter. Because Forgeworld only ships certain weapons with certain kits, I HAD to be flexable if I wanted the options to swap weapons out. The trick is to make sure your magets are aligned the right way. Sadly, Forgeworld does NOT put out plasma cannon or multi-melta parts for their demolishers, so it's just heavy bolters at this point for the sponsons. : / Again, at first glance it doesn't look like any other tank, which is what I wanted. Forgeworld puts out beautiful kits, so all my conversion work is to be invisible; I don't want to compete with the aesthetics of the tank, just add flexibility to it.

36
Post by: Moopy
Ethald wrote:I think I would break up the gold on the officer's chestplate by doing a little drybrush of mithril silver. Looking good so far!
Not a bad idea, but I think I'll use platinum, for directional lighting. I'm using This Bronze/gold for JR officers, and silver for officers. Not sure if I'm going to have any heroic officers in my line corps, but if I did it would be bright gold. That way you could tell the level of commander at a glance.
6005
Post by: Death By Monkeys
What are your thoughts on the aesthetics of the DKoK Demolisher turret vs. the standard Demolisher turret? I need two more Demolisher turrets for my AC and I'm debating between spending $14 for metal turret (and sponson pieces which I won't use because I'm converting SM Devastator plasma cannons for my sponsons) from an online bitz dealer vs. the $16-$17 for a Ryza demolisher turret from Forgeworld.
2776
Post by: Reecius
Seriously great stuff, you did the DKoK justice with the paint job.
9388
Post by: Stretch
DKok have always been some of my favorite models, I just dont have the money to get any right now. Great job on the paint and looking forward to seeing more!
36
Post by: Moopy
Death By Monkeys wrote:What are your thoughts on the aesthetics of the DKoK Demolisher turret vs. the standard Demolisher turret? I need two more Demolisher turrets for my AC and I'm debating between spending $14 for metal turret (and sponson pieces which I won't use because I'm converting SM Devastator plasma cannons for my sponsons) from an online bitz dealer vs. the $16-$17 for a Ryza demolisher turret from Forgeworld.
Ryza turrets... don't really say "Demolisher" to me. The barrel is a weird size as it looks too short for a standard battle cannon (I like vanquishers), and too long for a Demolisher. Demolishers have always been stubby things and I really like the metal recoil absorbers from the metal turret; it's something I wish the Krieg one had. So, I would go with the metal one, as it's also easier to remember what it is.
What dealer are you using to get the bits? I would love to get my hands on some plasma sponsons...
To the others: thank you!
6005
Post by: Death By Monkeys
Thanks for the info - I really appreciate hearing your take on it. I was seriously considering the Ryza demolisher turrets as they look really good on FW's website. On your tanks, though, (and not to disparage anything you've done with them) they looked a little...awkward. I'm glad to hear it's not just my imagination.
I've got an order in with BitKingdom for the SM Devastator Plasma Cannons. They're $3.99 a pop there. BitKingdom's also got the metal Demolisher bits for sale and I plan on buying 2 sets - if you want the plasma cannon sponsons that come with the metal Demolisher turret bitz, I'd be happy to work out a trade with you.
36
Post by: Moopy
Quick update:
Grenaders have started to come together. We have the melta gunner and a converted Vet. Sgt. I had to cut off the hand and put on the power weapon one from the Krieg sprue. That sword is SOOOOOO thin I'm afraid to look at it. Added a resin basing bit from the 40k set and added some greenstuff all around it to make it make sense. I used the rock from the Heavy Stubber figure to create the texture. When the greenstuff hardens, I'll trim down the sides. All Vets will have something special on the base.

Next picture we have a bomb holder (someone has to do it because bombs won't hold themselves!) and a question. I have a nice ruined resin piece that I'm thinking of putting a commissar on. However, you can see that the sides spill out over the normal base size. I'm not sure this is a good idea, any thoughts?

6005
Post by: Death By Monkeys
I'd do one of two things with the base - either a) center it so you've got the most interesting part on the 28mm base and then trim it, or b) mount your Commissar on a 40mm base and have the resin chunk be a part of the terrain on that.
11330
Post by: Gundam-Mecha
Nice work Moopy, thats a very vidid colour scheme and it works nicely.
Makes a nice change to see some Death Korp who aren't all muted dirty tones!
I especially like the work on that Junior Officer's Power sword. Very nicely done and a suitably imposing base!
36
Post by: Moopy
The project has gone along for a while and it's started to get cluttered.

And messy.

I'll clean it up this weekend.
I've started to assemble yet more of the Grenadiers and it's horrible work. Gluing one fragile piece to another makes my eyebrows arch. Gluing 2 fragile pieces to another that rely on each other to come out right involves cursing. Gluing 3 fragile pieces to another than rely on each other involves high pitched shrieking. UNG.
I also realized that if I want to have a Grenadier Vox Operator, then I would have to convert one. This is going to be a challenge because it involves my Krieg philosophy:
Due to the exact and beautiful nature of the Krieg sculpts, all conversions should be subtle. While I would do something more dramatic with other ranges, I believe a converted Krieg figure should look like it came out of the bag.
With that in mind, it gave me some challenges. Fortunately I had purchased a few extra characters, parts and pieces, from ebay (back when I had money). Now these pieces will come together. For my conversion, I took a standard Krieg grenader, the head bit from the items pack, and an extra command Vox operator sprue from the Command section.

I got a couple of the Command squad members to convert them into Veteran Watchmen. In this case I am going to use the arms and the backpack. The Grenadier has a round rebreather on the top of his back and the vox-pack has the exact same one! So, first I cut off his hot shot pack and rebreather. Luckily the hose plug in port stayed on. Even though he's the operator, I want him to have a weapon, and therefore I'll need somewhere to plug in the wires.

Next I put on the data slate arm. Since he was holding the data slate, he wasn't going to be holding his hellgun, so I trimmed off the hand.

The more I fiddle with the arm, the more It looks odd with him holding the gun. So I'm going to put on the other vox arm, and try and cut off the hellgun from standard arm. The Krieg weapons pack does not come with a hellgun (nor does it come with a bolt pistol  ) so I'll have to do cut it down. If I'm VERY lucky, I can save the arm with the tri weapon plate. As it stands I'm going to have to cut off the "C" symbol on the shoulderpad and put on some extra armor pads to get an even 3 on each side. Once the gun is free, I will glue it to the base then connect it to the backpack.
All this for one freekin vox operator. Considering I want to field at least 2 squad, I'm not sure what to do for the 2nd one as I don't have a 2nd command vox. : /
320
Post by: Platuan4th
Moopy wrote:Quick update: Grenaders have started to come together. We have the melta gunner and a converted Vet. Sgt. I had to cut off the hand and put on the power weapon one from the Krieg sprue. That sword is SOOOOOO thin I'm afraid to look at it. Added a resin basing bit from the 40k set and added some greenstuff all around it to make it make sense. I used the rock from the Heavy Stubber figure to create the texture. When the greenstuff hardens, I'll trim down the sides. All Vets will have something special on the base.
I just did this same basic conversion. 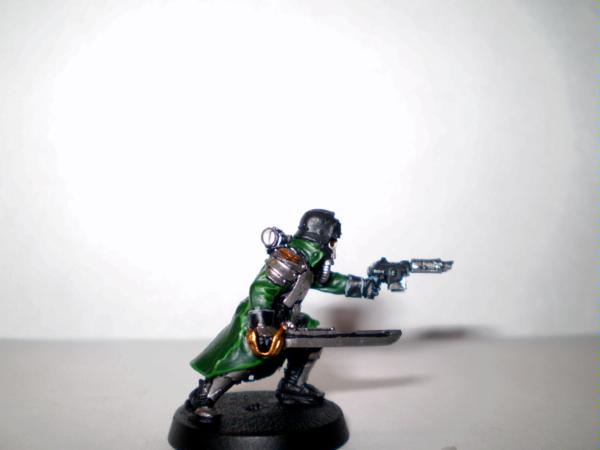 I was afraid I would have to do what you did, but after I clipped the handle from the sword, it fit the hand perfectly. Yours looks great, can't wait to see it painted.
36
Post by: Moopy
NICE! How is the stability of the conversion? Firm?
320
Post by: Platuan4th
Moopy wrote:NICE! How is the stability of the conversion? Firm?
Yeah, I literally snipped off the handle on the sword flush with the hilt sides. Did the same to the chainsword for just the hand left, applied glue to both top and bottom of the hand, then slipped it into the basket hilt, they meet exactly(great thing about FW's consistent scale on their models). I'm more worried about the blade bending or snapping than that hilt coming off the hands, there was plenty of surface space for the glue.
36
Post by: Moopy
That blade does snap. Take a look at my Jr. Officier with the blue power sword. That blade has broken twice. You can't tell because it took me forever to put it back on after it was painted, but its going to happen.
320
Post by: Platuan4th
Moopy wrote:That blade does snap. Take a look at my Jr. Officier with the blue power sword. That blade has broken twice. You can't tell because it took me forever to put it back on after it was painted, but its going to happen.
I'm not looking forward to that. So far I've been lucky with my other FW infantry models on that level(Lok,Titan Techpriest, Culn), so here's hopin...
6098
Post by: ghostmaker
Love your stuff keep it up I fianlly got my Grenadiers I'll post them when i'm done.
Love your progession at first I thought it was ok bu tknow it all looks out standing
844
Post by: stonefox
Did you get the infantry standing side-by-side to put in that Gorgon? If so and if you can comment on how attached they are, I'd like an opinion on how easy they would be to hack apart and repair.
36
Post by: Moopy
Sadly I don't have those. I have a feeling that while you could hack them apart, you'll have to do a good amount of green stuffing.
Speaking of Green stuff, I got a new batch of it and the vox operator is almost done. Stay tuned!
471
Post by: davetaylor
stonefox wrote:Did you get the infantry standing side-by-side to put in that Gorgon? If so and if you can comment on how attached they are, I'd like an opinion on how easy they would be to hack apart and repair.
I've been wondering about this too. I'll be at the Glen Burnie Bunker tomorrow night and check on the possibility.
Your DKoK are looking good Moopy.
Cheers
Dave
8884
Post by: viney
Sharp looking DKOK  My furry titan always tries to take the brush out my hands when I paint. LoLz
36
Post by: Moopy
Finished up the Vox Grenadier. Sorry for the crappy photos. My camera is a Kodak EasyShare Z712 IS and it's a piece of garbage. Don't buy.
First off, I've bleached out some of the photos a bit so you can see where the green stuff is.


These are easier to see:


Green stuff additions:
Finger armor (other arms didn't have the grenadier armor).
Extra arm armor
A thumb (it broke off)
Joiner for the backpack and rebreather hose
Hellgun cable input box
Hellgun handle replacement/rebuild
Fill in a divot on the shoulder
Fill in a divot in the gun
Add in the Hellgun trigger guard
Also had to soak the hellgun cabling in hot water to reshape it to reach the gun on the ground.
Had to cut the gun from the body. One side still looked good- the cut side is on the ground.
10542
Post by: anfie
I really like that conversion.
6005
Post by: Death By Monkeys
Fabulous conversion, Moopy. It succeeds with exactly what you wanted - that thing's going to look like it came out of the FW bag.
5904
Post by: FearPeteySodes
Really, really nice peice, really creative concept and positioning.
36
Post by: Moopy
Grenadier squad is finished! These... were a royal pain. The arms combined with the cabling was miserable. Many times I dropped the pieces (actually it seemed that they rather shot out of my hand into the carpet), glued my fingers together, glued them in the wrong position, etc... Ung.... To sum it up: 1 converted Vet Watchman, 1 converted vox operator, 2 "conversions" by adding demo charges.

Demo Charges

Special Weapons (not that I'll ever be using the grenade launcher)

And a heavy flame thrower. You HAVE to heat up the cabling and bend it into the right position. Be aware if you buy this.

I still need to cut off some of the flash on the cabling and green stuff in the gaps. And to think... I need to assemble another squad of these. Arrrgh.
Assembly left to go:
2-3 more squads of regular Krieg infantry. + vet watchmen conversions (2 squads already assembled/primed)
1 squad of Grenadiers
2-3 units of ammo loaders
Quarter Master's Retinue
HQ squad
Then a massive day of priming.
8745
Post by: Llamahead
Wow really nice. I like the use of Bronze its not used often enough in my opinion. Good luck on assembling them.
6098
Post by: ghostmaker
Grenadiers There cabling is the biggest pain ever.
I always feel like I will break it when i'm putting it on the model. I love your conversion I would never do that (due to I suck at it) and also I wouldnt want me to ruin my costly models.
I love all that you have done though keep it up.
9388
Post by: Stretch
Wow sounds like you have a ton of building ahead of you, good luck with that. Stuff looks awesome by the way, keep up the good work!!
11190
Post by: mcfly
Everything that you paint starts off bad, but ends up looking amazing. Krieg is one of the coolest armies, and you are giving it the treatment it deserves. Well done.
36
Post by: Moopy
Thanks to everyone for their comments!
@ Mcfly= yes! Very much so. Every figure starts out looking dorky but gets a lot of polish.
Right now I'm building out a few units and that's not all that sexy, so I'm not posting pictures until their done. Or if I convert something.
9389
Post by: lord marcus
Can i just say your JO looks AWESOME
36
Post by: Moopy
I've come to realize that most armies that win tournaments also have dioramas. Mine will be no exception. So, to tackle this I booted up Illustrator and tried to remember how to use it. After some fiddling, I came up with this.

We have a Krieg base of operations with a ramp going up into no-mans land. I will probably not be able to get ALL of this onto the display, or if I do, it will be a bit more crowded.
O is for objectives. I have 2 out in no-mans land (Ogryn holding the Kreigsman, and the dying Kriegsman from the Quartermaster set) and one in the camp (a big pile of bombs).
C is for commisars
HQ and JR and the officiers and their retinue. They were supposed to be standing around a table of operations, but... now I remember that the JR officier is in an action pose. He's not reading the war map but rather shooting it. I'll have to reposition him.
Q is for Quartermaster and servators.
S is for Storm troopers.
A is for Armored Fist, but could easily turn into Storm troopers.
HW are heavy weapon bases.
We have some Chimeras, a Hellhound, Basalisk, Vanquisher and Demolisher.
Just over the lip we have a bunch of barbed wire, so if I play Apocalypse games I could use that asset. Or something to it's equivalent since it will also be magnetized. I'm planning for more troops than I actually will be using in an 1850 point list because once I drill the holes, glue it on, and start painting it, there's no going back. I chose 50 troops (not counting Storm troopers) because that's how many fit in a Gorgon. I can put in dummy bases or other items to fill in the unused holes when I go to tournaments.
The Krieg staging area will be about an inch down below the no-mans land so the infantry can fire over it. To start it all off, I purchased a 24x36 dry erase board, a sheet of galvanized tin, and a quarter inch thick piece of particle board (24x48 was the smallest I could find).

What's that on the upper right part of the metal you ask? Why it's Krieg advancing of course!

Yes, that is my painted Jr Officer leading the charge up to the top! The whole point of this board and the magnetic bases was to keep my figures safe when being moved around. This proves it. I got the dry erase board because it's wood frame raises up about a quarter inch, so it will fit flush when I put in the metal and the drilled board. Problem is the dry erase board is 24x36 WITH FRAME, so now I have to cut both the tin and the particle board down to fit inside. I also didn't get any of the closed cell pink insulation foam because Home Depot only sold it in HUGE slabs, and I really didn't need a 5 foot by 3 foot item for something that I'm only going to use a foot or two of. I'm going to see if my friend has any left over from when he rebuilt his house... and some power tools 
36
Post by: Moopy
I took a break from taking a long designer test and visited a friend for a few hours. A friend with a garage and power tools. Soooo... step 2 of the diorama took shape.
Using tin snips, I cut the tin sheet down and wood glued it to the dry erase board.

As I feared, my original drawing was too grand; things are going to be a lot more cramped, but I kept most of it. What I did get room for:

6 10 man units
3 5 man units
3 objective counters
2 1 man units
2 3 heavy weapon teams
Room for 1 hellhound, 4 chimmeras, 2 tanks and basilisk.
I used photoshop to darken in the areas/show the height on the board where noman's land will be. Then, 60 holes were drilled.

We couldn't find the metal piece that held in the round saw bits so the objective markers and weapon platforms weren't done. Once finished, there will be a lot of sanding of the holes and then it will be glued onto the board.
I will probably not use 20 of the squad holes for most of my games, but I wanted to make MORE than I needed because once it's glued... I can't go back. I plan on making about 20 grave markers to fill the ones that are not in use. Soooo... if you have extra headstones... I wouldn't turn them down. ;D
6005
Post by: Death By Monkeys
Wow, man - what before seemed like an ambitious project is now even more so! I continue to be captivated by this thread.
11390
Post by: Grimvaril
Wow I must really see this project unfold into it's rightfull glory.
And really love the Death korps, its pure genouis those models.
11213
Post by: Mercurial
Ah, what's a regiment of fine boys from Krieg without an exquisitely bleak trench diorama?
36
Post by: Moopy
Quick update. Not too much to report since I'm painting figures on a commission, those will be done soon. But, now and then I keep plugging along.
Krieg artillery crew- heavy mortar. He's holding an Inferno shell. Shells will be color coded per type.

Krieg Grenadier Sgt getting fleshed out.

Bad angle of the Quartermaster, so more soon.

Banner bearer almost finished.

Krieg "medic". I was trying to figure out how to convert a medic for when I use this army as standard IG, and this was the easiest solution.

His Lordship has taken to the field. Sr. Heroic Officer and a dynamic base. He's toward the back of the base as I wanted him to be a bit stand-offish.

6005
Post by: Death By Monkeys
Really like the way the Quartermaster is turning out - the bone looks really great.
13085
Post by: jackinthetank
WOW!
6747
Post by: silverdaemon
i wish i had seen this before i made my display board..... I made the top layer of mine with foamcore and used a circle cutter to make all my spots. Let me tell you that is a collosal pain in the ass. Holesaw FTW! Hell my army has changed so much my old board doesn't fit anymore anyhow, maybe i'll be using your method soon. In short Ingenious man!
36
Post by: Moopy
Thank you!
Like a good painting or drawing, a good project is laid out before it's begun. Build from the ground up and everything becomes bite sized problems to solve.
Example- I knew I needed stability when I started my Krieg. Resin is very light and very fragile so I needed heavier bases and something to put them on so they would not move. The tin works out well because it's a solid grip, yet it's not a fight to get them apart (like it would have been with two magnets); too much grip and you'll wind up poping your mini off the base sooner or later. Another one was magnetizing the side sponsons of the tanks.
Other rules involve paint schemes and keeping them consistent across the regiment (tight color pallet w/variation colors here and there).
More soon.
11330
Post by: Gundam-Mecha
Moopy the base on that heroic senior officer is amazing!
It looks great, is that from the Citadel resin basing set?
36
Post by: Moopy
Gundam-Mecha wrote:It looks great, is that from the Citadel resin basing set?
Thank you!
It's either from that (and I think it is) or it's from the original Cityfight basing kits that came out a long long time ago.
36
Post by: Moopy
I am sad to say that the furry titan has passed on. No longer will the paint water be demanded. RIP.
Current WIP from my craptastic camera. I'm waiting for tomorrow to take another shot of the banner and Quartermaster.

Not sure if I like the white face mask for the Grenadier Sgt. We'll see.

Guard, His Lordship, and Mr. Bomb Holder. I was looking at the Krieg poster that comes with IA:6 and it shows the Senior Officer wearing a read overcoat. Nooooottttt entirely sold on that, but it would counter the black overcoat worn by the commissars. We'll have to see.
967
Post by: slann
Its scary how crappy they look on the first base coat it makes me cringe . But after your ink work and highlights they look real nice . I would just thin down the gold a tad . GO GUARD!!
36
Post by: Moopy
The bronze is actually pretty thin, it's just my crappy camera like to make highlights of everything and thus it looks bumpy.
And yes, they look horrible right now. I like to scare people and then surprise them.
36
Post by: Moopy
More done. Some have said I need to thin my paint. Sadly the small bumps you see are not the problem with the paint. There is highway work being done near me and will continue to be so for the rest of the year. It's kicking up dust and grit all over the place and is getting (ruining?) my work, and my lungs. Good times.
Anyways, here's the latest batch now that I finished my dwarf commission.
Quartermaster front, front/under, and back.


Servator (Lil' Wonky Mk2) or Medic depending if you've got a Krieg or an IG list.

Platoon Command Squad Banner bearer. This means... I have my first complete Krieg unit. Go me.

36
Post by: Moopy
Quartermaster is done. Going to try and take better pictures of him tomorrow. His leaning over pose is proving quite hard to get photoed right. : /


6265
Post by: IAmTheWalrus
Have to say that I love what you've done with the Quartermaster. The scheme looks great and the pose is interesting.
36
Post by: Moopy
Thank you!
This weekend the Seattle Battle Bunker held a painting competition where each store submitted their best painters and contributed models to compete against each other. I submitted the Quartermaster and the Command Squad for two separate categories. Both took first place and pushed the SBB to first place. It feels very nice to have put all that work into these things and have someone else validate it.
Currently working on the servitor and some lascannon teams.
36
Post by: Moopy
Small update- I've been doing a lot of job hunting. One prospect, but it involved moving to another state. Fate is like that.
I've rounded out my command squad as I would actually try and play with this army and I need to get the core choices rounded out. First we have a selection of the Vox operator and the special weapons trooper.

Next, I converted a heavy weapons team. This involved sawing a couple of Krieg in half and some green stuff. I didn't get the sash as well as I wouild have liked it, but I'm not a great sculptor.

So far I have assembled the following for the command squad: 2 guardsmen with lasguns, 1 plasma gunner, vox operator, regimental standard, heavy weapons team. A man must have options. If I turn them into regular IG, I already have a medic (servator), and plan on converting 2 bodyguards, master of the fleet and master of ordinance. That last one will be the most difficult since he looks like the vox operator. This will be a rough one.
14793
Post by: karnaeya
Man its funny like everyone else, when I saw the first pick I went woah. and hit the back button. And missed out on this thread until today.
Good luck with the job hunt man.
8745
Post by: Llamahead
Really nice stuff any chance of a description of how you did the Power Swords?
36
Post by: Moopy
Thank you to everyone!
Llamahead wrote:Really nice stuff any chance of a description of how you did the Power Swords?
Well, the Grenader's sword hand was cut off and repositioned.
Painting:
I started with a medium blue- this sword is buzzing with energy so there shouldn't be darks here. The metal bits were a medium silver with a light wash of black/blue ink. Some areas were then highlit by platinum.
Next I used the same technique that I used for everything else. I start by wetting down the area I plan to paint. Then with a brush that is a step above damp, I take a bit of the pigment I want on the very tip of my brush. Then I drag the edge of where the paint ends, along the edge of the object. The paint is drawn down through the area by capillary action, creating a natural blending. I do this several times, until I am happy with the results, often with lighter pigments each time. It's a watercolor technique that works well, although I am not very fast with it.
11457
Post by: Werdes
The sculpting looks fine as long as you dont look to close
13975
Post by: Müller
When I looked at page one I was terrified, I thought you we're really ruining FW models with horrible paint jobs and nearly tore my hair off. The I kept looking and was very positively suprised over how well they came out
I only have one thing, and I would suggest making their weathering look more "muddy" since Vraks is a muddy planet, not a dusty one.
15873
Post by: person person
Moopy wrote:Quick update:
Grenaders have started to come together. We have the melta gunner and a converted Vet. Sgt. I had to cut off the hand and put on the power weapon one from the Krieg sprue. That sword is SOOOOOO thin I'm afraid to look at it. Added a resin basing bit from the 40k set and added some greenstuff all around it to make it make sense. I used the rock from the Heavy Stubber figure to create the texture. When the greenstuff hardens, I'll trim down the sides. All Vets will have something special on the base
[b] I'm a bit late but, try these sites, if you need alot of resin bases these sites: http://armorcast.com/
http://dragonforge.com/
36
Post by: Moopy
Hello all!
Trying to find a job has taken up a lot of my time, so progress has been slow. I'll have a couple new picts when I've finished assembling the next troop squad. I'll also have one of all the different command squad conversions done.
@Müller Mud and dust are just times of the year. I live in the Seattle area, and normally we get a good amount of light rain. Howver, we hit a 29 day dry streak (a record!) at the end of Spring. What was supposed to be mud, turned into dust.
8745
Post by: Llamahead
Great stuff cheers for the tips
36
Post by: Moopy
Some updates.
First off, I wanted to see what I had, and what I still needed to round out my forces so I could actually... you know... play some games with these guys. What came to mind was: how do I determine who's in what squad? Krieg all look alike, so what to do? Answer: Krieg do not look all alike but very close to it!

The above picture shows four distinct configurations that revolve around the shoulder armor and the backpack. Between those two variations, I was able to get four separate squads! Enough for some bare bones troop choices. I'll figure something out if I want to add more squads into the mix. This will probably involve painting different platoons should armor different colors, giving me the option of having up to 4 squads in a platoon. Nice!
Next was to line up the squads to see if I had a basic legal list. I stuck everyone on the tin board and took count. Magnetized bases make for very easy storage- they're still up there!

First thing I saw was that I'm missing a second platoon command squad. Next would be filling out the special weapons squad and getting my heavy weapons teams put together. I've gotten the idea of drilling a base-sized hole in the larger weapons base, so that gunner and spotter can be on an even level, otherwise the spotter will always be on a hill. Huh. Other figures are from the heavy mortar squads, another of the Quartermaster's retinue (used for medics in a regular IG army), and extras for the Stormtrooper (See: Grenadiers) squad (special weapons swap outs). I've converted an Master of Ordinance figure for the Command Sqaud and was figuring out how to do the Master of the Fleet. I might just buy that figure, because the MoTF comes from the Navy and isn't Krieg. Hmmm.
Other things to try and figure out: how to make veterans and possibly penal troops. Hmmmm again.
15873
Post by: person person
I think the Master of the Fleet needs some kind of Krieg related feature e.g. trenchcoat.
For Vets I'd just give reg. infantry special badges or...
As for Penal troops, what if you used some Necromunda gangs?
36
Post by: Moopy
Problem with using Non krieg/ FW at this point, is that the GW pewter/plastics are much "Fatter" than the FW line. Take a plastic Cadian and put it next to a Krieg/Elysian or whatever, you'll see a HUGE difference- the scale is off.
So I could put the gangers in there, but they would look almost superhuman. This is the reason I don't use conversions from the regular line, only using Krieg or sculpted. I've been eyeing the Elysian commander squad because of his power fist. However that's a $36 conversion. : / http://www.forgeworld.co.uk/Imperial%20Guard/Elysians/Seniorofficer3.jpg
10127
Post by: Happygrunt
Good luck good sir with this monumental task. You got to bring that ogryn down to the bunker so I could see it in person. Good job.
(I don't think its forum necro to post in a blog right?)
23269
Post by: SirGordonblixt
Those models are lovely. I don't know whether to hate you or praise you for having so much money and Korps. 
36
Post by: Moopy
Well, I *USED* to have money for Krieg as I've been out of job for over a year. Lucky for me I collected 95% of my army before the end of my job.
@Happygrunt. I can bring it down on a Saturday after my life drawing classes. Let me know.
As for thread necromancy? Not really. I haven't been painting because I've gone back to college to get a BFA in production animation. Trying to reinvent myself. Unfortunately the school is incredibly rigorous, and I have NO time whatsoever for my personal projects; it's to the point where I have think about if I have spare time to watch a movie.
SO.
The Krieg are not dead- more painting will be done over the spring break (2nd week of March). I will post progress pictures then.
36
Post by: Moopy
Good news!
First of all, after 1.5 years of unemployment I've finally landed a job. I'm going to be a senior designer on the Warhammer 40k MMO down in Texas (Vigil Games). I should be moving down there in about two-three weeks which gives me time to find an agency to rent out my condo. Some seem to have problems believing this, but I'm not going to get into a debate over it; either you believe me or you don't. In the future you should see pictures of the Krieg in action against the guys from the studio so that should speak for it's self.
It also means that that I've left college to take the job. This was bitter sweet because while it's for my dream job, I was learning a hell of a lot in the classes, including color theory.
While I box everything up I'm going back to the paint table, so expect some new Krieg pictures in about a week. Until then I'm going to give you two websites to look at.
The first revolves around color. Many miniatures don't work because the colors clash or are too close together in value or tone. This website has a couple of VERY good diagrams to review when it comes to both those subjects:
http://handprint.com/HP/WCL/color16.html
Follow the links to the: information on mixing compliments and there's a great color wheel .pdf that you can get there. There's also a vertical color/tone chart that's worth downloading as it also shows if your colors are warm/cool.
Next up are the detail brushes from Silver Brush.

Take a look at the fan brush and and the angular ones. The fan is used to blend wet colors and I'll see if it works well with what I've been doing. The angle brush will get into those hard to reach places.
New pictures in a week!
10127
Post by: Happygrunt
Hooray for getting a Job Moopy. Gunna suck that I wont be able to see your Kreigsmen in person (highschool is a pain) but I wish you the best of luck. You gotta give us some info on the 40k MMO when you can tell us. I am looking forward to it. Good luck, the Emperor protects.
36
Post by: Moopy
Some new picts! unfortunately not as many as I would like.
First off we have a lascannon team that's about 50% done. Basic paint areas are blocked in (although the photo reveals some areas I missed!) and some first layer shading has been added. Still need to smooth out some darker areas, ink was the gun, then bring up the highlights. After that, whether it all. Oh, and repaint the broken parts on the leg. Damned fragile resin. : /

So, at some point in the move, I knocked over my heavy weapons box and broke about three stands of lascannon teams. Some were worse off for ware and this was one of them with both troopers broken off, the lascannon broken off and the cabling. Got everything glued up, the phone wrang and... yes... I knocked off the table. However, this time the magnetic base did was it was supposed to do and the figure landed base down. Only the lascannon and the cable broke the 2nd time. After a lot of swearing, I got it all together again, however that meant a lot of fixing and not a lot of painting. Damn.
Painted a whole bunch of krieg's tan leggings. Too boring for pictures at this point.
Next we have some conversion work. Two converted Sgts (chain sword & plasma pistol) and a trooper pointing. Every unit should have at least 1-2 converted figures.

At this point I'm a few days out from moving and I'm not sure if I'll have time to paint more. I'm leaving WA to go to TX on the 10th and should arrive on the 14th. Start work at Vigil on the 15th soooo... not a lot of breathing time!
15873
Post by: person person
Pointing guys always look awesome, good luck with your busy schedule!
|
|


