Switch Theme:

Share on facebook Share on Twitter Submit to Reddit  [RSS] 

[Guide] Airbrushing at the mini scale (long) @ 2009/08/05 22:35:25


Post by: atropos907


Ive been asked more than a few times for a tutorial on painting some of my models. Partially in line with said request I decided to try to fill a void Ive noticed in the miniature community. What I include here is based on my lessons and I am by no means an expert. I mainly am writing this so people will ask questions or point out problems. Afterall if I get more people to use airbrushes then they will get better and teach me a few things.

First off a few points.
1. An airbrush is just like a paint brush. It takes a lot of skill to use it well.
2. There are some things an airbrush is best for and some things a paint brush are best for(can also read faster for in both
cases). This depends on
2a. Scale of features(finest detail)
2b. Area to be covered
2c. Accessibility of surface(I usually assemble, paint, finish assembly, then add last bits of detail or repair)
2d. Relative skill with a paintbrush vs airbrush
3. A paintbrush and paints are cheap, an airbrush can be expensive or very expensive and the paint is a matter of preference.
You can get away with cheap but you often get what you pay for with both bristles and airbrushes.
4. Safety safety safety. You wouldn’t lick a brush with enamels would you? Then why would you line your lungs with any kind of
airbrush particulate.
5. Take good care of your paintbrush and take better care of your airbrush.

-----------------------------------------------------------------------------------------------------------------------
Ok so what do you need

1. Airbrush:
1a. I started using a Paasche dual action for $60. it’s a good starter but I would say relative scale limit is down to 1/2cm. if your trying to paint anything finer you will start getting headaches.
1b. After a lot of research I decided to get an Harder & Steenbeck Infinity two-in-one. This means it comes with two different nozzles. I ordered from http://www.germanairbrush.com/. Im doing this free advertising because I love this airbrush. I was also able to get Mike to exchange the larger of the two included nozzles/needle sets with a smaller one at no charge since I was only interested in painting small stuff.
1c. Quick couplers. GOLD! I thought it was silly at first but these can make cleaning messes so much easier. They also make changing your airbrushes out(with different colors) such a breeze if you don’t want to have a multi-line splitter on your air supply.
1d. Nozzle size. OK this one is tricky. The smaller features require smaller nozzle-needle sets. But smaller sets usually mean your acrylics will clog the tip faster and you HAVE to use properly thinned or even filtered paints. Sometimes the answer is to go to a slightly larger nozzle size. Even though you cant paint as fine a line, its better than not being able to paint more than a second before it clogs. As you get better you can maintain painting with the fine nozzle for longer.
1e. Quick fix/quick set. Some, like the infinity come with a dial to adjust the maximum retraction of the needle for a set point. And some of these come with a button or mechanism you can pull to quickly release the preset limit. This is gold for painting acrylics as it allows you to quickly blow a high volume or clog out the tip and then get back to painting.
1f. Nozzle brush: I am not sure what others use but a tooth brush or Q-tip may be used to quickly clean accumulation from the needle. I zip-tied a handy tinny bottle brush(4cm long) to my air hose a foot from the brush so I can quickly swipe my needle and get back to painting. The brush works better wet.

1g. Paint brush. Wait WTF? I use a small cheap paintbrush to clean the cup of my airbrush because its faster when Im switching paints than to disassemble. And often there is a little paint somewhere in there you cant see but the brush will brake up. You should still do a thorough cleaning when done but this brush is fine for cleaning the cup of particulates or paint.

2. Air compressor: Most hobby compressors state they run “continuous” flow at 20-35 PSI or so. Yea bull. Some things to consider below. But first what do I use. I use a Eurotec 10-A compressor mounted on a 1gallon tank with a flow regulator out of the tank. I run 20-35PSI regulated (up to 85PSI from the eurotec in the tank) And am pleased with the result. I run in a tinny apartment so the noise is important. Had I a garage I would go for a better tank and better pressure so I can paint more continuously. I also use a fan on my eurotec to prevent overheating since it states not to run more than 15 mins continuous.
2a. Canned air: You can use canned air but seriously, why did you buy an airbrush just to keep buying canned air. And that can wont last very long
2b. Noise: you want a quiet airbrush unless you have a garage. Don’t go deaf because you got something loud. I walked into various hobby stores and had them plug in the display models so I could hear them in action. I highly recommend this. You can also mount your compressor on carpet or squishy foam to reduce noise coupling to the floor or table.
2c. Flow rate. Depends on your airbrush nozzle size and recommended flow. Be sure to check before you buy. Its very disappointing to have inconsistent airpressure.
2d. Max airpressure. This is important if your trying to fill a tank. Otherwise it’s the combination of airpressure and flow rate(yes they are related but the impedance matching parameters are often not reported accurately IMHO) If you can test it. Otherwise its better to err on the side of higher flow rates and PSI as long as you can regulate the flow down.
2e. Consistent pressure: many claim this. Ive tested quite a few and seen that their continuity for the stated nozzle diameter leaves much to be desired. I highly recommend a tank is attached to your compressor.

3. Paint: Use acrylics unless you have great ventilation. Acrylics are a lot safer in many ways but they dry on your tip faster, which can be irritating. The better you get the less this is a problem but you will have to clean your tip fairly regularly
3a. What type? I use GW and Reaper with no problems. I also use createx but these don’t seem to dry as hard (more rubbery) and thus require a top coat for table-top pieces. However their transparent and fluorescent paints are a great compliment to normal paints. Hell I handbrush with createx a lot because GW and reaper are too limited. While you can get nice semi-transparent layers with GW/reaper using a wet-pallet, its easier with actual transparent paints, and fluorescents…. Need I say more.
3b. Filtering: I add water to my GW and reaper paint bottles. Especially if they start thickening. Sometimes you cant help it and you get particulates in your paint jars. If necessary I then take 1-2 to 1cc of the desired paint, place in a little filter cup or fine mesh cloth, and run the airbrush base through to get a filtered paint while leaving particulates behind. This will be thin and very watery requiring multiple layers. But your using multiple coats anyway right…?
3c. Preparation: I usually use a dropper to add roughly 50% airbrush medium and 50% paint with a paintbrush(1 brush holds about 1 drop of paint). The mix ratio will depend on the paint-medium combination and how fine you wish to layer. This takes practice to get it right for your preference and brush-air setup.
3d. Airbrush medium/thinner. You are using acrylics right? You like your health right. Then you should probably use the thinner/medium sold for your paint. However, assuming you have better than average ventilation so you wont breath any of it… I use windex (basic ammonia D version) for volume painting and the brand stuff for detail work. The windex helps clean the brush, slightly, I think… but it dries fast, a lot faster than water and so far I haven’t had a problem with it breaking down the paint binder. My logic on the safety of using windex(ammonia D) is thus. Window washers, to my knowledge, haven’t been suing windex. They evaporate a lot of it often in a house. Calculate the volume of windex to wet a rag or spray onto a huge window. 10CC plus. Yea right guess a lot higher for big windows. Well your wearing a paint filter and working in good ventilation right? Then unless your covering a huge area(sq ft or so) you will likely use less than 1cc in half an hour if your using a fine nozzle tip. If you plan on painting large areas use water instead, it’s a large area, you can wait for it to dry.

3e. Consistency: Thin to the level of skim milk. I want to hurt whoever started this because skim milk isn’t much more than water and its hard to tell with some paints. I test my consistency in two ways.
3ei. Shake the paintcup with water in it to see at what rate it splashes around, or swirls. Get your paint to be close to this.
3eii. As you shake, if you have a metal cup relax and watch the paint run back down the cup. On the walls you will see the paint show a degree of translucency or a period of time(you have to develop a gut feeling for this) after which you stop shaking that the paint no longer covers the walls of the paint cup. When it’s the right consistency the paint sheen will be fairly transparent and will resettle pretty fast. Again you have to develop a gut feeling for it.
3eiii. Other ides: capillary tubes-measure the height or rate of filling. Dropper- measure the rate of dropping out of a small tube-bucket with a tinny hole in the bottom. Droplet flow-put a drop on a known constant surface and see if it flows at a critical angle. Just ideas ive played with.

4. Safety equipment.
4a. Goggles. I don’t think they are necessary but I use goggles for darn near everything. Ive had too many things fly into my eyes. If you don’t use goggles have an eye-safe water source near for eye was if your paint explodes. Ive been lucky so far.
4b. Respirator. DON’T BE CHEAP get a good paint respirator!
4c. Fan. I don’t care where your painting. If there are walls around you you’d better be flushing atmo at a good rate. I usually place a fan sucking air from my project and blowing it right to the window. This fan also is blowing on my compressor to keep it cool since I work the poor thing hard and it overheats within 20 mins of typical use if I dont. It doesn’t hurt to have a second fan forcing air in from a second port to force a cross flow.
4d. Acrylics. If you use acrylics you don’t need dangerous solvents. Don’t breath solvents! The ammonia is questionable as it is and when I hear about window washer lawsuits Ill reconsider.

-------------------------------------------------------------------------------------------------------------------
On to painting!
The basics

1. Scale:
a. Always ask yourself. Is the airbrush the right tool for the job. You have to push your limits to get better but sometimes its just stupid. If your skills aren’t up to it grab that paintbrush and wet pallet and get to work.

2. Lines and dots:
2a. You know those exercises most books recommend in doing a line, doing a spot/dot. I agree they suck. Do them anyway if you want to get really good. An airbrush is like a sword and it takes a lot of training to use it well.
2b. Work your way up to harder skill sets by setting simple projects to paint that use the previous sets. Ex. Try a stripped cammo for your mini’s this is a great exercise for the stripe paint. Want to practice dots. Try bullet holes, scorch marks. Want to practice general brush control. Try painting just the armor or clothing of your minis. If you do thin coats it wont be a problem. You can fix your lack of skill with a paintbrush or just dip and retry. Once you get good you can paint armor or clothing with little overspill onto adjacent pieces. Assuming you have a good brush-air combination for fine detail.

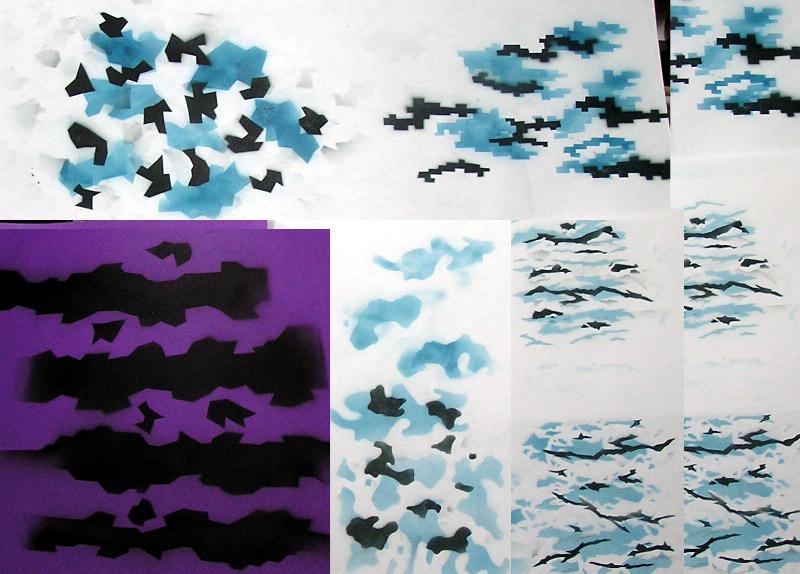
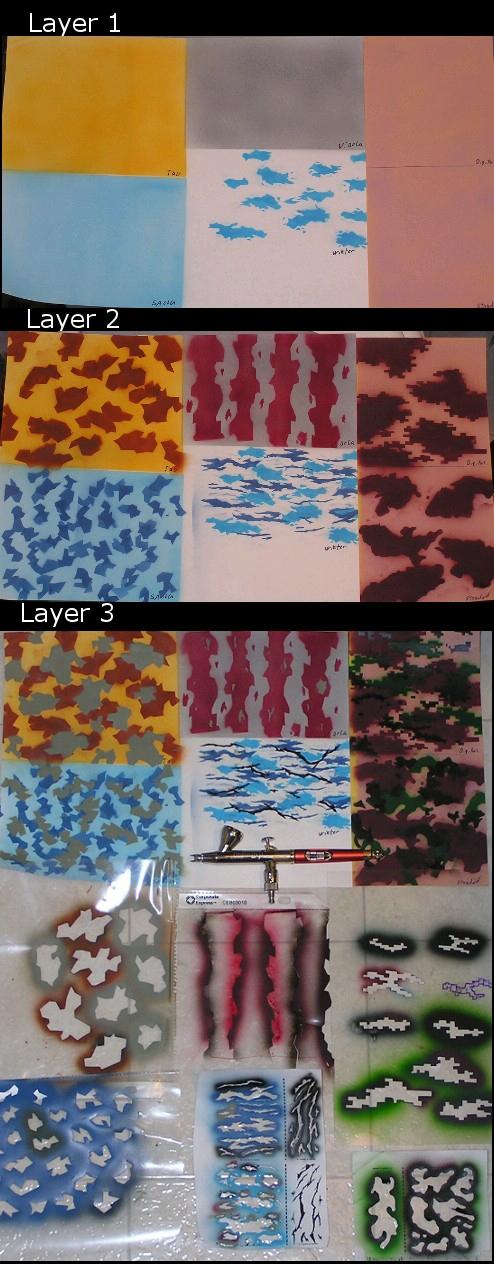
3. Stencils: The big secret/short-cut for airbrush painting. But only the first step in a great product. Don’t think you can get away from free hand.
3a. Pattern: at this scale you will have to make most of your own. This is a big time sink. I recommend a few methods
i. Draw what you want, and photo-reduce it with a digital camera and printer or photo-copier. Then cut it out with an x-acto
ii. Print a picture of what you want then see above

3b. Cleaning. Using a stencil a lot will mean it will collect paint. If paper this may limit the life span. Otherwise clean with water because your using acrylics. As you paint if the stencil is building up paint then keep a paper towel handy to dab the paint off of the stencil. Then blow a bit of air over it to dry and continue painting as normal.
3c. Material:
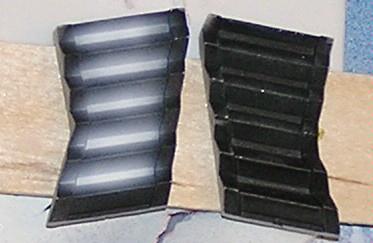
i. Paper: easy to pattern and cut, gets wet when painting and needs time to dry. Try sealing it first with an overcoat. This is how I do most of my lightning.
ii. Stencil plastic/transparency plastic. Can be printed on but harder to cut fine detail out of. Will last longer. I would love to know of a company that cuts stencils cheap with <2mm feature sizes given just a layout/vector file. If you know of one please share!
iii. Metal. Haven’t tried it yet. Kind of need a mill, circuit board router, or laser etcher to make any use of metal.
iv. Foam. Harder to cut(laser or hot wire can be useful) but gives dimensionality to the stencil. I’ve started using this for my lighting and fire stencils.
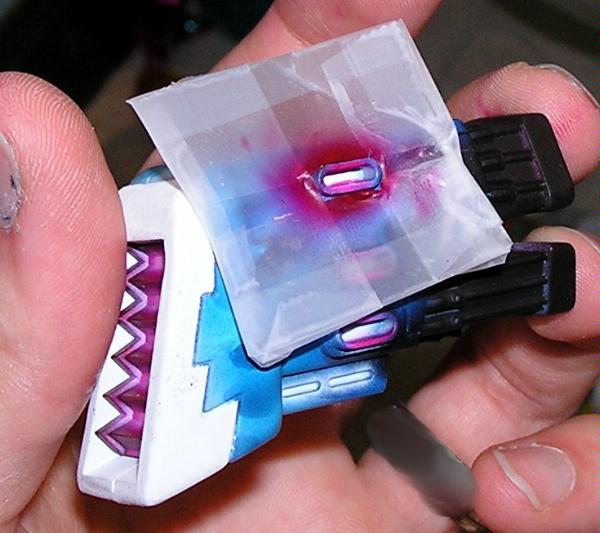
3d. Technique.
i. Lay the stencil over the project. Helping hands can be useful
ii. Sight along your airbrush to know your painting the part you want
iii. Spray light gentle coats. Thicker coats will build up on the stencil.
iv. Shift the stencil for shadowing
v. Dab the stencil with a paper towel as it builds up paint
vi. Use just air to help the paint dry
vii. Easy huh?

4. Depth.
4a. Just like in brush painting depth can be achieved with layers going from High to low value
4b. Paint transitioning white to color or color to black. Or even white through color to black. Then airbrush a thin layer of another color (usually the background color) over top to push its depth in. if using normal paint after a couple thin layers you will merge to the color your spraying. If using transparent colors you can apply more layers before you merge to the transparent color your using.
4c. Just like with real fire you can make a color really stand out if you first put white through black or white through your color . and then do a thin highlight coat over it.
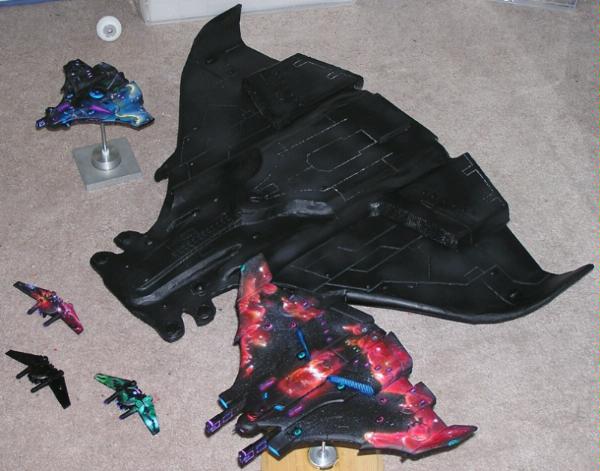
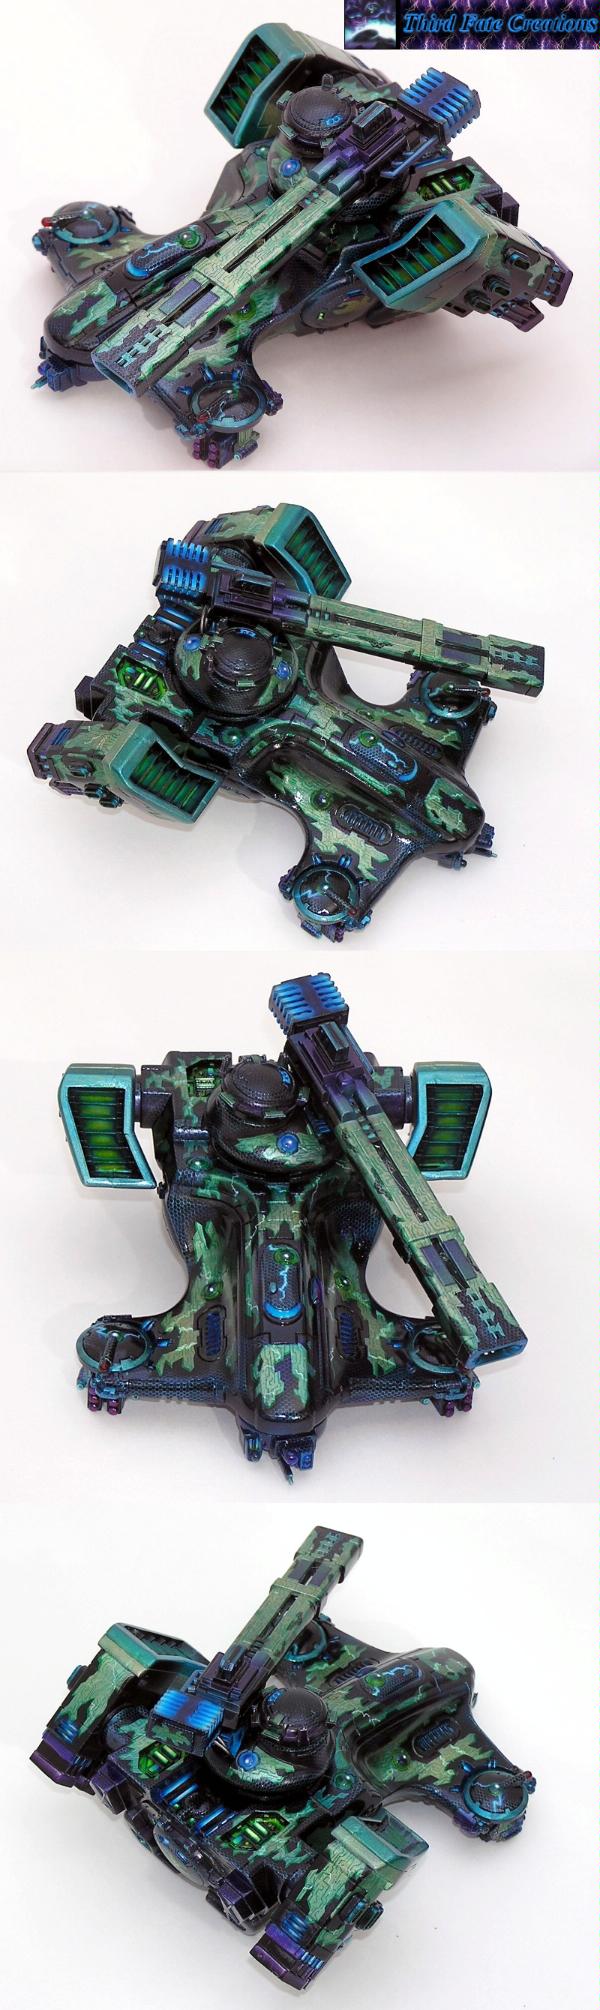

Example hammerhead
1. Prime. I don’t care how you do it but not too thick
2. lay down the base coat. White in my case or else my favorite purple is so dark its nearly black.
3. Mask and paint. Mask with masking tape carefully to block areas you don’t want a general coat applied to. Paint a general coat then remove the mask or remask more of your project depending on your end goal. I often transition from my purple to another blue or something for some eye catching but mask off a few areas of white to paint over later(with red) or leave white. You want to leave the white area for a later color if you want that color to really stand out. Its often easier to push depths darker than lighter with an airbrush.
4. Push the base depth. This means add more layers in areas you want darker. You can always add a bit of white to your color if you pushed to far but be very careful do doing this lest you go pastel. Don’t be afraid to start over at this point.
5. stencil the pattern in
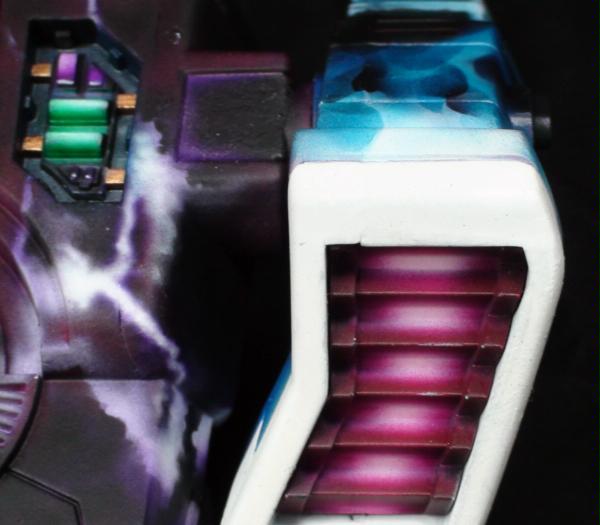
6. push the stencil deeper. I use transparent colors and paint the edges of the stenciled pattern to push the edges into the background. My hammerhead typically takes me 1-2 hours of carefully laying down transparent colors to push the lightning edges back with that aureal glow.
7. Remove any leftover masking tape
8. protective coat. The airbrush layer is so thin its easy to scratch. So I usually add a protective coat at this point
9. detail work. Either repeat above for more patterns and freehand or pull out the brush and wet pallet to finish that fine detail work that only a paintbrush can do. Proper use of stencils can push the airbrushes fine detail limit pretty small though.


Example FW
1. Prime
2. lay down a base coat color
3. use strips of paper and fine sprays to base-coat armor or clothing differently
4. touch up with a paint brush as necessary
5. highlight based on light sources with a lighter shade or with white and then reapply the base color of the light source.
6. finish all the detail work avoiding messing up your OSL or zenithal lighting. You can still push the OSL or zenithal contrast with a brush at this point.
7. seal and finish.

The osl is done by simply spraing up the rear of each FW and then detailing horizontally. All of the OSL rules apply so do it exactly as you would using a normal paint brush. The shadowing and OLS of on the guns, shields armor etc were all done with masking and iarbrushing. other than the lining and basalt these models were almost entirely painted with the AB.


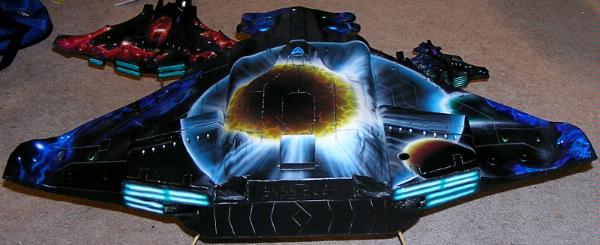
As time permits Ill add quasi tutorials on other painting projects done with an airbrush like my monolith.

Other than the heads of the warriors going into the distance this thing was 100% airbrushed. That includes the fire, clouds, lightning, power crystal and rods... everything. The heads were lined with a paint brush. and quickly because I was rapidly getting sick of doing hundreds of heads all around it. the night-bringer was 90% airbrushed. I touched up his stomach muscles with a paint brush.

Edit:
The image set below shows the progression of the Monolith.(reverse order sorry)
From bottom to top:
--First the base coat. I went red on the bottom to contrast the green knowing as I painted green over it would push the background to black but with a bit more visual interest than just using black.
--I then use stencils I made to put the heads in, the lightning, and I freehanded the clouds.
--I then used more stencils I made to do the skull pile on the bottom perimeter, stencils for the nightbringer, the mountains, and then freehanded the flames, the fog and softened the lines of the nightbringer
--I then used stencils to flesh out the flames and freehand to connect them with smoother gradients and push parts of the flames back. I then layered(picture not shown) and did a second set of flames like the first. Added the eclipse and more detail to the night bringer with stencils and freehand. I used a paintbrush to touch up the stomach muscles and the necron skull lines.
--Finally used stencils to do the pulse crystals, then freehanded a lot of gradients to smooth the entire thing out including the power crystal.
--Then a lot of touch up work and "washing" in the metalic areas of the rear to make them look older.
Then I abandoned the project declaring it done.


If you have questions comments etc please let me know and hopefully we can make this a useful guide.

How to's Ill add later if people desire:
Fire
Lightning
Clouds
light and shadow
Anything else?


[Guide] Airbrushing at the mini scale (long) @ 2009/08/05 22:44:26


Post by: Blightdrone


Amazing tutorial! Amazing models to show off your work!

Welcome to Dakka by the way.

Cheers,

Jack.


[Guide] Airbrushing at the mini scale (long) @ 2009/08/05 22:54:06


Post by: drummerholt1234


Very Nice!


[Guide] Airbrushing at the mini scale (long) @ 2009/08/06 00:25:52


Post by: Michailov


Waow...just Waow.

I'm stunnd


[Guide] Airbrushing at the mini scale (long) @ 2009/08/06 01:26:32


Post by: Soviet Yam


that monolith is just amazing. As are the Tau models. Makes me want to get an airbrush...


[Guide] Airbrushing at the mini scale (long) @ 2009/08/06 01:44:30


Post by: 31rls31


very awsome,your skilled with the air brush....like to see other work besides small scale..like do you do cars (driveable)or anything at a much larger scale?


[Guide] Airbrushing at the mini scale (long) @ 2009/08/06 02:04:15


Post by: tallmantim


Wow

I thought the Monolith at first was a computer generated picture that you were planning on copying! LOL.

Reminds me of a Sandman (http://en.wikipedia.org/wiki/Holden_Sandman - an Australian famous car that was regularly airbrushed on the side panels), although I doubt that the C'Tan are getting much nookie in there!

Love the hammerhead too.

Cheers


[Guide] Airbrushing at the mini scale (long) @ 2009/08/06 04:06:10


Post by: ShawnSum


Could you do a camo scheme?


[Guide] Airbrushing at the mini scale (long) @ 2009/08/06 09:47:14


Post by: shaunmox


they are amazing iv gotta learn that 10/10 on them mate


[Guide] Airbrushing at the mini scale (long) @ 2009/08/06 16:45:19


Post by: atropos907


ShawnSum: Sorry, I personally cringe at doing a camo scheme as it sounds boring. But perhaps I need to take that fault as a challenge to make an interesting camo. Im going to think on that. Basic patterns typically found in camo aren't interesting but detailed pictures for camo, IE trees leaves vines mountains clouds water.... these may be workable If I find the right vehicle for them.

31rls31: the largest I have done was a picture as a background for an army display(and because I was using minis as an excuse to get the airbrush but also told my wife I planned on painting pictures when my skill level got high enough. Here is my first attempt at something larger than mini scale.

Its my first try so eh. It measures about 2-2.5ft wide and its purpose was to try to tie in the variations of paint schemes of my army with a background. Still debating adding a bolt of lightning or not but I think its at the saturation point for buisy.
Part of me would love to paint cars and such because at that scale I think the painting would go a lot faster(may be wrong).


[Guide] Airbrushing at the mini scale (long) @ 2009/08/06 16:53:43


Post by: Moz


I've been dipping my toes in the airbrush waters recently myself and would be very interested in more of your how-tos. I haven't ventured into stencil use yet, just been doing basecoats and gradients across surfaces so far.

I've been doing mine with a dual action gravity feed using GW and PP acrylics mixed with 70% rubbing alcohol at a 7 to 1 ratio alcohol to paint. It makes applying the layers really easy and the paint doesn't seem to clog much at all when it's so diluted (but still dries plenty fast on the model). All of that at around 10-15 PSI to do the tiny little surfaces I'm working with (no vehicles in warmachine!).

I'll post some of my pics shortly here. It's been a really cool experience so far and I'd love to learn more techniques.


[Guide] Airbrushing at the mini scale (long) @ 2009/08/06 16:54:06


Post by: Rossko


Very nice work. You are very skilled with an airbrush. I'm really curious as to how you do all the detail work on the smaller models, seems like it'd be impossible with mine. I just did some base coating on my crisis suit with mine and even with the masking tape it still needs some touchup work with the brush. I'm also very interested in doing a camo pattern since I plan on doing that on my devilfish.

A few things I'd like to add as I've tried to use the airbrush when I can:

Isopropyl alcohol, I use this stuff all the time. I use it to thin my paints and use it at a 1:1 ratio with paint for my airbrush. I've never had a clog issue using this combination and I run it straight through the airbrush when I'm cleaning it after I'm done. In the USA it's usually a dollar for a bottle and available at any grocery or drug store. Don't have any experience using it with non acrylic paints though.

As far as settings are concerned, I always airbrush outside. I understand this is sometimes not possible depending on your living situation, but I've always had either a balcony or patio no matter how small my apartment was. Seemed like too much trouble to try to setup a both or exhaust fan to do it indoors.

BTW I'm currently using an Iwata HP-BC( http://www.iwata-medea.com/index.php/products/hp_bc_plus/ ). My air compressor is a Sprint Jet.


[Guide] Airbrushing at the mini scale (long) @ 2009/08/07 02:22:32


Post by: aflax1


Those models get one million stars for painting.


[Guide] Airbrushing at the mini scale (long) @ 2009/08/07 13:38:04


Post by: Moz


Thanks for posting the WiPs on the monolith. Cool technique starting with red to follow-up with the green over it - I would not have thought of that.

WiP shots of stencils in action for the flames, crystal glows etc... would be great the next time you're putting something together.


[Guide] Airbrushing at the mini scale (long) @ 2009/08/07 21:36:09


Post by: atropos907


The crystal glow was all freehand.
Start by highlighting white at the edges.
use a candy/transparent green to then push the middle in and let slight amounts over spray/diffusive spray whatever onto the edges as you go.

Try looking up Youtube (real OR realistic OR true) AND fire AND airbrush to get the basic techniques. the only difference at this scale is keeping the stupid brush flowing when its cranky(read you did a bad job mixing or cleaning) Though there are a couple tricks at this scale I may be able to convey though they arent anything big.

I will try to remember to take pictures of the painting on my next project. My biggest problem is once I get going just try to stop me to take pictures. I usually only remember when its time to go to bed so only some progress shots get taken.


[Guide] Airbrushing at the mini scale (long) @ 2009/08/07 22:33:15


Post by: bubber


Thank you very much for this.
Great work


[Guide] Airbrushing at the mini scale (long) @ 2009/08/10 16:57:27


Post by: Rossko


Thanks for the update Atropos. If your looking for more how to ideas, how about something along the lines of a newbie's guide to stencils. As much reading as I've done on airbrushing and the like, I really don't know anything about stencils


[Guide] Airbrushing at the mini scale (long) @ 2009/08/11 14:00:28


Post by: Moz


A tidbit I've read recently was to avoid using Rare Earth Magnets until after airbrushing, as the paint will be affected by the magnetic field and will ruin your work near the magnet.


[Guide] Airbrushing at the mini scale (long) @ 2009/08/11 18:36:58


Post by: atropos907


Moz wrote:A tidbit I've read recently was to avoid using Rare Earth Magnets until after airbrushing, as the paint will be affected by the magnetic field and will ruin your work near the magnet.


This is actually an interesting point. You have potentially ionized particles flying out of the brush interacting with a magnetic field. ooh swirly!
Ive not noticed a significant effect but Ill keep an eye out and probably do a few experiments in my infinite spare time.(while sarcasm on the time aspect I really will try to do this experiment) Do you have a link to this article? im curious how the chemistry of the paint may be a factor, IE enamels vs acrylics as an acrylic rod seems much more willing to play electron swap.

Thanks Moz.

Another effect Ive noticed lately is using purity seal mat. This stuff is horrible as it builds surface structures that collect dust. Anyone know of a good mat finish you can paint over but doesn't collect dust like mad in 2-3 coats?


[Guide] Airbrushing at the mini scale (long) @ 2009/08/19 19:32:08


Post by: atropos907


Fateweaver wrote:Airbrushes, with practice, allow some amazing things to be done at ANY scale.

This Skyray and the Monolith are very good examples. I'm getting back into airbrushing myself and even for just a simple paint scheme (traditional colors, markings, etc.) the airbrush is SUCH a time saver.

Best use for an AB in Warhammer scale is basecoats. I can basecoat a LR with a single coat of paint in 3 minutes....it would be around 15 with a GW tank brush and look like crap compared to the smoothness of airbrushing.

I hear people say it's cheating. It's not cheating, it's working smart instead of working hard. I could achieve AB smoothness with super reduced paint and a brush (like the French do) and it'd probably still take 15 mins. Would look smooth as silk but for something as large and flat as a LR why put in so much effort. I'll take the time I save and use it as extra time alloted for when I do pull out the old stick and hair brush....


Fateweaver brought up an interesting point in another topic.
Is airbrushing cheating. It is indeed more expensive. Yet, in life, time is money. You spend more time on a project for cheaper or you spend more money on it to get it done faster. This doesnt always hold true but its a general rule.

Is airbrushing cheating. If the goal is to paint with a paintbrush then yes. If it is said to be cheating because it requires no skill then I challenge you to show off how easy something is with an airbrush vs a paintbrush. Ok I challenge you anyway because I want to see the cool stuff you figure out. Its an art just like a paintbrush requiring some similar and some different skills. But seriously, it is not only falsely elitist to say you have to use a paintbrush, its silly. use what your comfortable with or desire to use. If I can generate two identical products via different methods does it matter which was used?

One should be careful of Paradigms as they lead to stagnation and can limit creativity and productivity. Look at the assembly line. one of the most popular breaks in paradigm that changed a lot. Or look at communication. in the past people made plans, now they have cell phones. Without one its hard to get stuff done now days because the paradigm has shifted. It makes some things so much more efficient. I personally think it was a huge hit against our social structure to have too much on demand right now reducing our ability to plan and wait, but that's another rant.

I personally think that the goal in painting is to get a nicely painted model in the minimum time possible for minimal expense. The startup for an airbrush is high but frankly you can use the same paints as normal and I believe waste a comparable or less amount than you would using a wet pallet. Although I challenge myself not to use a paintbrush on a model I can almost never meet that goal(thus far) because some fine detail work is just too difficult for my current skill level.

Therefore what makes the most sense, if you have the resources and patience to learn, is to use each for what their strengths are to minimize time consumption and maximize product value(pleasing to my eye is my measurand) and I hate seeing brush strokes. on all but the absolute best, if you look closely you can usually see them. granted the bane for the AB is over spray and splatter.

[To be inserted into article]
How to paint glowy effects. example on a vent.

1. I paint the rest of the model first, this is a detail and so should be saved to ensure the color looks right with your base color.
2. I typically base the bit-to-be-glowy white, it needs to glow. All areas that will exhibit scattered light should have some degree of white sprayed on them. the source should be pure white while the scattering surfaces should be faint white at the level of the darkest part of the source and then going darker.
The order of the next few can be reversed depending on the thickness/transparency of your layers


3. use a mask, held by hand, tape, or the object features and spray the next darker color(bright/light pink,purple,blue,green etc) such that one side is colored but the source of the light stays white, we can push this color in later once we see the overall effect.
This image shows a mask to protect the base paint job. using either thicker layers or darker paints as you go change the angle your spraying so that the inside is brightest and the outside near the edges is darker. If you want more complicated lighting look at such an object to see where scatter and surface reflections show up and spray accordingly. Admittedly, it is equally easy to airbrush and hand brush these parts to the same effect. I just use an airbrush to challenge myself.

4. Same as three but increase the sheer angle at which you spray the next darker color so you get a transition from white through to the darker and darker colors.


This image shows both the intake but also further up you see the glowing green "energy rods" done via the same method but in reverse order.

5. Optional: If you want it to really pop beyond what your current AB skill level allows then you can adjust the magnitude of the gradient, go with nonlinear gradients, or go back with a paintbrush and make sure that white is white and the darker shadows are as dark as possible. Again use a wet pallet and layers as with normal blending lest brush strokes ruin your nice paint job.

[end later insertion]


[Guide] Airbrushing at the mini scale (long) @ 2009/08/19 22:31:24


Post by: Rossko


The cheating argument doesn't seem very valid. If there's a better tool or method of doing something, it's worth looking into. You don't see people trying to hand paint in weathering and shading where a wash would work. Although money is an issue for everyone (good thing I got my airbrush before I got into 40k).

Thanks for the update, keep them coming. I'm looking forward to using this info to work on my devilfish soon enough. I'm really curious as to what you use for masking? I've used painters tape a little bit on my crisis suit, wondering what you use and what you use for stencils (and where to get some). Either way nice work, can't wait to see more.


[Guide] Airbrushing at the mini scale (long) @ 2009/08/21 12:51:13


Post by: Moz


Awesome update. Feeling empowered to try some new tricks out.


[Guide] Airbrushing at the mini scale (long) @ 2009/08/22 18:43:53


Post by: Cosmic


I was just thinking about this...

atropos907, have you ever considered using a liquid rubber masker when masking areas of a model? They're really good stuff. I personally use this stuff made by Humbrol called "Maskol". However, I have heard it said that CopyDex works just as well, if not better in fact. It enables you to keep things neat and tidy, and they peel straight off... In fact, Maskol is actually intended for masking areas of a model during spraying/airbrushing. I have mentioned this because it just seems really awkward cutting out masks and stuff... liquid rubber maskers would make more use for your projects than mine! (For now, that is...)

P.S. Maskol DESTROYS brushes, but rubber chisels (used when working with clays and Epoxy Putty, I think) work quite well, although they don't hold as much of the stuff. Saying that, it dries to a flexible film pretty fast. The alternative is to use really cheap brushes, so that they can be disposed of when done with. Cheers!


[Guide] Airbrushing at the mini scale (long) @ 2009/08/23 06:25:33


Post by: Kanluwen


Silly question for you, Atropos...

My parents got me a nice airbrush(a Steener and Hardbeck Evolution, very nice) and compressor for my birthday, but I'm hesitant to use it right now as I can't get the mix to a level I'm comfortable spraying.

Just how thinned out should I have my paints for spraying?
Right now, it takes .02 seconds for the mix to run down the side of the bottles I've stored/mixed them in.

Any tips would be very much appreciated, holding off on doing my Sentinels until I get an answer from you


[Guide] Airbrushing at the mini scale (long) @ 2009/08/23 06:35:37


Post by: Fateweaver


Check this vid out for tips on paint consistency.

It should run almost like water.

Good site for lots of airbrush tips and techniques...hours worth of video. Tony D and Ed Hubbs are very good at what they do.

http://airbrushtricks.com/start/airbrush-videos/22/437-thinning-your-paint.html


[Guide] Airbrushing at the mini scale (long) @ 2009/08/23 18:38:37


Post by: atropos907


Cosmic wrote:
atropos907, have you ever considered using a liquid rubber masker when masking areas of a model? They're really good stuff. I personally use this stuff made by Humbrol called "Maskol". However, I have heard it said that CopyDex works just as well, if not better in fact. It enables you to keep things neat and tidy, and they peel straight off... In fact, Maskol is actually intended for masking areas of a model during spraying/airbrushing. I have mentioned this because it just seems really awkward cutting out masks and stuff... liquid rubber maskers would make more use for your projects than mine! (For now, that is...)

P.S. Maskol DESTROYS brushes, but rubber chisels (used when working with clays and Epoxy Putty, I think) work quite well, although they don't hold as much of the stuff. Saying that, it dries to a flexible film pretty fast. The alternative is to use really cheap brushes, so that they can be disposed of when done with. Cheers!

I have heard of it but not tried it. I havent bothered because Ive been forcing my freehand and freehand stencil practice.

This stuff seems useful for a few purposes.
1. you can mask and know your mask wont move. alignment can be a pain on multiple masks.
2. by the look of it you might be able to print off a transparency of a picture and then mask it with this stuff, cut it out and lay it up on the model transferring the intricate pattern if your careful enough. sounds incredibly useful for that but again Id rather practice my freehand stencil use as im trying to waste as little time on stencils as possible and with the right base set of stencils you can do almost anything. But I can see projects where this would be invaluable especially for huge complicated projects where your afraid of messing up your previous layers. You may want to consider a dull coat here and there to protect before applying this stuff..

Thanks for mentioning that Cosmic.


Fateweaver wrote:Check this vid out for tips on paint consistency.

It should run almost like water.

Good site for lots of airbrush tips and techniques...hours worth of video. Tony D and Ed Hubbs are very good at what they do.

http://airbrushtricks.com/start/airbrush-videos/22/437-thinning-your-paint.html


The thinning your paint video is missing.
However this brings me to an old rant. "like water' "like milk" I hate these descriptors. It took me a long time to figure out WTH. But ive used this site a few times and agree it has some great tutorials .

[to be inserted into article]
Sites I visit when im stumped or want some inspiration
http://airbrushtricks.com/
http://www.airbrushtechnique.com/
http://www.howtoairbrush.com
http://theairbrushforum.com/
[end to be inserted]


Kanluwen wrote:Silly question for you, Atropos...

My parents got me a nice airbrush(a Steener and Hardbeck Evolution, very nice) and compressor for my birthday, but I'm hesitant to use it right now as I can't get the mix to a level I'm comfortable spraying.


Your right, that is silly. but not for the reason you might think. First Congratulations and happy birthday! I hope you learn to love your airbrush(but have a healthier relationship with it than I do) Its silly because
If your hesitant to ruin a model there are simple solutions.
1. Strip the model and try again. Ok I hate doing this but airbrush paint is so easy to strip. Assuming you haven't clear coated it. Then it can be harder.
2. Get your old toys or funny shaped objects you dont care about and practice on those. then see 1 and try again till you have the technique down.
3. Go to craft/toy store and buy realy cheap toys or wooden blocks/shapes at the right scale to challenge yourself.
4. Go to a hardware store and buy for sale signs(cheaper is better) for like a buck for a square foot and practice techniques on those. you can be lazy about cleaning these and scrub them with soap, water, and a sponge(not the dish sponge lest you like eating paint).
5. Go to craft store and buy construction paper or just colored paper and practice on that.

If your willing to invest the time there is no excuse for not having surfaces to paint. (other than not being able to spare 2 dollars) I recommend practicing on materials similar to what you want to paint as paint will behave a bit differently from metal to paper to plastic. primer helps to normalize this but dont waste primer on these practice pieces till you get somewhat competent.

Kanluwen wrote:
Just how thinned out should I have my paints for spraying?
Right now, it takes .02 seconds for the mix to run down the side of the bottles I've stored/mixed them in.

Any tips would be very much appreciated, holding off on doing my Sentinels until I get an answer from you

Dont hold off. Practice and experiment(with small quantities of paint) I usually use 2-5 drops of paint for any color session and equal or greater quantities of thinner.

For paint consistency my article states my "can see a bit of metal through the sheen of paint" test in the paint cup when you swirl it around. But pigmentation density plays a role and this changes on paints. basic starting point thin 50 50. if it wont spray for more than a second thin more. However it may not be that simple...

[to be inserted after editing]
Clogging:

To start. my wife just reminded me this and paint consistency were what I @$#%'ed about the most when I started. clogging is infuriating.
Questions for you. Ill answer anyway but im curious.
1. what is the length of your air hose and ID.
2. what is the end hose pressure
3. do you have a tank
4. what is your nozzle size
5. Im hoping its a gravity fed AB(evolution solo or one of those grav fed variants?)
6. what paints are you using
7. what are you thinning it with.


Clogging can be caused by any number of things. Here are some things to consider.
1. Paint must be of the *correct* consistency for the nozzle size and pressure used. This just takes practice to figure out. Starting thinner usually helps and thicken up to what your comfortable with. This approach helps prevent initial clogs. If your paranoid start 3:1 thinner to paint. Be warned these coats will likely have to be very thin.

2. Airflow/pressure. If you have no tank then you may be getting variations in pressure and this makes spraying fine sprays really really hard. You start spraying but pressure starts drooping even 10% and that causes a clog and it gets worse from there. Solution: Air tank. See above about overheating your compressor if it wasn't designed for an air tank. 2. airhose. adding an extra airhose of sufficient length and large enough ID will act as a cheap air tank(low volume). Pulsation can also cause clogging. Tanks help this too as do longer airhoses. However too long an airhose will cause laminar flow resistance to be so large that there will be a notable lag in pressure drop before the compressor can kick in. This lag also will cause the steady state(continual spraying) end hose pressure to be lower than what the compressor tries to hold pressure at. Ideal brush pressure Is often 15-30PSI depending on brush and nozzle size.

3. dirty needle. Be sure your CAREFULLY cleaning that needle frequently when using acrylics.

4. Bad paint. sometimes thinning isnt enough, you may have to filter for the smallest needle sizes. Dont let it sit in the gun too long. I often stir my paint in the cup every couple minutes to be sure it isn't sedimentation. Filtering reduces the need for this for cheaper paints. Buy airbrush paints to make your life easier here. Just a few colors at first. White, black, and 2 others you like.

5. damaged needle: will reduce the Venturi effect if bent and not pull the paint out as easily thus more prone to clogging. Also if the needle is left to sit in water or some chemical it may start pitting. Also if you aren't nice to it when you clean it you may scratch it. any defect will reduce the Venturi effect or the paint flow ability over the needle.

5. Once you clog it you have to do a good job of unclogging it because some solids may still be hiding in the nozzle. meaning you sometimes have to take it apart and clean it though generally just the nozzle and needle. See article for how to clean(Qtip, and IPA or water, IPA is better. Acetone if you must be be careful, some AB parts don't react well to acetone. Ahh the time Ive wasted not clearing a clog properly. again be VERY CAREFUL not to damage your needle. Ive bent two. They can be straightened but you will notice a difference in performance.

[end insertion]

Please answer the questions at the beginning and Ill respond if I can think of anything else that may help. But be patient. this was the biggest obstacle for me and once you figure it out things start going great from there.

Also Life is a classroom. Any lesson you fail to learn or retain will be repeated. I still occasionally have problems with not properly clearing a clog and wasting 20 minutes fighting the AB.

Great question thanks!


[Guide] Airbrushing at the mini scale (long) @ 2009/08/23 19:40:03


Post by: Kanluwen


Braided hose complete, 9 ft. with quick coupling nd 2.7, connection 1/4 inch is the hose I'm using.

Not sure on the end hose pressure(how would I find this out?)

No tank, but I've done some tests with the compressor and it's a consistent 28-30 PSI(28 if the hose gets tangled up, 30 otherwise).

It is an Evolution 2 in 1, and I've been using the .4 mm nozzle.

For paints: I've been using a 50-50 ratio for the Games Workshop paints, but when I tried spraying them with that ratio it seemed to build up in the nozzle and when I removed it to clean the build-up, all the paint was basically just dripping from the paint cup.

What would you say is causing that?


[Guide] Airbrushing at the mini scale (long) @ 2009/08/23 20:40:35


Post by: atropos907


For end pressure you would need a pressure gauge but that's not that important with short hoses. 9ft is fine.

You can tell if there is pulsation by spraying water or very thin paint in the finest smallest spray possible over paper. if its continuous then your pulsation is likely inconsequential.

Nozzle size is good.

OK, GW paints aren't great for AB'ing. Ive had some that I can thin down fine but others wouldn't spray well. I suspected it was because they were old.
On this point I suggest trying createx or badger as they are fairly cheap and flow well out of the bottle.

Removing the nozzle with paint in the cup is a no no. it will just drip out because the nozzle is no longer there to stop it. but unless you have a clog inside the nozzle the buildup on the needle just outside the nozzle can be cleaned with a wiping/rolling action of a wet or IPA'ed Qtip. roll and wipe such that the needle does not get bent. Gentle wipes will do. The same action with a very soft toothbrush works aswell.

But ultimately the use of acrylics makes airbrushing harder as it will build up on the tip faster than other paints. but its non toxic.


[Guide] Airbrushing at the mini scale (long) @ 2009/08/23 20:53:57


Post by: Kanluwen


See, I thought like you did that it was the paint being old, but I tried it with some brand new pots that I shook up as well as I could before trying.

Just makes me very curious, as I haven't really been able to find good matches outside of their range for the specific colors I'm planning on for my Cadians.


[Guide] Airbrushing at the mini scale (long) @ 2009/08/23 21:05:06


Post by: Fateweaver


Very good summary atropos907....

I stated more or less the same in another thread.

For basic color get the Createx paints. I use mostly the Autoair brand. Price sounds staggering at $7-9 for a 4oz bottle but thinned out (I normally go 3:1 paint to reducer) you will be able to do around 24 baneblade sized vehicles before needing to buy more.*

Also, try the Wicked series of paints from Createx. Smallest you can buy is 16oz and at around $17 isn't cheap but damned if you'll go through that much in any short time.

*Well, maybe not that much but if I had 24 baneblades lying about I'd for sure test that theory and let you all know but I'm sure it's close. My AB has a 1/3 oz cup and I can do an entire LR (single layer) before I need to refill so in theory around 17 LR's per 4oz bottle of paint.


[Guide] Airbrushing at the mini scale (long) @ 2009/09/02 18:13:42


Post by: atropos907


Been away a while scratching models rather than painting.
here is some progress on my tau armada.


I went to the hubble site and got some deep field images and other nice shots, and finally decided on nebulas after some experimenting.
I then printed off some nebulas, to scale, and then cut out the most notable features. Gently airbrushed these as reference markers and then went crazy freehanding with a few random stencils for assist.

[To be inserted later]

Stars:
Stars are done in two ways.
Far off, weak stars are done by the following steps
1. changing the consistency of the paint based on the size stars you want.
2. using a double action airbrush pull the needle back a certain distance a couple times to "wet" the needle. more pulls equals more paint on needle. further back gives larger globules faster.
3. Mask off areas you dont want to get stars with freehand stencils or paper.
4. holding the AB 10-30cm (depending on dispersion desired) gently depress the air action to speckle the model.

Stronger diffusive and diffracting stars
1. make dots just as they teach you in AB 101. get close and apply air then pull paint action back as you pull the airbrush away.
2. use a mask and do the same to get your nice sharp diffraction spikes. (see monolith and skyray for examples)

[End insertion]

Now for the monumental task of painting the manta. Suggestions always welcome in imagery colors theme etc.


[Guide] Airbrushing at the mini scale (long) @ 2009/09/02 22:40:05


Post by: ZeinEizoku


That looks AMAZING, I like the way they have a camouflage for space look with the red Nebula and stars you have on it.


[Guide] Airbrushing at the mini scale (long) @ 2009/09/04 04:52:39


Post by: Fateweaver


Look forward to the big one getting done.

I'm still waiting on my doors for my LR and found out I need to order the sponson assembly sprue for the LRR/LRC as the sponson weapon mounts for the regular LR won't work without some butchery and I'm not gonna butcher a model I intend to make a showcase out of, just need to order the sprues next week when I have money. Hope in 2 weeks to have pics of the completed LRR done in the airbrushed style


[Guide] Airbrushing at the mini scale (long) @ 2009/10/19 21:42:14


Post by: atropos907


I realized some of the more updated pictures of the spacecraft were not inserted in here.
And I figured Id take this opportunity to discuss a couple of the techniques used, again for later insertion.


The manta got painted after a great deal of work, and is still not done.
I first traced it out on paper, a lot of paper was taped together to get an area big enough.
Then I drew in the largest features on the paper for cutting out and reference using mainly a ruler.
I then drew in what I wanted to paint, which in this case was a nova whose shock wave is hitting several terrestrial bodies(unrealistically close together) and the point of view is behind one of the planets as the shock wave hits it.

I then pondered a lot over the order of operations and then cut out planets, shock wave etc as individual masks, bot positive and negative. making sure to number each and alignment markers so that adjacent masks can be set next to each other again and fit properly. I used tape to hold the masks together and to the models very gently adhering them so I wouldn't remove paint or destroy the paper mask.

=="bright white lines" or explosive streaks
Are done simply by streaking from the center of the explosion out. The planet was masked and the outer ring of the explosion and beyond was masked to contain the streaks.

==Planets
I negatively masked the planets so that paint would only hit the planet then worked with gradients from the brightest to darkest being sure to transition through a couple colors rather than going straight from bright white to 1 color to black.

==Planet cracks
Are free handed just like lightning with freehand stencils for selective edges.

==nebulae
I either drew or printed nebulae to scale and then again agonized over which were the most notable or highest contrast features and then cut them out again numbering and drawing alignment markers. Then I would work my way from darkest features to brightest features in multiple layers and colors frequently using multiple stencil pieces to mask the desired areas.

==stars
were then inserted as mentioned before using select masks to protect planets and other objects that should not have stars in their foreground.


[Guide] Airbrushing at the mini scale (long) @ 2009/10/19 22:06:18


Post by: Cosmic


I think that I know what you're getting at. I'm sure that this would come into great use for hard-core airbrush painters. But hey... It looks fantastic!

My favourite area on the model is where the supernova and larger planet are facing eachother. The blending cold/hot colours look unimaginably realistic. Well done! Imagine what an imperial navy pilot might say...

*Notices something outside the front windows*

"Cap'n, we're doomed!"

"What is it Jenkins?"

"The supernova blast will kill us all"

"What 'supernova blast'... We haven't even left for orbit yet! Oh, hehe, that..."

*Faints*


[Guide] Airbrushing at the mini scale (long) @ 2009/10/22 11:06:10


Post by: Natorum


Thanks for some awesome work on these tutorials. I bought an Iwata airbrush and compressor kit a while ago that I haven't used for much but I'm definitely going to get practising now.


[Guide] Airbrushing at the mini scale (long) @ 2009/11/17 18:44:20


Post by: tekk_45


Very good tutorial! Sharing information and techniques is what makes this hobby different from all the others. And once again thanks for the comments on my tank.


[Guide] Airbrushing at the mini scale (long) @ 2009/11/17 21:10:41


Post by: atropos907


As I don't have my tutorial file on me I'm just adding notes for later in this post after having answered another post on this topic.


***begin insertion

<<over thinned paint/ runny paint/ too heavy coating/ ahh crap my airbrush just exploded on my work.>>
Yea this #$ks and it happens when you really don't want it to.
Solutions:
1 Back off on the thinner. Thicker paint will adhere better, assuming your coats aren't too thick.
2 spray multiple finer coats. As with brush painting multiple finer coats leads to a much better looking finish.
3 After spraying and saying "ah @#$" pull the brush further from the work and depress the air only to accelerate drying without pushing the watery stuff around.

if your fast and the paint isn't drying very quickly you can
4a have a very lightly damp cloth(very soft so as not to scratch paint unnecessarily) to wipe up the wet paint and just have to repaint that small area again.
4b stop flowing paint but increase the flow of air to blow that wet stuff to the underside of the model or some place where it will collect and you can wipe it up.

I do A fairly often with a wet Qtip and b if there is a region right next door that doesn't have its final coat yet.


<<Wet Paint effects>>
Wet paint can be very useful for some effects. Ive been playing with water drops, simulated corrosion, dirt splatter etc by using intentionally over thinned paint and spraying too much on the object.

***End insertion

Im also looking back at trying some Camo's. I generally avoid them on principle(boring) but lately looking at Tekk's post and then doing a lot of camo research Ive found a few that may interest me that I may be able to get away with adding my typical "flair" to
Though my favorite, and least likely to implement, camo idea is a land crusader with orcs painted on it saying, "nodt tis waih! Shuut De Oter Waih Rokk Brain" and "Deyr Rit B'Hynd YUUU!!!"


[Guide] Airbrushing at the mini scale (long) @ 2009/11/29 06:31:17


Post by: jabbakahut


I was looking for some good tips on starting airbrushing, thanks! Can't wait to start.


[Guide] Airbrushing at the mini scale (long) @ 2009/12/05 03:02:18


Post by: atropos907


I thought Id use my tempaltes as practice pieces.


Skulls.
Skulls are easy depending on the level of detail you want. very basic. just cut it out as a stencil and spray.
See the top skull as an example

level 2.
gently spray the edges of the stencil as a guide
Then set the airbrush to a fine line and paint in ridges of the head, brow, jaw etc with dark or light colors depending.
See green skulls, especially right most as an example.

Level 3
repeat level 2 then use fine stencils to add fine detail to the skull as necessary
I have practiced this on paper but did not put it on anything of value yet.


[Guide] Airbrushing at the mini scale (long) @ 2009/12/05 05:13:48


Post by: ZacktheChaosChild


Amazing air brush work man.


[Guide] Airbrushing at the mini scale (long) @ 2009/12/05 07:10:57


Post by: mstersmith


Damn I need to spend some money on a good air brush


[Guide] Airbrushing at the mini scale (long) @ 2009/12/05 08:37:02


Post by: jabbakahut


I really like that true flame, how do you do that?


[Guide] Airbrushing at the mini scale (long) @ 2009/12/05 15:41:02


Post by: atropos907


I haven't and probably wont bother to do a Fire tutorial as they are so incredibly abundant online. The techniques are almost exactly the same as the videos Ive found. You just probably have to clean your tip more frequently given the low airflow and use of acrylics.
Youtube has a lot of good basic tutorials. using a subset of the set {airbrush, true, fire, real*, water drop, torn metal, skulls, lightning, etc etc etc}


[Guide] Airbrushing at the mini scale (long) @ 2009/12/09 02:18:59


Post by: Fateweaver


Google search for a man named Mike Lavalee; he makes the best looking flames on Earth; he in fact coined the phrase "true fire". His flames look like they'd actually burn you.

Best paints for making bright, realistic flames are Eurathanes but they are very toxic and a lot harder to clean up than acrylics so only spray them outside, not in your house/apartment. House of Kolor are the most popular eurathane paint.

No landraider guys, it got sold to a friend and I was too lazy to paint it. In fact I'm bout to order up a 2nd airbrush with a larger nozzle. A max line of .5" is good for some things but not tanks. (though still faster and better looking than basecoating by hand).

I might try to find something to airbrush when I get my new one, just not sure yet. My Tau I'm starting are going to be painted up like M.A.S.H units...OD Green, red and black. Nothing exciting. My 'Nids I might airbrush but so far even the MC's haven't been too horrible with just a normal brush.


[Guide] Airbrushing at the mini scale (long) @ 2009/12/09 03:06:28


Post by: Kanluwen


Honestly Fate, you should just grab the GW spraybrush and an adapter to hook it up to your compressor.

Best $45ish I spent.


[Guide] Airbrushing at the mini scale (long) @ 2009/12/12 21:28:35


Post by: Fateweaver


I prefer real airbrushes. Spray gun seems too gimicky and for a little bit more I can get a dual action airbrush that can go from hairline to 2" spray (and for 40k vehicles that still allows a LR to be base coated in around 5 minutes).

For $50 I can go to Home Depot and get a spray gun that I can hook to my bro's 120G compressor and do a spray pattern up to a foot wide (though even a Reaver doesn't need that much paint).

I love my Badger, it just paints too narrow of a line to effectively basecoat with it.

Mayhaps I'll hit up one of my Trygons or something with the airbrush. Soon as I get something going I'll put up pics and start a new thread.


[Guide] Airbrushing at the mini scale (long) @ 2009/12/14 01:10:49


Post by: atropos907


Fateweaver wrote:I prefer real airbrushes. Spray gun seems too gimicky and for a little bit more I can get a dual action airbrush that can go from hairline to 2" spray (and for 40k vehicles that still allows a LR to be base coated in around 5 minutes).

For $50 I can go to Home Depot and get a spray gun that I can hook to my bro's 120G compressor and do a spray pattern up to a foot wide (though even a Reaver doesn't need that much paint).

I love my Badger, it just paints too narrow of a line to effectively basecoat with it.

Mayhaps I'll hit up one of my Trygons or something with the airbrush. Soon as I get something going I'll put up pics and start a new thread.


A few things
Sprayguns have their uses and if you just want a base coater Id say buy a sparygun(GW). . Or if your brush allows buy a tip, nozzle, and needle for your current brush. I currently have several sets. I like the infinities many nozzle sizes .15 to .5.
Buying another airbrush may be wise for the scale you want to paint but Id consider if its better to get a larger more expensive airbrush, get a needle set, or just buy a cheap spraygun for basecoats.

I basecoat with a .15 needle It just takes a while but its a nice smooth coat that takes many fine layers. I have absolute controll as long as I have the patience. When I dont I use a larger nozzle.


Automatically Appended Next Post:
Given the number of questions ive had about Camo patterns I figured I should try some again.
But I hate camo as I feel its fairly boring and unimaginative. I figured Id try some Camo's as its one of the more common requests for mass painting commissions. But they are so painfully easy that I would suggest anyone wanting them just do it themself.


Its messy as I did it in under 5 minutes to see how things turned out, hence the blue(transparent) is not uniform and there are some slight burrs from overspray. If I were to Camo something Id use opaques rather than trans parents, then paint light to dark or dark to light. but opaques seem necessary to cover the previous layer and get uniform patches. I just used trans parents as they were easily on hand while I was working on another project.

For scale reference, the total width of this image is about 8 inches.

Again for a specific tutorial search the net for {airbrush, camo, kamo, etc) While some like to point to a particular artist I would say don't limit yourself and look at all artists who post such youtube tutorials. You can always learn something if your willing to try. Even from the less spectacular artists. I

I may paint one of these on something but frankly every model I see I see things more interesting than camo to put on it. Camo is practical, but if your really wanting to make cammo for the most likely table top game you will primarily use colors seen on the table top. IE olive, greyish black, ash grey, and a bit of light beige or off white. Although I found a better camo scheme is to paint the fire magnets really bright and big but leave things like the stealth suits or the more underestimated units darker and closer to table colors so your opponent notices them less often.

The types of camo tried here are Left side, 2 Tau inspired schemes. I would scale the smaller patches up a bit next time.
Top right- Digital, Next time I would take the time to ensure proper horizontal and vertical alignment of stencils.
Bottom right- Winter camo. I like this one best of all but probably because it is closest to Dazzle and lightning which are both more interesting to my eye.

Suggestions, comments, and questions for the tutorial are always encouraged. Thanks everyone.


[Guide] Airbrushing at the mini scale (long) @ 2009/12/14 07:17:24


Post by: Fateweaver


GW spray gun seems too gimmicky. I find most of their stuff is like buying a Cadillac auto. Overpriced due to name but not made any better than a Ford or Chevy.

I'm going to try again to use my fine line airbrush. In case anyone is interested Createx now has their wicked line in 2oz bottles (down from the 16oz minimum) and have detail colors which dry flat and have a few shades that are more natural (like ochre yellow and 2 different umber shades and some greys).

I might order up the Ochre yellow. I hope my damn RP order gets here soon. I hate not painting due to 2 week long orders (yeah, postal strike in the UK right now is fething up shipping).


[Guide] Airbrushing at the mini scale (long) @ 2009/12/16 03:42:19


Post by: atropos907


Ok,
This time I spent a little time on some camo. Unfortunately I dont have camo colors so I had to mix all but three of these colors hence the colors may be a little off of "traditional"


The basic premise is simple.
Spray the base coat, the most dominant color, and often the lightest color.
This is so that as you spray darker colors on top they hide any overlap, or at least make it less noticeable. This will be a function of your planning and of the opacity/number of layers you apply for each color.

Next spray one of your larger patterns being sure to not overspray, let the stencil lift up, etc. Masking tape helps here but will often remove paint. Thus low tack frisket is useful or hold that mask down well and spray light coats.

Next spray your smaller patterns, and so forth, going darker with each color so overlaps are hidden.
Yes these don't look great but, I sprayed it on paper and I did a single coat meaning some under spray occurred and the paper bled out some of the watered down colors. If I cared about the paint jobs I would have done at least three layers for each color to give a nice clean, uniform color.

As for stencils, find images online, print reduced, cut and spray. Paper wont last as long. Transparencies work ok but are harder to cut. plastic sheet protectors are easy to cut but aren't very rigid so allow for more under spraying and are harder to hold down( but conform more to surface features) The trade offs are up to you. Frisket is great but slightly expensive. Some of these I found online others I just made up. The stencils for each square is found in the corresponding square at the bottom of the picture under the airbrush(included for scale)

There are two basic techniques for this.
1. just lay the stencil and spray copying the pattern directly
2. lay the stencil, spray parts of it, move and spray again to get more randomized patterns
3. freehand roughly what you want and use the stencil to flesh it out. I tried all three in the various sets. The browns and yellows being this third set, as it shows since I was lazzy about confining my spray before stenciling.

Also, there are tricks to starting your spray on the stencil and angling toward the work so that the stencil is held down by the air flow rather than wanting to lift.
I got tired and lazzy when I started doing the browns and yellows so you can see how sloppy those got. Take your time and have fun!


[Guide] Airbrushing at the mini scale (long) @ 2009/12/16 04:30:34


Post by: Fateweaver


I just ordered up the Badger Patriot...it's gotten really great reviews.

It's basically a gravity-fed Anthem 155. Will go from penicl wide to 3" spray. Should arrive on my doorstep hopefully by Friday but thinking probably Monday.


[Guide] Airbrushing at the mini scale (long) @ 2010/01/03 18:00:30


Post by: cssj


wow


[Guide] Airbrushing at the mini scale (long) @ 2010/01/04 21:49:37


Post by: atropos907


I figured I should put a note in here
Ive begun cleaning up and compiling the tutorial on my website
http://sites.google.com/site/thirdfatecreations/tutorials-1

I will still check here for suggestions and questions and will eventually post an article on the dakka site covering the same thing, when I get around to it.
Just so i am not limited to the topic of aribrush tutorials Ive transferred most of my activity to my blog dakka.

Thanks for all your suggestions. Keep them coming if you come up with more.

I have a few simple video tutorials ready to post that are waiting on me to just buy the stupid software so the watermark will disappear from the first minute of the vid.


[Guide] Airbrushing at the mini scale (long) @ 2010/01/05 02:32:39


Post by: jabbakahut


Awesome, thanks for the contribution!


[Guide] Airbrushing at the mini scale (long) @ 2010/01/05 18:24:09


Post by: atropos907


I just uploaded a Pdf tutorial on gems
I hope you like it.
http://sites.google.com/site/thirdfatecreations/tutorials-1


Consider ThirdFateCreations for your titan painting "needs"


[Guide] Airbrushing at the mini scale (long) @ 2010/01/05 18:37:59


Post by: Fateweaver


Great tutorial.

I find urethane candy colors excellent for blending. Just use them in a well ventilated area unless you like to be high as a kite while airbrushing (not recommended as the headache it causes is killer).


[Guide] Airbrushing at the mini scale (long) @ 2010/01/05 21:14:37


Post by: atropos907


Sigh,
Fateweaver stands proud to all those out there as a reminder.
SPRAY SAFELY (ok that sounds a little wrong)

Always wear your respirator even with acrylics.
If using uro's then be very very safe and very well ventillated. Organic solvents are not good for you.


Automatically Appended Next Post:
And now the lightning article is up.

http://sites.google.com/site/thirdfatecreations/tutorials-1


[Guide] Airbrushing at the mini scale (long) @ 2010/01/05 22:45:47


Post by: jabbakahut


Excelent, can't wait to paint my Reaver.


[Guide] Airbrushing at the mini scale (long) @ 2010/01/05 23:22:44


Post by: Kanluwen


Atropos, have you considered sending in these tutorials to a modelling magazine?

I know that Fine Scale Modeler has just started acknowledging that Airbrushing is something that really needs to be taught for modelers(of all shapes and kit varieties )--and they might be willing to set it up so that they're hosted for free as a professionally compiled PDF with you credited.

Just food for thought.


[Guide] Airbrushing at the mini scale (long) @ 2010/01/05 23:59:36


Post by: Fateweaver


I only did it once Astro. Next time around I'll learn to obey the directions on the bottle.

It also actually requires a breeze blowing to have more of an effect than just opening the side and main garage door. I thought it'd be enough, 15 minutes later I couldn't feel my face.


[Guide] Airbrushing at the mini scale (long) @ 2010/01/17 02:04:58


Post by: atropos907


Kanluwen wrote:Atropos, have you considered sending in these tutorials to a modelling magazine?

I know that Fine Scale Modeler has just started acknowledging that Airbrushing is something that really needs to be taught for modelers(of all shapes and kit varieties )--and they might be willing to set it up so that they're hosted for free as a professionally compiled PDF with you credited.

Just food for thought.


Ive played with the idea but figured most wouldn't be interested as im too small time.

Also, Ive finally gotten around to setting up the website under the new url
http://thirdfatecreations.com/

Ill have pictures of my latest up soon(1 week? its been a tough one)


[Guide] Airbrushing at the mini scale (long) @ 2010/01/18 00:38:32


Post by: -=Scar=-


mine wont turn out right D:


[Guide] Airbrushing at the mini scale (long) @ 2010/01/18 01:38:23


Post by: chaos0xomega


Would it be possible for you to do a "glow" tutorial?

Basically, I mean a gradient from the top of a miniature down to the bottom of a miniature. More specifically, a gradient using multiple shades/colors. What I'm trying to achieve is the fire/heat look on my eldar. I want them to be black near their feat and start transitioning to red, then orange, then yellow and then white in such a manner to give the impression that they are radiating heat from their upper bodies.


[Guide] Airbrushing at the mini scale (long) @ 2010/01/19 19:03:53


Post by: atropos907


-=Scar=- wrote:mine wont turn out right D:

Umm without more information im not sure how I can help. What wont turn out right. Do you have a link to a blog showing said difficulty?

chaos0xomega wrote:Would it be possible for you to do a "glow" tutorial?

Basically, I mean a gradient from the top of a miniature down to the bottom of a miniature. More specifically, a gradient using multiple shades/colors. What I'm trying to achieve is the fire/heat look on my eldar. I want them to be black near their feat and start transitioning to red, then orange, then yellow and then white in such a manner to give the impression that they are radiating heat from their upper bodies.


I have been considering doing this for a while on a GW avatar but other projects keep bumping it in priority. I was planning on doing something like this, either fire or ice, for the avatar. I will attempt to remember to take pictures at every step as I have a bad habit of just painting and then taking one picture at the end of the night. Thanks for the request!

My Fire warriors show a bit of OSL with lava below them, shown previously in this tutorial but it was a very basic lighting from below. The avatar will be more complicated by far. I hate painting troops


[Guide] Airbrushing at the mini scale (long) @ 2010/01/21 20:27:02


Post by: SONS of ORAR


Wow that is awesome... it shows how much I needed to learn on the subject... I think this will be my airbrushing bible... I was wondering what you use to clean out your airbrush? I usually use water or thinners and occasionally nail polish remover. Is this good? Also I am currently painting a land raider (most of the basecoat is airbrushed) it’s very basic stuff compared to yours. I’m currently doing a blog on the subject so if you have time feel free to have a look and maybe give some tips... after seeing your fire warriors I think I may have an experiment with some marines. You can find my blog at: http://www.dakkadakka.com/dakkaforum/posts/list/274891.page

And again many thanks for such an awe inspiring tutorial


[Guide] Airbrushing at the mini scale (long) @ 2010/01/22 02:28:34


Post by: Fateweaver


So long as your airbrush is newer than 5 years old it should have solvent proof O-rings so you can use anything short of acid to clean it without worry.

So long as you spray acrylics water works good. Windex is good for an "end of session" cleaning as well and fairly cheap.

Best way to get into airbrushing is start simple. I've seen lots of threads where people get discouraged and threaten to sell their stuff because they can't make their stuff look like the pro's. If airbrushing like a pro was as simple as picking up an airbrush we'd all be getting paid $1000's of dollars for a couple days worth of work. It takes lots of practice and years of experience to be good enough to make $60+ dollars an hour or $3-5K per car/motorcycle/SUV.

Airbrushes make 40k painting and life so simple. I can basecoat 12 stealers in under 5 minutes. Could never do that with the old "hairy stick".


[Guide] Airbrushing at the mini scale (long) @ 2010/01/25 20:05:17


Post by: atropos907


Fateweaver's response is only partially true as Ive just recently learned.

While most modern AB's have solvent proof rings the ring isn't the only thing you have to worry about.
I have been doing some heavy painting lately on a variety of projects and have been experimenting with cleaning as well. Every time Im done I typically clean out with water a few times while scrubbing with a Qtip or soft brush made to clean out these parts. Sometimes I put a bit of solvent on the cleaning brush.

As mentioned before, Windex with ammonia will slowly attack chrome.(learned that one too late) but thankfully it only caused a bit of cosmetic damage on my brush. I still use Windex but much more sparingly when I need to base and want to spray some cheap GW paint through my brush. So there is gotcha #1

I often use Testors Airbrush cleaner or acetone to clean my nozzle, just a quick dip though I have tried overnight baths. Some airbrush cleaners come with an "overnight" bath you are to put your nozzle and maybe one or two other sensitive pieces in to help break up any buildup. Here is gotcha #2 Ive found that several of these cleaners seem to increase the rate of corrosion on my brass and steel bits. I found this out by accidentally leaving them in a bath for 3 days straight and then noticed the corrosion.

I believe alcohol will also slightly increase the corrosion rate on any metals prone to it, but wont attack chrome.

So long story short, While I would recommend using whatever cleaners are made for your paints, or sparingly windex and a stronger solvent. Know that many solvents may have unforeseen consequences.

I only use windex when working on projects like the one attached in which I don't care that much about it and want to slap some cheaper paints over a larger area.

[Thumb - TauResearchStation_small.JPG]


[Guide] Airbrushing at the mini scale (long) @ 2010/01/25 20:36:48


Post by: Fateweaver


Hmm. Guess it depends on airbrush.

My Iwata still looks as new though my Badger Velocity does show signs of finish being worn off because of what I presume to be ammonia attacking the finish.

I have a homebrewed reducer that consists of windex and some other stuff that I wash through in between colors. Lately I've been using 91% rubbing alcohol for after painting sessions. Cleans well and so far has shown no sign of harming my newest airbrush (Badger 105 Patriot).


[Guide] Airbrushing at the mini scale (long) @ 2010/02/14 23:45:38


Post by: TakeABow


Great tutorial. I might have to get myself an airbrush after seeing that.


[Guide] Airbrushing at the mini scale (long) @ 2010/02/17 23:49:44


Post by: Fateweaver


I highly recommend anyone wanting to learn to airbrush to check out the various forums listed on atropos97's website.

Youtube is also a great source of airbrush vids. Check out vids by jaime rodriguez of his script lettering. He is one of the best freehand letters in the airbrushing world. He can do nice looking free hand lettering with ain aribrush as fast as most people can sign their own name.


[Guide] Airbrushing at the mini scale (long) @ 2010/02/18 22:37:43


Post by: Aerethan


So I ordered a Paasche Talon airbrush yesterday. I found a little 3 gallon 100 psi shop compressor in my mothers garage the other day.

The regulator that it came with had a gauge for tank pressure, a quick release and a regulator. That broke at the top thread of the air tank, so I had a shop drill it out and re thread the tank.

I then went to Home Depot, bought a new regulator and fittings. So now, when I leave the valve open it hits it's 100 psi. The problem I'm having is that if I open the air on my brush, and adjust the regulator to 30psi, when I stop it goes back up to like 80 and when I start the brush I get a large burst of air at 80psi until it comes down to 30. If I turn the regulator all the way down to 30 and then turn on the brush, the psi drops to 0 and doesn't go back up unless I open up the regulator.

What am I doing wrong?

Should I just start the brush, wait for the pressure to drop to 30 and then open the paint flow?

I'm doing this to avoid having to shell out $70+ for some harbor freight compressor which is about all I could afford at this point.


[Guide] Airbrushing at the mini scale (long) @ 2010/02/18 23:07:42


Post by: Fateweaver


Sounds to me something is fishy with the regulator.

When you adjust the regulator with the airbush open like you are supposed to do, as soon as you shut off the air flow (release the trigger) pressure WILL rise as obviously the air is no longer flowing from the tank. It SHOULDN'T be spurting at 80 and then going down. It might LOOK like it's spurting at 80 since the needle jumps that high but it really IS only spraying at whatever you set it at when you adjusted the pressure.

Also, like with priming you never want to start paint flow with the airbrush directed at your work. Always start off to one side, start paint flow and bring airbrush across and then finish off outside of the project.

So, I think your regulator is doing it's job. I just think you see "OMG THE NEEDLE IS AT 80 SO IT'S SPRAYING AT 80 FOR A FEW SECONDS".

How long before the needle dips to 30? Mine dips to whatever the pressure I set it at the very split second I pull the trigger. If on yours the needle isn't moving for a few seconds down to 30 you might have a stuck valve in the regulator.


[Guide] Airbrushing at the mini scale (long) @ 2010/02/18 23:27:19


Post by: Aerethan


It's a 1/2 second burst at the higher psi while it falls down to 30.

I managed to put the stock regulator on it(had just enough thread left on it to hold tight and not leak below 100psi) and the problem went away. Perhaps the regulator that I bought is just uber cheap and doesn't work the way I need it to.

The stock regulator shows tank pressure and then has a setting for output pressure which only dips about 5psi when the brush is open. The stock regulator is also alot more sensitive with where you can set it, whereas the other one goes from 0 to 80 psi in all of a 5 degree turn of the knob.

Problem fixed for now I think. I'll find out for sure when my Talon arrives. Right now I was just testing it with a Harbor Freight dual action that cost $15 just to make sure the compressor worked right.


[Guide] Airbrushing at the mini scale (long) @ 2010/02/19 00:36:04


Post by: Fateweaver


Yeah, that or a bad regulator.

At least it appears you have it fixed.


[Guide] Airbrushing at the mini scale (long) @ 2010/02/19 03:30:39


Post by: atropos907


Fateweaver wrote:Sounds to me something is fishy with the regulator.

When you adjust the regulator with the airbush open like you are supposed to do, as soon as you shut off the air flow (release the trigger) pressure WILL rise as obviously the air is no longer flowing from the tank. It SHOULDN'T be spurting at 80 and then going down. It might LOOK like it's spurting at 80 since the needle jumps that high but it really IS only spraying at whatever you set it at when you adjusted the pressure.


A simple way to test this is to use another meter. Cheaper regulators may poorly regulate and allow for bursts. Mine is mid range in quality and exhibits the following behavior.
1. A slight turn will cause a larger air pressure change than Id like, which is why I recommend an air regulator on the brush, made for the brush. I am adjusting this thing constantly based on what im doing. The compressor regulator generally wont be precise enough unless you paid a LOT for it.
2. It does not jump but rather follows an exponential decay leveling out just below the set point, this is more normal for decent regulators. But I suspect your needle is jumping but that this is not due to the brush actually seeing a huge burst at the beginning, however you may be able to tell by simply feeling the airflow or listening to the noise it generates.

Fateweaver wrote:
Also, like with priming you never want to start paint flow with the airbrush directed at your work. Always start off to one side, start paint flow and bring airbrush across and then finish off outside of the project.


Not true. for fine detail you generally want to start air flow, then start paint flow while pointed at your work. This is one of the fundamentals of daggers. What I believe Fateweaver is addressing is one of the "quirks" of acrylics. They suck but people like me deal with it because I prefer non toxic. Acrylics like to dry on the needle a bit and so its often safer to start your spray on a freehand mask then move onto the work. But this is a quirk. many professionals who use professional uro's dont do this because their paint is good and toxic, but flows oh so nicely. About half of the time I start airflow and paint pointed directly at the work.


aerethan wrote:It's a 1/2 second burst at the higher psi while it falls down to 30.

I managed to put the stock regulator on it(had just enough thread left on it to hold tight and not leak below 100psi) and the problem went away. Perhaps the regulator that I bought is just uber cheap and doesn't work the way I need it to.


be VERY careful screwing with the fittings on your tank, especially drilling and re threading. nothing like a bullet driven by a 100PSI + tank.

Otherwise it sounds like your problem is fixed. Happy painting. Please share.
Speaking of sharing for those not aware of my blog here are a couple things Ive done lately

First a landing pad. Made of styrofam and paper mache, as usual. Then making a "high tech" grid on top of the pad. The fluff is this thing has a tractor beam array built into the pad that can capture and land a manta. Took about 5 hrs to paint. I used hex and square meshes for the grid pattern and cut out a very big stencil for the armor plates that act as actual landing pad positions.


This hammerhead was 1 year in the making. I had to wait until I had the patience to do the soldering for the lights inside, and for my skill and patience to get to the point I could pull off the armor and hex patterns with the edge highlighting and shading. I wanted it to look high tech, vs the rest of my tau that just look flashy. Just for something different. It took a hex netting mask and about 40-50 individual masks for the armor plates. This took a long time and a lot of patience, but hey, it took first and gold at Genghis con so yeay!


Finally My first commission
A Slassan from Iron Winds Miniatures. This is the lower limit in size of what Im willing to commission but I took it because I wanted to try these effects. The beetle shell armor with a very subtle under texture, and the bright symmetric belly texture with a slightly translucent greener back flesh. Then just bright green drops using translucent water effects and paint.
I really like it and will have a hard time giving it up. This also took first and gold at Genghis con.


If interested in what wierd things I did recently I update my blog more frequently than this as I wish this to be mainly airbrush problems and showcasing of just my best airbrush work when I try new techniques.
Blog at
http://www.dakkadakka.com/dakkaforum/posts/list/265995.page

Keep painting and asking questions!


[Guide] Airbrushing at the mini scale (long) @ 2010/02/19 06:44:46


Post by: Fateweaver


Wow, loving that Hammerhead. Nice hexwork.

I'd love to do more with Urethanes but Mn winter means AB'ing indoors. Urethans indoors means death to the cat and dog. :(


[Guide] Airbrushing at the mini scale (long) @ 2010/02/19 06:46:06


Post by: Aerethan


I had a professional machine shop tap and rethread my tank, no backyard job. I also leak checked the stock regulator every 20 psi to make sure it would hold up. I don't plan on pumping it past 80 psi ever really, as most of my painting will be at about 30 and during my dry testing today it lasted a decent while on a single pump. It's a 3 gallon tank, takes about 3-5 minutes to fill. I'll take a picture of it tomorrow to show what I did. I also never noticed how expensive brass fittings are!!! $2 for a male to male socket and the same for female to female!!!

My next purchase for it will be 1/8" quick disconnects and a cleaning pot. I was considering a standard brush holder, but for $10 I'd rather just use the one supplied with the brush and drill it onto one of my work shelves.


[Guide] Airbrushing at the mini scale (long) @ 2010/02/23 02:07:36


Post by: Kolath


Astropos, this is a fantastic guide! Thank you! I just recently purchased a Badger anthem 155 and a 3 gallon compressor but I have a question about safety. You mention the need for a respirator, but exactly what sort do I need to get?

I plan to spray GW acrylics mixed with water in my carport (once the weather warms up a bit). Do I need something as serious as this: Medium Paint Spray/pesticide Respirator Assembly or can i get by with something like this?


[Guide] Airbrushing at the mini scale (long) @ 2010/02/23 03:56:24


Post by: Aerethan


You only need a respirator if you are painting with solvent based paints like Tamiya or testors.

Water based acrylics are non toxic.


[Guide] Airbrushing at the mini scale (long) @ 2010/02/23 04:20:19


Post by: gruubii


Neat, I have a Iwata eclipse, and im trying to get more practice out of it.


[Guide] Airbrushing at the mini scale (long) @ 2010/02/23 04:58:59


Post by: Kolath


aerethan wrote:You only need a respirator if you are painting with solvent based paints like Tamiya or testors.

Water based acrylics are non toxic.


But in the first post, Astropos seemed to imply that you need some sort of breathing filter regardless. Even if GW paints are non-toxic to eat... I can't imagine they would be good to breathe, right?


[Guide] Airbrushing at the mini scale (long) @ 2010/02/23 05:07:05


Post by: Aerethan


A cheap dust mask would do just fine if you are worried about acrylic spray.


[Guide] Airbrushing at the mini scale (long) @ 2010/02/23 21:49:54


Post by: atropos907


Kolath wrote:
aerethan wrote:You only need a respirator if you are painting with solvent based paints like Tamiya or testors.
Water based acrylics are non toxic.


But in the first post, Astropos seemed to imply that you need some sort of breathing filter regardless. Even if GW paints are non-toxic to eat... I can't imagine they would be good to breathe, right?


You had better be wearing a filter or respirator. This crap gets into your lungs its there for life. Too bad I didn't save a couple safety articles I found about people who developed medical conditions from years of breathing acrylics. They scared me straight. General rule, more safe is better.
You may play warhammer or whatever for the next 2-10 years of your life. You don't want to be cursing your stupidity 20+ years from now.

While you may not need a respirator that can handle VOC's you had better make sure that particulates are kept out of your lungs. And at some time in the future you may say, Oh I want to paint something with Organic solvents, and without thinking you use a simple paper mask. Personally, I would rather pay a little extra to replace my cartridges and be sure I filtered as much as possible than to skimp on health.


Side note.
Its ATROPOS. the third fate in greek mythology, or the crone who cuts the thread. not astro...

Paint safely!


[Guide] Airbrushing at the mini scale (long) @ 2010/02/23 22:29:56


Post by: Kolath


Ah, sorry, Atropos! That'll teach me to read more carefully. I guess all I'm saying is I want to get the cheapest mask that will still provide protection. It sounds like a dust mask won't cut it, but I probably don't need an $80 professional mask for doing highly toxic paints either.

Do you know of any links to articles that say what buzz words to look for on respirator packaging? Like, "must filter particles of at least x microns" or some such.

Thanks again for the help!


[Guide] Airbrushing at the mini scale (long) @ 2010/02/24 19:41:43


Post by: atropos907


First, I made another tutorial on the basics of using GIMP or other image programs to help your painting. Its not meant to be complete, just to help those like me a few months ago get started with using such programs. They are great when you want to stitch togther web images to plan out your paint job and play with colors of say fire or of the entire project before or half way through your painting.
http://sites.google.com/site/thirdfatecreations/tutorials-1

Next respirators
the following is blatantly stolen from
http://safetyrealworldchallenges.blogspot.com/2008/02/respirator-ratings.html

The rating
* N = Not resistant to oil
* R = Resistant to oil
* P = Oil Proof

* 95 = Filters 95% of particles 0.3 microns in diameter or larger
* 99 = Filters 99% of particles 0.3 microns or larger
* 100 = Filters 99.97% of particles 0.3 microns or larger

for example I usually use a P95 organic vapor cartridges which is a common fairly cheap respirator but it has a rubber seal around the face that I checked in the store was comfortable but still sealed. A problem with the paper masks is even for P95's if they arent fitted well, say from many uses, then your breathing around the mask.

The P95 cartridges cost about 10 depending, while the P100's cost around 30.

Change them every 3 months or so as directed.

Read the instructions on your masks and follow their safety guidelines.


[Guide] Airbrushing at the mini scale (long) @ 2010/02/24 23:54:58


Post by: Ham doctor


i would accuse your models of being computer work only because thier so perfect. excelent work. you must be a master painter.


[Guide] Airbrushing at the mini scale (long) @ 2010/02/28 05:44:07


Post by: Scherdy


I just started using my airbrush and was wondering about setting the pressure to have it run at. I'm guessing it varies from AB to AB and depending on the paint being used and what type of material you're painting on.

My compressor has a regulator on it but I don't have one at the end of the hose with the AB. Although the AB does have a little screw below the nozzle that is to fine adjust the pressure but I'm not sure how effective it is really yet.

What am I looking for as I play around with the pressure? Am I trying to get the lowest pressure possible that will shoot the paint I'm using? Do I want lower pressure for when I'm painting smaller areas and have to be very close with the AB so the air doesn't blow the paint around too quickly? Higher pressure when I'm applying more paint from a slightly larger distance and broader area?

I know it will vary depending on a lot of things but just some general guidelines or things you are looking for when you're playing with the pressure. I'll dig through those links you provided too. I'm sure there's plenty of info there. Thanks for sharing your work here.


[Guide] Airbrushing at the mini scale (long) @ 2010/02/28 23:41:16


Post by: atropos907


Scherdy wrote:I just started using my airbrush and was wondering about setting the pressure to have it run at. I'm guessing it varies from AB to AB and depending on the paint being used and what type of material you're painting on.

My compressor has a regulator on it but I don't have one at the end of the hose with the AB. Although the AB does have a little screw below the nozzle that is to fine adjust the pressure but I'm not sure how effective it is really yet.

What am I looking for as I play around with the pressure? Am I trying to get the lowest pressure possible that will shoot the paint I'm using? Do I want lower pressure for when I'm painting smaller areas and have to be very close with the AB so the air doesn't blow the paint around too quickly? Higher pressure when I'm applying more paint from a slightly larger distance and broader area?

I know it will vary depending on a lot of things but just some general guidelines or things you are looking for when you're playing with the pressure. I'll dig through those links you provided too. I'm sure there's plenty of info there. Thanks for sharing your work here.


First bit of advice, just play. you seem to have the basic idea and it will depend a lot on what paints and mixing ratios your using.

For me I regulate as follows.
Hose is set to about 30-40PSI, or around what the brush says it should be set for depending on your nozzle size.
That little nob on the brush is generally quite useful for fine air control and I would recommend spraying fine little lines on a piece of paper while playing with that knob to get a feel for it. Its mainly good for fine detial adjustment.

you need enough airflow so that your brush isnt splattering/sputtering (airflow improves venturi effect and sucks paint out) and a proper balance has good atomization. but too much airflow and you start splattering because it blows the paint around before it tries(too high pressure or too much thinning typically). You also start splattering if you open the paint up too much. Usually if you want fine detial you thin the paint more and lower the pressure. Not always true but mostly true.

Also, something I often forget to mention is it will depend on color. IE black and especially White typicaly have more pigment and need a different thinning and or airflow recipe. But it sounds like your reasoning skills and expectations are in the right place. Its frusterating at first but just practice. And seriously, dagger strokes, and spots are very valuable for learning how the stupid thing works.

Paint and share!


[Guide] Airbrushing at the mini scale (long) @ 2010/03/11 19:57:08


Post by: Kolath


Thanks again for this thread, Atropos! Since the weather has finally improved, I've gotten a chance to try out my airbrush (I am doing it outside for safety). And I am thrilled with the coverage it provides and amazed by the fine detail it can do. An airbrush is definitely a welcome addition to my painting repertoire. Thanks again for the tutorials and for answering my questions on filters!


[Guide] Airbrushing at the mini scale (long) @ 2010/03/17 20:24:30


Post by: BloodQuest


Slightly off the main point of the thread, but the subject of compressors has come up, so:

I have an Iwata Sprint Jet which I'd say is only a passably useable compressor.

I also have a decent Ridgid compressor with a tank which is used for nail guns, etc.

Is it possible to use some sort of adapter (and possibly some sort of intermediate pressure relief/control) to use the Ridgid for sustained work?

If so, where would I obtain one?

Simon


[Guide] Airbrushing at the mini scale (long) @ 2010/03/17 23:51:57


Post by: atropos907


I dont know what your rigid compressor has but you need a moisture trap and a decent air regulator. If you have both of these then forget the little compressor, if you dont mind the noise just use the big one. These components can be mail ordered(TCP global for example) or found in many hardware stores and even art stores that sell airbrushes.


On a different note, here is an example of a crystaline creature I just finished painting.
Unfortunately while the clear coat makes it look more crystaline in person, it adds an annoying glare even when I use ambient scattered light for the picture.


[Guide] Airbrushing at the mini scale (long) @ 2010/03/18 00:40:12


Post by: BloodQuest


Thanks - I'll go and do some shopping tonight!

(Later) Well, $2 for an adapter from Home Depot and $32 for a Paasche Regulator/Trap at my local model store. Will report progress later -- assuming it doesn't blow up!

Simon


[Guide] Airbrushing at the mini scale (long) @ 2010/03/19 19:49:40


Post by: kravus master of Horus


Very Nice!


[Guide] Airbrushing at the mini scale (long) @ 2010/03/27 00:59:06


Post by: atropos907


This is a little redundant with my blog but...
The eldar wraithlord. All airbrushed except gem highlights.
Unfortunately you cannot see some of the neet refractive effects this plays on the eyes when looking at the armor padding.
I used a variety of stencils and just Clever(or so I think) tricks that ive presented before to pull this one off.

I thought this was a good example of what is achievable with an airbrush, planning, and a lot of patience.

Click to enlarge picture


[Guide] Airbrushing at the mini scale (long) @ 2010/03/27 19:10:48


Post by: Fateweaver


Very nice. I'd like to paint a FW Revenant sometime using mainly the chameleon colors. Pricy as hell though so I'd probably sell it to make some of my money back (HOK Cham-shift colors are like $80 for 4oz).


[Guide] Airbrushing at the mini scale (long) @ 2010/04/19 20:14:11


Post by: Kolath


Atropos, thanks again for your help on respirators. I've successfully done some practice painting of tank traps and base coated a landspeeder with mordian blue foundation paint!

But now I have another question. How do you recommend getting paint out of the GW paint pots with minimal wasted paint? I tried using an eye dropper, but I think I wasted about as much paint stuck to the inside as actually made it into my air brush color cup. What do you use to transfer paint without leaving tons of it on whatever tool you use to transfer the paint?


[Guide] Airbrushing at the mini scale (long) @ 2010/04/19 20:41:53


Post by: atropos907


Kolath wrote:
How do you recommend getting paint out of the GW paint pots with minimal wasted paint? I tried using an eye dropper, but I think I wasted about as much paint stuck to the inside as actually made it into my air brush color cup. What do you use to transfer paint without leaving tons of it on whatever tool you use to transfer the paint?


I transfer GW paint with a paintbrush. I take a cheapo michael's brush, cut it down so it holds barely over a drop of paint(by my estimates) and I go drop by drop transfer into the cup. This is my measuring system for mixing paint. I have a syringe(no needle) with one of my airbrush mediums, and a dropper bottle with the other.

Keep painting!

And for those who monitor this but not my blog here are a couple of the jobs ive done recently.

A happy little nuclear family of shards


A battletech broadsword dropship


Battletech Union drop ship with SENMM or space earth non metal


[Guide] Airbrushing at the mini scale (long) @ 2010/04/20 21:57:52


Post by: cormz


Those are awesome models, they are some of the coolest i have seen


[Guide] Airbrushing at the mini scale (long) @ 2010/04/20 22:06:43


Post by: Nurglitch


Those are awesome! I really like that Wraithlord.


[Guide] Airbrushing at the mini scale (long) @ 2010/05/26 15:44:40


Post by: Kolath


[Delete]


[Guide] Airbrushing at the mini scale (long) @ 2010/06/07 17:28:49


Post by: dahli.llama


Wonderful post!

I've borrowed an airbrush from my father and have been playing around with it. This thread has really given me a lot of things to think about, since I'm considering getting my own airbrush setup.

I do have one question, though. I am working on my own Tau army, and one big reason I'm considering an airbrush is to help with doing the basecoat and then some camouflage patterns. I have one Hammerhead that I started doing with a brush and have a partially completed camo pattern very similar to the red and gray striped on in the picture below.

My question is, how do do stencils on odd shaped things like the Tau tanks? I can understand and have no problem with stencils on flat surfaces, but on the curves and corners of the Tau tanks, how do you prevent overspray and fuzzy edges?

Thanks!


[Guide] Airbrushing at the mini scale (long) @ 2010/06/13 04:28:02


Post by: atropos907


I typically use paper as my stencil,
I contour 3d things either very carefully or I use a combination of freehand and cutout stencils to prevent overspray on complicated objects like tau tanks.
and I often go back and fix overspray if it is not to a tolerable level. IE go back and sharpen that edge with a smaller more versatile freehand tool.

Paint and party!


[Guide] Airbrushing at the mini scale (long) @ 2010/08/02 16:46:52


Post by: Hasdrubal


I definitely want to get into airbrushing flames and true fire for my 40K vehicles (orks so far, definitely some Guard and Tau or Eldar in the future), and consider investing into a dedicated artool stencil to help me get the job done. Based on your personal experience of airbrushing flames (especially considering the battlewagon you've done recently), would you recommend the mini series (7"x3-4") or the nano series (3.5"x2")? Thanks for the advice!


[Guide] Airbrushing at the mini scale (long) @ 2010/08/10 13:28:06


Post by: nurgles_warrior


awsome man i love the warith lord...what am i saying i love all of it makes me want to use my airbrush even more


[Guide] Airbrushing at the mini scale (long) @ 2013/01/08 19:37:50


Post by: Styrofoam04


thats alot of great info and tutorials in here thanks .. Sub