21898
Post by: Oldmanronald
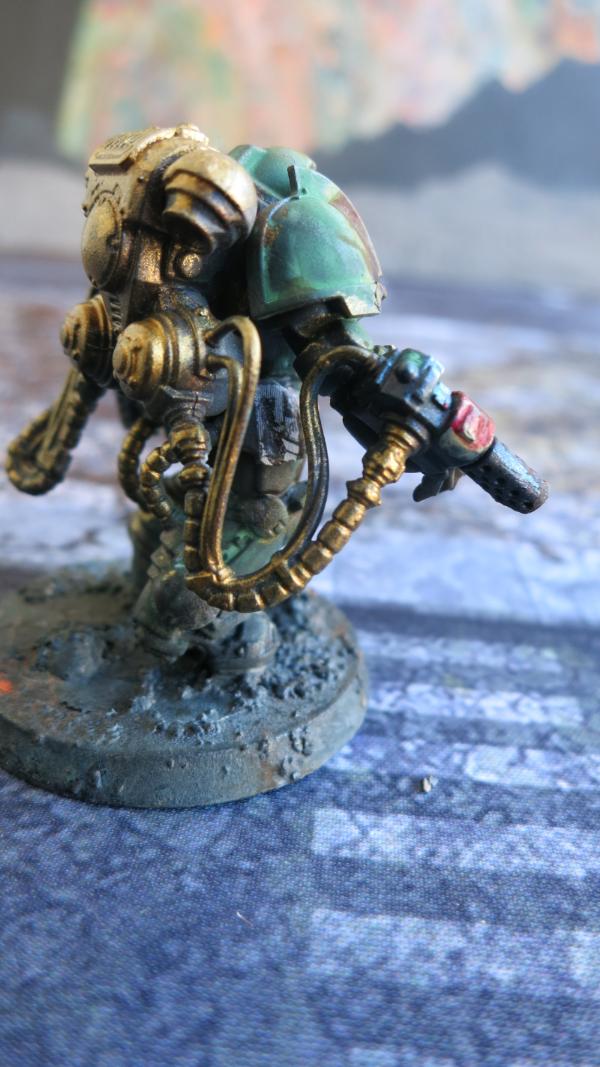
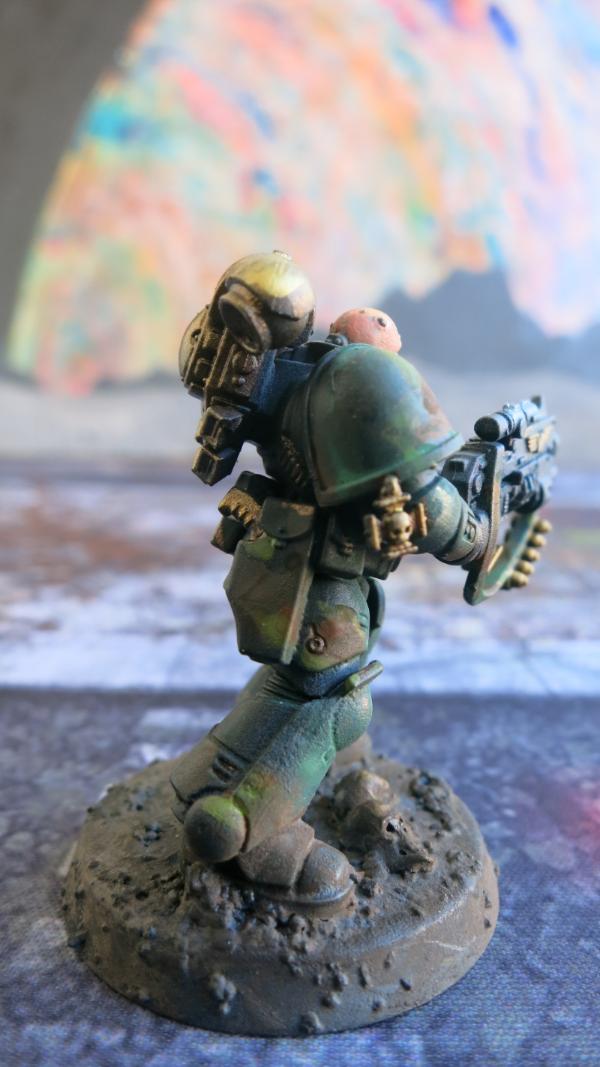
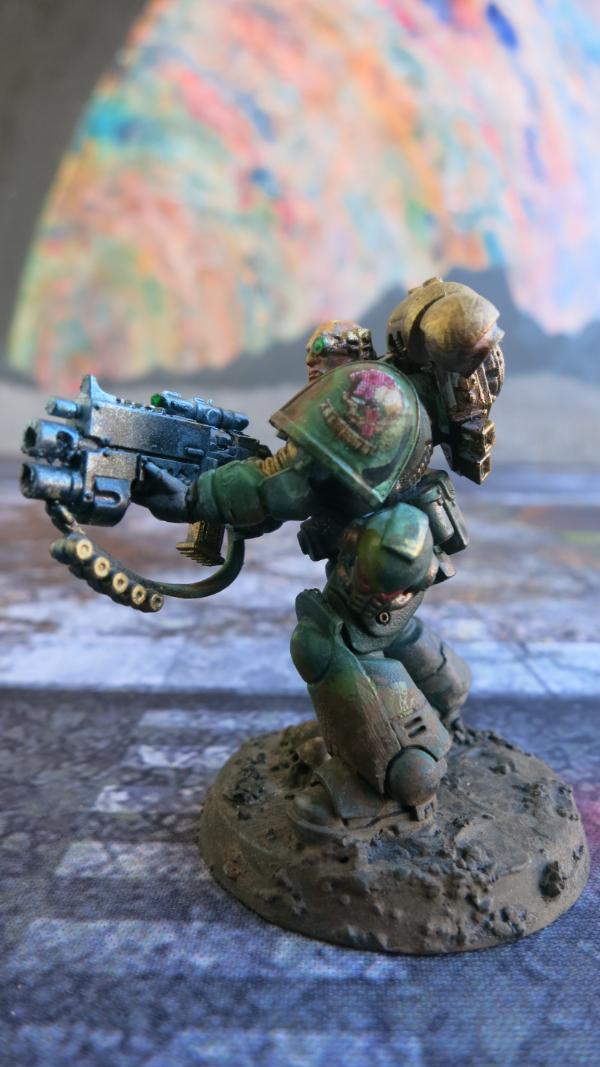
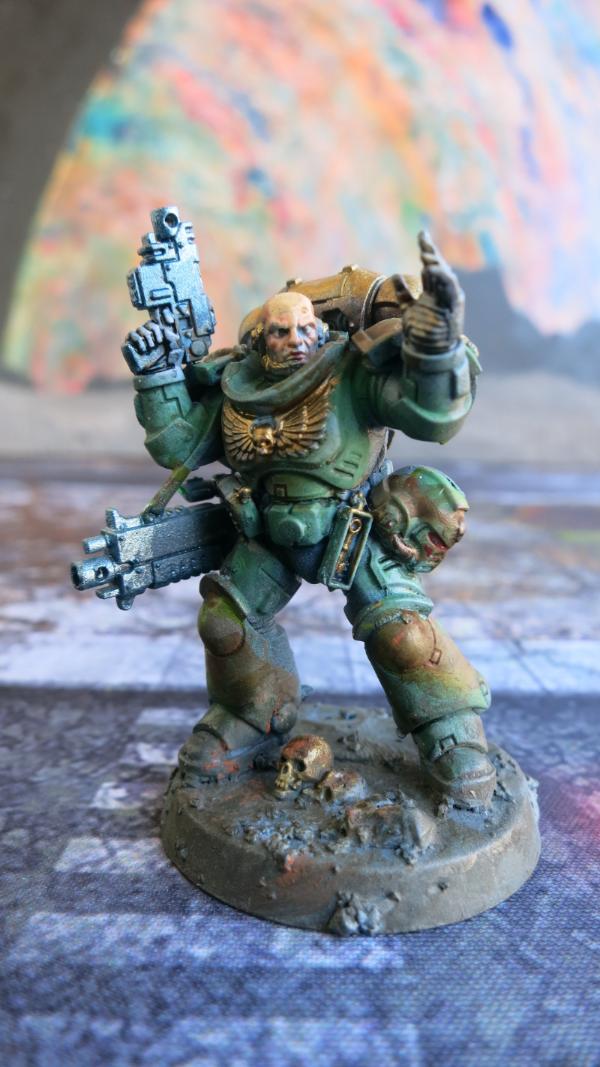
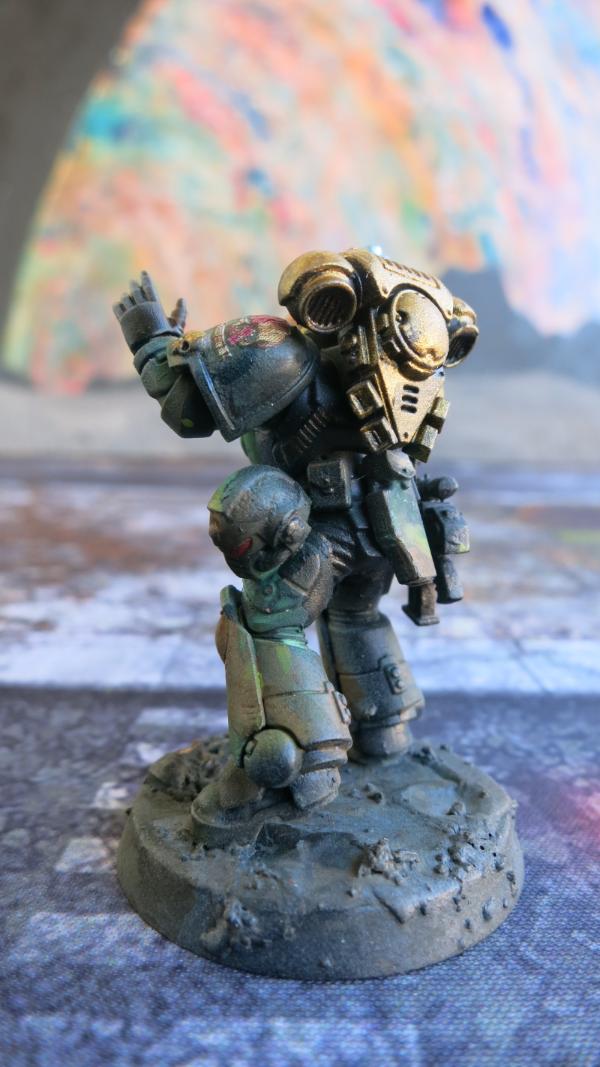
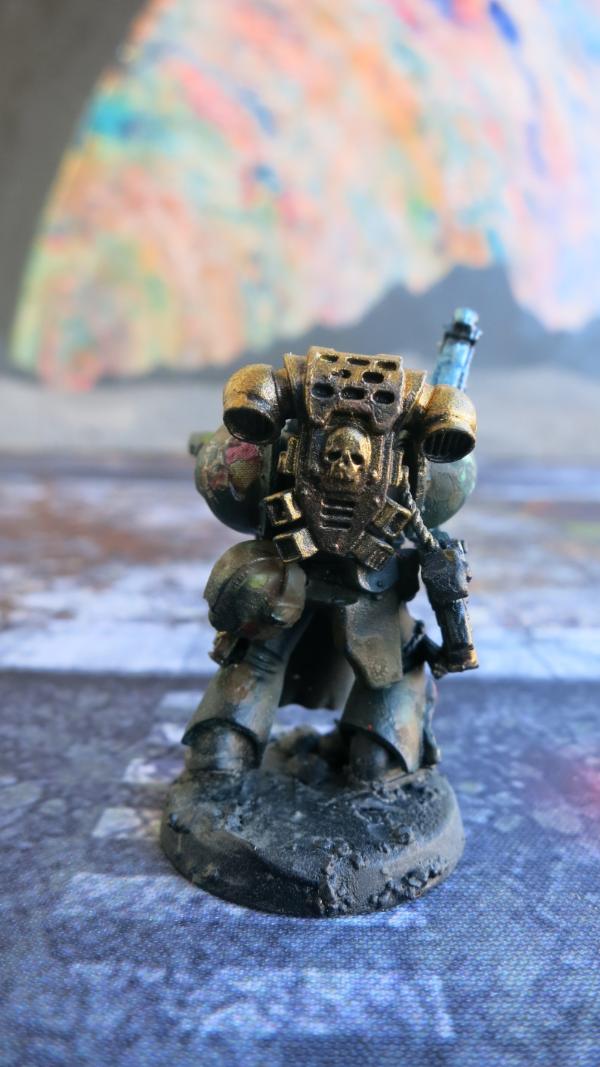
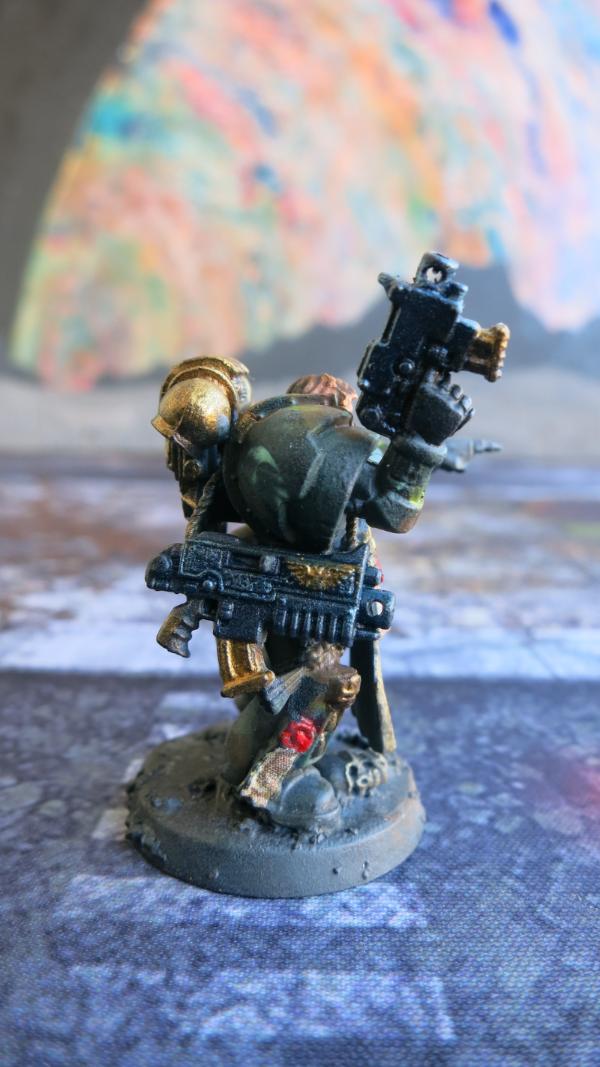
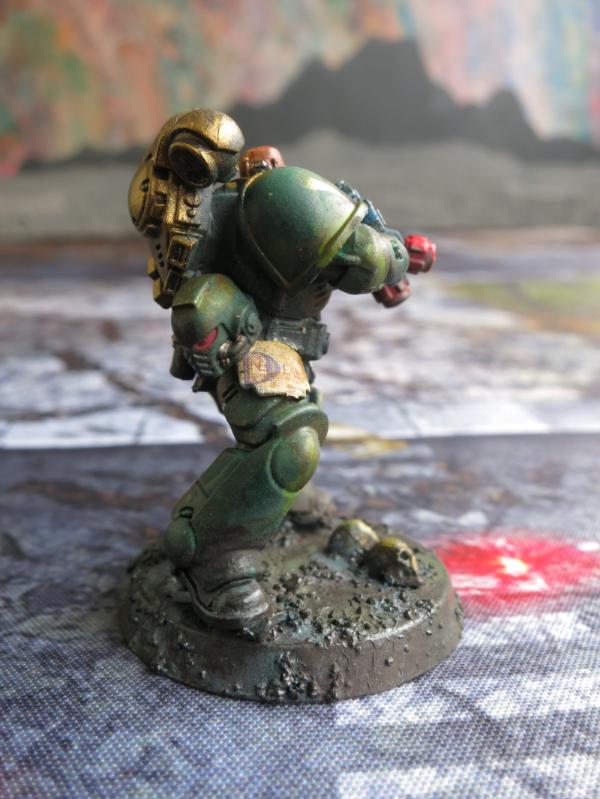
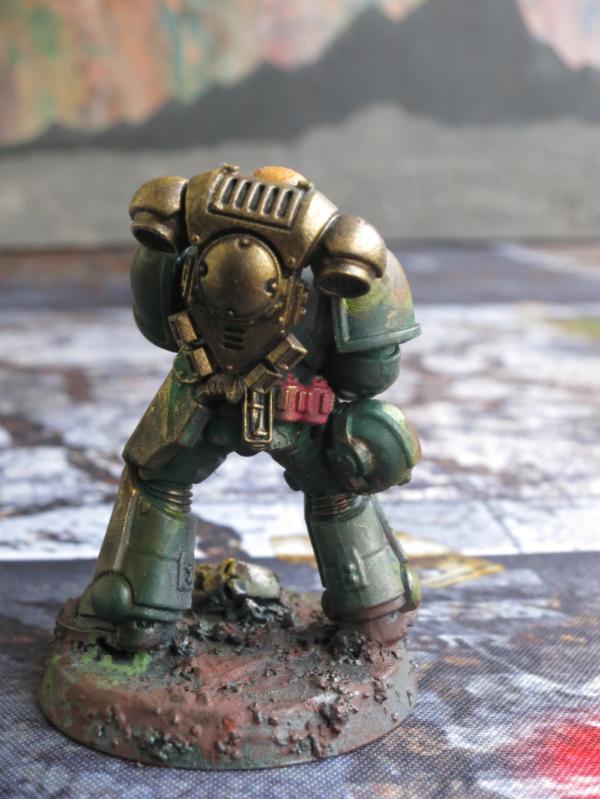
Intercessor

Intercessor – Right View
This again is too close up and shows granularity that is not noticeable on the actual model.
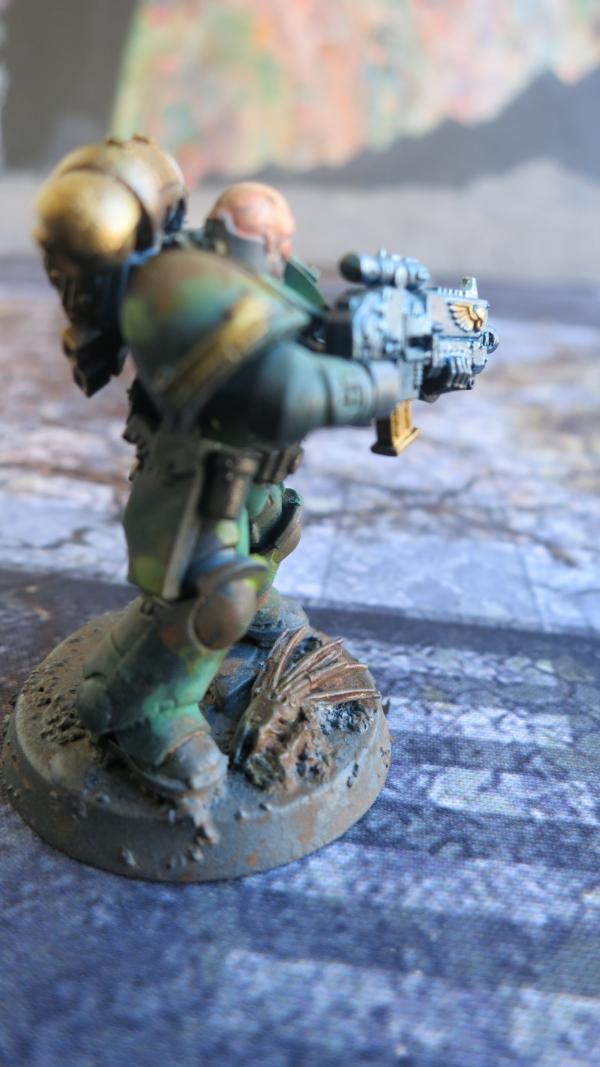
Intercessor – Right Rear View
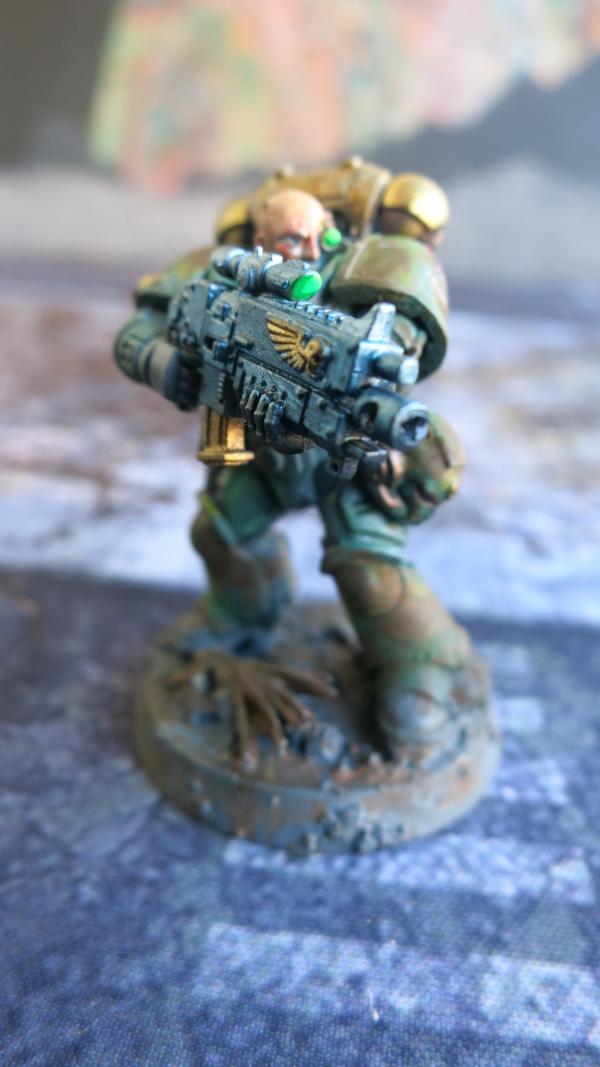
Intercessor – Front View
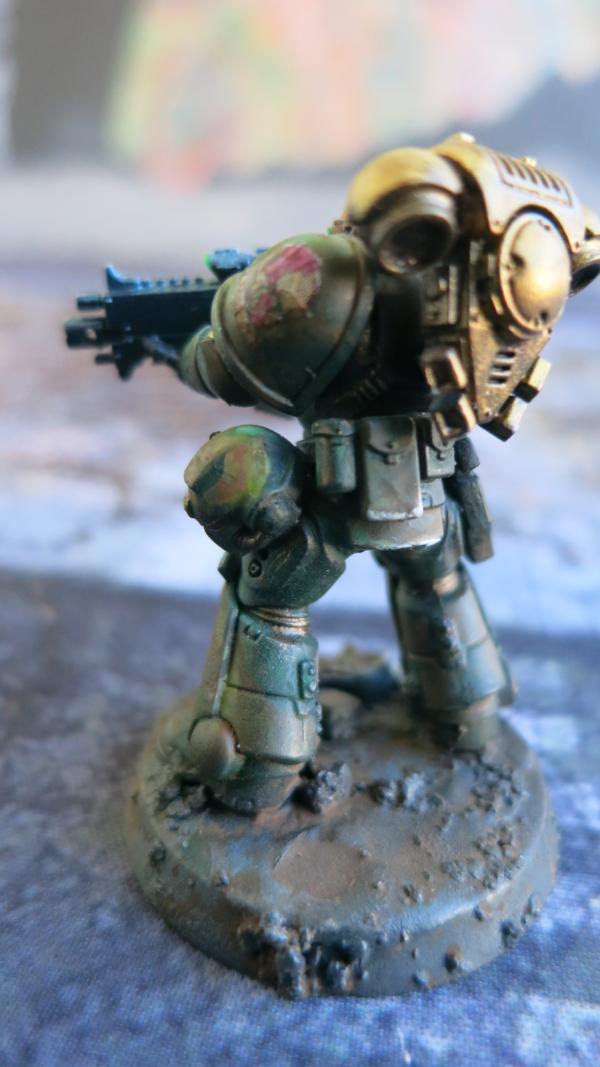
Intercessor - Rear View
21898
Post by: Oldmanronald
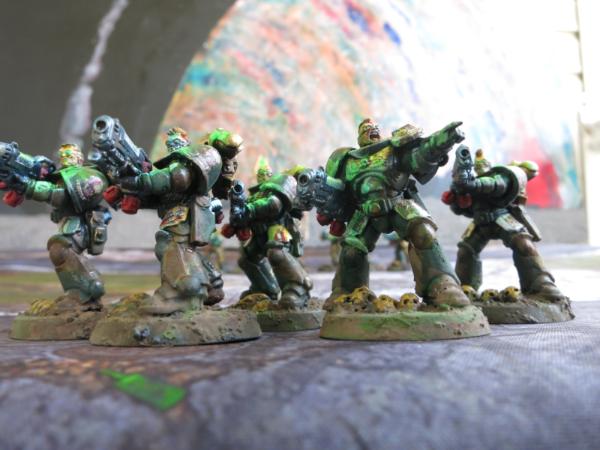
The Red Spot

Red Spot at Feet of Aggressor Squad
This picture was posted before but I am reposting it because of the red spot on the pavement. Notice the red spot on the mat, just under the aggressor on the right. Look at the spot itself. It is yellow white in the middle. Then it has a red splat surrounding the white spot. Even more interesting, it has a third region where the red is blended with the gray pavement. This color arrangement makes this seem as if this particular part of the pavement is still hot, either from an incoming round or lava seeping up from the depths of an unstable planet or moon. This spot give real interest and depth to this urban map.
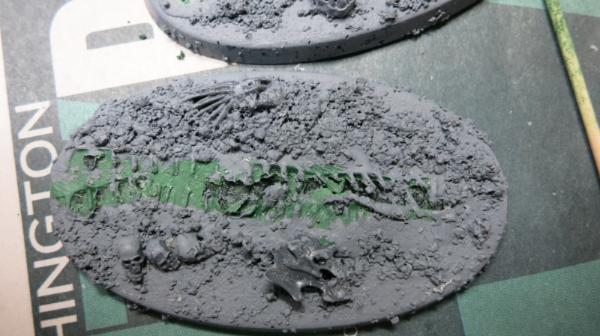
While I was experimenting with pigments on the flamers, I used a little rust red and a drop of it got on the base. Notice the red spot on the base below. The spot is red in the middle but the pigment spread into the gray base material so that it also looks like the pavement is heated.

Base with Red Dot
I am working on some new models, Hellblasters. I am going to experiment with molten areas of their bases using my red and white pigments. This could be fun. I will post the results in several weeks.
Base with a Red Molten Spot
21898
Post by: Oldmanronald
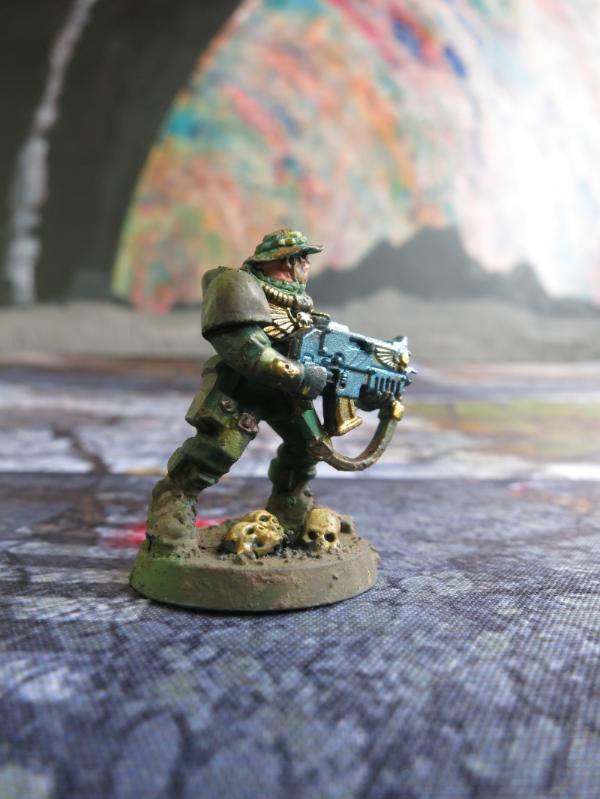
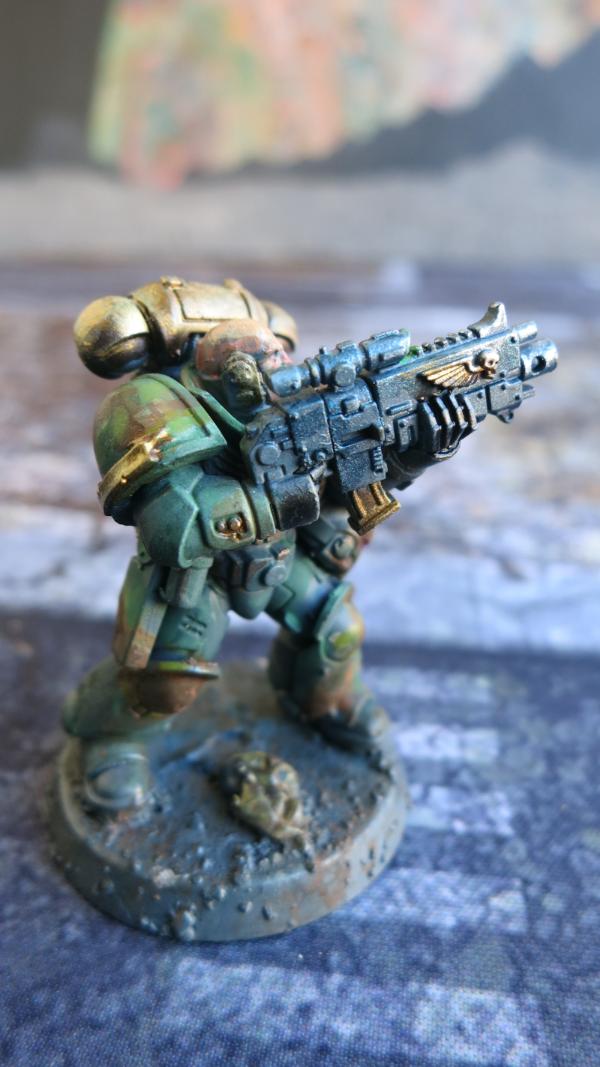
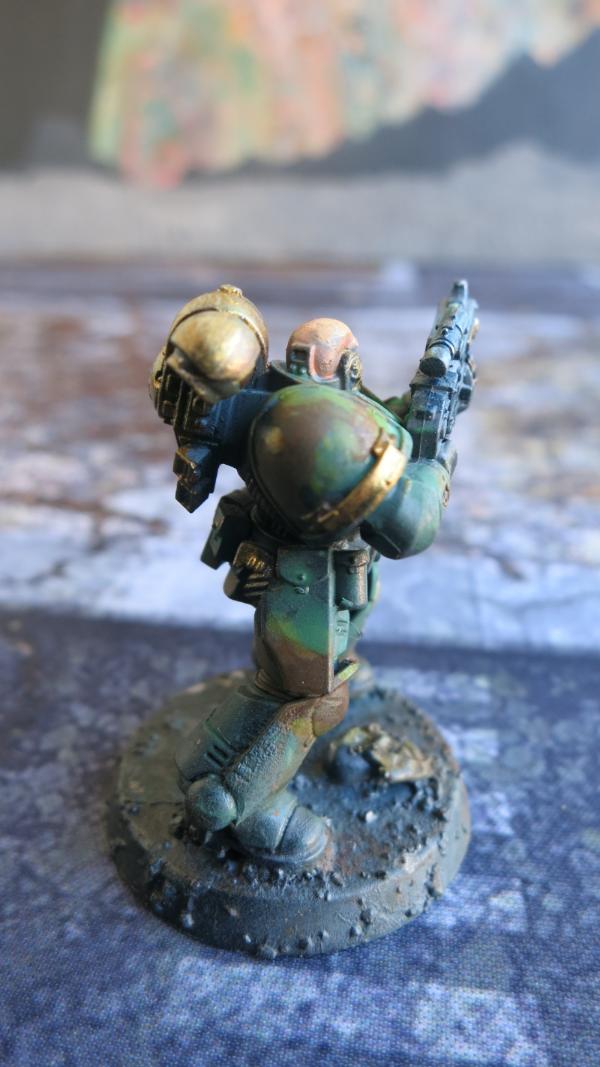
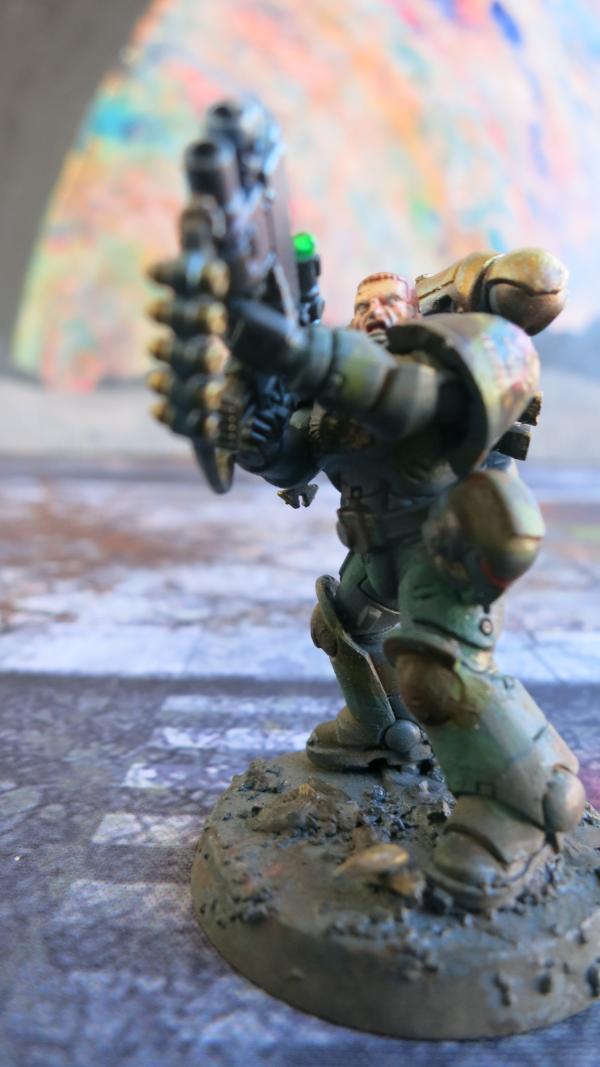
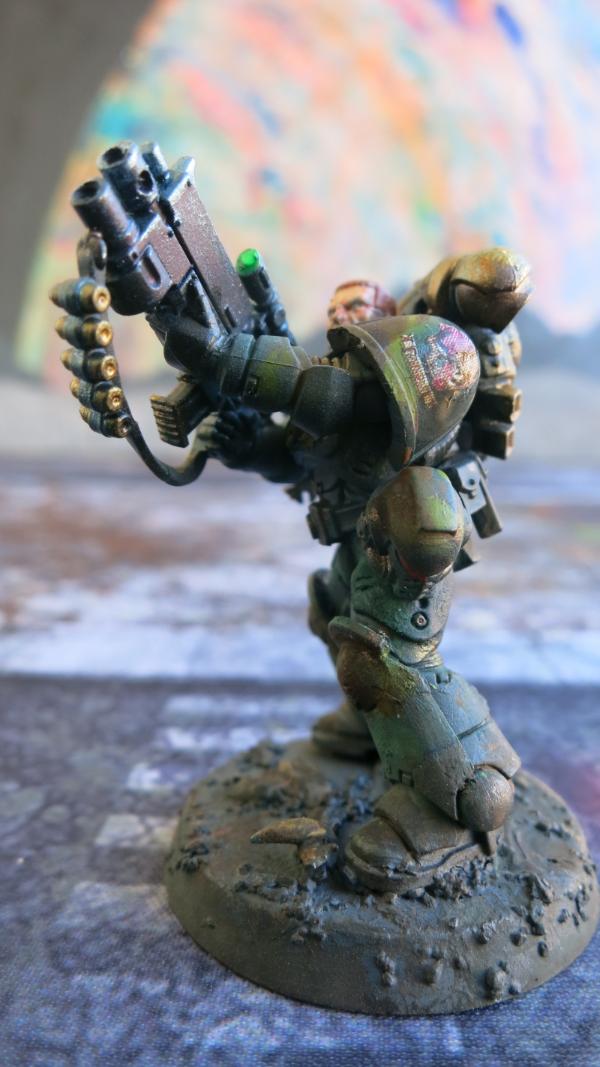
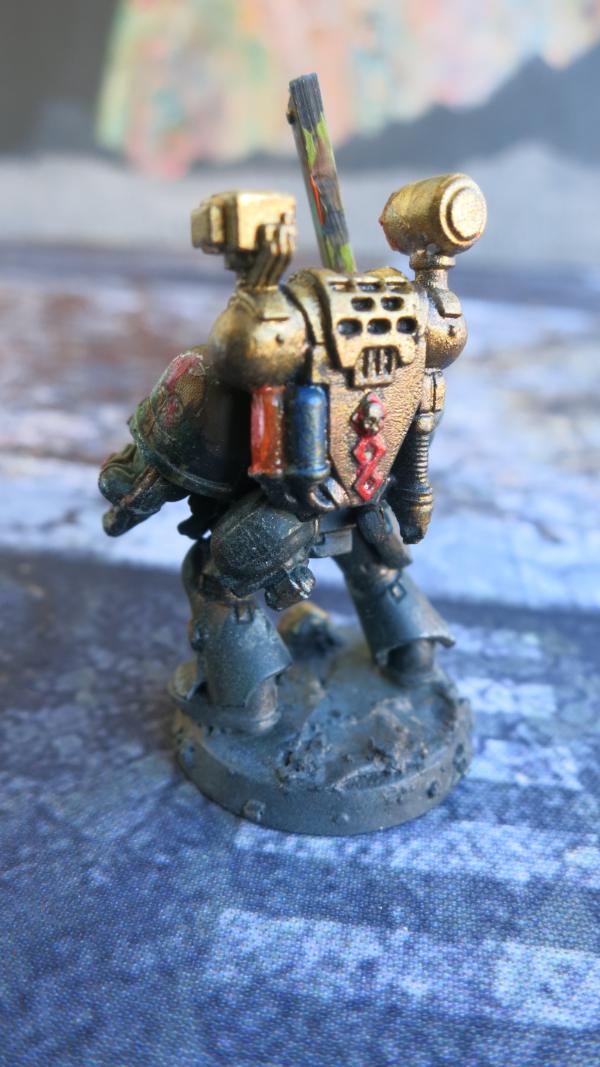
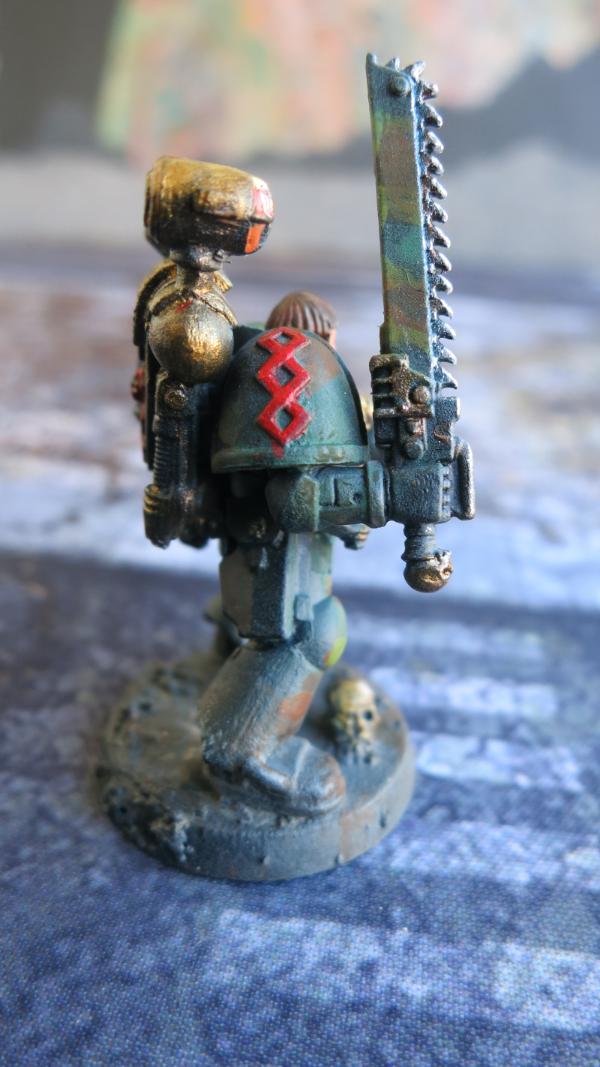
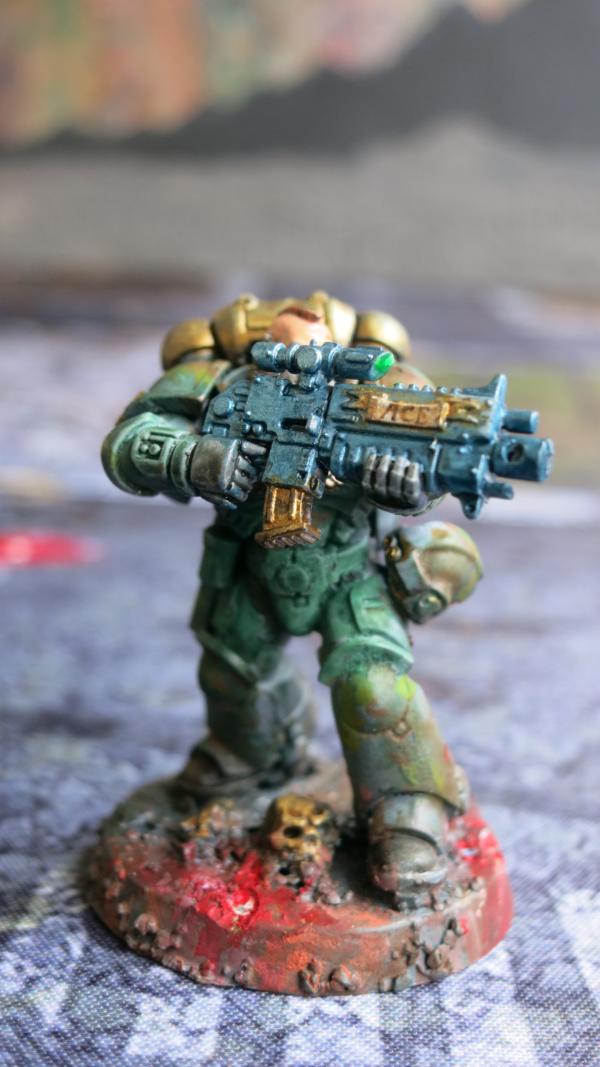
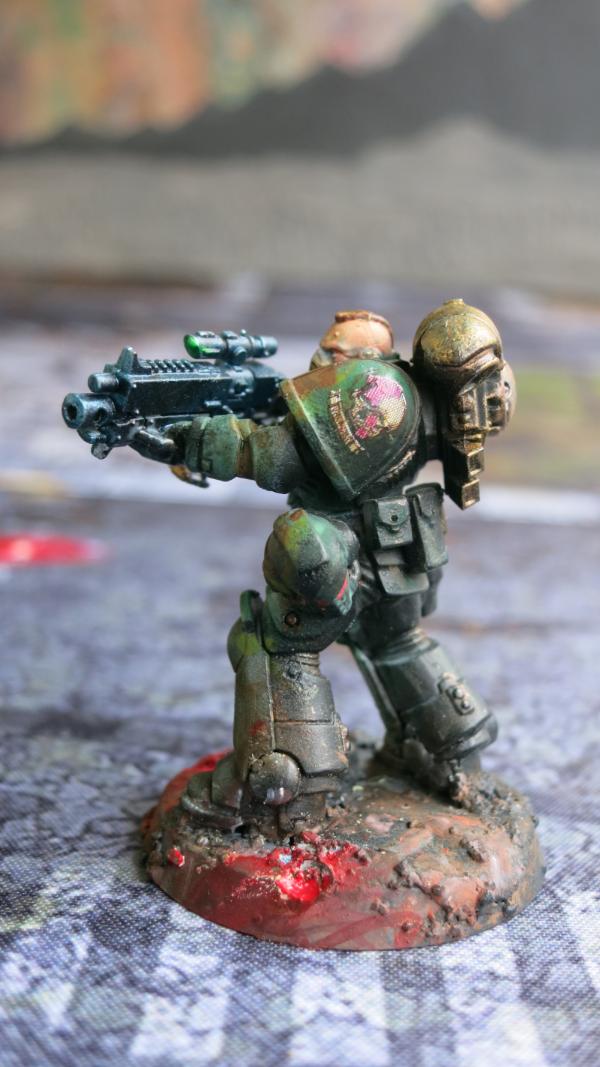
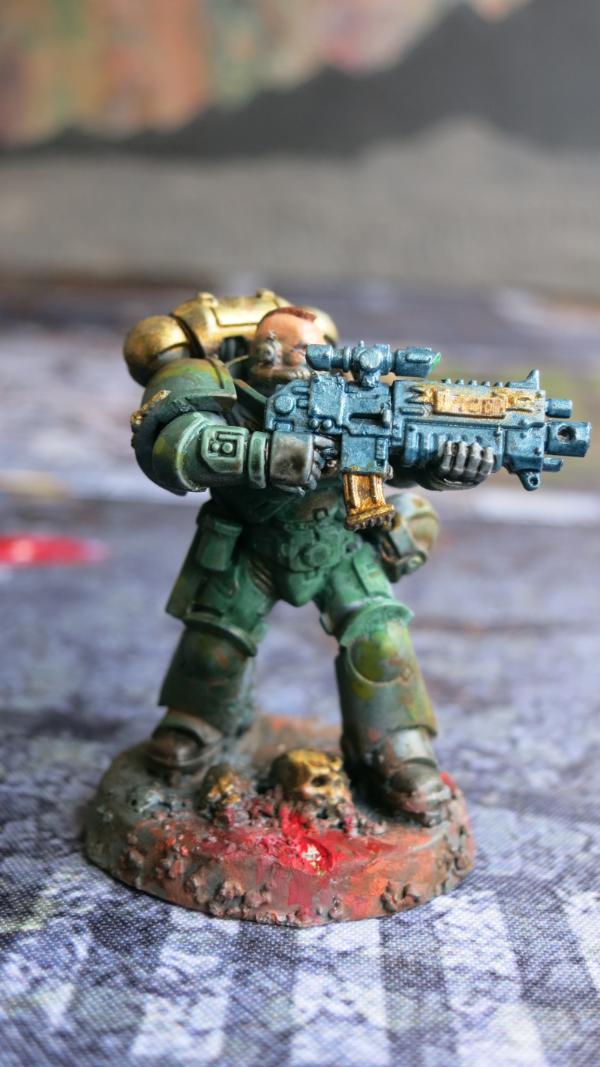
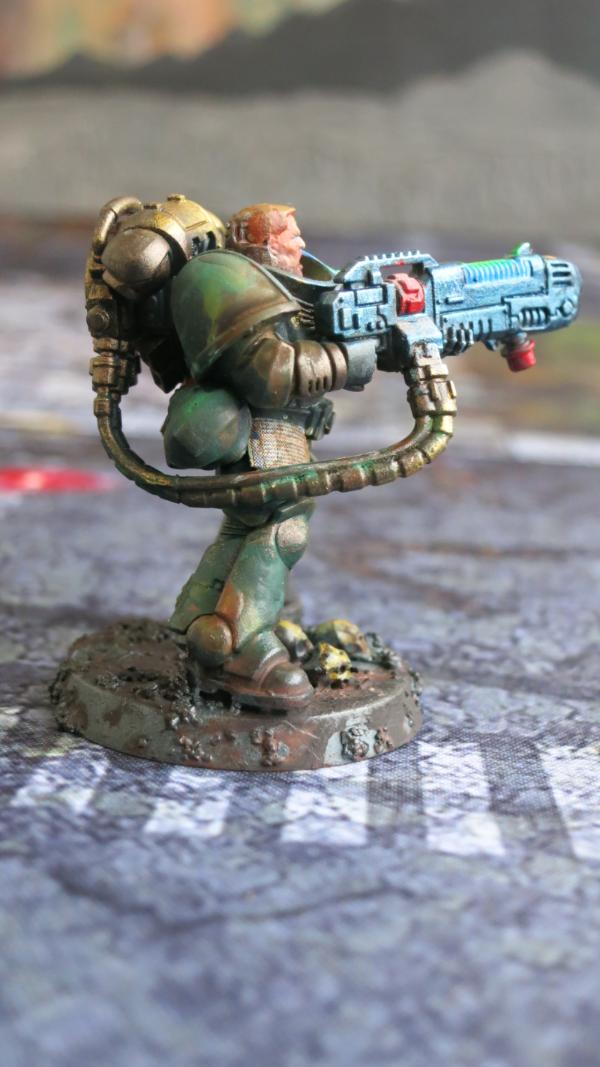
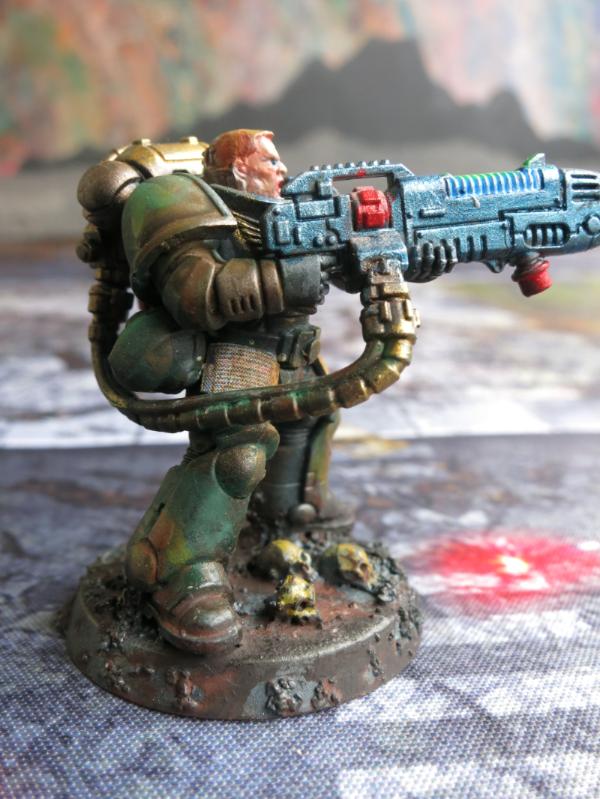
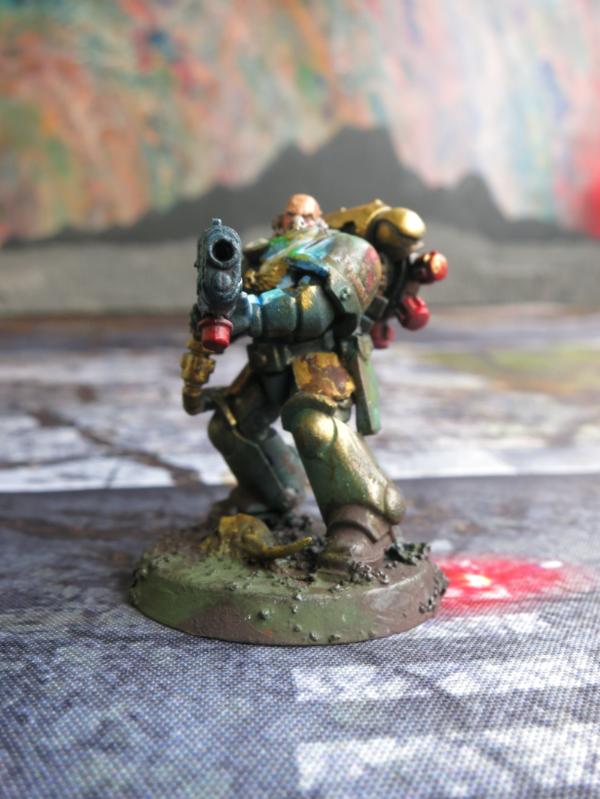
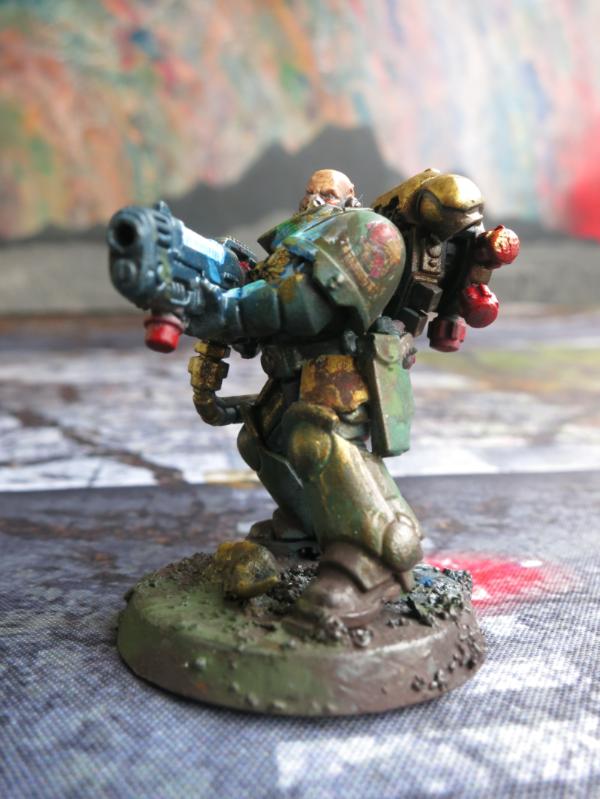
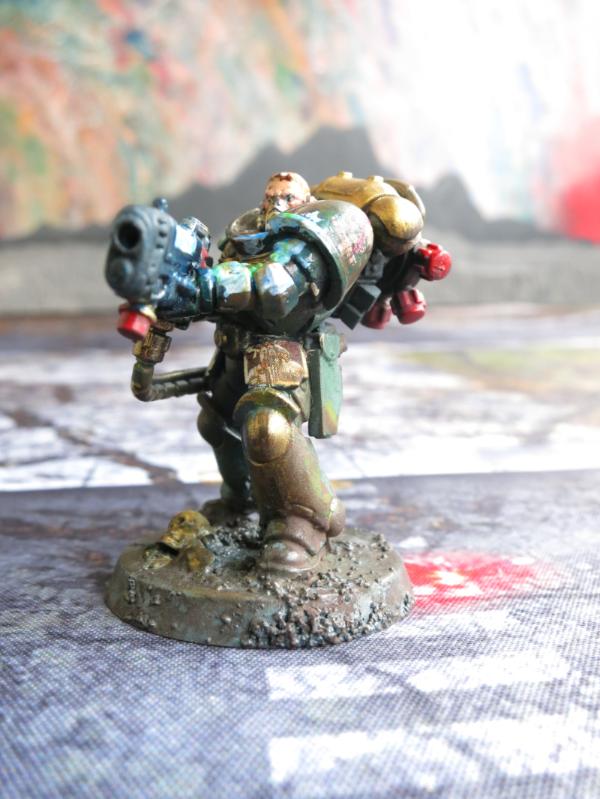
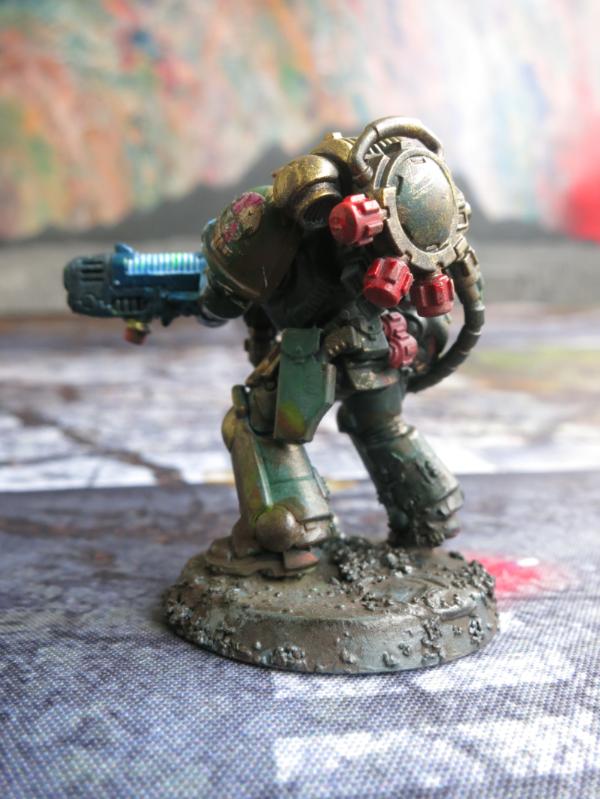
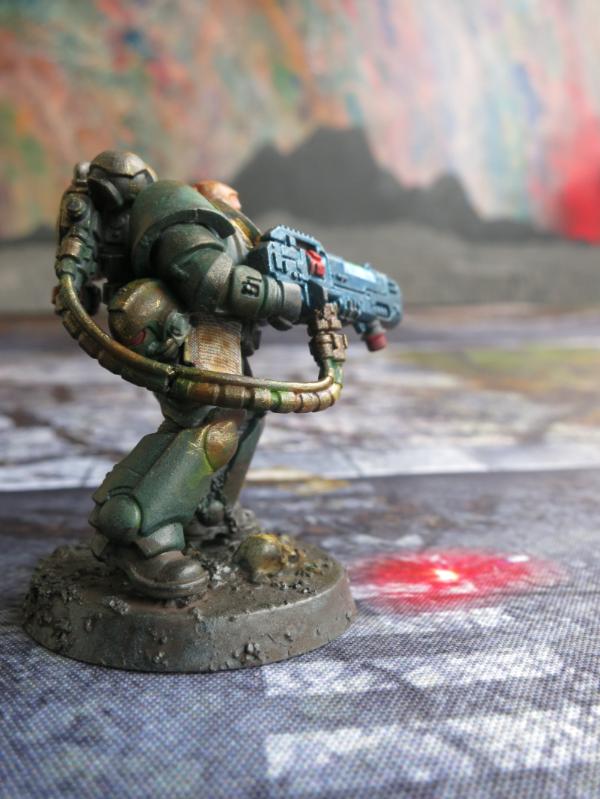
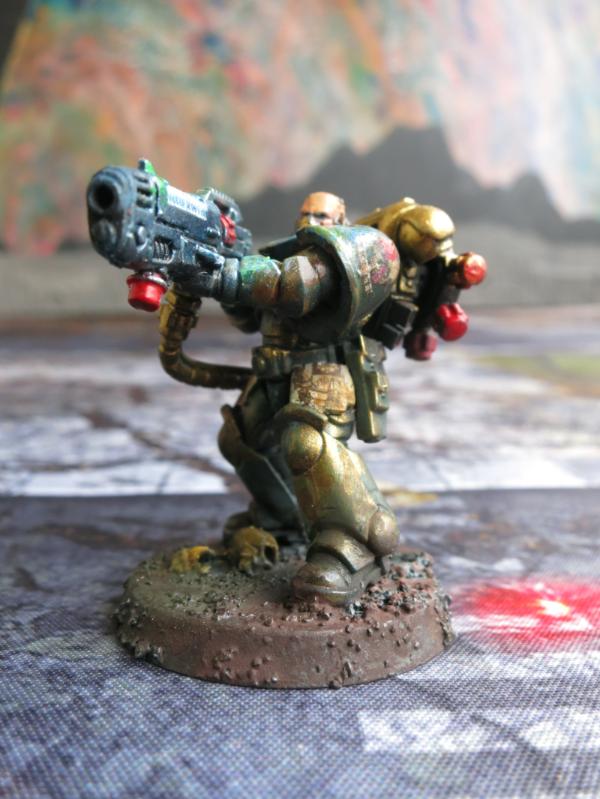
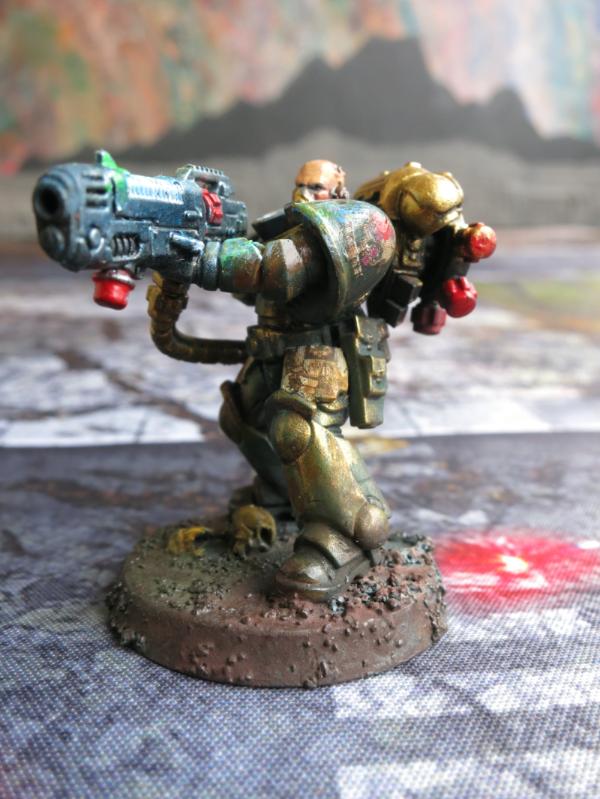
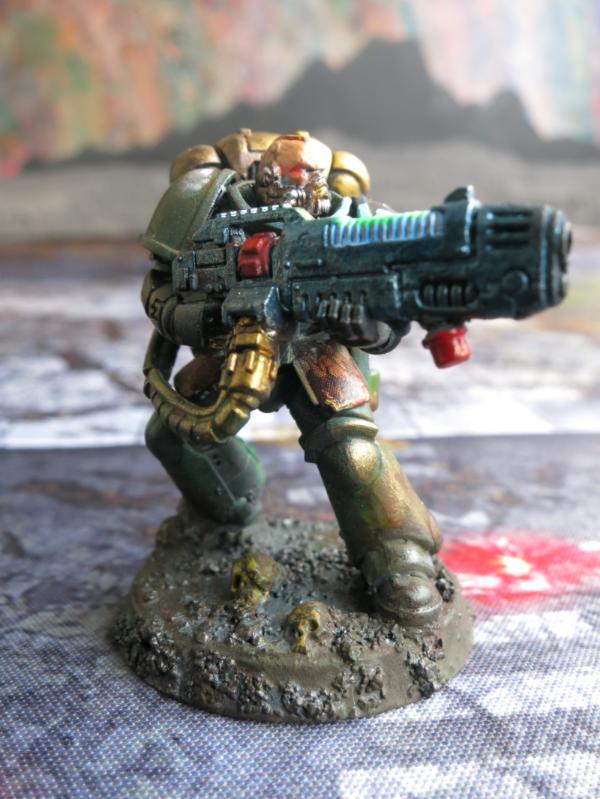
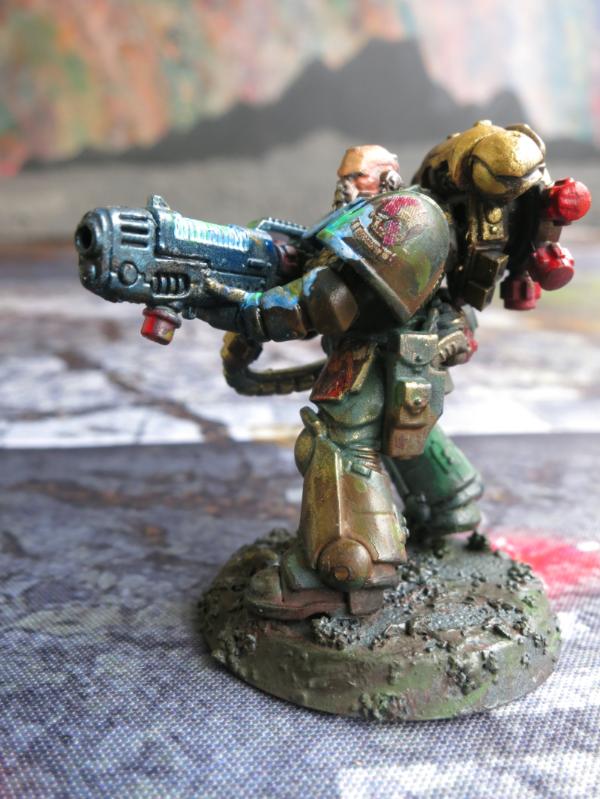
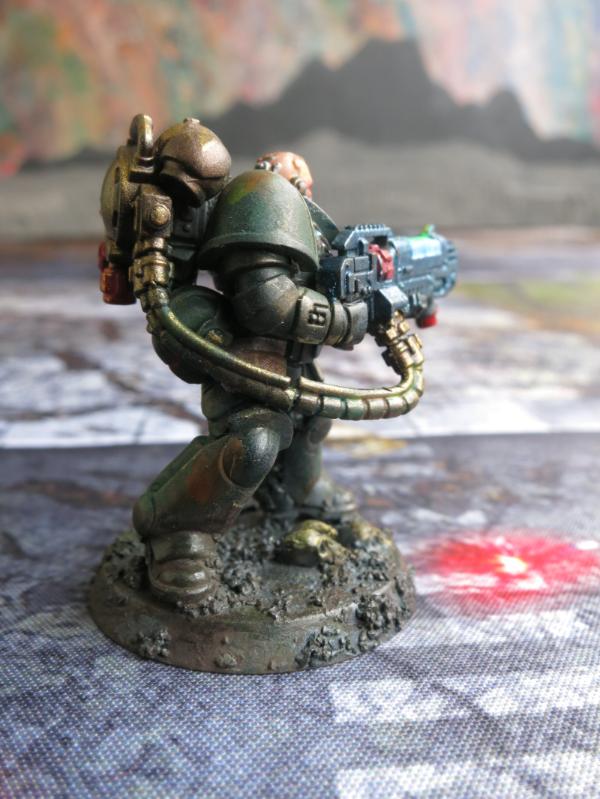
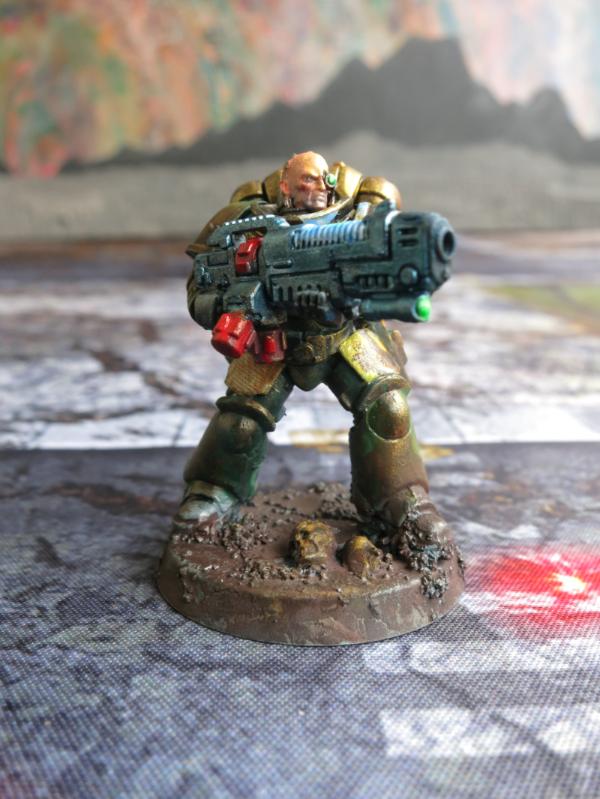
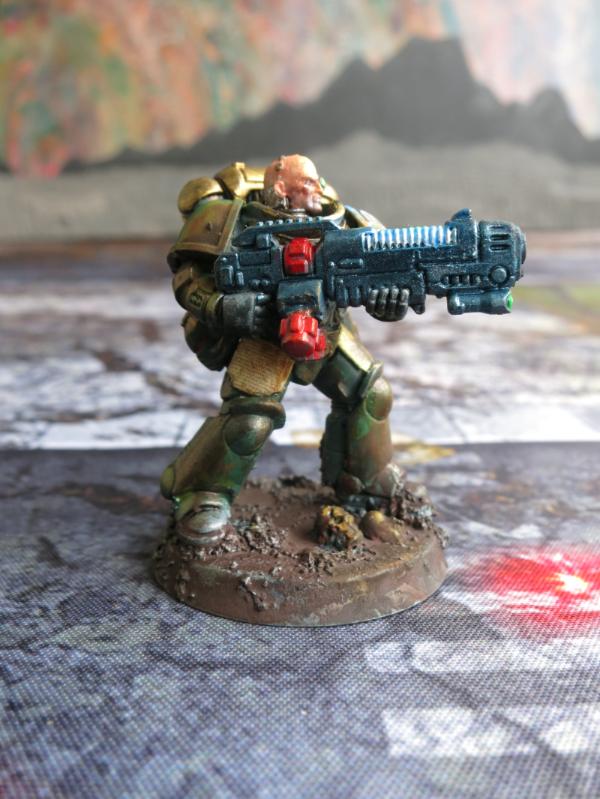
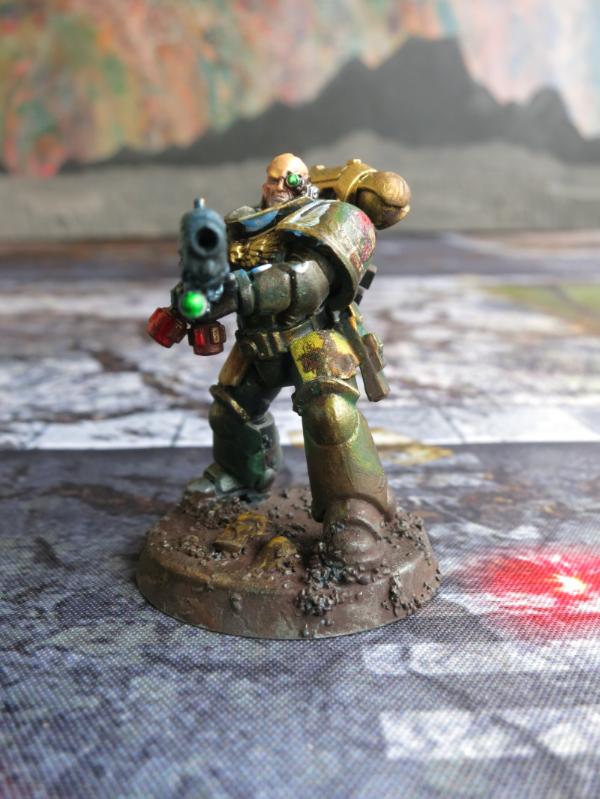
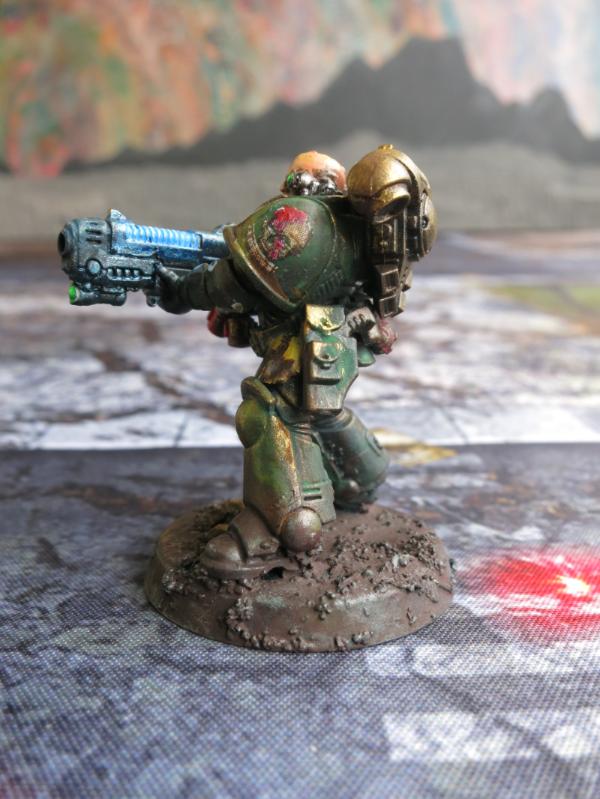
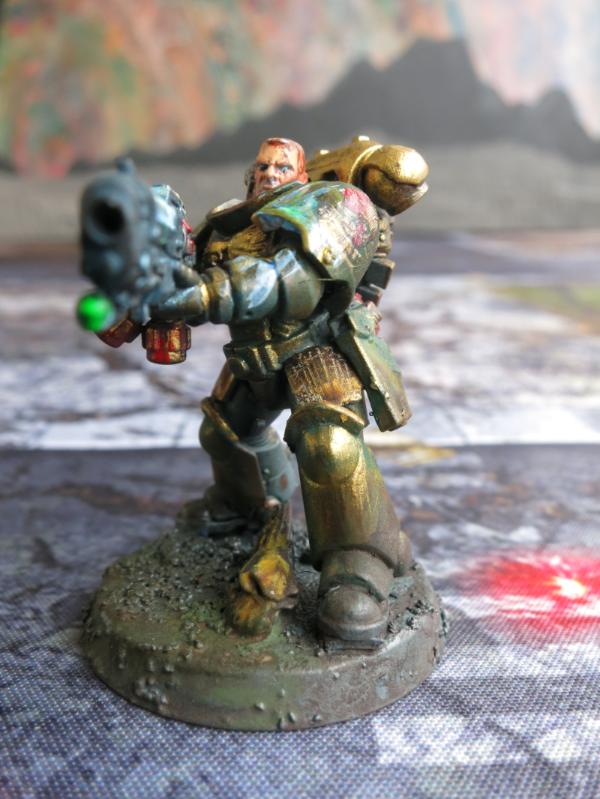
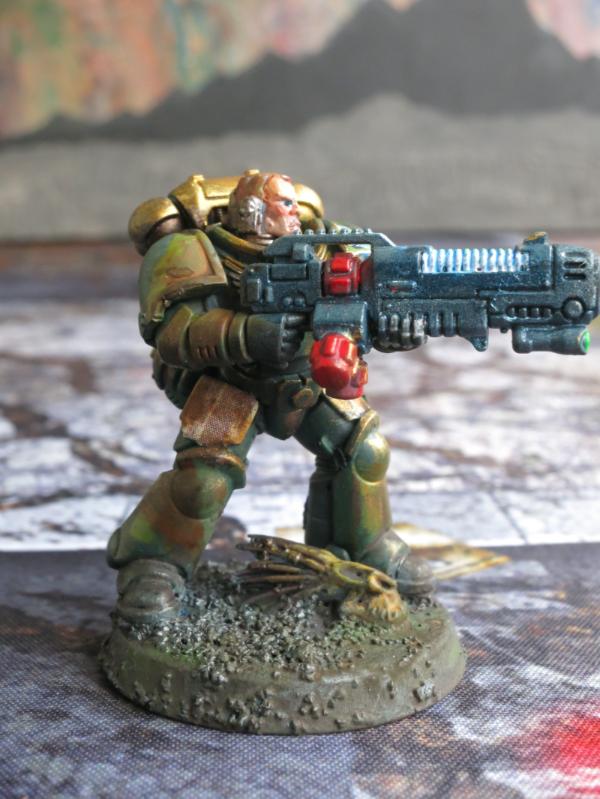
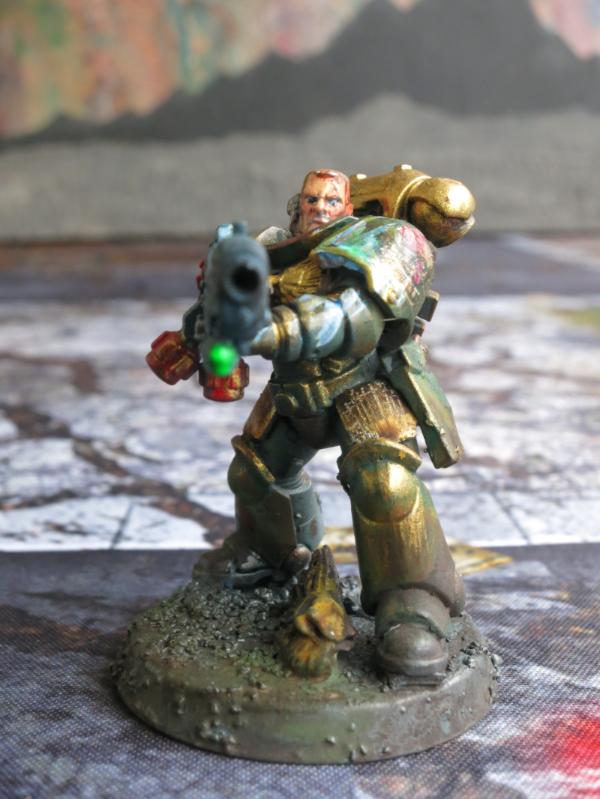
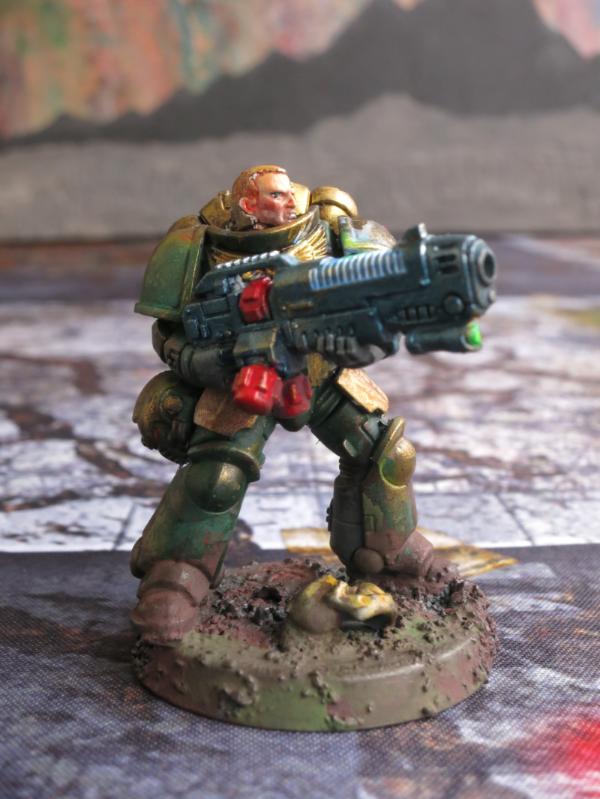
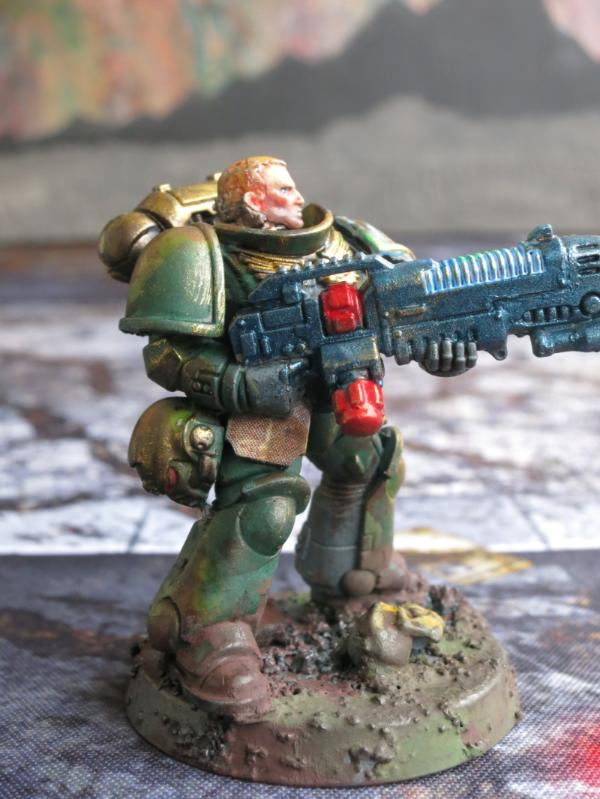
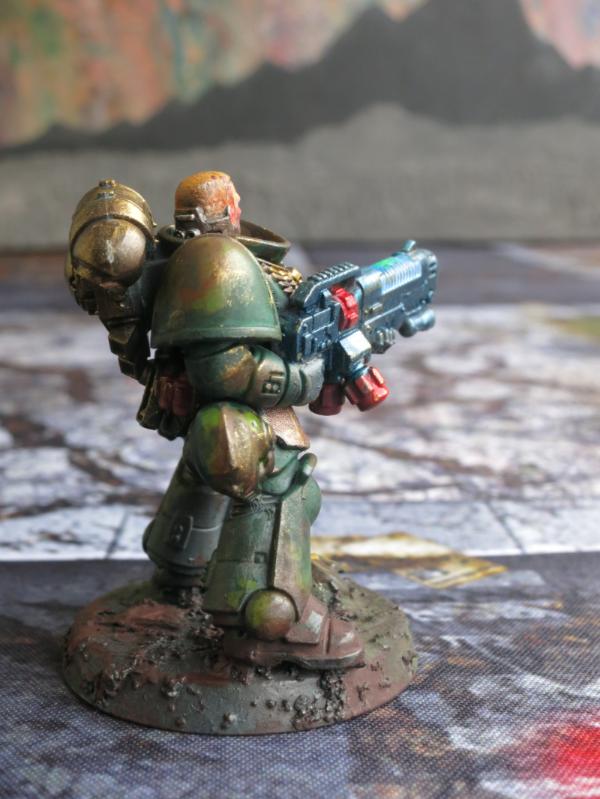
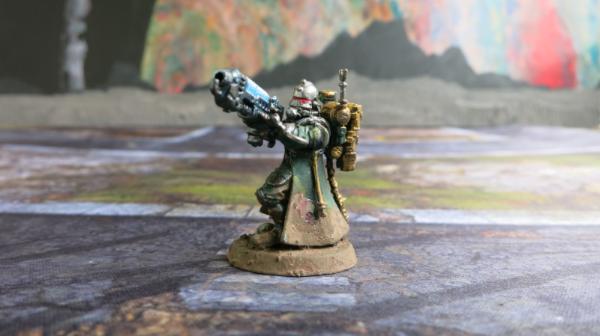
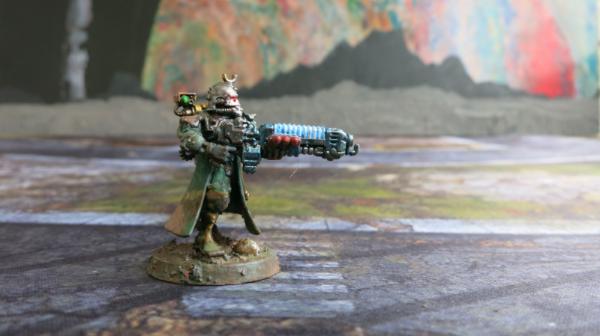
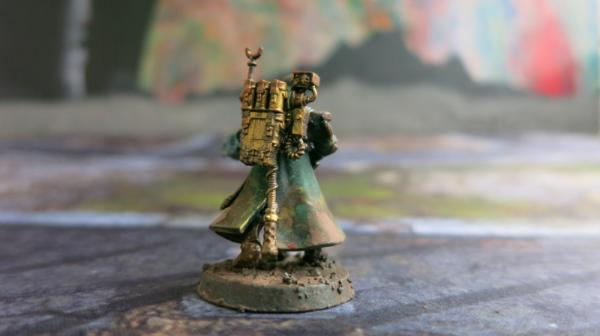
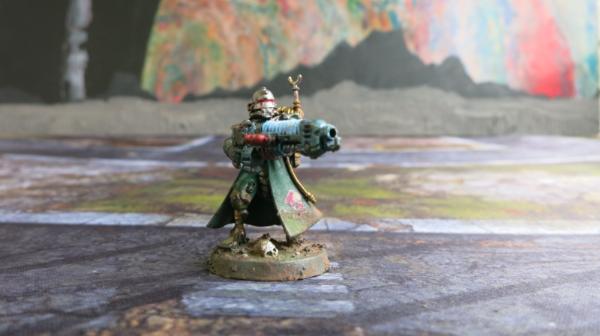
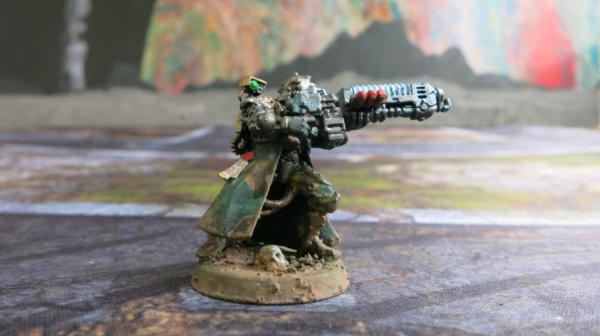
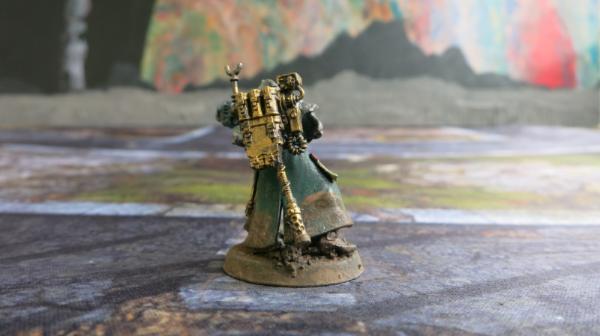
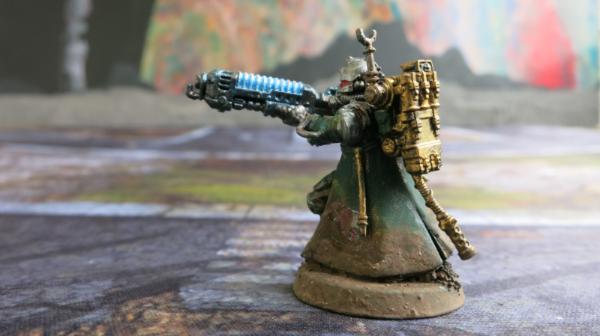
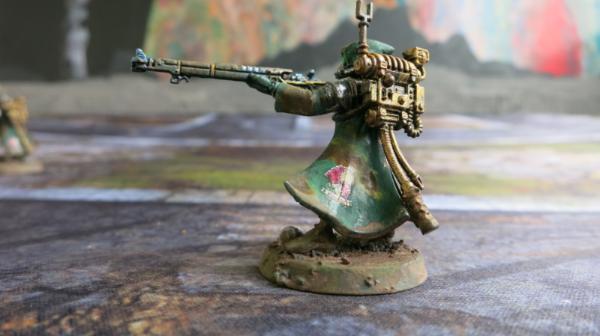
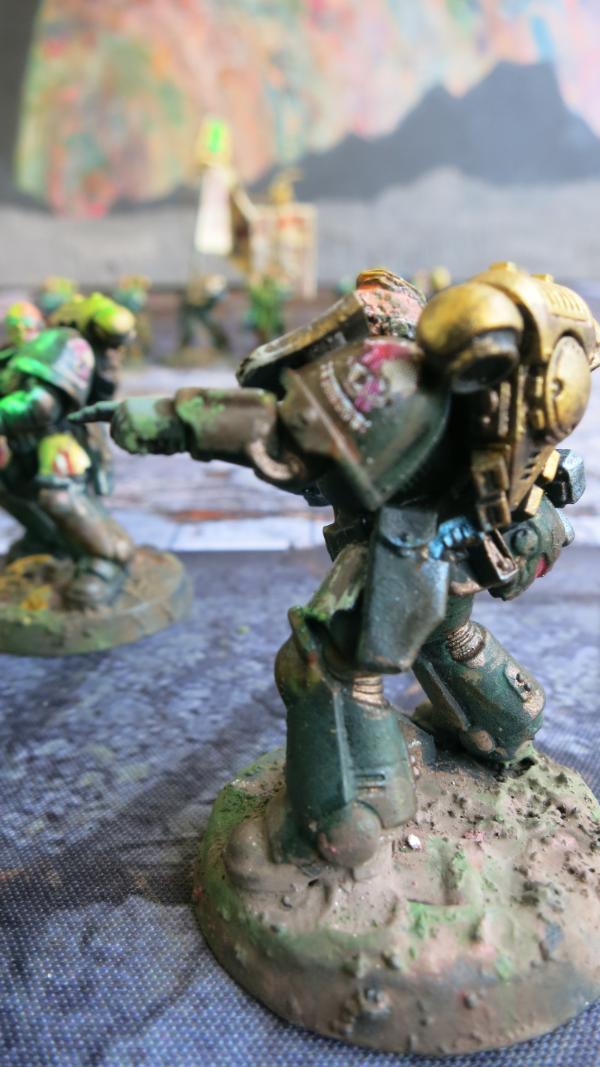
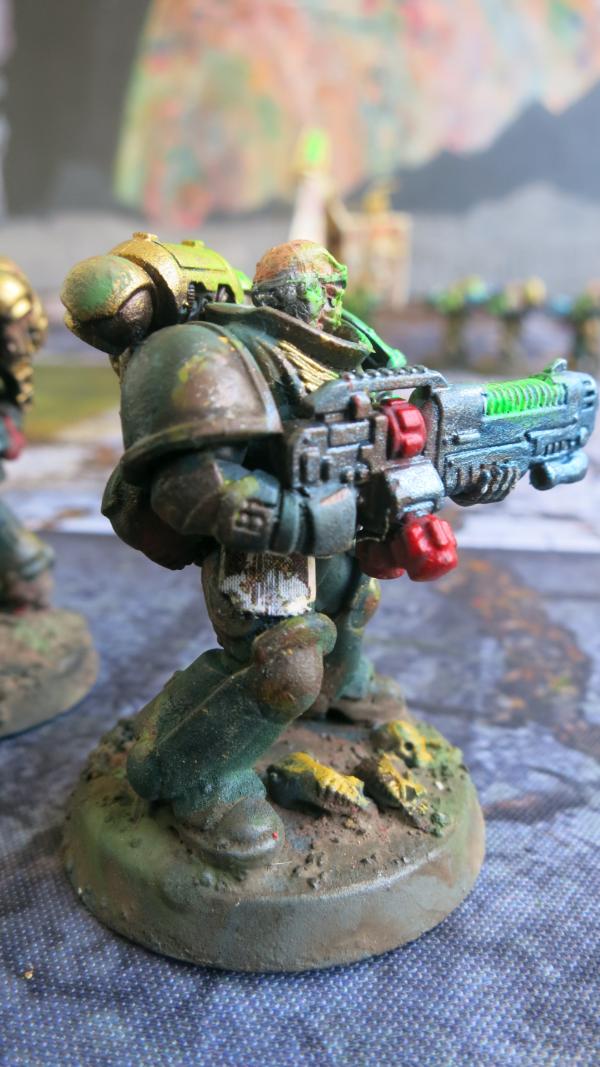
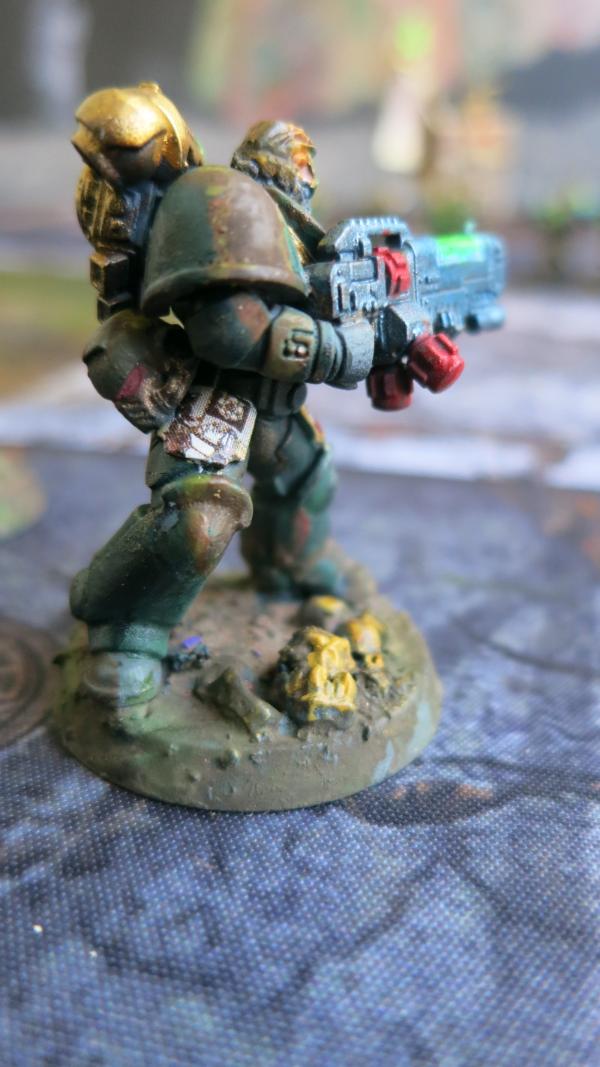
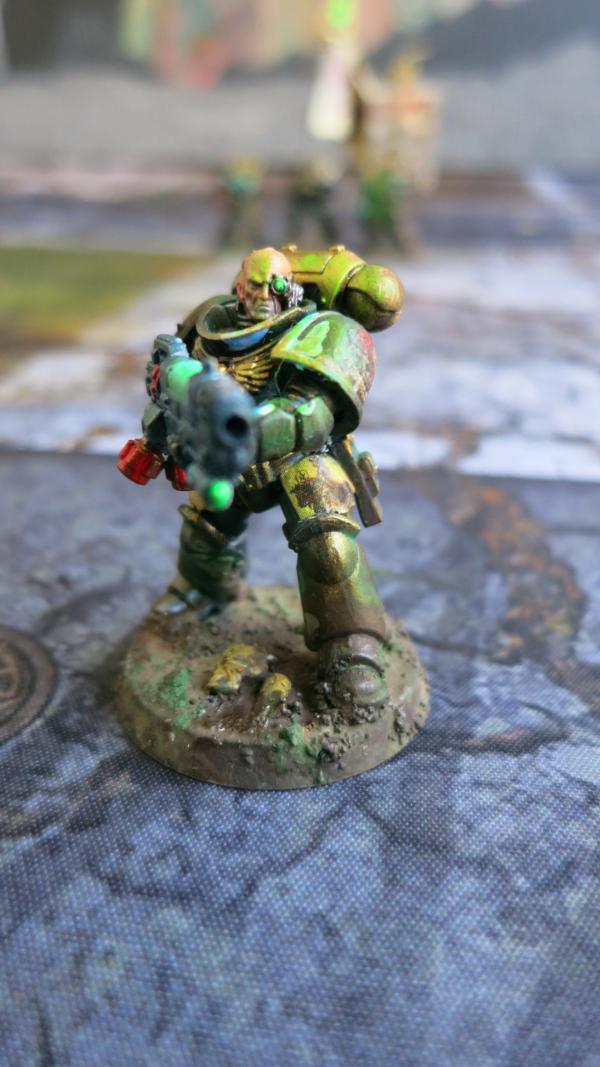
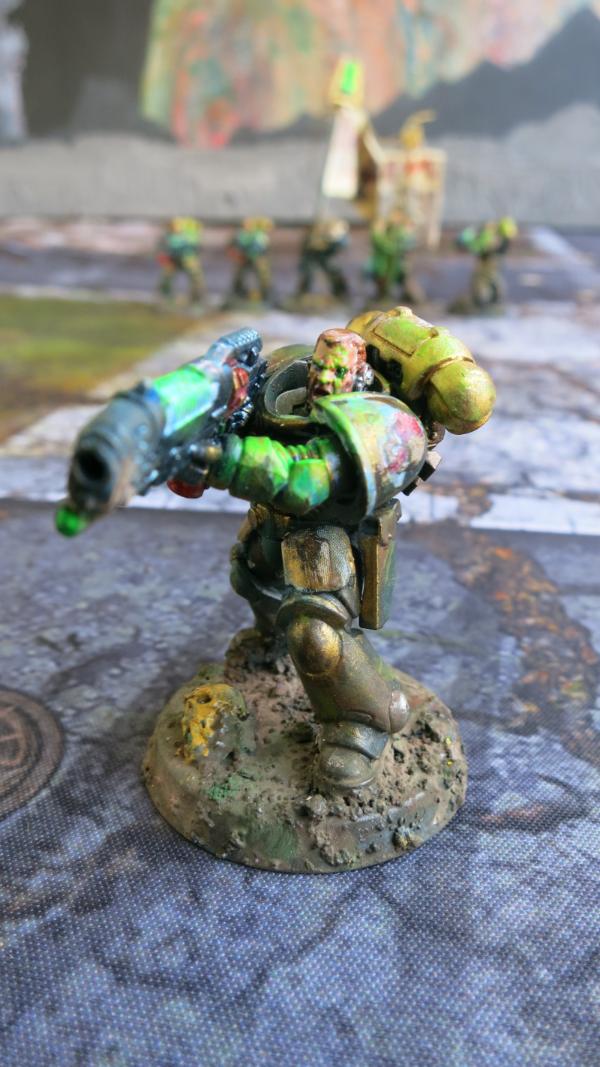
Intercessor - ACE
Just a good old Intercessor with the name ACE on his boltgun.
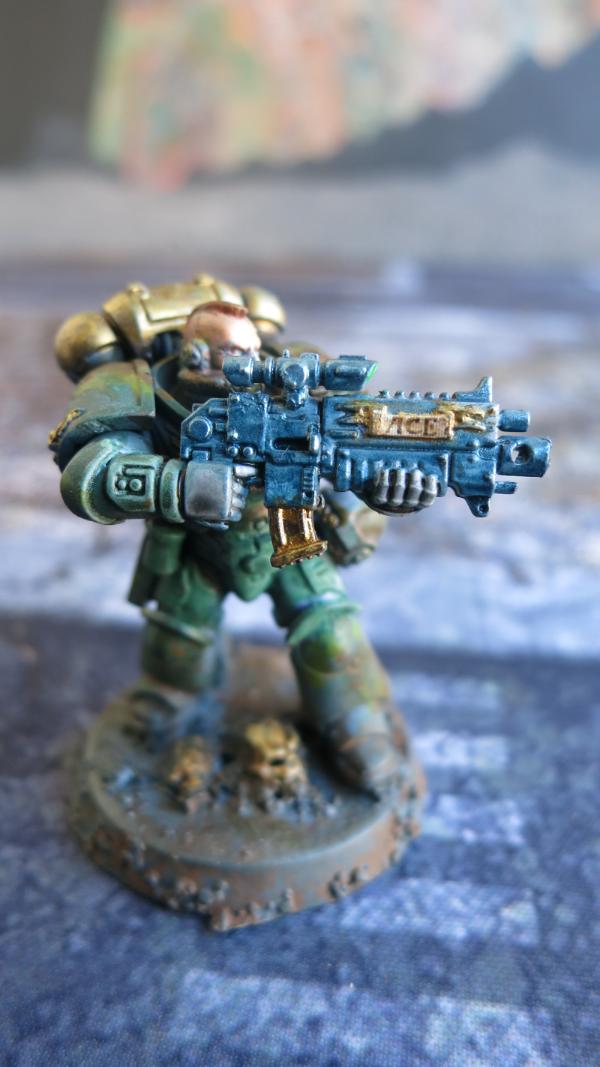
Ace the Intercessor – Right Side View
The gunmetal blue and the bronze/brass look good together.
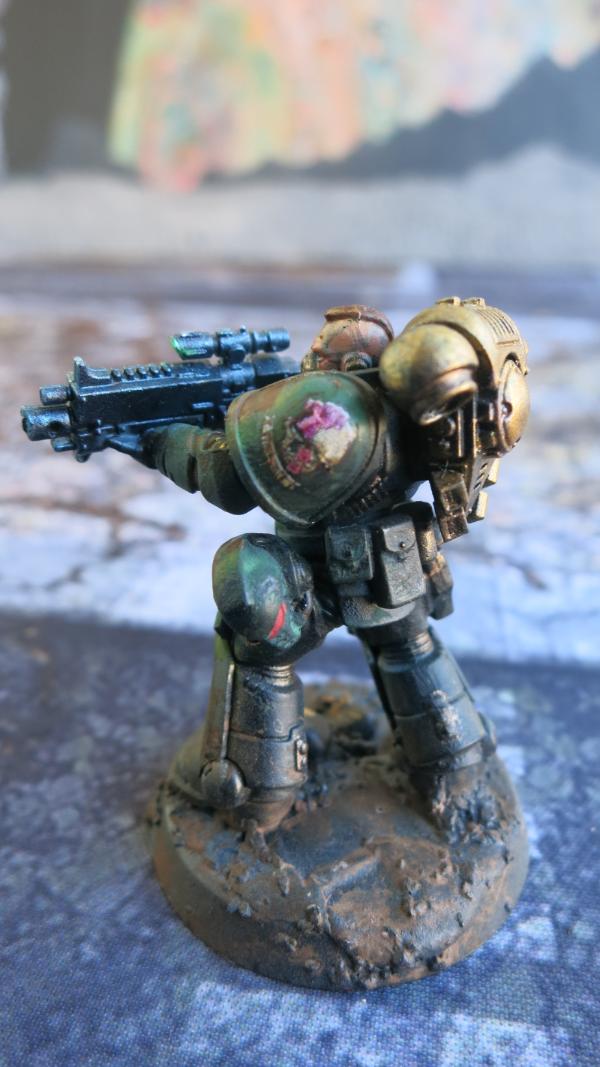
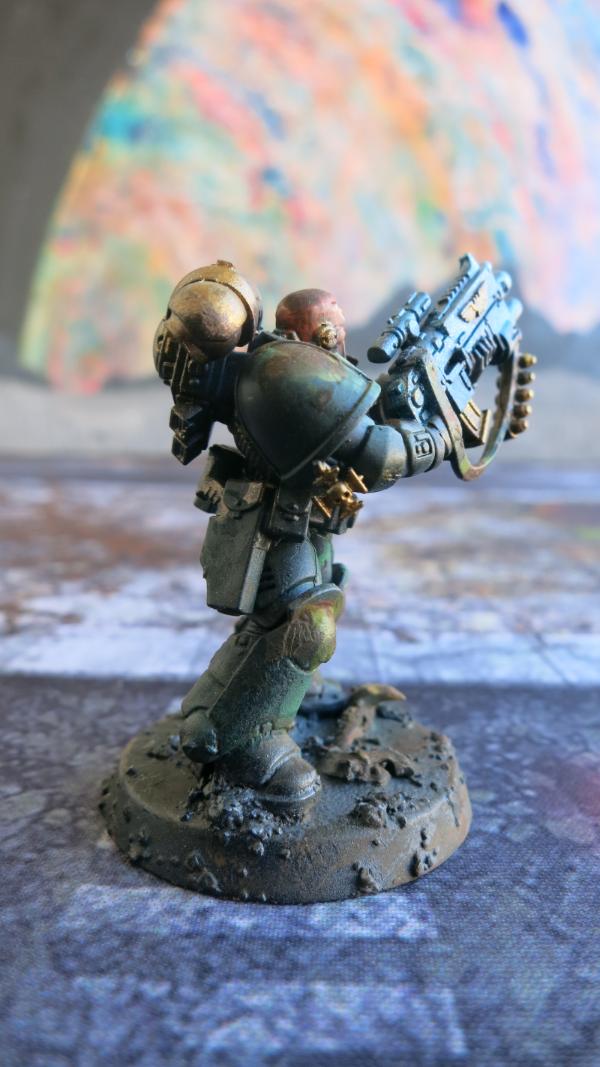
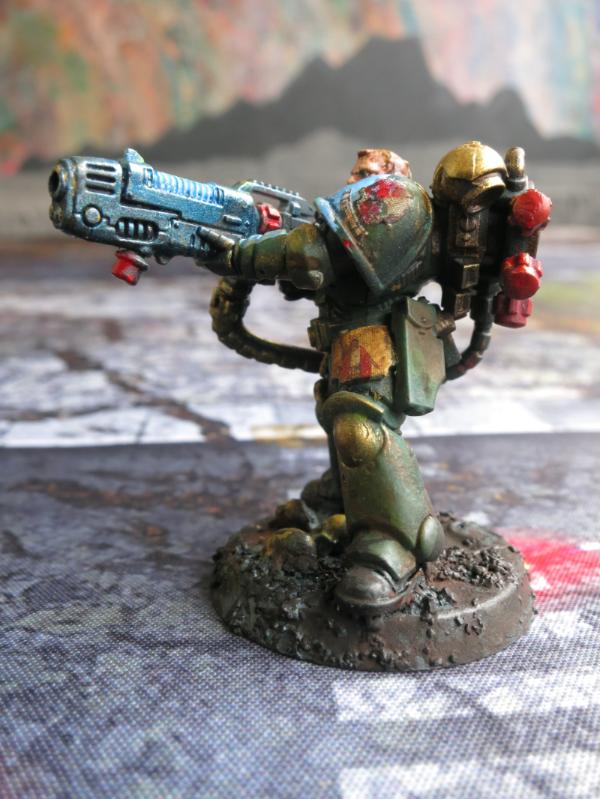
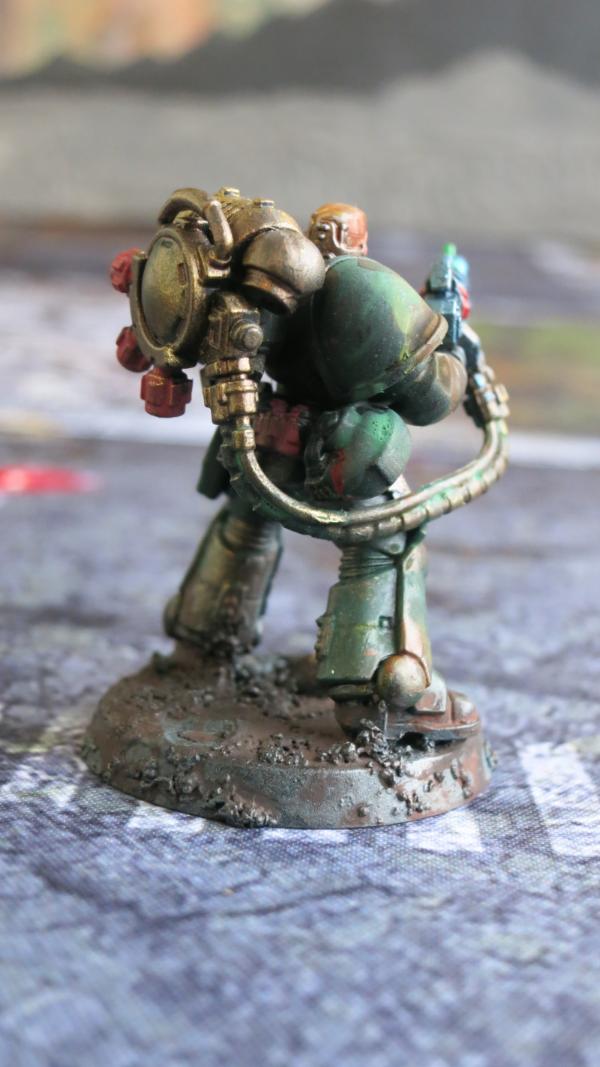
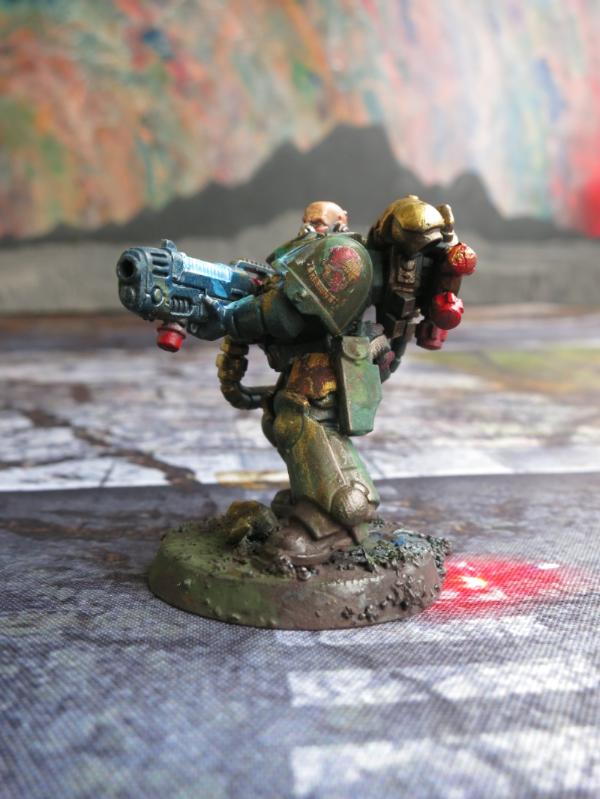
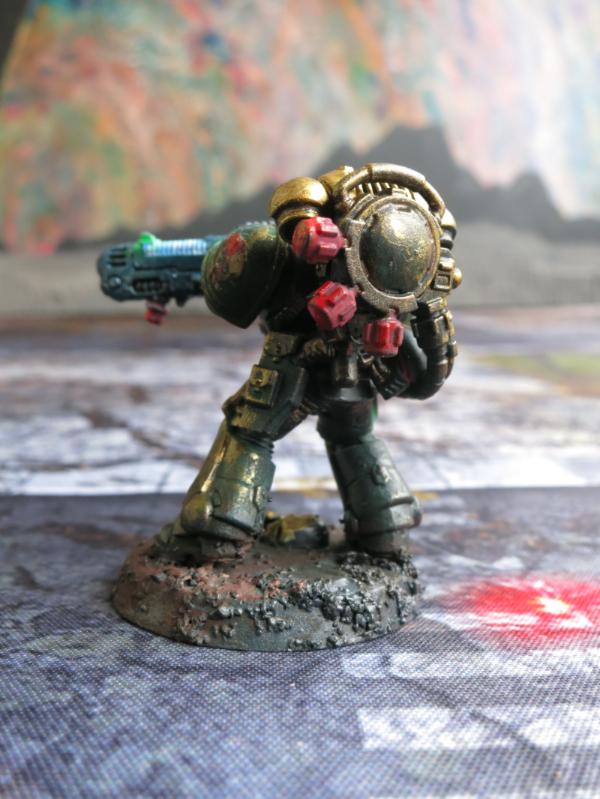
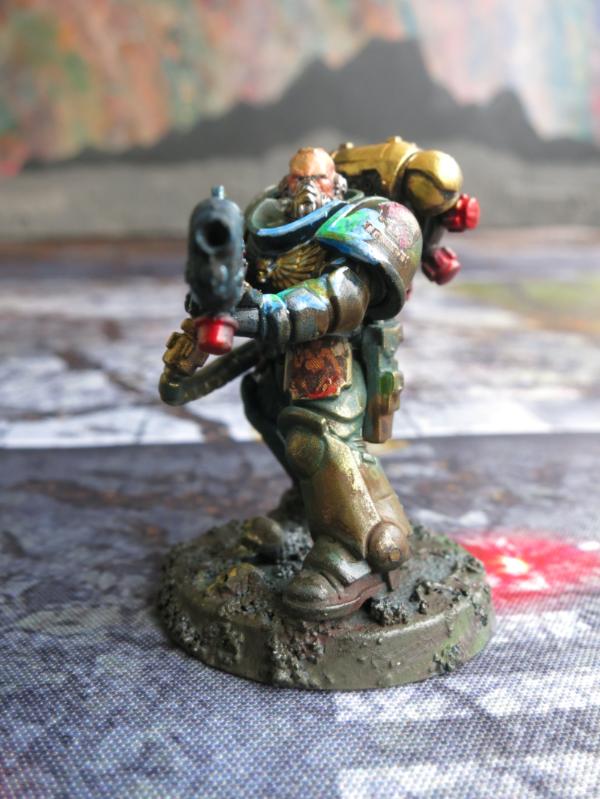
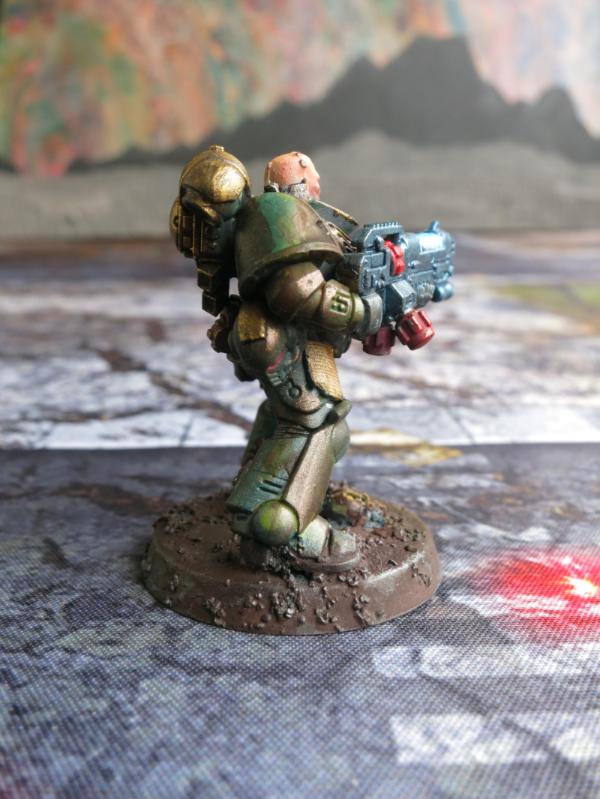
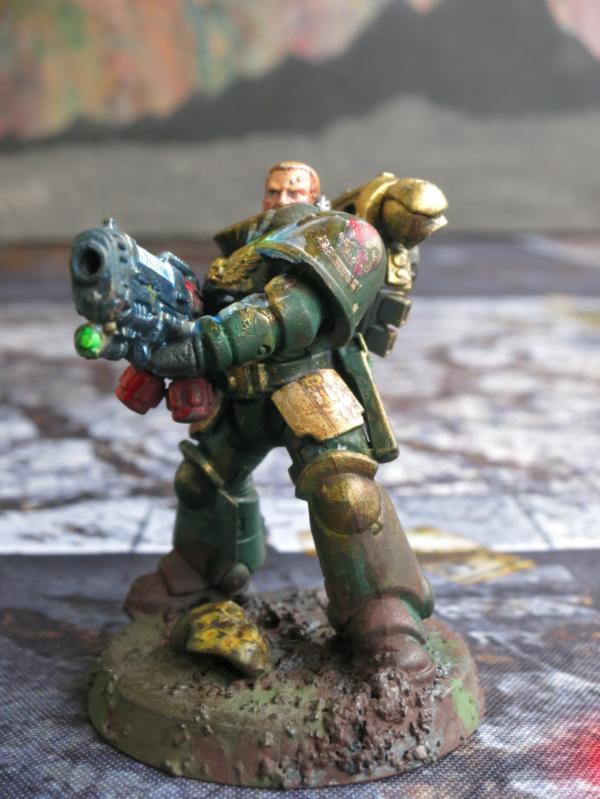
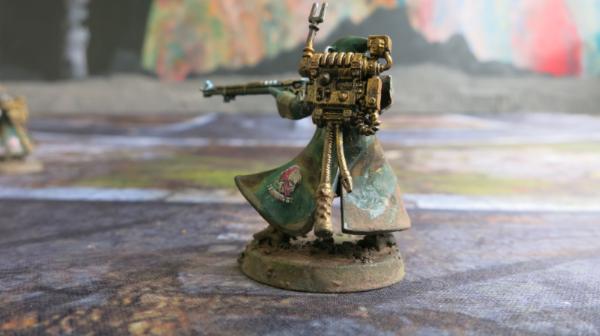
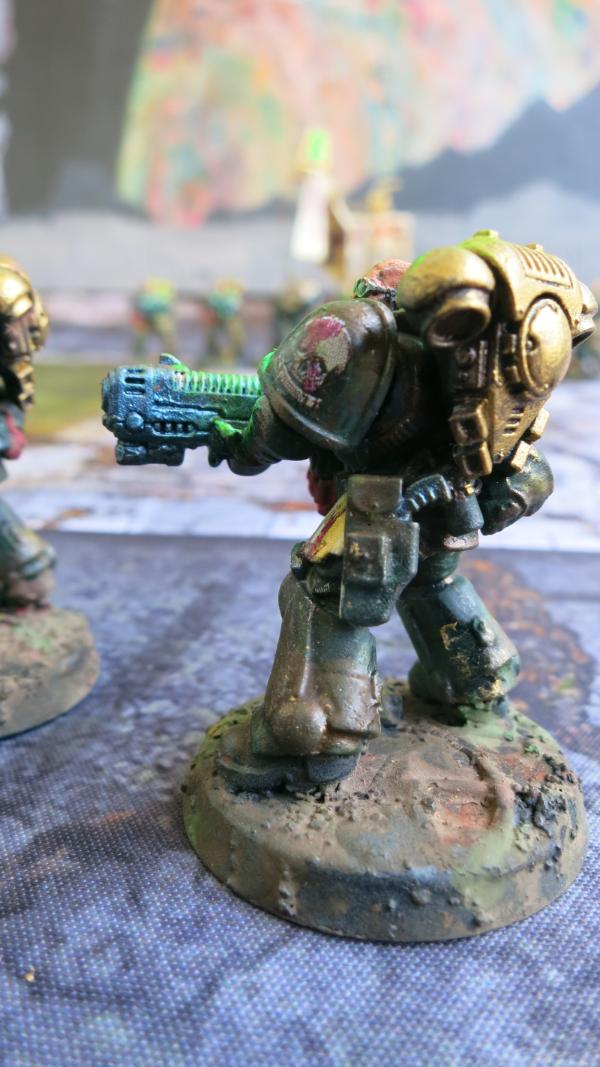
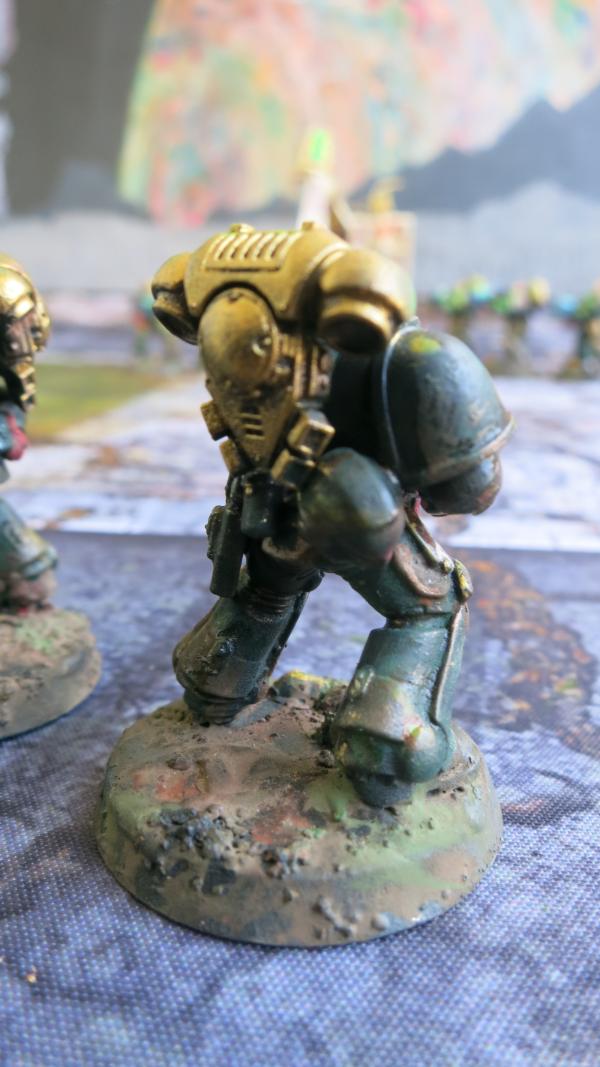
Ace the Intercessor - Left Side View
This base and the model capture the effect that I want. The terrain is rough and dirty and his boots are rough and dirty. This models reflect my fluff, a no-name space marine chapter created to perform for the Lord High Admiral the grubby little missions that other space marine chapter’s refuse to take. When the Master of the Administratum for the Imperium requested that certain other chapters provide space marines for this unnamed chapter, the other chapter masters took advantage of this to get rid of their troublemakers, hot-dogs, and embarrassments. These soldiers are not Adeptus Custodes, golden soldiers to guard the Emperor’s Golden Throne. Instead, these are the soldiers that are called to clean up an Ork or Demon infestation on a space station or abandoned space cruiser lost in the Dead Zone.
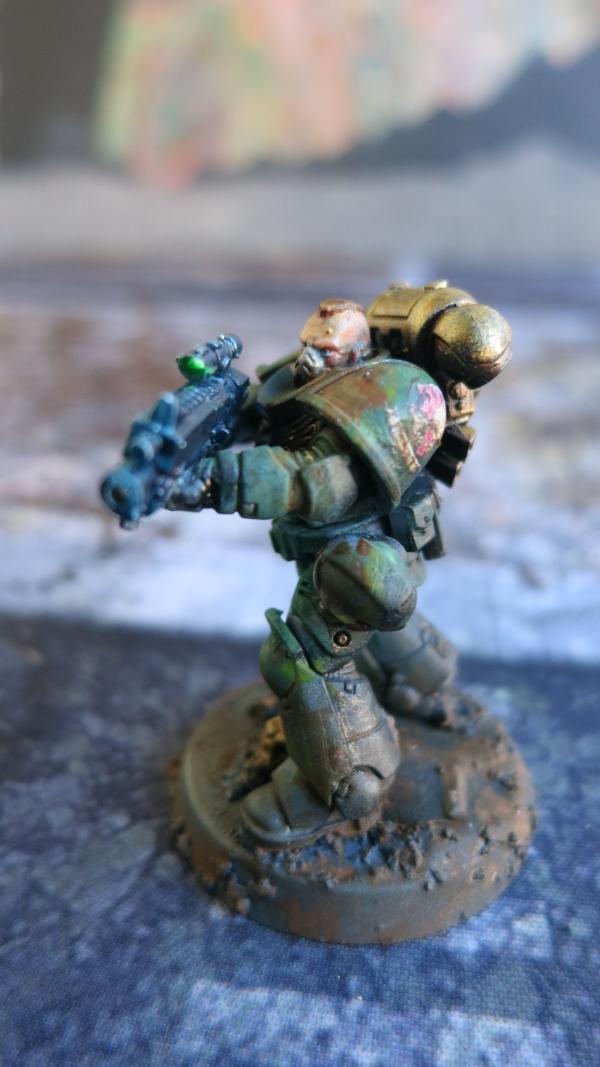
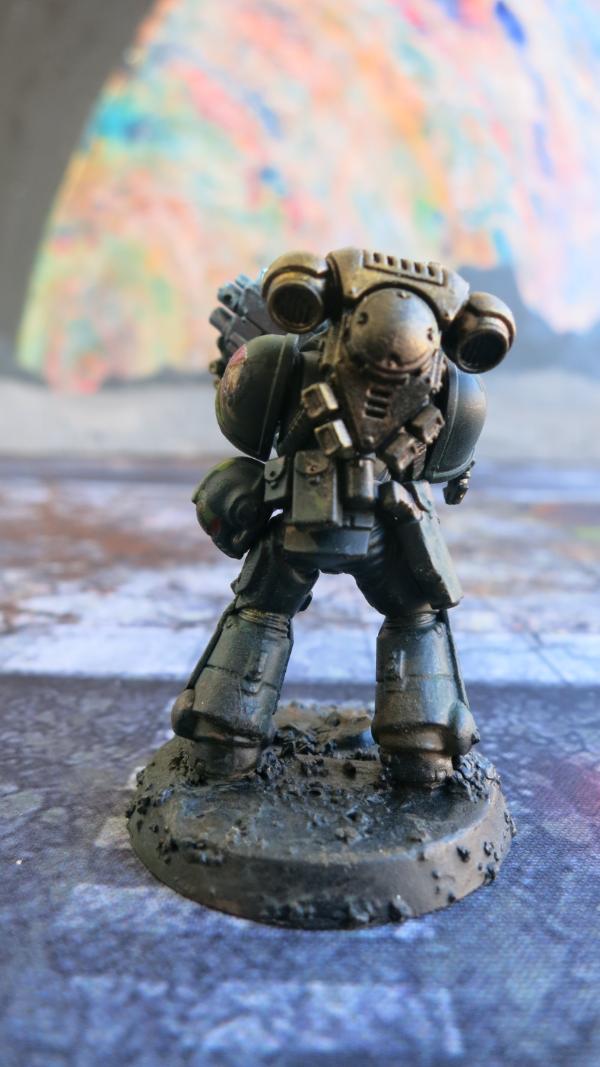
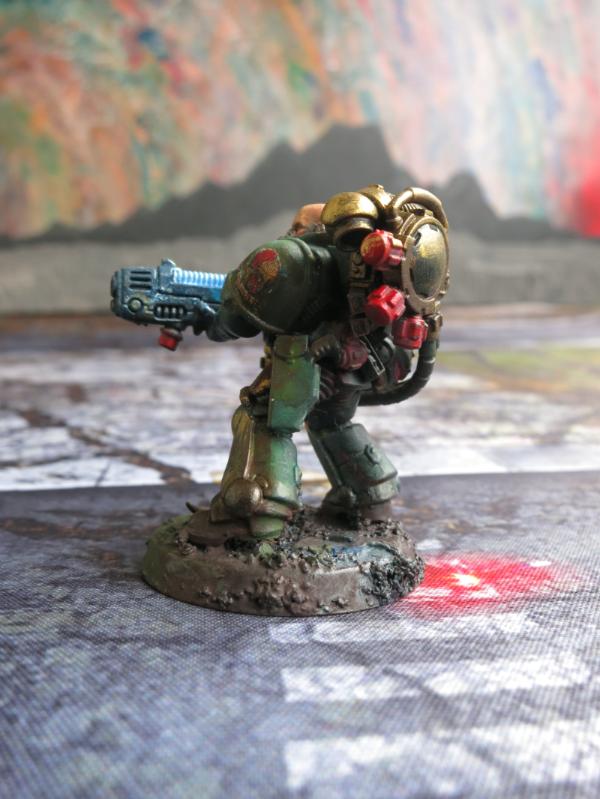
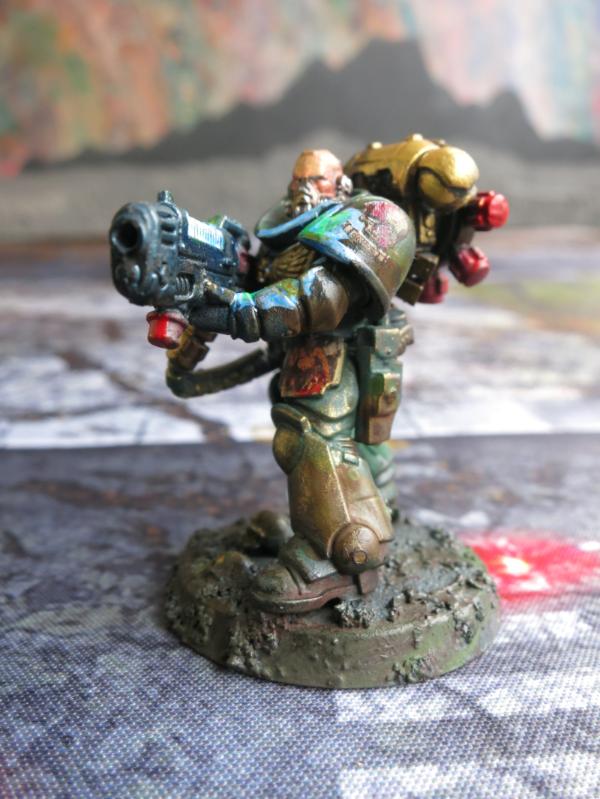
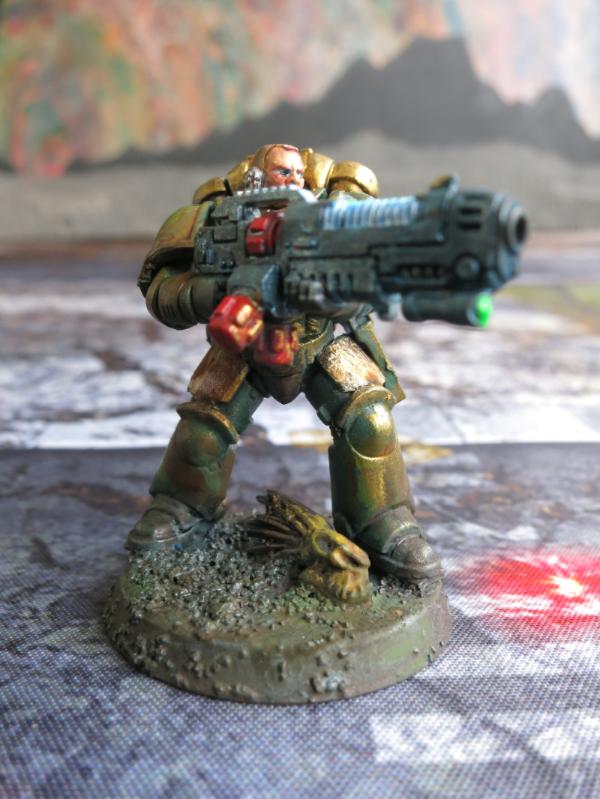
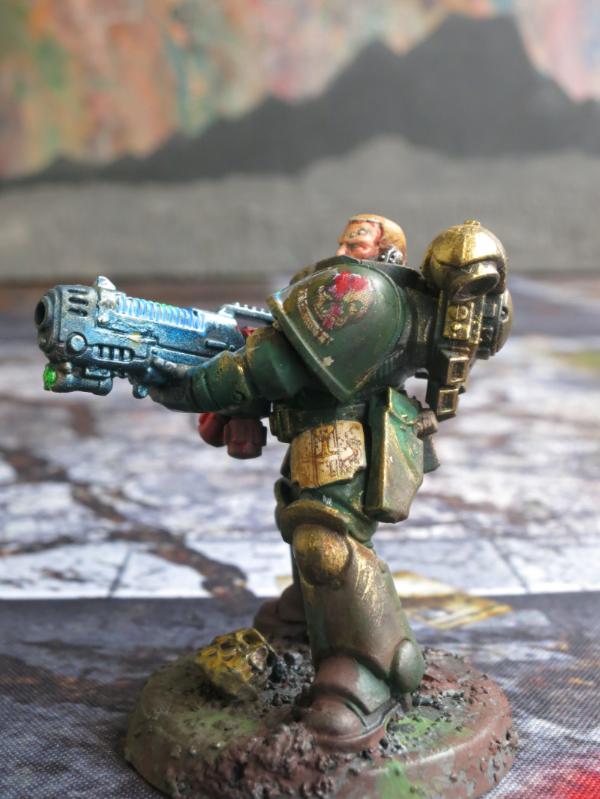
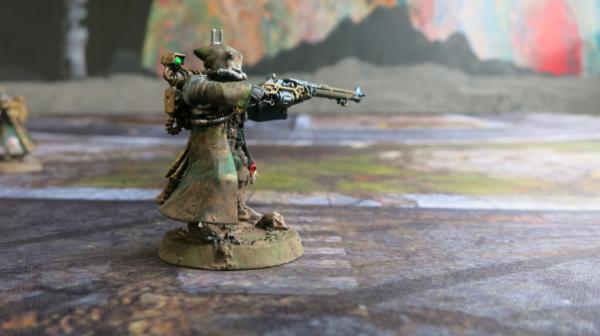
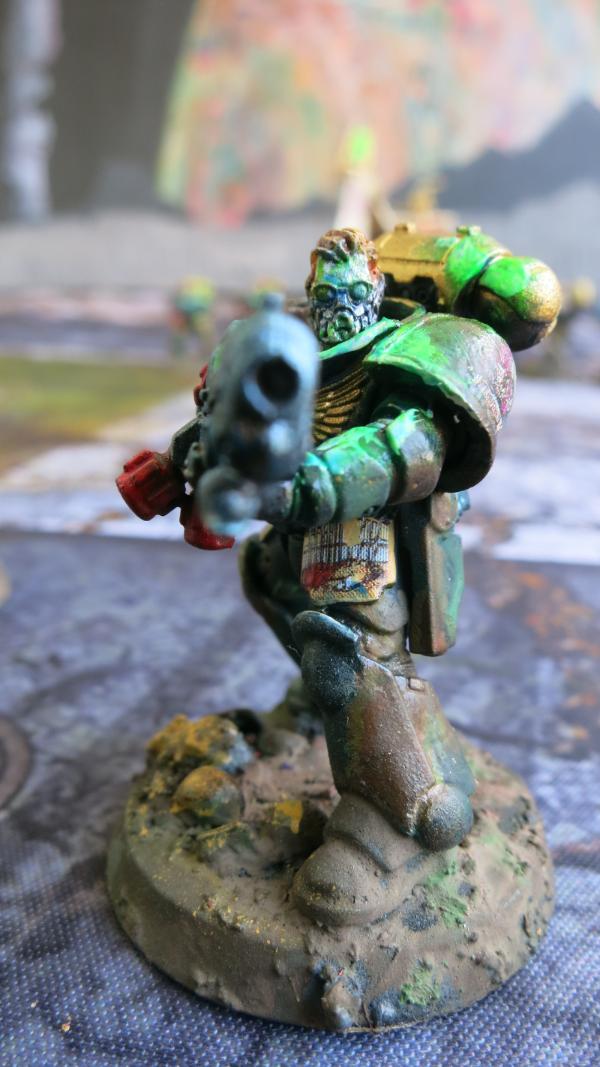
Ace the Intercessor - Front View
21898
Post by: Oldmanronald
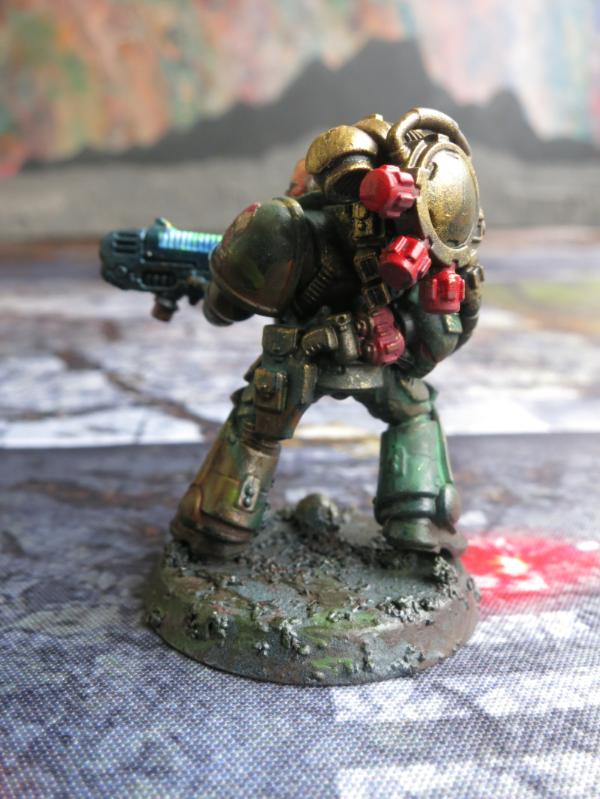
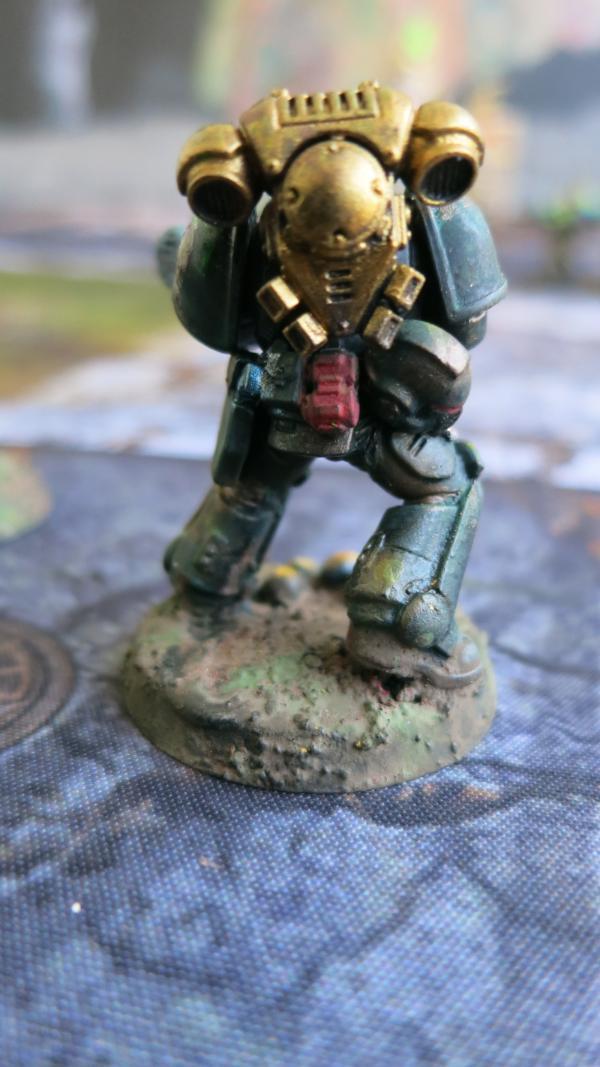
Another Intercessor
Intercessor – Front View
Intercessor – Right Side View
Intercessor – Rear View
21898
Post by: Oldmanronald
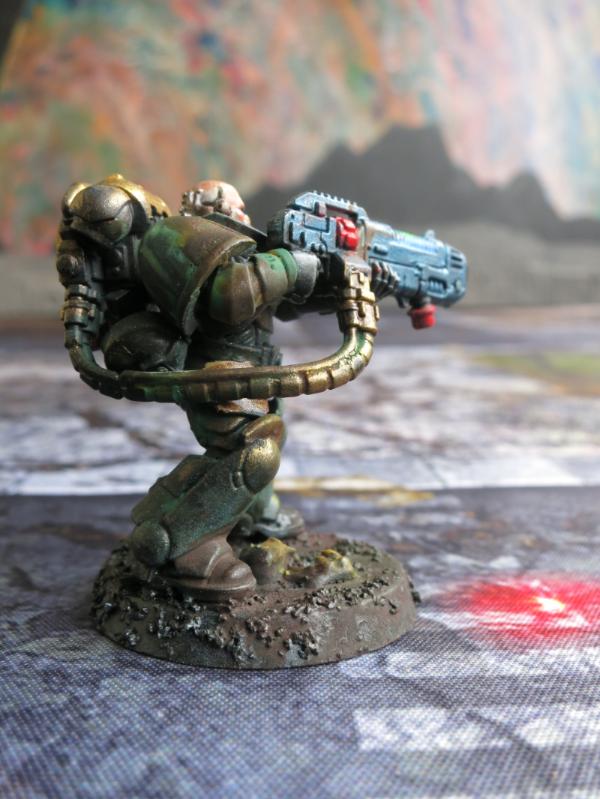
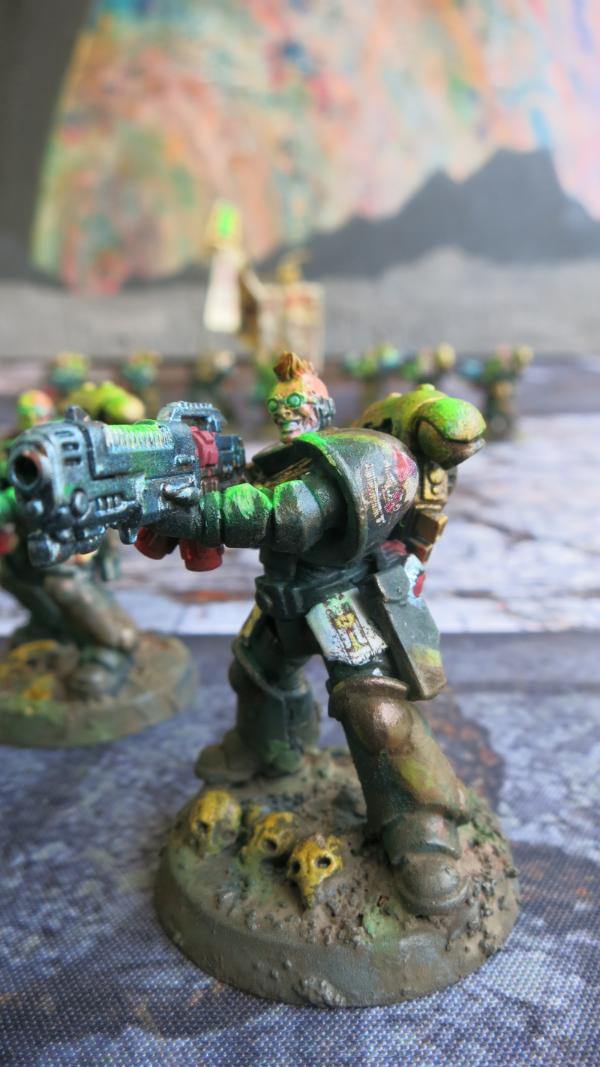
Intercessor with Auxiliary Grenade Launcher
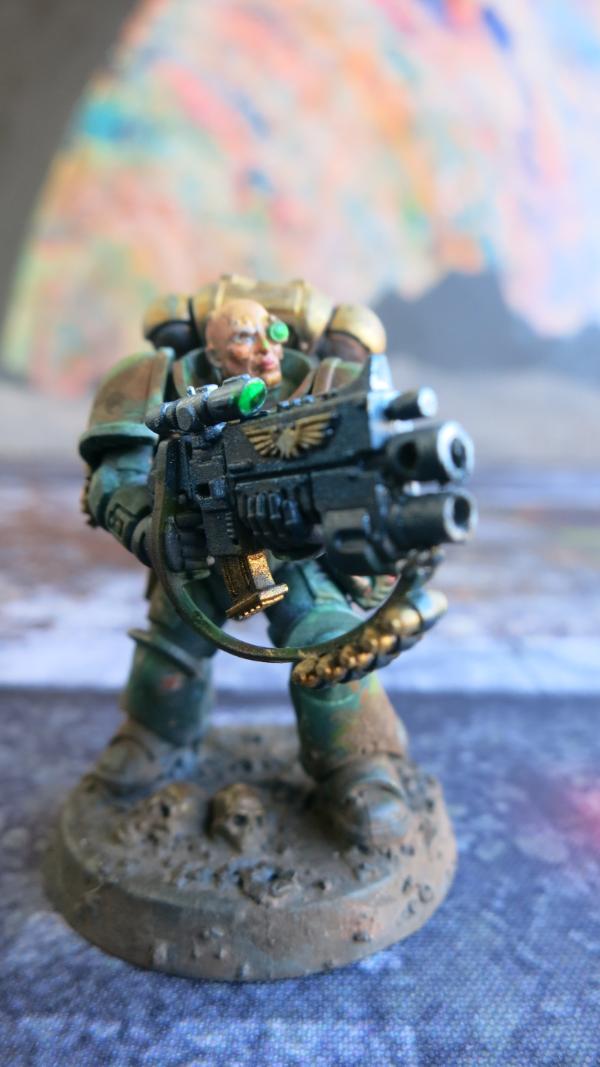
Grenadier – Front View
Grenadier – Rear View
Grenadier – Left Side View

Grenadier – Right Side View
21898
Post by: Oldmanronald
Second Intercessor Sergeant - Cups
Intercessor Sergeant – Front View
He must be a sergeant. He has the key.
Intercessor Sergeant – Left Side View
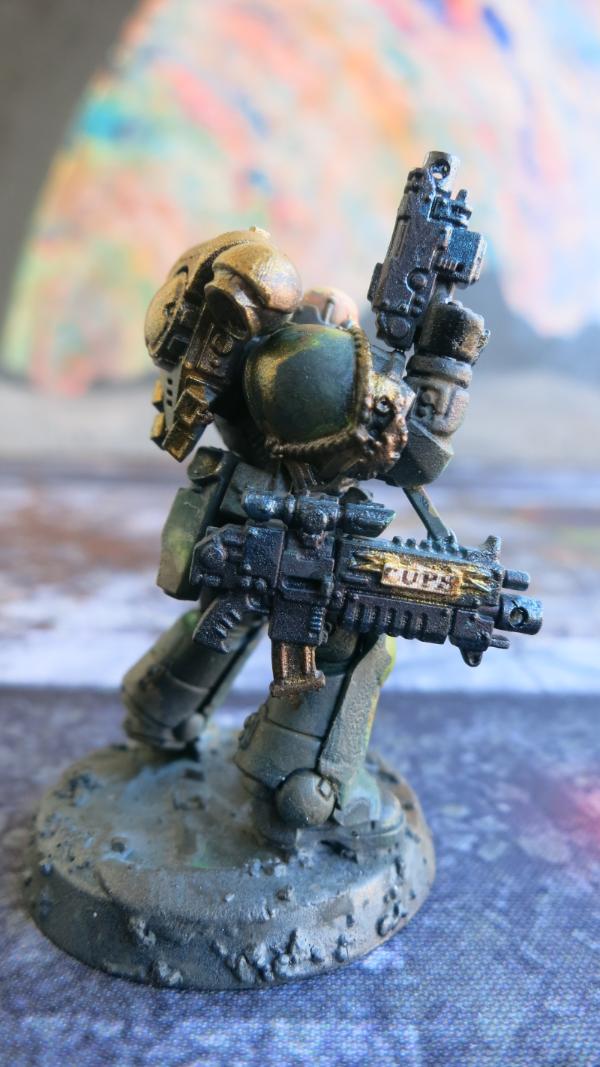
Intercessor Sergeant – Right Side View
Now you know his name – Sergeant Cups because his bolt rifle has the name CUPS on it.
21898
Post by: Oldmanronald
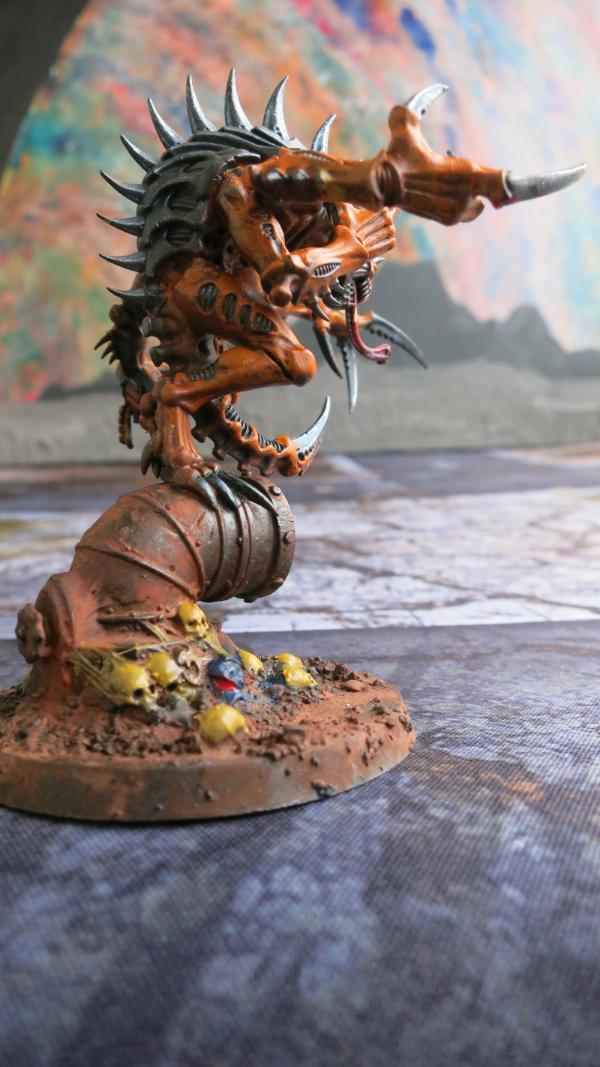
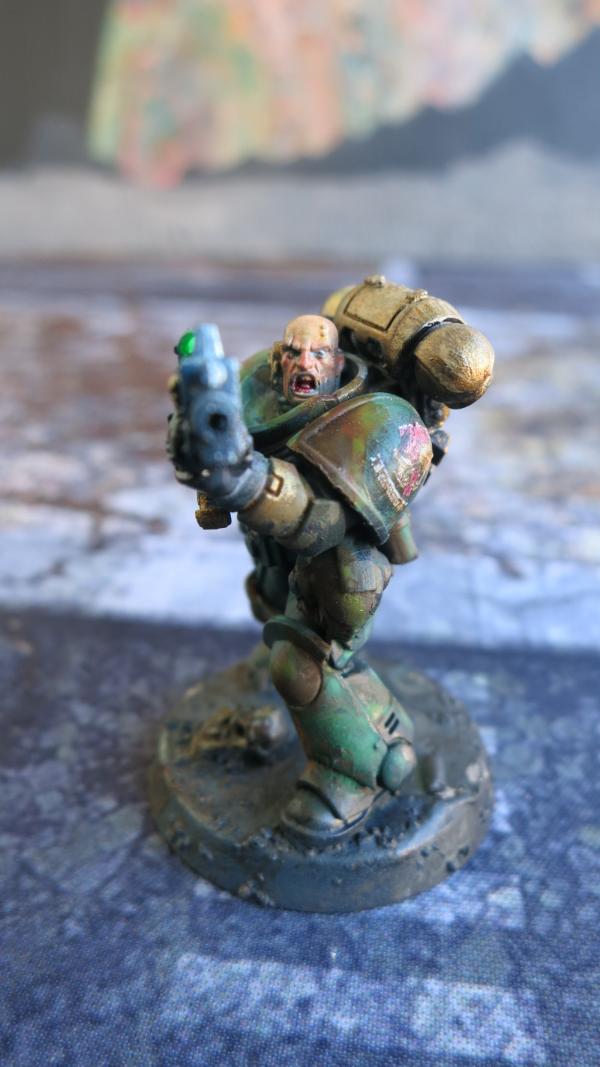
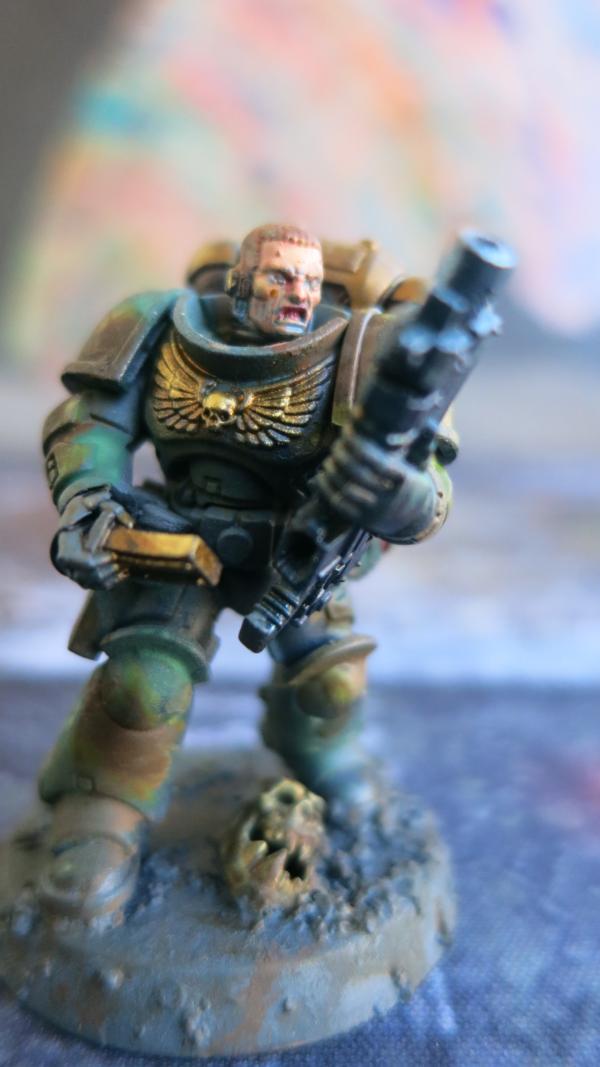
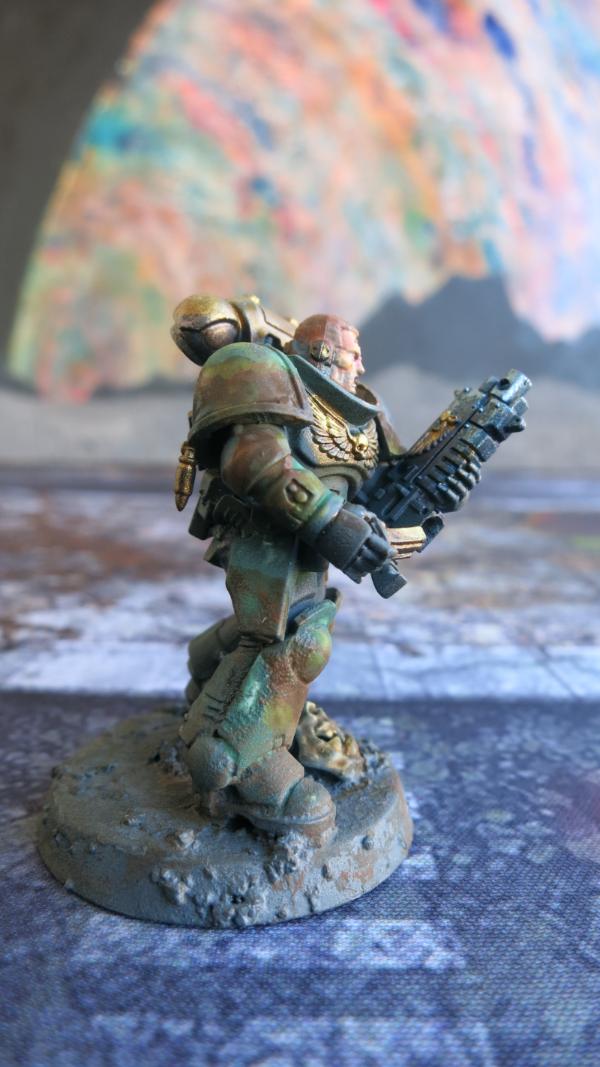
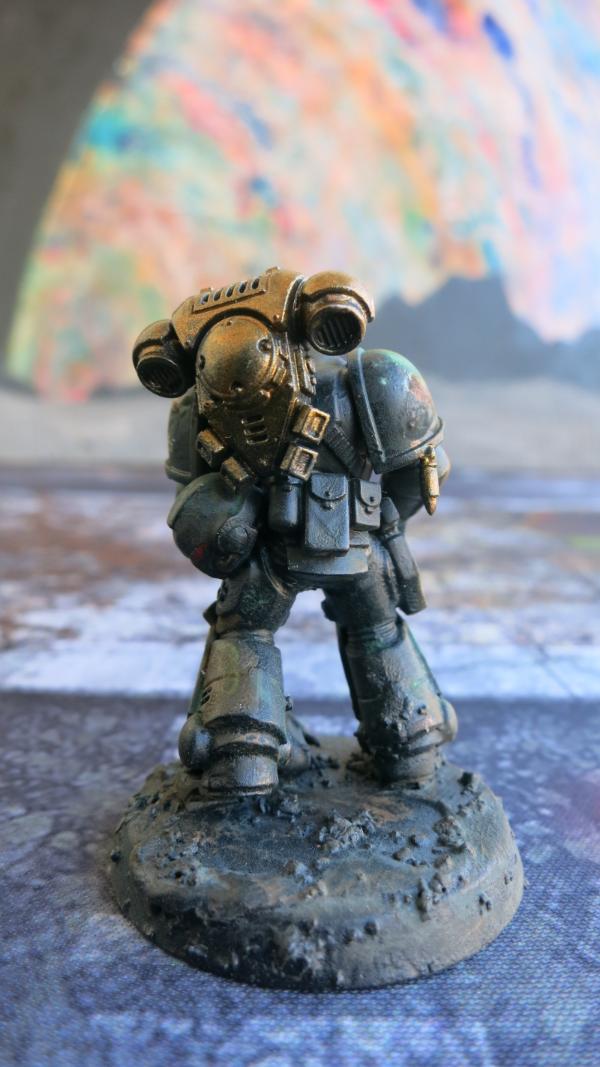
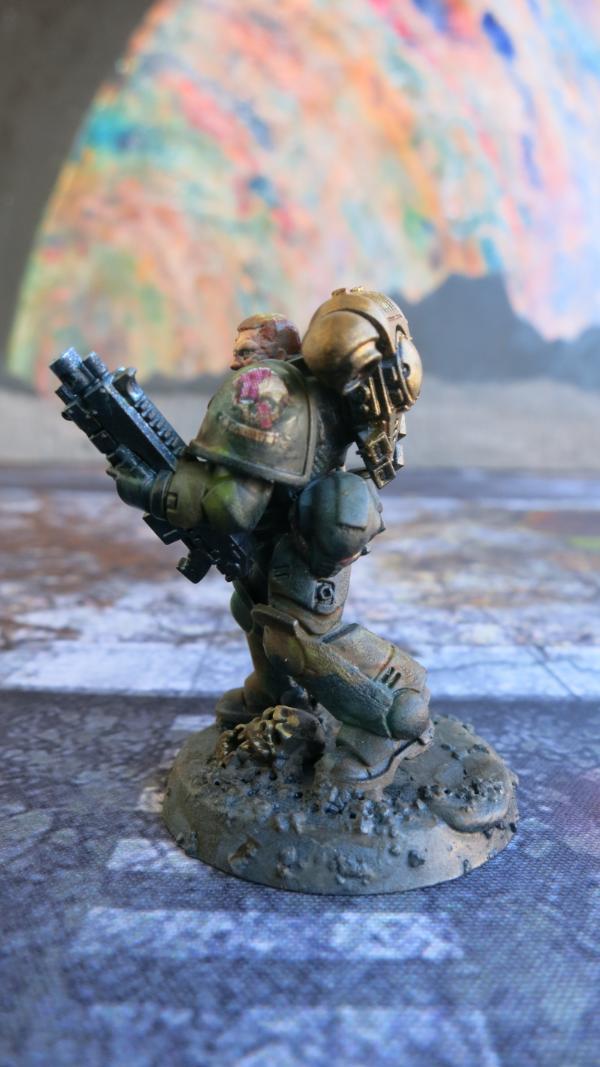
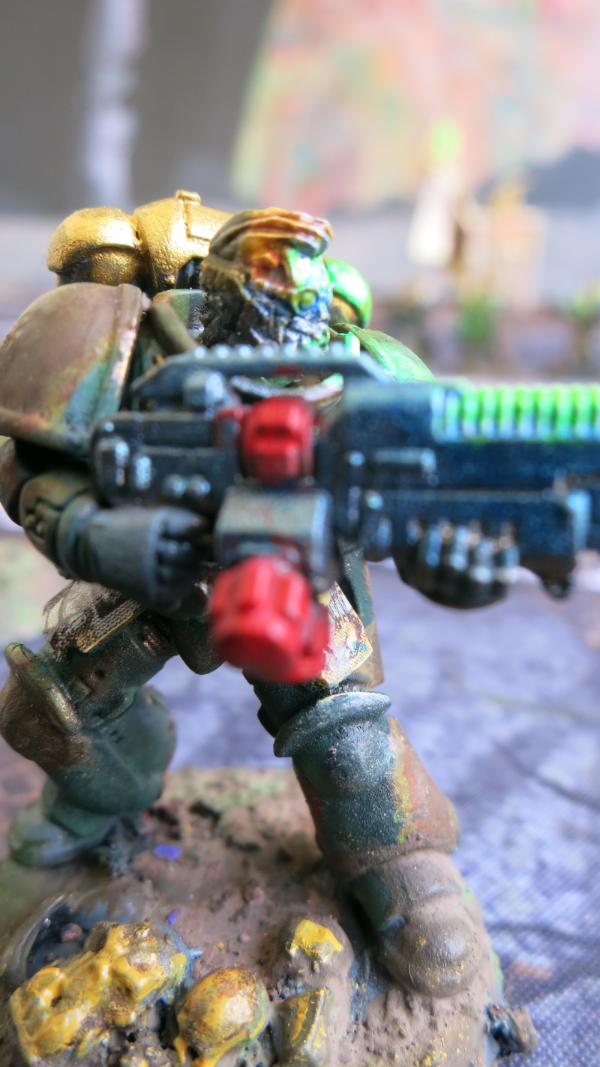
Intercessor Mangled Face
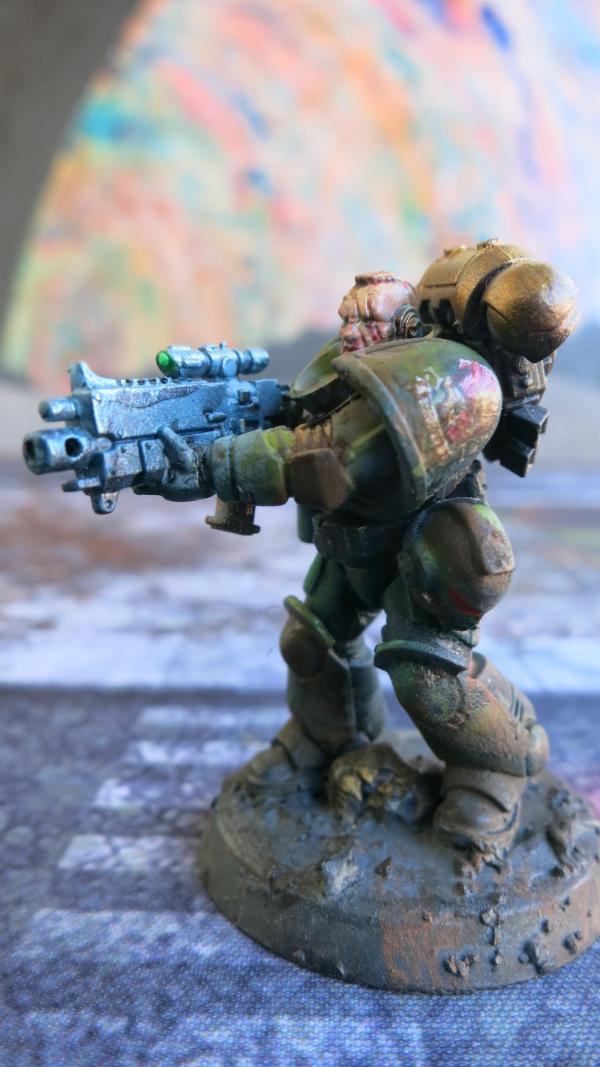
Mangle Face – Front View
Mangle Face – Rear View
Mangle Face – Right View
21898
Post by: Oldmanronald
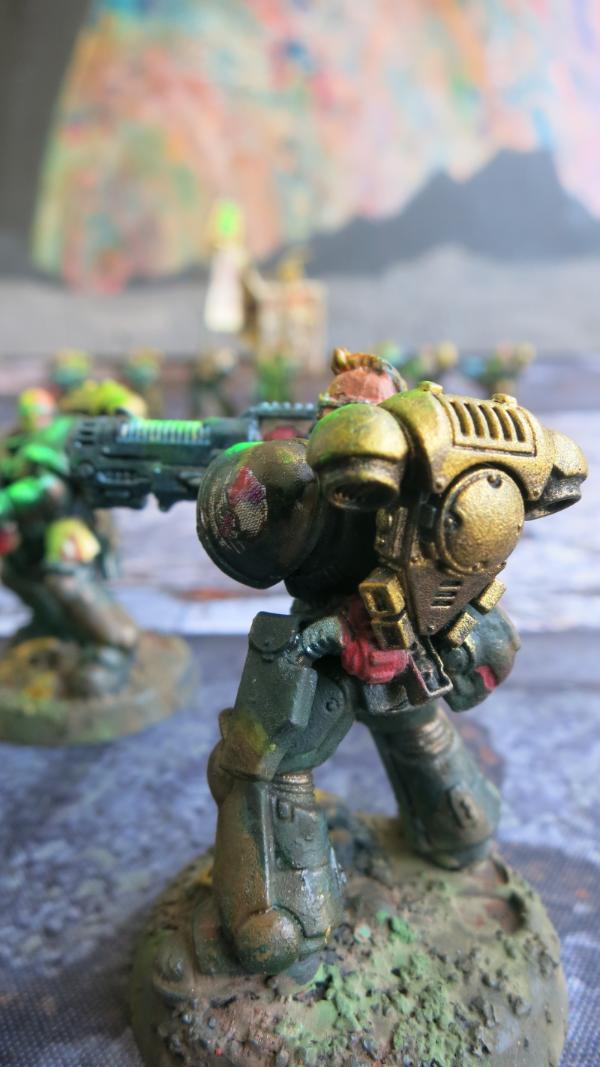
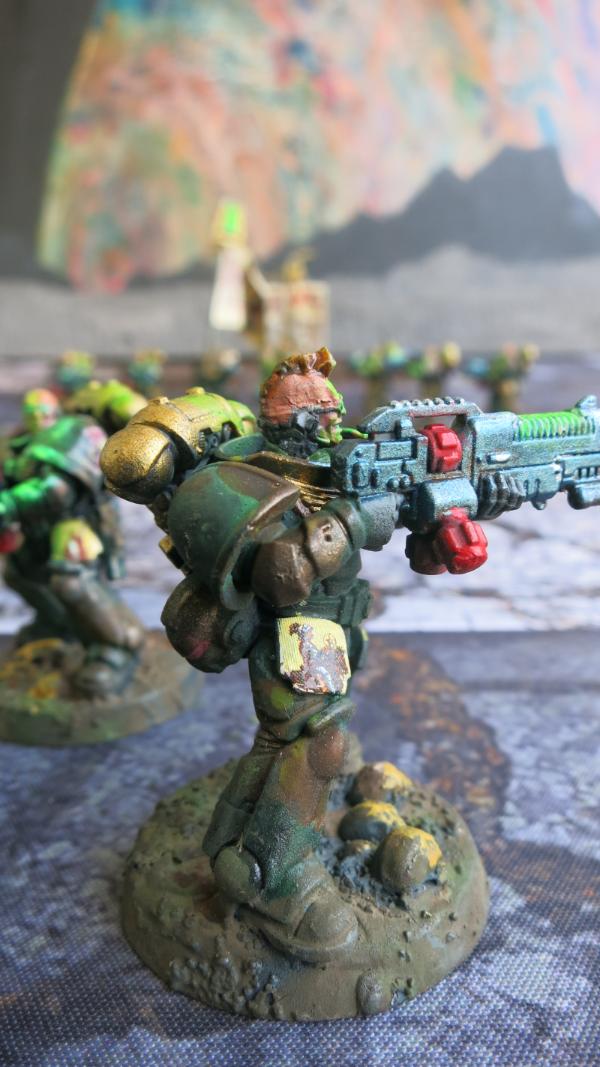
Second Intercessor with Auxiliary Grenade Launcher
Grenadier – Front View

Grenadier – Right Side View
Grenadier – Right Rear View
Grenadier – Rear View
Grenadier - Left Front View
21898
Post by: Oldmanronald
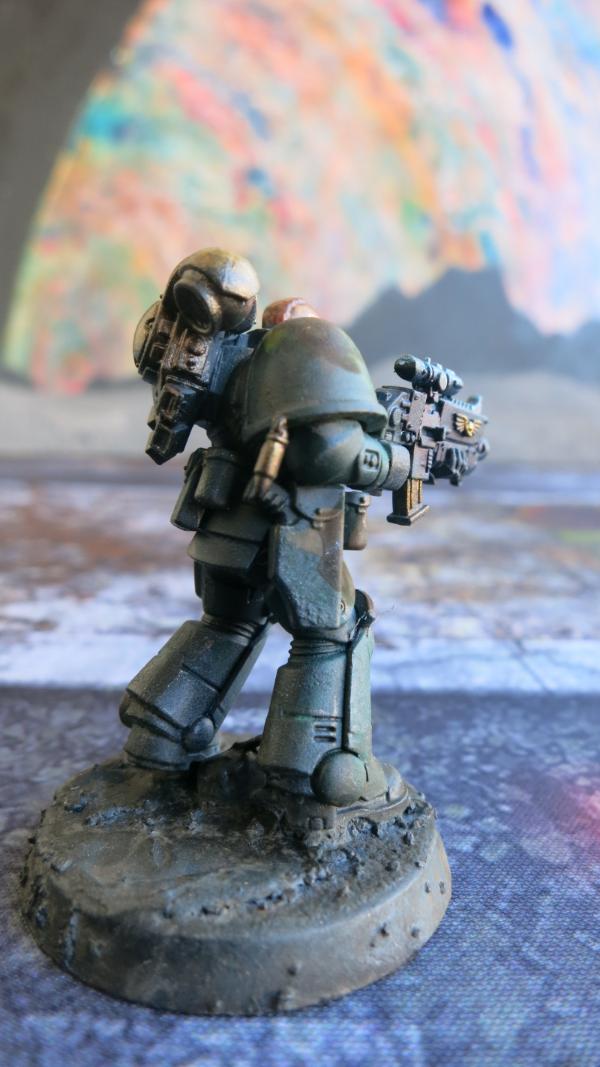
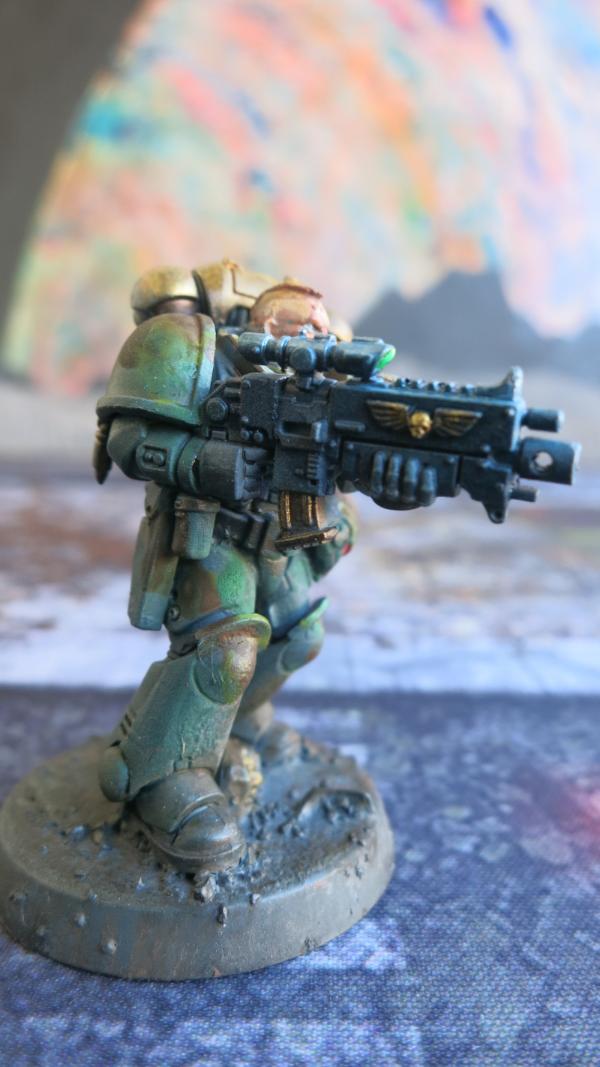
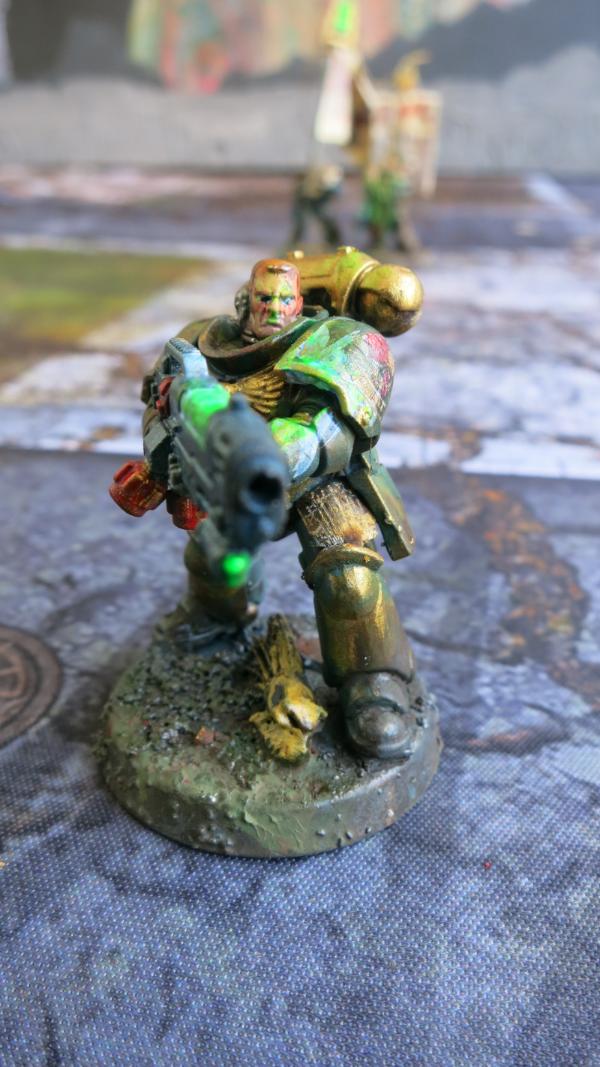
Last Intercessor
The Last Intercessor – Front View
The Last Intercessor – Right Side View
The Last Intercessor – Rear View
The Last Intercessor – Left Side View
21898
Post by: Oldmanronald
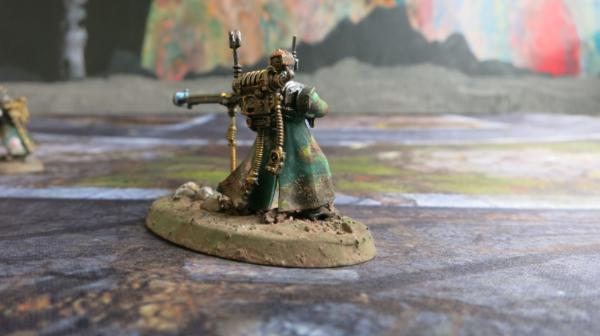
The Apothecary
I have experimented with an apothecary. Although a primaris apothecary may be a better fighter and has an additional wound, the standard apothecary may a better deal. Both have the Narthecium that allows them to heal but the standard apothecary is cheaper. I built a standard apothecary out of some spare parts I had laying around.

The Apothecary – Front View
The head is a squire’s head from a spruce of the old Bretonnia knights.
The Apothecary – Rear View

The Apothecary – Right Front View
The Apothecary – Right View
Painting mistakes show up in the close-up view.
The biggest problem with this model is that he looks like a dwarf when he is next to a Primaris space marine model.
21898
Post by: Oldmanronald
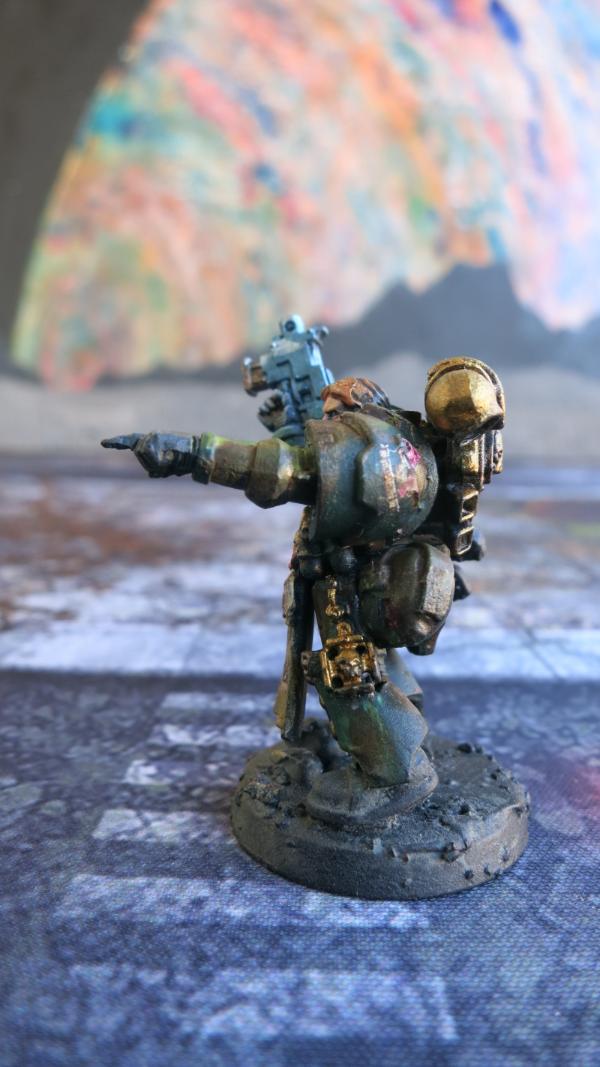
The Lieutenant
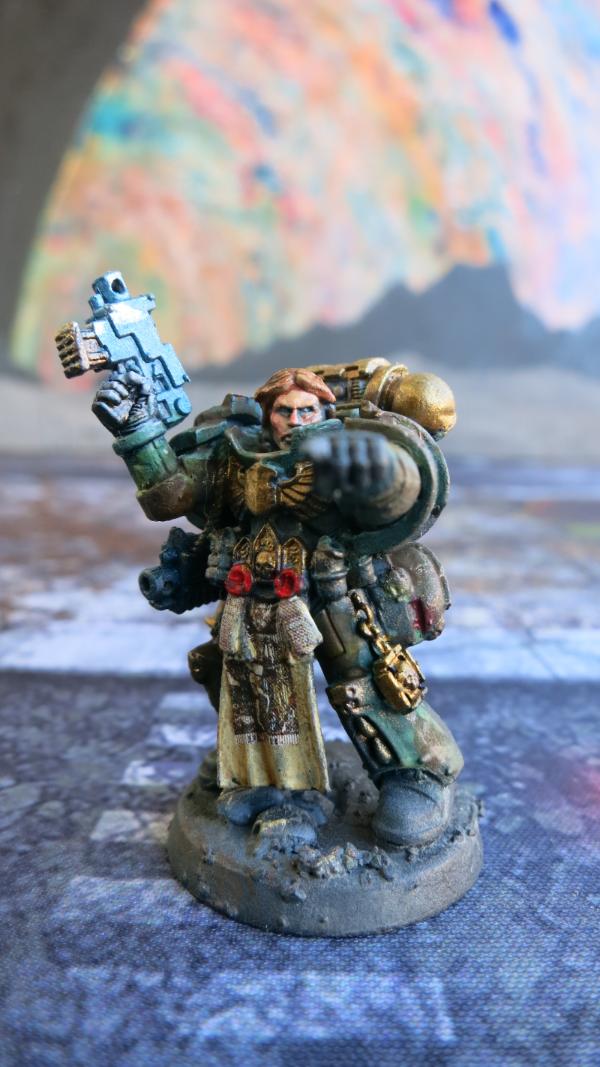
The Lieutenant – Front View
The Lieutenant has tactical precision so you can re-roll rolls of one for related units that are within 6” of the lieutenant. The primaris lieutenant has the same ability, is a more robust and deadly fighter, but is 20 points more. Since Games Workshop sells a primaris lieutenant but not a regular lieutenant, I made one from a company champion, some Dark Angel’s parts, and a head from an old Bretonnia squire.
The Lieutenant – Left Side View
The pointing finger is always a great. It may be the best single bit for a model and always make the model look great.
The Lieutenant – Rear View
The Lieutenant – Right Side View
The strap for the bolter was made of floral wire.
21898
Post by: Oldmanronald
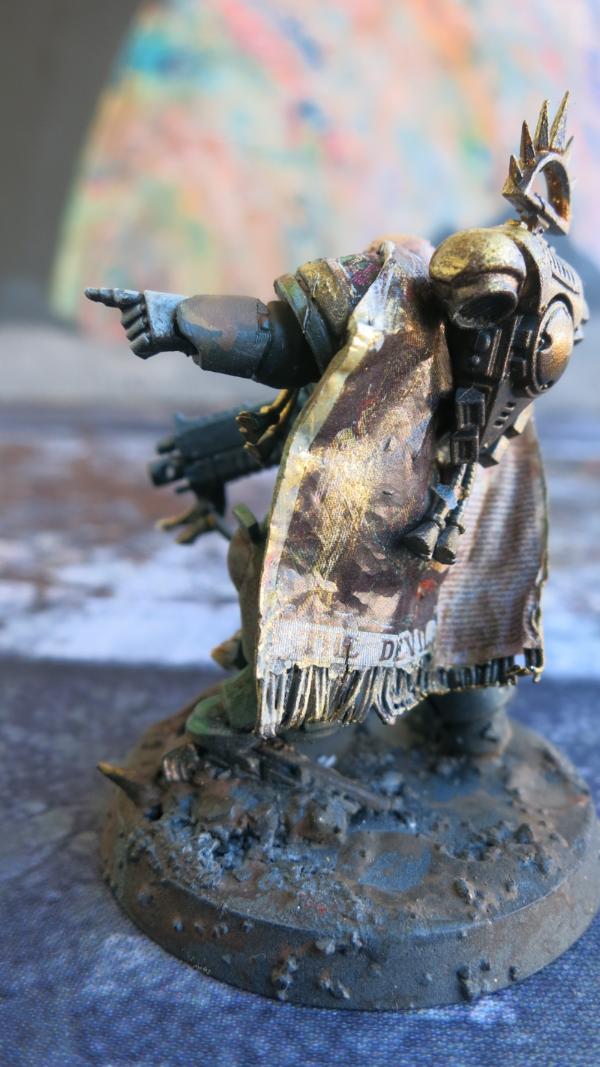
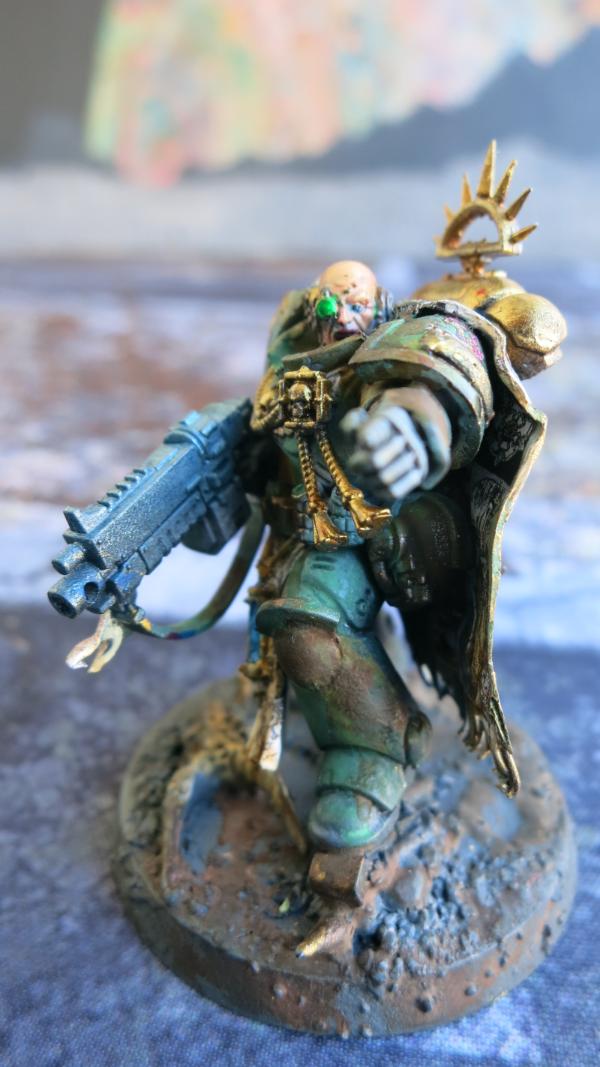
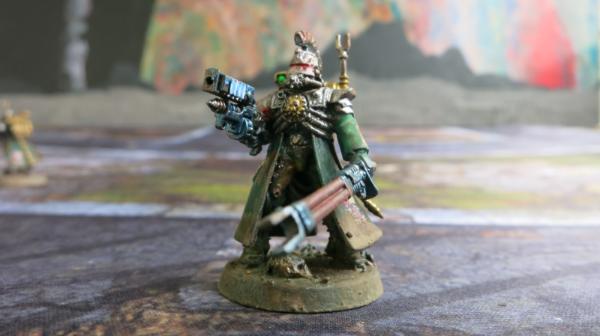
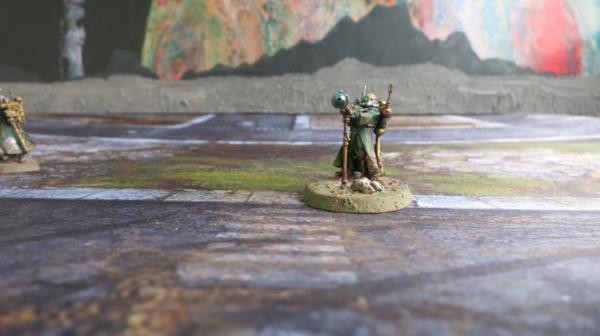
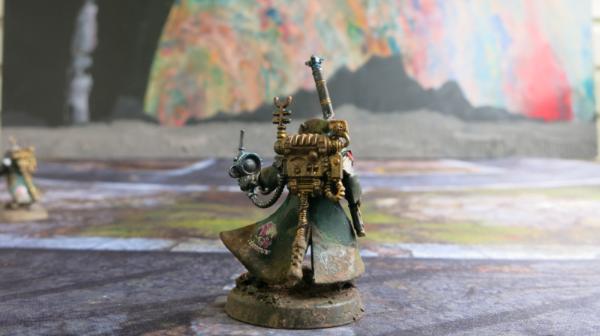
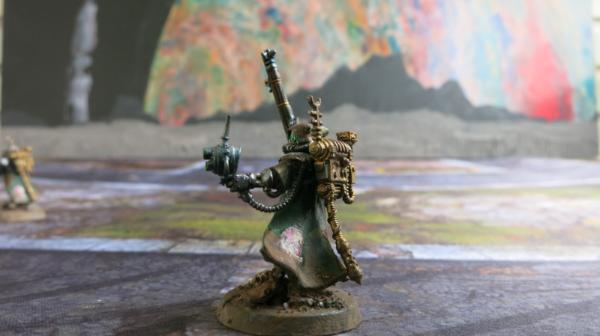
The Primaris Master (or Captain)
This model is the Primaris Captain if you are a space marine or a Primaris Master if you are a Dark Angel. Regardless, this is a great looking model. I really like the pointing finger.
 The Primaris Master – Left Front View
 The Primaris Master –Front View
 The Primaris Master –Rear View
I replaced his cape with one I made from green stuff and floral wire.
 The Primaris Master – Left Rear View
This one show some details of the cape
 The Primaris Master – Left Side View
He may be a captain or a master but he has the same grubby appearance as my other space marines.
21898
Post by: Oldmanronald
Lava on the Base
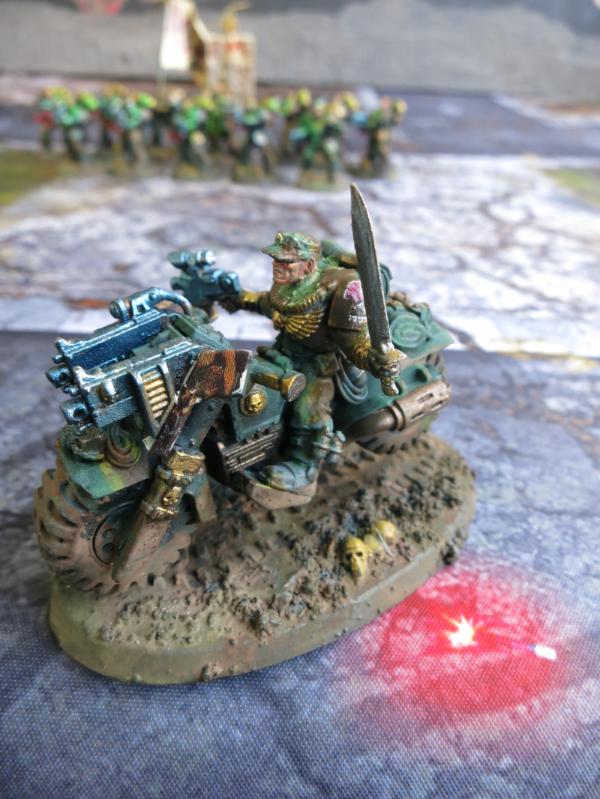
A few posts ago I mentioned the red spot on my gaming mat that had the appearance of heated rock or lava. I noted a red spot on one of my bases and considered playing with such spot to give my bases a look of lava. I did so with two of my models, the primaris captain or master and one of the intercessors. Below is the intercessor.
Intercessor on Lava Base – Front View
I used a combination of washes and pigments to create the red spots on the bases.
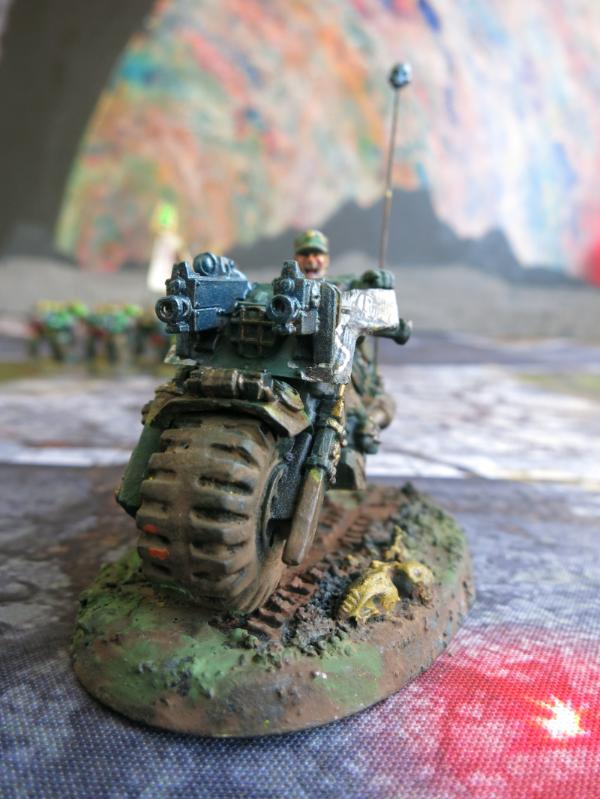
Intercessor on Lava Base – Left Side View
Intercessor on Lava Base –Right Side View
This was a fun effect but I was not wowed by the results. This effect may be more impressive on a display board or panoramic background. I will keep the technique in mind but will probably not use it regularly on my bases.
21898
Post by: Oldmanronald
The Primaris Master (or Captain) with Lava
In the pictures below, I played with placing a red lava spot on the base of my Primaris Master (or for those familiar with lesser chapters than Dark Angels, a Primaris Captain.) The color is interesting but not great. It may work better if I had not gone back and put a final coat of bright red around the white. Again, I was not wowed with the results but may still play around with it.
Primaris Master with Lava Base – Right Side View
Primaris Master with Lava Base – Front View
The bright red looks more like blood than lava.
21898
Post by: Oldmanronald
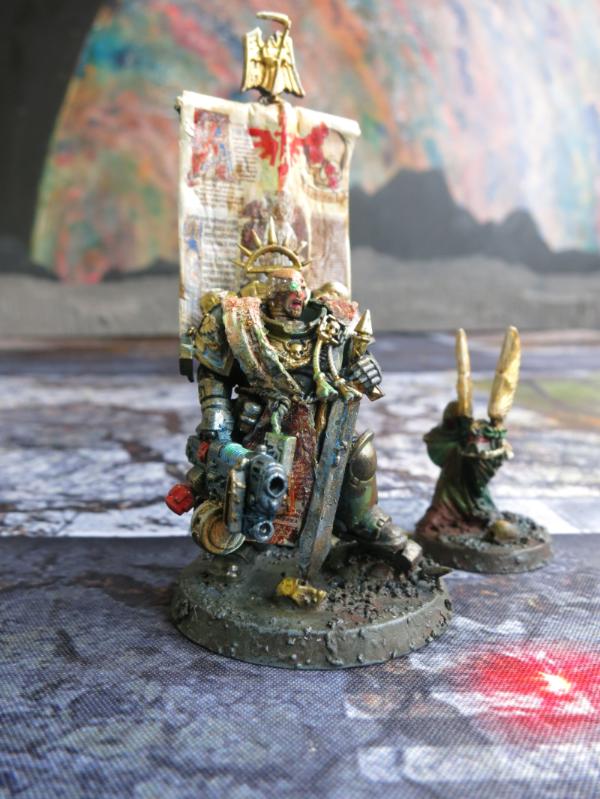
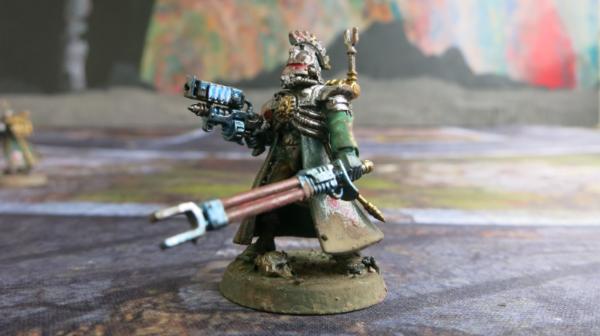
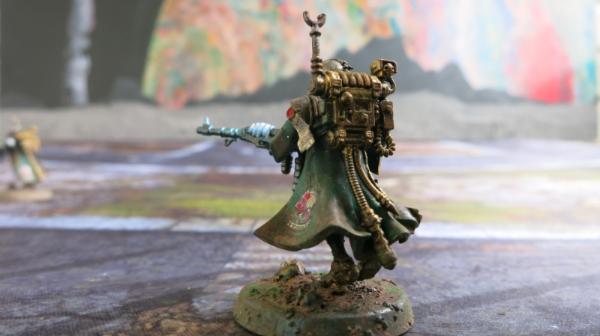
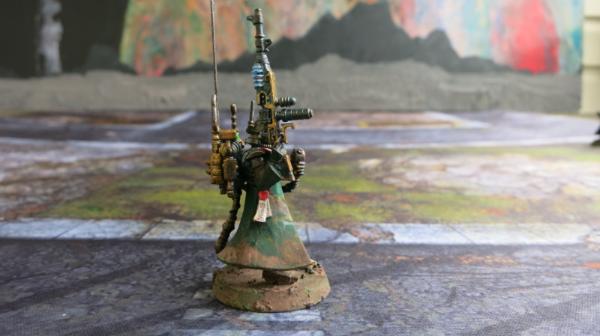
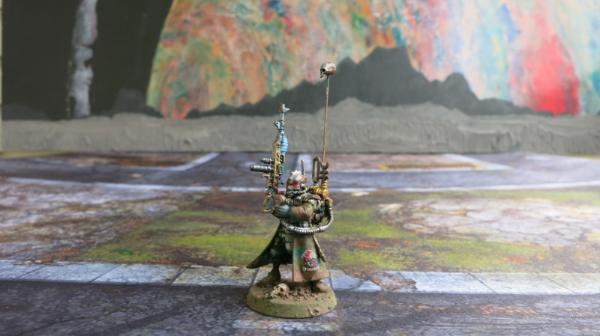
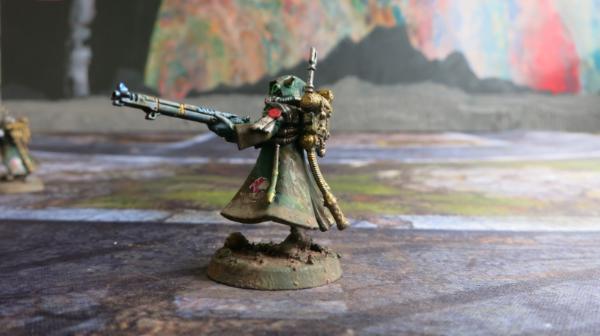
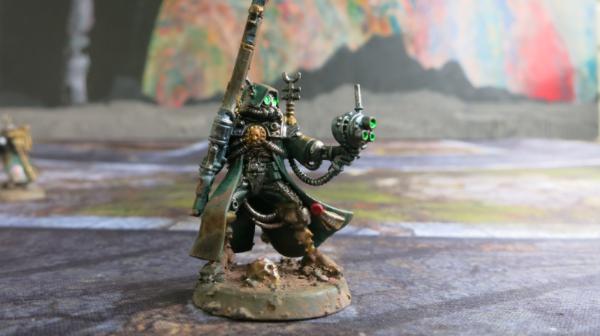
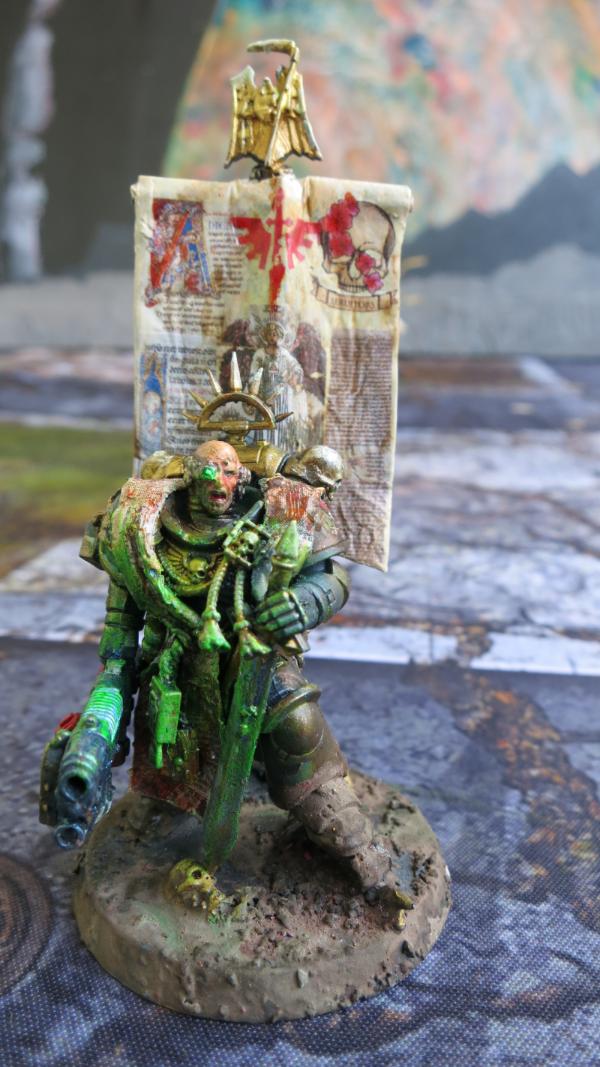
Azrael – The Suffering Supreme Grand Master of the Dark Angels – The Keeper of the Truth
I have always enjoyed the Dark Angels, both the models and the fluff. Religious mysticism, especially Jewish and Christian intrigues me. The Dark Angels are the most religious faction of the 40K universe with its Chaplains and Interrogator-Chaplains, its concern with religious themes such as the Fallen, heresy, redemption, and forgiveness or the withholding of forgiveness, and the rich use of religiously significant names. El is a name for God and names ending in El, such as Azrael, Ezekiel, and Sammael signify a relationship with God. Azrael is the name of Angel of Death in the Hebrew Bible and means help of God. Samael is an archangel who is an accuser, seducer, and destroyer, whose name means venom or poison of God. Ezekiel is a Bible prophet who has one of the strangest visions of heaven in Bible and whose name means strength of God or God will strengthen.
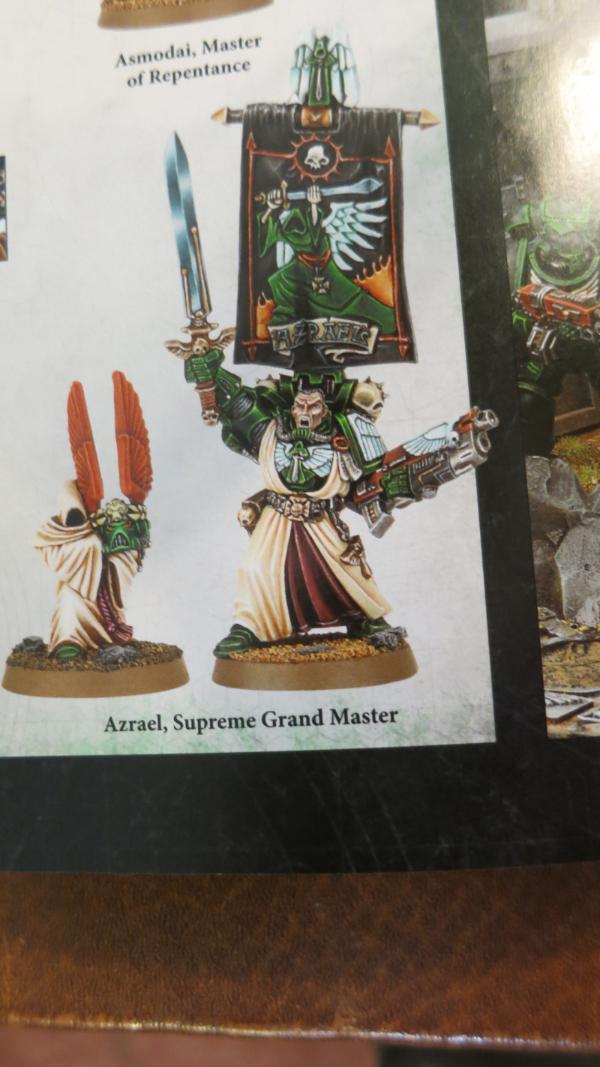
As I built my Azrael, I wanted my Azrael to look like this picture in the Dark Angels Codex.

Picture of Azrael Found in the Dark Angels Codex.
I was unhappy with the metal Azrael and felt that it lacked the power and authority of the above picture. Below is a picture of the metal Azrael painted by one of Games Workshop’s master painters. He looks evil and angry but lack the authority shown in the above picture.
Picture of Metal Azrael
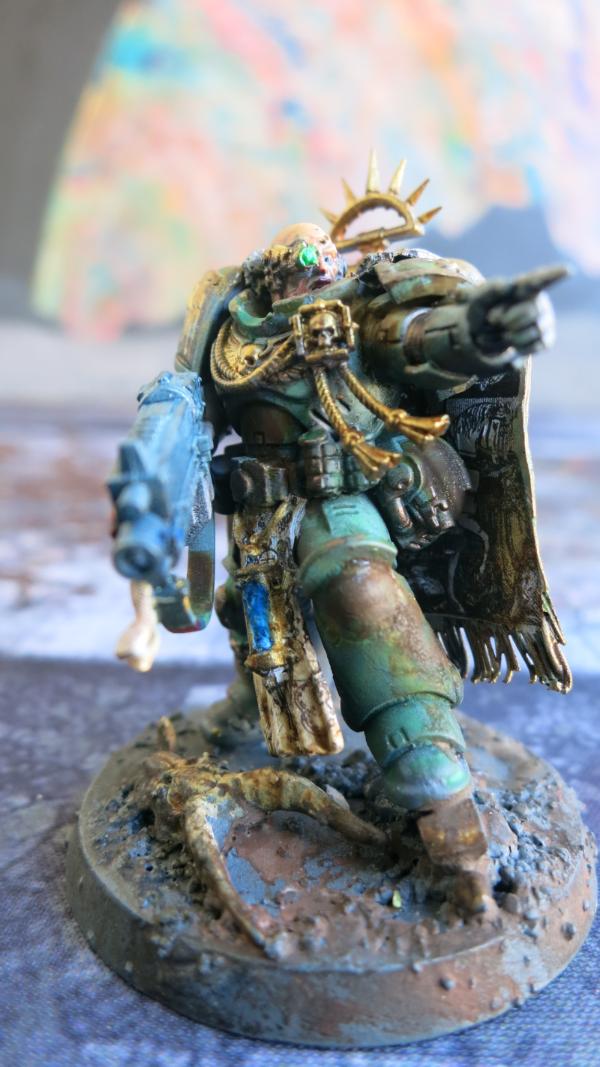
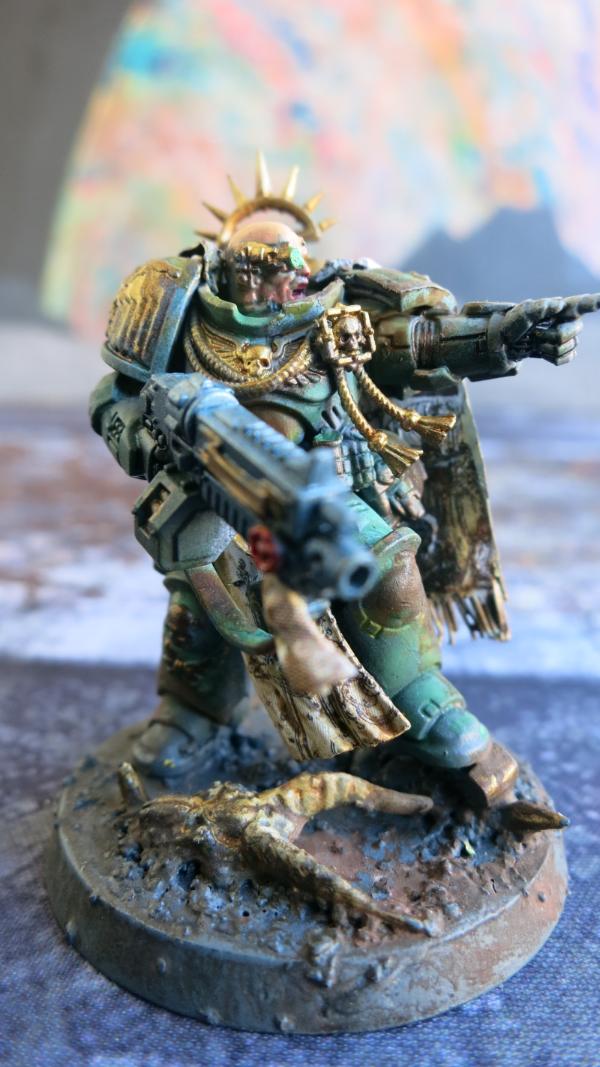
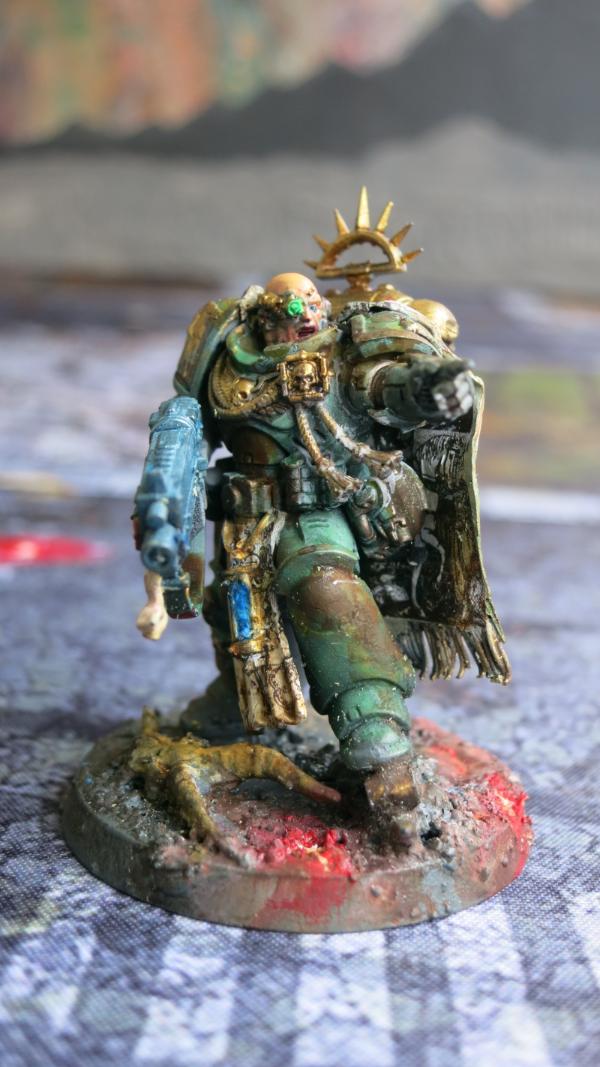
Although I already own a metal Azrael, I decided to use a primaris captain to make Azrael rather than to use the metal model. I am pleased with the results but this new Azrael turned out much different than I expected.
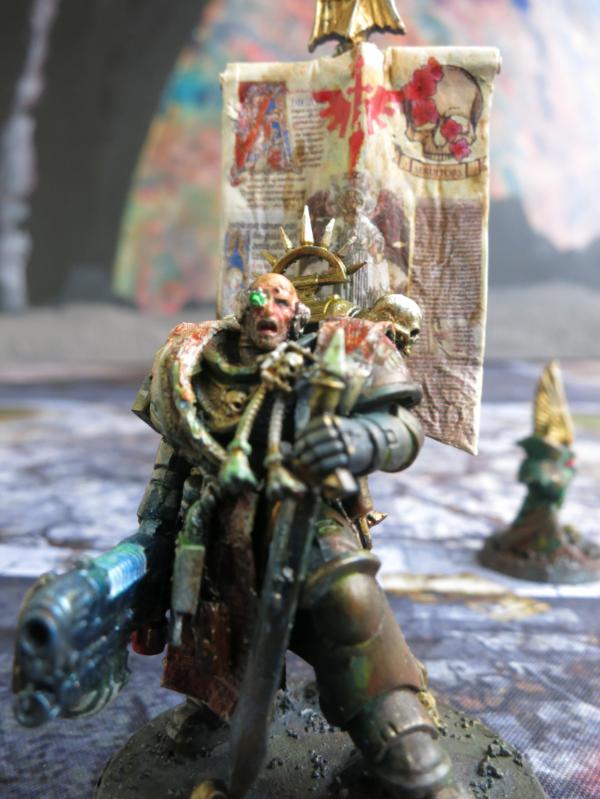
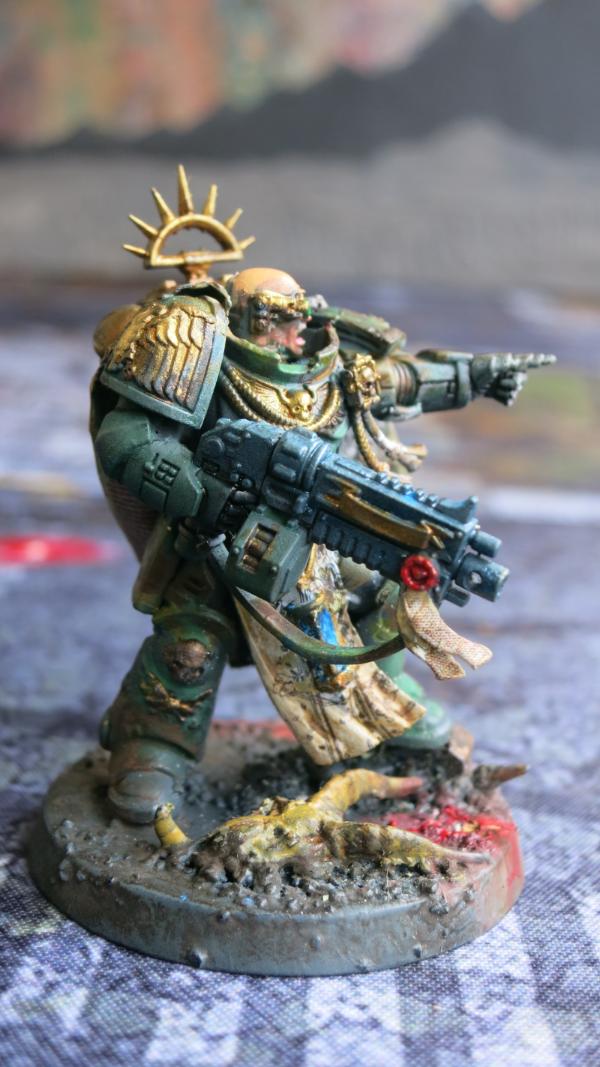
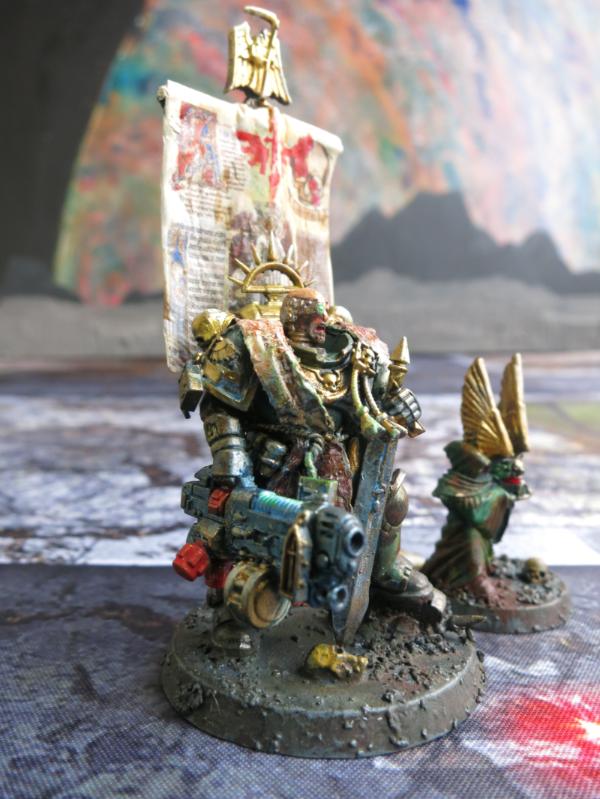
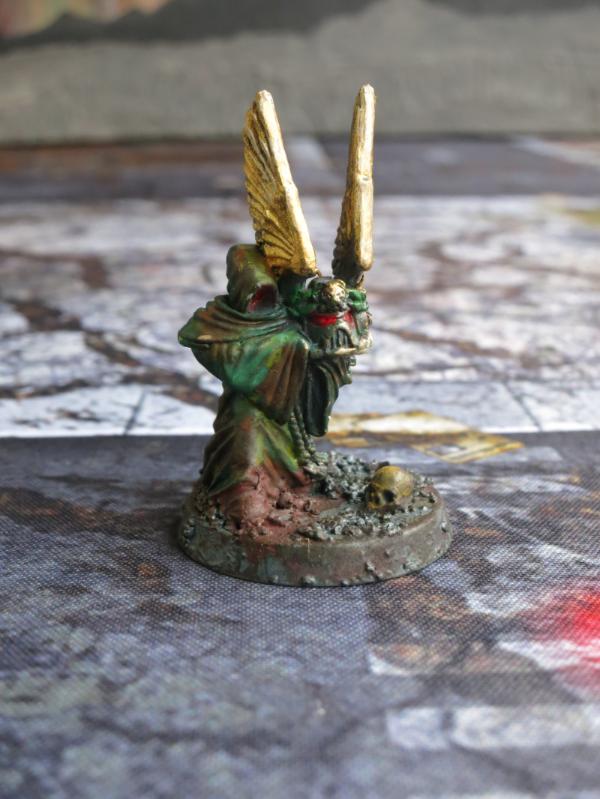
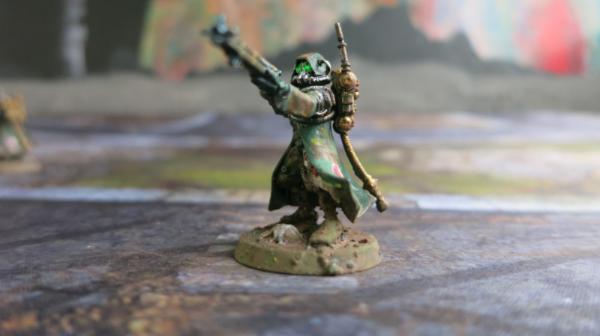
New Azrael - The Supreme Grand Master of the Dark Angels
Notice that there is almost an anguish in his face. He appears as the suffering servant, a martyr for Imperium of Man, not a martyr for own his death but for his willingness to bear those burdens of command even over the most condemned and chosen servants of the Imperium, even the Dark Angels themselves.
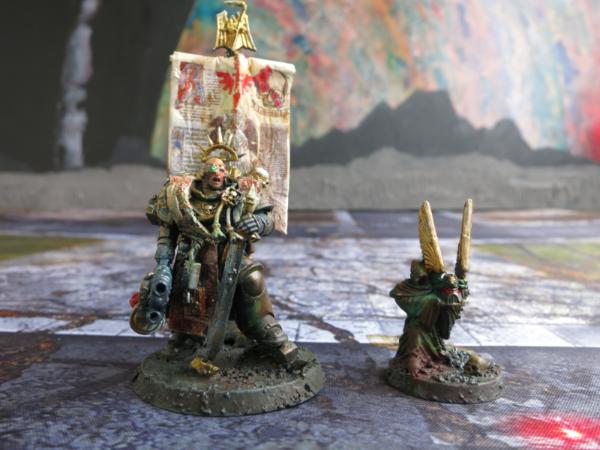
New Azrael and the Relic Bearer with the Lion’s Helm
21898
Post by: Oldmanronald
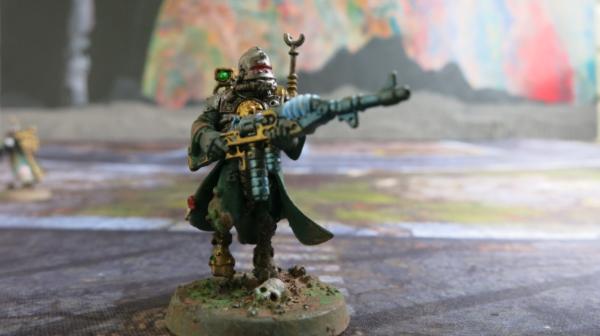
The Face of Azrael
One question is why the head of my Azrael appears to be anguished even though the identical head on my primaris captain does not? Compare the two pictures below.
The Head of New Azrael
The Head of the Primaris Captain
Why the difference? There are at least three possible reasons.
1) My Painting
I glued the head on the captain and then painted the face. This is how I usually paint my models. The advantage is that the head is on a solid mount so I don’t have to figure out how to hold the head in place. Also, the head is painted with the rest of the model so it has the same shadows and the same ambiance. The disadvantage, however, it that the model's body blocks my brush so that I cannot place my brush to get to the face from certain angles.
For Azrael and my latest models, I started painting the heads separately and then glued them to the model.
The advantage of painting the head before mounting it on the model is that I can get to each head from almost any angle and can really focus on certain details. In the picture of the captain and Azrael above, compare the eyes and the beard. The captain’s eyes are too big. It is almost impossible not to paint the eyes too big but with the head unmounted, I can paint from underneath the head to put skin tones around the eyes to shrink them down to the proper size and shape. The beard, or more accurately, the five o-clock shadow, was easier to paint in the free head than the mounted head. So was the mouth which means that I was able to bring out details in the lower portions of the face that really give the face its expression.
Heads Painted on the Spruce – the Azrael Head is the Un-spruced Head with a Notched Neck
2) The mounting
For most space marine models, the head has a rounded neck so the face can be placed looking in any reasonable direction. For the primaris captain model, however, the neck is notched so that it only faces one way when mounted. When I mounted the head on the captain, I placed it so that the notch fit and the head was lower in the model. This covered up the expressive neck and lower mouth and jaw line.
For Azrael, I placed the head facing forward. I did not trim the notch so the head was held up higher on the model. To see this, compare the head on the right side view of Azrael with the right side view of the Captain’s face.
Azrael – Right Side View
Captain – Right Side View of the Face
Notice how much lower the face is in the Captain than in Azrael and how the anguished mouth is hidden. Also note with the head higher, Azrael has a much longer neck which gives him an El Greco type appearance. The elongated neck on Azrael makes him appear mystic and combined with his expressive mouth, gives an expression of passionate suffering.
3) The Pose
The Captain is posed with the pointing finger. With the strong pointing finger, the Captain appears to be barking out an order. His mouth is open to project his orders.
Azrael’s pose is more serene. He appears to be quietly observing the battlefield so his open mouth become a look of anguish rather than yelling out a command.
21898
Post by: Oldmanronald
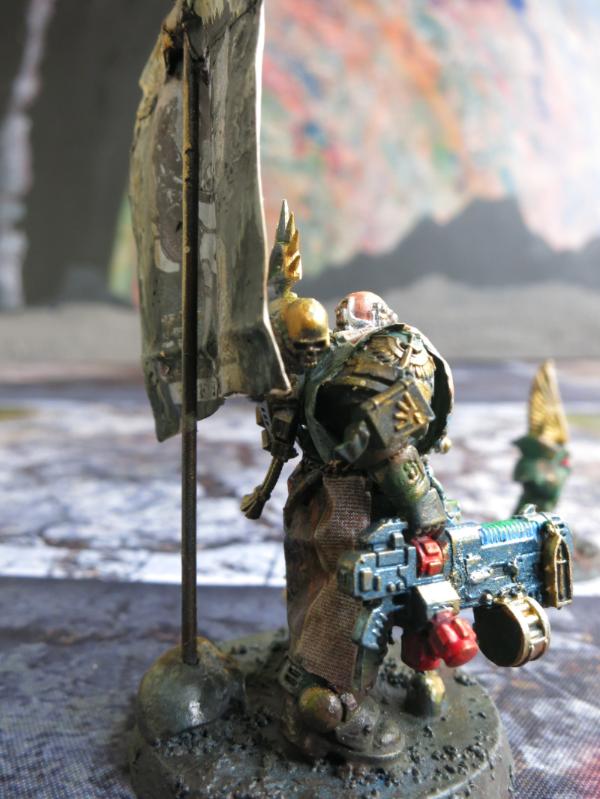
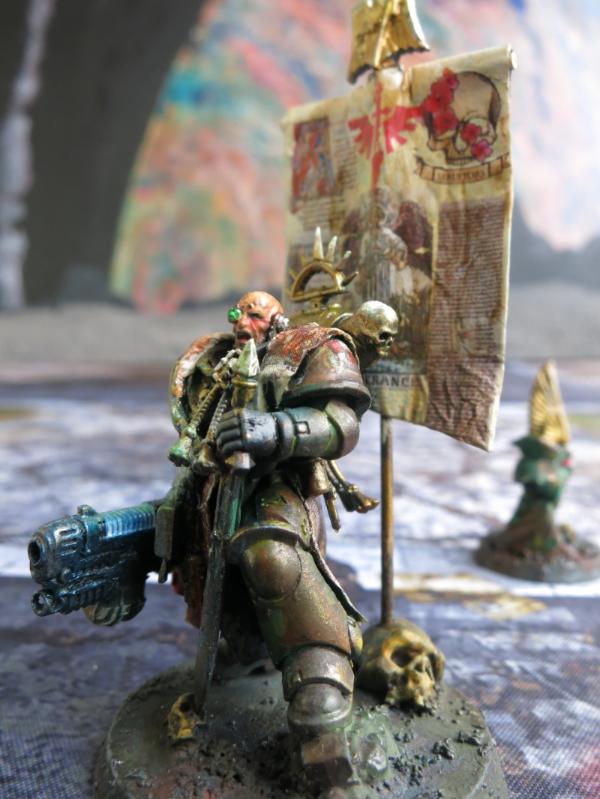
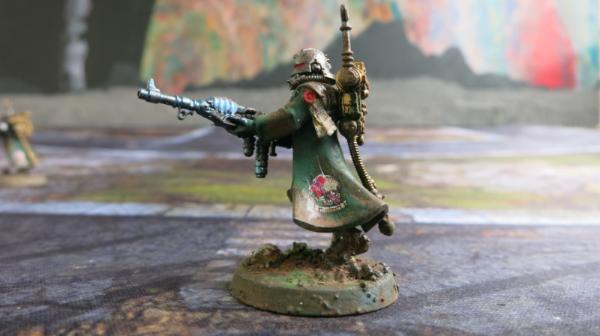
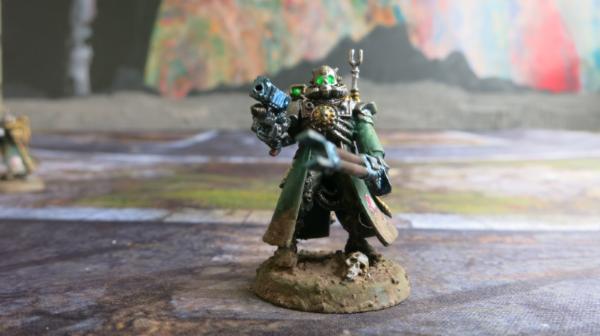
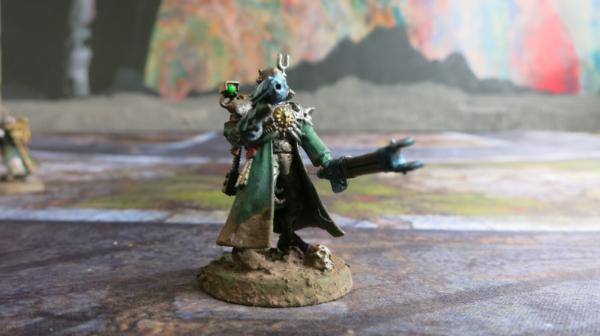
More Views of the New Azrael – The Suffering Supreme Grand Master of the Dark Angels – The Keeper of the Truth
New Azrael with Relic Bearer with Lion Helm
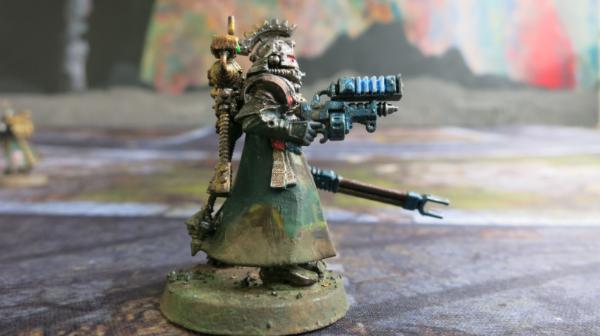
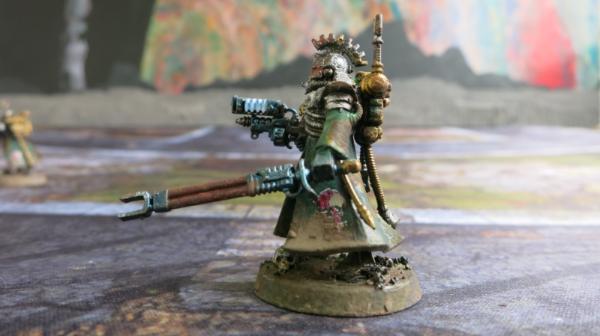
I have to figure out what I did to get the blue effect on the blade of the Sword of Secrets and see if I can expand it on other blades.
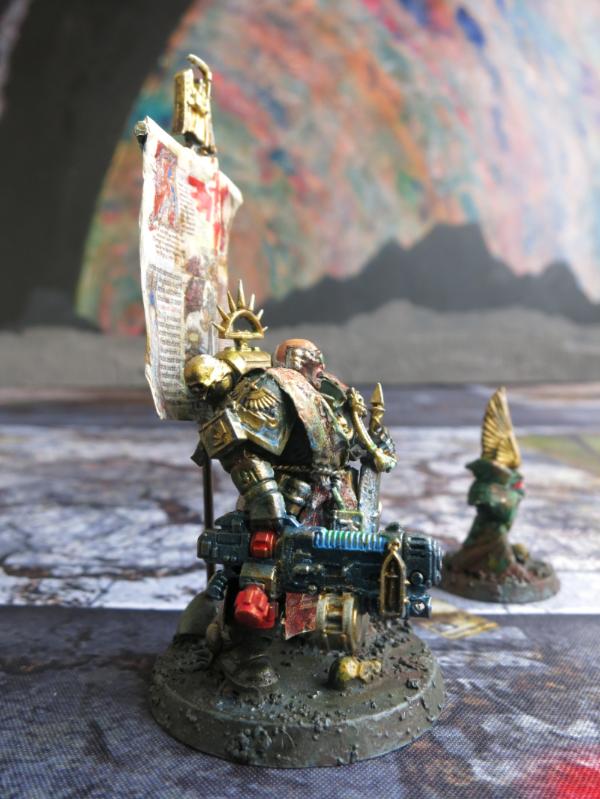
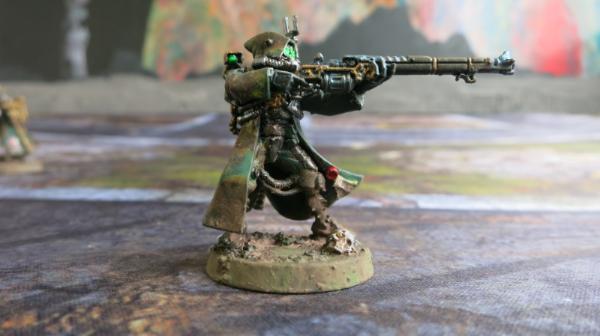
New Azrael – Right Side View Showing Details of the Lion’s Wrath
I had to do some real cutting to put together the Lion’s Wrath, Azrael’s Combi-Plasma Gun.
New Azrael- Left Side View
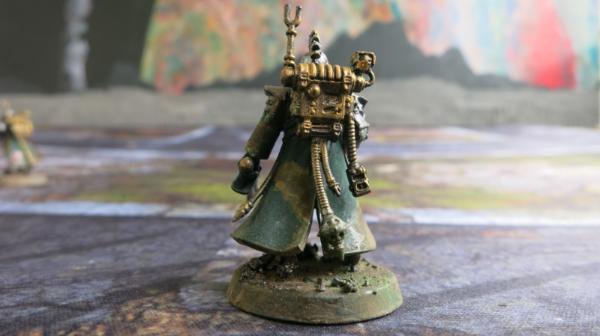
To mount the skull on his backpack, I had to drill a hole on the backpack to mount the skull in rather than try to shape the skull to the backpack. The skull was too small to carve into shape.

New Azrael – Back View
I left the back of the banner somewhat sloppy. I am not sure I want to fix it or not.
21898
Post by: Oldmanronald
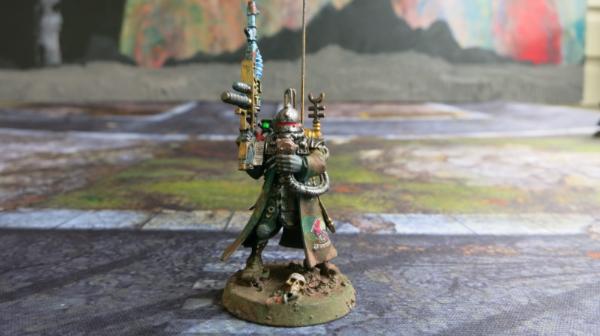
The Relic Bearer with Lion Helm
A number of years ago, I bought the metal Azrael which came with a Relic Bearer and Lion’s Helm. Although I have not painted up the metal Azrael, I painted up the Relic Bearer.
New Azrael with Relic Bearer with Lion Helm
Relic Bearer with Lion Helm
You can see why I am not a big fan of metal models. It is already chipped. I may have to cover these models with varnish to preserve them. I have never done that with my models but it may be time.
21898
Post by: Oldmanronald
The Azrael Banner
Below is a picture of the Azrael Banner that comes with the metal Azrael.
Picture of Painted Up Azrael Banner
Several years ago, I painted this banner up and mounted it on a bike. To be honest, I hated it and stripped it down. I still have the banner and have it drilled out so it could have been mounted on the pole behind my Azrael. Instead, I decided instead to make a new banner and use my own decals.

Green Stuff Banner
The cross bar is made of some plastic tubing that I have. The upright pole is piano wire that I bent into shape so it is fitted into the base. See picture below which shows how I fitted it although it is for another model not for this banner.
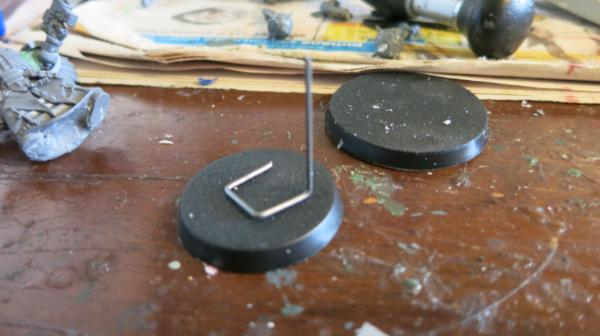
Fitted Piano Wire
The big King Kong skull is from the Citadel Skulls kit which contains all sorts of skulls. Most of the skulls I have on my bases and the skulls on Azrael’s backpack are from this kit. This is a great kit for modifying your models if you are into skulls.
New Azrael Banner – Front View

New Azrael Banner – Side View
This picture also shows a nice view of the back of Azrael’s robe and the big King Kong like skull.
21898
Post by: Oldmanronald
New Azrael and Friends
Here is a picture of my new Azrael posing with two squads of Hellblasters. One is armed with heavy plasma incinerators, the other with standard plasma incinerators. I will be experimenting with both.
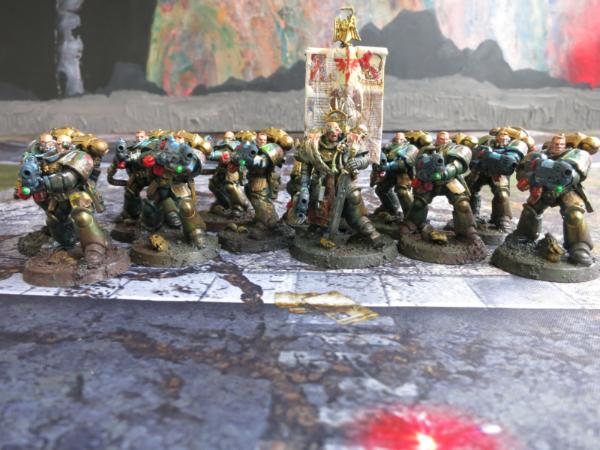
Azrael and His Friends

Azrael and Hellblaster Squad with Heavy Incinerators
I don’t have a picture of Azrael with just the standard incinerators. I take a lot of pictures and delete those that are out of focus. With these close-ups, I always have to delete about a fourth of the pictures. I probably deleted the pictures of Azrael with just the standard incinerator Hellblasters.
21898
Post by: Oldmanronald
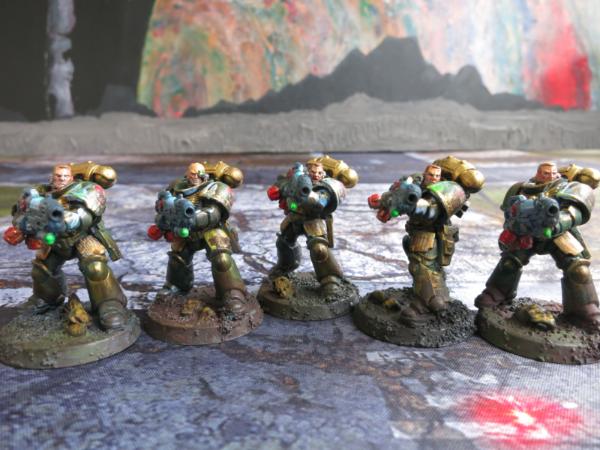
Primaris Hellblasters
I have just painted up two hellblaster squads. One is armed with heavy plasma incinerators. The other is with standard plasma incinerators. I made none with the assault plasma incinerators. I plan to play them and see which ones I like better. I suspect that both are useful.

Hellblaster Squad with Heavy Incinerators
I tried several new techniques. I painted the heads separate from the bodies and generally like the results. I painted the plasma incinerators with metallic blue with the corrugated section with white overlaid with fluorescent blue to create a glow. I also tried highlighting portions of the armor with the fluorescent blue to try to give the effect of glowing light. It isn’t perfect and may have looked better with a fluorescent green.
Hellblaster Squad with Standard Incinerators
I put pigments on the base and the lower legs of the primaris models to give the models a grubbier appearance. I had fun with the decals which I often painted over with a wash.
21898
Post by: Oldmanronald
Hellblaster with Heavy Incinerator – False Eye
If you look closely at this model, you will see that he has an artificial eye. The front view shows the decal on his tasset, the armor plate protecting his upper legs. I painted a wash over the decal to give it a more worn look. I added white highlights covered with a fluorescent green and blue washes on the bevor (neck piece armor), pauldron (shoulder plate) and the upper arm to represent the reflected glow from the plasma incinerator.
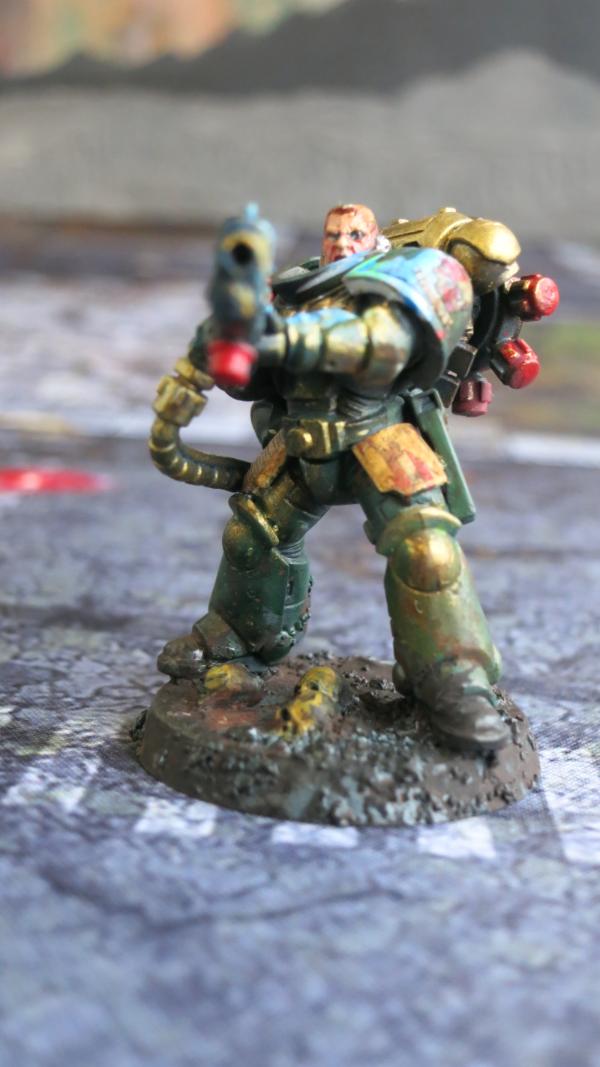
False Eye – Primaris Hellblaster with Heavy Plasma Incinerator – Front View
False Eye – Primaris Hellblaster with Heavy Plasma Incinerator – Lower Front View
This view better shows the scar on his face over the artificial eye. Presumably, this scar is from the same wound that gauged out his real eye.
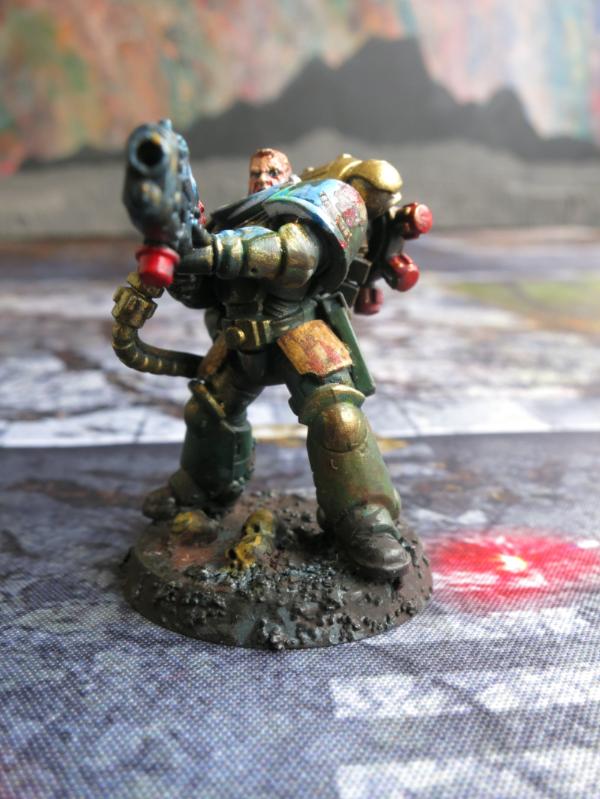
The hose is shown below in these right side views.
False Eye – Primaris Hellblaster with Heavy Plasma Incinerator – Right Side View
His hair is a mixture of dull orange and yellow paints and so he ended up a ginger or redhead, perhaps as a tribute to my wife who is also a redhead. It really isn’t much of a tribute since she is totally indifferent to miniatures and war gaming.
False Eye – Primaris Hellblaster with Heavy Plasma Incinerator – Right Side View
I have a number of duplicate pictures of this model. This is because I take my picture of my finished models outside. I started taking pictures of him and a storm came up and threatened to knock down my panorama so I stopped. When I took my pictures again, I forgot that I already had pictures of this model.
False Eye – Primaris Hellblaster with Heavy Plasma Incinerator – Left Side View
This view shows the wash on over the flowered skull on the shoulder plate. Also, the upper flowers on the skull have a wash of fluorescent magenta paint.
False Eye – Primaris Hellblaster with Heavy Plasma Incinerator – Rear View
21898
Post by: Oldmanronald
Hellblaster with Heavy Incinerator – The Sergeant
I took a lot of pictures of this Hellblaster but that is okay since I really like how he turned out. He is the sergeant. How do you know he is the sergeant? It is pretty subtle but look at the small skull icon on the lower edge of his pauldron (shoulder plate) and the icon in the box hanging from his belt.
Primaris Hellblaster Sergeant with Heavy Plasma Incinerator – Front View
Primaris Hellblaster Sergeant with Heavy Plasma Incinerator – Left Side View
This view shows the wash on over the flowered skull on the shoulder plate. Also, the upper flowers on the skull have a wash of fluorescent magenta paint.
Primaris Hellblaster Sergeant with Heavy Plasma Incinerator – Left Rear View
Primaris Hellblaster Sergeant with Heavy Plasma Incinerator – Rear View

Primaris Hellblaster Sergeant with Heavy Plasma Incinerator – Right Front View
Note the one horn cyclops skull on his base. It appears that the skull has one horn because the other broke off but the skull has one eye socket.
Primaris Hellblaster Sergeant with Heavy Plasma Incinerator – Left Front View
This has a good view of face. I really like the left eye. Not all the eyes on my latest models look this good so it has to be a little bit of dumb luck.
21898
Post by: Oldmanronald
Hellblaster with Heavy Incinerator – Another Redhead
One of the biggest challenges of painting faces are the eyes. The problem is that when we look at another human being, we look at the face and in particular the eyes. But eyes are really small. If you compare a head to the rest of the figure, the head is about 1/7 or 1/6 the body length. Except for space marines, the head is about 1/3 the body width. The head for a space marine is thinner in proportion to the body. This means from any view the head is about 1/20 the size of the body. The eyes are even smaller. For the average space, each eye is about 1/10 the height of the head and about ¼ the width of the head. So the eye is about 1/40 the size of the head. Doing the math, each eye is about 1/800 of the size of the body and that is figuring it out in only two dimensions. If calculated in three dimensions, the eyes are even more proportionally smaller.
Look at any of these pictures I have posted lately. Each eye is barely a dot size, the size of the tip of one of the fingers, the size of a single grain of ballast on the base. If I put a black dot any place on the model other than the face, it would disappear. In fact if you look at some of the pictures, there are many with little blips of misplaced paint. Such mistakes are barely noticeable but these blips are bigger than the eyes. I have found that to paint the pupil of the eye I have to have a tiny drop of paint on a single hair of my paintbrush. In fact, for painting eyes, it doesn’t matter if my brush is a 2 as opposed to a 000 in size since I am only painting with the longest single strain. I don’t know if I got the eye right until I either use a magnifying glass or take a picture and blow it up. I cannot see the error on the model at arms distance. Still, if the eye is not right, the model as not quite right.
This next model has a bad eye. The model has a tip of dark on the eyebrow and the eyes are too opened, making him looked weird and startled looking. On the table top, he looks okay. Even if you are viewing this picture on a smartphone, it may look okay. On a large screen, however, the eyes are wrong.
Primaris Hellblaster with Heavy Plasma Incinerator – Front View

Primaris Hellblaster with Heavy Plasma Incinerator – Right Side View
Primaris Hellblaster with Heavy Plasma Incinerator – Left Rear View
Primaris Hellblaster with Heavy Plasma Incinerator – Right Rear View
21898
Post by: Oldmanronald
Hellblaster with Heavy Incinerator – Another Baldy
Primaris Hellblaster with Heavy Plasma Incinerator – Left Front View
In this one, the reflection of the plasma incinerator is a little more subtle than some of my other hellblasters.
Primaris Hellblaster with Heavy Plasma Incinerator – Left Rear View
Primaris Hellblaster with Heavy Plasma Incinerator – Right Rear View
It is hard not to have a kink where the two parts of the hose join each other. I should have put some green stuff on the kink and smoothed it out.
Primaris Hellblaster with Heavy Plasma Incinerator – Left Front View
21898
Post by: Oldmanronald
Hellblaster with Heavy Incinerator – Mohawk
Primaris Hellblaster in Mohawk with Heavy Plasma Incinerator – Right Front View
The Devil decal on the tasset, the armor plate protecting his upper legs, has gaps. I should fix this. I can go and paint in some browns to cover the gaps.
Primaris Hellblaster in Mohawk with Heavy Plasma Incinerator – Front View
Primaris Hellblaster in Mohawk with Heavy Plasma Incinerator – Left Front View
Primaris Hellblaster in Mohawk with Heavy Plasma Incinerator – Left Rear View
Primaris Hellblaster in Mohawk with Heavy Plasma Incinerator – Left Side View
Primaris Hellblaster in Mohawk with Heavy Plasma Incinerator – Right Rear View
21898
Post by: Oldmanronald
Work in Progress - Assassins
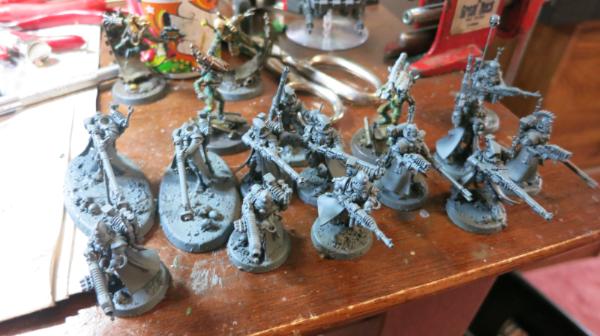
I have been painting camouflage space marines or equivalents for years. I am getting a little tired of it and have been trying to branch out. I have started to work on assassins. I still use the camouflage pattern as a base so that they look like they are part of my army. Still, they are not space marines and they are a nice break. Below are some that I am working on.
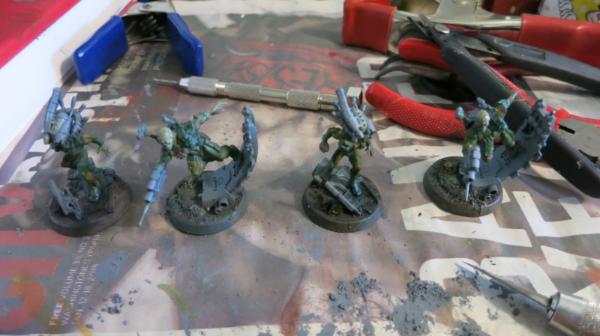
Four Assassins
Culexus Assassin
I haven’t gotten too far on my culexus assassin, just the basic camouflage pattern and a base coat of tin bits which will undercoat my metals. The tin bits gives depth to the steel, silver, gold, or bronze that will be painted over it.
21898
Post by: Oldmanronald
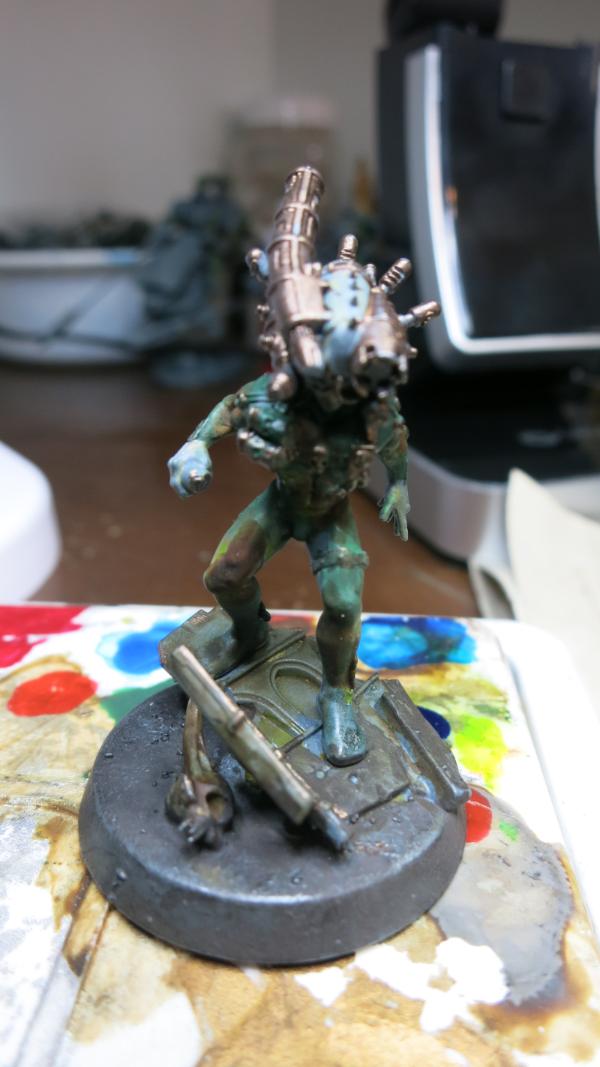
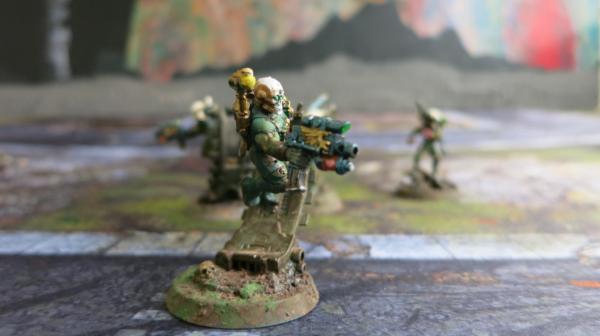
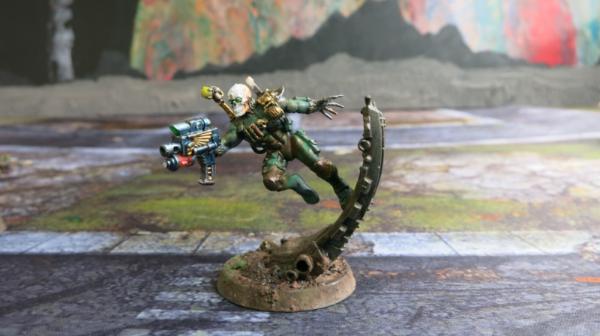
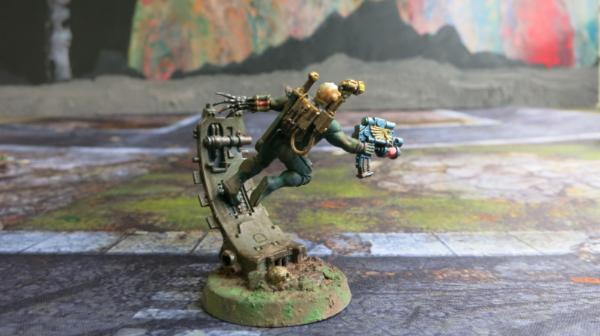
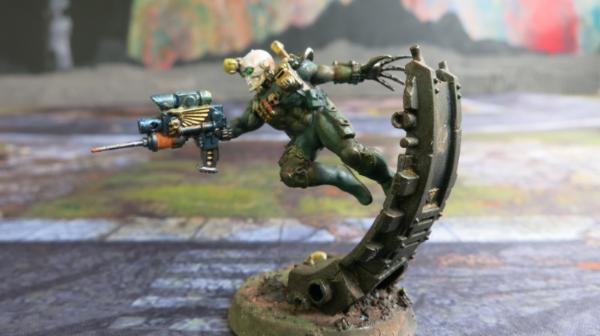
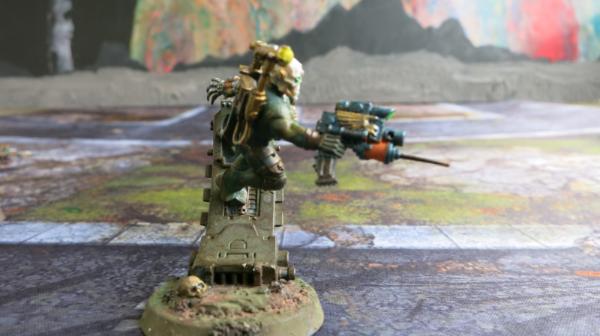
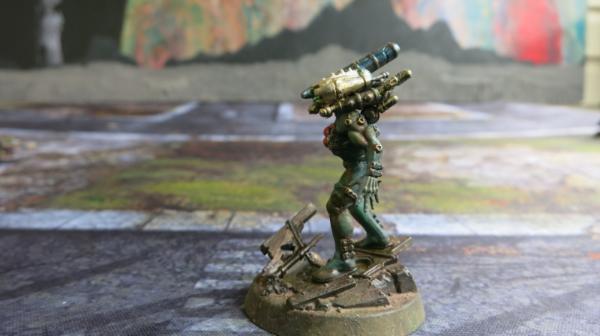
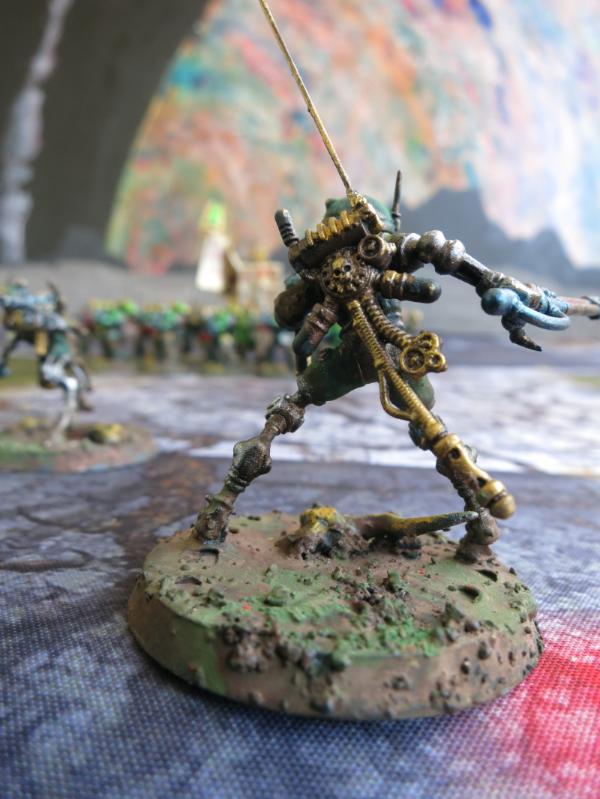
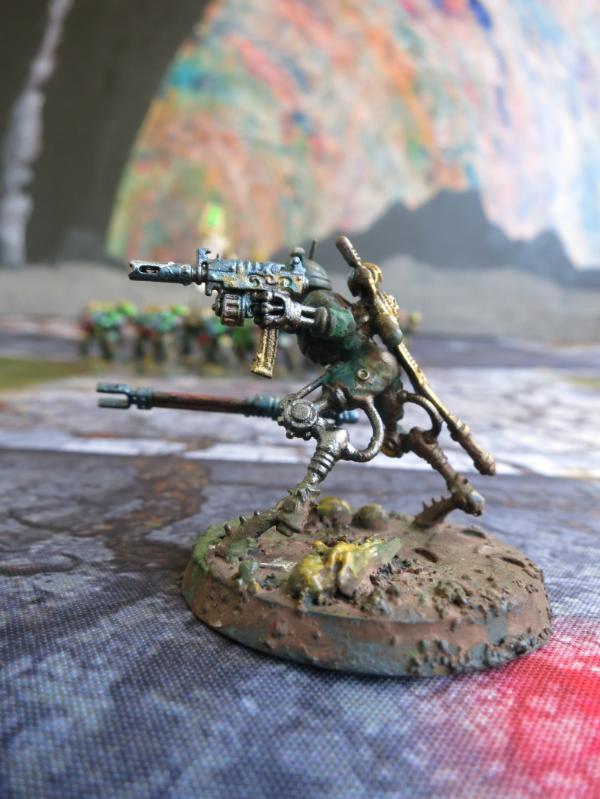
Work in Progress – Eversor Assassin
This Eversor Assassin is further along than some of my other assassins. Most of the basic colors are in place. I need to add highlights to the colors and some pigments to the base to make the model really pop.
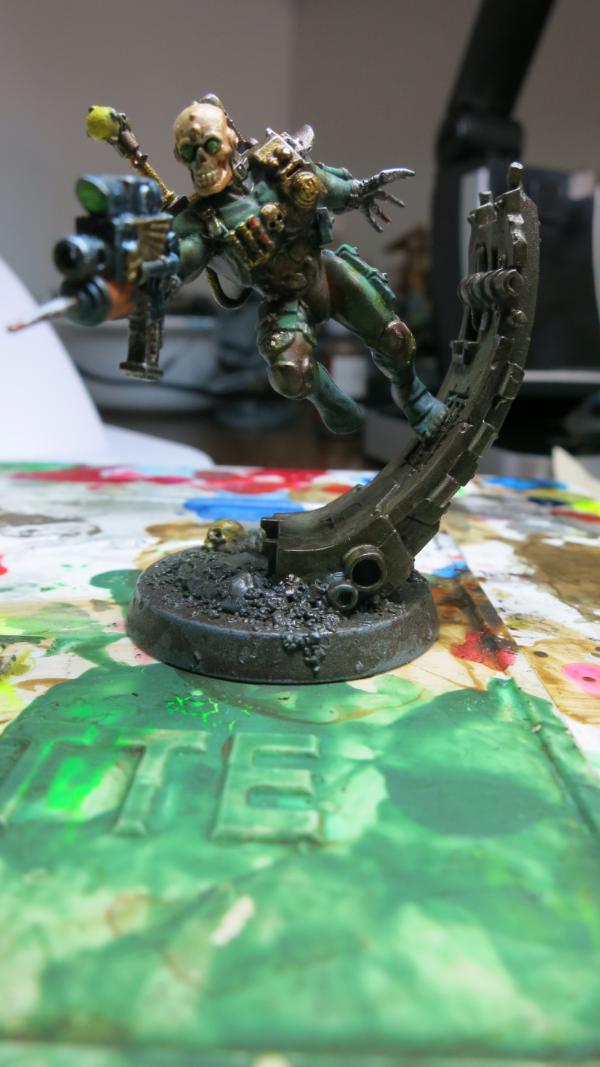
Eversor Assassin
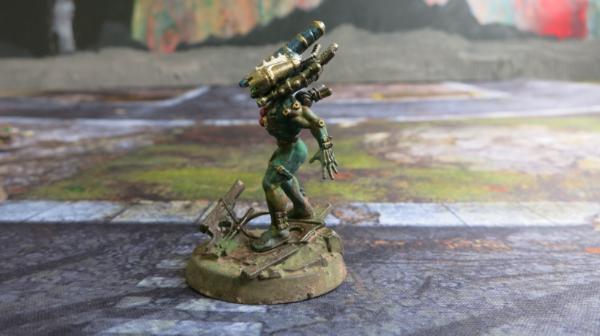
This closeup makes his oversize head look even bigger.
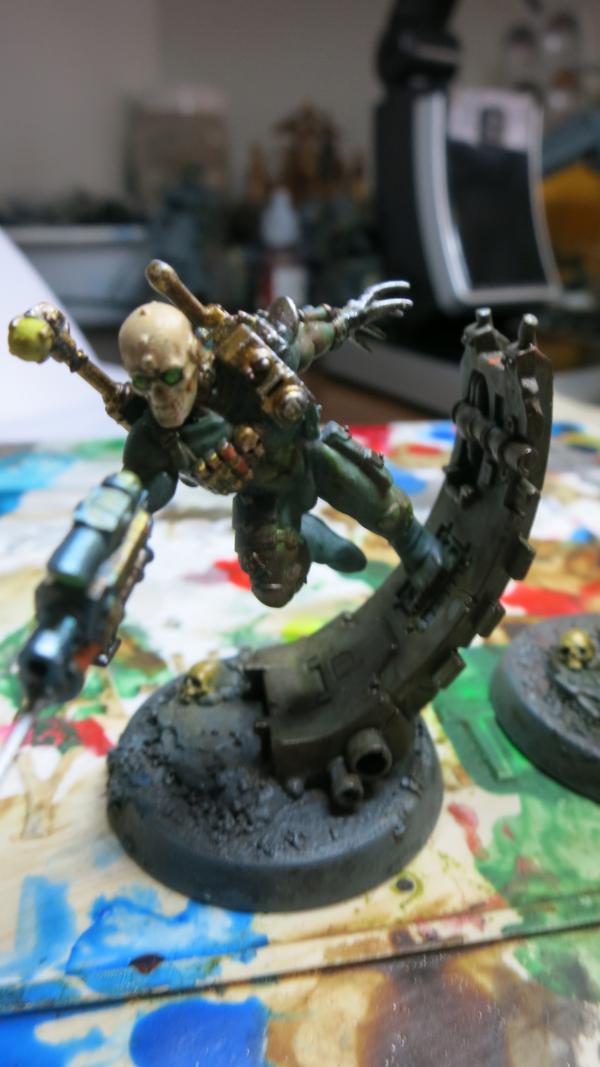
Eversor Assassin - Closeup
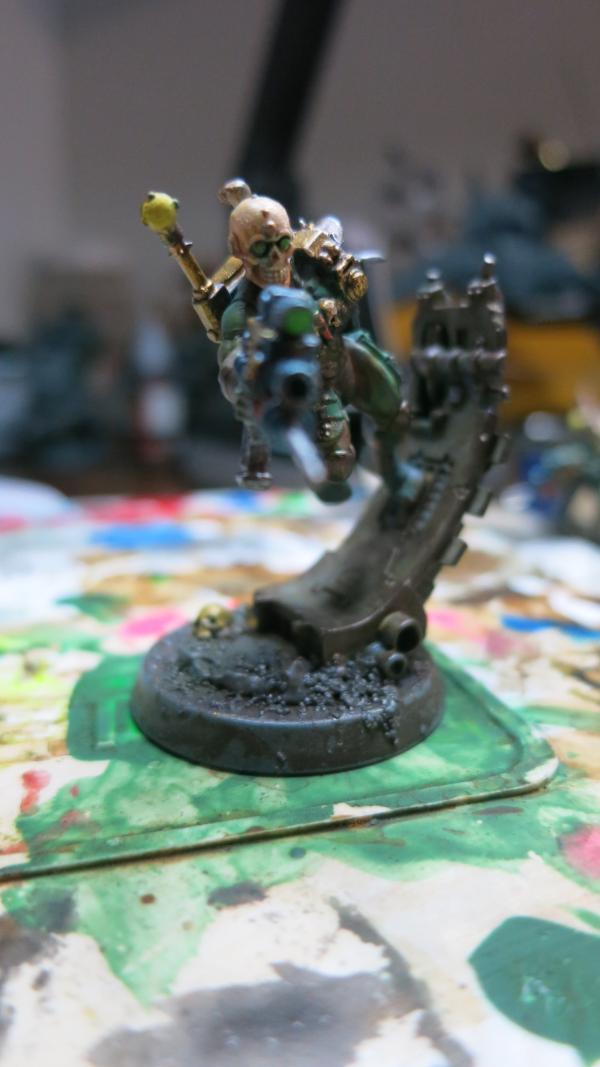
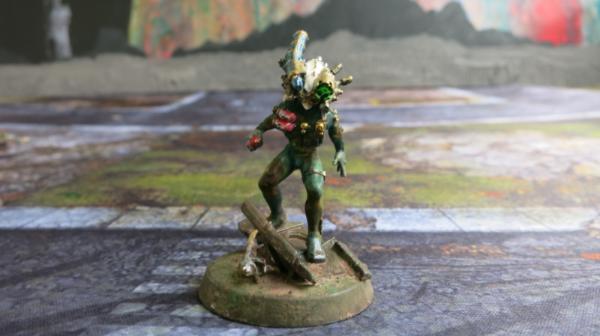
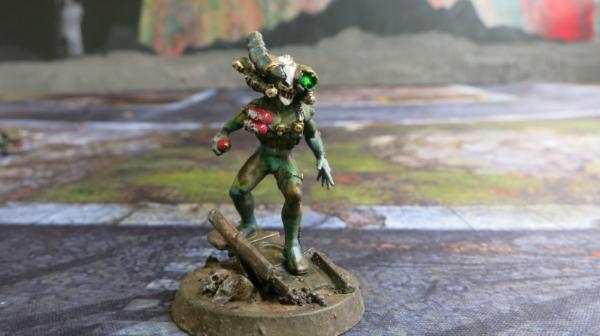
Eversor Assassin – Happy in His Work
Last week my wife dragged me to see the ballet Swan Lake. We watched a bunch of men dressed in tights prance around. If you look at the assassins, you'll notice that they're running around in tights. I thought that the ballet would be improved if they put some skulls on the men’s heads, gave them some executioner pistols and neuro-gantlets, and let them take out Von Rothbart, the evil and powerful sorcerer, in proper style. Of course, it would be even better if Rothbart had been dressed as a Demon Prince rather than as a ugly crow.
21898
Post by: Oldmanronald
Adeptus Custodes Shield Captains on Dawneagle Jetbikes
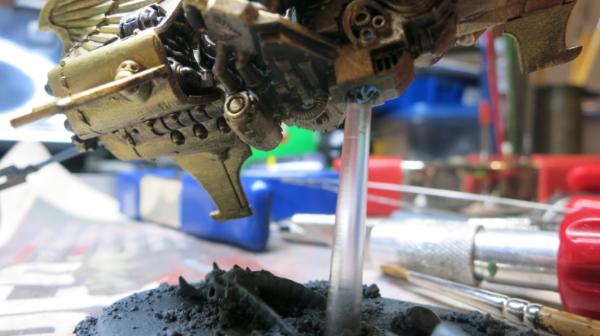
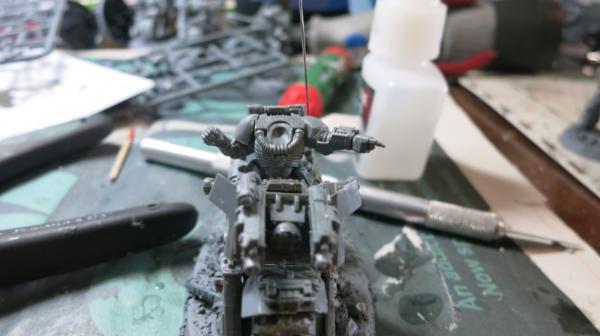
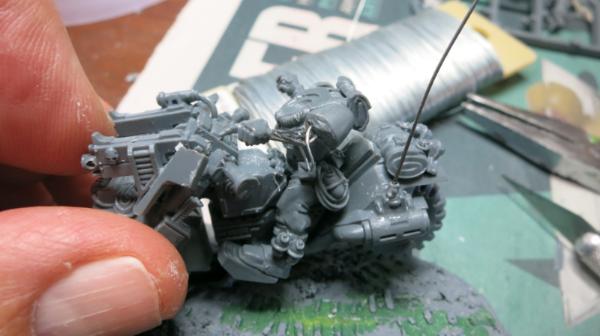
As I wrote in my last post, I am getting tired of painting space marines in camouflage. So I am painting up some Vertus Praetors as Shield Captains on Jetbikes. Below are three unpainted jetbikes. Notice that I haven’t added their heads. They are pretty much stock except I have mounted the helmets on the bikes so that they are accessible to the Shield Captains although all three will be bareheaded. I have adjusted the shoulders so that all the interceptor lances are all level. I also cut out the plastic shafts of the interceptor lances and replaced them with heavy piano wire. This last step will make them less brittle for transport.
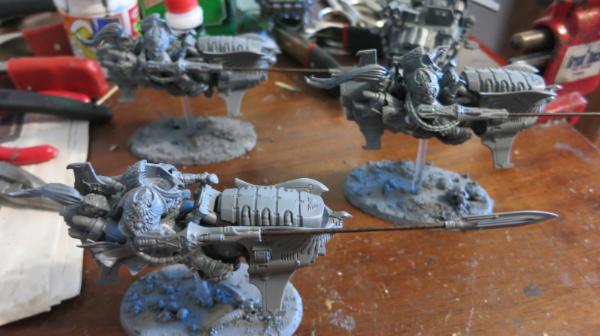
Three Unfinished Shield Captains on Dawneagle Jetbikes
As an acknowledgement to the camouflage of my army, I have painted a small portion of these models in camouflage. The bulk of the model, however, will be gold. I am using a more intense and dark gold paint than the light gold paint used by Games Workshop. After undercoating all the metal areas with tin bits, I used a Vallejo Gold as my base gold color. I mixed the gold with MSP high intensity Core Color purple for my shadows and with MSP high intensity Core Color for the highlights.
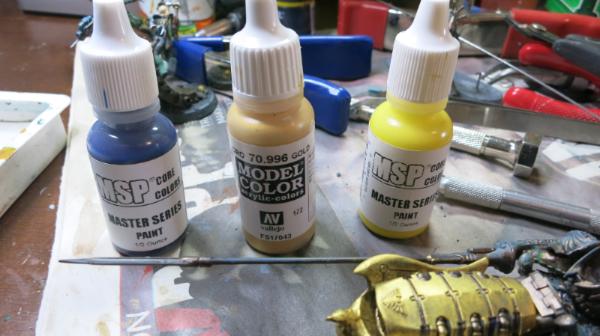
Bottles with Gold Paint and MSP Core purple and yellow
.
The picture below shows my wet pallet with the gold mixes. The standard base gold is in the middle, the mixture of core purple and gold is on the left with a blob of core purple underneath and the mixture of gold and core yellow is on the right with the core yellow just above it. The blue stain in the middle bottom is just a dried out stain that had no effect.
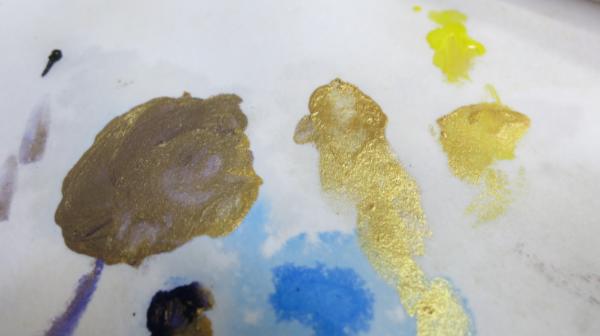
Gold Shade, Base, and Highlight on Pallet
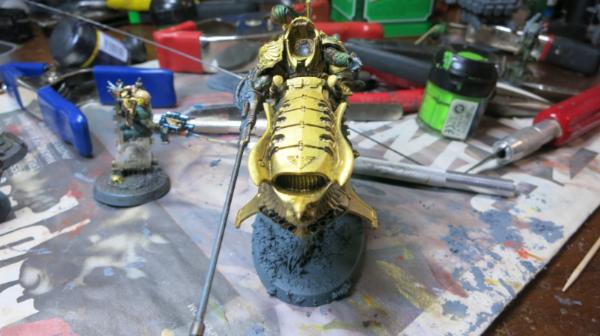
The gold was difficult to paint. It usually took several coats to cover the surface. I am painting the model from front to back. In the picture below, the first two panels and the eagle wing and heads have several coats, the middle panel two coats, and the last two panels have one coat. The little recess between the panels have the purple gold mix. Most of the rest of the model has the camouflage or tin bits painted, at least in the expected shadow areas.
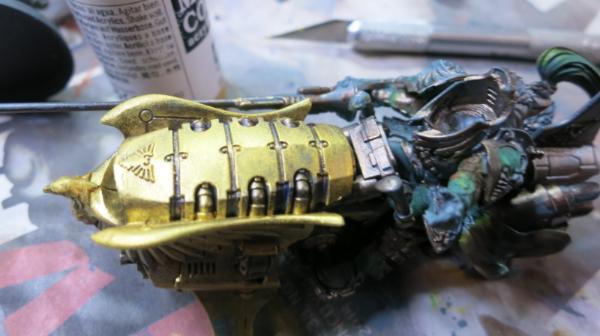
Gold Painting on Cowl of Dawneagle JetBike
The feathers on the eagle have a mixture of the purple gold and base gold mix interwoven to bring out the shape of the feathers. The top of the eagles head, the tops of the wings, and the first two panels also have some of the yellow gold to bring them out.
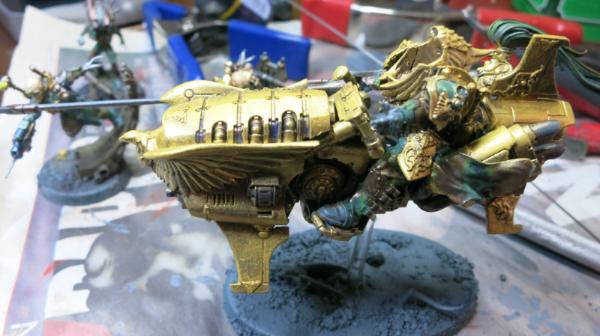
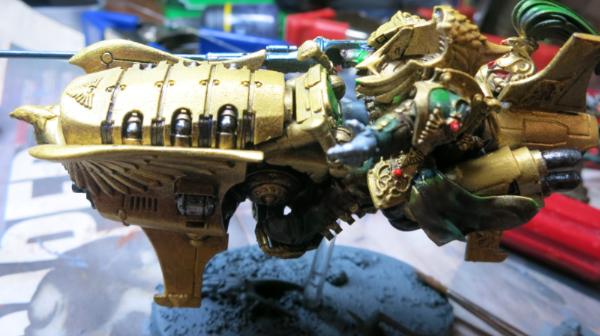
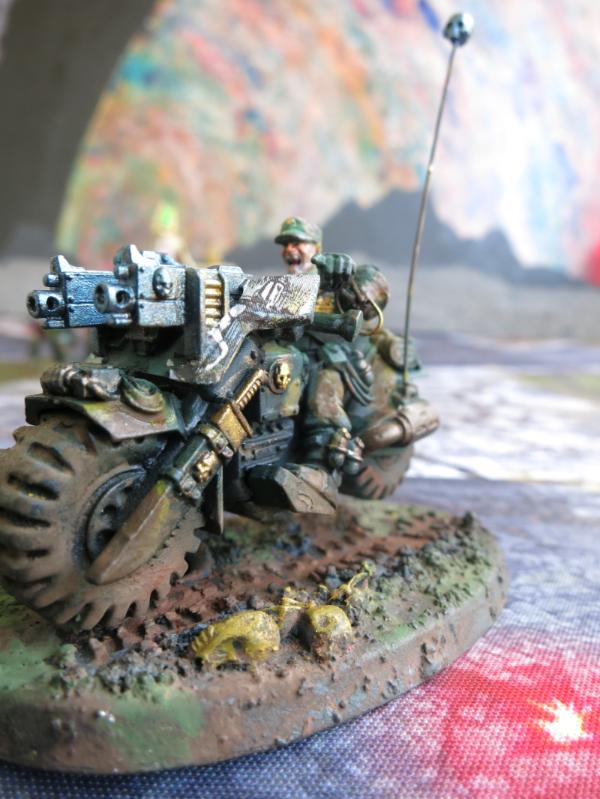
Dawneagle Jetbike with Gold Paint – Left Side View
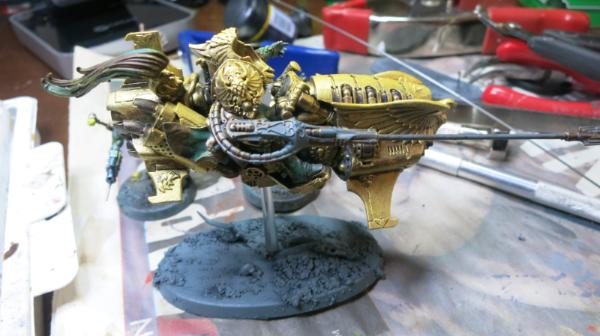
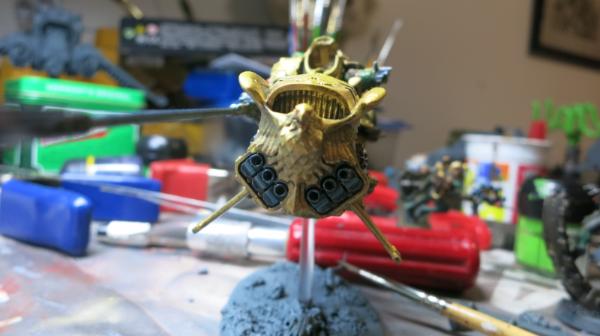
Dawneagle Jetbike with Gold Paint – Right Side View
Dawneagle Jetbike with Gold Paint – Front View
I have only painted one bike so far with the gold paint since it takes a while to do the paint job. For the gold on this picture, there are both natural shadows and painted on shadows. Without the painted on shadow, this model would appear dull and flat.
21898
Post by: Oldmanronald
Shield Captain on Dawneagle Bike – Model in Progress
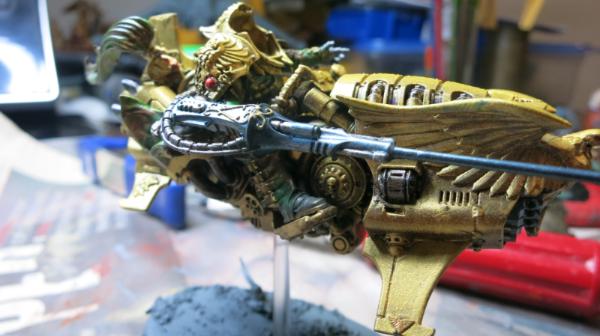
I have been working on this bike. Although I built three bikes and am planning on deploying it as a three bike squad, I am painting up one bike at a time. Since I have never painted an Adepus Custodes model, I am experimenting with my metals and other effects. I had fun painting the gold. Now I am working on Vallejo Model Color gunmetal blue with gold trim for the spear. I also used Vallejo gunmetal gray and oily steel for some details. For highlights on the gunmetal blue, I mixed the blue with silver. The effect is subtle but rounds out the lance handle.

Vertus Praetor with Interceptor Lance – Close up of Details
I also used gunmetal gray, oily steel, and silver on some of the pipes and other non-gold metals.
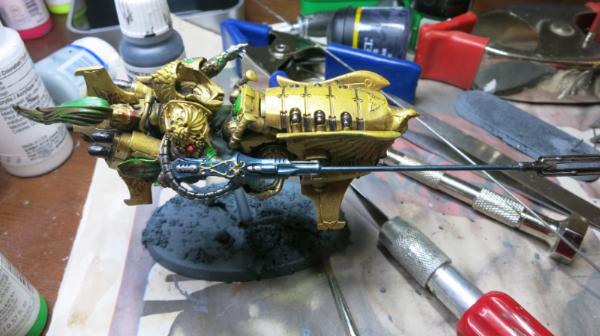
Vertus Praetor with Interceptor Lance – Right Side View
Vertus Praetor with Interceptor Lance – Right Rear View
Vertus Praetor with Interceptor Lance – Under View
This view shows the underside of the jetbike. The underside is painted with Vallejo Game Color Tinny Tin, dry brushed with gold and other metallic colors. It gives the underside both a shaded look and an engine grim look.
Vertus Praetor with Interceptor Lance – Left Side View
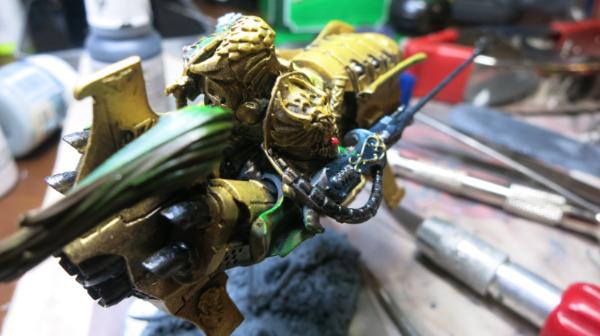
The jewels are painted in red with the highlights being white overlaid with fluorescent magenta mixed with a little fluorescent orange.

Vertus Praetor with Interceptor Lance – Close-up of Shoulder
Vertus Praetor with Interceptor Lance – Front View
This view shows the hurricane bolter. They are painted in gunmetal blue with a mixture of silver and gunmetal blue for the highlights.
Vertus Praetor with Interceptor Lance – Right Front View
21898
Post by: Oldmanronald
My New Lamps
A few weeks ago, I bought two new lamps for my work area. I bought the first and then realized that I wanted one with a magnifying glass so I bought another one. I have discovered that I like having the two lamps in my work area. The one that looks like a toilet seat has the magnifying glass.
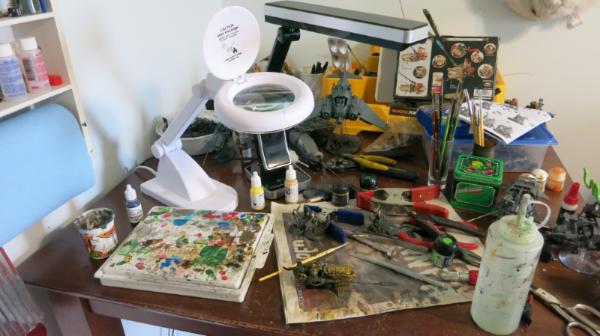
The Two New Lamps in My Workspace
I always like to see pictures of an artist’s workspace. It appeal to my inner voyeur.
21898
Post by: Oldmanronald
Hellblaster with Standard Plasma Incinerator
I built a squad of five Hellblasters with the standard Plasma Incinerator. I will probably get another set and run them as a squad of ten. As a model, I think I like the heavy slightly better, but I think the standard will be more useful in actual games.
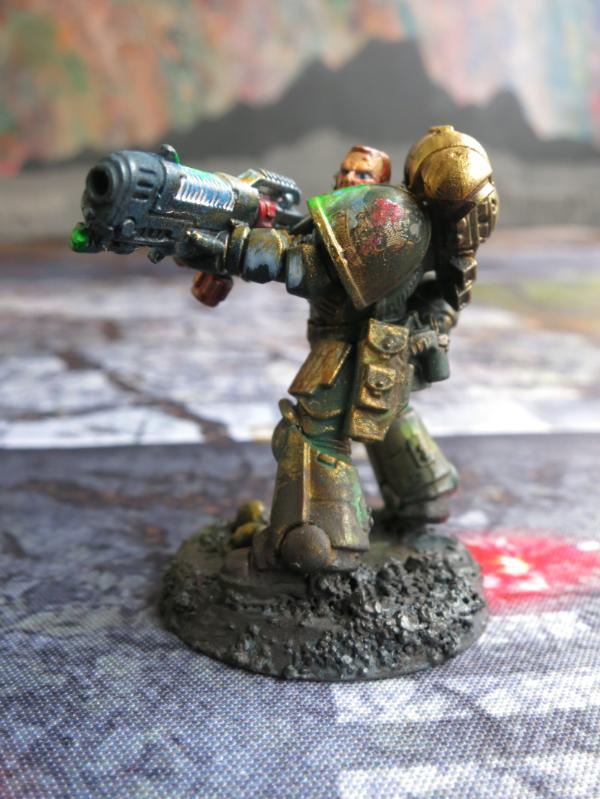
Hellblaster with Plasma Incinerator – Left Front View
The model is grubby. I like my models to look like they have been in combat for a while. This is one of my grubbiest models and it looks like the paint on his power armor is wearing off. His eyes are a little too big. The light reflection from his plasma gun isn’t quite right.
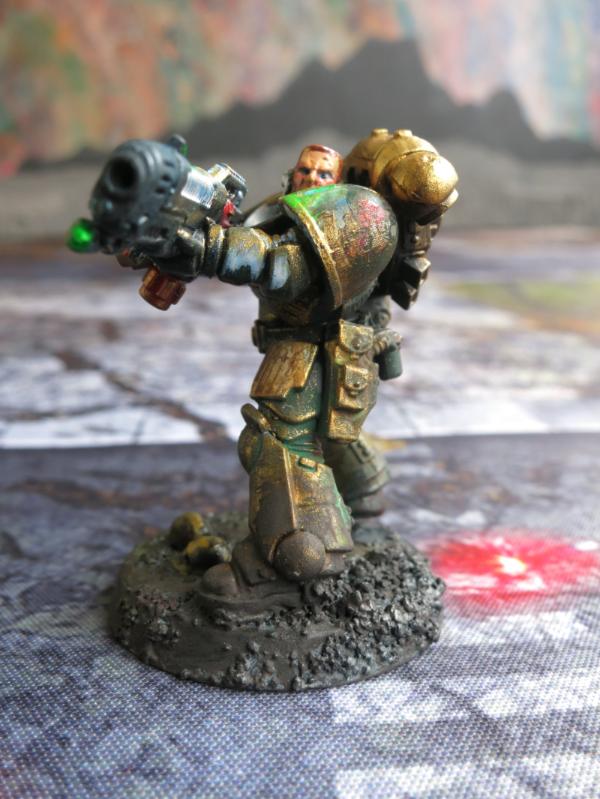
Hellblaster with Plasma Incinerator – Left Rear View
I messed up on the reflection from the plasma incinerator. The bluish white is in the wrong place. It should be on the upper surface of his arm, not the side.
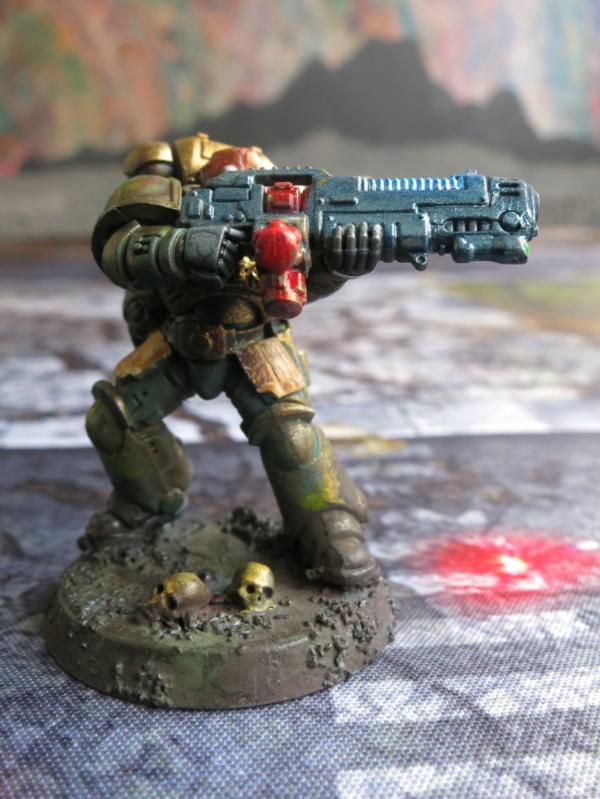
Hellblaster with Plasma Incinerator – Right View
Actually, I do like the look of the standard plasma incinerator.
Hellblaster with Plasma Incinerator – Rear View
21898
Post by: Oldmanronald
Second Hellblaster with Standard Plasma Incinerator
Second Hellblaster with Standard Plasma Incinerator – Left Front View
This is one of my favorite of the Hellblasters. I like his face.
Hellblaster with Plasma Incinerator – Right Side View
Hellblaster with Plasma Incinerator – Front View
Hellblaster with Plasma Incinerator – Left Side View
Hellblaster with Plasma Incinerator – Right Rear View
Hellblaster with Plasma Incinerator – Rear View
21898
Post by: Oldmanronald
Third Hellblaster with Standard Plasma Incinerator
The third Hellblaster has the big bird skull at his feet.
Hellblaster with Plasma Incinerator –Front View
Hellblaster with Plasma Incinerator – Left View
His eyes are weird.
Hellblaster with Plasma Incinerator – Right Front View
Hellblaster with Plasma Incinerator – Left Front View
21898
Post by: Oldmanronald
Fourth Hellblaster with Standard Plasma Incinerator
The fourth Hellblaster has the big Orc skull at his feet.
Hellblaster with Plasma Incinerator –Right Front View
Hellblaster with Plasma Incinerator – Right View
Hellblaster with Plasma Incinerator – Left Front View
Hellblaster with Plasma Incinerator – Left View
Hellblaster with Plasma Incinerator – Left Rear View
Hellblaster with Plasma Incinerator – Rear View
Hellblaster with Plasma Incinerator – Right Rear View
There are actually five Hellblaster with Plasma Incinerators. I only show pictures for four. I deleted all my out of focus pictures and may have deleted one model. Or I counted two models as one.
21898
Post by: Oldmanronald
Assassins
I finally finished four assassins, two Eversors and two Culexuses, at least for taking pictures. Here they are standing on a moon of a distant gas giant.
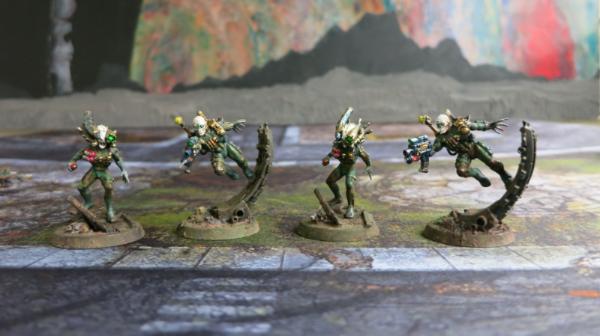
Four Assassins
21898
Post by: Oldmanronald
The Eversor Assassin
The Eversor Assassins were fun to paint. I am not sure that I am finished and I am not sure that I will use them in a game. I may make a Callidus Assassin to freeze up command points.
Eversor Assassin - Front View
Notice that the needle on his executioner pistol is broken. I may replace it with a steel needle or pin but that does get a little more dangerous to game with.
Eversor Assassin – Right Side View
Eversor Assassin – Left Side View
Eversor Assassin – Rear View
He looks happy in his work.
21898
Post by: Oldmanronald
The Other Eversor Assassin
Eversor Assassin –Left Side View
The needle on his Executionor Pistol has not broken off yet. It will. I love the hypodermic syringe fingers on the left hand.
Eversor Assassin –Right Side View
21898
Post by: Oldmanronald
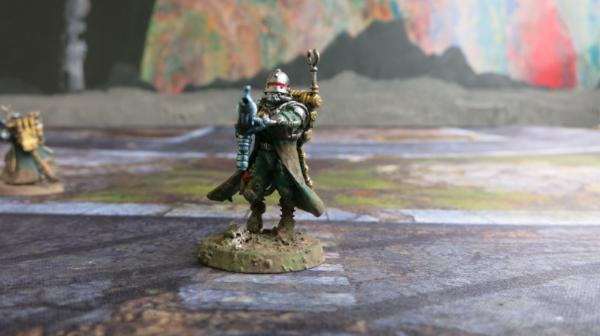
The Culexus Assassin
I need something to shut down Psykers. I don’t really use Psykers because I haven’t really mastered that part of the game. (Actually I have mastered very little of the actual game.) So since I don’t use them, I may use this Culexus Assassins to neutralize the psykic threat.
Culexus Assassin – Left Side View
I thought these were pretty weird looking models and I wasn’t sure I liked them. At first, I liked the Eversor models better. Now that I have them painted up, however, I really like these models. This model takes advantage of five techniques that I am using that are fun. The first is the camouflage pattern on the uniform. This really fits assassins and especially this model. The second is the use of black and gray basecoats to have dark and light areas on the models. This is especially good for the Culexus Assassin with its dark body and bright head and grenades. The third is bases which include pigments. The fourth is the used of metallic paint. I have been experimenting with metallic paints. The fifth is use of fluorescent paints and bright colors high intensity paints for highlights and light sources.
Culexus Assassin – Front View
This view shows the use of bright colors and lights, the clear reds on the hand grenades and the light on his weird eyepiece on his head. This is the ugly faced model.

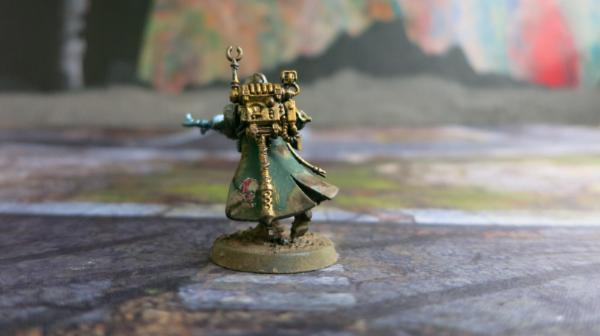
Culexus Assassin –Rear View

Culexus Assassin – Right Side View
These view shows a little of the effect of the metallic paint. I actually blend and layer the metallic paints. The base coat is laid down with tinny tin which is a dark brownish metallic. This makes a nice shadow for all the metallic surfaces.
Culexus Assassin with Tinny Tin Base Coat
I used gunmetal blue on the animus speculum as the main color and then used it blended with silver for the nightlights. I also added a little high intensity blue paints to enhance the gunmetal blue. I did the same with some of the other metal surface, blending the steels paints and silver and then covering them with fluorescent washes.
21898
Post by: Oldmanronald
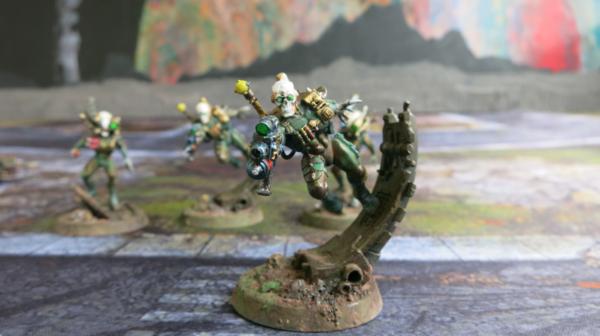
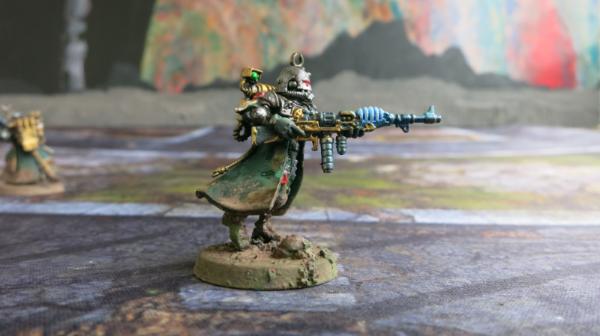
The Smiling Culexus Assassin
The smiling Culexus Assassin is one of my favorites. In part, it is because the model is fun and really lends itself to the techniques I have been working with. This front view shows the use of the high intensity colors on the red hand grenades and the fluorescent green paint to make parts of the model pop.

Smiling Culexus Assassin – Front View
Smiling Culexus Assassin – Front View
Smiling Culexus Assassin – Left Side View

Smiling Culexus Assassin – Right Side View
21898
Post by: Oldmanronald
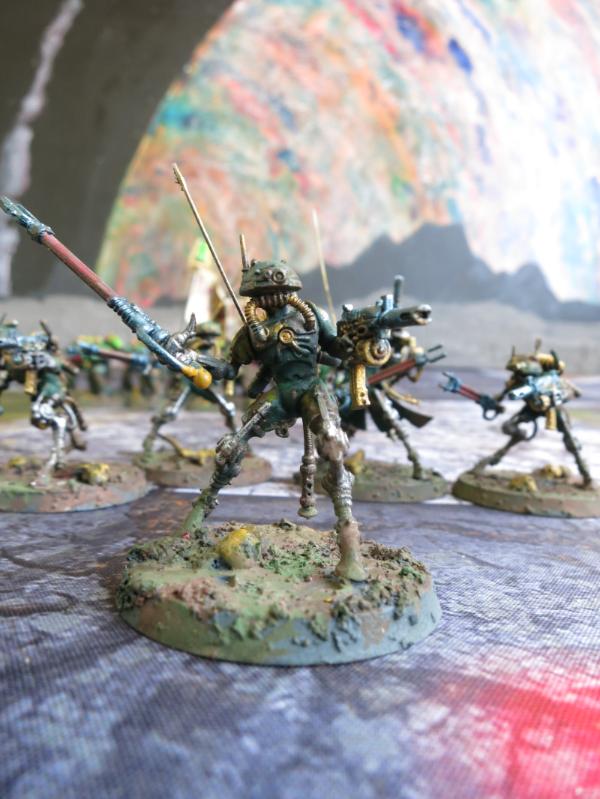
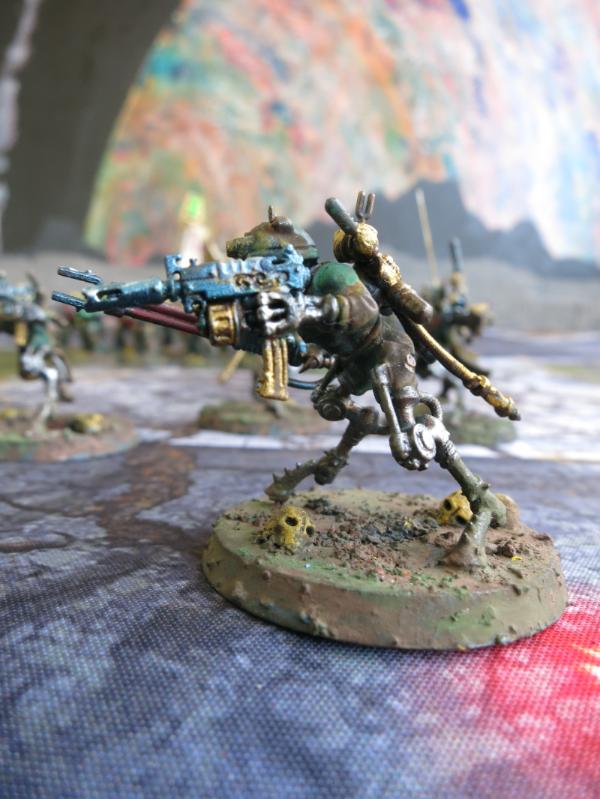
Skitarii Vanguard
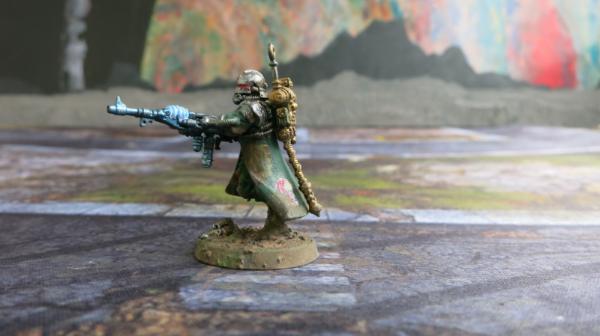
Skitarii Vanguard with Radium Carbine – Right Side View
I am getting a little tired of painting space marines so I am branching out. Several years ago, I purchased two boxes of Skitarii infantry. I started building them the way I built old space marines which is to ignore the instructions which were not very good anyway and just build them. The space marine parts are all interchangeable with the legs, tarsals, arms, and heads easily fitting each other. This is not true of Games Workshop’s later models. The instructions have improved and most of the parts are not easily interchangeable. So I built an army of Skitarii legs and started putting on the great coats without matching them to the legs and found that these parts are not all interchangeable. So I stopped working on them with the models from one box only partly built.
For NOVA 2018, however, I signed up for the Narrative Recon Patrol which has a two hundred point limit. After playing with some possible army lists I decided to build the other box of Skitarii infantry. This time I followed the instructions. I am pleased with the results. These models are really fun to paint.
Skitarii Vanguard with Radium Carbine – Front View
Skitarii Vanguard with Radium Carbine – Rear View
Skitarii Vanguard with Radium Carbine – Left Side View
21898
Post by: Oldmanronald
Building the Skitarii
These are some of my pictures showing the Skitarii as I painted them. The first is the models with just the black gray basecoat.
Skitarii models with Black/Gray Base Coat.
Since the view of these models is from the front, the models look gray.
Skitarii with Transuranic Arquebus
Notice how much darker these models look. It is the lighting. The base coats is a mixture of black and white but the black just looks like shadows.
Skitarii Vanguard with Enhanced Data-tether - Front View
51001
Post by: tarar2d2
I am utterly enthralled by your work. Your use of transfers is amazing, and makes your miniatures really come to life. I don't think I've ever seen miniatures represent 40k artwork as well as these guys, with an amazing amount of expression and feeling coming from each model. Keep up the great work! (also I might steal the whole transfer thing you've got going on here  )
21898
Post by: Oldmanronald
 tarar2d2 wrote: tarar2d2 wrote:I am utterly enthralled by your work. Your use of transfers is amazing, and makes your miniatures really come to life. I don't think I've ever seen miniatures represent 40k artwork as well as these guys, with an amazing amount of expression and feeling coming from each model. Keep up the great work! (also I might steal the whole transfer thing you've got going on here )
Thank you for your kind remarks. I appreciate the compliment especially after looking at your Adeptus Custodes. I also admire your work. You do wonderful faces and I love how each character has a individual personality. I like the falcon. It looks like it is from the old bretonnian knights. These are some of my favorite bits. “Good Artists copy. Great Artists Steal.” Pablo Picasso.
21898
Post by: Oldmanronald
Building the Skitarii – Camouflage and Tinny Tin Undercoats
These pictures show the tinny tin undercoat for the metallic surfaces. This base coat gives depth to the upper layers of metal.
Skitarii Vanguard with Enhanced Data-tether with Tinny Tin Base Coat
Skitarii with Transuranic Arquebus with Tinny Tin Base Coat
21898
Post by: Oldmanronald
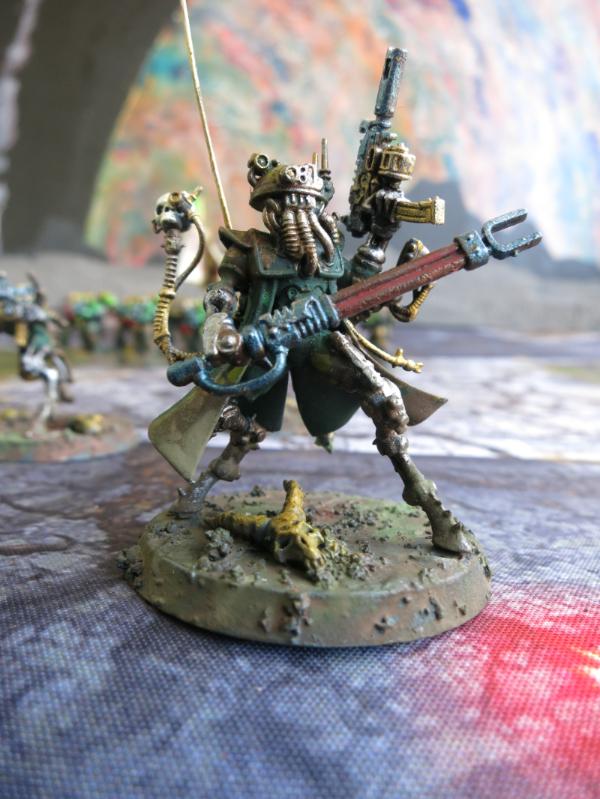
Skitarii Vanguard Alpha
Skitarii Vanguard Alpha with Arc Pistol and Taser Goad – Front View
Skitarii infantry is fun to paint. The camouflage pattern on the great coats matches these models to my already built armies. The models have armor which really allows me to play with my metallic paints. The models have glowing parts such as lenses and glowing weapons that work with fluorescent paints. The best part is the dirt and mud and rust using pigments and pastels to give contrast between the dull and shiny parts.
Skitarii Vanguard Alpha with Arc Pistol and Taser Goad – Left Front View
This has a nice view of the Taser Goad and the dirt on the bottom of the great coat. It also shows the details of the arc pistol with its glow and reflection.
Skitarii Vanguard Alpha with Arc Pistol and Taser Goad – Rear View

Skitarii Vanguard Alpha with Arc Pistol and Taser Goad – Right Front View
Skitarii Vanguard Alpha with Arc Pistol and Taser Goad – Right Side View
This has a nice view of the purity seals which are also fun to work with.
Skitarii Vanguard Alpha with Arc Pistol and Taser Goad – Left Side View
This view shows the skull decal covered with dirt. I often apply the decals and either highlight it with fluorescent magenta or cover it with a pigment or wash. Here I did both fluorescent highlight on the roses and dirt covering a portion of the skull.
21898
Post by: Oldmanronald
Dirt
Skitarii Vanguard with Dirty Base and Great Coat – Left Front View
Look at the dirt on the model’s base, feet, and the bottom of the great coat.
I have been working with pigments and some pigment fixer that I bought from Secret Weapon Miniatures. I had taken a class on pigments from Justin McCoy, founder of Secret Weapon Miniatures, and found it a great way to weather my models and especially my bases.
Then I found an old baby food jar of pastel grinds that I had kept from a pastel class that I took years ago. Pastels are basically pigments in a stick form that are painted on a rough sandpaper like surface. The rough surface grinds down the pastels holding the pigment in the sandpaper but giving off a lot of grinds. I collected my grinds in that baby food jar. Since pastels are all different colors and since all colors mixed together are brown, the grinds look like dirt.
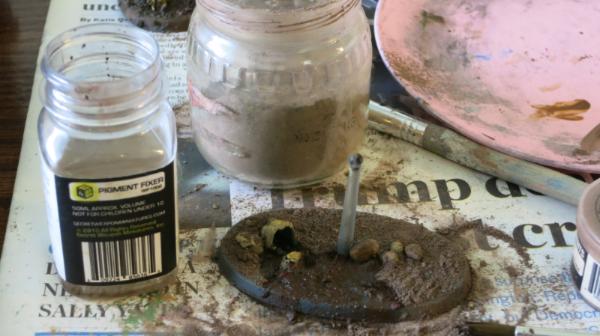
Baby Food Jar full of Pastel Grinds next to a Jar of Pigment Fixer
In the above picture, the pastel grinds have been poured on a base. Notice that the grinds are dirty looking and of different sizes.

Adding Pigment Fixer to Pastel Grinds on Base
After pouring on the grinds, I added the pigment fixer to the pastel grinds to hold them in place and poured on more grinds to fill in any gaps. Actually, I held the bristles of an cheap brush filled with the pigment fixer next to the pastel grinds on the base and allowed the capillary effect to pull the liquid pigment fixer into the grinds. The pastel grinds make great dirt. I added a little green pigment over the dirt to make it appear like the dirt is mossy or covered with grass. I also splattered grinds against the feet and bottom of the coats of the models with the excess pastel grime in my paint brush to give those coats and feet a dirty look.
I still have my pastels sticks and am thinking of how I could use them for miniature gaming. I don’t think I can use them on individual models but I could use them on bases, displays, and playing surfaces especially if the pastel pigment are held by some type of pigment fixer, either spray or liquid.
21898
Post by: Oldmanronald
Skitarii Vanguard with Plasma Caliver
Skitarii Vanguard with Plasma Caliver – Right Side View
Skitarii Vanguard with Plasma Caliver – Rear View

Skitarii Vanguard with Plasma Caliver – Left Rear Side View
Skitarii Vanguard with Plasma Caliver – Right Front View
21898
Post by: Oldmanronald
Second Skitarii Vanguard with Plasma Caliver
Skitarii Vanguard with Plasma Caliver – Right Side View
Skitarii Vanguard with Plasma Caliver – Rear View
Skitarii Vanguard with Plasma Caliver – Left Side View
21898
Post by: Oldmanronald
Second Skitarii Vanguard with Radium Carbine

Skitarii Vanguard with Radium Carbine – Right Front View
Skitarii Vanguard with Radium Carbine – Rear View
Skitarii Vanguard with Radium Carbine – Left View
Skitarii Vanguard with Radium Carbine – Right Front View
The left foot is pinned to the base since the right foot is raised and not supporting the model.
21898
Post by: Oldmanronald
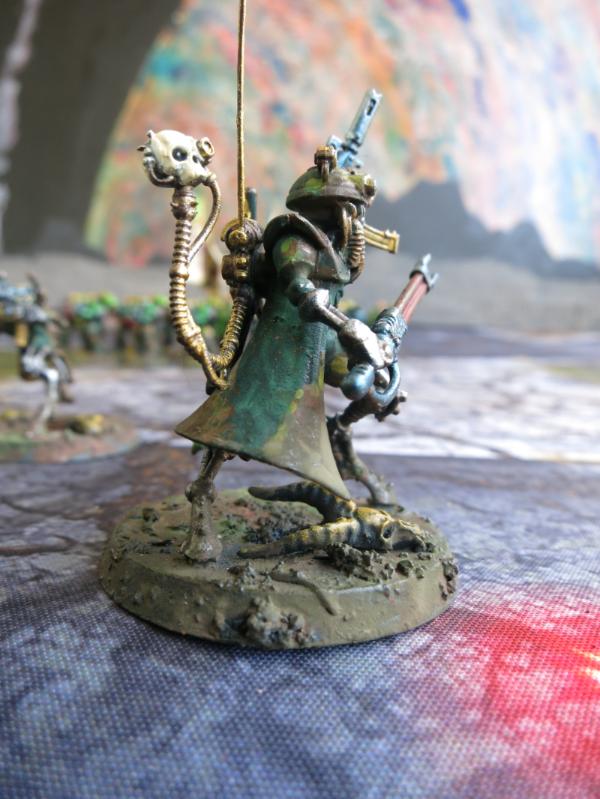
Skitarii Vanguard with Enhanced Data-tether
Skitarii Vanguard with Enhanced Data-tether – Front View
He also has a radium carbine.
Skitarii Vanguard with Enhanced Data-tether – Right View

Skitarii Vanguard with Enhanced Data-tether – Rear View
I have done very little customizing of these models. Still, I cut off the regular antenna and added a longer antenna made of piano wire with a skull head form the skull package I have. It is less breakable and longer.
Skitarii Vanguard with Enhanced Data-tether – Left Front View
21898
Post by: Oldmanronald
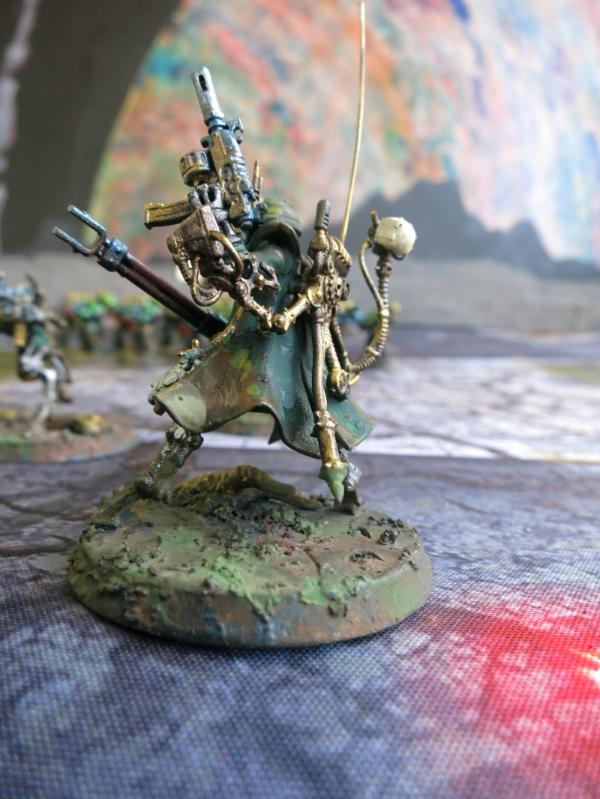
Skitarii Ranger with Galvanic Rifle
Skitarii Ranger with Galvanic Rifle - Right Side View
Like the Vanguard, the Skitarii Rangers are fun to paint. It is especially fun to do the trim on the Galvanic Rifles. My understanding is that the Ranger and Vanguard are some of the best infantry in the 8th Edition but that cheap hoard infantry is even better for board control and in the 8th, good infantry dies about as fast as cheap infantry. The Skitarii also suffer because for some reason, Ad Mech has no vehicles. For recon patrol missions of 200 points, however, good leg infantry may be very effective. We shall see.
Skitarii Ranger with Galvanic Rifle - Front Side View
Skitarii Ranger with Galvanic Rifle – Left Side View
Skitarii Ranger with Galvanic Rifle – Left Rear View
Skitarii Ranger with Galvanic Rifle – Right Rear View
21898
Post by: Oldmanronald
Second Skitarii Ranger with Galvanic Rifle
Skitarii Ranger with Galvanic Rifle - Right Side View
Skitarii Rangers look so much alike I had to put these images side by side with the prior post to make sure that I wasn't posting the same model twice. This second Skitarii Rangel is almost identical to the first Skitarii Range I posted a few days ago. These are like some of those kids puzzles where you have to find a difference. One has a purity seal, the other does not. One has the skull a little bit closer to his feet and a lump of dirt.
Skitarii Ranger with Galvanic Rifle - Right Rear View

Skitarii Ranger with Galvanic Rifle - Rear View
Skitarii Ranger with Galvanic Rifle – Left Rear View
Skitarii Ranger with Galvanic Rifle – Left Front View
21898
Post by: Oldmanronald
Third Skitarii Ranger with Galvanic Rifle
Skitarii Ranger with Galvanic Rifle - Right Side View
Skitarii Ranger with Galvanic Rifle - Left Side View
21898
Post by: Oldmanronald
Skitarii Ranger Alpha
Skitarii Ranger Alpha with Arc Pistol and Taser Goad – Front View
His arc pistol did not turn out as nice as the one for the Skitarii Vanguard Alpha. I suspect, however, that I will not play him and use the Skitarii Ranger with the Omnispex as my Alpha. I am cutting back on the ranger and Vanguard squads to include a couple of Sicarian Infiltrators. Infiltrators look fun to make and should add a little more mobility to the recon patrol.
Skitarii Ranger Alpha with Arc Pistol and Taser Goad – Right Front View
This picture is taken from a lousy angle. The arc pistol is blocking his face. It does show the dirt on his great coat.

Skitarii Ranger Alpha with Arc Pistol and Taser Goad –Rear View
21898
Post by: Oldmanronald
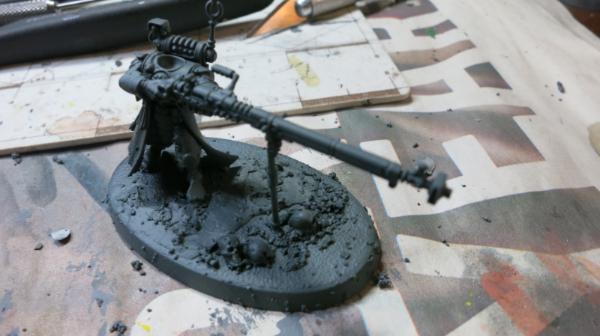
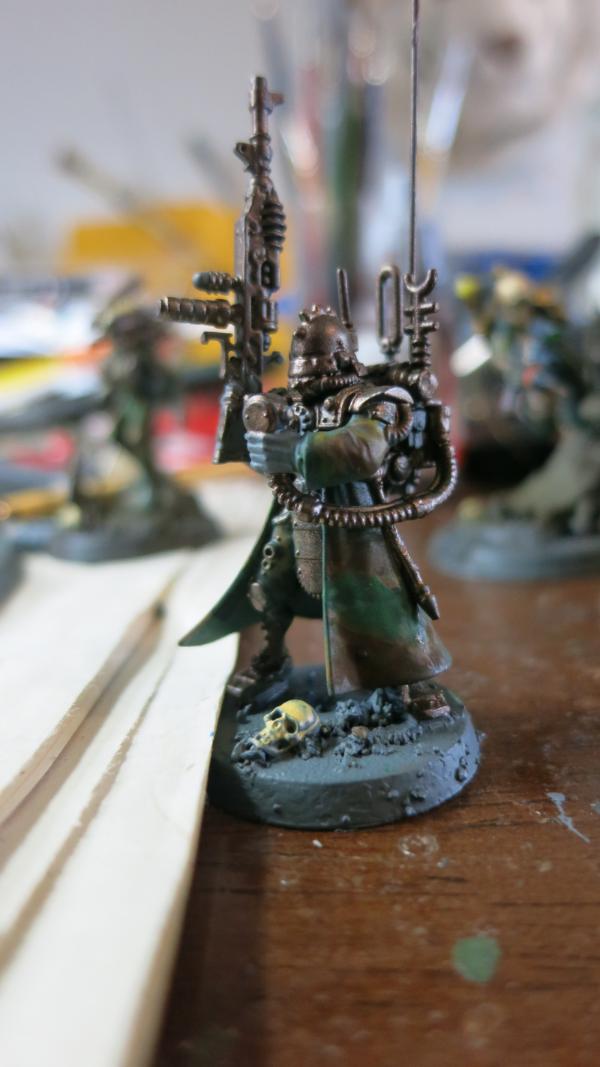
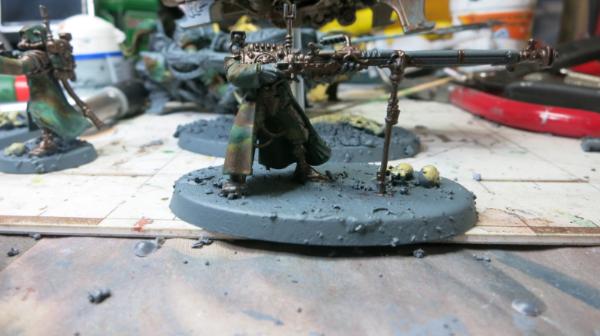
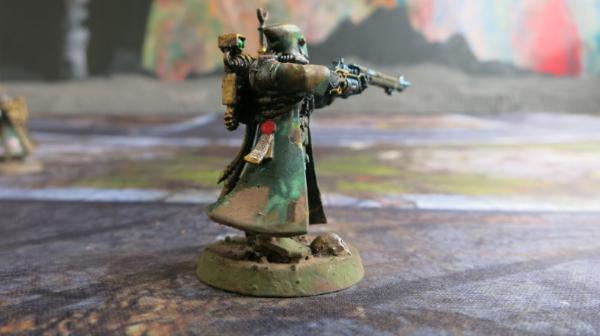
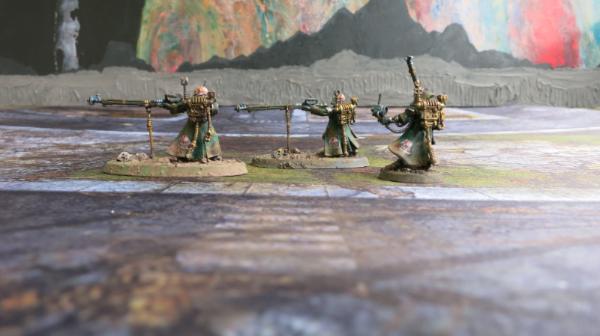
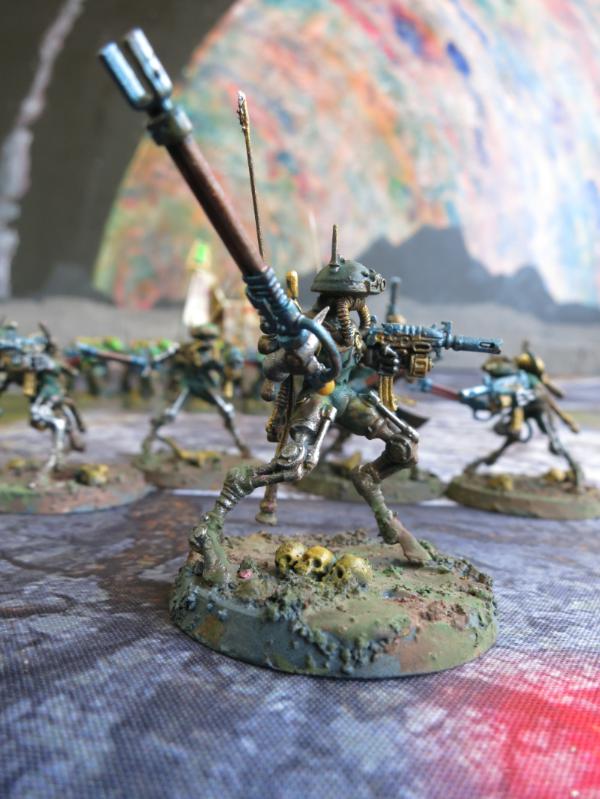
Skitarii Ranger with Transuranic Arquebus
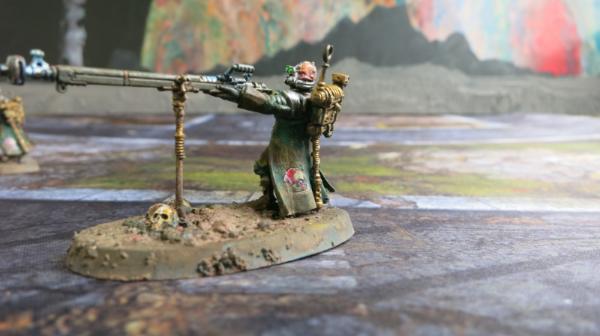
I made two Skitarii Rangers, each with an arguebus. I think they are neat but I will probably only use one in my recon patrol since the arguebus takes up too many points and I can field a Sicarian infiltrator for less than an arquebus. Still, this weapon is too neat to not take. This was a fun model to paint.
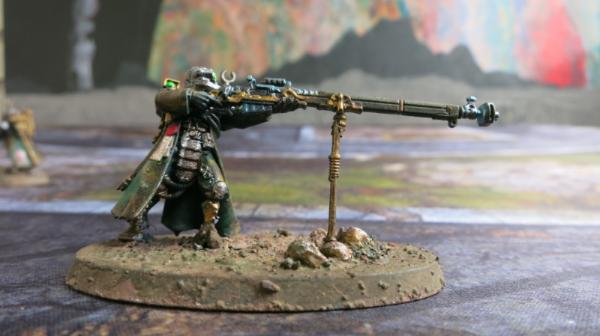
Skitarii Ranger with Transuranic Arquebus – Right Side View
The support pole for the arquebus was made from piano wire so that the model is a little less breakable.
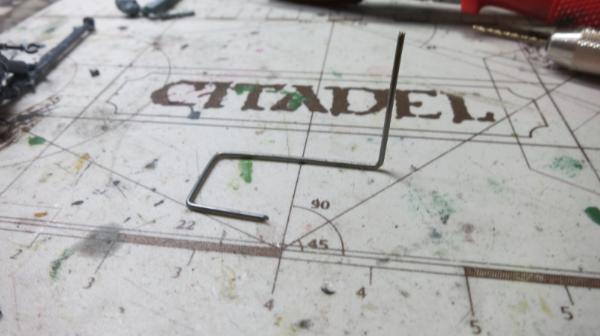
Piano Wire bent to create a support pole for the Transuranic Arguebus

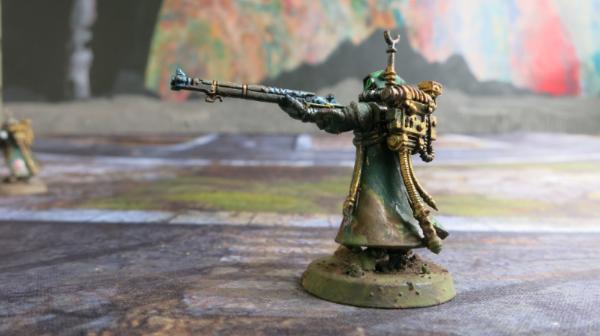
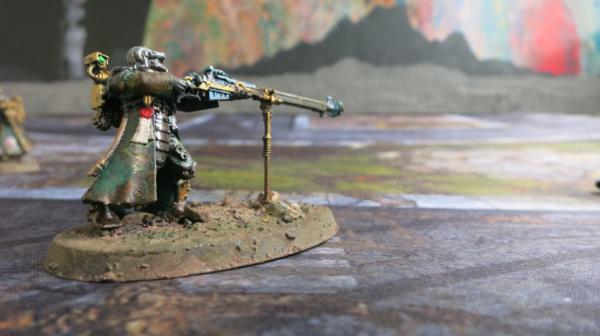
Skitarii Ranger with Transuranic Arquebus – Front View
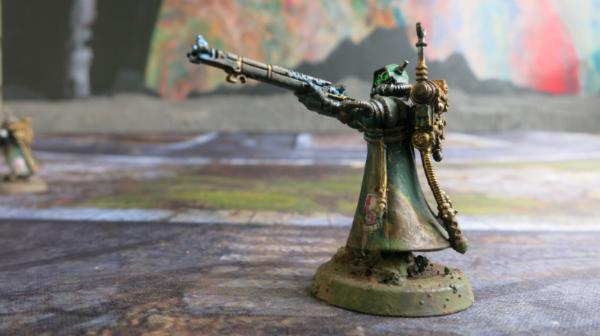
Skitarii Ranger with Transuranic Arquebus – Left Front View
I used the half face for my Arguebus gunners because I like to paint faces. Notice that this model is bent in a somewhat awkward position which is why I will probably use the other gunner rather than this one.
Skitarii Ranger with Transuranic Arquebus – Right Rear View
21898
Post by: Oldmanronald
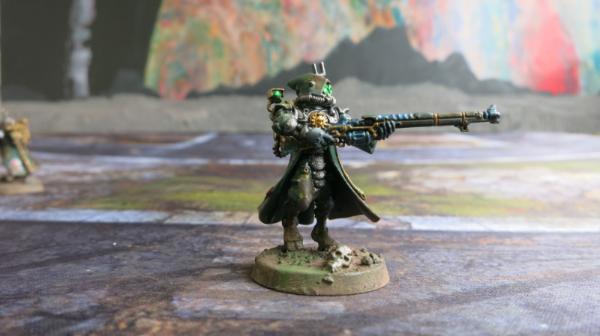
Second Skitarii Ranger with Transuranic Arquebus
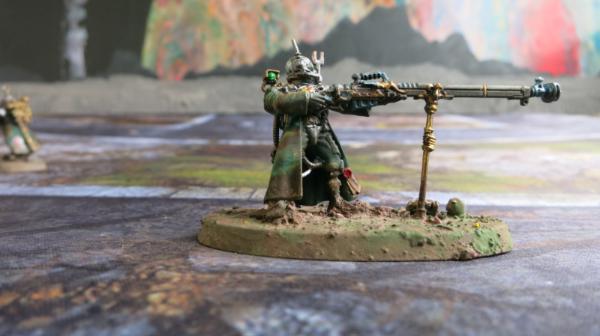
Skitarii Ranger with Transuranic Arquebus – Right Rear View
Skitarii Ranger with Transuranic Arquebus – Front View
Not all of my pictures are great. This one is too far away.
Skitarii Ranger with Transuranic Arquebus – Left Rear View
21898
Post by: Oldmanronald
Skitarii Ranger with Transuranic Omnispex
Skitarii Ranger with Galvanic Rifle and Transuranic Omnispex – Front View
This model shows the metallic paints and the florescent paints to help the model glow.

Skitarii Ranger with Galvanic Rifle and Transuranic Omnispex – Right Side View
This picture shows the detail of the galvanic rifle. The metallic parts are painted with shades of gunmetal blue and brass over a tinny tin base. The stock of the rifle is a sepia wash over the gray and black base coat. The next picture shows the metallic parts of the model painted with tinny tin base before adding the other metallic paints.
Skitarii Ranger with Galvanic Rifle and Transuranic Omnispex – Tinny Tin Base Coat
Skitarii Ranger with Galvanic Rifle and Transuranic Omnispex – Rear View
Skitarii Ranger with Galvanic Rifle and Transuranic Omnispex – Left Side View
21898
Post by: Oldmanronald
Skitarii Ranger Sniper Team with Transuranic Arquebusses
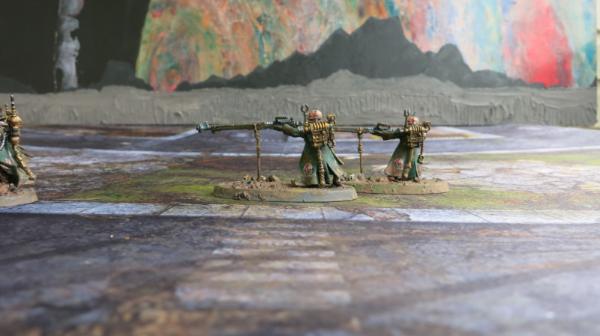
Skitarii Ranger Sniper Team with Twin Transuranic Arquebusses
The idea of two arquebusses sniping together has appeal. But it may be too pricey for a 200 point recon squad game.
Skitarii Ranger Sniper Team with Omnispex and Twin Transuranic Arquebusses
21898
Post by: Oldmanronald
Callidus Assassin
With her ability to muck up enemy kill points, the Callidus Assassin may be worth taking. This was an okay model to build and was somewhat fun to paint. Maybe because she is so skinny, I had trouble focusing on her when I took her picture so I only got one picture of her.

Callidus Assassin
21898
Post by: Oldmanronald
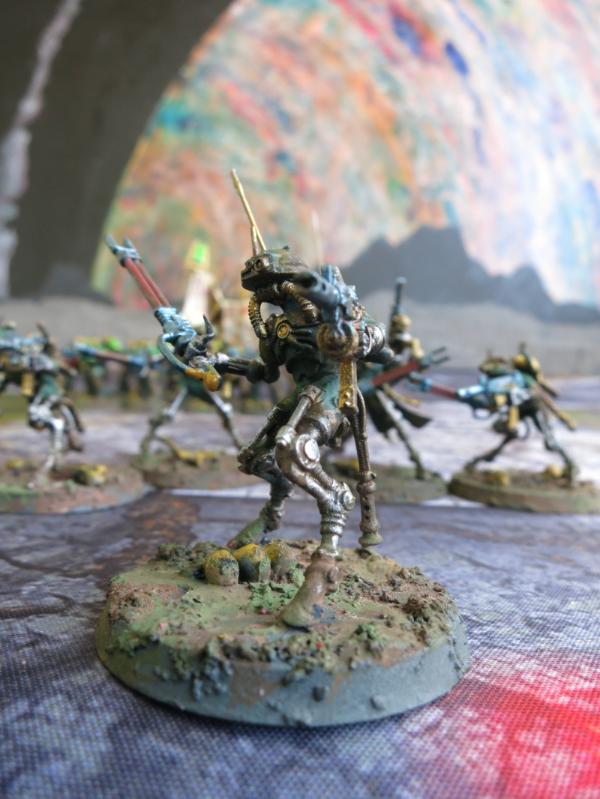
Sicarian Infiltrators
I am somewhat excited about the new Kill Team manual and plan to do some Kill Teams patrols during the narrative event at the NOVA open. I plan to use my Sicarian Vanguards and Rangers in the Kill Team but I will add a few Sicarian Infiltrators. I just finished a squad.
Sicarian Infiltrator – Front View
I haven’t really finished him. I need to paint in the lights on his scope but it is good enough for now. Actually, I am not really fond of these models. They are awkward on their oversized horse feet. They are also brittle and will quickly break.
Sicarian Infiltrator – Right Side View
Sicarian Infiltrator – Left Side View
Sicarian Infiltrator – Rear View
21898
Post by: Oldmanronald
Second Sicarian Infiltrator
For my Kill Squad, I need only one of the four Infiltrators in this squad. The kill team will have two infiltrators but the other will be the Princeps. This one will probably not be picked because he is too hunched over and is missing his long whip antenna.

Sicarian Infiltrator – Front View

Sicarian Infiltrator – Right Side View
Sicarian Infiltrator – Left Side View

Sicarian Infiltrator – Rear View
21898
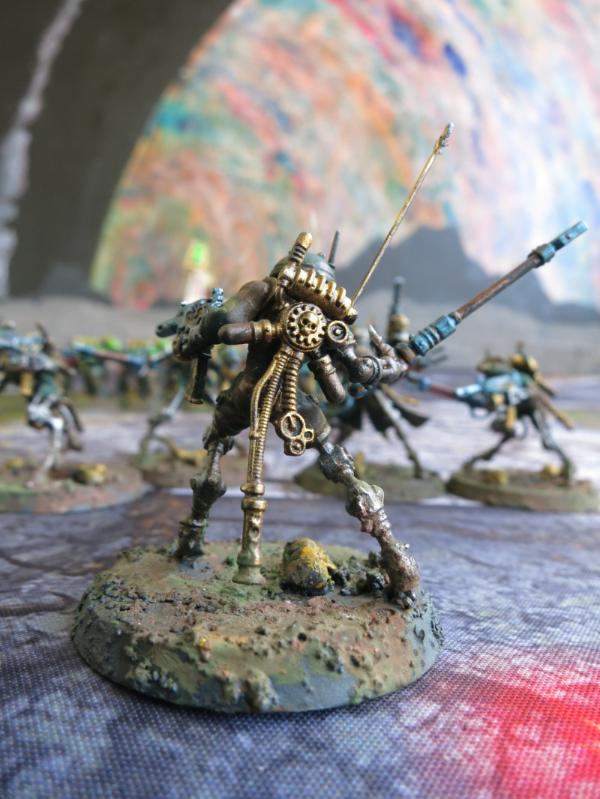
Post by: Oldmanronald
Sicarian Infiltrator – The Princeps
This is my favorite of the Sicarian Infiltrators.
Princeps – Front View
Princeps – Right Side View

Princeps – Left Front View
Princeps – Left Rear Side View

Princeps – Rear View
21898
Post by: Oldmanronald
Third Sicarian Infiltrator
For the Kill Squad, I need only one of the four Infiltrators in this squad. The kill team will have two infiltrators but the other will be the Princeps. This one might be the one since he is standing reasonably straight and has the long whip antenna.

Sicarian Infiltrator – Front View

Sicarian Infiltrator – Right Side View

Sicarian Infiltrator – Left Side View
Sicarian Infiltrator – Rear View
21898
Post by: Oldmanronald
Fourth Sicarian Infiltrator
For the Kill Squad, I need only one of the four Infiltrators in this squad. The kill team will have two infiltrators but the other will be the Princeps. This one will probably not be picked because he is missing the long whip antenna and his small antenna is bent.

Sicarian Infiltrator – Front View

Sicarian Infiltrator – Right Side View
Sicarian Infiltrator – Left Side View

Sicarian Infiltrator – Rear View
21898
Post by: Oldmanronald
Building Games Workshop Models – New and Old

Sicarian Infiltrator and Space Marine Bike Tires
While I was building the Skitarri Sicarian Infiltrators, I was also building Space Marine Scout Bikers. These are really two different type models. The Infiltrators are new GW models; the bikes are old style models. The new GW models are detailed, precise, fussy, and the parts fit tightly together. The old models are easier to assemble but need more brute force to finish. The new instruction booklets are more detailed than the old instructions but need to be followed closely since the new models fit together only one way.
I used a clamp to hold the bike tires together while the glue dried. Notice the seam where the left and right side of the tires join.

Clamped Bike Tire
I filed down the seam to even it up.

Filed Tire with Files
Now imagine what would happen if I put the clamps on and tried to file down this model.

Unfinished Princeps
In building both at the same time, I was really impressed with how different these models are. I am less inclined to modify the new models but they are more finished to begin with and need less customizing than the older models.
21898
Post by: Oldmanronald
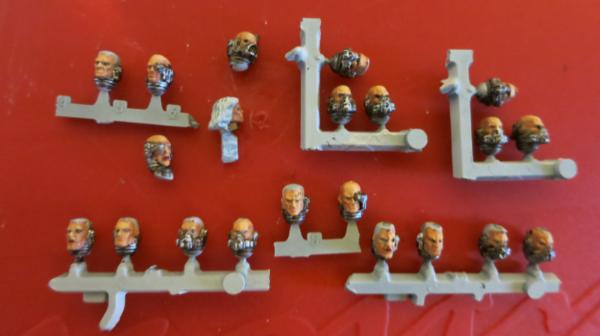
Getting a Head in Life
Since in the 8th edition, scouts are probably the most point effective troops available for Space Marines and Dark Angels, I decided to make another scout squad. A problem is that I really don’t like the Games Workshop scout heads. So I ordered some new heads from Puppets War in Poland. I ordered four sets of heads, the guerilla heads (old version), the mercenary heads, the patrol cap heads, and the officer heads. The order took some time. I finally emailed them and asked about the order because I had waited a couple weeks with no notice of them mailing my product. They responded that they made each order a special order and were just getting ready to ship the heads.
Finally, the heads arrived and I was glad I ordered them. While the guerrilla heads (old version) are okay, the others are great. Still, I will use the guerrilla heads on my scouts because I like their boonies caps.
The other three sets are wonderful. I have started painting them and mounting them on my models. I paint the heads separately from the rest of the model.
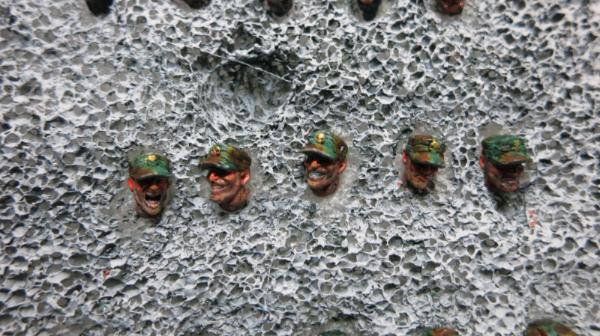
The Patrol Cap Heads
I really like how these models painted up. The heads are made from resin (the material that GW calls finecast). Resin has its problems. Resin models are often distorted so flat surfaces become round and round surfaces twisted. The casting requires lots of lead lines so that there is a lot of bling to cut away on each model. Finally, the mold line are terrible and require a lot of scraping to remove.
On the other hand, however, resin loves paint and paint loves resin. I am not sure why but I think that the sharp edges on a resin model pick up paint much better than either metal or the standard modeling plastic. So the details on a resin head really pop.
Because the heads are so small, the disadvantages of resin is negligible and the mold lines and the bling are easily cut away. In fact, I think all models should have a plastic body and a resin head.

The Mercenary Heads
I love these mercenary heads. Again, the resin loves paint and these heads have lots of personality. I used these heads on my last squad of Hellblasters.

The Officers Heads
I also love these heads. Note the details including the cigar on the left head, the beards, and the insignia on the caps. I used one head on my primaris ancient and the other three on my Dawneagle Jetbike Shield Captains.

Guerrilla Heads (Old Style)
These last heads are less exciting. I have not yet mounted them but will on a scout squad I just built. We’ll see what they look like when they are mounted.
Looking at these heads, it almost appears that the artist who sculptured these heads had a creative leap from okay average heads in the old style to really inspired and dynamic new heads. I will definitely order more heads from Puppets War in spite of the wait. I love the new heads.
I found the best way to paint these heads was to mount them on an old Styrofoam block that I had. I simply pushed each head into the Styrofoam so that each sat in a little depression. I would then spray paint them and then later paint them with little or no movement. Otherwise, especially with spray paint, the heads are so small that they go flying when I try to paint them.
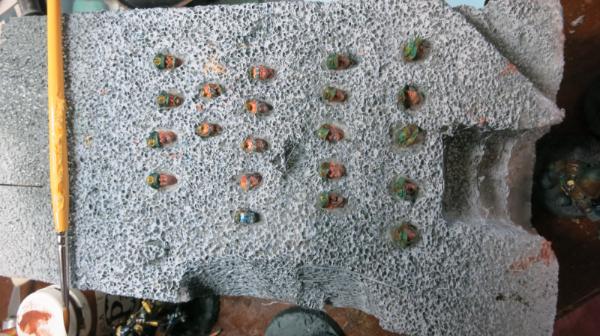
Heads on a Styrofoam Box
21898
Post by: Oldmanronald
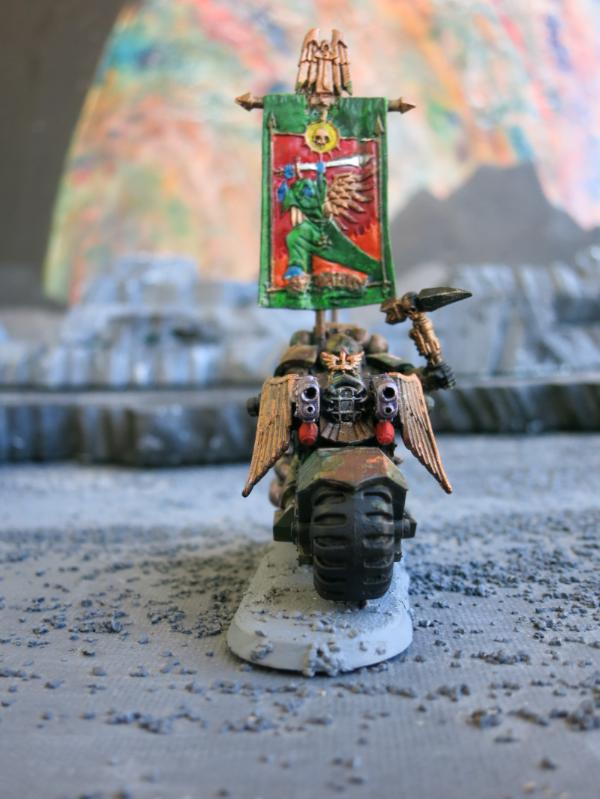
Primaris Ancient
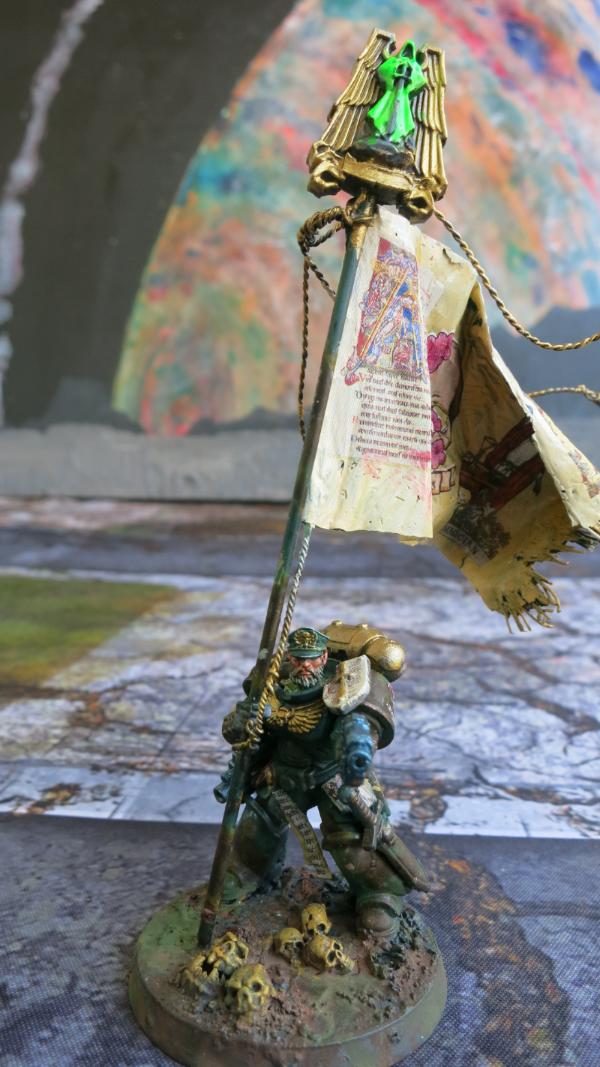
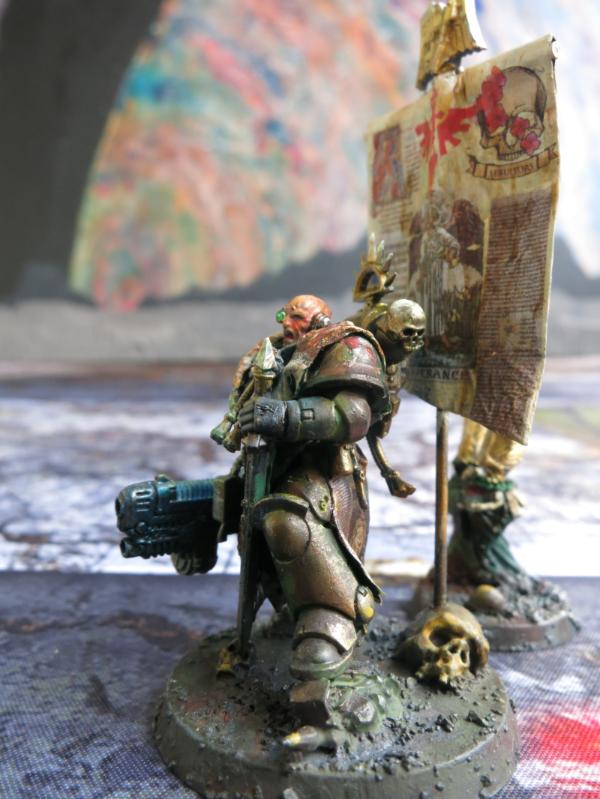
Primaris Ancient with Astartes Banner – Front View
This Primaris Ancient uses one of the Puppets War Officer Heads. The body is from the 30 Years of Warhammer 40,000 Primaris Intercessor Veteran Sergeant kit with some other bits from other kits. The flag is made from green stuff. I am really pleased with this model.

Primaris Ancient with Astartes Banner – Close Up of Front View
This picture shows the details of the head
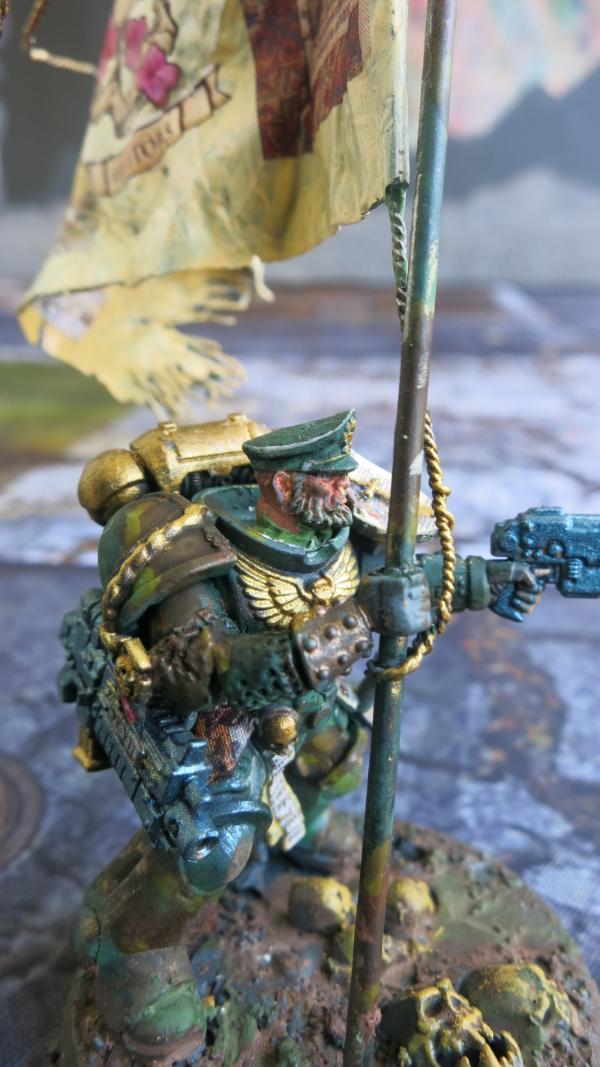
Primaris Ancient with Astartes Banner – Close Up – Right Side View
The arm is from an old Bretonnian knight set.

Primaris Ancient with Astartes Banner – Close Up – Left Side View
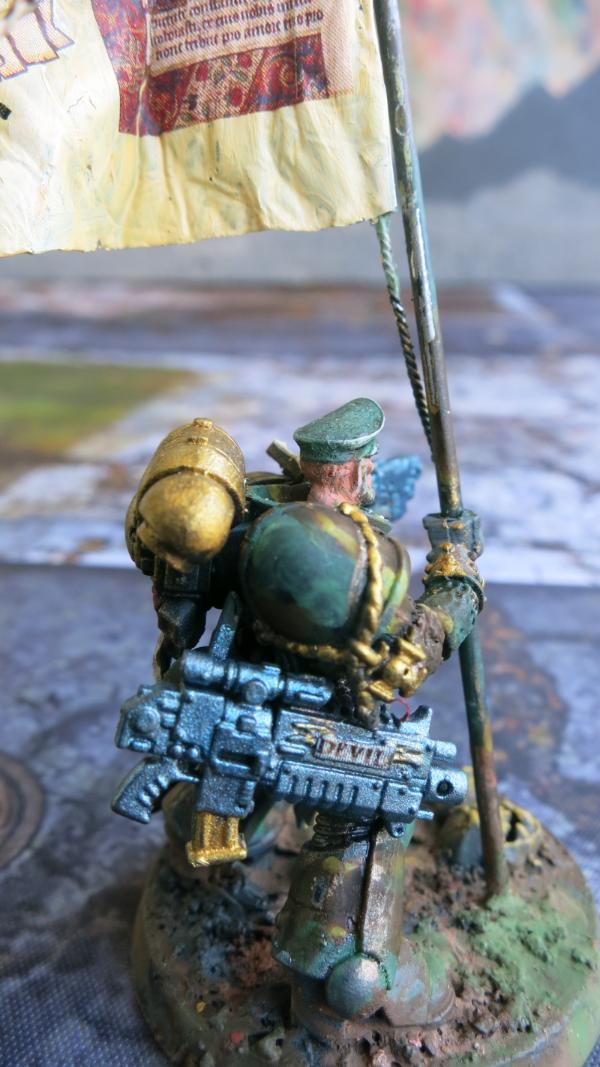
Primaris Ancient with Astartes Banner – Close Up – Right Rear Side View

Primaris Ancient with Astartes Banner – Rear View
For detailed instructions on how to make the Astartes Banner, see my post How to Make a Cape out of Green Stuff: https://www.dakkadakka.com/dakkaforum/posts/list/671876.page#8288936. The flag is made the same way as a cape. Both are fairly easy to make and require no special sculpting skill.
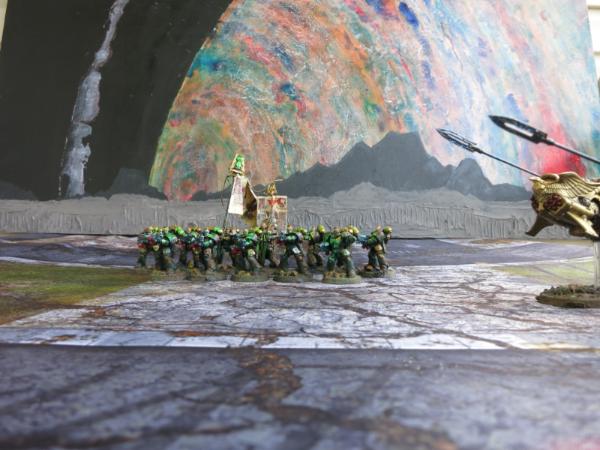
Hellblasters with Azrael and Primaris Ancient with Astartes Banner
This model really looks good as part of a formation with my Hellblasters and Azrael.
21898
Post by: Oldmanronald
First Scout Biker
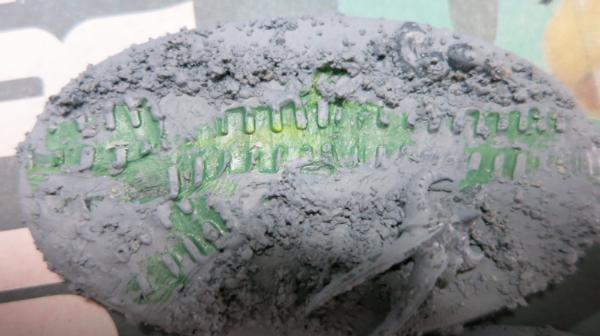
Scout bikers are fun to make. For some reason, biker scouts now come with bigger oval bases so I was able to experiment making the bases with tire tracks and skulls. The first scout biker is carrying a shotgun. He has one of the Puppet War patrol cap heads with a big grin.

Biker Scout – Front View
Biker Scout – Left Front View

Biker Scout – Right Front View
This shows the holster for the shotgun. Since he is holding the shotgun, I had to carve out the shotgun handle out of its holster. The dirt on the tires and on the ground are my left over pastels grinds that I saved from a pastels class I took several years ago.
Biker Scout – Right Rear View
This shows the skulls on the base as well as the tire tracks.
Biker Scout – Left Rear View
This shows the tire tracks and the dirt on the tire, exhaust bike and boots of the biker.

Biker Scout – Rear View
The tire tracks are made by rolling the tires over some green stuff. The next picture shows the unpainted bases with the green stuff tracks.
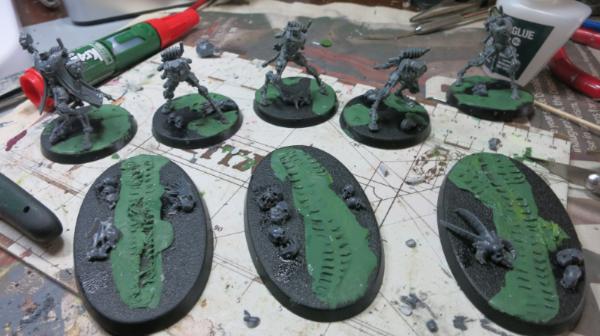
Green Stuff Tracks on Bases
I then painted on a gesso base coat mixed with ballast to cover up the green stuff except for the tracks. The gesso also helped bury the skulls to make them part of the landscape.
Unpainted Biker Base
21898
Post by: Oldmanronald
Second Scout Biker
The second scout biker is carrying a combat blade and a bolt pistol.

Biker Scout – Front View
Biker Scout – Left Front View
Notice that the knife handle is carved out of the scabbard on the bike since he is already carrying a knife in his hand.

Biker Scout – Right Front View
Notice that the shotgun is in the holster. Since he isn’t carrying the shotgun in his hand, it didn’t have to be carved out.

Biker Scout – Rear View
This view really shows the tire tracks.

Unpainted Biker Base
21898
Post by: Oldmanronald
Scout Biker Sergeant

Biker Scout Sergeant – Front View

Biker Scout Sergeant – Right Front View
Biker Scout Sergeant – Left Front View

Biker Scout Sergeant – Right Rear View

Biker Scout Sergeant – Left Rear View
Unpainted Biker Base
21898
Post by: Oldmanronald
Making the Scout Biker Sergeant Arm
The Biker Sergeant was tricky. I had to work to get the Scout Biker sergeant’s pointing arm right. I used a pointing arm from a Primaris set but it turned out to be too big.
Unfinished Biker Sergeant with Pointing Arm
So I cut off the arm.

Biker Sergeant with Amputated Arm
I then cut off the arm from the hand and kept the hand with the pointing finger.
The Amputated Arm and Hand
I then re-attached the hand using paper clip wires and floral wire.
Biker Sergeant with Re-attached Hand

Painted Biker Sergeant with Re-attached Hand
Biker Scout Sergeant – Left Front View
21898
Post by: Oldmanronald
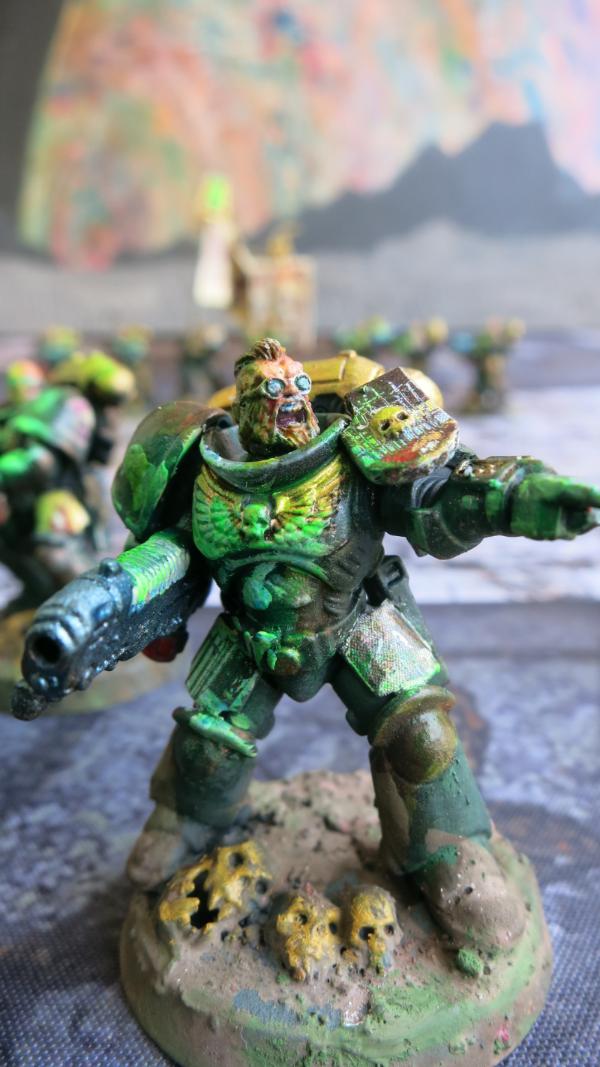
Hellblasters
The Hellblaster Squad
I had fun making the last squad of hellblasters. I used the Puppet War mercenary heads and perhaps too dramatic use of OSL (object source lighting) from the plasma incinerators. These models are not subtle. My favorite is the sergeant with the pointing finger but I love them all.
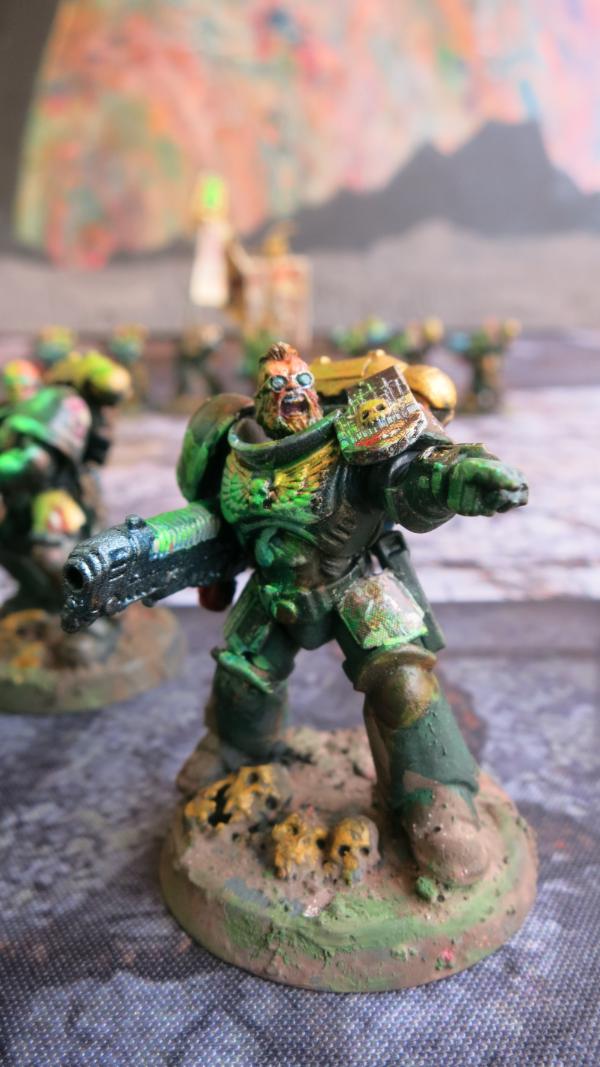
The Hellblaster Sergeant

Hellblaster with Mercenary Head
21898
Post by: Oldmanronald
The Hellblaster Sergeant
The Hellblaster Sergeant – Front View
Here I pushed every technique to the limit – the weird but great Puppet War mercenary head, the decals, the faces with blends of colors, the OSL (object source lighting) from the plasma incinerator perhaps overly dramatic and exaggerated, the base skulls, the dirt on the boots and the base, and the greatest single bit in the Games workshop arsenal – the pointing finger. He is a little cartoony but fun.
The Hellblaster Sergeant – Right Front View

The Hellblaster Sergeant – Left Front View
The Hellblaster Sergeant – Left Rear View

The Hellblaster Sergeant – Right Rear View

The Hellblaster Sergeant – Rear View
21898
Post by: Oldmanronald
First Hellblaster with Mercenary Head – The Mohawk
These new hellblasters with the mercenary head are almost too cartoon-like for dark angel space marines but they were fun to paint. I may have overdone the OSL (Object Source Lighting) from the Plasma Gun. I like the crazy Mohawk.

Hellblaster – Close-up

Hellblaster – Front View
Hellblaster – Left Front View
Hellblaster – Left Rear View
Hellblaster – Right Rear View
This has a nice view of his helmet strapped to his belt.

Hellblaster – Rear View
21898
Post by: Oldmanronald
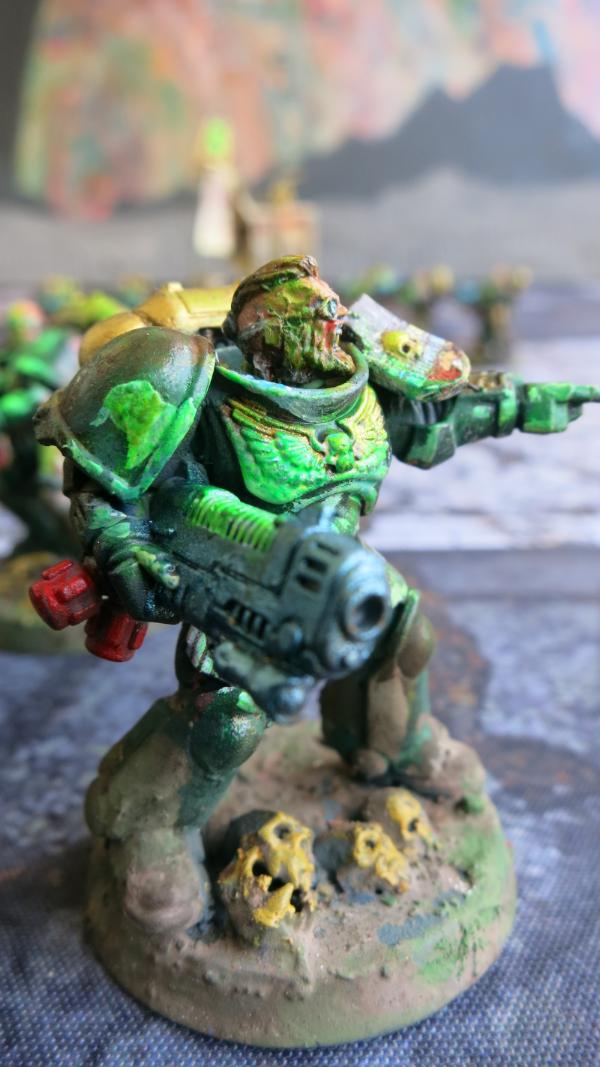
Second Hellblaster with Mercenary Head - The Old Man
This is another fun model with his old looking mercenary head.

Hellblaster – Lower Front View

Hellblaster – Right Front View
Hellblaster – Right Rear View
Hellblaster – Left Rear View
This has a nice view of his footprint on the base.
Hellblaster – Rear View

Hellblaster – Front View
21898
Post by: Oldmanronald
Third Hellblaster with Mercenary Head – Iron Face
Hellblaster – Front View
What could be better than a Hellblaster with an iron face and curly hair?

Hellblaster – Right Front View

Hellblaster – Left Front View
Hellblaster –Right View
Hellblaster – Right Rear View
Hellblaster – Rear View
21898
Post by: Oldmanronald
Fourth Hellblaster with Mercenary Head- Square Head
Square Head is the Hellblaster who looks most like me. Kind of ugly, isn’t he?

Hellblaster – Front View

Hellblaster – Left Front View

Hellblaster – Left View

Hellblaster – Right Rear View
This is a good view of his helmet hanging from his belt.

Hellblaster – Right View
This is a good view of the skulls at his feet.

Hellblaster – Front Right View

Hellblaster – Rear View
21898
Post by: Oldmanronald
Five Other Hellblasters Reworked
I plan to employ my Hellblasters in a ten man squad so I have combined my five mercenary heads Hellblasters with the five other Hellblasters that I have already made and shown on this blog. Since I shared these models, however, I have redone the base and repainted the OSL (object source light from the plasma) to match my mercenary head models. These are the updated models.

First Updated Hellblaster
Second Updated Hellblaster
Third Updated Hellblaster

Fourth Updated Hellblaster
Fifth Updated Hellblaster
21898
Post by: Oldmanronald
Azrael Reworked
Since Azrael is deployed with the Hellblasters and since Azrael has a plasma gun, I reworked my Azrael to match the Hellblasters squad by adding the new base colors and the OSL from his plasma gun.
Updated Azrael - Front View

Updated Azrael – Side View
21898
Post by: Oldmanronald
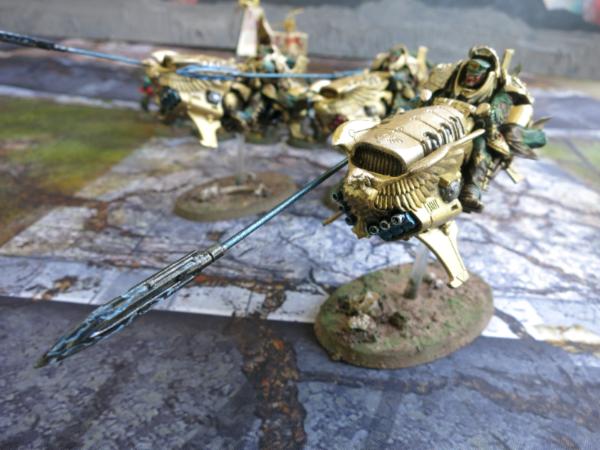
Painting Shield Captains on Dawneagle Jetbikes

Three Shield Captains on Dawneagle Jetbikes
Adeptus Custodes Shield Captains are all the rage right now. I painted them gold but I kept their robes and uniforms in the camouflage to better match the rest of my army. I have never painted so much gold before and it presented several challenges. The first is that it took a number of coats to cover the surface of the model. Second, the gold needed to be shadowed if it was appear three dimensional.
After painting on the camouflage, I undercoated the shadow area of the metal portions of the models in Vallejo game color tin bits to dull and darken the shaded areas.

Shield Captain with Tin Bits Undercoat
Vallejo Model Color Gold, MSP Core Color Purple and Yellow
To paint the gold, I originally mixed the following colors, Vallejo Model Color Gold, MSP Core Color Purple, and MSP Core Color Yellow.
My Original Palette
I mixed the gold with the purple for shadow areas and with the yellow for highlights. It seemed to work if I painted several layers but later I mixed in Vallejo Model Color Silver with the Gold to create more defined highlight.
I had to paint it several times to get it the gold solid. Notice in the picture below, I am painting from the front to rear. Since I painted the gold over the front several time it is solid gold. Note those back plates on the hood that show the base color coming through. These need another layer of gold.

Gold Surface on Hood of the Jetbike
21898
Post by: Oldmanronald
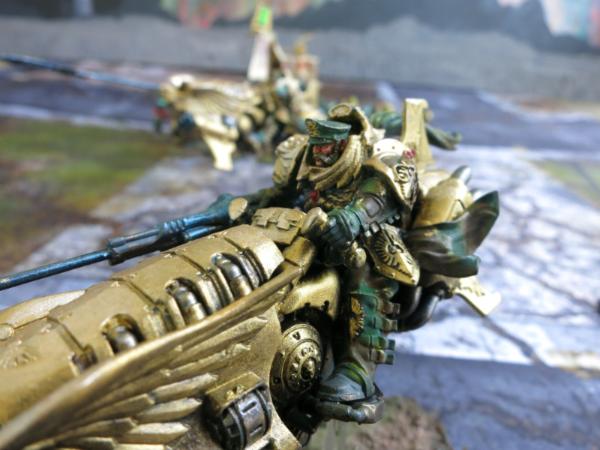
First Shield Captain on Dawneagle Jetbike

Shield Captain on Dawneagle Jetbike – Close-up Front Left View
This picture shows one of the Shield Captains on his Dawneagle jetbike. The head is one of the officer heads from Puppet War. His uniform is camouflaged to match the rest of my army although the bike and much of his armor is gold. The jetbike is armed with a Hurricane bolter.
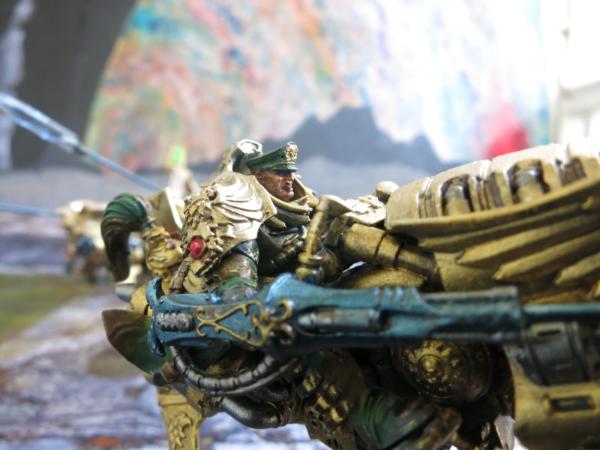
Shield Captain on Dawneagle Jetbike – Front Right View
If you look carefully, you will see that this model has a cigar in his mouth. This shows the details of the interceptor lance. Notice also his helmet mounted on the back of the jetbike.

Shield Captain on Dawneagle Jetbike – Right Rear View
This view shows his helmet, the detail on his interceptor lance, and the contrasting metals on his exhaust pipes. It also show a little of the base.
Shield Captain on Dawneagle Jetbike – Front Left View
Shield Captain on Dawneagle Jetbike – Left Rear View
If you look closely, you can see the hilt of his misericordia just behind his left arm
21898
Post by: Oldmanronald
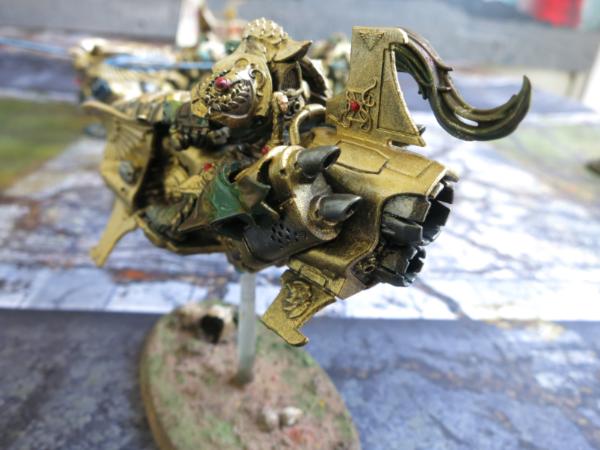
Second Shield Captain on Dawneagle Jetbike with Salvo Launcher

Shield Captain on Dawneagle Jetbike with Salvo Launcher
Notice the red tipped missiles in the Salvo Launcher. I made one jetbike with the Salvo Launcher. All the posts I have read on Adeptus Custodes recommend using the Hurricane Bolter. I actually built the model so I can replace the Salvo Launcher with the Hurricane Bolter. In this case, I didn’t use magnets. The parts fit so closely that they simply snap in and out.
Shield Captain on Dawneagle Jetbike – Left Front View
This view shows the mutton chops on this Shield Captain.

Shield Captain on Dawneagle Jetbike – Right Front View
Shield Captain on Dawneagle Jetbike – Right Close-up View
Shield Captain on Dawneagle Jetbike – Right Rear View
This shows his helmet attached to the back of the jetbike.
21898
Post by: Oldmanronald
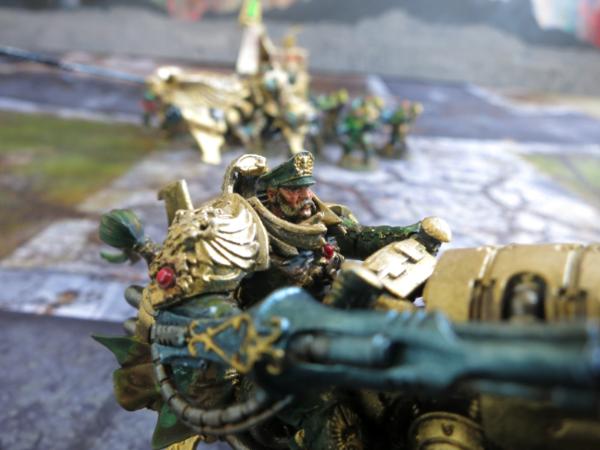
Third Shield Captain on Dawneagle Jetbike
Shield Captain on Dawneagle Jetbike – Front View
This last shield captain was a little tricky to make. In the other models, the left hand is grapping the handle of the jetbike. I wanted one model with a pointing finger. I had the pointing finger but I had to cut off the hand from the handle so the handle was free. The picture below shows the carved down handle. It turned out okay.

Shield Captain on Dawneagle Jetbike – Front Left View with Pointing Finger
This picture also shows some the details of the face. He looks like he is yelling or laughing. I must admit that these Puppet War officers’ heads give real personality to each model.
Shield Captain on Dawneagle Jetbike – Left Rear View with Pointing Finger
This view shows the hilt of his misericordia just behind his left arm.
Shield Captain on Dawneagle Jetbike – Front Top View with Pointing Finger
This view shows the tip of the interceptor lance and a clear shot of the base and of the hurricane bolters.
21898
Post by: Oldmanronald
Putting Details on the Shield Captains on their Dawneagle Jetbikes
These pictures show painting and placing some of the details on the Shield Captains.
Interceptor Lance
The interceptor lance is painted with Vallejo gunmetal blue and trimmed with Vallejo gold. Highlights are a mixture of Vallejo silver and gunmetal blue. I also used various Vallejo steel paints for some contrasting metal parts such as the hurricane bolters.
The Ruby Jewels
The Ruby Jewels have various reds highlighted with fluorescent magenta over white.

Left Over Pastel Grinds, Pigment Fixer, and Pigment with Base
The bases are colored with old leftover grinds from a pastel class mixed with Pigment Fixer and sewage muck (green) pigment from Secret Weapon miniatures.
Preparing the Base for the Dawneagle JetBike
21898
Post by: Oldmanronald
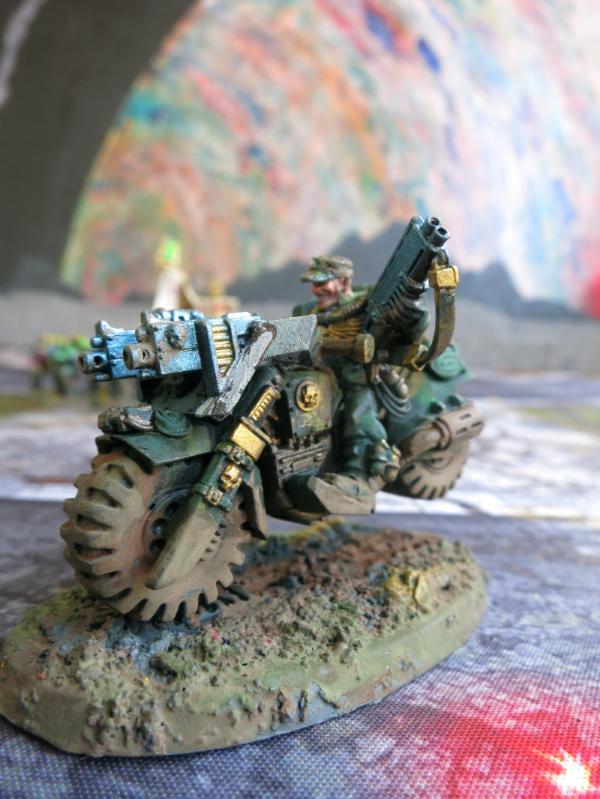
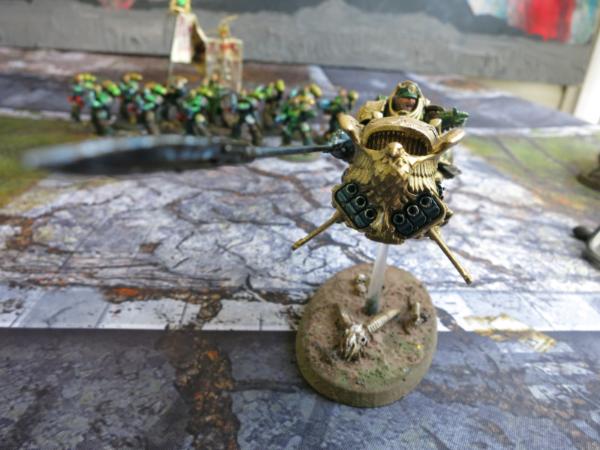
Ravenwing Talonmaster
It is painting and styling that make each model unique. This is the Ravenwing Talonmaster although it is painted with a camouflage pattern rather than the traditional Ravenwing Black and White scheme. The heads are PuppetWar heads rather than the traditional 40K space marines.
Ravenwing Talonmaster – Top Front View

Ravenwing Talonmaster – Right Sidet View

Ravenwing Talonmaster – Rear View
Ravenwing Talonmaster – Left Rear View
Ravenwing Talonmaster – Left Side View
Their helmets are pinned on the side just below the cockpit.
21898
Post by: Oldmanronald
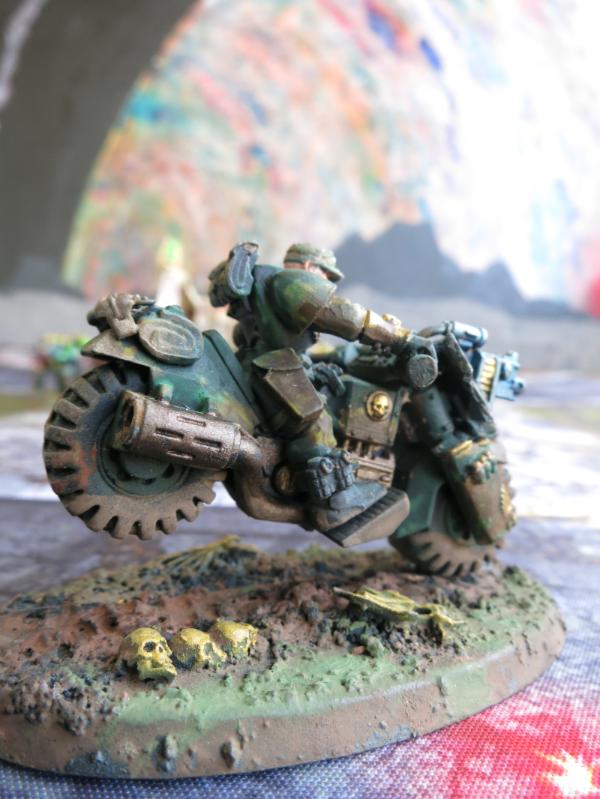
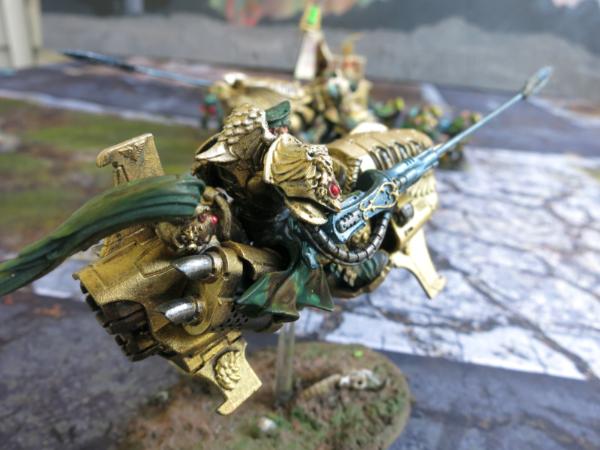
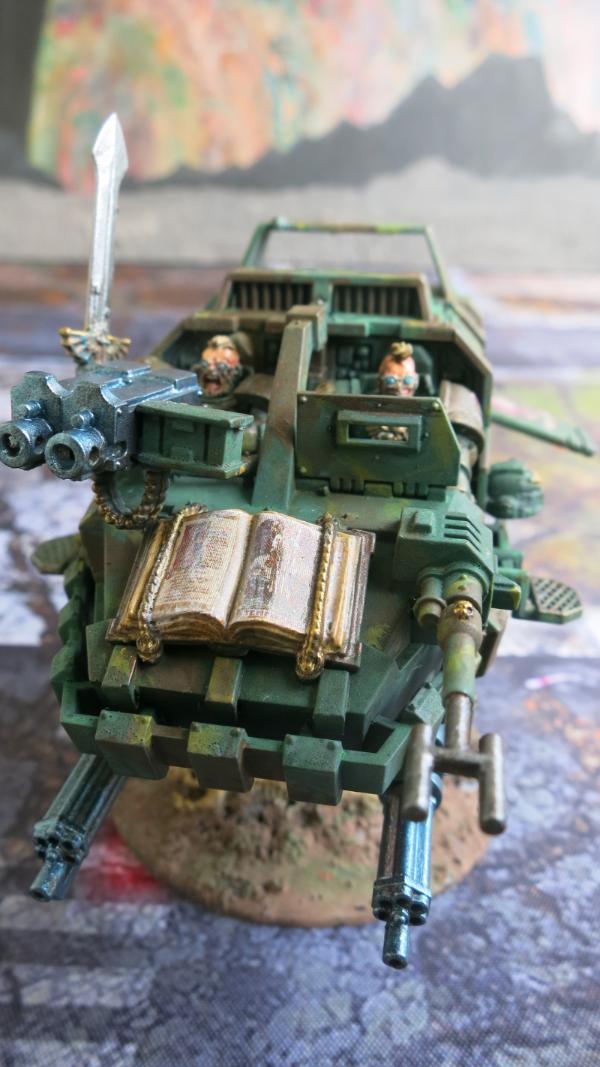
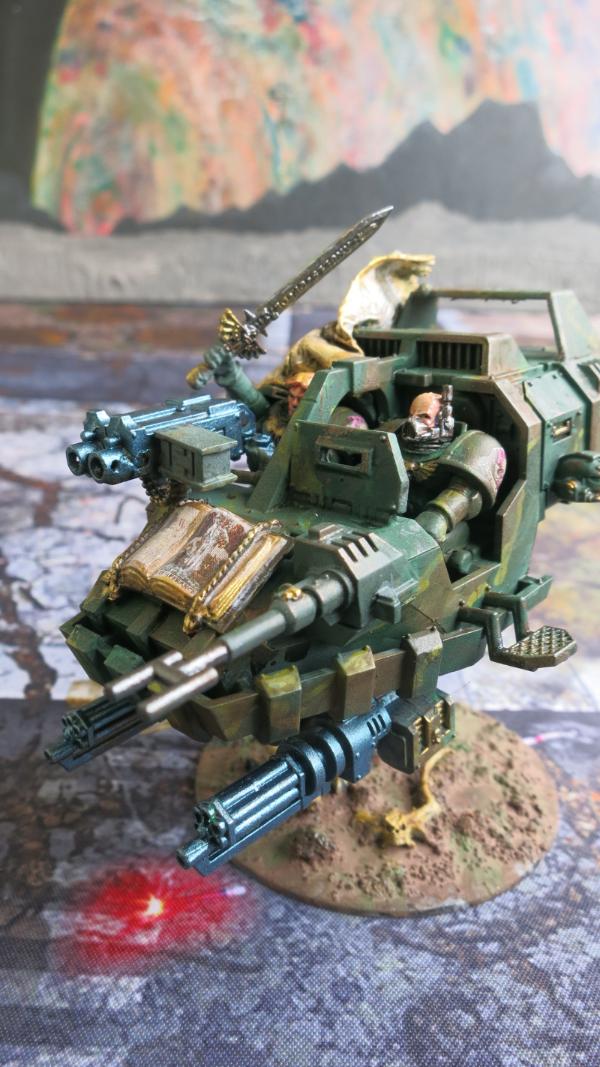
Sammael in Sableclaw
For modeling, the difference between Sammael in Sableclaw and a Ravenwing Talonmaster is just a matter of styling. Although it seems to be missing in the newest Dark Angel Codex, the older codex give Sammael a special cloak called the Adamantine Mantle. The Sammael model on the jetbike, Corvex, has the Adamantine Mantle. It also shows Sammael with long hair. These are two of the styling details that I added to the model to indicate that it was Sammael in Sableclaw.

Sammael in Sableclaw – Right Front View
The head is from the old Warhammer Bretonnia® knight’s set. Games Workshop has discontinued the old Bretonnia knights but I bought a few bits for conversions and find them useful. I added two more details: 1) the book on the hood of the Sableclaw which is identical to the book on the hood of the Talonmaster, and 2) the winged Dark Angel Captain Helmet from the Dark Angels Upgrade Pack. The winged helmet is mounted on the side of the Sableclaw.

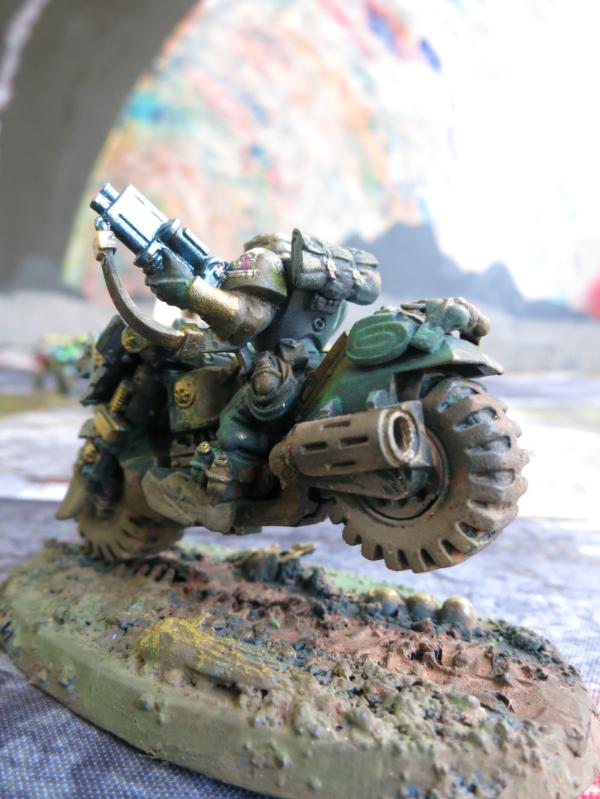
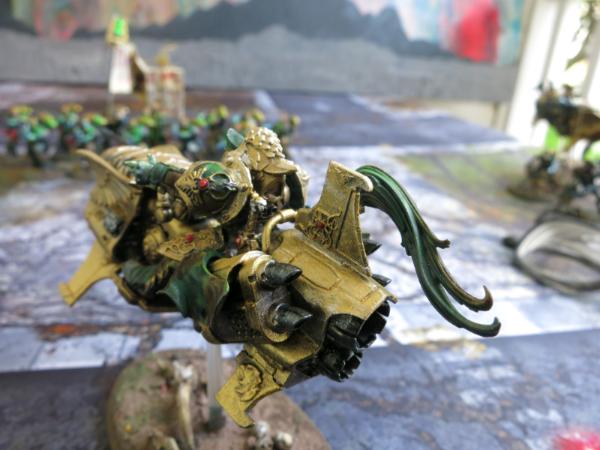
Sableclaw – Right Side View
The sword is also from the Dark Angels Upgrade Pack.

Sableclaw – Left Side View
A regular Dark Angels helmet is mounted on the left side for the pilot.

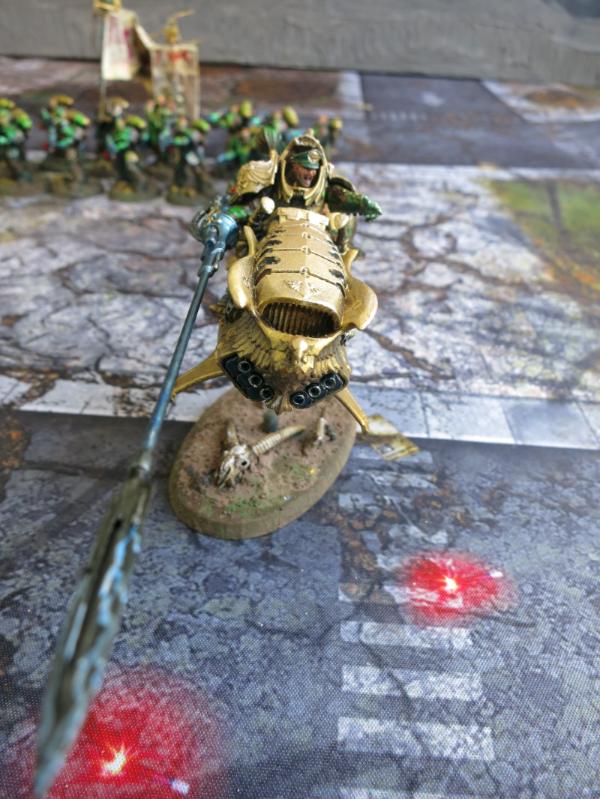
Sableclaw – Front View
Sableclaw – Rear View
21898
Post by: Oldmanronald
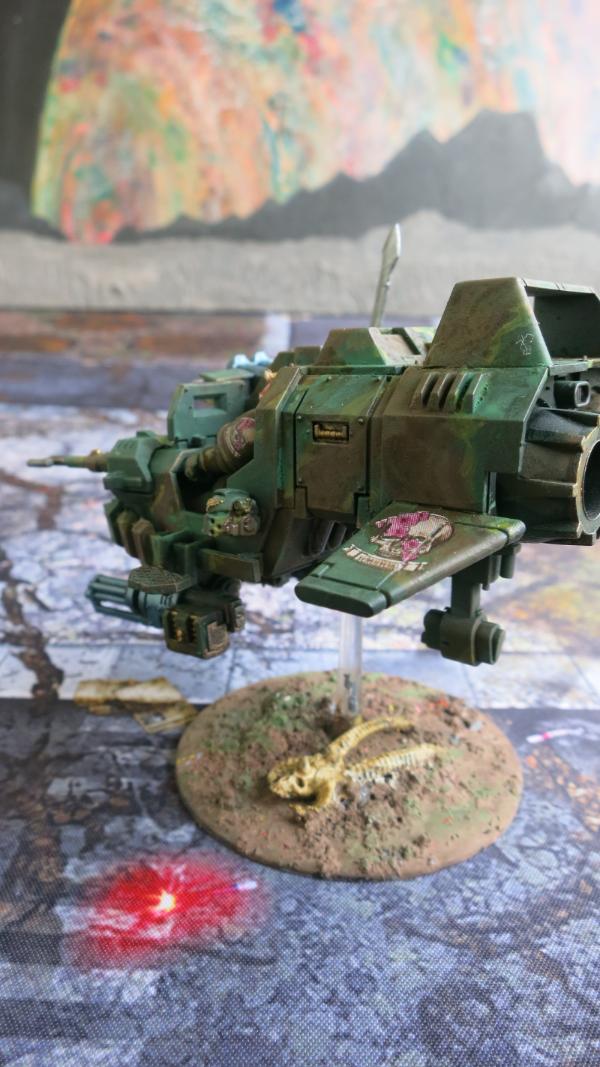
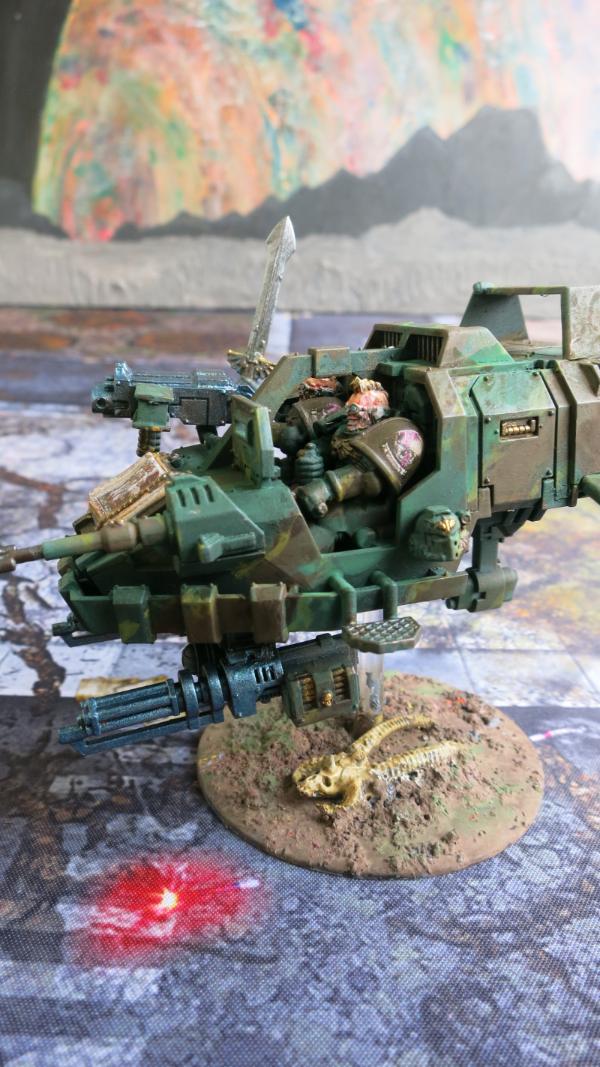
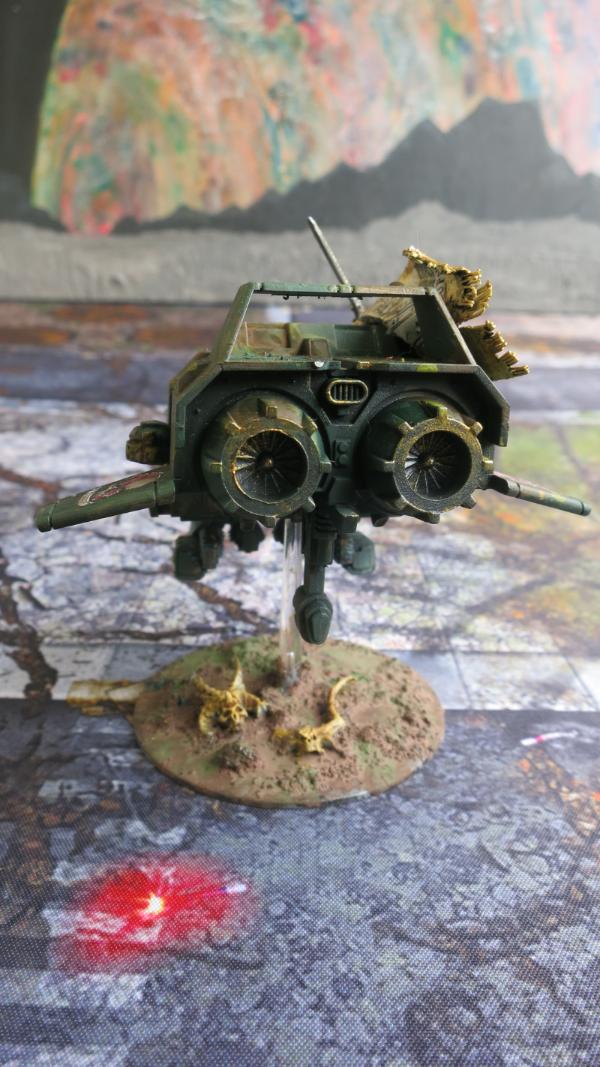
More Views of Sammael in Sableclaw
I took a lot of pictures of Sableclaw. Here are some more views.

Sableclaw – Right Front View

Sableclaw- Right Rear View
Sableclaw – Left Front View
21898
Post by: Oldmanronald
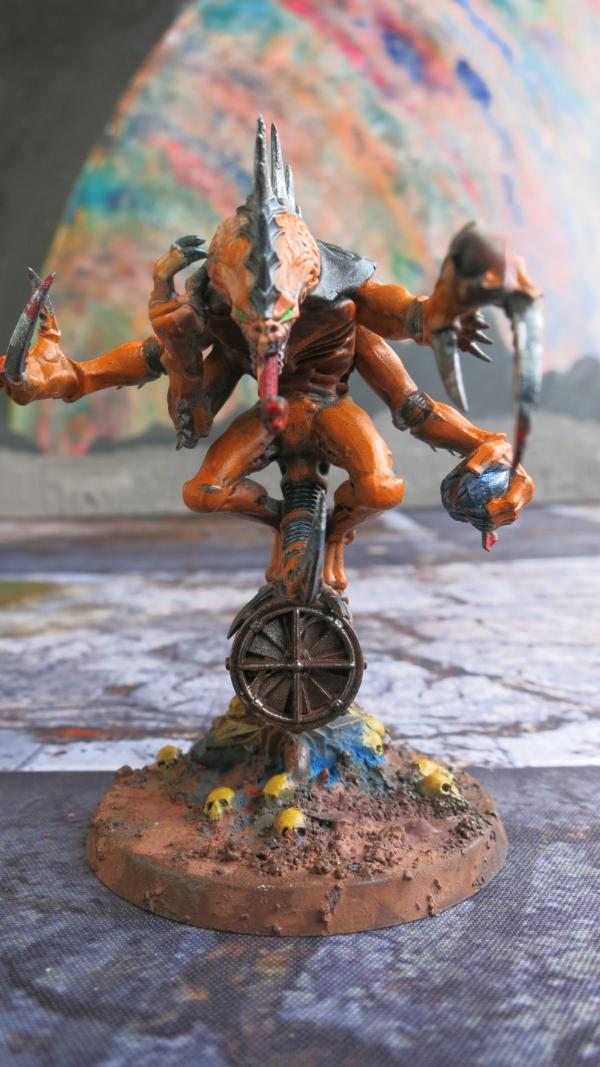
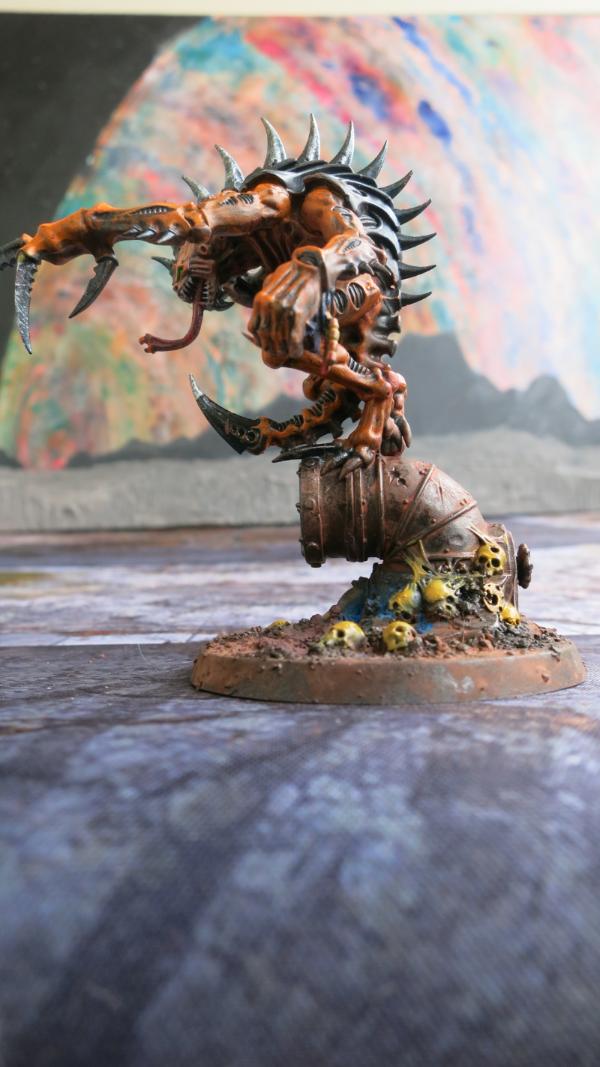
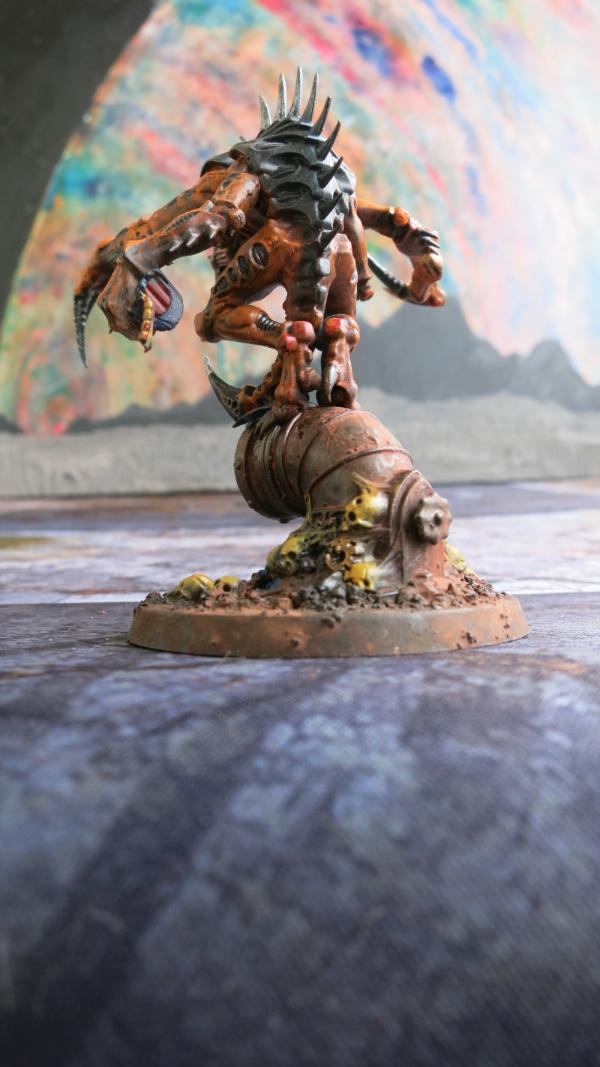
Something Different – Genestealer Cult
I really like Kill Team. Not only are the games easier and quicker than traditional 40K, it is easy to try out new armies. When I play for 2000 points, I pretty much have to stick to my old Space Marines since it would take so much time and investment to start a new 2000 point army from scratch. Even when I added a few Ad Mech models, I painted them the same as my space marines so that they would match my current army on the playing field.
For the 100 point Kill Team, however, one can easily put together a whole new army with a completely different paint scheme and play it. So which army should I start with? I like models that have reasonably human heads since I really enjoy painting them. But I also want something with a totally different feel. So I decided to paint up a genestealer cult. I already purchased the kill team starter kit which includes the neophyte hybrid squad. I am tired of camouflage and want a completely new color scheme. I decided to use orange and blue as my basic colors, orange for the uniforms and gunmetal blue for the guns and armor.
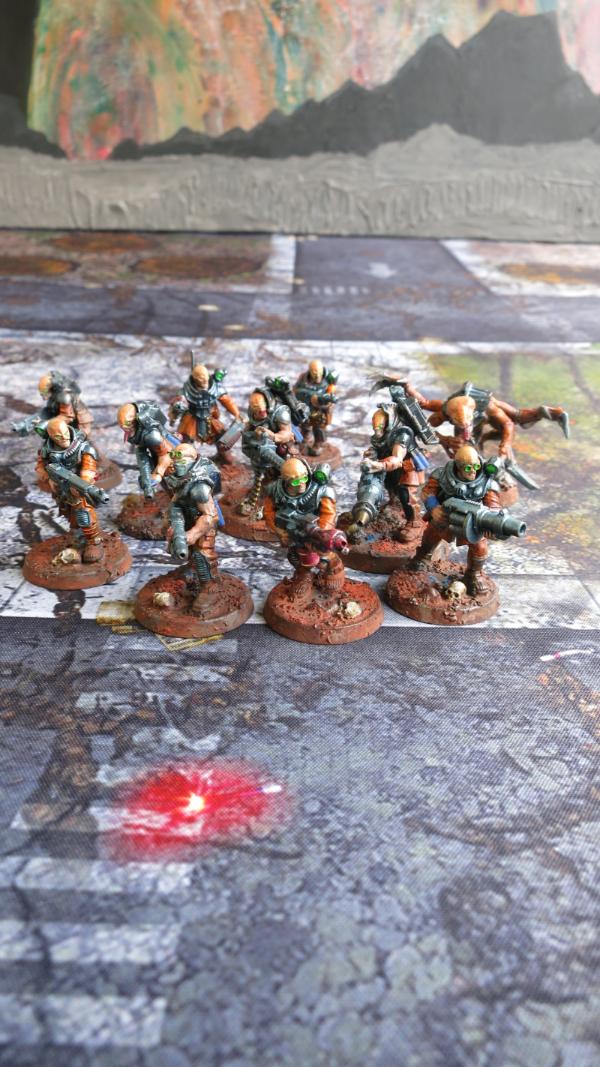
Gene stealer Cult Squad
This change is freeing, fun, and difficult. I had gotten into a comfortable old rut with my old paint scheme and knew which colors to paint with little thought. With this new scheme, I really had to think out my colors. Orange is a bright and difficult color but is fun. I bought a jar of Golden Cadmium Orange acrylic paint. Although reds and oranges are not color fast, cadmium reds and oranges will last. I tamed its brightness with a blue for light shadows and with a cobalt black for dark shadows.
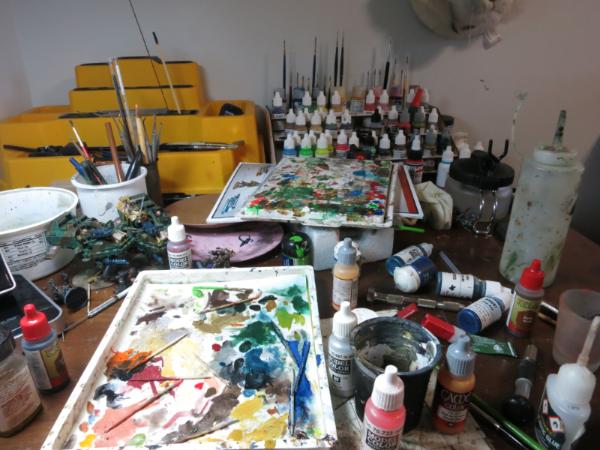
My Workspace
Above is my workspace with my open wet palette. The mixtures of cadmium orange are on the left and the mixtures of the gunmetal blue on the right. Below the orange are some of the flesh tones. Other colors are throughout the palette. I use the lid of the wet palette in the upper right of the picture as a base for the washes.

My Workspace – Second View

Models in Progress
Because I need to be able to angle my brush when I paint faces, I paint heads separate from the rest of the body. This also gives me some flexibility especially since Games Workshop tends to include more heads than bodies in their kits. I paint up all or most of the heads and pick the ones I like best for the bodies. If I botch a head I don’t have to use it. I paint the rest of the model’s body already assembled so that the shadows and highlights are consistent on the model. After I glue on the head, I add any necessary shadows and colors to blend it into the body.
In the kit for the Neophyte Hybrids, there are two types of heads, one for the 4th generation who have reasonably normal human heads and one for the 3rd generation that are more Tyranid-like.
I was pleased with the results. The heads turned out okay. On the bodies, I was able to deal with the orange paint scheme although I was afraid at times that it would overwhelm the models.

Three Cultists

Four Cultists

Genestealer Cultists with Tyranid Genestealer
Note the camouflaged scouts in the background. I actually used the same left over pastel grinds on base for the scouts and on the bases for the cultist except I added green pigment to scouts. I added rust pigment, and a little violet pigment, and a little blue pigment to the bases of the Cultists.

Cultists and Scouts
The scouts look like they are jungle fighters, the cultists desert fighters.
21898
Post by: Oldmanronald
Neophyte Hybrid with Autogun

Neophyte Hybrid with Autogun – Right Side View
In these models, I play with complementary colors, the blue in the band, the armor and the autogun verses the orange in the uniform. Although I bring in some other colors, I use a fairly limited palette. Still I use shades and highlights to make the colors, especially the bright orange, more realistic.
I like the big hands on these models. I also have big hands which my daughter has inherited. Sometimes when she feels bad that she didn’t get petite hands like some of her friends, I flex my hands and tell her, these are strangler’s hands. This makes her feel better because, like me, she knows a few people who should be strangled and with our hands, we have that option (assuming no pesky legal problems).

Neophyte Hybrid with Autogun – Rear View

Neophyte Hybrid with Autogun – Right Rear View

Neophyte Hybrid with Autogun – Left Rear View
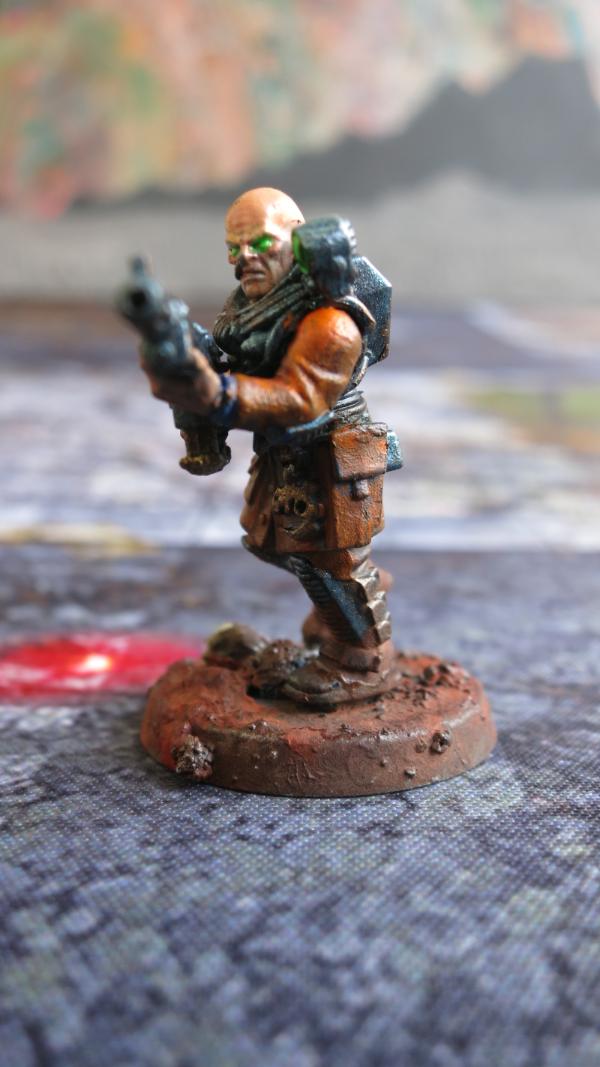
Neophyte Hybrid with Autogun – Left Front View
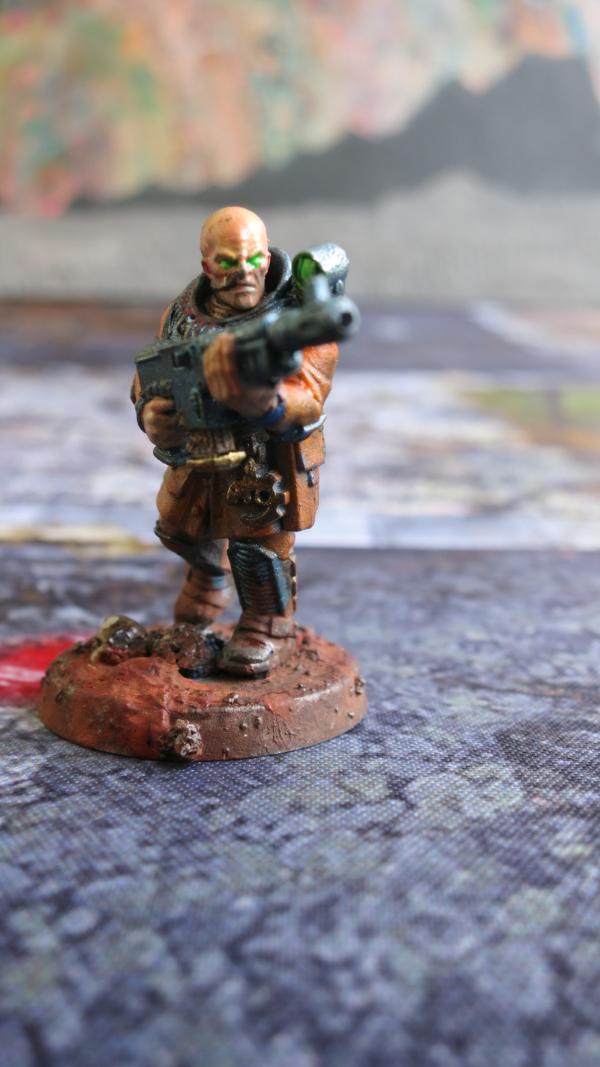
Neophyte Hybrid with Autogun – Right Front View
One thing about taking photographs of models, you can easily see errors that you don’t see otherwise. I painted the eyes fluorescent green but some of the green paints got on the skin under the eyes.
This model is only 5 points in Kill Team. There could be up to twenty cultist on a kill team although with upgrades, leaders, and specialist models, the average for a genestealer cult built around neophyte hybrids is about thirteen to fourteen models. Compare this to about four to five models on a Space Marine kill team or eight models on an Admech kill team.
21898
Post by: Oldmanronald
Neophyte Hybrid with Heavy Stubber

Neophyte Hybrid with Heavy Stubber – Left Right View
Notice that his 3rd generation head is more Tyranid-like than the heads of his 4th generation counter-parts. I keep the same flesh pallet that I did for the 4th generation which is the same flesh pallet I use for my space marine heads. I did brush in a little orange in his forehead scales to give him a more Tyranid type look.
Also note a few errors including the bullets at the top of the ammo feed which I missed and the little red smear on his cheek. I have since painted the bullets and added a red wash to the gun barrel. I will take some more pictures to show these changes.

Neophyte Hybrid with Heavy Stubber – Left Front View
I missed a seam on his pocket that I need to remove.
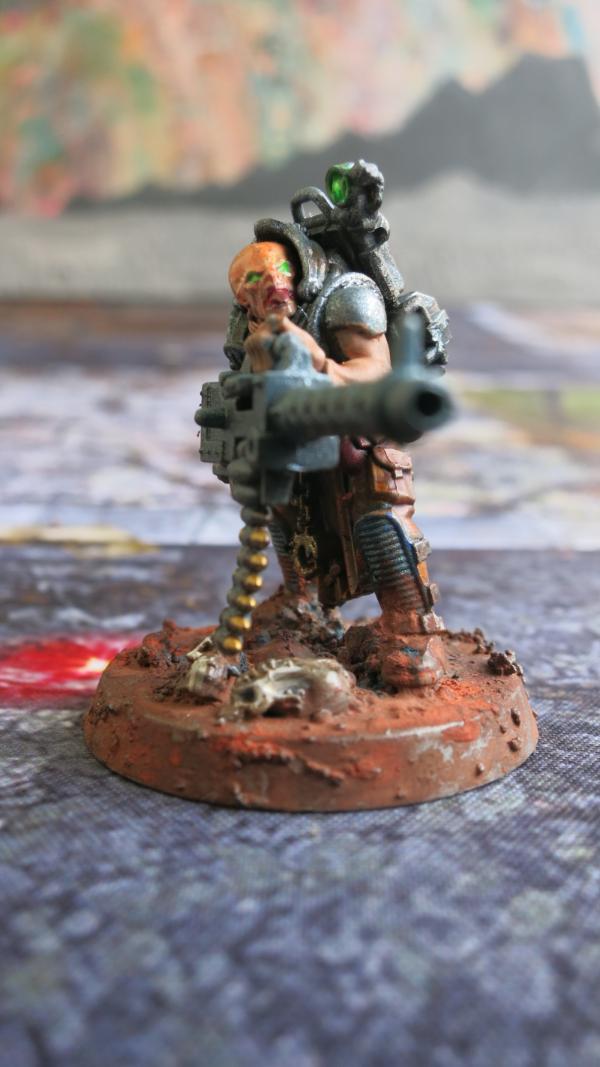
Neophyte Hybrid with Heavy Stubber – Front View
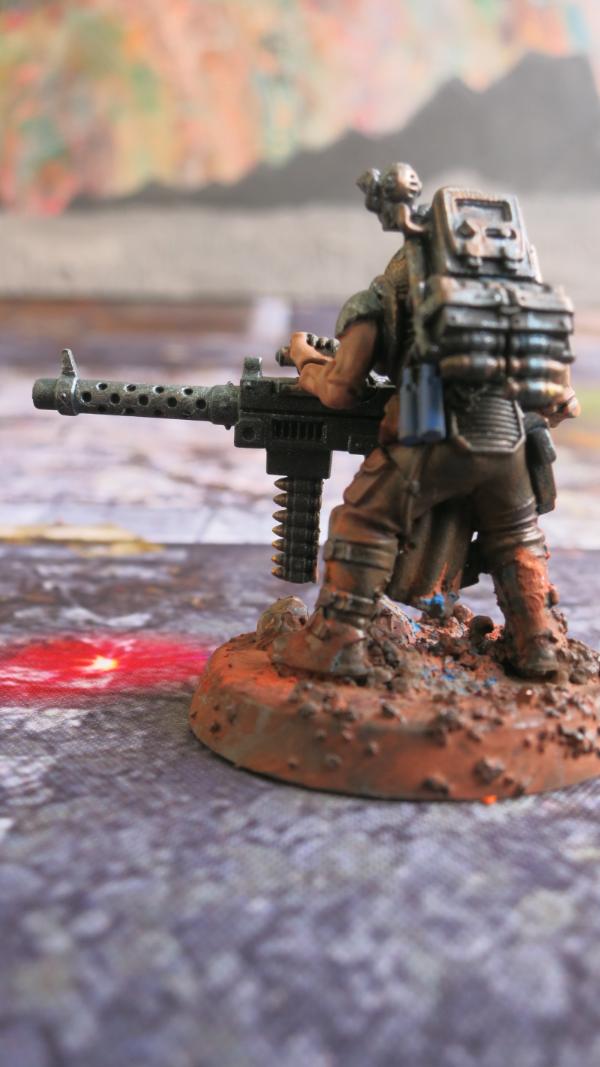
Neophyte Hybrid with Heavy Stubber – Left Rear View
The left hand and the left arm don’t quite mesh on the model. I have since smoothed it out with some Milliput Yellow-Gray which works like green stuff but is water soluble so it can be used like liquid green stuff as well as regular green stuff. Now, I need to repaint the arm and take new pictures.
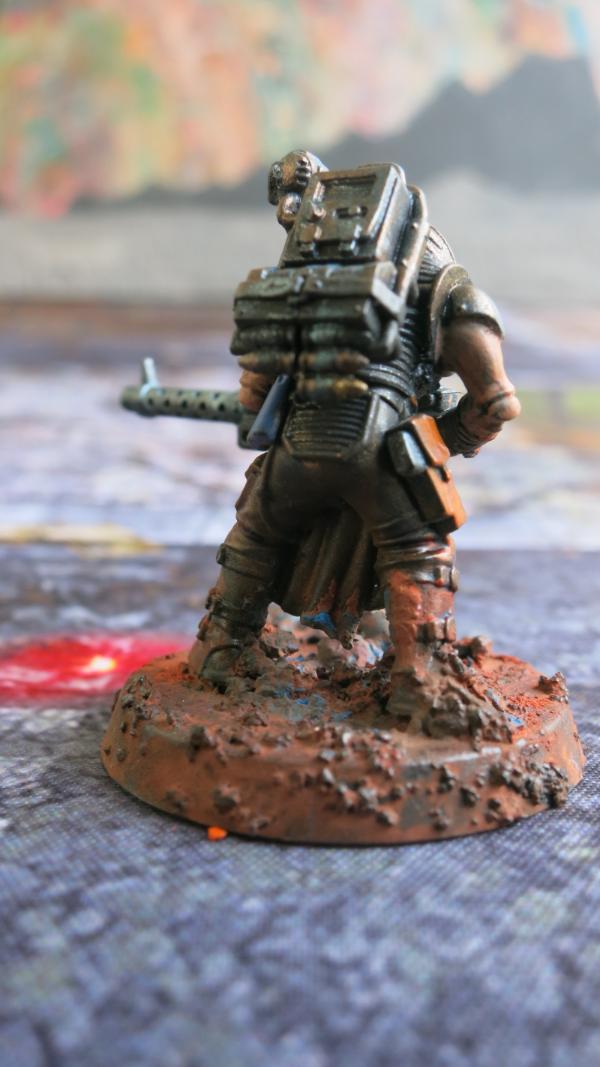
Neophyte Hybrid with Heavy Stubber – Rear View
21898
Post by: Oldmanronald
Neophyte Hybrid with Heavy Stubber, Part 2
Since my last post, I have fixed some of the flaws in the Heavy Stubber model. All the bullets have been painted, a red smear removed from his face, the seam removed from his pocket, and his hand fixed up. I have some new pictures although they don’t show his fixed up hand.

Neophyte Hybrid with Heavy Stubber – Right Side View
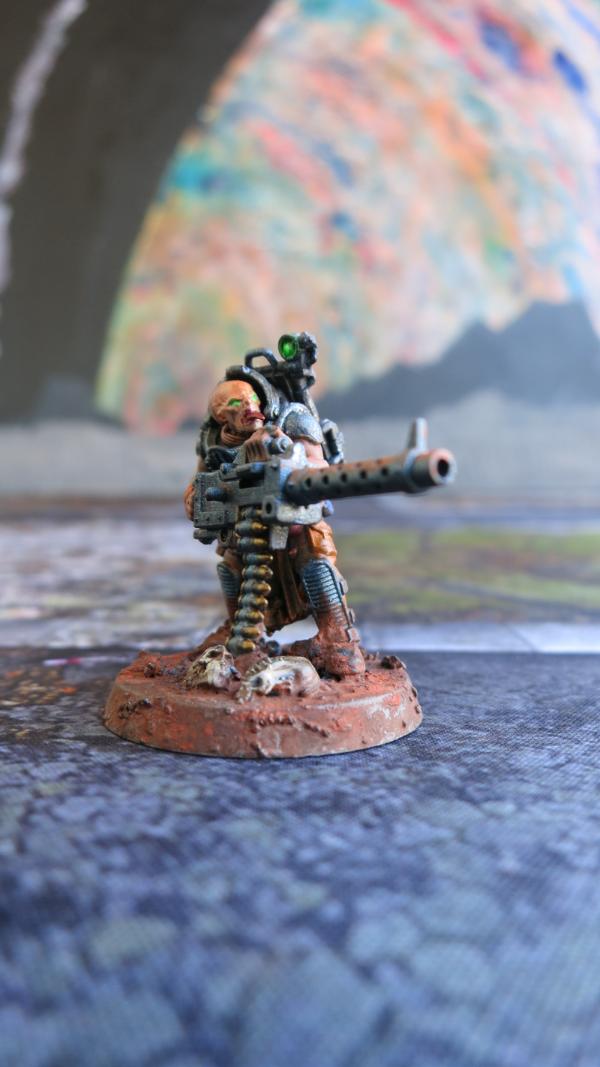
Neophyte Hybrid with Heavy Stubber – Right Front View
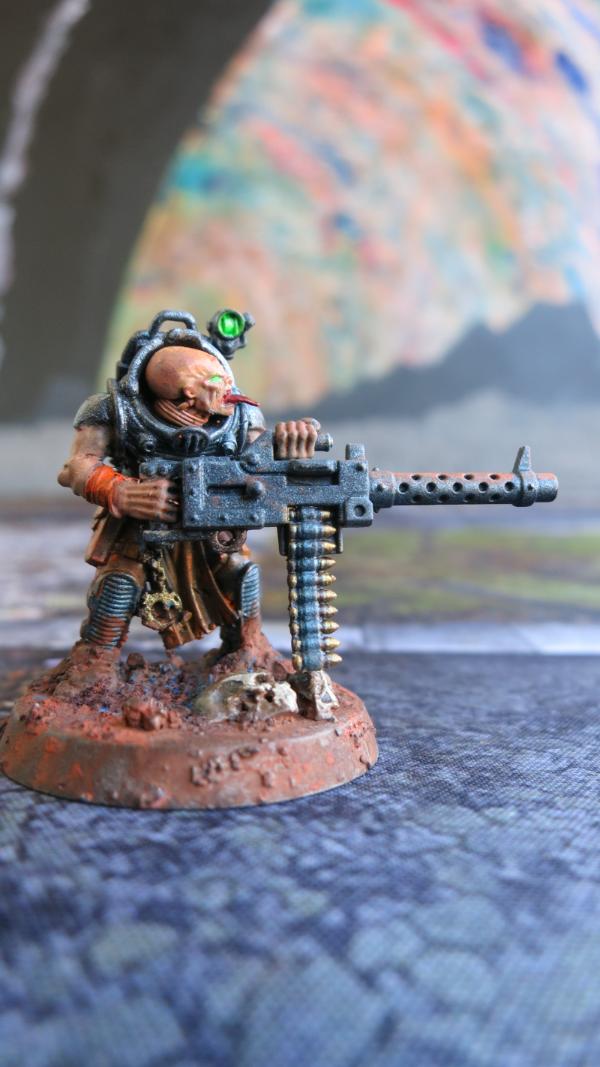
Neophyte Hybrid with Heavy Stubber – Close Up - Right Side View
21898
Post by: Oldmanronald
Neophyte Hybrid Leader with Chainsword and Web Pistol
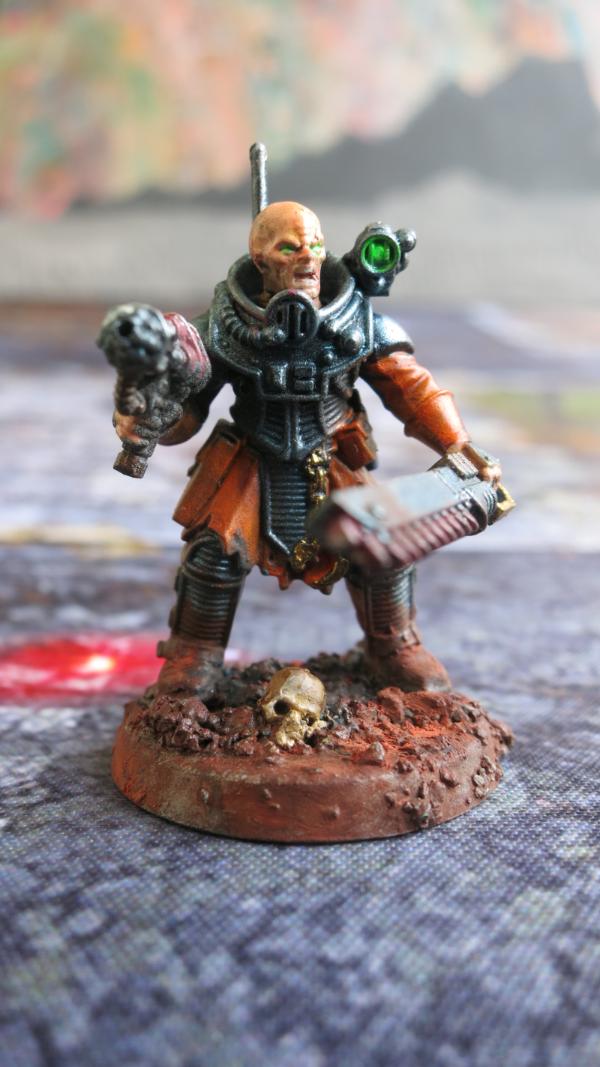
Neophyte Hybrid Leader with Chainsword and Web Pistol – Front View
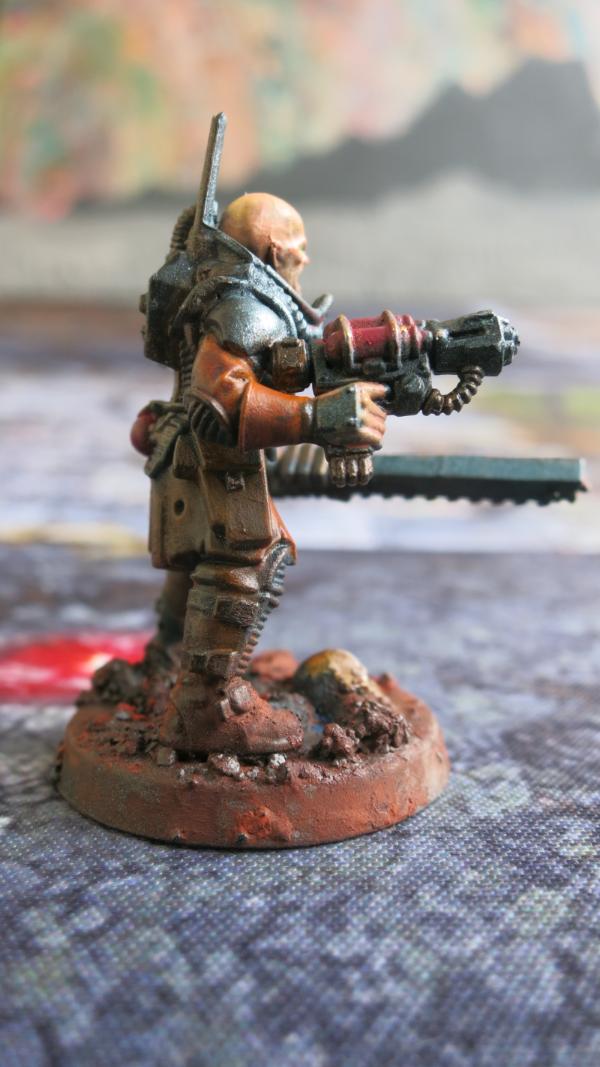
Neophyte Hybrid Leader with Chainsword and Web Pistol – Right View
I really enjoyed painting these genestealers. I like the bright colors. Notice the secondary group of complementary colors, red and green, on this and some of the other genestealers.
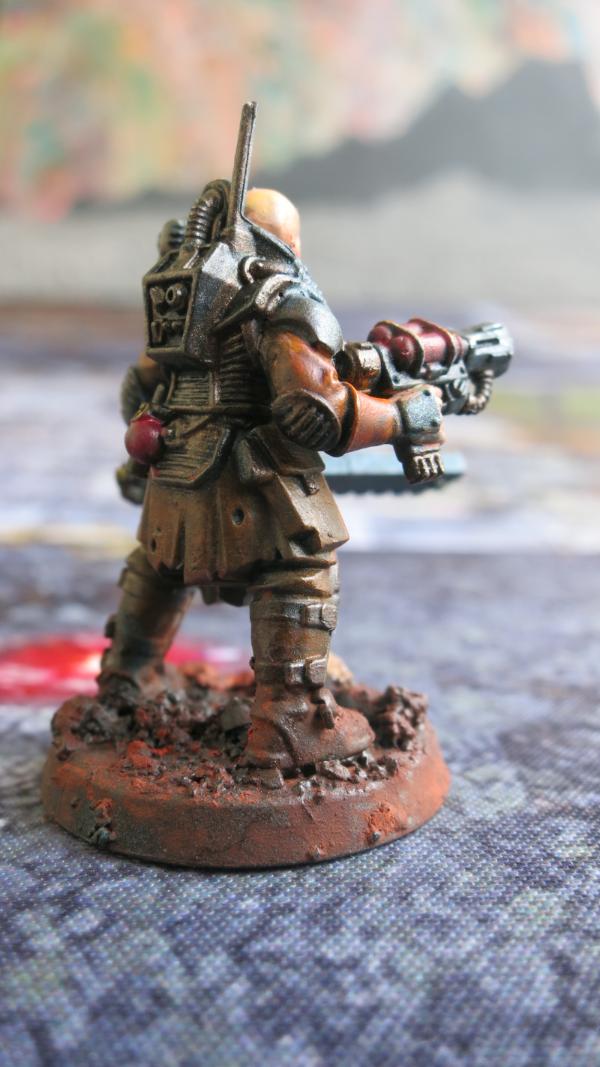
Neophyte Hybrid Leader with Chainsword and Web Pistol – Right Rear View

Neophyte Hybrid Leader with Chainsword and Web Pistol – Left Rear View
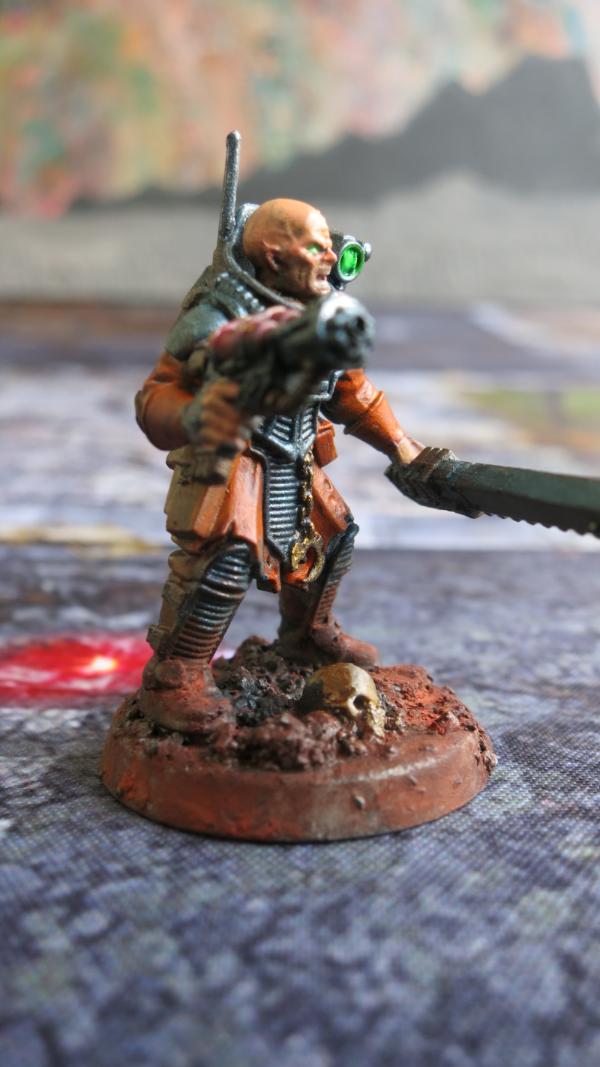
Neophyte Hybrid Leader with Chainsword and Web Pistol – Right Front View

Neophyte Hybrid Leader with Chainsword and Web Pistol – Left Front View
21898
Post by: Oldmanronald
3rd Generation Neophyte Hybrid with Autogun
Although this is only a five point model, it is fun to paint and use.
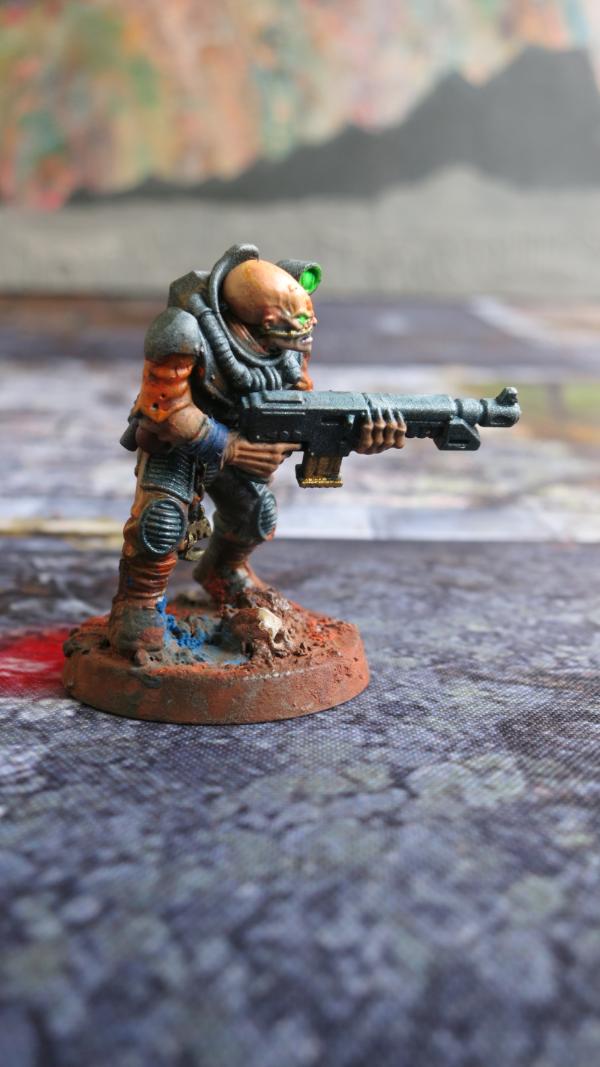
3rd Generation Neophyte Hybrid – Right Side View

3rd Generation Neophyte Hybrid – Right Rear View
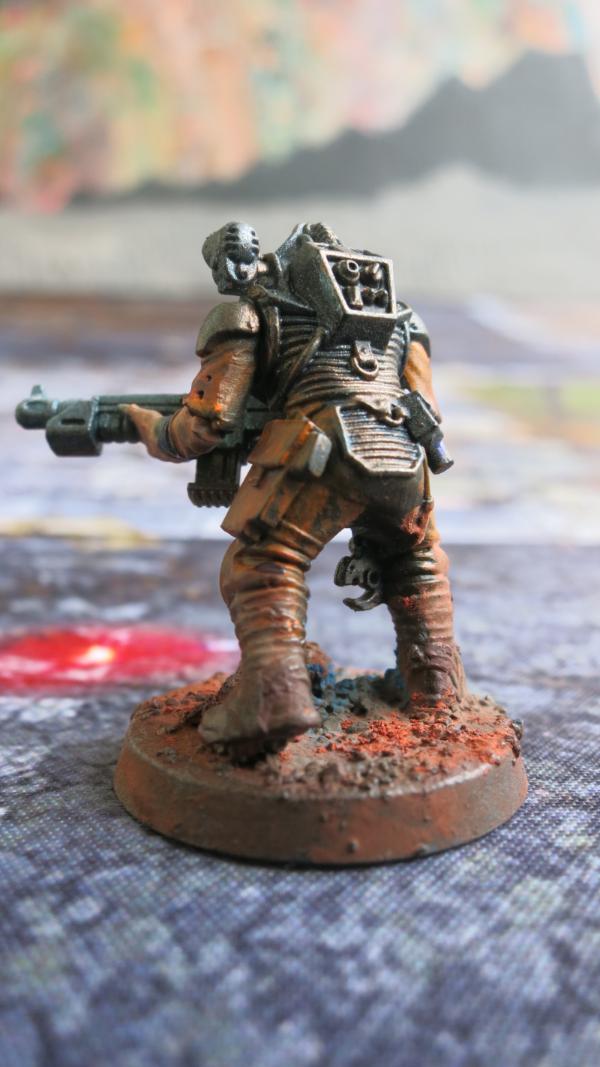
3rd Generation Neophyte Hybrid – Rear View
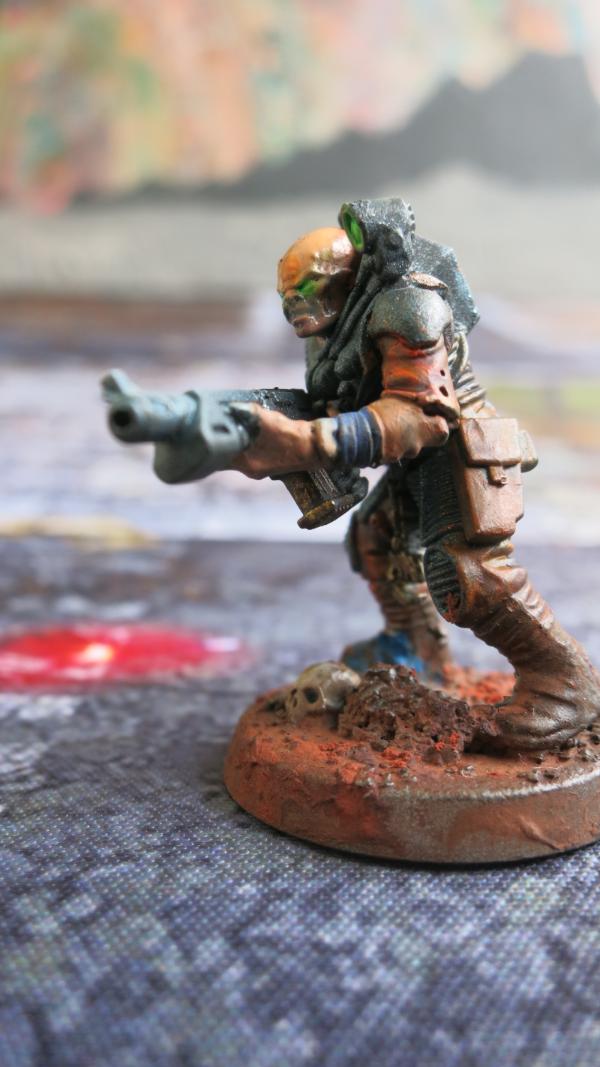
3rd Generation Neophyte Hybrid – Left Front View
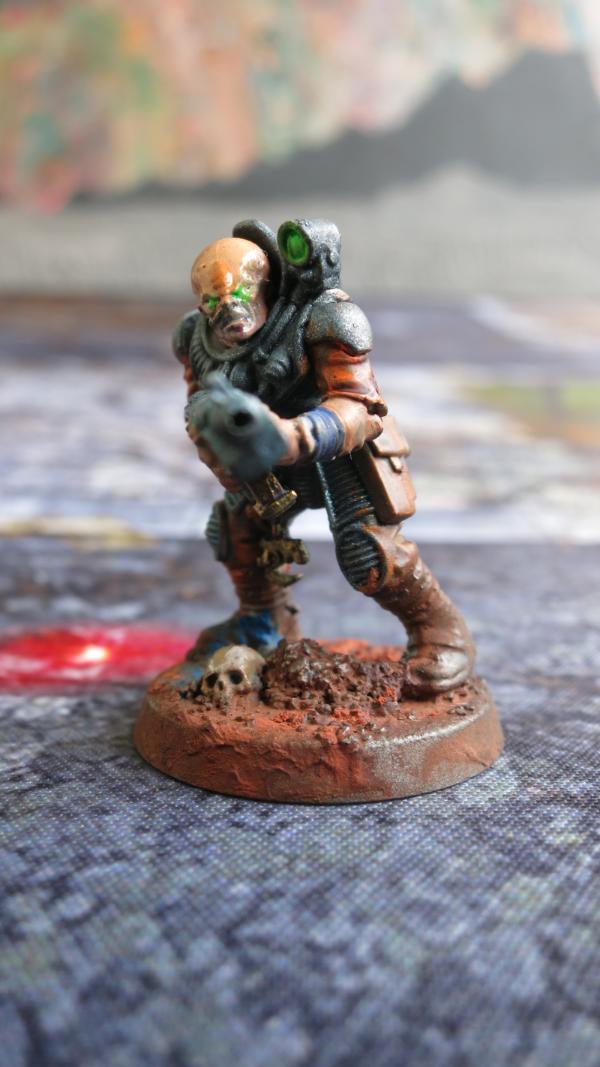
3rd Generation Neophyte Hybrid – Front View
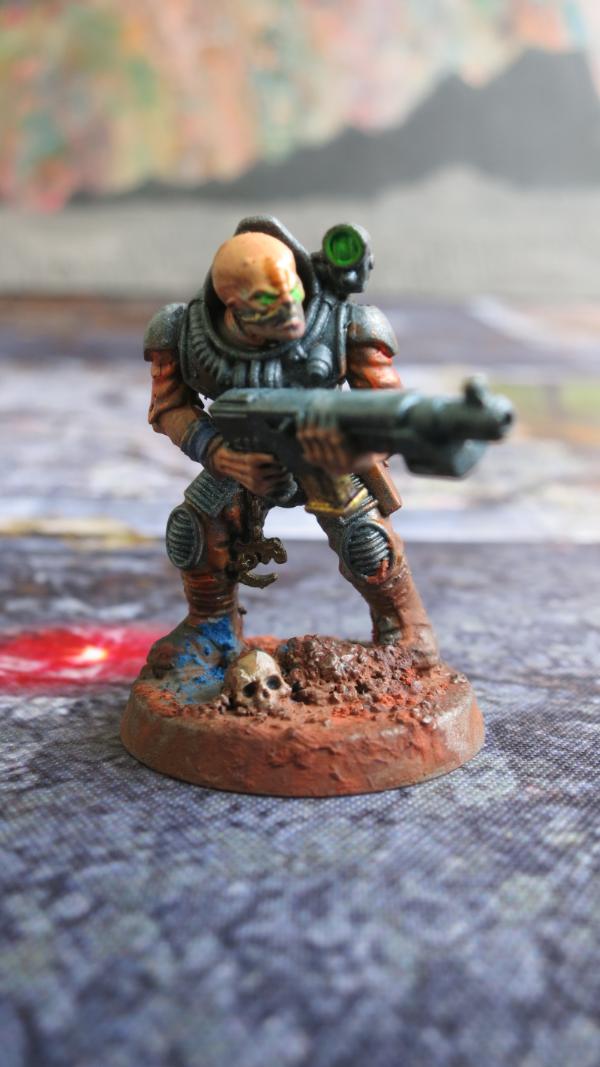
3rd Generation Neophyte Hybrid – Right Front View
The orange tinted scales on his forehead help to match him to the Tyranids genestealers.
21898
Post by: Oldmanronald
Purebred Genestealer with Rending Claws and Scything Talons
Purebred Tyranid genestealers give the genestealer cult kill team assault power. I used the same colors for these Purebreds as I had for the neophyte hybrid models, including the flesh colors for the head. On the scales on the head, I dry brushed in some orange. I also added orange to its snout and cheekbones. I really like how this model turned out.
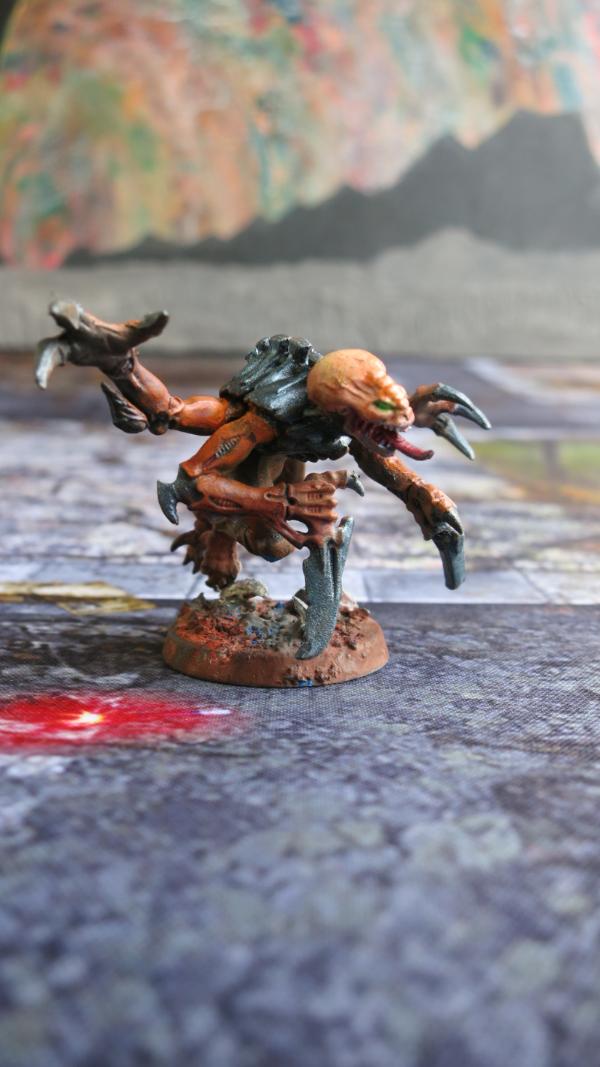
Purebred Genestealer with Rending Claws and Scything Talons – Right Side View
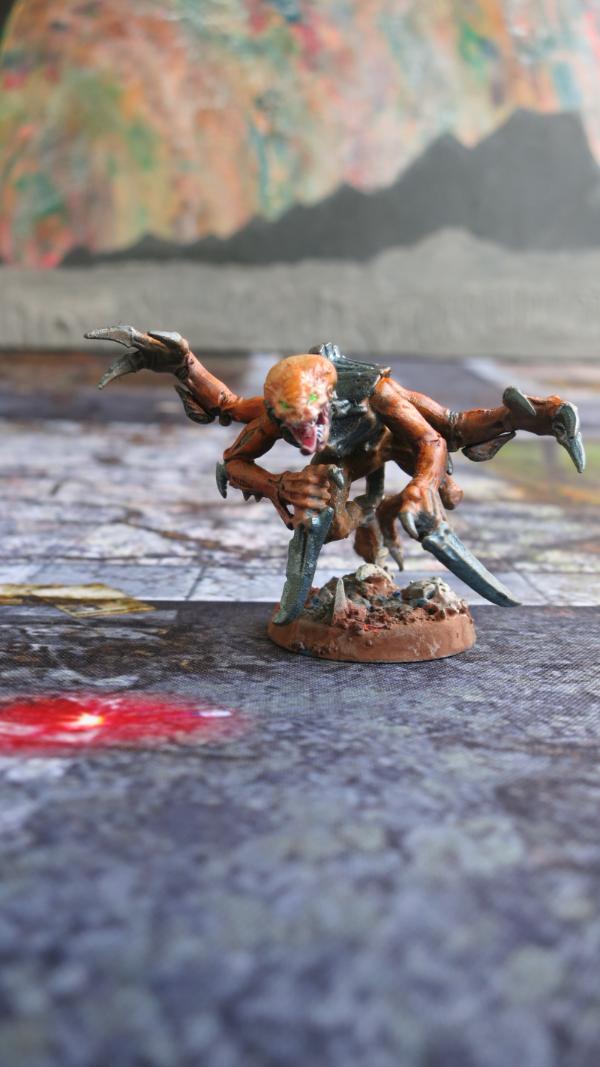
Purebred Genestealer with Rending Claws and Scything Talons – Front View
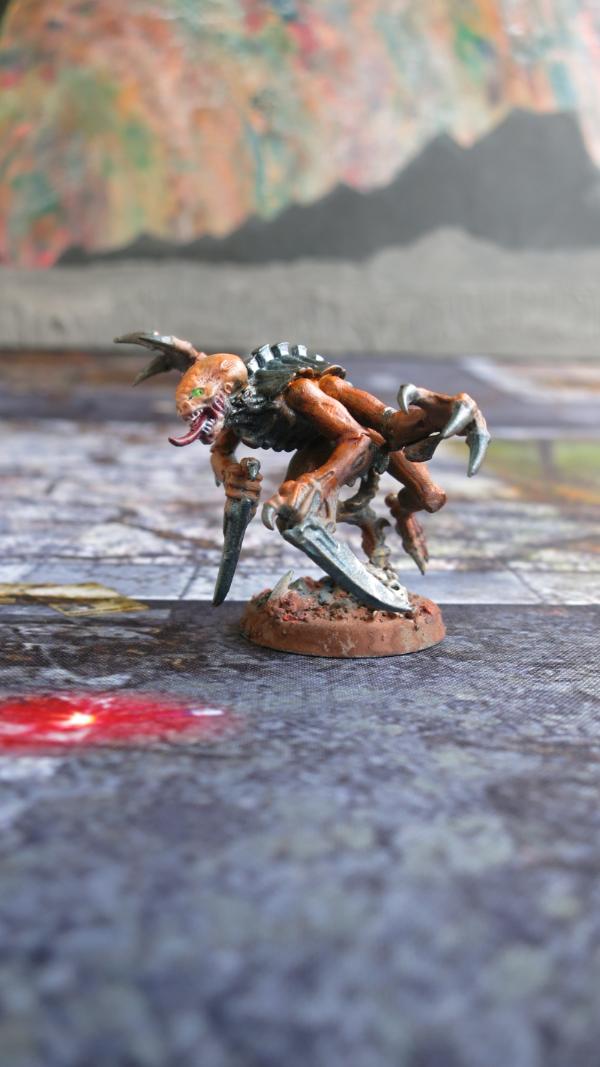
Purebred Genestealer with Rending Claws and Scything Talons – Right Side View
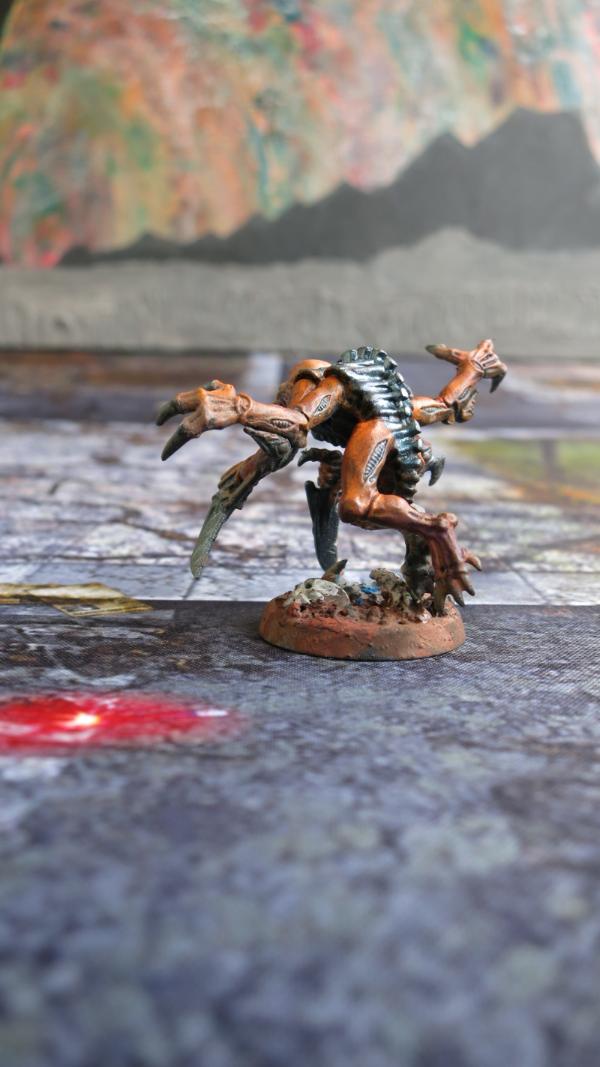
Purebred Genestealer with Rending Claws and Scything Talons – Left Rear View
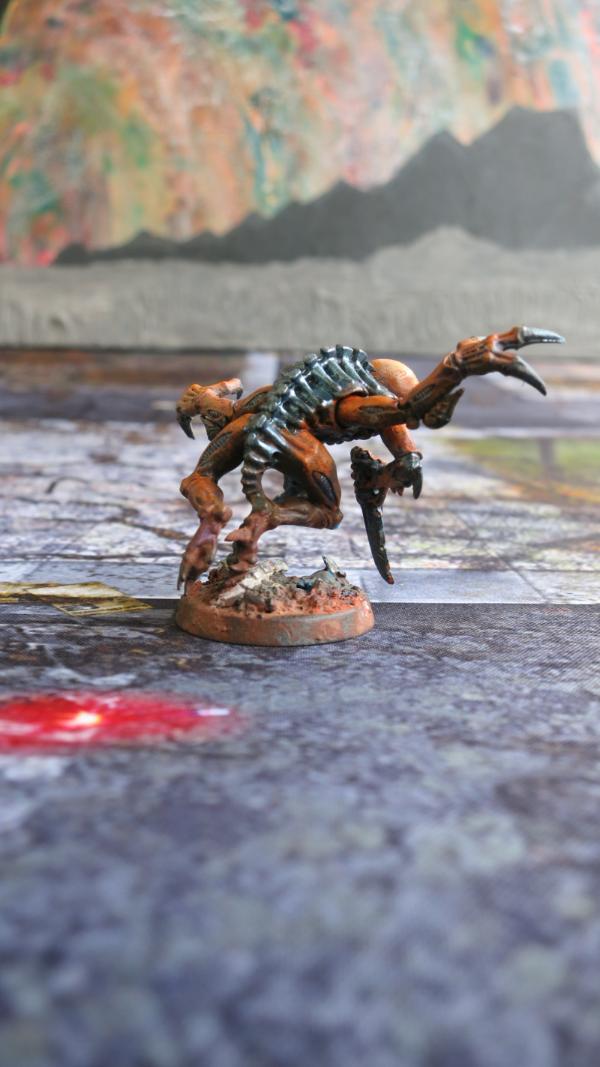
Purebred Genestealer with Rending Claws and Scything Talons – Right Rear View
I was pleased how my Purebred genestealers turned out. The colors blended together to make it appear realistic. Too many Tyranid armies look like the cooties in the old Cooties Game that we played as kids.
Old Cooties

Purebred Genestealer with Rending Claws and Scything Talons – Right Side View
21898
Post by: Oldmanronald
Another Neophyte Hybrid
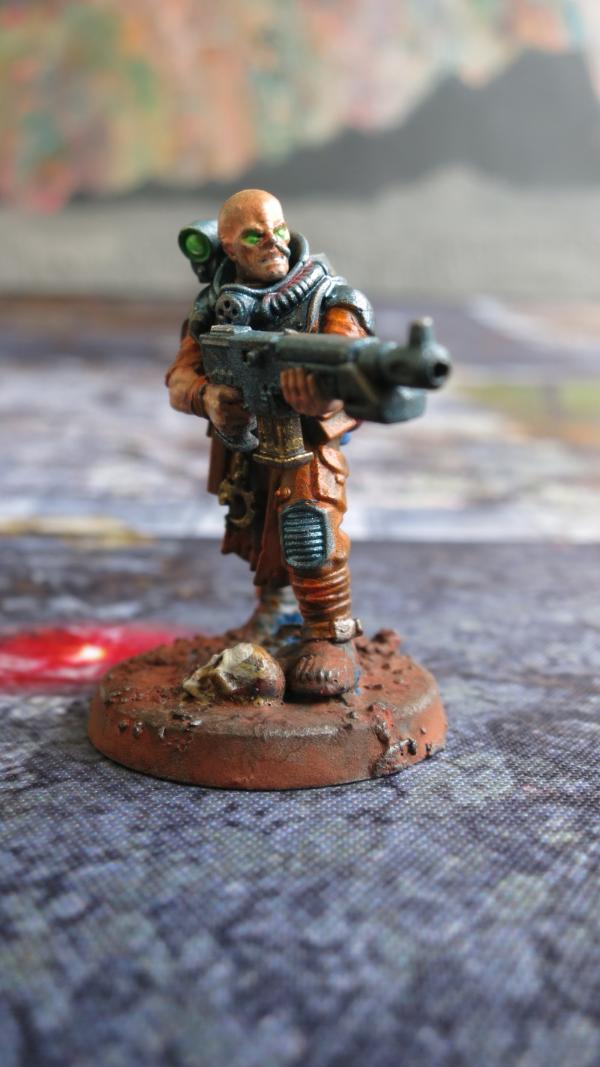
Neophyte Hybrid with Autogun – Left Front View
This is another 4th generation hybrid with an autogun.

Neophyte Hybrid with Autogun – Right Side View
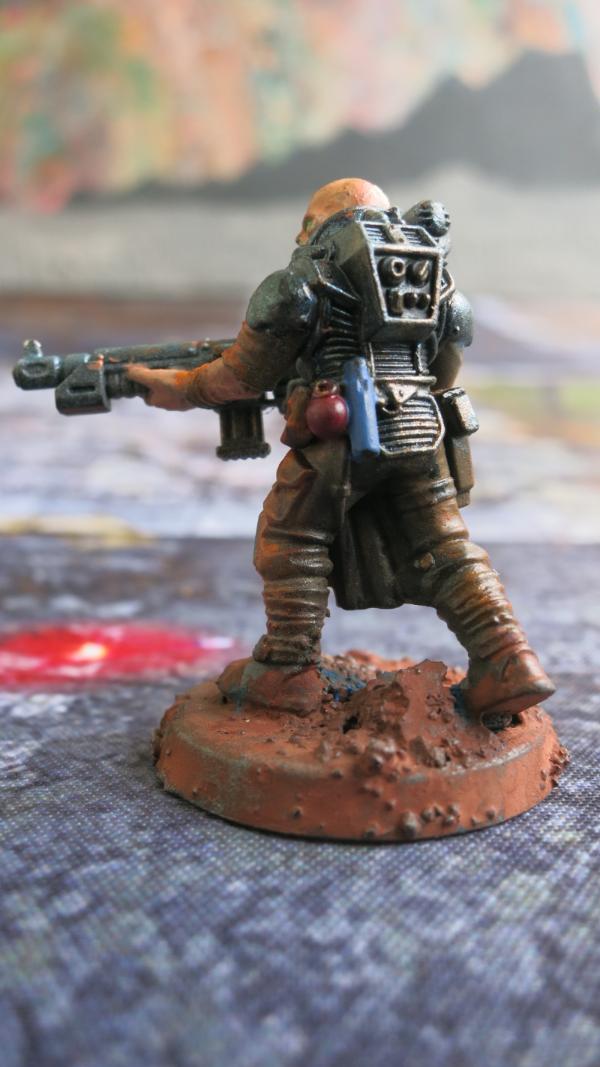
Neophyte Hybrid with Autogun – Left Side View
I assume that the round red grenade on his belt is the blasting charge since the blasting charge is used like a hand grenade. I don’t know what the blue cylinder on his belt is. Perhaps it is the blasting charge. Maybe the red grenade and the blue cylinder work together to make up the blasting charge. Sometimes with Games Workshop models, I have had to look through several caudexes to figure out which piece of equipment is what. So far I have found none that identify the blasting charge.
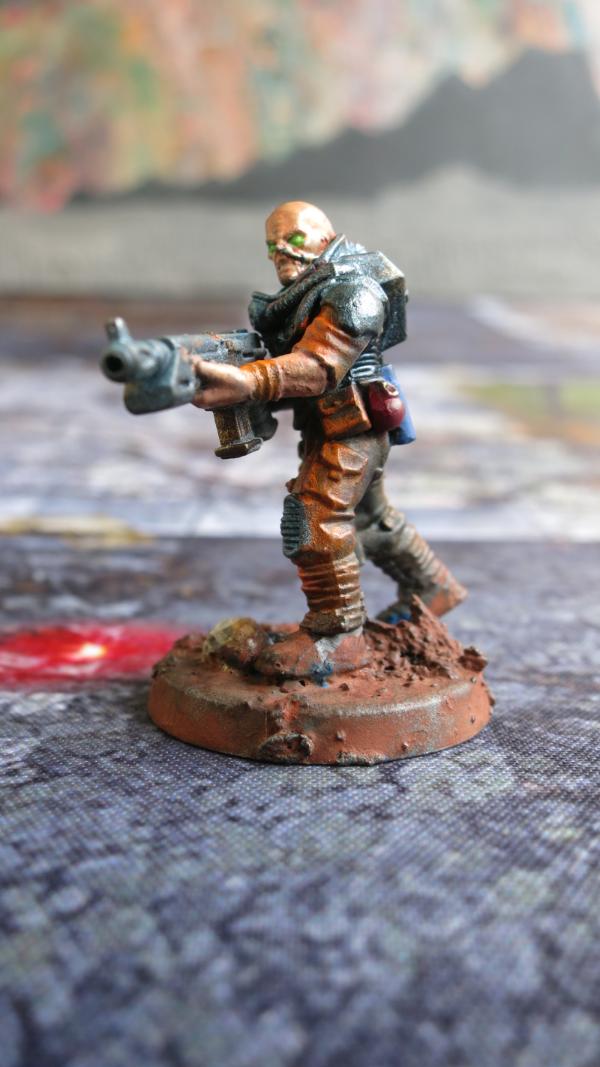
Neophyte Hybrid with Autogun – Left Front View

Neophyte Hybrid with Autogun – Right Rear View

Neophyte Hybrid with Autogun – Left Front View
21898
Post by: Oldmanronald
Neophyte Hybrid – The Tongue
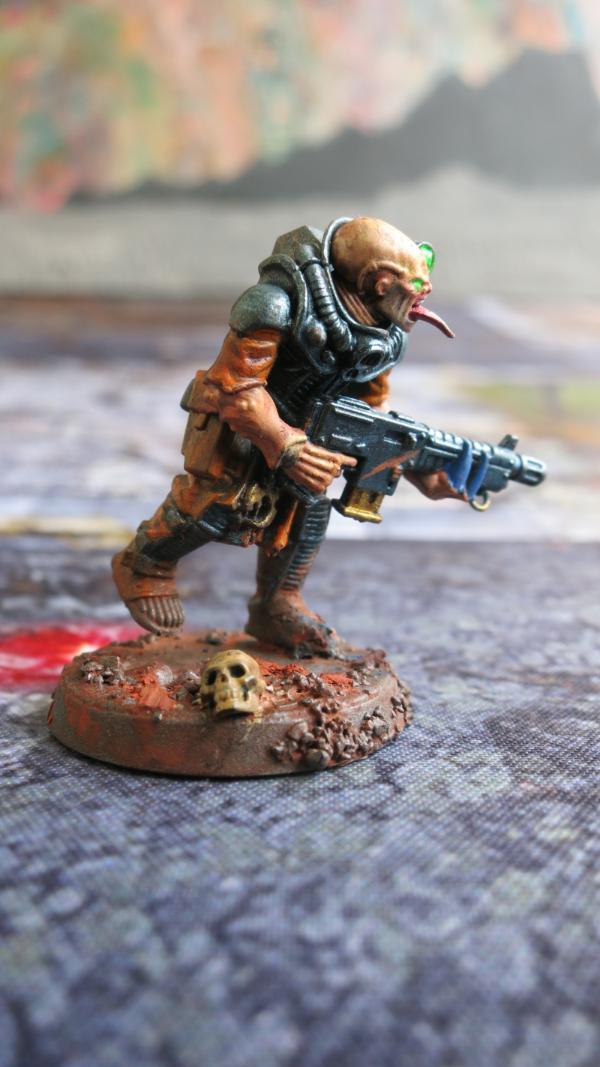
Neophyte Hybrid – Right Side View
This is a 3rd generation neophyte hybrid with autogun. This is another five point model. My favorite feature is the long tongue.
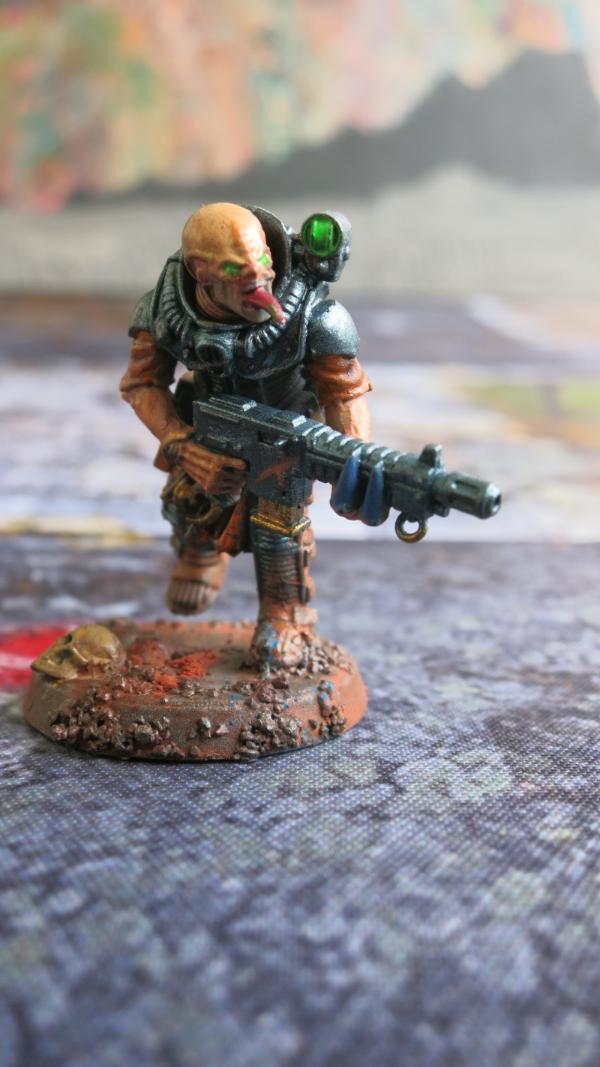
Neophyte Hybrid – Right Front View
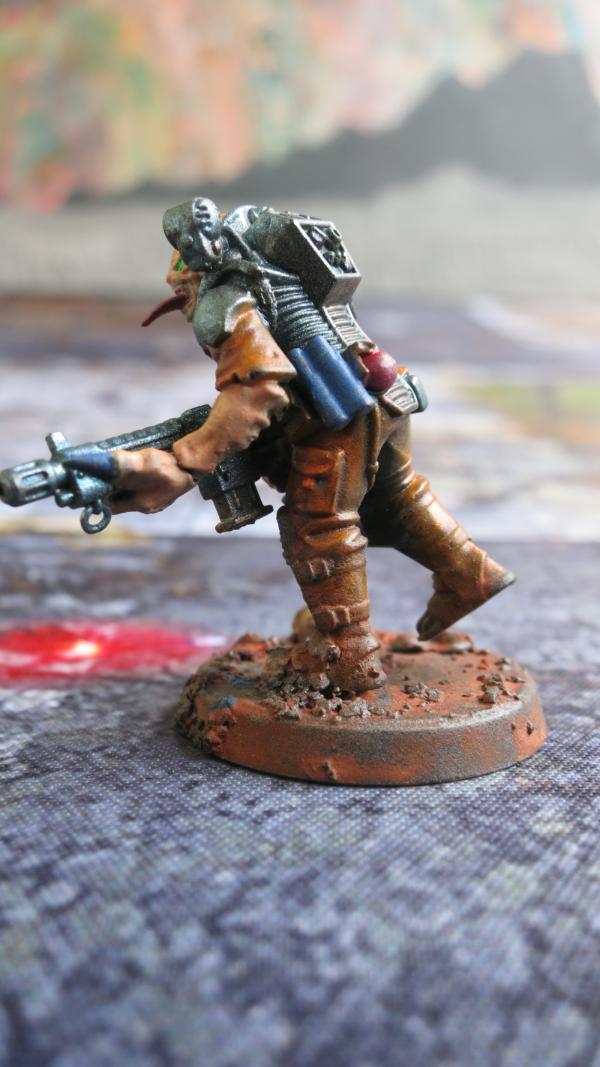
Neophyte Hybrid – Left Side View

Neophyte Hybrid – Front View
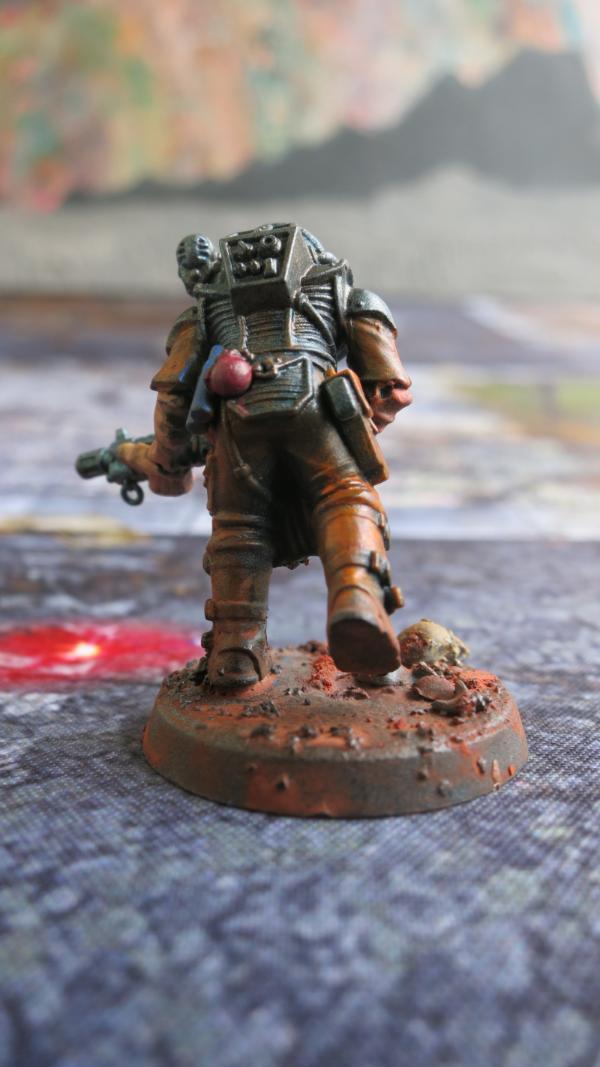
Neophyte Hybrid – Rear View
21898
Post by: Oldmanronald
Neophyte Hybrid with Grenade Launcher

Neophyte Hybrid with Grenade Launcher – Right Front View
Appearance wise, this is a good solid model. The grenade launcher is huge. Assuming he is a normal sized human being and the grenade launcher is made of steel and other heavy metals, what would this grenade launcher weigh in real life? I like his head, especially the googles.
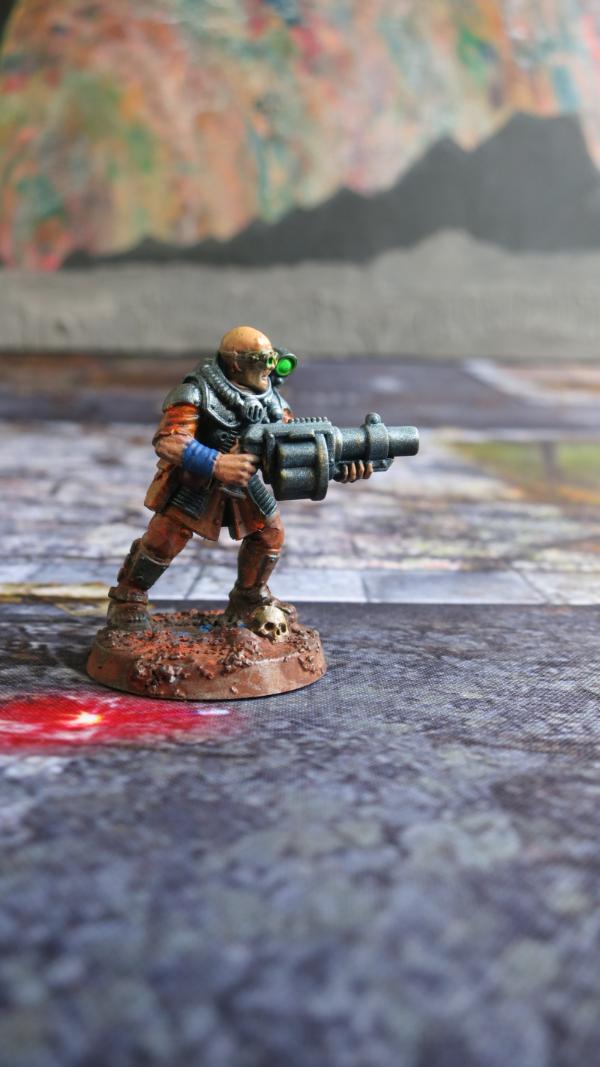
Neophyte Hybrid with Grenade Launcher – Right View

Neophyte Hybrid with Grenade Launcher – Front View
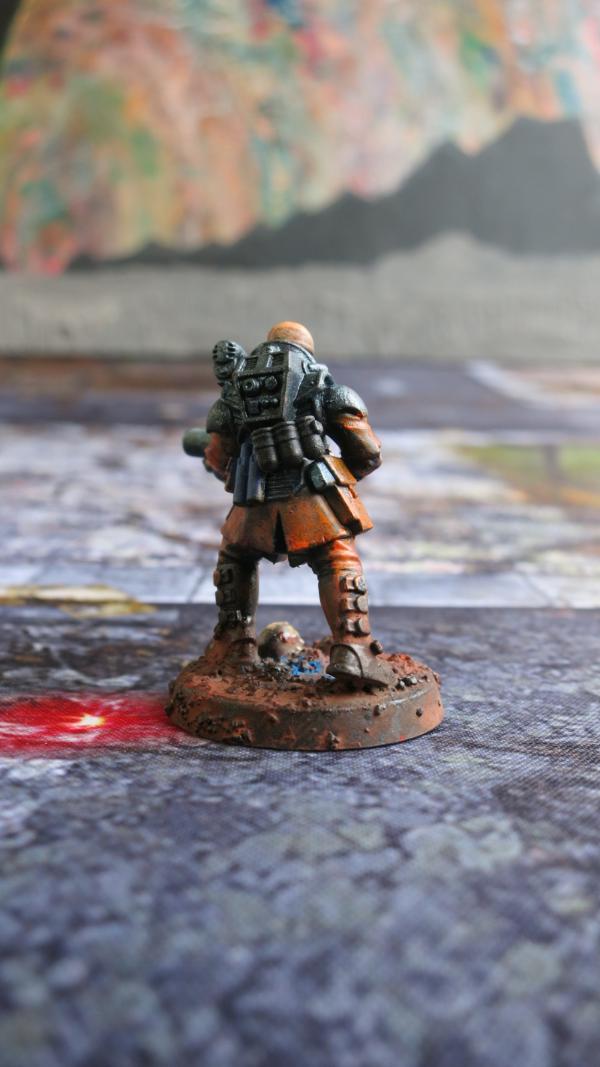
Neophyte Hybrid with Grenade Launcher – Rear View
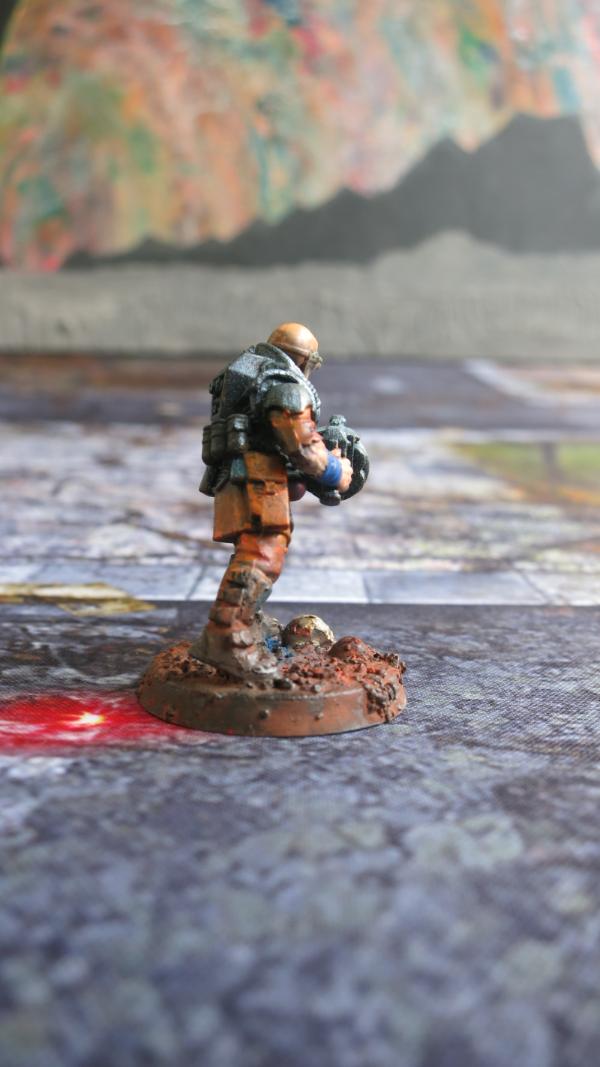
Neophyte Hybrid with Grenade Launcher – Right Rear View
21898
Post by: Oldmanronald
Neophyte Hybrid with Flamer
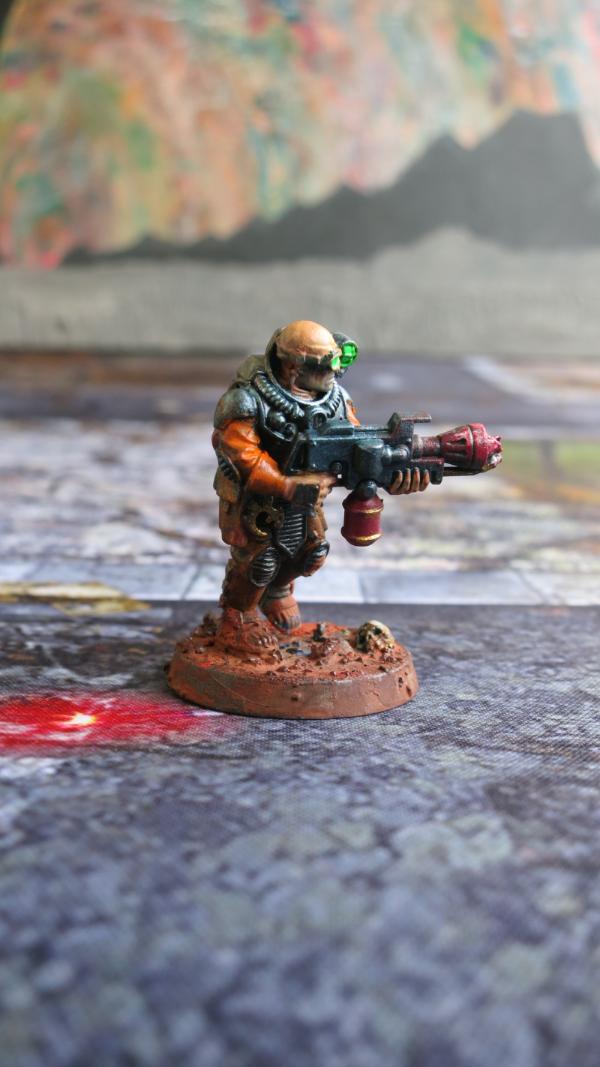
Neophyte Hybrid with Flamer
I only have one picture of this model. Actually, I am missing another cultist model completely. I assume since I discard any out of focus pictures, that I discarded the missing pictures.
21898
Post by: Oldmanronald
Neophyte Hybrid with Mining Laser
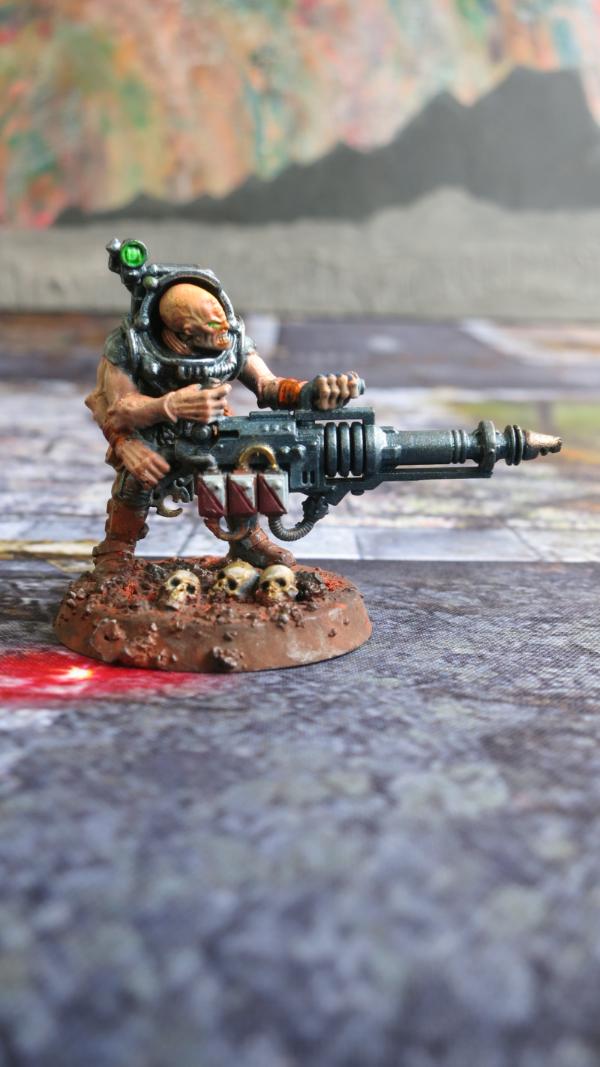
Neophyte Hybrid with Mining Laser - Right Side View
This is one of my favorite models. I like the weapon. I like the extra arm. I like the head. I like the boney fingers. I like the artistic three on the model – the three arms and hands, the three white and red batteries on the mining laser, and the three skulls in the dirt. The picture and model have both balance and movement or direction.
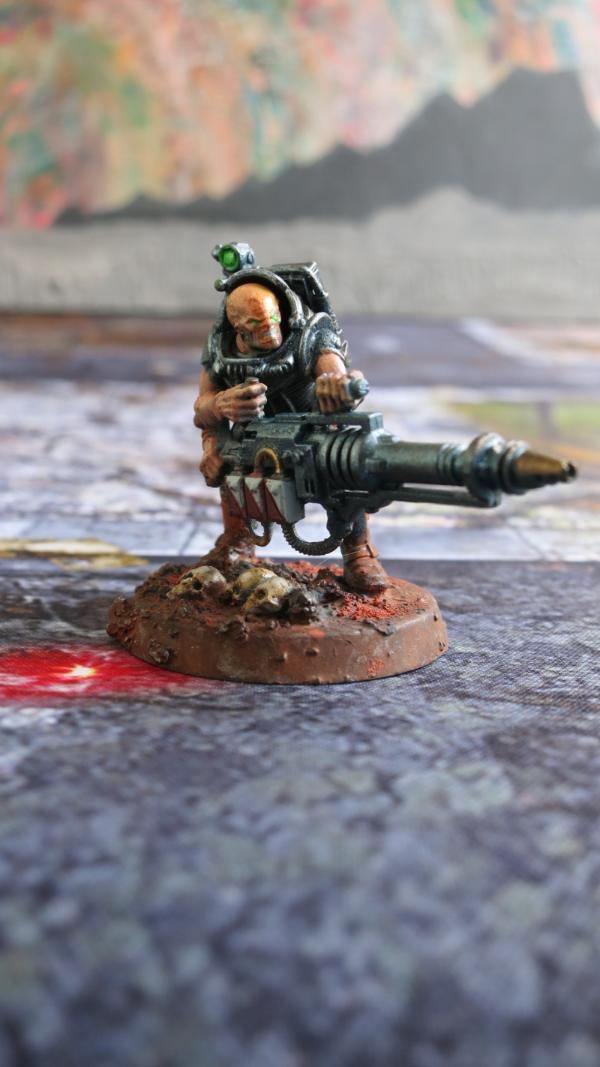
Neophyte Hybrid with Mining Laser – Front Right View

Neophyte Hybrid with Mining Laser –Left Front View
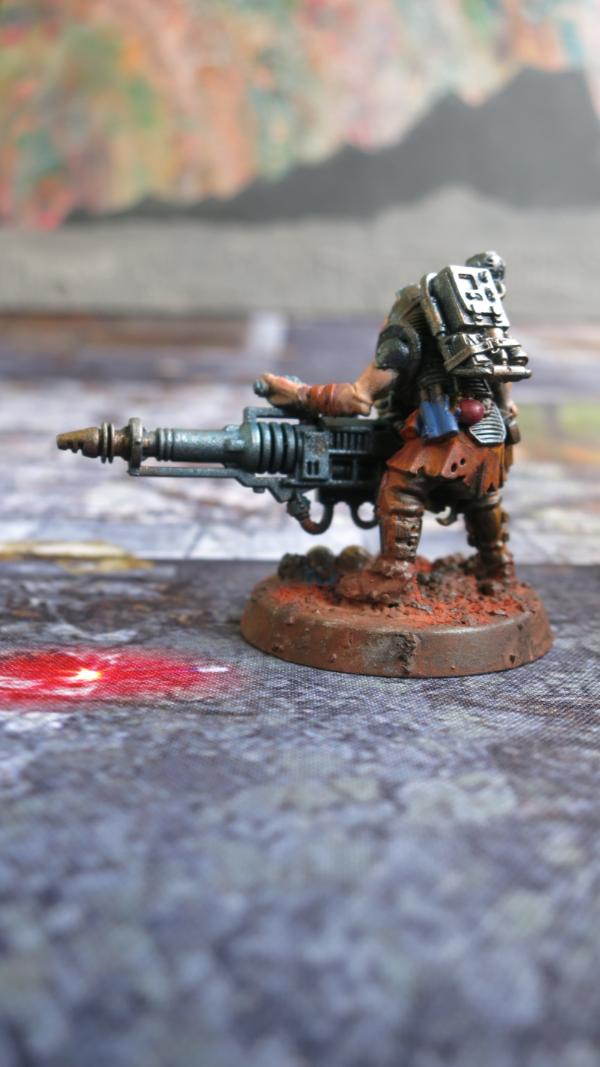
Neophyte Hybrid with Mining Laser – Left Side View
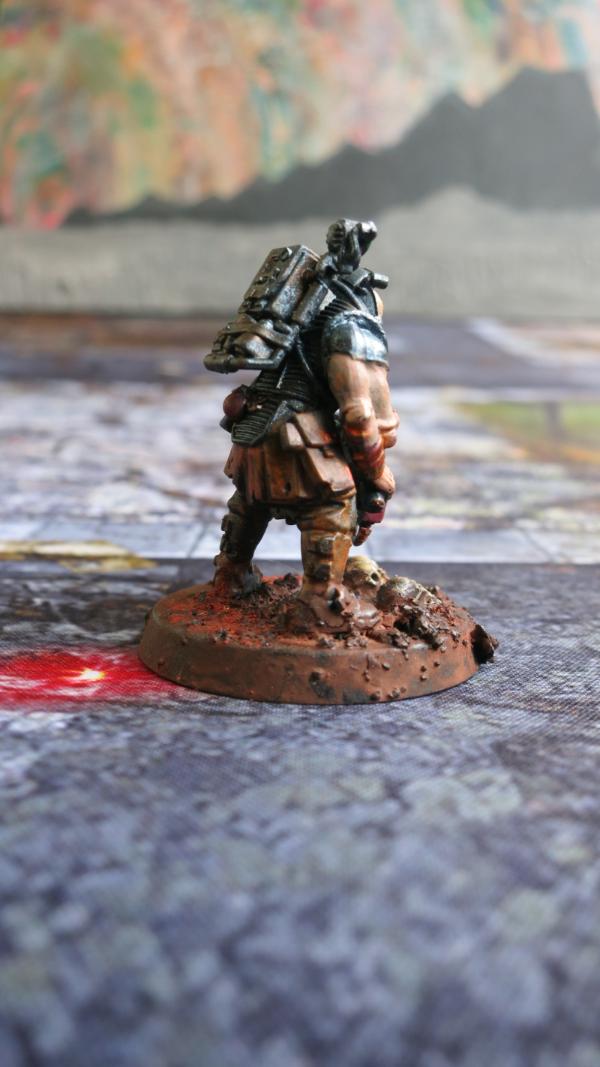
Neophyte Hybrid with Mining Laser – Rear View
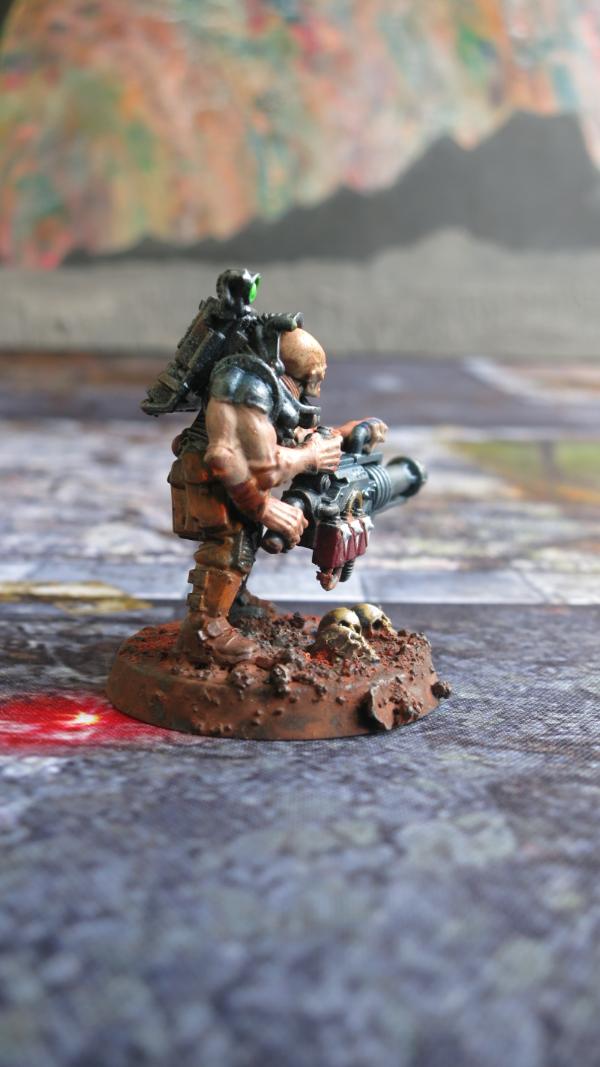
Neophyte Hybrid with Mining Laser – Right Rear View
21898
Post by: Oldmanronald
Purebred Genestealer with Flesh Hooks
I never thought I would want to build a Tyranid army. The models are okay but I don’t really like the fluff. I guess I am really a human at heart and find it hard to support those creatures, even in my imagination, that would destroy the human race. So I am a fan of space marines and the Imperium. I think I would like building Chaos Marines because they are still human and more than that, they represent the free spirit of mankind, as opposed to the regimented oppression of the Imperium. I am less enthused about spending the time to build alien races although some have enough human characteristics to be fun.
Still, I have been delighted by how my three Purebred genestealers turned out. I am especially delighted with the heads and faces.

Purebred Genestealer with Flesh Hooks - Right Front View
I am pleased with the coloring of the face. It looks realistic. I colored the heads in the exact same way that I colored space marine heads with two exceptions. The first is that I put fluorescent green into the eyes. The second is that I blended in orange into the face and scales on the forehead of the model. This blended the head into the rest of the model.

Purebred Genestealer with Flesh Hooks – Left Side View
I use the same reds for the mouth and the grey for the teeth that I do on space marine. Of course, this creature has the flesh hooks coming out of his mouth which is typically missing from a space marine. But if a space marine had flesh hooks, I would paint them the same way.
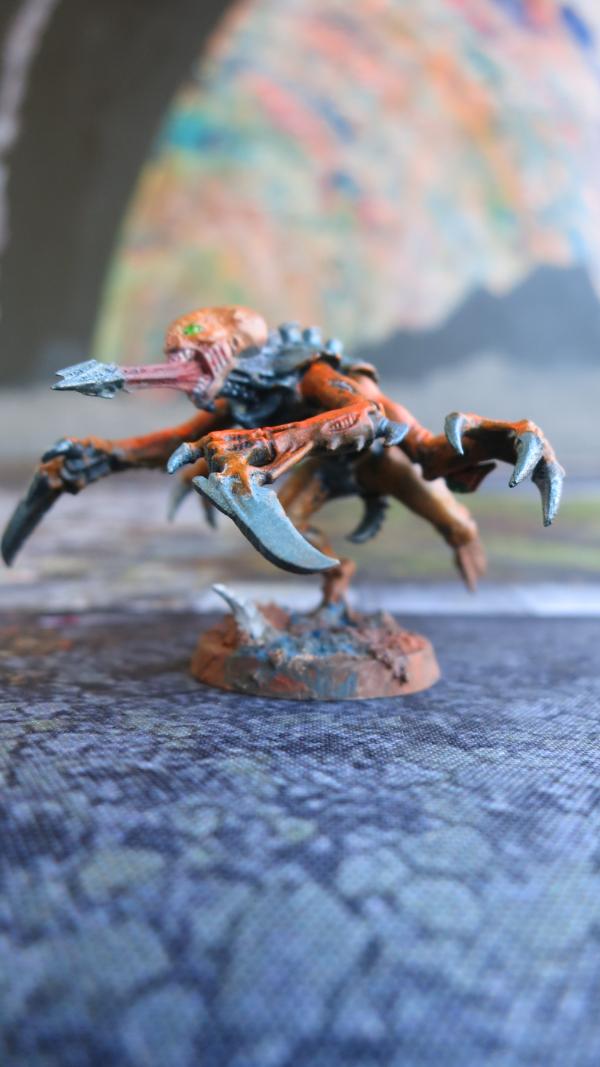
Purebred Genestealer with Flesh Hooks – Left Front View
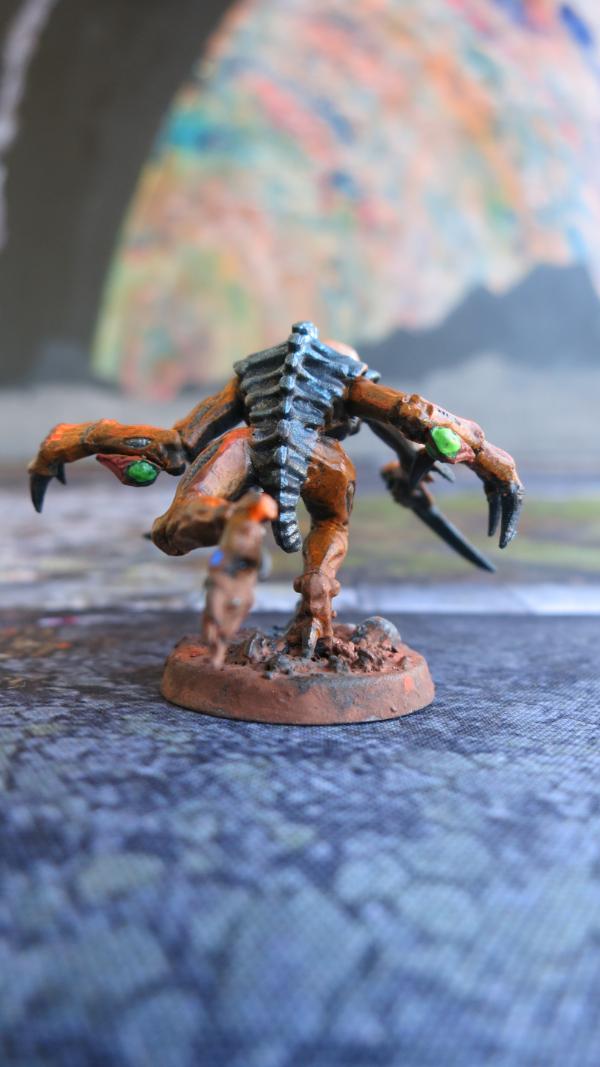
Purebred Genestealer with Toxin Sacs – Rear View
The Toxin Sacs are highlighted with fluorescent green.
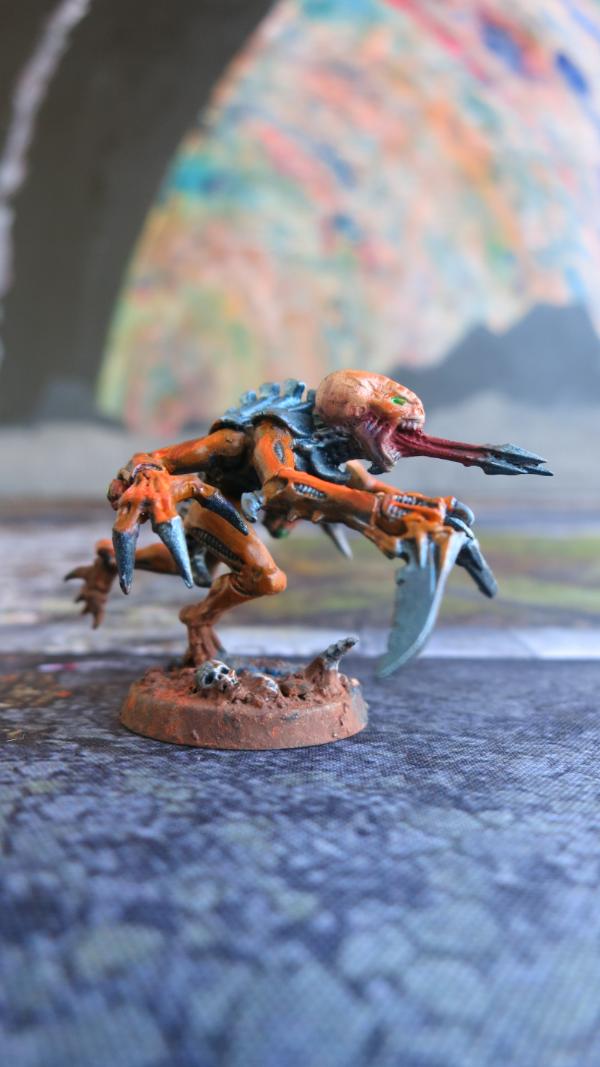
Purebred Genestealer with Flesh Hooks – Right Side View
21898
Post by: Oldmanronald
The Last Neophyte Hybrid
Because I take my pictures close up with a digital camera with an automatic focus, I often end up with several out of focused pictures in each batch. I eliminate the out of focus pictures as I review them and upload them to the Dakka Dakka site. Sometimes, this means that I have few or no pictures of one of the models. In my last batch, all of the pictures of one of my models was out of focus so I had no pictures of this model I wanted to share. In this batch of pictures, I retook pictures of this model. I actually took more than I intended and most turned out.
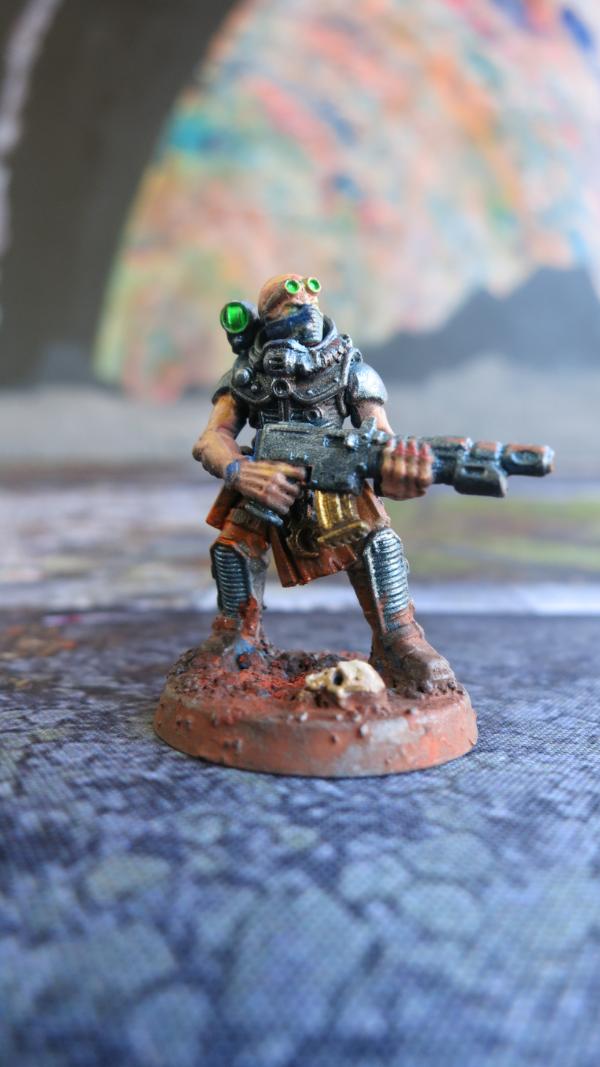
4th Generation Neophyte Hybrid with Autogun – Right Front View
Although I like this model, the face is hard to read. He has a large mask that comes up to his eyes. His googles are on his forehead. Unfortunately, many who look at this model see the googles as eyes since they are so much easier to see then his eye right above his mask.
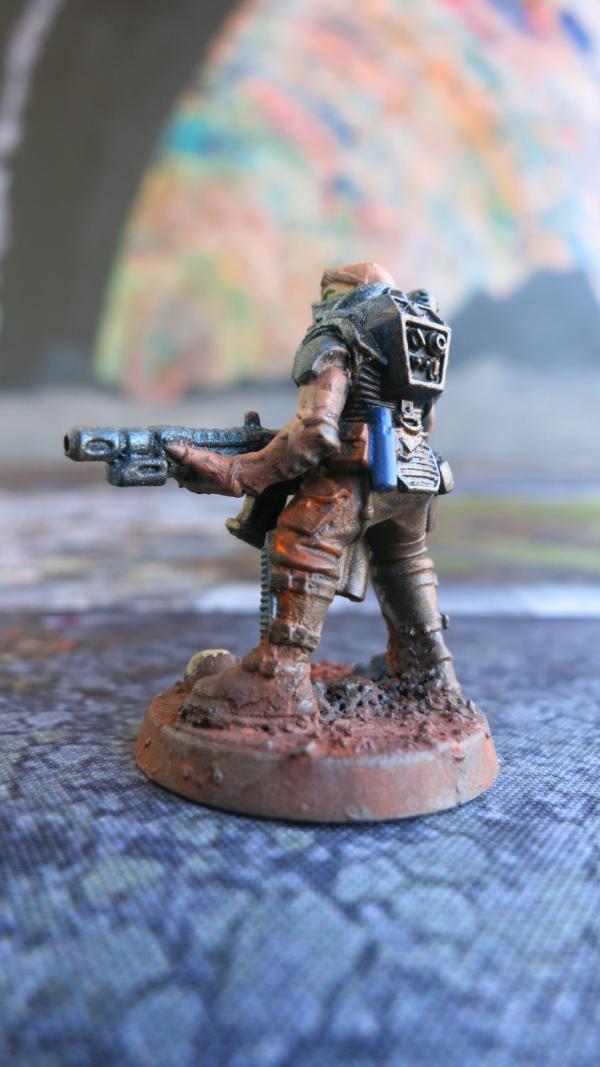
4th Generation Neophyte Hybrid with Autogun – Left Side View

4th Generation Neophyte Hybrid with Autogun – Rear View

4th Generation Neophyte Hybrid with Autogun – Right Side View
He is another 5 point model.
21898
Post by: Oldmanronald
The Acolyte Hybrid with Autopistol and Cultist Knife
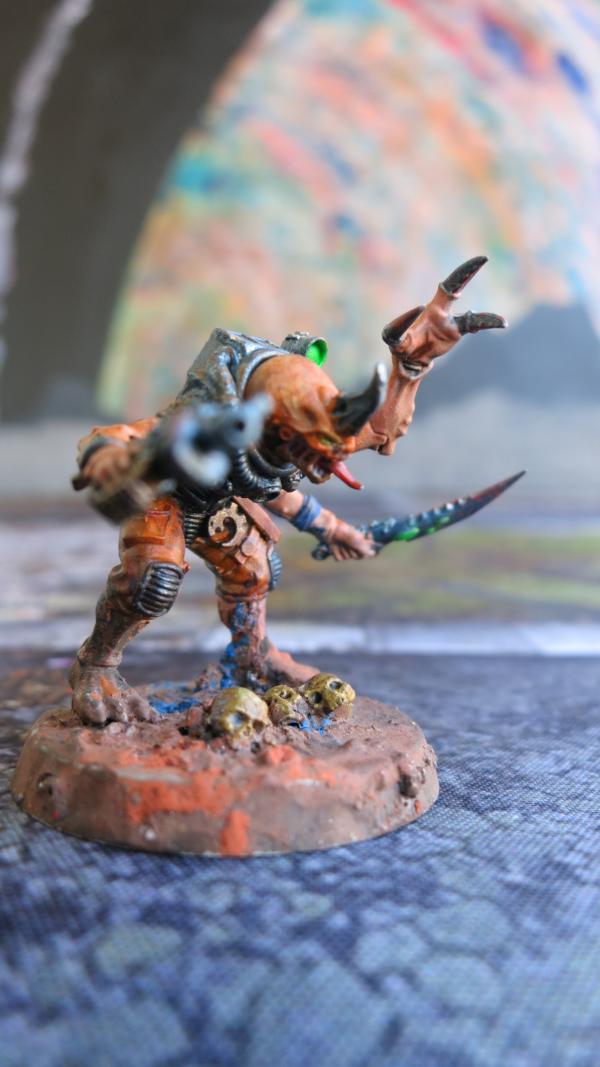
The Acolyte Hybrid with Autopistol and Cultist Knife – Front Right View
Note the horn on his head. This head is actually for the Acolyte Leader but I found it too much for the leader and placed it on a standard Acolyte Hybrid. The horn forces the face of the model to look down rather than out. A leader should look out rather than down. But a regular acolyte hybrid can look down and the horned head is fun.
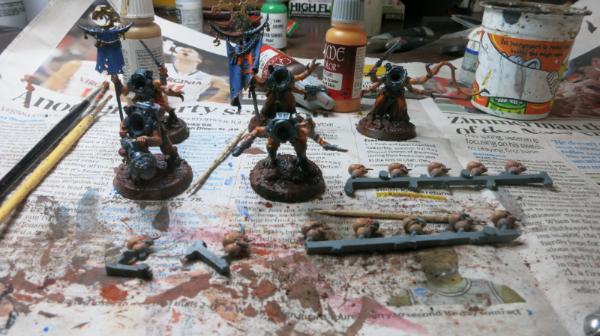
Acolyte Hybrid Bodies and Heads
I paint up the bodies for the models and their heads separately and usually paint up a lot more heads than bodies. This allows me to pick my heads to best match the model’s body. I don’t always pick the head that the instructions say should be with the body. I pick out that head that best matches the mode and theme of each model.
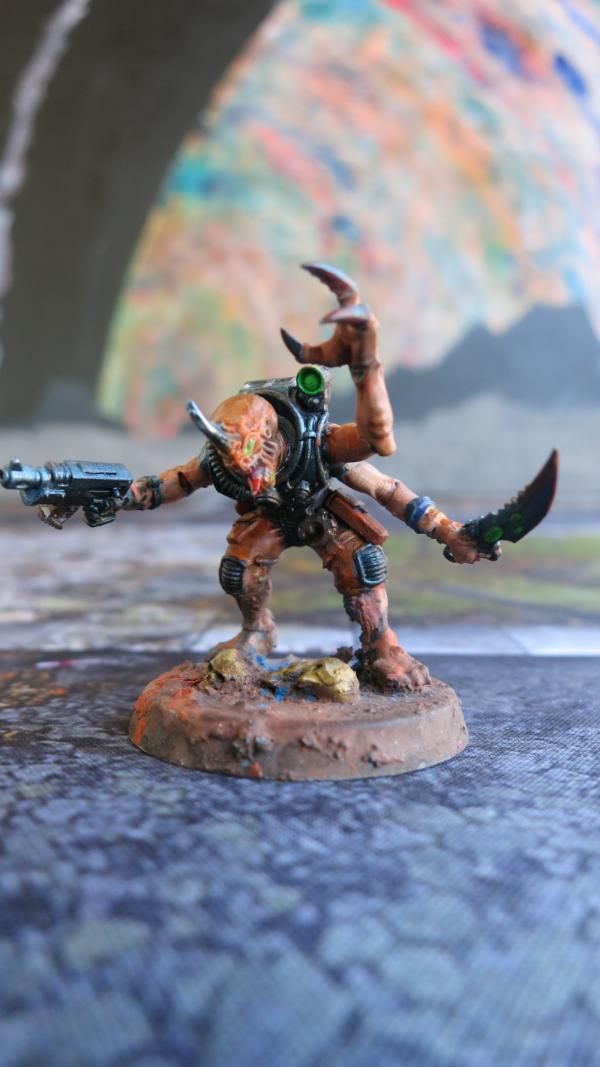
The Acolyte Hybrid with Autopistol and Cultist Knife – Front Left View
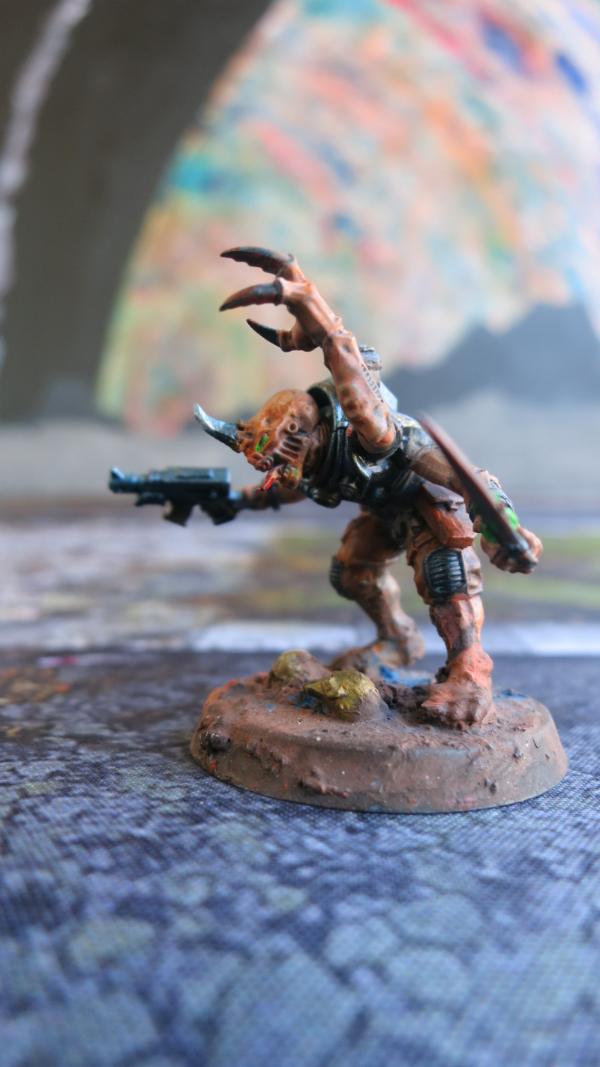
The Acolyte Hybrid with Autopistol and Cultist Knife – Left Side View
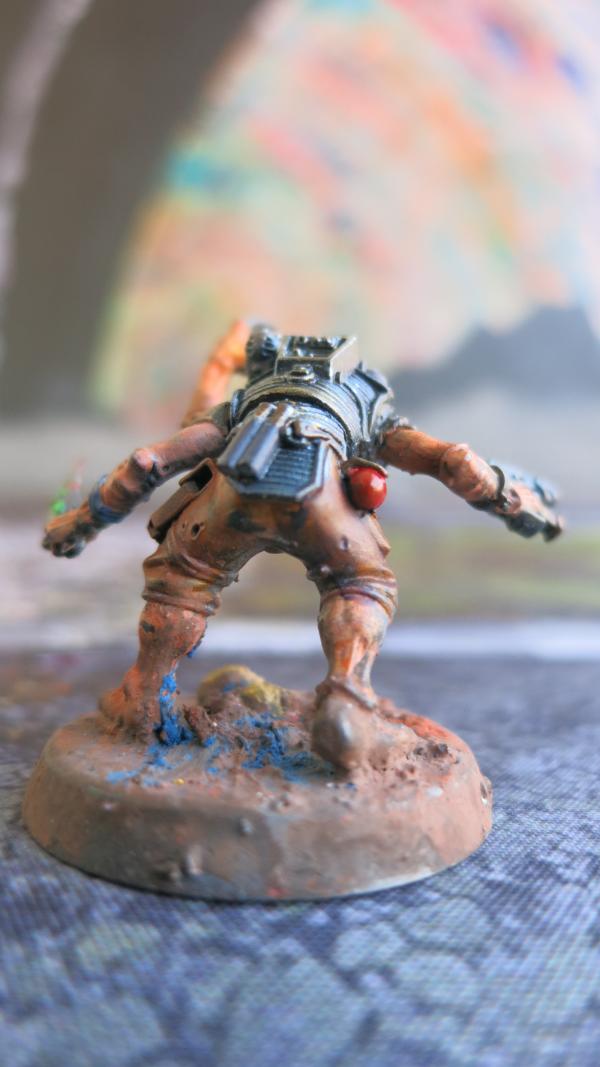
The Acolyte Hybrid with Autopistol and Cultist Knife – Rear View
I like his cherry red blasting charge.
21898
Post by: Oldmanronald
Purebred Genestealer with Acid Maw
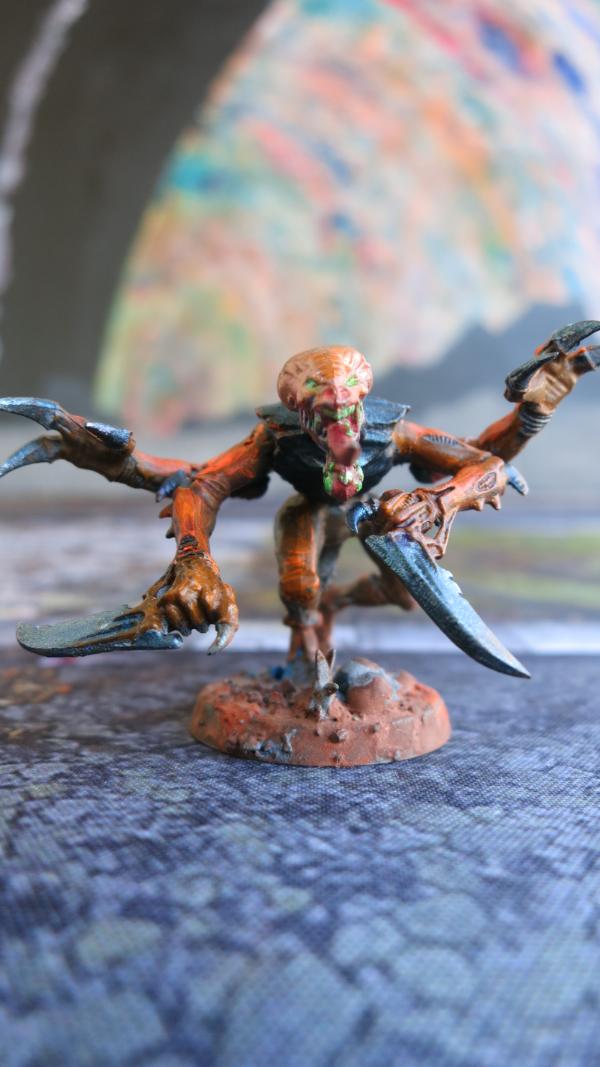
Purebred Genestealer with Acid Maw - Front View
This is the last of the three Purebred Genestealers I have made so far. For now, three is sufficient for Kill Team but I might create a whole genestealer cult army and make up the other Purebreds that I have.

Purebred Genestealer with Acid Maw – Right Front View
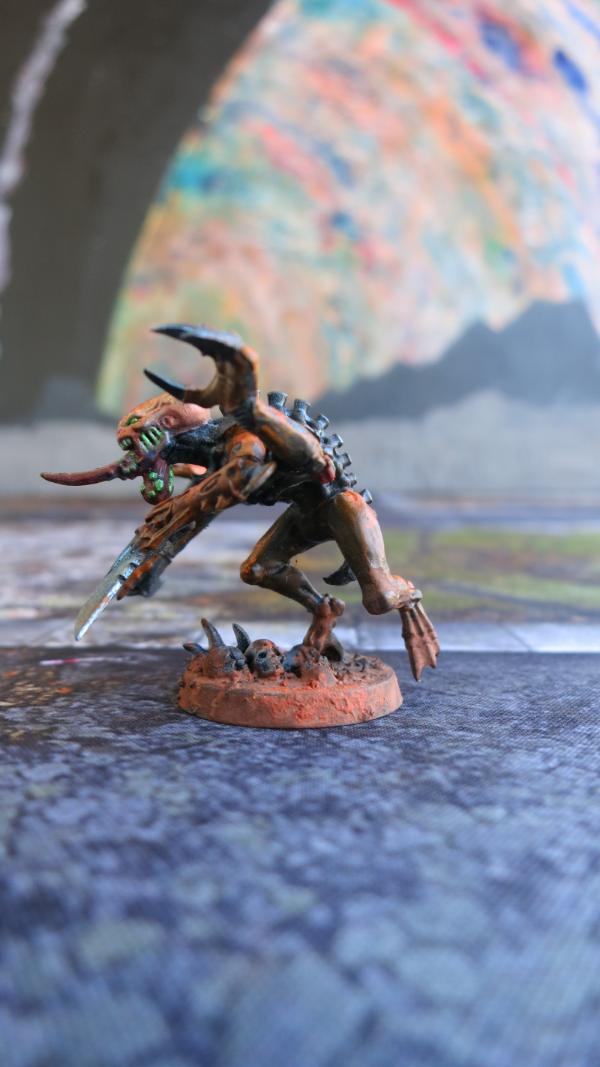
Purebred Genestealer with Acid Maw – Left Side View
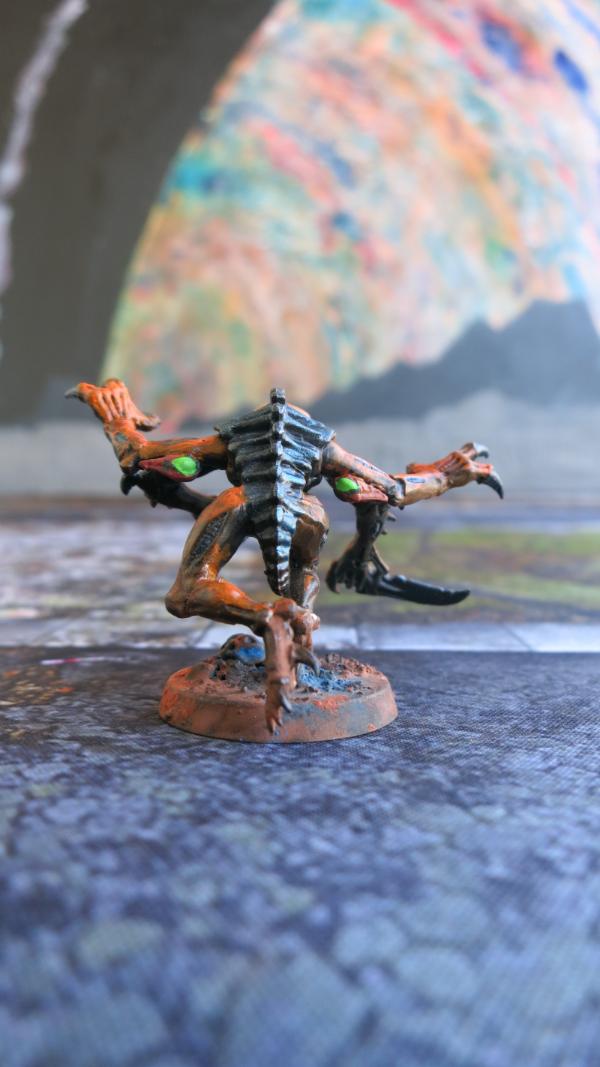
Purebred Genestealer with Acid Maw - Rear View
This has a nice view of the toxin sacs, at least what I assume are toxin sacs. The instructions for this model are sparse and it don’t label all the extra pieces. Sometimes I make an army list with the weapons selected and then make the models. On the instructions for the older models, they have pictures of the alternative weapons but they don’t label them. Sometimes you can go to the Codex and see a picture of the desired weapon. Sometimes you just have to guess. The instructions for the newer models are better about labeling the weapon choices.

Purebred Genestealer with Acid Maw – Left Front View
21898
Post by: Oldmanronald
Acolyte Iconward
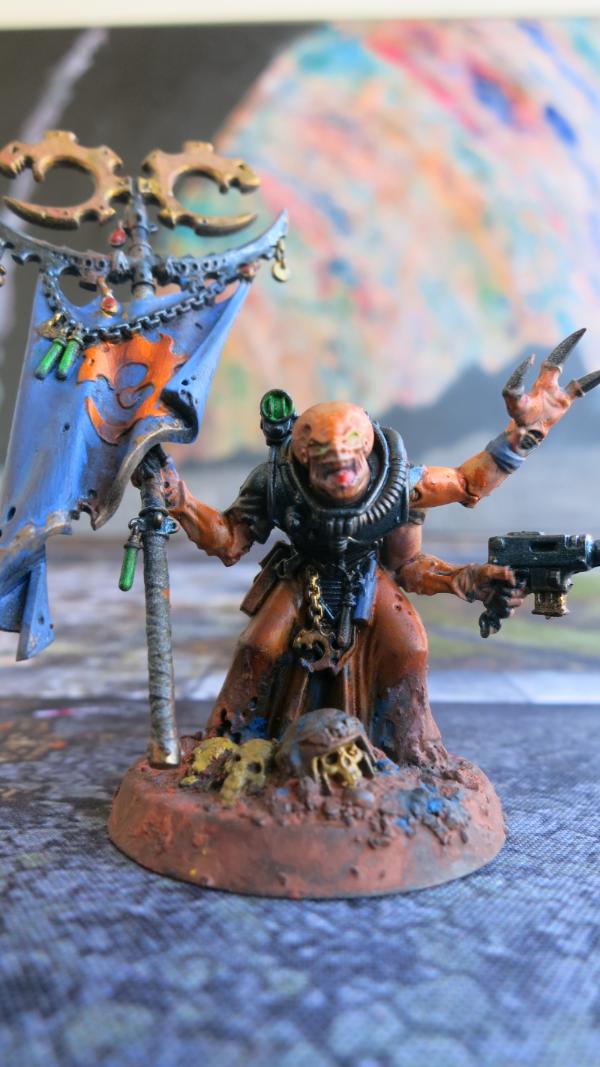
Acolyte Iconward - Front View
I was not sure what an Acolyte Iconward was when I built this model. I bought this model and assumed it was the same as an Acolyte Hybrid with a Cult Icon but the Acolyte kit also has an Acolyte Hybrid with a smaller cult icon. The two models are different but I don’t know if they fulfilled the same function. I built both and figured I would take my favorite. I like both. I did not use the head that came with the model but instead used another hornless and simpler Acolyte Head because I liked it better.
I have since reviewed the Index and discovered that an Acolyte Iconward is a Headquarters unit that functions differently than a Neophyte Hybrid with an Icon. They have two different roles. My focus has been on Kill Team, which doesn’t use the Acolyte Iconward, but I am eagerly awaiting the Genestealer Cult Codex that may be coming out in the next few months and may build a complete genestealer cult army.
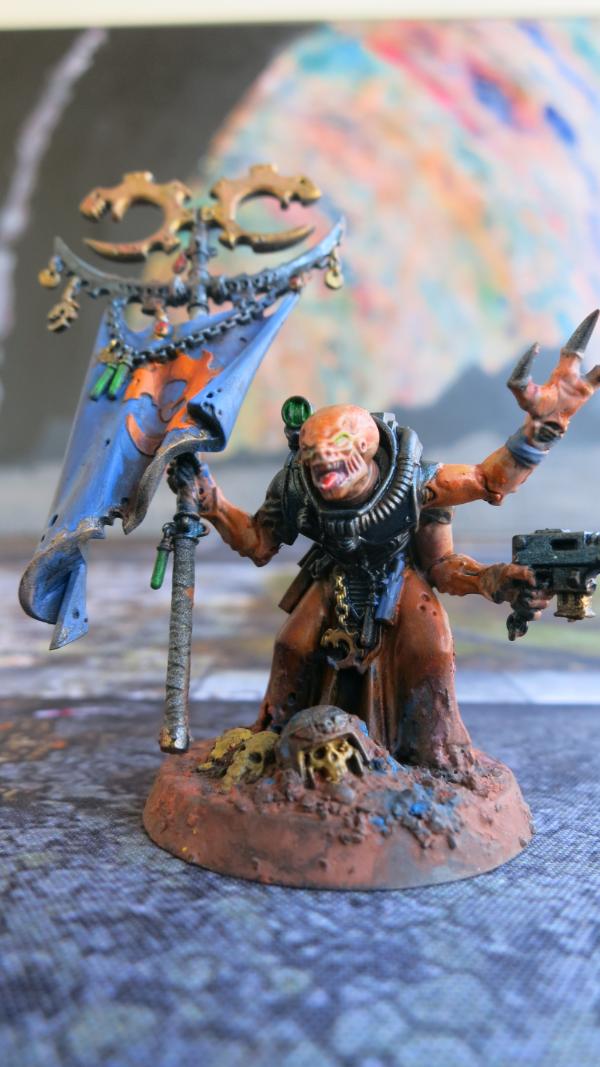
Acolyte Iconward - Left Front View
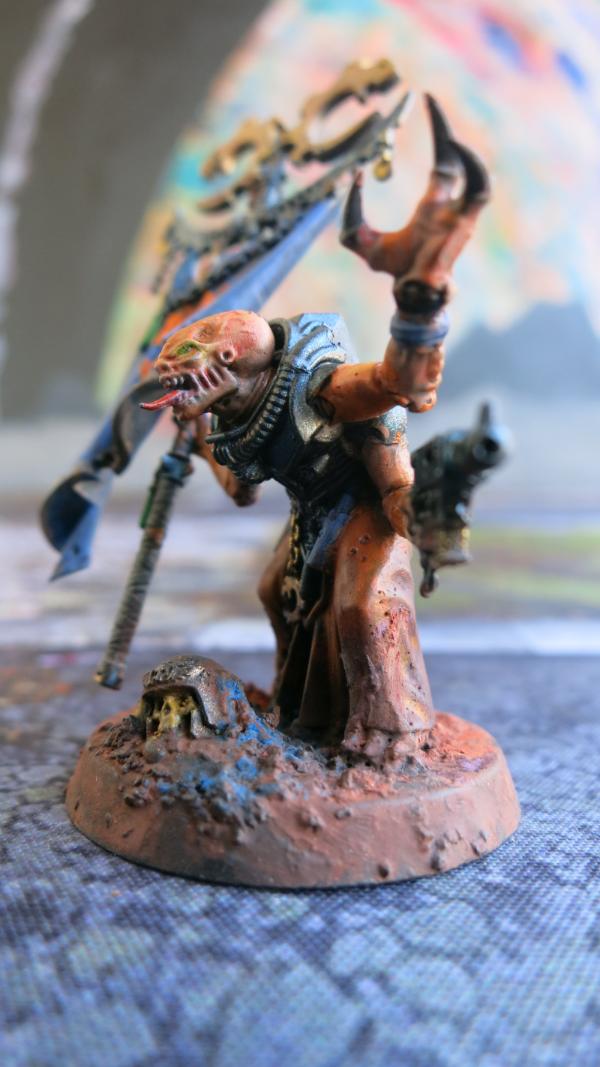
Acolyte Iconward - Left Side View
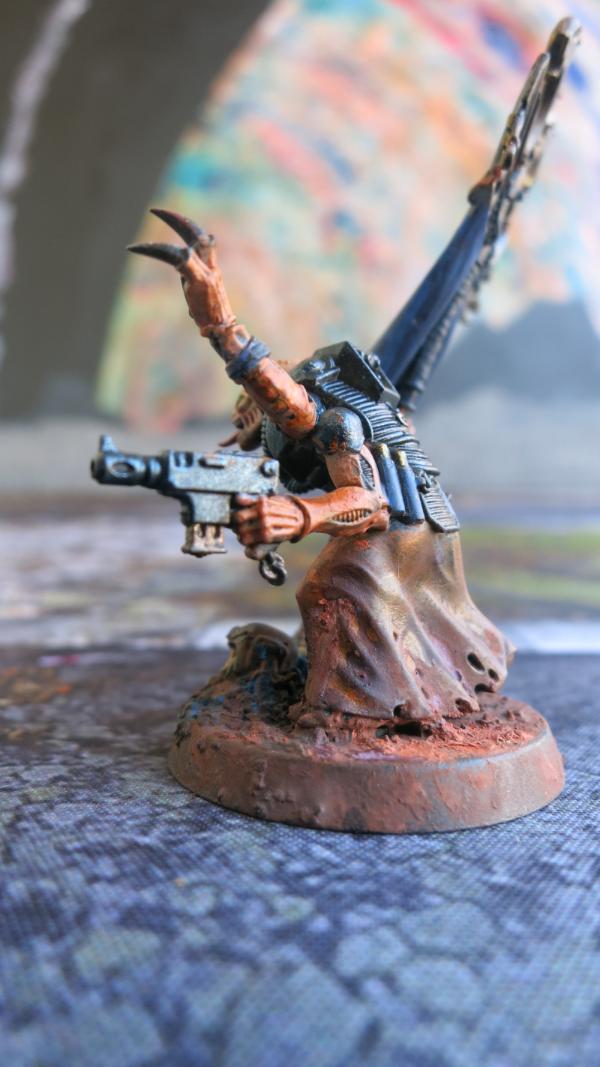
Acolyte Iconward – Left Rear View
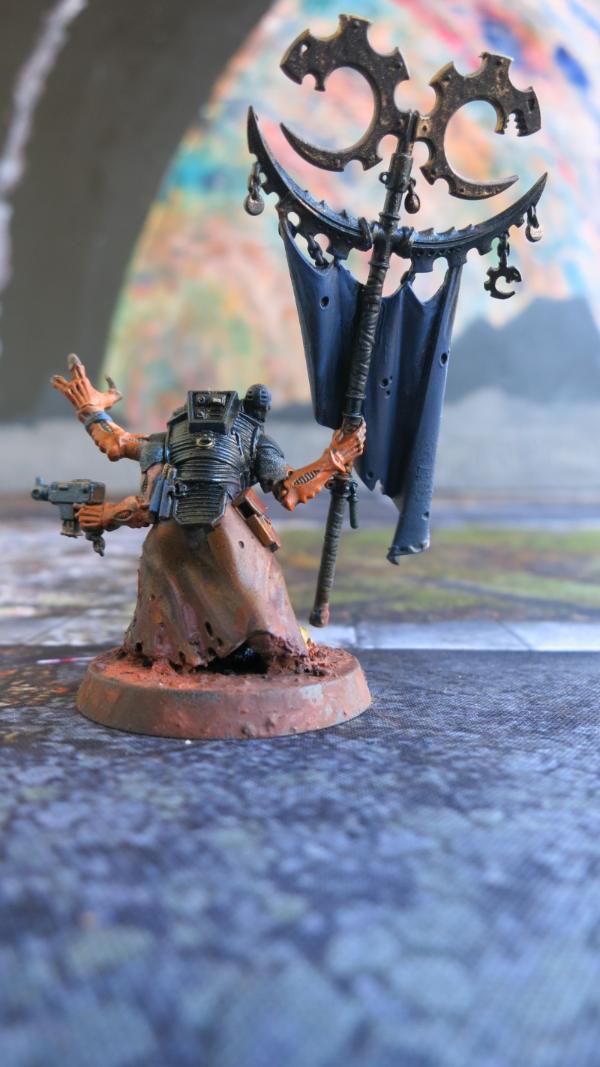
Acolyte Iconward – Rear View
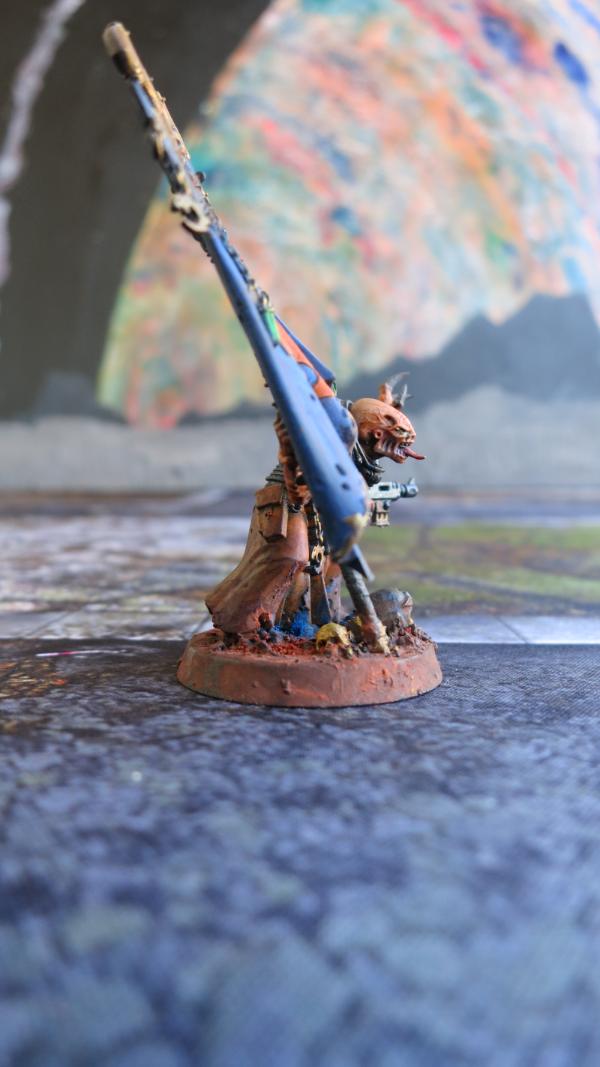
Acolyte Iconward – Right Side View
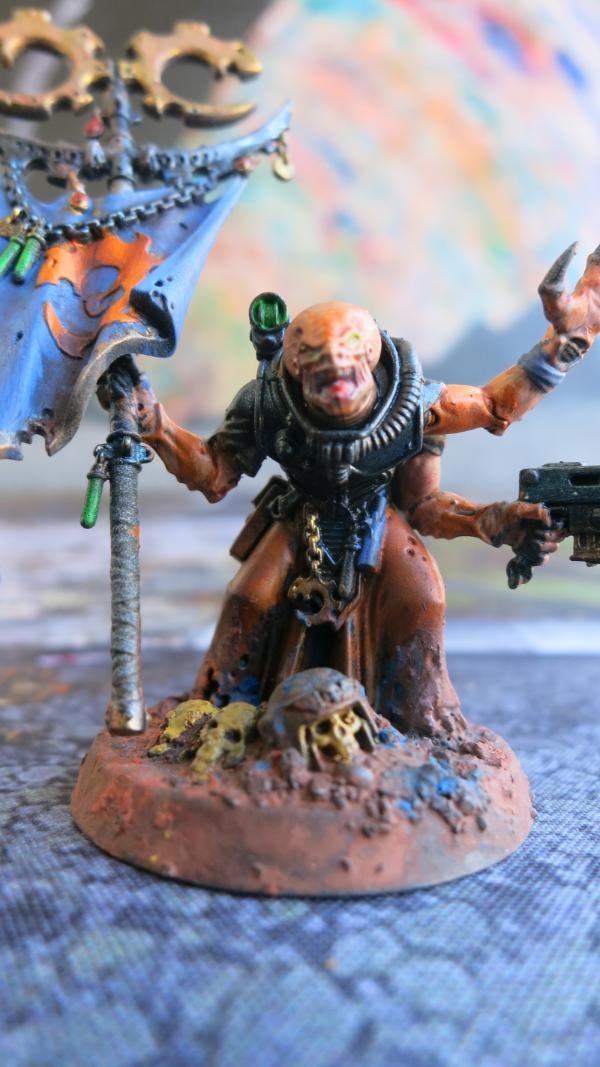
Acolyte Iconward – Close Up
21898
Post by: Oldmanronald
Acolyte Hybrid Leader

Acolyte Hybrid Leader with Bonesword – Front View
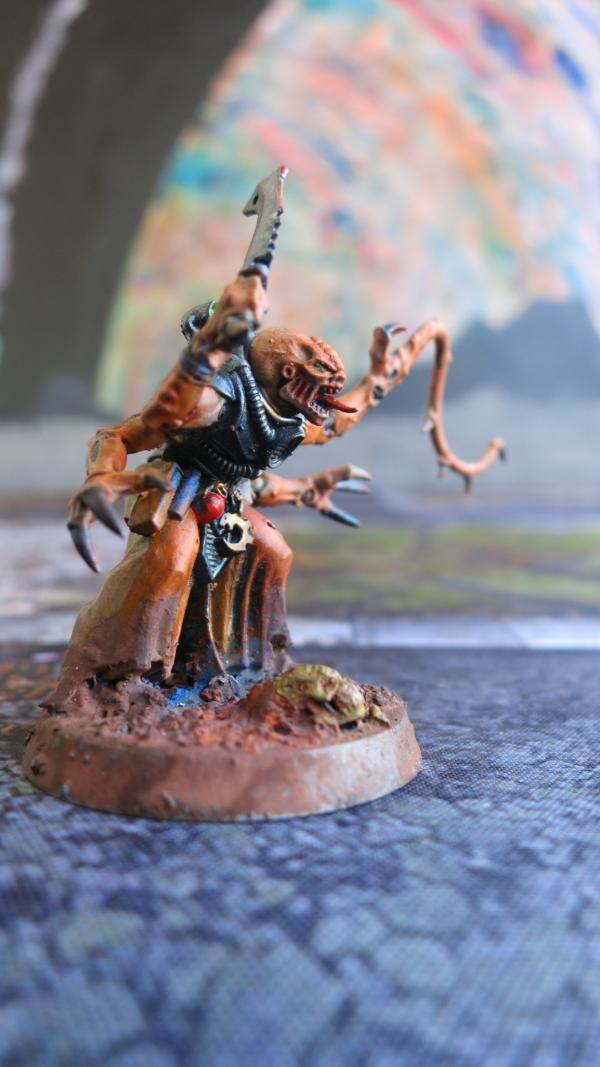
Acolyte Hybrid Leader with Bonesword and Lash Whip – Left Side View
I used a different head than the horned leader head which I used on another model. I like this head better on the leader. I have painted the heads on all these cultist and genestealers with the same colors and techniques that I used for space marine heads except that I added a little orange to the scales on the forehead and around the eyes and painted the eyes a fluorescent green. The combination works better than I expected. The color don’t look human like even if they are the same colors as space marine flesh. Still, the technique does produce realistic looking heads. I am considering experimenting with Orc heads using the same color scheme but highlighting with green and washing its face with green shade. I am curious whether this technique will turn out life like Orc faces.
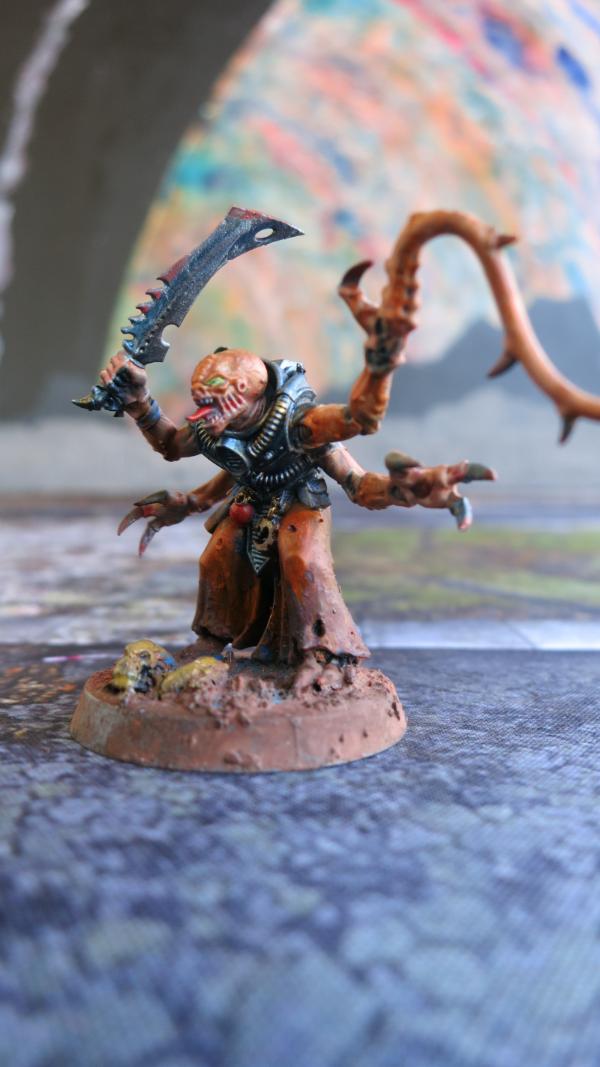
Acolyte Hybrid Leader with Bonesword and Lash Whip – Left Front View
The lash whip makes this a difficult model to photograph.

Acolyte Hybrid Leader with Bonesword and Lash Whip – Right Rear View
21898
Post by: Oldmanronald
Acolyte Hybrid Fighter with Heavy Rock Drill
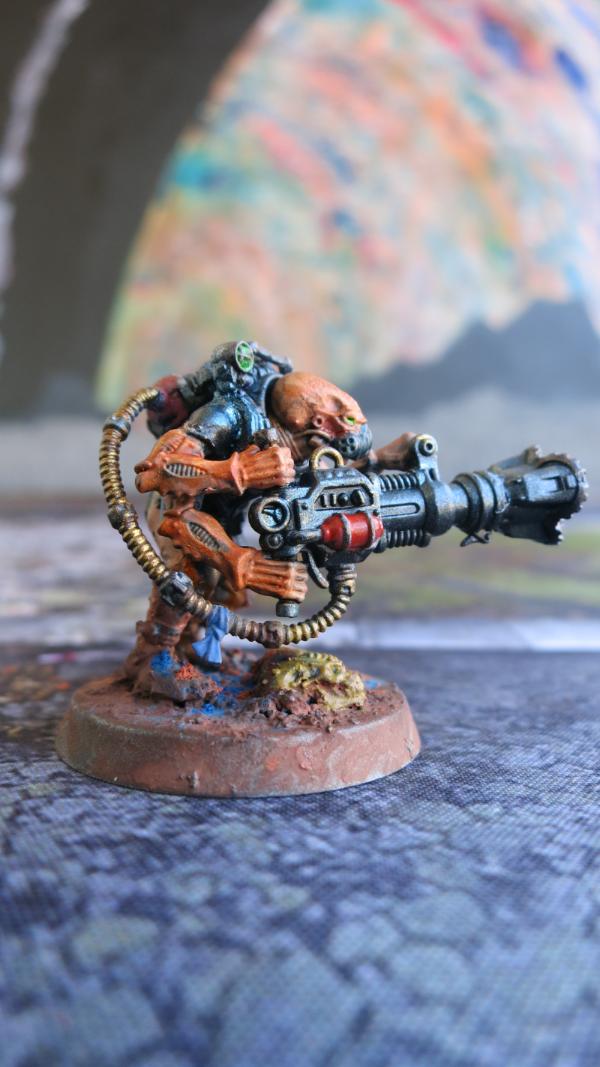
Acolyte Hybrid Fighter with Heavy Rock Drill – Right Side View
This is one of my favorite models. The colors are perfect. The lines are clean. The heavy rock drill looks good. I really like the face although it has no teeth or horns showing. The respirator works on this model since the heavy rock drill would produce so much dust.
Because I like this model so much, I took more pictures and am going to share them all even though some of them are almost the same.

Acolyte Hybrid Fighter with Heavy Rock Drill - Left Front View
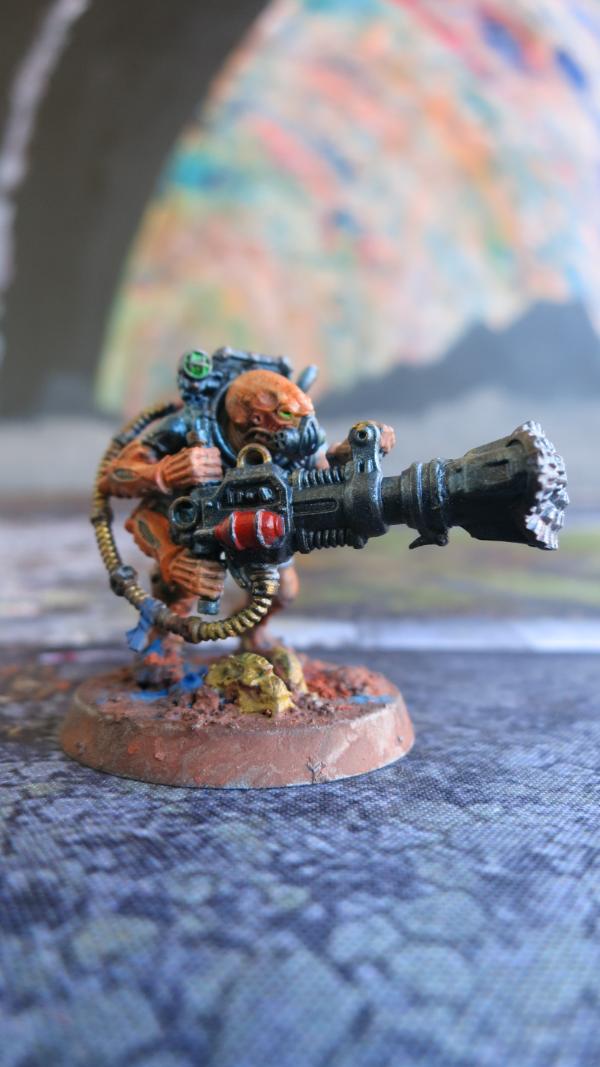
Acolyte Hybrid Fighter with Heavy Rock Drill – Right Front View

Acolyte Hybrid Fighter with Heavy Rock Drill – Left Side View
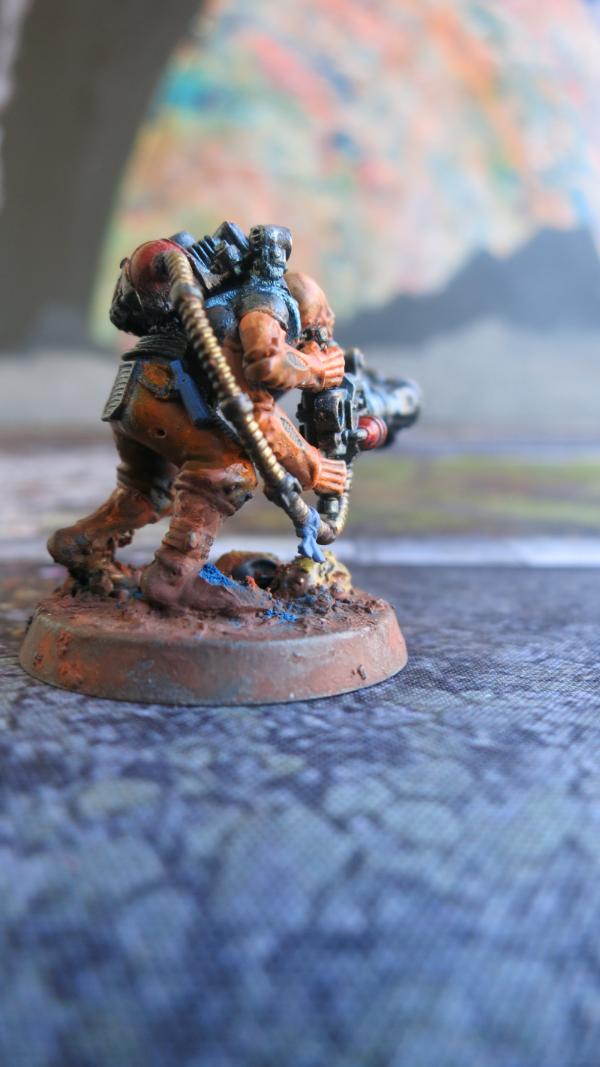
Acolyte Hybrid Fighter with Heavy Rock Drill – Right Rear View
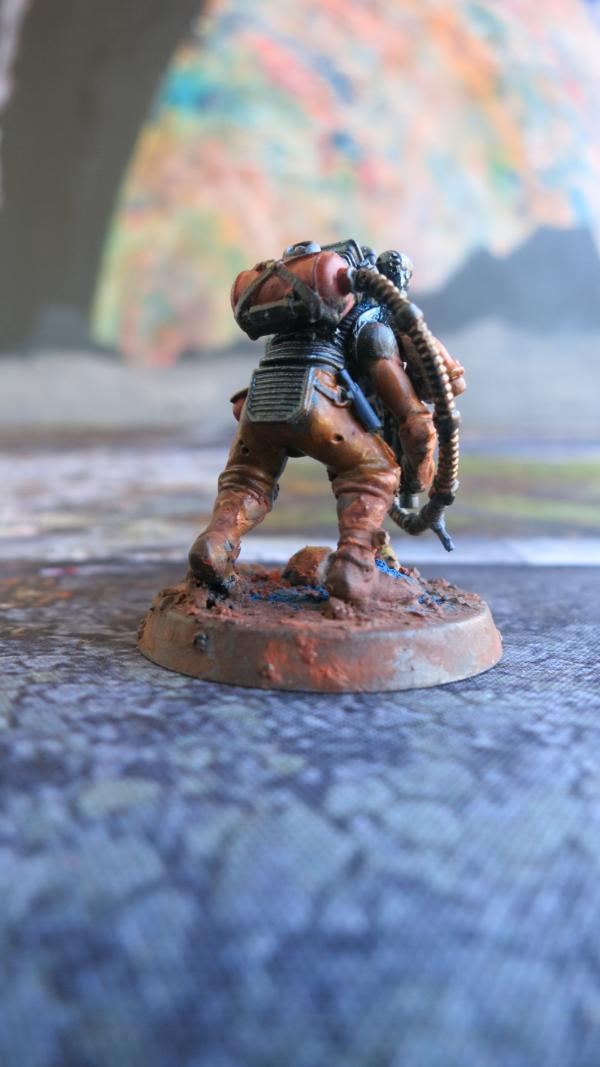
Acolyte Hybrid Fighter with Heavy Rock Drill – Rear View

Acolyte Hybrid Fighter with Heavy Rock Drill – Right Rear Side View

Acolyte Hybrid Fighter with Heavy Rock Drill – Close-Up
21898
Post by: Oldmanronald
Acolyte Hybrid with Cult Icon
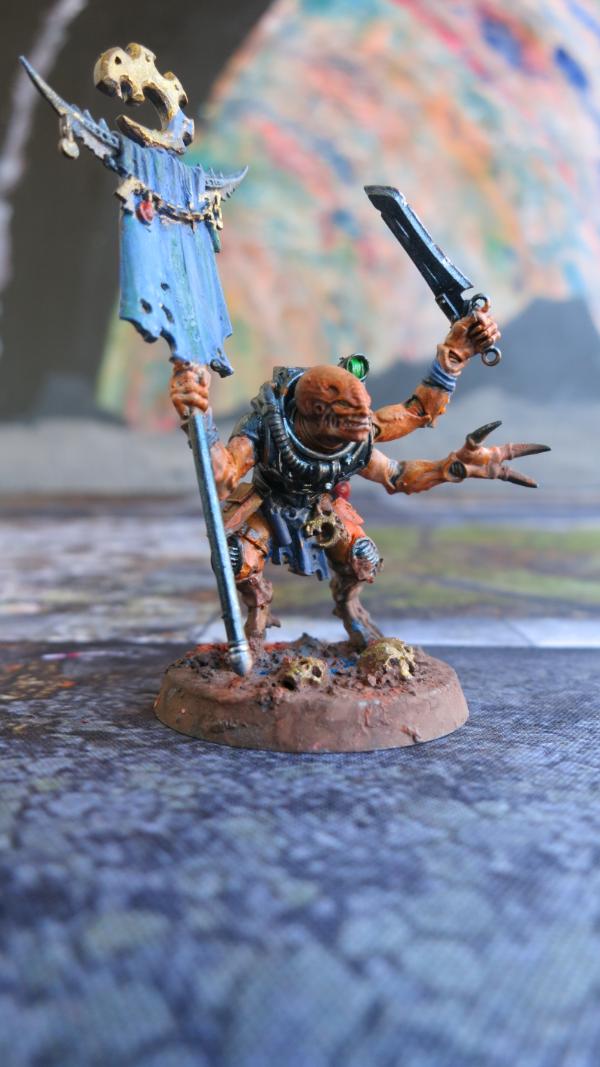
Acolyte Hybrid with Cult Icon – Right Front View
When I built this model I was not sure if this model fulfils the same battlefield roll as the Acolyte Iconward that I displayed earlier. Since I like both models I hoped I can find room for both. I have since learned that the Iconward is a headquarter character while this model is part of the Acolyte hybrid infantry troop. So they do have separate roles in the cult. I really like the head, especially the lips and teeth on this model.
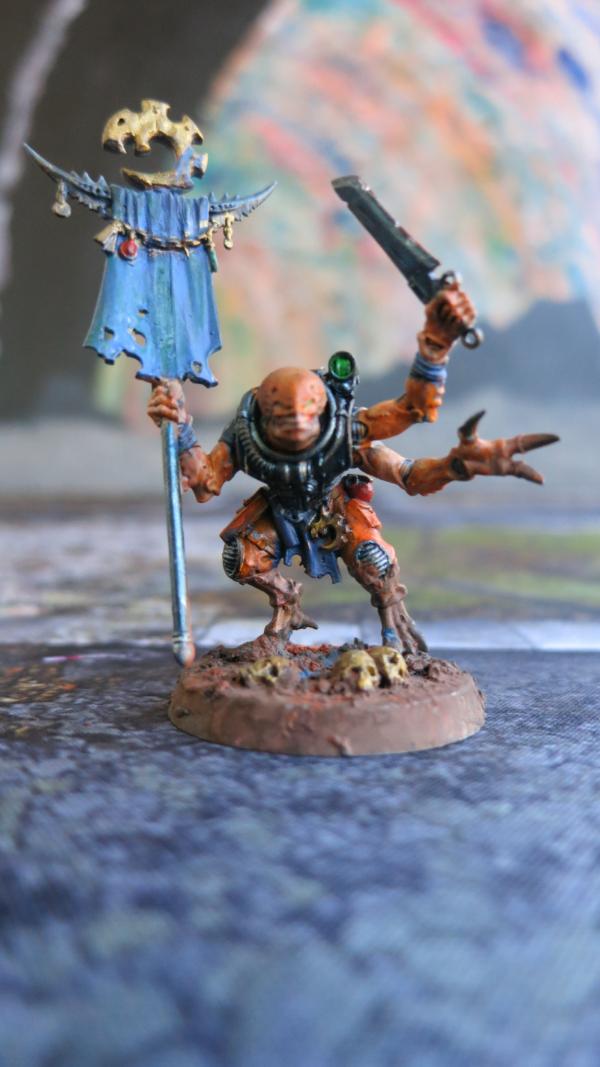
Acolyte Hybrid with Cult Icon - Front View
The face is out of focus on this front view of the model.
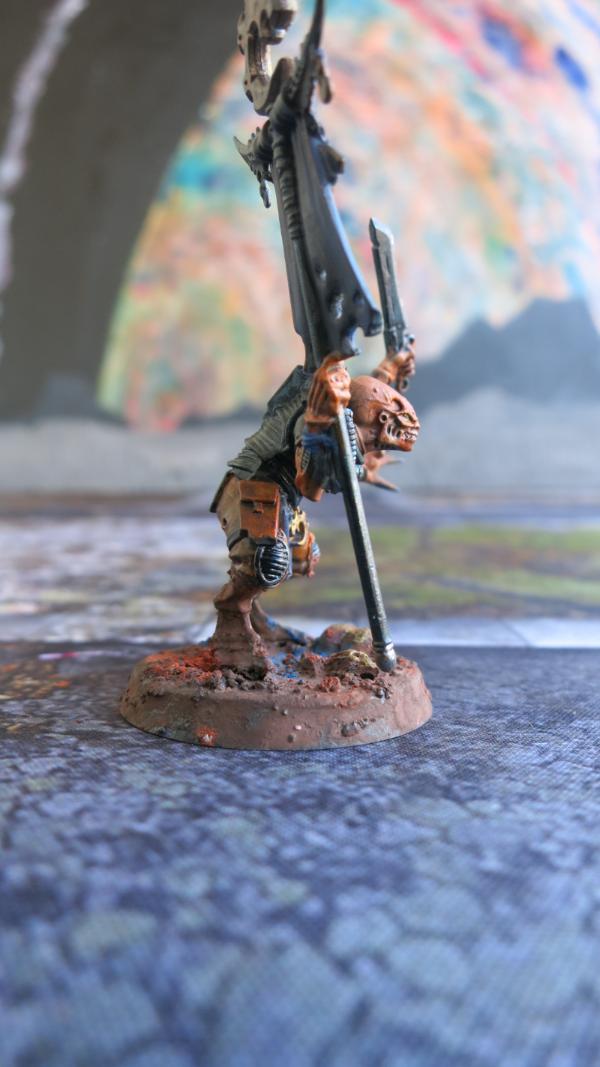
Acolyte Hybrid with Cult Icon – Right Side View
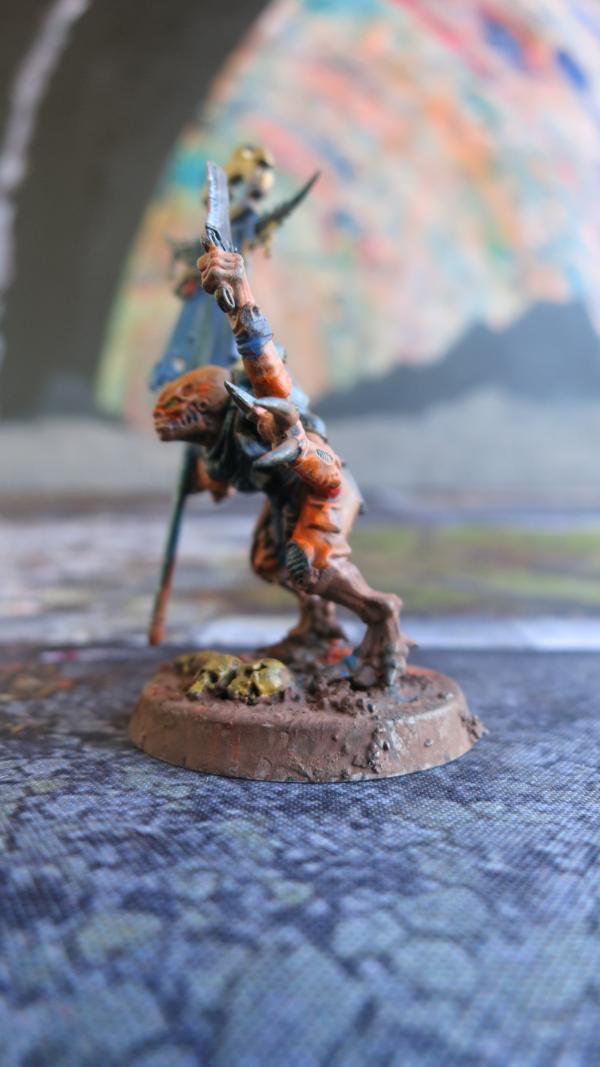
Acolyte Hybrid with Cult Icon – Left Side View
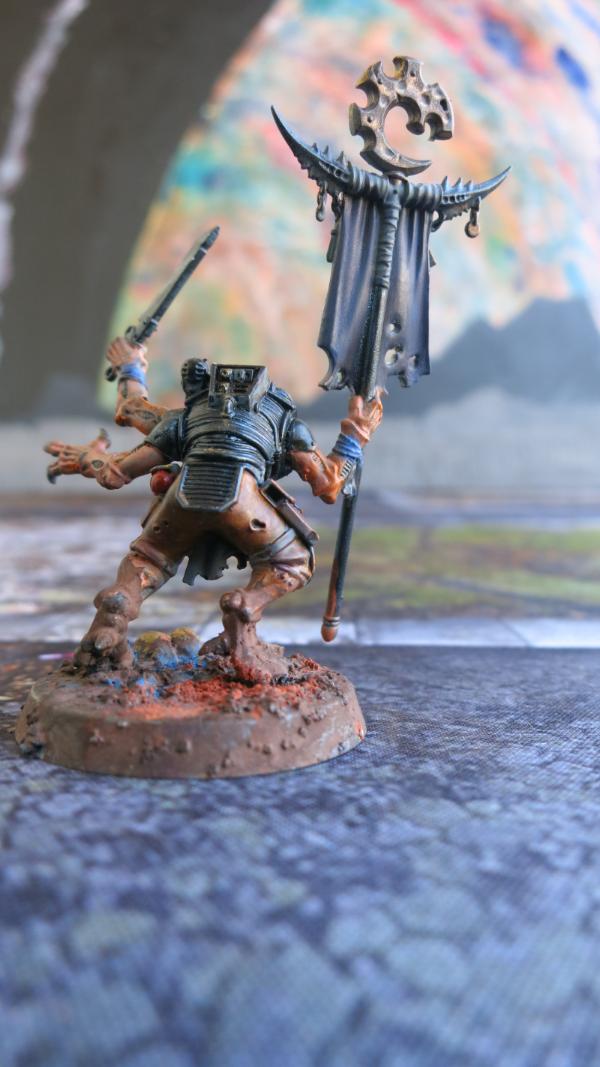
Acolyte Hybrid with Cult Icon – Rear View
21898
Post by: Oldmanronald
21898
Post by: Oldmanronald
Another Scout with Ranger Hat
After my bright orange Gene Stealer Cult models, I find my camouflage based model dull and boring. This is especially true with these scouts who I painted up because I needed scouts for gaming, not because I really like the models. I replaced the heads with heads from Puppet War. I painted up five heads with boonie hats but lost one so I used a head with a patrol cap for this model. It is okay.

Second Scout with Patrol Cap – Right View
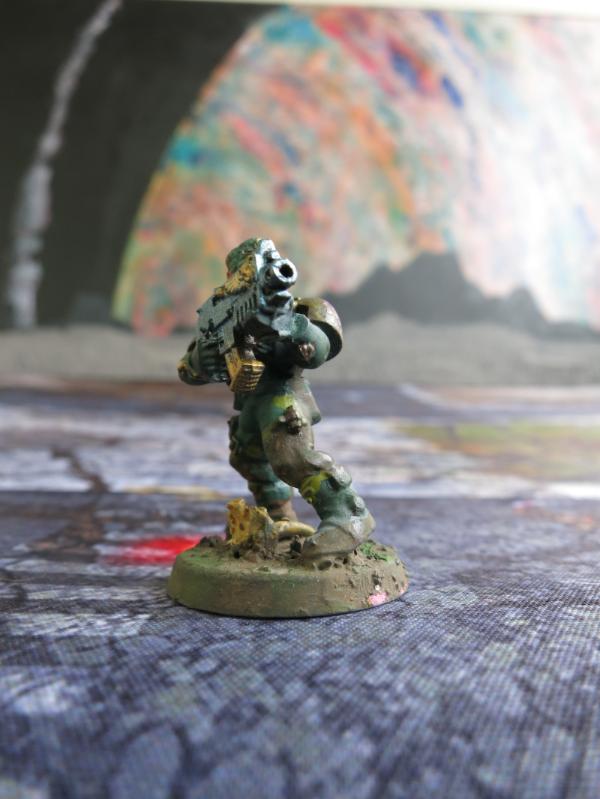
Second Scout with Patrol Cap – Front Right View

Second Scout with Patrol Cap – Front Left View

Second Scout with Patrol Cap – Rear View
21898
Post by: Oldmanronald
Scout with Heavy Bolter
This is another model that is not pretty but is serviceable for gaming. I do like the muddy boots.
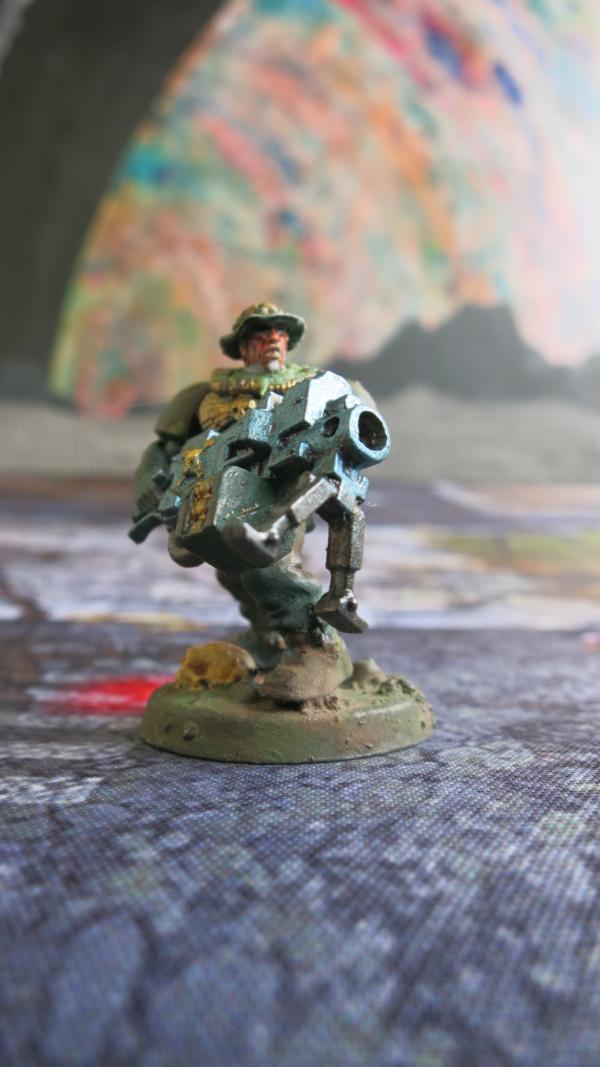
Scout with Heavy Bolter – Right Front
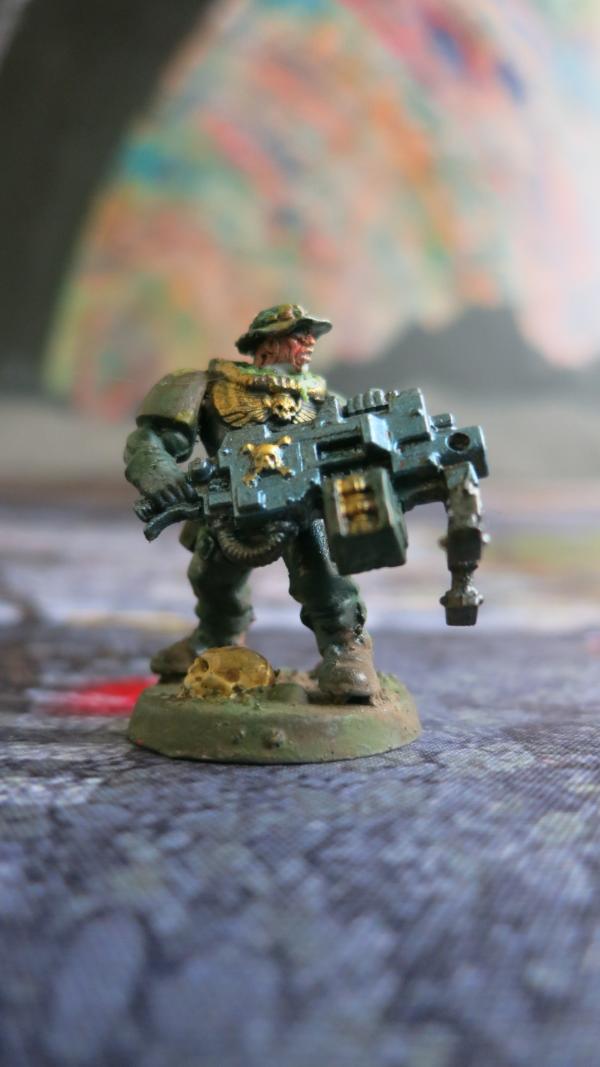
Scout with Heavy Bolter – Right
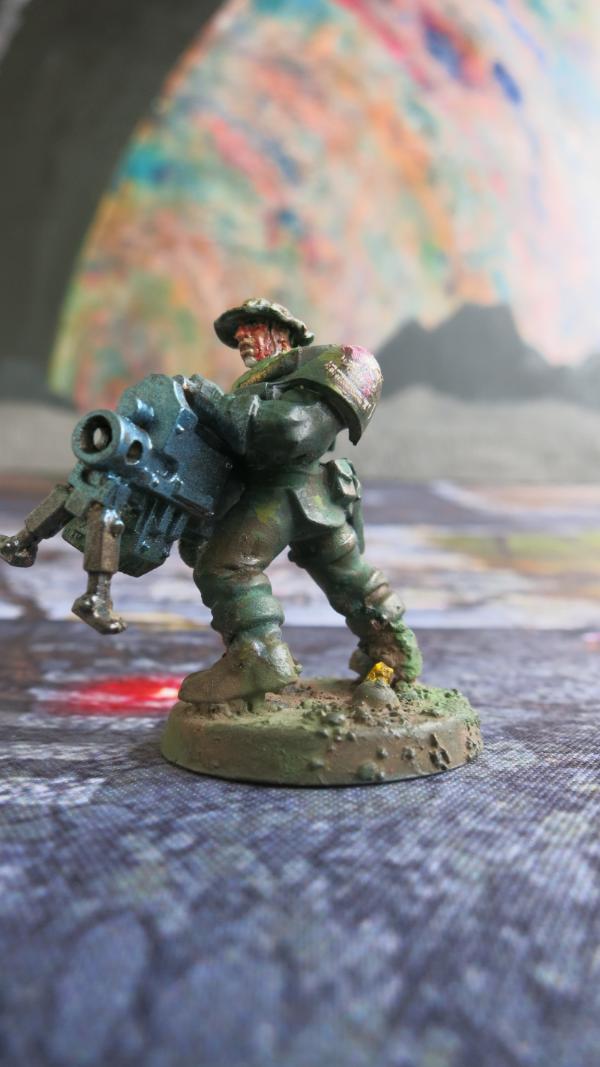
Scout with Heavy Bolter –Left
The head and face is terrible. It just wouldn’t come together when I painted it.

Scout with Heavy Bolter –Rear
21898
Post by: Oldmanronald
Fourth Scout
One thing about close-up shots is that the mistakes show up. In this first picture, the mold lines are clearly seen on the front of the bolter. The mold lines on bolters are easy to miss and difficult to remove. Still, this is more a playing model than a show model.
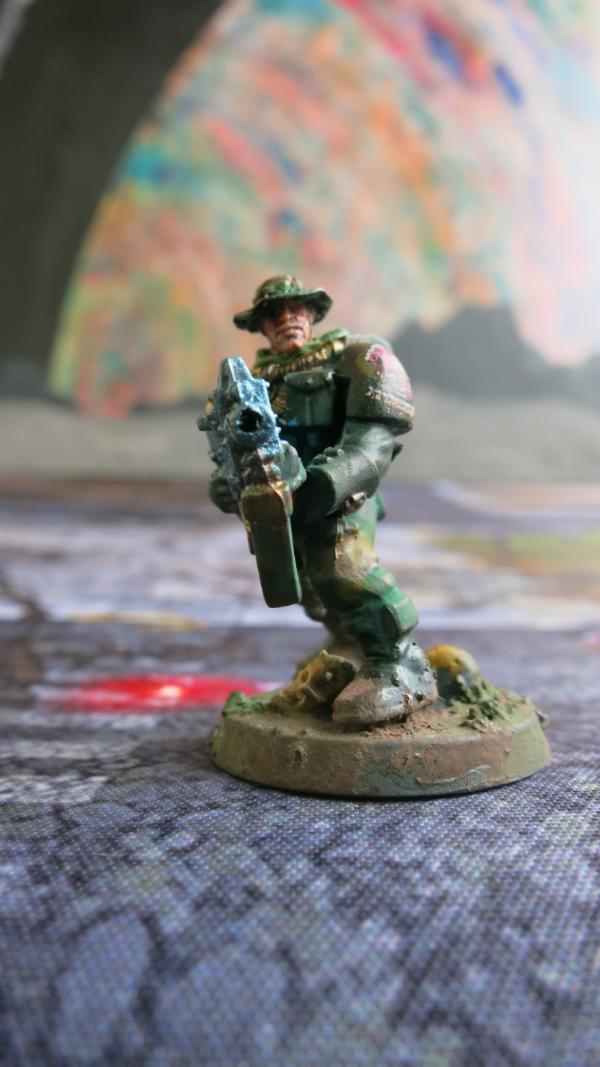
Scout – Front

Scout - Left
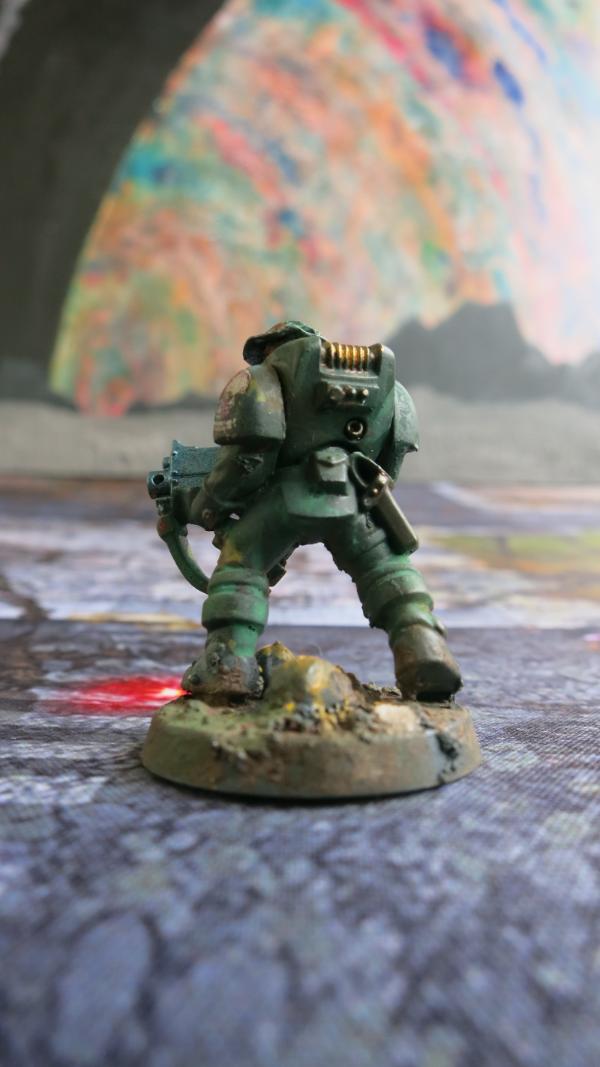
Scout – Rear
21898
Post by: Oldmanronald
Fifth Scout
Again, this model is more for playing than display. Actually all my models are intended for playing but I primarily had to hurry these scouts to have them finished for the 2018 NOVA Open.
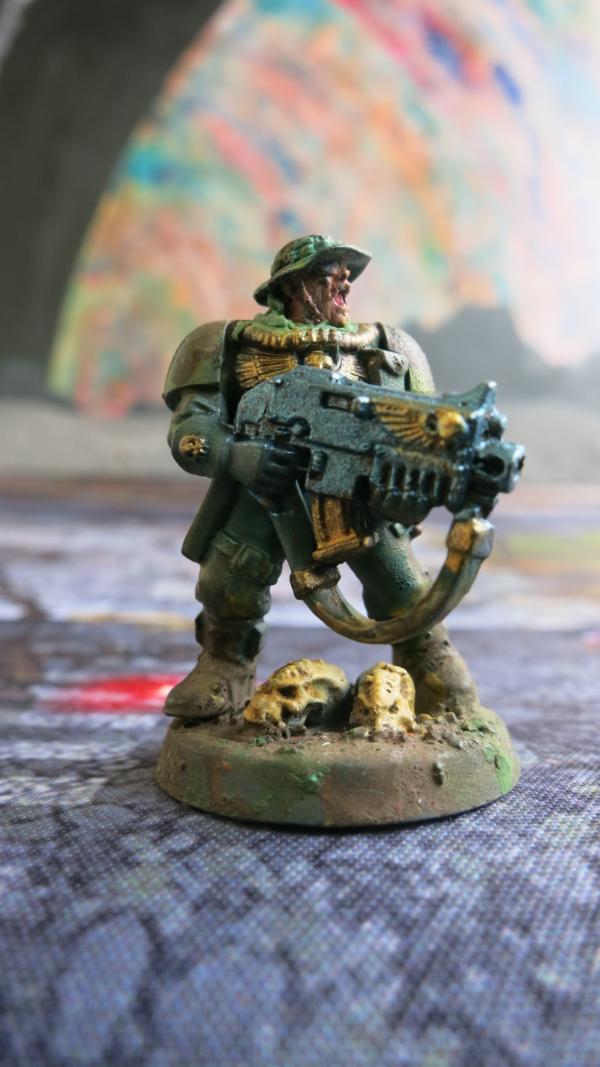
Scout - Right
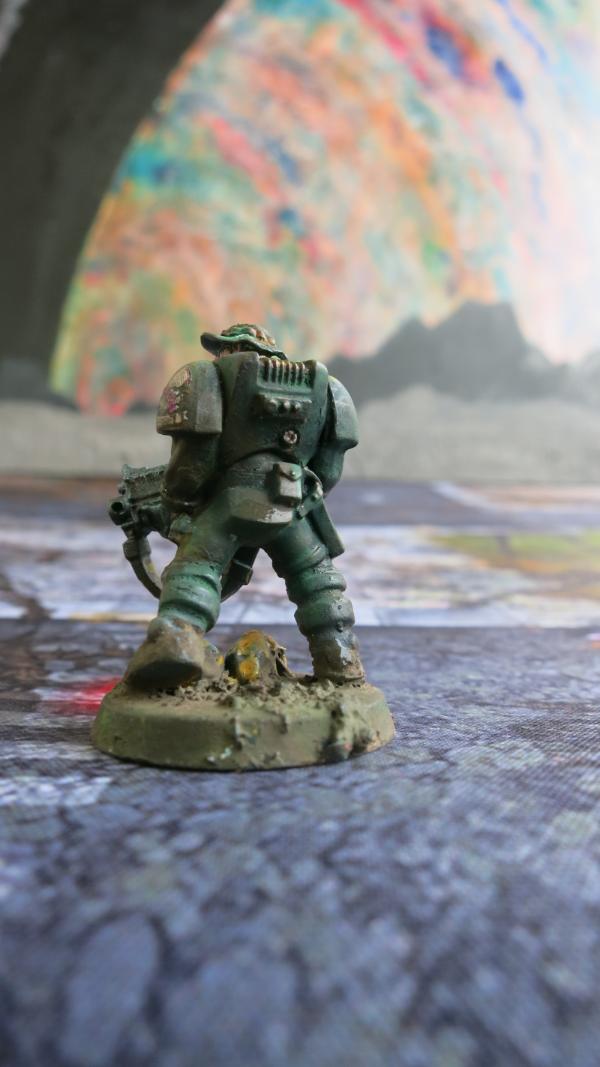
Scout - Rear

Scout – Left
My favorite detail is the dirty boots. This is the last of my scouts. I will probably focus on my genestealer cult models for now.
21898
Post by: Oldmanronald
Genestealer Cult Army – Brood Brothers

On the Workbench - Brood Brothers Imperial Guard
I really like my Genestealer cult figures and have decided to build a Genestealer cult army for the next Nova Open. Although the next Nova Open starts the last week in August, building a new army by then, especially a Genestealer cult army will be a real challenge. Besides the normal crush of work, family, church, and life, building this army poses several challenges.
1) This army requires lots of new figures. I have tentatively written up a 1500 point army. For just the infantry squads, it would require 60 figures of which so far I have made about 20, not all of which are useable since some of them are designed for kill team which rewards using special weapons on infantry characters as opposed to the standard 40K where the points are better spent elsewhere.
2) The Genestealer Manual is expected to come out in the new month or two. This means that any figures I build now may be obsolete. Games Workshop has already shown several new models that I may be wanting.
3) This is a whole new army for me. I have been building camouflage space marines for years and have hundreds of models. Typically when I build my army, I add a few new models to the old army. This project requires all new models.
My plan includes a detachment of Imperial Guard brood brother’s allies. The Imperial Guard will support the Genestealers Cult army by providing a buffer during the initial phase since most of the Genestealer Cult army want to be in reserve and deep strike into assault positions. The Imperial Guard also provides what I really like, powerful shooting units. I especially like the artillery indirect fire to do unto other what has been done unto me, blasting away critical units in the first turn. I plan to include lots of indirect fire in the Imperial Guard army, including Basilisks to shake up and remove critical enemy units and weapons squads armed with mortars to remove as much bubble wrap surrounding critical targets that I want to attack with my Abominants, Aberrants, and pure strain Genestealers.
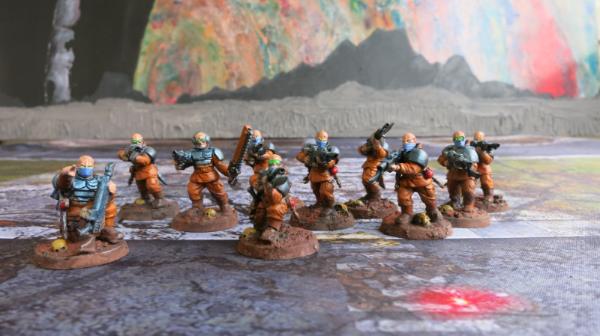
Brood Brothers – Infantry Squad
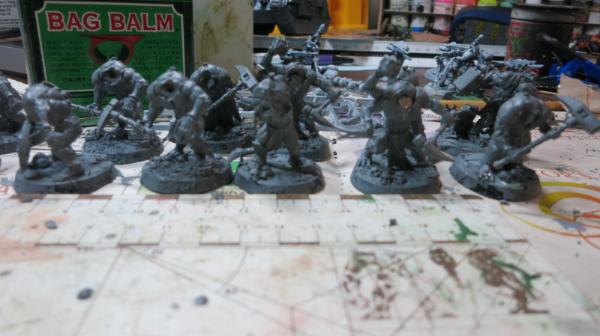
On the Workbench - Aberrants
21898
Post by: Oldmanronald
Brood Brothers – Heavy Weapons Team with Mortars
The first units I started building for the brood brothers were heavy weapons teams with mortars. I built three teams so far although I plan to field six teams. Their primary mission is to remove cheap infantry bubble wrap surrounding critical enemy targets. Their secondary missions are to hit other infantry targets and to help fill in the backfield against deep striking units.
I substituted some figures from the infantry squad to add some variety to the teams. These teams got a little tedious to make because they have lots of individual parts.

First Heavy Weapons Team - Unpainted
All the figures are kneeling in the first team.
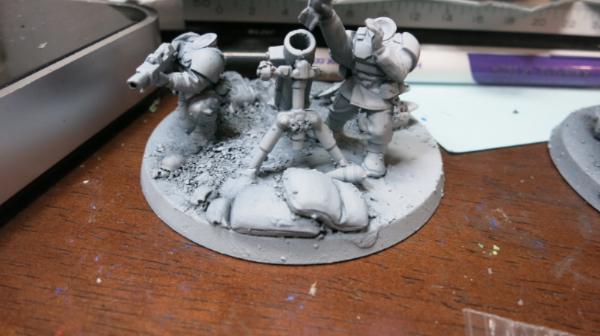
Second Heavy Weapons Team - Unpainted
The gunner is standing on this team.

Third Heavy Weapons Team - Unpainted
The gunner is kneeling and the assistant is standing.
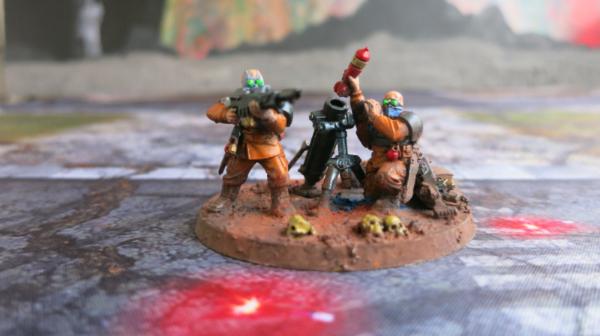
Third Heavy Weapons Team - Painted
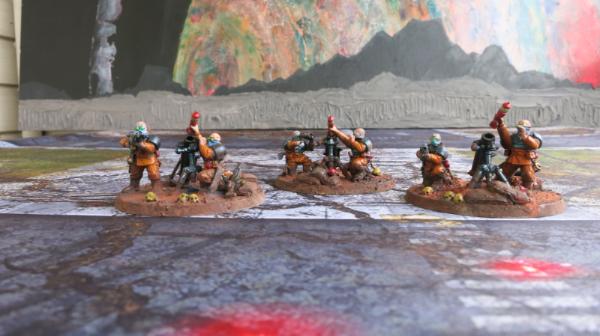
Heavy Weapons Squad with Three Teams - Painted
21898
Post by: Oldmanronald
Brood Brothers - First Heavy Weapons Mortar Team
This the standard heavy weapons team with all the figures kneeling. These weapons teams are old style Games Workshop models with lots of finicky bits for modification but none really fit together that well. I actually like the new style kits better. They are not easily customized like the old kits but they fit together easier and generally look better.
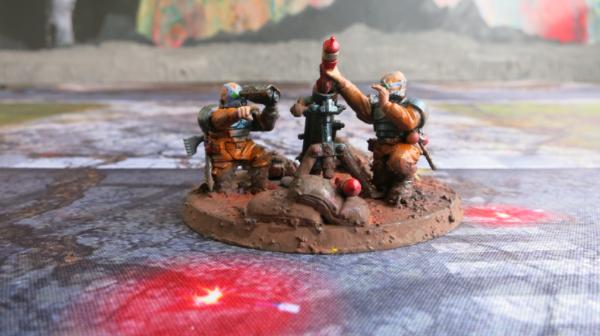
Heavy Weapons Mortar Team – Front
All the gunners and assistants in the mortar team have gas masks. All the heads and bits are from the Genestealer Cults Upgrade Frame.

Heavy Weapons Mortar Team – Front Left
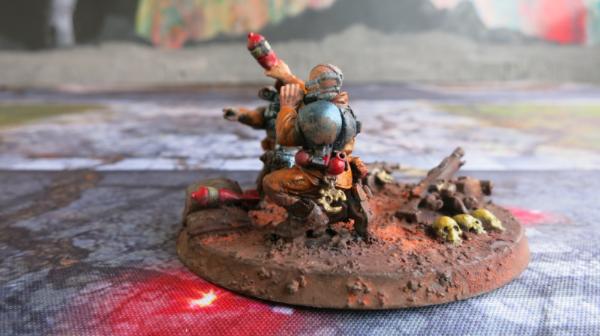
Heavy Weapons Mortar Team – Left
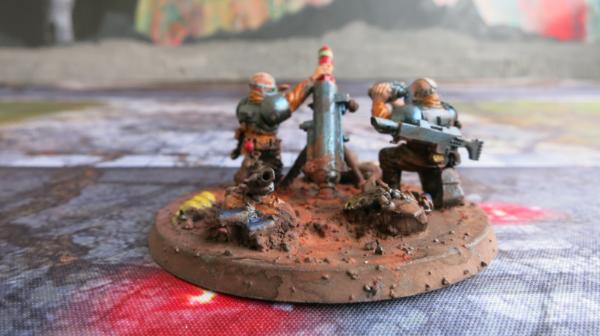
Heavy Weapons Mortar Team – Rear

Heavy Weapons Mortar Team – Right
It took me a few minutes to figure out what that the grey thing on the assistant’s back was. It is the butt of his rifle. It needs some work.
10667
Post by: Fifty
That dirty look works so well on the genestealers.
21898
Post by: Oldmanronald
Brood Brothers - Second Heavy Weapons Mortar Team
I used the legs from a rifleman in the infantry squad kit to replace the kneeling gunner with a standing gunner.
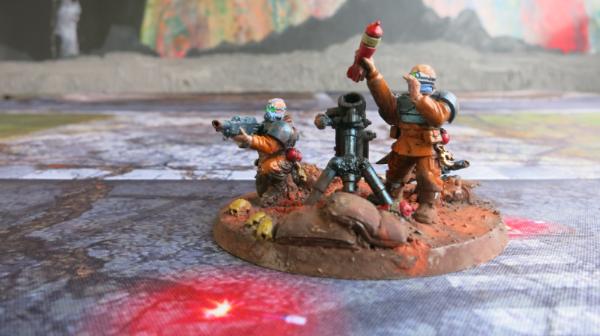
Heavy Weapons Mortar Team – Front
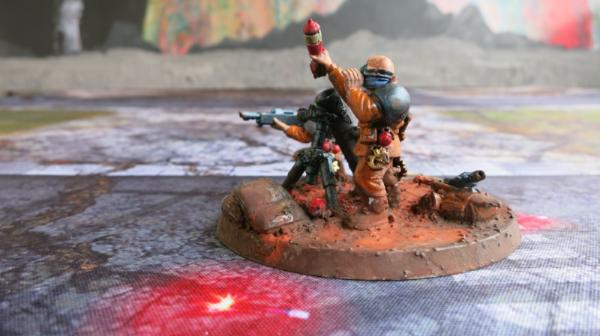
Heavy Weapons Mortar Team – Left
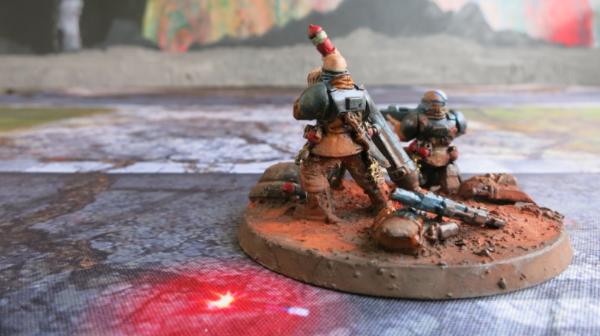
Heavy Weapons Mortar Team – Left Rear
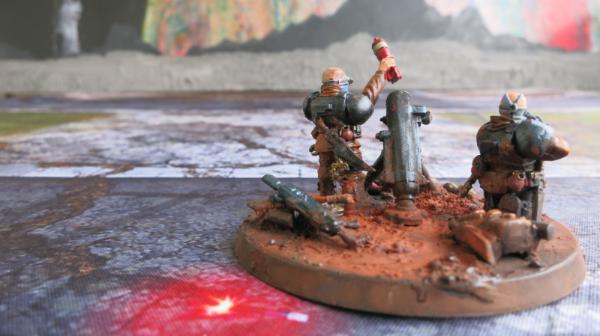
Heavy Weapons Mortar Team – Rear View

Heavy Weapons Mortar Team – Right Rear View
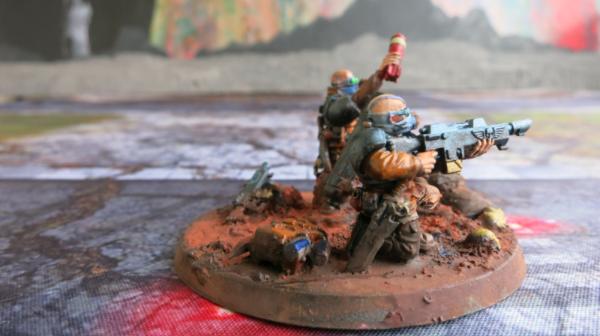
Heavy Weapons Mortar Team – Right
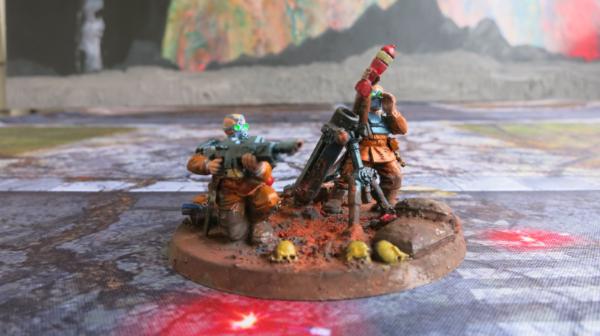
Heavy Weapons Mortar Team – Right Front
What happened to the kneeling figure for the gunner that I replaced for the mortar team? He ended up being an infantry soldier.
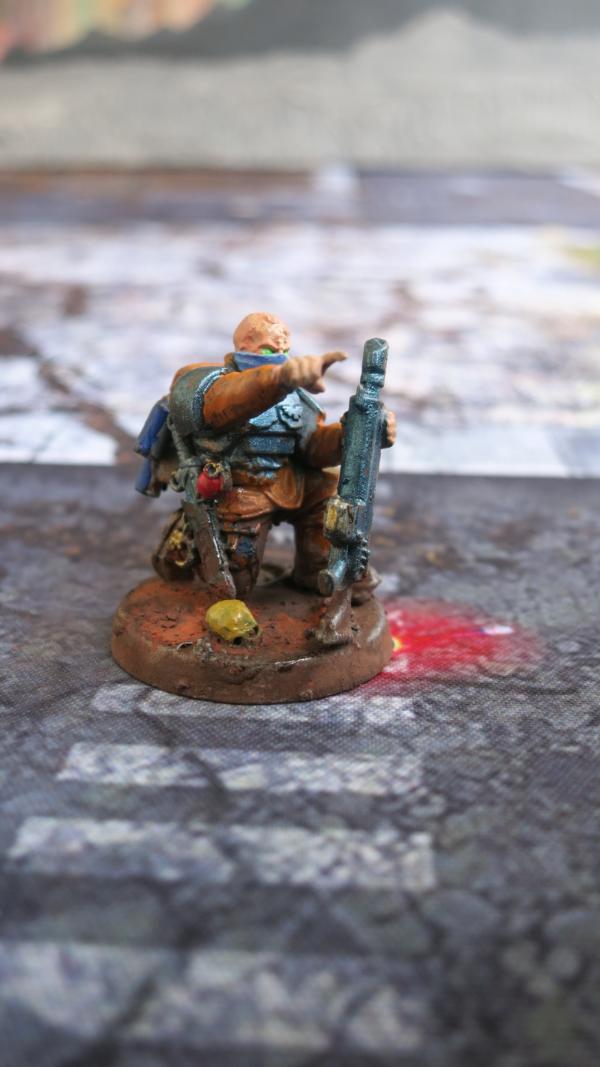
Brood Brother Rifleman – Infantry Squad
21898
Post by: Oldmanronald
Brood Brothers - Third Heavy Weapons Mortar Team
In the third heavy weapons mortar team, I replaced the assistant gunner with a standing figure.

Heavy Weapons Mortar Team – Front

Heavy Weapons Mortar Team – Right
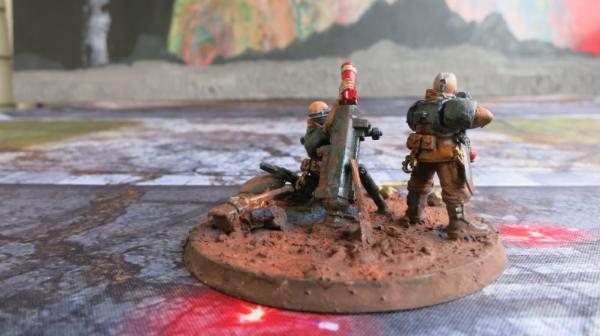
Heavy Weapons Mortar Team – Rear
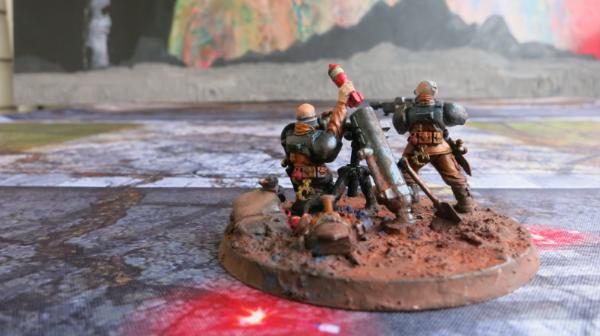
Heavy Weapons Mortar Team – Left Rear
This view shows the shovel in the dirt. This is the advantage of the bits in the old kits. They can be adapted for all sorts of interesting effects.
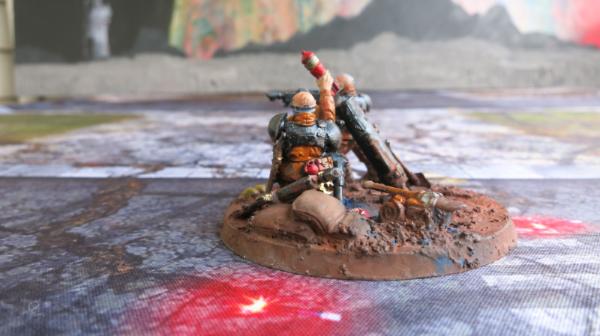
Heavy Weapons Mortar Team – Left
What happened to the kneeling figure for the assistant gunner that I replaced for the mortar team? He ended up being an infantry soldier.

Brood Brother Rifleman – Infantry Squad
1124
Post by: Captain Brown
Oldmanronald,
Nice work on the mortar teams.
Cheers,
CB
21898
Post by: Oldmanronald
Genestealers Cult – Magus with Force Stave
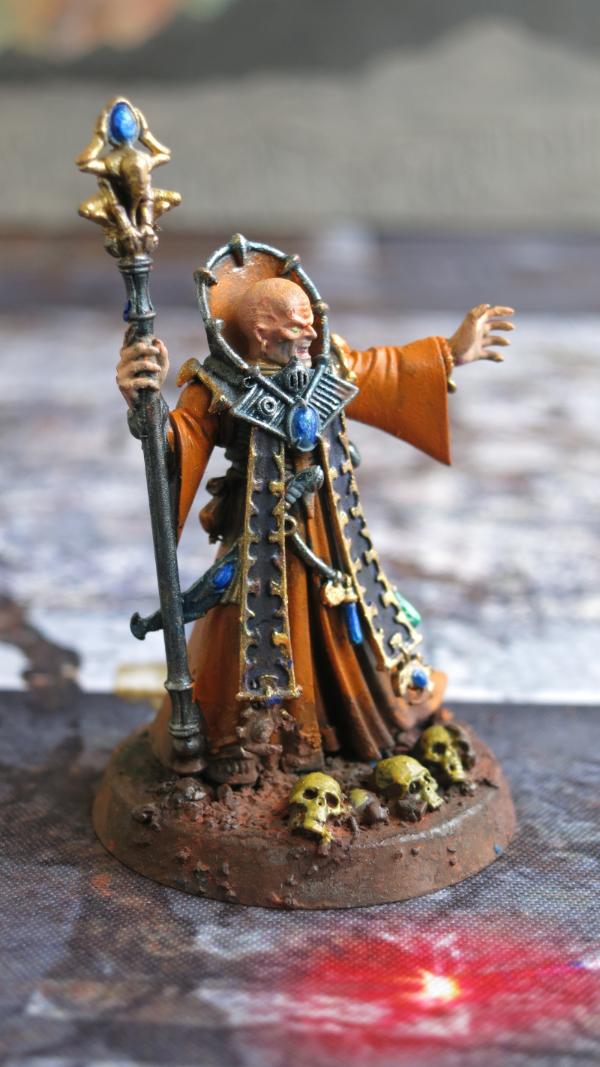
Magus – Front
This was a fun model to paint. It has lots of details that lend themselves to different painting techniques. My favorite details are the blue emeralds in his sword, breastplate, and staff. These were painted with a first layer of dark blue, white highlights, and then the gem was covered with Vallejo fluorescent blue
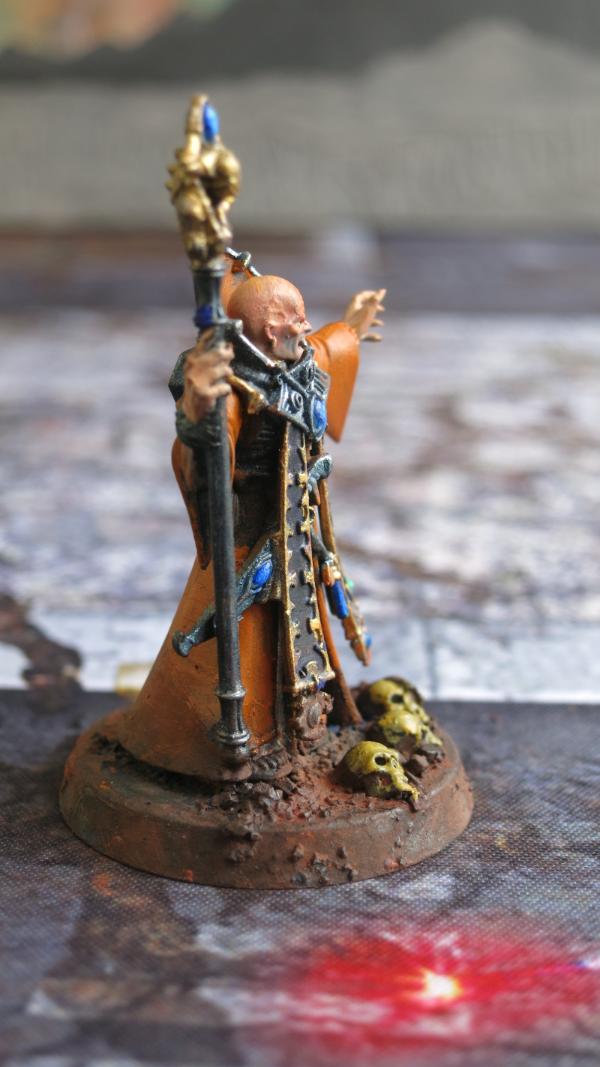
Magus – Front Right
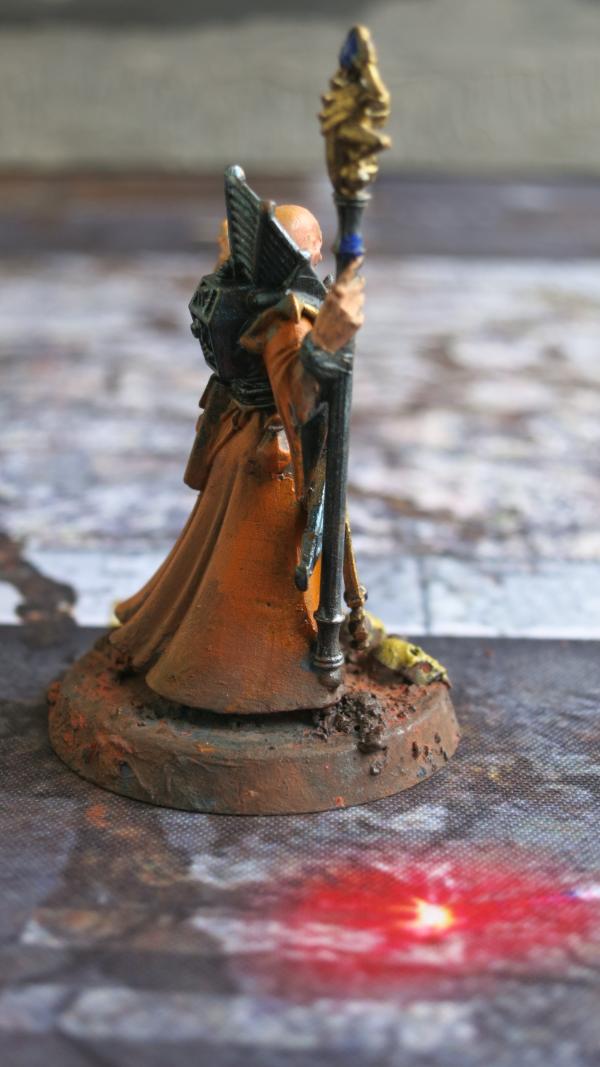
Magus - Right

Magus - Rear

Magus – Left Rear
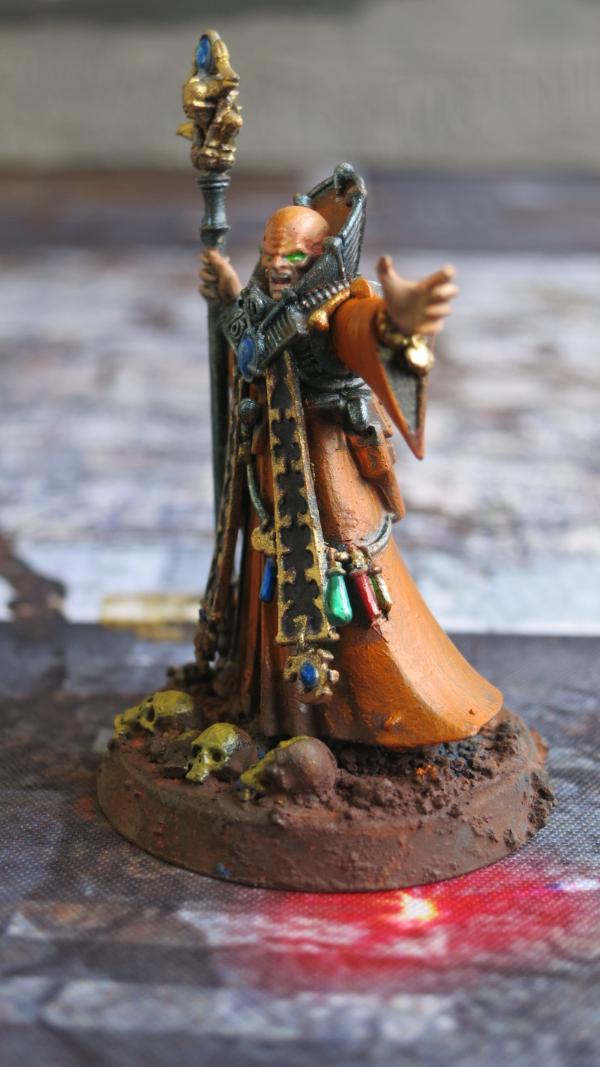
Magus - Left
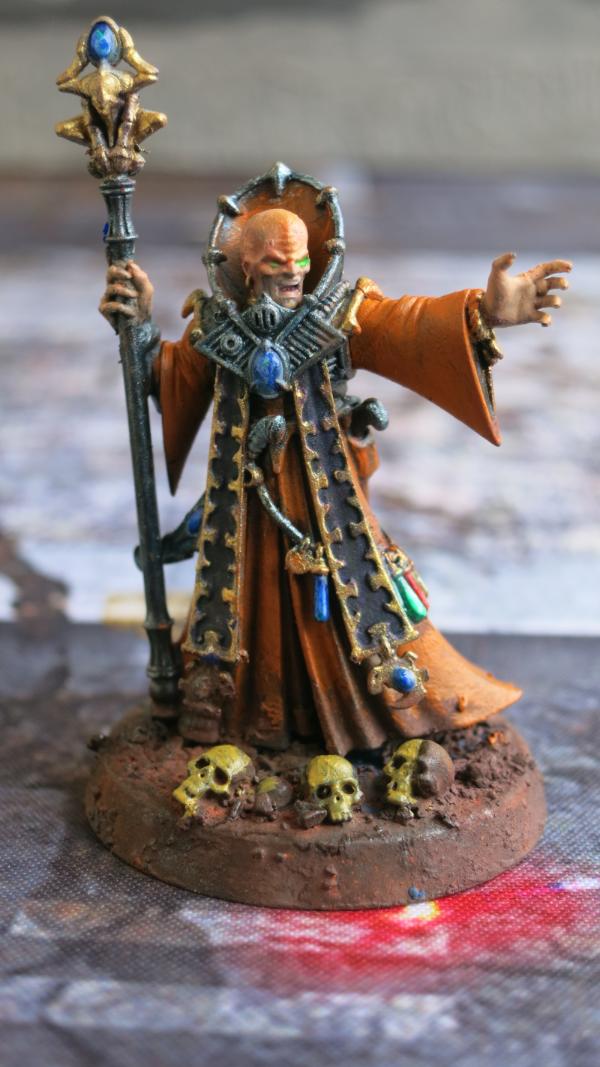
Magus – Left Front
This next picture was a mistake and I almost deleted it. I clicked the camera as I was setting up the picture. I got my thumb and index finger. I kept the picture because it reminds me of how small these figures really are and why it is so difficult sometimes to paint the details on our models.
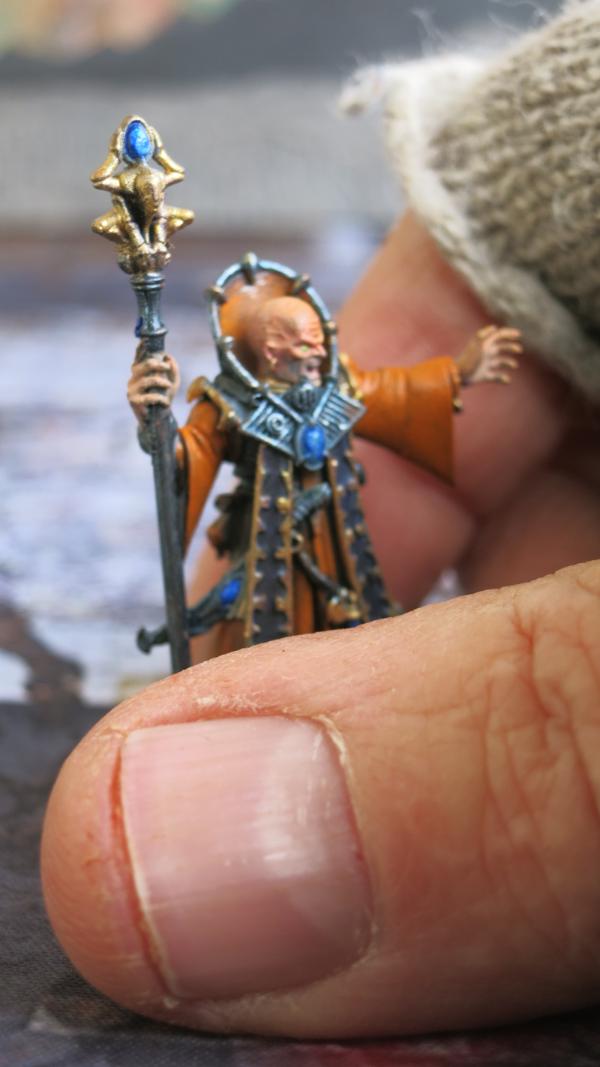
Magus with Thumb
21898
Post by: Oldmanronald
Primus
This is the Primus. Unlike the Magus which is one of my favorite, this one is just a good competent playing piece whose traits support and compliment a Genestealer cult army. I do like his face except for the little microphone piece on his chin that looks like a blotch.
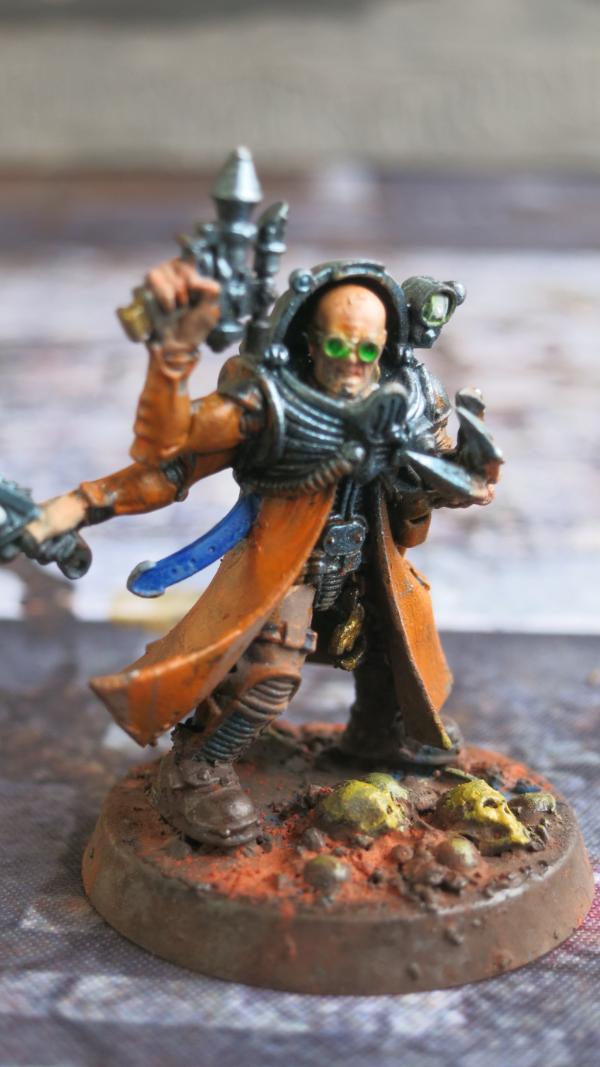
Primus - Front
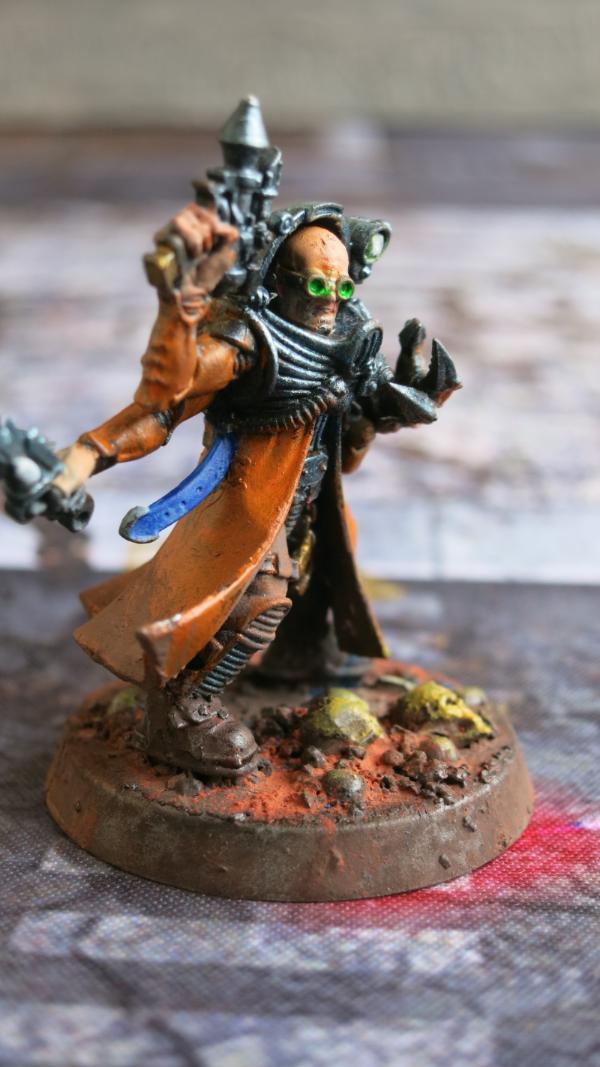
Primus – Right Front
I forgot to paint the jewel on his bonesword so it is just white. I have added it since but haven't taken a picture of the updated model.
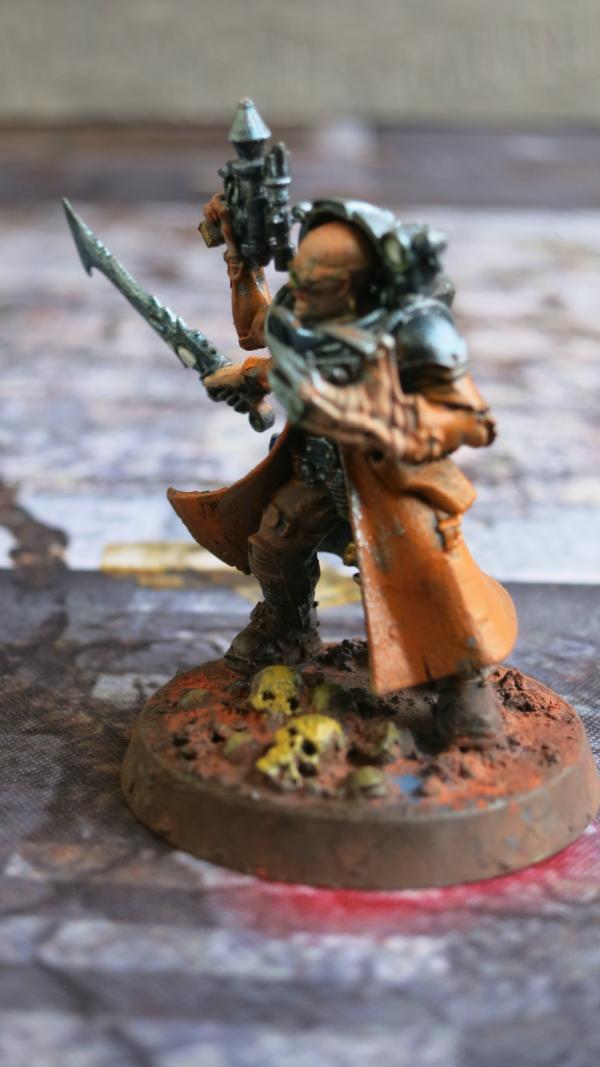
Primus – Left Front
This picture is slightly out of focus.
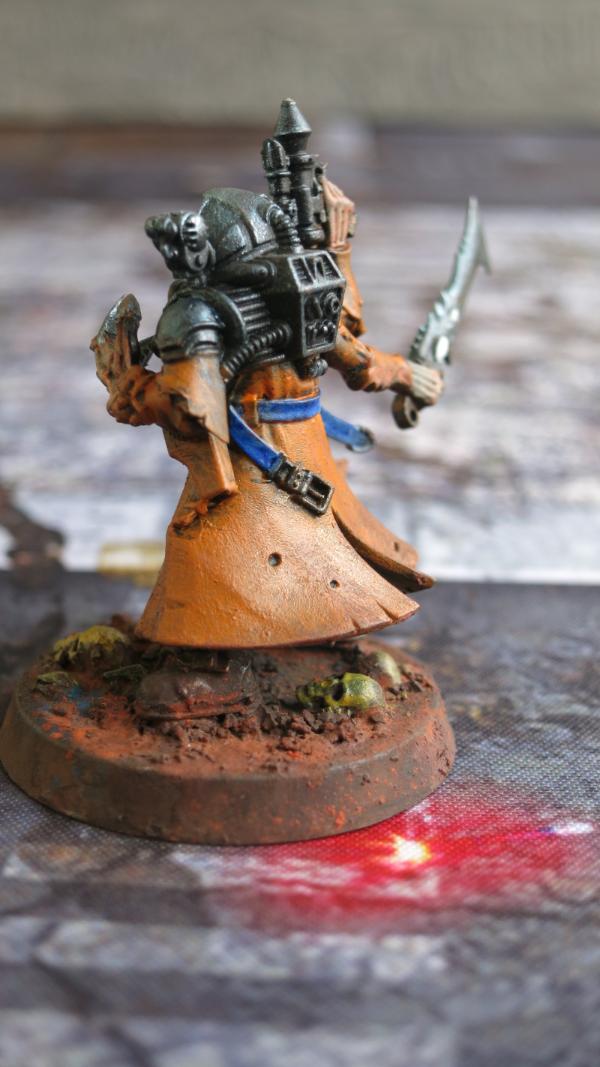
Primus - Rear
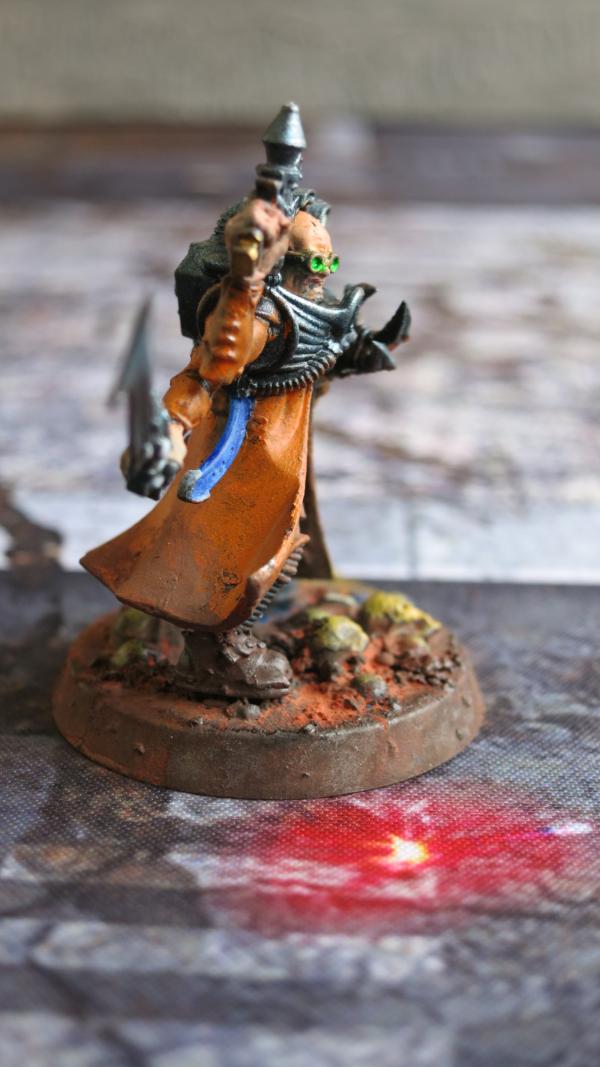
Primuis – Right Side
120215
Post by: StormX
Very nice, would you tell me how you did the green goggles they are nice also. Cheers
21898
Post by: Oldmanronald
Painting the Googles
Fifty, Captain Brown, and Stormatious. Thanks for the encouraging remarks.
In answer to Stormatious’s question, the googles were painted in three steps.
Step 1: Put a drop of green paint on the lenses. I used old Warhammer Scorpion Green but any yellowish green would do. With the raised rim around the googles, the effect was really nice since the paint tended to flow to the edge so that the thickest paint is around the rim.
Step 2: Put small dot of pure white in the middle of each lens. Use the tip of the brush.
Step 3: After the first two coats dry, put a drop of florescent green paint over the lens. I used Vallejo Green Flo. Let it dry and repeat several times. The florescent green paint is transparent so use several layers. Since the googles were slightly raised, I was able to really put a lot of wet florescent green on each lens, almost a puddle.
I find that I have the best control over the paint using a size 0 or 1 or 2 kolinsky red sable brush. My default for most detail work is size 1 or 2 although when I am painting, I really don’t notice which of the three sizes I am using. These sizes maintain the proper curvature for a narrow tip while smaller brushes such as size 00 or 000 quickly lose their shape. Some experienced model painters even recommend a size 3. I have a size 3 but haven’t started using it since I am cheap and am waiting for my other brushes to wear out first.
21898
Post by: Oldmanronald
Brood Brothers – Grunt Infantry
These next several posts are of a brood brothers infantry squad, basically a Cadian infantry squad with the Genestealer Cult upgrade frame. I don’t like them as well as the Neophyte Hybrids but they will be great as a Brood Brothers Imperial Guard Detachment. Although not as fine as the regular Neophyte Hybrids, they painted up reasonably nice. The squad has ten models and all but three of them are almost the same so I will just share the pictures without trying to separate each model into its own post.
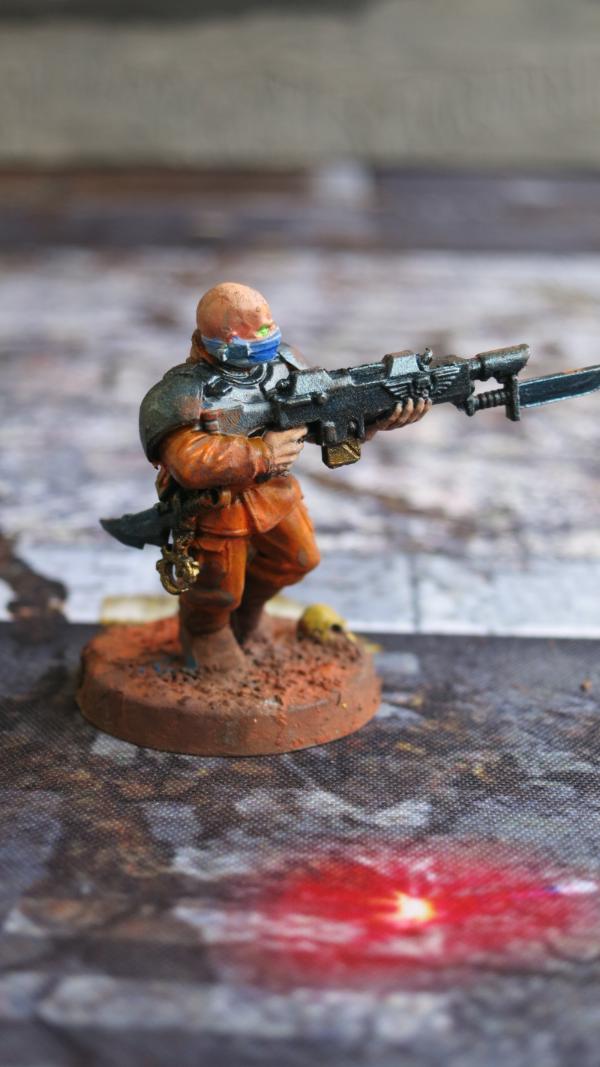
Grunt Infantry - Right
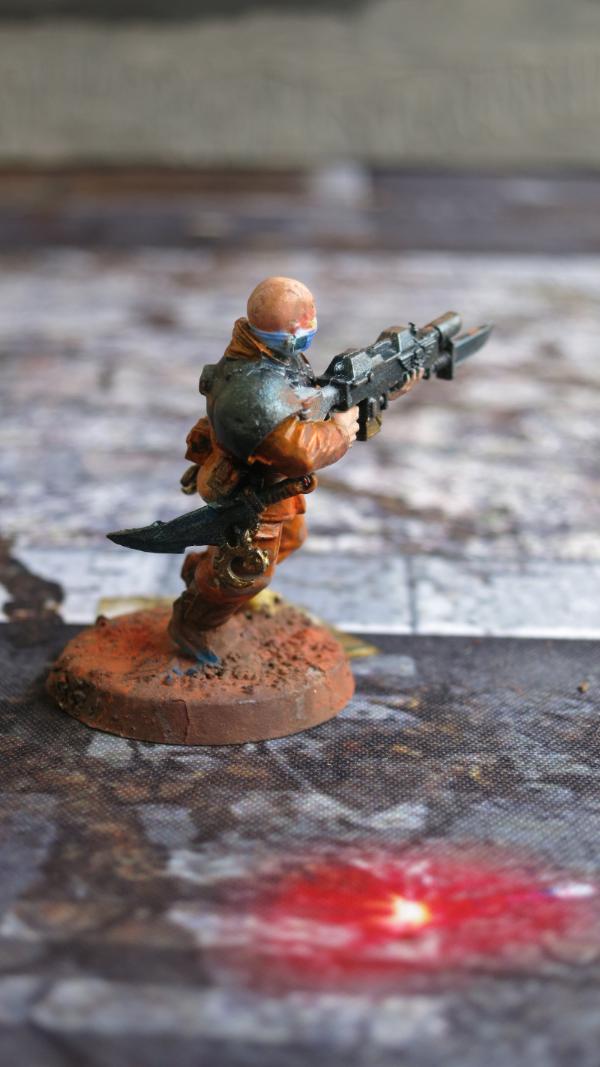
Grunt Infantry – Right Rear
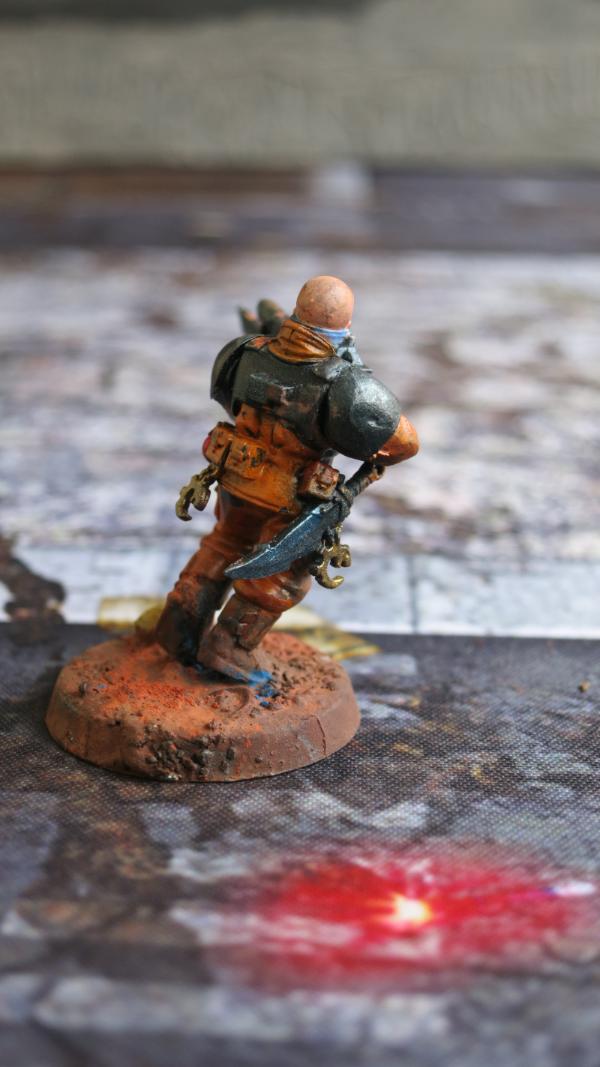
Grunt Infantry – Rear
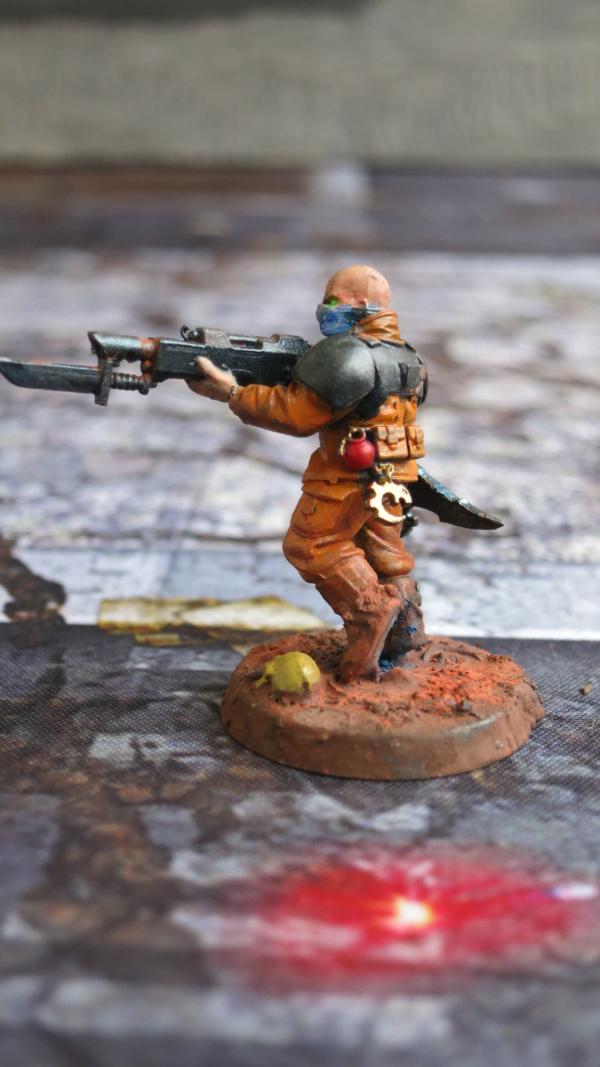
Grunt Infantry – Left
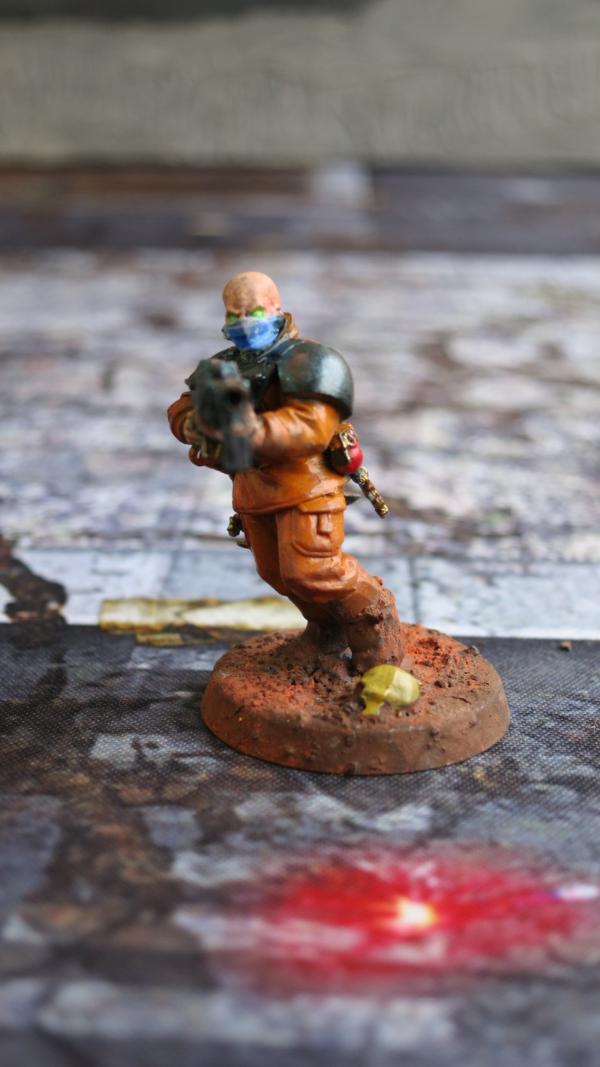
Grunt Infantry - Front
21898
Post by: Oldmanronald
Brood Brothers – More Grunt Infantry
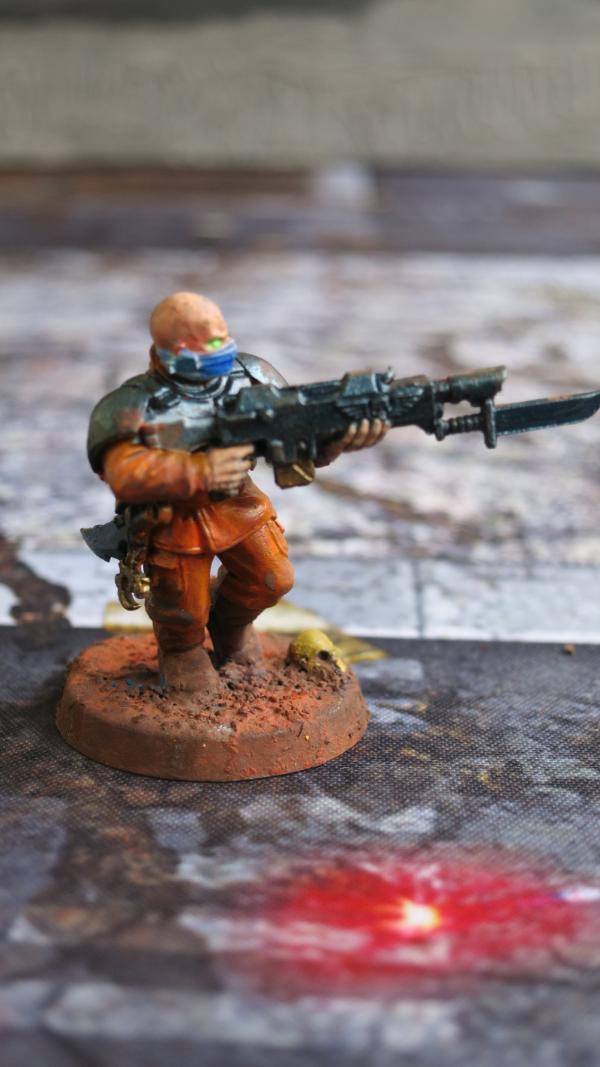
Grunt Infantry - Left
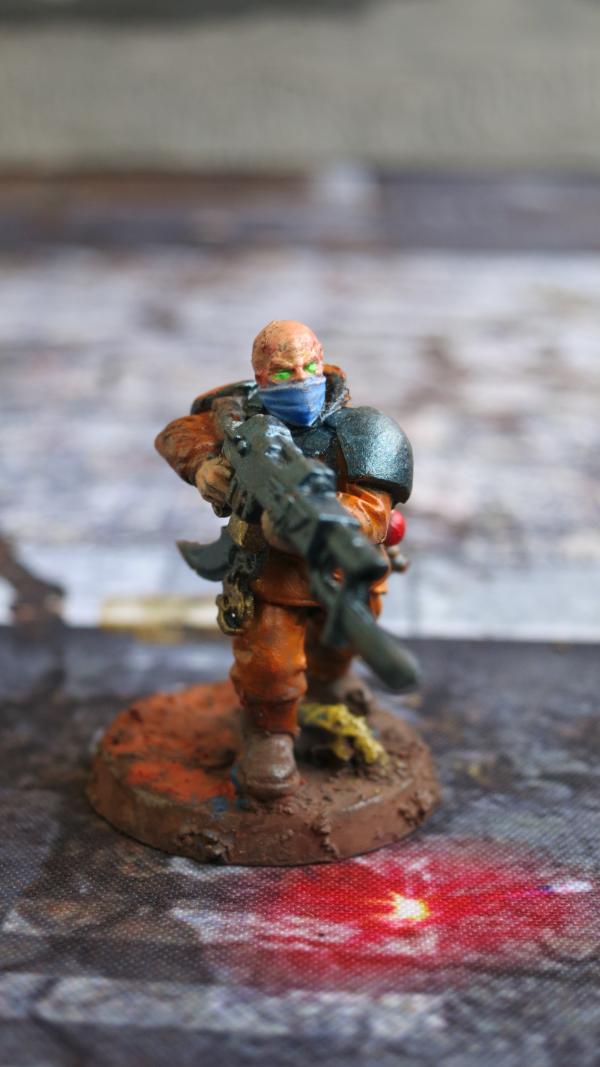
Grunt Infantry – Front
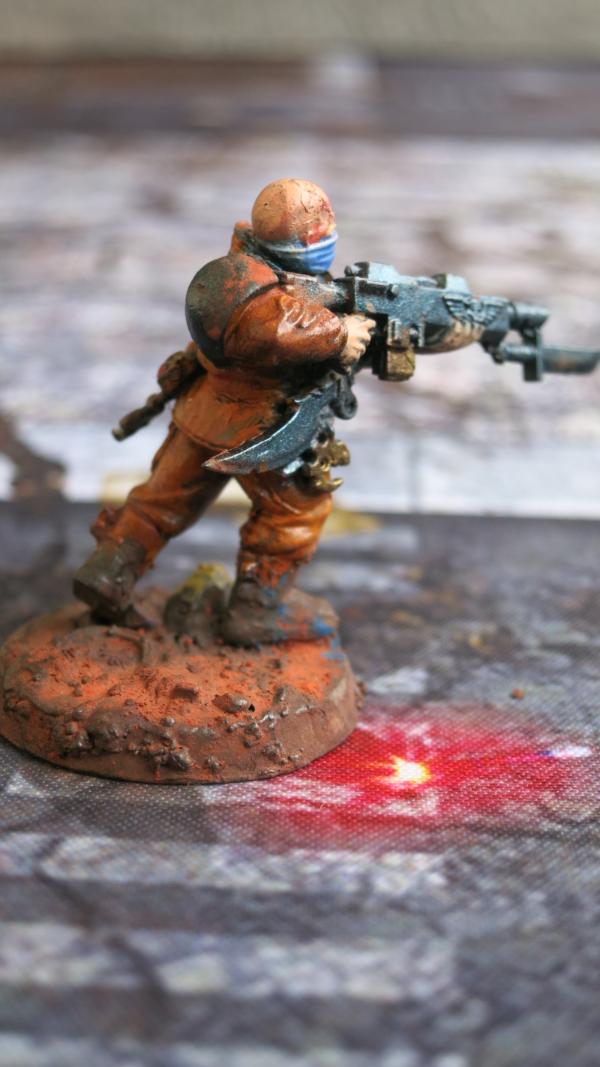
Grunt Infantry – Right Rear
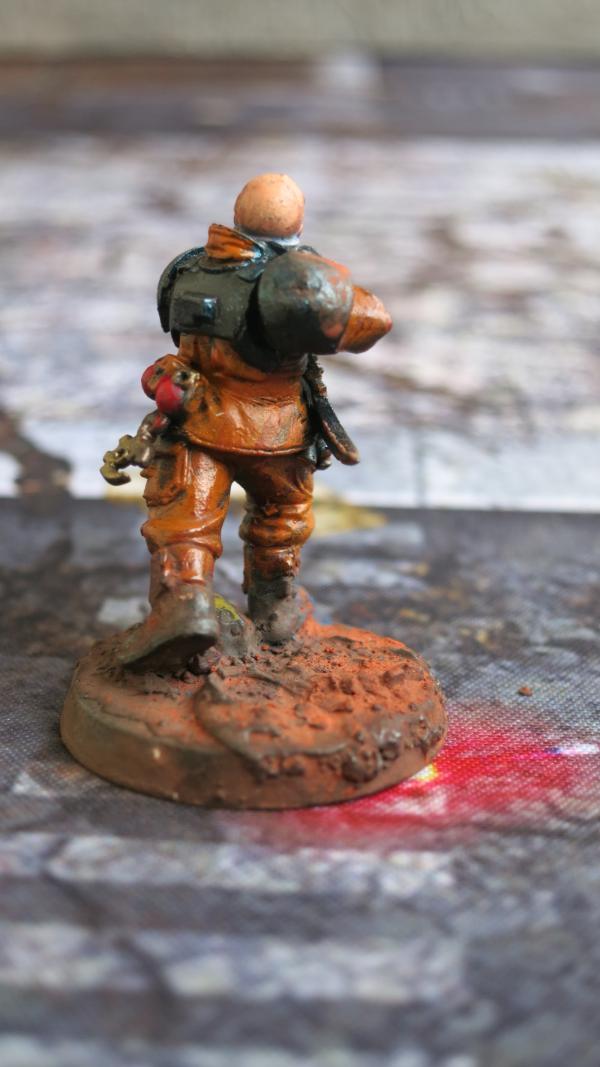
Grunt Infantry – Rear
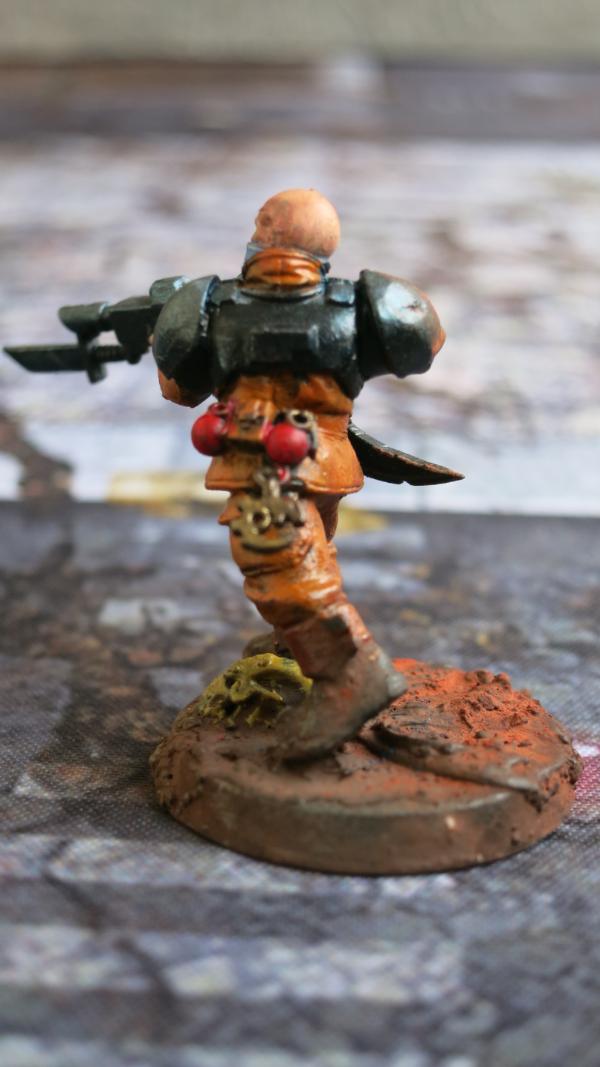
Grunt Infantry – Left Rear
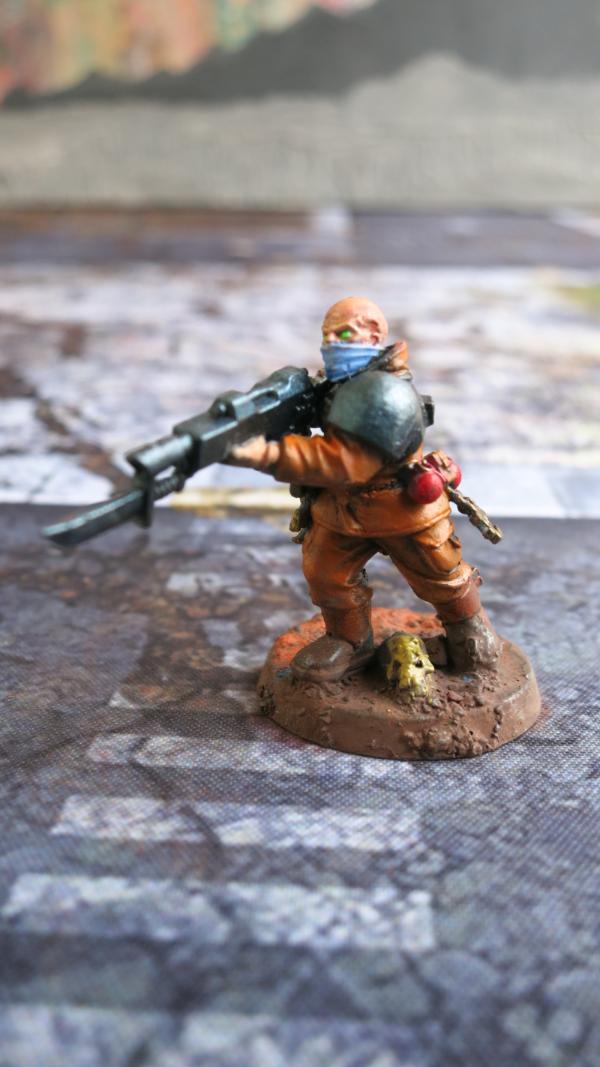
Grunt Infantry – Left Front
21898
Post by: Oldmanronald
Brood Brothers – Even More Grunt Infantry
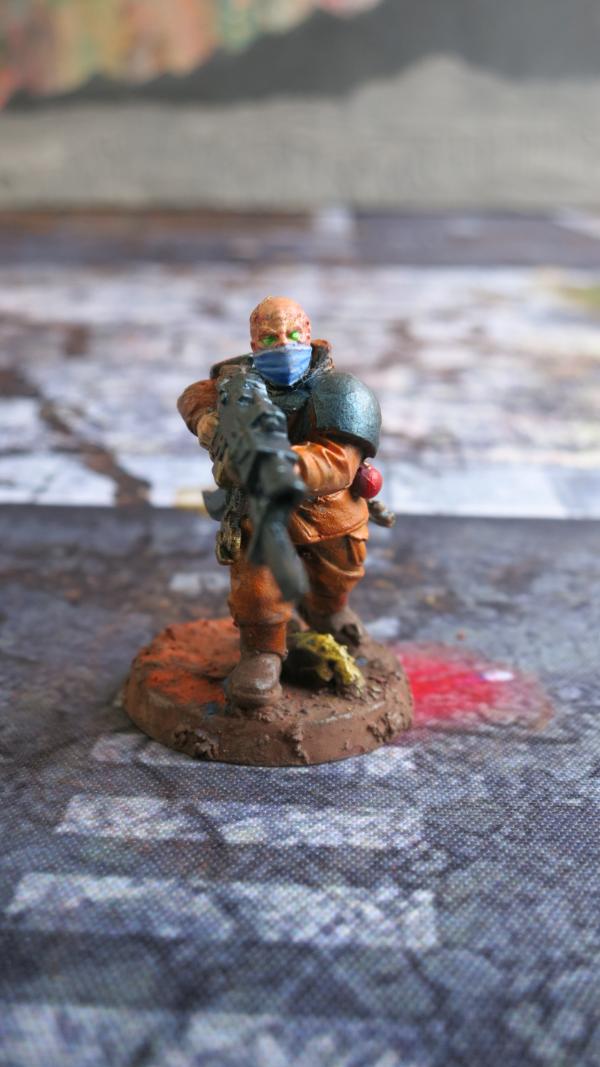
Grunt Infantry – Front
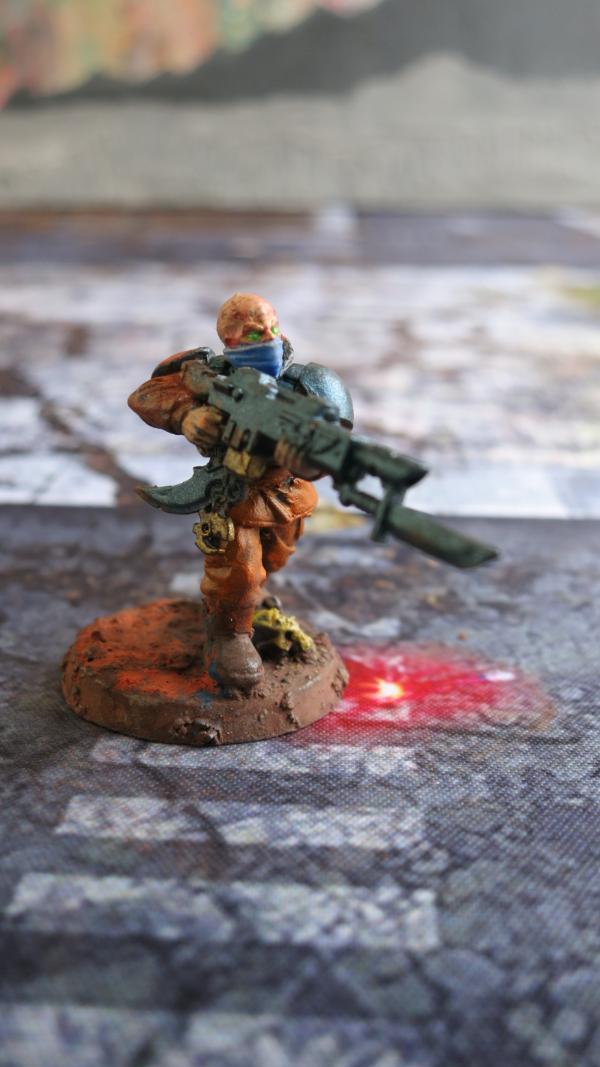
Grunt Infantry – Front Left
21898
Post by: Oldmanronald
Brood Brothers – Kneeling Grunt Infantry
I switched two standing bodies from the infantry squad for the kneeling bodies in the heavy weapons squads so I have some kneeling infantry and some standing mortar men.

Grunt Infantry – Front

Grunt Infantry - Rear
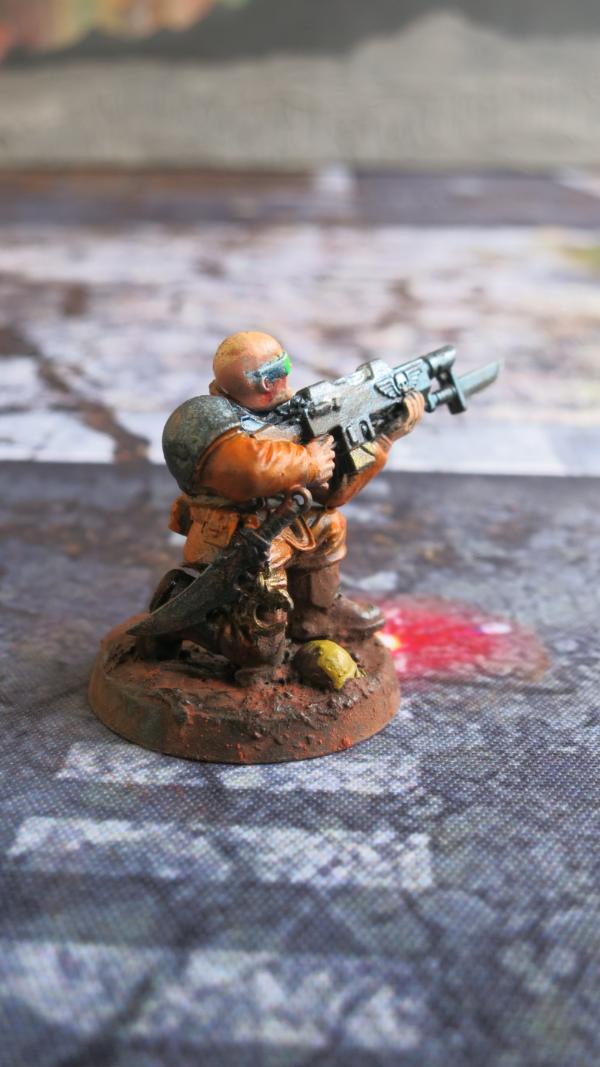
Grunt Infantry – Right Rear
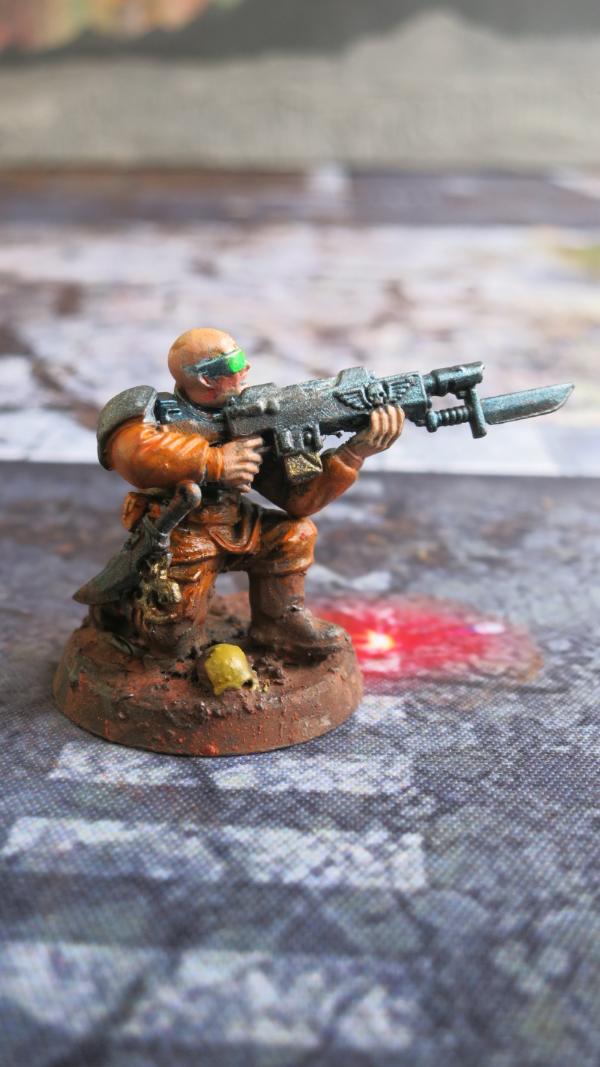
Grunt Infantry – Right
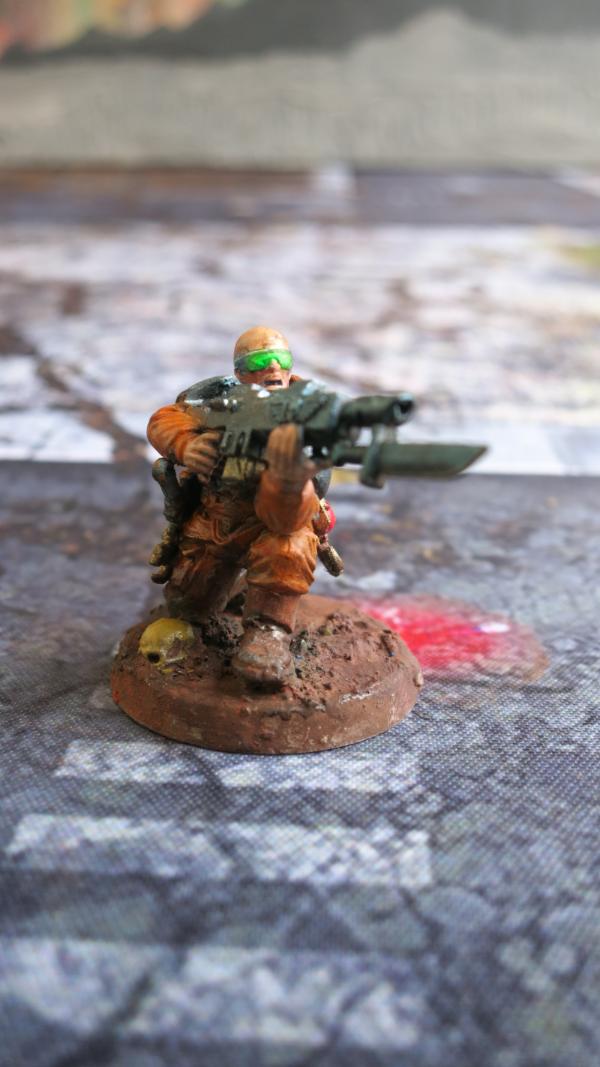
Grunt Infantry – Right Front
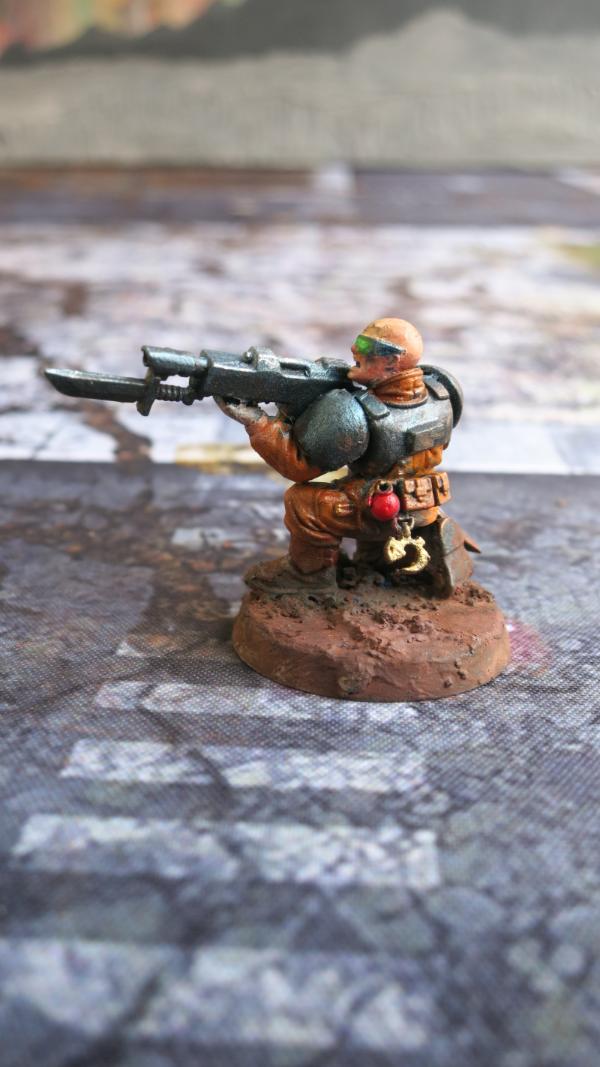
Grunt Infantry – Left
21898
Post by: Oldmanronald
Brood Brothers – More Kneeling Grunt Infantry
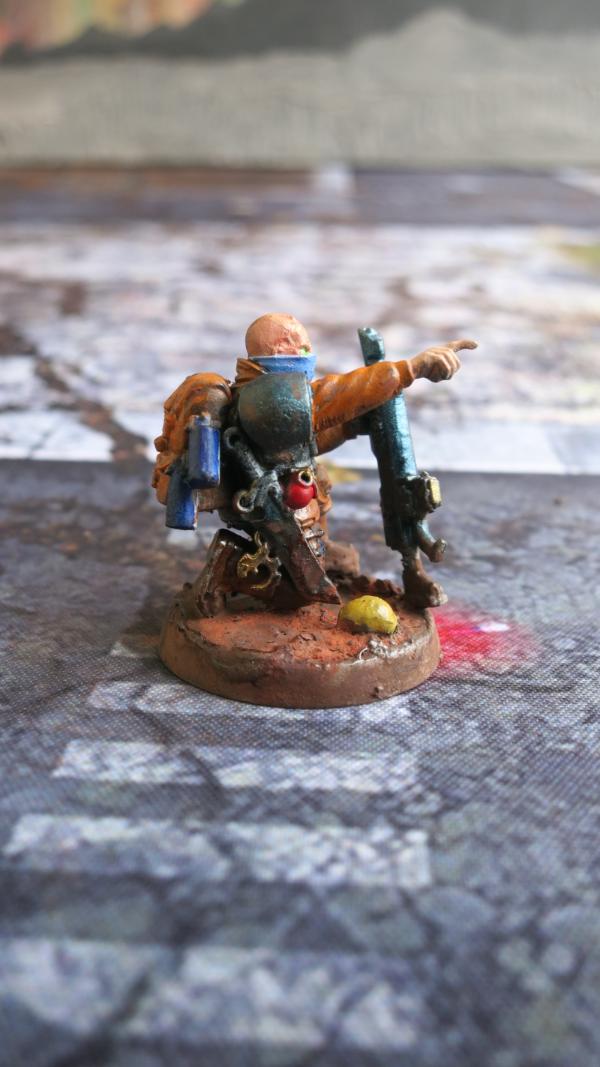
Grunt Infantry – Right
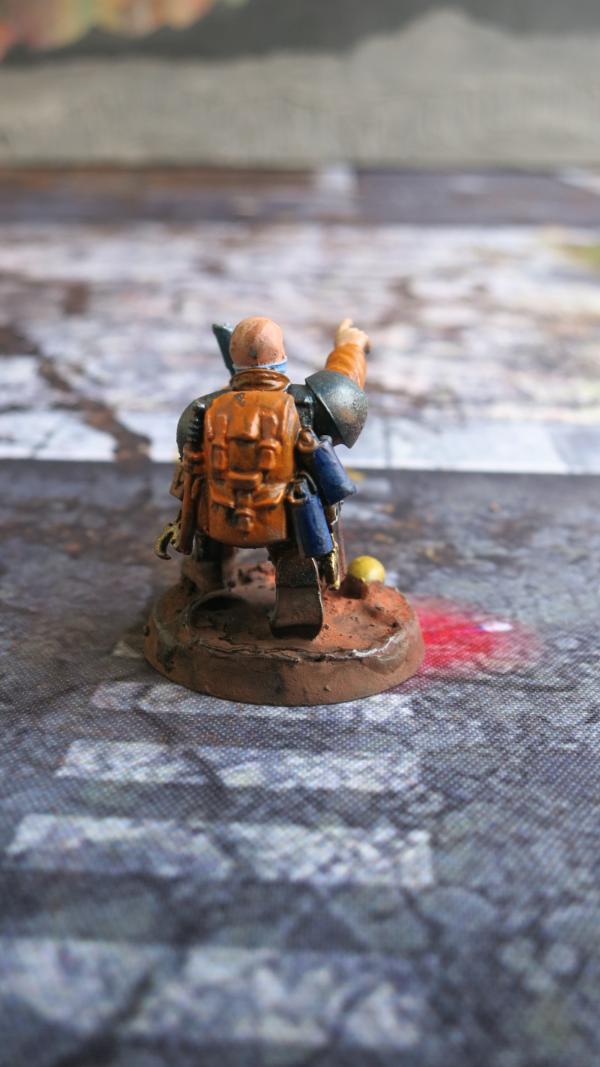
Grunt Infantry– Rear
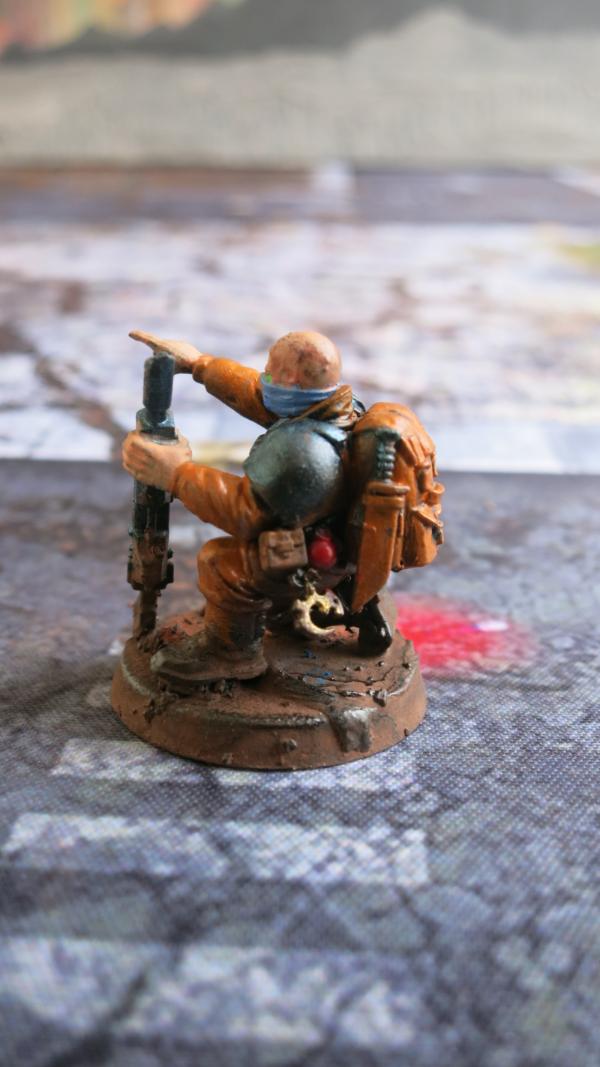
Grunt Infantry – Left Rear
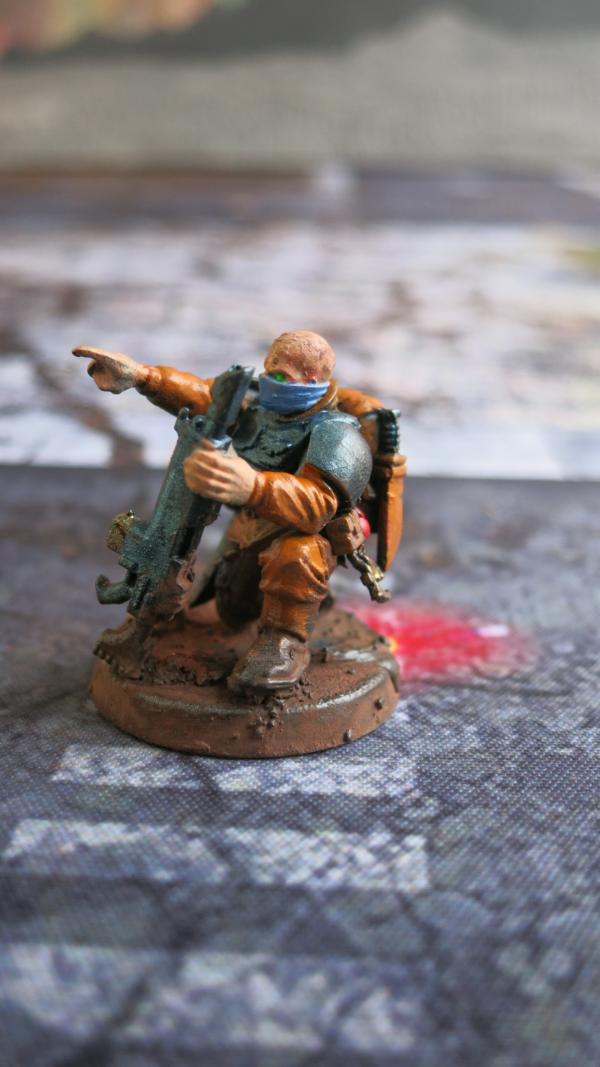
Grunt Infantry – Left Front
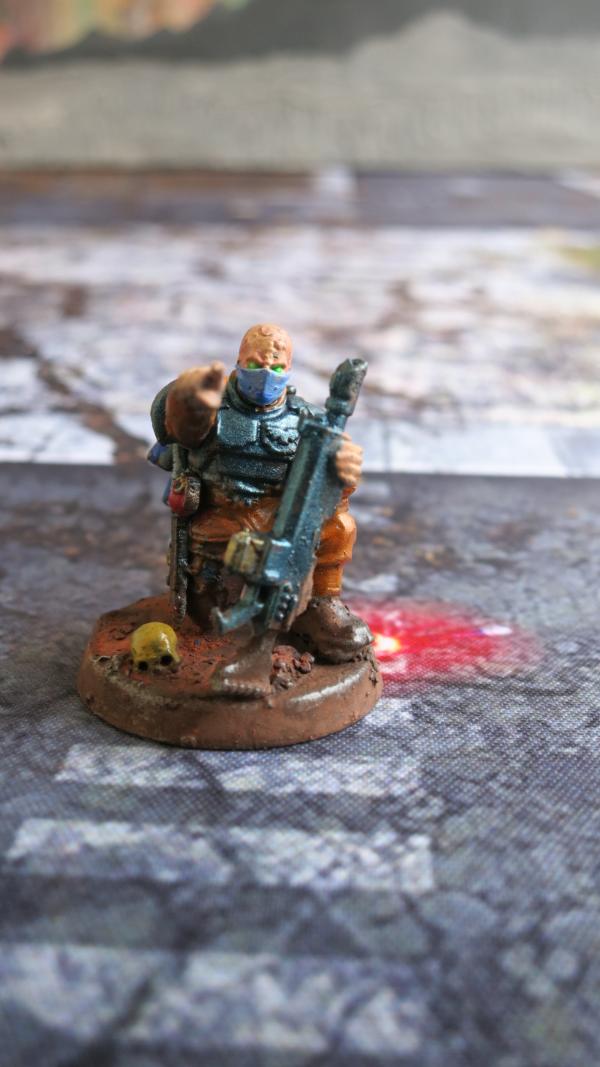
Grunt Infantry – Front
21898
Post by: Oldmanronald
Brood Brothers – Another Grunt Infantry
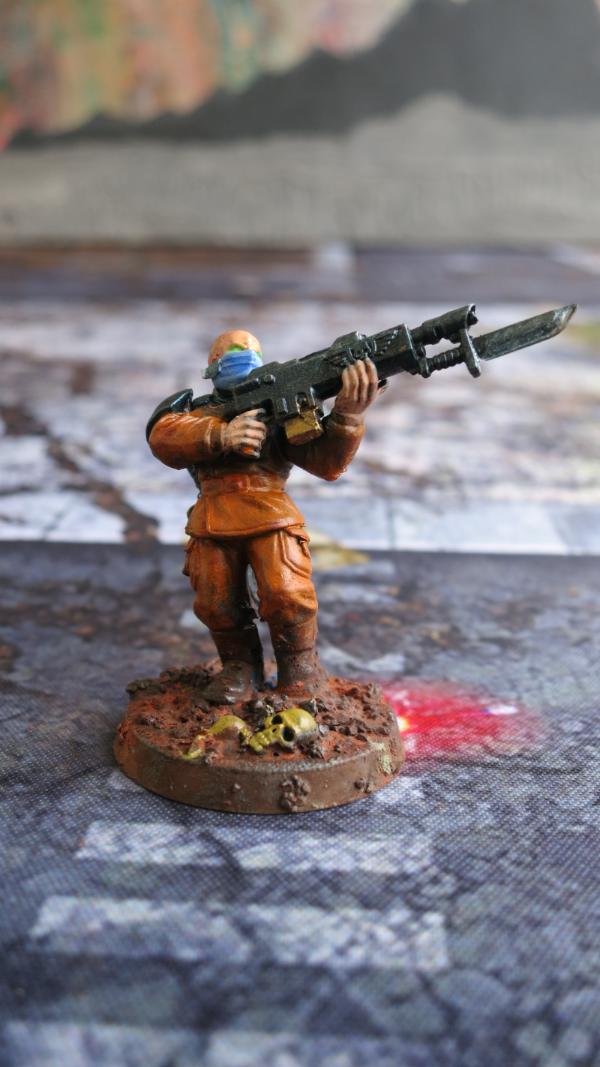
Grunt Infantry – Front
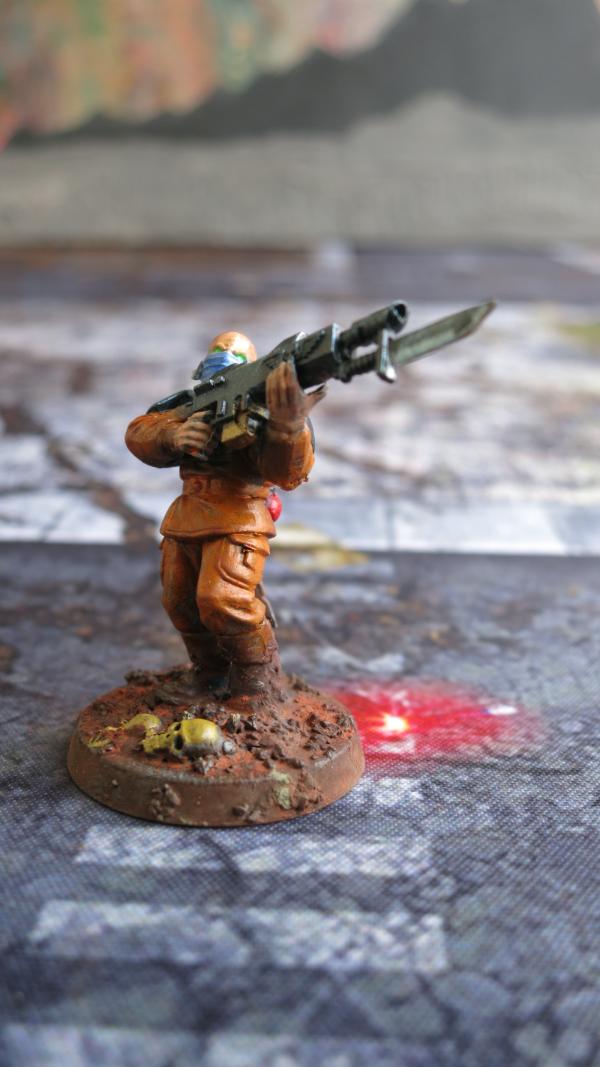
Grunt Infantry – Left Front

Grunt Infantry – Left
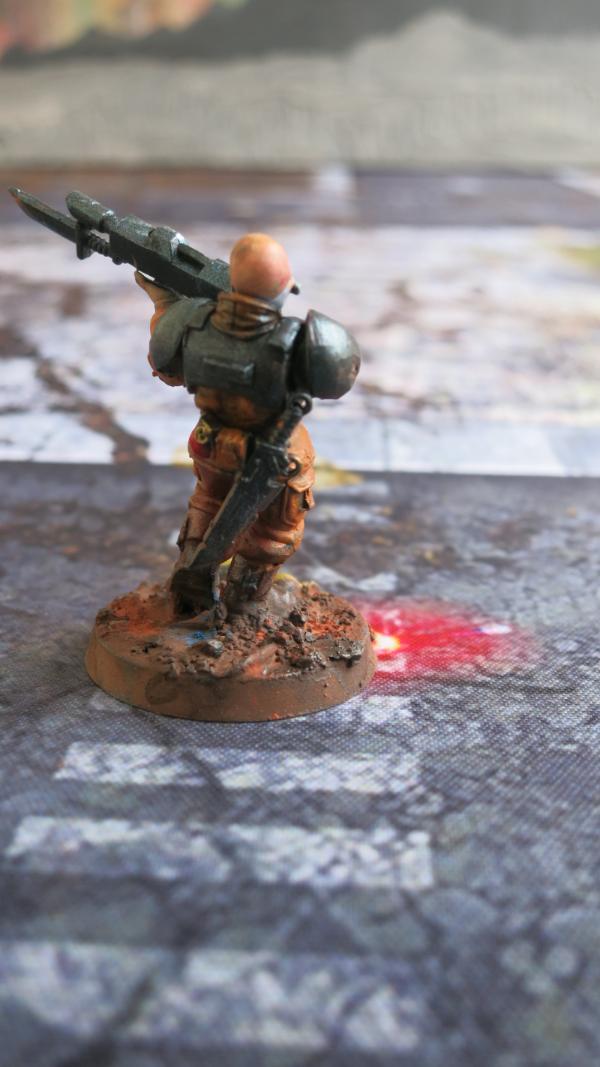
Grunt Infantry – Back
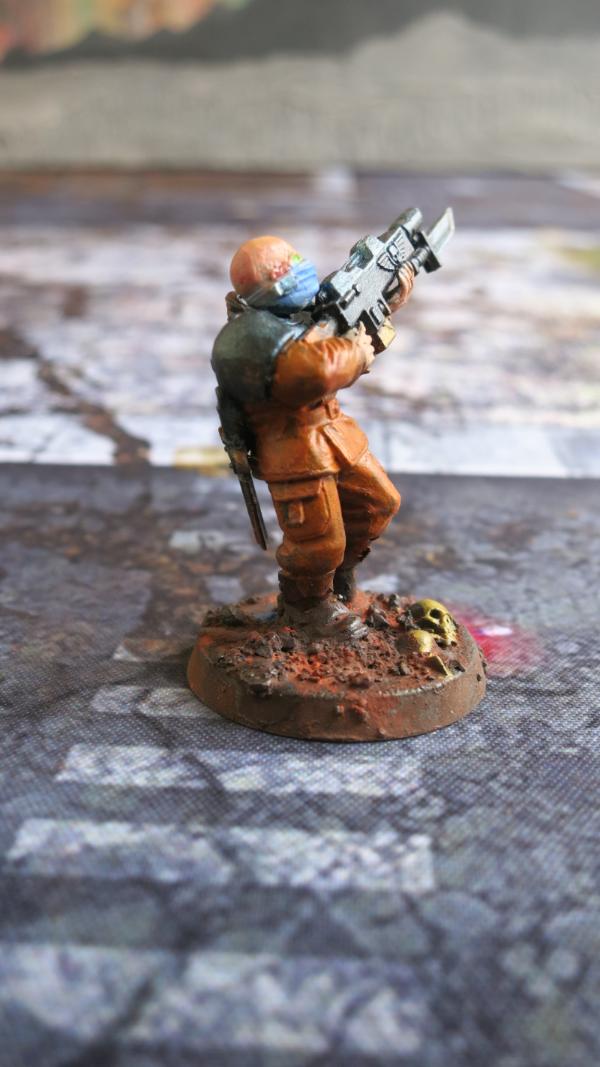
Grunt Infantry – Right
21898
Post by: Oldmanronald
Building the Ugly Model - Aberrants
War Gamers are strange. Suppose you are playing a game and you look over at your opponent’s army with the Green Unclean One placed right in the middle of his deployment zone. You blurt out, “That is the ugliest most disgusting thing I have ever seen.”
Will your opponent be offended? No. Instead of being offended like a normal person, he will beam with delight. He probably spent many hours painting just to get that right blend of pus green on the rotting flesh and the perfect putrid motted red on the exposed and torn intestines. He is happy that you noticed his work.
Although Games Workshop produces many heroic and imposing models, from time to time GW produces some really ugly and disgusting models.
I have a hard time building and painting such models. This does not mean that I hate it when my opponents put such models on the game board. In fact, I quite like that because I find a certain satisfaction as my army cleanses such filth from the battlefield.
Still, I don’t want to spend my time building and painting an ugly model. To me, art is creating something of beauty, not something that looks like it should be taken out with the trash. Generally, this is not a problem. Space Marine models are heroic and dynamic. So are most of the Genestealer cult models. The exception are the appropriately named Aberrants.
How do you build ugly models? The same way as you build other models. I basically used the same color scheme for the rest of the Cult and hoped that these models do not appear as ugly as they look. For me, assembling and painting these models was a work of endurance. I built these models because they are good models to have during the game for the Genestealer Cult army.
Aberrants – On the Work Bench
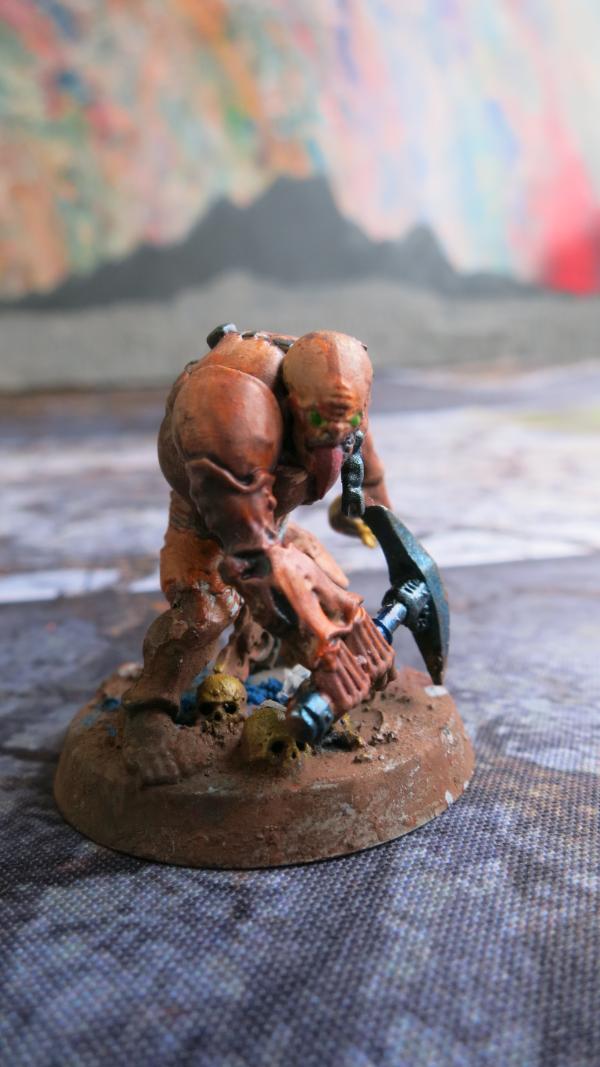
Painted Aberrant with Skull
He is not quite as ugly as he could be but he is no glamor boy either.
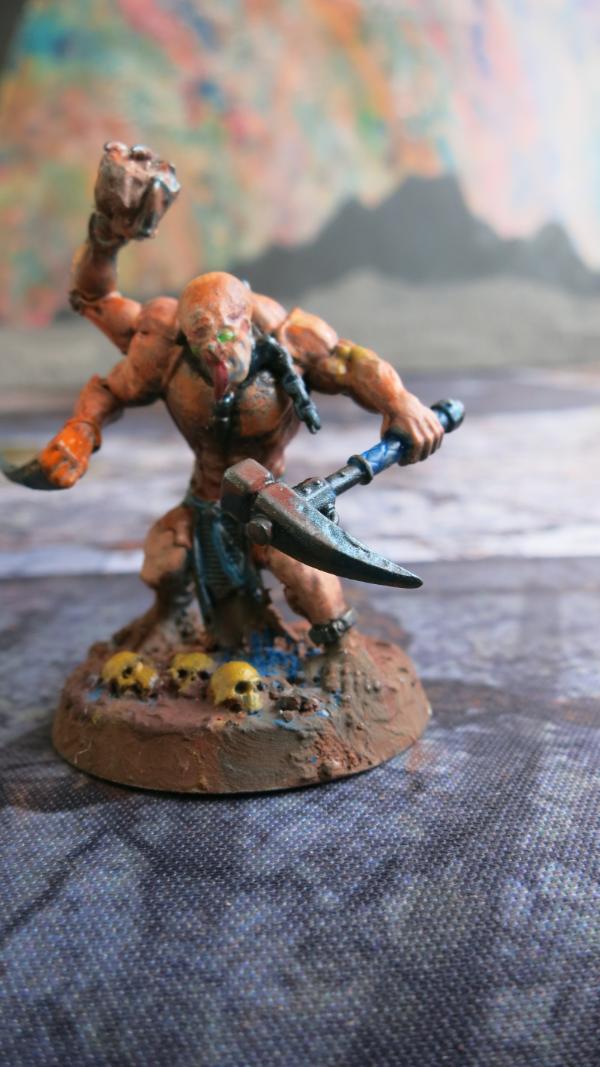
Painted Aberrant with Rock
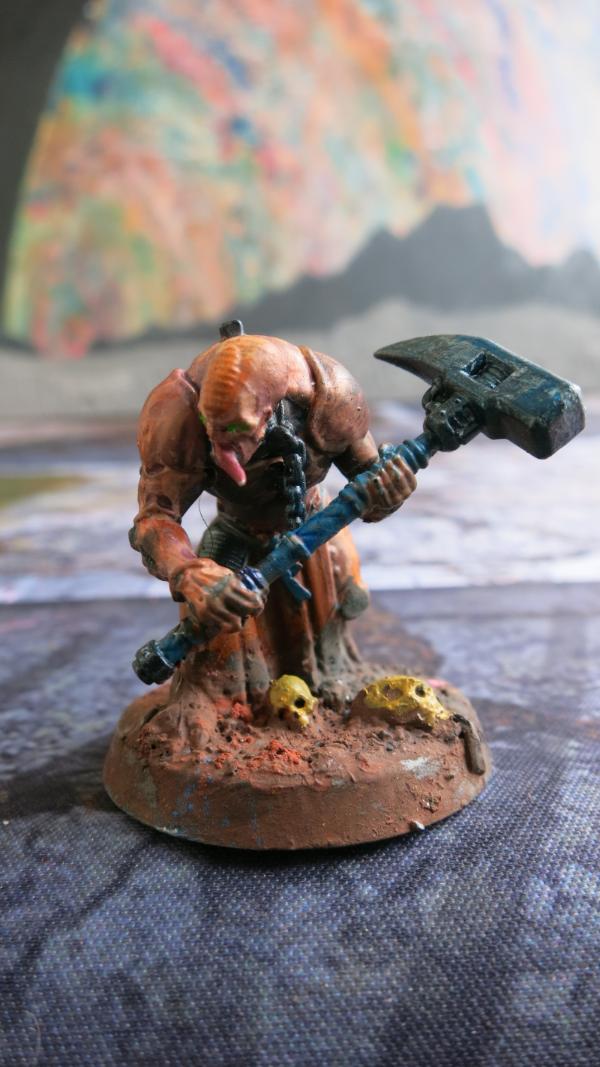
Aberrant with Tongue and Robe
21898
Post by: Oldmanronald
Aberrant with Pick and Skull in Hand
This is the first of the Aberrants that I have completed. He is ugly but that is the nature of Aberrants.
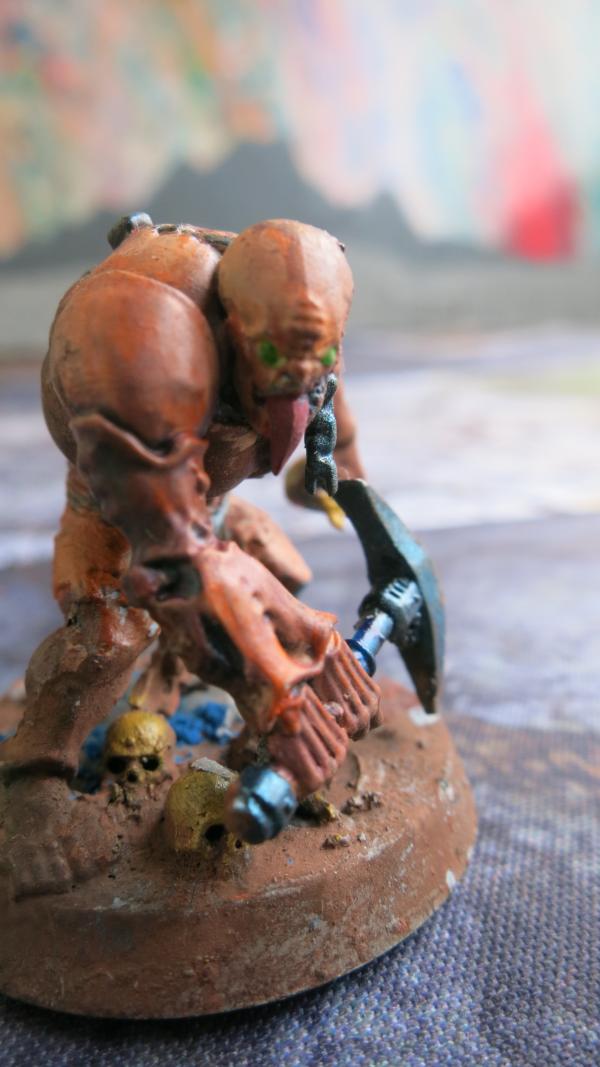
Aberrant – Right Front
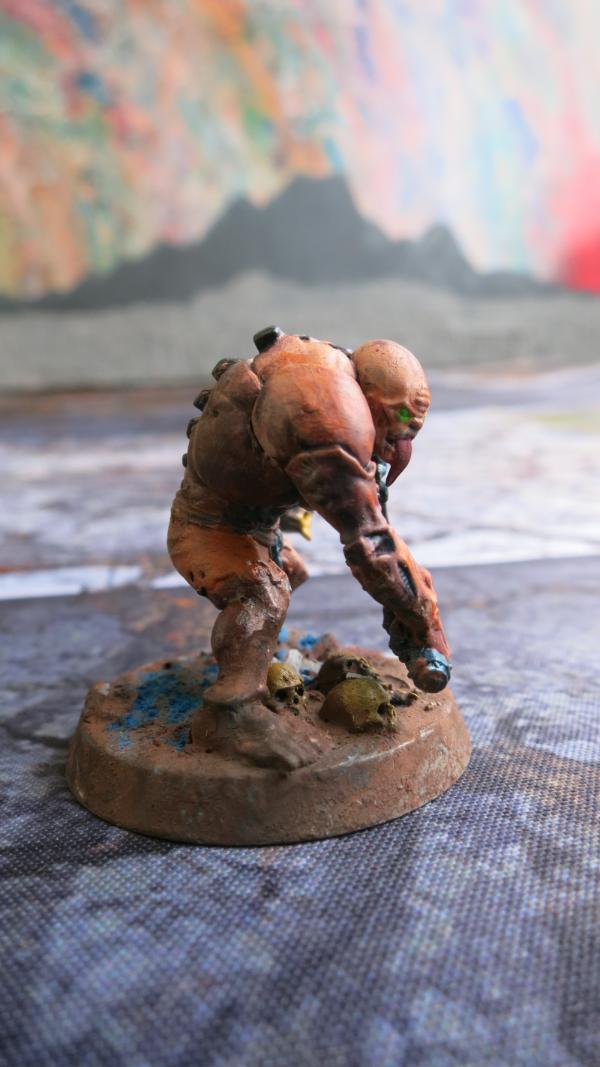
Aberrant – Right
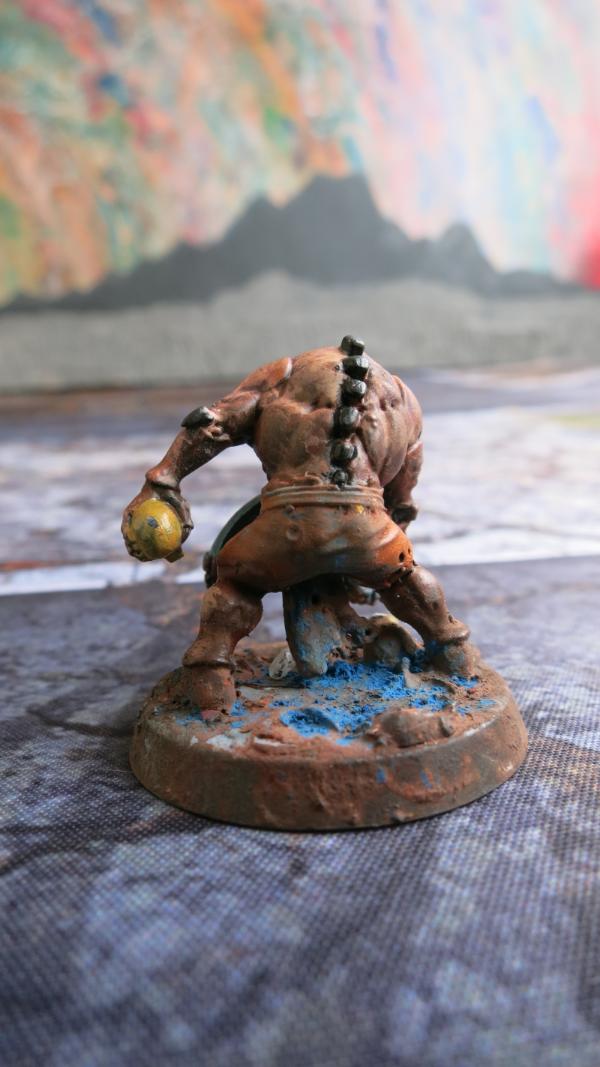
Aberrant - Rear
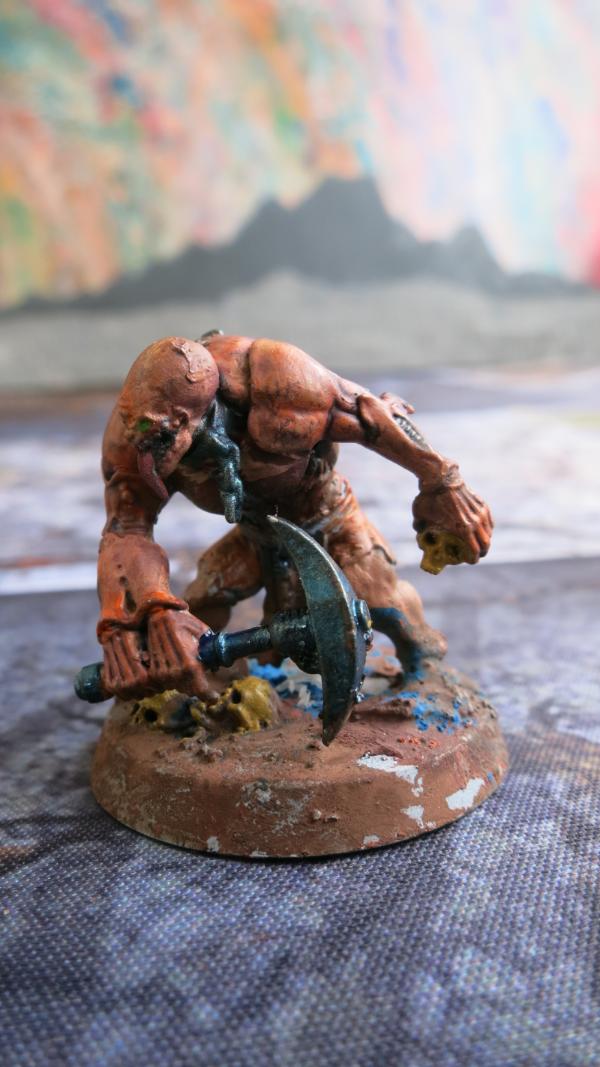
Aberrant – Left Front
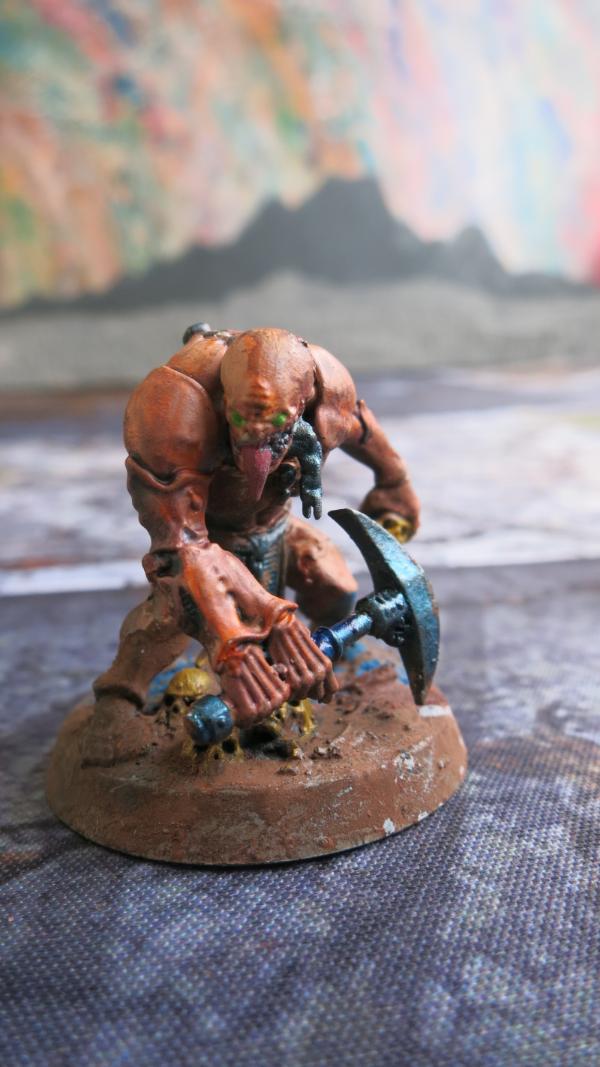
Aberrant - Front
21898
Post by: Oldmanronald
Aberrant with Rock
Here is another ugly model. Again, I endured rather than enjoyed painting this ugly model.
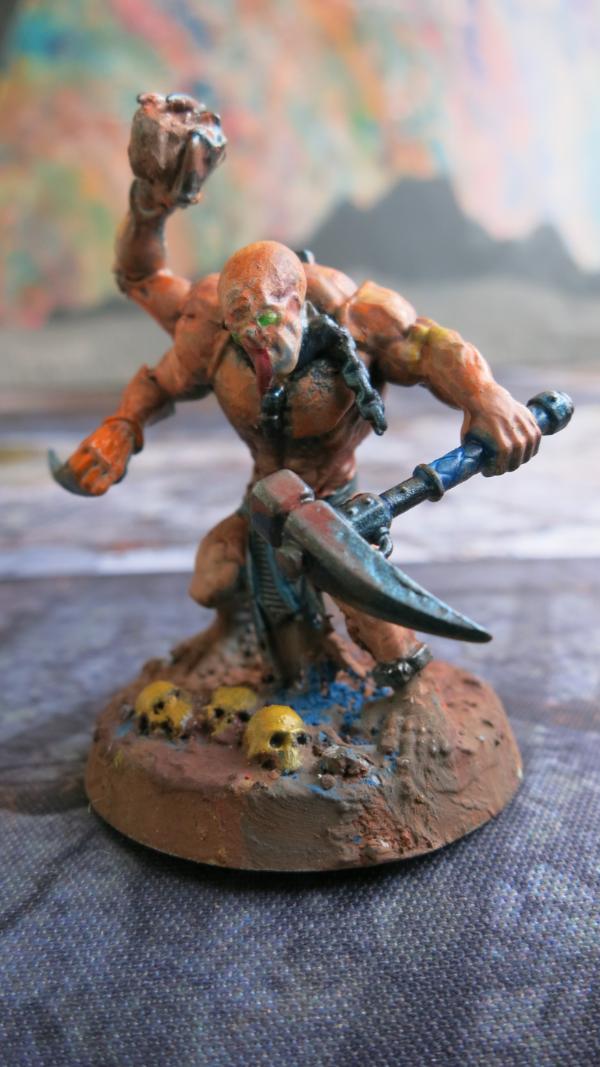
Aberrant with Rock – Front
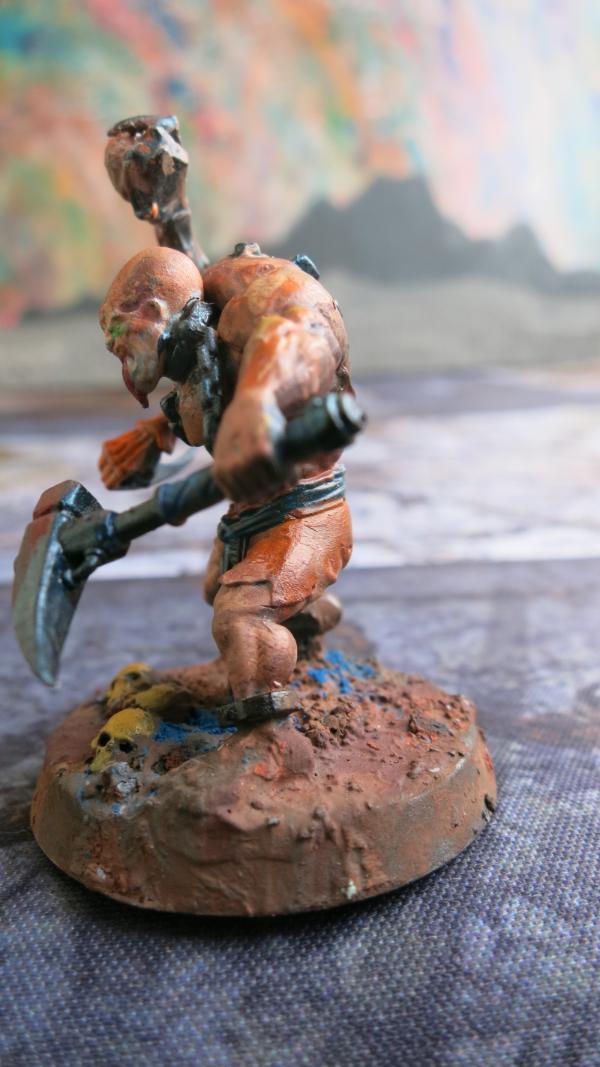
Aberrant with Rock - Left
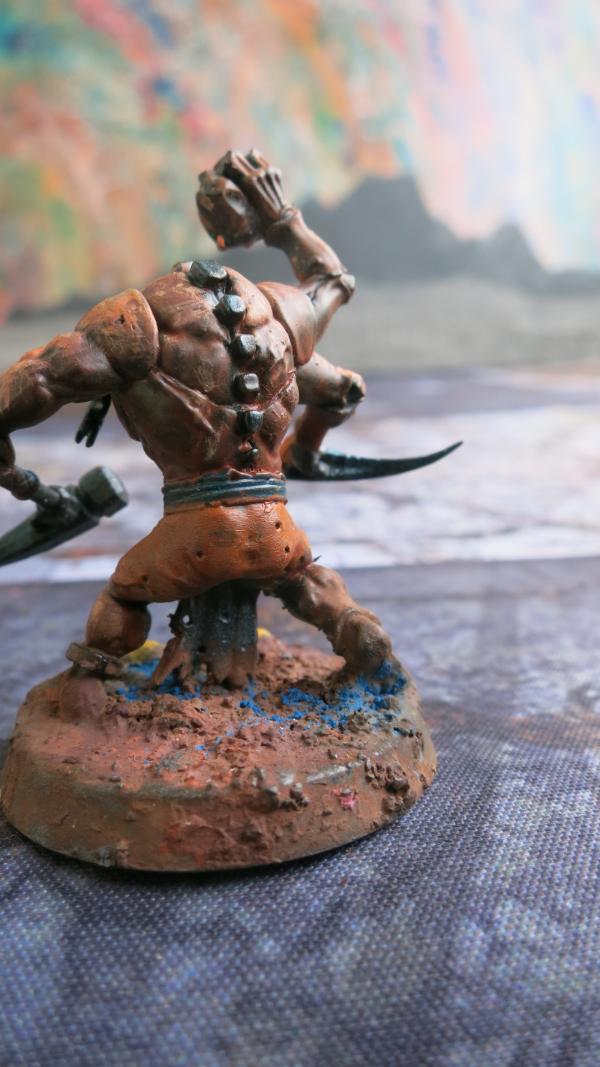
Aberrant with Rock - Back
21898
Post by: Oldmanronald
Aberrant with Tongue and Robe
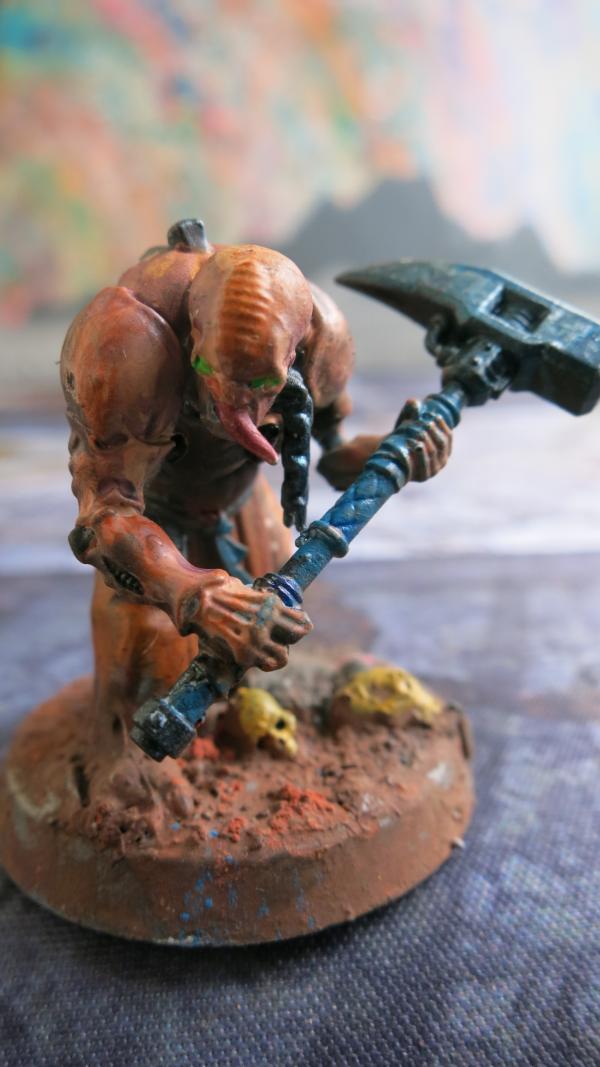
Aberrant with Tongue and Robe - Front
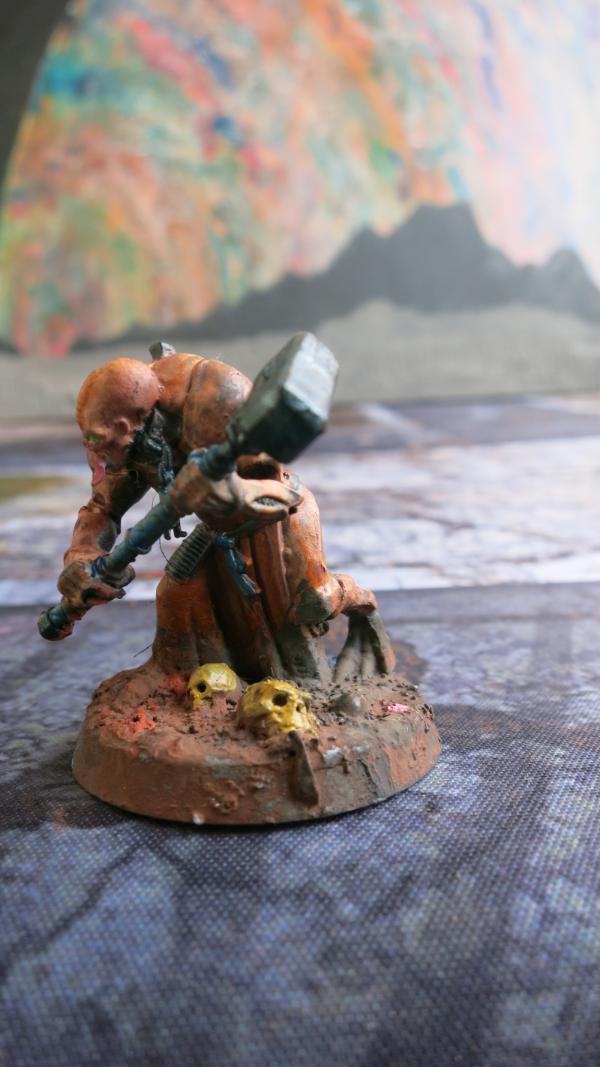
Aberrant with Tongue and Robe - Left
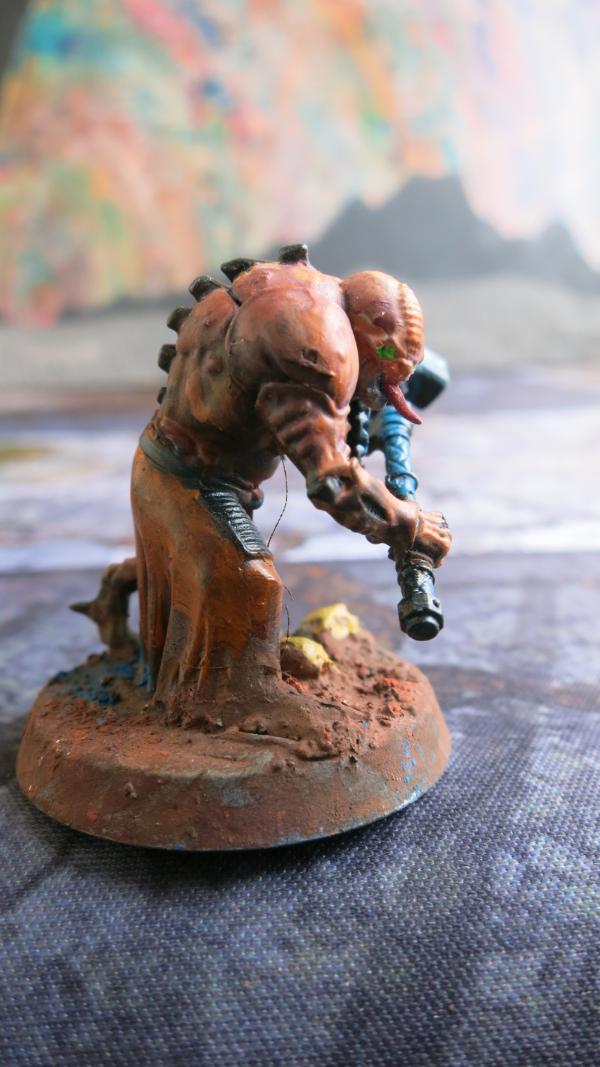
Aberrant with Tongue and Robe - Right
Somehow this model has a piece of string hanging down. I have no idea where it came from.
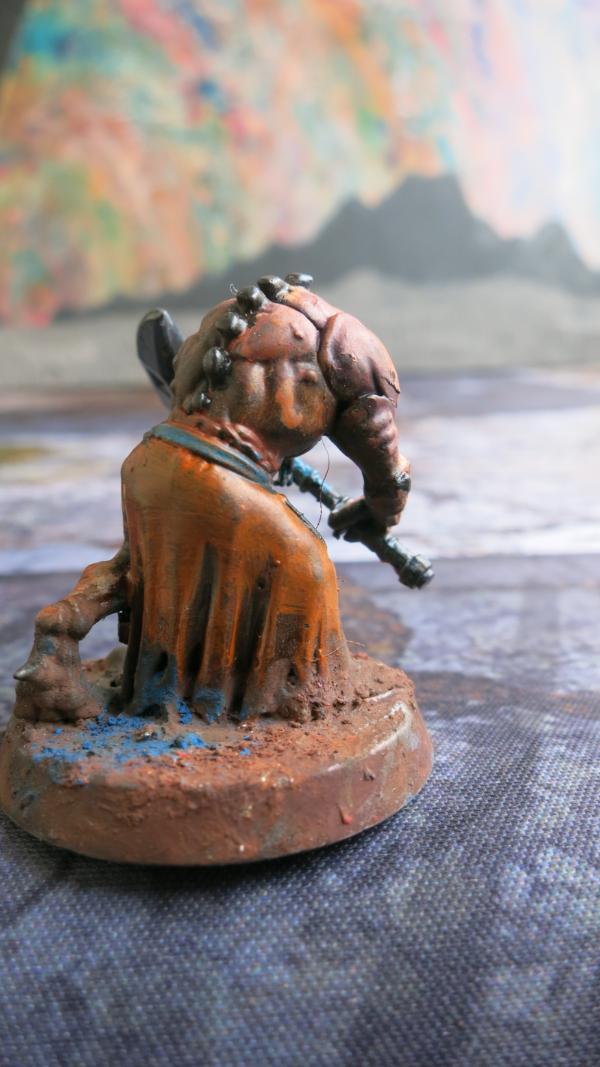
Aberrant with Tongue and Robe - Rear
21898
Post by: Oldmanronald
Two Faced Aberrant
As if an Aberrant couldn’t be any uglier, this one has two faces on one head. Even worse, the two faces are sharing the same tongue.
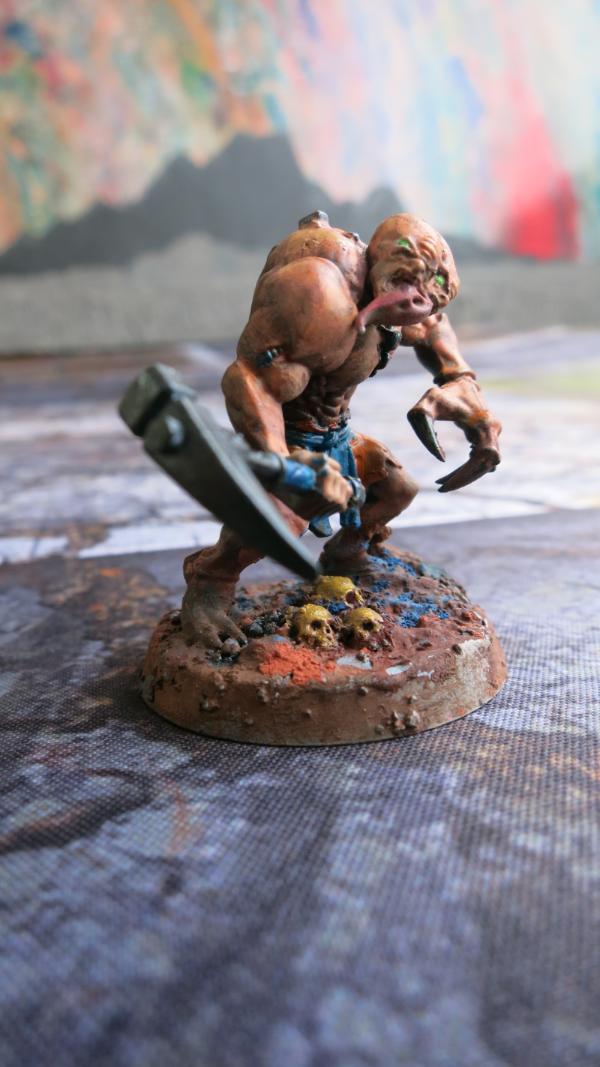
Two Faced Aberrant – Right Front
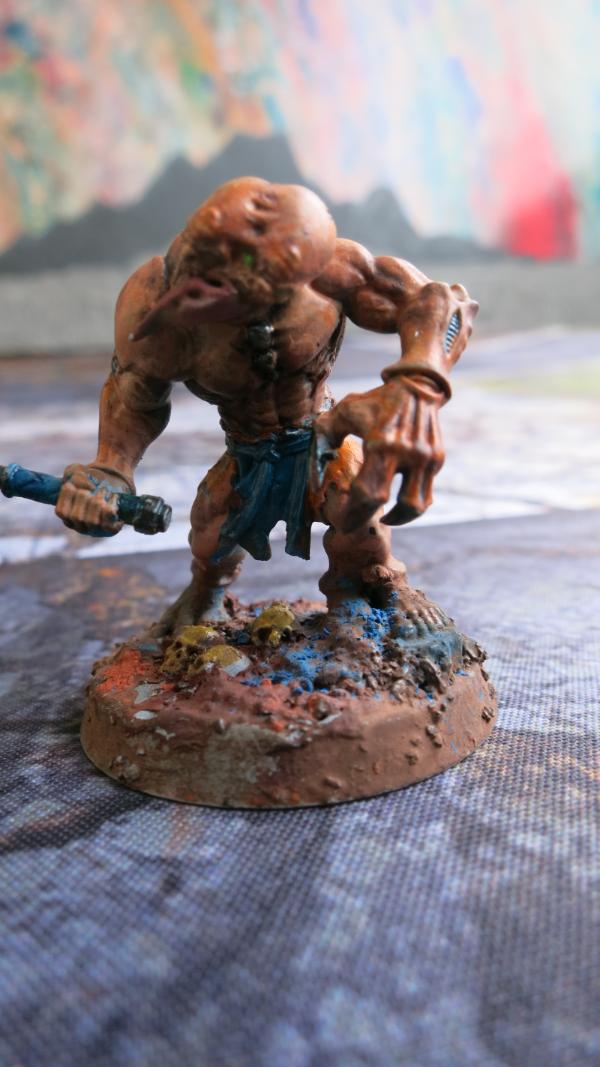
Two Faced Aberrant – Front
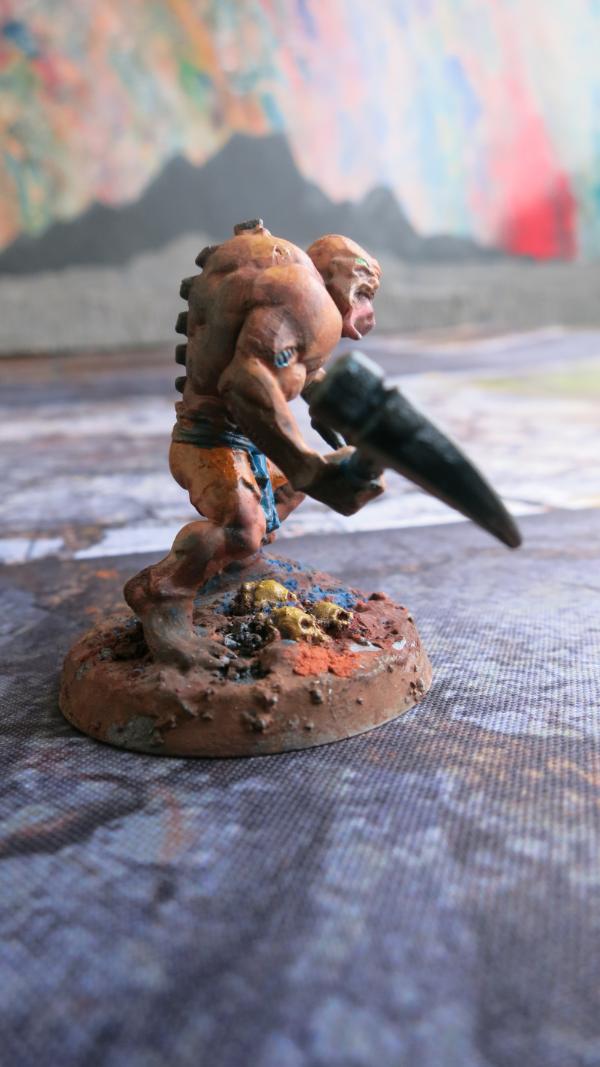
Two Faced Aberrant – Right
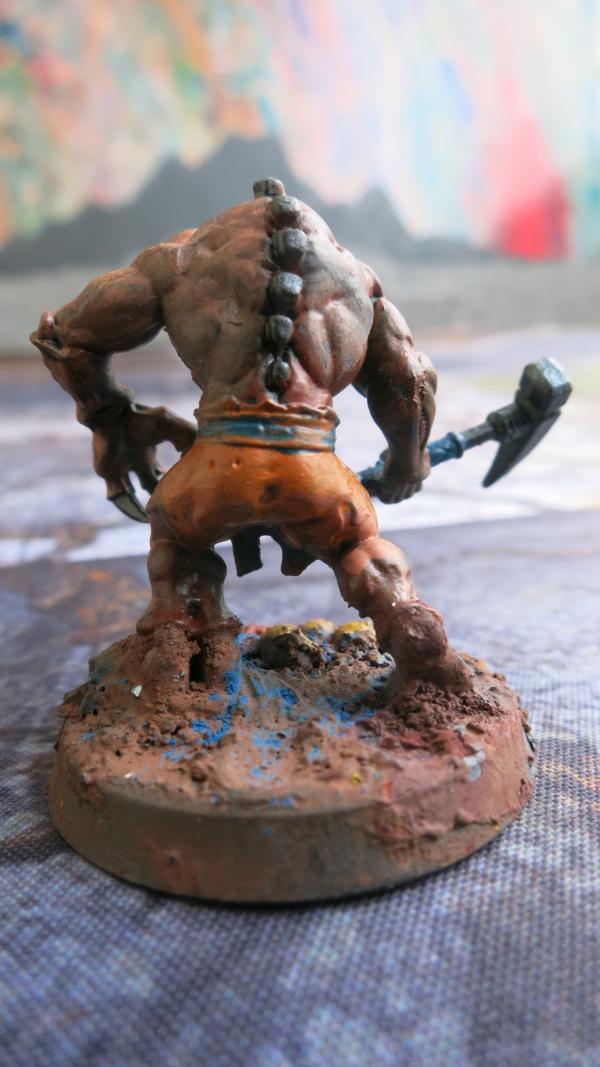
Two Faced Aberrant – Rear
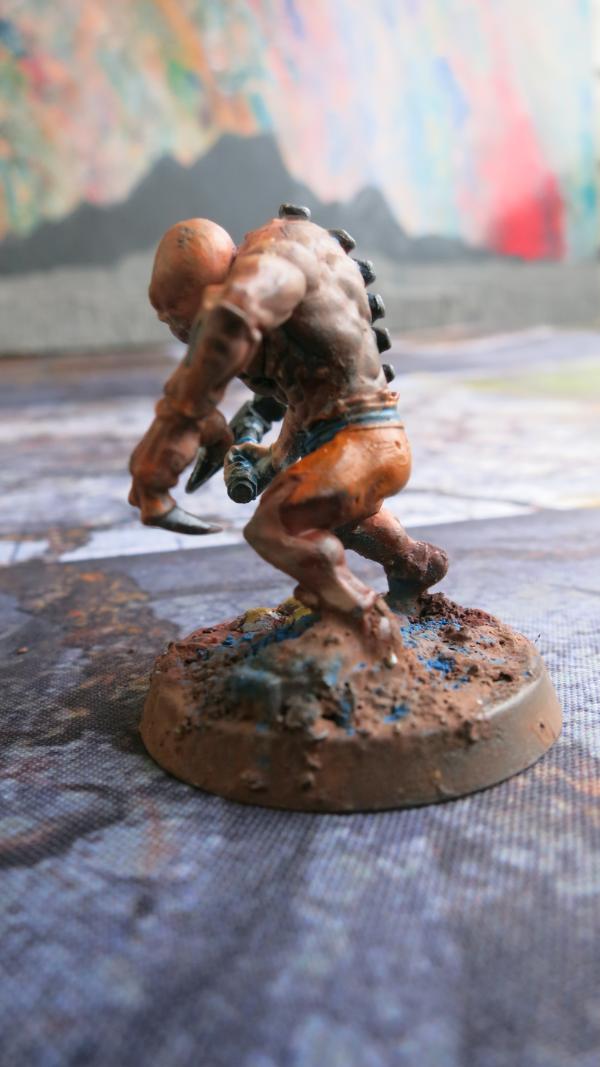
Two Faced Aberrant - Left
21898
Post by: Oldmanronald
The Big Ugly: Abominant with Mindwyn
What is as ugly as an Aberrant? An Abominant. He is ugly but I actually enjoyed painting him a little more than the Aberrants, probably because he is only a single model although he also has an ugly little companion.
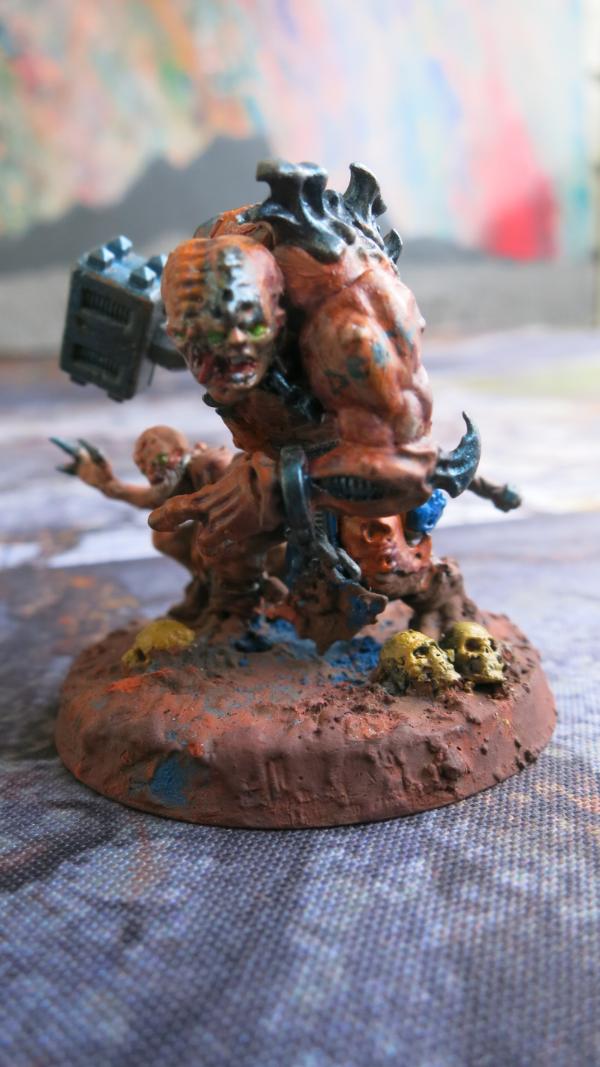
Abominant with Mindwyn - Front

Abominant with Mindwyn – Front Left
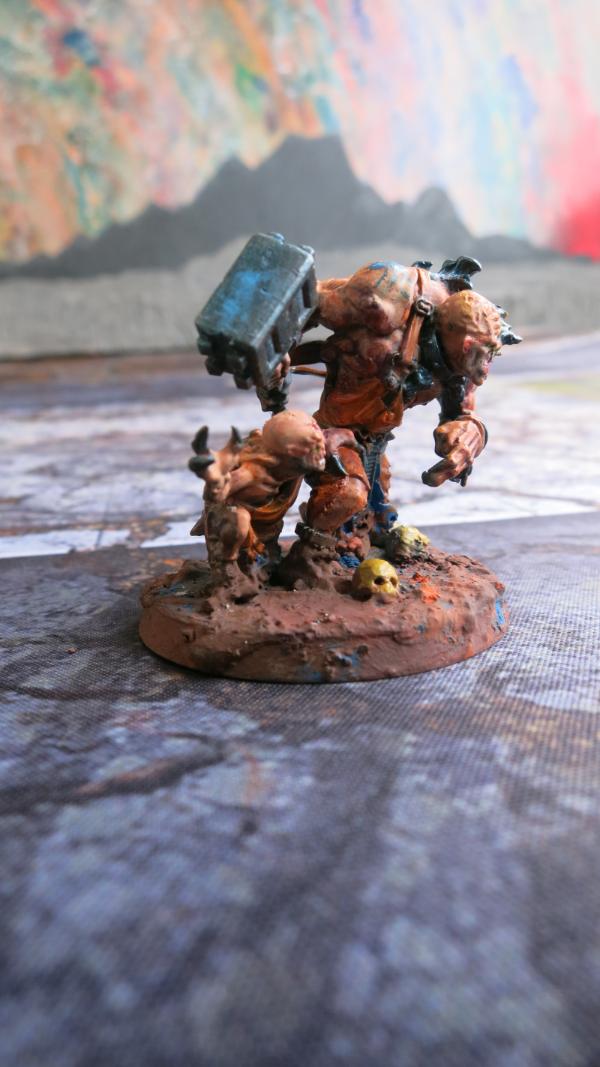
Abominant with Mindwyn – Right Front
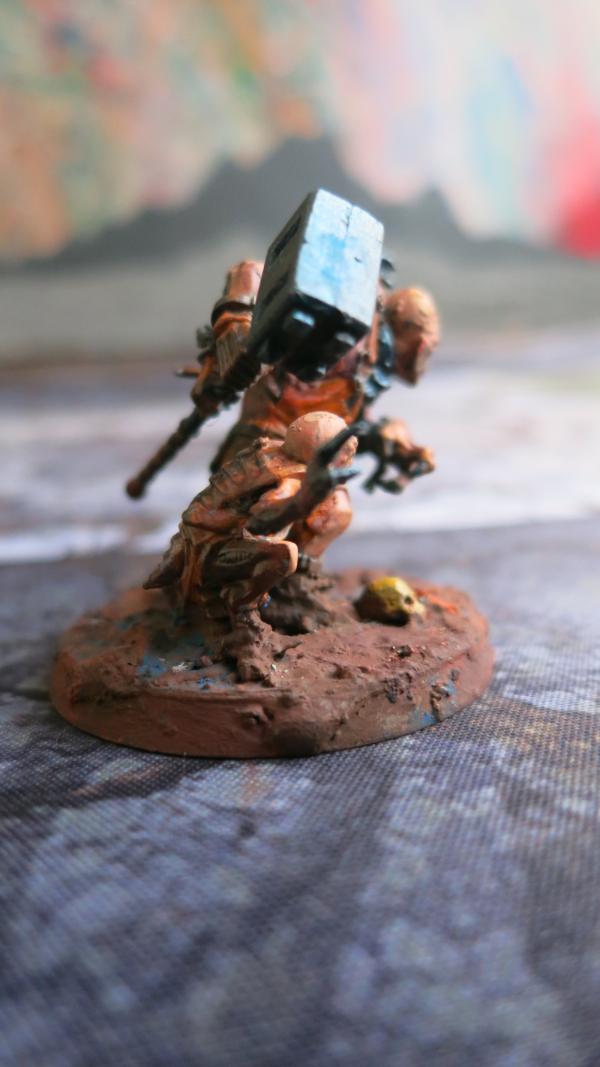
Abominant with Mindwyn – Right
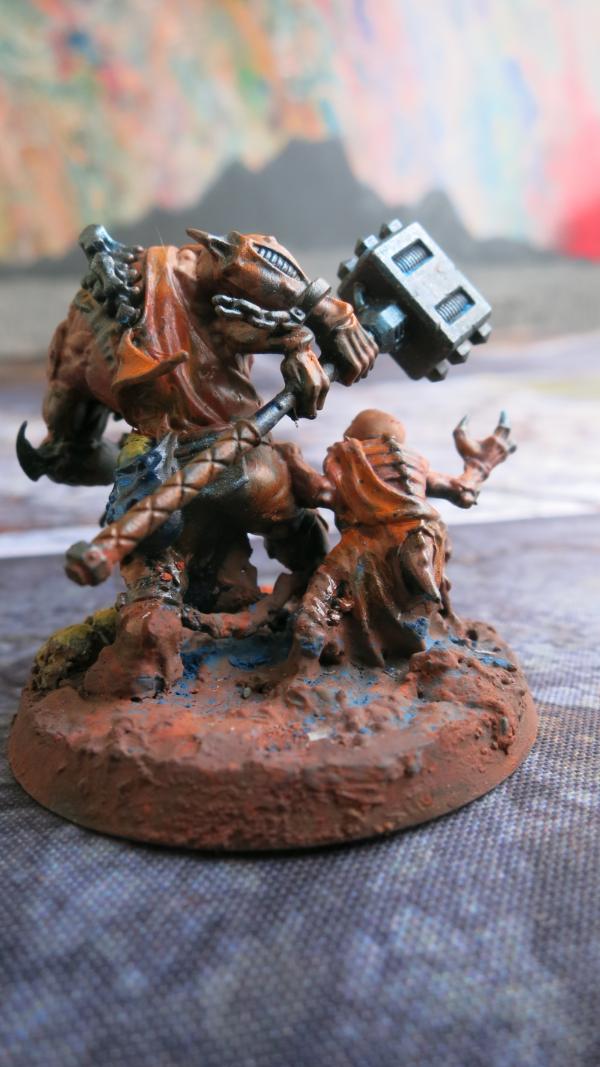
Abominant with Mindwyn – Rear
122359
Post by: tzurk
Love the gritty scheme, and the photography is unreal - crystal clear. Any chance of a group shot of the GSC so far?
1124
Post by: Captain Brown
Very nice Aberrants there Oldmanronald.
Cheers,
CB
21898
Post by: Oldmanronald
21898
Post by: Oldmanronald
The Great Cockroach
I am going to share some more pictures of him since it took me so long to paint him and because I like looking at him.
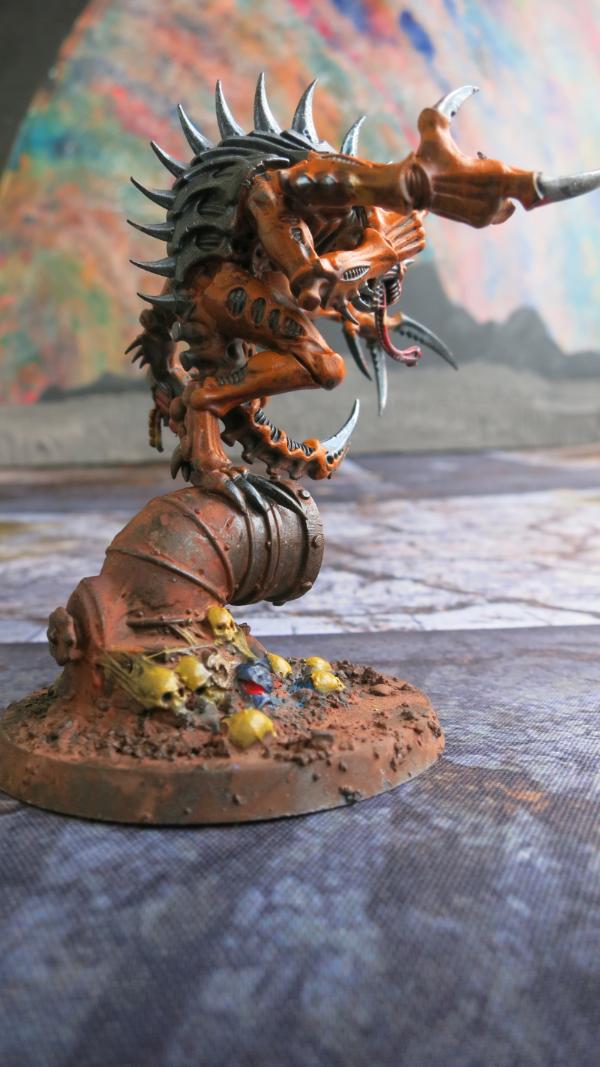
The Patriarch – The Great Cockroach – Right Rear
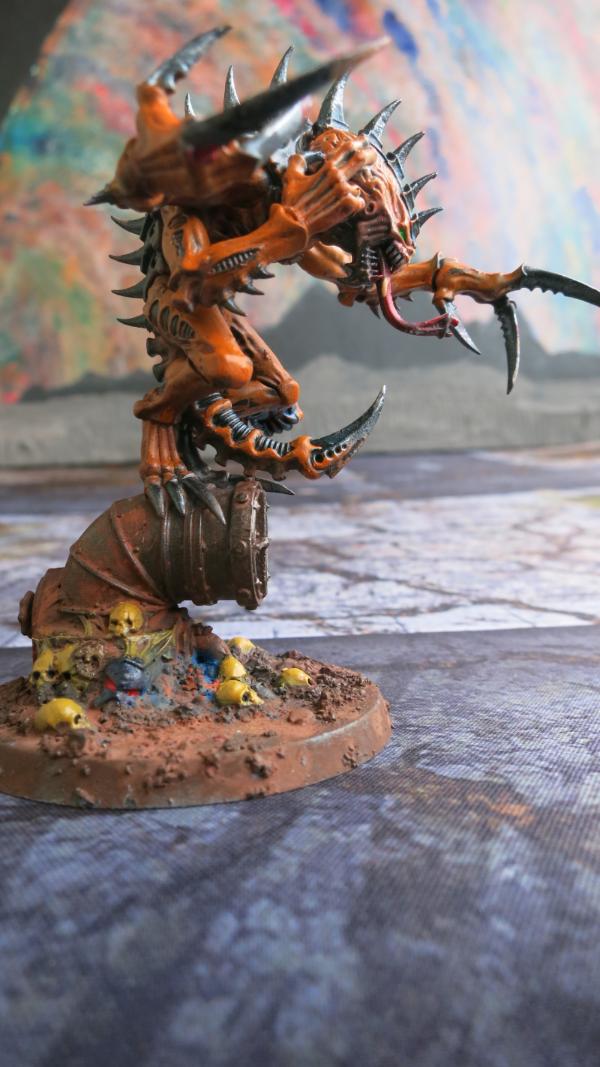
The Patriarch – The Great Cockroach – Right Front

The Patriarch – The Great Cockroach – Front
This last picture is blurry in his face but shows some of the lower details.
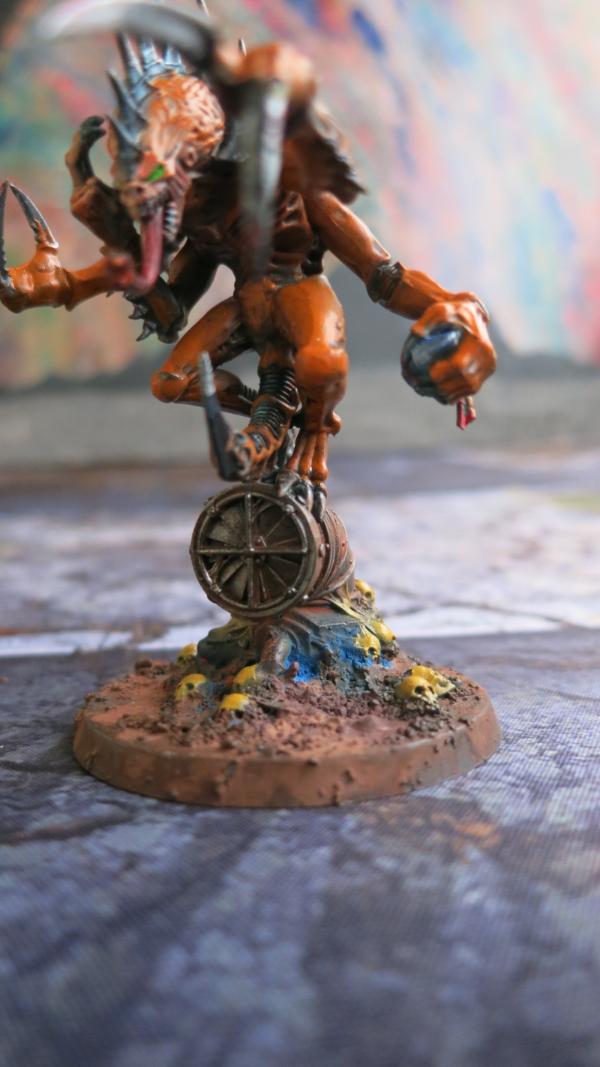
The Patriarch – The Great Cockroach – Front Left
21898
Post by: Oldmanronald
Female Magus
After building and painting the ugly Abominan and even uglier Aberrants, building and painting a Magus is a relief. The new female Magus model by GW is a nice looking model and I enjoyed painting her. Unlike many war gaming women’s model that are dressed ridiculously scantily for their warrior functions, GW puts women like Sisters of Battle in full cover sensible armor. This model is dressed somewhat sexier but still reasonably covered and wearing clothing that, why a little too unprotected for a combat soldier, is in keeping with her role as a Psyker. I did experiment with the blue leather on her left boot and forearms. The result looks more like patent leather than highly polished natural leather.
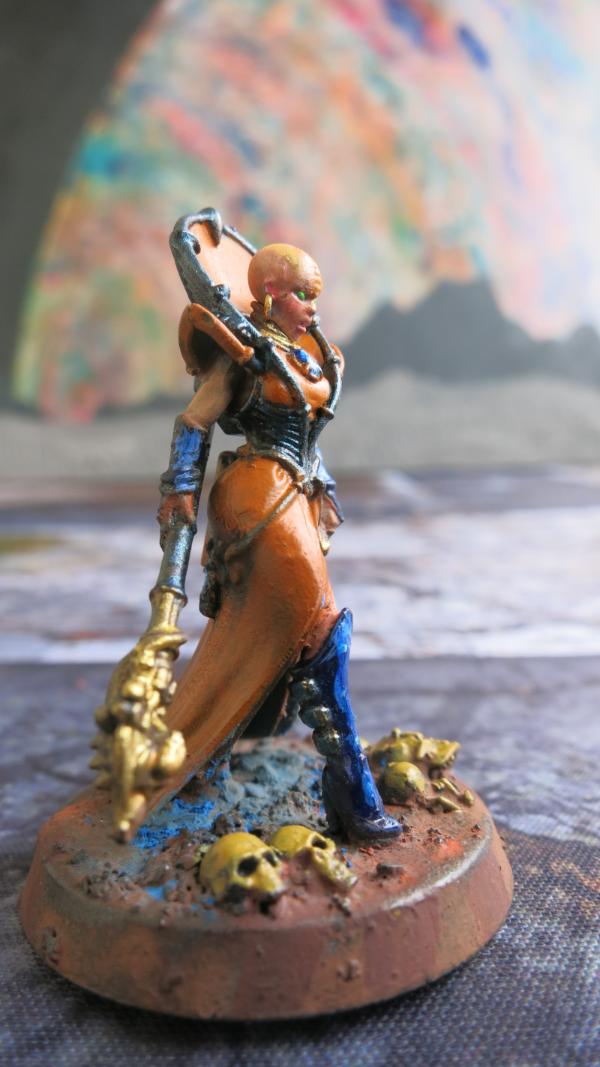
Female Magus – Right
I plan to field two Magus, one a man and the other a women. It is nice that GW put out two different models for the Magus.

Female Magus – Front

Female Magus – Left

Female Magus – Rear
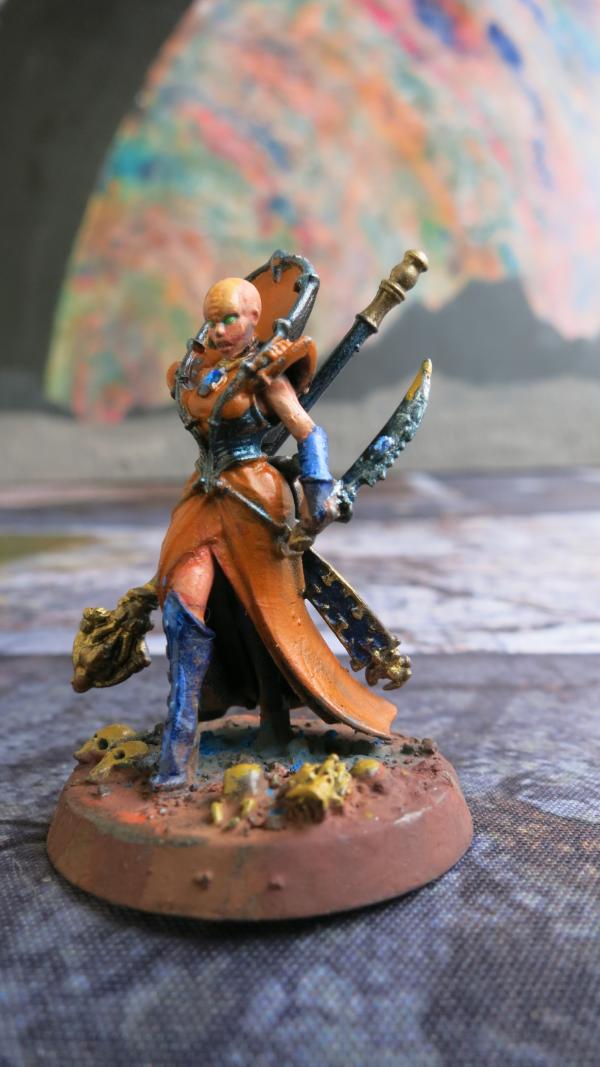
Female Magus – Left front
21898
Post by: Oldmanronald
Brood Brothers Company Commander
I had fun combining a guard officer with some left over Acolyte Hybrid arms. The ribbons on his chest were tricky and time consuming to paint.
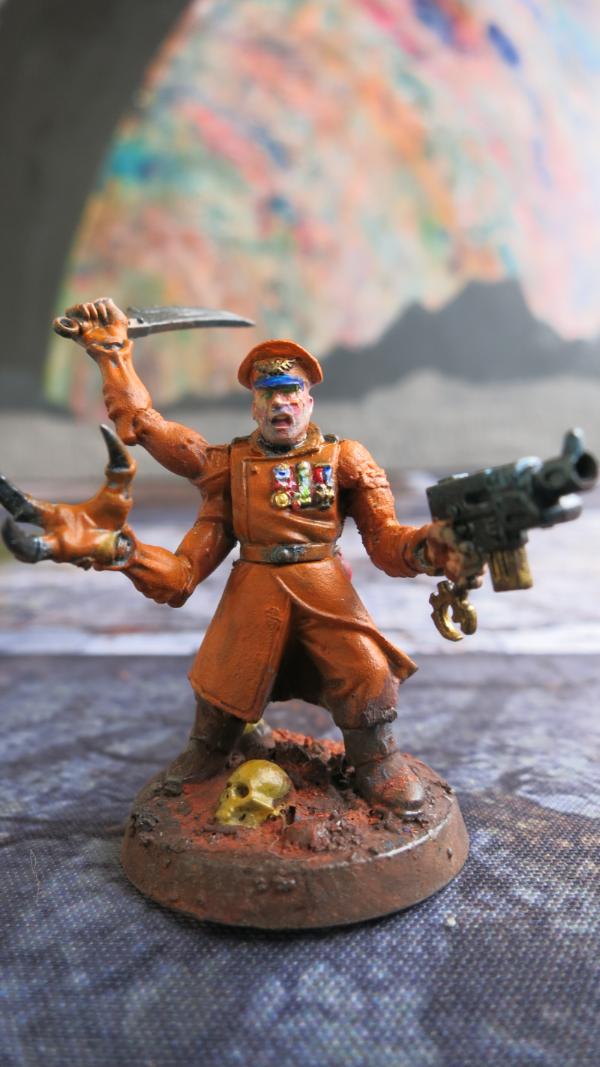
Brood Brothers Company Commander Front
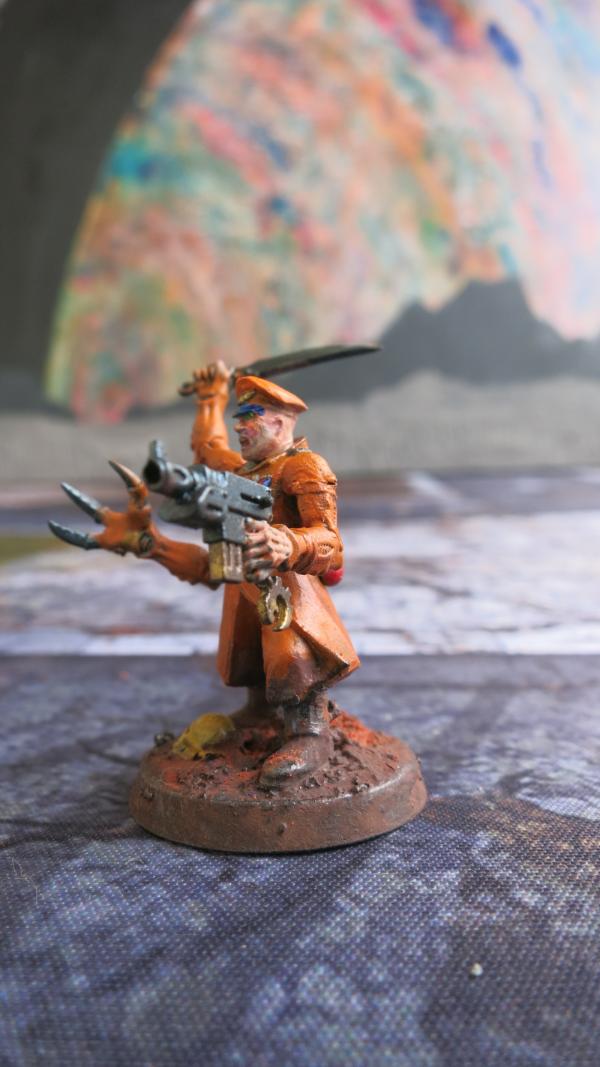
Brood Brothers Company Commander Left
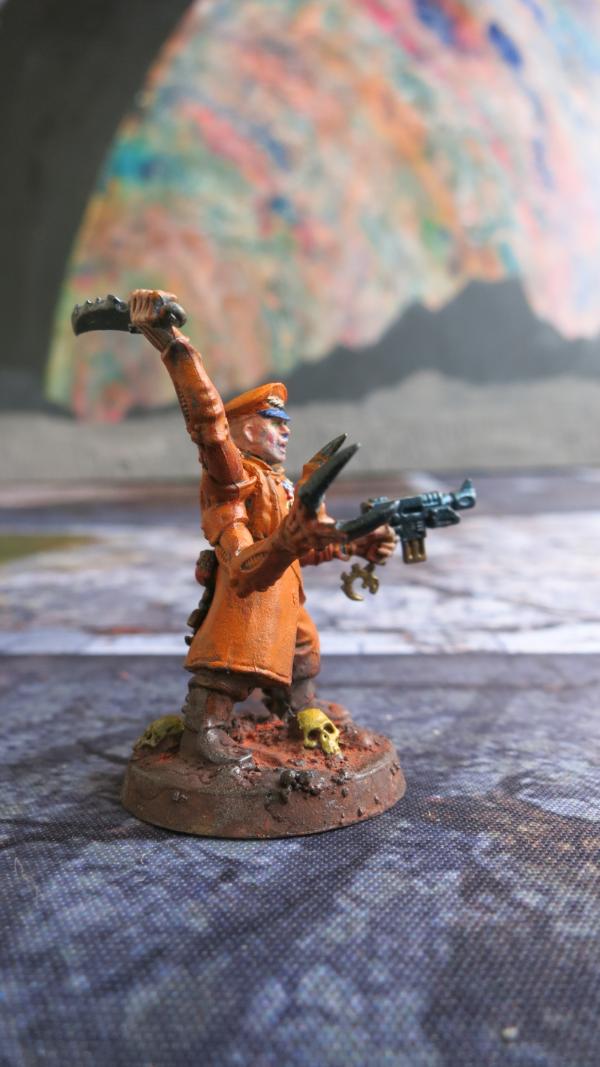
Brood Brothers Company Commander Right
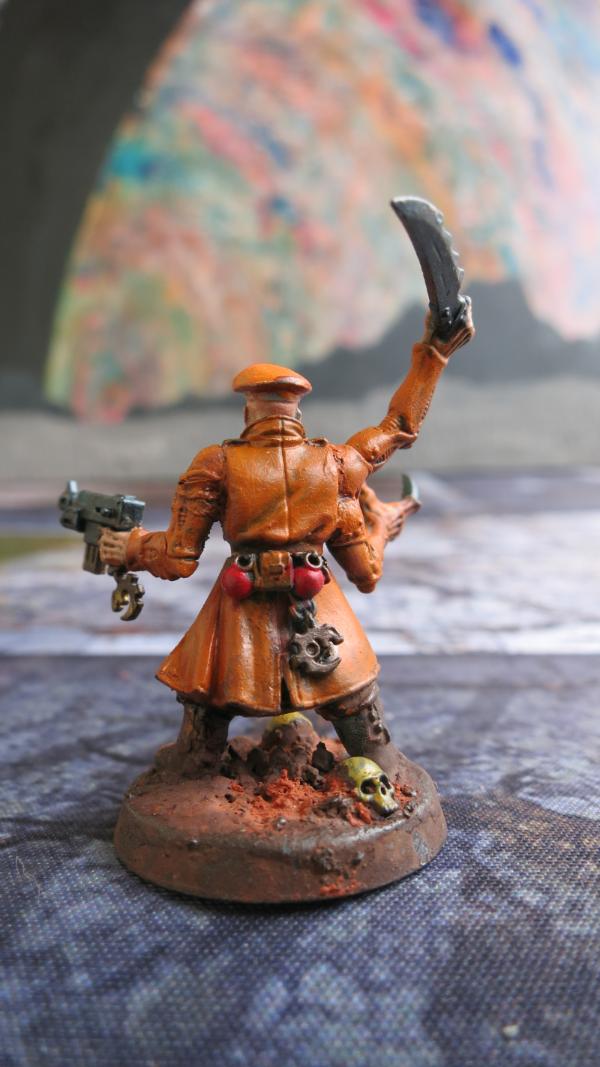
Brood Brothers Company Commander Rear
1124
Post by: Captain Brown
Oldmanronald,
Consistent theme on the colouring of your Cult figures.
Cheers,
CB
21898
Post by: Oldmanronald
The Kelermorph
Captain Brown made an interesting comment “consistent theme on the colouring of your cult figures.” I wondered if this was a positive or negative comment but it is a true comment. I have been using the same colors for this whole cult army.
The advantage is that my army will match itself and will look more striking on the table, especially with units as different as armor and purestrain genestealers. It also makes it easier to paint since the colors are already mixed and most of the decisions are already made. This is especially important for an army like the genestealers cults which field so many models. I figure that this army will have almost 120 models when I am finished. It also makes it easier to paint such odd ball creature such as Aberrants, Abominant, and purestrain genestealer which don't have a uniform or a standard type color theme.
The disadvantage for this blog is the models are starting to look all the same and this can get kind of boring.
I notice that Games Workshop has most of their armies painted with limited colors but they have a few models in every army that are different colors such as black chaplains for space marines chapter or white terminators and black fast attack units with the greenish Dark Angels.
For this army, I am going to stick to my limited colors although I may increase the amount of blue on a few on my specialist models. An example of this is the next model, the Kelermorph
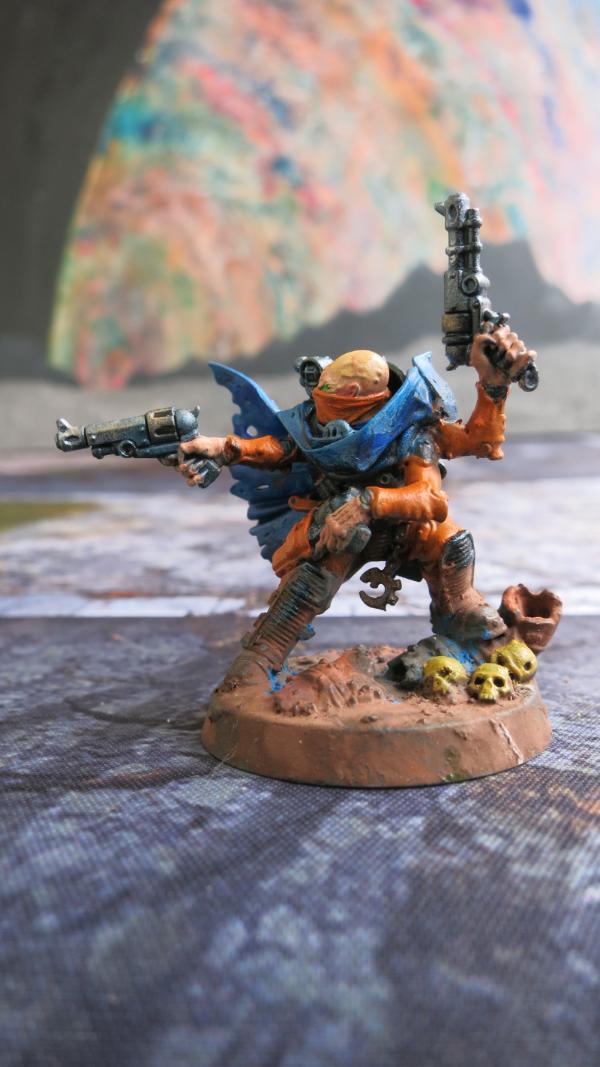
The Kelermorph - Front
I have decided that this view is the front since his torso is facing front although his head is facing right (his right, our left),
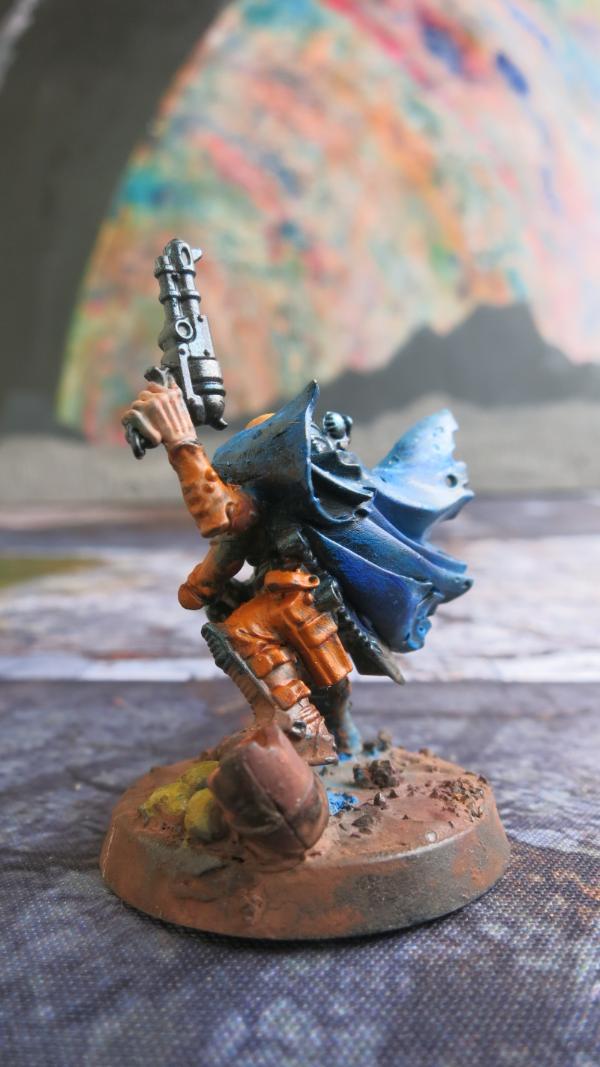
The Kelermorph – Right Rear
The Kelermorph is an elite gunfighter armed with three snub revolvers called Liberator Autostubs, one for each of his three arms and hands. This is a fun model to paint, in part because of his cape that is flowing around him and partly because each Liberator Autostub is slightly different. I decided to paint the cape with a complementary blue to his orange uniform. Actually, I have been using blue as a compliment to the orange in all my Genestealer models but usually I am using gunmetal blue as the complimentary color so it is a little more subtle than the pure blue. The blue in the cape is blended with light blue highlights and dark blue shadows. The Liberator Autostubs are painted with a blend of carbon black and gunmetal blue in the shadows, with the gunmetal blue for the core color with a mixture of gunmetal blue and silver for the highlights. I blended a little brass paint on the cylinders of the Liberator Autostubs to bring out the details.
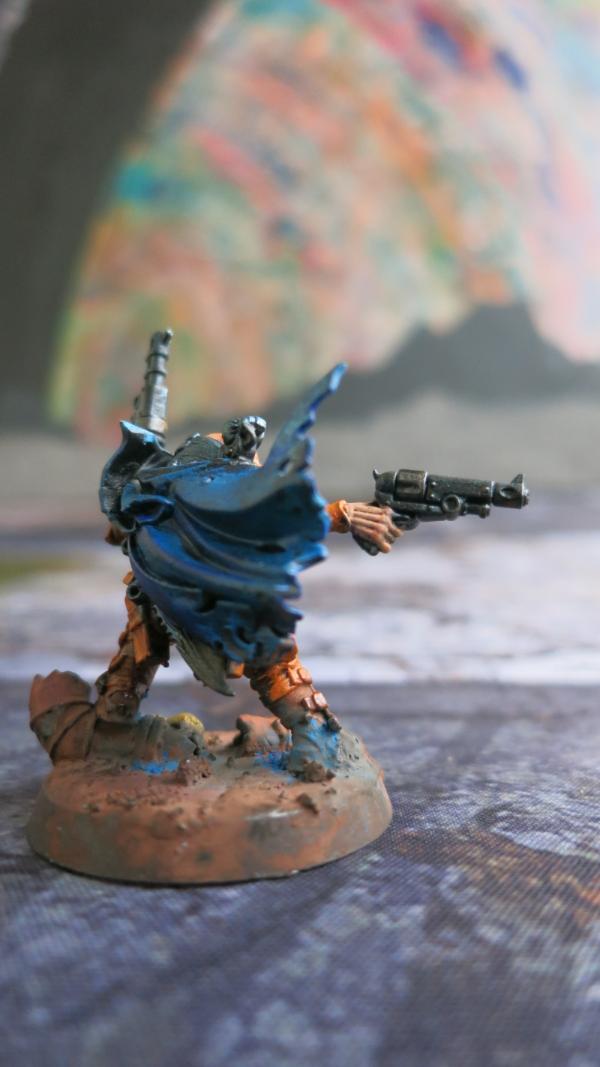
The Kelermorph – Rear
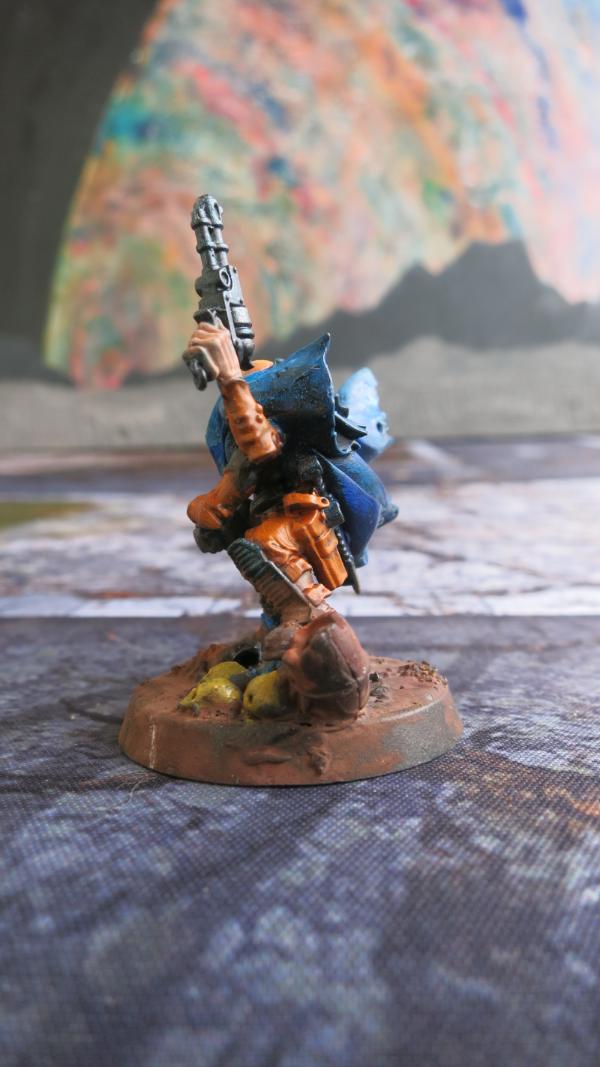
The Kelermorph – Left
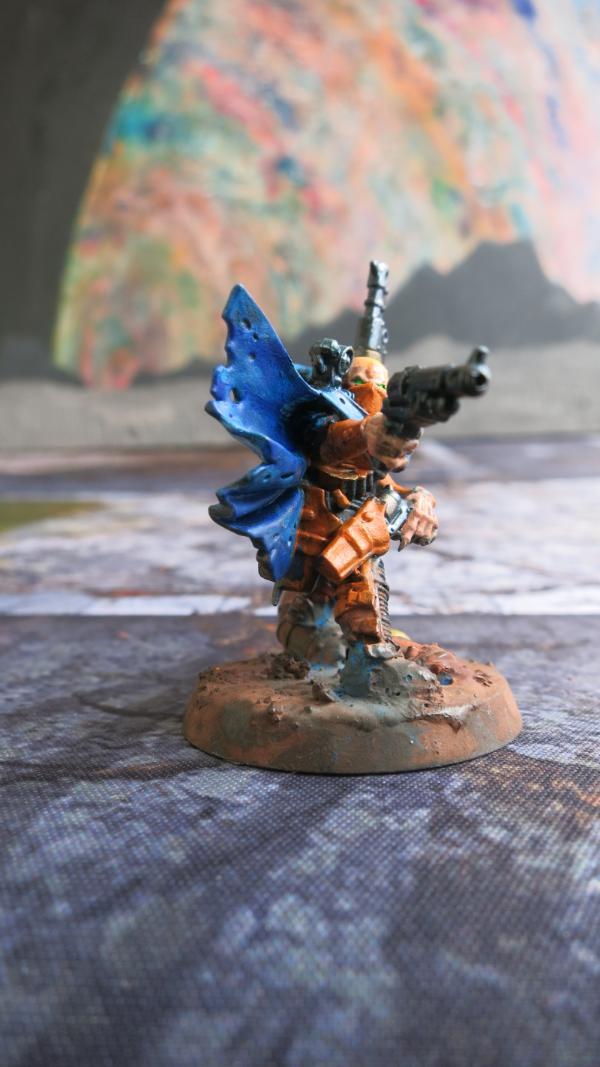
The Kelermorph – Right
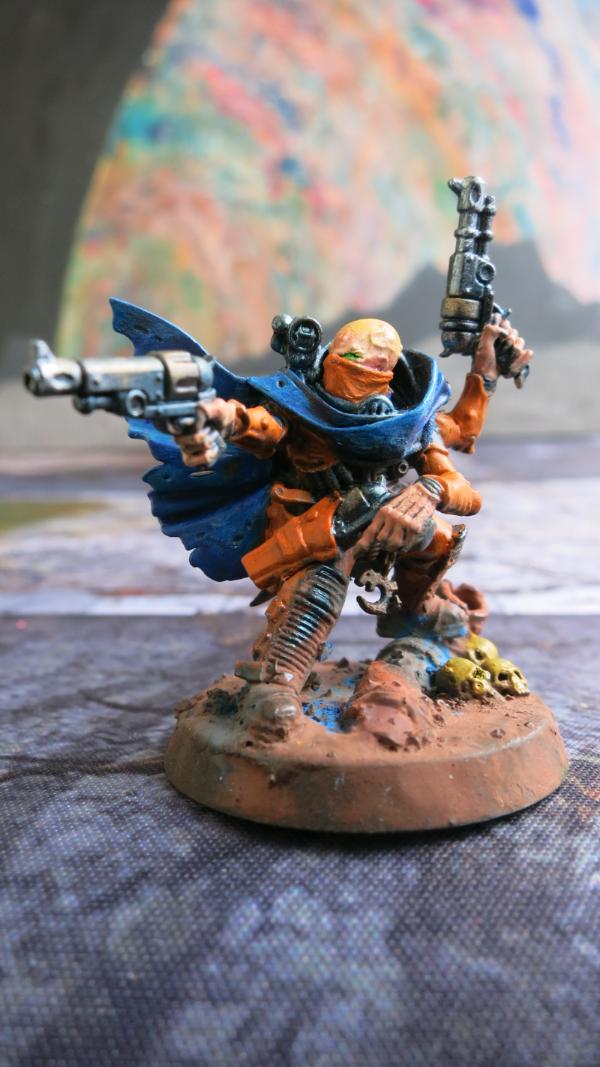
The Kelermorph – Front Right
This last is my favorite view of this model.
21898
Post by: Oldmanronald
Brood Brothers Spearhead Detachment – First Basilisk
I plan to support my Genestealer Cult Detachment with a Brood Brothers Spearhead Detachment. The detachment will include at least a company commander, a Battery of two Basilisks, and two heavy weapons squads of mortars. I may add another Basilisk to the battery and a Master of Ordnance to the Detachment. I like units that can both hide and kill stuff almost every round, especially the first round when most of the Genestealer cult is so vulnerable. As a model, I like the appearance of the Basilisk.
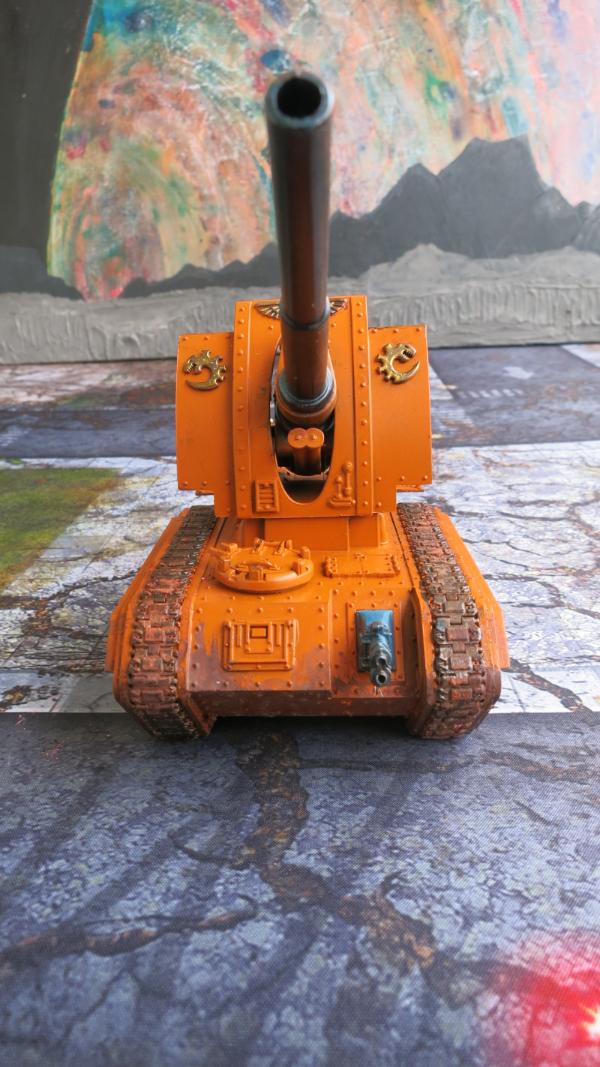
Basilisk – Front
I used an airbrush to paint the orange. The underside is airbrushed with burnt sienna and the upper side is airbrushed with cadmium orange with a dash of blue mixed in to dull its brightness. The guns were painted with a gunmetal blue with the undersides and shadows with a mixture of gunmetal blue and carbon black and the highlights a mixture of silver and gunmetal blue. Actually, all the colors are a three level blend with a darker undercoat for shadows, a core color for most of the model, and highlight of the core color mixed with white for the standard colors or silver for the metallic colors. Still, these armored models appear brighter and with less muted colors than the infantry models, probably because they were airbrushed and have large flat spaces.

Basilisk – Front
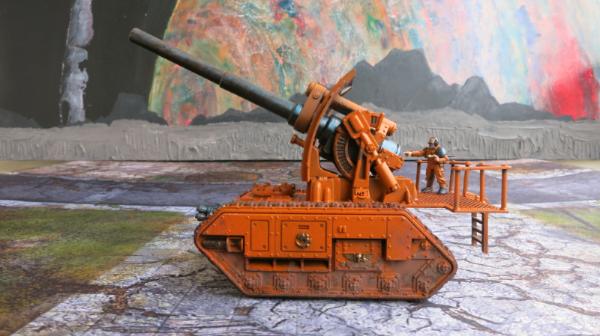
Basilisk – Left
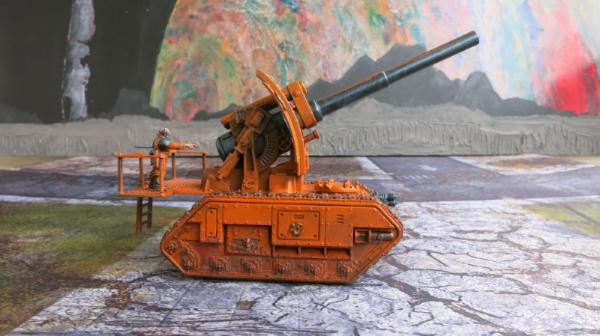
Basilisk – Right
21898
Post by: Oldmanronald
Brood Brothers Spearhead Detachment – Second Basilisk
In the pictures, the first and second Basilisk are nearly identical. The only difference are the gunners. The first gunner has a standard imperial guard body with a genestealer cult brood bother head. The second has the standard imperial guard body with a squid-face head. This picture includes the squid faced gunner.
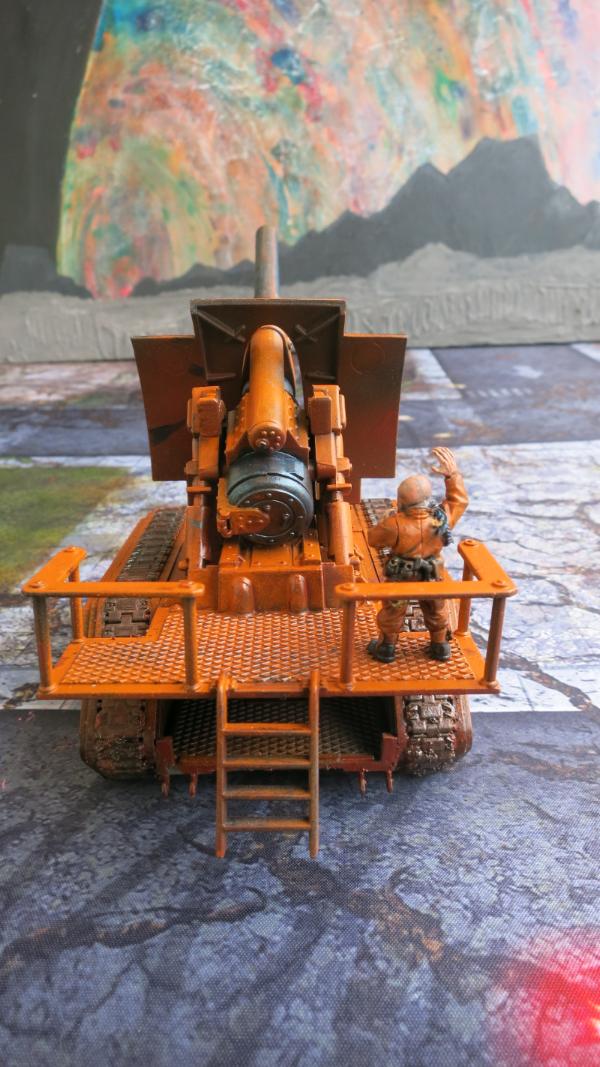
Basilisk – Back
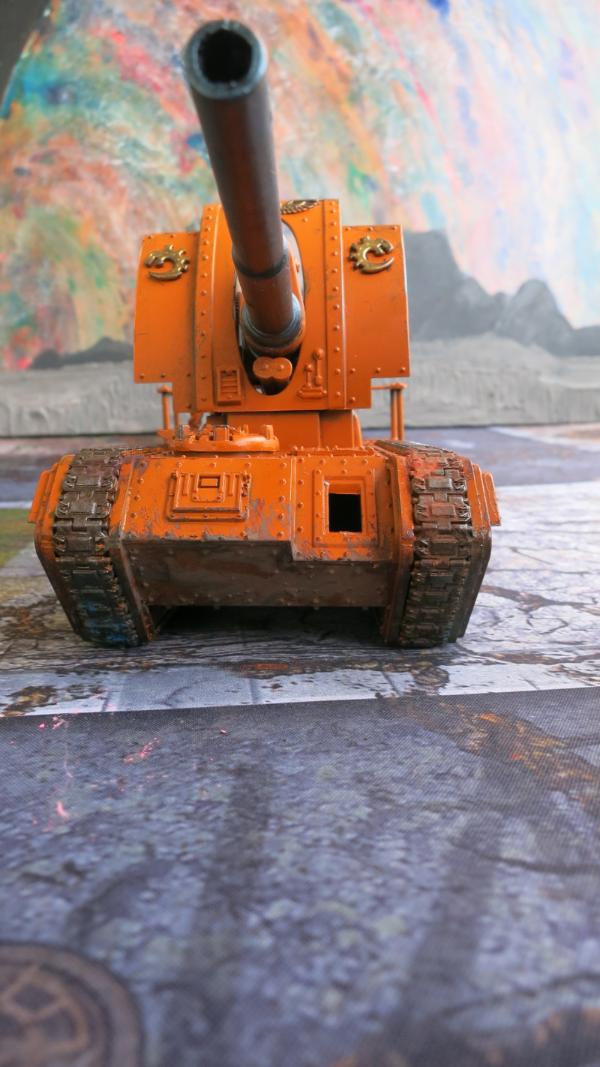
Basilisk – Front
I haven’t actually glued in the heavy bolter or the heavy flamer because I am not sure what to put on the model. Pointwise the heavy bolter is cheaper and has a better range. The heavy flamer is better if the enemy is threatening to assault the model but if I am in that position, I probably am in real trouble since I want this model in cover out of line of sight in the rear of my deployment zone with lots of bubble wrap troops protecting it.
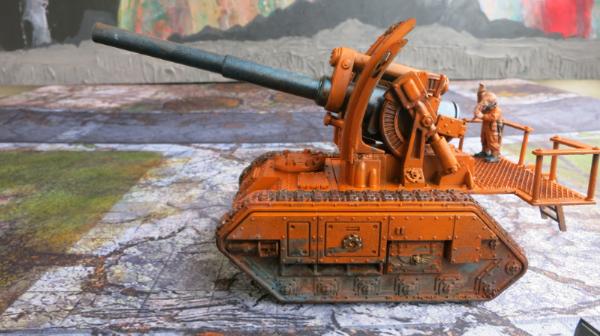
Basilisk – Left
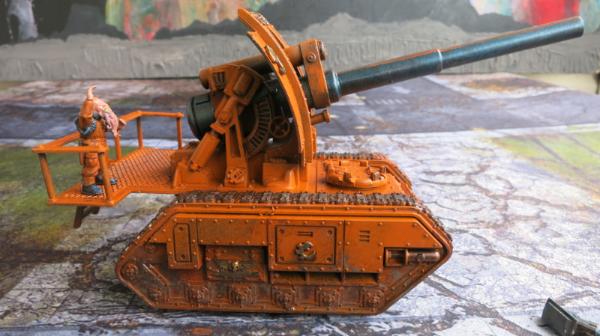
Basilisk – Right
21898
Post by: Oldmanronald
Brood Brothers Spearhead Detachment –Basilisk Gunners
I put the optional gunner on both Basilisk because I like how they look. Both gunners are attached with magnets. Each is made with a standard imperial guard body with a genestealer cult head.
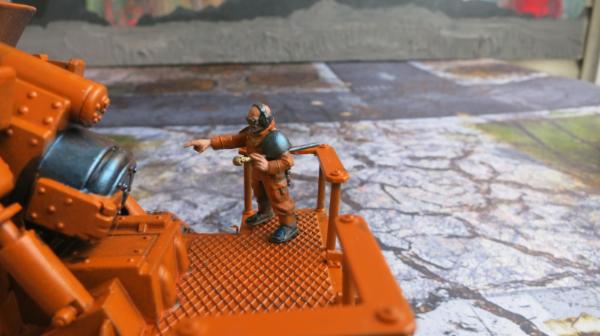
Gunner with Genestealer cult head with ear protection - left
The arms on this gunner are bits from the Cadian Command Squad.
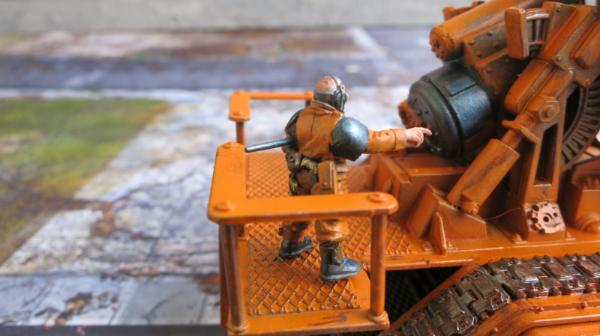
Gunner with Genestealer cult head with ear protection - right
Note the polished boots and clean uniform. Compare his boots and uniform to one of my infantry models.
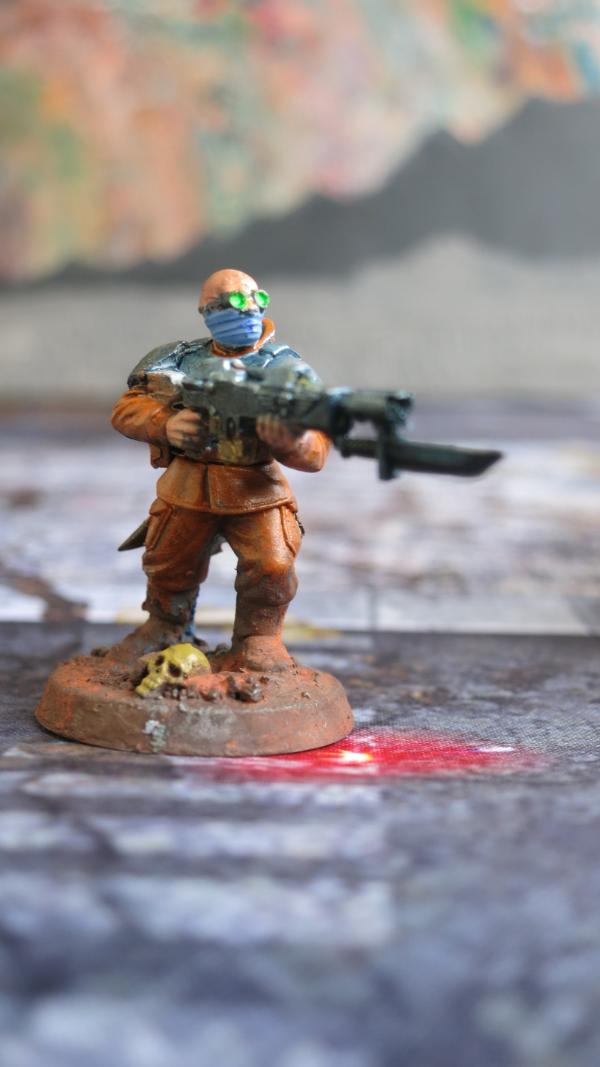
Brood Brother Infantry Model - Front
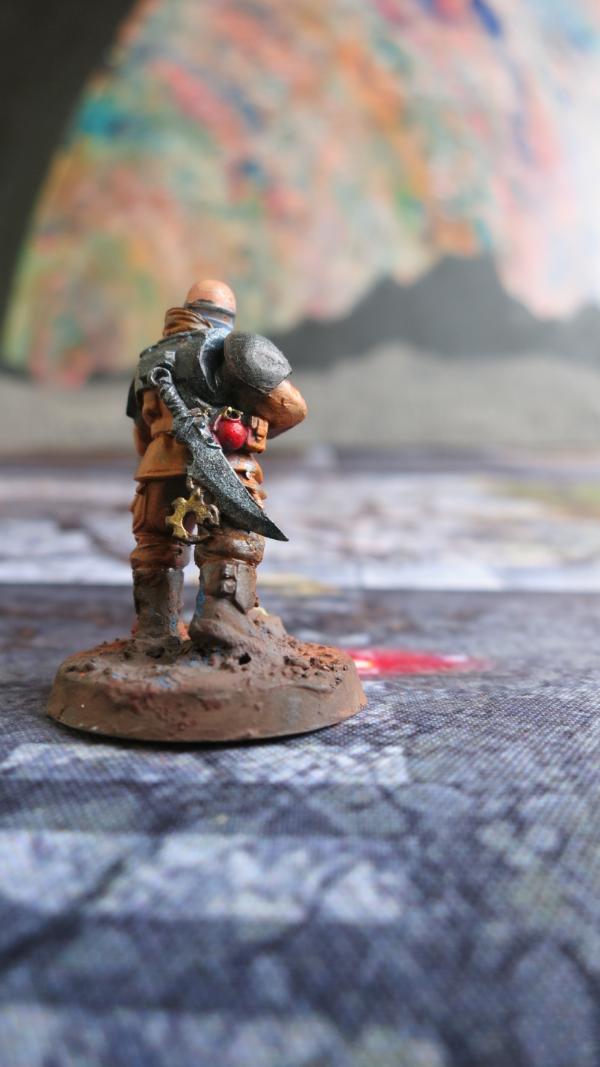
Brood Brother Infantry Model – Rear
I remember when I was in the infantry, we were amused after a week in the field that some of the armor soldiers were still wearing clean spit-polished boots.
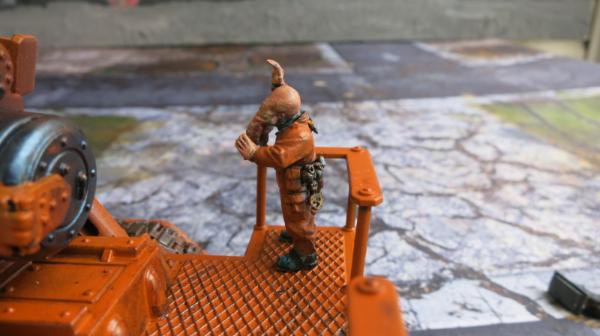
Gunner with Squid Head – Left
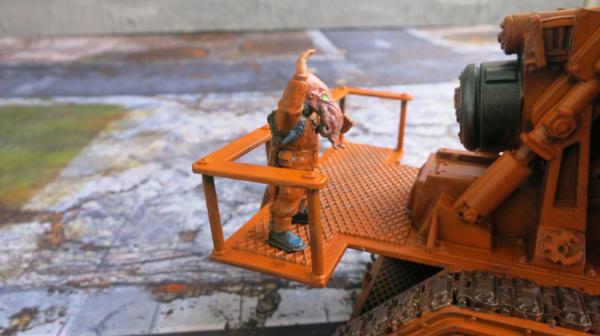
Gunner with Squid Head - Right
21898
Post by: Oldmanronald
First Cult Chimera
I built two Cult Chimeras and I really like them. Unfortunately, in the new Codex, they are restricted to carrying only brood brother’s infantry so I am not sure that I can justify them in a 2000 point army. So they will remain on the shelf for now.
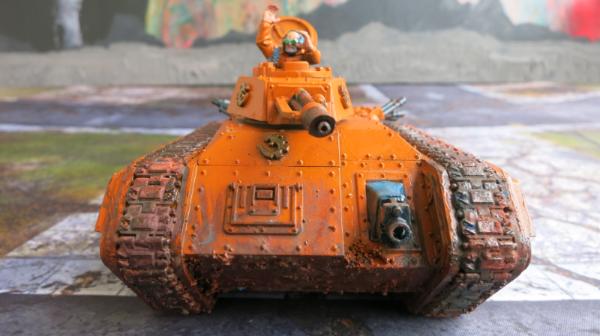
Cult Chimera – Front
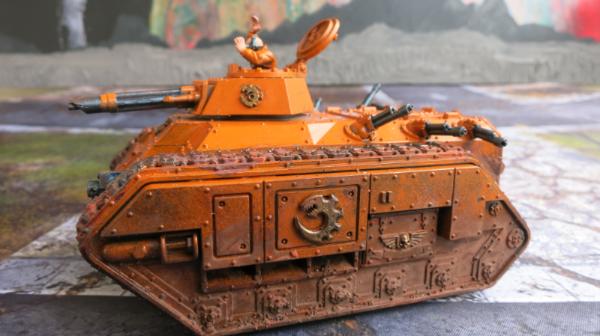
Cult Chimera – Left
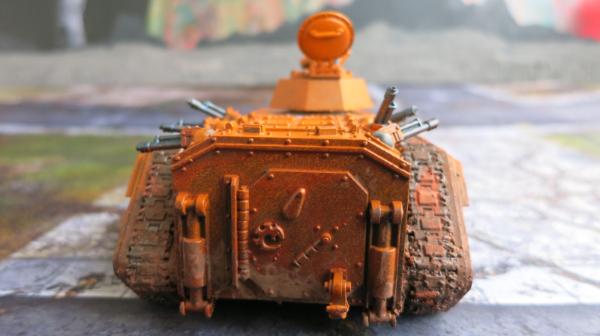
Cult Chimera – Rear
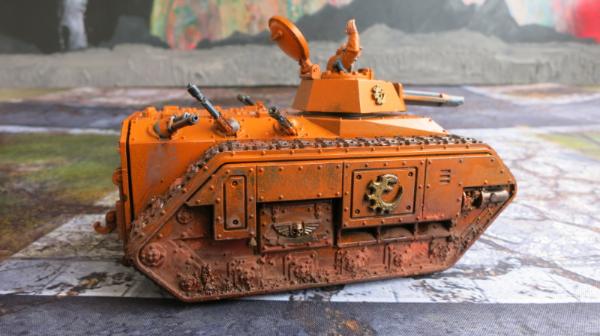
Cult Chimera – Right
21898
Post by: Oldmanronald
Second Cult Chimera
This is the second Cult Chimeras with the commander having a pointing finger.

Cult Chimera – Front
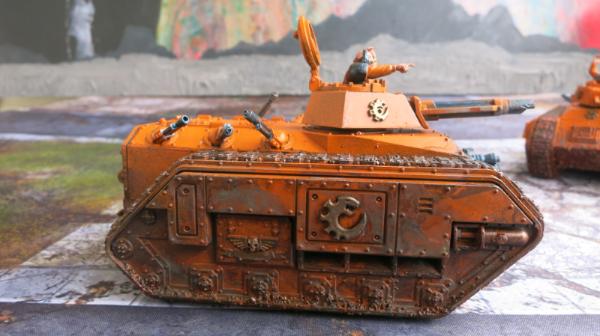
Cult Chimera – Right
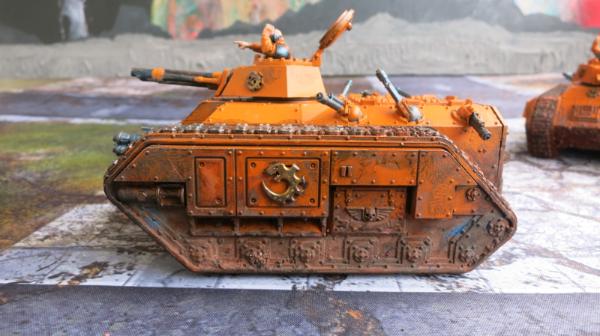
Cult Chimera – Left
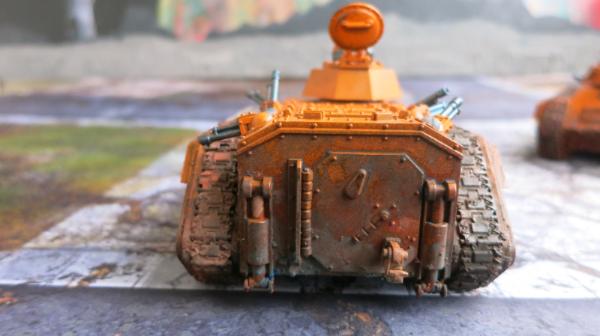
Cult Chimera – Rear
21898
Post by: Oldmanronald
First and Second Cult Chimera
These are two more pictures of the Cult Chimeras
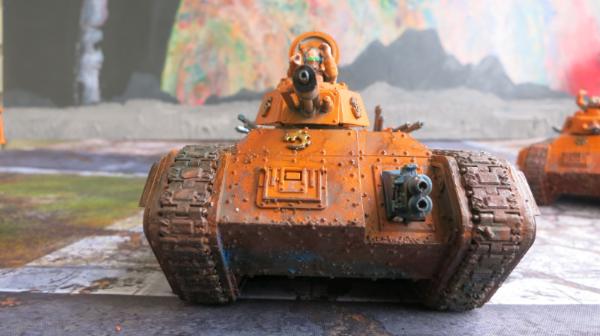
Cult Chimera – Front
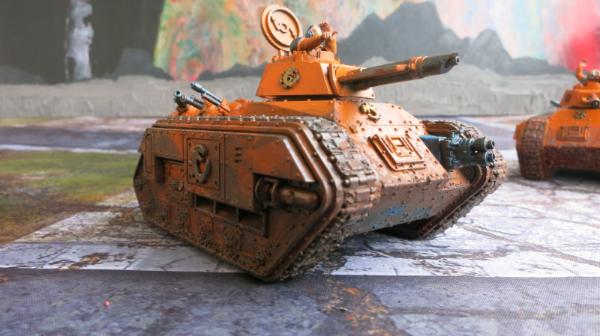
Cult Chimera – Front Right
21898
Post by: Oldmanronald
On the Workbench – Cult Scout Sentinel
I am putting together a Brigade Detachment for my Genestealer cult. It requires at least three fast attack units. I picked the Cult Scout Sentinel since it is the cheapest and since it has the scout rule. These Sentinels are armed with the cheapest weapon possible, the Multi-laser, although I magnetized one of the models so that I could replace the weapons if I want. I considered the Atalan Jackals for fast attack. But the Jackals take up more points and I don’t think that the genestealer cult really need fast attack except to fill out a Brigade. I could be wrong and may want to build them later.
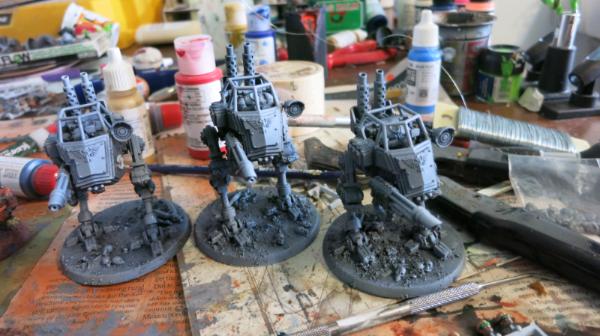
Three Unpainted Cult Scout Sentinels
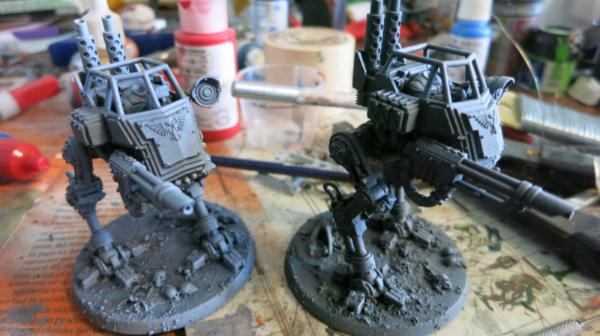
Two Unpainted Cult Scout Sentinels
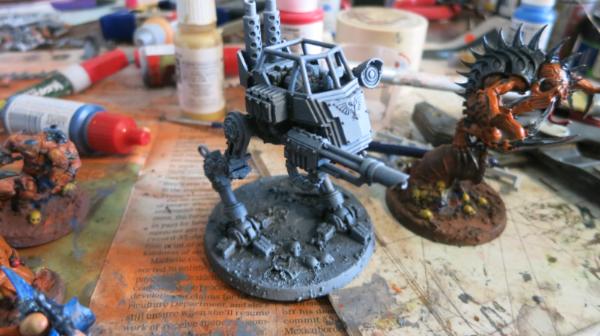
Cult Scout Sentinel with Painted Patriarch
These models are ready for painting. I already painted the heads for the drivers which I will glue on later. I plan to use an airbrush for the orange colors of the body. I like the looks of the models even though I suspect they will not last long on the game board. Still, if my opponent is shooting these models, he is not shooting my more important players.
122359
Post by: tzurk
Really love the brood brothers commander - good stuff.
Let's see those sentinels oranged up!
21898
Post by: Oldmanronald
Oranging Up the Sentinels
Thanks Tzurk for kind remarks about the brood brother’s infantry commander. He is really the only customized piece in the Genestealer Cult army so far. Also, I have oranged up my sentinels.
I used an airbrush in a portable painting booth to spray on the orange paint. I like to do this for my bigger models since it is quicker.

The Painting Booth with Sentinels

Airbrush with Sentinels in Painting Booth
I first painted the undersides of the models with a burnt sienna undercoat. Then I used a Golden Cadmium Orange acrylic paint for the orange but I mixed it with a little blue to tone down the intensity of the orange. In this case I mixed the blue with orange right in the cup on the airbrush but the orange was still a little too bright. Next time I will premix the paint before putting it into the paint cup to make sure the color is right. The result is that the model looks orange with some defined shadows although that shadow is actually the burnt sienna undercoat.
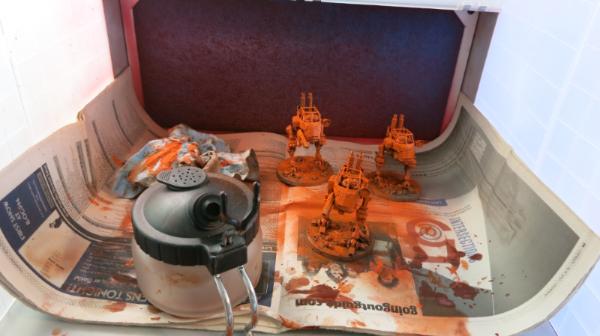
The Painting Booth with Sentinels
These models look pretty intensely orange since I also sprayed the bases and the parts that will be later covered with additional colors. Compare this to the rest of the figures which I painted with a standard brush. Notice that they are not so intensely orange.
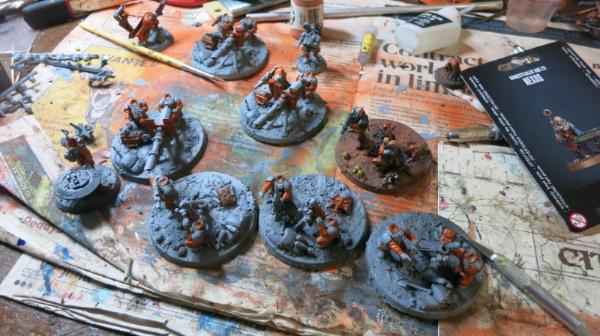
Hand Painting Several Infantry Figures
The finished painted mortar team in the picture above is a template for the other models.
Once the Sentinel was finished with other colors and duller pigments on the base, it wasn’t so intensely orange.
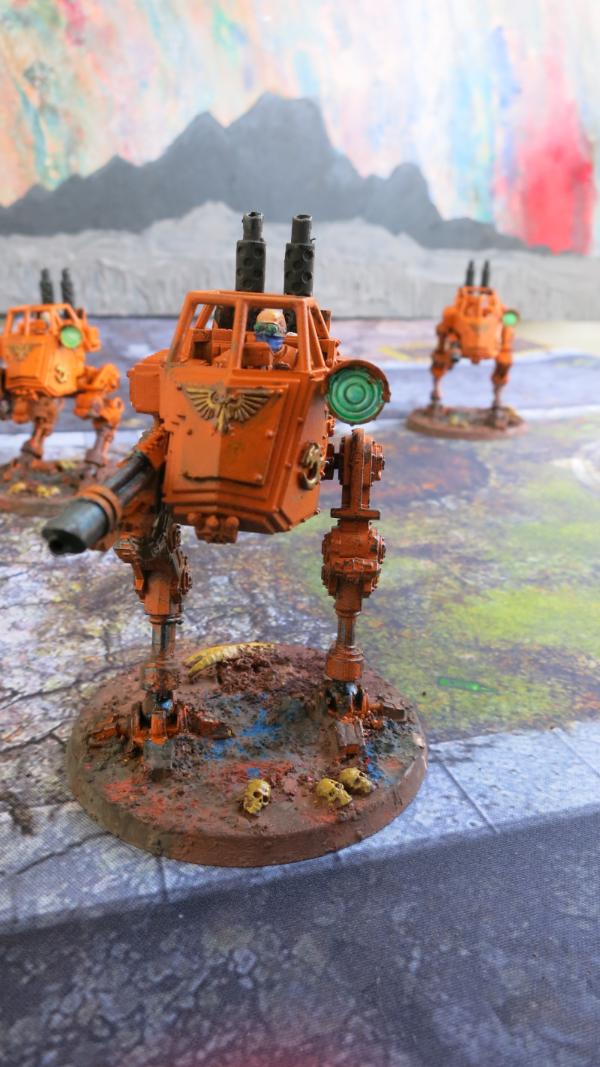
Scout Sentinel
21898
Post by: Oldmanronald
Nexos
One fun thing about Genestealer Cults is the number of weird characters. In this last batch, I made up several including the Nexos. He is described as a Strategic Coordinator and has a certain ability to add command points during the game. I had fun painting this model. The character himself is painted with the standard pattern that I have on all my genestealer cult models. The map portion of the table is painted white and overlaid with fluorescent paints. This made the map look like it is glowing. It was an experiment that worked.
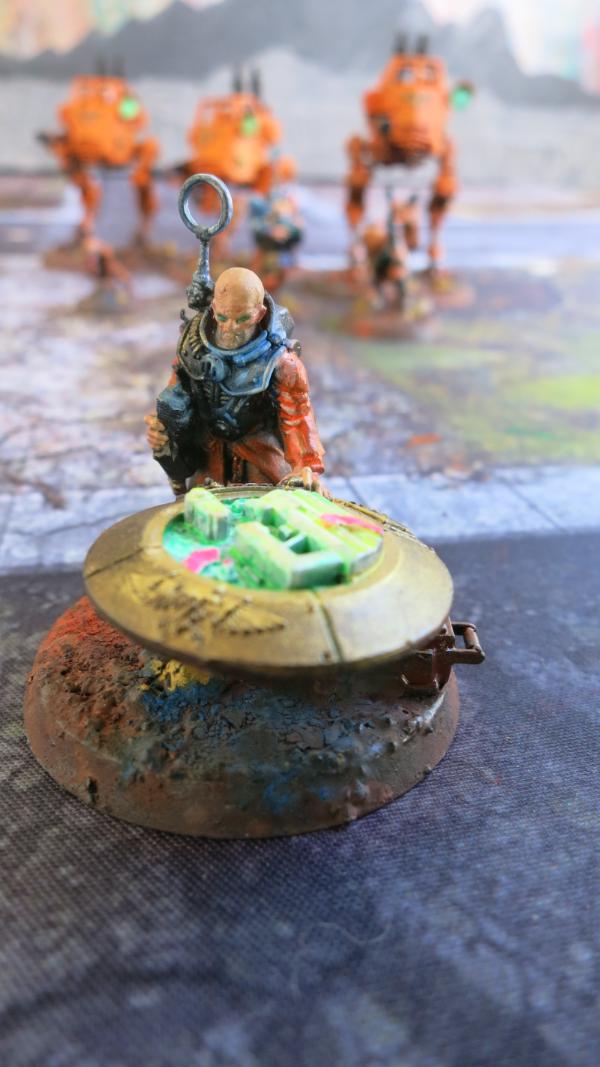
Nexos – Front
I also painted portions of his armor, arm, and hands white and then painted over them to mimic reflected light.
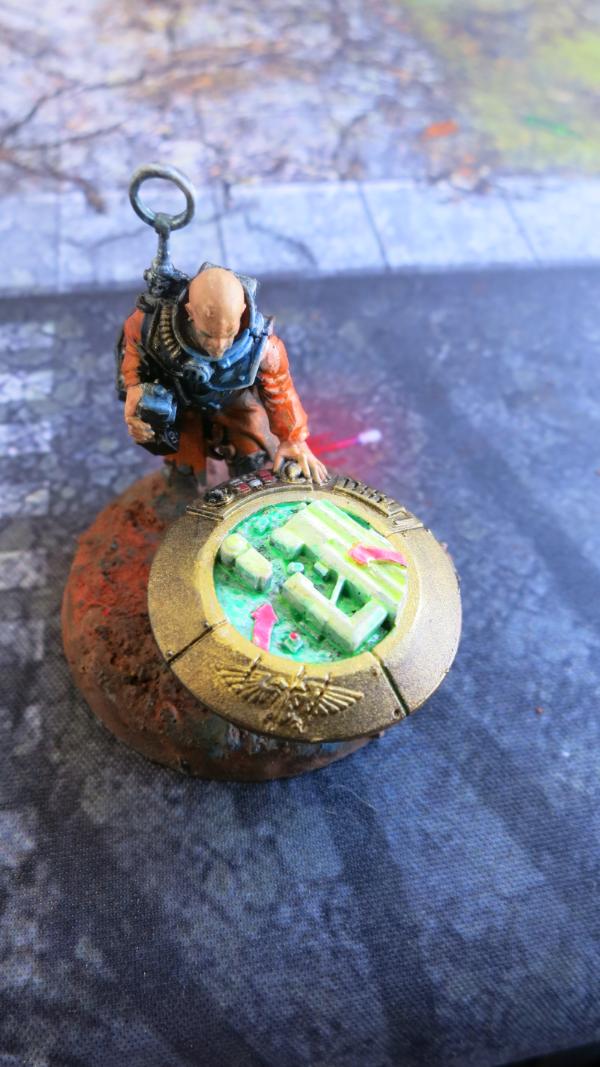
Nexos – Top
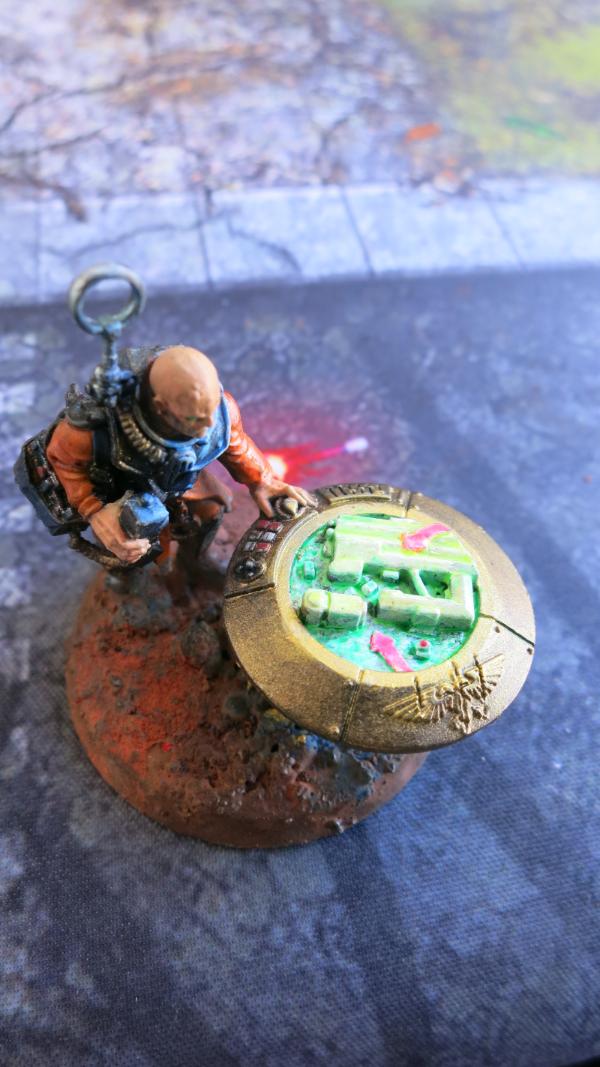
Nexos - Looking at Map
I painted the table mostly bronze with gold trim at the top so that it looked like light was emulated from the map.

Nexos – Over the Shoulder

Nexos - Side
21898
Post by: Oldmanronald
First Cult Sentinel
The main reason I made these Cult Scout Sentinels was to fill the fast attack slot for a Brigade Detachment. These are fast moving models that will die fast. Since with cult ambush all the Genestealer cult models can pop up on the board just about anywhere and will die fast, I really don’t see a real special role for these models except to grab objectives and to put some pressure on the enemy during the first turn. They are neat looking models and will be fun to play as long as they last.
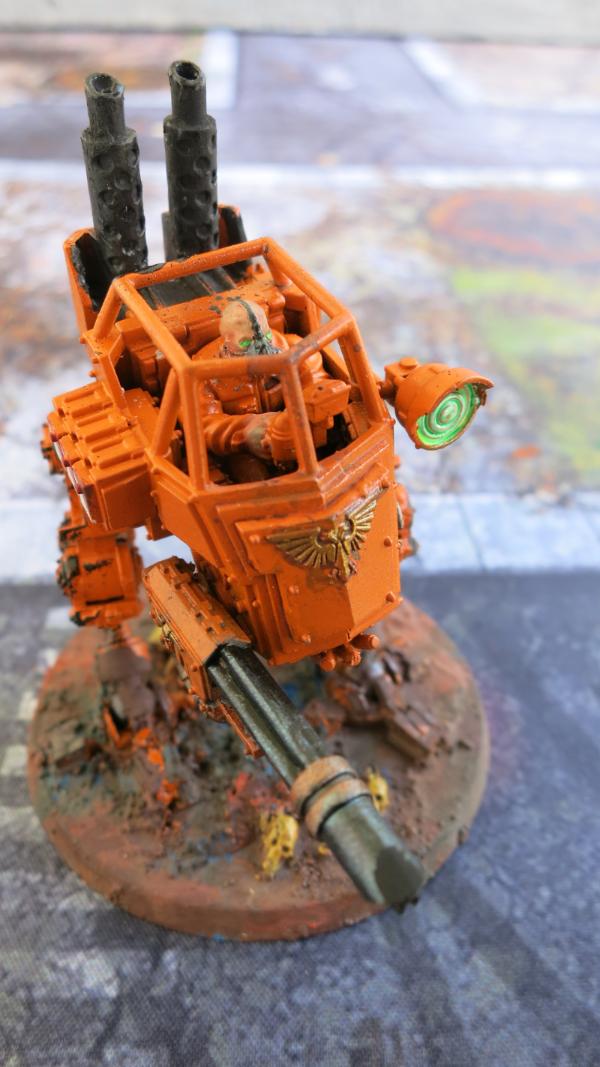
Cult Sentinel – Upper Front
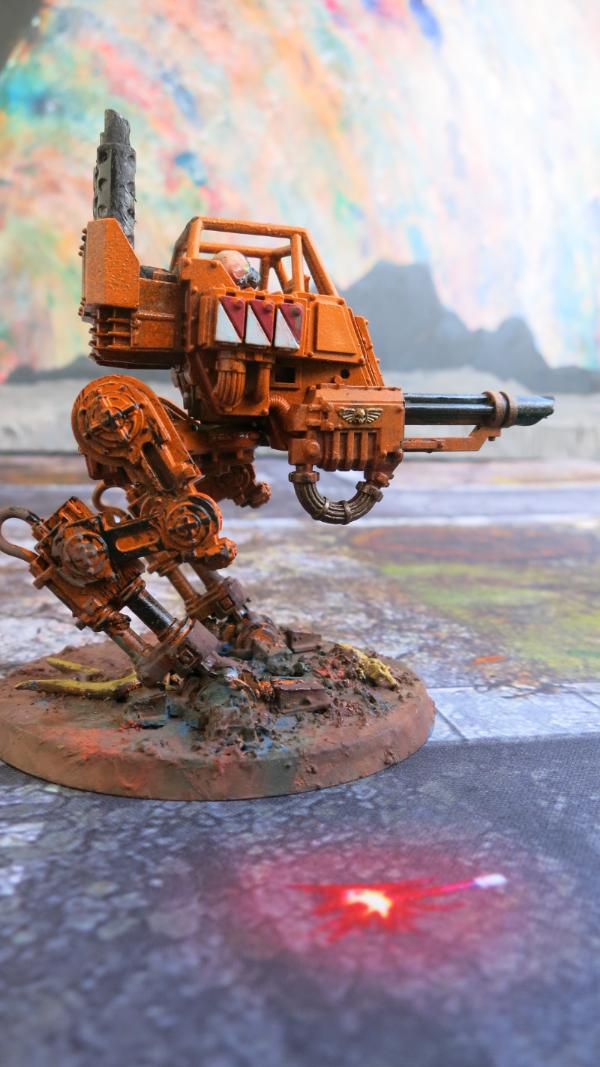
Cult Sentinel - Right
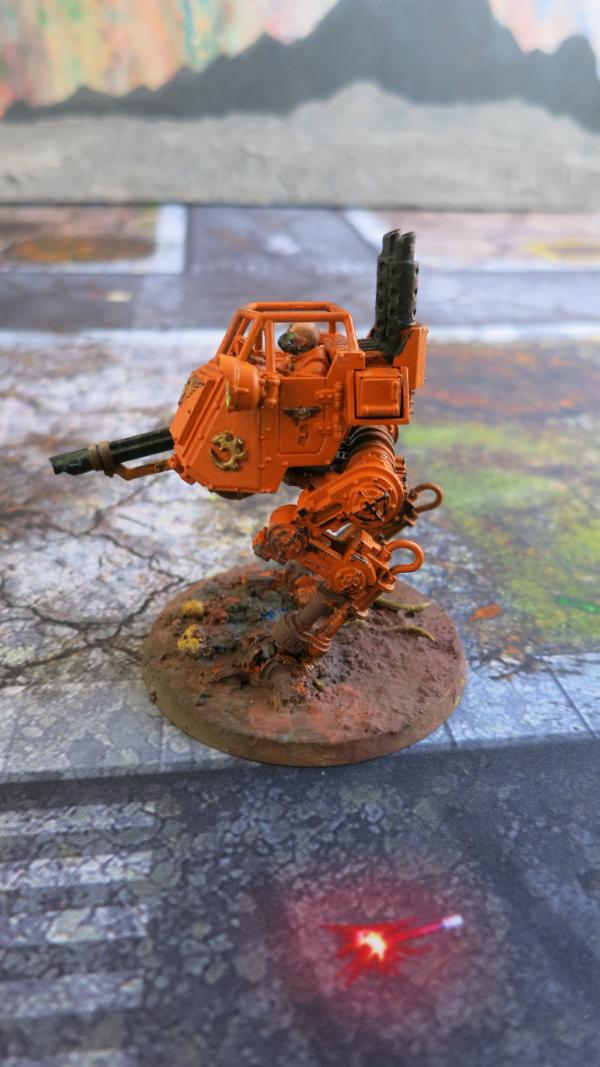
Cult Sentinel - Left
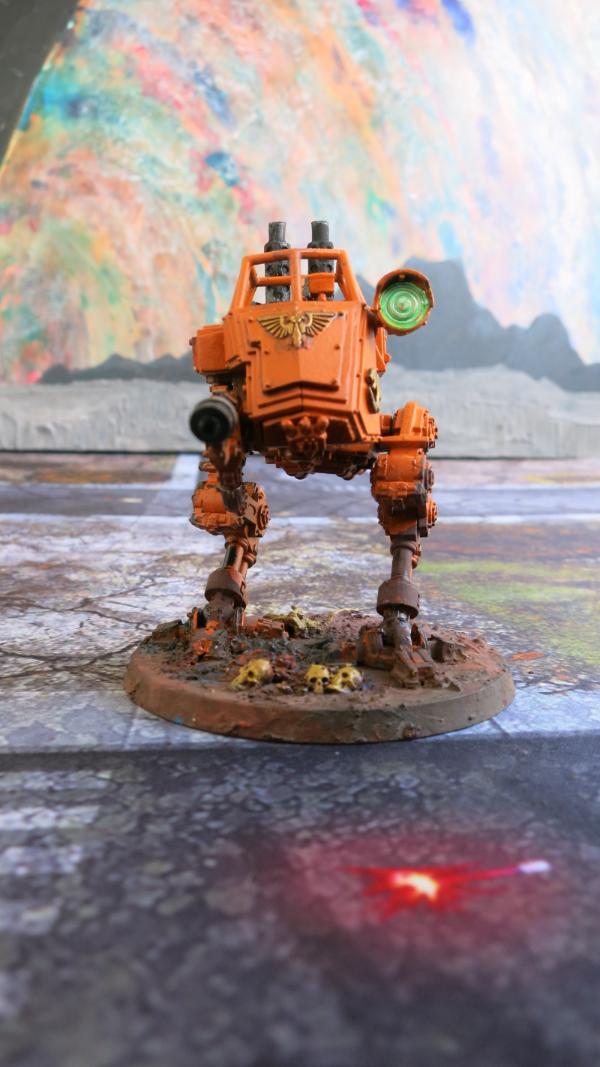
Cult Sentinel – Front
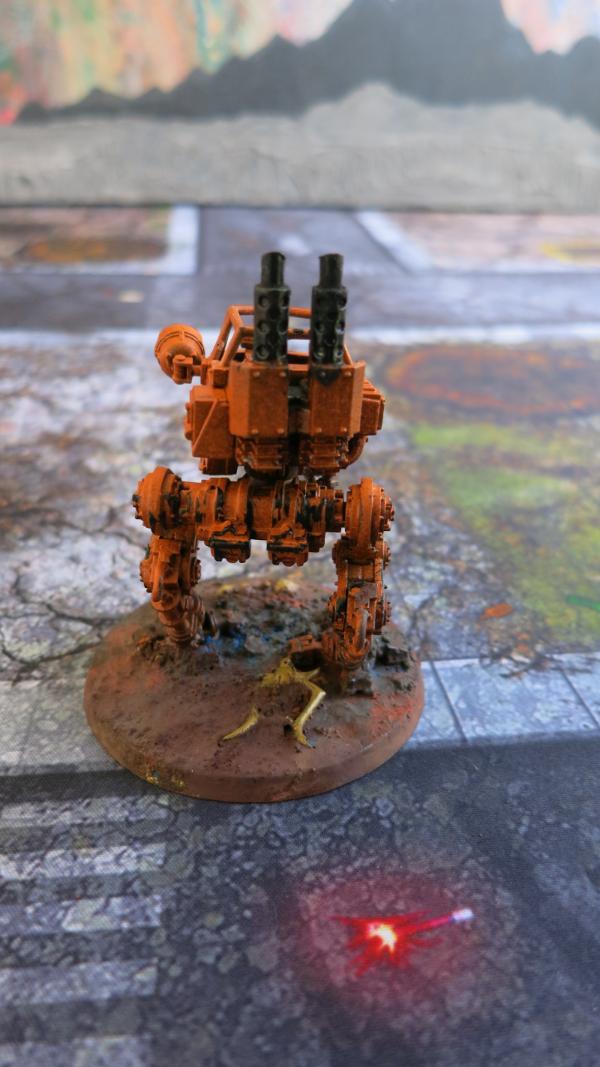
Cult Sentinel – Rear
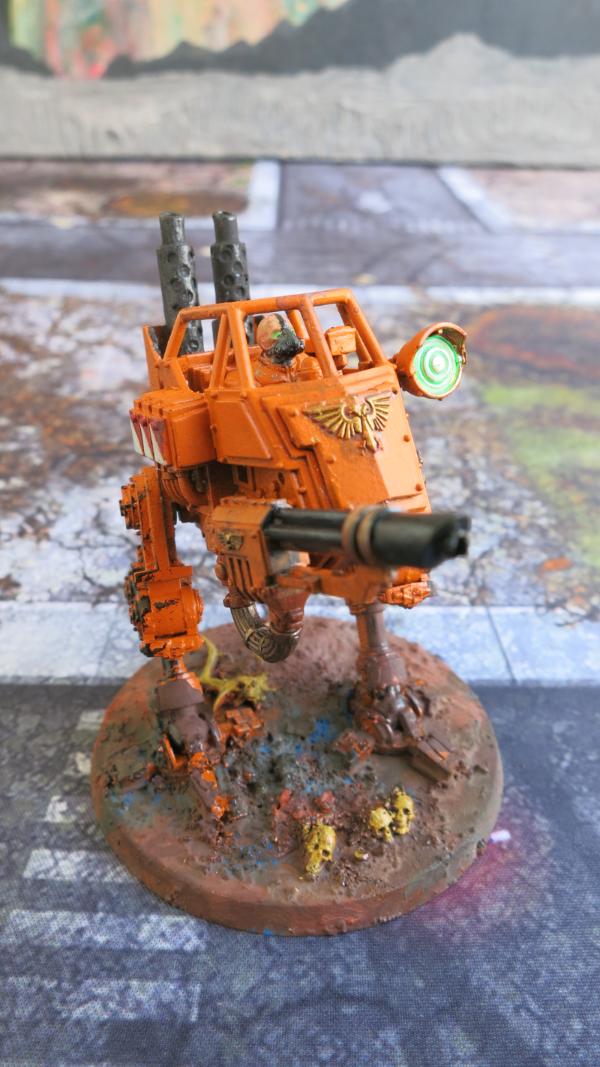
Cult Sentinel – Upper Front Right
21898
Post by: Oldmanronald
Familiar
I painted this model several months ago but forgot to take a picture of him. He is an easy model to overlook, simple and small. I really like this model but it was hard to get his head in focus in the picture. The space marine helmet under his hands was fun to paint.
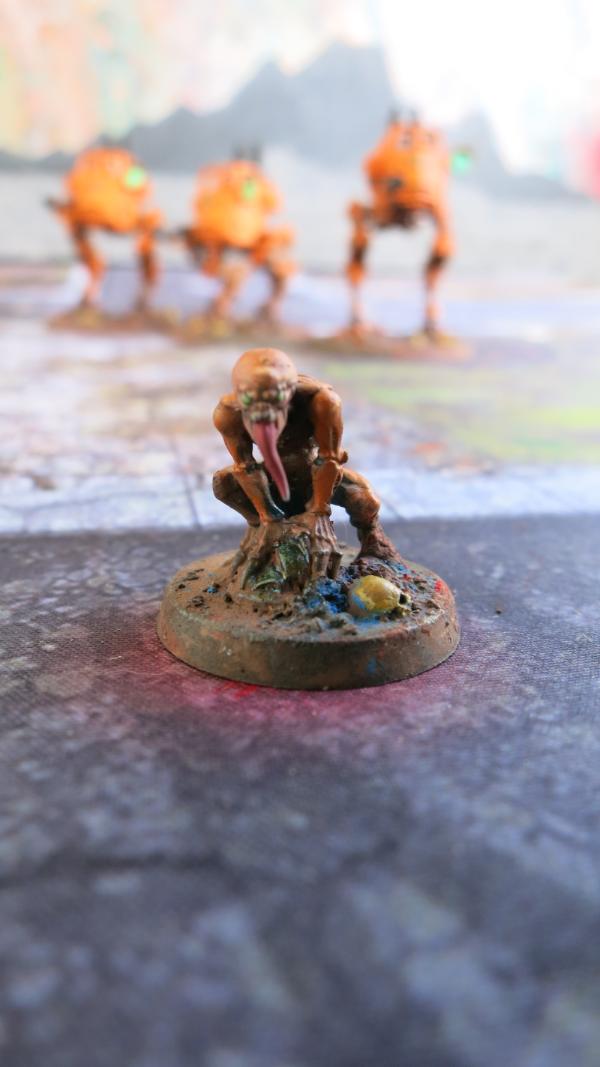
Familiar - Front
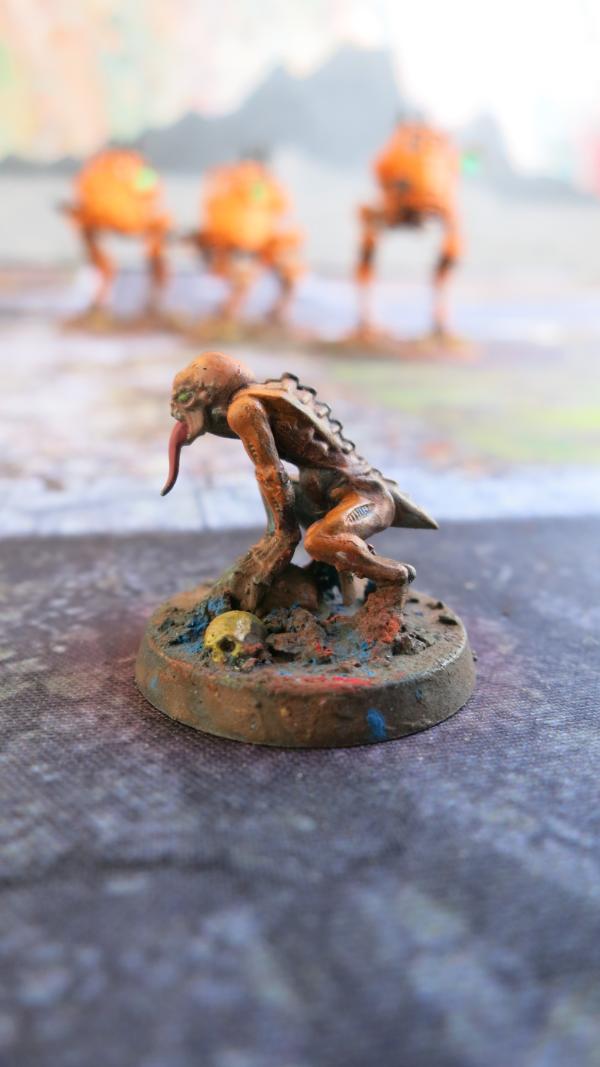
Familiar – Left
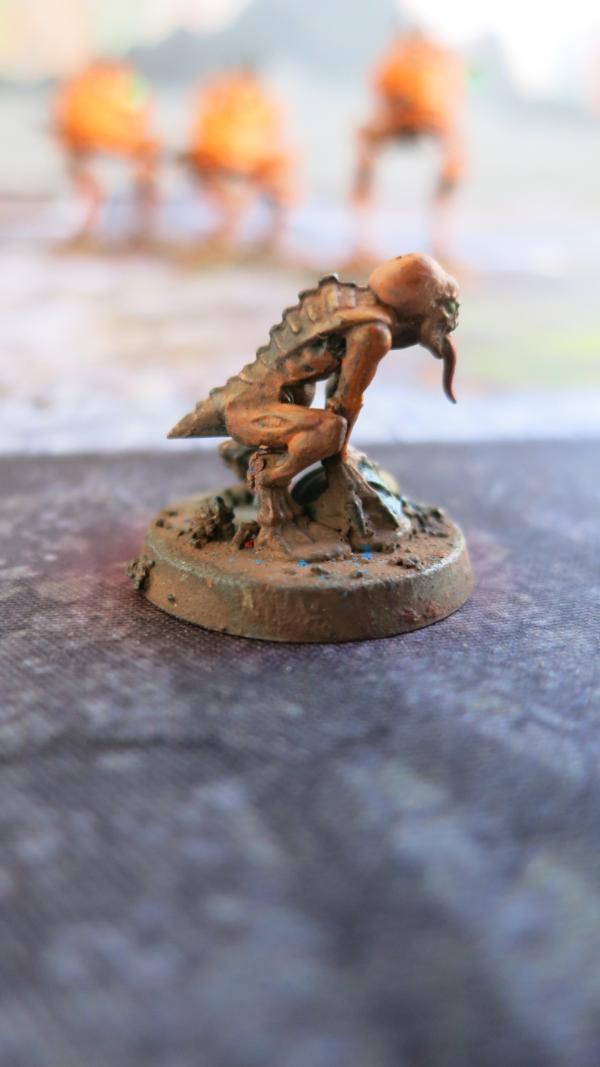
Familiar – Right
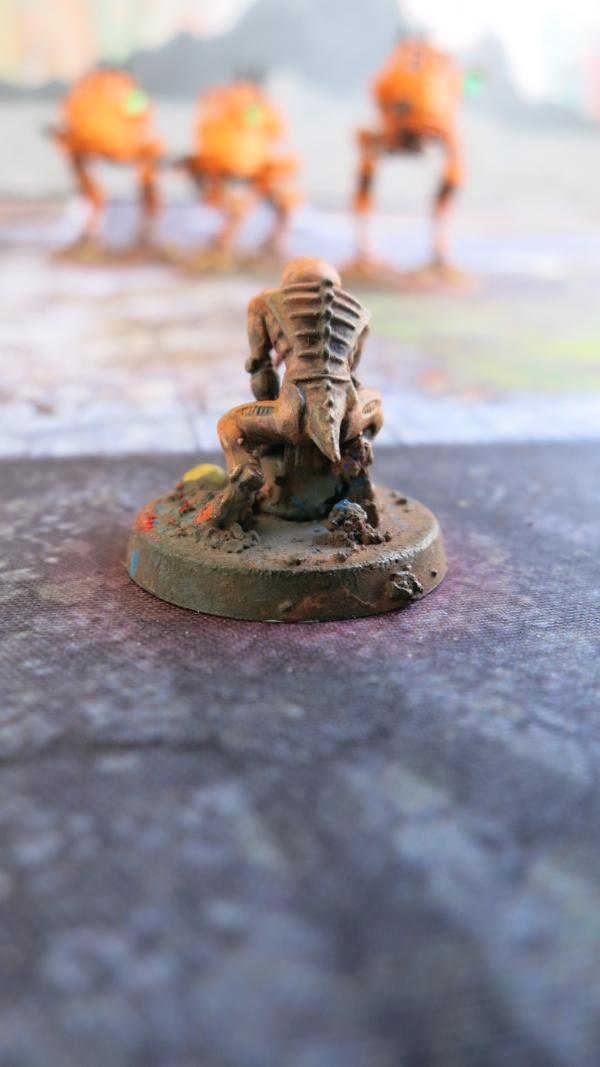
Familiar – Rear
The little pile of debris to the right just under his tail is looks like something that he just defecated. This was not intentional.
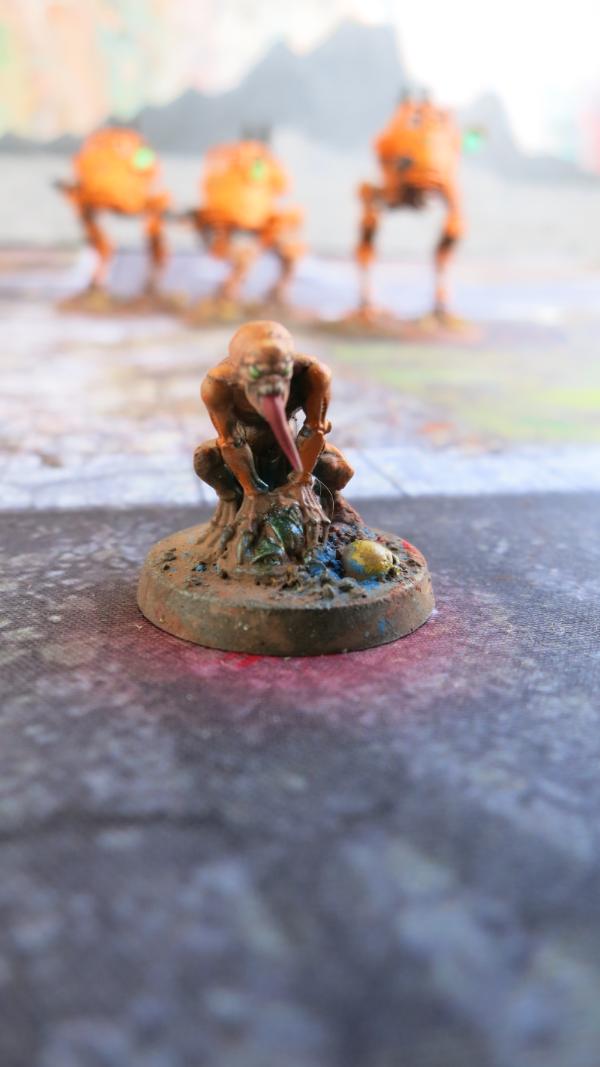
Familiar – Another Front
21898
Post by: Oldmanronald
Brood Brothers Master of Ordinance
This model is built using bits from the Cadian Command squad and from the Genestealers Cult Upgrade Frame. I made the braid from two strands of floral wire and was pleased with the results. The coat is blue rather than orange to make him appear more regale. I really like this model. He is an elite who will beef up the three Basilisks in this army.
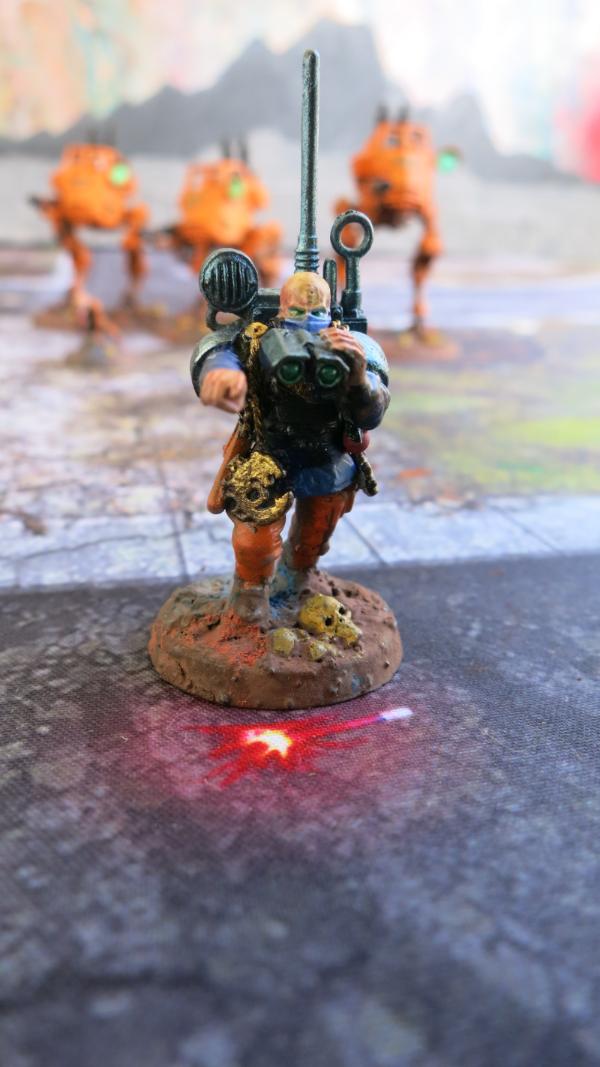
Master of Ordinance - Front
He looks cross-eyed. I did not do this on purpose but actually it is more fun and sort of fits his character.
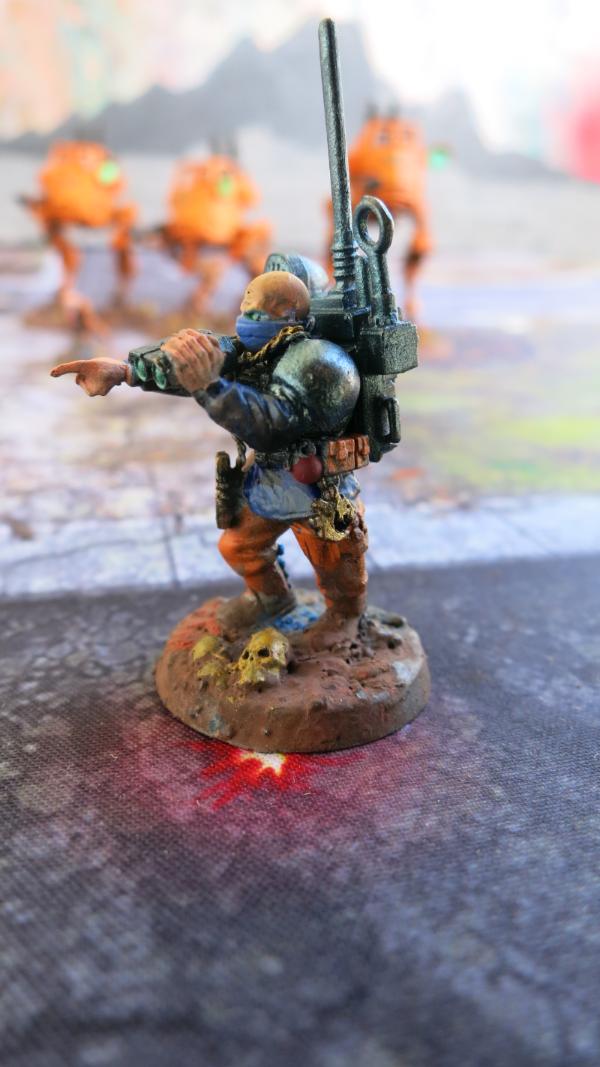
Master of Ordinance - Left
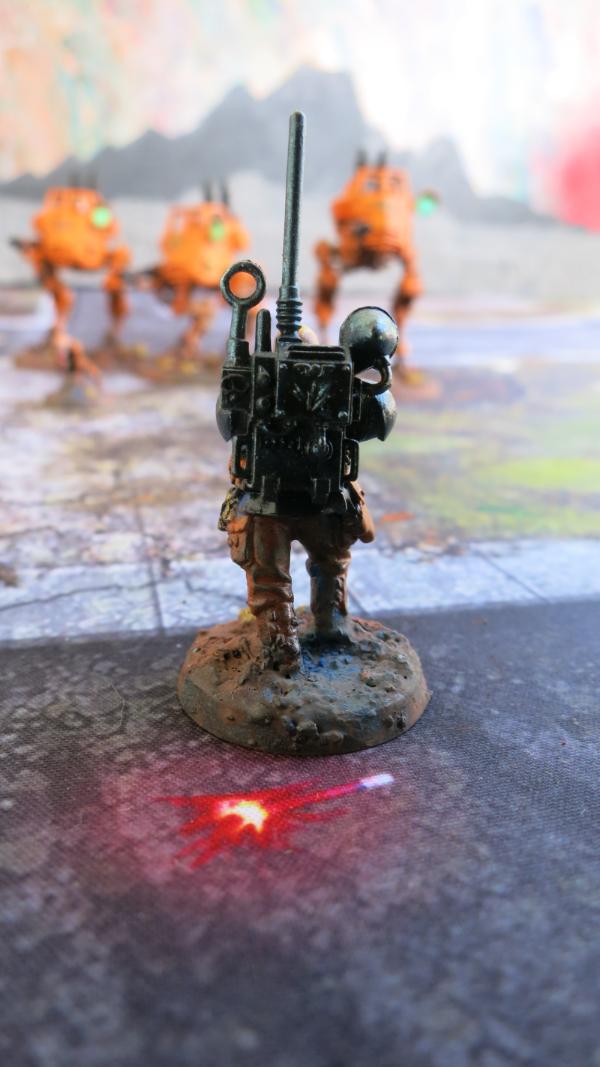
Master of Ordinance - Rear
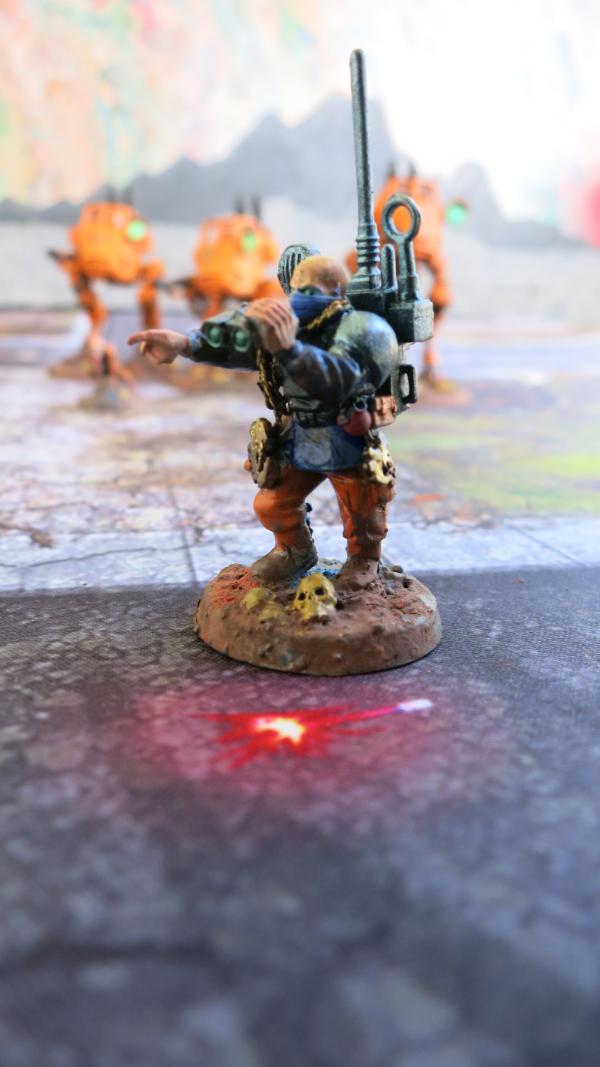
Master of Ordinance – Left Front
This shows some of his braiding over the chest and arm.
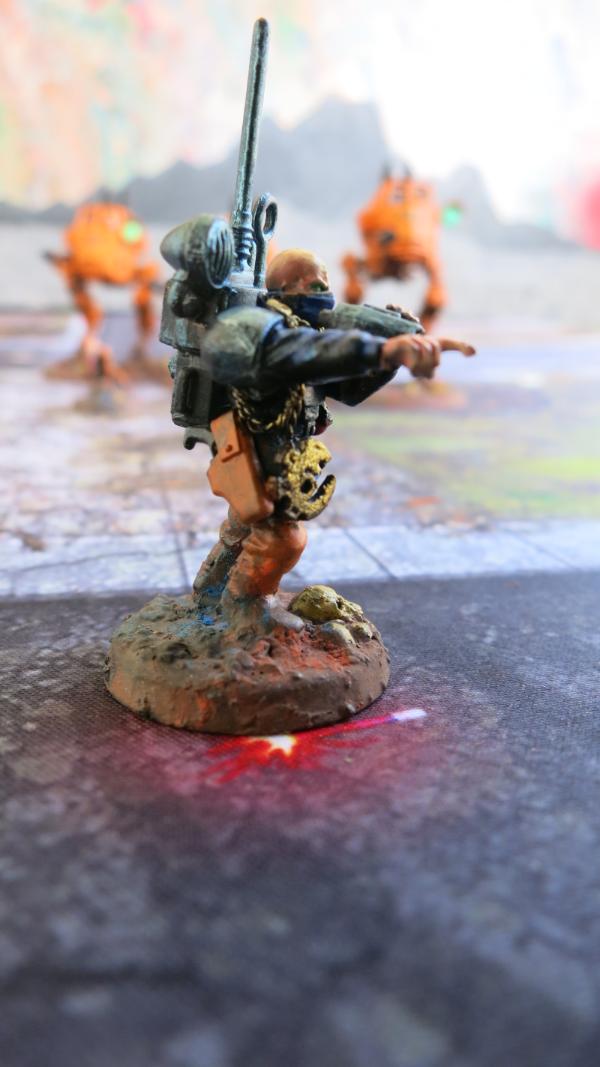
Master of Ordinance - Right
21898
Post by: Oldmanronald
Spearhead Detachment
I have almost finished my spearhead detachment with a three armed company commander, a master of ordinance, two heavy weapons squads each with three mortars each for a total of six mortars, and a three gun Basilisk Battery. I only show two of the Basilisks but I have already assembled and have started painting and have almost finished the last gun. This spearhead detachment is intended to set up behind any terrain during the first turn and to remove bubble wrap and any other difficult targets during the first turn and to remain in place with little movement during the rest of the game taking out targets using indirect fire. The brood brother’s company commander role got clipped after the latest FAQ but he will should still be reasonably effective giving orders to the two mortar squads.
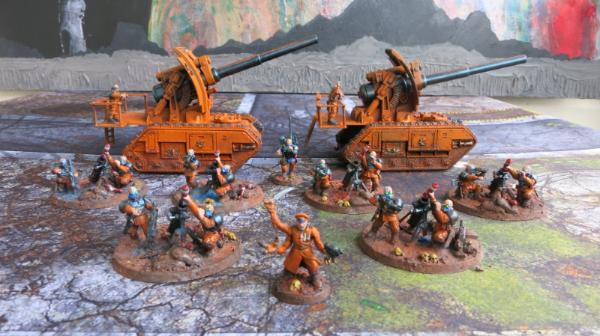
Spearhead Detachment
For 450 points, this spearhead detachment should give a real shooty backbone to the genestealer cult ambush based army.
21898
Post by: Oldmanronald
Sanctus with Silence Sniper Rifle and Soulsight Familiar
The fun thing about the Genestealer cult is all the various models that seem to fit the colors and style of painting that I do. Except for a few highlights of fluorescent green and a little red, most of my colors are shades of orange and blue. There is a little sienna yellow in the skulls and ruins at the base of most of my models and a little bronze gold in the tokens although bronze and gold are variations of orange and yellow. I actually vary the textures from the dirty base to the shiny tokens and weapons more than the colors. None of the colors are pure, however, as most are mixtures of several colors. Thus this model’s orange uniform and cape includes a base of burnt sienna and an orange mixed with blue to lower its intensity. The weapons are painted with black as a shadow, metallic blue as the light, with a touch of silver mixed with metallic blue as a highlight.
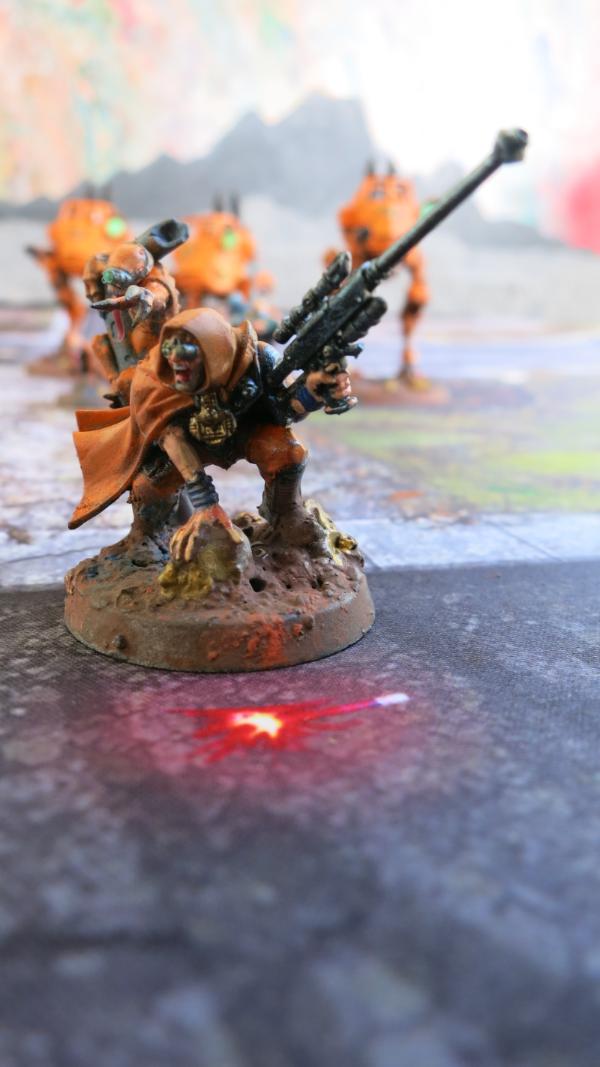
Sanctus – Left Front
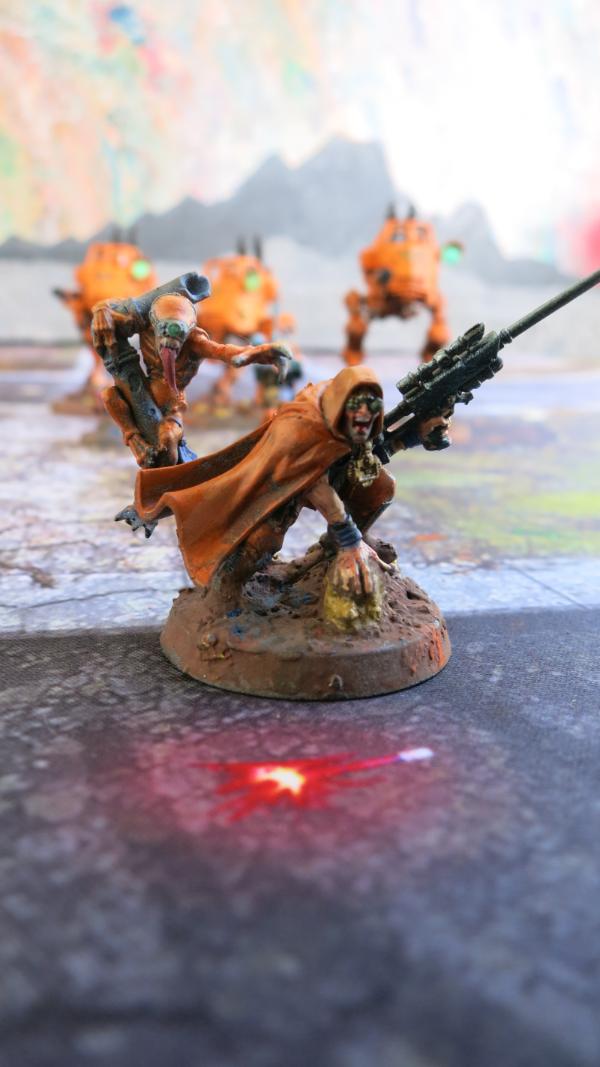
Sanctus – Front
The familiar was fun to paint. To paint the pipe that the familiar is climbing, I left the black and white spray painted base coat and the accidental smears of paint from painting the rest of the model on the unpainted pipe and simply covered the pipe with Army Painter blue tone. This keeps the underlying stains and shadows that give the pipe depth but the blue tint contrasts to the orange and ties the pipe into the rest of the model. I really like the technique of using tints and shades over an unfinished base coat and simply adding regular paint for details and accents. One of these days I will paint a whole model this way. It might be great with Orcs. It gives the model a weathered look and is very realistic.
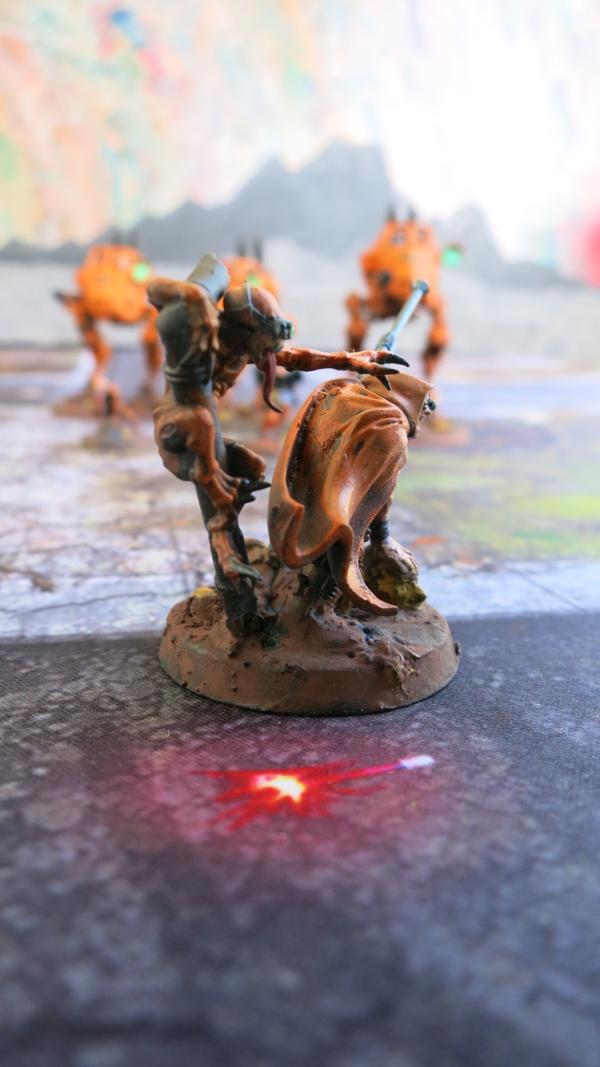
Sanctus - Right
I wasn’t sure that I liked the Familiar and the pipe when I made the model until after I painted it. Now I really like the Familiar and the Sanctus together. This model turned out better than I thought it would while I was painting it.
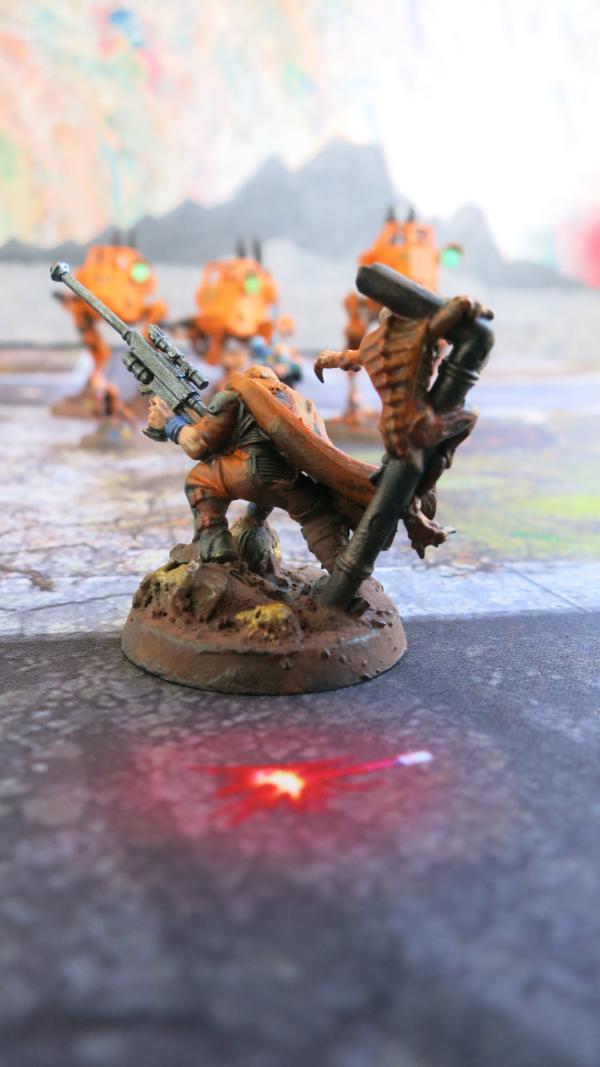
Sanctus – Rear
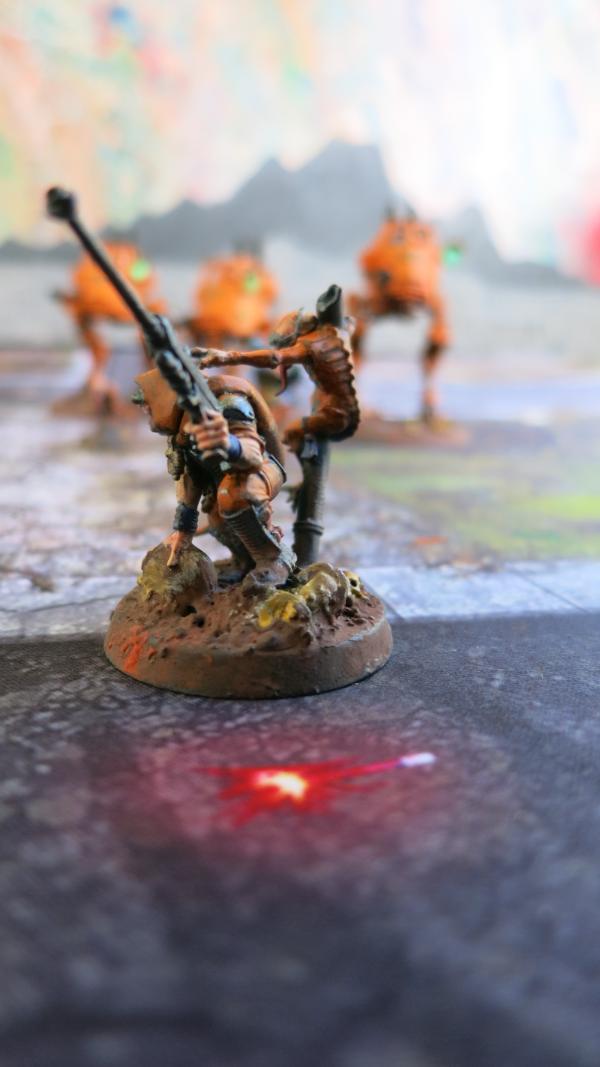
Sanctus - Left
21898
Post by: Oldmanronald
Bad News – Good News
This post includes bad news and good news.
What is the bad news?
My plans for this army were to have two heavy weapons squads in my Brood Brothers Spearhead detachment and three heavy weapons squads in my Genestealer Cult Brigade detachment. The two in the Spearhead detachment are armed with mortars. The three in the Brigade detachment would include 1 more mortar squad and two other heavy weapons squads, one with lascannons and a second with lascannons or possibly autocannons or heavy bolters. I have already built two mortar squads and a lascannon squad. Although I really like my mortar squads, they are tedious to build and I wasn’t really looking forward to building the last one. I liked building the heavy weapons squad with lascannons and really like the look of them.
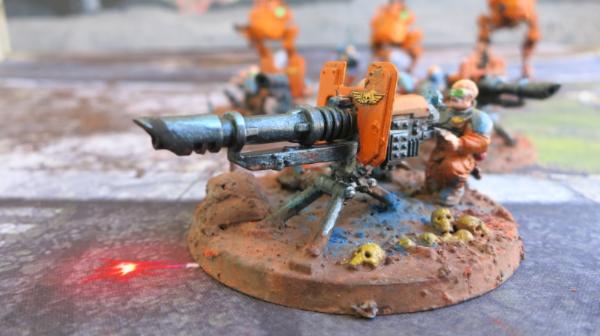
Heavy Weapons Team with Lascannon – left front
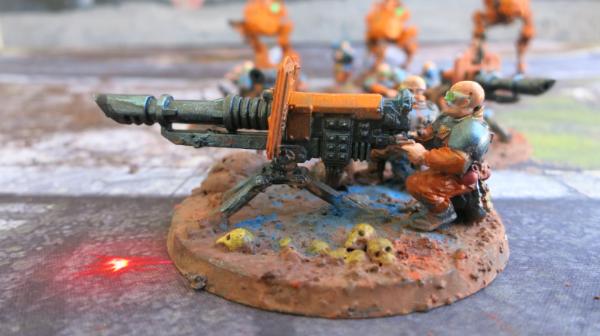
Heavy Weapons Team with Lascannon – left

Heavy Weapons Team with Lascannon – right
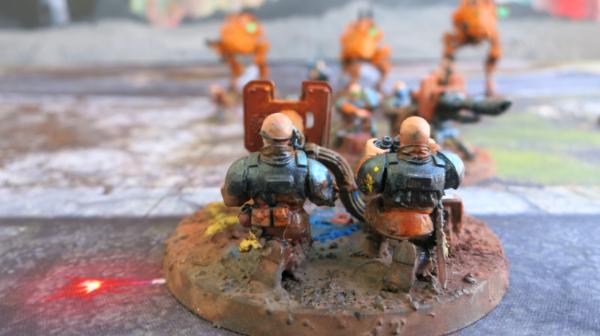
Heavy Weapons Team with Lascannon – rear
This view shows a footprint just under the gunner’s assistant butt.
Heavy Weapons Team with Lascannon – right

Heavy Weapons Team with Lascannon – front right
So the bad news is that under the latest FAQ, the rule of three has been amended so that my army is limited to only three heavy weapons squads even though the heavy weapons teams are from different codices. Since I already have three heavy weapons squads built, I will use them although for the points I would be better off with three mortar squads rather than two mortar squads and one lascannon squad. The mortar squads are cheaper and are great for removing screens around important targets. Although I like the idea of a lascannon squad with cult ambush that can pop up any place on the battlefield, I must admit that my experience with lascannons has usually been disappointing. And that has been with space marines who have a much better ballistic skill. Still, I find the mortar squad tedious to build and I don’t want to buy and build another weapons squad, at least for now.
What is the good news? Since I want to run a brigade detachment, I need two more heavy units. After considering the options, I ordered two Goliath Rockgrinders and they should be arriving today. This means I have a weekend ahead of assembling and painting these models. I can hardly wait. My air brush trigger finger is already itchy.
21898
Post by: Oldmanronald
Two of My Favorite Steps
I got my two Goliath Rockgrinders Friday night and was able to completely assemble one of them and get the second one almost assembled this weekend. That is a problem with this hobby. Real life interferes. I wanted to spend this weekend assembling and painting these models but my daughter had a baby shower, my house was filled with guests, I had to mow my lawn and do yard work, we went to Church for Mother's Day, and I had to spend lots of time with my wife, children, and grandchildren. So my spray painting trigger finger is still itchy. I might finish and get a base coat on the models after work this week.
When building models, certain steps are more fun than others. My favorite steps use to be assembling and especially customizing the models but lately I am enjoying the painting more. Now, two of my favorite steps are 1) painting the base with a mixture of gray gesso and model railroad ballast, and 2) painting the base with pigments. Both steps bring the model together. The gesso and ballast cover the base and unify the model so that all the bits and green stuff mounted on the base are pulled together in the same landscape. The models feet, the skulls and other battlefield debris, and any green stuff that I have used on the base are now made part of the same terrain. Painting with the pigment does the same thing for this almost final step in building and painting the models. Again, all the diversely painted parts of the model are unified into the same desert landscape.
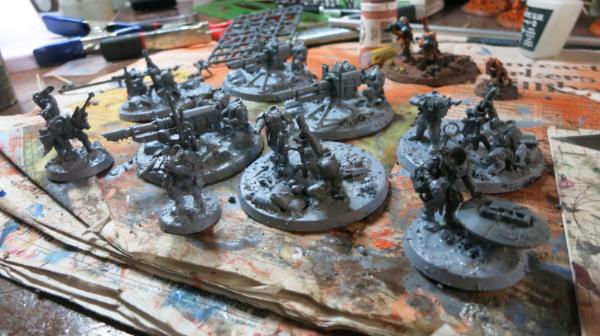
Models with Newly Applied Gesso and Ballast
Some of the gesso is still wet in the picture above.
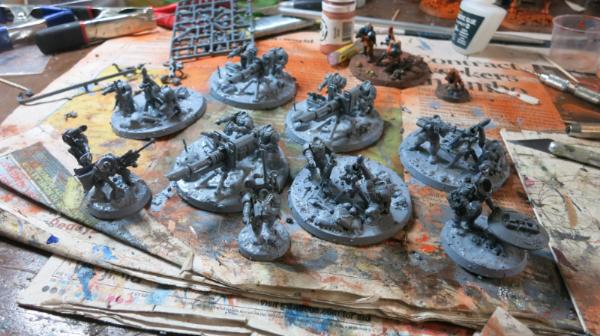
Models with Newly Applied Gesso and Ballast
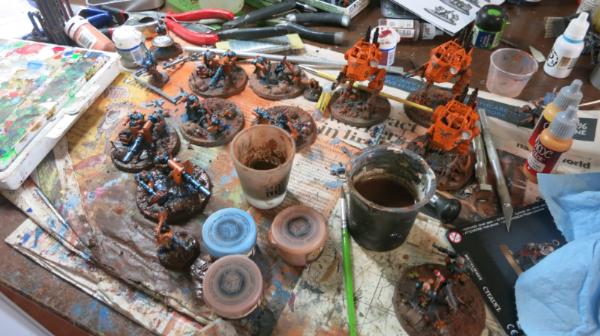
Models with Newly Applied Pigments
The pigments on the base are still wet on the models near the front. The NOVA shot glass contains a mixture of orange pigment and old pastel grinds that I mix as the primary base components. The orange, violet, and blue pigments in their containers are also in the picture. So is the green brush that I use to apply the pigments and the pigment fixer. The fixer is not in this picture.
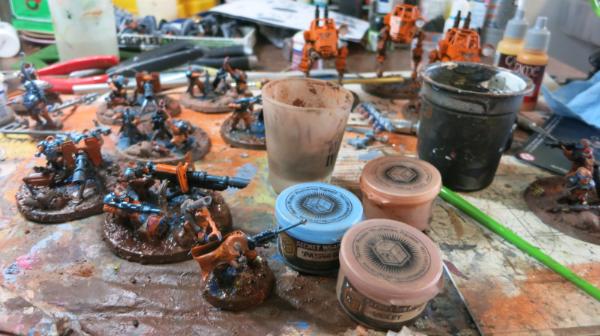
Models with Newly Applied Pigments
Some of the pigment is on the newspaper. Since the Goliath Rockgrinders don't have a base, I will not be using my gesso on these trucks but I will be putting some pigment on the truck, expecially on the rockgrinder front blade.
21898
Post by: Oldmanronald
Kill Team Terrain
Last year I ordered the Kill Team Starter set. It included a Kill Team Core Manual, a couple of spruces of Adeptus Mechanicus figures, a couple of spruces of the Genestealer Cult, some datacards, and a gothic destroyed cathedral. I have been working on this and have built and painted most of the models. I am still working on the cathedral.
I have experimented with some techniques that have been somewhat successful. I assembled the cathedral and its outlying walls and primed the cement portions of the wall with pastel primer that I had. The pastel primer is full of fine grit that is designed to hold pastels into place. I then used an air brush to paint metal portions with reds and turquoise, the red to underlay the iron and the turquoise to underlay the bronze. The pictures show the painted areas and the grey pastel areas.
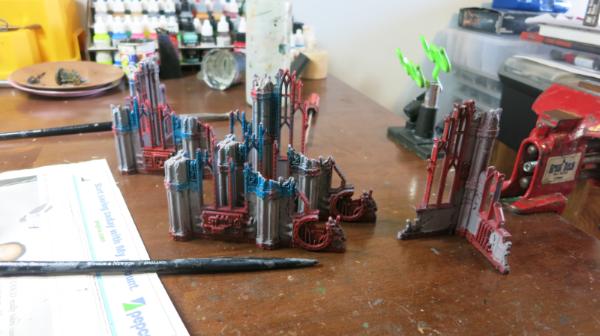
Outlying Walls

Colourfix Primer – Pastel & Multimedia Primer - Elephant
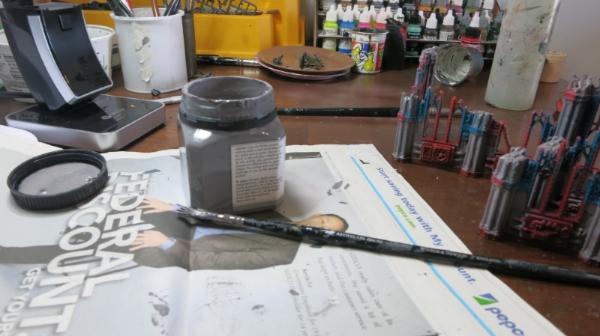
Opened Colourfix Primer – Pastel & Multimedia Primer – Elephant

Walls with Pastel Primer Painted on
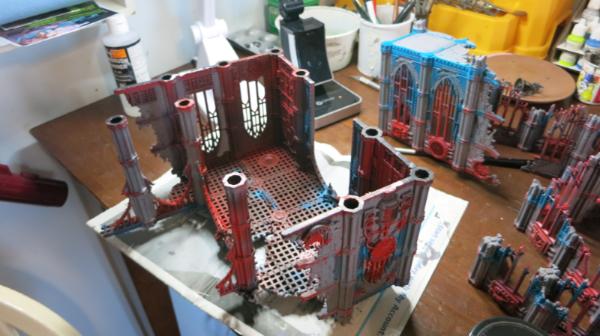
Interior of the Cathedral
I then actually took pastel sticks and colored the walls mostly with dark pastels to represent crumbling and discolored and flamed cement.
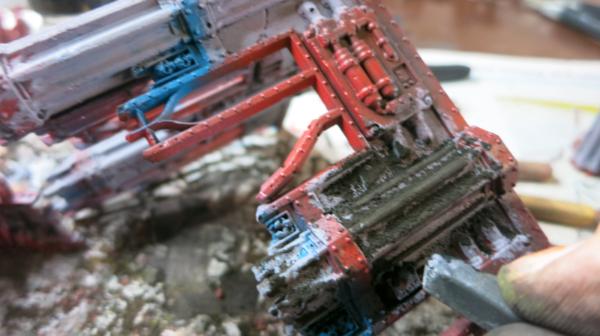
Wall with Pastel Stick in Hand
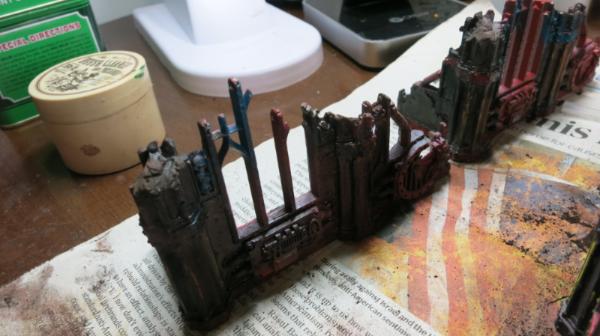
Wall Darkened with Pastels
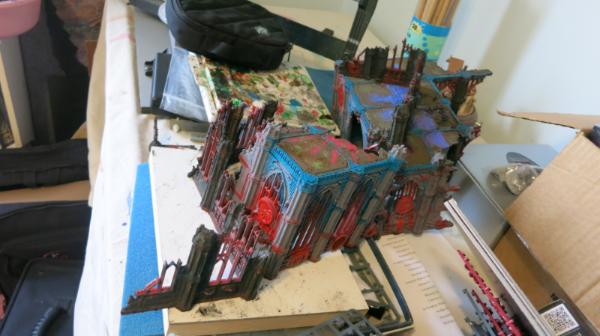
Cathedral with Designs in the Roof Painted with Pastels
I spray painted on a fixture to hole the pastels. Actually, I wasn’t too happy with the results. The pastels comes off when the terrain is handled and it seemed too bizarrely colored. So I put it aside for several months. A few weeks ago, I started painted over the metal work on the Cathedral with metallic iron and bronze paint. I’ll have to take some pictures of these and post them in the next few days. The Cathedral is turning out okay but this use of pastels took too long. So overall, I wouldn't do it again..
21898
Post by: Oldmanronald
Painting the Last Basilisk
I use an airbrush to paint vehicles. A couple of weeks ago, I finished up the last of my three Basilisks and this week I assembled and airbrushed my two Goliath Rockgrinders.
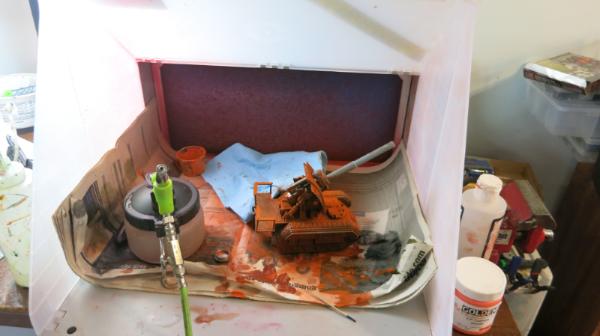
Basilisk in the Paint Booth
I have a portable paint booth that I set up on my work bench. In the back is a filter that shows in the picture and behind the filter is a fan which draws in the spray paint. It seems to work pretty well. The filter is turning orange. My airbrush is on the left mounted on my airbrush cleaning jar. The Golden Cadmium Orange is on the right. I paint the underside of the model with Burn Sienna which is a dark orange and then overcoat it with a mixture of Cadmium Orange with a little ultramarine blue to cut the intensity of the pure orange.

Basilisk in the Paint Booth – Closeup
The combination of burn sienna and orange gives the model some depth. I will hand paint in the details including metallic blue on the main gun.
21898
Post by: Oldmanronald
Assembling and Priming the Two Goliath Rockgrinders
I enjoyed assembling these models but it took longer than I thought it should. They are latter GW models so the instructions are reasonably detailed with few errors.
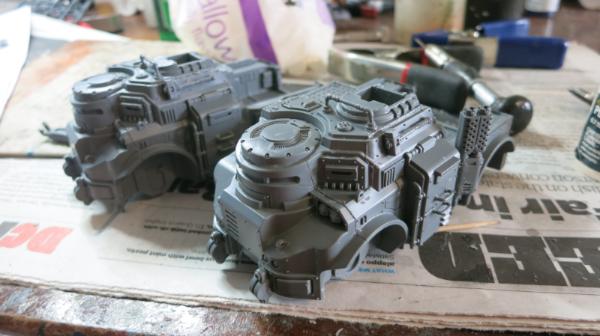
Assembling the Goliath Rockgrinders
The models had some gaps. I filled them in with Yellow Milliput which works better than Green Stuff for filling in the gaps. Milliput is water solvable so it can be diluted and more easily pushed in the gaps. The excess can be wiped away with a wet rag or finger.
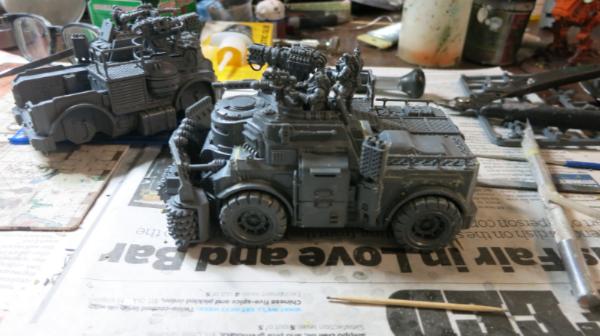
Assembled Goliath Rockgrinder with Milliput in Gaps.
If you look closely, you can see the yellow Milliput in the gaps. Also, note the pointing finger on the second model. I like it but it comes from the heavy weapons team spruce which are for imperial guard troops or brood brothers. So the pointing finger does not quite match these neophyte hybrid gunners who have gloved hands. I will use green stuff to modify the arm so it appears to have a gloved hand. The pointing finger with the glove made of green stuff is in the next picture.
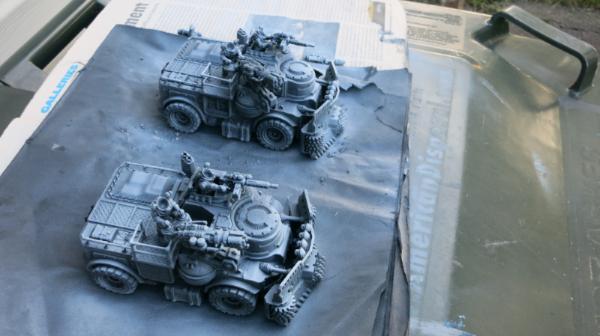
Goliath Rockginders with Base Coat - Side
I prime all my models with black and with a quick spray of white primer from the front and top. Notice the gloved hands on all the figures including the pointing finger with the gloves gauntlet made of green stuff. I use less green stuff on my Genestealers than I used to use making my Space Marines. I have so many models to complete for the Genestealer army that I don’t have the time to really make them quite as individual as my space marines. Overall, however, the Genestealers Cult army looks better than the Space Marines because they are a dramatic orange with contrasting metallic blue armor and weapons rather than a more subdued camouflage green brown.
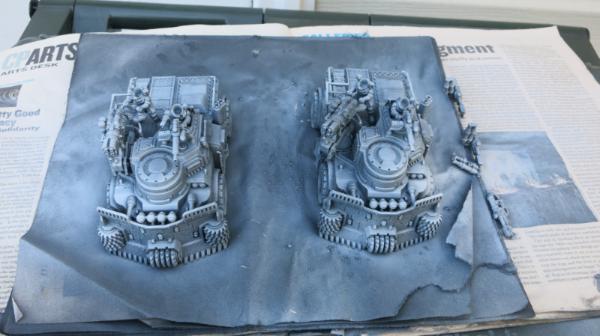
Goliath Rockginders with Base Coat – Front
The weapons lying on the newspaper on the right are heavy flamers for the sentinels.
21898
Post by: Oldmanronald
Airbrushing the Two Goliath Rockgrinders
The Two Goliath Rockgrinders are ready for the airbrush. The undercoat will be burnt sienna. The overcoat with be cadmium orange diluted with a few drops of ultramarine blue.
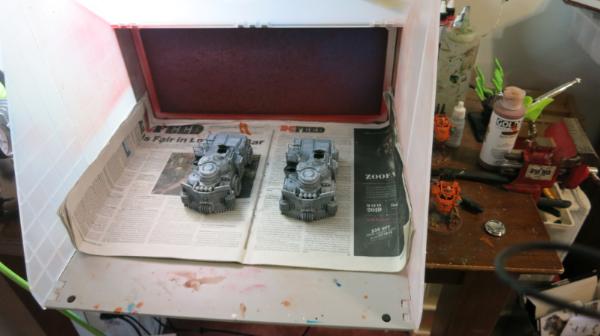
Goliath Rockgrinders in the Paint Booth
The burnt sienna is in the bottle on the right. The figures and guns have been removed. I will hand paint them.
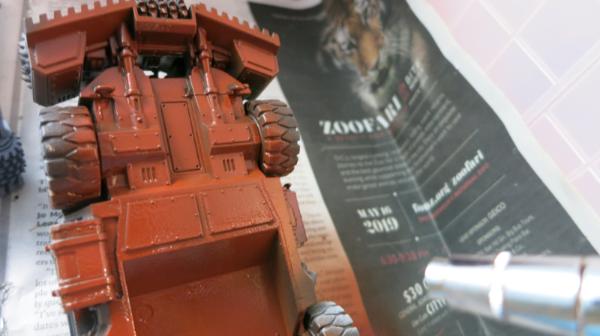
Underpainting the Burnt Sienna
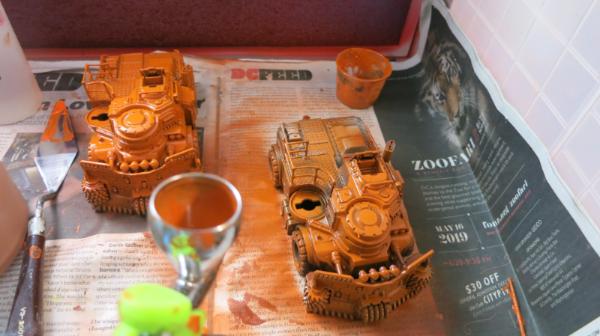
Overpainting the Cadmium Orange
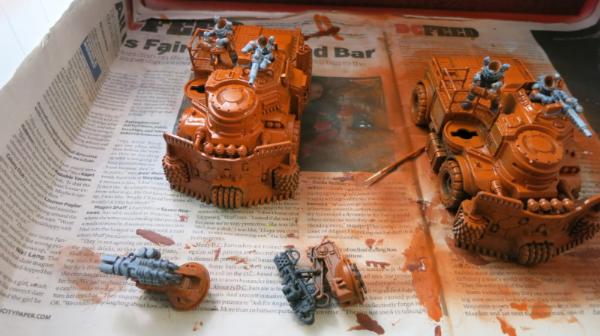
Goliath Rockgrinders with Figures
I have painted the orange on the figures and the guns. Now the figures, guns, and trucks are ready for the details to be hand painted. I see some seams that may need to be refinished and touched up.
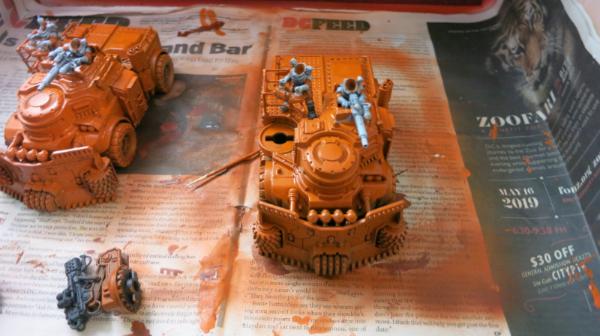
Goliath Rockgrinders with Figures
21898
Post by: Oldmanronald
Finishing the Two Goliath Rockgrinders
I really enjoyed assembling and painting the two Goliath Rockgrinders. After airbrushing the Goliaths with burnt sienna and cadmium orange, the Goliaths are ready for hand painting. This was a fun stage since this really brought out the details. It has the same color scheme I have used for all my army but the colors seemed prefect for the Goliaths. The pigments really finished up the appearance of the Goliaths.

Goliath Rockgrinder – Top: On the Workbench
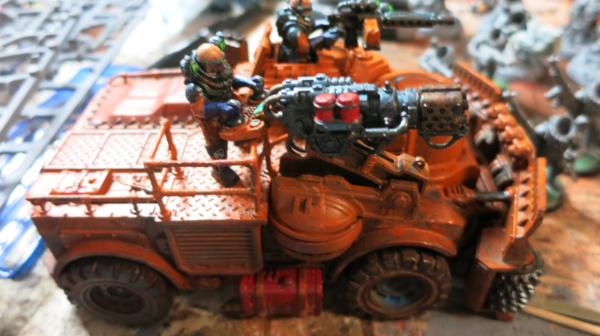
Golaith Rockgrinder – Side: On the Workbench
This view shows the details of the Clearence Incinerator, especially its control panel.
21898
Post by: Oldmanronald
Three More Models Down
My goal is to have a 2000 point Genestealer Cult army ready for the narrative for Nova Open in the last week of August. This is a challenge since I don’t build models real fast. The Genestealer cult is a mass army with lots of infantry models that need to be painted up. In addition, I had several false starts on models that I made but don't really fit into my army.
Finishing these three models, however, makes me feel like I might make the goal. The third Basilisk finishes up my Brood Brothers attached Spearhead detachment of three Basilisks, two heavy weapons squads of three mortars each, a company commander and a Master of Ordinance. The two Goliath Rockgrinders add a little heavy first round punch to my Cult army.
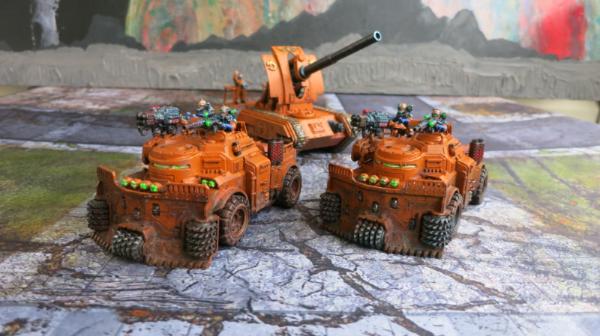
Two Goliath Rockgrinders and One Basilisk
I have started assembling my second to last batch of models. This batch includes ten acolyte hybrids and thirteen or fourteen Neophyte hybrids. These are the models that motivated me to start building a Genestealer cult army.
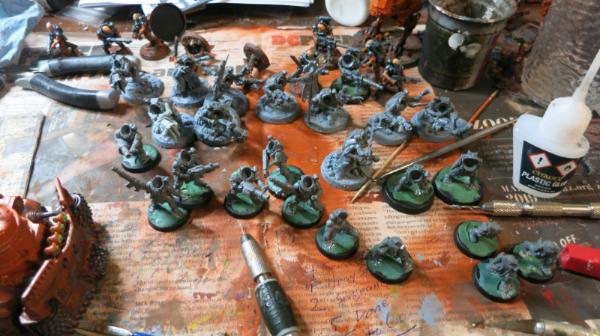
Acolyte and Neophyte Hybrids on the Workbench
21898
Post by: Oldmanronald
First Goliath Rockgrinder
I really like the Goliath Rockgrinders so I took a lot of pictures of the two models. This is the first group. The pigments give the model a gritty look. To get the cutters on the Drilldozer blades looking right, I applied the pigment over the cutters and then wiped the pigments off the tips of the blades.

Goliath Rockgrinder – Right Front
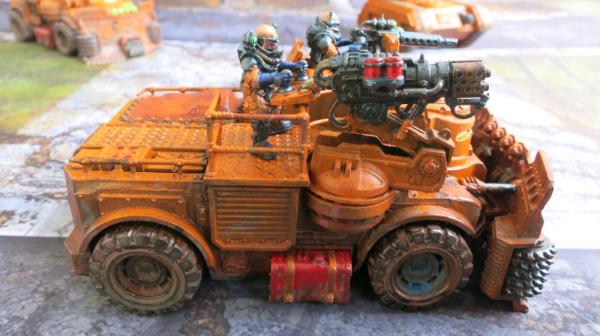
Goliath Rockgrinder – Right
This view shows the details of the Clearance Incinerator. The tires were fun to paint. A semitransparent black and blue over the orange base coat gave the tires a realistic look, especially with the pigment.
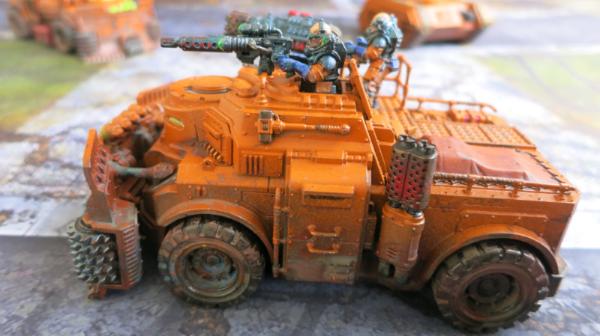
Goliath Rockgrinder – Left

Goliath Rockgrinder – Rear
Dry brushing with silver metallic paint for the flooring and blue washes over some of the ropes and cables bought out details.
21898
Post by: Oldmanronald
Second Goliath Rockgrinder
In the second Goliath Rockgrinder, I added details not in the first. My detail favorite is the pointing finger on the heavy stubber gunner. This was actually a tricky conversion. Both the gunners on the Goliath Rockgrinder have gauntlet type gloves that cover most of their forearm. The pointing finger is a bit from the astra militarium heavy weapons squad kit. It is designed for an imperial guard soldier with a cloth sleeve. To match the heavy stubber gunners right arm, I used green stuff to change the pointing finger bit from a bare handed with long sleeve shirt hand and arm to a glove gauntlet.
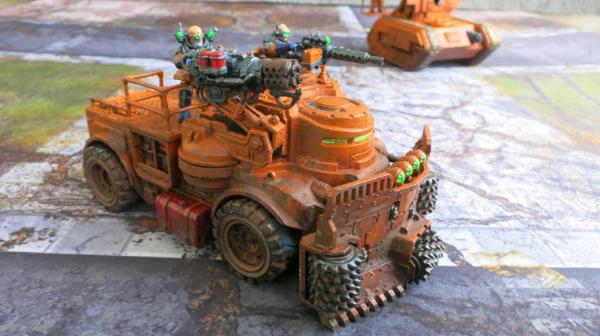
Goliath Rockgrinder – Right Front
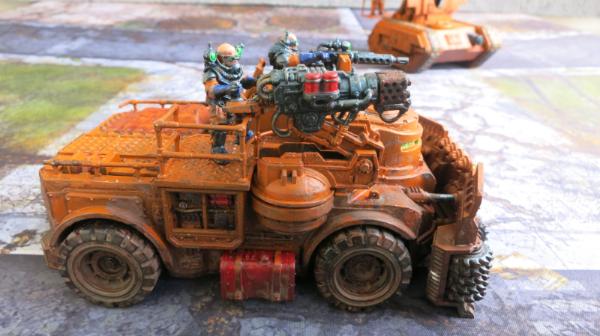
Goliath Rockgrinder – Right
The other detail that is different in this second Goliath Rockgrinder is that the access to the instruments panel is left open.
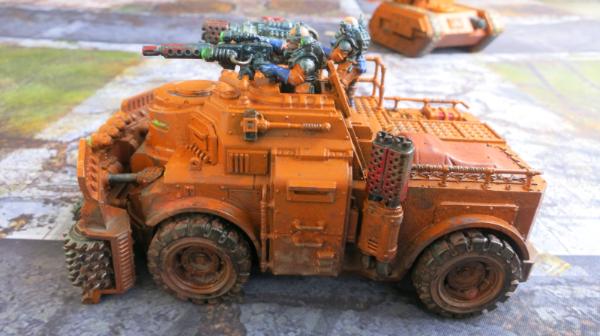
Goliath Rockgrinder – Left
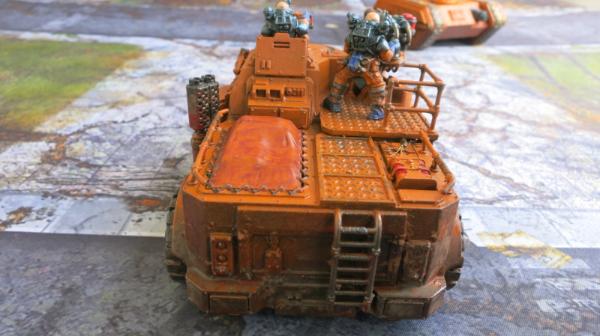
Goliath Rockgrinder – Rear
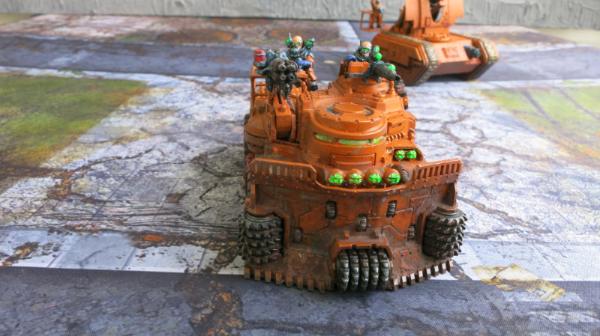
Goliath Rockgrinder – Front
I rarely pass up an opportunity to use the pointing finger on at least one character on a set of vehicles.
21898
Post by: Oldmanronald
Goliath Rockgrinders – Drill Dozer Blade
I really like the Goliath Rockgrinders so I took a lot of pictures of the two models. These are taken from a lower angle than the first pictures.
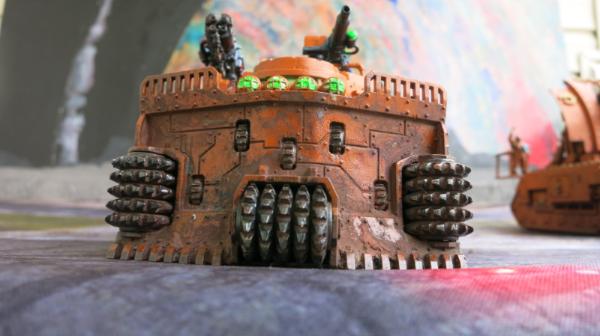
Drill Dozer Blade – First Goliath Rockgrinder
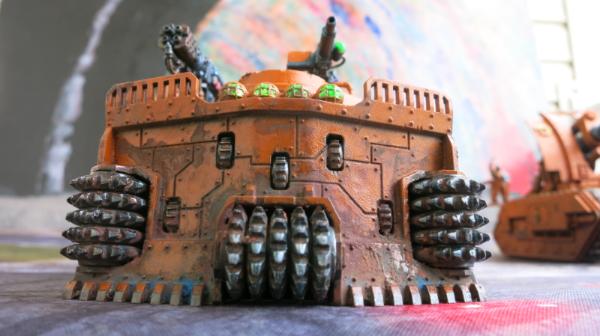
Drill Dozer Blade – Second Goliath Rockgrinder
21898
Post by: Oldmanronald
Goliath Rockgrinders – Side View
The Goliath Rockgrinder is a fun model to build and paint. If you want a treat, go into the dakka dakka gallery and search rockgrinder. You will see some beautiful models by different painters. Each has a different color scheme and interpretation. I am not the only one who had fun building and painting the Rockgrinder.
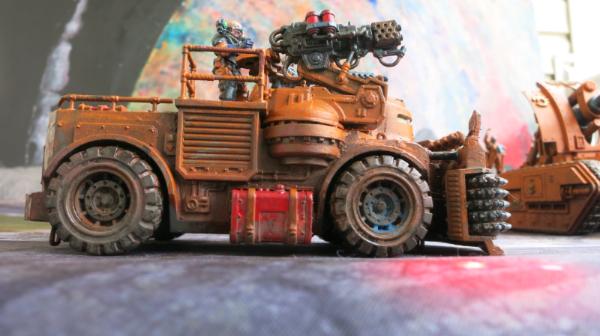
First Goliath Rockgrinder – Right Side

Second Goliath Rockgrinder – Right Side
The instrument panel is open on the second Rockgrinder
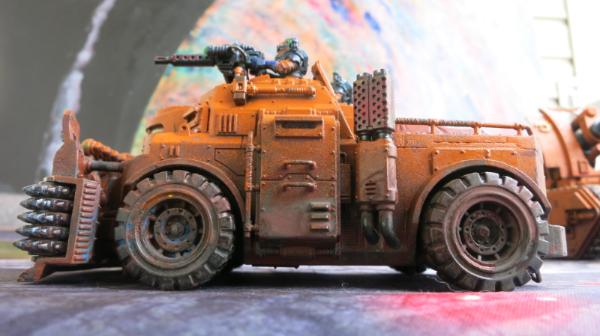
First Goliath Rockgrinder – Left Side
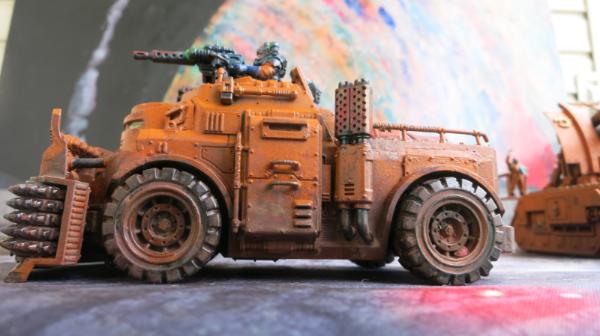
Second Goliath Rockgrinder – Left Side
The left side of the first and second Goliath Rockgrinder are almost identical except that the second has a stone embedded in the wheel well of the second model.
21898
Post by: Oldmanronald
Goliath Rockgrinders – Rear View
For those of you who enjoy checking out rears, these are pictures of the rears of the Goliath Rockginders.
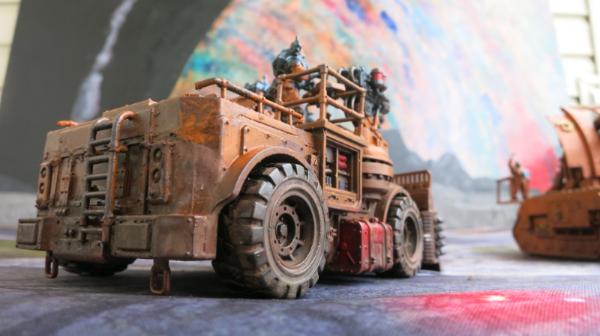
Goliath Rockgrinder – Right Rear
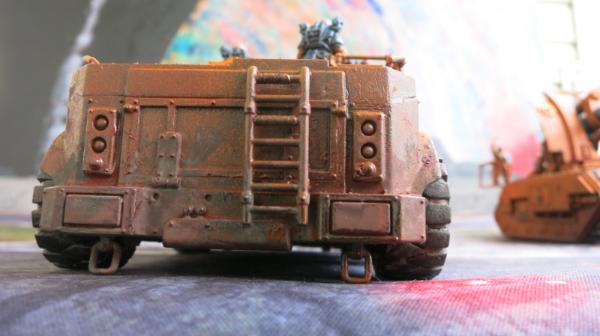
Goliath Rockgrinder – Right
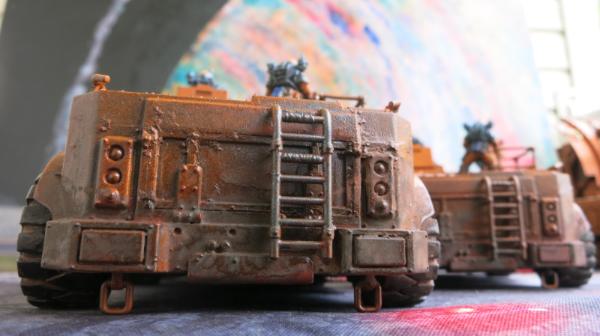
Goliath Rockgrinder – Side by Side
21898
Post by: Oldmanronald
Brood Brothers Spearhead Detachment – Third Basilisk
In my pictures, the first and second Basilisk are nearly identical. The only difference are the gunners. This third is nearly identical except it doesn’t have pigment on the treads so the gun is a little cleaner. This third gunner is slightly different than the other two.
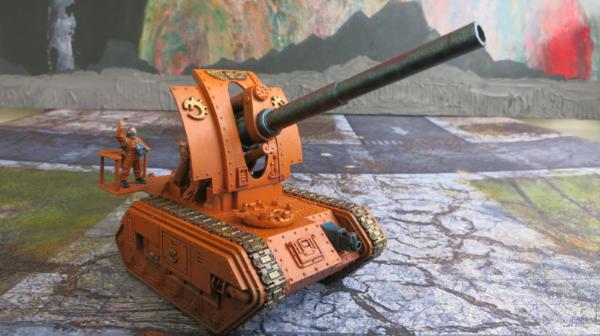
Basilisk – Right Front
Notice how shiny the tread is.
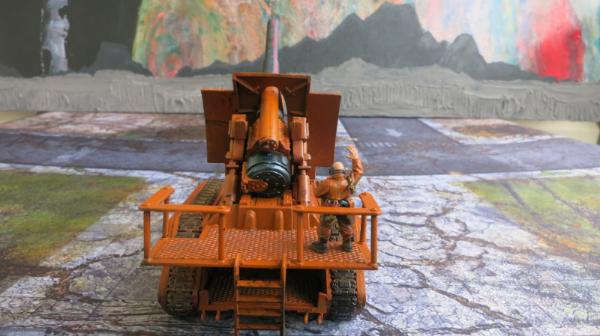
Basilisk – Back
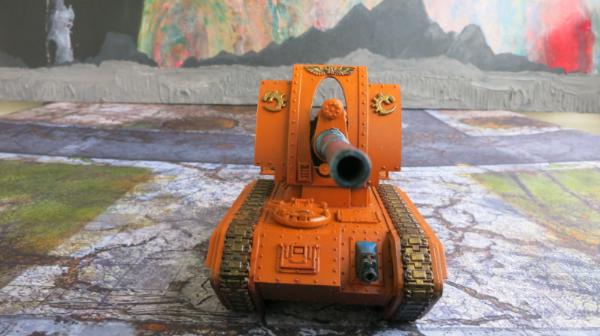
Basilisk – Front
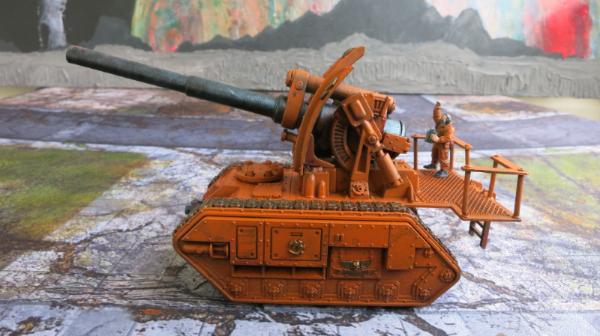
Basilisk – Left
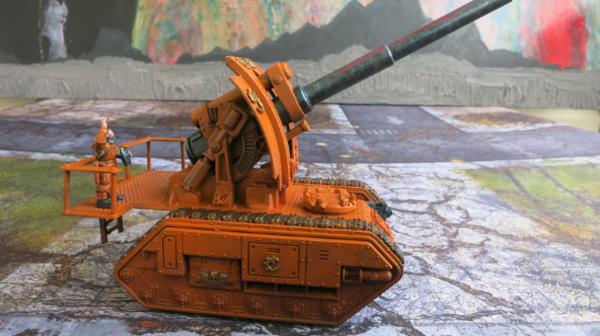
Basilisk – Right
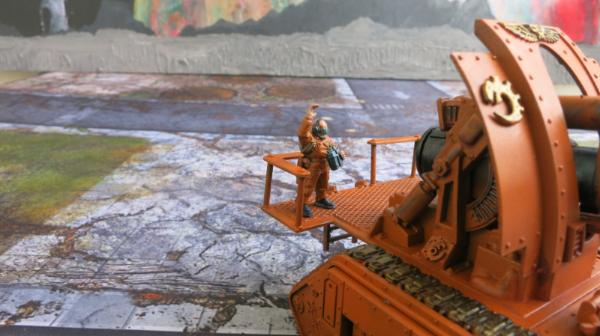
Basilisk Gunner
121055
Post by: Maharg
Cult is coming on nicely. The dirty orange works really well for this army
90488
Post by: The Riddle of Steel
Impressive army you have going. The dirty orange works well and the bright green as a detail color adds nice contrast.
-Rids
21898
Post by: Oldmanronald
The Brood Brothers Spearhead Detachment
Thank you Maharg and The Riddle of Steel for your kind remarks. I like the phrase “dirty orange” to describe these models.
I have completed my planned Brood Brothers so-called Spearhead detachment. I say so-called since this detachment is a pure artillery support detachment consisting of three Basilisks, two heavy weapons squads of three mortars each, a company commander and a Master of Ordinance. It will be deployed behind cover out of the line of sight except maybe for the Master of Ordinance who needs line of sight to maximize his artillery barrage.
When I think of a spearhead detachment I think of tanks that will plunge directly into the enemy troops breaking them apart, not an artillery detachment hiding at the rear of the battlefield. Regardless, this is my powerful firepower unit that will impose casualties on the enemy every turn as long as these units last.
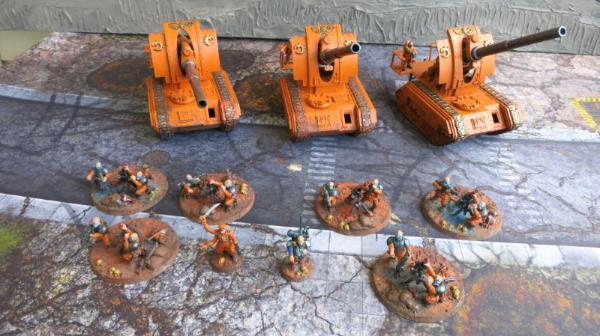
Brood Brothers Artillery Detachment
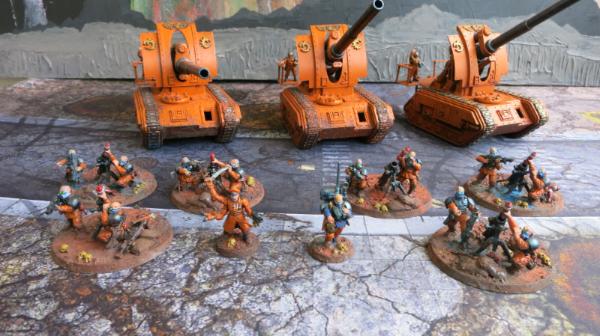
Brood Brothers Artillery Detachment
21898
Post by: Oldmanronald
The True Genestealers Cult Spearhead Team
I do have a team that I plan to set up in ambush and have available during the first turn to hit the enemy hard. It consists of my two Goliath Rockgrinders each carrying an Acolyte Hybrids unit with a leader, a cult icon, two heavy rock saws, and hand flamers. It should be fun to deploy although it probably won’t survive the first few turns.
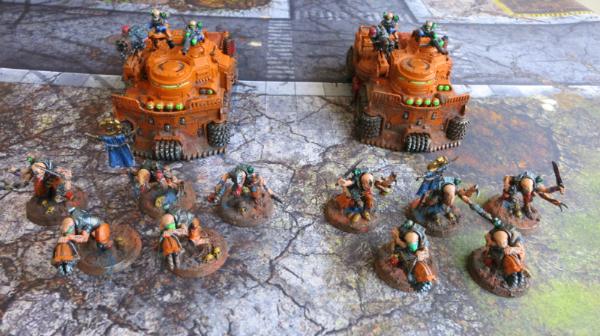
Goliath Rockgrinders and Acolyte Hybrids
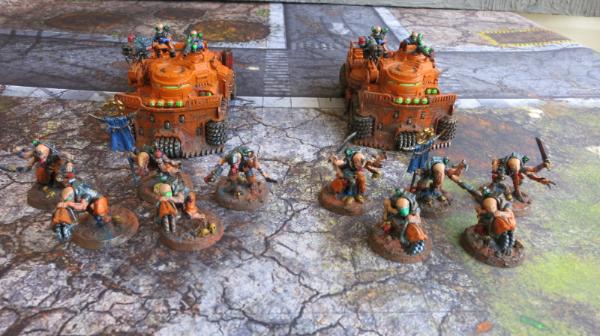
Goliath Rockgrinders and Acolyte Hybrids
121268
Post by: Gwyn chan 'r Gwyll
I love your setting these up as little detachments that make sense fluff-wise. It's all tied together very well!
10505
Post by: Mellon
I really like your cult. Striking beautiful colours.
21898
Post by: Oldmanronald
The Genestealers Cult
This is the first posting I have done for two months. First, I need to acknowledge the encouraging remarks of Gwyn chan’r Gwyll and Mellon. Thank you.
I have actually built a number of models and posted a lot of picture of the models to the Gallery. The problem is that this is a mass army which requires a lot of models. Thus the pictures are somewhat redundant and since I have to build so many models to put together the cult, I have gotten a little sloppy with the paint and it shows in the pictures. Here are a couple.
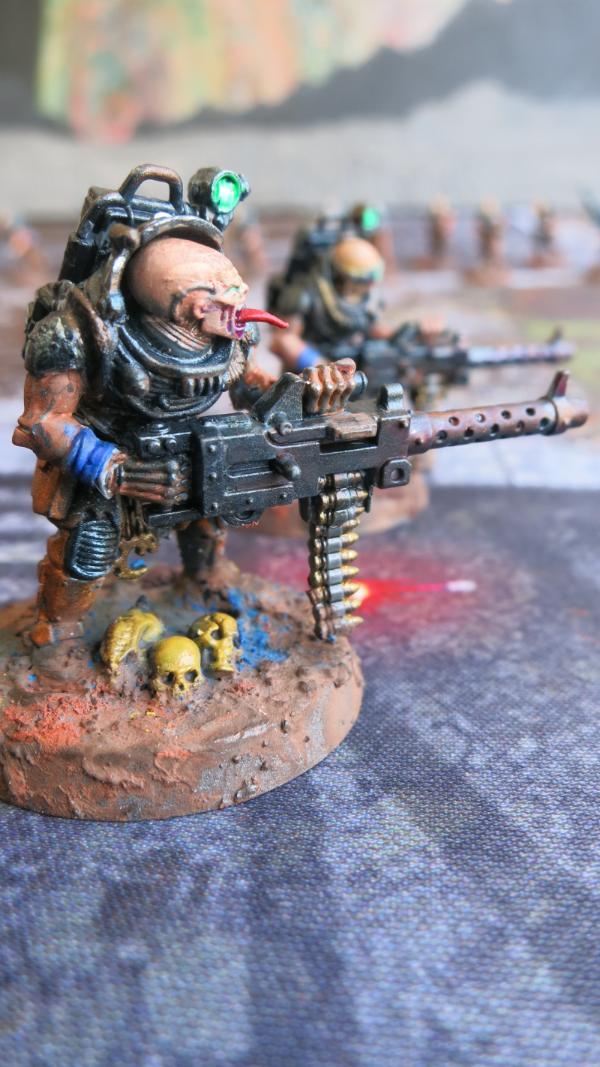
Neophyte Hybrids with Heavy Stubbers
These models are some of my favorites but I did get sloppy with the paint, particularly with the hands.
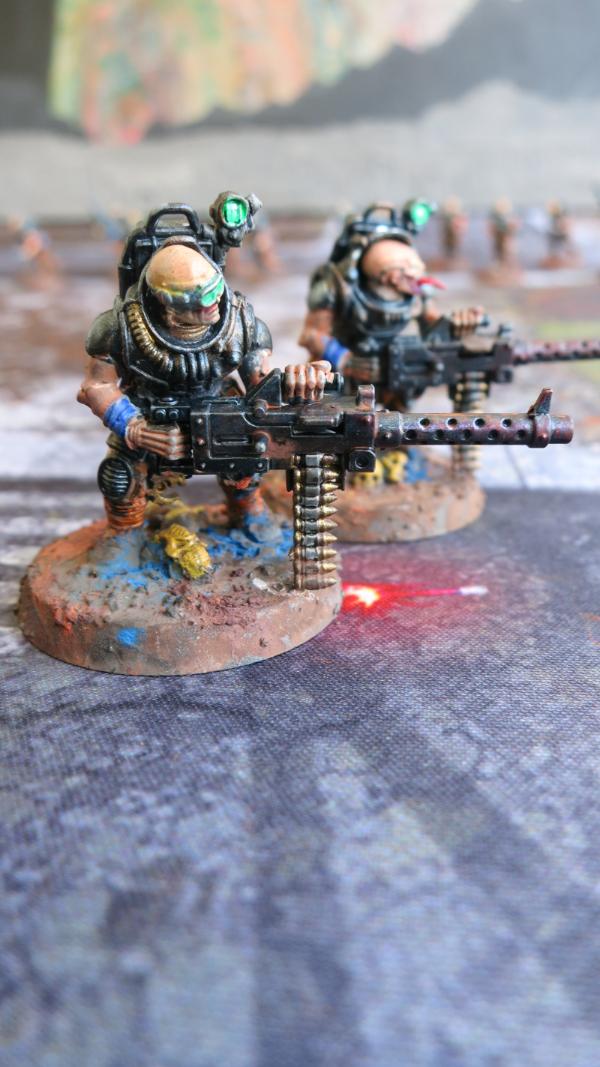
Neophyte Hybrids with Heavy Stubbers
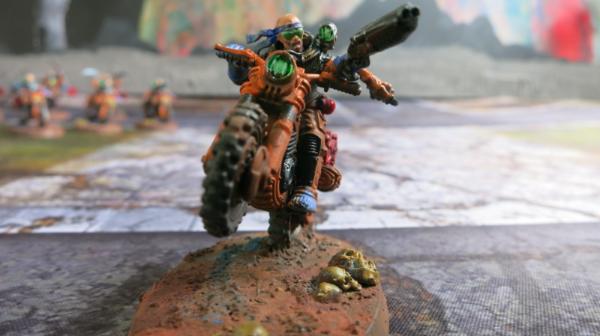
Atalan Jackal with double barrel shotgun and cultist knife
I had fun with the Atalan Jackals and made them with three arms so that they could display all their weapons.
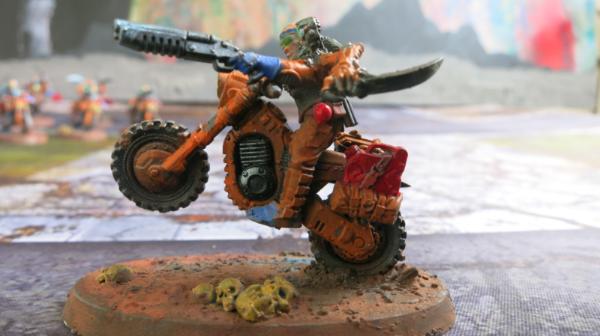
Atalan Jackal with double barrel shotgun and cultist knife
1124
Post by: Captain Brown
Oldmanronald,
Painted is always nicer to play with and against than unpainted.
Cheers,
CB
21898
Post by: Oldmanronald
Atalan Jackals with Shotguns
I made some Atalan Jackals, four with shotguns, four with grenade launchers, and four with demolition charges. I added an extra arm so each Jackal can carry all their weapons. Originally, I build them with cultist knives but now think that is not the best configuration. Since I took these pictures, I have cut off some of the arms and replaced them so I have only three with grenade launchers and the rest with shotguns. I now have three squads. Two squads have three jackals with demolition charges and shotguns and a single jackal with a grenade launcher. The other is three shotguns and a grenade launcher. Here is a picture of the four Jackals with shotguns and cultist knives.

Atalan Jackals with Three Shotguns and a Single Autogun
21898
Post by: Oldmanronald
Atalan Jackal with Double Barrel Shotgun
I like the double barrel shotgun.

Atalan Jackal with Double Barrel Shotgun – Left Side View
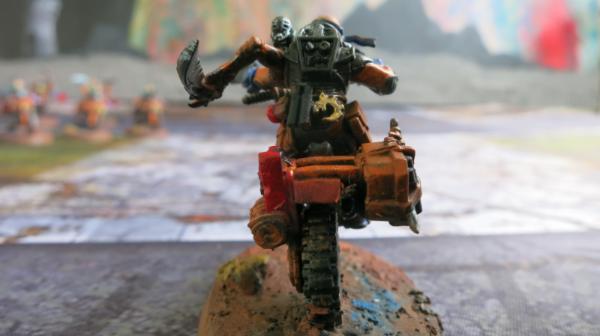
Atalan Jackal with Double Barrel Shotgun – Rear View
Since the genestealers are a mass army and have so many models, I got sloppy with my details. The sloppy appearance does work with genestealers better than for Space Marines.

Atalan Jackal with Double Barrel Shotgun – Front Right
Notice the tracks on the bases. I used green stuff to make the tire tracks. I highlighted them by using blue pigment loosely mixed with the brownish orange pigment to make it appear that the top surface of the ground had been chewed up by the tire.
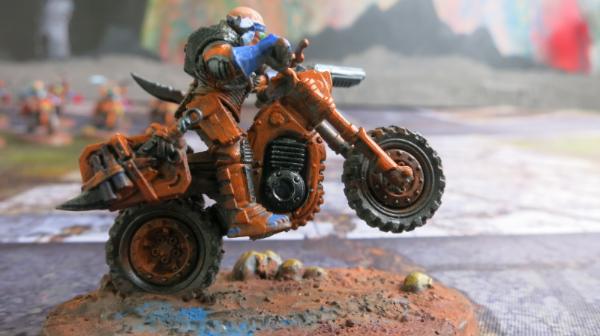
Atalan Jackal with Double Barrel Shotgun – Right Side
21898
Post by: Oldmanronald
Atalan Jackal with Shotgun and Mask
He is not fancy but is a good solid model
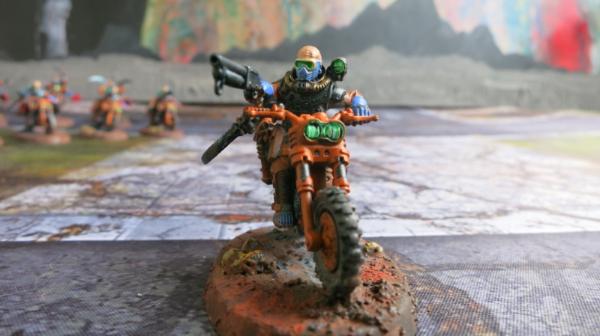
Atalan Jackal with Shotgun - Front

Atalan Jackal with Shotgun – Left Side
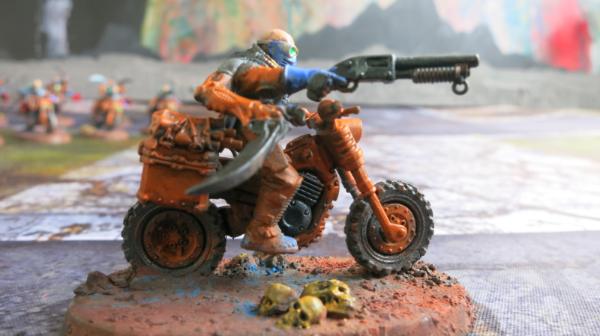
Atalan Jackal with Shotgun – Right Side
21898
Post by: Oldmanronald
Jackal Alphus with Sniper Rifle

Jackal Alphus with Sniper Rifle - Right
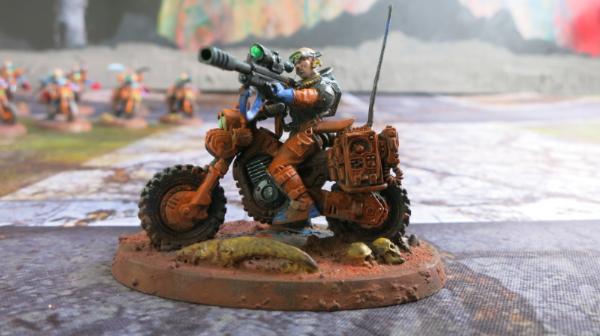
Jackal Alphus with Sniper Rifle - Left
There is a piece of fiber near the model’s face. That Is a problem of photographing mininatures.
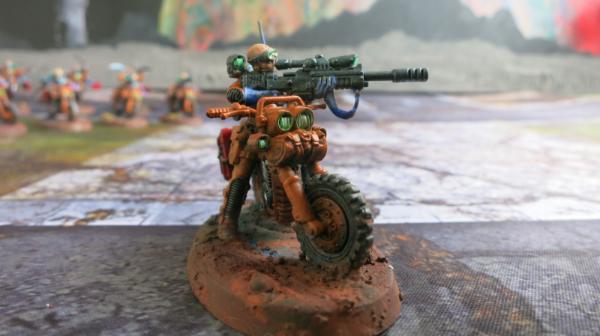
Jackal Alphus with Sniper Rifle - Front

Jackal Alphus with Sniper Rifle - Rear
21898
Post by: Oldmanronald
Atalan Jackal with Autogun
This is another not fancy but a good solid model. The dirty orange and the shiny blue gun metal look good together.
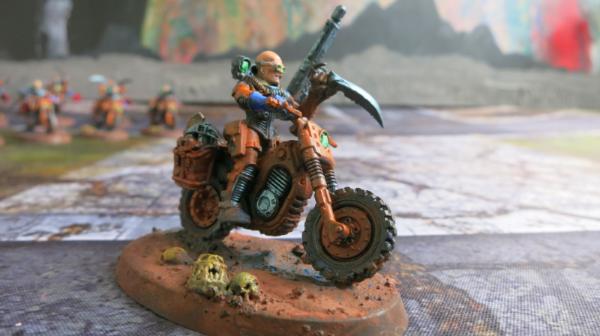
Atalan Jackal with Autogun – Right Front

Atalan Jackal with Autogun – Right

Atalan Jackal with Autogun – Rear
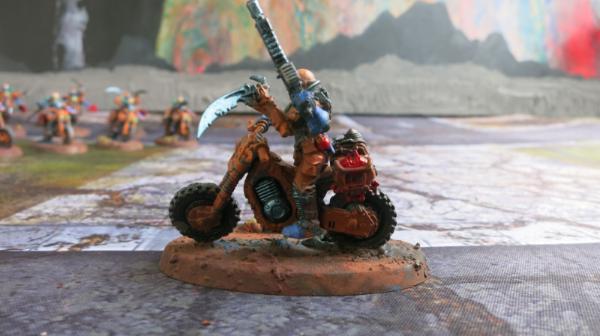
Atalan Jackal with Autogun– Right
I gave him the autogun since I wanted to indicate that he was the leader and only the leader is allowed an autogun. Since I took this picture, I have rebuilt this model so that he carries a shotgun and a demolition charge.
21898
Post by: Oldmanronald
Atalan Jackal with Shotgun

Atalan Jackal with Shotgun – Left Front

Atalan Jackal with Shotgun – Left
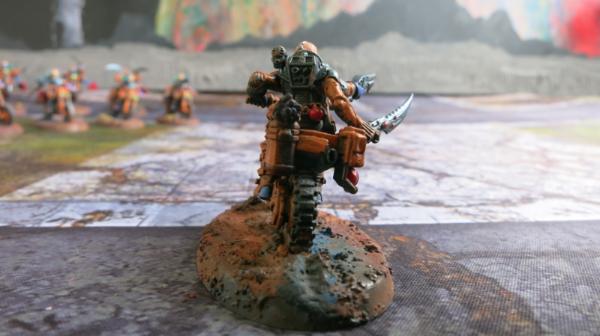
Atalan Jackal with Shotgun – Rear
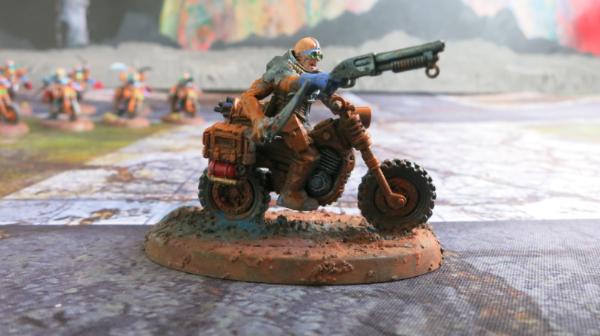
Atalan Jackal with Shotgun – Left
I saw some beautiful Atalan Jackals on display at the NovaOpen and was a little envious at how nicely they were painted. On the other hand, mine look more realistic as if they had been struggling and fighting through the dusty desert sand. I have been in this dusty red sand in the deserts of Utah, California, and Arizona.
21898
Post by: Oldmanronald
Atalan Jackals with Grenade Launchers
When I made this unit I forgot that I can only have one grenade launcher for every four bikes. Since I have twelve bikes, I built one too many. Since I took this picture, I have stripped the grenade launcher of one of these bikers and replaced it with a shotgun. It would have been fun to have a fast moving unit with four grenade launchers but no.
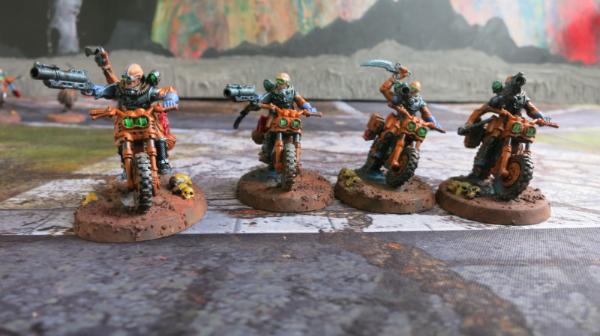
Four Atalan Jackals with Grenade Launchers.
21898
Post by: Oldmanronald
Atalan Jackal with Grenade Launcher

Atalan Jackal with Grenade Launcher - Left Front
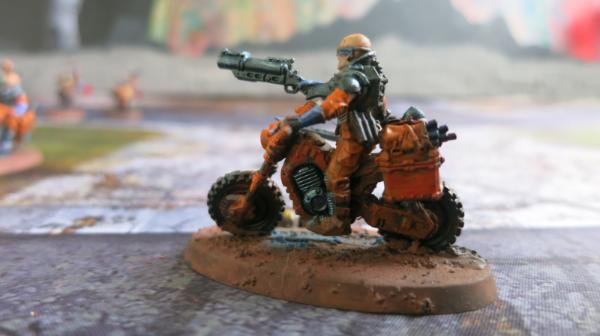
Atalan Jackal with Grenade Launcher – Left

Atalan Jackal with Grenade Launcher - Rear
This picture shows the tire tracks
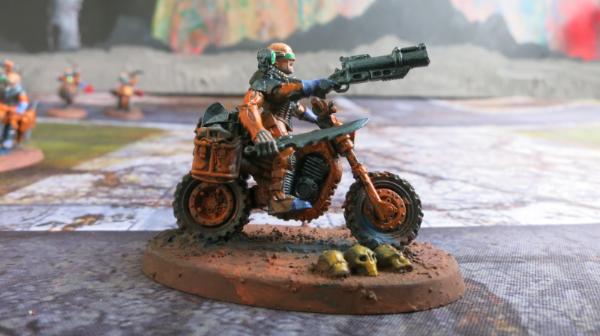
Atalan Jackal with Grenade Launcher - Right
Why have only two arms when three arms are better.
21898
Post by: Oldmanronald
Atalan Jackal with Grenade Launcher
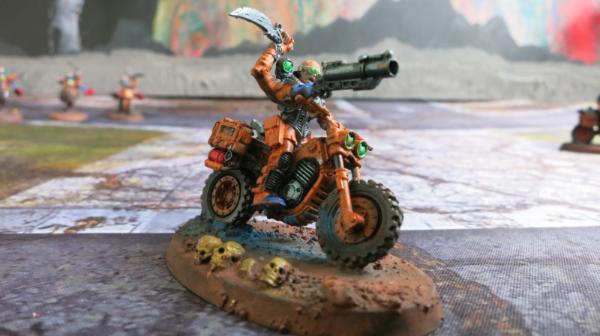
Atalan Jackal with Grenade Launcher - Right Front
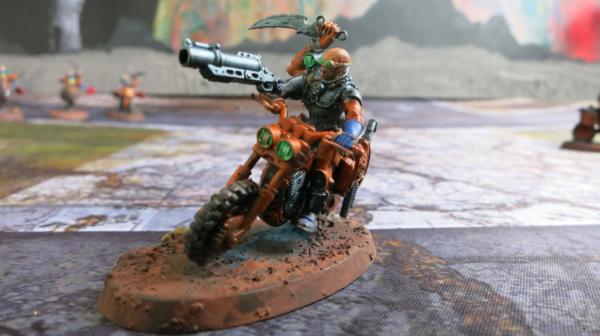
Atalan Jackal with Grenade Launcher - Left Front
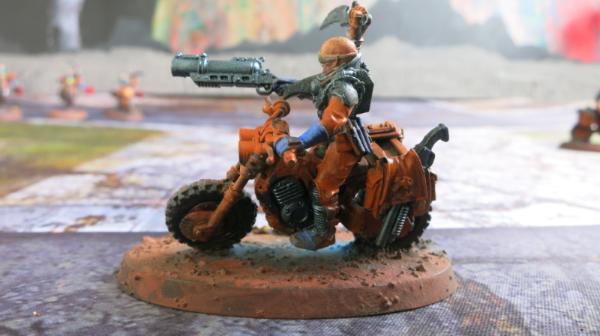
Atalan Jackal with Grenade Launcher - Left

Atalan Jackal with Grenade Launcher – Rear
I really like the shotgun he is carrying in his saddlebags.
21898
Post by: Oldmanronald
Second Atalan Jackal with Grenade Launcher
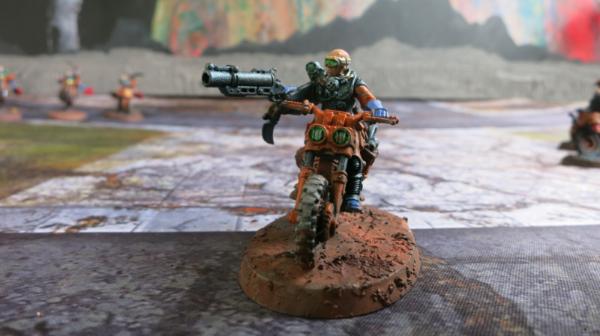
Atalan Jackal with Grenade Launcher – Front
For some reason I forgot the skulls that I have put on all my bases.

Atalan Jackal with Grenade Launcher – Left Front
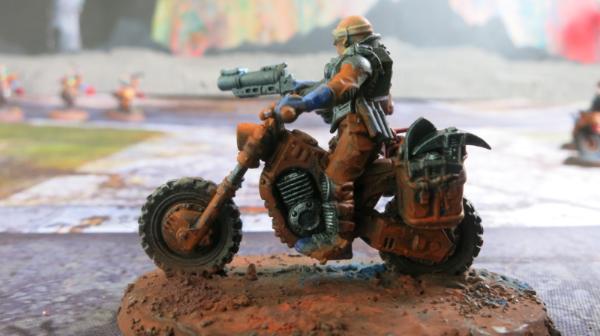
Atalan Jackal with Grenade Launcher – Left

Atalan Jackal with Grenade Launcher – Rear

Atalan Jackal with Grenade Launcher – Right
21898
Post by: Oldmanronald
Third Atalan Jackal with Grenade Launcher
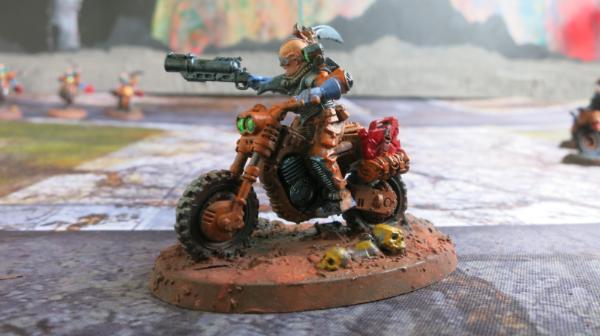
Atalan Jackal with Grenade Launcher - Left Front
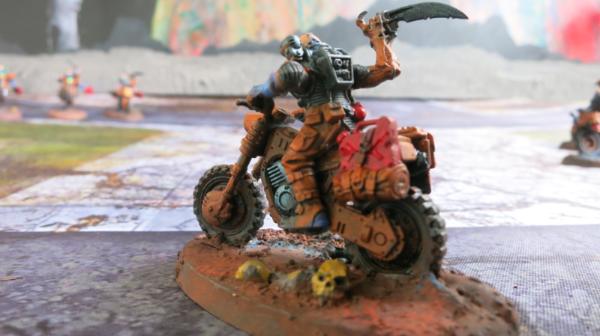
Atalan Jackal with Grenade Launcher - Left Rear
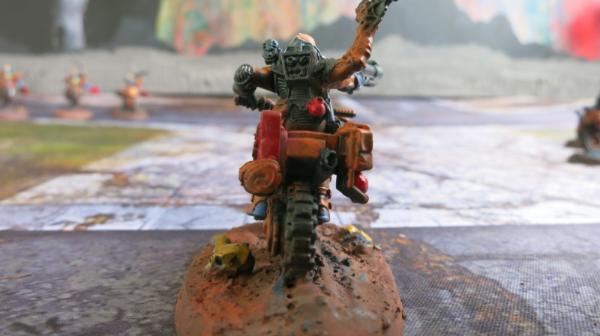
Atalan Jackal with Grenade Launcher – Rear
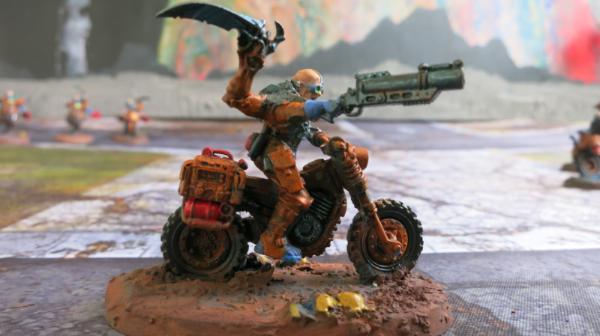
Atalan Jackal with Grenade Launcher – Right

Atalan Jackal with Grenade Launcher - Right Front
21898
Post by: Oldmanronald
Atalan Jackals with Demolition Charges
[size=16]
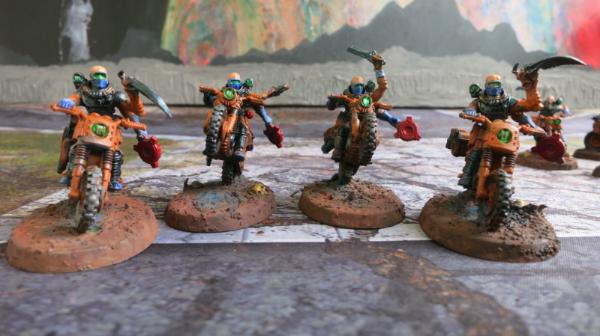 Atalan Jackals with Demolition Charges –Front
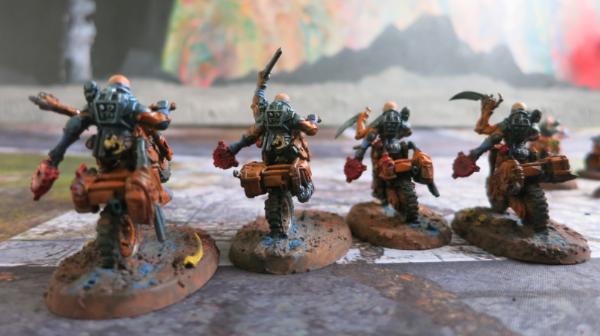 Atalan Jackal with Grenade Launcher - Rear
1124
Post by: Captain Brown
Some more great additions Oldmanronald.
Cheers,
CB
21898
Post by: Oldmanronald
Display Board for Genestealer Cult
Thanks for the encouragement, Captain Brown.
I like having a display board for my army. It is useful for any type of tournament or to simply store models. Space at tournaments is limited, usually just enough room for the game and a chair for each participant. There is usually no space for the army or for the rule books and other gaming paraphernalia. A display board and a cart to hold the board helps.
A good display board serves three purposes. 1) It is a good holder for the army so that the army is easily moved and stored. 2) It helps keep me from losing models since each model has a designated place so I can visually see if I am missing a model that I may have accidently left on the gaming table. 3) If done right, it shows off the army. Here is the display board that I just built for my Genestealer Cult army.
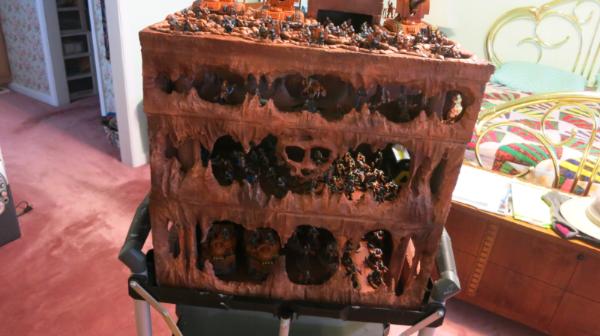
Display Board for Genestealer Cult Army
I wanted the footprint of the board to fit the top of my portable cart and the only way to do so for a mass army like the genestealer cult was to make the display board three and a half levels or stories high. In the past, I have built my display boards from insulation sheets; that is, Styrofoam type sheets that are designed to be put on the walls of a building for insulation. I tried building a display case from just the insulation sheet which works for a one level display but not for a multilevel display since the insulation sheets are so bulky they end up crowding out the space for the models.
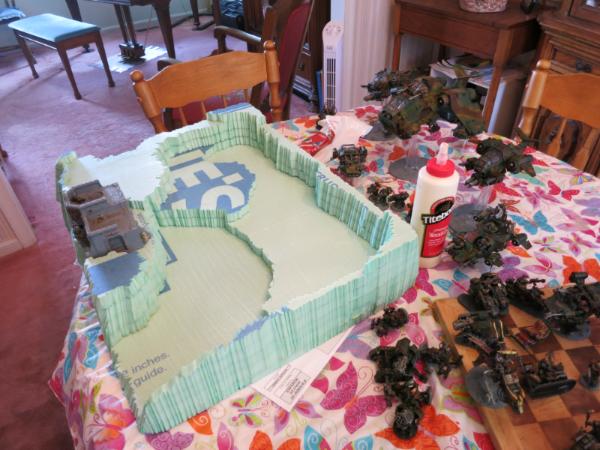
One Level Display Board made from insulation Board
Although this display board actually has several levels where the models can be put, I still call it a one level display case because all the models are placed on top of the board. None of the models are placed in a level below the top level.
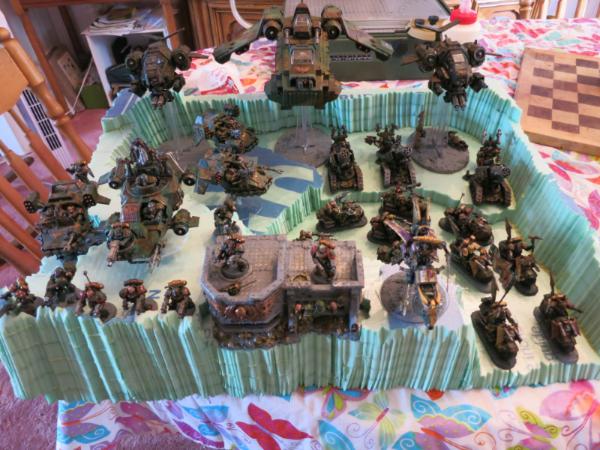
One Level Display Board with Models
This one level display case has a much larger footprint than the multi-level display case for the Genestealer Cult but holds less models. I did try to build a multi-level display cases purely out of insulation board supported by a wood picture frame but it became too bulky and could only carry a few models for a kill team combat squad.
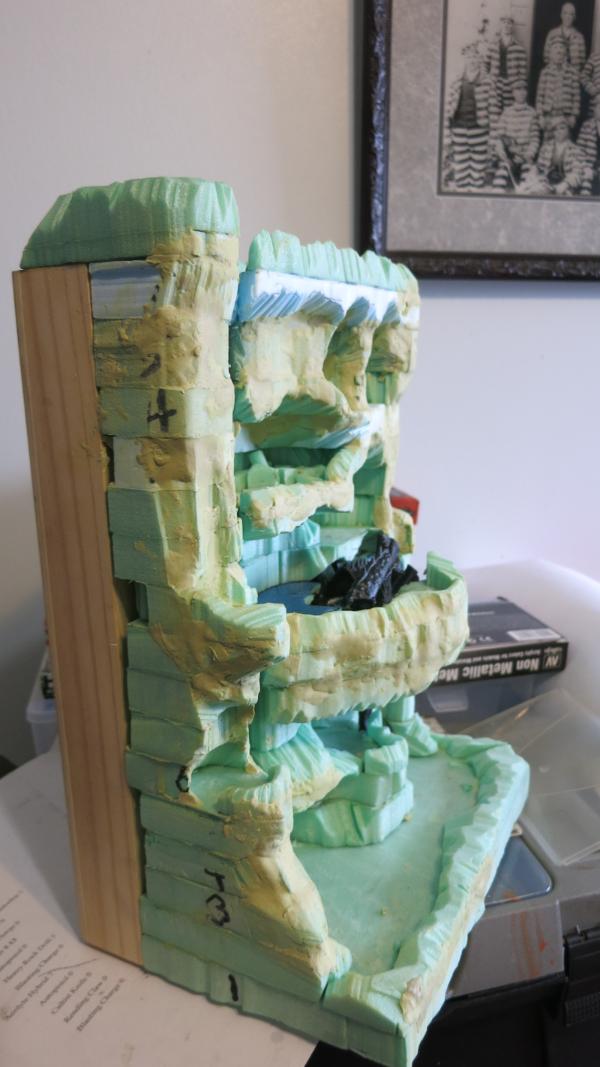
Multi-Level Display Board – Experiment - Side
This display has too little actual useable surface to hold the individual models. It also had a lot of gaps that I tried to fill in with Mulliput but that got real expensive as Mulliput is not cheap.
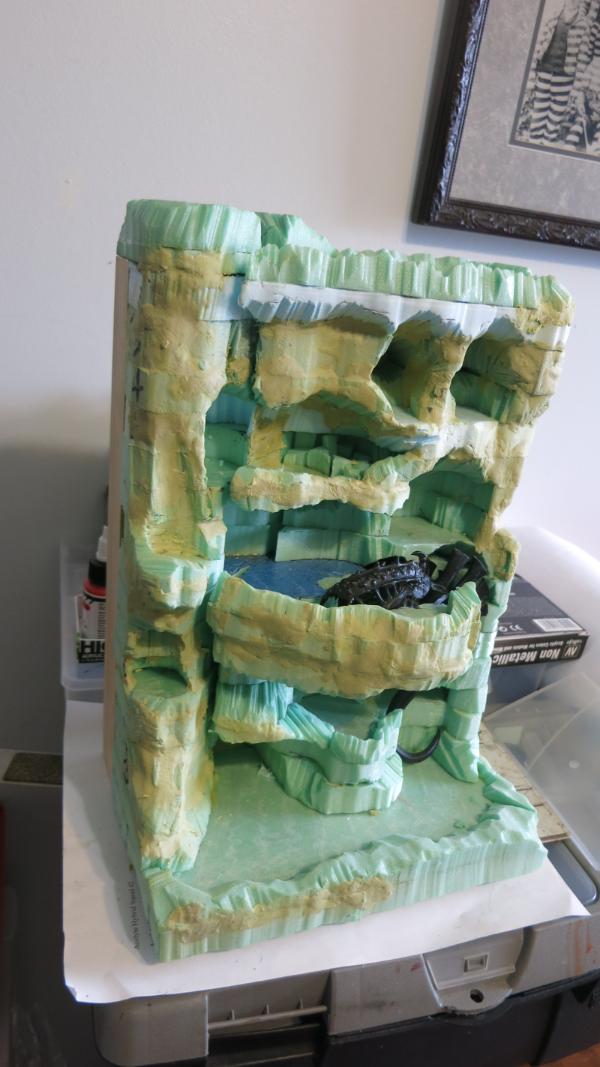
Multi-Level Display Board – Experiment – Front
I experimented with building around an old scrap Tyranid model. Finally, because of the problems, I abandoned this project.
Instead I made a three story frame out of plywood and dowels. The floors of each level are plywood. I still used the insulation boards but only for the sides of the walls and for the top level trench work.
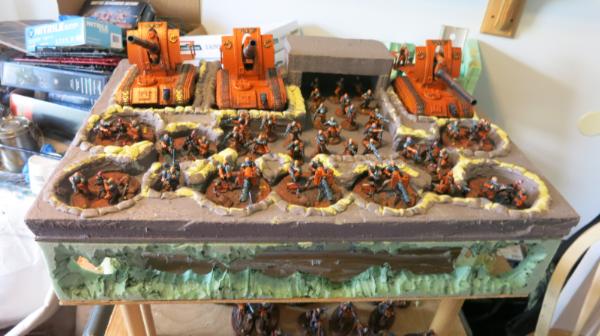
Unpainted Top Level of Display Board
See the dowels and the plywood support with the foam boards cut to form the walls of the cave and the trenches and the bunker above. The sand bags are made from Mulliput.
21898
Post by: Oldmanronald
Details of the Display Board for Genestealer Cult
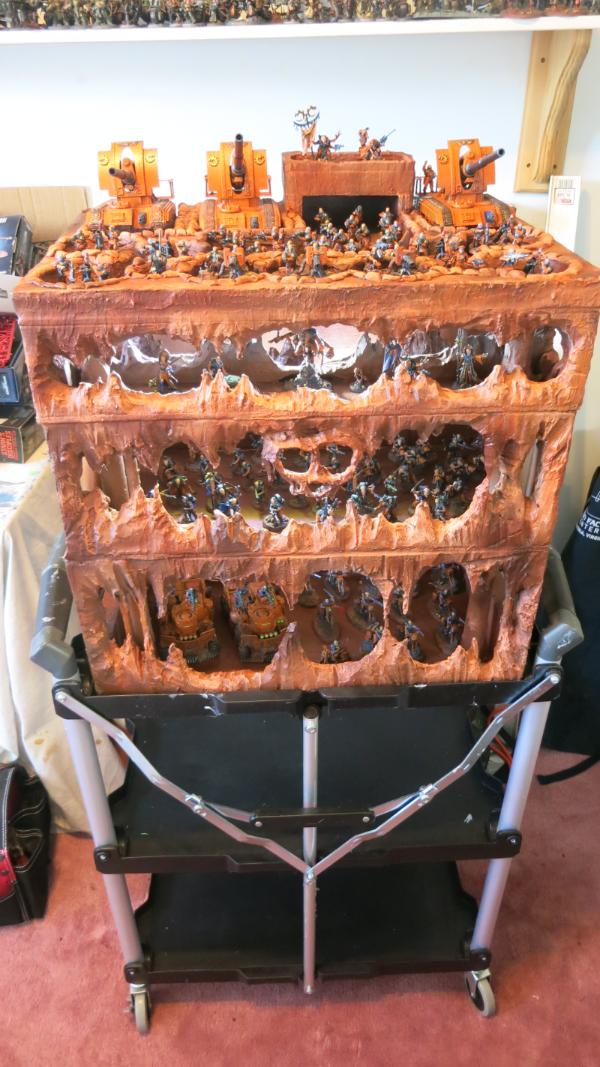
Display Board for Genestealer Cult Army on Portable Cart
Except for the two figures on the bunker, all the figures on the top level are brood brothers imperial guard units. The figures in the half level immediately below the top are Genestealers headquarters models. Those in the skull cave are Genestealer Cult Acolyte and Neophyte Hybrids. Those in the bottom are Goliath Rockgrinders and Jackals.

Display Board for Genestealer Cult Army - Front
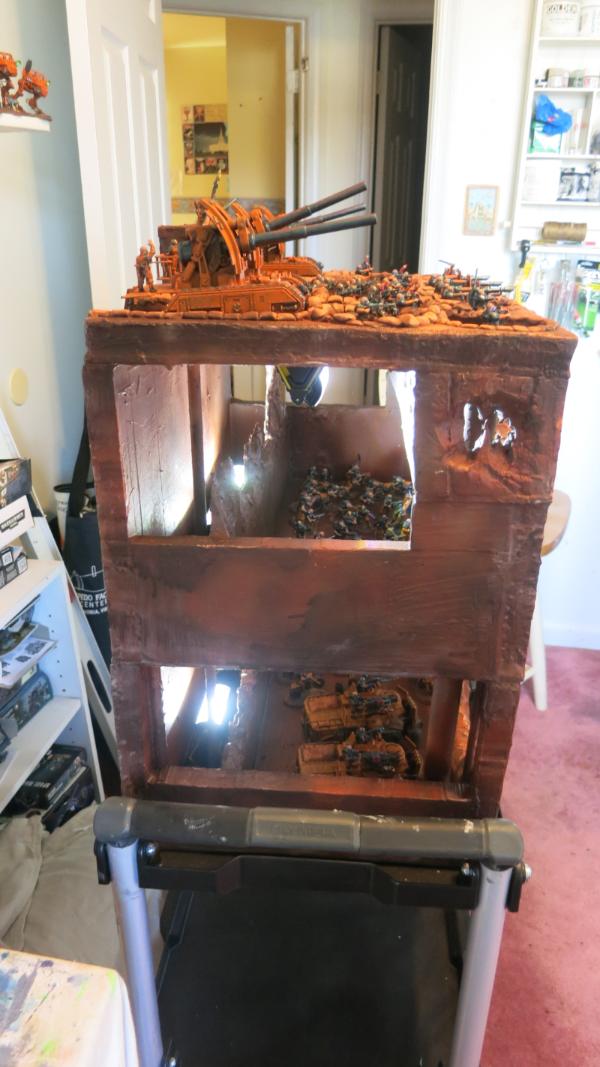
Display Board for Genestealer Cult Army – Right
The big side windows gives pretty good access to the models. The front is for display. The side is for access. The windows also allow light into the caves. Interior battery powered backlights supplement the ambient light. These backlights are designed to be hidden from the front but are angled to light up the models. Some of the walls are painted light orange to reflect light.
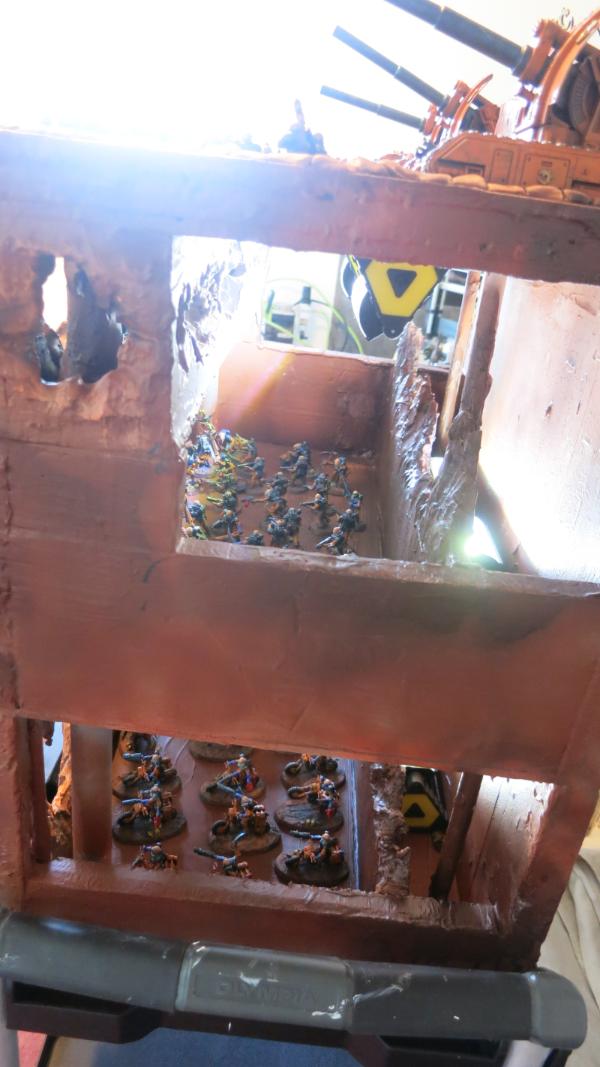
Display Board for Genestealer Cult Army – Left Side
This view shows the backlights in more detail.
Display Board for Genestealer Cult Army – Top Cave on Left Side
Although I used an airbrush to add the colors so that they are blended and rough, the different surfaces have different tints. The front, top, and sides are a blend of the muted orange and burnt umber with a little pure orange highlight. The very back walls are muted orange mixed with white to make them more reflective and bright. The interior walls with the rough cave appearance are painted with a mixture of burnt umber and blue. This gives depth to the caves, especially when viewed from the front.
21898
Post by: Oldmanronald
Further Details of the Display Board for Genestealer Cult
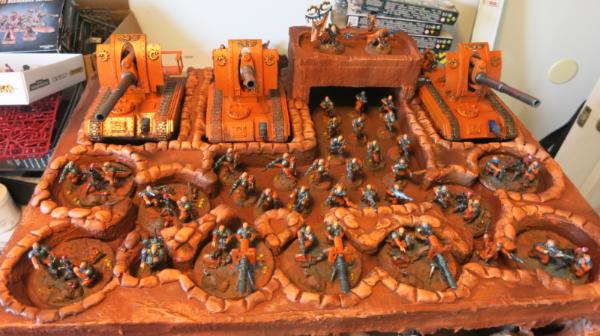
Top of the Display Board with Brood Brothers
This top of the display is for the brood brothers who represent the portion of the army that is not hidden in caves and mines below the ground. The display is bright, both because it is in the direct light from the room and because I painted it with blends of orange and burnt umber with the burnt umber being in the floors of the trenches to give it depth and the muted orange for the surface and light orange for the sand bags and contrasts.

Middle level of Display Board with Skull Cave for the Acolyte and Neophyte Hybrids
This middle level is for the Acolyte and Neophyte Hybrids who wait hidden in caves to burst forth to support the brood brothers and anbush the unwary. Hidden lights illuminate this level.
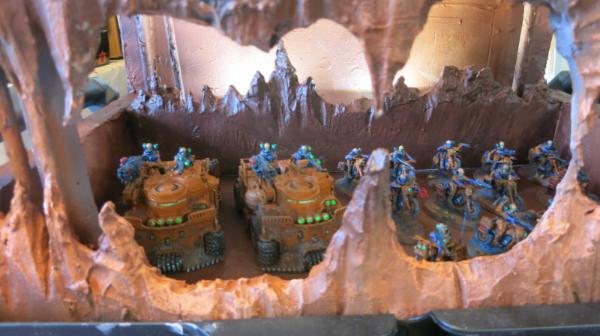
Bottom Level of Display Board for Genestealer Cult Army for Goliath Rockgrinders and Jackals
Deep in the bowels of this display lurk the Rockgrinders and Jackals waiting for the day of redemption so that they will burst forth spreading terror to the doomed unbelievers. Note how the metallic blue armor and fluorescent green headlights pop in this view. Again, hidden lights illuminate this level.
106575
Post by: Denny
Awesome Looking board and army; really like the colour scheme. Nice to see ‘stealers in something other than purple.
125355
Post by: Grenb
I'm in awe of that cave board, so very fitting for GSC. Seriously, well done.
Do you have plans to add any more detail to the interior, stalagmites or posters maybe?
10505
Post by: Mellon
That display board is impressive!
21898
Post by: Oldmanronald
The Headquarters Cave of the Display Board for Genestealer Cult
Thank you Denny, Grenb, and Mellon for your encouraging remarks. Although I don’t have any immediate plans to add more detail to the interior, a few more stalagmites would make it more interesting and posters would be great. I’ll have to think about it.
Here are some close-ups from the little cave at the top for the Cult headquarters.
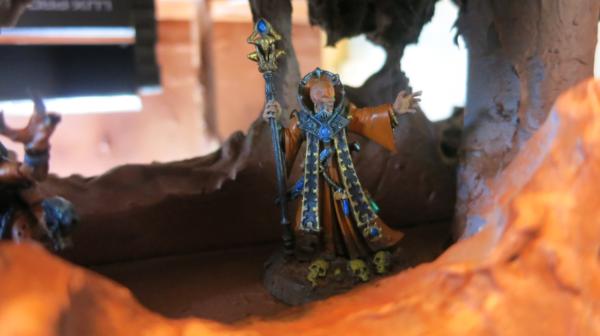
Boy Magus
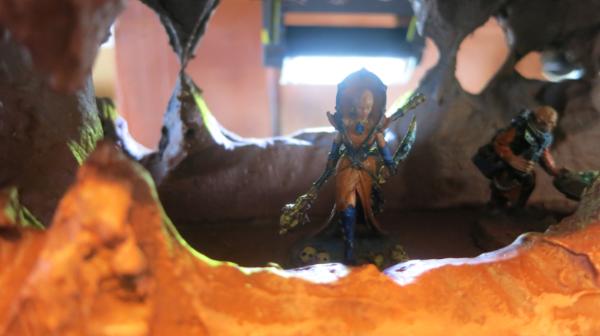
Girl Magus

Nexos
I realize that Nexos is an elite rather than a headquarters but since he is a more a planning creature rather than a fighting creature he should be in the headquarters cave.
I actually have several other headquarters figures. One is the Patriarch and his Familiar which for some reason I didn’t get a picture of although he is in the middle of the headquarters’ cave. The others are the Jackel Alphus who is in the lower cave with the other Jackals and two Acolyte Iconwards. One iconward is in the headquarters cave and the other iconward is on the top level on the bunker with the Sacred Banner held high for all to see.
21898
Post by: Oldmanronald
The Display Board for Genestealer Cult
I am adding a few more pictures of the display board that I took with my smartphone. Ironically, these may be better than the ones I took with my camera. Both the camera and the smart phone are digital but the camera is several years old and the smartphone is new. It is likely that the smartphone camera has better resolution than my regular camera. I will still use my regular camera since it can do close-ups better and it can be mounted on a tripod.

The Display Board for Genestealer Cult – Top
The Brood Brothers make up the bulk of the top level. I do have a Acolyte Iconward and a Sanctus with a silence sniper rifle on the top of the bunker.
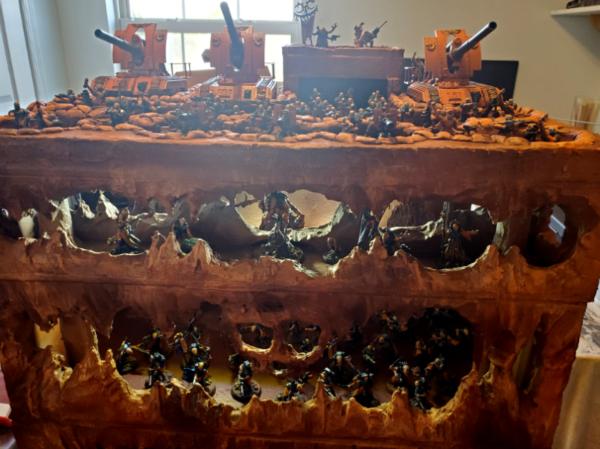
The Display Board for Genestealer Cult – Top Front
This view shows the Patriarch and other headquarters models in the top headquarters cave.

The Display Board for Genestealer Cult – The Skull Cave
The Skull cave has the Acolyte and Neophyte Hybrids.
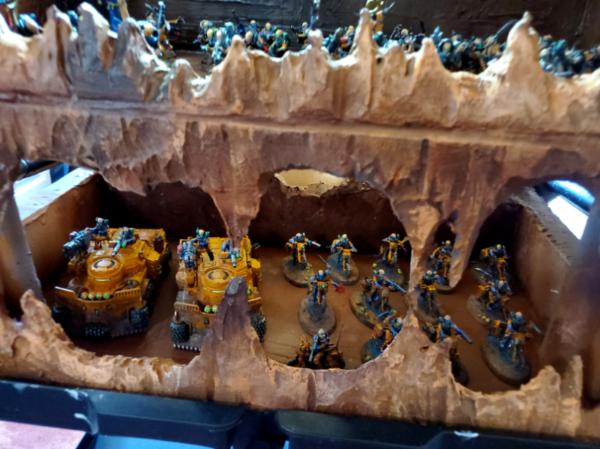
The Display Board for Genestealer Cult – Lower Cave
The Lower Cave has two Goliath Rockginders and the Jackals. The Jackal Alphus is in the front of the cave.
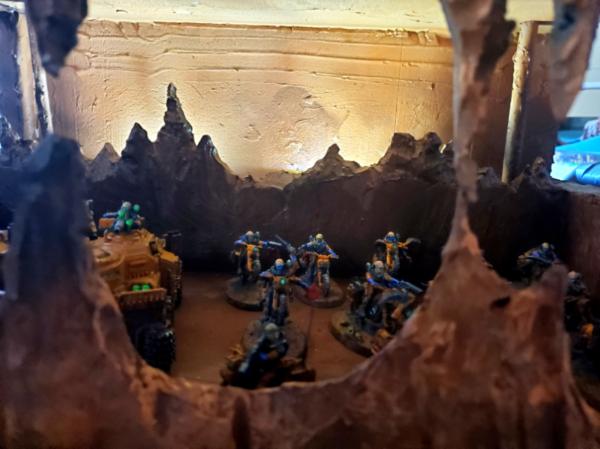
The Display Board for Genestealer Cult – Close- Up Lower Cave
The Jackal Alphus is in the front of the cave

The Display Board for Genestealer Cult – Skull Cave and Lower Cave
I am thinking of writing up a tutorial on how I made the display case.
21898
Post by: Oldmanronald
Atalan Jackals with Demolition Charges
Here are four jackals with demolition charges. Since this picture was taken, I removed some of the knife arms and replaced them with shotguns. I also have made more jackals with demolation charges and shotguns from some of my other atalan jackals.
Four Atalan Jackals with Demolition Charges – Front
Four Atalan Jackals with Demolition Charges – Rear
121055
Post by: Maharg
Nice idea with the display case, looks really good. Liking the bikers too, keep up the good work
21898
Post by: Oldmanronald
First Atalan Jackal with Demolition Charge
Thank you Maharg for your encouraging words.
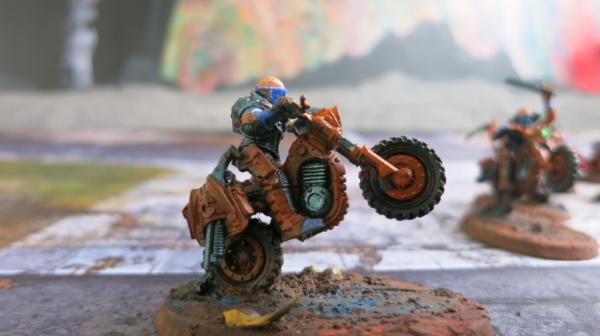
Atalan Jackal with Demolition Charge - Right Side
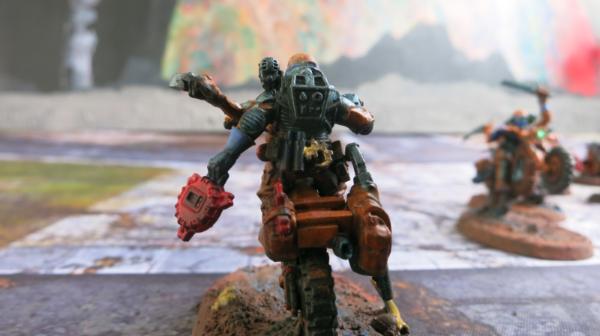
Atalan Jackal with Demolition Charge – Rear
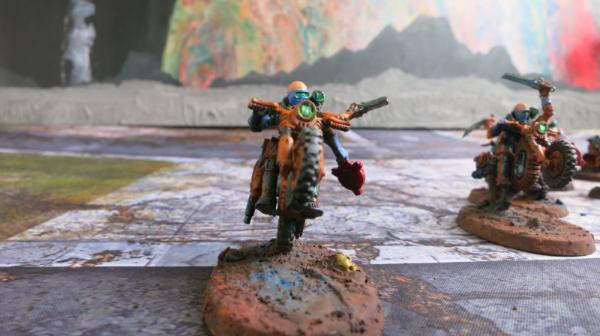
Atalan Jackal with Demolition Charge – Front
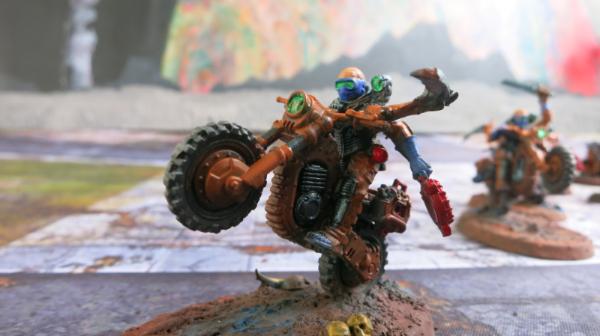
Atalan Jackal with Demolition Charge - Right Side
21898
Post by: Oldmanronald
Second Atalan Jackal with Demolition Charge
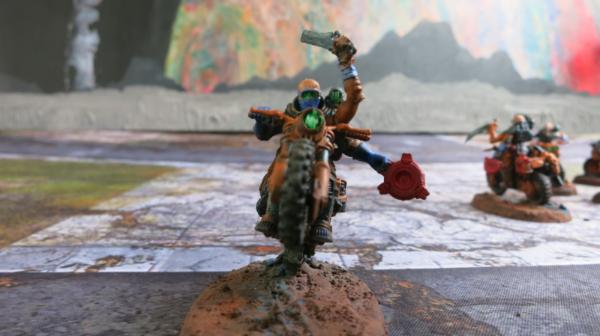
Atalan Jackal with Demolition Charge - Front
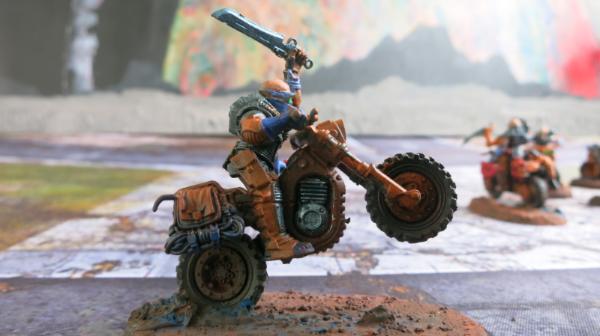
Atalan Jackal with Demolition Charge - Right Side
I forgot to put some skulls on his base.

Atalan Jackal with Demolition Charge – Rear

Atalan Jackal with Demolition Charge - Left Side

Atalan Jackal with Demolition Charge – Left Front
21898
Post by: Oldmanronald
Third Atalan Jackal with Demolition Charge

Atalan Jackal with Demolition Charge – Rear
I really like the shotgun hanging from the right pack on this model.
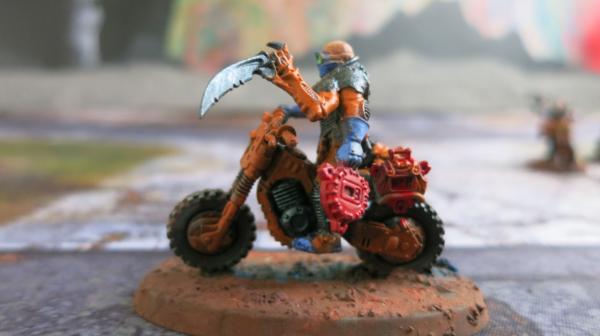
Atalan Jackal with Demolition Charge - Right Side
This jackal has a spare demo charge in his left pack.
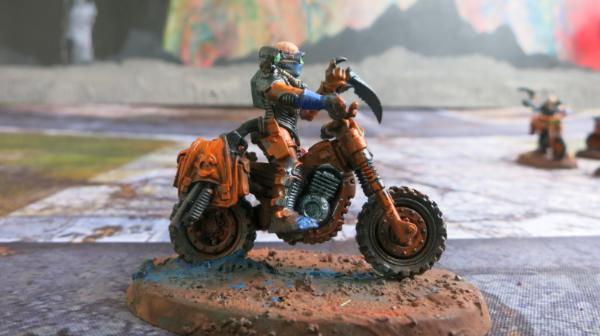
Atalan Jackal with Demolition Charge - Right Side
This picture has a nice view of his shotgun.
21898
Post by: Oldmanronald
Fourth Atalan Jackal with Demolition Charge
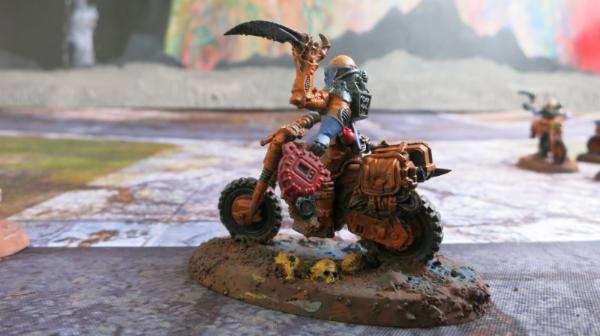
Atalan Jackal with Demolition Charge -Left Side

Atalan Jackal with Demolition Charge - Right Side
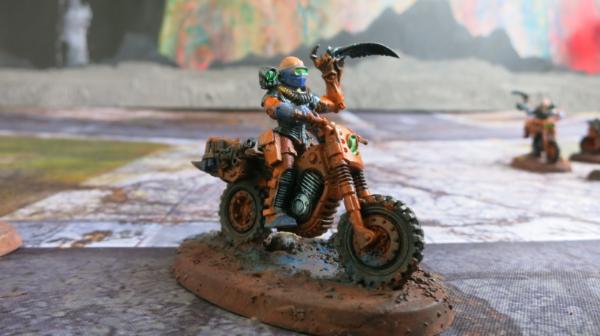
Atalan Jackal with Demolition Charge – Front Right Side
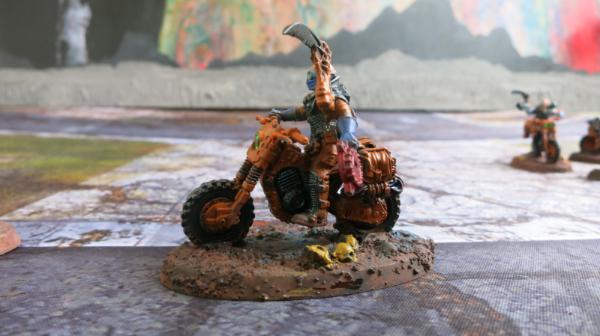
Atalan Jackal with Demolition Charge – Front Left Side
21898
Post by: Oldmanronald
Return to My First Love
I have pretty much finished building my Genestealer Cult army with a display case. It has been an interesting lesson in painting models, especially with its orange with complimentary blue scheme. Even though it has been fun, I found myself missing my Servitors of the Unnamed Chapter.
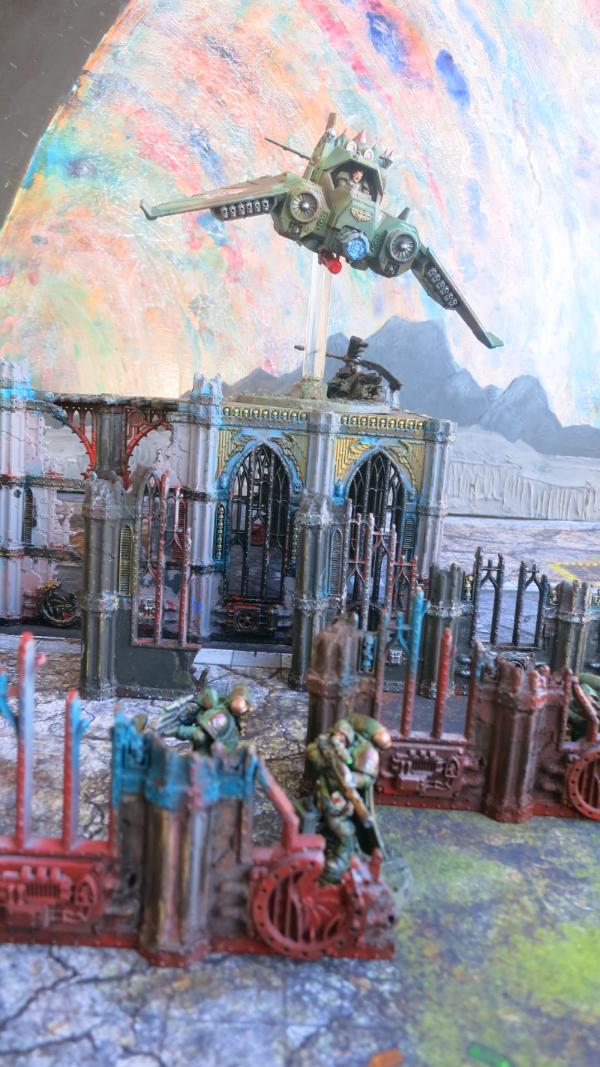
Dark Talen over Eliminator Squad in Ruins
Who are the Servitors of the Unnamed Chapter?
After the Lord High Admiral had been frustrated dealing with arrogant chapter masters each time he asked for fleet support, he demanded creation of his own space marine chapter to do the grubby little missions that these chapter master had refused to do. Unlike the other chapters, however, this chapter was not at first created from their own or a single predecessor chapter’s gene-seed. Instead The Master of the Administratum responded by requesting that each chapter provide one or more units of their best space marines to be permanently transferred to this new chapter. The chapter masters took advantage of this request to rid themselves of all their troublemakers, hot-dogs, and embarrassments. Thus, this chapter started as an unholy mix of irreverent space marines, mellow blood angels, and fun loving dark angels. Many of these were bitter at being removed from their former chapters to which they had devoted their lives and being forced to serve with equally demoralized strangers.
This chapter gained a reputation, unusual among space marines, of being ill-disciplined and unruly. In response, the Lord High Admiral stripped them of the use of heraldic uniforms and insignia. Instead, these fleet space marines were dressed in a dull camouflage uniform more typical of scouts or Imperial Guards. In final insult, the Lord High Admiral refused to name a space marine as the chapter master but instead assigned the position to General Quantum Wells, an aging military bureaucrat who had distinguished his career by avoiding risks, factious attention to obscure regulations, and petty military politics. Thus, assignment to this chapter was a dirty duty with little glory, much boredom, and ugly and extremely dangerous missions.
Although the chapter was organized under code name of the 157th Security Detachment, no formal name was ever assigned. The individual members of this unnamed chapter often referred to themselves as the servitors. The members of the un-named chapter started to sarcastically refer to themselves as the servitors after Chaplain Jambalaya “Dry” Bones gave a rather unfortunate and maudlin sermon on the Dying Servitor. At first, they referred to themselves as the Servitors because they felt that their own chapters had rejected them. In time, however, they called themselves servitors to represent their willingness to submit themselves to the Emperor’s will in all things just as a servitor submits to the most humble of tasks.
I play this army either as space marines or as dark angels. When I use them as dark angels I play them as regular dark angels rather than as a successor chapter so that I can use the named characters. I have built several new models including a new Dark Talon, an Eliminator Squad, and a Repulsor Executioner
 \ \
Repulsor Executioner with Glowing Macro-Plasma Incinerator
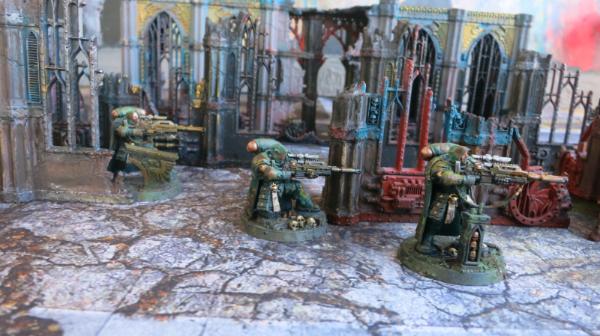
Eliminator Squad in Sector Imperial Ruins
21898
Post by: Oldmanronald
Getting A head in Space Marines– Puppet War Heads
I love painting human heads on War gaming models. Although it would be more realistic to build space marines with helmets, I almost always built the models with bare heads. Models with bare heads are much more expressive and interesting than the models with helmets.
Games Workshop usually provides their models with both helmets and with bare heads. The Games workshop bare heads are nice and look pretty good. Lately, however, I have been replacing their heads with heads that I ordered from Puppet Wars in Poland. Whoever these Puppet Wars artists are, they sculpture their heads with inspired, imaginative, and dynamic features that are a creative leap from the traditional heroic model style typical of war gaming miniatures. I love these Puppet War heads.
Puppet Ward heads are made from resin (the material that GW calls finecast). Resin has its problems. Resin models are often distorted so that flat surfaces become round and round surfaces twisted. The casting requires lots of lead lines so there is a lot of bling to cut away on each model. The mold lines are terrible and require a lot of scraping to remove.
Still resin loves paint and paint loves resin. I am not sure why but I think that the sharp edges on a resin model pick up paint much better than either metal or the standard modeling plastic. So the details on a resin heads really pop. Because the heads are small, the disadvantages of resin is negligible and the mold lines and the bling are easily cut away. Since resin heads look especially good, models with the Games Workshop plastic bodies and Puppet Wars resin heads are exciting. Here are some of my latest models.
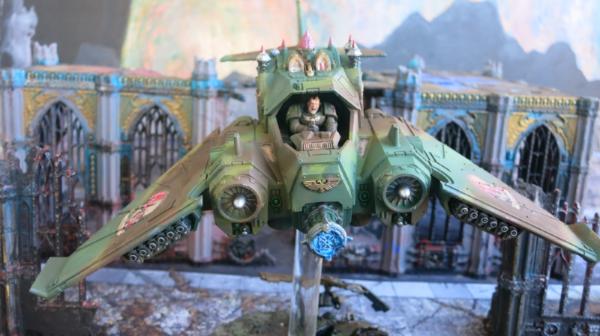
Ravenwing Dark Talon with Puppet War Mohawk head on the Pilot
I left the canopy off so that the head can easily be seen. The head is one of the Puppet Wars Mohawk heads.
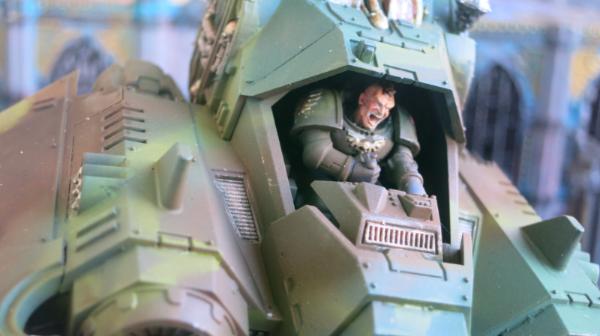
Close-Up of Ravenwing Dark Talon Pilot with Puppet War Mohawk head
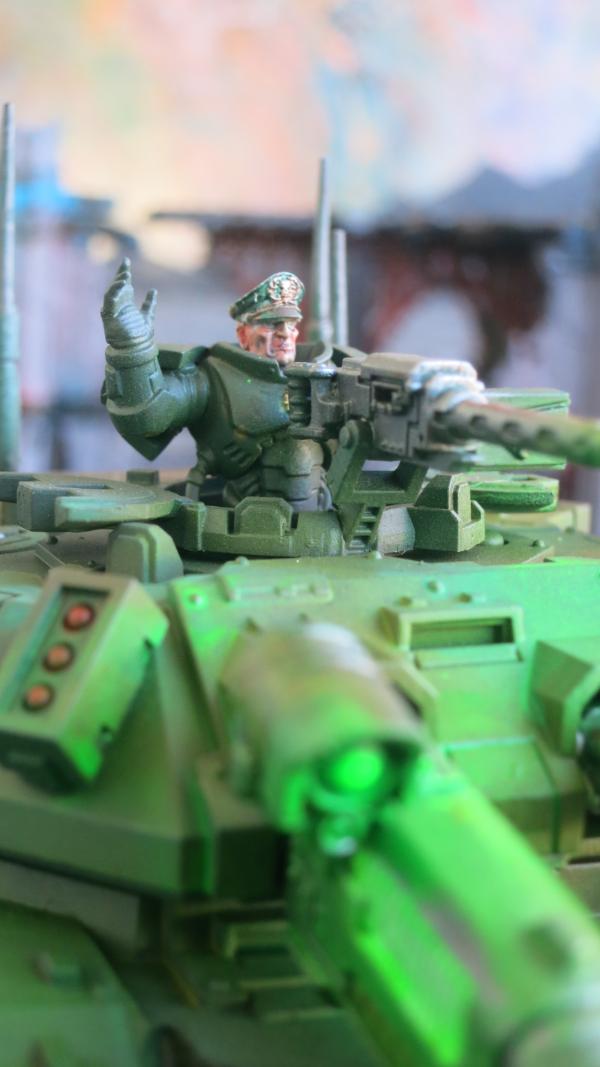
Repulsor Executioner Tank Commander with Puppet War Officer’s Head
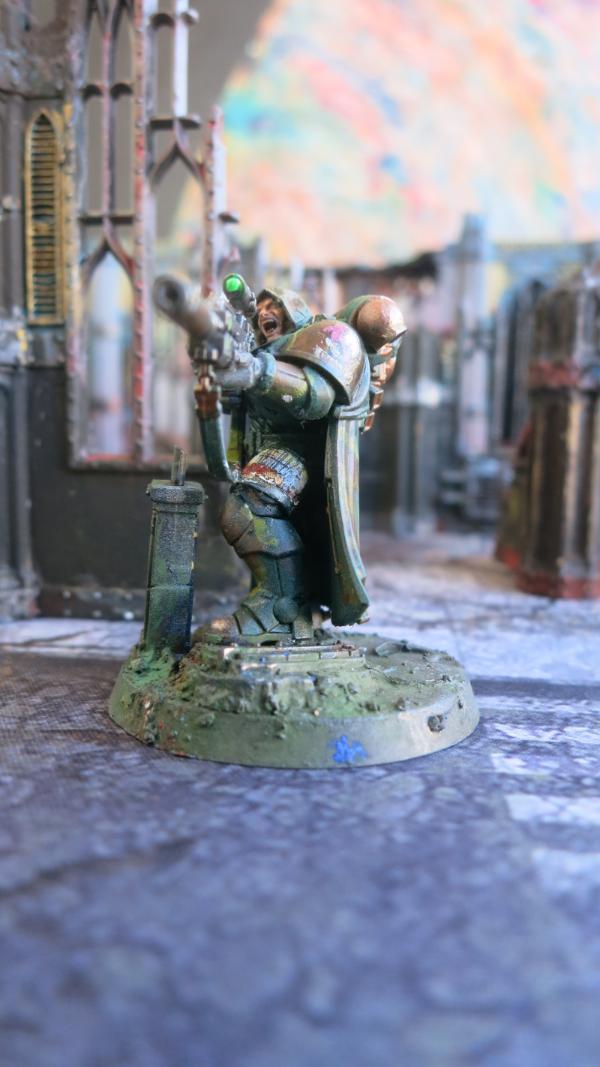
Eliminator with Bolt Action Rifle and Puppet War Hooded Head
90488
Post by: The Riddle of Steel
Those jackals look great. I am surprised I have not seen more of those painted up. They are such dynamic and expressive models.
The head swaps are looking good, too. I especially like the mohawk pilot. You can picture him screaming with indoctrinated xenos-hate at whatever he is obliterating.
21898
Post by: Oldmanronald
Kill Team Terrain
I agree with you The Riddle of Steel. Jackals are dynamic and expressive models. I saw some great ones at the Capital Palette Contest at the last Nova Open. Here is a link: https://www.flickr.com/photos/novaopen/48675184942/in/album-72157710681106433/ These are not my models but I really admire them. I suspect that we don’t see a lot of Jackals because Genestealer Cults are a niche army and the Jackals are not real competitive, especially with the recent jump in cost of the demolition charges. I am really pleased with the Mohawk pilot. I paint the heads separately in a batch of ten or twelve and then glue on the heads that best match the models.
Last year I ordered the Kill Team Starter set. In addtion to a Kill Team Core Manual, spruces of Adeptus Mechanicus adnd Genestealer Cult models, and some datacards, it included a gothic destroyed cathedral. I am almost finished with the cathedral and have started using it as terrain. I tried out several new techniques on it. The cathedral and its outlying walls are primed with pastel primer. The pastel primer is full of fine grit that is designed to hold pastels into place. The metal portions are air brushed with reds and turquoise, the red to underlay the iron and the turquoise to underlay the bronze. I painted the wall using pastels and then spray painted on a fixture to hold the pastels. Finally, I painted over most of the metal work with metallic iron and bronze paint. That was too much work but it does make good terrain.
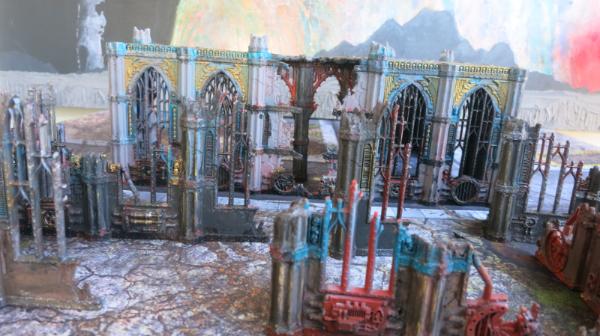
Sector Imperial Ruins
This makes a good background for my models.
Eliminator Squad in the Ruins
110309
Post by: ListenToMeWarriors
I really like your take on the GSC, I assume they are Rusted Claw? Have you got any plans to paint up any Ridge runners? They are my favourite models in the range. And they were one of the few GSC units to get a price reduction in Chapter Approved.
21898
Post by: Oldmanronald
Thanks, ListenToMeWarriors. I had heard that Ridge Runners were hard to play because they are fast moving vehicles with heavy weapons. Maybe the point drop will make them viable. The pictures of them look really great. I think I will get one, paint it up, and use it. What is the best configuration as far as weapons?
I do like vehicles, especially with the gunners or tank commanders showing so the Ridge Runners should be a fun model for me to assemble and paint. Thanks for the suggestion.
21898
Post by: Oldmanronald
Repulsor Executioner with Macro-Plasma Incinerator – Over Doing the Object-Source Lighting
I just finished building a Repulsor Executioner. I have been playing around with Object-Source Lighting or OSL, using plasma guns for my source lighting. The Macro-Plasma Incinerator should generate a large glow and I really played with the OSL on this model. I may have overdone it.

Repulsor Executioner with Macro-Plasma Incinerator - Left Front
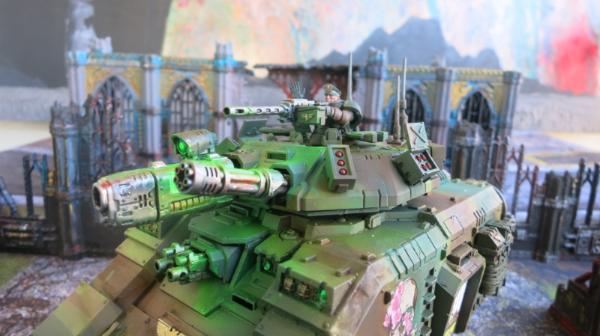
Repulsor Executioner with Macro-Plasma Incinerator – Left Front Close-up
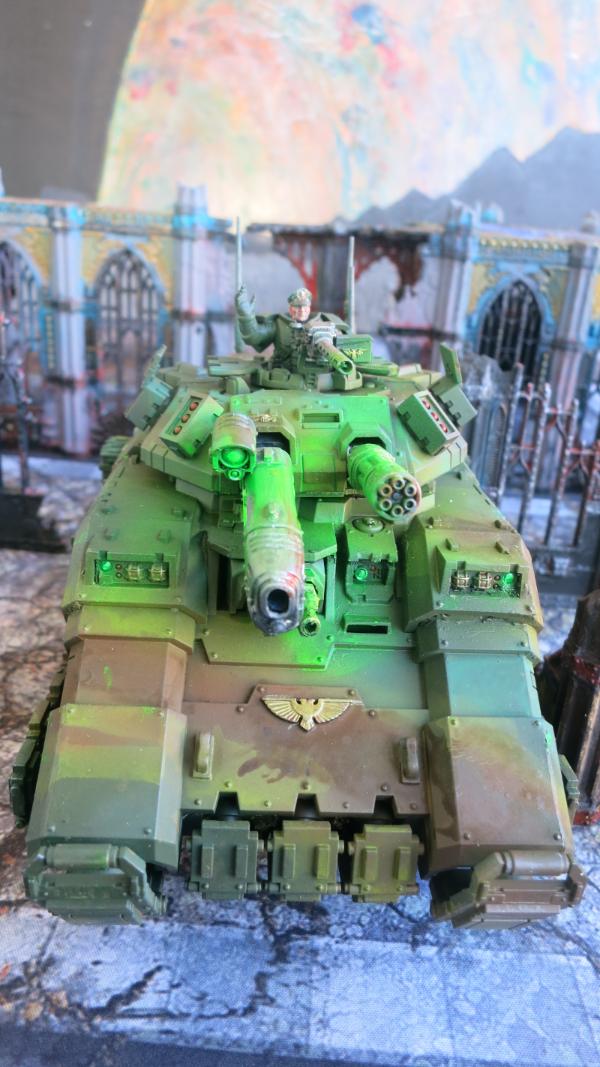
Repulsor Executioner with Macro-Plasma Incinerator – Upper Front
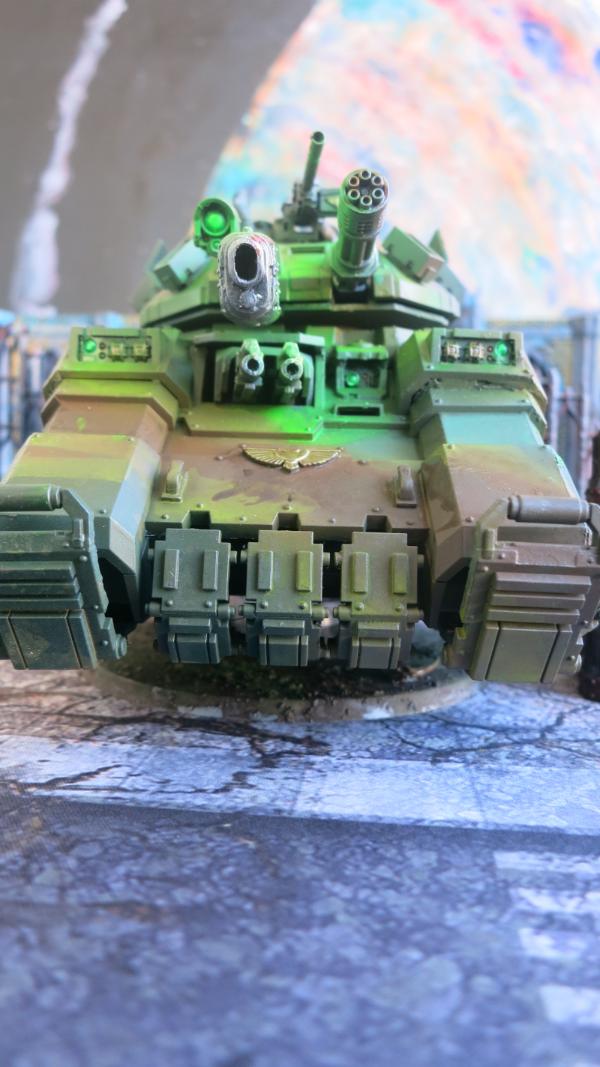
Repulsor Executioner with Macro-Plasma Incinerator - Lower Front
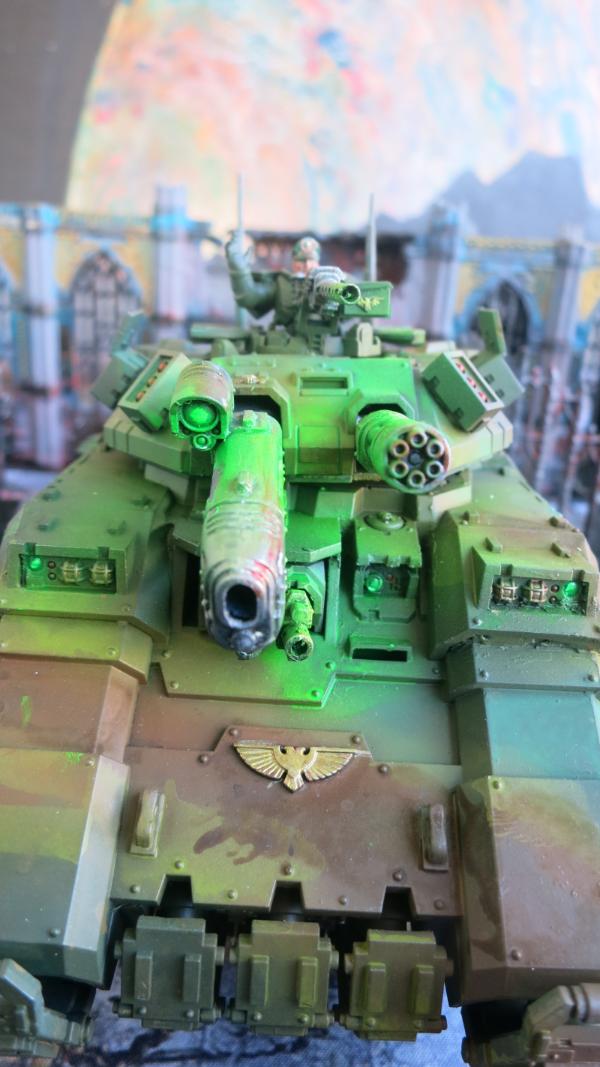
Repulsor Executioner with Macro-Plasma Incinerator – Front View Close-up
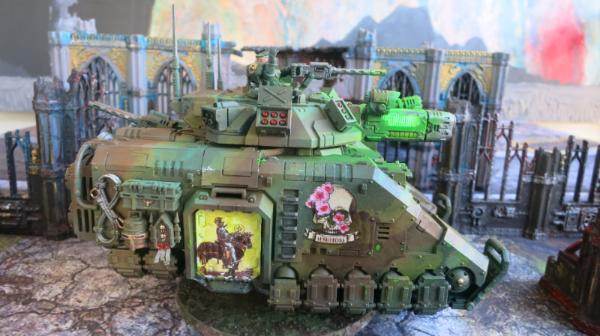
Repulsor Executioner with Macro-Plasma Incinerator - Right Side
I think I should have left off the decals on the side doors or used smaller decals for the skull with roses or both.
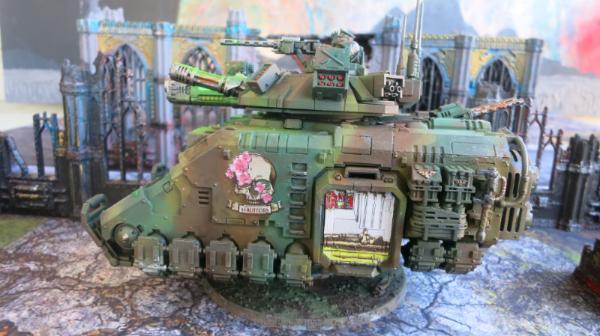
Repulsor Executioner with Macro-Plasma Incinerator – Left Side
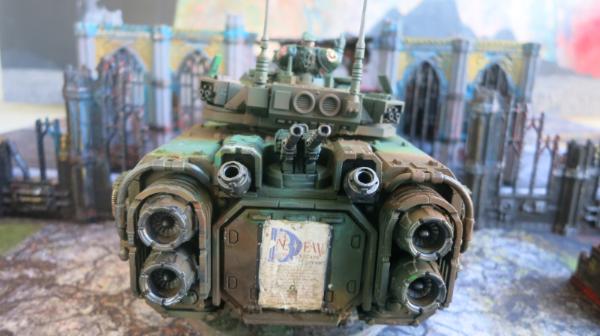
Repulsor Executioner with Macro-Plasma Incinerator Rear
The exhaust pipes need some pigment to make them look more realistic. Actually, the whole models needs some pigments to dull down the decals.
21898
Post by: Oldmanronald
Tank Commander - Repulsor Executioner with Macro-Plasma Incinerator
The Tank Commander has a Puppet Wars Officer’s Head with the standard primus tank commander body. I think I got a little careless with the face but it is hard to paint.
Tank Commander - Repulsor Executioner –Right Front
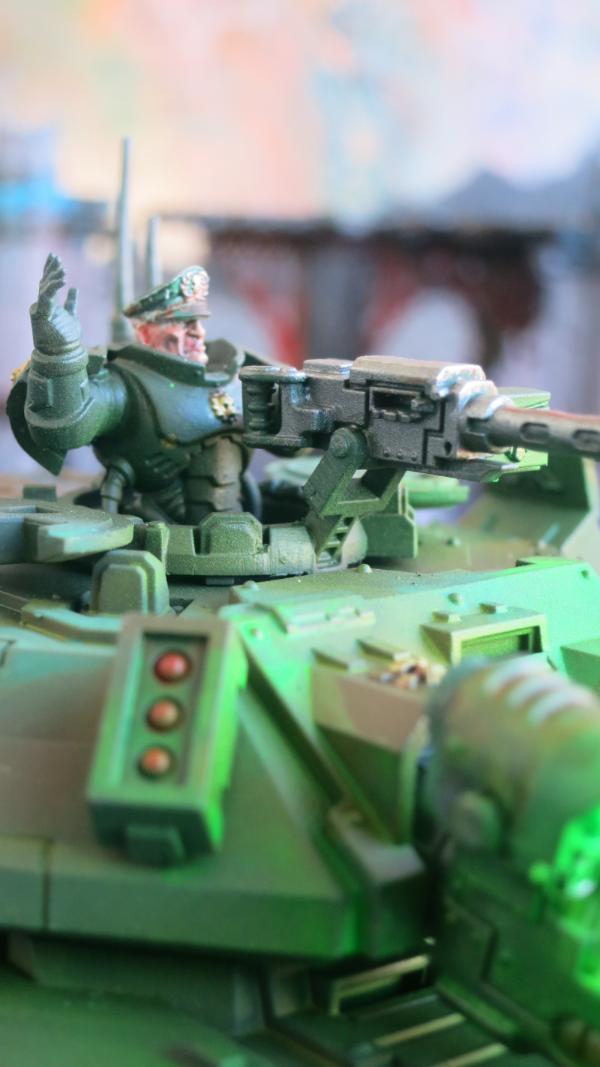
Tank Commander - Repulsor Executioner –Right
The object source lighting from the Macro-Plasma Incinerator is really intense in the picture. Actually, it barely shows up on a direct view of the model.
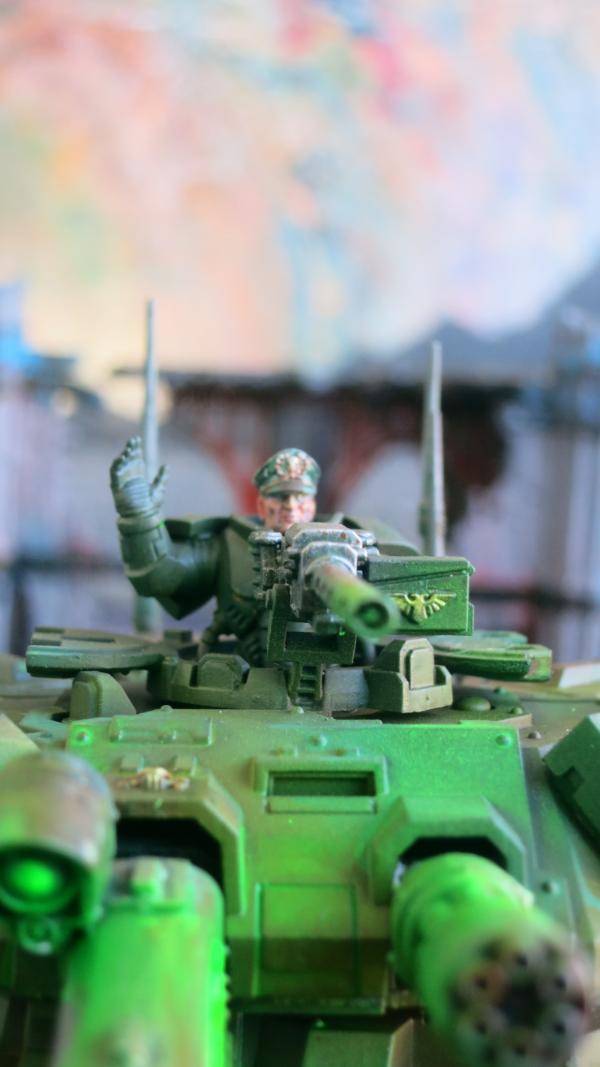
Tank Commander - Repulsor Executioner –Front
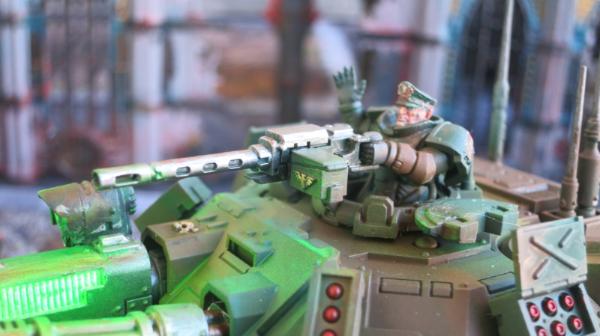
Tank Commander - Repulsor Executioner – Front Left
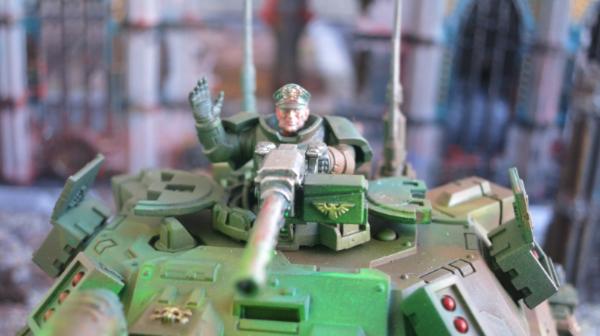
Tank Commander - Repulsor Executioner – Upper Front
21898
Post by: Oldmanronald
Ad Mech Kill Team
I find that I enjoy Kill Team because it is much quicker than a standard 40K game. Also, it is cheaper to build or modify a Kill Team squad than a standard 40K army. I just finished a twenty model Adpetus Mechanicus army with a display case so that I can easily display and store it. Actually, there are 22 models displayed but two of the models, the radio tower and the Skitarii Ranger with the transuranic arquebus are for show rather than to be played as part of the 20 limit Kill Team.
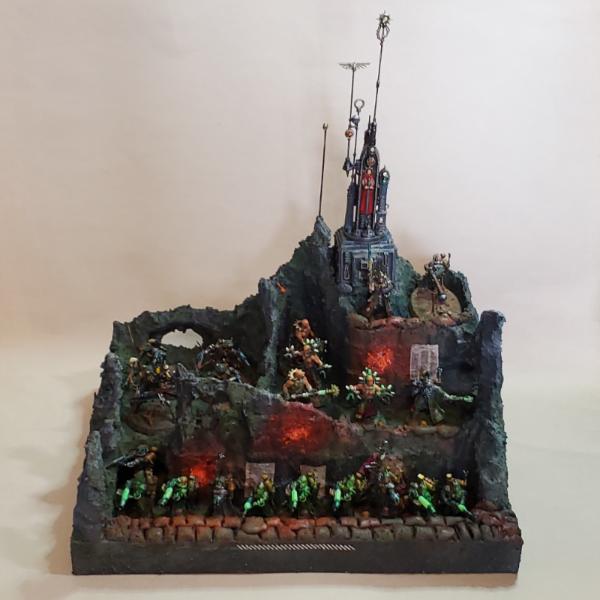
Display for Ad Mech Kill Team – Front
In the front row, the kill team includes starting at the left, a Skitarii ranger with galvanic rifle, two Skitarii rangers with plasma calivers, a Skitarii ranger with galvanic rifle and omnispex, a Skitarii vanguard with radium carbine, two Skitarii vanguards with plasma calivers, a Skitarii vanguard with radium carbine and omnispex, a third Skitarii vanguard with a plasma caliver, and a Skitarii vanguard with radium carbine. The middle row starting from the right includes a Skitarii Alpha with arc maul and phosphor blast pistol, two corpuscarii and two fulgurite electro-priests, three Sicarian Infiltrators, two with a flechette blaster and taser goad and one with a subcarbine and power sword, and a Infiltrator Princeps with a flechette blaster and Taser goad. The three figures at the top include the decorative Skitarii Ranger with transuranic arguebus and radio tower as well as a Skitarii vanguard with radium carbine and enhanced data-tether.
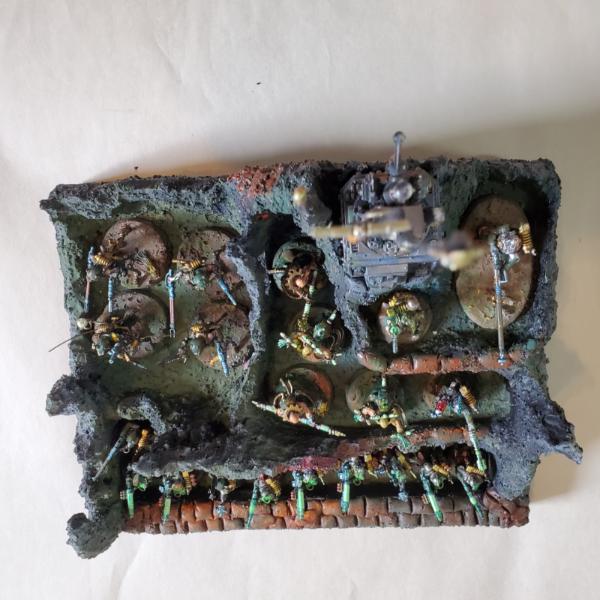
Display for Ad Mech Kill Team – Top
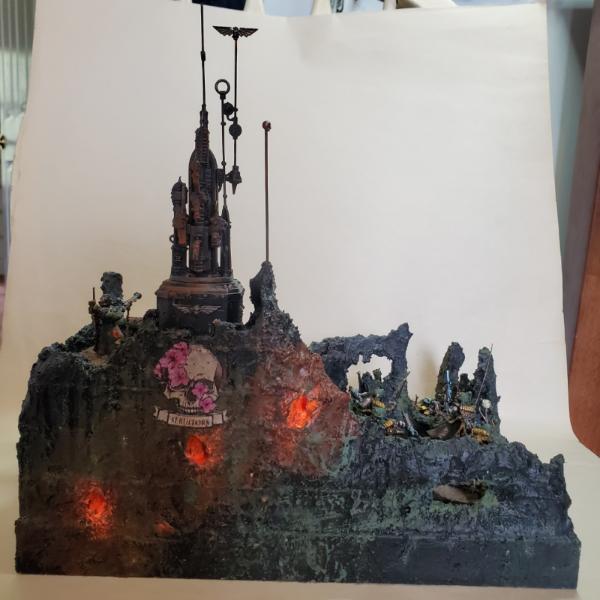
Display for Ad Mech Kill Team – Rear
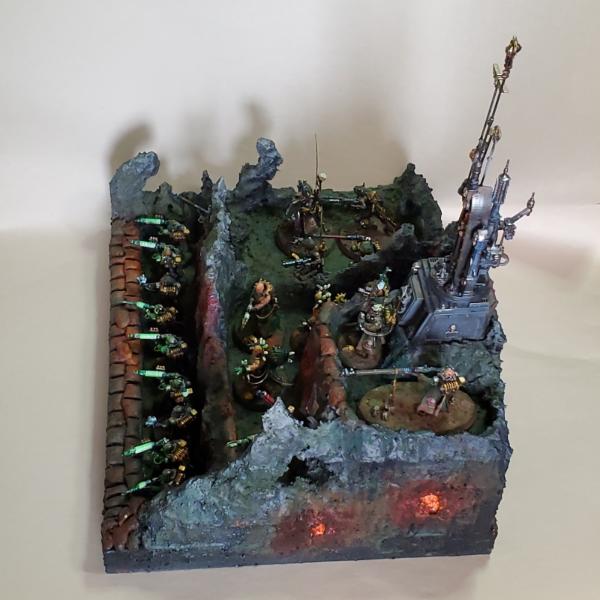
Display for Ad Mech Kill Team – Right Side
121268
Post by: Gwyn chan 'r Gwyll
That's a beautiful display! Definitely looks like an old ruin turned into a hardpoint.
21898
Post by: Oldmanronald
Kill Team Display
Thanks Gwyn chan ‘r Gwll. These displays are fun to make but it took me a while to figure out how to make these displays. I use the foam that they use for insulation on the outside of a house. I basically layer the foam over a wood frame and then use a foam cutting pen to cut the shapes out. Then I slap on a thick layer of Golden Extra Heavy Molding Paste over the foam which hardens the display. I’ll have to take step by step pictures when I am building the next one so I can make a tutorial out of it. Here is another fun from the top picture.
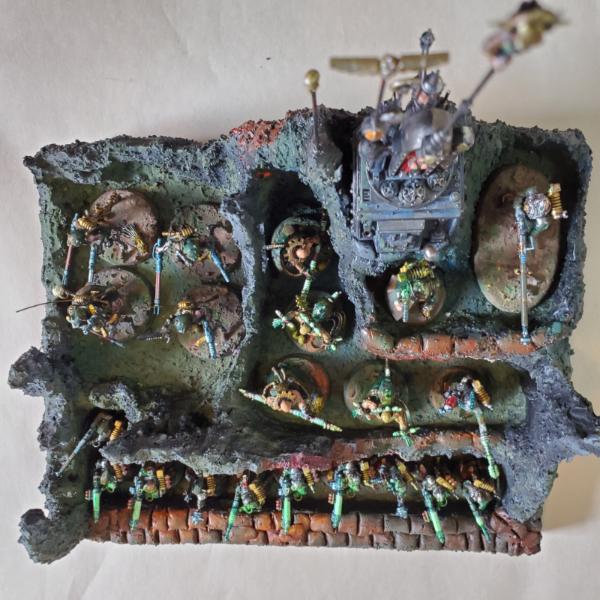
Display for Ad Mech Kill Team – Top
21898
Post by: Oldmanronald
Skitarii Rangers and Vanguard for Ad Mech Kill Team
The bottom row contains four Skitarii Rangers and six Skitarii Vanguard. One Ranger and one Vanguard carry an omnispex. Two Ranger gunners and three Vanguard gunners carry Plasma Calivers. I painted the Plasma white and then sprayed a light fluorescent green over the white and over those portions of the model near the plasma coils as plasma glow. The Skitarii Alpha is in the next level and another Skitarii Vanguard with an enhanced data tether is on the top level.
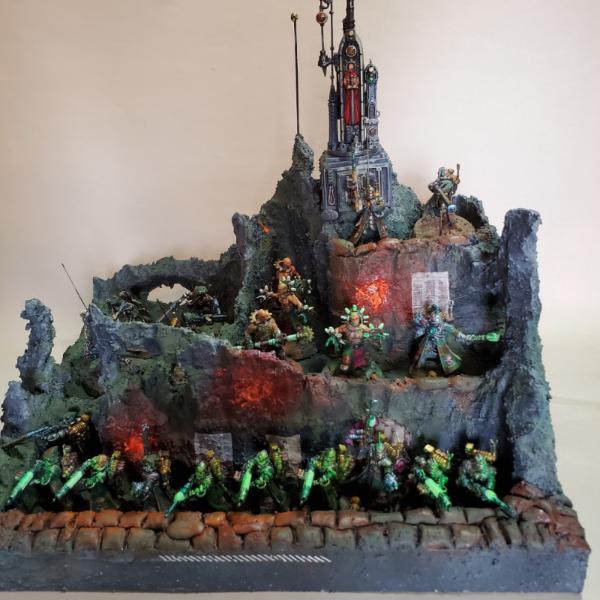
Skitarii Rangers and Vanguards
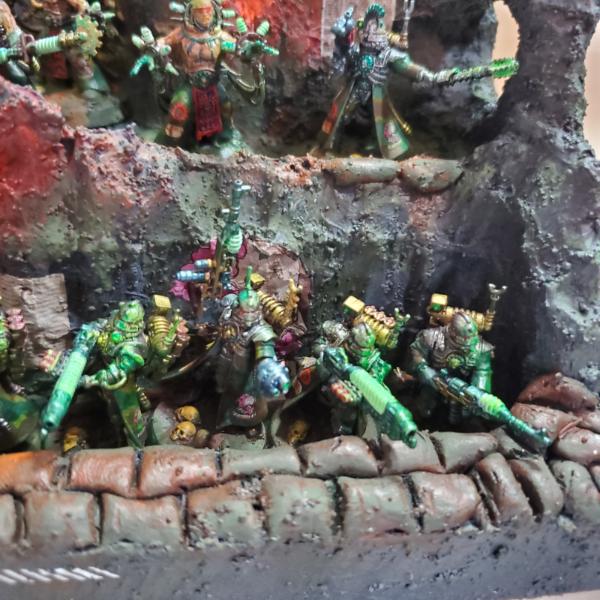
Skitarii Vanguards
This view also shows the Vanguard Alpha. I was pleased with the turquoise green on his chest and crest on his helmet. He is my leader. He has a phosphor blast pistol mainly to hit obscured models if he is threatened by other models. I plan to generally keep him hidden to generate command points.
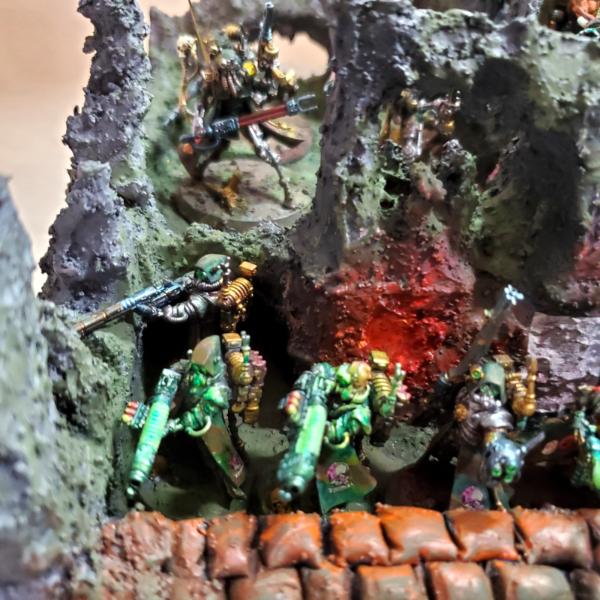
Skitarii Rangers
21898
Post by: Oldmanronald
Electro-Priests
I have mixed feelings about Electro-Priests. In my mind, it makes little sense for a Mechanicus army of cyborg warriors to have half naked men running around as assault troops. Still, I like how these Electro-Priests turned out. The fluorescent blue plasma really glows on these models.
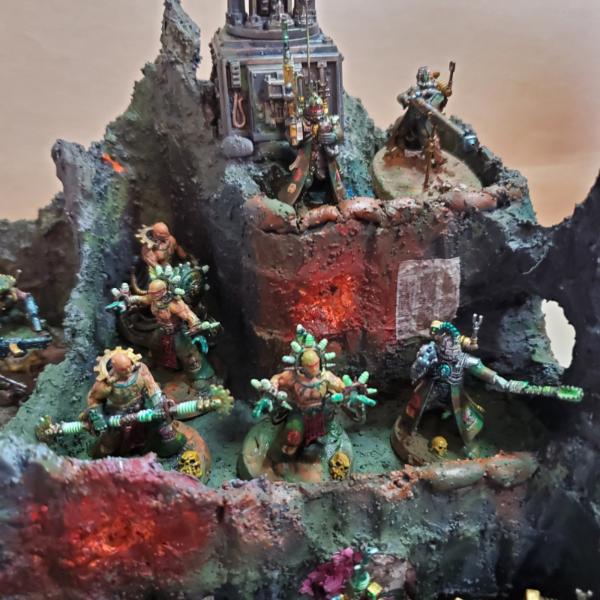
Electro-Priests
This Kill Team has two Fulgurite Electro-Priests and two Corpuscarii Electro-Priests. The Fulgurites are supposed to be good assault units for fighting heavy infantry like space marines. The Corpuscarii are good fighters against hoard armies. This picture also includes the Vanguard Alpha, a Vanguard with an enhanced data tether and a ranger with Transuranic arquebus. I don’t plan on using the arquebus on the Kill team because he is not too effective on the heavily covered Kill Team terrain. Still, I have him on the display since I really like the model. I want to experiment with the enhanced data tether. It should be good but I suspect that my two omnispexs are a better value.
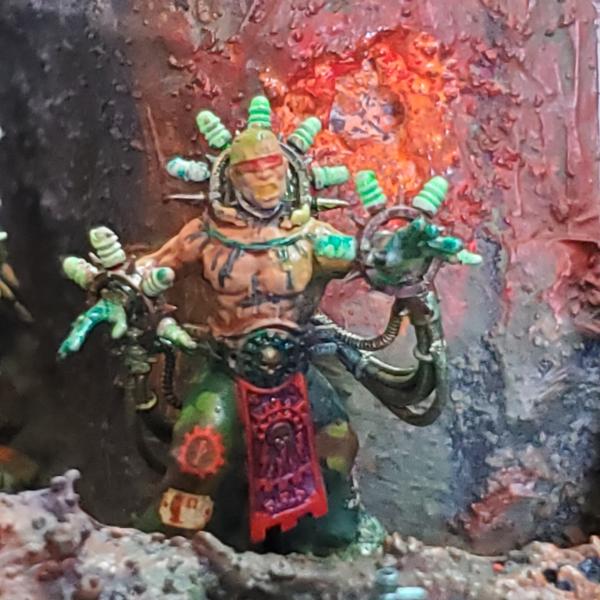
Corpuscarii Electro-Priest with Electrostatic gauntlets
This was a fun model to paint.
21898
Post by: Oldmanronald
Corpuscarii Electro-Priest with Electrostatic gauntlets
I took some more pictures this weekend including these close-ups of the Corpuscarii Electro-Priest with Electrostatic gauntlets.
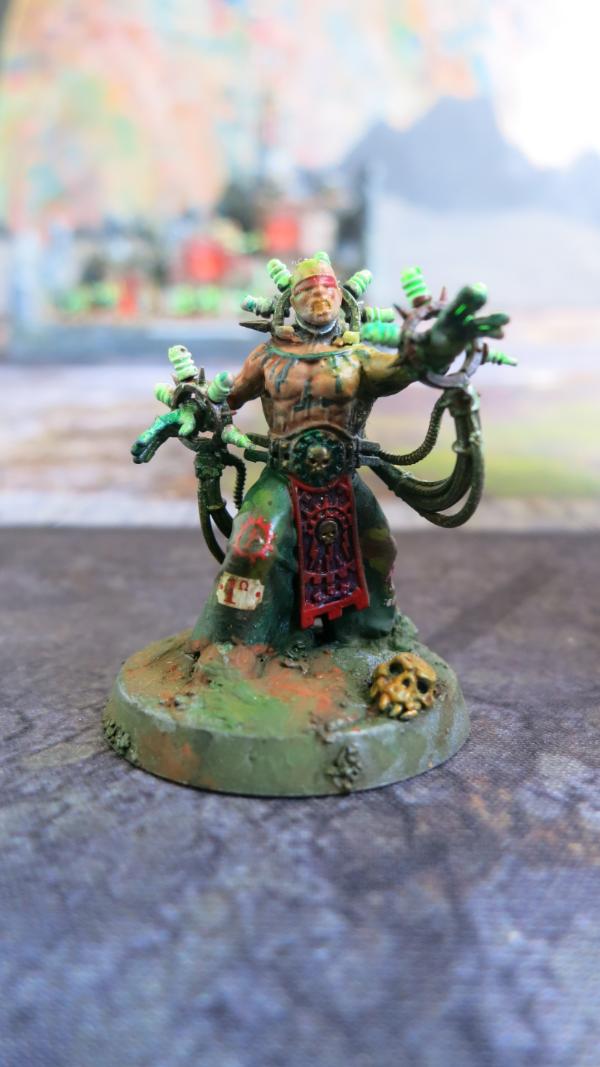
Corpuscarii Electro-Priest with Electrostatic gauntlets – Front
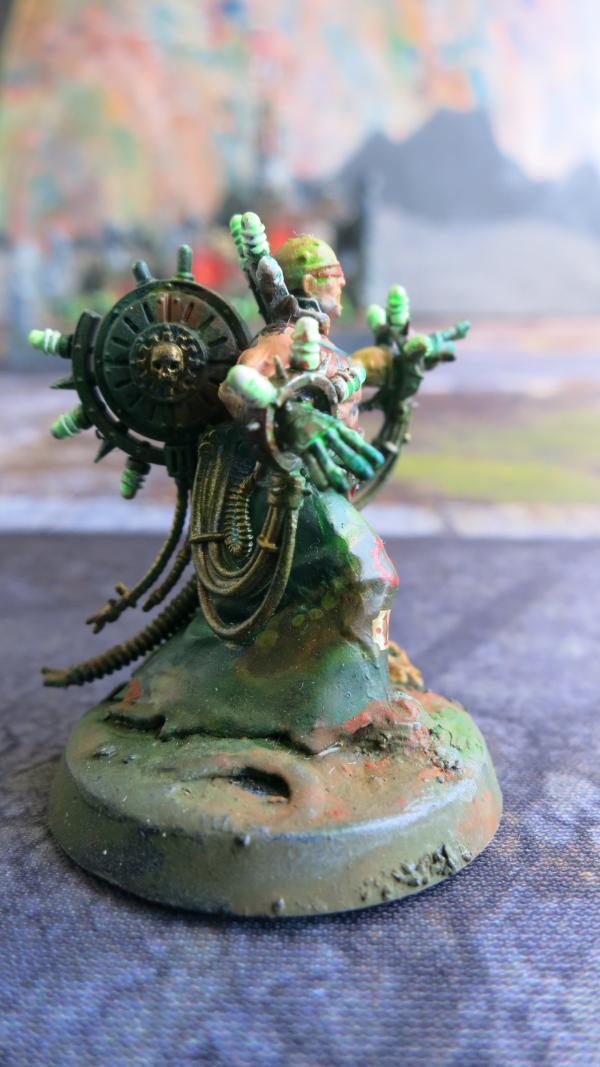
Corpuscarii Electro-Priest with Electrostatic gauntlets – Right
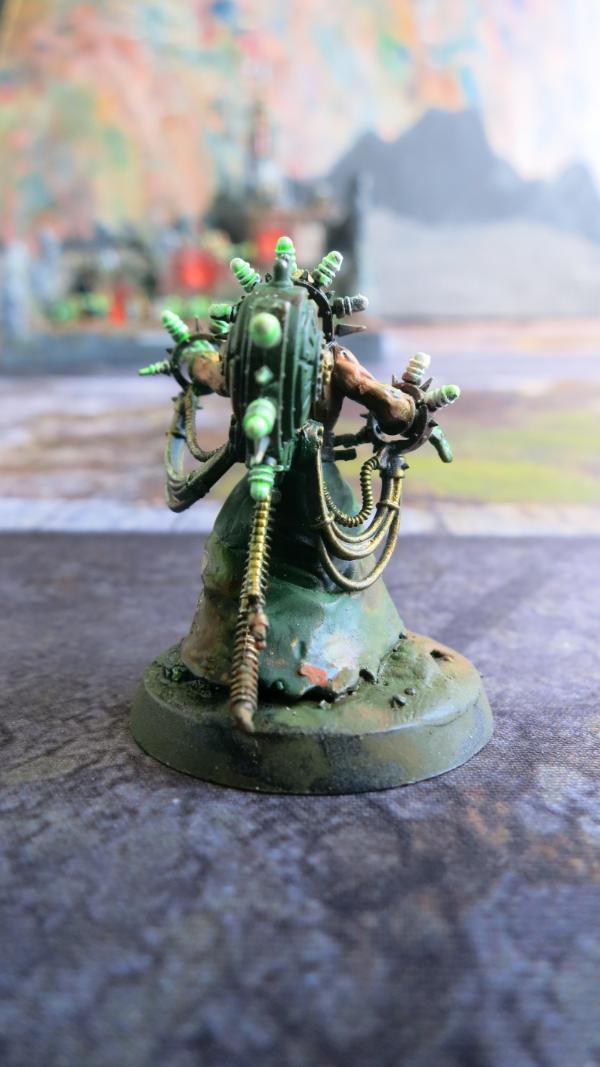
Corpuscarii Electro-Priest with Electrostatic gauntlets – Rear
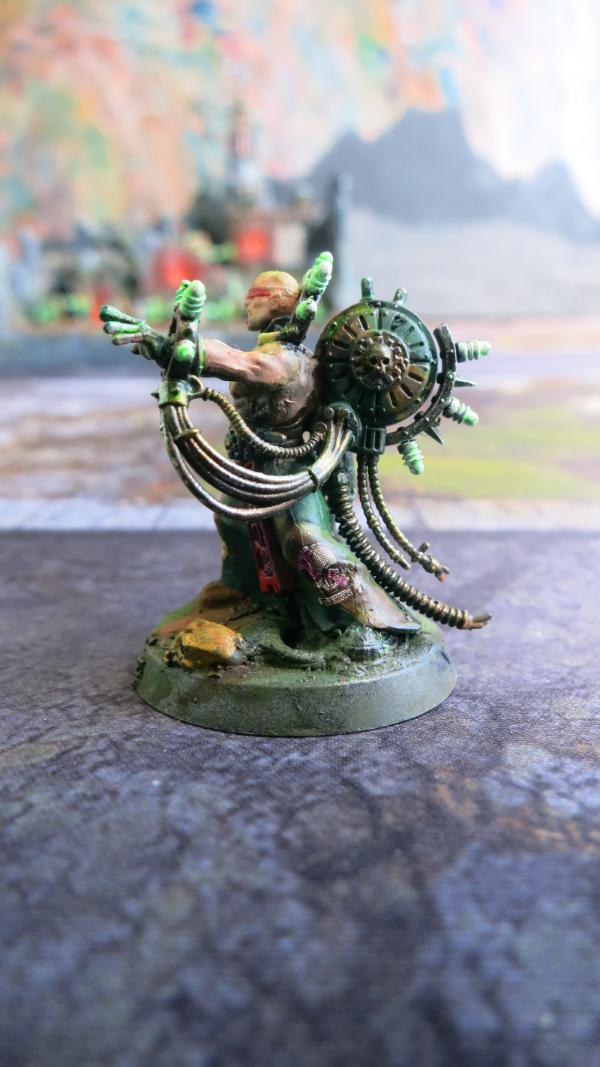
Corpuscarii Electro-Priest with Electrostatic gauntlets – Left
21898
Post by: Oldmanronald
Fulgurite Electro-Priest with Electroleech Stave
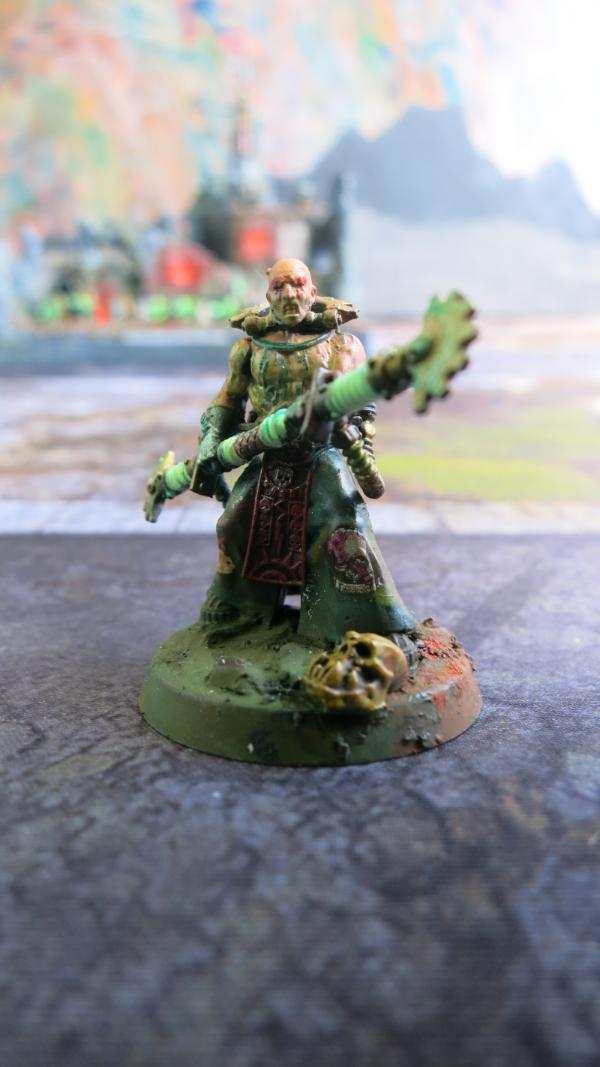
Fulgurite Electro-Priest with Electroleech Stave – Front
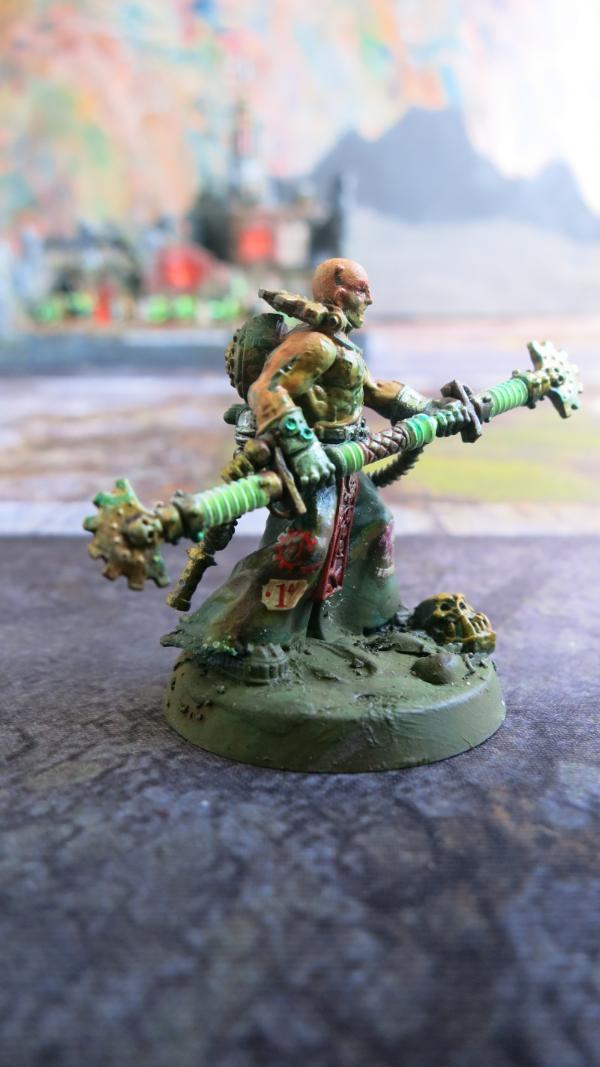
Fulgurite Electro-Priest with Electroleech Stave – Right
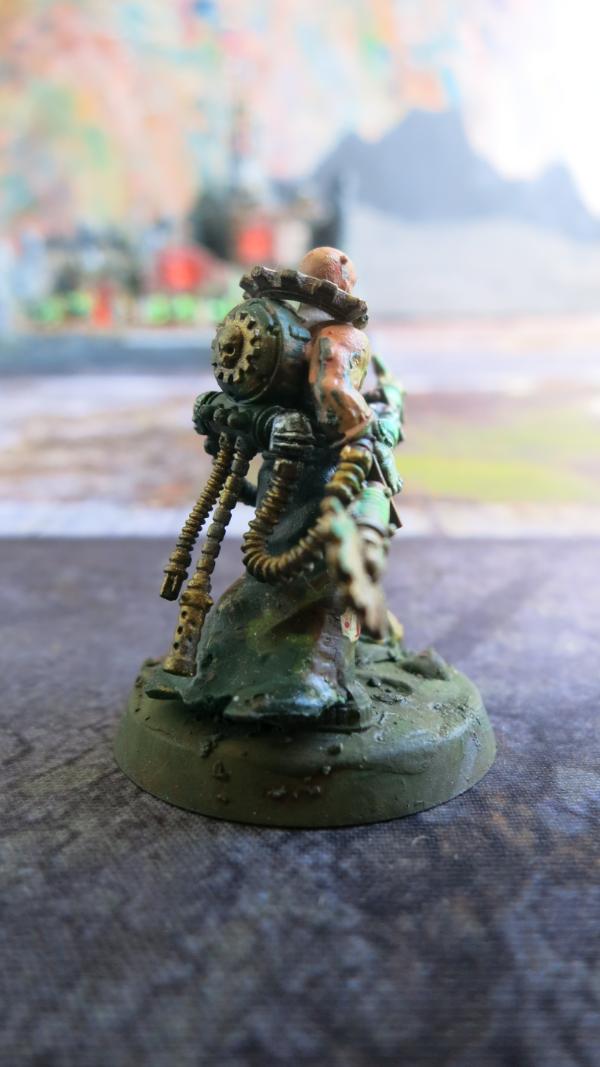
Fulgurite Electro-Priest with Electroleech Stave – Rear
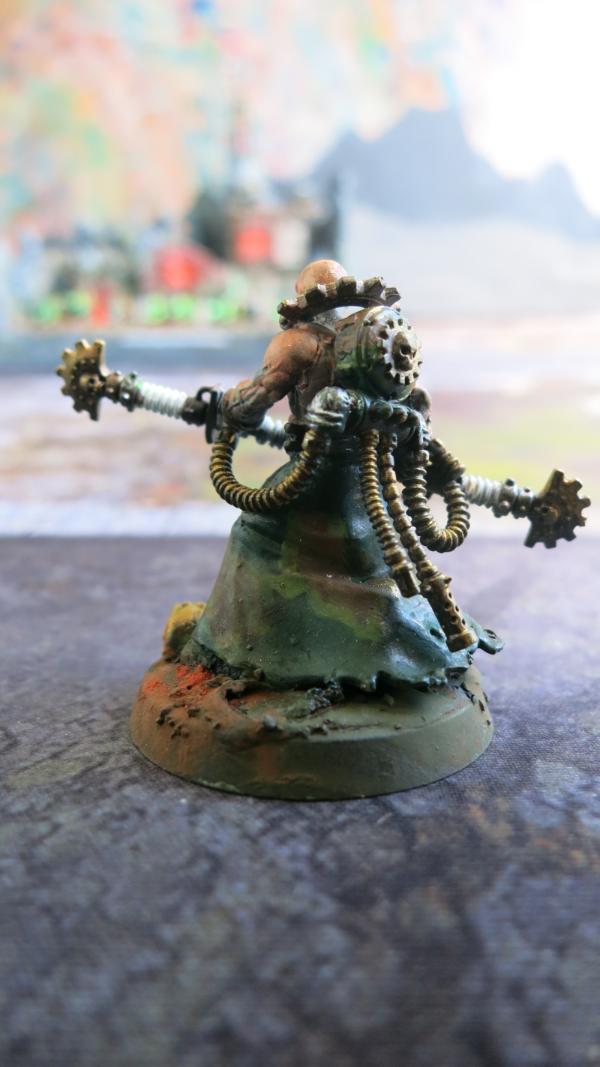
Fulgurite Electro-Priest with Electroleech Stave – Left
In this view I can see that I have a hose that become dis-attached on the right side. It is not noticeable in the other views. I will need to fix that.
21898
Post by: Oldmanronald
First Skitarii Ranger with Plasma Caliver
For Kill Team, I am trying to max out the number of Plasma Caliver choices since they are good for killing space marine opponents. I already have three Skiratii Vanguard Gunners but I think that I could use up to five Plasma Caliver so I built two more Skitarii Ranger Gunners. To create object source lighting from the plasma, I spray paint a coat of fluorescent green on the model.

Skitarii Ranger with Plasma Caliver – Front
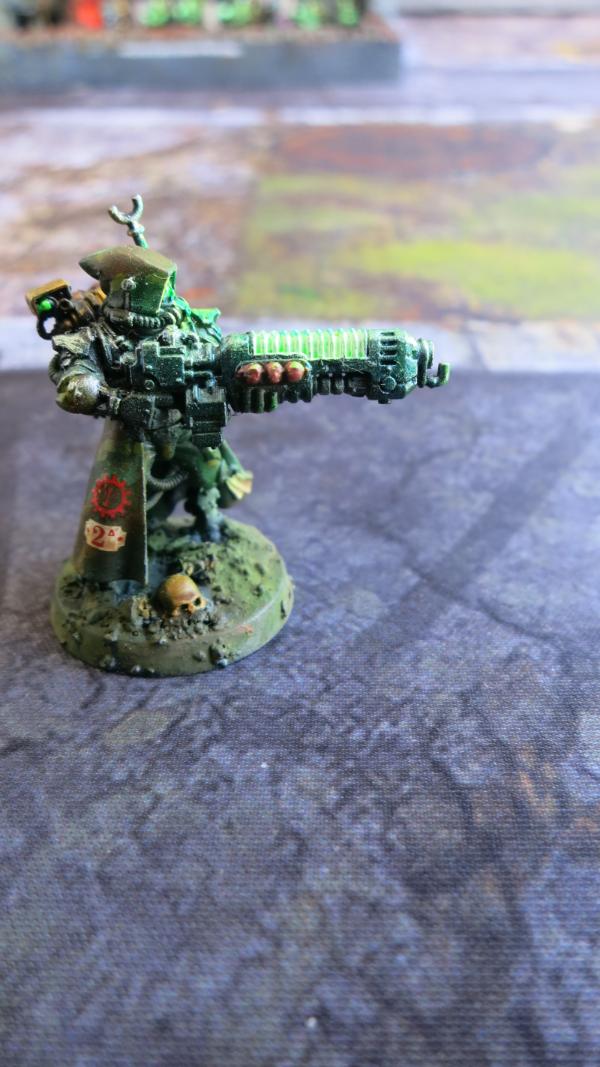
Skitarii Ranger with Plasma Caliver – Right View
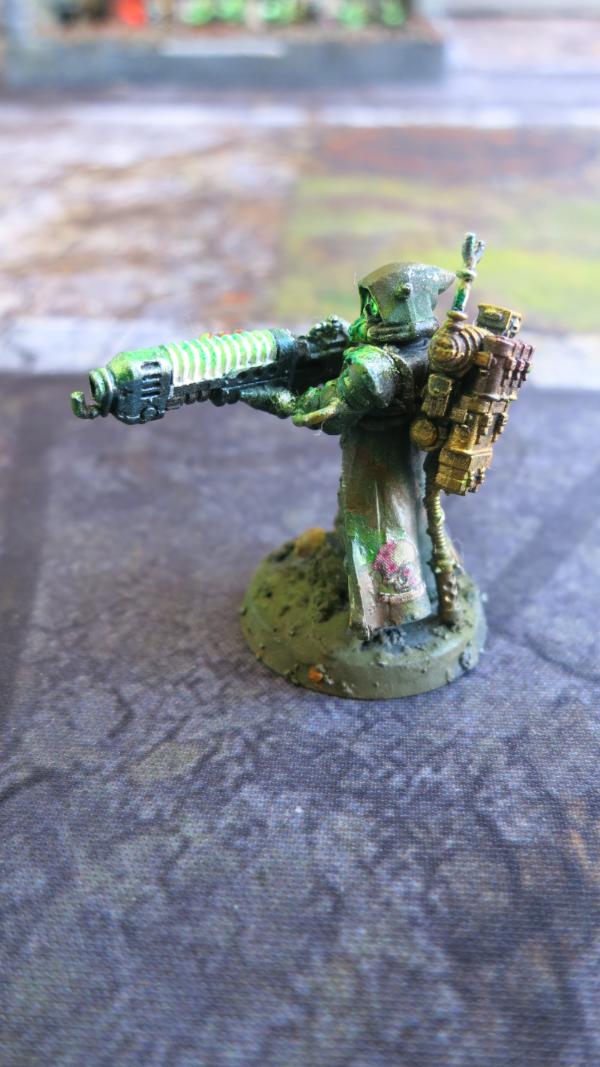
Skitarii Ranger with Plasma Caliver – Left
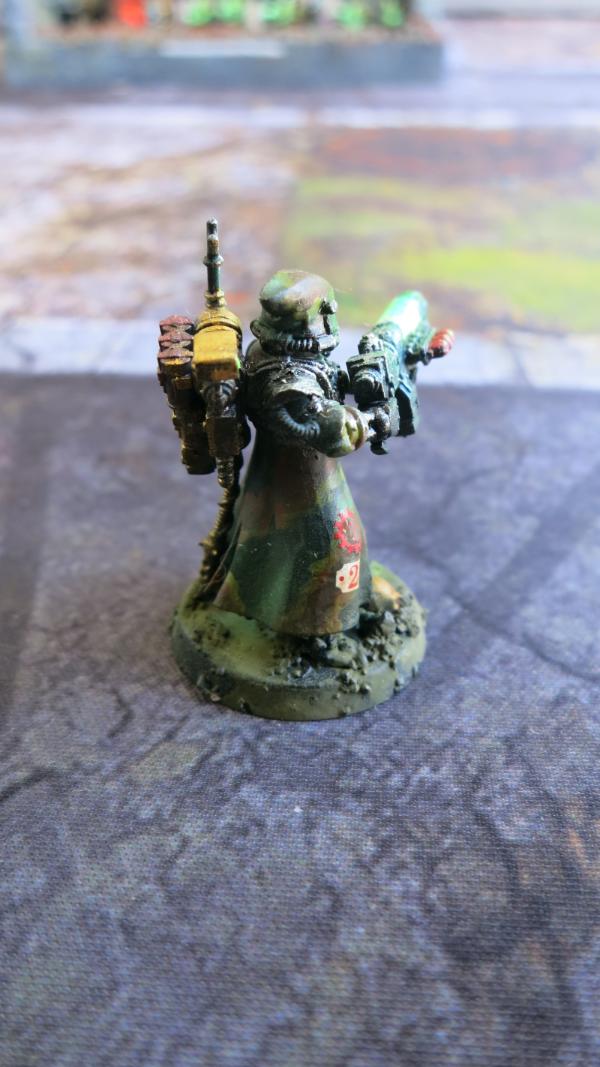
Skitarii Ranger with Plasma Caliver – Rear
21898
Post by: Oldmanronald
Second Skitarii Ranger with Plasma Caliver
Unlike the hooded first ranger, this guy is bareheaded.
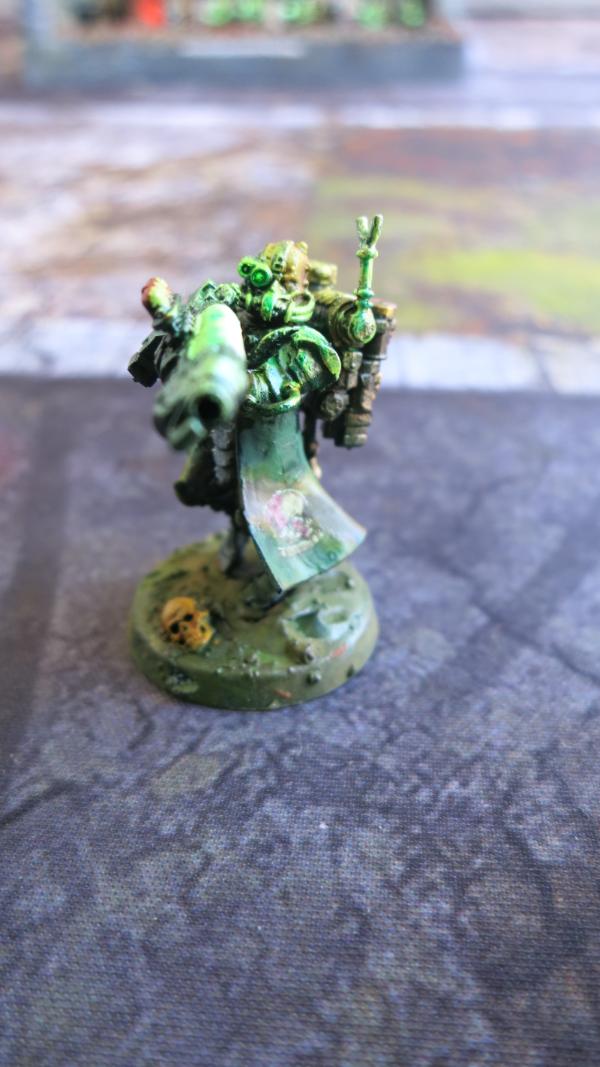
Skitarii Ranger with Plasma Caliver – Front
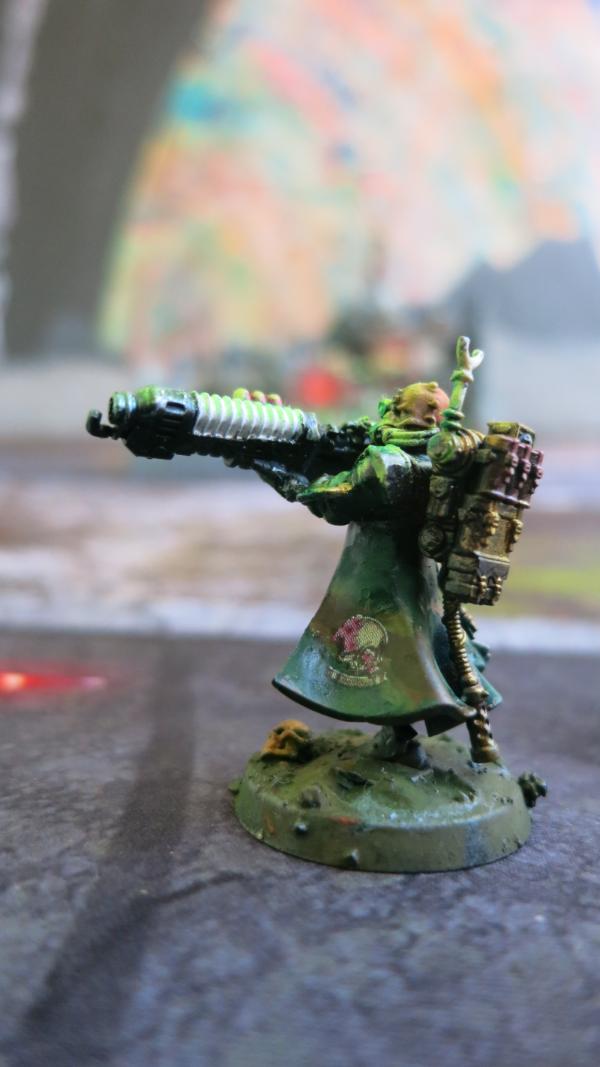
Skitarii Ranger with Plasma Caliver – Left
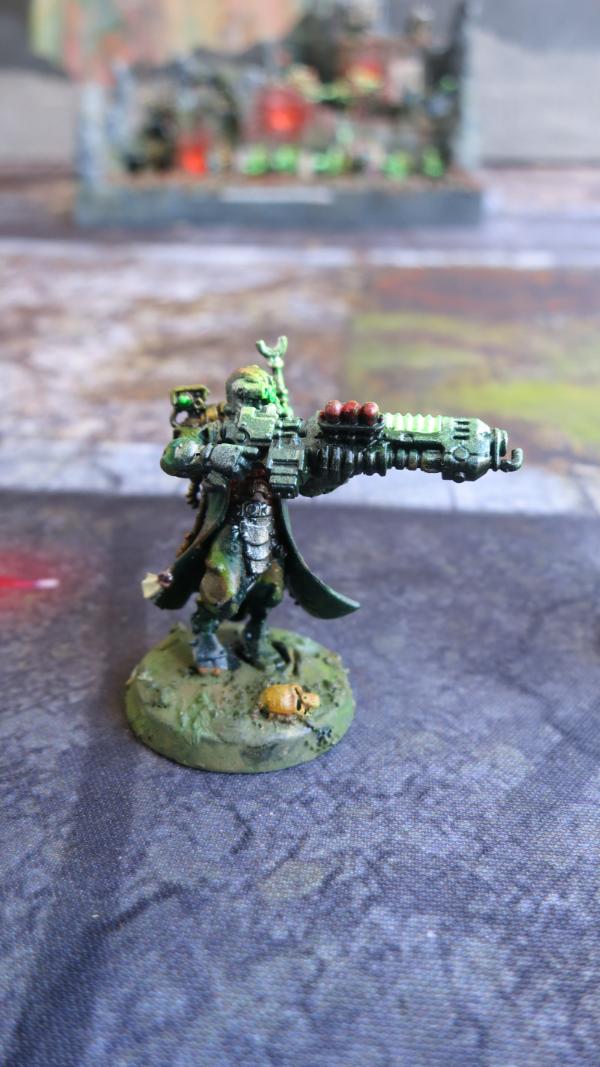
Skitarii Ranger with Plasma Caliver – Right
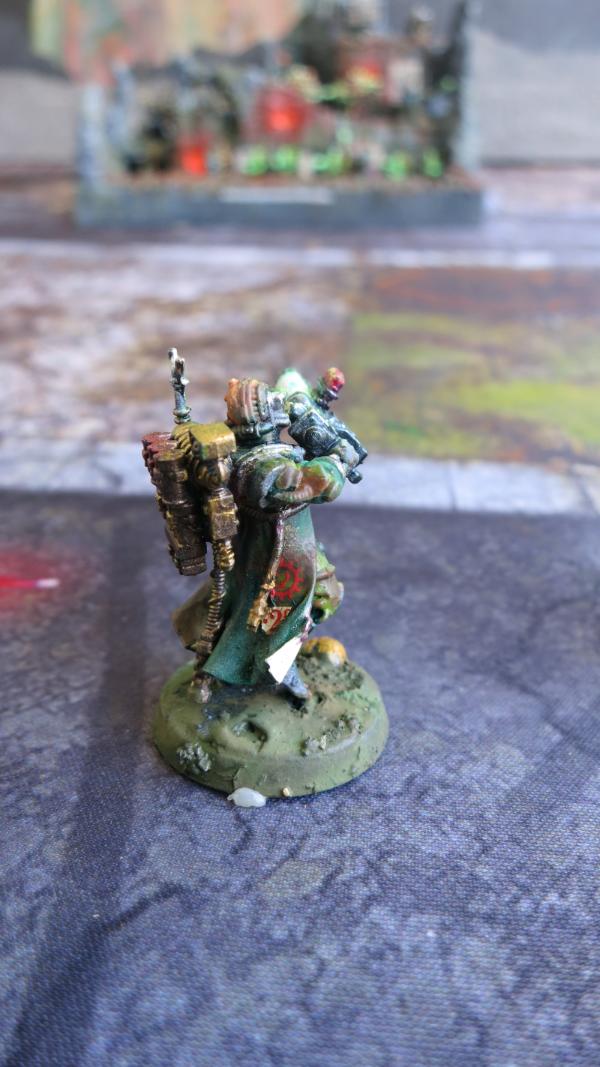
Skitarii Ranger with Plasma Caliver – Rear
21898
Post by: Oldmanronald
Skitarii Vanguard Alpha with Arc Maul and Phosphor Blast Pistol
In Kill Team, the goal for the Skitarii Alpha is to keep him cheap and alive for the command points. He has a pistol and an arc maul in case he gets in trouble but I am not using him as an offensive piece. He has a Phosphor Blast Pistol which may be handy since it ignores cover.
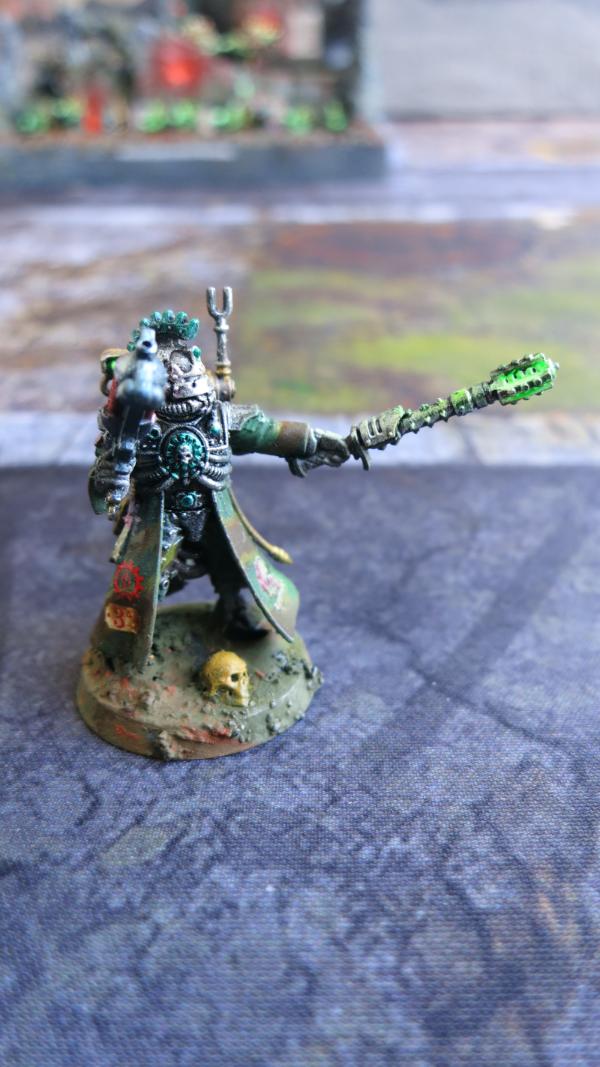
Vanguard Alpha with Arc Maul and Phosphor Blast Pistol – Front
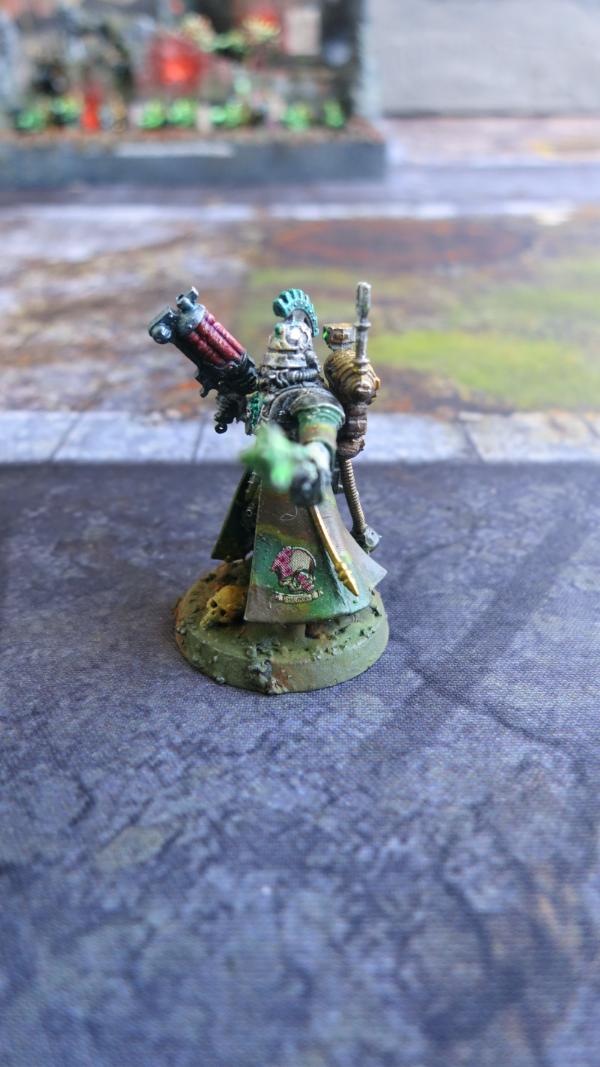
Vanguard Alpha with Arc Maul and Phosphor Blast Pistol – Left
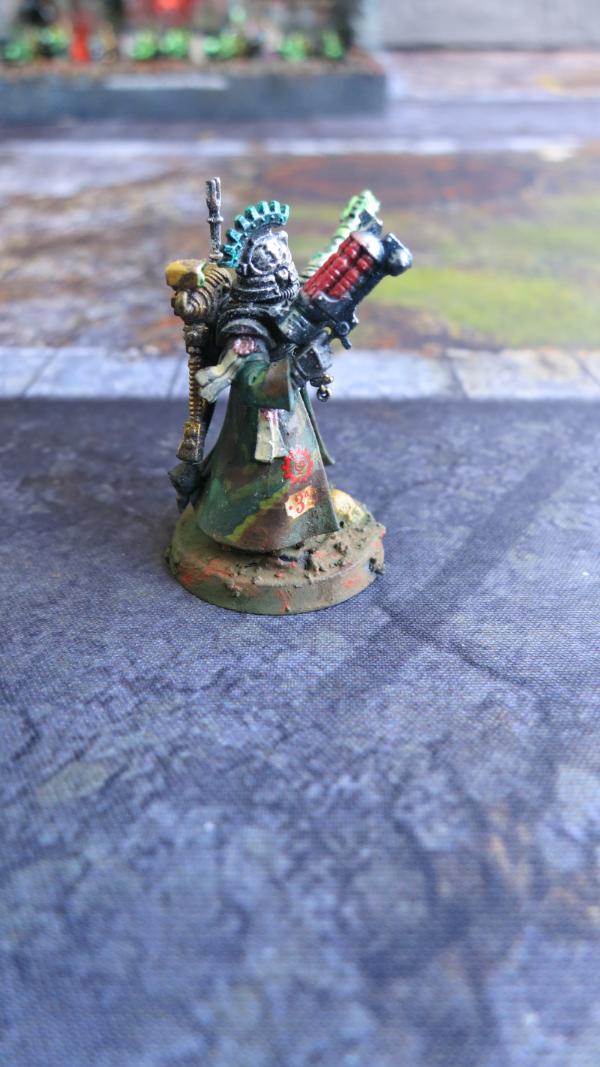
Vanguard Alpha with Arc Maul and Phosphor Blast Pistol – Right
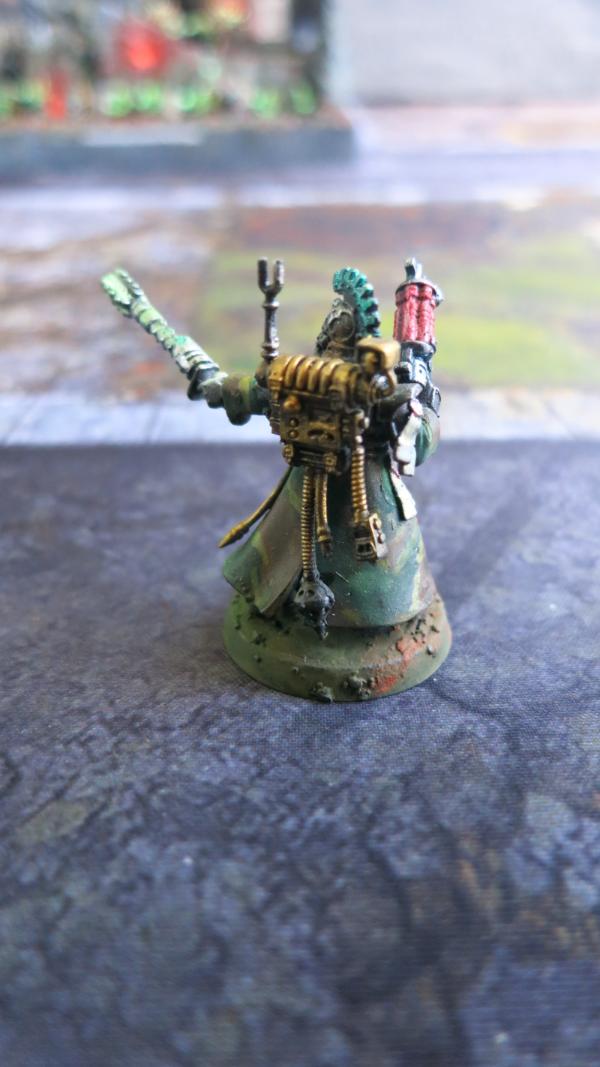
Vanguard Alpha with Arc Maul and Phosphor Blast Pistol – Rear
21898
Post by: Oldmanronald
Dark Angels – Deathwing Knights
Although I am using admech for kill team, for regular 40K games, I am returning to my old chapter figures, the Servitors of the Unnamed Chapter, which I play as Dark Angels. I have made up an army list that uses mostly figures that I already have. Some of these old models need to be refreshed and a few new ones built.
I plan to use Deathwing Knights to support a Ravenwing force so I am rebuilding my Deathwing Knights. I refreshed my old models by painting the left shoulder pad off white to match the robes and the already white right shoulder pads, adding a crystal blue to their Ace of Absolutions or Flail of the Unforgiven, and adding pigment to their bases.
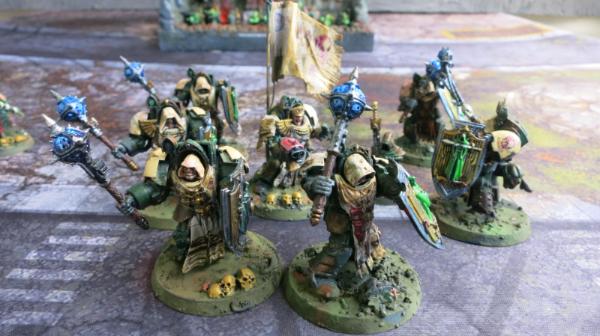
Refreshed Deathwing Knights
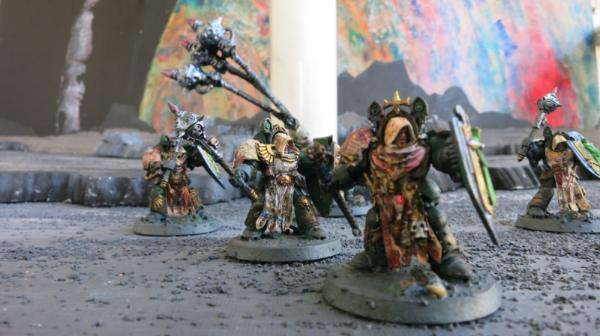
Old Deathwing Knight
I enjoy refreshing my old models, especially models that I liked in the first place. I had fun making the Deathwing Knights the first time, especially putting the decals on the robes. Making small changes to models I already like is fun because it seems to renew my interest in them. I had stopped playing Deathwing Knights since they could not move fast enough to engage the enemy. With the new stratagems and abilities in Psychic Awakening Ritual of the Dammed, my Ravenwing should be able to use Combined Assault to place the Deathwing Knights where I need them.
I also built three new models to support the Deathwing Knights. The first is another Deathwing Knight. The second is a Deathwing Ancient with a Deathwing Company Banner. The third is a Watcher in the Dark.
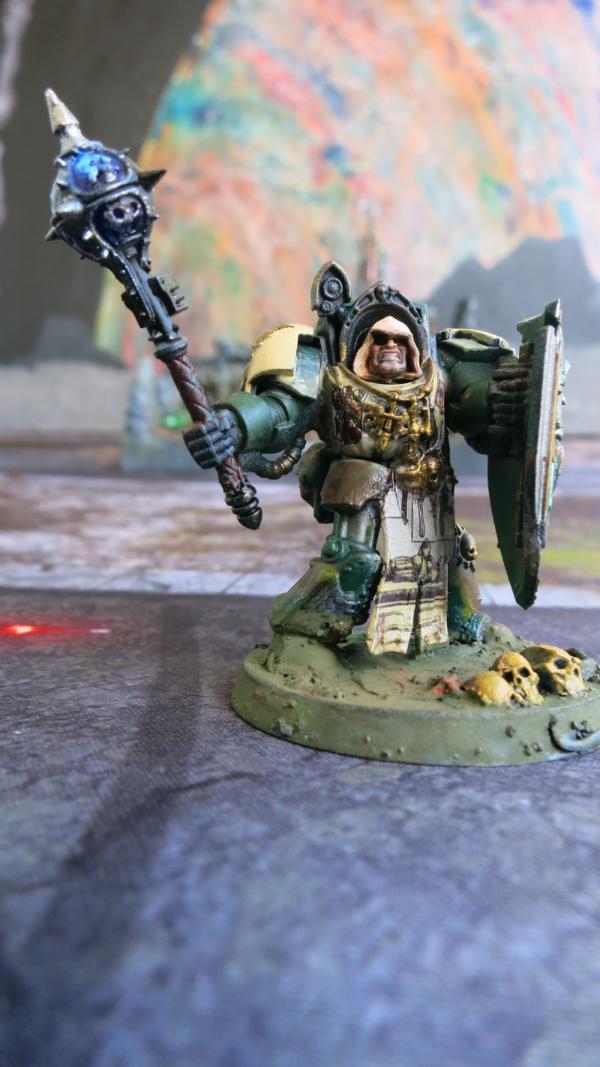
New Deathwing Knight
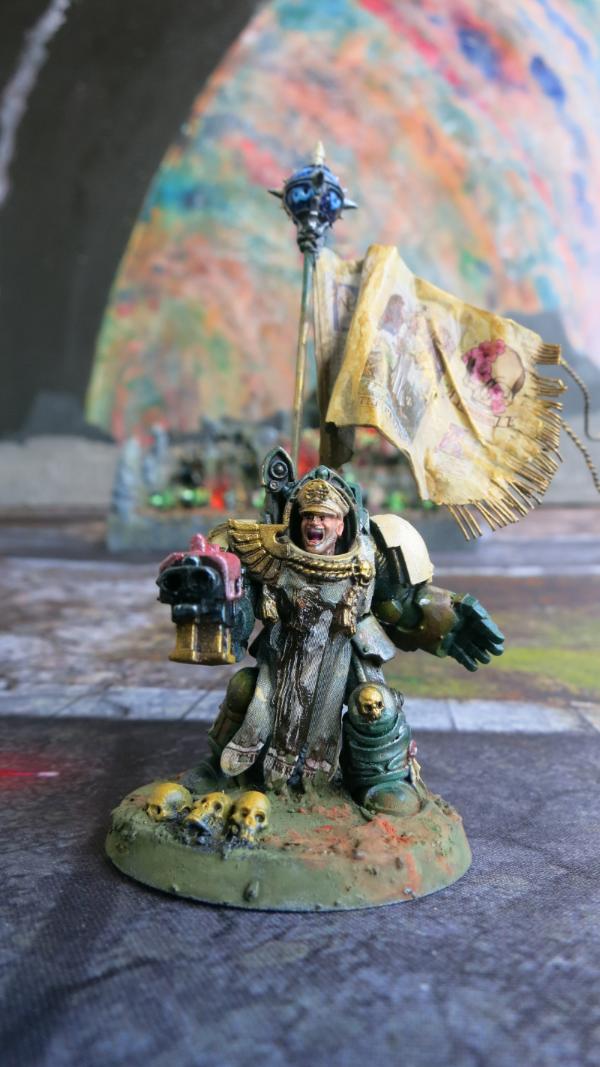
Deathwing Company Ancient with Deathwing Banner
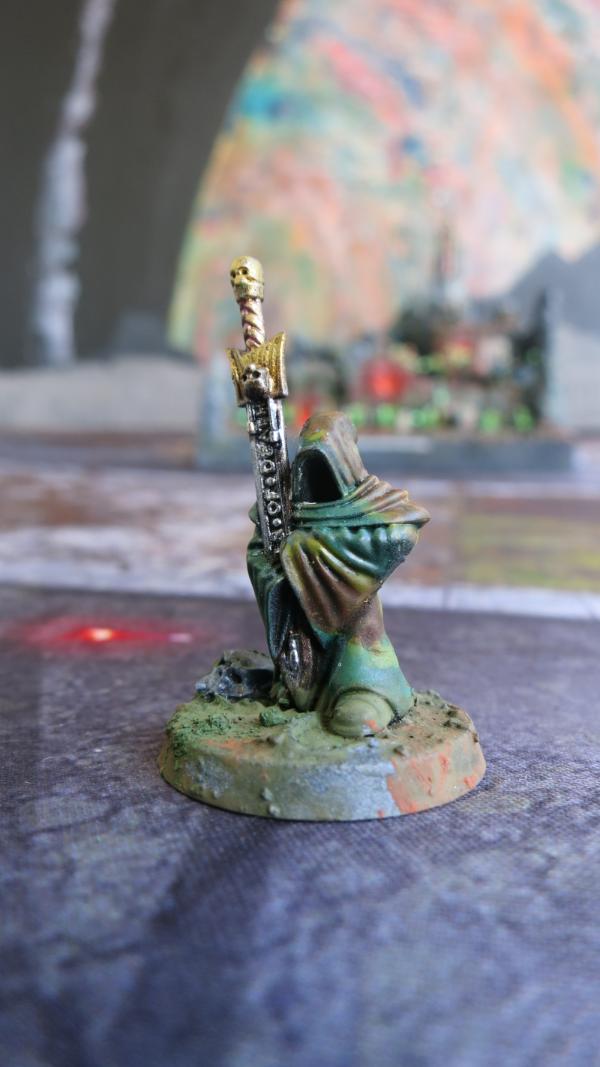
Watcher in the Dark
21898
Post by: Oldmanronald
New and Old Deathwing Knights
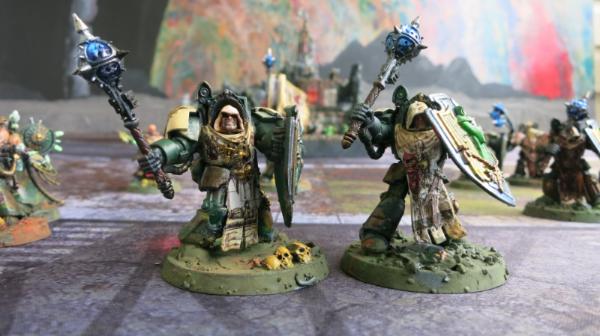
New and Old Deathwing Knight
The new Deathwing Knight is on the left, the old on the right. Some things I like better in the new. In the old I tried to put a decal on the model’s right shoulder pad with the engraved insignia craved off. This time I just painted both shoulder pads white and left the insignia on the right shoulder pad with no decals. The decals covering the whole shoulder pad never sat right.
In the old I used Ork bits on the base and they just disappeared into the green pigment. On the new I use skulls from the Games Workshop Skull packet and they look much better on the base since the skull color contrasts with the green pigment of the base.
Some of the details are better on the old, such as the green glass in the light in the light altar on the shoulder which I missed on the new model and the bronze skull just above the head which I also missed. I also have a little sloppiness on the lay of the decal on the new model and some white paint in the wrong spot.
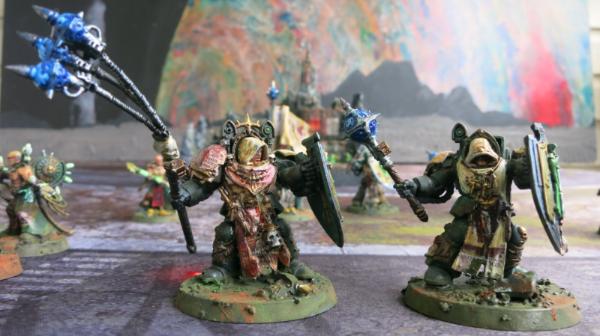
Refreshed Old Deathwing Knights including Deathwing Sergeant with Flail of the Unforgiven
This view shows the decal put on the models right shoulder pad on the sergeant. In the new model, I just left the shoulder pad white without the decal which I think looks better.

Refreshed Old Deathwing Knights
21898
Post by: Oldmanronald
New Deathwing Knight
This picture shows why I like Deathwing Knights with hooded head, tapestry robe, mace of absolution, and storm shield. Each part is fun to paint.
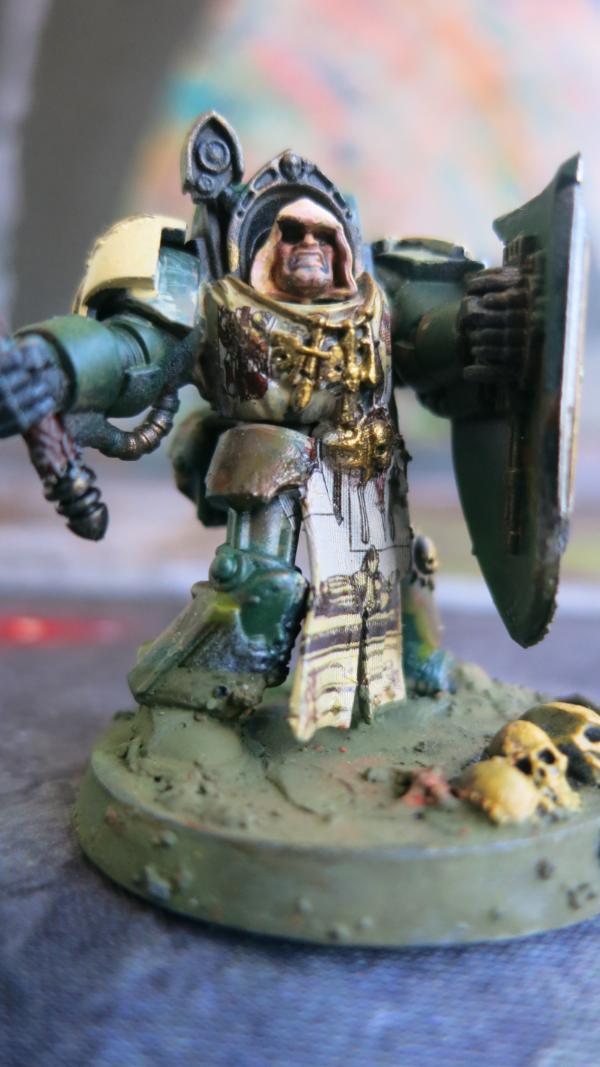
Deathwing Knight – Front
The body is from Games Workshop. The hooded head is from Puppetswars.eu which is based in Poland. I really like the Puppetswar heads and I have ordered several sets from them. It takes a while for them to ship to the United States, but I order a number of sets and keep them as bits for my models. Puppetswar bits uses resin rather than plastic. Although I like working with plastic since it is easier to use and paint, resin is great for details. Resin seems to love paint and the details are sharper than plastic. Puppetswar heads are even more expressive and fun than Games Workshop heads.
A few years ago, I ordered a three sets of custom made decal sheet from Fallout Hobbies. The first were the skull and roses decals for shoulder pads and I use these as the insignia for the Servitors of the unknown chapter. The second was a mix of manuscripts from Medieval Bibles. The last were selected Tarot cards. All these are on this model. The skull and roses is on the shoulder pad. A tarot card and a manuscript are the ropes to give the robe the appearance of tapestry.
The robes and the shoulders are painted with a mixture of Golden Acrylics Titanium White and Yellow Oxide with just a touch of a gold metallic. This allows variation in the colors for shadows and highlights with the shadows being primarily yellow oxide and the highlights being primarily titanium white. I am using artist grade acrylic paints more and more to paint my figures although I still use modeling paints for certain effects and where I want my colors to be consistent.
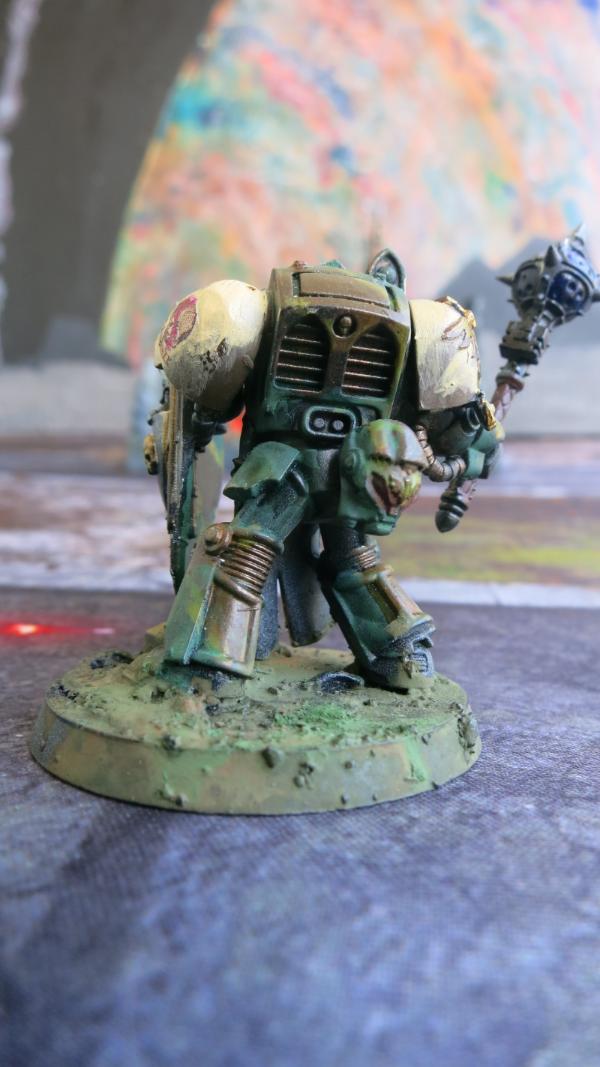
Deathwing Knight - Left
I like to show heads on my models but also believe that every model should have a helmet so I suspend the helmet from the models armor, usually on the back hip.

Deathwing Knight – Shield
The shield is another fun part to paint. I use metallic gold and silver over a dull tin. The robed figure in the middle of the shield is silver paint under a fluorescent green coat. The skulls on the base are painted with yellow oxide.
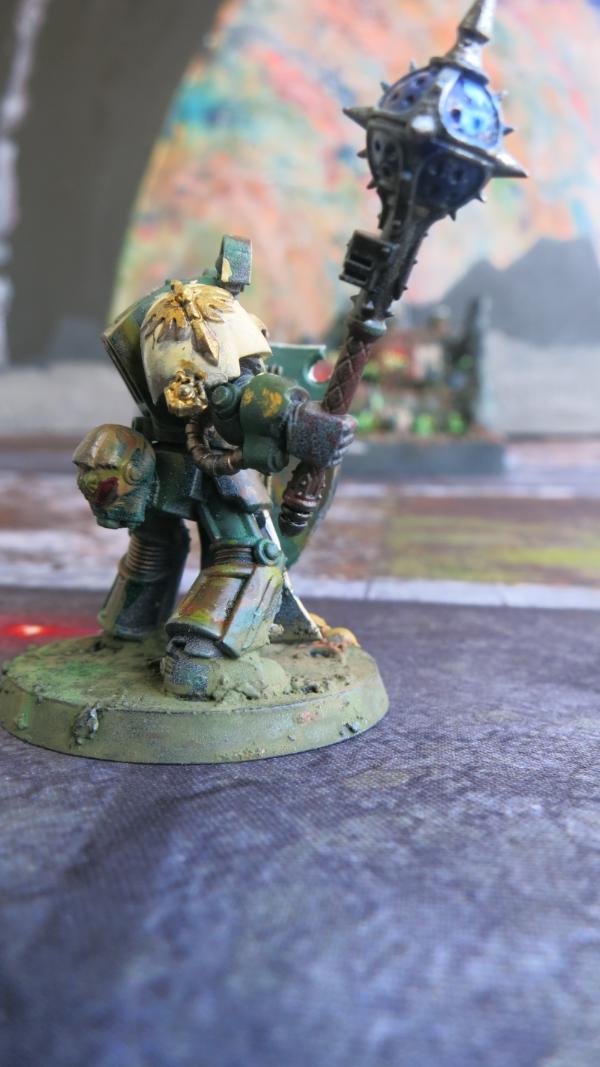
Deathwing Knight - Right
The crystal ball in the mace of absolution is painted with blue ultramarine, then some titanium white for highlights, and then the whole crystal ball is covered with several thick layers of Vallejo fluorescent blue. Fluorescent paints are somewhat transparent.
21898
Post by: Oldmanronald
New Deathwing Ancient

Deathwing Ancient - Front
The Deathwing Ancient’s body is Deathwing Knight with powerfist and a stormbolter. I wanted to keep him cheap and have some firepower to support the Deathwing Knights. The head is an officer’s head from Puppetswar and the flag is made from green stuff. His tapestry robe is a decal over a mixture of titanium white and yellow oxide base. The braid and other brass and gold items over his robe were actually painted after I applied the decals.
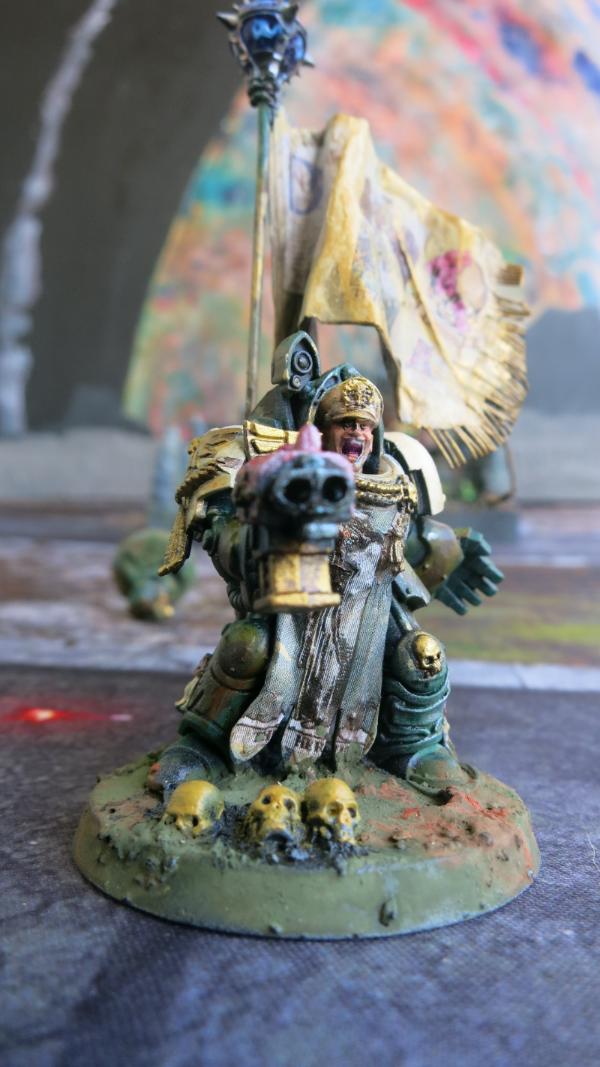
Deathwing Ancient with Pig Nosed Storm Bolter
His storm bolter looks like a pig nose.
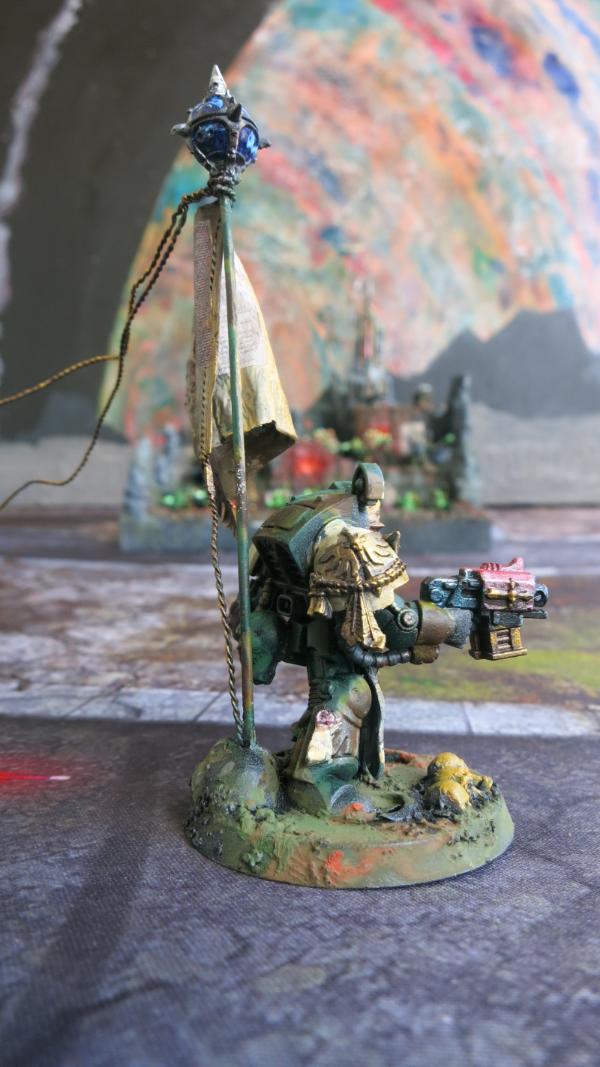
Deathwing Ancient - Right
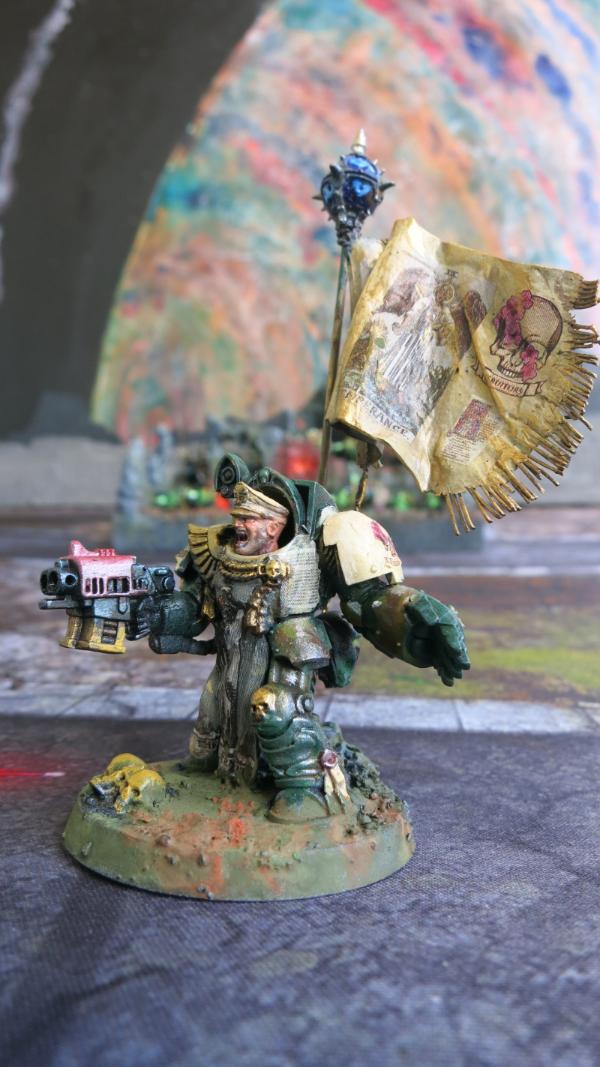
Deathwing Ancient – Left
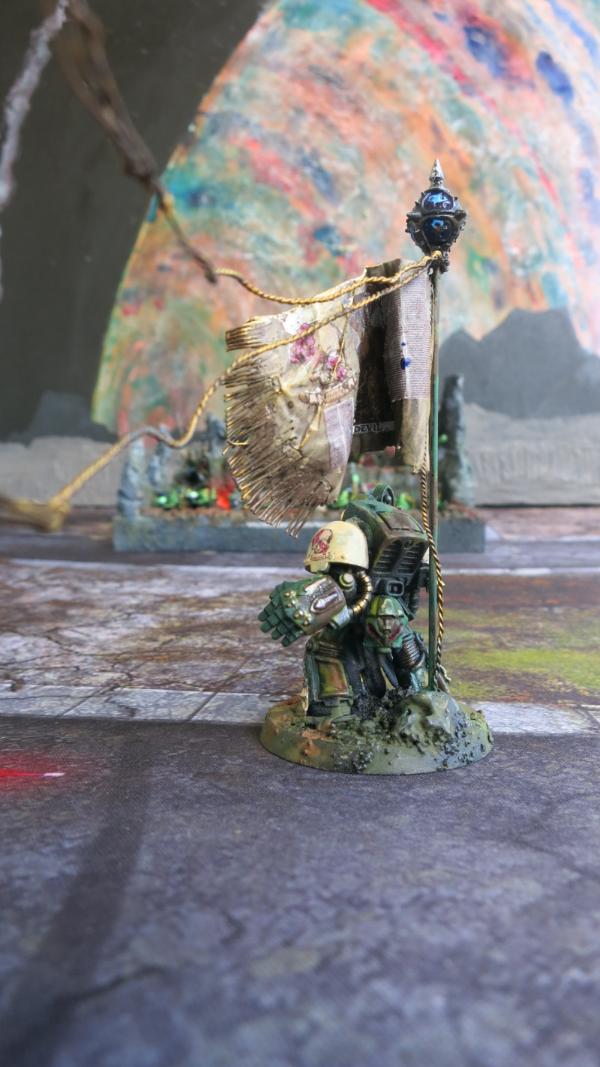
Deathwing Ancient – Rear
Since I took these pictures, I have torn apart this model. I have some more Deathwing Knight models and have decided to increase my Deathwing Knights to ten. I am swapping out this Deathwing Ancient body with that of the Knight Master. I will then use the old body for another Deathwing Knight. I, of course, am hoping that my Deathwing Knights are still viable in the 9th Edition. I am holding off purchasing any new models until the 9th comes out.
21898
Post by: Oldmanronald
Necrons Warriors
Several months ago, I purchased the Indomitus box because I wanted the space marine models to add to my Dark Angels army but I am holding off building any new Dark Angels until the new Dark Angels codex comes out. In the meantime, I started building the Necrons. This gave me a chance to experiment with a new color scheme. I started with Warriors to determine my basic paint theme and was pleased with the results.
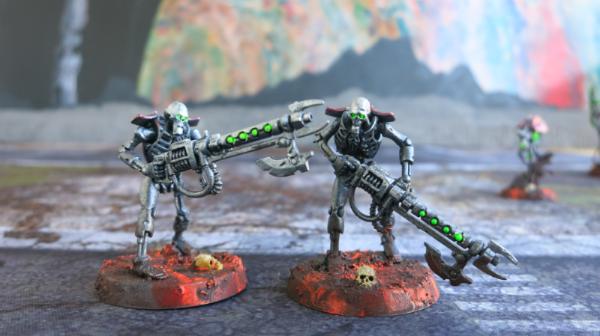
Necron Warriors with Gauss Flayers - Front
I had to experiment with a few spare pieces to get the right paint scheme but it is actually a simple color scheme. For each model, the body and the guns are a blend of silver and steel metallic paints. The pronotum (the plate-like structure on the backs of the Necron) is Turbo-Dork Miami Sunset, a dynamic metallic paint that I bought several years ago, wanted to experiment with, and seemed like a good fit for Necron living metal. The head is Turbo Dork pearly gate. I also used the pearly gate as highlights on the silver. The green dots are fluorescent green over titanium white dots.
The base includes fluorescent orange over titanium white. I then covered the base with a blend of pigment. The pigment is made of waste pastel dust I collected several years ago when I did a lot of pastel painting, blended with some blue pigment to darken it. The skulls on the base are a blend of ochre paint highlighted with titanium white.
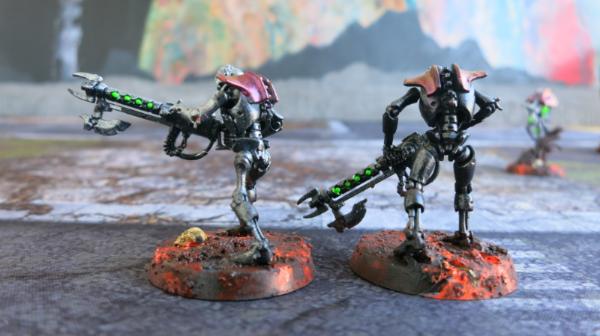
Necron Warriors with Gauss Flayers - Rear
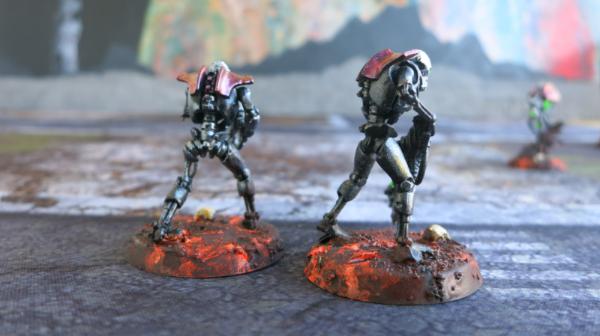
Necron Warriors with Gauss Flayers – Side
The bases include a few splotches of green stuff for some depth covered by gesso mixed with a mixture of fine and extra-fine model train ballast.
21898
Post by: Oldmanronald
Necron Warriors with Gauss Reapers
I built half of the Necron Warriors with Gauss Flayers and some with Gauss Reapers. The Indomitus had twenty warriors. I bought twenty more so I have twenty with Gauss Reapers and twenty with Gauss Flayers.
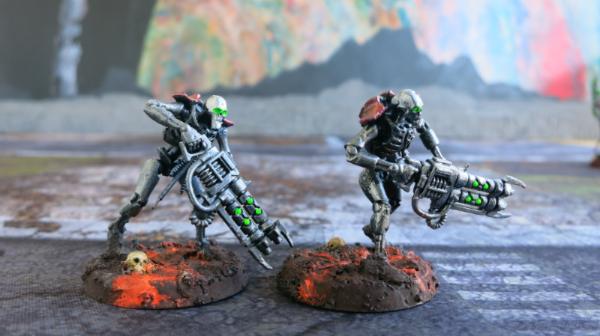
Necron Warriors with Gauss Reapers - Front
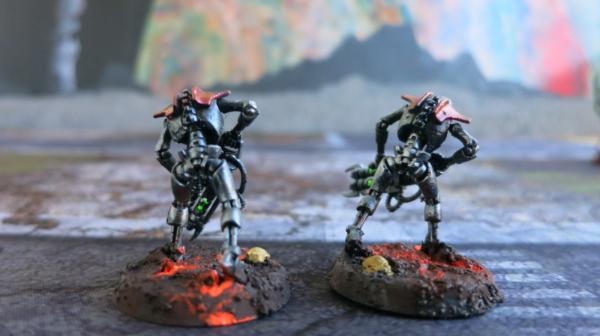
Necron Warriors with Gauss Reapers – Rear

Necron Warriors with Gauss Reapers - Side
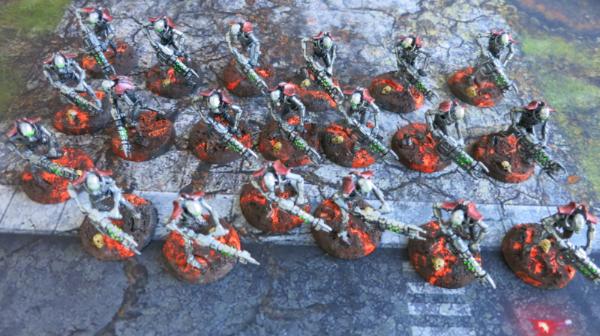
Twenty Necron Warriors with Gauss Reapers
Necron Warriors with Gauss Reapers are good.
21898
Post by: Oldmanronald
Canoptek Scarab Swarms
The Indomitus box included six canoptek scarab swarms. They were also fun to make and are supposed to be good in the Ninth.
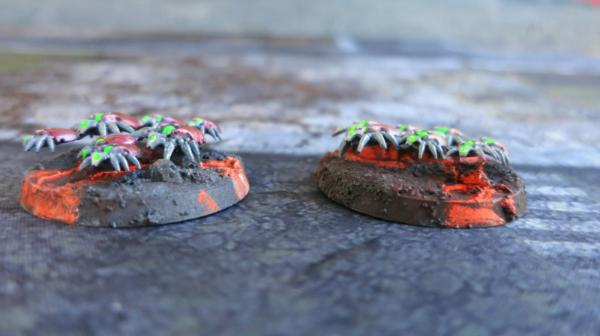
Canoptek Scarab Swarms
I noticed that I missed putting the pigment on the swarm at the left and didn’t paint up the skull. I am out of fixer. I ordered it but it hasn’t arrived yet.

Canoptek Scarab Swarms
This is a different view. The skull is painted and there is pigment on the right swarm. Side view of scarab swarms are not too interesting. The next shot is from the top looking down, which is how the players in a game view scarabs.
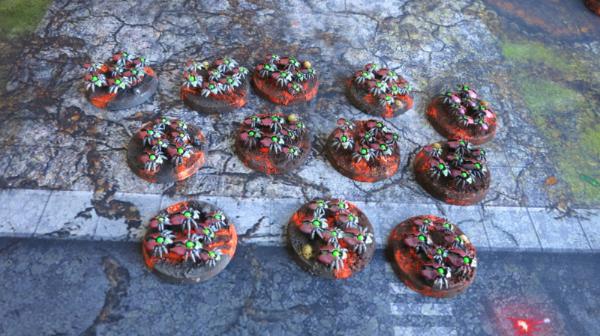
Twelve Canoptek Scarab Swarms
21898
Post by: Oldmanronald
Necron Overlord with Hyperphase Glaive and Tachlyon Arrow
The Indomitus box includes a Necron Overlord with Hyperphase Glaive and Tachlyon Arrow. Although I developed the color scheme with the Necron Warriors, this color scheme is even better on the more complex models. Except for the gold on the amulet around his neck, this uses the same colors as the warriors and scarabs.

Necron Overlord
The fluorescent green really pops on this model, especially next to the reddish Miami SunsetTurbo Dork painted on his hyperphase glaive and on his "Tzitzit” hanging from the front of the model.
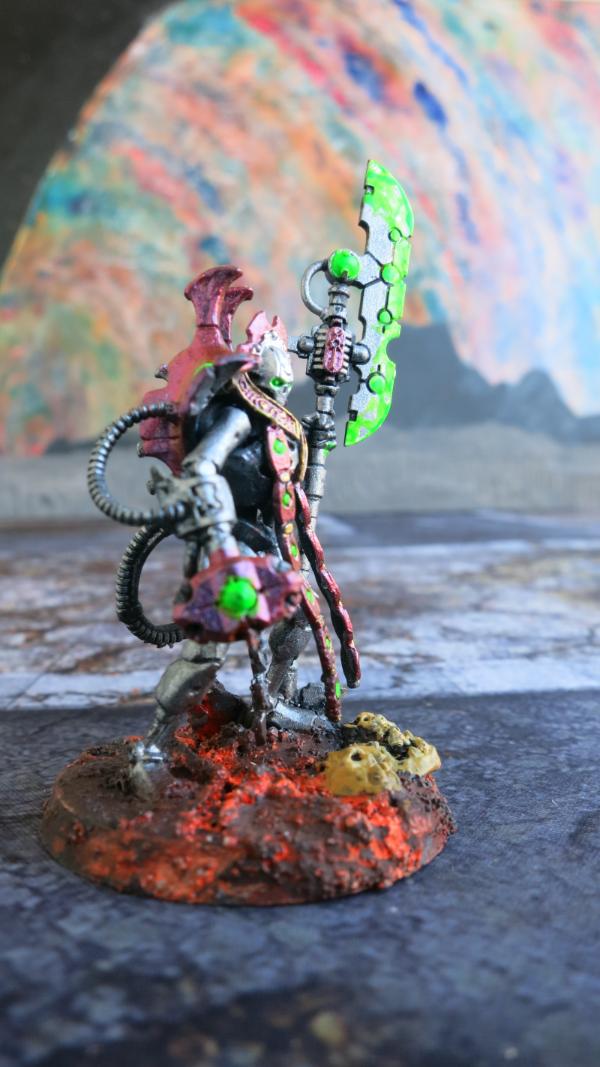
Necron Overlord - Side
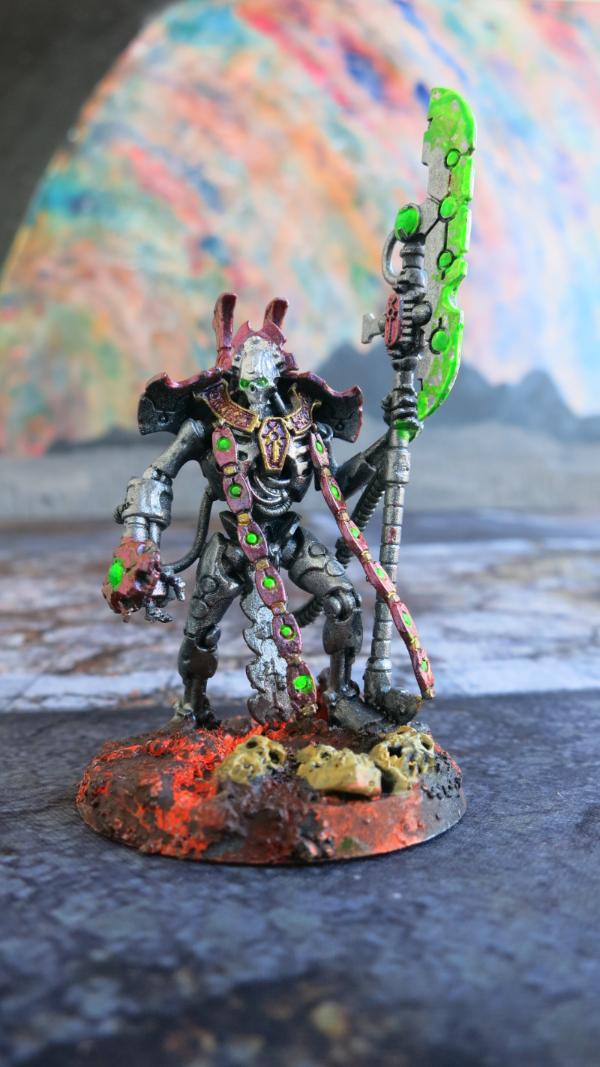
Necron Overlord – Front
This is a good-looking model and I may play it. Unfortunately, it competes with other good Necron models in the headquarters slot.
21898
Post by: Oldmanronald
Plasmancer
The Indomitus box included a Cyptek model, the Plasmancer. This was another fun model to paint and the color scheme worked.
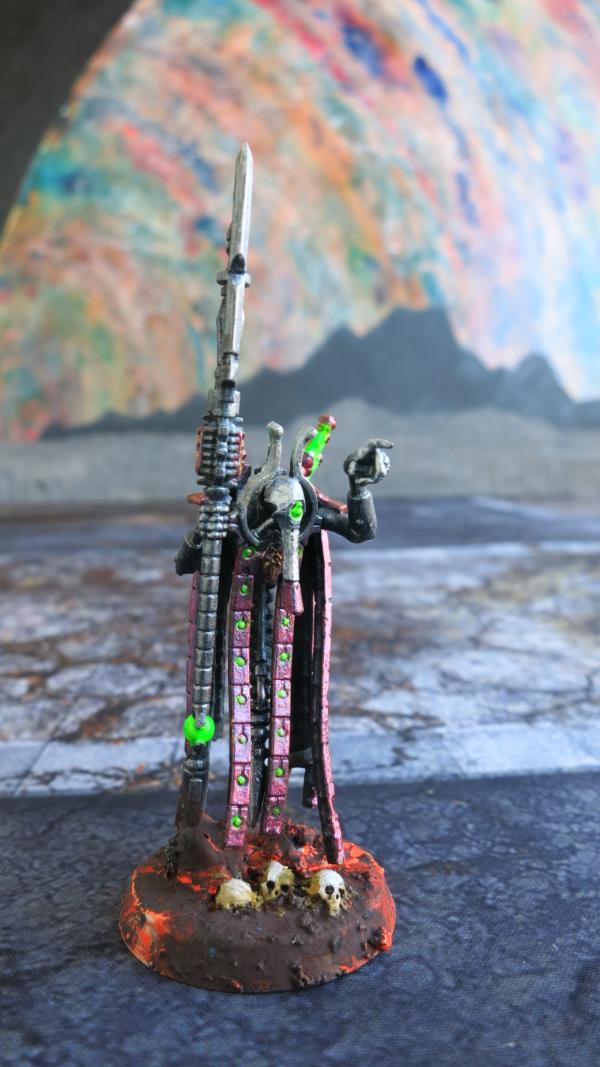
Plasmancer – Front

Plasmancer – Left Side
The left side and the front view show the details in his left hand.
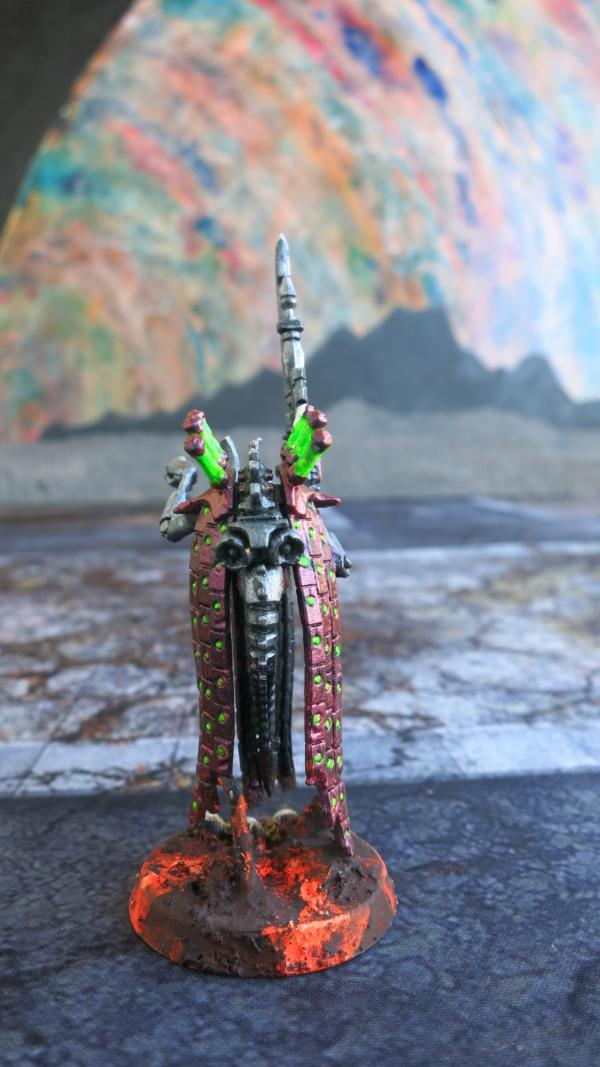
Plasmancer – Rear
21898
Post by: Oldmanronald
Canopek Reanimator
The Indomitus box included a Canopek Reanimator. This was a fun model to make and paint but it isn’t really my favorite model. It is too tall and spindly for my taste. That’s okay since I probably not play it. Most commentators agree that it is too many points for its use. In the codex, it is 110 points. In the FAQ, it dropped to 80 points but still too expensive. So for now it will remain on the shelf.
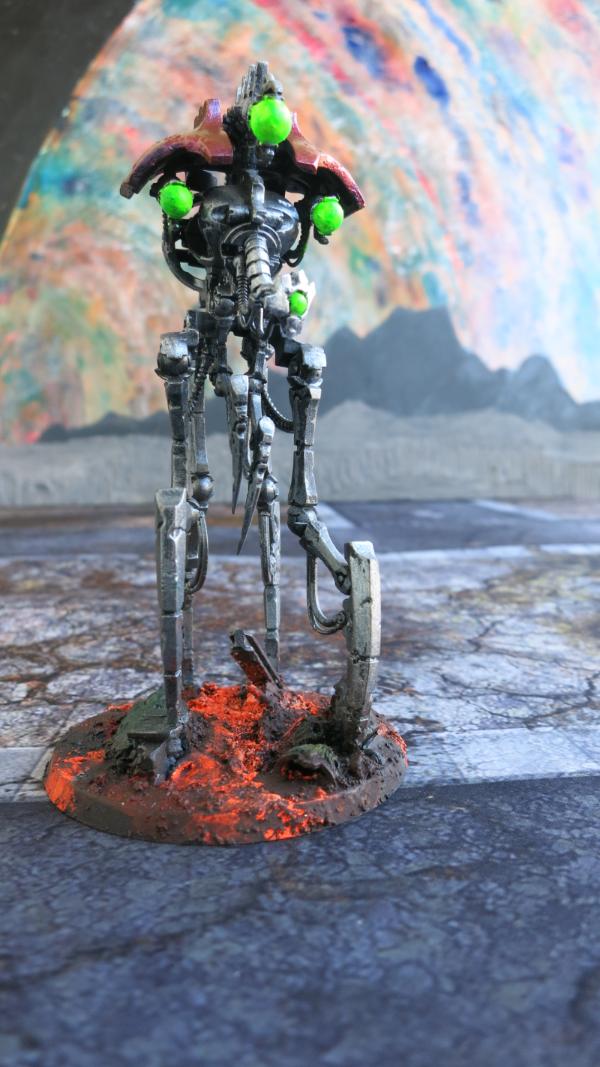
Canopek Reanimator – Front
I do like the metal pieces on the base and the green balls.
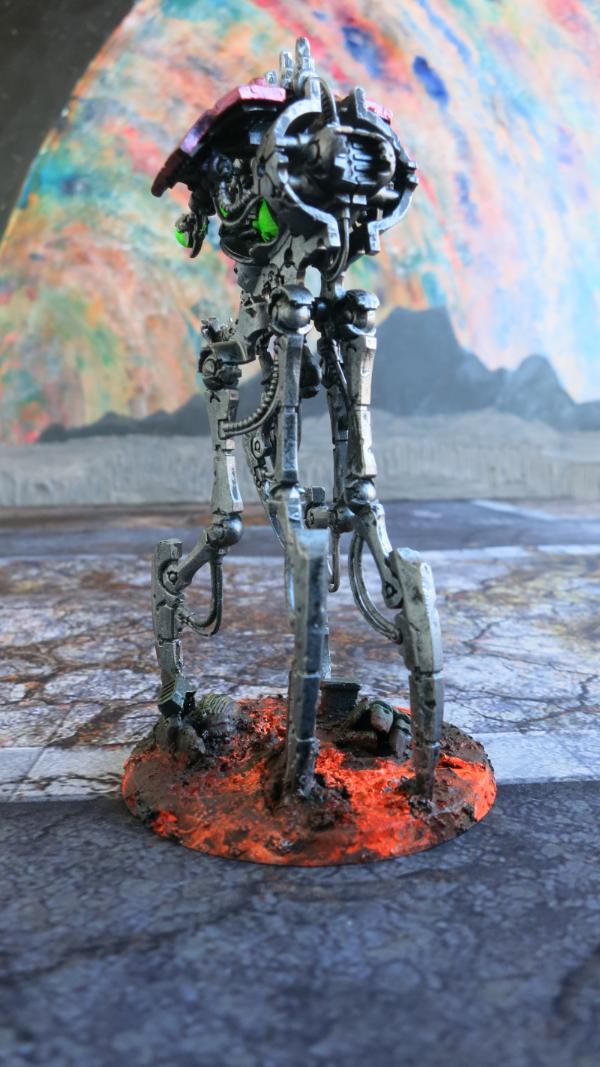
Canopek Reanimator – Back
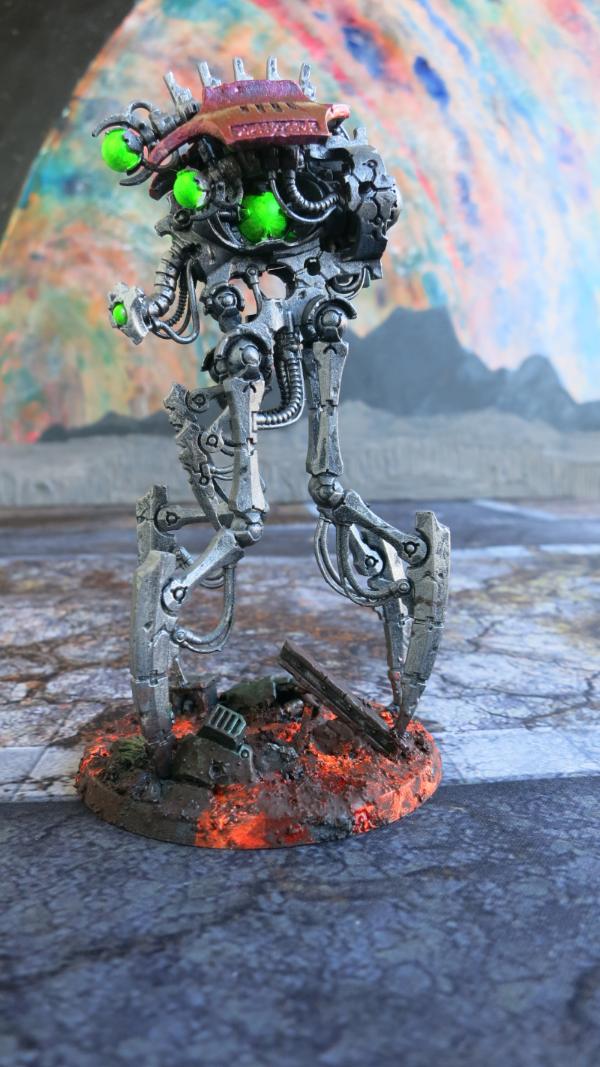
Canopek Reanimator – Left
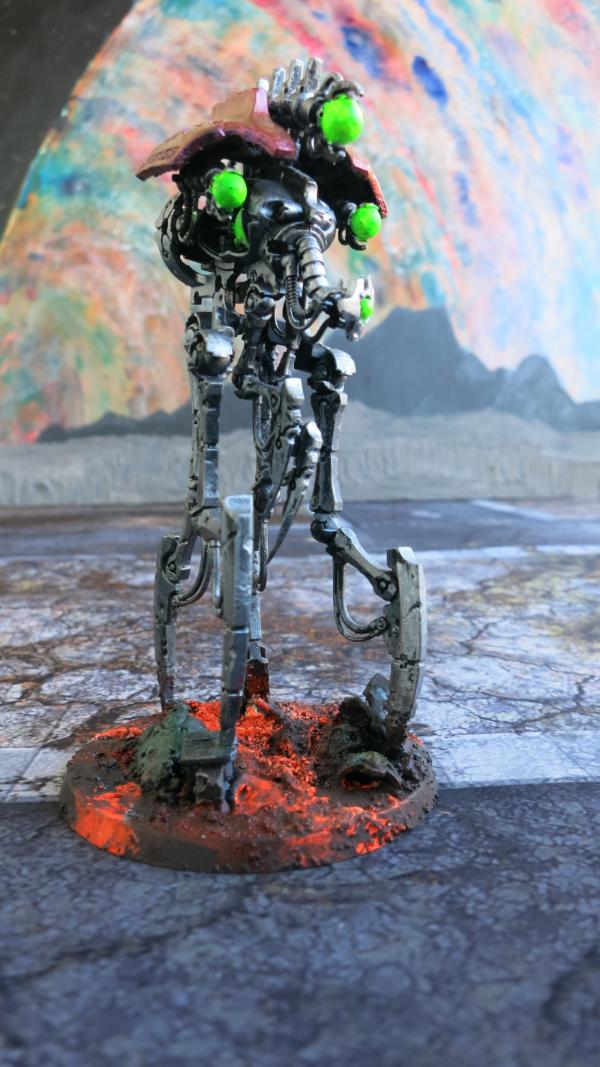
Canopek Reanimator – Right Front
21898
Post by: Oldmanronald
Royal Warden
The Indomitus box includes a Royal Warden with a Relic Gauss Blaster. I like the looks of this model. It is the same paint scheme as the rest of the army but has a little gold on his amulet.
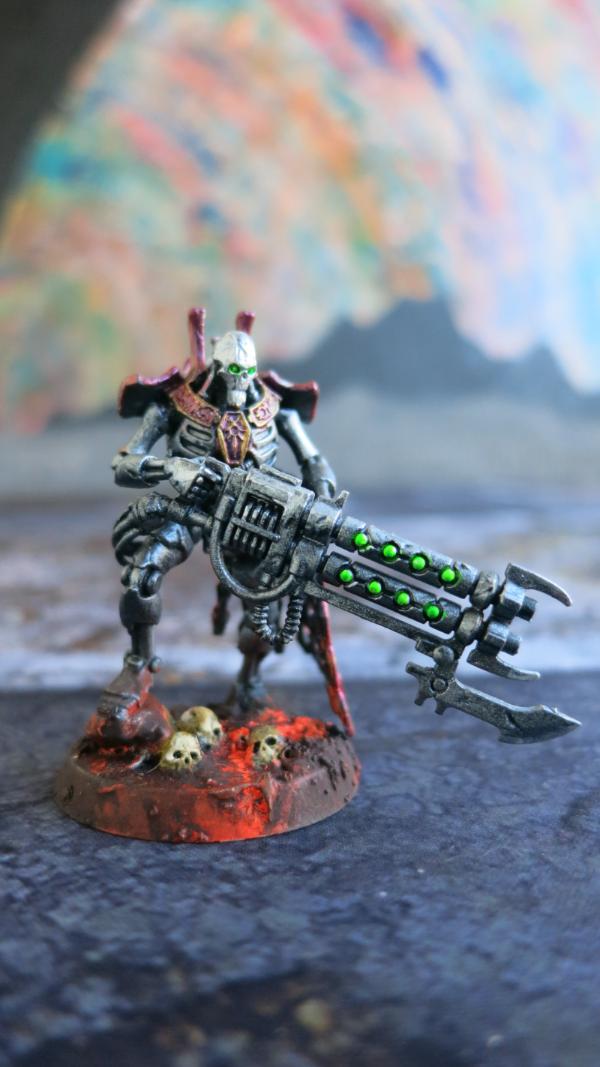
Royal Warden with Relic Gauss Blaster - Front
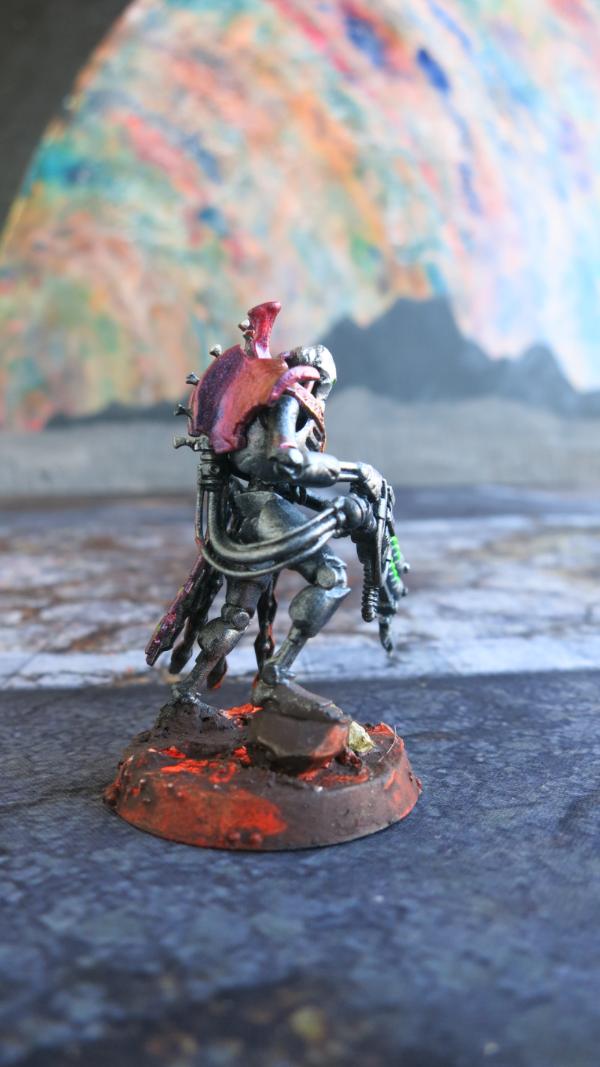
Royal Warden with Relic Gauss Blaster – Right Side
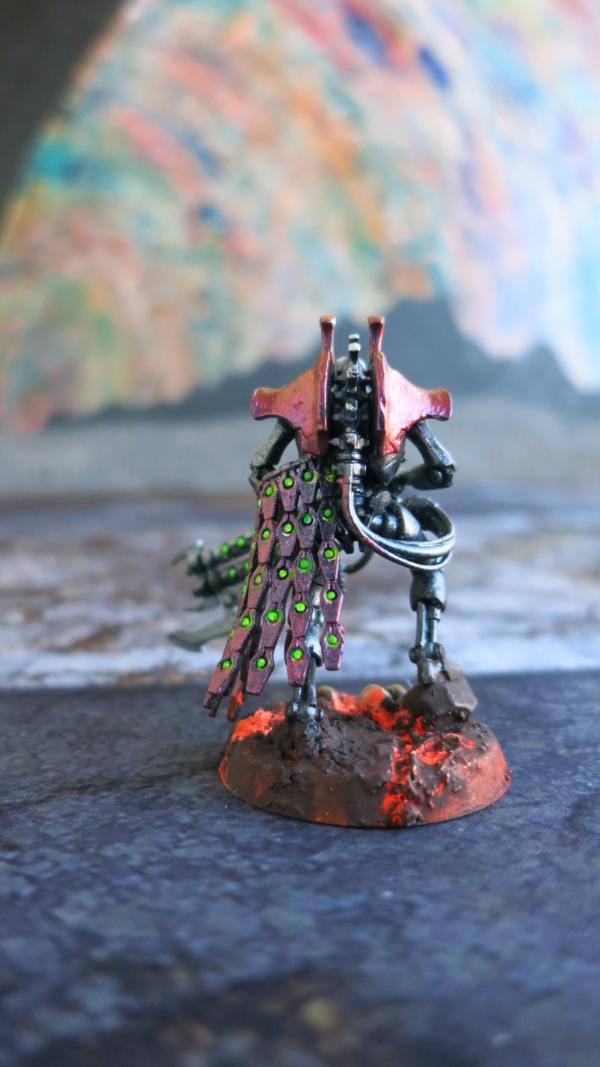
Royal Warden with Relic Gauss Blaster - Back
This is a nice looking model but it competes with other headquarters.
21898
Post by: Oldmanronald
Cryptothralls
The Indomitus box includes two Cryptothralls. These are small models but they were fun to paint.

Cryptothrall - Front
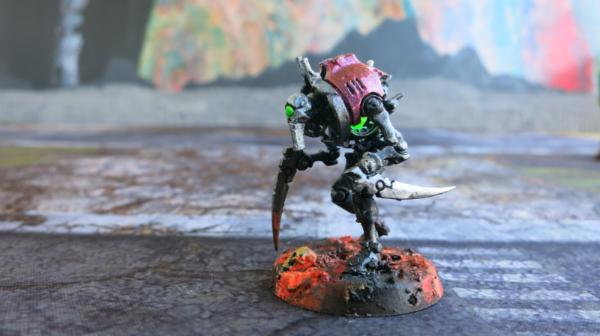
Cryptothrall – Front Left
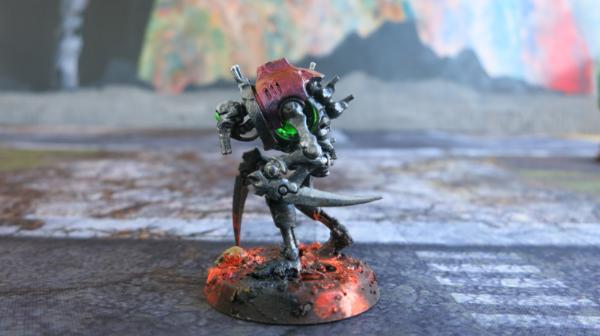
Cryptothrall – Left Side
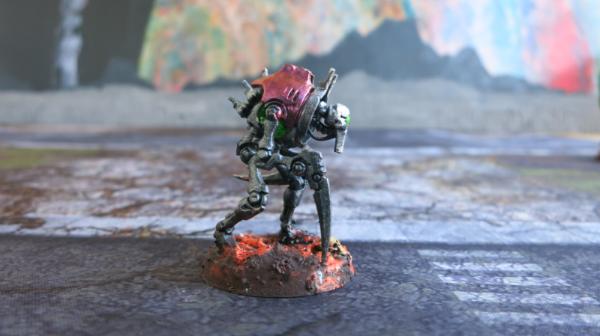
Cryptothrall – Right Side
21898
Post by: Oldmanronald
Skopekh Lord – The Destroyer Cult
The Indomitus box includes a Skorpekh Lord. This is a great looking model. It is the main figure on the cover on the Codex Necrons, probably because it is such a good-looking model.
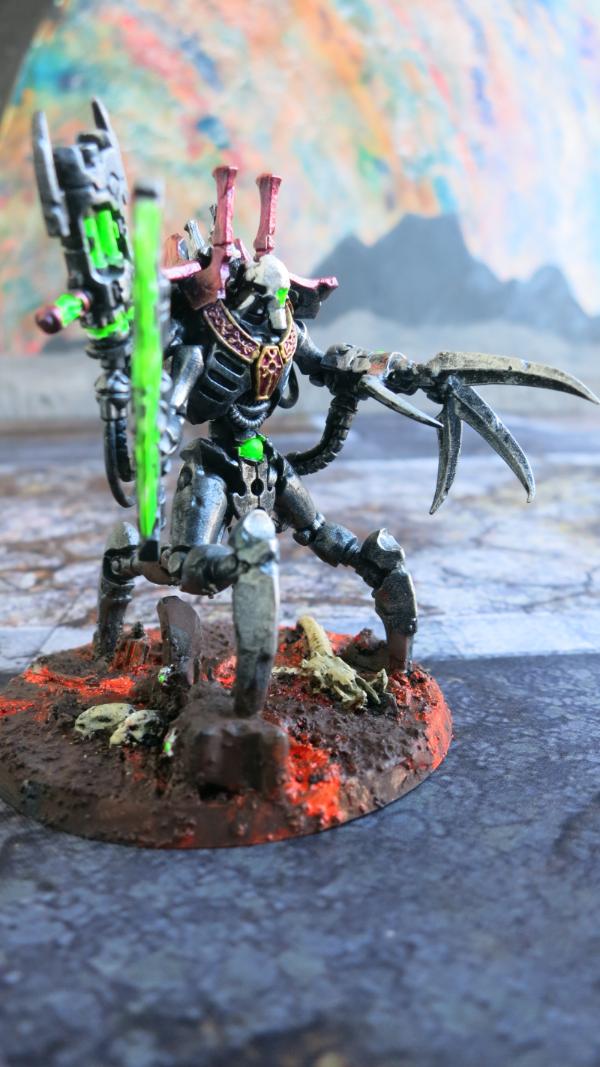
Skopekh Lord – Right Front
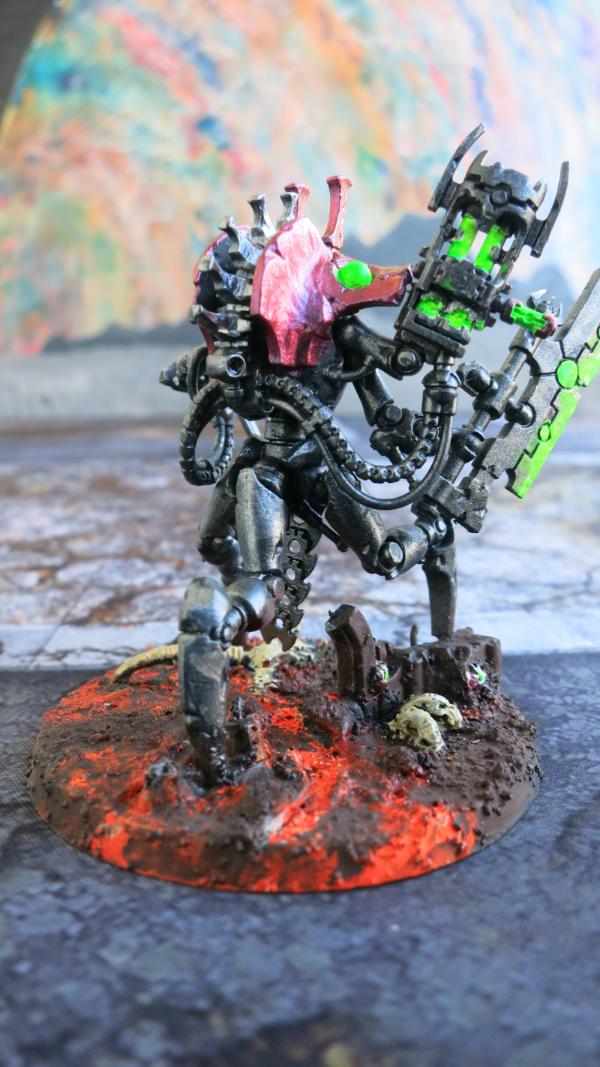
Skopekh Lord – Rear
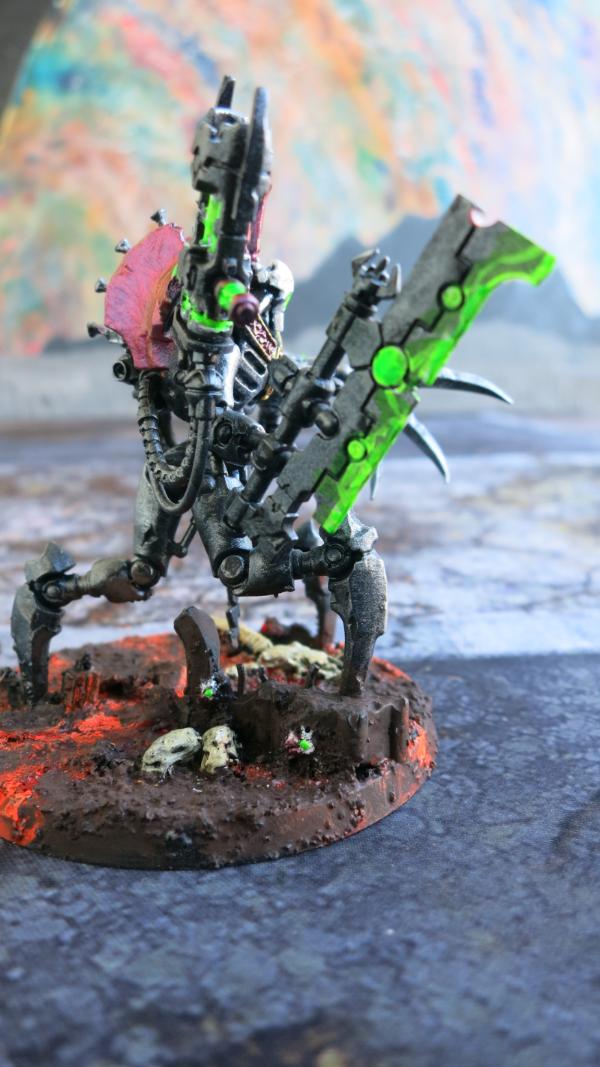
Skopekh Lord – Right
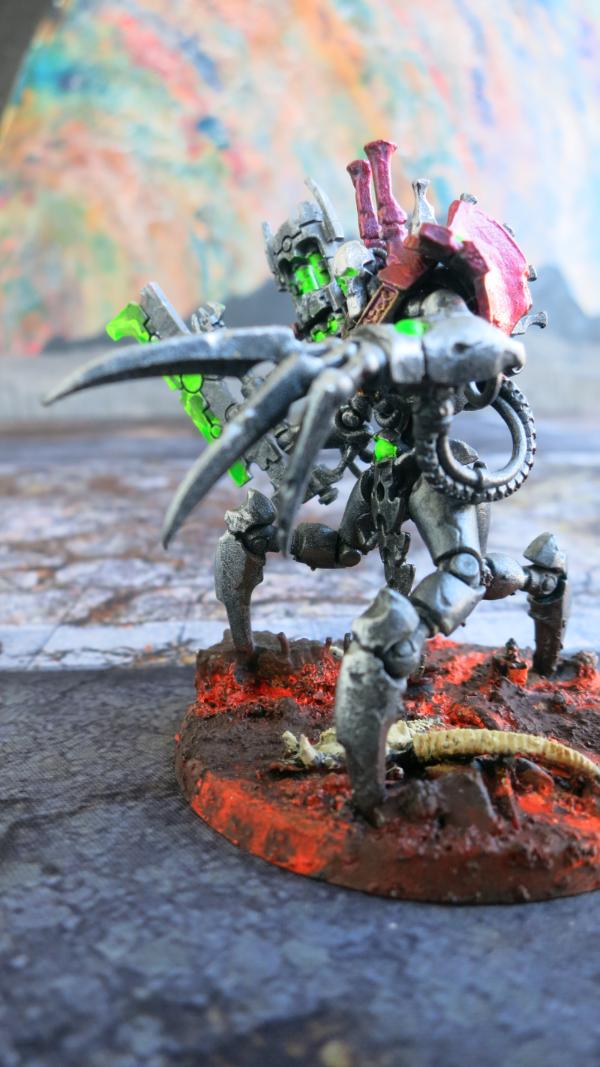
Skopekh Lord – Left
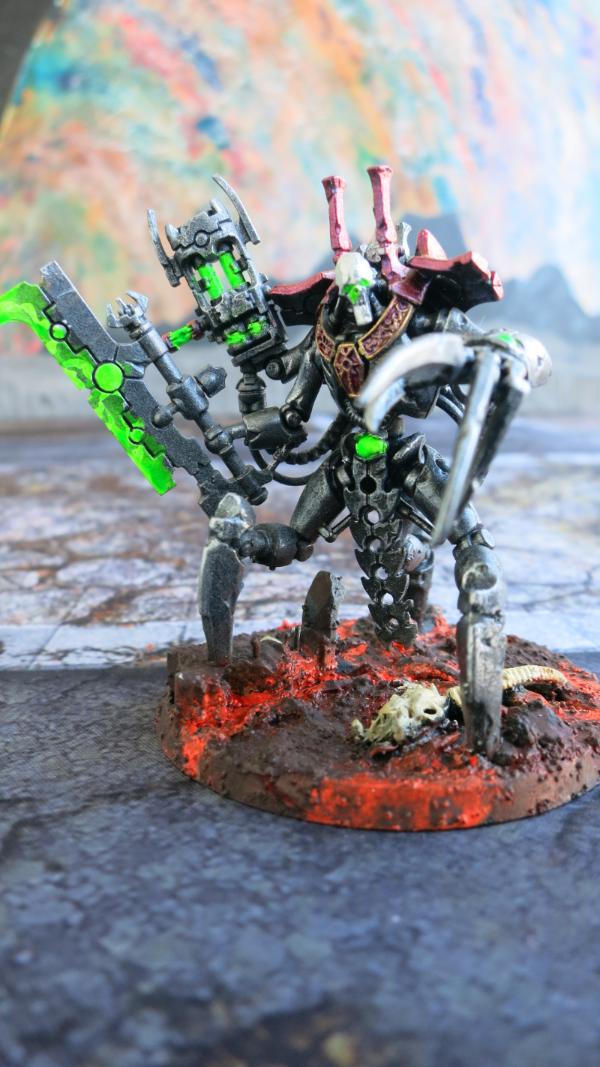
Skopekh Lord – Front
On these close up views I can see my mistakes that I need to touch up.
122359
Post by: tzurk
Hey mate,
I feel like i should apologise - I was sure that I had commented earlier on this page after the Ad Mech kill team!
You are churning out some seriously good work man. The new necrons are brilliant; similar palette to the ad mech but very different mood! I adore the lava bases spilling over the rim. I haven't seen that before and it looks great. You have gotten some serious heat out of the orange colour too - all that OSL practice is definitely paying off!
The display base for the Ad Mech is a brilliant piece - it must feel really good to look at it on the self and see all the hard work paid off!
The Deathwing Knight with the peaky hat is super grimdark and very, very cool. Unique idea and well executed, always a good combo.
I also really admire the organisation of your blog. It's so easy to read and follow your ideas and it's always nice to get some insight into the painting process as well as how things might work out on the tabletop.
Thanks for sharing all your great work, keep it up!
21898
Post by: Oldmanronald
Hi Tzurk
Thank you for your encouraging words. Making these models and writing this blog been a fun project, maybe an addiction.
Oldmanronald
21898
Post by: Oldmanronald
Skopekh Destroyers – The Destroyer Cult
The Indomitus box includes three Skorpekh Destroyers, one with a hyperphase reap-blade and two with hyperphase threshers. These are also fun models to build and paint. Below is the Skorpekh Destroyer with the hyperphase reap-blade.
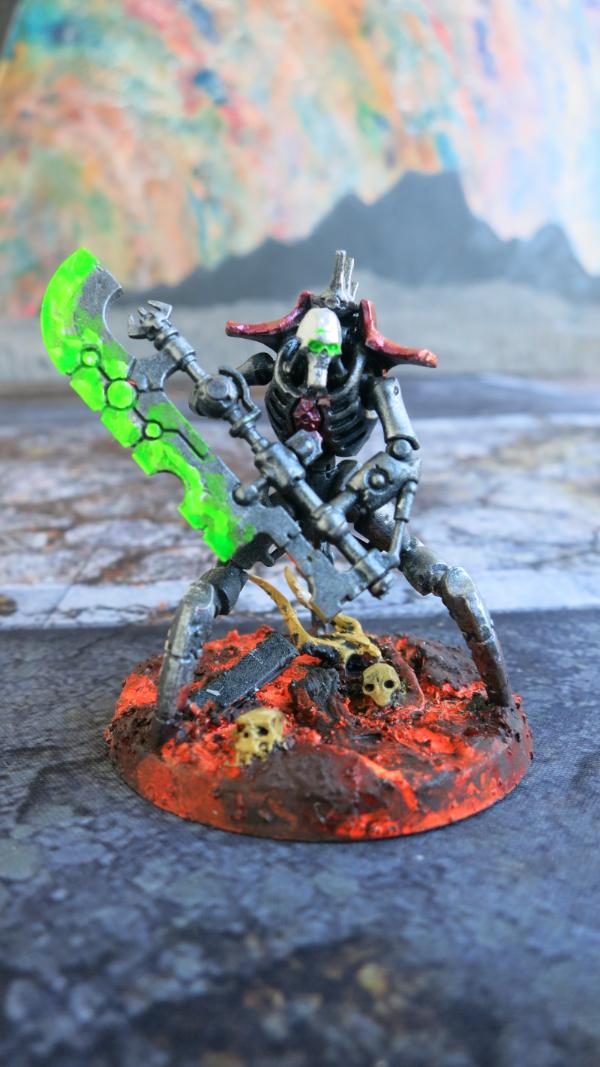
Skopekh Destroyer – Hyperphase Reap-blade - Front
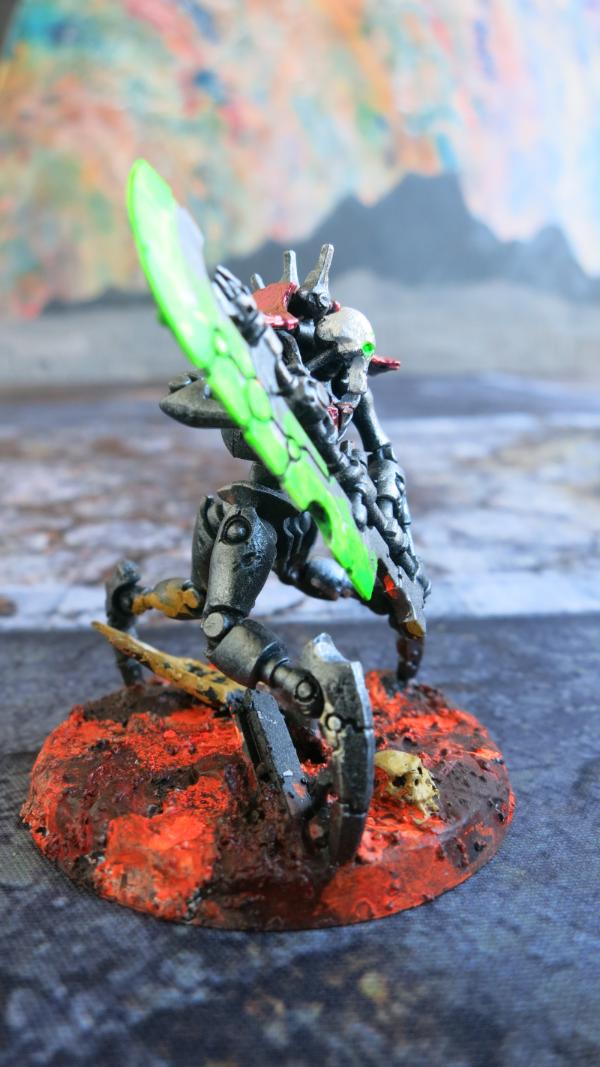
Skopekh Destroyer – Hyperphase Reap-blade – Right
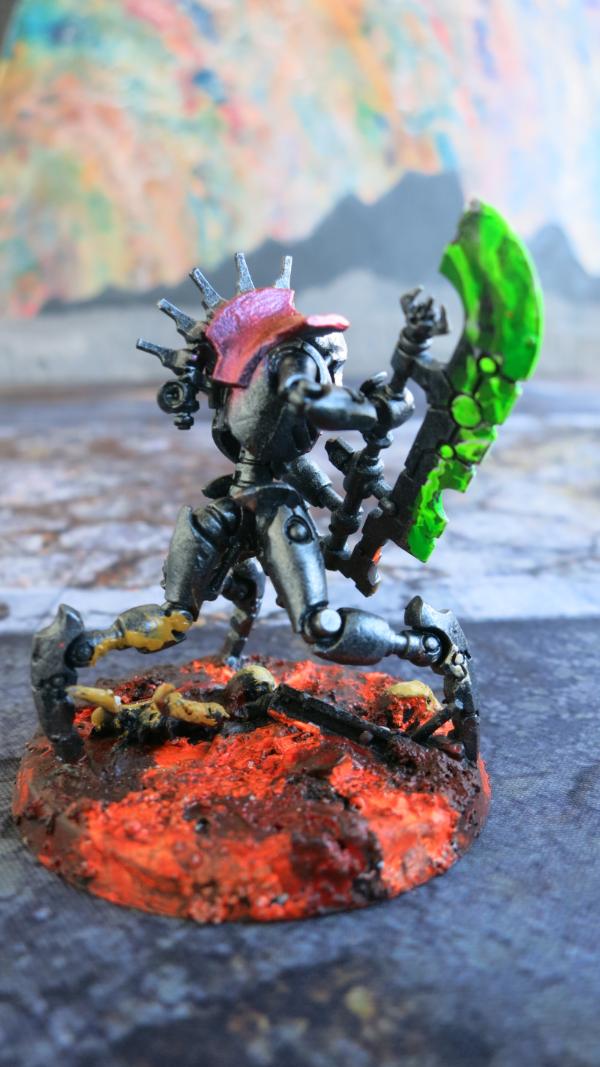
Skopekh Destroyer – Hyperphase Reap-blade – Right Rear
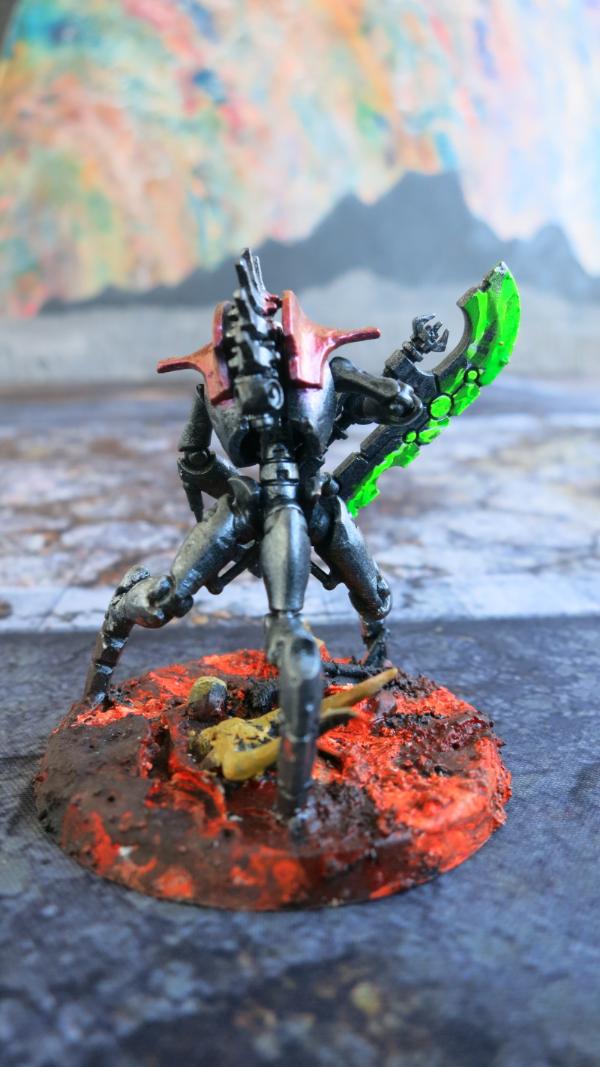
Skopekh Destroyer – Hyperphase Reap-blade – Rear
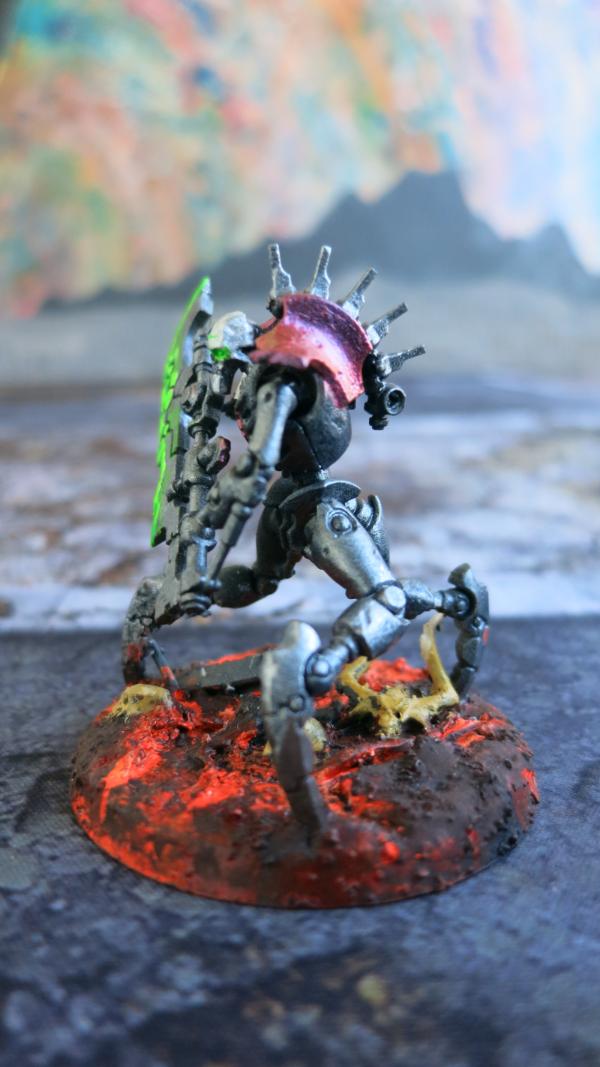
Skopekh Destroyer – Hyperphase Reap-blade – Left
21898
Post by: Oldmanronald
First Skopekh Destroyer with Hyperphase Thresher
The Indomitus box includes two Skorpekh Destroyers with hyperphase threshers. This is the first.
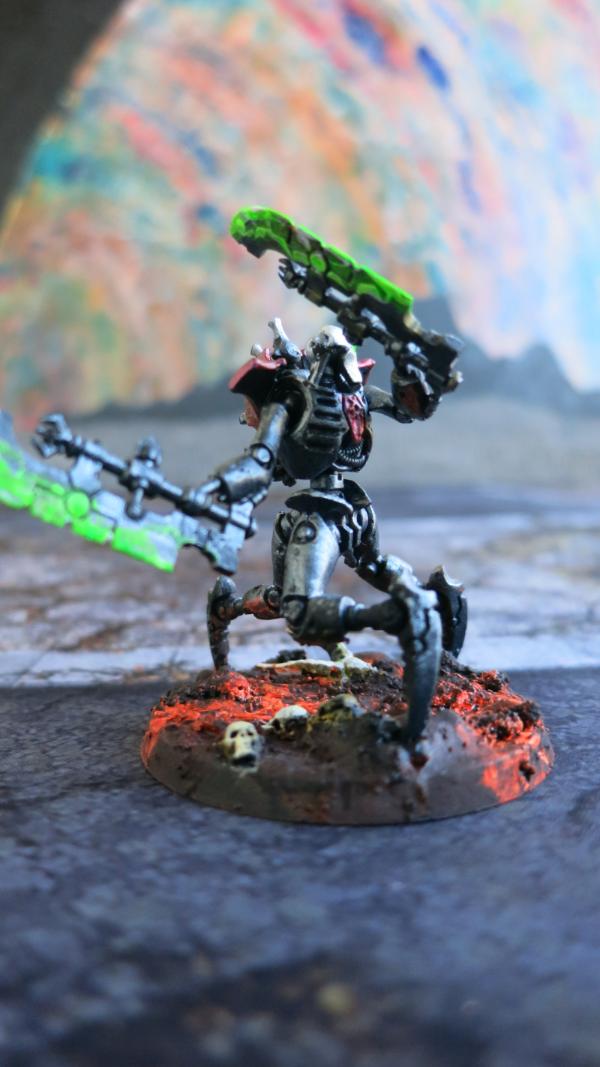
First Skopekh Destroyer with Hyperphase Thresher – Front Right
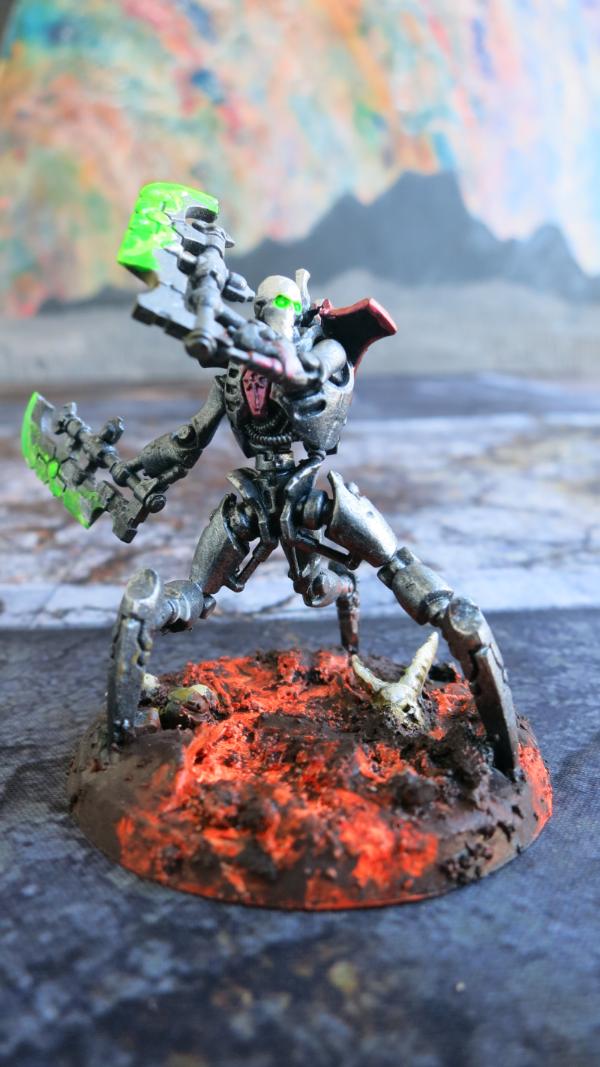
First Skopekh Destroyer with Hyperphase Thresher – Front
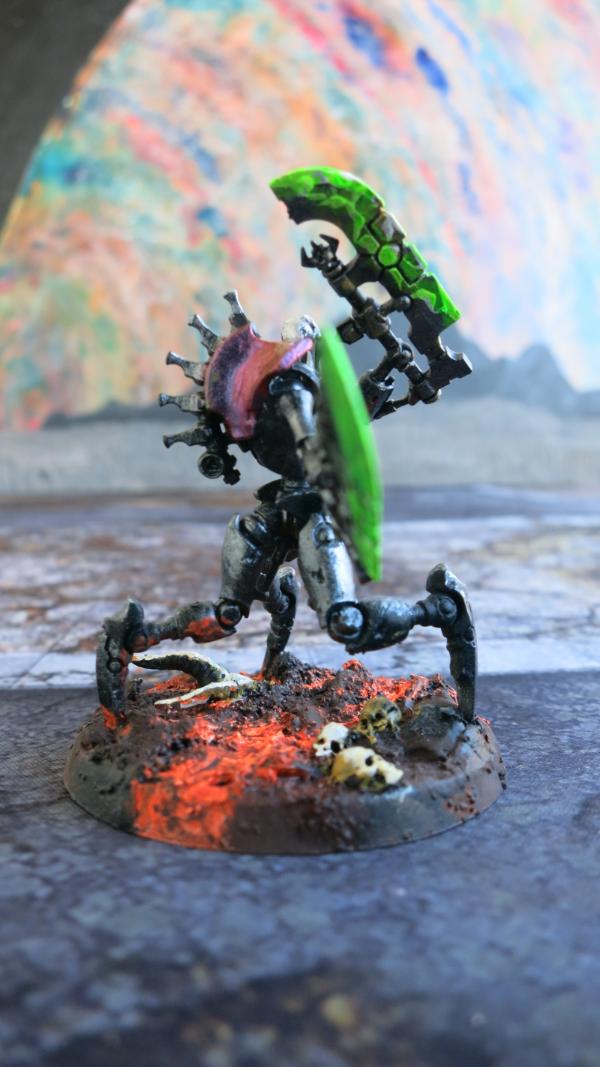
First Skopekh Destroyer with Hyperphase Thresher – Rear
21898
Post by: Oldmanronald
Second Skopekh Destroyer with Hyperphase Thresher
The Indomitus box includes two Skorpekh Destroyers with hyperphase threshers. This is the second.
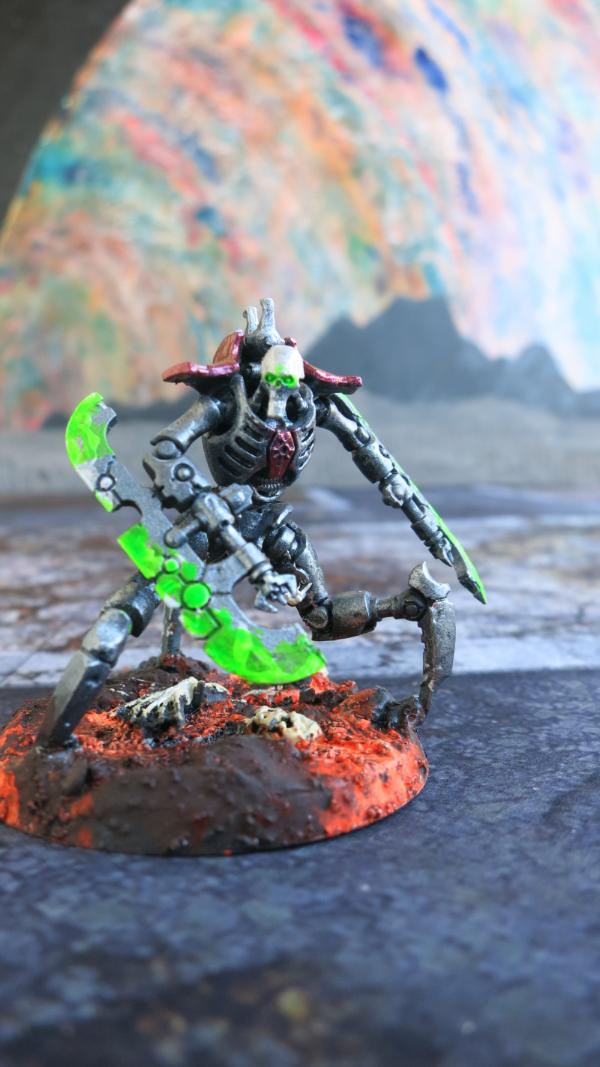
Second Skopekh Destroyer with Hyperphase Thresher – Front
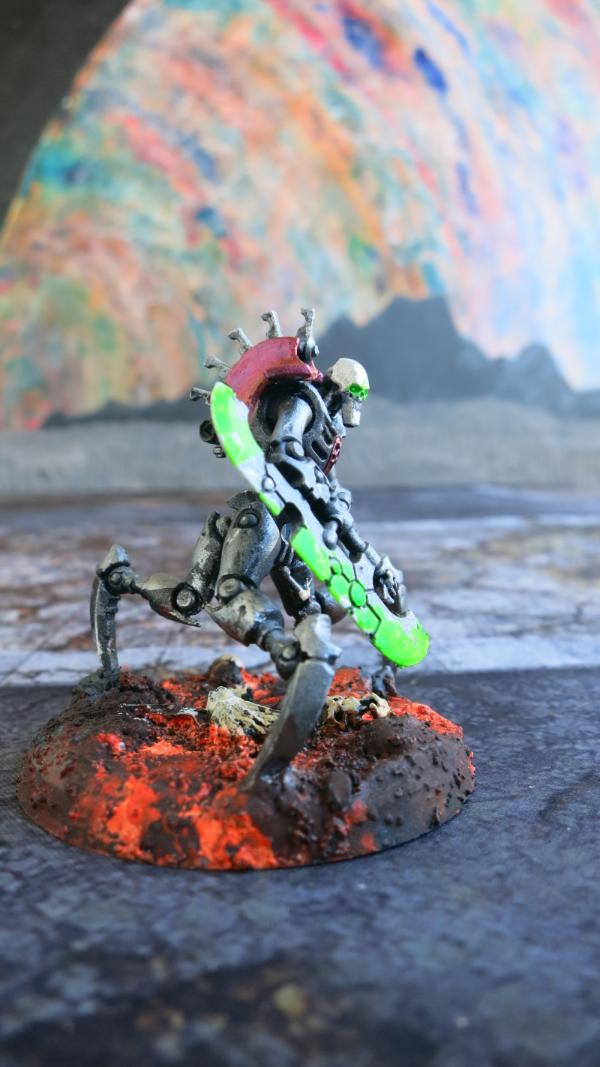
Second Skopekh Destroyer with Hyperphase Thresher –Right
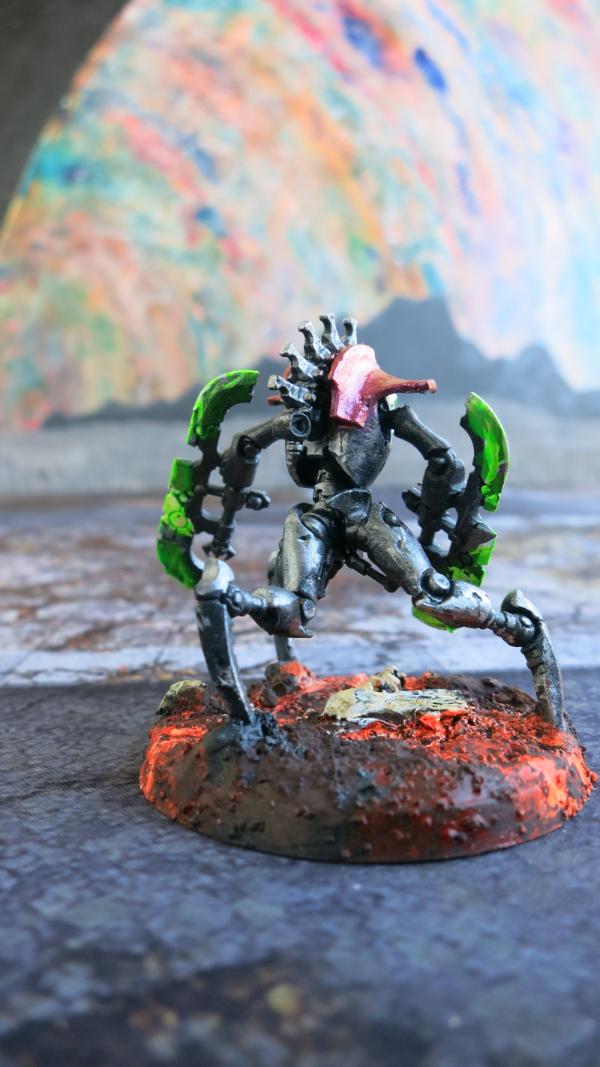
Second Skopekh Destroyer with Hyperphase Thresher –Rear
21898
Post by: Oldmanronald
Canoptek Plasmacyte
The last Necron model in the Indomitus box is a Canoptek Plasmacyte. I only have one picture of it but this may be enough.
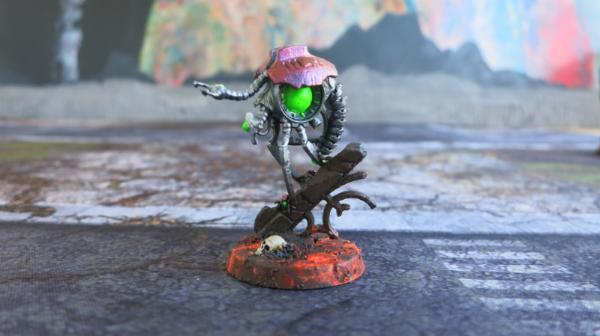
Canoptek Plasmacyte
21898
Post by: Oldmanronald
Lokhurt Heavy Destroyer
I added some Necron models not in the Indomitus box to round out my army. This is somewhat difficult at this time since Covid-19 has impacted Games Workshop. Some of the models I wanted are unavailable even online and when available, shipping is much slower than it has been pre-Covid-19. I bought some models because they were available rather than they were optimal for completive play. One such model is the Lokhurt Heavy Destroyer. I built three of them but when I finished my 2000-point list, I left them off.
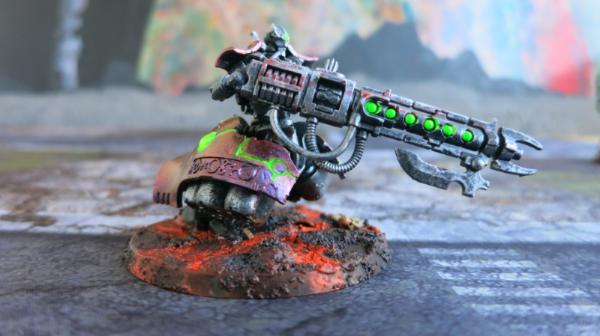
Lokhurt Heavy Destroyer – Right Side

Lokhurt Heavy Destroyer – Right Front
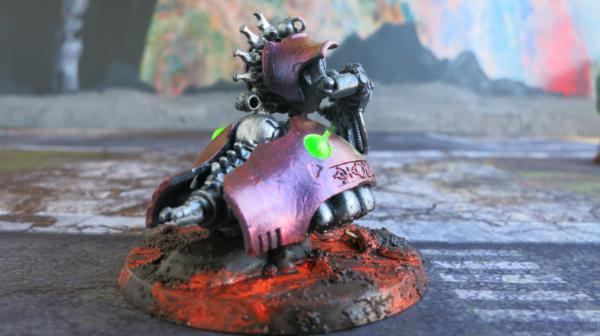
Lokhurt Heavy Destroyer – Rear

Lokhurt Heavy Destroyer – Left Side
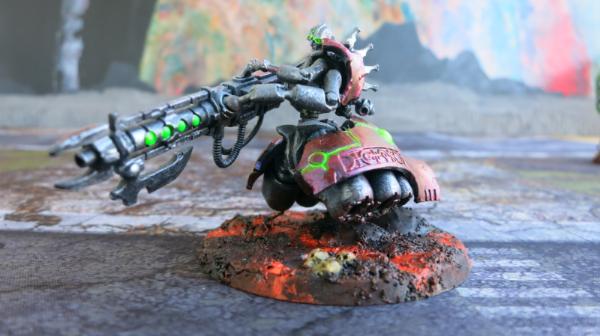
Lokhurt Heavy Destroyer – Left Front
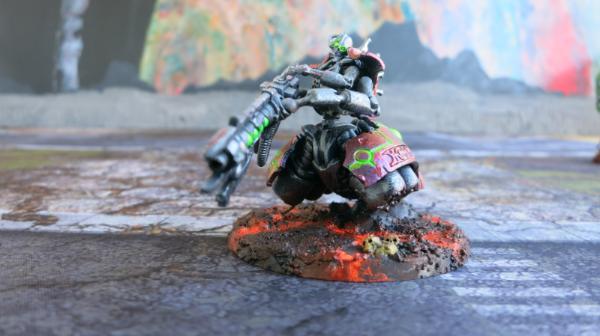
Lokhurt Heavy Destroyer – Front
I have mixed feelings about this model. Some models I play because they are effective during matched play. Other models I play because they are cool looking. In my mind, this model is only okay looking and is over-costed for matched play.
21898
Post by: Oldmanronald
Technomancer
The technomancer is another model not in the Indomitus box.
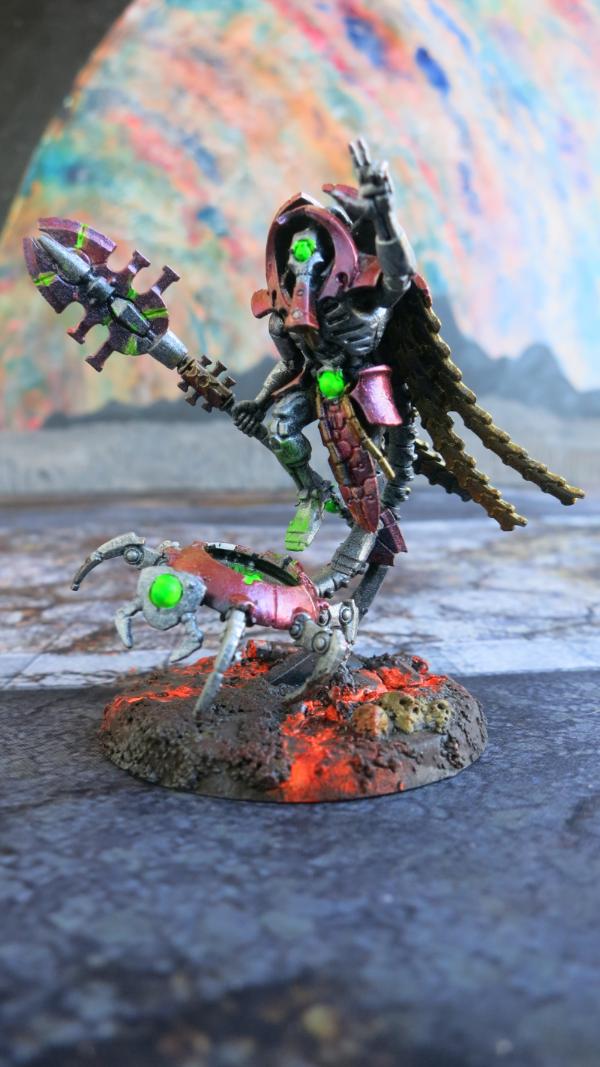
Technomancer – Left Front
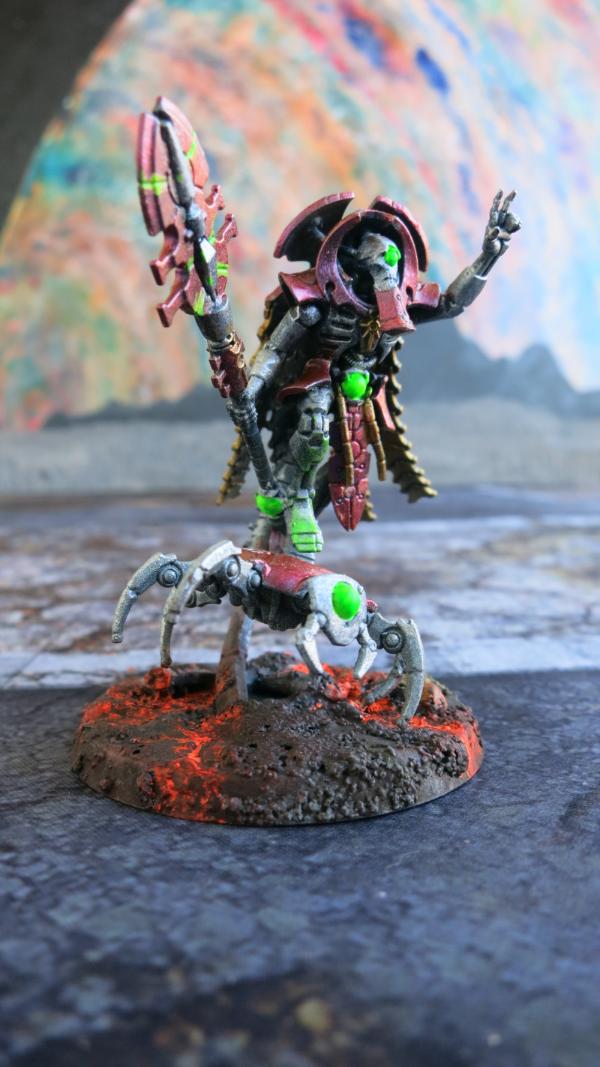
Technomancer – Right Front
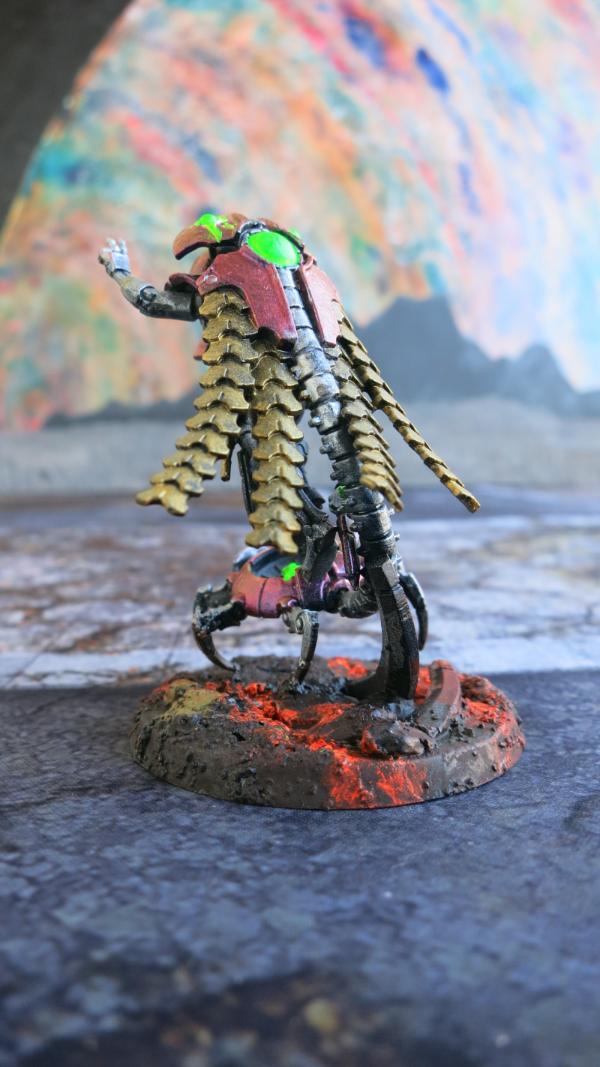
Technomancer – Rear
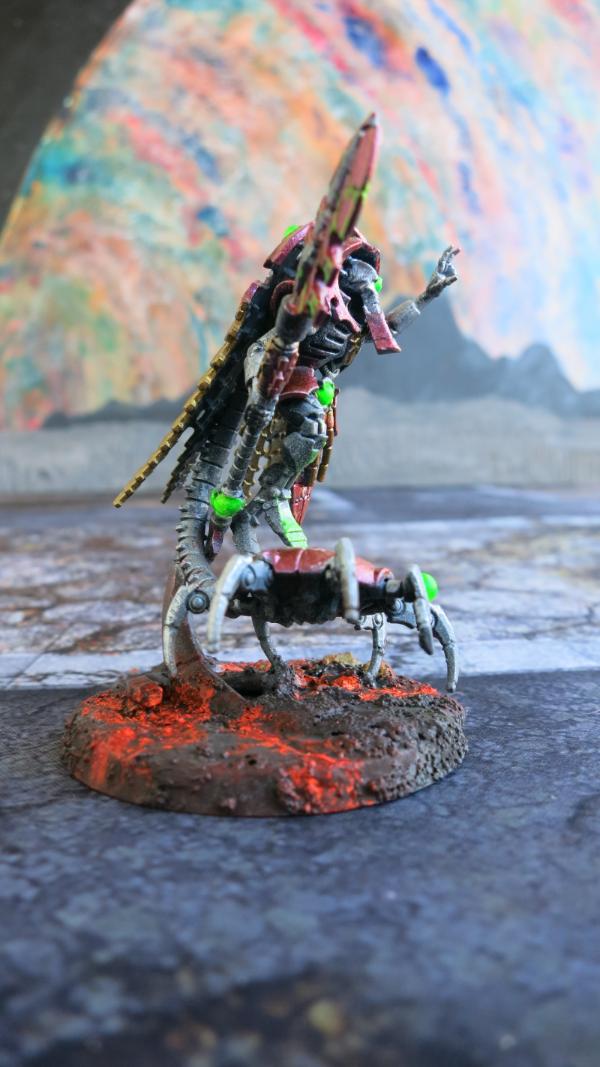
Technomancer – Right
This is a fun model, both good-looking and effective on the battlefield. I really like this model.
21898
Post by: Oldmanronald
Catacomb Barge – Part 1
The Catacomb is another model not in the Indomitus box. This is one of my favorite Necron models and I took too many pictures of it.
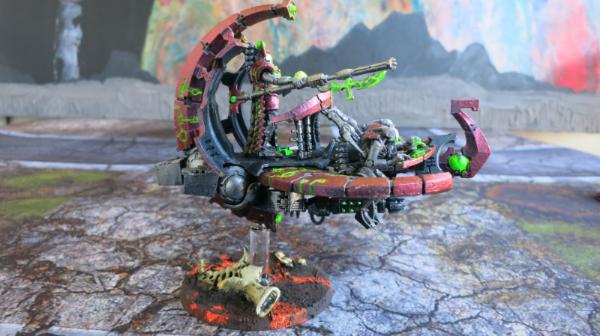
Catacomb Barge -- Right Side
The different types of paints each have their own characteristics. The easiest to use is the mixture of silver, steel, and coal black for the steel metal portions of the model. On the wet pallet, I have a dab of coal black, a dab of oily or natural steel, and a dab of silver that I wet blend both on the pallet and on the model. This coat easily covers the model in a single coat. In part because the paints are reasonably thick and go on easily, in part because I have already spray-painted a base of GW Chaos Black highlighted with Corax white. Thus, I am merely adding a reinforcing metallic sheen to the base coat.
The bones at the base are also easy to paint with wet blending of ochre paint highlighted with titanium white. This also takes a single coat.
The most difficult is the reddish purple Turbo-Dork Miami Sunset which requires a least two coats and usually three, four, or even five coats to get right. This was especially difficult with this model since the Turbo dork Miami Sunset is closely intermingled with the green lines. Oddly enough, the Turbo-Dork Pearly Gate on the Necron heads required only one or two coats and went on fast.
The green is also challenging. The fluorescent green needs a white undercoat so I had to paint a white undercoat before adding the fluorescent green paint. Usually, I needed two coats of the fluorescent green.
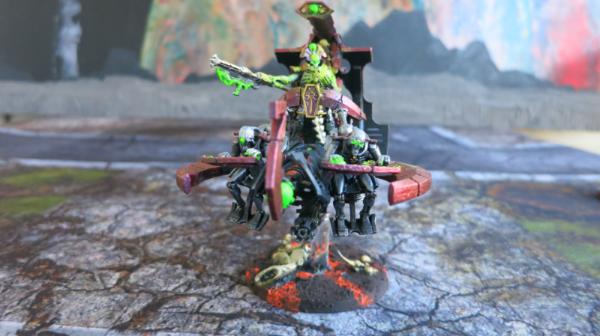
Catacomb Barge – Front
The resurrection orb in the Noble’s hand is fluorescent yellow. I used some indirect lighting (OSL or object source lighting) to make the orb appears to glow.
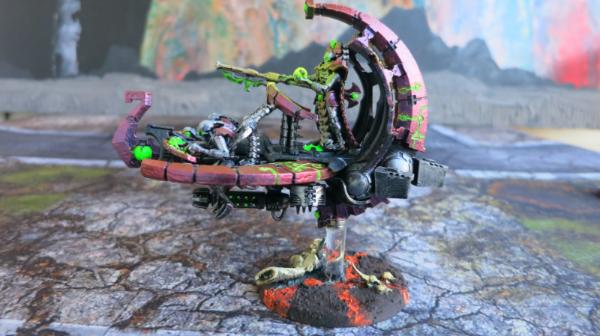
Catacomb Barge -- Left Side
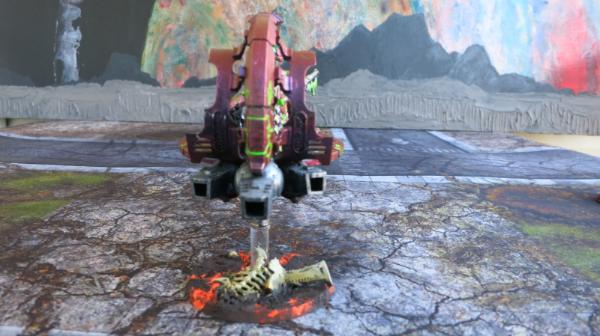
Catacomb Barge – Rear
Several years ago, I bought a primed, unfinished, and broken Tyranid model from a used model dealer. It was a great purchase. I take a saw and cut bits and pieces off it for bones for my bases.
21898
Post by: Oldmanronald
Catacomb Barge – Part 2
I tend to take pictures of my models from the side. This, however, is not how players view the models during a game. I have taken these pictures from a game player's point of view. This view show some of the features of the model missing in the side views.
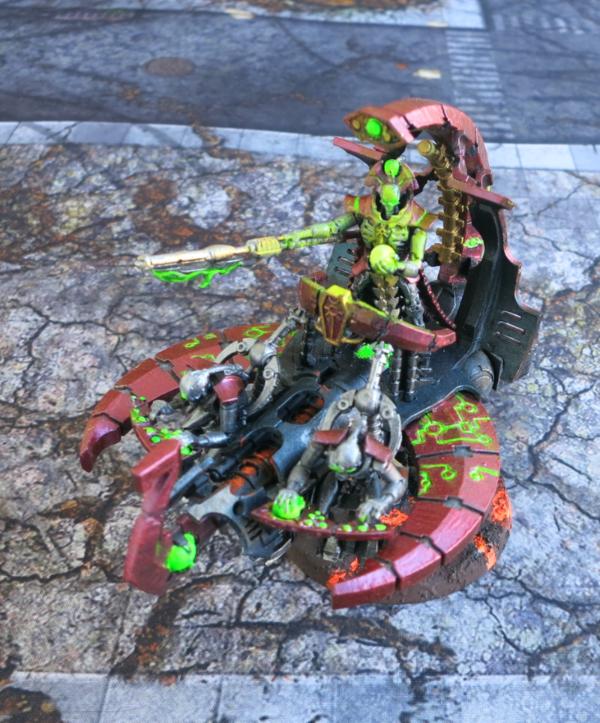
Catacomb Barge
This view shows the resurrection orb in the Noble’s hand. The orb is fluorescent yellow. This and the next picture show the highlights created by the object source lighting (OSL), here the resurrection orb.
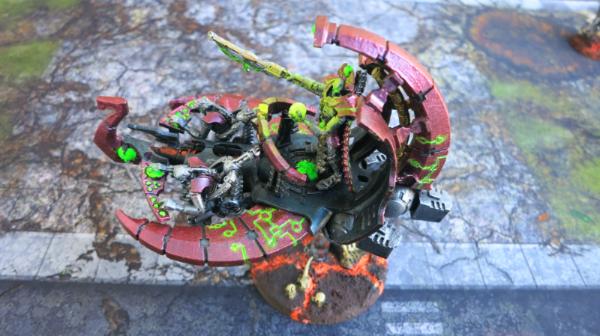
Catacomb Barge – Upper Left Side
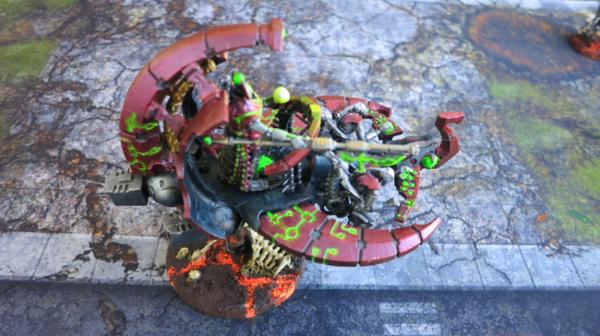
Catacomb Barge – Upper Right Side
121268
Post by: Gwyn chan 'r Gwyll
Nice OSL coming from the Orb in this one!
21898
Post by: Oldmanronald
Hi Gwyn chan’r Gwyll
Thank you for your complement on the OSL.
Oldmanronald
21898
Post by: Oldmanronald
Catacomb Barge – The Base
Although Games Workshop makes great models, the clear plastic bases for their flyers are flimsy. Below is a picture of the typical plastic bases, here on a Land speeder. The clear plastic spindle that holds up the model easily breaks. The clear plastic base is okay but I like GW’s standard black plastic bases better since I can more easily finish it.
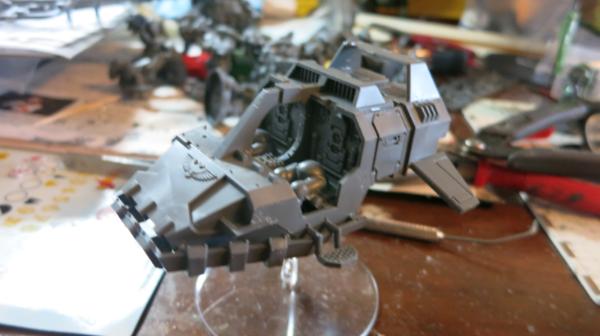
Flyer Base on a Land Speeder

Flyer Base on a Land Speeder
I now replace these clear plastic flyer bases with standard black plastic bases and use for the upright holder, plastic rods and the magnets I bought from Magnet Baron. These are much studier and look better.
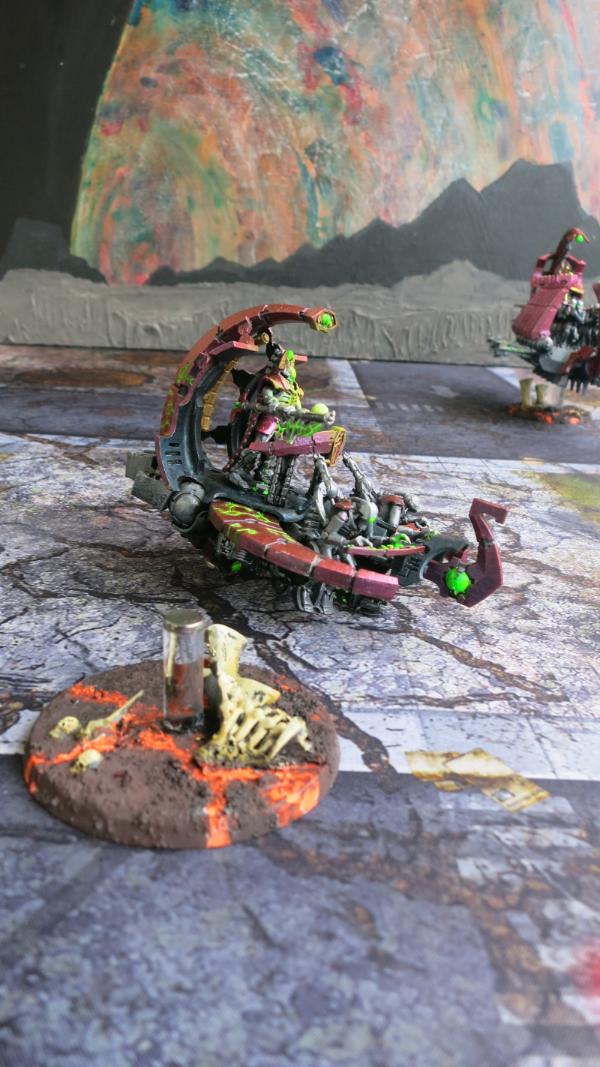
Base for Catacomb Barge
21898
Post by: Oldmanronald
The Silent King
In normal times, I purchase and build a model based on three factors. First, how does the model look? Second, how does the play in a game? Third, how much does the model cost (in real money)? Now, however, there is a fourth factor. Is the model available? Normally, if my local hobby store or my local Games Workshop store does not have the model, I order it directly from Games Workshop and have the model within a week. Lately, either because of Covid-19 or Brexit or both, many Nectron models are unavailable. Moreover, even if the model is available, it is now taking Games Workshop almost a month to ship it.
I found The Silent King in a local hobby store. I might have passed on it because the model is expensive, $150 US, and because the model is boring looking especially for a model that should be the centerpiece of a Necron army. But since it is hard to find enough Necron models to fill out a 2000 point and because The Silent King is on many competitive Necron lists, I bought it.
Why do I find the model visually unappealing? In my mind, it has too many divergent themes or parts that don’t seem to flow together. Of course, many Games Workshop models have details but most of the models have a central theme or focus. The dominant feature on this model is the caged shard of the C’tan star god at the top of the model. The second most dominant feature should be Szarekh in the center of the model but the figure is lost in a maze of surrounding detail.
In the sample model that Games Workshop displays in their ads, the painter has used dark or black paint to remove some of the background detail and has used light paint to highlight Szarekh. I have included a copy of the picture of The Silent King found on their webpage.
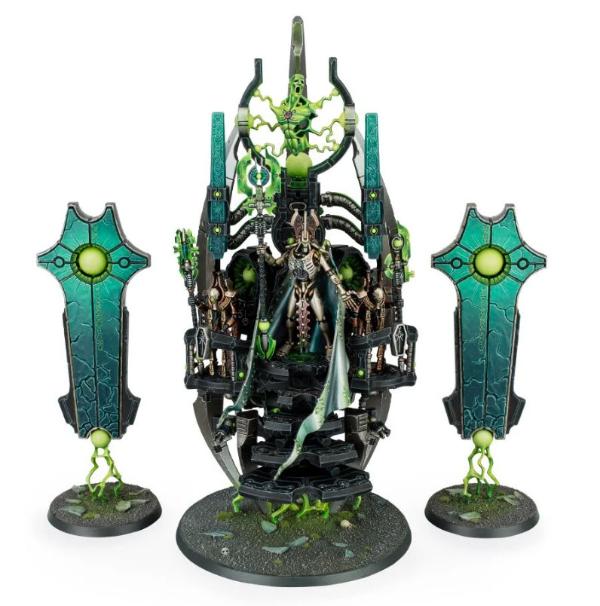
The Silent King – Games Workshop
Notice how the painter has used dark or black paint to create negative space surrounding the figure of Szarekh in the middle at the top of the stairs. The helps bring out the figure of Szarekh. Still the figure of Szarekh does not pop. In addition, by painting all the foreground black, including the front steps, the model lacks depth except for the two “candlesticks” or pillars at the top. I tried a different paint scheme to bring out the important details and push back other details to give the model more depth.
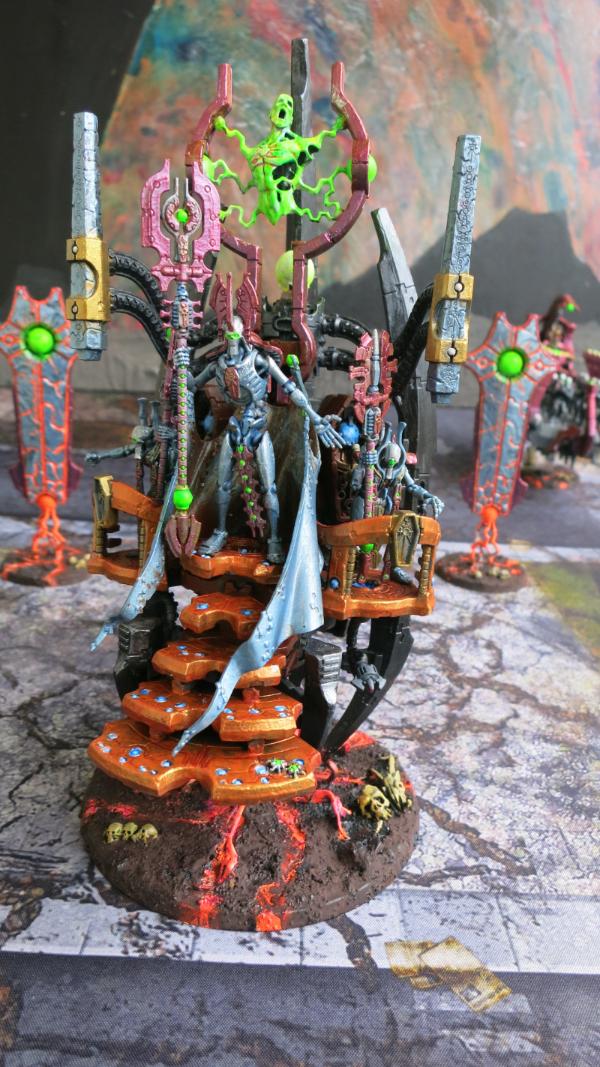
The Silent King – Front
Like the painter at Games Workshop, I used black and browns to create negative spaces. I also used contrasting colors, here blue and orange on the bottom half of the model; and, red and green on the top half of the model to bring out the details in Szarekh and the C’tan star god. Mine is a more colorful than the Game Workshop version.
Finally, I broke the arms holding the candlesticks above Szarekh’s head and re-glued them so that they are further apart. This moved the candlesticks so that they blocked the weapons on the two Phaeron figures on the left and the right of Szarekh. To display these weapons, I switched the two Phaeron figures placing their weapons closer to Szarekh and further from the candlesticks.
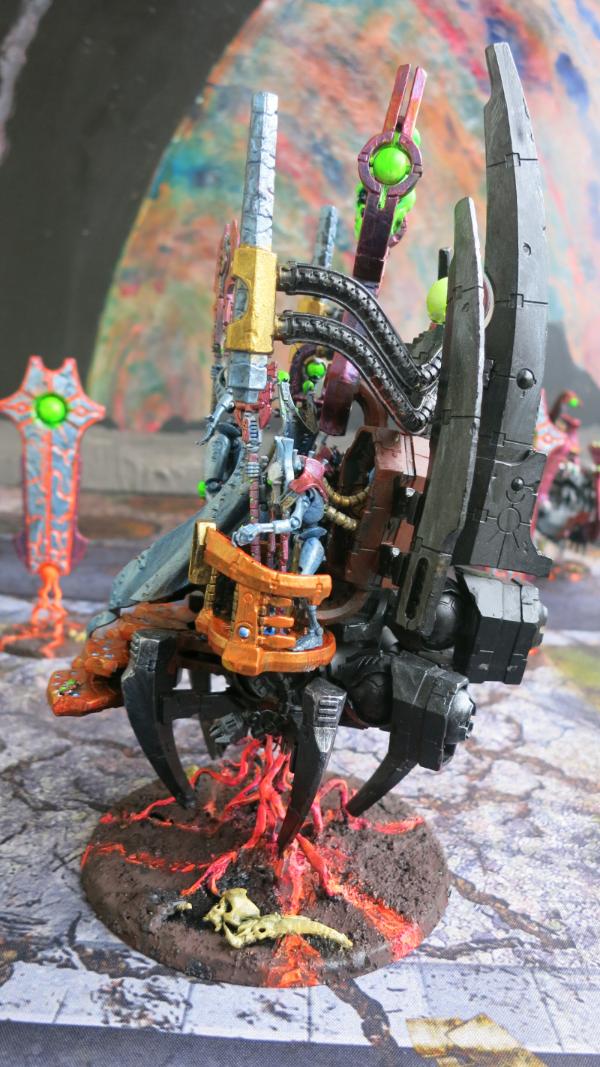
The Silent King – Left Side
This side view illustrates another technique to give depth to the model. Notice that much of the middle portion of the model is painted burnt sienna. This middle portion of dull reddish brown behind the glowing turbo-dork of orange Multipass and reddish Miami Sunset makes it appears that these colors are continued in the shadowed interior of The Silent King’s Dais (or throne) of Dominion.
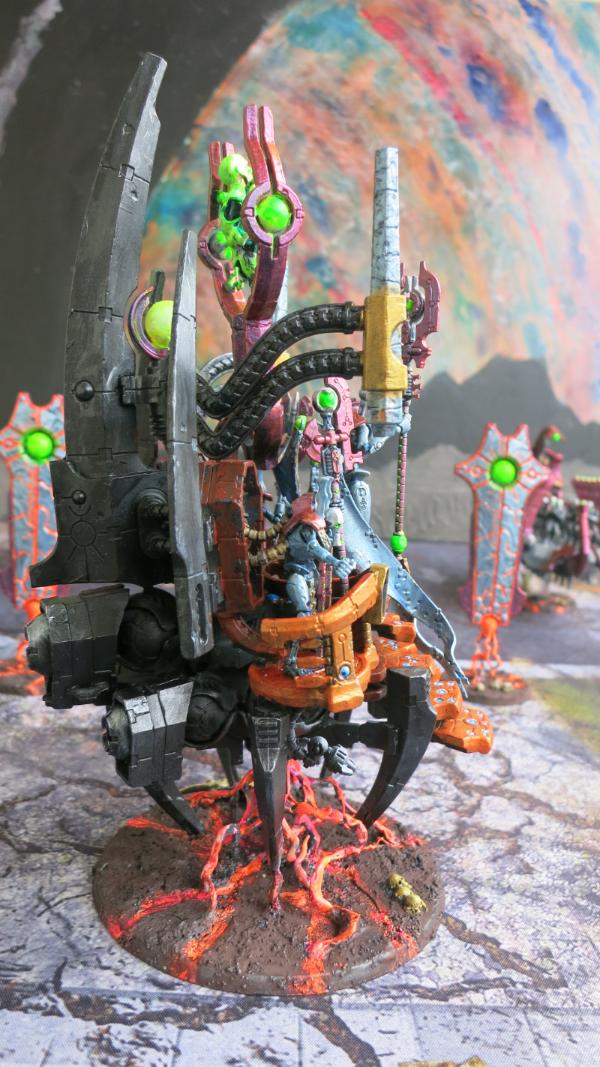
The Silent King – Right Side

The Silent King – Rear
21898
Post by: Oldmanronald
The Silent King – Mesophet
The Silent King has four figures mounted on the Dais of Dominion. According to the Necron Codex, Szarekh elevated Hapthatra the Radiant and Mesophet of the Shadowed Hand to form his Triarch. It is often hard to match the figure in the model to the fluff in 40K, so I had misidentified this figure as Hapthatra. After reading Gwyn chan 'r Gwyll post and checking the internet, I realized that this figure is Mesophet. Mesophet is also known as the Phaeron of Blades and wields the Scythe of Dust.
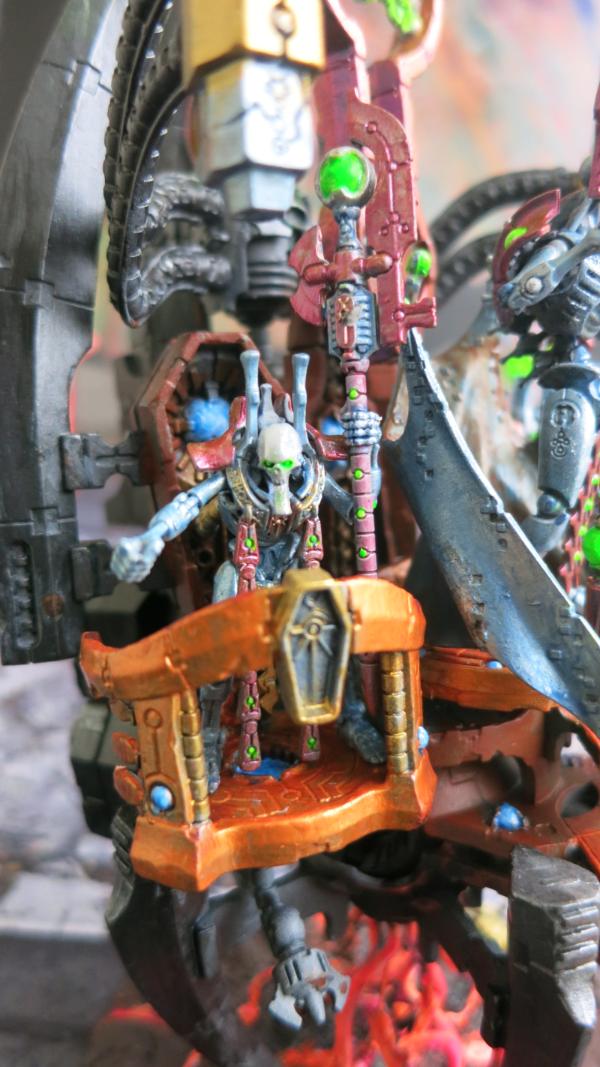
Mesophet of the Shadowed Hand - Scythe of Dust – Close-Up

Mesophet of the Shadowed Hand - Phaeron of Blades.
121268
Post by: Gwyn chan 'r Gwyll
Think you got it backwards. That weapon looks like a Warscythe, while the other Triarch's weapon looks like a Staff of Light. The statline of the Staff of Stars looks more like a Staff of Light, which would be the other guy. I think that's the Scythe of Dust, which would make this guy the other Triarch.
21898
Post by: Oldmanronald
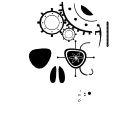 Gwyn chan 'r Gwyll wrote: Gwyn chan 'r Gwyll wrote:Think you got it backwards. That weapon looks like a Warscythe, while the other Triarch's weapon looks like a Staff of Light. The statline of the Staff of Stars looks more like a Staff of Light, which would be the other guy. I think that's the Scythe of Dust, which would make this guy the other Triarch.
I did a little more research on the internet and you are correct. I did get Hapthatra and Mesophet backwards. I will correct the prior entry. Thanks.
21898
Post by: Oldmanronald
The Silent King – Hapthatra
The Silent King has four figures mounted on the Dais of Dominion. This figure is Hapthatra the Radiant with the Staff of Stars. He is also known as the Phaeron of Stars.
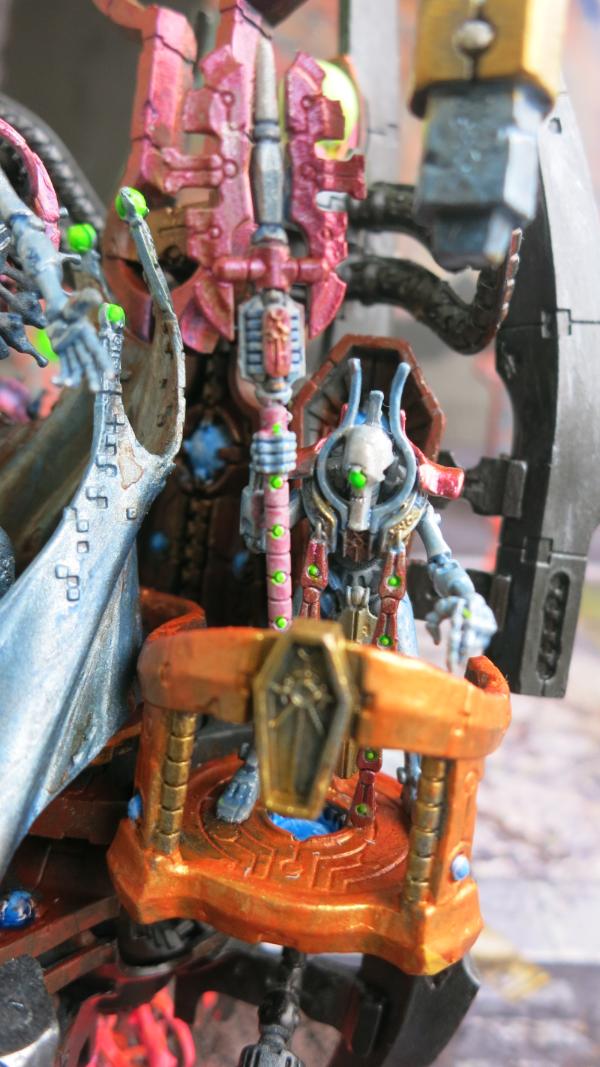
Hapthatra the Radiant with the Staff of Stars – Close-Up
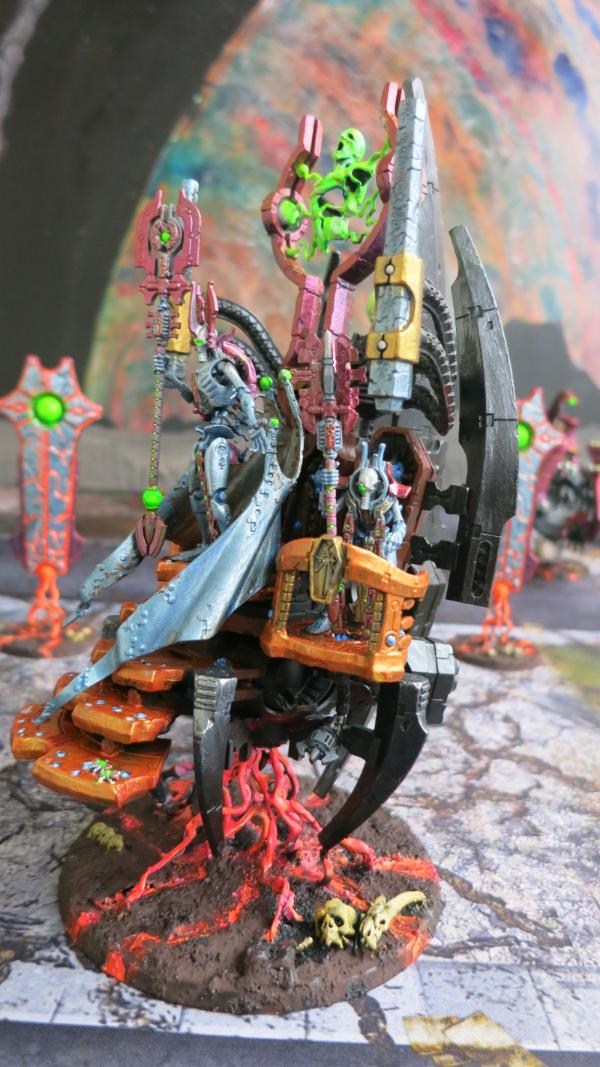
Hapthatra the Radiant with the Staff of Stars
Normally, I assemble the model first and then paint it. This is different from many modelers who paint the pieces on the sprue and then assemble the model. There are advantages of painting first but I find it harder and less satisfying. I like the model assembled first because I can paint it as a whole, darkening the shadow regions and brightening the highlights as they actually appear on the assembled model. Painting after the assembly does make it more difficult to get details into recessed portions of the model but generally such recessed portions are hidden in the shadows and don’t need painted details.
Still, on certain models, I will assemble portions of the models, paint the subassembly, and then finish assembling the model as a whole. I do this for bareheaded models where I paint the head separately from the rest of the model so I can really focus on the details on the head. I don't do this for the Necrons since their heads are so simple. In this model, however, I assembled and painted the figures of Hapthatra, Mesophet, and Szarekh and his mantel separate from the Dais of Dominion. I glued them on after they and the Dais of Dominion were painted.
21898
Post by: Oldmanronald
The Silent King – Szarekh
Szarekh, also known as The Silent King, Supreme Ruler of the Necron Dynasties, Last of the Silent Kings, Shatterer of the Star Gods, Defender of the Old Ones, Bringer of Unity , Master of the Final Triarch, Wielder of the Scepter of Eternal Glory, and a few other minor titles, is the top dog of the Necrons. Apparently, he is kind of a smoothie who can talk or trick most Necrons into supporting him.
Szarekh with the Scepter of Eternal Glory
During Thanksgiving weekend, I was at Atlantis Games & Comics in Norfolk, Virginia, and found some Turbo-dork paint, this time Blue Steel. I really like this color so I used it for Szarekh and his two sidekicks on this model. To bring out the blue in this figure, I also used Turbo-dork Multipass, essentially an orange color complimentary to the blue steel, to paint the stairs and railing. I had to use several coats of the Multipass but it did bring out the steel blue.
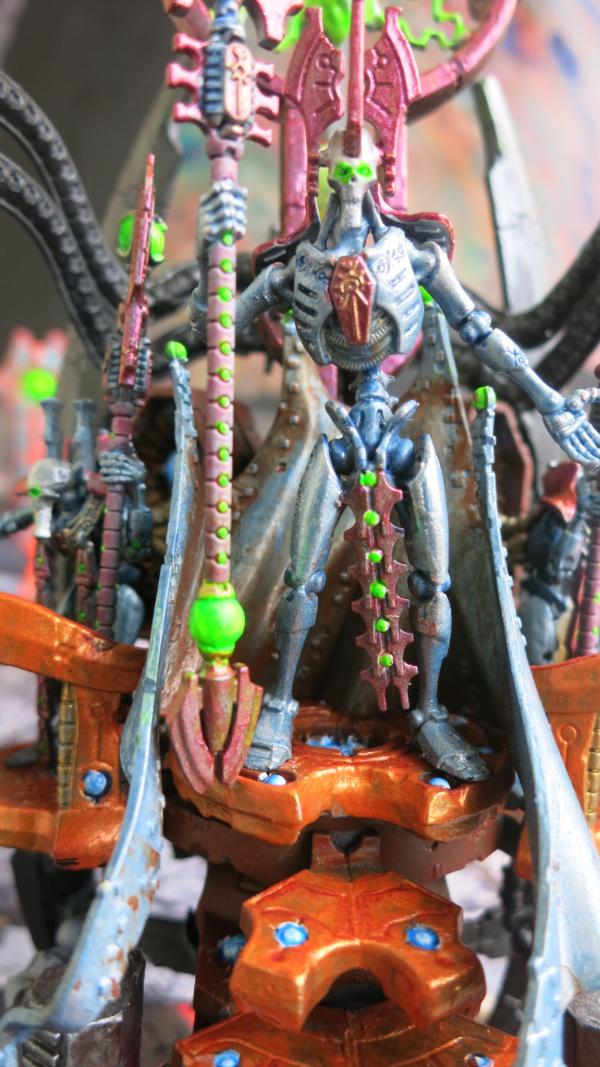
Szarekh with the Scepter of Eternal Glory
Szarekh’s mantle is also steel blue. According to the fluff, this mantle is from a C’tan’s flensed necrodermis, which is his living metal skin so the Turbo-dork steel blue is a perfect color. I also wet washed shadowed the inside of the mantle with orangish-brown burnt sienna to bring out the steel blue of Szarekh's body.
This model is the only one of my Necrons that I used the Steel Blue and Multipass so it has a somewhat different color scheme than the rest of my Necron army. This fits the fluff since The Silent King is a dynastic agent and is a separate dynasty from the rest of the army.
I really like the Turbo–dork blue steel but it needs its complementary orange color to make it pop.
21898
Post by: Oldmanronald
The Silent King – Caged Shard of Nyadra’zatha
The last of the four figures on The Silent King is the Caged Shard of Nyadra’zatha. According to the fluff, this captured C’tan star god is the power source of the Dais of Dominion, sort of like a super-doper solar panel. This was a fun figure to paint. I played with the fluorescent green with patches of fluorescent yellow as highlights on this glowing figure.
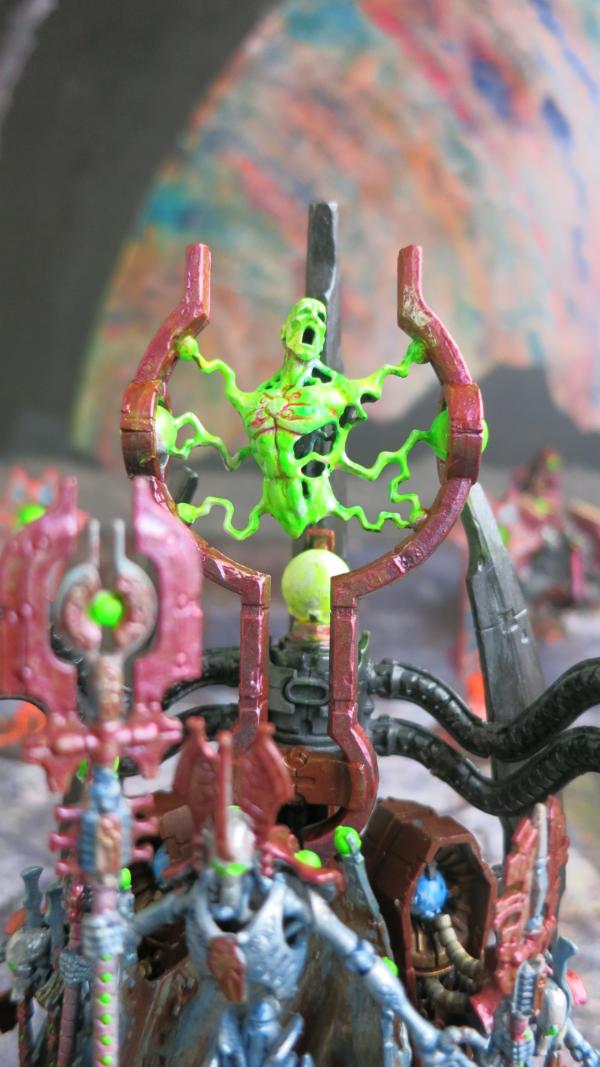
Caged Shard of Nyadra’zatha
The Silent King would be a hard model to put together and paint quickly, but because I found it hard to get some of the supplies I needed for my other models, I was “forced” to concentrate on this model alone for several weeks. Since I was unrushed, I could focus on each portion of the model for a few days. It still is not one of my favorite models but was fun to build, paint, and photograph each of the parts and try to match the figures to the fluff. Actually, knowing the fluff also helps me to understand the rules for playing the Silent King.
21898
Post by: Oldmanronald
The Silent King – Triachal Menhir
A pair of Triachal Menhir hang around the Dais of Dominion. These were easy to paint.
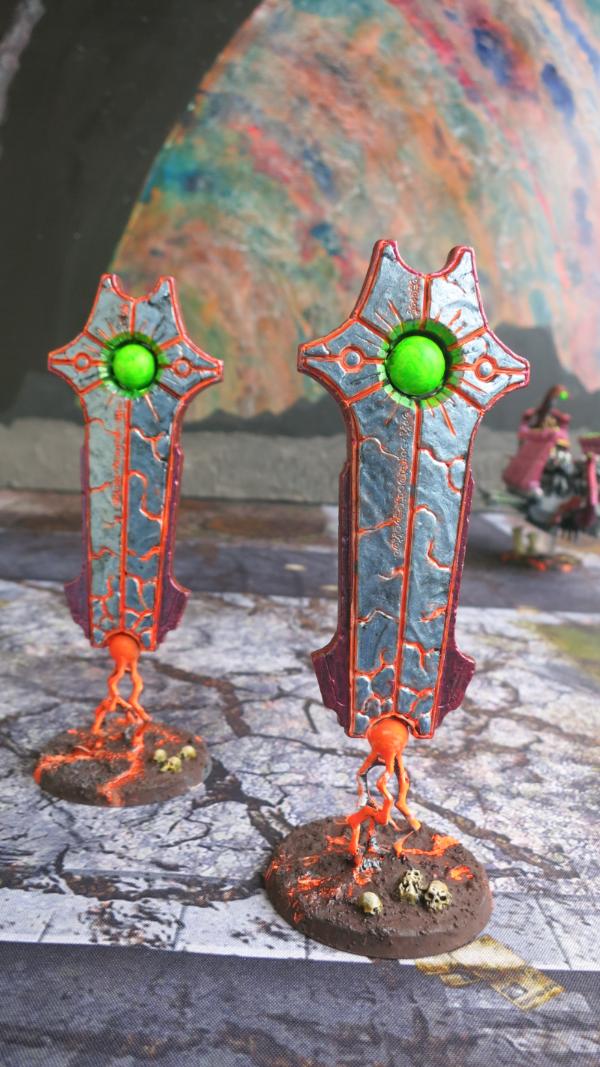
Pair of Triachal Menhir
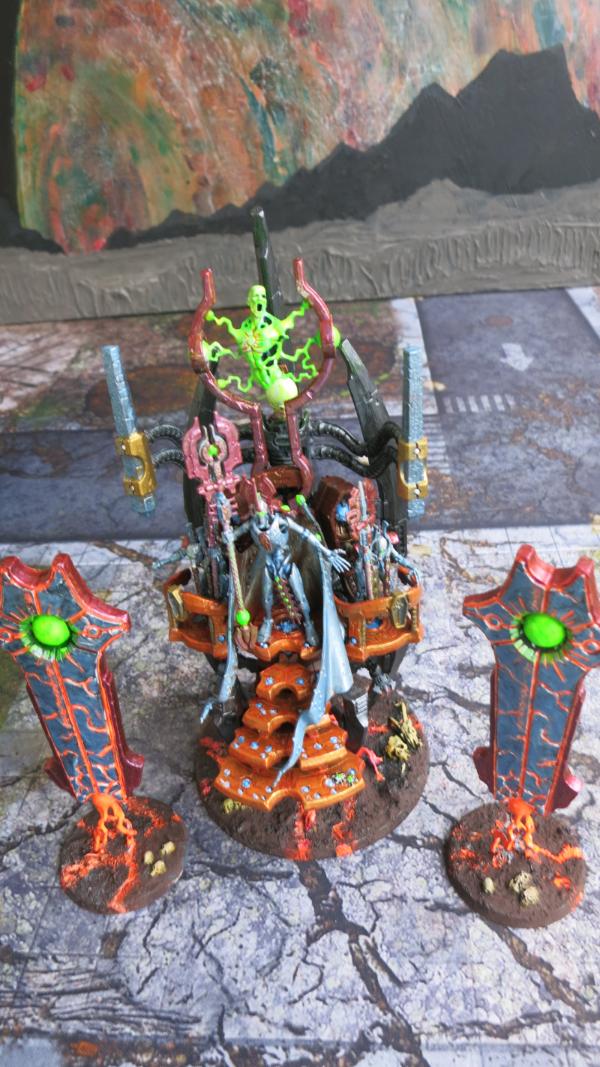
Dais of Dominion with Triachal Menhirs – Player’s View
21898
Post by: Oldmanronald
Ghost Ark
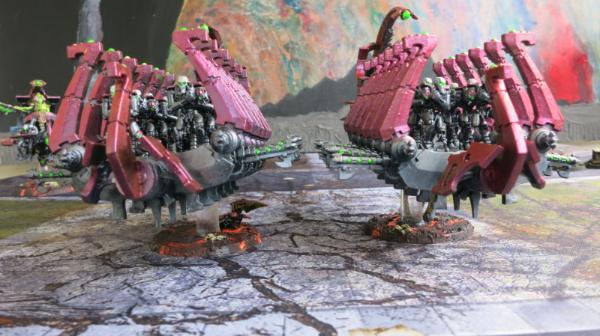
Pair of Ghost Arks
The Ghost Ark is difficult to make and paint but is a beautiful and for this Codex, a useful model for the Necrons. I made and painted the Ghost ark and the wounded Necron passengers separately. The Necron passengers were somewhat difficult to place in the already assembled model but it was a lot easier to paint the passengers and the Ghost Ark separately and then glue them together that it would have been to paint the Ghost Ark with the passengers already mounted.
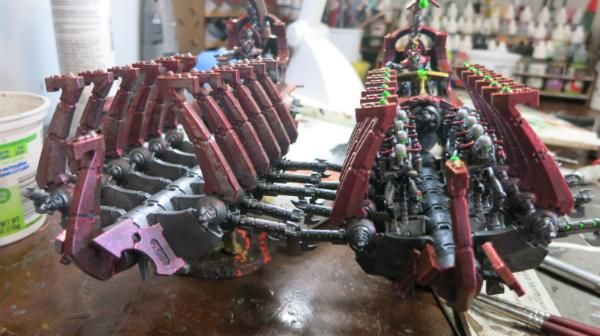
Pair of Ghost Arks with the Left Ghost Ark without Passengers
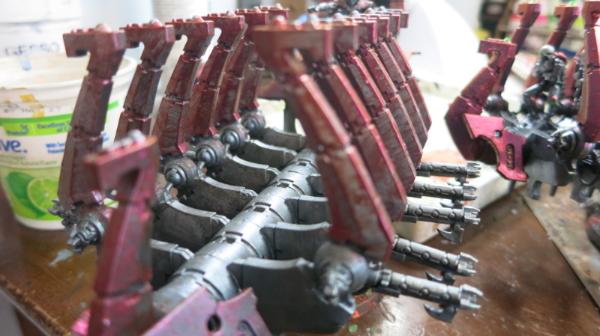
Ghost Ark without Passengers
Notice in these pictures the arches on the Ghost Ark need another coat of the Turbo-Dork Miami Sunset. I added more coats of Turbo-Dork after mounting the passengers.
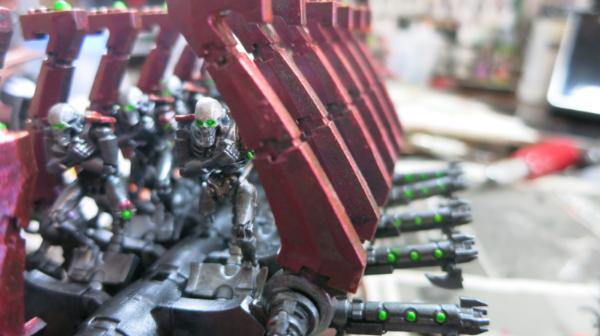
Ghost Ark with Passengers
21898
Post by: Oldmanronald
First Ghost Ark
The ghost ark looks like an ancient Greek Galley with the Gauss flayer array looking like a row of oars. This is a distinct and beautiful model.
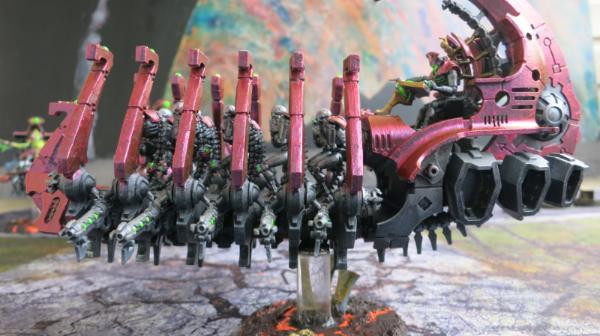
Ghost Ark – Left Side
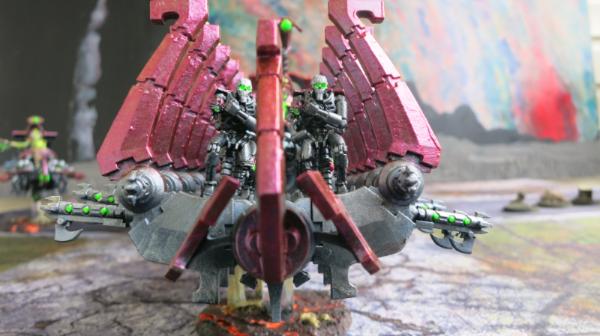
Ghost Ark – Front
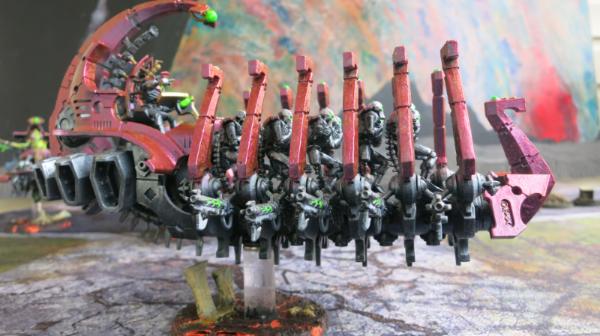
Ghost Ark – Right Side
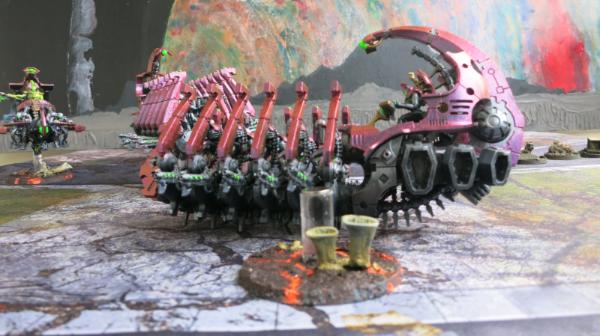
Ghost Ark – Base
The only way I could tell the pictures of the first ghost ark from the pictures of the second ghost ark was that this first ghost ark had the two rib like bones on its base. The clear post and magnet on the base are from Magnet Baron.
21898
Post by: Oldmanronald
Second Ghost Ark
If one Ghost Ark is good, two should be better.
The first and second Ghost Ark are almost identical. Actually, I was only able to determine the first Ghost Ark picture from the second Ghost Ark picture by looking at the base for each. The first Ghost Ark’s base has white-rib like pillars while the second has a reddish black crab-like claw.
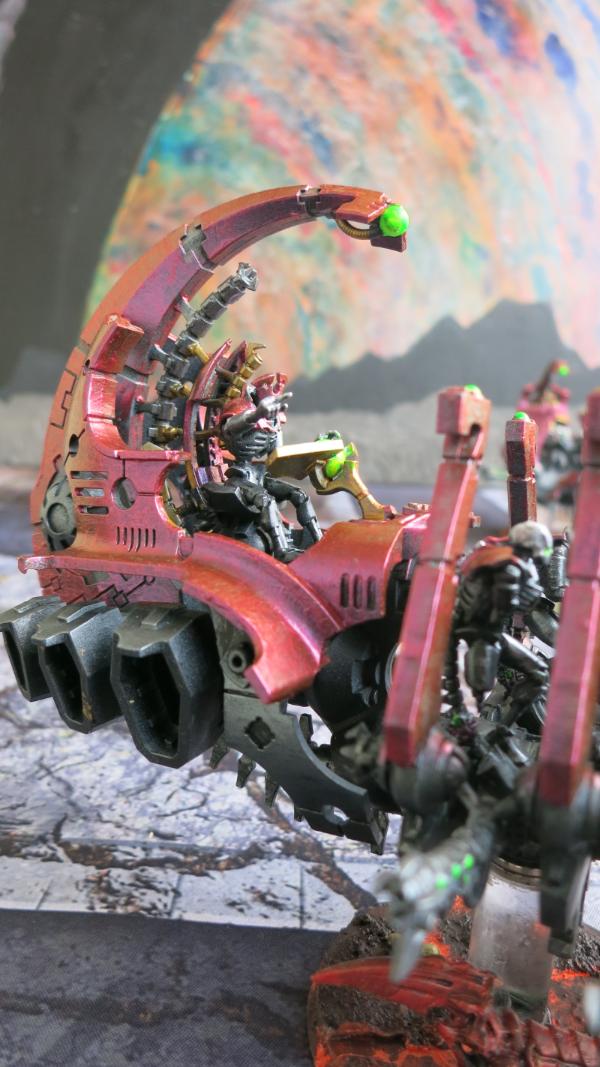
Ghost Ark – Close Up of Pilot
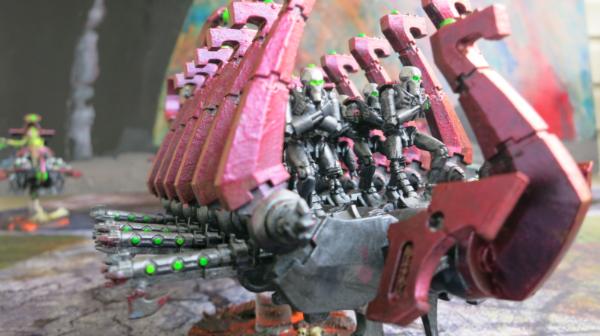
Ghost Ark – Left Front

Ghost Ark – Right Side
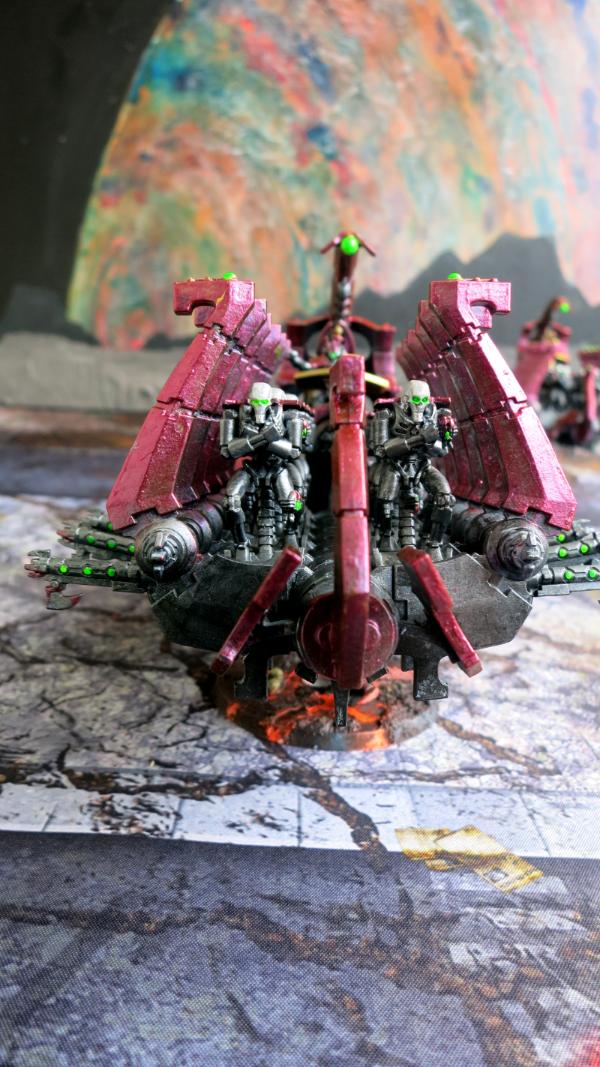
Ghost Ark – Front
21898
Post by: Oldmanronald
Ghost Ark – Player’s View
I usually take my pictures with my camera mounted in the same plane as the model but in actual play, the players are looking down on the models, not from the side. The pictures below are more how the players would see the models on the table.
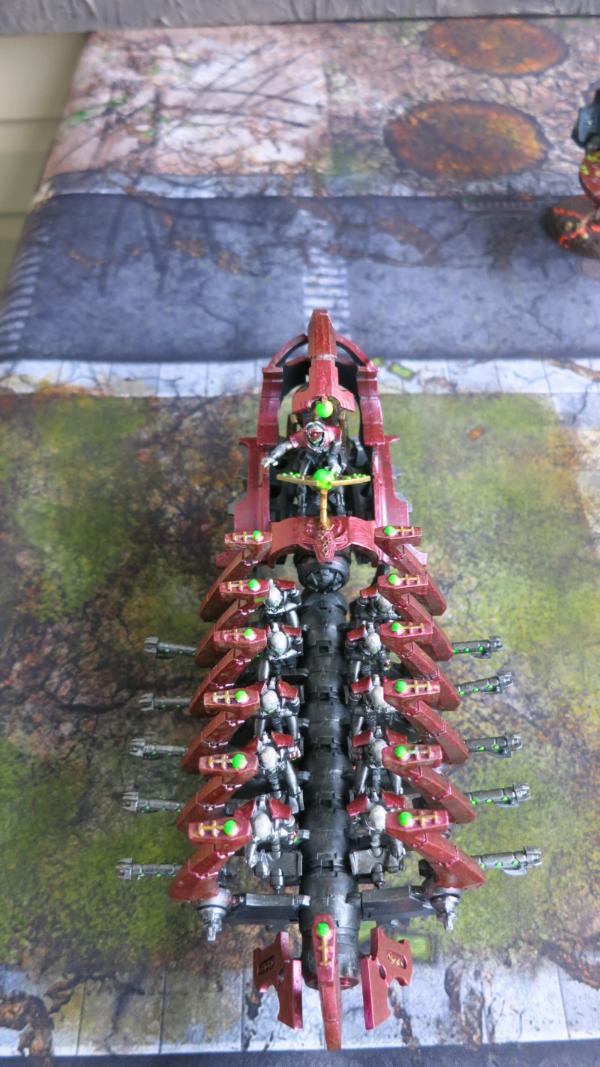
Ghost Ark – Player’s View – Front
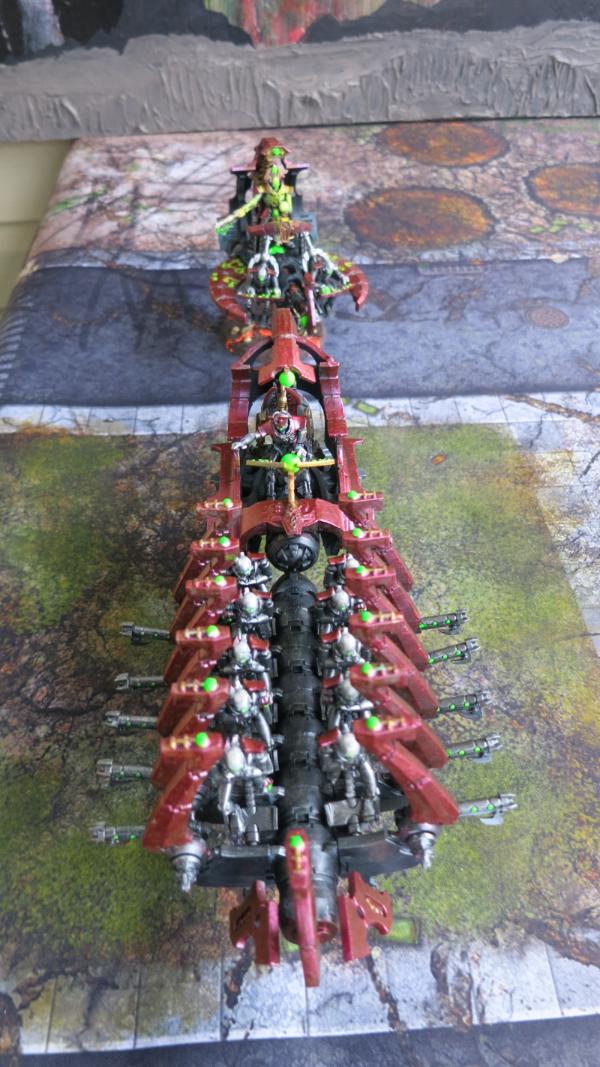
Ghost Ark and Catacomb Barge – Player’s View
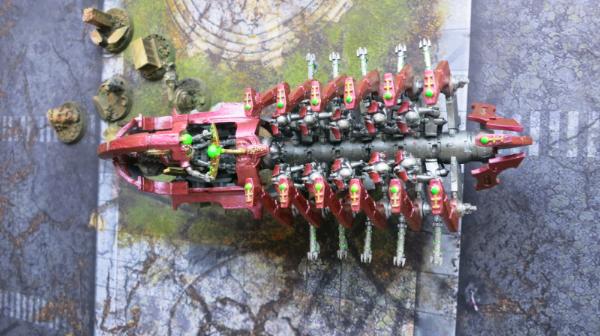
Ghost Ark – Player’s View – Side
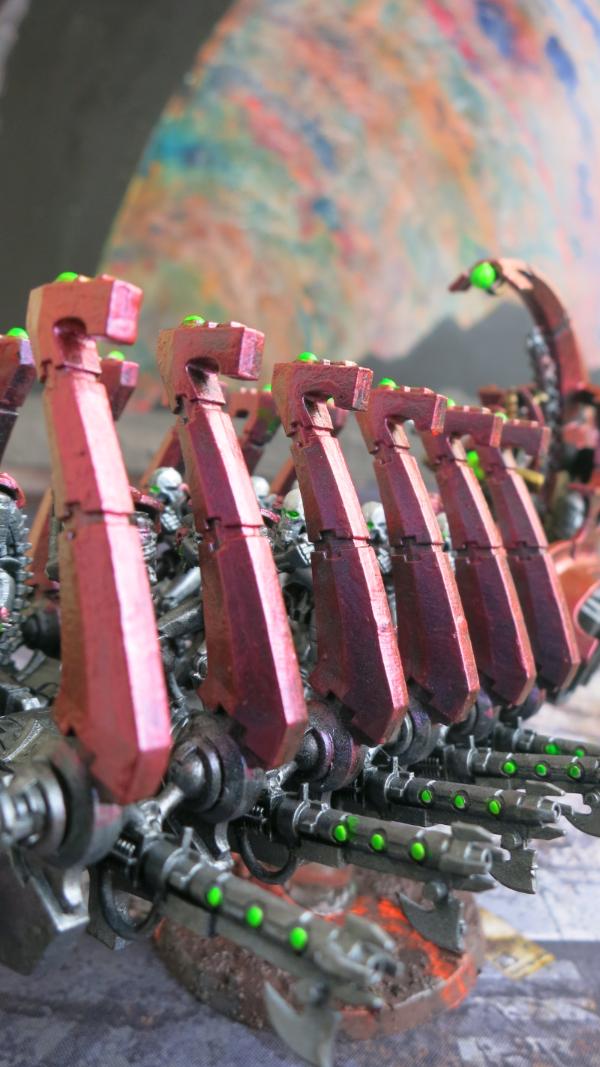
Ghost Ark – Close-up of Ribs
76303
Post by: Warboss_Waaazag
I really like the feel of these necrons. To me, their look evokes age.
21898
Post by: Oldmanronald
Thank you. Necrons are fun to assemble and paint. In some ways they are easier to paint than Marines.
21898
Post by: Oldmanronald
Washington D.C. Ruins
Several years ago, I bought some tokens at the NOVA convention. These were for the 40K narrative, an invasion of Earth with the battlefield in Washington D.C. These tokens represent the various ruined remains of prominent D.C. landmarks. Although I had them for years, I just finished painting them.
The individual tokens are not in scale to each other. For example, the FDR Roosevelt dog token is the same size as the Jefferson Memorial token although the Jefferson Memorial is much bigger.
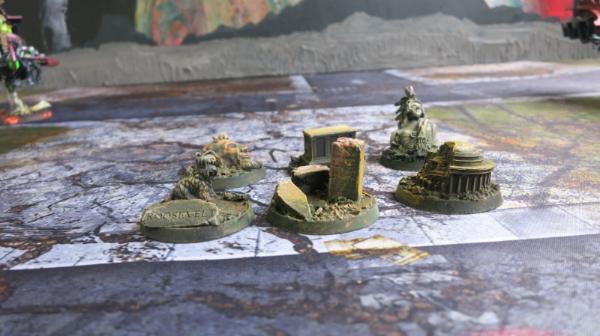
Tokens - Washington D.C. Ruins
I used pigments and dry brushing with dull earth tones to color the tokens.
21898
Post by: Oldmanronald
Statue of Freedom
The Statue of Freedom is on the dome of the U.S. Capitol Building. It is bronze so I may have to repaint this token since I treated it as stone. I guess I should have researched this before I painted it, not after.
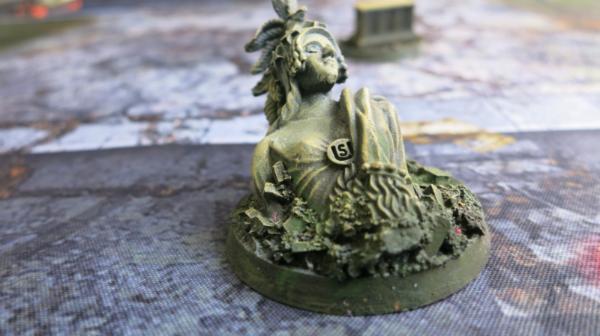
Statue of Freedom Token - Front
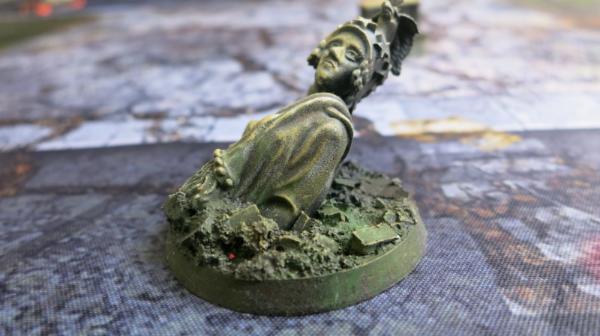
Statue of Freedom Token - Side
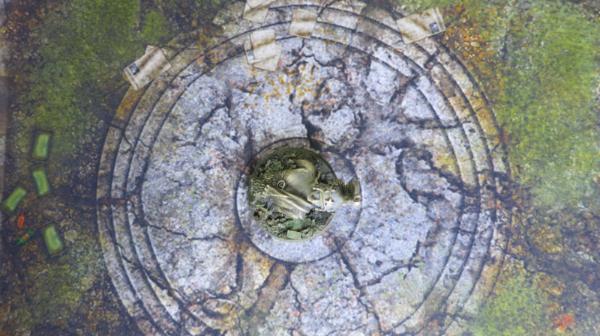
Statue of Freedom Token – Top
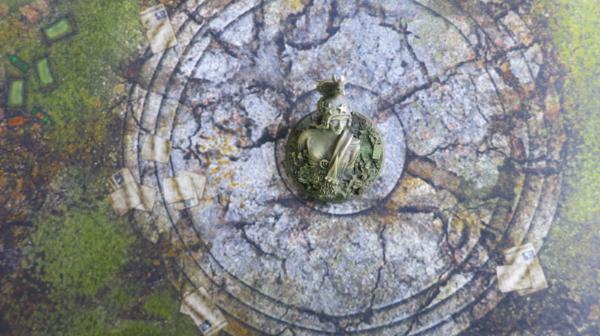
Statue of Freedom Token – Top
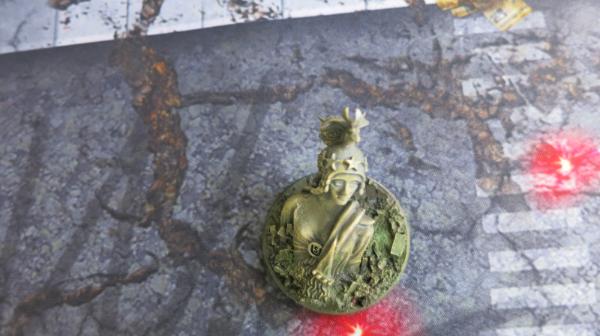
Statue of Freedom Token – Player’s View
I took more pictures of this token than any of the others even though it isn’t my favorite and I should have given it a ancient bronzed look. I may repaint it.
121268
Post by: Gwyn chan 'r Gwyll
Alternative you could repaint the ground it's buried under and then the statue itself is heavily verdigris'd. I think it works.
21898
Post by: Oldmanronald
Gwyn chan 'r Gwyll wrote:Alternative you could repaint the ground it's buried under and then the statue itself is heavily verdigris'd. I think it works.
I agree. I may do a little dry brushing or some washes on this model to bring out the statue.
21898
Post by: Oldmanronald
Tomb of the Unknown Soldier
The Tomb of the Unknown Soldier is a beautiful token. I think the sculptor did a nice job with the lettering.
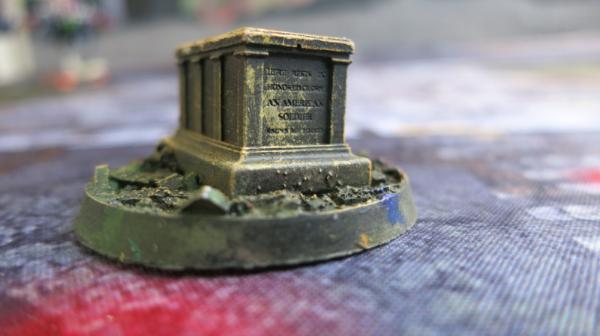
Tomb of the Unknown Soldier Token – Front with Lettering
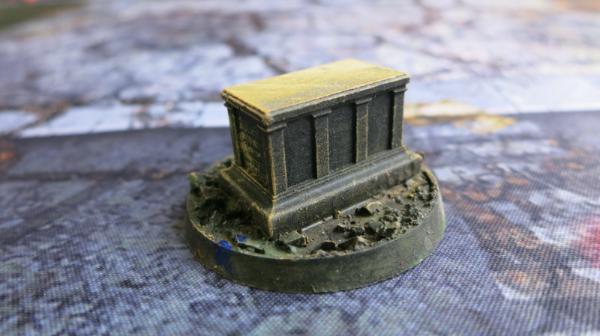
Tomb of the Unknown Soldier Token – Side
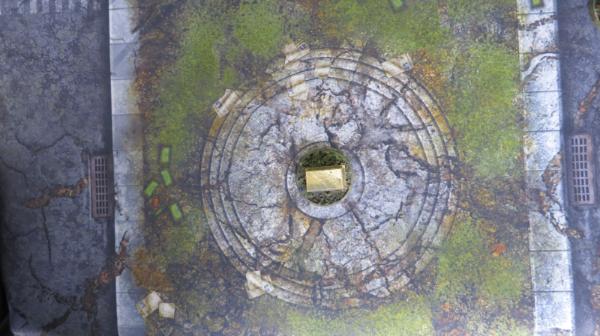
Tomb of the Unknown Soldier Token – Top
I have mixed emotions, however, about using this as a gaming token.
21898
Post by: Oldmanronald
Jefferson Memorial Token
The Jefferson Memorial is my least favorite D.C. token. The Jefferson Memorial is big enough to be terrain rather than a token.
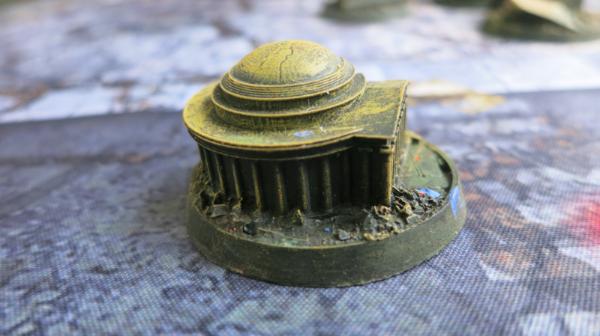
Jefferson Memorial Token – Side
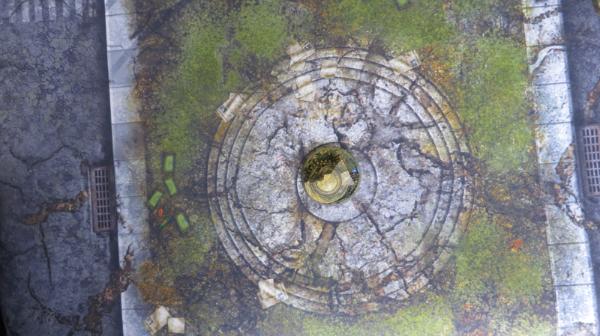
Jefferson Memorial Token – Top

Jefferson Memorial Token – Top
21898
Post by: Oldmanronald
Token - Washington Monument
The Washington Monument is big, the tallest stone structure and tallest obelisk in the world. This collapsed Monument would be better as terrain than a token.
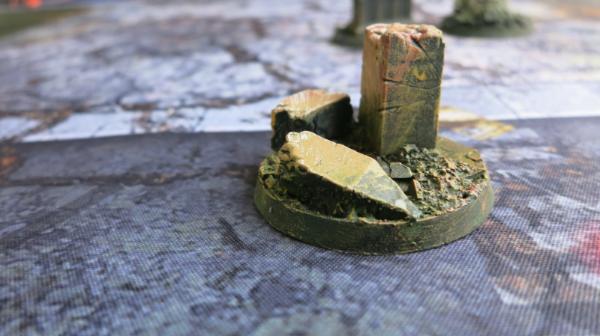
Washington Monument Token - Side
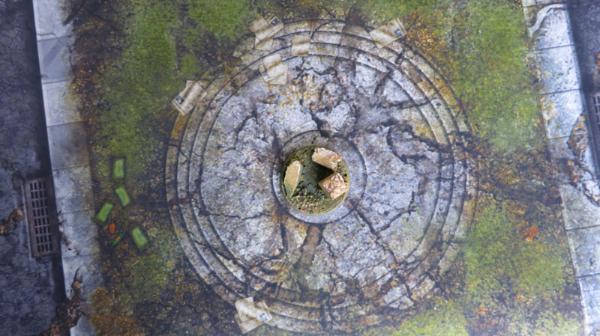
Washington Monument Token - Top
21898
Post by: Oldmanronald
Token - Franklin Delano Roosevelt Memorial
The FDR Memorial is my second favorite of these tokens. Although I live fairly close to D.C., I don’t remember visiting this memorial. By comparing the pictures of the memorial to the token, however, it appears the sculpture took some minor liberties, specifically using the Roosevelt’s name next to Fala, his Scottish terrier. In the pictures of the FDR Memorial, I don’t see his name near Fala. Still, this is a great sculpt.
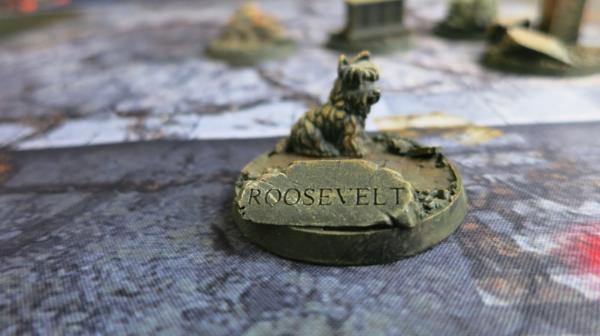
Roosevelt and Fala Token – Side
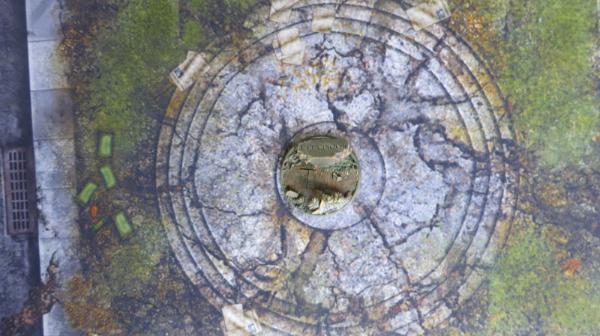
Roosevelt and Fala Token – Side
21898
Post by: Oldmanronald
Token - Lincoln Memorial Head
This is my favorite of these NOVA Open D.C. Narrative Tokens. I like the Lincoln Memorial and this particular sculpt.
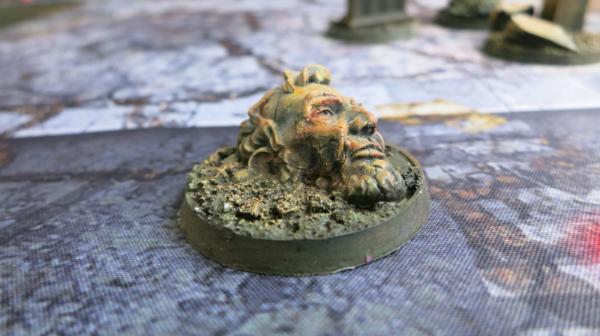
Lincoln Head Token – Side
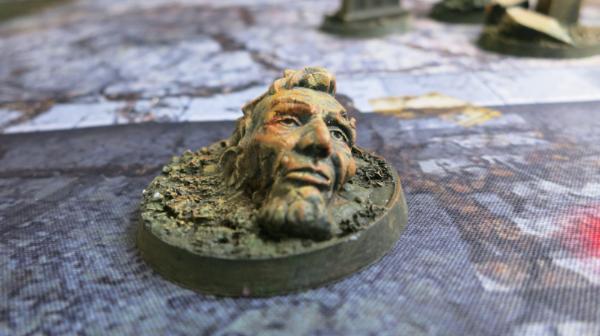
Lincoln Head Token – Front
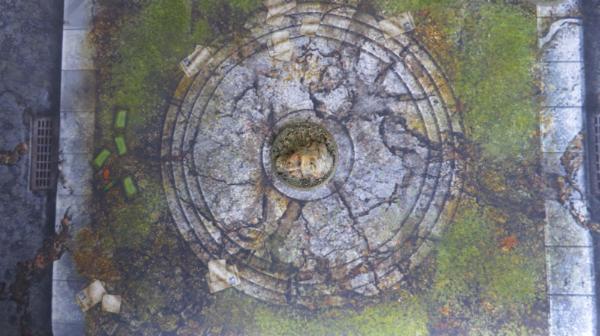
Lincoln Head Token – Top
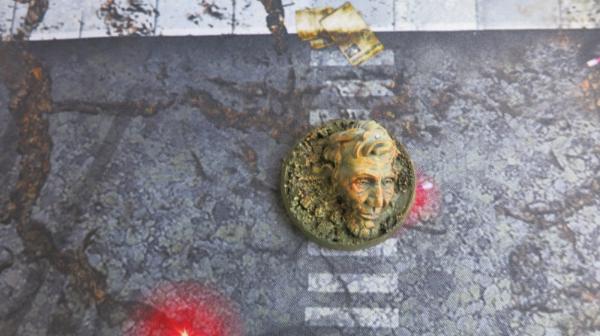
Lincoln Head Token – Player’s View
21898
Post by: Oldmanronald
Deathwing Ancient with Deathwing Company Banner
Old Deathwing Ancient
Last June I shared pictures of my Deathwing Ancient but noted that I tore it apart and planned to rebuild it with the Knight Master body. Below is the result.
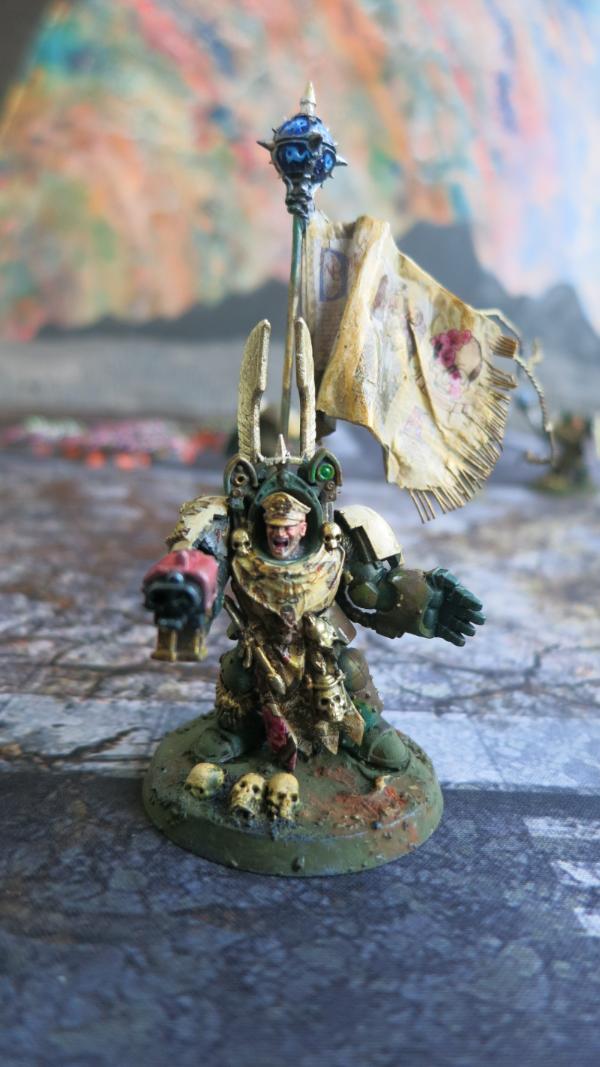
New Deathwing Ancient – Front
The wings on the back give this a real Dark Angels look. If you compare this new model to my old model you would see that the flag, the head, the storm bolter arm, and the Power Fist are the same. The only difference is the body with the wings. The new body has a different robe.
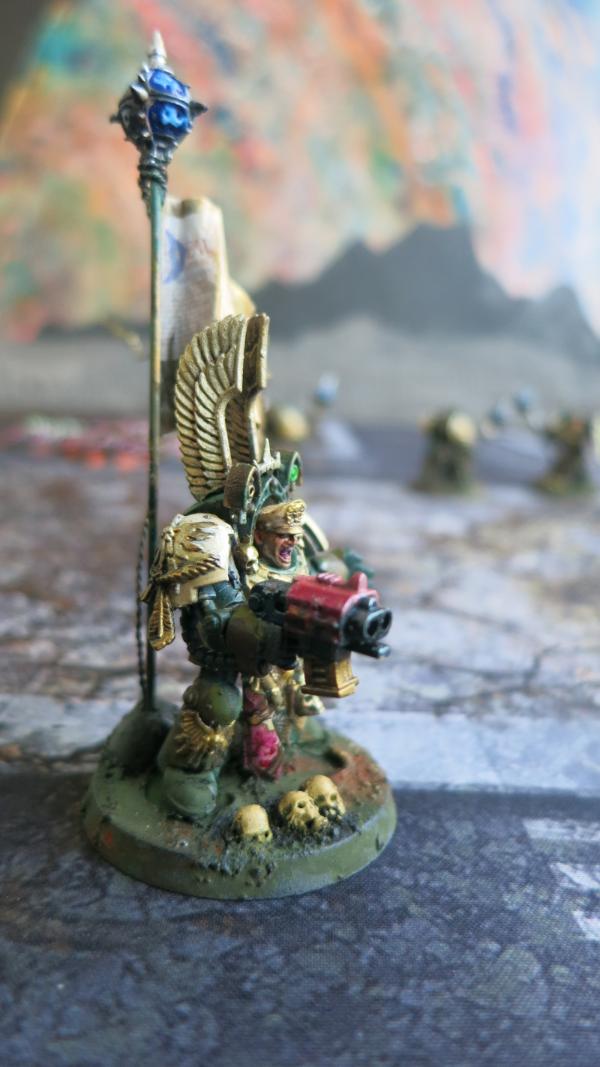
New Deathwing Ancient - Front Right

New Deathwing Ancient – Right Side
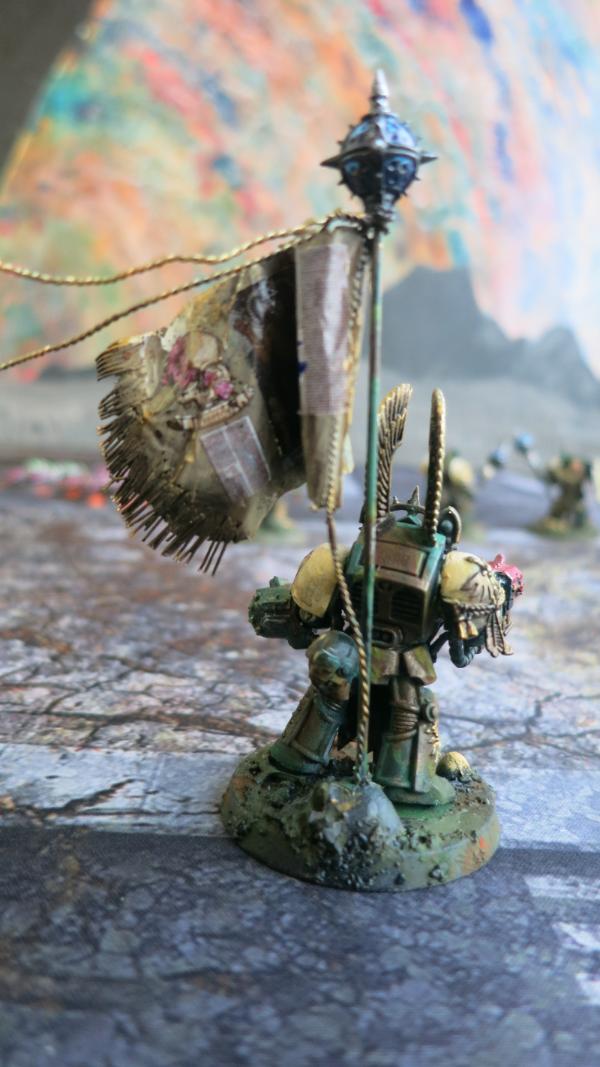
New Deathwing Ancient - Rear
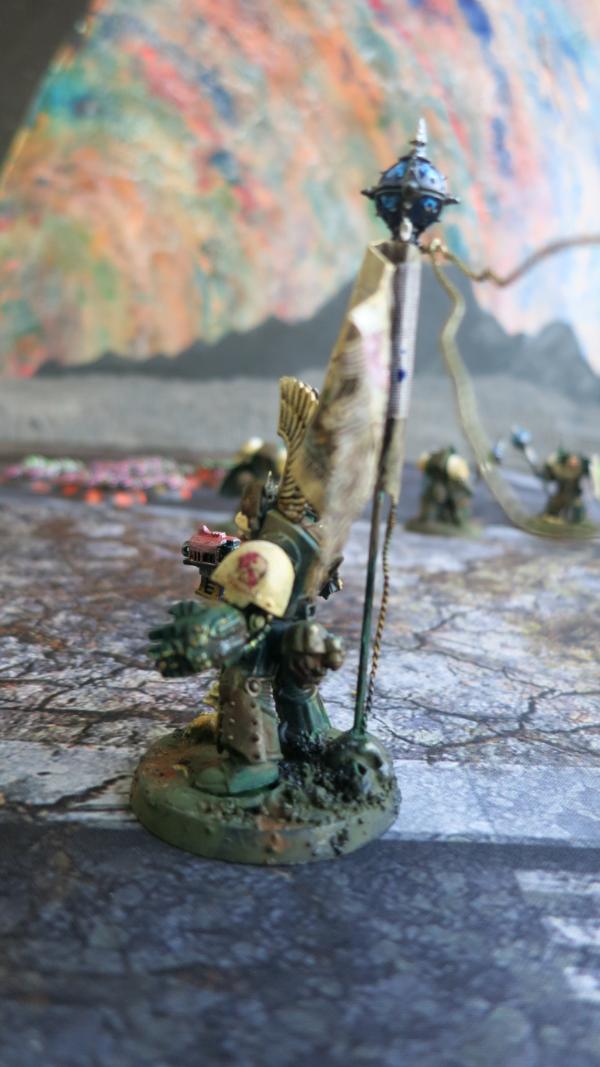
New Deathwing Ancient – Left Side
21898
Post by: Oldmanronald
Deathwing Knight with Recycled Deathwing Ancient Body
I took the body I removed from my Deathwing Ancient and reused it for another Deathwing Knight.
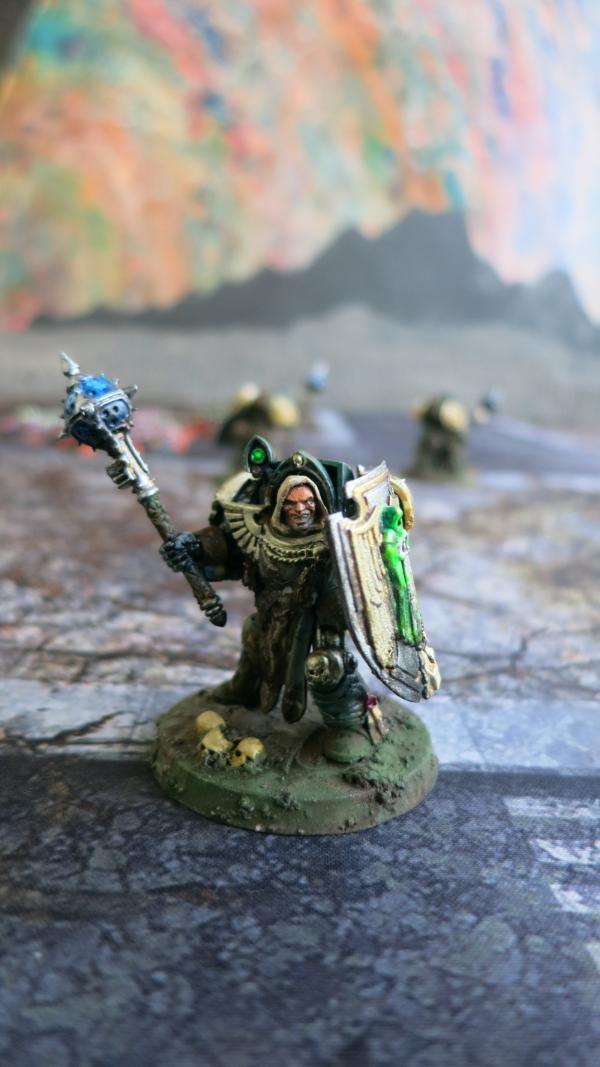
Deathwing Knight with Recycled Deathwing Ancient Body
The hooded head is from Puppetwar in Poland at puppetwar.eu.
I feel a little guilty about Puppetwar. Several months agos I recommended their heads online but noted that the heads shipped from Poland and it took a long time for the heads to be shipped to me in the United States. Then I ordered some more heads from Puppetwar. Puppetwar has changed their shipper and I got the new heads in about a week. In the meantime, I ordered some Necrons from Games Workshop. Games Workshop didn’t ship my models for over a month so it took about six weeks before I got my models. Obviously, I was mistaken. Now if you want your models fast, go with Puppetwar, not Games Workshop.
21898
Post by: Oldmanronald
The Royal Wardens
Right now, I am addicted to Necrons even though I have the new Dark Angels codex, Dark Angels are strong now, and I have many Dark Angel models. Still, I keep working on my Necrons. I am painting a new army with a new color scheme and especially playing around with Turbo-dork paints.
I went to my local Games Workshop store to pick up 10 new Warriors and the manager suggested I pick up Recruit Addition Starter Set instead for 5 dollars more. It includes the 10 Warrior plus a Royal Warden, a Primaris Lieutenant, 5 Assault Intercessors, dice and a little terrain. I built the 10 warriors and experimented with paint job on the new Royal Warden. I used four different Turbo-dork paints on him, pearly gate for the head and Miami Sunset for the pronotum (shoulder pads) which are the same paints on my other Necrons. But I added Multipass and Blue Steel, the same colors that I added to the Silent King. I also used Burnt Sienna to undercoat the Miami Sunset and the Multipass. Below is the new Royal Warden next to the old Royal Warden.
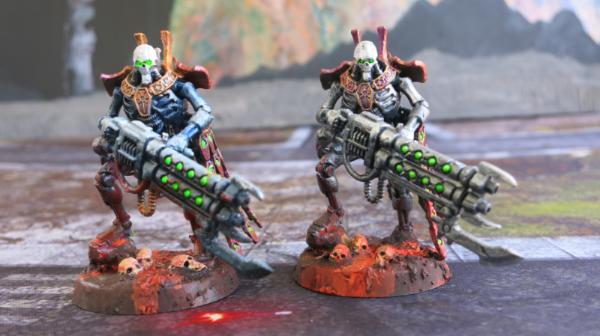
Royal Wardens – Front
The new Royal Warden is on the left, the old on the right. The results are similar. The left has a little more blue. The Multipass amulet around the neck of the left Warden’s head is almost the same color as the metallic gold over the Miami Sunset of the amulet on the right. Generally, I like the new Royal Warden on the left better more then I like the old Royal Warden on the right. The exception are the green eyes that are better on the right. Still the difference are minor.
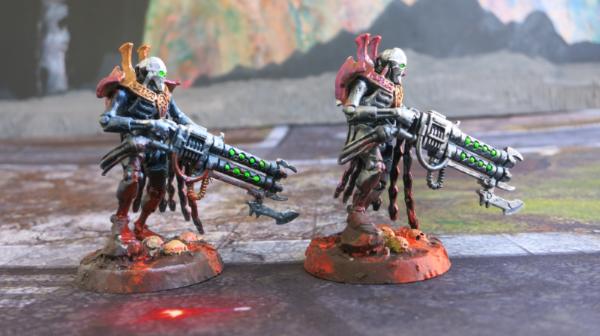
Royal Wardens – Right Side
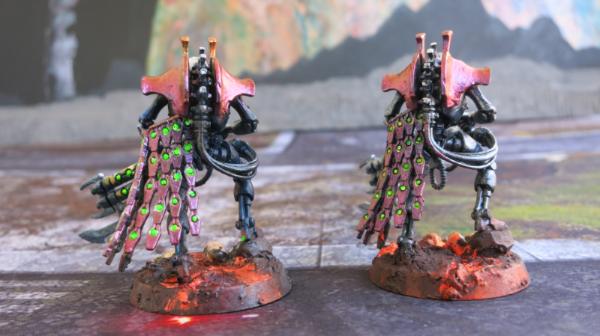
Royal Warden – Rear
The undercoat of Burnt Sienna seemed to make little difference although the Miami Sunset on the left seems a little brighter and smoother than that on the right. I like the technique but I suspect the results would be better on my bigger models. It can save me a little money since I don’t need as many layers of the Turbo-dork Miami Sunset and Multipass if they are over a layer of Burnt Sienna. Burnt Sienna is cheap and plentiful while Turbo-dork is expensive and difficult to find.
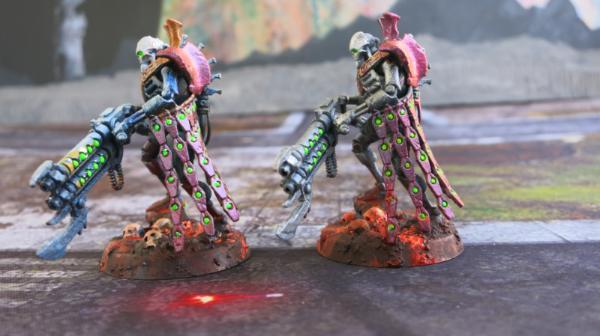
Royal Wardens – Left Side
21898
Post by: Oldmanronald
The Royal Warden
Here are some more pictures of my new Royal Warden. In the first picture, he is on the left side of the old Royal Warden.
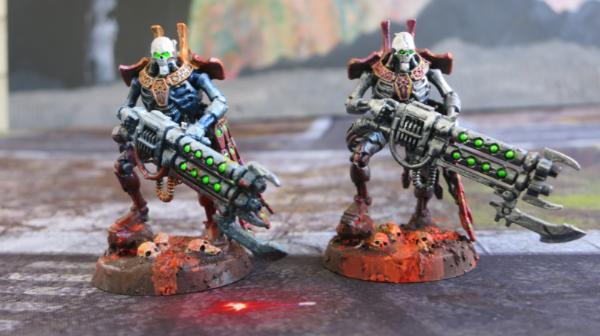
Royal Wardens
The Royal Warden is one of those Necron headquarters with high zenergy to core units, especially warrior blobs. Still, I suspect that two royal wardens are overkill.
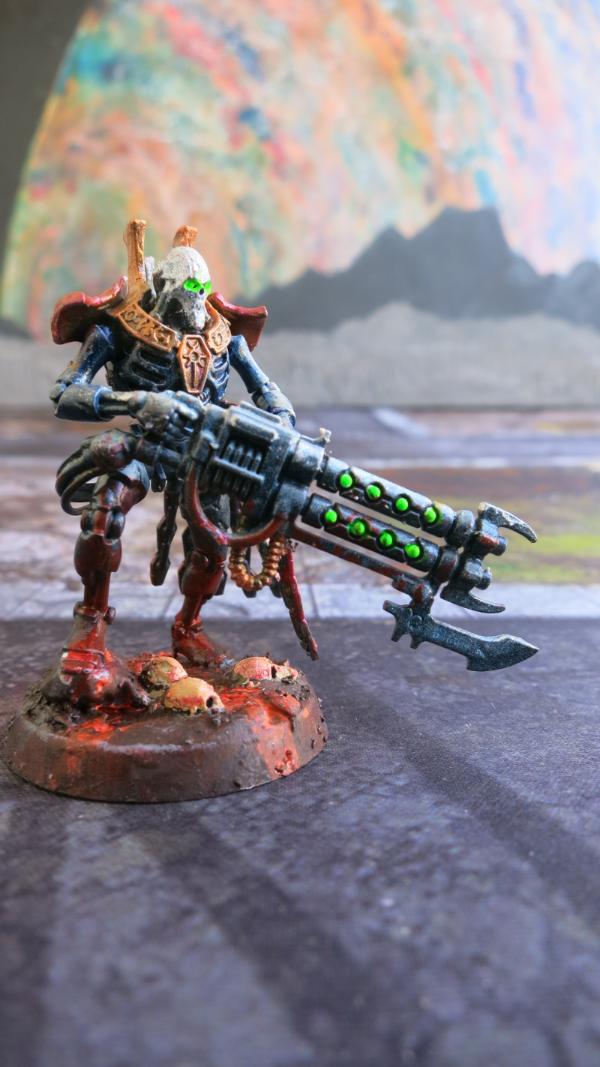
Royal Warden - Front
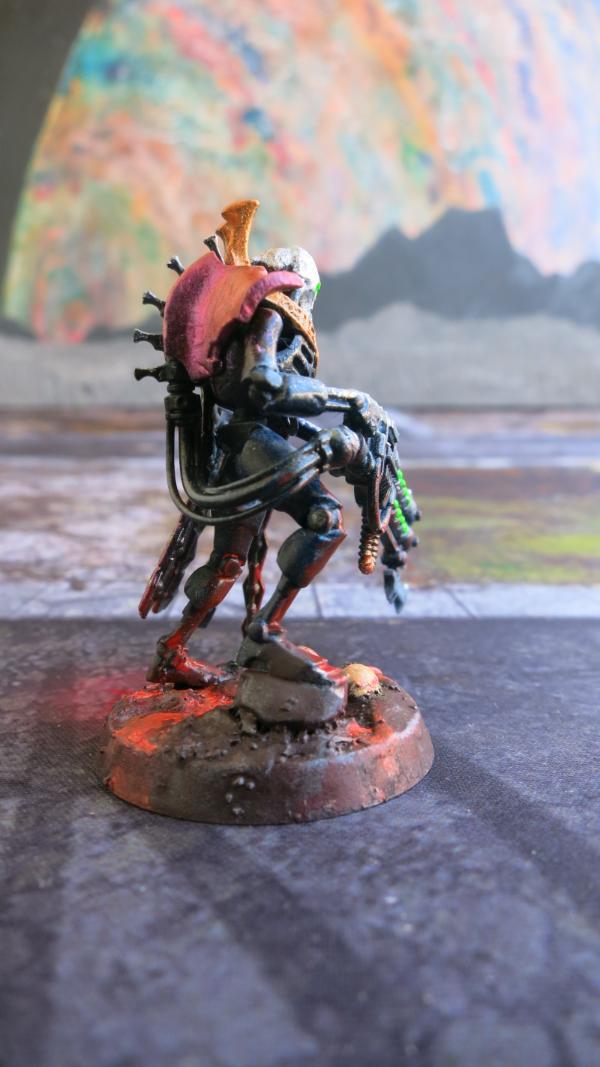
Royal Warden – Right
I also played around with the colors on the base. The original bases had fluorescent orange over white to create the effect of lava. In these new bases, in addition to the flourescent orange over white, I brushed a high flow Naphtha Red Light over parts of the base and on the lower legs of the model to represent reflected OSL (object source lighting) from the glowing lava. This made the lava appear more realistic.

Royal Warden - Rear
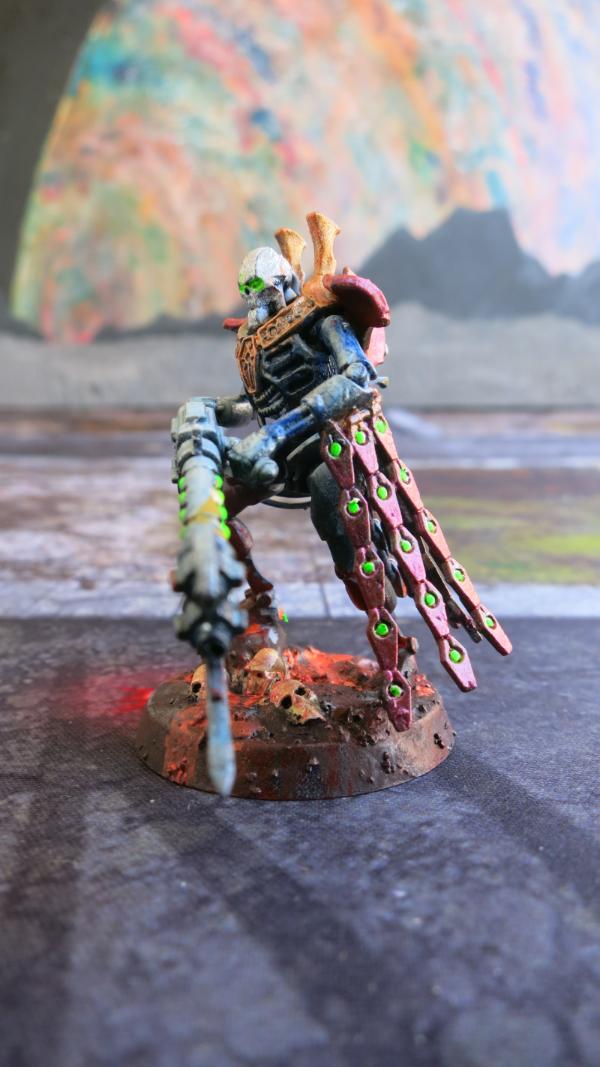
Royal Warden – Left
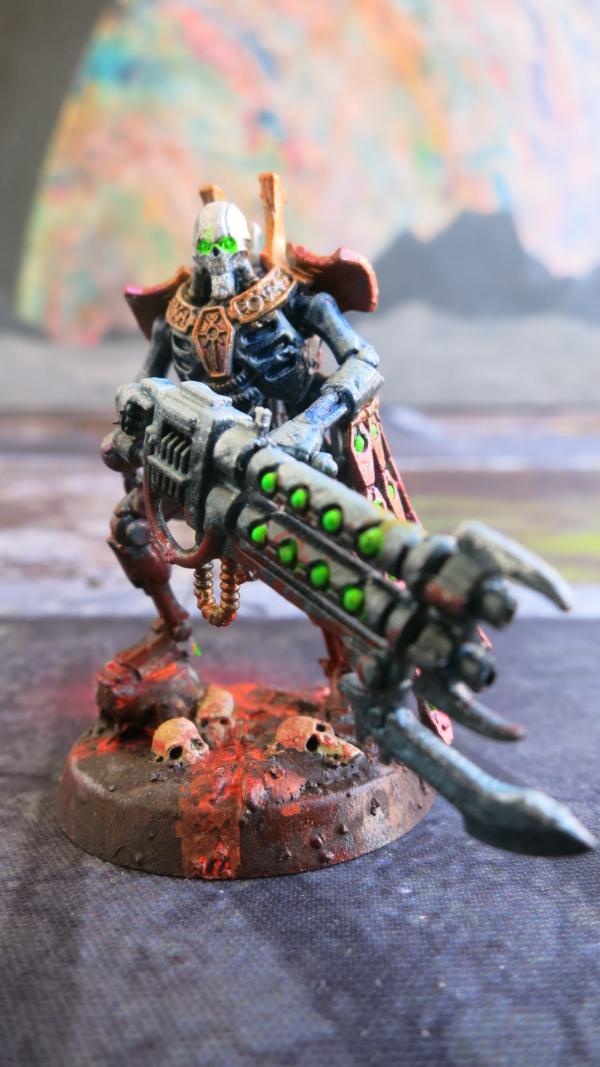
Royal Warden – Front
21898
Post by: Oldmanronald
Lynchguard with Hyperphase Sword and Dispersion Shield
About six weeks after I ordered them from Games Workshop, my Lynchguard models arrived. I finished the first five and took pictures of four of them. I built the Lynchguard per the Games Workshop instructions except that I used the heads for the Triarch Praetorians (the models could be built either as Praetorians or as Lynchguard) and I cut off the tabs off the Dispersion Shields.
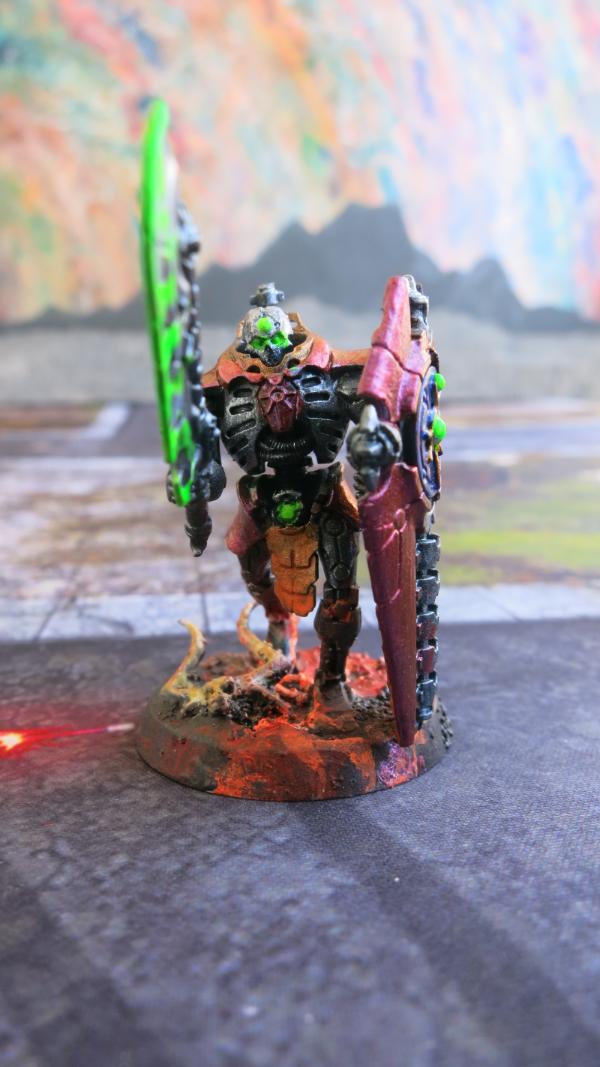
Lynchguard - Front
I used the same color scheme as my second Royal Warden except that I added a Turbo-dork Cool Ranch blue to the center on the Dispersion Shield.
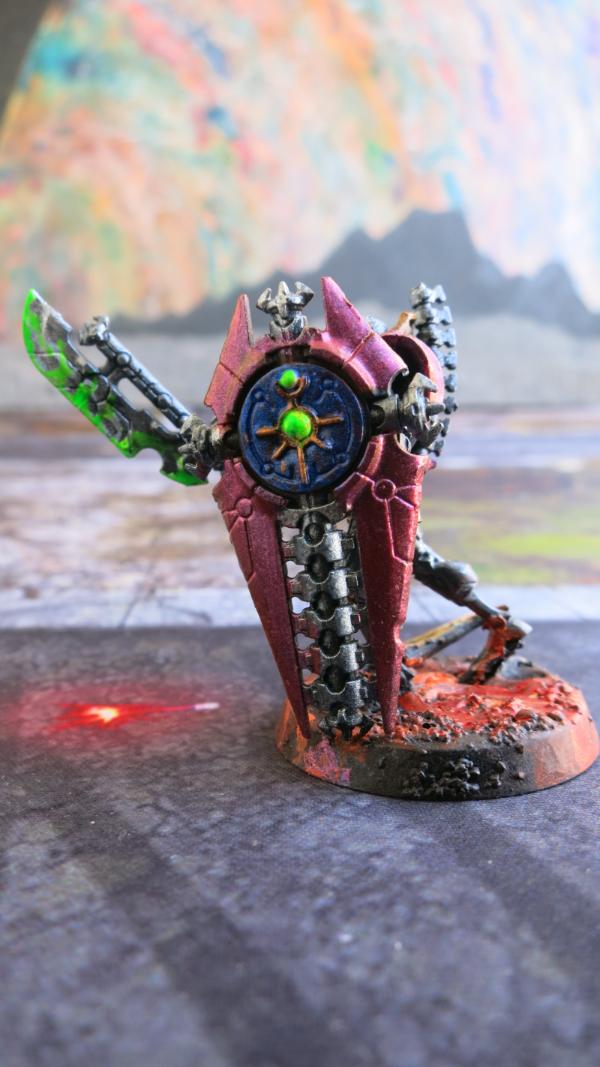
Lynchguard – Left
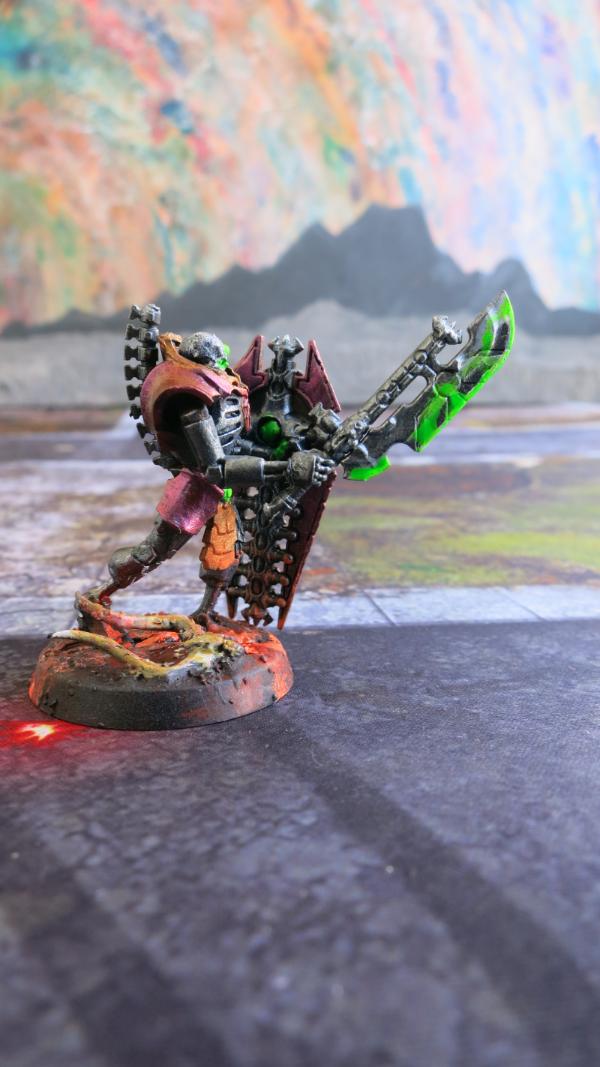
Lynchguard – Right
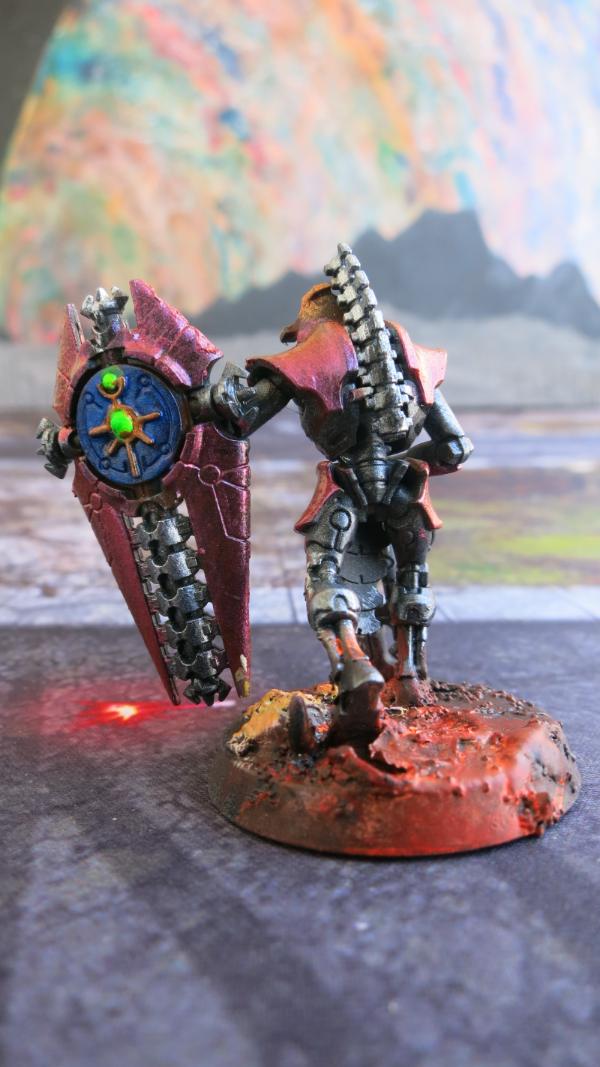
Lynchguard - Rear
21898
Post by: Oldmanronald
Lynchguard with Hyperphase Sword and Dispersion Shield
One out of the five Lynchguard is modeled holding the Hyperphase sword upside down.
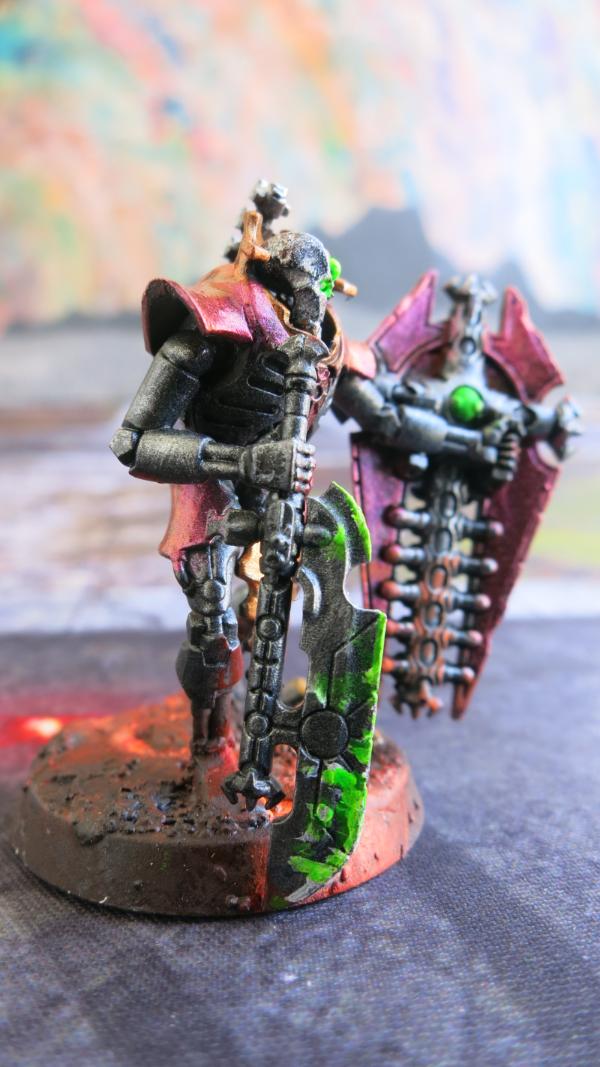
Lynchguard – Right Front
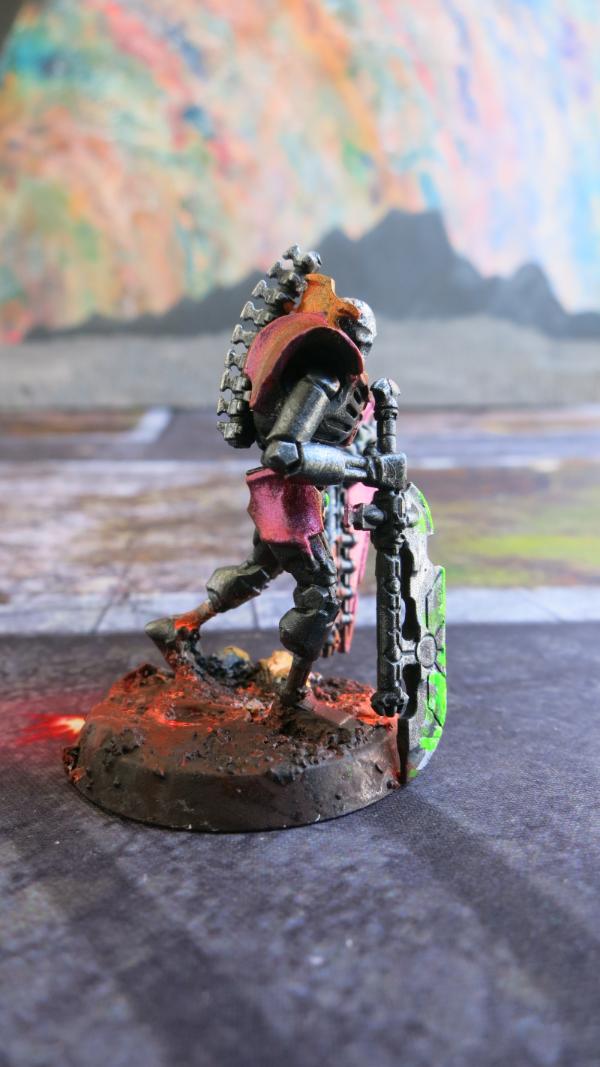
Lynchguard – Right Side
Lynchguard – Rear
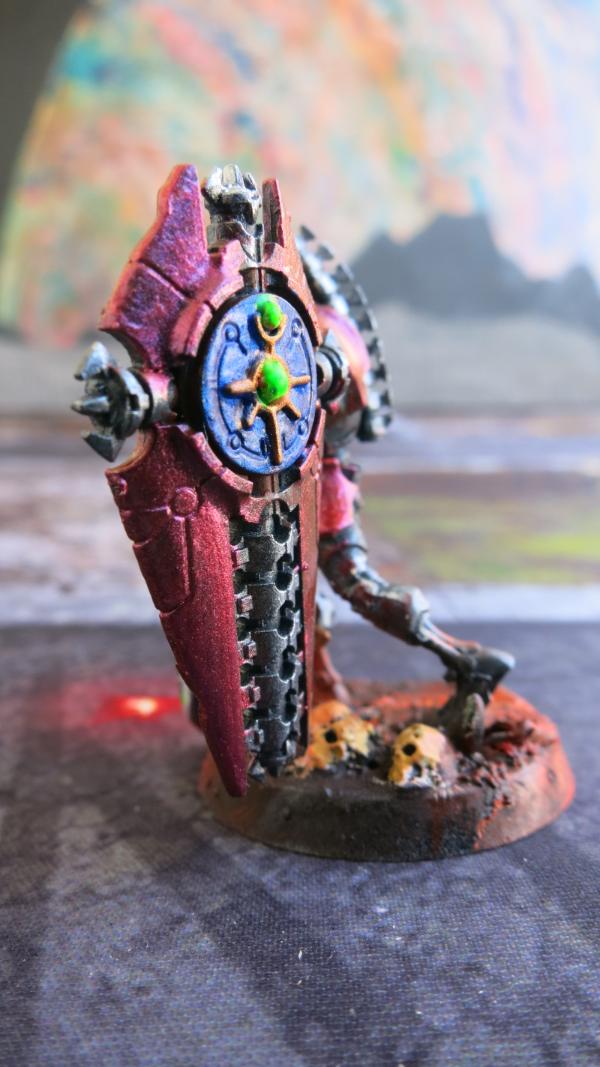
Lynchguard – Left Side
21898
Post by: Oldmanronald
Ankra the Colossus
Ankra the Colossus is an Overlord made for kill team. In comparing him to the picture of the overlord in the Necron codex, it appears that Ankra is a mirror image of the standard Necron Overlord. This was a fun model to paint, especially the OSL (object source lighting) from the Resurrection Orb.
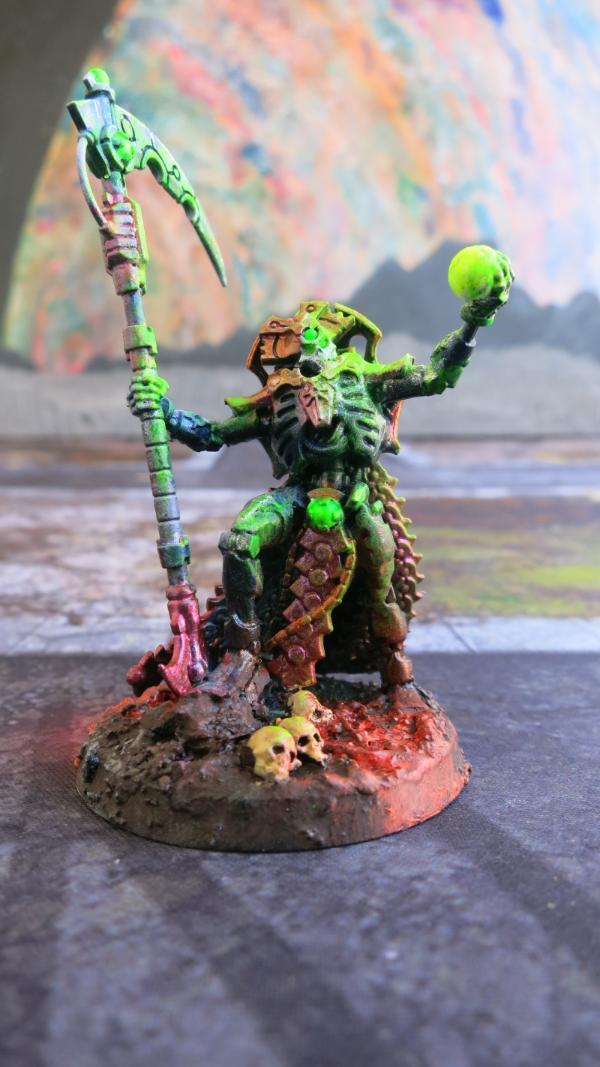
Ankra the Colossus - Front
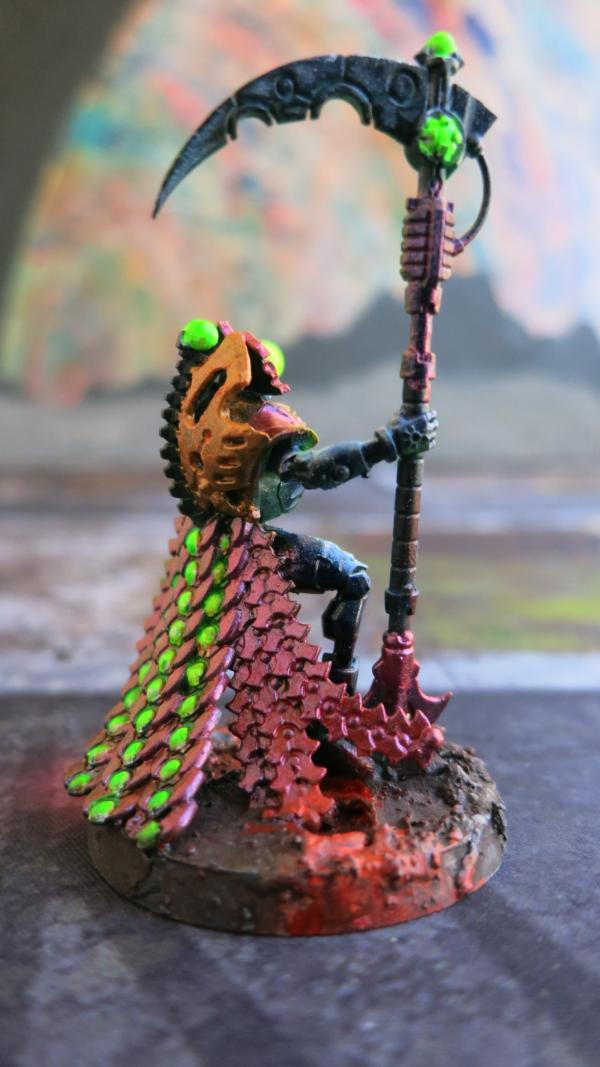
Ankra the Colossus – Right
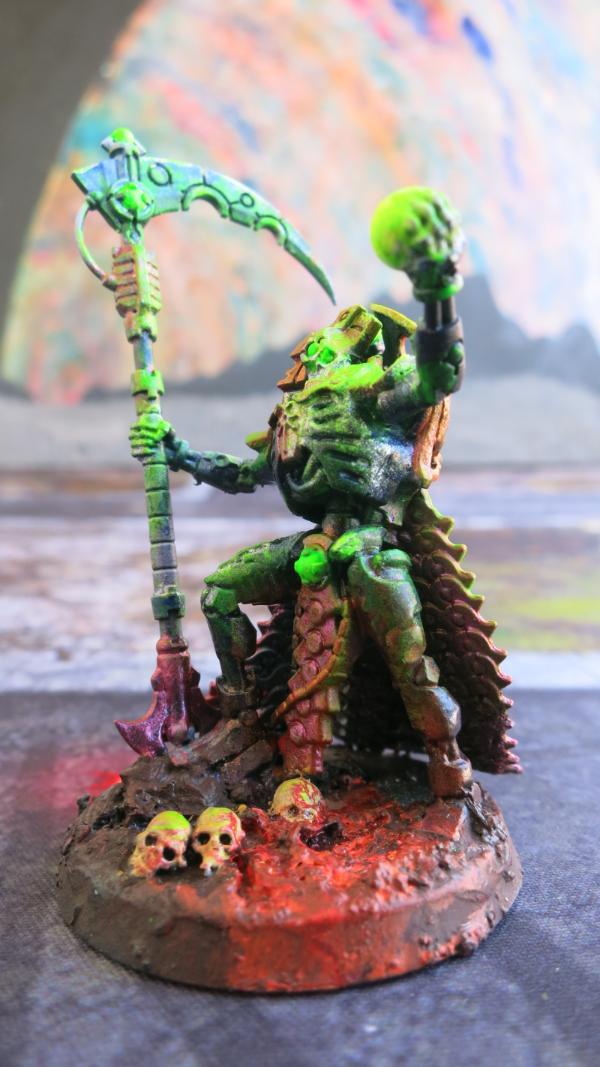
Ankra the Colossus – Left
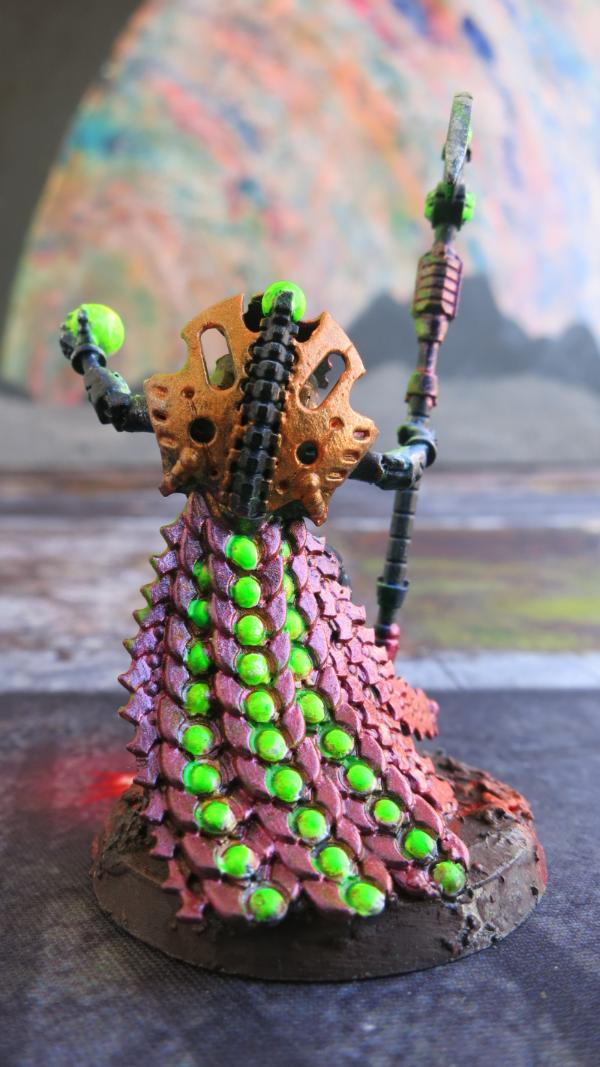
Ankra the Colossus – Rear
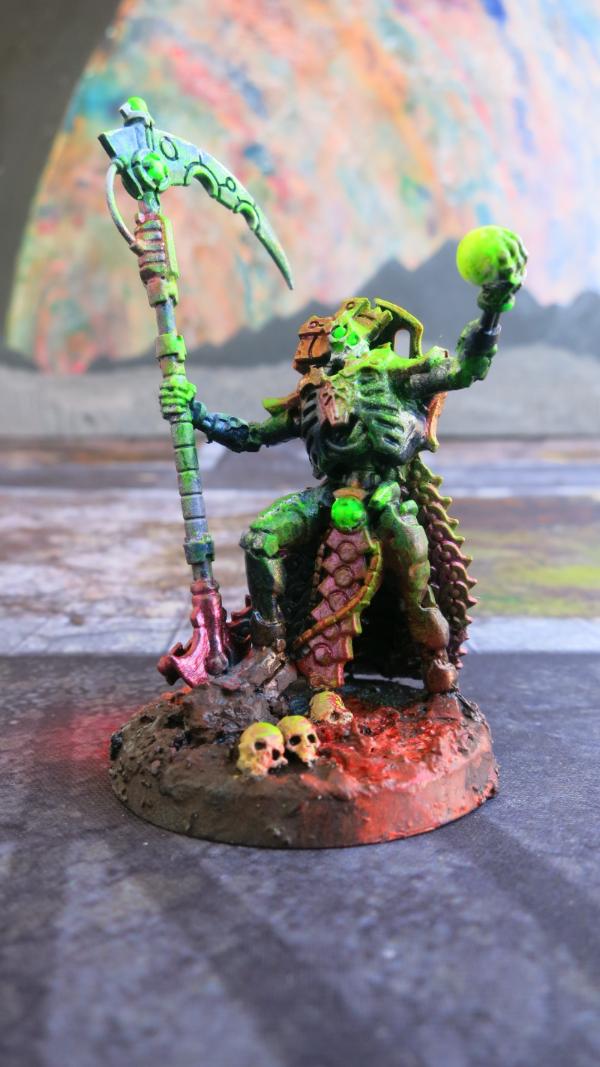
Ankra the Colossus – Left Front
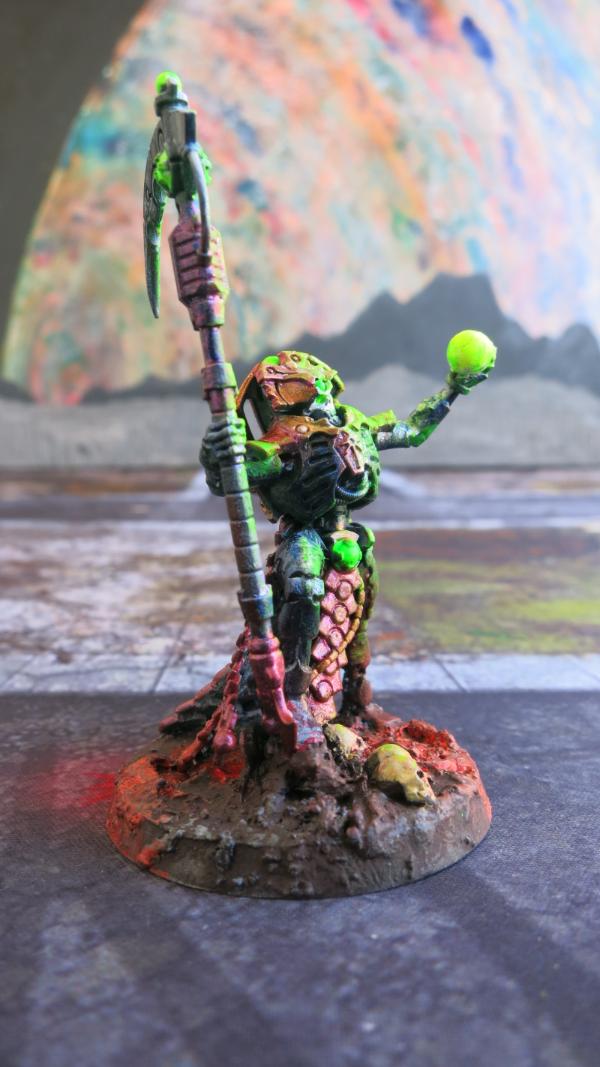
Ankra the Colossus – Right Front
21898
Post by: Oldmanronald
Ankra the Colossus Part 2
These are more pictures of Ankra the Colossus taken from a game player’s view.
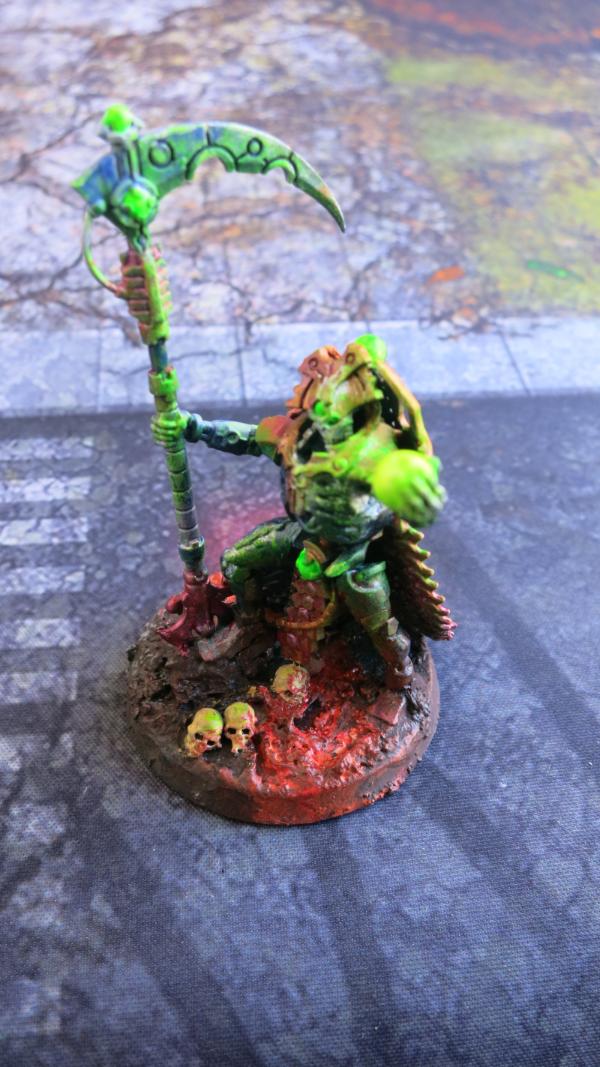
Ankra the Colossus – Top Front
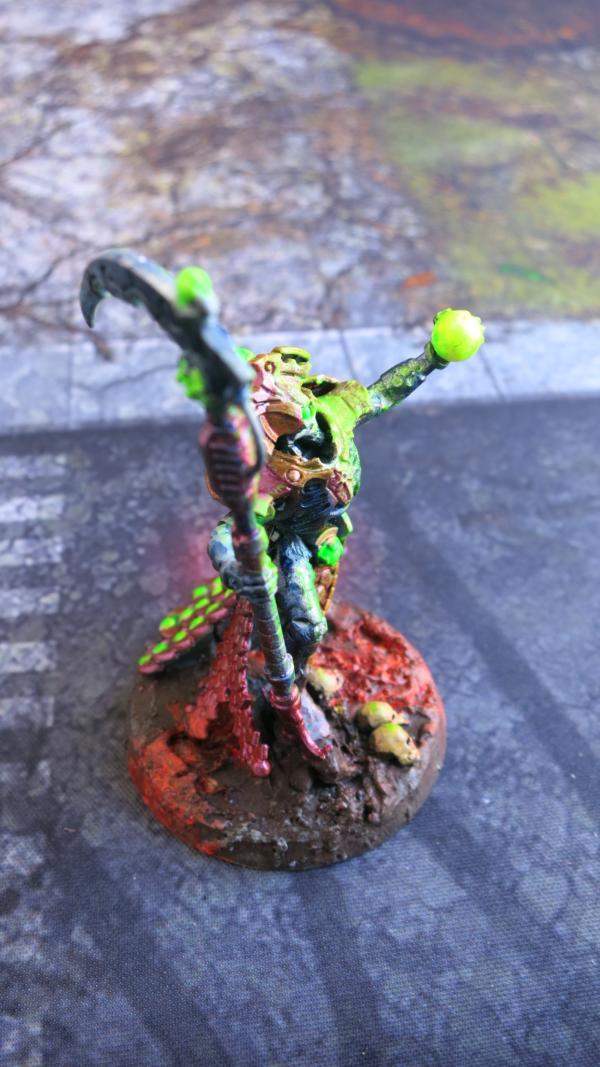
Ankra the Colossus – Top Right
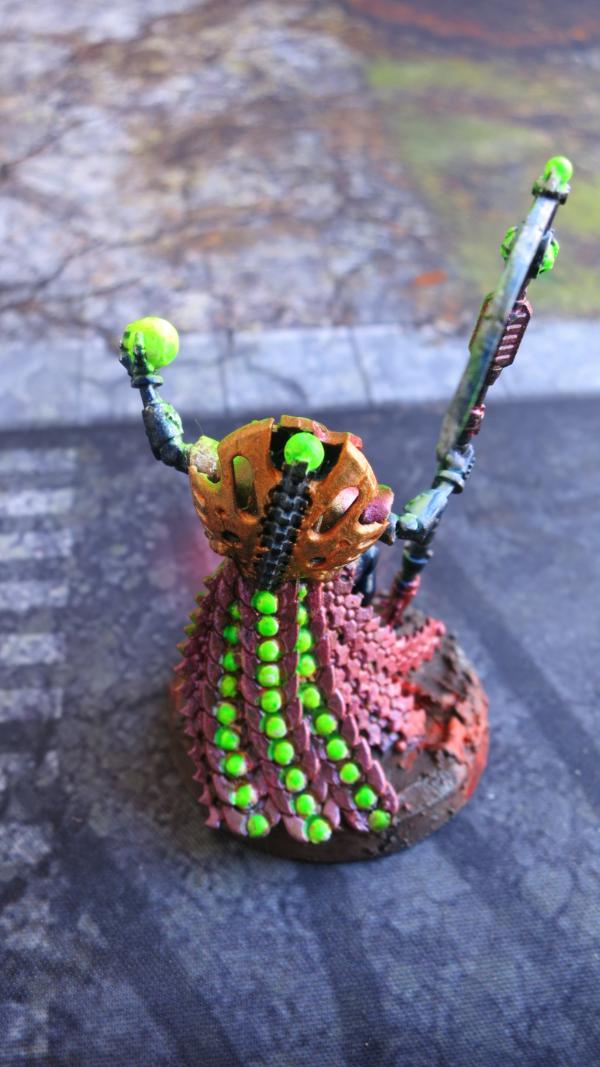
Ankra the Colossus – Top Rear
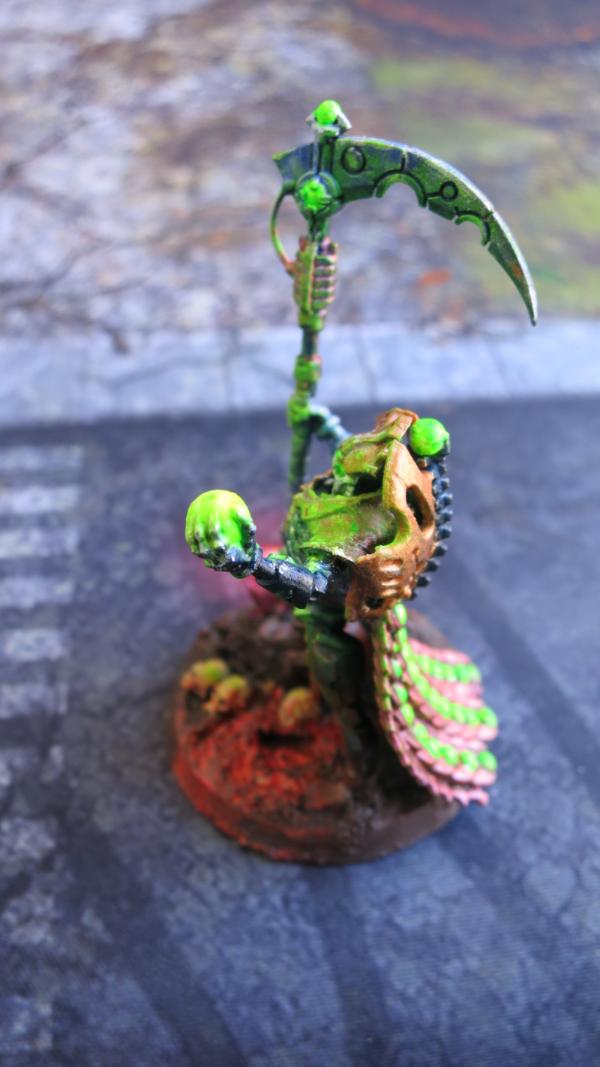
Ankra the Colossus – Top Left
|
|