@ Theophony: Yes they'll have tails, little stubby ones that extend about 3 or 4 vertebrae from back of the body.
Similar to a real leach really, only these canoptek ones have legs, I think they just look creepier that way .
Sorry it's been so long since I posted anything, but I have been working on several new projects,
one of which is a new fantasy Terrain piece, the Dwarf Statue.
I've almost finished work on the master sculpt (see pics below) which will then be cast in resin,
and hopefully available to buy later this month.
The Statue will come with a selection of options, including a choice of weapon, Battleaxe or Warhammer.
Also included are a pair of armored shoulder pads and helmet mask.
These options can be mixed and matched, and so far I've discovered 12 different ways to assemble the Statue.
I still have a few more details to add to the master before I start molding and casting, and will bring you an update as soon as I can .
If anyone has any questions or feed back on this project please comment below.
That looks really, really good.
The scales and the platted beard are just awesome.
You've done really well sculpting the lines on the armour plates so straight, parallel and neatly.
Faces are hard and you've certainly pulled a off a good broad gnarly look to it.
It would be good to add the same angular knotwork on the battleaxe and warhammer
@ OneManNoodles: Thank you, and yes the Hammer and Axe will both be lavished with detail,
I'm still finalizing the design but it will incorporate more of the dwarf style knot design.
@ Dr H: I found the best way to make a good looking platted beard was to actually make a platted beard,
so I rolled out three strips of putty and platted each one together, then repeated the process until I had enough pieces,
very time consuming but worth the effort .
This looks awesome! Reminds me of the huge Dwarf Statues to each side of the entrance or Erabor in the Hobbit film! The beard is definitly my favourite!
@ Klaus, not Santa: Thank you, the 12 different options are only small differences,
but it should be enough choice to let people build their statue, and not have it look like everyone else's.
A little individualism goes a long way .
@ MagosBiff90: I actually saw the Hobbit for the first time recently while working on this project,
and it's definitively helped my inspiration.
@ Red Harvest: yes your absolutely right, should of included a scale pic to begin with,
but I'll make sure to include one in the next update.
In the meantime here's the statues approximate height: 190mm (7 1/2 Inch's)
A quick update on my Dwarf Statue sculpt.
I've almost finished the axe and hammer, and have also added some more detail to the Armour.
Here are a few pics including two Armour variants, and a scale pic with a warhammer plastic Dwarf (these things are so tiny,about half the height of a space marine).
With the next update I hope to have the sculpt finished, and start work on the molding and casting process,
which I will be covering in detail, showing how I make my molds, and cast the final version in resin (for all those who have been asking for a tutorial )
These look really cool. I especially like the masked helm and pauldron versions. I think they'll be AMAZING on the table. The modular break at the top of the kilt throws me for some reason. It's too abrupt or out of line with the section above or something. It's like it's a different scale from the kilt down (like the abdomen and torso should be scaled up just a hair to match).
@ mars2024: Your right, the join between the torso and the legs doesn't line up,
this is due to a design change I made half way through the sculpt.
I've corrected that now, and the two halfs line up neatly.
But thank you for the feedback, its always useful to have a different perspective on the deisgn,
helps me to fix things I might of missed .
hk1x1 wrote: @ mars2024: Your right, the join between the torso and the legs doesn't line up,
this is due to a design change I made half way through the sculpt.
I've corrected that now, and the two halfs line up neatly.
But thank you for the feedback, its always useful to have a different perspective on the deisgn,
helps me to fix things I might of missed .
Here are the first two complete resin test casts of my Dwarf Statue, Their not perfect, but these are the 5th and 6th versions
and are the best results so far.
I've got a new piece of equipment on the way, which should help me improve the quality of the castings.
In the meantime I'll be painting up these test pieces, trying out different techniques,
I'll post the results here when their done.
Nice work, really impressive.
Few tips to help with the bubbles:
Try using a bit of talcum powder just puffed in to the finer bits before you put the sides of the molds together.
Also try "painting" in a bit of resin, with a lollipop stick or whatever, into the parts where air will collect before putting the sides together and pouring in the rest of the resin. I've not tried it myself and it sounds a bit messy for a 2 part mold.
@ OneManNoodles: Thank you, and thanks for the tips as well, their always welcome .
I did use talcum powder a few times, but it got clogged up on one occasion and ruined the cast,
so I've decided to work without it. As for painting in the resin, it does work but like you said it can be a bit tricky.
The best technique I've found for getting rid of bubbles is to agitate (vibrate) the resin once it's in the mold,
by gently shaking or tapping the mold, this causes the bubbles to dissipate. (but also makes your arms ache )
I'm planning on using a vibrating table, which can keep the mold moving as I pour the resin,
this should hopefully provide a much more effective result.
Nice looking statues turned out looking spot on, think I might invest in a couple of theses for a display of my dwarfs
You could just carve the bubbles in the resin to look like crumbling stone damage, I have found using a make up brush (ask the misses first ) gently dip it in the talc and brush the mould.
This seems to prevent the clumping of talc but still leaves enough dusting for removal.
Yeah, LDD got there before me. I use a large soft brush to talc my moulds. You don't want any loose talc in the mould. I brush it on then knock off any excess and that seems to always work well for me.
It's always nice when presents arrive at your doorstep, especially when their unexpected ones.
A few months ago I was a winner on this online competition, (which I'd completely forgotten about)
and today I received my prize, an almost life size resin Servo Skull.
I've already got plans to build it some little robotic arms, add some extra detail here and there,
and fit in a battery pack with some LED's to light up the eye and sensors,
might even turn it into an Adeptus Mechanicus Servo Skull.
@ Warboss_Waaazag: Yeah I was wondering why they designed it like that,
I was thinking of actually Carving the eye socket out properly, and sculpting in a more realistic one.
Very cool, the design is based on the old 40k crux / mechanicus skull based on Mr Blanch's small designs in the second ed rulebooks.
Congratulations, dare we ask what you had to do to win such a thing?
Personally, depending on size and weight I'd be tempted to make it fly, or mount it on a hex or quadrupedal set up.
Many are the deformed followers of the corpse god emperor , at least it might explain the eye. though I hint it needs to push a broom and be the larger brother for my league of extraordinary servo-skull janitors. never did I expect to take on a janitorial job just months after building them irony, thy name is theo.
Finished painting up one of the resin Dwarf statue's,
It could need a little more weathering maybe some moss here or there, but for now it'll do.
I've also taken this chance to show you all the small grass board and rock scenery I've been working on.
It's mainly for display purposes, so I can take photos of my finished projects against a much more interesting background,
which will eventually include a variety of different backdrops, Mountains, Forests etc.
Im currently rearangeing my workspace, trying to find places for all my projects (most of them unfinished)
but I'll start painting the next statue asap, pics to follow shortly .
So I've spent the weekend casting up the first batch of Dwarf Statue's,
and while I was waiting for the resin to cure I started work on a piece of 40k background terrain,
Something to photograph my 40k project's against rather than a plain white background.
Once it's finished I'll post up the final piece along with a few WIP shots,
but for now here's a little WIP teaser of a large metal door .
I recently finished painting some of the new Resin Dwarf Statue's, which you can see below in my little Mine Terrain setup.
I've also been building a 40k Background Display piece,
this will give me something more interesting to photograph my projects against rather than a plain white background.
It's given me a chance to use up a lot of my old plaster and Resin casts, which I stumbled across (fell over ) during a recent tidy up.
Here's a pic below of the background,
plus another showing how it all comes apart and folds together for easy storage (which is always a problem)
In case anyone's interested, I'll post some WIP pics in my next update .
These are fricking awesome!
Yes, I DEMAND WIP images Really nice work.
That bronze door is absolutley stunning - will you add some green rust?
Cheers
Klaus
@ Red Harvest: Yeah a lot of my Terrain does end up looking all samey and grey,
I think I need to experiment with a few painting techniques, so I can change things up a bit,
paintings never been my strong point .
@ Klaus, not Santa: I did have a go at weathering and rusting up the door, but it didn't work out the first time round so I painted over it.
I might give it another go soon, as it does need aging and toning down a bit.
@ OneManNoodles: lol, I do seem to have this thing about building massive projects, I don't know why,
even when they start of as a simple idea I do have the tendency to over complicate it.
Which is probably one of the reasons I find myself surrounded by unfinished projects .
Thank you everyone for the comments, and keep them coming as they really do help my motivation .
As requested here are the WIP pics of my 40k background wall, starting with the dry fit mock up.
Finally my first Resin Terrain kit, the Ancient Dwarf Statue is now available on eBay,
and not only has it taken me ages to get finished, it's also been quite a steep learning curve.
But I have learnt a massive amount, which will come in useful on my next project, starting monday.
I wont go in to too much detail about it yet, just to say that it's another Terrain piece, and like the Dwarf it will be a fantasy based statue,
only this one will be very different .
I'll post an update when the Master Sculpts finished,
for now here's a few more pic's of the Resin Dwarfs (I promise no more dwarfs after this )
and a link to my eBay page, as I know a few of you wanted to see the final product.
I think I'll be hitting you up once I get back to my bloodbowl dwarf team. I may need a giant barrel of bugmans best beer to go where you have the hammer and axe. Possibly have a spigot on it where I can do a water effect/beer pouring out of it.
And @ Theophony: That sounds like a fantastic idea with the barrel and the beer pouring out,
It's good to know there's still plenty of original ideas out there .
With the new Warhammer wood elves release coming up, I decided to base my next resin Terrain kit around a forest elf theme.
The result is 2 separate kits (soon to be 3), one Is the "Guardian of the Forest",
the other a Woodland Spirit (still needs a decent name).
The master Sculpt for the Guardian is just about finished,
I only have a few more details to add to the other one, so Here are some WIP pics of the sculpt,
and I'll post up the finished version as soon as it's ready.
I hope to start making the molds for the kits later this week, and begin casting sometime next week.
I'll post updates as I go.
@ Camkierhi: Yeah, I'll be painting them basically like trees, so lots of browns and greens.
The hooded ones shield is like a standing stone, so it will receive a weathered stone effect.
As I've just finished pouring the molds for my wood elves terrain, I thought I'd throw together a very quick and simple guide,
showing the mold making process. This is a very basic example, but it gives you an idea.
Also here's a pic of the molds for for my Wood Elves terrain kit.
There's 12 molds, with a total of 32 individual parts.
I'll post another guide once I've opened up the molds, and started casting the resin.
I'm no expert on mold making and casting, but if anyone has any questions I'll do my best to answer them .
@ OneManNoodles: Thanks mate, and yes foamboard and tape, plus a small piece of MDF to base the master sculpt on.
I find foamboard works really well, It's sturdy, holds it shape and just peels of the silicone mold once your finished, then I can use it again.
A quick update: The silicone has now set, and this morning I removed all the molds from their foamboard casing.
Their now prepped and ready for the resin (when it arrives) .
Really pleased how they've all come out, especially the large tree stump.
Here's a pic of the finished one's, and the tree stump sculpt with it's mold.
I've finished casting the Resin pieces for my Wood Elves Terrain, just have a little bit bit more painting to do before their done,
which will hopefully be tomorrow.
I've also done a little more work on my 40K background Display Piece, by adding a ruined Courtyard and road. (pics below)
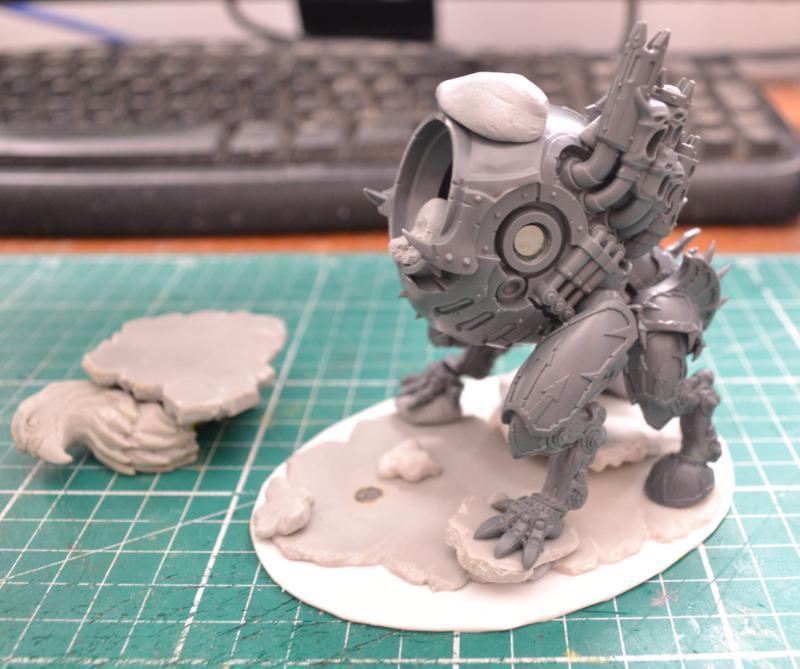
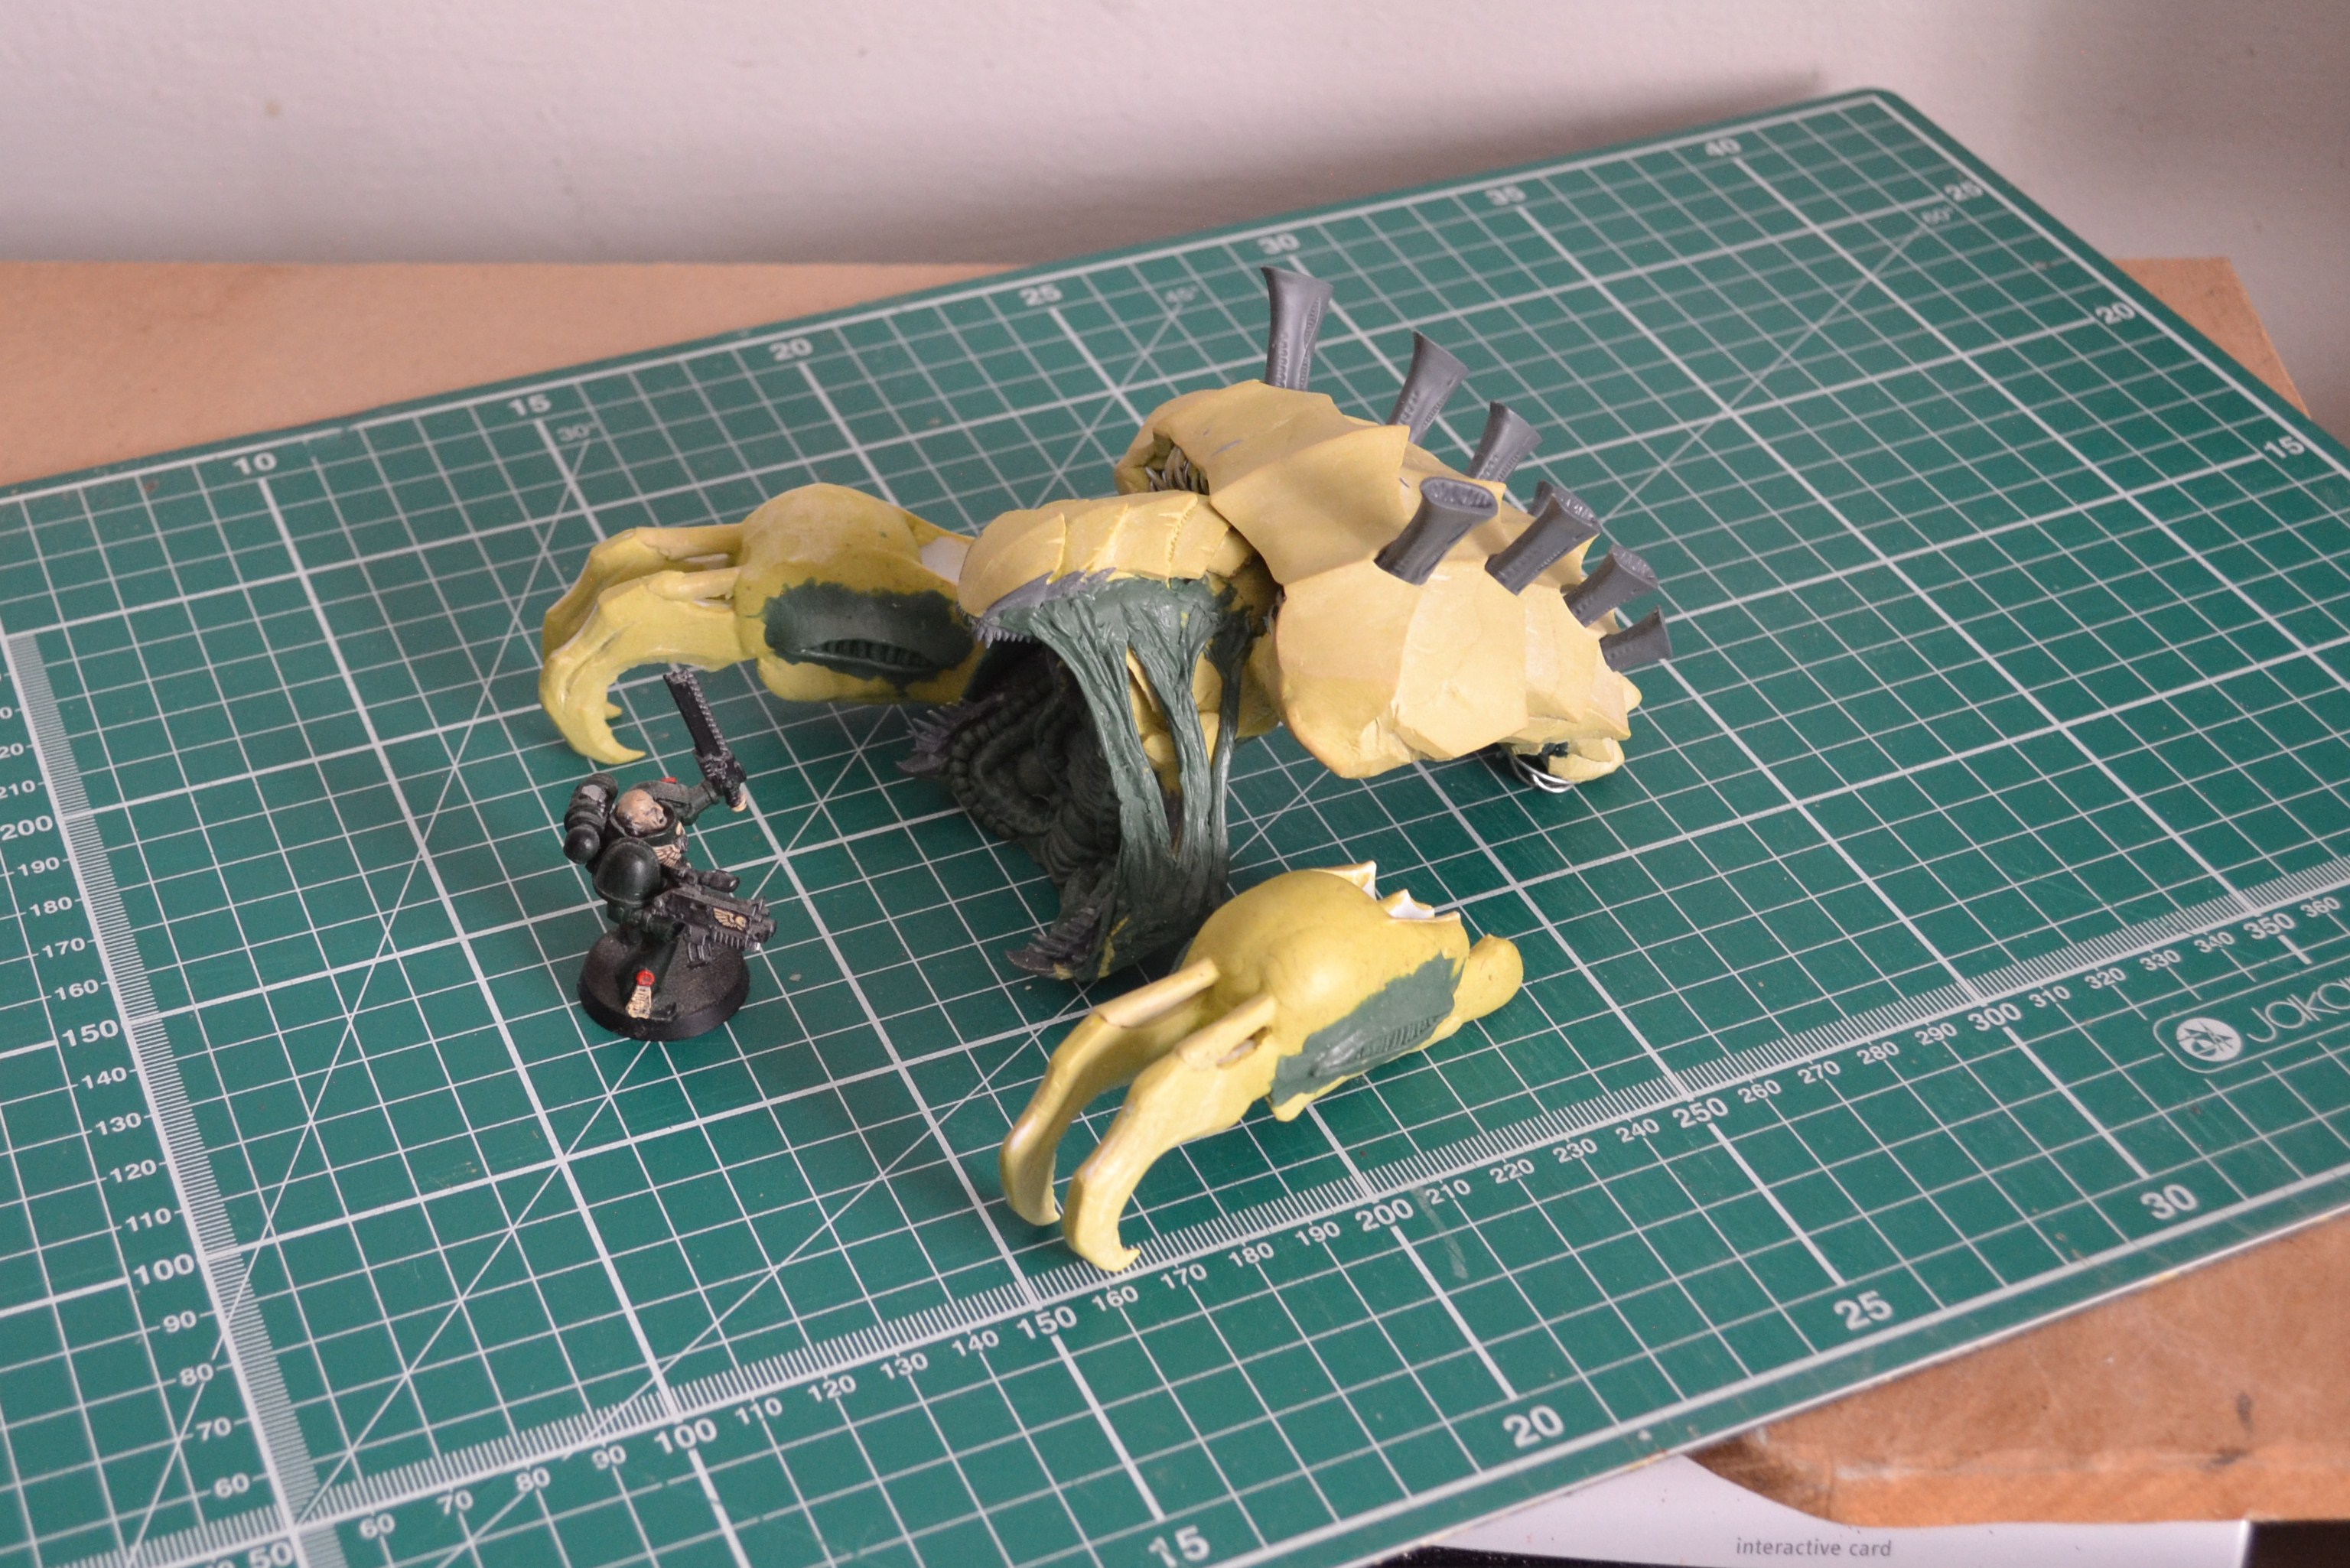
Time for a new project, well newish, as this is something I've wanted to do since the latest Tyranid release.
What I'm planning to do is build my own Tyranid Haruspex (the one with the really big mouth)
using a Tyrannofex/Tervigon kit as the base, as well as some bits and pieces I salvaged from eBay, and probably large amounts of putty and green stuff.
I already have an idea in my head, but it may take me a while to work out how I'm going to use all the piece's,
which undoubtedly means lots of experimenting and dry fitting.
As soon as I have something worth showing I'll post it up here,
for now though here's what I have to work with, plus a pic of the standard Haruspex.
@ Cam: Thank you, I might take you up on that offer at some point .
For now though I want to practice my sculpting, and build most of the Haruspex from scratch.
Haruspex Update:
So I've started working on the head first, as this will give me something to scale the rest of the body to.
I used one of the Tyrannofex/Tervigon heads to create the upper jaw, and its tail section has become the throat of the Haruspex.
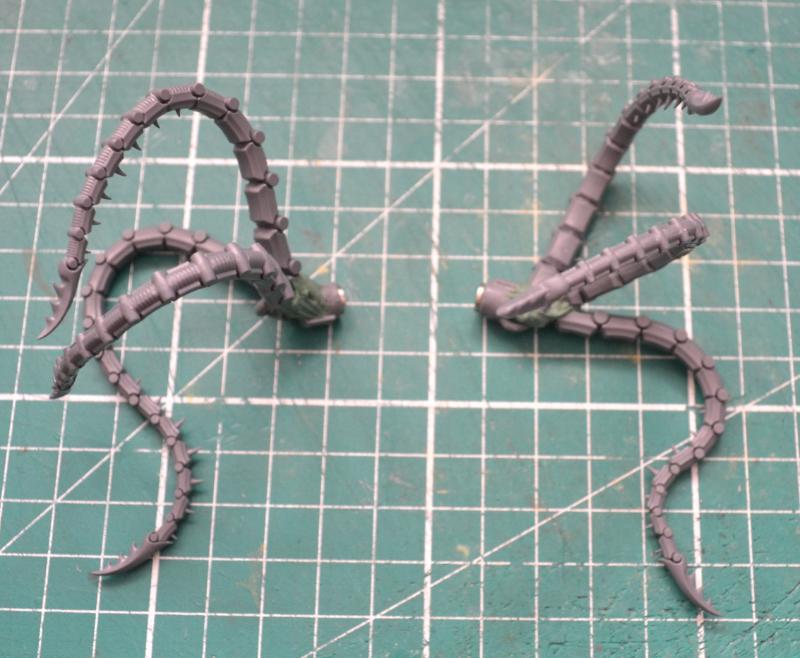
Like the GW model I also want my creature to have Claws, but I want the claws to look as terrifying as the gaping maw on the Haruspex,
so apart from a few plastic pieces I'm gong to sculpt most of the claws from scratch,
the plastic card shapes you see below are the starting point.
I plan to spend the rest of the weekend working on this project,
so I'll hopefully have something more to show you soon .
Made a little more progress on the Haruspex this weekend, mainly just bulking out the shape of the claws,
and starting on the lower rib cage section of the torso.
As you can see from the scale pic below with the very worried looking Space Marine,
these claws are huge, and that's exactly what I wanted.
The back ground of the Haruspex details how it destroys everything in it's path, buildings, tanks, everything,
which it then crushes and consumes.
I think a creature like that needs to be a lot bigger and more imposing than the standard GW model,
hence the reason for the giant claws.
The body too will need to be scaled up, in order to give it the muscle weight and strength to move those hulking claws.
Plus it needs a stomach big enough to hold and digest all it consumes.
I've made a small start towards building the body, using the Tyrannofex/Tervigon rib sections.
I cut off the extra back detail and built a frame to widen the two half's, then built up layers of 1mm plastic card to form the base shape of the lower rib cage section,
which I'll sculpt the ribs too, this will then attach to the existing ribs and lead into the neck piece.
I can´t really comment in a helpful way as I have almost zip know how about bugs... but I will comment later on when more is seen about the general aesthetics...
Thank you everyone for the comments I appreciate it, and please keep them coming as it really does help the motivation
I've managed to get some sculpting done for the Haruspex this week, which includes the torso rib cage extension, a bit more work on the head, and the beginnings of a lower leg section.
The rib cage sculpts not perfect I know, but for a first attempt I don't think it's too bad, as I'm still working through different techniques at the moment, trying to find what works and what doesn't.
The head has been bulked out a little more, plus I added a few plates to the crest, all of which is quite rough right now as nothings been sanded or polished yet. I've also covered up the eyes, which is a design feature I want all my Nid's to have, giving them a more animal/Insect feel, like their simply tools to be created and used by the Hive Mind, rather than a race of individuals with their own thoughts and feelings.
Last but not least is some very early work on the leg section, which as you'll see from the comparison pic below is being scaled up from the original Tyrannofex/Tervigon leg. Once the sculpt is finished I'll be making a mold of it, I can then cast multiple versions and add extra detail where needed, which should save me a lot of time. Not sure yet If I should cast the legs in resin, or do a simple press mold using Milliput, I think I'll have to experiment a bit, which is always fun .
If anyone has any questions, ideas or feedback please let me know, and I'll hopefully have another update coming soon.
A simple shape like that leg, I'd probably go for a press mould. Unless you are planning many many copies. Or if you have some resin open that needs using.
The jaw like that scares the stink out of me . I've been watching shows about huge snakes lately and let me tell you the idea of being swallowed whole is freightening. Great work on the claws as well.
@ Dr H: I am planning to get some more resin soon, and looking at the recent detail I've added to the leg
I think resin casting them will be the best way to replicate the detail.
@ Theophony: funny you should mention snakes, as I've been looking at lots of reference material of snakes and lizards to help get the jaw design and mouth musculature
right. So just for you, here's some of my reference pics .
Whoa, that snake maw is intense. The double rows of teeth look wicked. Great find, thanks for sharing.
And let me take this opportunity to say more generally: I freakin' love your work. Found your Dark Eldar take on the Eldar Titan in Dakka's gallery, and liked it so much I tracked you here. Can't wait to see more.
@ tinfoil: Thank you very much I appreciate that, and welcome to the madness .
No new update on the Haruspex conversion just yet, but I have been working on it and hope to have something to show you all soon.
In the meantime I thought I'd share my attempt at building two scenic bases, using some of the new shaped bricks I recently started casting.
I've made large angled, small angled and curved bricks, to go with the standard bricks I made a while back.
Check out the pic below for a little example of some of the shapes that can be made.
I haven't had a chance to build any large pieces of terrain with them yet, but I'm sure I will eventually .
Hey hk, I'm thinking about purchasing your 100 brick set, and I'm just wondering, how does your resin compare to games workshop plastic?
I mean, I've heard that resin can be very crumbly, and can rub off on our fingers and things like that, so I was just wondering.
Hi mate! REALLY like that Nid Monster you have going on! Going to be truely terrifying!
And my second point..... DARN YOU.... for putting your page link there....... and on the day i get paid aswell........ got a weekend in Amsterdam coming up... but if there is any finds left over after that.... you sir... will be recieving my order!
Hi guys, sorry it's taken me so long to reply, just had a few real life things to sort out.
@ the shrouded lord: The Resin I use is very sturdy stuff, it actually cures harder than GW plastic, which is great when casting solid or thick pieces.
I tend to avoid casting extremely thin parts though as they can be a little more brittle, but anything over 2mm thick is usually fine.
I've also never had any crumbling or rubbing of with the resin I use, but that could be due to the type of resin, there are a lot of different types.
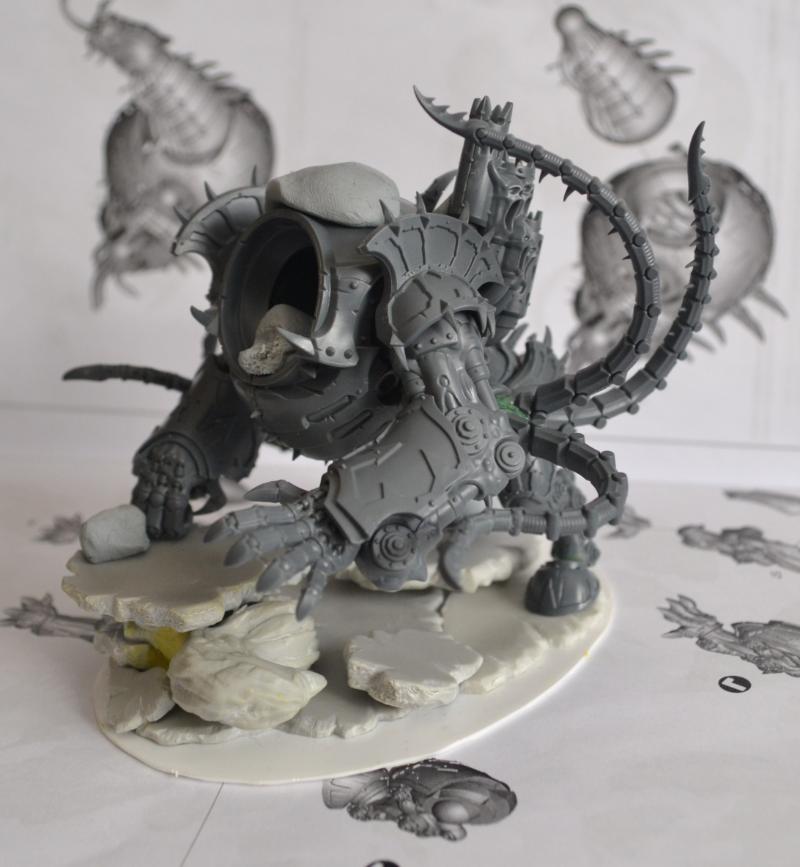
Haruspex update: The Haruspex is slowly starting to take shape now, with the mouth almost finished, and the basic shape of the Carapace (Minus the detail's) all sculpted out and sanded.
The leg section is also close to done, just have the toes to add plus a dozen or so spikes and claws.
Along with the finished leg section I've also decided to mold and cast up the carapace, as it took a while to build and might prove useful in future Nid projects.
Here's some progress pics below, plus a rough mock up using the Claws, head and carapace,
just to give an idea of what this thing might look like when finished.
At the moment though it reminds me of one of creatures from Dead Space, dragging itself across the floor .
Work on the Haruspex has slowed down recently, while I continue work on my next big project.
It's something I've been designing and working on for a while, and when finished should hopefully
help speed up the building process on some of the large scale kit bash or scratch built models I'm planning on building.
I cant reveal too much about the project yet, but here's a pic of some WIP pieces.
Lets see if anyone can work out what their for .
Please Ignore the bad photo, In reality those pieces do have clean straight edges.
That time is upon me again, when something new and shiny comes out that i'd really like to buy, build and paint.
But with shelves of expensive unfinished plastic surrounding me how can I justify another purchase.
So I've decided to make myself finish at least one of my more insane projects,
in order to make room for a new one.
Although I'm still working on the Tesseract vault conversion, I've also been planning my next big project,
which I will hopefully be building over Christmas.
It will be a large Diorama focused around the Undead Lord Nagash, showing his summoning and return to the old world (or at least my version of it).
I haven't yet got the new Nagash model, but will be picking one up some time in December.
What I have just received through the post however is a box full of Vampire Count sprues, including: 13 Skeleton Warriors, 17 Grave Guard,
17 Ghouls, 20 Dire Wolves, 2 Metal Varghulfs, 2 Corpse Cart's, and a partridge in a pear tree .
All that lot will form my bits box for the project, and should be more than enough to help me detail the scene.
As you'll see from the pics below Nagash: The supreme lord of the Undead has arrived on my doorstep,
which means I can now start work on my Rising of Nagash Diorama.
The Diorama will take place in an old forgotten fortress ruin high in the mountains,
and show the dark ritual that summons Nagash back to the old world for the End Times.
So Today I received a large block of foam in the post, and after 20 minutes of muttering to myself (my version of careful planning)
I grabbed some tools and started working.
Several hours, and a considerable amount of mess later, I have the basic shape of my mountain top all carved out.
It currently stands over a foot high and one and a half feet long, and I have no idea where its going to live when it's finished .
the "where am I going to put it?" question usually stops me making big things like that, along with wondering if I'll ever finish making it let along paint it.
the "where am I going to put it?" question usually stops me making big things like that, along with wondering if I'll ever finish making it let along paint it.
Nice columns btw
Its always fun making a mess, for me it's almost mandatory when being creative .
Yeah I have that problem too, wondering if I'll ever get it finished, but for this project I just remind myself how much I've spent
so far on everything .
Update:
So I've started the actual brick construction of the fortress, beginning with the corner tower.
I'm going for a built into the rock look, as if this dark city has been carved into the mountain.
This wont be a massive update, but I have made some progress In the form of two large support pillars,
which will hold up the remains of an old stone bridge.
In my mind this bridge would of been the main access to and from the fortress, and will lead directly into the large domed throne room
at the top (which I will be building later )
monkeytroll wrote:Not a massive update - just a few hundred bricks put together
560 bricks to be exact, but whos counting
Dr H wrote:Looking very nice. Liking the way those bricks are sticking out.
Thank you, apart from breaking up a plain flat surface those bricks will also hold wooden beams,
that will support a set of old wooden huts and buildings.
DiDDe wrote:That looks great! how tall do you expect the build to be in total?
Once the throne room goes up the whole thing will stand just over 2 feet tall.
Theophony wrote:It huge. That's not a 28mm marine in the pic, that's HK1X1 in his cardboard powered armor standing there.
No, the cardboard Armour's only for special occasions, that day I was wearing the plastic card set
Warboss_Waaazag wrote:NICE terrain! That looks great!
Phutarf wrote:Amazing. Looking forward to seeing this one progress hk1x1!
Thank you
ckig wrote:Amazing! Looks very grand and imposing.
You built it brick by brick? :O
Yep, brick by brick, I find it's the best way to get a realistic brick effect,
plus it can give the structure a sense of gravity and weight, with one block pushing down on another.
Update: Sorry for the late update, been busy with other projects and things ,
but I have started work on a few of the actual miniatures that will feature in the Diorama.
First of is Nagash, who's undergone a little reposing, plus hes received a new sculpted left hand and pair of skeletal feet (still WIP),
as I really didn't like the silly pointy Armour shoes he came with.
Next up is the Ghouls, who will be carrying eight of the nine books of Nagash,
and be chained around a central altar where the rising ritual is being performed.
So I've finished the eight book bearing Ghouls, added some chains and strapped the books to their backs.
I've also done a bit more with Nagash, adding his shoulder pads and building the spine back piece,
both of which needed slightly converting due to the position I moved the arms, but nothing too complex.
What did you have to do with the feet and left hand? A staff there originally isn't there.
Yes there was the option to have a staff or a sword, but I decided on an open hand pose
which meant I had to build a new left hand.
Luckily there was a left forearm and a thumb, so I only had to sculpt the palm, back of the hand and four fingers.
Sculpting new skeletal feet was more a design choice, as he did have these silly looking pointy armored shoes,
that made him look like a court jester .
Hmm, the right had looks completely unmodified, but I dont remember having a hand like that on the sprue. Is it just the spirit claw without the spirit?
Hive Fleet Cerberus wrote: Hmm, the right had looks completely unmodified, but I dont remember having a hand like that on the sprue. Is it just the spirit claw without the spirit?
No it's the hand that holds the open book, I just re-positioned it a little.
I'm back to working on the mountain fortress, and have made a few changes and additions since you all saw it last.
I've carved away a bit more of the rock face at the base, and added a small ruin bridge which leads to a cave entrance at the base of the tower.
Just above the small bridge you'll see an old wooden hut, this is the start of what will be a little abandoned village now inhabited by Ghouls.
The top of the large ruin stone bridge has also been built up, and given a stone slab floor.
This leads us into the throne room, which has been scaled back a bit due to weight issues,
but will still be the grand center piece of the Diorama.
Once again if anyone has any questions about this project, then please feel free to ask
and I'll do my best to answer .
What are you going to do with the card parts, I know they are for you to build up from, but what's the plan?
Can you move it? It looks a little top heavy and unstable. Just wondering what you have done to keep it togother.
The card pieces form the center core of the wall sections, then I add brick work to the front and back of each section, (See WIP pic below)
I can move it... just , but your right it is getting heavy. As far as stability goes I've pinned the top MDF hexagon piece to the foam core
to keep it in place, but once everything's glued together that corner tower will act as a counterweight for the large wall sections at the back.
Plus the whole diorama will be fixed to an MDF base at a later date.
He sells bags of bricks on Ebay:http://www.ebay.co.uk/sch/hk_terrain/m.html?item=281359912049&ssPageName=STRK%3AMESELX%3AIT&rt=nc&_trksid=p2047675.l2562
I knew I wanted something eye catching above the main entrance to the throne room, but wasn't quite sure what.
so I just started building, and this is what I came up with, I'm actually quite pleased with it
An incredible piece of design and craftsmanship! Could spend hours looking at this and still find new and exciting little details! I dare say this has the potential to easily be the best dio I have seen ....
Incredible. Simple as that. I can totally appreciate the time, thought and effort you're putting into this build - the finished result is going to be spectacular!
Hive Fleet Cerberus wrote: He sells bags of bricks on Ebay:http://www.ebay.co.uk/sch/hk_terrain/m.html?item=281359912049&ssPageName=STRK%3AMESELX%3AIT&rt=nc&_trksid=p2047675.l2562
You deserve an exalt. So does Lone as well... Greyskull references are pure win.
Wow!
Simply amazing.
You''re the most talented terrain builder around here - and the scene you have planned for this is breathtaking.
I look forward to see how this develops.
Cheers
klaus
An incredible piece of design and craftsmanship! Could spend hours looking at this and still find new and exciting little details! I dare say this has the potential to easily be the best dio I have seen ....
both eyes glued for more...
Thank you very much, there are some amazing Dioramas out there, and this is something I've always wanted to try, so I hope it lives up to your expectations when it's finished
Phutarf wrote:Incredible. Simple as that. I can totally appreciate the time, thought and effort you're putting into this build - the finished result is going to be spectacular!
Thank you, I hope it will be spectacular, I'll do my best
lone dirty dog wrote:BY THE POWER OF GREYSKULL !!!!!!!!
No seriously looks great the way have moulded the skull in brick form is a very cool trick, this has continued to amaze me with each stage
Thank you very much I'm pleased you like it, And yeah I was I thinking Castle Greyskull as well
Stormwall wrote:You deserve an exalt. So does Lone as well... Greyskull references are pure win.
Anyways, HK loving the thread, keep it up. O:
Thank you, and here's a little nostalgia
Klaus, not Santa wrote:Wow!
Simply amazing.
You''re the most talented terrain builder around here - and the scene you have planned for this is breathtaking.
I look forward to see how this develops.
Cheers
klaus
I've seen your Diorama work and it's stunning, so thank you very much for the compliment .
My painting's not great though, so I'll probably be asking for advice at some point, especially when it comes to Object Source Lighting.
Trying to find words for this.....
Only word i can think of is....awesome...found some more words...great work Cant wait to see it painted up!
Grtz
Mark
As you'll see from the pics the Throne room now has a roof, or a least the crumbling remains of one.
I still have more to add to it, in the form of large rusty iron work blades that fit around the battlements.
Speaking of rusty Iron work, I've started building an iron crown for the brick skull outside the throne room.
Its still a WIP but I wanted to ask your opinions on how I should do the rest.
Should I put brackets at the back that curve over the skull towards the battlements?
or maybe you think it just needs more rivets.
Let me know your thoughts and I'll have another update for you soon
The crown makes the skull look MUCH better (Not that it wasnt good in the first place. now its just... more good). I think a couple of extra rivets would look nice, not too much but maybe a few where the crown meets the stone
Just amazing bud, absolutely amazing. Roofing is just perfect. Crown looks great, personally rivets and your done, but up to you.
Just a little question, are you done on the door way, just that it needs a lintle. I know you probably have this in hand, just a silly little thing.
Yes It will have a lintel (well spotted ), as well as an inner door frame that will support a set of large wooden double doors
that have been barricaded and sealed.
Thanks for the advice everyone, Extra rivets it is
Late to the praise party but I'm finding the build (as well as your other projects) riveting! (See what I did there? ) can't wait to see the paint job you do on it....
Update: As I start work on the throne room interior, I thought I'd share a new addition to the diorama.
This Idea came out of nowhere really when I found these cheap Dinosaur Skeleton toys at a nearby shop,
they where so cheap in fact that I ended up buying six of them.
I now had a large selection of Dinosaur bones, and it didn't take long before I'd decide on what to build,
an Undead Dragon.
The basic Dragon shape (or Wyvern if you want to get technical ) is done, just have the back spines to sculpt,
as well as a few other small details.
What I'd like to do is add pieces of dried skin hear and there, especially on the wings so its somewhere between a skeleton and a zombie.
When its finished it will perch atop the ruins of the Corner Tower, drawn to the power of Nagash.
Woooh nice!
The idea of using these cheap dinosaur bones is genius The way you have them layed out is already good, but...
(yeah, you knew this was commin' didn't you?)
I think you need to prolong the tail a bit more, to balance the body - you have a rather large and bulky torso, so I think you need a longer tail.
And as the shrouded lord pointed out....the head is a bit on the "heavy" side. I mean a Trici is a rather heavy set boy, an Elephant or a Rhino rahter than a slim fly-boy The neck is thin and in proportion to the torso and tail, but the head is a bit too heavy looking.
Any way you can make it look lighter?
What size is it, can you post a scale shot with an Imperial Trooper?
Maybe....
Cheers
klaus
Thanks for the feedback guys, I was hoping I was wrong about the head being to big and bulky,
but it definitely is out of proportion.
The other head I have is way too small, but I can get another that should scale perfectly with the body.
As for the tail, I think it will look better once I've added on the back spines that will join up with the ones on the tail.
As requested, here's a scale pic of the dragon next to a space marine,
I've removed the legs and wings just to give you a less cluttered view of the body.
I'll try and pick up the other head next week while I do the rest of my Christmas shopping,
and yes I have left it to the last minute
the castles not glorious enough......let's add a dragon .
Love the crown on the skull, perfect addition to show the regality of Nagash. Now the castle just needs ugly curtains (tattered of course) to match his old models robe. Of at least brackets to show where he got his robe from.
lone dirty dog wrote: WTF !!!! first "Castle Grayskull" and now "Dungeons and Dragons" (all be it a dead one LOL )
Yes I have to agree the head does seem a little large in comparison, though you could use it as a trophy on the wall
By the way can I ask what shop you found these in at a good price I only ask as I want some large rib bones for some Apoc Sand Dwelling Nomads
I was just in town and saw these exact 'Fossil Hunter Dino Tubes in Poundstretcher for £1.99 a pop... I got a couple for the kids (Tyrannosaur & Mammoth) and three for me... (Tyrannosaur; Triceratops & Pterodactyl) for £9.95
Good use of the skeleton parts.
I didn't think that the head was that much too large. With the added flesh to the body that would bulk up quite a bit more and the head would be in proportion... maybe.
Ruined roof and the crown on the skull look brilliant. Good work.
Happy New Year everyone, and welcome to 2015. Now although I don't Believe in New Years resolutions, there is a list of things I would like to get done this year.
My biggest goal is to get this Nagash Diorama Finished, which also means you'll get to see me paint some actual models for once .
Getting back into painting is something I've been meaning to do for a while, also I think Nagash and the other models in the diorama
deserve the best paint job I can possibly give them, so I need to get some practice in.
I already know which Vallejo box sets I'm getting, but if anyone has any suggestions on paints they found particularly useful,
I'd welcome the advice.
The final thing I have planned for this year is making more terrain products, but rather than making more large Resin piece's
I'm going to focus on simplistic terrain that everyone can use, such as walls, rocks, cliffs and small buildings.
I'll also be ditching the plaster in favor of Extruded foam (Styrofoam) which is so much easier to use,
especially now I have a new Hot Wire cutting board.
Get your self an extractor, I had the joy to use a bigger version in a product design workshop a few years ago
Good luck with it! Certainly a lighter idea.
as for paints, the Vallejo model colour range are good, I'm more or less using them exclusivity now. don't forget to look at the mediums range, like the glaze medium etc.
For flaking paint get a masking medium
Tamiya does some texture paints that are good, only one to avoid is the grass one (really it's static grass in paint...).
Physh wrote:Holy crap... didn't realize the scale of the skull archway until it was put into place
Yeah I wanted to give it all a real sence of scale, and also have the doorway large enough that Nagash could walk through it,
If he wasn't so busy floating everywhere .
lone dirty dog wrote:Nice idea and great cutter looks like a start of a good business to me
Also got to pound stretcher at long last not one pack have to try another one me thinks
Same here, I also found nothing left at pound stretcher. I might just have to sculpt the Dragon's skull from scratch,
at least that way I can get the scale right.
OneManNoodles wrote:Get your self an extractor, I had the joy to use a bigger version in a product design workshop a few years ago
Good luck with it! Certainly a lighter idea.
as for paints, the Vallejo model colour range are good, I'm more or less using them exclusivity now. don't forget to look at the mediums range, like the glaze medium etc.
For flaking paint get a masking medium
Tamiya does some texture paints that are good, only one to avoid is the grass one (really it's static grass in paint...).
Before I get back to work on the Diorama, I thought I'd show you the new foam bricks,
that at this moment have taken over my desk and half buried my keyboard .
I've also built a few new pieces of Scenery using the bricks, and for once managed to finish and paint them.
Having purchased some of your plaster blocks.... and been extremely happy with the product... I recon these will be a nice new addition to your repertoire! As you have shown with your little terrain pieces they will work very well.... my only one thought... and this is only because I like to destroy and break everything..... but I REALLY like the damage effects and scrapes and dents you can add to the plaster blocks... I am wondering how the foam would react to this treatment..... but like I said that's only a very minor thought I had.... I guess you could just use plaster blocks for the damaged ones and foam for the rest.... so in essence I have answered my own question, making my point null and void! Ignore me.. Looks really cool!
And really like those little packs of flock... just picked up a couple.. cheers for the tip!
Hi everyone, sorry it's been a while since my last update, been busy with a new large scale project ( yes I started another one )
and working out plans for a new Business venture, which I will talk about at a later date once everything's in place.
As for my other recent big projects, the Nagash Dioama and my Necron Tesseract Vault, I will be getting back to those at some point
so they've not been abandoned, just put on hold.
What I can show you now is my recently reorganized work Space, which should at least for the moment help me keep the place tidy,
I hope .
Working areas tend to stay clean and tidy for about two mostly three days , good luck with your projects I would really like to see that Vault finished.
Tell us honestly, you cleaned up just before you took these pictures, right? Or is your work space always this clean? Or is this the first and last time your new work space will be this clean. Because mine is an absolute mess. Every time I "clean up" I find old half-finished projects buried under my scattered bits.
dubovac wrote:Working areas tend to stay clean and tidy for about two mostly three days , good luck with your projects I would really like to see that Vault finished.
Yeah I'd like to see the vault finished too, it will get there eventually .
Dr H wrote:Many interesting looking projects on those shelves.
Most of them are half finished model projects, and large scale sculpts. I really must stop starting new projects
before I finish the old ones .
Warboss_Waaazag wrote:Tell us honestly, you cleaned up just before you took these pictures, right? Or is your work space always this clean? Or is this the first and last time your new work space will be this clean. Because mine is an absolute mess. Every time I "clean up" I find old half-finished projects buried under my scattered bits.
You got me, I had just spent four days reorganizing, rebuilding and tidying up the entire room.
The reason it looks tidy now is that I filled 14 bin bags full of rubbish, before that it really did look like a wasteland
and you couldn't find anything, or see the floor .
Sorry for the lack of activity recently, the reason for this will become apparent later in the year .
For now though I think it's about time I started painting again, and for that, I'm more than likely going to be asking for your help and advice,
as it's been years since I properly painted any mini's, and my skill set kind of stops at dry brushing.
I've just received my first batch of paints as you'll see below, with a set of Wash's currently on the way.
The three Battlesuit's I'm Painting are going to be test piece's for a much larger Tau project I'm working on,
so I want to try a range of different techniques including blending, chipping, weathering, painting optics and maybe some OSL.
I'm in no rush to do this, as I want to get it right, and avoid making a mess of my other project.
I'll be adding updates as I go .
Looking great so far. I was wondering, since I see that you bought game colors paints do you found hard to work with them. I am asking since I buy model color line and they seem much better. Game colors have, how would I put it nicely, thin consistency and pigments are not so strong.
dubovac wrote: Looking great so far. I was wondering, since I see that you bought game colors paints do you found hard to work with them. I am asking since I buy model color line and they seem much better. Game colors have, how would I put it nicely, thin consistency and pigments are not so strong.
I'm actually finding them great to work with because of the thin consistency, as I prefer to paint using many layers,
and using thinner paint means I wont obscure any detail.
I haven't tried the Model color range yet but I do want to get some, just to see what their like and how they compare to the Game color.
I also prefer thin layers, but for my preferences I like to thin them down by myself. Those game colors are too thin of my taste. But they are great for shading areas, giving tint to some other color and generally they mix excellent with model color range.
As always pics from Forgeworlds open day have started to appear all over the internet, one in particular though has caught my attention.
As you'll see below Forgeworld have built themselves a Tau Titan (or knight), It's called the KX-139, and it's a behemoth of a battlesuit.
Now the reason I'm interested in this, and why I'm posting it here, is because for the last four months I've been kitbashing my own Tau Titan.
It's still a work in progress, and doesn't have a name yet, but I want to get your feed back on both Titan's.
So let me know what you think, and if anyone has any questions about how I built my Titan, just leave them below.
I can't believe how huge that thing is man! Great work! It looks much faster and more lithe than the FW one which seems kinda bulkier by comparison. Is it pure coincidence that your right-sided gun looks so similar to the FW Titan?
NidLifeCrisis wrote: I can't believe how huge that thing is man! Great work! It looks much faster and more lithe than the FW one which seems kinda bulkier by comparison. Is it pure coincidence that your right-sided gun looks so similar to the FW Titan?
Yeah I did notice that . Actually at one stage I did have the barrels the other way up, in which case it would of looked just like FW's version.
But it is just a coincidence, maybe we where looking at the same reference material, and concept art.
I think the FW one looks decent, though I can't get over the trio of big guns in the middle. It looks like someone literally just stuck them on the back of the model.
I would say that I prefer yours. Mostly for the same reason given by NidLifeCrisis. Yours looks sleek and fast, even for its size. It looks like something the Tau would design to stealthy hunt down other races' titans and take them out in a quick ambush. Not a walking gun boat like the FW model.
Taking a break from the Titan now, as I contemplate how I'm going to paint it.
In the meantime I've started work on a Kastelan Robot conversion, using the parts from both standerd robots to build one of my own.
So far I have the head torso and arms together, and I'm working on the legs.
Its beginning to remind me of a cross between the the giant robot from Fallout 3, and a Cylon,
But tell me what you think .
That is truly awesome for some reason it reminds me of several movie robots from Real Steal to Cain from Robocop 2, either way it looks more practical and proportioned as a working defensive robot and it does not even have legs yet
If you could do a how to that would be totally amazing as I would like to recreate this
lone dirty dog wrote: That is truly awesome for some reason it reminds me of several movie robots from Real Steal to Cain from Robocop 2, either way it looks more practical and proportioned as a working defensive robot and it does not even have legs yet
If you could do a how to that would be totally amazing as I would like to recreate this
Thank you, and yes I do want to do a step by step guide on how to build one of these.
but it might have to wait until I build another one, for me to do it properly.
In the meantime I can do a guide showing of the arms, legs, head, and torso, and describe which pieces I used.
This should help as a reference point if you wanted to build your own.
Sorry this updates at little late, been having computer issues.
But here's the first mock up with the legs, as well as some close ups of the head.
I'm still working on my Kastelan robot conversion, and it's very much a work in progress at this stage.
But for anyone who wants to maybe build their own, or at least get some ideas, I've gone ahead and made a simple parts guide.
This is just to show which piece's from the Kastelan kit I used, and where I used them.
I did decide to have some fun with it though, hence the old green computer display look .
Damn this just continues to impress love the cable being added it actually looks part of the model rather than randomly applied.
I want one of these can I have one daddy can I ..........
We throw around the words "your stuff is amazing" and "holy feth" a lot on DakkaDakka, but really every time I come in to check your progress I'm floored. GW makes nice kits, but they have fallen behind others in the industry in my opinion. It's kits like this where they get close (almost like they are trying to take away Mantics "Almost" nickname). But then we see really creative people such as yourself turn kits of theirs up to 12 on a 1-10 scale. Well done sir. Nice touch adding cabling too.
And since their heads are made from the groin parts you said, that means these robots can be the real heads that I always imagine the mechanicus to be
lone dirty dog wrote:Damn this just continues to impress love the cable being added it actually looks part of the model rather than randomly applied.
I want one of these can I have one daddy can I ..........
Thank you . And yeah, hopefully all the green stuff cables will blend into model once it's painted.
Theophony wrote:We throw around the words "your stuff is amazing" and "holy feth" a lot on DakkaDakka, but really every time I come in to check your progress I'm floored. GW makes nice kits, but they have fallen behind others in the industry in my opinion. It's kits like this where they get close (almost like they are trying to take away Mantics "Almost" nickname). But then we see really creative people such as yourself turn kits of theirs up to 12 on a 1-10 scale. Well done sir. Nice touch adding cabling too.
And since their heads are made from the groin parts you said, that means these robots can be the real heads that I always imagine the mechanicus to be
I appreciate that, thank you . Your right GW have fallen behind a little, for me it's the bad design decisions they sometimes make. It's like they have several designer's working on the one project, and occasionally designs styles will clash,
and create an awful looking model. That being said, I still think they produce some of the best multi part plastic kits available, which provide so much opportunity for conversion projects.
There is something I want to do in the future (probably next year now), that touches on this subject.
The idea is that once a month I choose a model that I think looks terrible, and try to convert it into something which looks better, but still fits the same role.
Haven't quite worked out the details yet, but there's plenty of time for that.
shasolenzabi wrote:That robot is looking very cool!
Camkierhi wrote:What Theo said, truly inspirational.
StarDrop wrote: After seeing those statues and 'Inquisitor', I must say you got me thinking into making a whole battlefield in that style.
Amazing work. How long have you been sculpting? Is that just a hobby, or did you study that?
I've been sculpting on and off for about 5 years, but really only as a hobby, although I have done the odd commission here and there. Basically everything I know has just been learnt from practice (and the internet ).
I never really put enough time into getting really good at it, but I think I'm slowly improving. As when I look back at my earlier work, like that Inquisitor, I cringe, because I now know I can do better.
Yup. I definitely need to make a over-sized temple style battleground.
I actually want to get more into terrain making in the upcoming years. So, yeah. Your work is an influence! Thanks.
StarDrop wrote: Yup. I definitely need to make a over-sized temple style battleground.
I actually want to get more into terrain making in the upcoming years. So, yeah. Your work is an influence! Thanks.
Well I'm no expert, but if you ever need any help or advise on building terrain, then feel free to ask .
I've completed a bit more work on the Kastelan, which now has some added cabling for the Power Fist's, as well as an arm mounted Heavy phospor Blaster.
I never liked the original shoulder mounted look, so I moved the gun to the arm instead, which I think fits way better.
Thank you. The Posing turned out to be more difficult than I thought, as I had to reposition and reglue the legs three times.
But I'm quite happy with the finished pose .
ckig wrote:Awesome conversion. And great work sourcing all those parts!
Many thanks. As for the parts, they all came out of the Kastelan box set. So apart from a little green stuff, that's the only kit you'd need to build one of these .
Theophony wrote:Bravo Let's see some paint on this glorious piece. And let's see his brothers as well. If nothing else he could be an Ancient Kastelen
Thank you. Yeah I was thinking that it could be some kind of ancient Prototype Kastelan. I mean they where all built around 10,000 year's ago (If you take the 41st millennium as present day).
So their all pretty ancient. As for it's brothers, I do want to build more, especially the gun arm variant model, which I've got some interesting plans for.
It might have to wait a while though, as I'm currently saving for a new PC. But I will build them eventually
shasolenzabi wrote:Yes! Now to see him painted up and looking Marsy!
I'm not a great painter, so I've no idea how it's going to turn out. But I do know that It'll be red .
Lindstrom wrote:Now that's one mean looking automated killer! I'd say the head is absolutely the biggest improvement from the stock model though
yeah I agree, the original head is the main problem with the model. Give it a different head, which I've seen loads of people do, and It looks so much better .
Thraxas Of Turai wrote:I am a big fan of the Kastellan in its basic form, but that Sir is a spectacular conversion. The concept and the execution are sublime.
Thank you very much, I appreciate it .
So I've just given the Kastelan an Undercoat, and once its got some color on it, I'll post some pics.
For now though I'll leave you with this video. As for ages I've been trying to work out what my kastelan reminds me of,
and I finally worked it out, enjoy .
Viktor von Domm wrote: i fear that build is sooo cool you need to make a squad worth of these... all in different poses like charlies angels...
Hi Vik. Yeah I do want to make a whole squad of these at some point, the next one will have two big guns insted of the power fists,
with ammo feeds leading from the arms to the back. At least that's the plan .
Not sure about the charlies angels thing, but will defiantly do all different pose's .
That is so many kinds of awesome the structure and poseing is just astounding, it looks like an actual kit rather than a Frankenstein creation A unit of these would look just superb especially on the game table, will you be varying the design for each model or keeping to the same blueprint ?
lone dirty dog wrote: That is so many kinds of awesome the structure and poseing is just astounding, it looks like an actual kit rather than a Frankenstein creation A unit of these would look just superb especially on the game table, will you be varying the design for each model or keeping to the same blueprint ?
Thank you for that, I appreciate it . I will be sticking to the basic design, but adding little variations here and there. Like extra optics on the head, for the heavy gun variant,
and fuel canisters on the back for the arm mounted flamer version. I do wish there were more weapon options for the Kastelan in the rules.
Maybe there is something in the new mechanicus codex (haven't got my copy yet), as a set of twin linked heavy bolter's, mounted on each arm could look awesome .
How about adding some extra armour to the Heavy gun variant and maybe fire shields to the flamer ?
Double trouble bolters that would look cool lets hope that happens
even tho i have read and tried to understand the (very cool looking btw) conversion step by step guide...i wonder... did you use only one kastelan worth of bitz or more than one model worth of bitz?...just to figure out the ratio of original and conversion...in a cost effectiveness kind of view...
lone dirty dog wrote: That is so many kinds of awesome the structure and poseing is just astounding, it looks like an actual kit rather than a Frankenstein creation A unit of these would look just superb especially on the game table, will you be varying the design for each model or keeping to the same blueprint ?
Thank you for that, I appreciate it . I will be sticking to the basic design, but adding little variations here and there. Like extra optics on the head, for the heavy gun variant,
and fuel canisters on the back for the arm mounted flamer version. I do wish there were more weapon options for the Kastelan in the rules.
Maybe there is something in the new mechanicus codex (haven't got my copy yet), as a set of twin linked heavy bolter's, mounted on each arm could look awesome .
How about adding some extra armour to the Heavy gun variant and maybe fire shields to the flamer ?
Double trouble bolters that would look cool lets hope that happens
Yeah I did wonder about adding extra Armour, and I do have a few ideas. The Fire Shield's a great idea, thank's for that . It'll help show that it's been designed for that role,
and not just had a gun slapped on it's arm.
Viktor von Domm wrote:even tho i have read and tried to understand the (very cool looking btw) conversion step by step guide...i wonder... did you use only one kastelan worth of bitz or more than one model worth of bitz?...just to figure out the ratio of original and conversion...in a cost effectiveness kind of view...
I did actually use both of the Kastelan Robot sprue's from the kit, to build this one robot. So cost wise it's going to be quite pricey to build an entire squad.
On the plus side, I didn't use any parts from the Data Smith Tech Priest model that also come's with the kit. So I will eventually end up with plenty of parts to make Tech Priest conversions .
I actually like the bland coloring as I see it as very mechanicus. They don't do lots of ornamentation, and don't want to stand out, so I think it's a direct hit with the palette choice. They aren't marines after all.
Viktor von Domm wrote:the red, while crisp looking, still looks a bit bland...will there be some markings and so on later?
Theophony wrote:I actually like the bland coloring as I see it as very mechanicus. They don't do lots of ornamentation, and don't want to stand out, so I think it's a direct hit with the palette choice. They aren't marines after all.
Thanks for the Feedback guys . I agree the panels do look a little flat at the moment, and I will be adding a few small subtle markings here and there.
I also want to have one of the larger panels, (Shoulder, upper legs or arms) painted with the classic black and yellow hazards stripe's.
This will hopefully break up the red a little, and suggest that it's recently been repaired, or maybe was never quite finished.
I do still have highlighting to add, as well as chipping and weathering detail's, which should help break up the those flat surfaces, yet still keep that mechanicus feel.
Seeing as how I'm really slow at painting, and don't enjoy it all that much, I've put my Kastelan Robot conversion to one side for now, and have decided to start a new project.
I've no idea if this is going to work, or if there's even still a market for it. But what I plan to do is assemble, and in some cases convert small starter armies for 40k.
These could be for people who love painting and gaming, but just don't have the time to sit down and build or convert an army themselves.
I've already made a start on the first army, which will be Chaos Space Marines.
So Far I have a Helbrute finished, and 10 Chaos Cultists (see pics below). I also have another 10 Cultists to build, along with 6 Chosen Chaos Space Marines, a Chaos Lord,
one Aspiring Champion, and a Daemon Prince.
Now I'm trying to restrain myself from going too crazy on detail, and giving myself too much to do per army.
So at the moment all I'm doing is:
- Removing all mold lines
- Assembling Model's
- Filling any panel gaps or seams
- magnetizing certain models (for weapon options, and easier access when painting)
- Drilling out all gun barrels
- Simple conversions (Head and weapon swaps)
- slotting or pegging all models to bases (so model can be removed)
I think that'll do for now.
I'll be posting more pics as soon as their ready .
I probably should of carried on building more cultists, but I couldn't resist having a bash at one of my favorite models for this army, The Daemon Prince.
I could've gone to town converting this guy, but I decided to keep it simple, and just make a few subtle changes.
I've also built him a little scenic base out of odds and ends I had lying around, and mounted them to a piece of 1mm plastic card.
I then attached a small plastic peg to the daemon's foot, so he can be removed when needed,
The last thing was magnetizing the arms, which did take a few attempts .
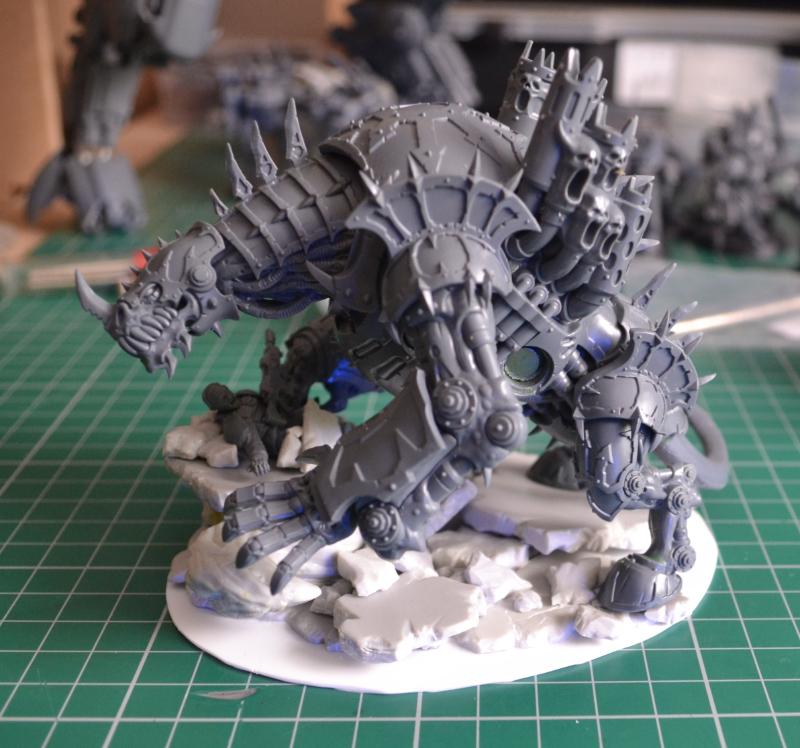
Just a quick update on my progress so far. I've started some conversion work on the Helbrute, added some tentacles, a banner, and now working on green stuff details.
I also just received my Forgefiend/Maulerfiend, which I'll be converting and magnetizing, so all three variants (pictured below) can be built from the one kit.
I'll post progress on both of these as I go .
Did you magnetize the Prince so that he could have wings? I am not criticizing, I am merely curious. Also, I will be curious as to how you do the Maulerfiend/Forgefiend magnetization, as I intend to get one or two of those eventually for my Daemonkin army.
ZergSmasher wrote: Did you magnetize the Prince so that he could have wings? I am not criticizing, I am merely curious. Also, I will be curious as to how you do the Maulerfiend/Forgefiend magnetization, as I intend to get one or two of those eventually for my Daemonkin army.
I decided not to magnetize the wings for this Daemon Prince, as I'm not too keen on the wings that come with the kit. I also wanted to reproduce that classic 40k Daemon prince look, hence why I went for the back pack piece's.
A Daemon Prince with wings is something I do want to build, but I'll probably use the wings from the Tyranid Hive Tyrant instead.
As for the Maulerfiend/Forgefiend, I've just finished magnetizing the Forgefiends front arms (pics below). I'm no expert, but if you have any questions, feel free to ask, and I'll do my best to answer .
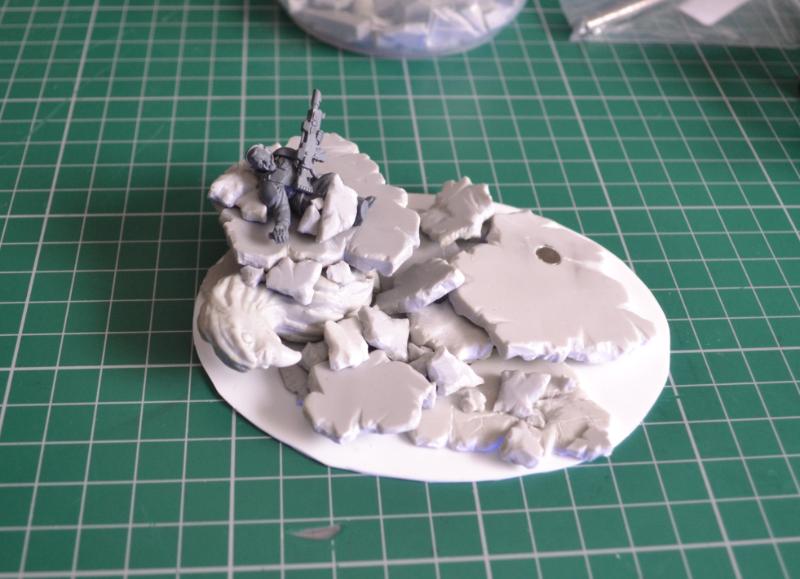
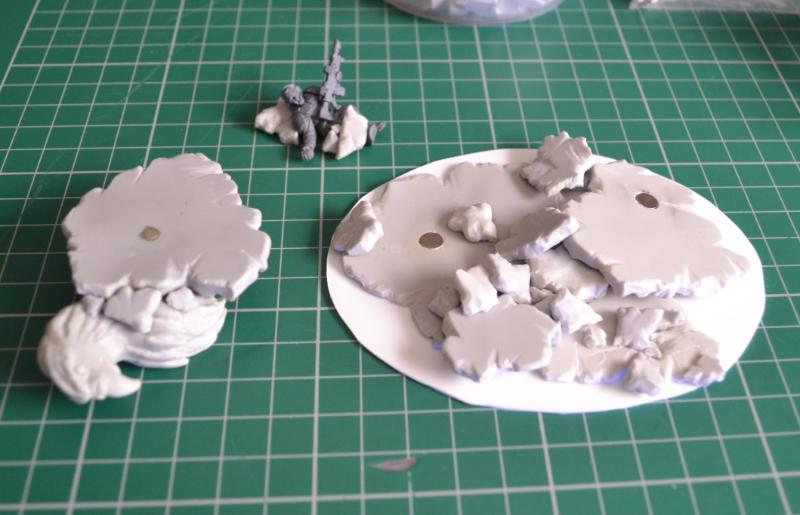
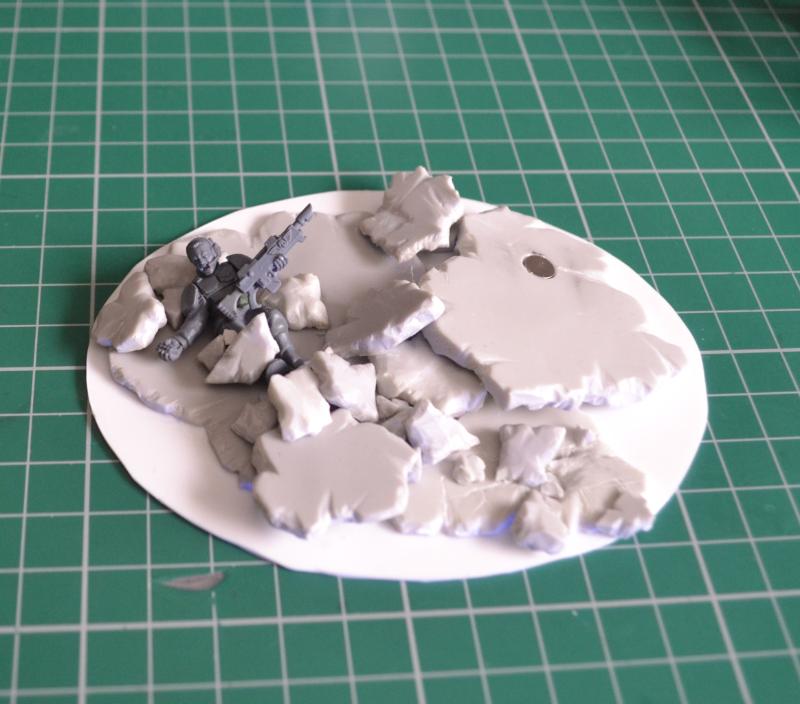
Something I knew I wanted to do from the beginning with the Forgefiend/Maulerfiend, was give it a scenic base that the model could interact with.
I quickly realized that because I'm magnetizing this kit to build either the Forgefiend or Maulerfiend, the base would also have to be adaptable, depending on which model you chose to build.
So what I've done is added a magnet to the main base, and another to the large concrete slab piece, so it can be swapped out when needed.
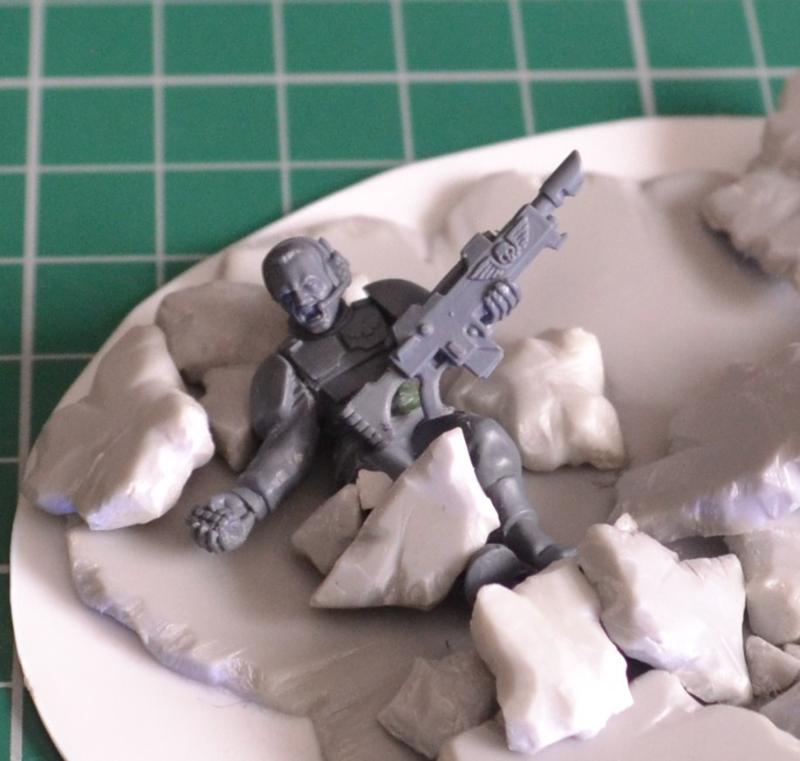
I will be adding a somewhat doomed Imperial Guardsmen to the top of the slab piece, who will also be fitted with a magnet, so he too can be attached to the main base.
I've also gone ahead and reposed the tentacles for the Maulerfiend, as I wanted them to look more chaotic and dynamic than the standard ones.

 .
.
 Oh yes

 .
.


 , at least it might explain the eye.
  though I hint it needs to push a broom and be the larger brother for my league of extraordinary servo-skull janitors.
  never did I expect to take on a janitorial job just months after building them

 , or are those guides for placing rivets perfectly spaces each time.

 have to try another one me thinks