9594
Post by: RiTides
Both boards looked fantastic at GenCon, Tonio! But you're keeping the Endless one, right? It is my favorite, and I didn't expect it to be there, so that was awesome 
64782
Post by: Tonio
 RiTides wrote: RiTides wrote:Both boards looked fantastic at GenCon, Tonio! But you're keeping the Endless one, right? It is my favorite, and I didn't expect it to be there, so that was awesome
Thanks. I'm happy to know they looked good. I'll need to wait for Warstore Weekend or Templecon to event see the BF one all together. lol
Yes, the EFT one is mine, and will come back up North next time I meet the OTL crew. I'll definitely do at least another one for me, and maybe more, and bring a new one at TC this year. If you're going again, I would be happy to get a game with you, or any other dakkanaut for that matter.
36184
Post by: Alfndrate
I will take pictures today
36184
Post by: Alfndrate
I tried to snap a few quick shots for ya Tonio.


 Automatically Appended Next Post:
Sorry for the blurry shots, this was literally before we started packing up on Sunday.
64782
Post by: Tonio
Thanks for those Alf. I prefer a couple of blurry pic than no pics at all.
69824
Post by: Galen
Both of those boards are fantastic. Those Brushfire models seem perfectly at home on that street. I makes it seem more real than a game about anthropomorphic rodents probably should 
42485
Post by: miskatonicalum
You got my pics off my twitter right Tonio?
64782
Post by: Tonio
Yep, I got them, thanks. However, the more the merrier. 
64782
Post by: Tonio
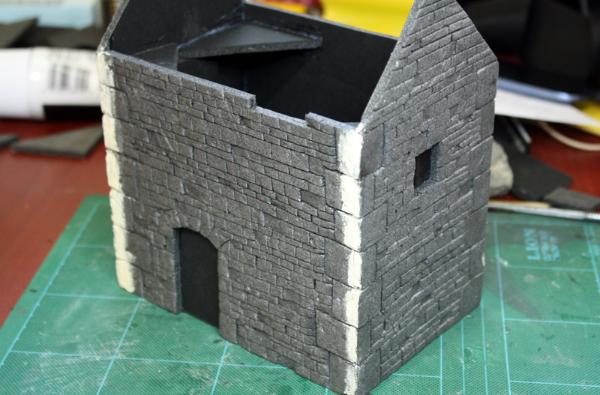
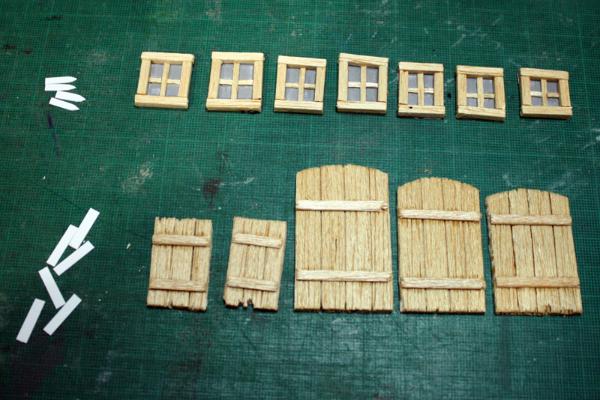
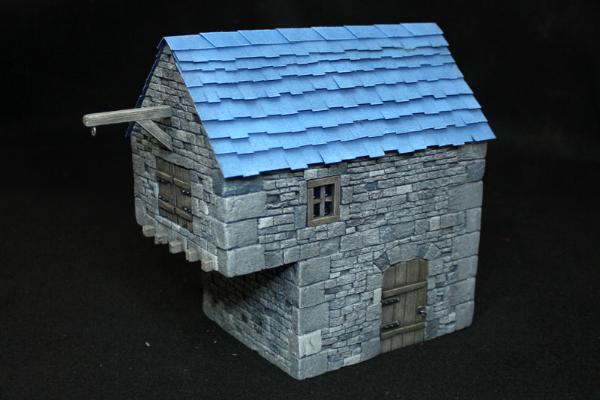
I have a bit more free time right now, and have gone through some of the pictures I took while making the board. Here is a little wip on the making of the buildings. I don't have pictures off ALL steps, but it still is pretty complete.
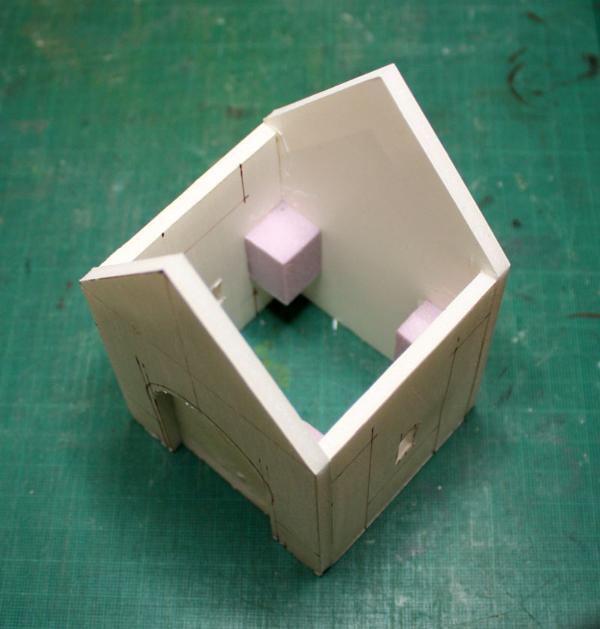
Foamcore stone building 101
To make the walls, I first cut each sides to their respective format. Once that is done, I peeled the paper from of side of each piece. It will give something like the following pic.
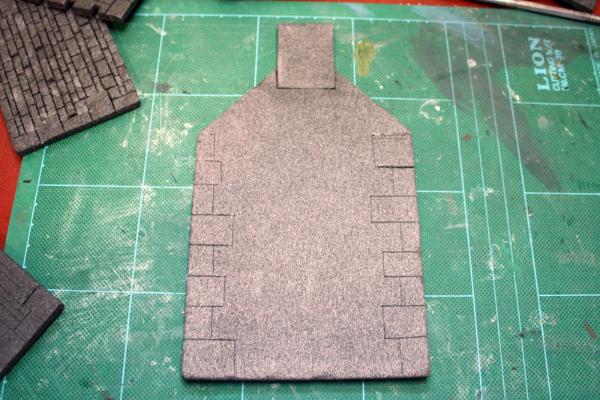
For my design, I had big stones in the corners, then smaller stones in rows filling the rest of the wall. To mark them, I used an hobby knife, and cut into the foamcore a bit, just enough to mark it, but not enough to get through all the way. The previous picture has the first cut made for the big stones, while the next picture has the horizontal lines, and also some individual stones cut in the bottom. I also took time to cut holes for doors and windows.
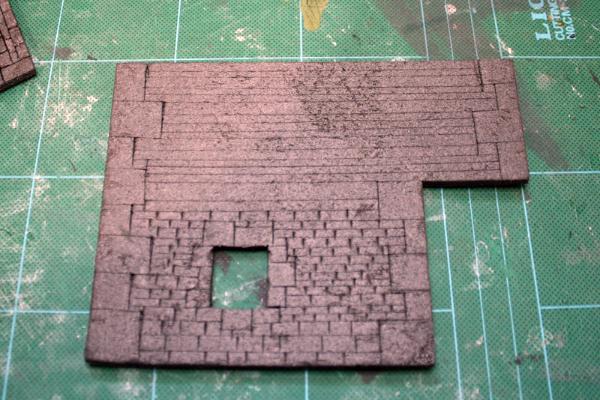
Once that is done, I used a larger tool, like a pen of a sculpting tool, to enlarge all the cuts made in the foamcore. Next step was pressing some of the stones down, either level or at an angle, to give some age to the wall.
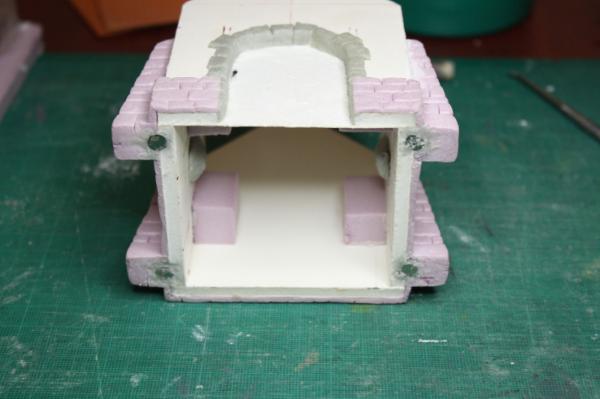
Before gluing the wall together, I added some cardboard pieces behind the holes made for the doors and windows, to have some backing onto which I could glue those extra bits, and also to block the holes for the step after the current one. I then assembles the walls. I used No More Nail glue, and also added some squared triangles on the inside to help with the gluing and aligning of the walls. On that picture, you can also see that I used some wood filler putty to hide the seams made by the glued walls.
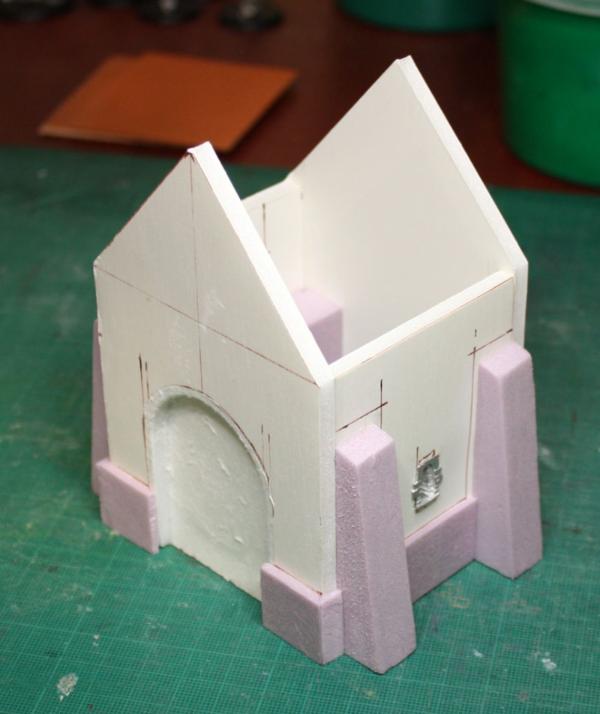
As the building had to travel, and will probably see lots of play, I wanted to give them some more solidity. For that, I put them on an old cardboard piece, and little by little, I added some expanding isolation foam into the hole. I now know to not add too much too quickly, as the pressure when it build up will warp the building, and could even break them. Let the foam coat dry completely before adding more. (We learn by our mistakes...) The buildings also received a coat of primer (Gesso) and a base coat at that time.
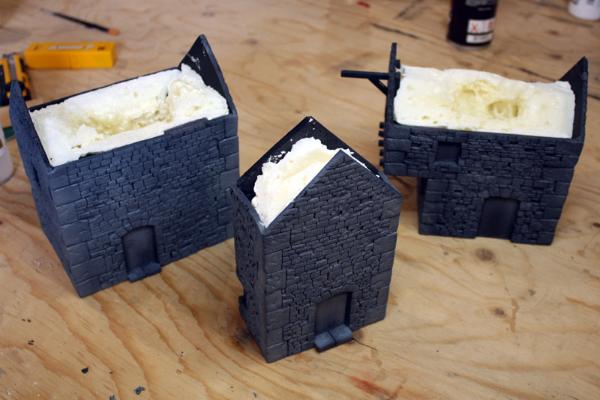
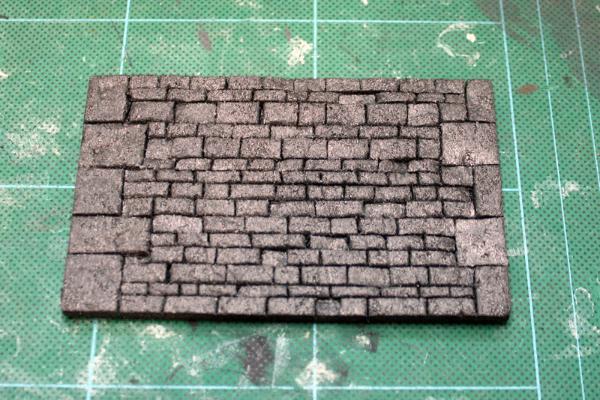
Now began the painting proper. To break the monotony, I painted various stones in different shades of grey and blue.
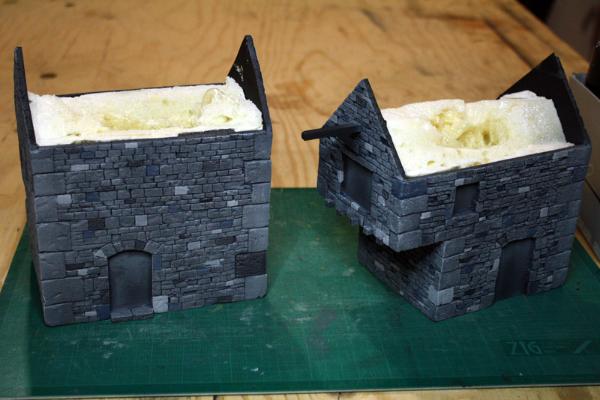
That was followed by an heavy drybrush, a coat of wash (a bit to thick which, glazed everything darker than I planned), and another drybrush.
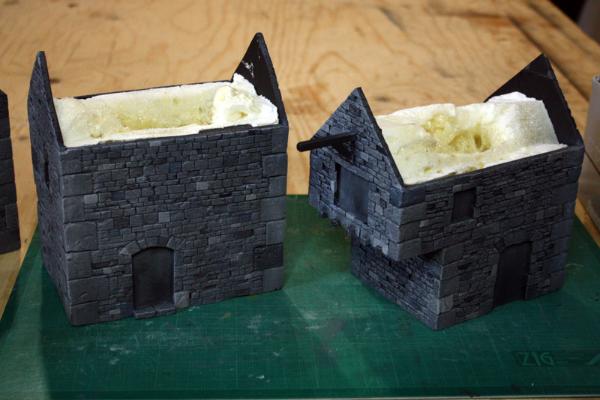
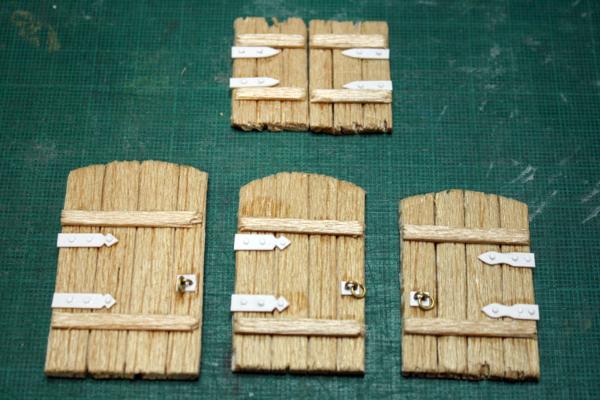
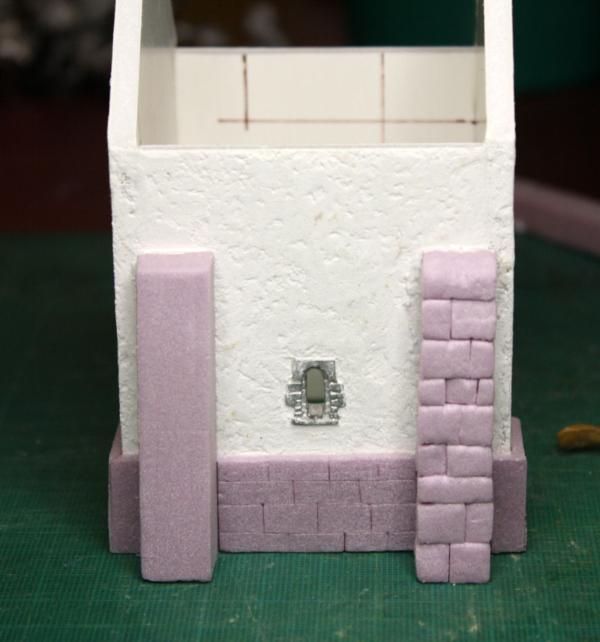
The painting of the walls done, I moved to making the doors and windows. Each window is made of small balsa sticks glued on a plasticard rectangle. It's not apparent, but the walls' holes and the windows were numbered on their back.
I then added details using plasticard, tiny plasticard rod and tiny brass rods. (I had a picture of those painted before gluing them to the building, but I seem to have deleted it by mistake...)
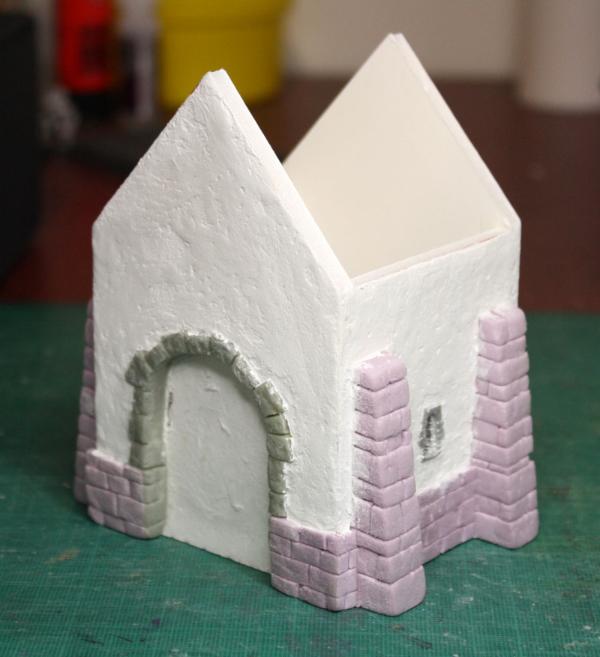
Next up was the making of the roof. For those I used some heavy cardboard (the one used in frame backing I think) to make the base roof. I used box tape to fix each side together, but that was a mistake, as glue don't adhere to it. I had to make cuts into the tape to give something for the glue to grip. Masking tape would have been a better material.
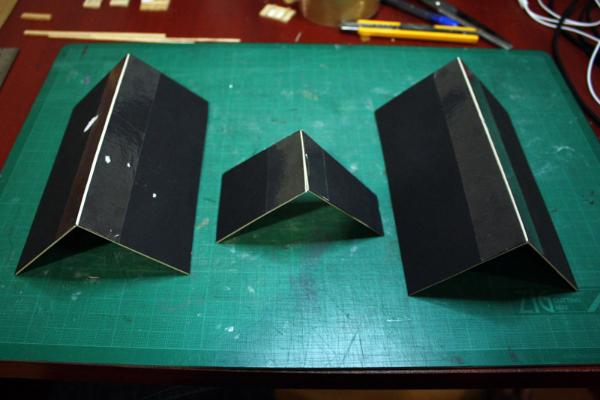
To make the tiles, I cut some thin cardboard slice, about an inch wide, then made small cuts all along it's length on one side, then glued it onto the roof, starting at the bottom, and overlapping them.
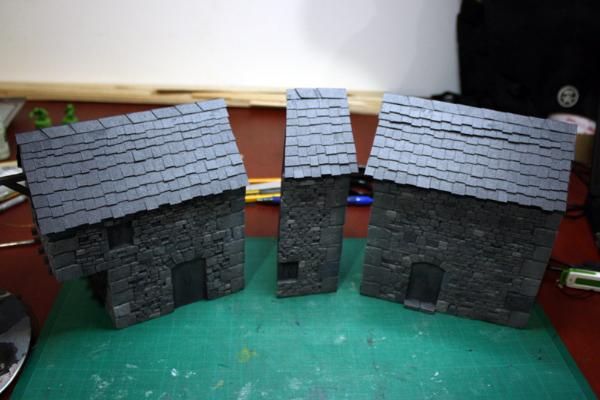
I then painted the roof with a mix of airbrushing and then drybrashing to help with the definition. They were painted seperate, so I didn't risk painting over the walls. I like the look of them, but if I had more time, I would have weathered them a lot more, as they have a "clean" look compared to the rest of the building. It was then time to glue them, again using No More Nail, and they were wrapped in rubberbands to help with the drying. During that time, I also glued the doors and windows.
Here is the final product. You can see the other two buildings done in a previous picture.
And that's it for this board. Now, I have to decide what to work on.I have my EFT pledge coming in soon (I hope), some conscripts to build and paint, a Conquistador I want to sculpt, a box of Capybara Marine on order, and a couple EFT board to start. I won't be slacking anytime soon.
15297
Post by: Ramos Asura
I've been following this log for some time now, and just want to say that your work is inspiring! The boards truly turned out fantastic, and I would kill for that EFT board with the crystals! Its very reminiscent of a few levels in FF:Tactics.
Thanks a ton for the tutorial- I will be sure to give a few of those methods a shot!
Im really looking forward to what you have in the future
70211
Post by: WhiteRoo
Great Tutorial! I'm going to get some from that foam next time I can find any.
42485
Post by: miskatonicalum
I had quite a few people try to tell me your buildings were pre-fab at Gencon, Tonio! They didn't believe me when I said they were made from scratch.
64782
Post by: Tonio
 miskatonicalum wrote: miskatonicalum wrote:I had quite a few people try to tell me your buildings were pre-fab at Gencon, Tonio! They didn't believe me when I said they were made from scratch.
I guess that is a good thing, right?
36184
Post by: Alfndrate
The easiest way to prove they weren't pre-fabricated was to flip them over and show them the spray foam
28292
Post by: Catyrpelius
miskatonicalum wrote:I had quite a few people try to tell me your buildings were pre-fab at Gencon, Tonio! They didn't believe me when I said they were made from scratch.
After seeing the pics I still don't belive that they weren't prefab...
Tonio you have way to much time on your hands. You need a hobby like resin casting, so maybe I'll stand a chance of getting my endless stuff before I'm too old to paint.
64782
Post by: Tonio
 Catyrpelius wrote: Catyrpelius wrote: miskatonicalum wrote:I had quite a few people try to tell me your buildings were pre-fab at Gencon, Tonio! They didn't believe me when I said they were made from scratch.
After seeing the pics I still don't belive that they weren't prefab...
Tonio you have way to much time on your hands. You need a hobby like resin casting, so maybe I'll stand a chance of getting my endless stuff before I'm too old to paint.
Well, way too much time is relative. Nothing else hobby wise was made in two months, and my wife started to wonder if I came to bed only before the alarm was going off in the morning. I even skipped our club's weekly painting nights during that time. But I'm happy with the results, and I gained some trick for future projects, which should go quicker. Experience well earned.
43045
Post by: Casey's Law
You really are excellent at that stuff Tonio! Hope we see more from you soon. Good man for doing a tutorial, it's always insightful to see how others work. 
70211
Post by: WhiteRoo
What's up with the building that looks like it was cut in half?
64782
Post by: Tonio
 WhiteRoo wrote: WhiteRoo wrote:What's up with the building that looks like it was cut in half?
It's going on the edge of the board. The back that is never shown is flat and black like the side of the board.
77726
Post by: Digclaw
The WIP shots of the endless board are a great help it gives me some ideas of how to start my own board. Though it also means i gotta get more stuff to make it, hahahaha.
64782
Post by: Tonio
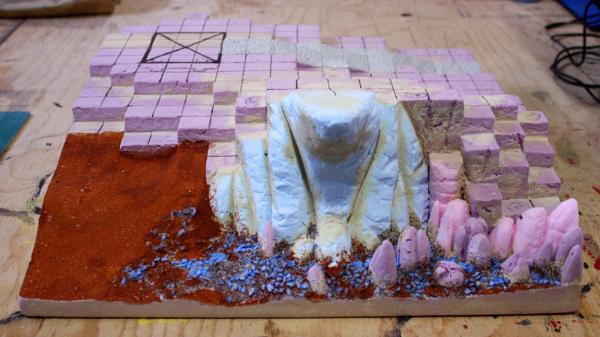
New project! This time, I'm making a demo board for EFT, again for OTLG. The one I already have (the crystal mine) is a bit big even for regular sized game, so I'm going for 16x16 instead of 20x20. That should work well for demo and small games.
The theme is inspired by an actual console game map, the Orbonne Monastery from Final Fantasy Tactics. Not to be to similar in colour to the BF board, the style will also be different: it will be inspired by Spanish churches and coasts, instead of the northern look the original map has. Dryer ground, white walls, red clay tile roof, etc.
Here are links to the reference pictures I got up to now.
Coast
- Coast picture 1
- Coast picture 2
Church
- Church picture 1
- Church picture 2
- Church picture 3
- Church picture 4
Symbol and colours of Numina (light goddess in the game setting)
- Symbol picture 1
I tried my hand at doing a 3d concept, but it was taking far longer than I wanted, and I lost the file when my computer crashed during a save. Screw that; I'm now back to pencil sketches right now.

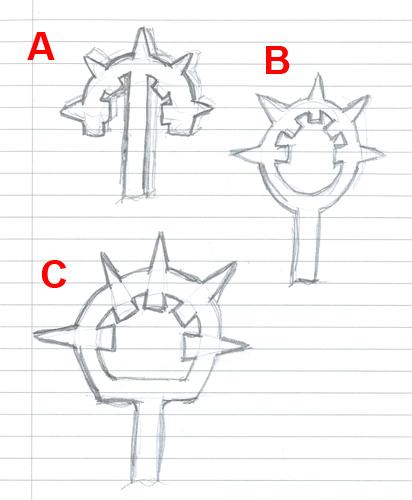
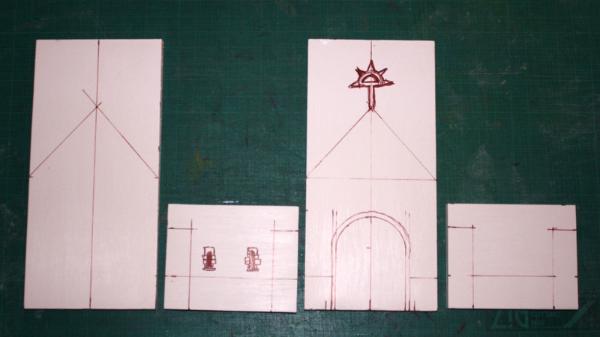
First is the symbol of Numina and three modifications I made to it, as I want to have it free standing on the board, a bit like a statue or totem. I'm sure there is an English word for exactly that, but it escapes my 2nd language knowledge. Design C was chosen in the end.
Next I have a sketch of the church. It will be pretty small, 4 tiles by 4 tiles, not to use to much space on the small board. The top will have a "totem" similar to the one mentioned above, and the true symbol of the goddess will be found on the front side, over the main door.
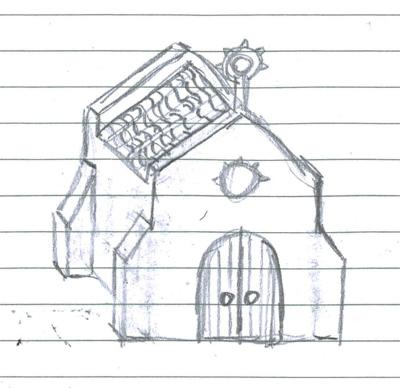
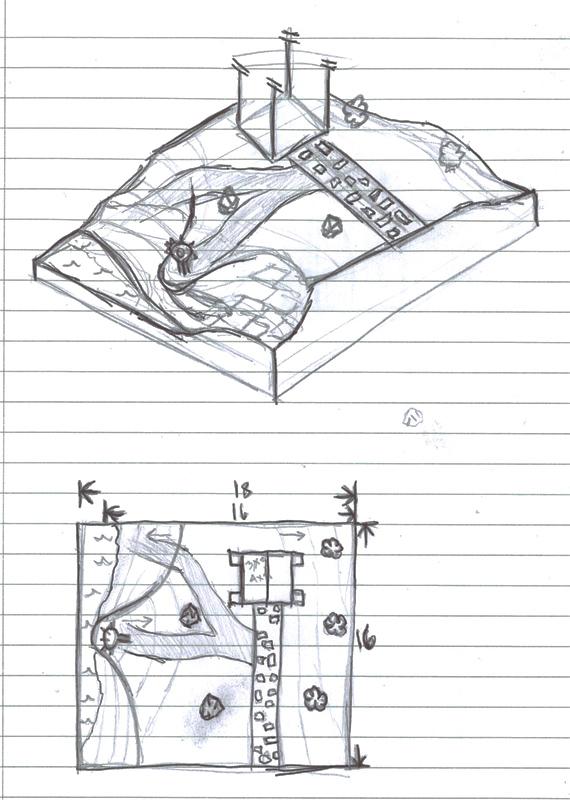
Last are my sketches of the board itself. I'm not too happy with the angled one. I need to work on my drawing skills to make denivelation easier to see/understand. The "totem" will go on the arm of land that span a bit over the cliff going down to the water. Some scrubs will be used as movement blockers on the right side, and some weighted rocks (to stay in place, but still be able to be switched between games)on the left side.
The design overall is pretty simple, but so is the reference game map. The most difficult parts will be to do the slopes without making them too blocky, and the tiled roof of the church. I tried ordering some moulded plasticard, but the supplier I tried was out. Not sure yet how I will do that. Any suggestion?
15297
Post by: Ramos Asura
Oh this is gonna be great! Loving the concept art thus far.
Im particularly excited to see how you tackle the cliffside monument (Relic/totem/statue... I cant think of any other words that would fit better, even with English being my first language!)
As to the tiled roof... I suppose you could probably build one from bits of plasticard tubing cut in half lengthwise? It'd be a hell of a lot more work than simply plasticarding it, but would get the desired effect.
43045
Post by: Casey's Law
Looking forward to this!
Oh and you may be searching for the word, 'monument'.
9594
Post by: RiTides
I love following your board projects, Tonio. If this second EFT board is anything like your first, it'll be amazing!!
69824
Post by: Galen
Of course you have to go and pick one of the most boring, flat FFT maps All kidding aside, It should make a great demo board since it is such an iconic map.
I've stuck mostly to rocky terrain, partially because it looks good being cubed, and partially because my modelling skills are not the best. I'm curious to see how you are doing the slopes. I have a feeling you will come up with something, hopefully an idea I can steal.
64782
Post by: Tonio
 Galen wrote: Galen wrote:Of course you have to go and pick one of the most boring, flat FFT maps All kidding aside, It should make a great demo board since it is such an iconic map.
Hey, don't knock the terrain guy, the map wasn't my own idea. But yeah, as you said, it should be pretty good for demos, and even with the changes, should be easy for the video game players to identify, or at least catch their interest a bit.
I'm curious to see how you are doing the slopes. I have a feeling you will come up with something, hopefully an idea I can steal.
That's something I'm still toying with. As you said, the blocky look works for rocky areas, but not as much for a natural, smooth slope. I have a couple ideas, but nothing I'm too sure will look right. I'll try to make some test pieces for the group to give me feedback on.
Ramos Asura and Casey's Law, "monument" was in fact a word that came to mind, but the French equivalent kinda points toward something huge or with great historical significance. The wikipedia entry I just look into gives a similar description. This seems to be a bit too grandiose for that simple stone work. Doing some more research and back and forth translation, I think the best term would be " wayside calvary".
I finally found some pre formed plastic sheet for the tiled roof that fits the look I want, which I ordered today. I just hope they show up in time, or else I will have to do it myself. I did find a good tutorial about it, but the work it represents is a bit labour intensive for the time I have left.
15297
Post by: Ramos Asura
Ah "shrine" coulda been another word for it (amazing how one doesn't think of these things till later!)  In any case, that term seems exactly what you were searching for. And I learned something new! Had never heard of a wayside calvary before.
64782
Post by: Tonio
I had to put this project on hold before the Holidays due to the workload at my day job, but that's all over and I'm back on the board now. The deadline is early February, to have it ready for Templecon, but I hope to have it done earlier, so that I can paint some EFT to be able to play at the con.
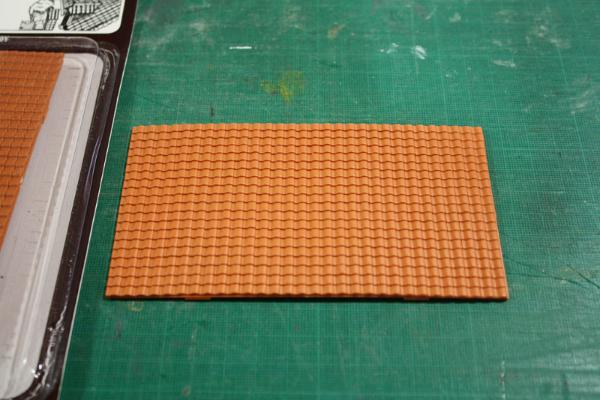
In the last posts I made, I mentioned ordering some preform plastic to make the roof tiles. It got here and it seems like a good match for the scale. Sheets are about 3x5", which is big enough to have a single one by side, instead of having to patch them up.
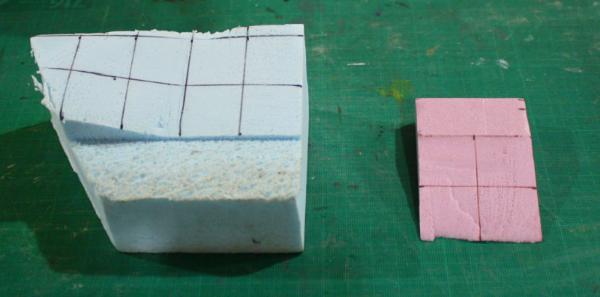
Something else I talked about was some tests on how to do the slopes. I wanted to test out some ways to have them more natural looking, instead of huge blocks. I tried straight angles, and some curved surfaces. The straight ones work well, the angle being low enough that models stand well on it and don't slide. I'll probably use some of those. However, the curved ones were not working at all, especially with the flat bottomed EFT bases. Models stood wobbly and were sliding. I could probably make it works, but I would need to have my elevation change a lot smaller, and I think it would break the look, leaving the whole board too flat. Maybe on a future project. Here a shot of some of the test pieces.
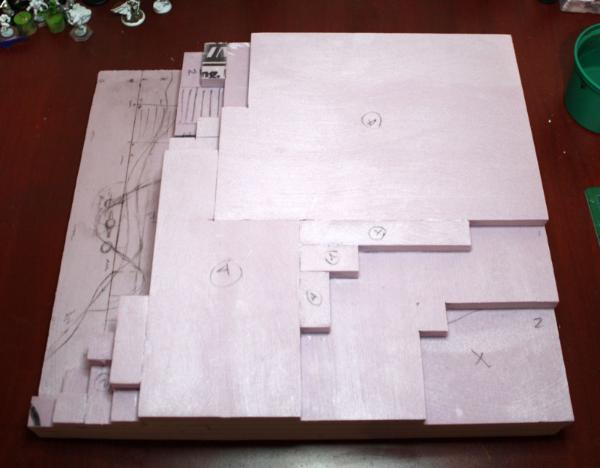
After that, it was time for a top down sketch at the right scale. The foam board is 18x16". It's a bit of a mess, as I went back over several parts more than once, but it does give you a idea of the final layout.
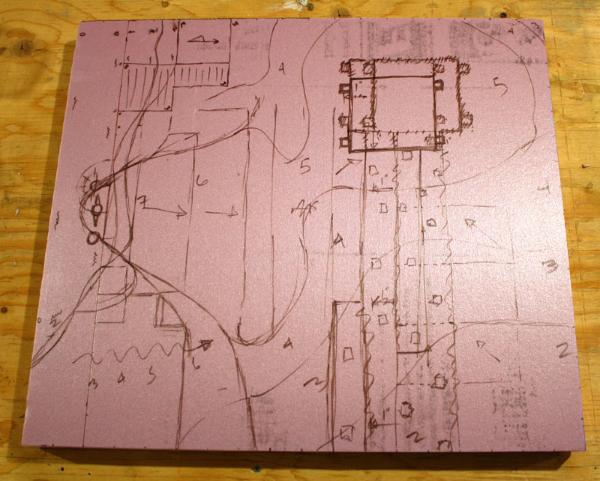
With that in hnad, and the original sketch, I did my grid layout map, using Excel. The final board will probably have a couple of small changes, but that's my reference for all the initial foam cutting per elevation.

That's all the pictures I have uploaded right now. Next batch will show the start of work on the board itself, like all the basic foam cutting and the rough shape, before texturing began.
Any comments or criticisms are welcome.
42485
Post by: miskatonicalum
Thats great to hear that the flat slants worked so well. For some future proofing, maybe test both the flats and curves with texture/basing on them, see if that makes a difference? Possibly scruffing up the bottom of the bases with some sandpaper could help too.
If possible, I'd love to see a detailed walkthrough when you get to the water. I've never had luck with that aspect.
The Spanish Colonial tiling is also really cool. Where did you find it?
64782
Post by: Tonio
miskatonicalum wrote:Thats great to hear that the flat slants worked so well. For some future proofing, maybe test both the flats and curves with texture/basing on them, see if that makes a difference? Possibly scruffing up the bottom of the bases with some sandpaper could help too.
I did some tests with sand, but I couldn't find those pieces when picture time came. The sand makes it even slippier, so I'll need to make sure to add some elements between the squares to help prevent models slipping. I haven't tried to rough up the bases, but I think the problem has more to do with their flat, full bottom, then the exact texture. A base with an hollow bottom (like the regular 25mm square GW bases) could fit over some small curve in the terrain, but the flat one can't.
If possible, I'd love to see a detailed walkthrough when you get to the water. I've never had luck with that aspect.
No problem, I'll take more notes and pictures this time around.
The Spanish Colonial tiling is also really cool. Where did you find it?
Those come from Wills, a UK line making OO/HO scale train stuff. I had a picture of the package, but erased it by error instead of the one I put in the thread... 
64782
Post by: Tonio
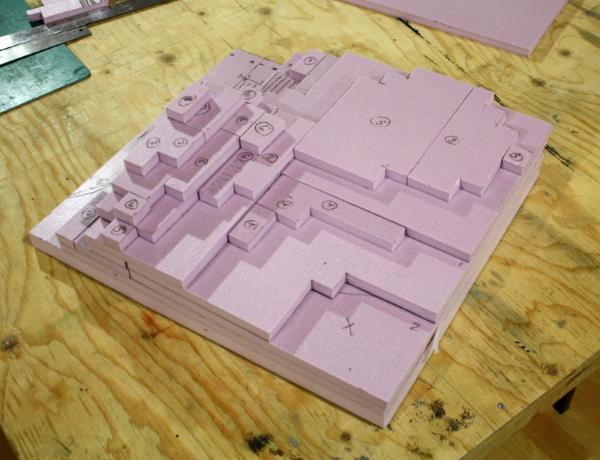
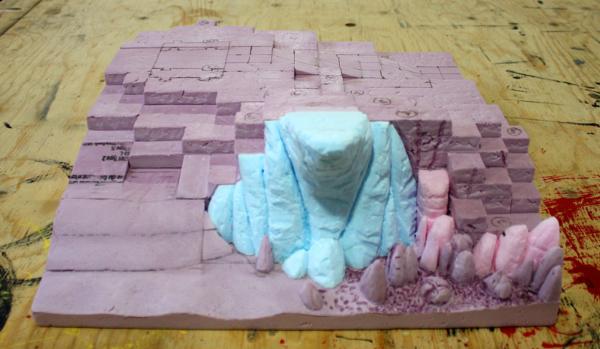
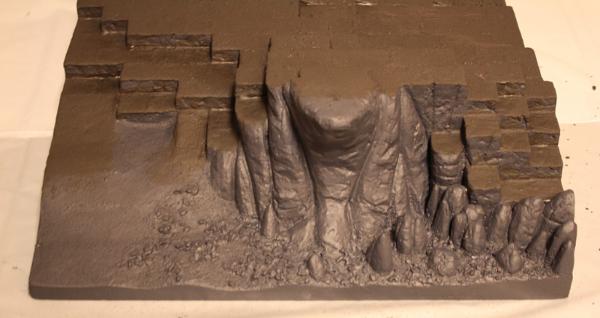
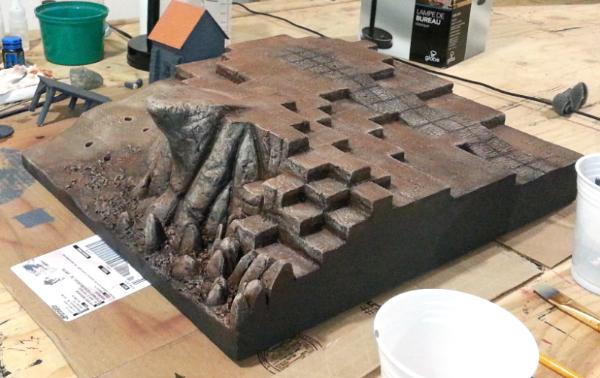
Here are a couple more constructions pics. Taking pictures is not the problem, it's finding time to edit them and post them here. The work on the cliff, which is fully texture, not blocky, is well under way. You can also see that I didn't glue the final 8th level, as it's worked in the cliff texture work.
WiP - Dry fit test of all the levels
 WiP
WiP - Gluing of the base elevations, midway
 WiP
WiP - Gluing of the base elevations, completed
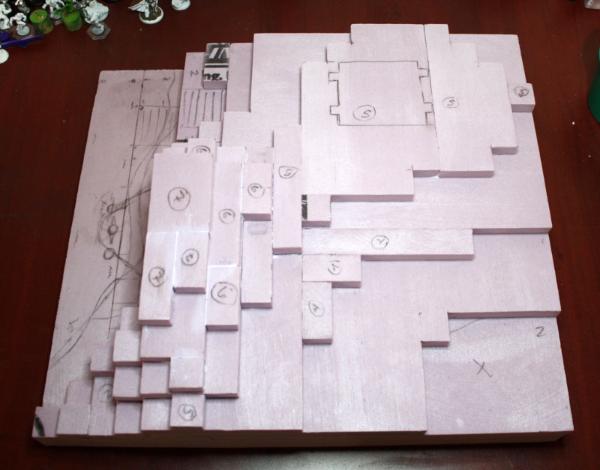 WiP
WiP - "Before" view of the cliff
9883
Post by: Cyporiean
Looks great!
9594
Post by: RiTides
Your first EFT board absolutely blew me away, and I really like the layout of this one so far. Not much time left you'll have to power through!
64782
Post by: Tonio
 RiTides wrote: RiTides wrote:Your first EFT board absolutely blew me away, and I really like the layout of this one so far. Not much time left you'll have to power through!
You don't tell me! On top of that, I've been sick most of the weekend, with cut down my freetime, but the whole timing still looks good. I'll just not have time to paint a small EFT party like I wanted before the convention. It's going to be grey resin or proxies for me, sadly, but I will still want to play!
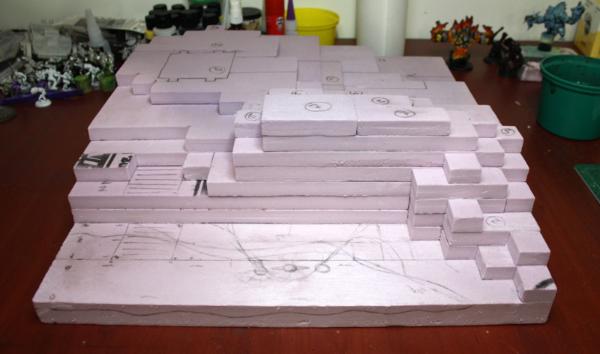
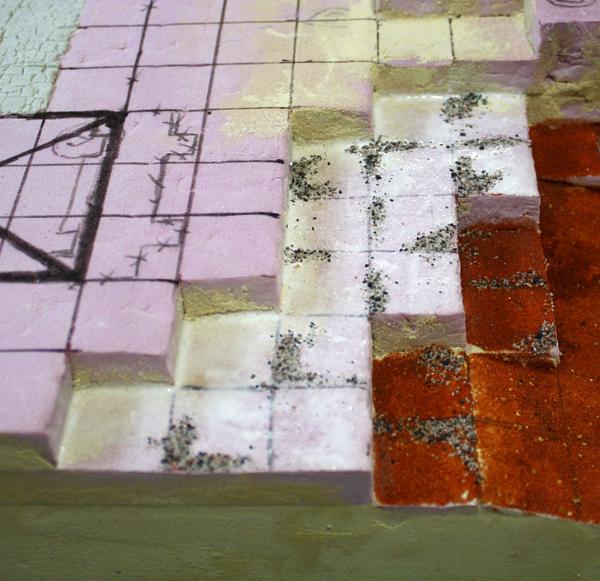
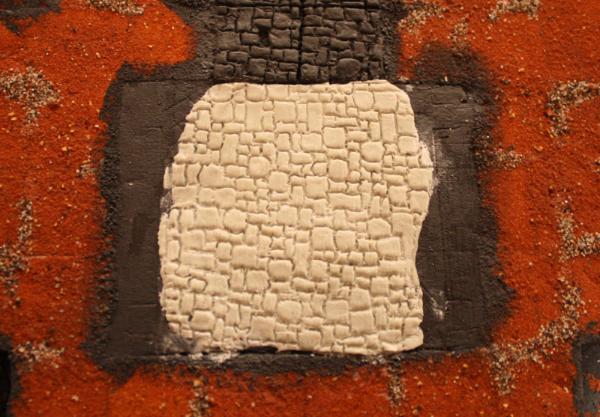
Here is the next batch of update pictures. The pic titles are pretty self explanatory, so I won't go in detail for each step. I just want to mention how I did the flagstone road. For that, I used my newly received Happy Seppuku Texture Stamps. I applied putty in the correct squares, then pressed the stamp everywhere it was needed. As the stamp doesn't come "tiled", I just had to adjust the putty to help define each squares.
Wip - Rough shaping of the cliff
 WiP - Foam of the cliff and board textured
 WiP - Putty applied to fill gaps and smooth slopes
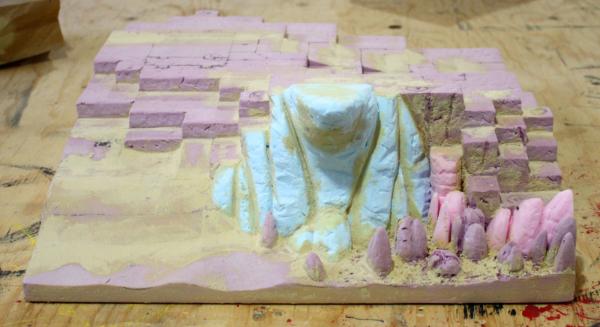 WiP - Flagstone road
 WiP - Tiles marked for texturing
42485
Post by: miskatonicalum
In the final picture, what is the blue stuff over by the rocks?
The texture on the road is amazing. Tell me you used a template or resin tiles and didn't do that by hand again.
64782
Post by: Tonio
miskatonicalum wrote:The texture on the road is amazing. Tell me you used a template or resin tiles and didn't do that by hand again.
Tonio wrote:(...) I just want to mention how I did the flagstone road. For that, I used my newly received Happy Seppuku Texture Stamps. I applied putty in the correct squares, then pressed the stamp everywhere it was needed. As the stamp doesn't come "tiled", I just had to adjust the putty to help define each squares.
miskatonicalum wrote:In the final picture, what is the blue stuff over by the rocks?
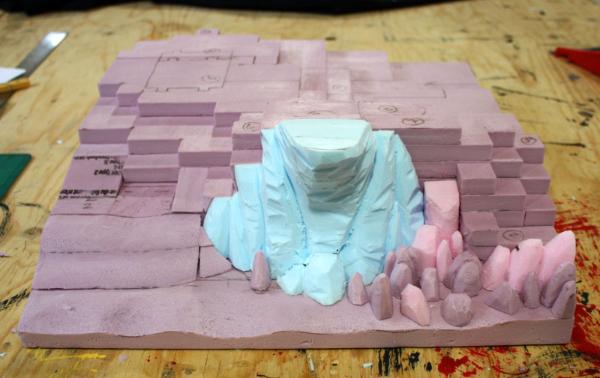
Those are simply aquarium rocks. I'm in the middle of texturing the base of the cliff, and was waiting for the whole section to be done before doing another picture.
42485
Post by: miskatonicalum
 Tonio wrote: Tonio wrote:(...) I just want to mention how I did the flagstone road. For that, I used my newly received Happy Seppuku Texture Stamps. I applied putty in the correct squares, then pressed the stamp everywhere it was needed. As the stamp doesn't come "tiled", I just had to adjust the putty to help define each squares.
D'oh, I just saw pretty pictures. Nothing else entered my mind.
69824
Post by: Galen
That looks great! The cliff and rocks below look so good.
What tool do you use to cut the slopes into the foam for the road?
64782
Post by: Tonio
Galen wrote:That looks great! The cliff and rocks below look so good.
Thanks.
Galen wrote:What tool do you use to cut the slopes into the foam for the road?
Patience and an x-acto knife.
I cut a 2x2" piece of foam, put it on its short side, mark two opposite corners, then slowly cut through it. The result is not perfect, but after a light sanding and some putty, it's nice and flat like the rest.
64782
Post by: Tonio
Here is some more work.
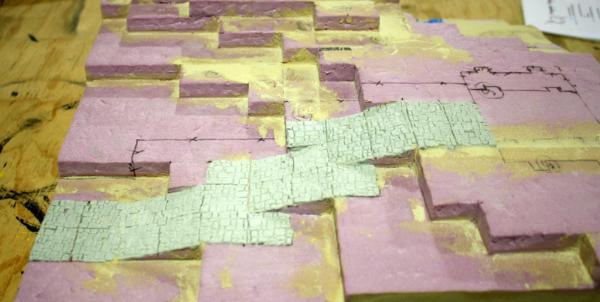
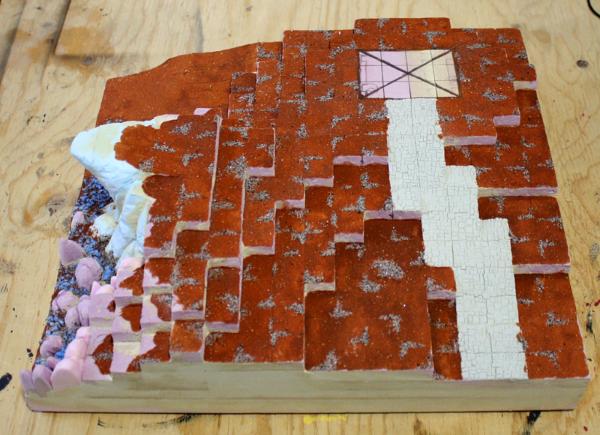
For the reef and beach, I started by roughing up the foam with a Hot Foam Knife, applied some wood putty and then added bigger rocks (blue aquarium rocks). Those three steps were already done in my last post, but not mentioned. Next step was adding rough sand (grey), and finally some really fine one (rust).
For the playable tiles, I decided to do them in a different way then the ones on my Mine board. Instead of making grooves in the foam to physically mark the squares, I am doing it with basing material and paint this time around. As I had already drawn all the tiles on the board, I had nice guides to start applying the texture. The idea was to have some rough patches to help identifying lines and corners, while the rest would be filled with fine sand. This will be reinforced with the painting and the flocking of the board, to make sure it's easy to use. It all works out in my head, I promise.
For this, the first step was applying watered down glue on a section of the board, then using a small spoon, I dropped small quantities of rough sand on random lines and corners of tiles. Before the glue dried, I then filled the space with the finer sand. Repeat and rinse, until all the board is textured. I still have to do some touch-ups, and add some sand patches on the road, but that's about done.
Next up are two important steps I need to do before I can start painting. First step will be to make the stand for the wayside calvary. The calvary itself can wait a bit, but not the stand. Same thing for the base of the chapel. I need to have my exact shape done before I start painting, as it probably won't be squared like the zone reserved for it on thr last picture, and some texture will get in there too, that will need to be painted too.
42485
Post by: miskatonicalum
Looking great! It's amazing to see it come together.
9594
Post by: RiTides
So cool  . That texture stamp is the bomb, although I'm sure it's harder than you make it sound. Tempting me to get one, though... I just modelled and 3d printed a cobblestone part as a gift for someone, and man, it took me forever!
64782
Post by: Tonio
They really are that easy to use. Sure, they are mostly made for bases, and I had to slightly modified my flagstone stamp to make it print up to edges, but that was nothing complicated. The most time consuming part was making/enlarging the lines that separate the tiles. That required some basic sculpting, but again, nothing big.
Here is the youtube channel for Happy Seppuku, where they show how to use their stamps. You'll see that it is really easy.
http://www.youtube.com/channel/UCXZhLR4FQkgejjMYCDqZK2A
9594
Post by: RiTides
Basic sculpting to you
But thanks for the link, I will check it out
4670
Post by: Wehrkind
Wow, I hadn't peaked back here in a bit. That board is fantastic looking so far! I am really glad you are posting the step by step on how to do it. Great reading, even if it does softly whisper "you should totally take on another project like this!"
If I do, I will post pictures of my subsequent seppuku here. Or at least I will try and do a live stream or something. (Clearly I haven't thought this through.)
52617
Post by: Lockark
aw man this is what i get for negletceing to look in this thread for abit! top notch stuff on the new board!
O____O
64782
Post by: Tonio
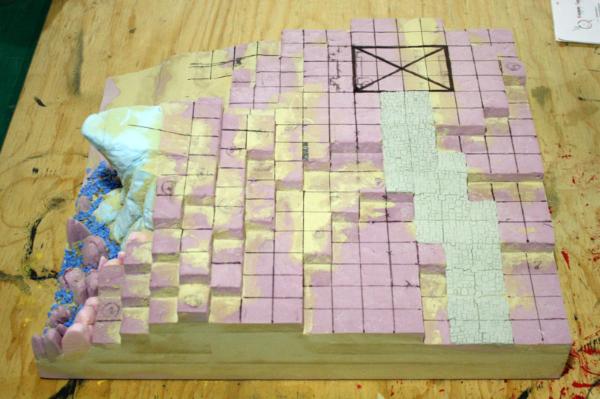
The board is now all primed and ready for painting. I've also started work on the chapel, with only the roof, the door and some accessories to add.
Just for you RiTides, I've done a mini step by step of the stone work, to show how easy it is.
Step 1 - Spread the putty
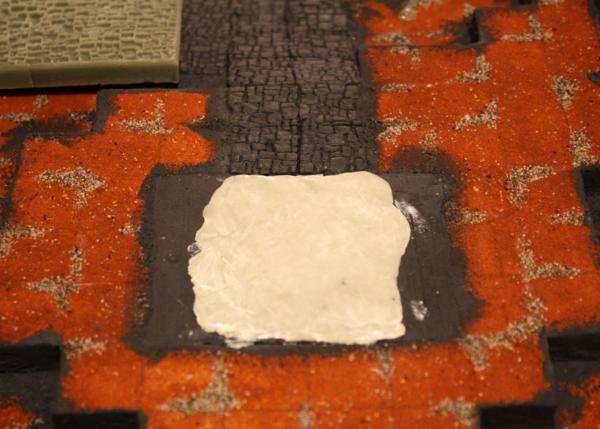 Step 2 - Press the mold
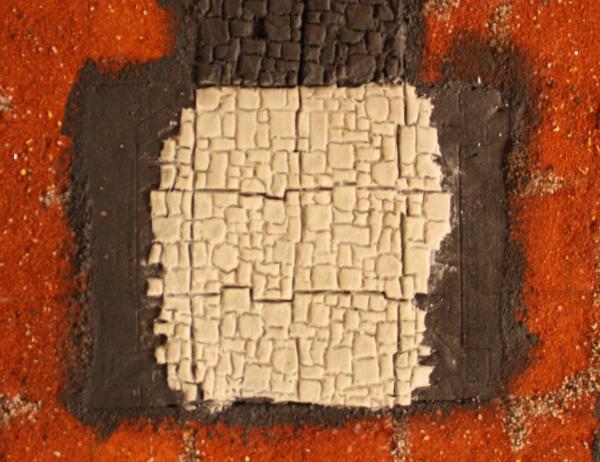
If you are going for an "untiled" look, you are done. Super easy. As I'm doing it for EFT, I just had to "magnify" some of the lines, to give an idea of tiles. This isn't hard, just a bit time consuming.
Step 3 - Tiling
Here is a shot of the cliff and beach, all primed. With an unified colour, it ties in everything and gives a better idea of the look I'm going with.
Now here are a bunch of shot of the work on the chapel. The white plaster is actually... white plaster, left over from the work on my basement this summer. It was applied with a plaster tool, and using a small cloth piece, I sponged it. Once a bit dryer, I simply smoothed it a bit with a flat wooden tool. The chapel is magnetized so to stay on the board, but still be easy to transport.
9594
Post by: RiTides
Thank you very much for the step by step on the tiling
I thought it would be hard to use so close to the edge of the prior tiles, but it seems to work right up to the edge. Looks awesome
9883
Post by: Cyporiean
Are those little metal window frames?
Awesome work as always!
64782
Post by: Tonio
Yes, the window frames are metal pieces from Antenocitis Workshop.
15297
Post by: Ramos Asura
Im just speechless!
You've way too much talent, Tonio- I would love to play on a board like that! Looks really good with a coat of primer on it.
What do you think the durability on the plaster will be like as far as travel and play?
64782
Post by: Tonio
 Ramos Asura wrote: Ramos Asura wrote:Im just speechless!
You've way too much talent, Tonio- I would love to play on a board like that! Looks really good with a coat of primer on it.
What do you think the durability on the plaster will be like as far as travel and play?
Are you attending Templecon? The board will be there.
The plaster is just a thin coat on foam core, that will be further hardened with watered down glue. It should do fine, I think. @Cyp, did the other boards got any damage during the transportation?
9883
Post by: Cyporiean
Tonio wrote:@Cyp, did the other boards got any damage during the transportation?
Previously we've had boards last us around a year, but I'm planning on getting some hard plastic containers to store the boards you've made in; that should hopefully keep them around longer.
I think the only wear and tear on the two boards we've got from you now is some minor rubbing around the corners/edges.
64782
Post by: Tonio
Here is a quick pic I took with my phone earlier this week, to at least show some of the ongoing progress.
9594
Post by: RiTides
Wow, that's already shaping up really nicely Tonio! And you're saying you're further along than it shows?
I guess there's not much time left, though . At least take a break to watch the Super Bowl!
64782
Post by: Tonio
The painting itself hasn't progressed that much: it's mostly the accessories that got worked on since that picture. However, I'm looking forward to that freetime weekend to get the board all ready for the first resin pour on sunday night.
9883
Post by: Cyporiean
The board looks great! Just needs some more grid lines
64782
Post by: Tonio
Yes... My plan to have them show up during painting with the use of a coarser grain of sand has been mostly cancelled by the magnetic primer I applied on the board to have movable elements. I didn't expect that much thickness and texture in the primer, and it flattened/hid most of those texture lines. I'll know for next time. 
The grid will still be painted on, and the flock and turf will help to strengthen the visual cue. I just won't have the sand texture to help also.
9594
Post by: RiTides
Tonio wrote:The painting itself hasn't progressed that much: it's mostly the accessories that got worked on since that picture. However, I'm looking forward to that freetime weekend to get the board all ready for the first resin pour on sunday night.
What is the resin pour for? Water at the base of the cliffs / edge of the beach?
69824
Post by: Galen
Tonio wrote: the magnetic primer I applied on the board to have movable elements.
I never realized anything like this existed. This could be one of the best ideas EVER!
I had toyed with the idea of using gravel or grass to denote a grid. I can't wait to see how that works out. Also the straight slopes on your road are a good analog to the rooftops I am considering. I figured that a gradual increase in elevation over a couple inches would be flat enough for models, but hadn't got around to testing.
64782
Post by: Tonio
RiTides wrote:What is the resin pour for? Water at the base of the cliffs / edge of the beach?
Exactly that. It will go up about an inch in height.
9594
Post by: RiTides
I hope this was a productive weekend, Tonio, time is almost up
9883
Post by: Cyporiean
RiTides wrote:I hope this was a productive weekend, Tonio, time is almost up
I'd say it was, he has been sending me some nice shots
64782
Post by: Tonio
Yes, as Cyp mentions, there was progress, and a lot of it. But editing and posting those pics takes too much time for the few days/hours I have left. I might be able to post some tonight, and I'll come back after Templecon and post the rest of the wip.
28292
Post by: Catyrpelius
Tonio wrote:Yes, as Cyp mentions, there was progress, and a lot of it. But editing and posting those pics takes too much time for the few days/hours I have left. I might be able to post some tonight, and I'll come back after Templecon and post the rest of the wip.
I'm really glad that I'm not the only one that has deadlines sneak up on them.
9594
Post by: RiTides
Looking forward to seeing the pics after the fact then, Tonio
70242
Post by: kenshivalion
They have pics of the finished board on their Facebook page. It does indeed look amazing!
So is it safe to say we now know what the Ulbane Monastary looks like?
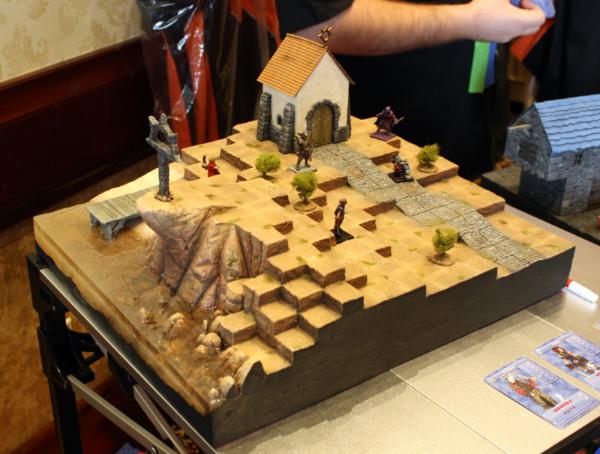
64782
Post by: Tonio
Back from Templecon! Here are some pics of the board I took. I'll go thought my backlog of wip in the following days.

28292
Post by: Catyrpelius
Glad I got to finally meet the man behind the boards!
15297
Post by: Ramos Asura
Simply amazing work, Tonio. The board turned out awesome! Just everything about it.... spot on perfect!
A brilliant idea using magnetic paint underneath. I'll have to keep that in mind if/when I make my attempt at a board.
9594
Post by: RiTides
Those pics are great! I saw a few from the event, but really well done Tonio. The road to the church really makes it
64782
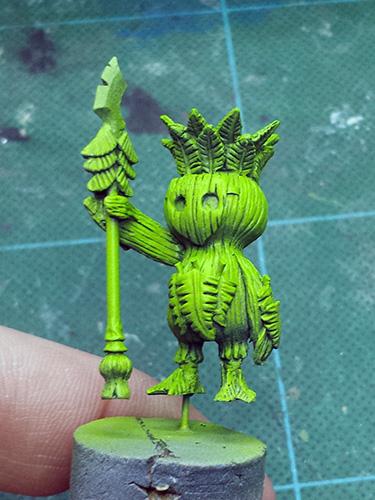
Post by: Tonio
It's been a while since I've worked on anything OTLG related, but I got my 2nd KS package last week, and could not wait to start painting the Mandragora. I don't have much to show right now, just a quick airbrush priming and zenithal basecoat. More to come soon.
320
Post by: Platuan4th
Nice start. Can't wait to get in my own Mandragora, but I expect it'll be awhile since I backed at Sergeant level and added on more stuff.
9594
Post by: RiTides
Looks promising, Tonio!
28292
Post by: Catyrpelius
I'm looking forward to getting my stuff in too, some of the models turned out fantastic!
9883
Post by: Cyporiean
Can't wait to see what ya do with that Mandragora
64782
Post by: Tonio
That model wasn't supposed to take that long to paint, but with a new baby who showed up a little early, hobby time has been scarce lately. I was at least able to paint a bit today. The "skin" is done, as well the face plate. The rest is just some colour blocking to see if I like the multiple colours of leave.
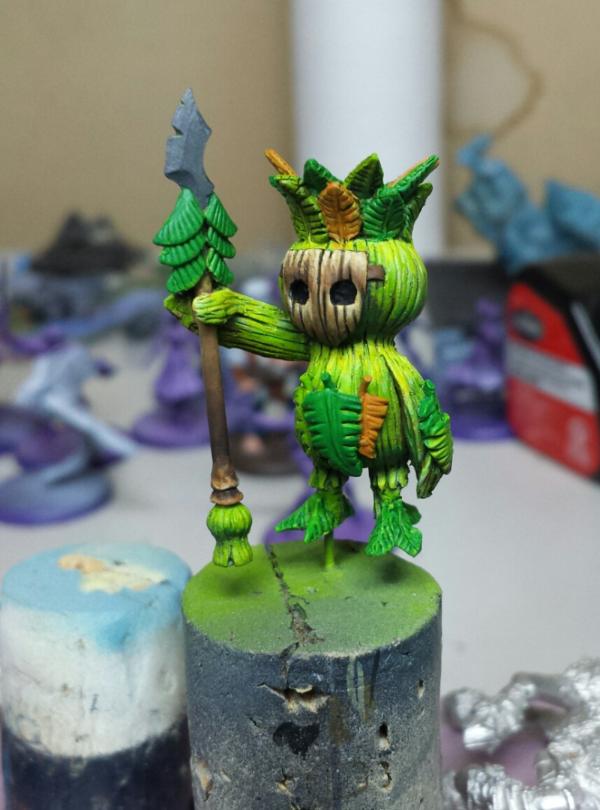 p
9217
Post by: KingCracker
Very cool looking to me
320
Post by: Platuan4th
Looking good!
Also grats on the baby!
9594
Post by: RiTides
That faceplate and green "skin" are fantastic! And second the congrats
64782
Post by: Tonio
Thanks everyone.
A bit more work, leaves all done. Just the blade of the spear and the base left to do.
15297
Post by: Ramos Asura
That looks really, really sharp, Tonio. Very well done!
4670
Post by: Wehrkind
Very nice! I love the mask.
Congrats on the sprog!
64782
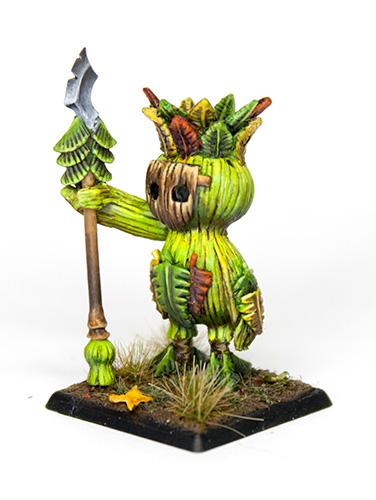
Post by: Tonio
And done! Really fun mini to paint.
320
Post by: Platuan4th
I'd comment, but I already did on the Facebook group.
9594
Post by: RiTides
Love the finished product Tonio, awesome job!
64782
Post by: Tonio
Final pic of the Mandragora. It's at the same painted status than last picture, just done in a nicer photo setup.
9594
Post by: RiTides
Did you touch up the surroundings in photoshop, or is that just the pic straight from a lightbox?
I pledged for this to use as a lightbox, which was projected for delivery last month, but likely won't be showing up for a little bit:
https://www.kickstarter.com/projects/orangemonkie/foldio-2-bigger-and-smarter
I need a solution soon, so any tips / thoughts on your photo setup would be appreciated!
15297
Post by: Ramos Asura
^seconded- I could totally use a new photo setup, myself!
I really like how that Mandragora looks. Ace job on the paint!
64782
Post by: Tonio
I looked a lot at the foldio2 too. I was too tight money wise at the time, but once it's out, I might invest in one.
My setup is pretty simple. A single light, background and a tripod. I think what helped a lot is how I changed the light. I'll have some pics later today to explain it. The tripod does make the biggest difference though.
Did you touch up the surroundings in photoshop, or is that just the pic straight from a lightbox?
I only used the level tool in PS to set the background as "white". Open Image > Levels > Highlight pipette > Click on the background > Done.
64782
Post by: Tonio
I won't have time to write my full blog post today, but here is the gist of it. I've been using a ring bulb lamp for painting for a while, which also have a big magnifier in it. Earlier this week, I hacked into it and removed the magnifier lense which I don't use anyway. Now, I just have to shoot through the hole in the lamp to have a nicely, fully lit model with no ugly shadows. To get good pictures, you still need a tripod or another way to stabilize your camera/phone, and if you can, adjust the white balance, as it removes most of the photo editing you would have to do. Even my android phone provides that option by default, so most phones can probably do it too. 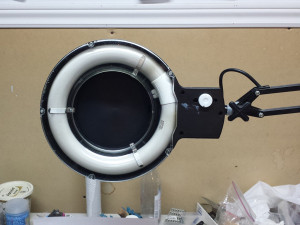 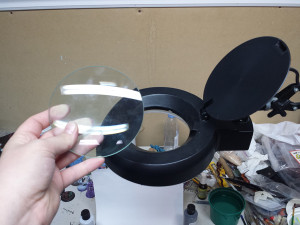 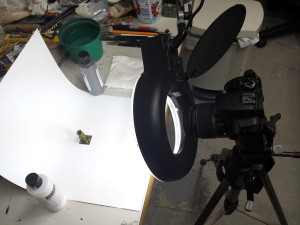
9594
Post by: RiTides
That is a brilliant yet simple setup, Tonio - well done!
|
|


