106010
Post by: Meer_Cat
The Vallejo racks are ace, and the GW not bad. Above them though- that is fething brilliant to use kitchen drawer dividers mounted flat to hold paints and things. If you glued a couple popsicle sticks across the long, vertical slot on the right, you could store brushes, coffee stirrers or other long unwieldy objects that spill all over the painting desk! I'm stealing that. 
38561
Post by: MDSW
 Theophony wrote: Theophony wrote:I am so looking forward to making that print once this KS ends and delivers.
Automatically Appended Next Post:
So while looking for an answer to fixing my SD card I may have learned the issue. I bought a 64GB micro SD, seems with having to format it as a FAT32, FAT32 cannot save files over 4GB  . No wonder its larger prints that I keep loosing. Plus i'll need to partition (  ) the drive. I'll look into that later. Basically even though I have a 64GB drive it can also only hold up to 32GB of material or it'll crash. Makes no sense to me, but TECHNOLOGY  .
Reformating the disk now.
What did you reformat the card to to be able to put larger files on and use the entire disk space?
68139
Post by: Barzam
Cool. I'm happy to hear that the terrain is fdm optimized. I hate having to mess with supports.
Speaking of, I've been printing stuff from Rebel Minis' stl Kickstarter. While pretty much everything needs supports, the quality of the models has, so far, been top notch. When I get home tonight, I'll have to get a pic of the Infiltrator Bike i printed. It has a curved top to it and the thing is smooth. If not for the cleanup i still need to do to remove some of the support scarring, you probably wouldn't even be able to tell it was printed with an fdm printer.
106010
Post by: Meer_Cat
That's a fine tuned fdm printer, Barzam! I'd like to see the pic when you can get it. 
30672
Post by: Theophony
 MDSW wrote: MDSW wrote: Theophony wrote:I am so looking forward to making that print once this KS ends and delivers.
Automatically Appended Next Post:
So while looking for an answer to fixing my SD card I may have learned the issue. I bought a 64GB micro SD, seems with having to format it as a FAT32, FAT32 cannot save files over 4GB . No wonder its larger prints that I keep loosing. Plus i'll need to partition ( ) the drive. I'll look into that later. Basically even though I have a 64GB drive it can also only hold up to 32GB of material or it'll crash. Makes no sense to me, but TECHNOLOGY .
Reformating the disk now.
What did you reformat the card to to be able to put larger files on and use the entire disk space?
I stupidy just put dozens and dozens of files on there and took up more space than I should have, which is what caused the crash. Creality also said not to have file names longer than 12 characters, I have to get better about that.
106010
Post by: Meer_Cat
Hmmm.... I haven't put that many files on my SD cards yet, but I'm a "I paid for it, Imma gonna use it" kind of guy (drat those Depression Era parents and their thrifty values!) I better take a look and make sure I'm not crowding the edge of the envelope!
77159
Post by: Paradigm
Well, the Anycubic anniversary sale got me and I now have a Photon and a wash/cure machine on the way... The research begins in earnest tomorrow, but in the mean time, just throwing out some general feelers on the best resin to use, any decent settings profiles, pitfalls to look out for, that sort of thing. Basically, what should a noob know about the Photon?
106010
Post by: Meer_Cat
And I will write all this down, as a resin printer is next for me.....
30672
Post by: Theophony
The sale almost got me. Hope it works out for you.
68139
Post by: Barzam
Forgive my potato quality phone camera and my messy first layer of paint. You can see how smooth the canopy is on the bike though. The top looks good, but the underside is fairly messy since that's where most of the supports were.
1
306
Post by: Boss Salvage
SirayaTech Fast Grey resin was recommended to me for mini printing and I've only ever used it. Flat out great for my purposes, and while I sometimes wish I could faff around with all those bright colored resins I see out there, I don't really have a reason to downgrade, so shrug. You can get it on Amazon for $30-35.
I also just found this, might be relevant: https://www.reddit.com/r/AnycubicPhoton/comments/ctm95t/sirayatech_fast_resin_printing_settings/
30672
Post by: Theophony
Well back in cheap FDM printing
Lord (of the Dance) Borak is breaking in a few good men for a Ballet of Death. Sometimes the Long War has just gone on too long .
There are just too many great models out there to print.
106010
Post by: Meer_Cat
@Barzam: That is an amazing print for an FDM printer- very nice! I like the model itself, too. Imagine a squad of cyber-ninja Roughriders on THOSE!
@Boss Salvage: I've heard/read good things about SirayaTech, nice to see validation/verification. And thank you for all the reading material on getting the best results.
@Theo: Each of those dancing figures needs to be holding a thornless, long-stemmed rose  Dirty Dancin', indeed! Nice printing, very smooth.
18509
Post by: endtransmission
Following Meer_Cat's rose suggestion, I now can't get the vision of two Deathguard doing the same pose with their stomach-mouths holding dead roses between their teeth... disgusting 
106010
Post by: Meer_Cat
Welp, not unexpectedly the second bowden tube coupler between the tube and the extruder burned out (wore out all its widdle teef) and is now useless. I'd been after the company via online chat and email about where to get these unicorn couplers- as they are completely unlike anything else any other printer has ever used or will ever use. Tonight I called and asked where to get either more couplers, a different extruder that can accept Mk-4 or Mk-6 couplers or I was going to have to go with yet another printer from yet another manufacturer. They'll 'open a case number' and 'get back to me'.
I was smart(er) I think and ordered this Monoprice product from Amazon- so next step is to contact them and report a faulty product and see about exchange or refund. I really don't want to do that, because other than the weak bowden tube coupler, the printer has performed extremely well.
In the meantime, I have two entire quadrants (2 square feet) of parts to paint, and even some from the other two quadrants- so it isn't like I don't have things to keep me busy.
It's the downtime for the machine; every minute I waste trying to obtain a part that isn't intended to be serviced in the first place is a minute I'm not printing something I need/want for later.
Honestly, it's enough to make me go back to scratchbuilding with the bits I scavenge out of the gutters! 
30672
Post by: Theophony
That’s really strange on the couplers . I’m sure they will sort it out, it just sucks that it will be down for a while.
106010
Post by: Meer_Cat
Problem (temporarily) resolved! Heard back from Monoprice:
- the type of extruder on the MP10-Mini and some other models "new and improved"
- The issue with the connector (they don't call it a coupler, but it is) is a known problem caused by the bowden tube flexing as filament is pushed through
- A LOT of people have been submitting complaints and wanting to know where to get replacements
- They don't sell the connector except as part of the whole extruder (which they are out of)
HOWEVER (and this is the part that really surprised me): They gave me the website of a company called GigDigit that makes replacement connects. I ordered a bag of 10 for US10.
AND GigDigit gave the Thingiverse address for a file that you can print that acts as an adaptor for the new fangled extruder and a standard Mk-6 bowden tube connector.
I'm a belt and suspenders man- I ordered multiple new type connectors to get back in business, but I'm downloading the adaptor from Thingiverse so I can use all the spare Mk-6 couplers I have left over from trying to make my Ender-3 Pro work.
Mwa-hahahahahahah!!!!!!!!
30672
Post by: Theophony
Glad the issue is resolved. Sounds a lot like the parts on the Ender that Capricorn tubing replaces the couplers when they send you tubes. The original connectors have plastic teeth that break, the Capricorn ones have metal teeth.
38561
Post by: MDSW
That is certainly a better solution than what I ended up doing - I crazy glued the tube! I got so tired of it coming loose during a print. The rare times I had to take it apart I just clipped the end, as there was a bit of slack.
I will now try your new connectors if i fire up the Ender again!
30672
Post by: Theophony
Been printing almost nonstop. Each 4 paint rack takes 3 hours. I want/ need twice as many 
38561
Post by: MDSW
That is awesome!!
30672
Post by: Theophony
Copied over from the new 3D printing forum .
Yeah, A 3D thread I won’t have to manage ......sucker .
My name is Theo and 3D printing Addict  .
Printer: Ender 3 (Regular, not a pro, though I have added just about all the upgrades to make mine a pro)
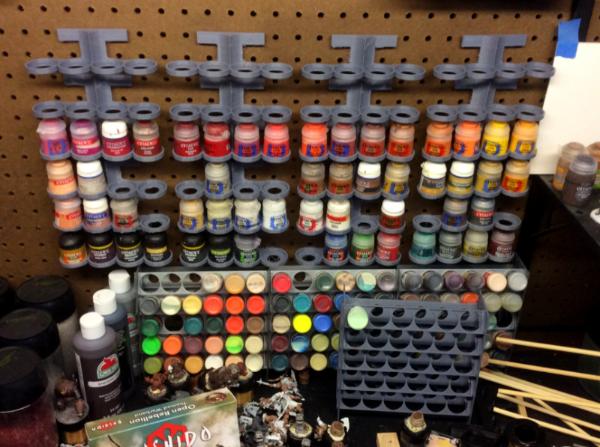
Current Project: getting my hobby desk organized. Printing paint racks.
Next Project: too many ideas, but most likely more terrain for Frostgrave, Ragnarok, Bushido or Gaslands.
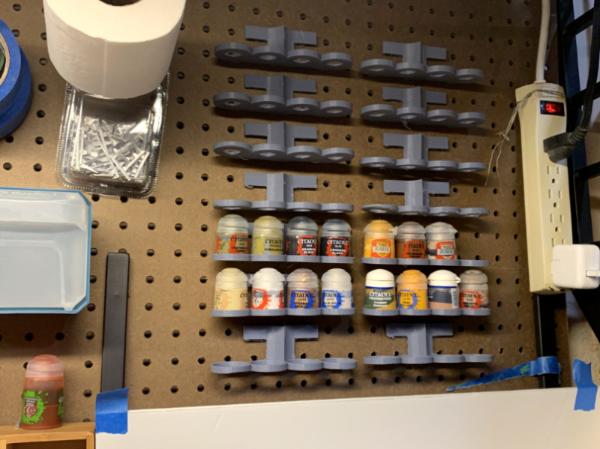
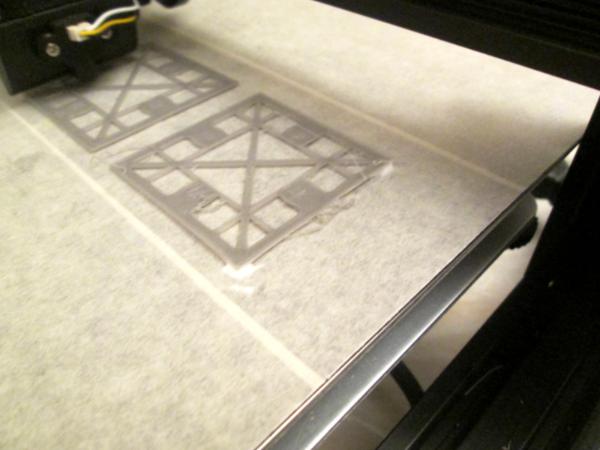
This mornings print fresh off the Ender 3.
The picture is actually very important. The left is a raft that I print whenever I’m doing tiny or multiple parts to make sure nothing breaks free. The five holy strips on the right are the five no sag back pieces for a section of army painter dropper bottle racks. I recently adjusted my raft air gap to 0.4mm and these came off with little fuss as opposed to the pain of the last few prints where the air gap was 0.2mm and I had to cut the parts off.
I just started printing the sides (2) of the rack and will do the fronts tonight when I get home from work.
This is the Thingiverse item number 3263946 by Montbel which is based off of the same design by bbzed, it just has some added struts to keep the bars from sagging due to the weight of the bottles. Here is a profile of the bbzed model printed, one of my first prints from months ago.
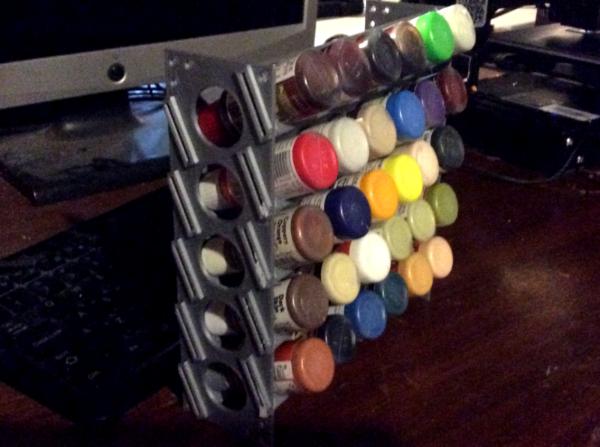
Material wise the 30 bottle section of rack will cost me $3.44 to print for the first one and $2.90 for each additional section as the end of one can be used for the next side.
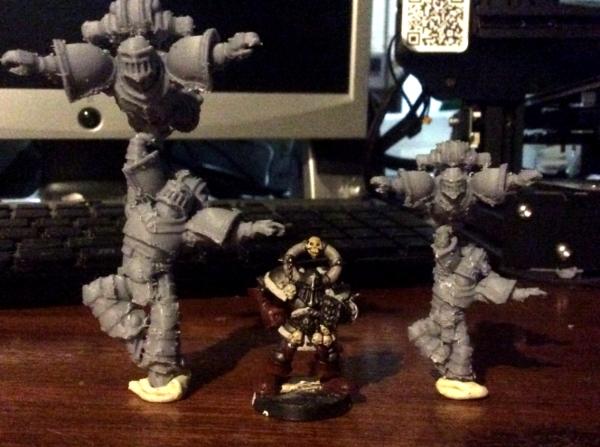
I’ve spent the last four days printing pegboard racks for my GW paints. Here is a picture of about half of them that I have done. Thingiverse item 1374310 by ShadyRabbit.
That part cost $0.42 each and takes about 3 hours each to print. I got 24 of them done, but with the raft adjustment working I might be able to go back and get 3 done at a time and have less down time between prints.
106010
Post by: Meer_Cat
Wondered where the 'gather 'round the printer kids' thread had got off to, nice to find it again- lots of good information and advice here.
I'm Meer_Cat, amateur printer, with one Monoprice MP10- Mini in operation,an Ender-3 Pro I can't make work right but haven't given up on yet and two from Kickstarters that haven't come in yet: the IVI polar printer and the Creality SE-6.
A weakness of the MP10-Mini is that the bowden tube coupler between the tube and the extruder wears out at around 50 hours (the 'teeth' inside the connector wear out from flexion and fall off)
but I have a supply source now and am willing to put up with it.
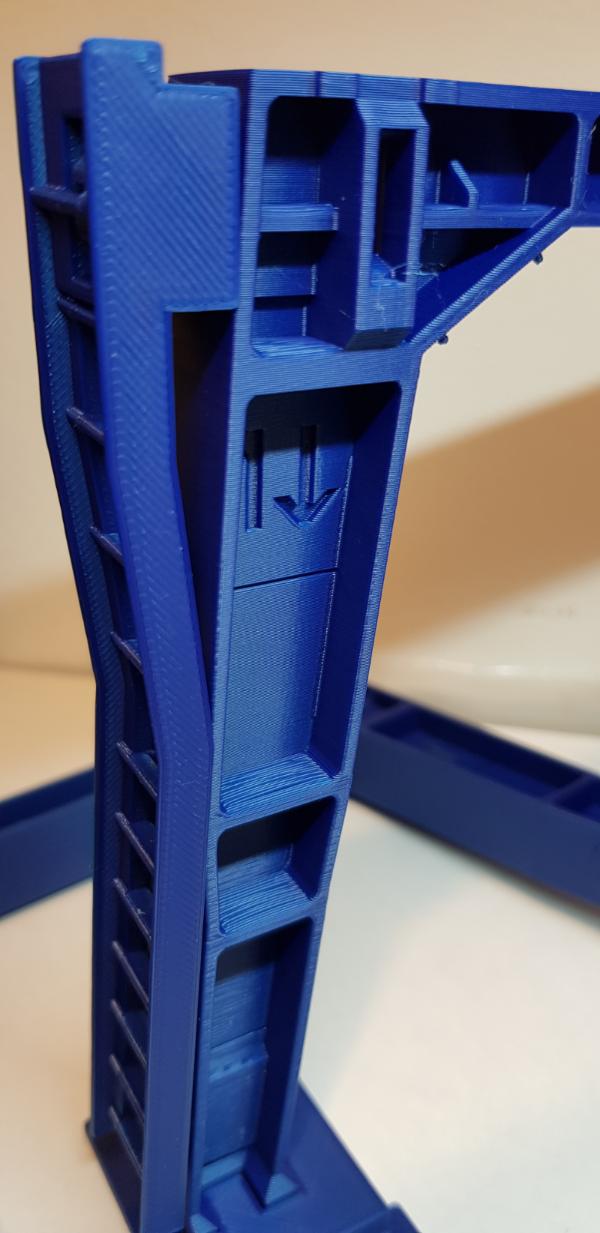
I have gotten a few things printed since Sunday night, when I got back and found my package from GigDigit waiting for me with new bowden tube couplers. First up, the 'chipped' wall section- it shows damage/weathering on both the front and the back:
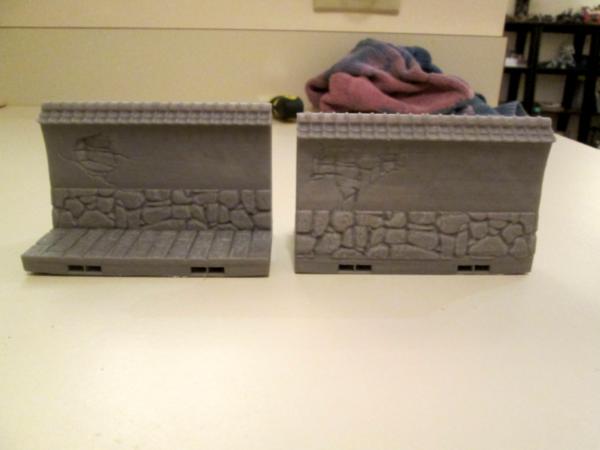
Next another 'porthole' wall section, this time with the 'hole' filled in (there's one more, with bars across the port, I'll print that soon):
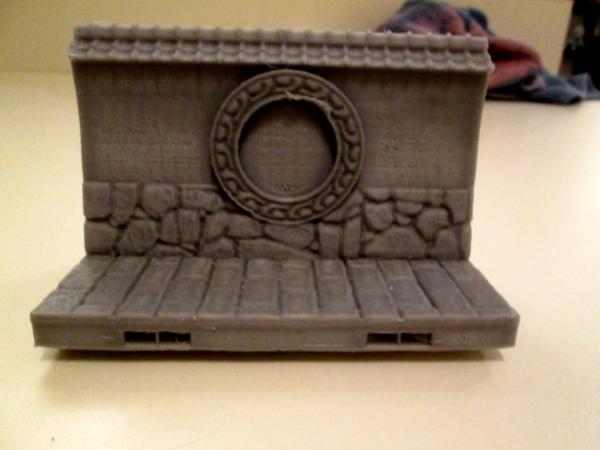
And finally two shots (these pieces I printed some time ago) of the wall steps and fighting platforms to go around your city or compound or whatever:
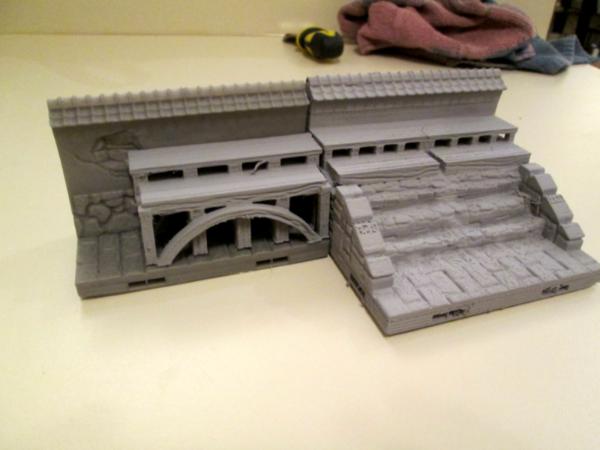
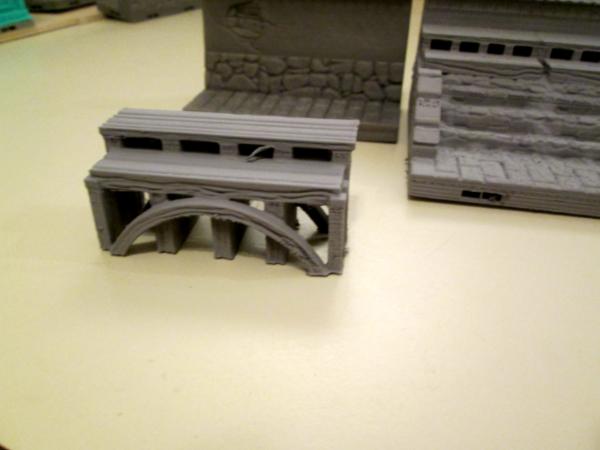
All of the pieces here are as they came of the printer, no cleaning yet or anything. And none of them required supports. You can see on the porthole wall section especially that the toe of the base is curled up slightly; this might mean my bed temperature is too high, I may need to try lowering it to 60 or even 55 degrees C. We'll see. For now, I don't mind a little curl because I'm going to be gluing everything down, probably with two part epoxy and it won't be seen and won't matter. But for stand alone pieces with their own bases, may need to try lower temp.
More follows soonest!
30672
Post by: Theophony
I love those prints, can’t wait to get my pledge from Iain to start printing those.
The only thing that gets me is the connector spots. They make me want to hop on a forklift to pick them up and move them .
Also progress on my paint racks.
I started to reprint my Army Painter racks with a newer version that has anti sagging rails on it. Between that and the difference from my first prints to now they are 100% better. I’m also printing more racks for future Army Painter/ Vallejo bottles.......because one day I might pick up more 
106010
Post by: Meer_Cat
Yeah, the OpenLock system may be handy for terrain that is intended to be re-arranged from game to game, but I'm going to have to fabricate a curbing or something (maybe a piece of flat trim) to hide it. Once together, I ain't taken this project apart!
106010
Post by: Meer_Cat
Tried the weirdest thing and it worked:
I was printing more courtyard tiles (I need a bunch more) and they were still at the 'very thin' stage and the corners were starting to lift up. Because I have to put masking tape down because adhesion to the build plate is too strong, I thought to try putting a dab of Aileen's Tacky Glue under the offending corners. I figured the tape would keep it from hardening to the build plate (which is in rough shape already, but it doesn't matter because- tape) and that the heat of the build plate would harden it quickly. Son of gun- it worked- print (and about an hour into it) saved). You can just see the dabs of glue at the corners:
18509
Post by: endtransmission
 Meer_Cat wrote: Meer_Cat wrote:Yeah, the OpenLock system may be handy for terrain that is intended to be re-arranged from game to game, but I'm going to have to fabricate a curbing or something (maybe a piece of flat trim) to hide it. Once together, I ain't taken this project apart!
There are half clips you can get from various places that are intended to use magnets as a connector. You could use those to fill in the holes
https://www.thingiverse.com/thing:3612827
106010
Post by: Meer_Cat
I like those clips, Endtransmission, they seem like they might be easier to work with than the friction clips (and I like magnetizing things). But I'm wanting a 1/4 tile that has a flat or beveled edge so that the diorama/terrain piece doesn't sit there abruptly a quarter inch higher than everything else. I'm learning to use Meshmixer, so I may be able to design something for myself.
Always possibilities!
38561
Post by: MDSW
I like the glue in the offending corners!! I think is better than my fix for the corners that start to pop loose in the first layers of printing...
I kept a couple of the really thin palette knives slid under the magnetic liner of my Ender 3 pro, so they are toasty warm. I just slid them on the edges, so it did not disrupt the build plate at all. So, when i saw a corner start to lift I would slide out the knife and press the corner down. Since the knife was hot, it would help hold it down until I got a few more layers on it to hold it fairly flat. When the one knife cooled, I would slide it back and pull out the other hot knife - rotating as needed until the corners were fixed.
Stupidly, it worked, but a lot of work to save an early print.
3309
Post by: Flinty
Here is a blanking plate solution.
https://www.thingiverse.com/thing:4611929
If you search a bit more I'm sure you will find this done already. A lot of the terrain kickstarters i see have edging bits to merge the raised terrain into the table top.
30672
Post by: Theophony
Nice solution to the edge curl
106010
Post by: Meer_Cat
Good solutions all! I like MDSW's idea for using the palette knife to 'fuse' the thin edge back down- I may try that as well.
Thanks for the link Flinty! The Asian buildings from Iain Lovecraft doesn't have those 'curb' bits, so I'll look around Thingiverse and OpenLock's site and see what they might have. The pieces you linked to I can use to glue my own beveled pieces to, to then clip into the courtyard tiles- they'll fasten more strongly! Plus I have the 1/4 inch thick plywood base to hide.
30672
Post by: Theophony
So one of the troubles i've had since the beginning is the attachment points of the supports on models. Between the scarring and the initial layer having poor bridging a bunch of prints (including the big beast i'm doing now) has some ugly spots. I may have just read about a possible fix though. Has anyone with a FDM printer reduced the flow in cura? The article I read just suggested it and I might give it a shot after this print is done. It's a custom setting in Cura under material settings.
77159
Post by: Paradigm
I set flow at 96% in Cura these days, but it doesn't actually seem to work as when I check the Tune menu while printing, floe is still at 100%. From there, I do then dial it back to the intended 96% (if I remember) and there seems to be no adverse effect, though it's also hard to say if it makes a difference.
In terms of cleaner support contact arras,I've come round to not using Support Interfaced and slightly increasing the Support X/Y distance in Cura. The X distance defaults to the closest layer height to the input number, so it's generally at 0.2 when I'm printing at 0.1, and 0.24 when I'm printing at 0.12, which is most of the time these days for larger pieces. I find the 0.24 especially really works nicely, the supports do the job well but just snap away really neatly afterwards. Y distance I have set at 0.8, up from the 0.7 I was using.
I also don't take support density below 12% now, my experiments at 10 gave me some really bad results. If it's thr supports themselves failing, Curan4.7 has a Join Supports option that will make them a bit more sturdy, at the cost of material and time.
77159
Post by: Paradigm
Has anyone had any success printing at layer heights around 0.15? I'm printing a bunch of fantasy terrain on the Ender while I wait for the Photon to arrive for mini printing, and while some stuff is pretty quick, I feel I'd get way more done with a slightly higher layer height/faster print time. Being mostly wood/rough stone I don't need super high quality, but I'd at least like it to look decent and I'm not sure whether pushing the layers past the 0.12 I've been doing so far is worthwhile.
38561
Post by: MDSW
Probably might be tough with the standard .4 nozzle - try a small test and if layers are not sticking, try boosting the flow to 125% or go to a thicker nozzle.
16769
Post by: Kinetochore
 Paradigm wrote: Paradigm wrote:I set flow at 96% in Cura these days, but it doesn't actually seem to work as when I check the Tune menu while printing, floe is still at 100%. From there, I do then dial it back to the intended 96% (if I remember) and there seems to be no adverse effect, though it's also hard to say if it makes a difference.
In terms of cleaner support contact arras,I've come round to not using Support Interfaced and slightly increasing the Support X/Y distance in Cura. The X distance defaults to the closest layer height to the input number, so it's generally at 0.2 when I'm printing at 0.1, and 0.24 when I'm printing at 0.12, which is most of the time these days for larger pieces. I find the 0.24 especially really works nicely, the supports do the job well but just snap away really neatly afterwards. Y distance I have set at 0.8, up from the 0.7 I was using.
I also don't take support density below 12% now, my experiments at 10 gave me some really bad results. If it's thr supports themselves failing, Curan4.7 has a Join Supports option that will make them a bit more sturdy, at the cost of material and time.
If I'm correct the 100% you are seeing is 100% of what you have laid out in your Gcode. I.e. 100% of the 96%. By reducing this to 96% you are in effect running at 96% of the 96% or 92%
I second your support findings. Going too low just causes more issues random spaghetti getting stuck into your model and no support structure
30672
Post by: Theophony
I lowered to 95% and the supports popped off really easily. Less stringing , but still some at the gaps. Had a couple issues where bridging was an issue, but I think that’s not related to the flow change. Overall I’m happy.
3309
Post by: Flinty
I've been printing scenery at 0.2mm layer heights and it's worked fine

I've just been using the default Prusa settings for 0.2 layer height.
30672
Post by: Theophony
Hey guys, sorry for the long absence, new job duties and stuff had me sidelined.
Also the hot end on my Ender3 had a catastrophic end to its run. I replaced it with a $13 hot end from Amazon (Zeelo), which immediately was an issue as it had a “runaway temperature” failure and began smoking my filament in the first 5 minutes after warming up. Thanks to Amazon the return was immediately processed without having to send the mess back, and I instantly ordered the $14 kit (which came with more tips and silicone sleeves) which arrived two days later. These were factory original parts, went on easily and are working like a charm.
I got a couple quick tests done and releveled the bed after having the Ender up on its sides to replace the wires to the CPU. Then off to the races...or troll race to begin with . Momma Troll breastfeeding the One-too-many-sake-love-child-of-Usagi-thewargamesfactory-samurai.
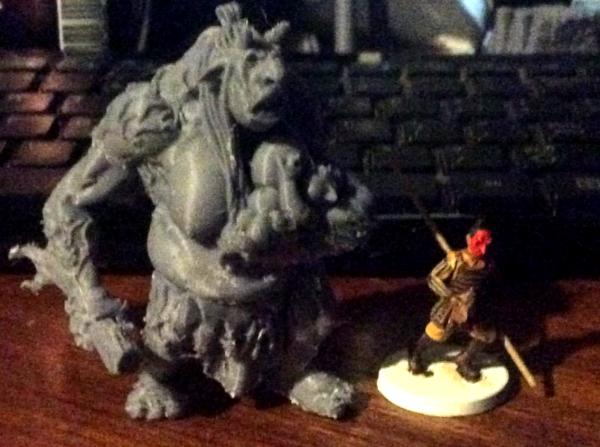
It’s a .stl from this months Titan Forge Patreons. Next up/now printing the Ice Giant from the same Patreon. He comes in at about 8” tall, close to 200mm. Automatically Appended Next Post: 
Upper torso of the Giant is done. His legs have just started, they are a 14 hour print, so they should be done late tonight when I get home. Depending on how late I work at church this evening, I’ll either do one of his arms (both7-8 hours each) the hammer head 4hours or his cloak, which I’m going to try and reorient as right now it’s 15 hours .
77159
Post by: Paradigm
Glad to hear you've got your Ender back up and running!
Nice to see that Giant at full size, I'm currently printing it at 50% scale to fit in with my other DnD giant minis, it's a great model to be sure. A good illustration of the difference the size makes to print time as well, no part of it at half size was more than 5 hours for me!
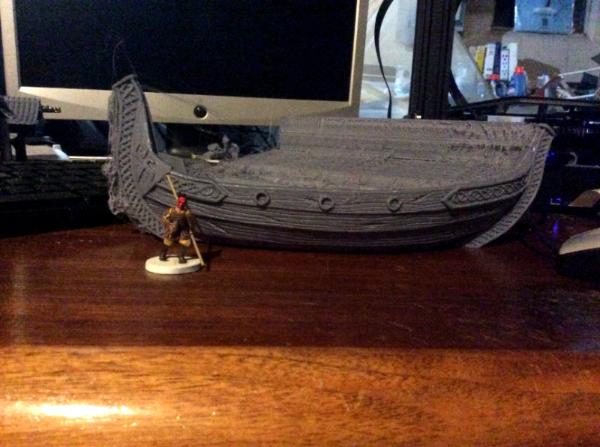
Out of curiosity I sliced the longship from TitanForge's Barbarians pack, the hull came out at 51 hours with my current settings, so that might need cutting into parts if I ever decide to print it.,,
While we're on the subject of Enders, I must say that Cura 4.7 has made a big difference to my prints, simply because Tree Supports are out of experimental and into general support settings. I've found I need to up the density, and add a wall round the supports, but I'm having way less failures, issues with the print head knocking supports, stringing between supports and model ect. Much, much cleaner prints overall, so I'd definitely recommend giving them a go.
18509
Post by: endtransmission
Oh wow, that troll and giant are a lot bigger than I was expecting! I suspect I'll need to scale down to fit them onto the Mars.
Speaking of, I ordered a new tank as the pack of new feps is going to take a week to arrive! Fingers crossed that all the sticking is due to the current one being a bit damaged. Test print is currently running, so we will see if that fixes the sticking issue I've been having recently. After printing the tanks nicely, it was disappointing to see things go back to the same old issue with everything sticking to the bottom of the tank and not the build plate.
30672
Post by: Theophony
@paradigm, the boat I printed in just 22 hours. Needs a bit of clean up yet, but came out great.
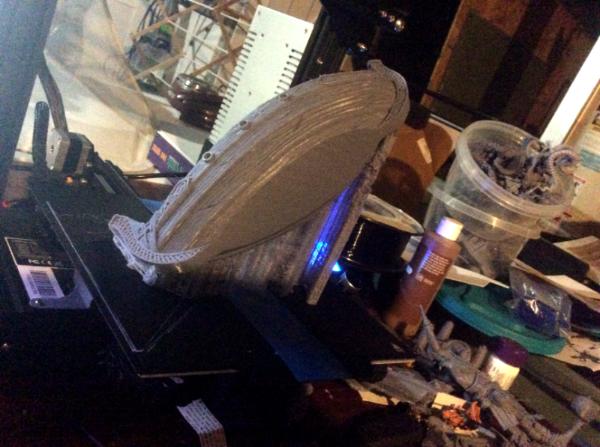
I have to redo e cloak on the giant, I laid it flat to drop it down to 8hours, but way too much support damage happened.
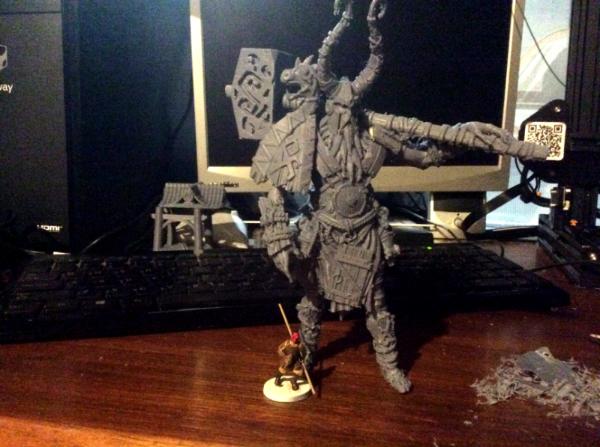
He is 8” tall. I found another Ice Giant on Thingiverse who may be joining him shortly.
Viking house on the printer currently.
38561
Post by: MDSW
What a great giant sculpt!! Do his feet look small to anyone else?
18509
Post by: endtransmission
The more I play with the resin printer and the more I see of Theo's stuff... the more I want an Ender to go with my Mars so I can do larger pieces...
38561
Post by: MDSW
 endtransmission wrote: endtransmission wrote:The more I play with the resin printer and the more I see of Theo's stuff... the more I want an Ender to go with my Mars so I can do larger pieces...
Yes! I actually am looking forward to giving the Mars a bit of a rest and firing up the Ender 3 again for some terrain once I get the stl files from some KS projects set to deliver soon.
106010
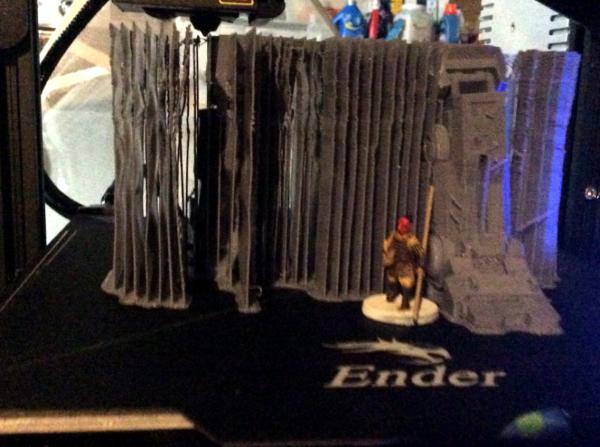
Post by: Meer_Cat
My machines have been down for maintenance for awhile, waiting for time to get stuck in and fix what was needful.
Monoprice MP10 Mini:
I had been sawing off V6 nozzles ordered from Amazon to make them fit- the first one worked swell until it got clogged, the second started leaking (so not cut right to meet the Bowdon Tube properly in the heat block). I found that the extruder nozzle for the MP Mini-Select also fits the MP10 Mini (not always a given) a ordered some in from Gigdigit.com- they have a lot of OEM and replacement parts for a lot of different types of printers. Because of the leak, the ceramic 'sock' around the heat block was fragged, so ordered replacements for the silicon sock, ceramic tape and the high-temp tape that holds it in place. Being retired military, I ordered at least two of everything (having two is one, having only one means none if something breaks).
I replaced the nozzle with no problem, just brought it up to max temperature and wound it out with a 7mm socket. I could not get the new ceramic tape and fastening tape on- the ceramic shredded no matter how careful I was and the fastening tape either wouldn't come off the backing or got stuck on itself and was ruined. So I said to myself SCREW IT! and put just the silicon sock (or 'bootie') on and am running a print, even as we speak. So, far, good base layer adhesion, no curling, no stringing, no overheating/burning smells- just a good print even without the ceramic tape around the heat block. 6 hours into a 9 hour print, all is good.
Ender-3 Pro:
Haven't mustered the energy to mess with this one yet. But I've learned a whole lot more about how it is 'supposed' to work, so I'll get around to it one day to start from scratch bringing it back on-line.
Creality CR-6:
This actually arrived a little while ago and has just been waiting for the time to actually put it together.
The good: This sucker is quiet- much quieter than even the MP10 Mini and 'way quieter than the Ender-3 Pro. It also comes largely assembled: you only have to fasten the gantry to the base and then add the screen housing, filament holder and carry handle, make your wire connections (all easy) and your basically done. Also, this printer came with a full kilogram spool of Creality filament, so that was very nice.
The indifferent: I'm running a wall section for my Chinese Estate project as a test print (more on that below) and am about 4 hours into the 9 hour print. There is some minor stringing in the base build, but I won't know how bad it is until it gets to the true 'outer' skins of the print.
The bad: I could not get the filament past the filament feed mechanism and ultimately had to take the feed mechanism apart just to load the filament. That little bugger is tricky to get apart and put together and this must be a common experience for users because Creality have put a .pdf file on the SD card describing how to do it. The print head moves a bit jerky and I'm waiting to see on a taller print how this might affect the smoothness of the print. And the included SD card has files for printing test objects- animals and test device files- except they can't be read when the card is in the printer. When I opened the folder on my laptop, everything was there. But to actually run a print I had to re-save everything onto the SD card. Finally, I'm not convinced that the 'auto-leveling- actually did; as the print began the filament being laid down was awfully flat and squashed looking, and one corner was definitely not building as fast as the other three. The bed itself does not have leveling screws to adjust this manually- it's all or nothing through the software.
I've watched a metric crap-ton of videos on this machine so as to be ready, I may have to try to find some more to start trying to tune in this device. I did find Tomb of 3d Printing Horrors and Just Vlad to be very helpful.
So: one hit (the MP10 Mini), one ball (the Ender-3 Pro) and one foul (the Cr-6) which might curve back into fair play territory.
More follows soonest.
30672
Post by: Theophony
Might be old news, but CURA 4.8 popped up as new to me when I went to slice stuff this morning.
30672
Post by: Theophony
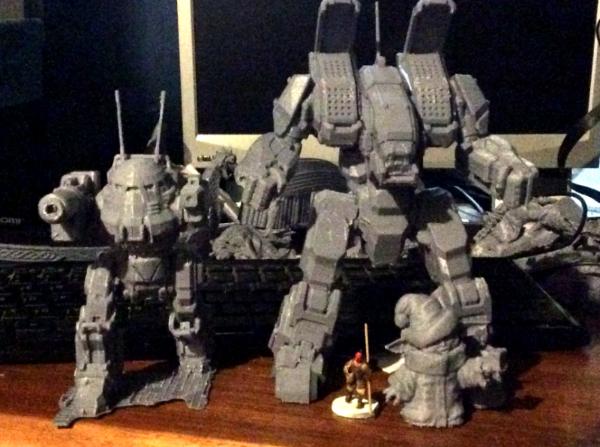
So i have been lax here.
I've gotten into Battletech, a game I have avoided the last 40 years . With the new plastics from Catalyst looking so nice I decided to grab a couple....then some more...now I'm jonesing for another shipment to arrive. Well why wait, I went on thingiverse and found plenty of designs. Most of them lead to 404 pages as they have been taken down, but I nabbed a few still up. With some tight adjustments on my printer I was able to get a few nice prints.
The Longbow in the front (not based) alongside two of the new plastics from Catalyst. Not Perfect, but sure stands up to my arms length rule. Also $0.16 compared to about $5-8 really sells me on it.
Local group had a meeting to start a tournament and casual play at the LGS. Had the first meeting, and I got my first game, then local government is shutting down gatherings again. So I'll Have time to print and paint more mechs (12 or so done to date with another dozen to paint), until late december/early Jan.
5269
Post by: lord_blackfang
Best time for BT right now, there's loads of artists doing mechs and all of them are better than the metals
85989
Post by: Henry
Every now and then the printer will do something to get me raging. A little while ago it was a massive layer shift part way through printing that turned out to be a sticky bearing on the Y axis. Usually though it's the first layer not sticking to the bed. I've cleaned the bed, used glue, hairspray and masking tape. The damn thing won't stick. So I go back and reread the instructions.
It strongly says not to use any of the tricks and tips that are out there, just use acetone to degrease. Right says I, chemical warfare it is. What have I got that will strip grease?
Nitrilotriacetic acid. Kitchen degreaser. Holy crap, it sticks like a barnacle. I'm getting the best prints ever.
Speaking of which, I've finally printed enough to make the first Space Hulk mission.

30672
Post by: Theophony
That's awesome .
Now that I think about it I haven't wiped down my bed with iso-alchohol in a bit 
117413
Post by: H
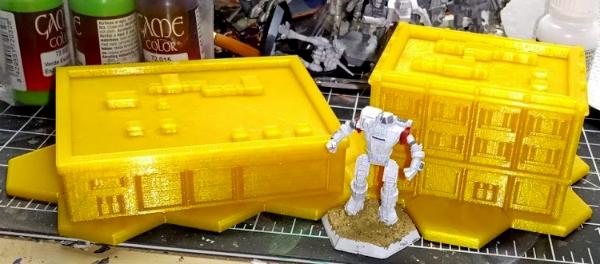
So I finally got some time and printed something! I figured I'd start with some relatively small stuff, so these are a few free buildings I found for Battletech. The Hunchback is an old metal model, just to show scale. They turned out pretty well, considering I had no idea what I was doing and I just stuck the first in the slicer and hit "slice now." The second I went to .2 layer height and went down to 15% infil.
The yellow filament is hard to photograph, plus my camera phone is terrible and the lighting in that room is not great. All in all though, I am pretty happy with how they turned out.
Just trying to figure if I should try sanding them or just prime and paint them to see how bad the layer lines might be.
77159
Post by: Paradigm
The first print is always the most exciting! Well done, they look nice and sharp and even. At .12 or .1 layer height I find a coat of spray primer hides the lines just fine. but at .2 you might want to do a bit of sanding, or just a double coat of primer.
117413
Post by: H
Paradigm wrote:The first print is always the most exciting! Well done, they look nice and sharp and even. At .12 or .1 layer height I find a coat of spray primer hides the lines just fine. but at .2 you might want to do a bit of sanding, or just a double coat of primer.
Yeah, I forgot to write it, that shorter building (the first print) was done at .15 because that is what the slicer defaulted to. I'll probably give double priming a shot and see how that goes, since I really don't have anything to sand it with anyway right now. I was really pleased with how sharp they turned out though, so even if there are some layer lines on these, I'm OK with that as a place to start.
18509
Post by: endtransmission
Looks like I'm going to have to go back through this thread for all your tips and tricks for working with an Ender as one should be turning up around Christmas
Are there any filaments I should be avoiding/focusing on to stock up for the great winter print run?
77159
Post by: Paradigm
At this point, I just start by eSun PLA+.
Not experimented with too many brands, but even so that stuff seems to get the best possible results from the Ender. Only trouble I've had is that it does seem to pick up humidity or get a little brittle when it gets really cold though, so keep it covered when not in use for a while and you should be golden.
18509
Post by: endtransmission
Cool, thanks. The printer will be living on a table over the radiator... so it shouldn't get too cold
30672
Post by: Theophony
Esun pla+ (Amazon $22.99 a roll for most basic colors, put it on a monthly reorder and you will start getting 5% off) is the one I swear by  . I’ve gone through 10+ rolls, and never a problem with it. I have 2-3 spools of others that have clogged up.
Being over a radiator might be an issue with humidity, you have to keep all filament dry.
If you need any other advice PM me.
106010
Post by: Meer_Cat
his topic may have been covered earlier in this thread; if so- I apologize.
This topic may already be well-known to the printing community; in which case- why didn't you tell me?
BLUF: Some printers behave/print erratically if the SD card inserted has too much data stored on it, or if the SD card's storage capacity is beyond what the printer's micro-processor can handle.
Background: After many hours of successful prints on my Monoprice MP10-Mini, it began to behave erratically: the print head would move outside the perimeter of the object that it had- up until that point- been printing successfully (coloring outside the lines, as it were); it stopped extruding filament at a certain point (about 20mm up from the print bed); it shut off the bed heater and nozzle heater block at about the same time. And all this using gcode that had worked perfectly well before, many times.
Solution: I contacted the Monoprice help team by email as a start. They also offer online chat on their website, but I prefer to do some preliminary diagnostics first, to better shape my observations and questions if I have to go to the next level. I got a response within an hour with links to articles about filament grinding and other common 'failure to extrude' problems but also the observation that the MP10-Mini is designed to accept up to an 8Gb micro- SD card- and I had mentioned that I had purchased a new 64Gb card as part of my efforts to eliminate possible causes before asking for help (I had also resliced the original .stl file).
So I hied me hence to yon local store of electronic flummery and got a new 16Gb card- they didn't have anything as small as an 8, on the chance that the card that had shipped with the printer had gotten corrupted somehow (it came with a 16Gb card). I saved the newly resliced file onto the new card and ran it- and everything came out fine (a slight curling up of the corners, but I think that is because I have my print bed too hot- 65 degrees C- I'm going to try turning it down to 55 or even 50).
Apparently, I had been slicing various files and saving them all to the card and the amount of memory that the microprocessor for the printer could handle was exceeded and it went mad. I had tried SD cards that came with the other printers, but they were too big (64k), to full of files or both.
So, the MP10-Mini can handle a 16Gb card, just not one that exceeds 8Gb of stored files. Other printers may have similar limitations.
Something as simple as this took my printer out of action for two days. I'm going to have to rethink how I organize files I have sliced- probably store the gcode on my laptop and transfer over to the SD card just the files needed for the current project- or start an SD card for each project and keep an eye on how many files are building up. I suspect I'll use the former. For one thing, I'm frequently re-slicing .stl files because Cura keeps evolving, so there's no sense in getting a whole bunch of files in Cura 4.8 when 4.9 and 5.0 are really just around the corner.
I'm still printing and painting- will post an update with pics when there is some real change to show. Frankly, I'll be happy when this Walled Estate project is done; it's turned into a bigger bear than I first thought. As the printer(s) work more reliably, it is getting easier to start a print run and then paint, and ZZ Top covers the sound of the printer.
More follows soonest.
30672
Post by: Theophony
I think I mentioned that earlier n one of my threads. Ender also suggested not having the file name longer than 13 characters. It can befuddle the stupid processor .
106010
Post by: Meer_Cat
I meant to mention the file name restriction as well; it can be the simplest things that throw the machine off, and hard troubleshooting to fix something that turns out to be very simple.
18509
Post by: endtransmission
Useful tips there, thanks. 13 character filename?!
I think I've encountered similar on the Mars as well, in terms of number of files. At one point it was misbehaving quite badly, but formatting the USB stick and re-adding the file I wanted to print seemed to fix it
30672
Post by: Theophony
I was having issues with my prints and the files being corrupted, I contacted Ender/Creality and they said 13 is a bad number, so is anything bigger than that. I did further research on it and saw others had said the same. Now any slices get the names trimmed. No problems.
Still printing. 37 hours into this print now, it was around 25 when I took this photo.
Printing a Battletech Atlas T 400% size to go with my other 400% mechs.
Also there’s a Warhammer printed too, but it’s getting cleaned up right now.
30672
Post by: Theophony
Blows dust off of this thread. Trying to run multiple threads was not working at the time, maybe now will be slightly easier.
I picked up a Photon Mono, Wash and Cure 2.0 and some resin, it was kind of a cluster with shipping coming in 3 different boxes over two + weeks. Cannot complain too hard as I got all 3 for $335 shipped.
My first print (one I tried playing around with the Photon Workshop failed and printed everything on the film . I releveled the print head and my next print (one that was pre-supported from titan-forge) came out great.Pictured below with the best version I got out of doing the model on my Ender3.
I am very impressed. Had a bit of a spill with the resin, but otherwise all is coming along nicely. I should have 5 more models when I get home today.
so I have already ordered more resin, but where is everyone finding good resin for the Anycubics from? While $40 a liter doesn't sound bad, I am a total cheapskate as many of you would know from my other blogs.
Also I was thinking about buying a second Build Plate to save those precious seconds between printing one file and starting a new one while the first is in the wash and cure. Has anyone else done that? Or am I now being too ridiculous?
306
Post by: Boss Salvage
Congrats and welcome to the resin side of the force! The different in quality between those two prints right there speaks volumes to SLA's abilities for minis. As for resin, I probably can't help much, I've only ever used one resin with my Mars Pro and haven't felt the need to experiment with a replacement, so basically have no idea what all is on the market at this point (Siraya Tech Fast Grey about $35 on Amazon with supply holding pretty strong) EDIT: Speaking of resin spills, the first thing I did with my printer when I took it out of the packaging was slap one of these on ( https://www.amazon.com/Mach5ive-Stick-Vinyl-Gasket-Printers/dp/B081D4NLCH/ref=sr_1_4?dchild=1&keywords=3d+printer+resin+gasket&qid=1623354932&sr=8-4), just in case of catastrophe. Proud to say I have yet to cover my screen or fill my machine up with resin, but better safe than sorry.
3309
Post by: Flinty
That is a great print.
I like the water washable clear blue from Elegoo on my Photon Mono. Cuts down on the volume of toxic chemicals a bit, and means you can save on buying IPA as well, although it’s a bit more expensive in itself.
Rather than a second build plate, I would recommend getting a pair of magnetic spring steel plate sets. You stick a flexible magnet thingy to your build plate and then stick the build plate to it. Makes getting models off the plate super easy as you just flex the plate and with a reasonably stiff raft, it just pops off. Given that i gashed myself pretty badly with the scraper on a previous print, I was well motivated, but also used to the concept as my Prusa FDM machine has a similar thing.
Automatically Appended Next Post:
Also if you get a pair of plates, you can use one magnet sticker in the machine build plate, and use your Ender to print up a dummy plate for the second sticker in your wash and cure machine.
30672
Post by: Theophony
Well it's been a while..
My computers were too old to handle the programs for my printers and my Photon mono blew it's screen twice, so it has been sitting useless for some time. I went out and bought an inexpensive laptop that could handle the slicing software and a new Photon mono 4k. Still getting my hobby space back slowly as One daughter had taken over the basement, I was okay with it as I got a main floor hobby room, but then lost that to the mother-in-law moving in after a surgery. She has since moved out, moved back in, moved out and back in a 3rd time and is now back in her house. Anyway I was going to wait a bit longer till I could get a larger printer, but I think I have gotten a tad bit smarter in my middle-age and decided I don't need to print 80 models a day as I won't paint that many in a few months. I did however go on a BloodBowl splurge as we have a league going right now. So here are some of the things coming out right now.
Amazon Team, very Mauri inspired.
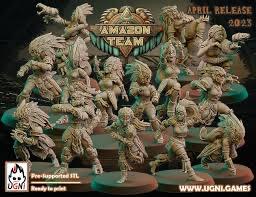
Fully printed, not primed yet. I'll probably paint them up for my friend playing them in the league.
Tomb Kings, The Beetles

Just got this months Tribe which is support staff for them. All printed, primed and trying some color schemes. Great thing about 3D printing is that I can waste a model with trying schemes out and not feel I have to buy another $50 team from GW
And some of the Techrats, currently printing them out, trying some slapchop painting on them. This is just the underpainting.
Rat Ogre comes with 3 or 4 head options, different bionic claw options and I think a different body option as well.
Still Undecided on a dwarf team to print out as thats what I'm playing in the league using my old 3rd edition dwarves. I've seen a couple teams I like and will probably get later this week.
77159
Post by: Paradigm
Nice to see you back in action! Those are some crisp prints.
30672
Post by: Theophony
Thanks Paradigm,
Not done painting, but almost there with the Rat Ogre, still need the stitches picked out and a few other details.
126263
Post by: DJJazzyJeff
Skaven models are so cool. And there are so many 3d sculpts out there for them. Looking good so far.
30672
Post by: Theophony
Thanks
Well you can tell it's been a while since I had messed with a resin printer. I tore my FEP sheet by trying to pry off a stuck misprint. I forgot the trick of using a left over support clump and just running a full screen detection for 15-30 seconds and peeling off the whole bottom . I ordered new sheets off amazon 6 for $15 was decent and came the next day, unfortunately the resin that I had ordered was set to come Thursday. The delivery showed out for delivery from Amazon, but then showed it arrived in California . I'm in Saint Louis, Missouri. So I had to reorder as Amazon's customer service sucks. They still cannot tell me when the first order will come, it'll probably be refunded. Only thing I can think of is that it must have leaked or something and they had to return/hazmat it.
Anyway the new screen is on and the replacement of the replacement resin has arrived. I am currently printing off a Necromatic team from Brutefun miniatures for a friend. I got the files for 5 teams for $20 and $5 of resin for 20+ models is crazy.
For those of you who print things out for Friends, what do you charge? I'm not looking to start a business, but I do want to be able to help some friends out with cool teams. I'm more just looking to get reimbursed for the cost of the resin, though a little for the amount of time slicing/printing/cleaning the models wouldn't hurt.
About halfway done painting up the Tomb Kings team that I printed already. I dropped one of the skeletons on the floor in my heroic yet all so unathletic attempt to catch it with my fat fingers it lost an arm and a leg. I found the arm and reattached it, the legs broke off the base, but the one leg also broke off at the thigh so it's a one legged skeleton with it's remaining other foot on the ground under him, I guess he has a ghost leg and the foot follows him.
30672
Post by: Theophony
Bast or Nuffle were unpleased with the progress on my Khemri BloodBowl team.they sent my cats into the painting area and knocked a heavy brass lamp onto the team. Half of them were out of action and missing more than the next game.
Luckily $5 worth of resin and a few prints later we can rebuild and start the team over, hopefully making Bast proud.
9594
Post by: RiTides
Oh no!!! But praise Nuffle for the resin printer . What team (designer / 3D artist) did you print, and were the cat-destroyed ones also printed, or are you using this as an opportunity to try a new style of Khemri?
30672
Post by: Theophony
 RiTides wrote: RiTides wrote:Oh no!!! But praise Nuffle for the resin printer . What team (designer / 3D artist) did you print, and were the cat-destroyed ones also printed, or are you using this as an opportunity to try a new style of Khemri?
Thanks,
The team are The Beetles by RealmofPath (Tribe). The full team was available one month and the support crew is this month's offering. The support Crew is a Female mummy/tomb guardian with an alternate that has her taking the facemask off showing her desiccated face. It also has an apotheary(female mummy surgeon), 5 cheerleaders, Flaming chainsaw star player, werewolf star player and Frank N Stein star player as well. I liked the look of this set the best out of all the Khemri teams available by .stl. I have 2 sets of the metal team from years ago, but they were such a PITA to assemble with the beetle knee/elbow pads.
The broken pieces will become "sprinkles" on basing for a KoW/Hobgoblin army. I always wanted tomb Kings and can now afford to print my own.
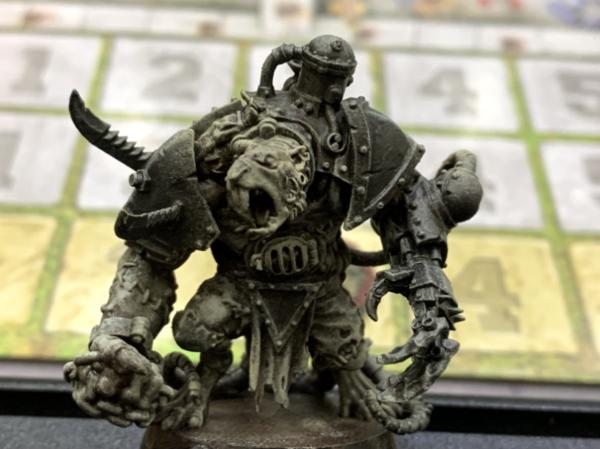
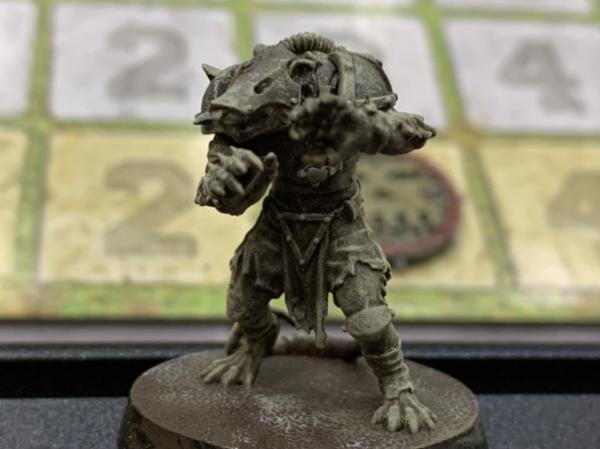
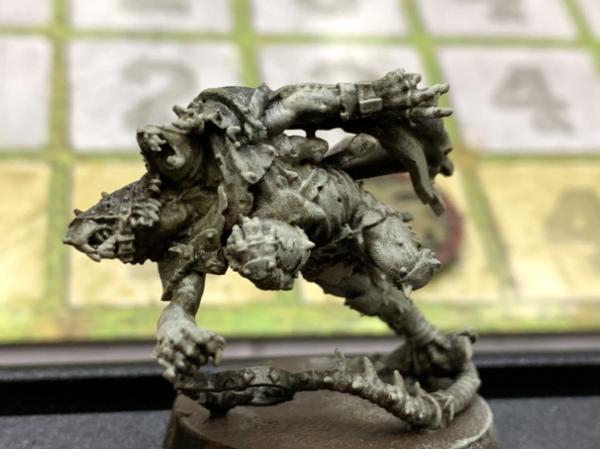
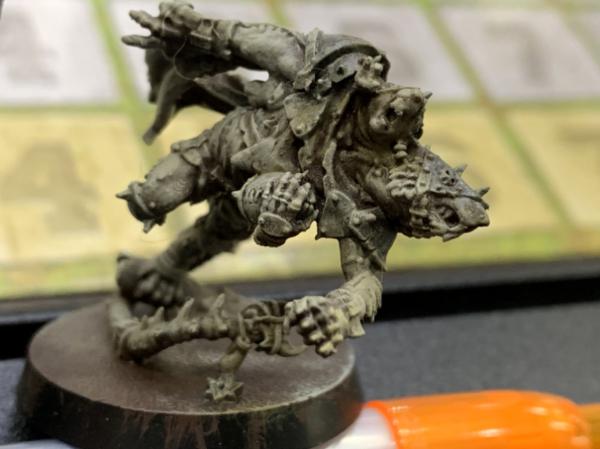
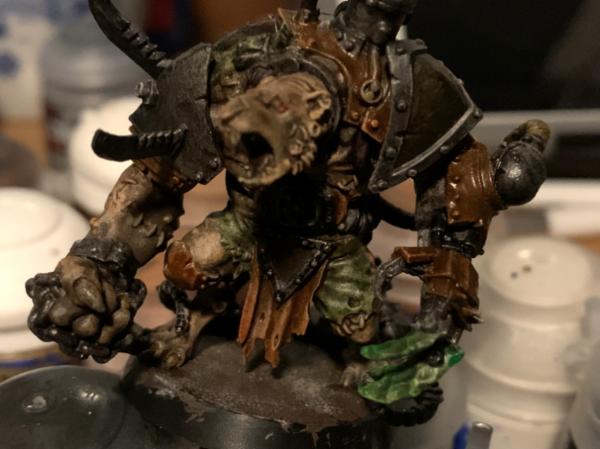
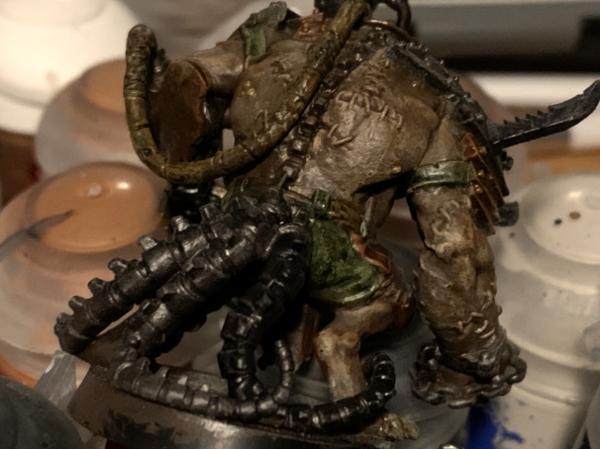
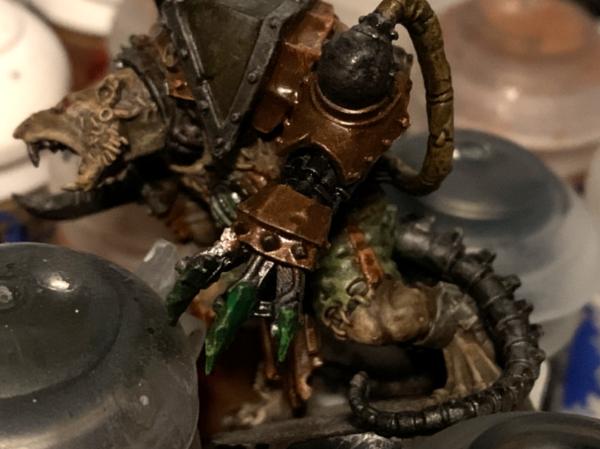
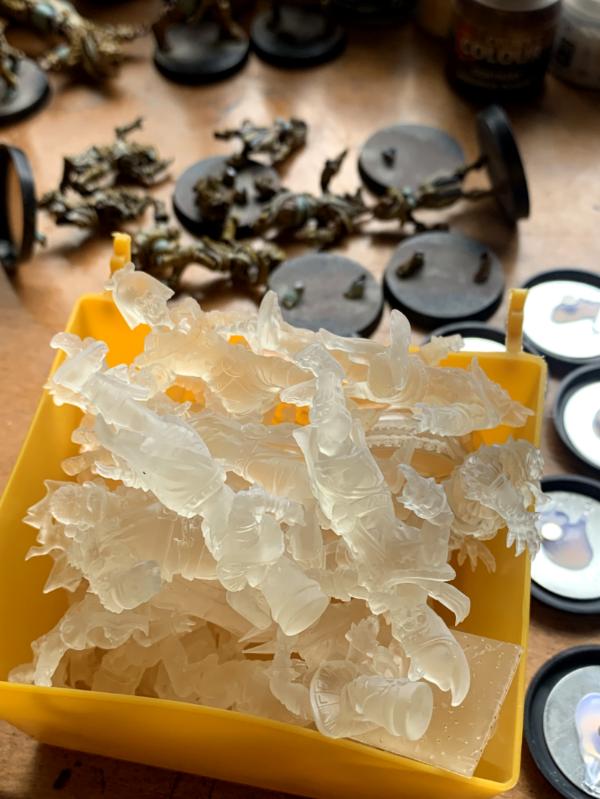
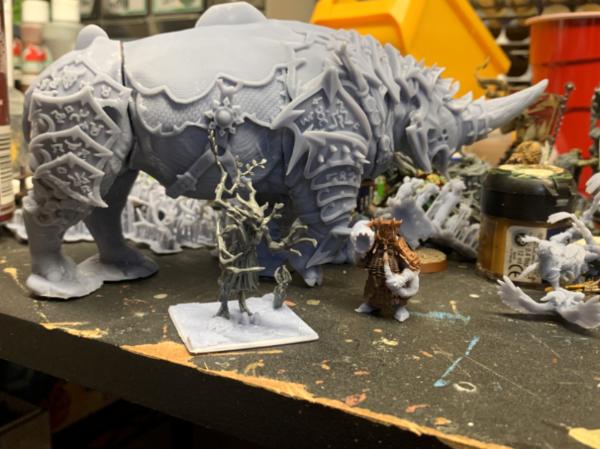
Speaking of the Kow/Hobgoblin army, I decided to print a model I have had the file for over a year. It's Lost Kingdom Miniatures and is part of the Welcome pack. It's a Tomb King on Ammit, whatever that means. All these models had been printed out in clear resin, because it was on sale at the time. I need to look into an ABS resin for durability....cats. Here is the Ammit with the surgeon and a lineman for scale (both of them are on a 32mm base).
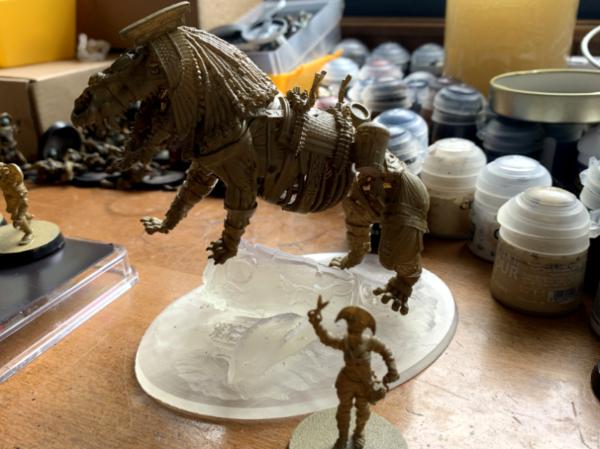

the Howdah is not attached at the top, but it is where the Pharoah sits casting magic.
The file comes with alternate top pieces of the fallen column, I went with the dead lion draped over it for added detail, there is also a rectangle base for KoW with the same details, I really should print that one out before I get too far.
The model is great as you can look in it's mouth and see the neck bones and look down through the empty eye sockets into the nasal passages.
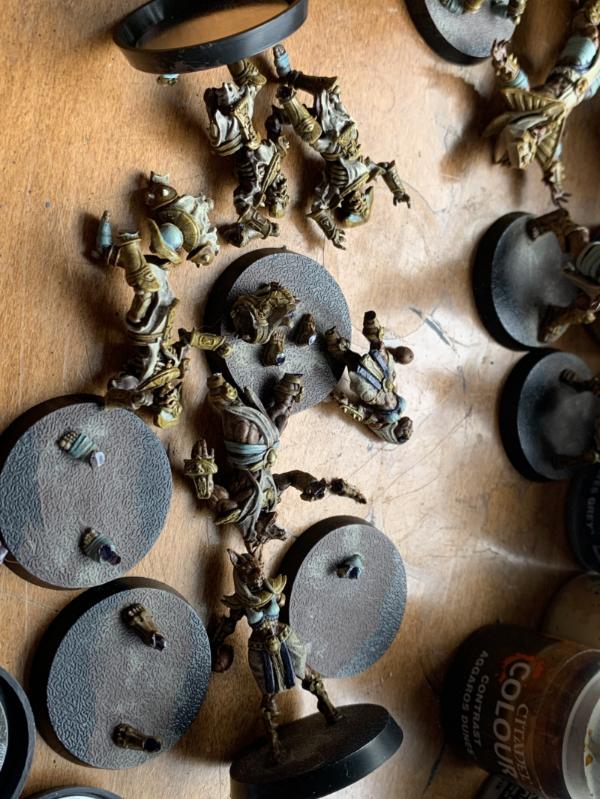
LostKingdomMiniatures is fantastic and I just backed them on Patreon because they did another release of the Chaos Dwarves this month. Here are some of the older prints I did from over a year ago with their older chaos dwarves.

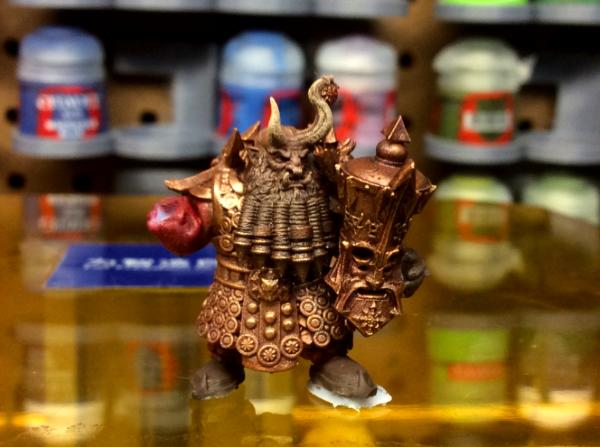
the old monthly package I had picked up way back when.
Those were done on my old printer 2K photon mono. The new printer 4K photon mono is doing a better job of reducing those swirls, but still there.
Sadly this will probably be my last post here on Dakkadakka. I am tired of what has become the norm in the news & rumors section. While I could try to just stay away from that area as the P&M and 3Dsections have been great, I do like trying to keep up with what else is going on in the universe of fun hobby things. I have PM'd a MOD to shut down my threads. I've enjoyed interacting with so many great people all over the world and really had a blast getting to meet a few in person at events. If I land someplace sane I'll throw a lifeline back here.
John
306
Post by: Boss Salvage
 Theophony wrote: Theophony wrote:Sadly this will probably be my last post here on Dakkadakka. I am tired of what has become the norm in the news & rumors section. While I could try to just stay away from that area as the P&M and 3Dsections have been great, I do like trying to keep up with what else is going on in the universe of fun hobby things.
I don't disagree re: N+R threads going to hell, and generally avoiding a huge part of Dakka. You'll be missed - if you're looking for a place to share your KOW adventures, we'd love to have you over at kowforum.com  All the same, good luck with the printing and the cats and everything!
7375
Post by: BrookM
Locking per request OP.
|
|
