40217
Post by: Ash 1
This piece was done a few years ago and was my first attempt at anything bigger than a tank:
I bought the model via eBay in a pretty poor state; had to replace all the steps, girders etc with plasticard and remake the radar.
Also added some ammo boxes, jerry cans and barrels.
The Hydra barrels were bent as a bunch of bananas and I had no experience of straightening resin. Hopefully make a better job of it now.
The IG have had their bases redone since these pictures were taken.


10972
Post by: Ruglud
Wow, more wonderful models. Just seen your other bunker in your gallery as well.
Can't wait to see more.

22107
Post by: Jordankeeps
wow looks good, love to defend that hahaha 
37674
Post by: HelSinG
That looks great! well done
16217
Post by: Scrazza
This looks awesome. I'm really digging your stuff, Ash
16217
Post by: Scrazza
These bunkers sure look nice. Congrats on the neat paintjob.
32560
Post by: NecronBender
Great looking terrain! I like your eye for detail, also.
32977
Post by: Inquisitor_Dunn
Love the bunkers. The posters on the walls really add. Very nice pictures too. Very good lighting.
5417
Post by: Sturmtruppe
Everything looks pretty awesome. Do you have a table shot that shows all of your stuff on one battlefield?
7680
Post by: oni
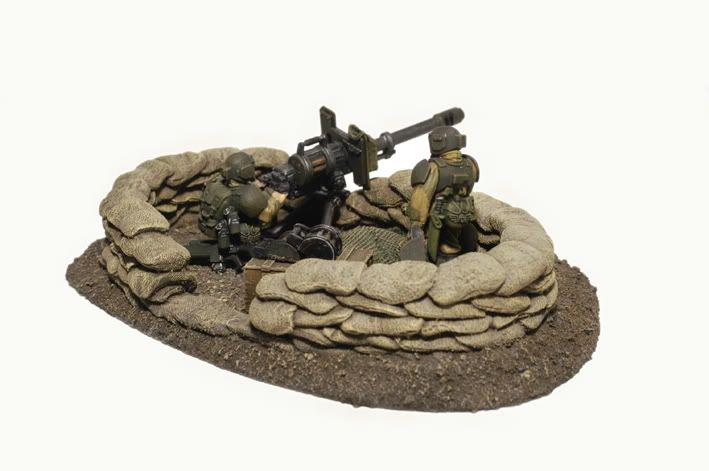
Yes, sir... I do believe I like those. Nicely done. The autocannon emplacement is sweet.
19650
Post by: shingouki
firstly those are some really cool looking pieces there.
secondly where can i get hold of that camo netting?
284
Post by: Augustus
Those are great! They really match your army perfectly too!
Well done!
38000
Post by: necron2.0
Chiming in. Your terrain looks totally boss.
40217
Post by: Ash 1
Cheers all for the kind feedback, the pillboxes were a fairly straightforward paint-job.
Sprayed with grey car primer, then a wash of thin brown paint followed by a couple of progressively lighter shades of grey dry brush.
The cam net is just medical gauze painted green and stuck down with thinned PVA. You can get it from any chemist/pharmacy.
Re doing a table, I have an 8' x 4' planned out - unfortunately due to lack of suitable storage it only exists in my head!
I've made a couple of 2' x 4' test boards, mainly to try out different materials.
The other stumbling block is finding a supplier of either blue or pink Styrofoam.
I have also done a couple of the little turret emplacements:

This ones not 100% done yet


40687
Post by: soviet.russia
Nice Guard
17349
Post by: SilverMK2
Very nice terrain indeed.
16217
Post by: Scrazza
It keeps getting better and better. 
14152
Post by: CT GAMER
I love your terrin.
The attention to detail is superb.
I also like your choice of colors/tones, etc. and the weathering and highlighting is excellent.
I'd love to see some "full table" shots or in-game shots with your stuff
I also will be trying the medical gauss as I want to do some camo nets on some of my son's IG...
17349
Post by: SilverMK2
Curse your excellence! 
18567
Post by: CadianXV
These are fantastic! Do you mind sharing how you've achieved the grounds look?
8907
Post by: cadbren
Wonderful stuff!
39358
Post by: Paranoia_Agent
Great looking terrain!
1021
Post by: AesSedai
Need to see a table laid out with a selection of these wonderful pieces!
299
Post by: Kilkrazy
What can I do except to add my praises!
25141
Post by: Chibi Bodge-Battle
Would be good to see the table.
Some great painting and some lovely detail ideas to inspire.
well done!
39274
Post by: Steu
Wow your table top must look amazing kudos on the effort put in
18286
Post by: big_d
Awesome thread. You have some really amazing pieces of terrain in here that just make me green. This makes me want to go back and redo some of my pieces.
17808
Post by: oadie
Wow, fantastic stuff, here! The subtle additions you've made blend seamlessly into the pieces and the painting is superb. I might have to cite this thread to anyone who doesn't think there's a proper way to drybrush. Some of the subtle tints and smooth blends made me think you were using pigments, not drybrushing.
40217
Post by: Ash 1
@ Cadian: The ground on these (and grunt bases) I do ; black primer, Vallejo 'chocolate brown', dry brush a mid brown such as 'English uniform', dry-brush something pale 'dark sand' or 'buff'.
@ big-d: Cheers, re going back to older minis - I quite often see bits I don't like and re touch stuff, repainted half a dozen tanks once, felt much better after.
@ oadie: thanks for the feedback, I do use a lot of dry-brushing (nearly 200 Marines with less than shiny armour). As you can probably see in the pics of the buildings there is also a fair amount of pigment.
Black soot stains up walls, some European dust along the base of walls, rubble dust on . . rubble .


I've picked up all the larger OOP FW pieces from eBay over the last two - three years, most were in a fairly grim condition; peeling primer and mold-lines.
I've added a lot of sandbags (hides the mold-lines in the windows and provides another colour to break up all the grey), the odd bit of rusty corrigated sheeting, posters and cam netting.


22107
Post by: Jordankeeps
Wow that is insane man you can sell all this stuff bro!
29610
Post by: fox-light713
Nice.
20585
Post by: 1-UP
Looks good - thank you for the tip on the camo netting. Cheap and effective things like that are why I love modelling.
Definitely some of the best Imperium city terrain I've seen. I really appreciate how you thought of color breaks and contrast points. It gets sooooo old looking at the same six gray ruined walls folks put up. Too many folks subscribe to the "In the Grimdark future, there is no paint!" philosophy.
40137
Post by: Arken Vul'tan01
Really nice work here I love the Skellton one, with the sniper!
40217
Post by: Ash 1
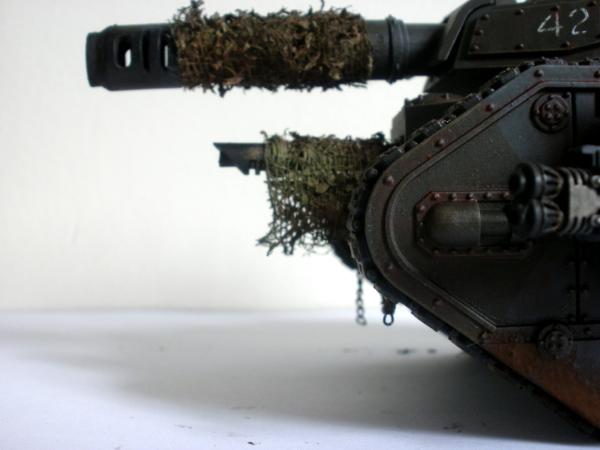
Cheers chaps, that skelli was floating around in my bits box for years.The armour was a fairly half hearted effort with a bit of plasticard and his trousers are just tissue and PVA.
Since these pictures were taken the bloody cat took a dislike to the piece and ripped off the walkway, snapping all the supports in the process . It also attacked my second Baneblade, clawed the cam net off the turret and bent the ariels! I have developed a dislike for cats . . . (well one evil cat anyway)
Here's some more pics of the Censorium piece:


I'm planning on adding some Ivy to all of these, once I've worked out how to make Birch seed look the part. The posters could also do with a wash, looking a tad bright.
Found some PIP pics with added grunts for scale:


32169
Post by: Rogue Wolves
As always great work im surprised no one comments
29086
Post by: Austragalis
These pieces have got me really inspired! I've been eyeballing some miniature set-pieces at Hobby Lobby. WW2 tank traps, barbed wire fencing, dug-outs...bet I could make some great 40k/warmachine terrain! Thanks for the inspiration, again
48159
Post by: FifthChaosGod
All your stuff is very well painted. I'm impressed.
20983
Post by: Ratius
Incredible stuff and picture quality is fantastic. Great job.
48376
Post by: Capitansolstice
good looking
will we be seeing a game-board soon?
20965
Post by: kain3883
Cool stuff, I bet your battlefield is a ton of fun.
20983
Post by: Ratius
He plays on 4x4 unpainted polystryene boards stolen from his local hardware store
Classy.
j/k mate, fantastic stuff, show us the boards!
40217
Post by: Ash 1
Ratius wrote:He plays on 4x4 unpainted polystryene boards stolen from his local hardware store
Classy.
j/k mate, fantastic stuff, show us the boards!
It's true. . . I do. If only, I use the carpet.
Other than not fitting the Autocannon to the tripod prior to taking the pictures, this is done:

722
Post by: Kanluwen
I didn't see if you'd answered it already or not--but how in the hell did you do the camo netting on your emplacements?
I've tried to replicate something like that before for my Tarantulas, but it always looks terrible.
But yeah...these are fantastic. Good to know I'm not the only one liking defensive emplacements. 
40217
Post by: Ash 1
Here's one I prepared earlier:
First up, get all your bits together. Cut some gauze to fit the space you want. I find it easier to have several smaller bits to cover a large area. Remember that if you want it to have some substance it will need to be folded over a couple of times, or it will be so thin you'll hardly see it.

Test fit it.

I mix together dark green paint, some water and PVA, in an old Bakewell tart tin (thank you Mr Kipling!). Make sure it's a good tin, I had to eat my way through half a dozen boxes of Bakewells to find the perfect tin!
(I mix it up to a thickness of paint and then drip in more water until it's more like the thickness of milk).


Once mixed dunk in your piece of would be cam net.

I use tweezers to extract the gauze from the tin and plonk it on the model. Stretch it out and press the gauze into the surface of the model. Leave to dry.


For the rag strips, repeat the process using a different shade of paint (went with a sand/khaki mix). I use any sort of smooth tissue; three ply tissues are good as you get three bits for each cut strip. Arrange to taste. I tend to let them fold over and don't worry if they tear as you can just squish all the bits on as you go. Use the tweezers to push the 'rags' into the texture of the gauze. Leave to dry.


Once it's dry, give it a light drybrush with a lighter shade.
48376
Post by: Capitansolstice
Steu wrote:Wow your table top must look amazing kudos on the effort put in
can we see the whole?
38981
Post by: fiddler6291
Another great way to add some realism to your camo netting is to sprinkle them with herbs while they're still wet. I usually use oregano because of the size of the flakes, gives a very nice leafy finish.
A pic says more than 1000 words I guess:
24190
Post by: rodgers37
Some of your images aren't showing (says 'this image exceeds bandwidth with too many views') But the stuff i can see looks simply amazing, seriously I wish i was half as good as you are, i'm not sure if you stuff can even be improved on?
40217
Post by: Ash 1
fiddler6291 wrote:Another great way to add some realism to your camo netting is to sprinkle them with herbs while they're still wet. I usually use oregano because of the size of the flakes, gives a very nice leafy finish.
Cheers for that; I've had a go at the herb/gause combo, got a nice result with a mix of dried parsley and tea leaves!
I was going to use it on some of my IG stuff, but as so much of it already has the WW2 style Hessian Tape camo nets, I stuck with them for continuity.
I do however have an 'almost finished' Chaos Chimera for my renegade IG, Mmm . . . . . . .
re the 'bandwidth' thing, Photobucket only allows a set amount of info traffic within a set period, the account with most of my more recent pictures has exceeded that amount.
Should reset around the 18th, when the pictures will reload. (that's the theory)
722
Post by: Kanluwen
Or try uploading to the Dakka Gallery, which gives you no bandwidth limit. 
46928
Post by: snagrod
AWESOME!
49358
Post by: Arclite
Amazing terrain! I really like the bunkers and ruined buildings.
37420
Post by: Jensvejmand
I really love the dead guardsmen corpses. very nice work
40217
Post by: Ash 1
Other than some mud this is done:


@ Jensvejmand: Glad you liked the skelli IG, here are a couple of the FW IED markers:

40217
Post by: Ash 1
Little resin Urban rubble pile that I picked up at Salute for 99p!

Also done with these, by Maximin, came with the siege gun conversion kit:

48706
Post by: Viersche
Awesome looking terrain there
48594
Post by: dsteingass
Fantastically fantastic!
45909
Post by: tilarium
I love those dark arts pieces. I'm going to have to order some of those. Those dead guardsmen? Where are those from?
40217
Post by: Ash 1
tilarium wrote:I love those dark arts pieces. I'm going to have to order some of those. Those dead guardsmen? Where are those from?
The Dark Arts stuff is very nice, I think they now do all the Dragons teeth bits as a combined set.
The FW IED markers came from this set:
http://www.forgeworld.co.uk/Warhammer-40000/Warhammer_40,000_Terrain/CITIES-OF-DEATH-BOOBY-TRAPS.html
48376
Post by: Capitansolstice
very Gothic!
48594
Post by: dsteingass
Man those are awesome! I love resin terrain best, your little touches like the camo netting and ammo crates really look ace!
19650
Post by: shingouki
Firstly i have to say how fantastic this thread is.Secondly i want to thank you for the mini tutorial on making the camo netting.I'm definately going to have a bash at it.
10667
Post by: Fifty
I'd really like to see a whole table set up with this lot on it. Any chance of a photo of that?
48594
Post by: dsteingass
You really have a talent for composition. Everything is micely balanced.
33700
Post by: bloodaxegit
The turrets look very similar to those in DoW dark crusade. Very nice work, especially the poster detail.
40217
Post by: Ash 1
Thanks for the feedback , glad you like the defense line, I think I prefer this stuff to the FW version.
This rather odd shaped 'emplacement' I picked up in the same lot as the walls and shot up bunker:


50343
Post by: Jonesyboy12
These are pretty sweet. I play Imperial Guard and these would be amazing in my Catachan world jungle terrain. Drooling over these pics. 10/10!
24082
Post by: Flying Pooo
The quality of the work here is amazing! I love all of your terrain pieces. They're absolutely top notch!
56028
Post by: Mr.Pirate
All of it. Just everything is so beautiful.
Keep painting it makes me feel like I should paint.
(then I feel bad because I suck at it.)
53888
Post by: Emerett
Those all look fantastic, wonderful work.
48376
Post by: Capitansolstice
Sweet, The poor pilot!
48594
Post by: dsteingass
Man, That is badass!
10127
Post by: Happygrunt
I love the terrain and I love the IG even more!
54592
Post by: AlfonsoTheTraitor
I love all the small details you have added . It's that attention to small detail that makes it come alive .
48089
Post by: ZachFTWx
Loving the hydra flak
48594
Post by: dsteingass
Beatutiful man! Just Beautiful! May I ask what color orange did you use for the orange rust spots over the brown rust?
48594
Post by: dsteingass
Ahh I have Doc O Briens weathering powders, I have dark rust, and red rust, but no orange rust- I will have to get some of that! Thanks man!
54989
Post by: Vulkanshammer
Wow! Your modeling talents are spectacular! Your terrain pieces are outstanding, and would make any table an absolute treat to play on. Top-notch work!
40217
Post by: Ash 1
Vulkanshammer wrote:Wow! Your modeling talents are spectacular! Your terrain pieces are outstanding, and would make any table an absolute treat to play on. Top-notch work!
Thanks a lot, much appreciated.
@ dsteingass: I would also get some Vallejo 'red leather', once thinned down to a wash is great for putting a rust effect around rivets, and doing streaks
48594
Post by: dsteingass
Awesome! Thanks man!
56036
Post by: neal1975
absolutely TOP RATE stuff !! Id kill to see a whole table like this
48870
Post by: Digits
One of my favourite oieces. I have one too but not as well done!
48594
Post by: dsteingass
Very Badass man! Very Badass...
26800
Post by: Commander Cain
Amaaazing! They should have no problem getting a signal in that bunker.
26800
Post by: Commander Cain
Nah, not OTT at all, it all fits together great! Interior is super, great touch with the poster, I wish my printer could get detail that small, all I get is a jumble of pixels.
19602
Post by: Chi3f
Absolutely brilliant! I love everything about this thread xD
53748
Post by: varl
your attention to detail is amazing! are the terrain bits all done in resin? it's really inspiring work I'd love to see some of these bits on a table mid-game.
40217
Post by: Ash 1
Commander Cain wrote: I wish my printer could get detail that small, all I get is a jumble of pixels.
Printer? mate that's all free hand! Honest. . .
Think it needs another between the blue poster and the door.
@ Varl: I think so, most are old Forge World pieces that I've been picking up from eBay every now and then. I couldn't afford them when they were fresh and hunting down all the bits has become a hobby in itself.
So far I haven't paid as much as the original prices for any of it.
@ Chi3f : Thanks very much.
26800
Post by: Commander Cain
Ash 1 wrote:Commander Cain wrote: I wish my printer could get detail that small, all I get is a jumble of pixels.
Printer? mate that's all free hand! Honest. . .
I belived you for a second, just a second mind you!
48594
Post by: dsteingass
CC- you are doing something wrong driver-wise or software-wise then...unless you still have a Dot-matrix printer from 1986, your printer CAN do that.
26800
Post by: Commander Cain
Oh! Well in that case I think I will have another go at it, thanks!
*Waddles off to the printer with while rubbing hands maliciously...
48706
Post by: Viersche
Awesome job as always
7885
Post by: rexscarlet
Looks GREAT!
Could you please post a pic with it all together on a table?
really great...
57210
Post by: DemetriDominov
Awesome work. You should do a printing press as your next big piece since you have so much propaganda already!
60387
Post by: razieltemplar
Im just wondering i dont know if you make them your self or not but how do you make the sand bags or are those pre molded piece
45656
Post by: ssspectre
This whole thread has just been a pleasure to read. Terrain always seems to get neglected by gamers as a whole, so it's great to see so much of it here and completed to such a high standard.
In particular I love that wrecked/abandoned chimera - the way the sand has started to fill the transport compartment is excellent.
40217
Post by: Ash 1
@ razieltemplar: Mixed bag of home made and pre molded. Any in particular?
@ ssspectre: Thanks a lot, glad you like it all. I can't take any credit for modeling the knocked out Chimera as it's a Forge World piece.
60387
Post by: razieltemplar
Ash 1 wrote:@ razieltemplar: Mixed bag of home made and pre molded. Any in particular?
@ ssspectre: Thanks a lot, glad you like it all. I can't take any credit for modeling the knocked out Chimera as it's a Forge World piece.
how do you make the homemade ones?
40217
Post by: Ash 1
GS or Milliput
The ones on the roof were a first attempt with milliput, way too big and heavy:

These are GS:


61239
Post by: Tagony
Your man cave has got to be epic, great work!
26139
Post by: Skalk Bloodaxe
Great work as always, and I'll be taking the rebar idea from you to apply to those same kind of GW ruined walls.
40217
Post by: Ash 1
Scale rebar, it's what paper clips were invented for . . .
16439
Post by: General_Chaos
I want to come play at your house!
46972
Post by: matapata98
amazing 
14152
Post by: CT GAMER
This thread is chock full of awesome btw. I have been wanting to get some quantum gothic pieces...
40217
Post by: Ash 1
Thanks, I have quite a wish list of QG bits. They have some very nice looking modular generators and armored gates
26800
Post by: Commander Cain
They do indeed have some great looking stuff. Their prices have always put me off however, I could easily spend a hundred pounds on the barricade system alone!
59465
Post by: Pasanax
i dont know how you do it, but those models look incredibly alive! just amazing work, the color of their faces is so well done that it feels they breathe and move just by looking at the pic!
well done!!
40217
Post by: Ash 1
Pasanax wrote:i dont know how you do it, but those models look incredibly alive! just amazing work, the color of their faces is so well done that it feels they breathe and move just by looking at the pic!
well done!!
Thanks. Much appreciated.
67286
Post by: Darkenone
@Ash you are the reason I have gotten into terrain building and painting more then my army....
Love the realism of your stuff. I have found myself searching and buying any OOP forgeworld terrain I can.
Keep posting them pictures!
58966
Post by: tankboy145
The camo netting deal is awesome and I am really going to give it a try!
40217
Post by: Ash 1
@ Darkenone: Thanks very much, I'm currently collecting any plastic CoD/Skyshield bits etc, not sure what I'll do with it all yet . . . Got a scratch build radar emplacement on the go, think there are some pics in my WIP thread.
@tankboy145: Go for it, cam netting couldn't be easier and is great for hiding dodgy joins etc
42971
Post by: Kal-El
What is this building made of? It looks really awesome.
58966
Post by: tankboy145
Now I noticed that once you dab the gauze in the paint you just put it on the model, do you let it dry at all before hand or does it not really run or drip? Ive also been looking for tips on how to get the cam netting to the point where I can remove it if needed.
40217
Post by: Ash 1
The building is a rather large lump of resin; the Forge World 'Ruined Administratum Building'. Was released back in 2002, and went OOP around 2007. Would have come with resin walkways and support. I bought mine from eBay in a fairly grim condition and had to scratch build the walkways, also added some 'metal' sheeting, sandbags, PSP, barbed-wire etc.
Re the gauze, it will soak up a fair amount of liquid (primary function after all), so I tend to give it a bit of a squeeze to bin excess. However don't wring it dry, it will need a bit of weight (and glue) to stick down and look the part.
Once dry, if it's a bit springy give it another coat of water'd down PVA and let it set.
Because it's being stuck down with PVA you can remove the netting once dry; PVA is quite flexible and if you have primed and sealed the paint, and remove carefully, the paint job should be relativly undamaged, but I'd expect some marks . . .
58966
Post by: tankboy145
Thank you, if anything I will put plastic wrap over the model so that when the gauze is drying it wont tear the paint off the model. That way I can put it on if needed. Thanks again for the help I've been looking for a tutorial on how to do camo like this.
18474
Post by: Darth Bob
I believe with terrain, it is very important to retain a sense of realism. Whether it be paint chips, how a crack looks, the way metal bends and breaks, or the actual colors, all of these help to maintain that sense of gritty realism that helps one become immersed in the gaming experience. You have done all of that brilliantly. Exalted.
42971
Post by: Kal-El
 Ash 1 wrote: Ash 1 wrote:The building is a rather large lump of resin; the Forge World 'Ruined Administratum Building'. Was released back in 2002, and went OOP around 2007. Would have come with resin walkways and support. I bought mine from eBay in a fairly grim condition and had to scratch build the walkways, also added some 'metal' sheeting, sandbags, PSP, barbed-wire etc.
Re the gauze, it will soak up a fair amount of liquid (primary function after all), so I tend to give it a bit of a squeeze to bin excess. However don't wring it dry, it will need a bit of weight (and glue) to stick down and look the part.
Once dry, if it's a bit springy give it another coat of water'd down PVA and let it set.
Because it's being stuck down with PVA you can remove the netting once dry; PVA is quite flexible and if you have primed and sealed the paint, and remove carefully, the paint job should be relativly undamaged, but I'd expect some marks . . .
Cool thank you well done on the add ins.
67886
Post by: zoldkozi
I scroll down all the pages, love your work.  Cheers
10972
Post by: Ruglud
Ash, first time I've checked in for a while and you're still my terrain hero... I absolutely adore all your CoD pieces, they look so amazinlgy real...
Looking forward to your next piece with much anticipation...
40217
Post by: Ash 1
Cheers Ruglud, that's very nice of you to say so. I've not managed to get hold of any more bits of the old FW walls etc, when they do come up on eBay they seem to go for silly OTT prices. I do have a WIP attempt at HESCO bastion on the go, (pictures in the WIP thread). Will put up some pics here once it's finished.
14703
Post by: mayfist
Mother of god, your terrain is like a dream come true.
Not only that, your IG models are absolutly fantastic !
From the painting, the modeling, to the poses, you have got everything right.
Brilliant production ! You have a new fan !
9697
Post by: MattRendar
What can I say , I love your stuff . Great work!
48377
Post by: spudkins
What a fantastic read. Your terrian is awesome and painted very nice indeed.
Very realistic feel to it. Look forward to more.
32545
Post by: Element206
Every piece is just amazing. the realism, the attention to detail, the variation in weathering and rock size on the base is just great. the grey tones used for the bunkers is perfect. Anyone would love to play on a table filled with your scenery....great work
60662
Post by: Purifier
Absolutely amazing scenery!
Any chance of a minitutorial like the camo netting one for the greenstuff sand bags?
There are a lot of different ones out there already, but your bags look great. I'd love to see how you do yours.
40217
Post by: Ash 1
@ mayfist, MattRendar, spudkins, Element206 & Purifier: Thanks very much for the encouraging comments, I'm glad you like it so far.
Re the sandbags:
I'll try to take some pics next time I make some, but it couldn't be easier.
Mix your GS; roll it out like a thin sausage; chop into suitably sized pieces with a sharp blade (don't go too big, some of the ones on FW pieces look like futons next to the minis!). Flatten the GS a bit with finger/scalpel handle; try to keep the shape rectangular; place it where you want it to go; give it a push to mold it into the surface of whatever you want it to stick to. Lastly I press a piece of gause bandage (not the thin stuff that I use for netting, but heavier weave like an Elastoplast) into the still soft GS, this leaves an nice imprint of the texture on the 'sand bag'. It looks the part and hides/covers any finger prints. Add paint . . .


61618
Post by: Desubot
Those rock basket barriers are way cool
how did you make em?
53776
Post by: TheLionOfTheForest
Really top notch terrain! I am gonna have to steal your ideas.
48594
Post by: dsteingass
Absolutely fantastic Ash! Yes, do tell!
40217
Post by: Ash 1
Cheers chaps, glad you like them. There are some pre-paint pictures in my WIP thread.
They were fairly simple; I got hold of a roll of wire mesh, cut suitable size strips, folded around a piece of plasticard to make the square shape, lined with some scrap paper and filled with bits of polystyrene/paper etc then topped off with a mix of PVA and sand.
I made it up as a test piece to try and make HESCO bastion, then made an emplacement for the radar dish. Works just as well for a gun emplacement:


40063
Post by: talljosh85
Great work, relatd note, are you military? The IED markers and the Hesco bastions are really spot on. Either way, great terrain and I look forward to mor of your stuff.
30723
Post by: iheartlargeblasttemplates
Seriously awesome, inspiring.
2776
Post by: Reecius
Excellent terrain! Seriously great work.
10972
Post by: Ruglud
Superb piece there, great scratchbuild and awesome paint job as ever
69063
Post by: poz_dog
Wow! Wish i could play on a table covered in those awesome scenery pieces. Awesome job. So jealous.
39297
Post by: Cave_Dweller
I love your scenery!
40217
Post by: Ash 1
Cheers for the feedback chaps.
Made this little mine field marker:

61618
Post by: Desubot
Woh are those the forgeworld mines? that marker looks boss. edit never mind. for whatever reason i though forgeworld had mines but i cant seem to find them.
40217
Post by: Ash 1
I think the original mine came from one of the FW Cadian upgrade packs, but I can't see it either. There was an arm carrying a mine, a mine in a sort of pouch to either stick on a vehicle as stowage or add to a backpack & a plain mine on its own.
61752
Post by: Wagguy80
Very nice pieces. I think it's easy for some people to overlook how much enjoyment quality terrain can add to the gaming experience.
42971
Post by: Kal-El
Ash 1 wrote:@ mayfist, MattRendar, spudkins, Element206 & Purifier: Thanks very much for the encouraging comments, I'm glad you like it so far.
Re the sandbags:
I'll try to take some pics next time I make some, but it couldn't be easier.
Mix your GS; roll it out like a thin sausage; chop into suitably sized pieces with a sharp blade (don't go too big, some of the ones on FW pieces look like futons next to the minis!). Flatten the GS a bit with finger/scalpel handle; try to keep the shape rectangular; place it where you want it to go; give it a push to mold it into the surface of whatever you want it to stick to. Lastly I press a piece of gause bandage (not the thin stuff that I use for netting, but heavier weave like an Elastoplast) into the still soft GS, this leaves an nice imprint of the texture on the 'sand bag'. It looks the part and hides/covers any finger prints. Add paint . . .
Hey Ash thank you for posting this tip. Do you think it would work with air dray clay? Its extremely cheap in contrast to greenstuff.
40217
Post by: Ash 1
I've made sandbags with Milliput and they take the texture well. Not quite as good at molding to uneven detail as GS, but good for building sandbag walls. I've not tried airdry clay, but I would have thought it would work just as well. If you make some send me a link I'd be interested to see the results.
48594
Post by: dsteingass
I use air-dry clay, it works well, but if you are building up a fortification with piles, you can glue them with white glue while they are still wet.
64368
Post by: Rorschach9
Air dry clay works perfectly. I've made hundreds of sandbags out of the stuff.
You can glue it together with white glue while wet, or wait until the entire assembly dries, then take each piece individually and re-place it with glue between. It takes the pattern off of your gauze for the sandbag look quite easily as well and is easy to work with (no mixing, shapes and cuts easily, dries overnight).
@Ash - I love your work! It's inspiring. Keep it up!
48594
Post by: dsteingass
Oh..but don't use the Crayola stuff..it tends to crack and crumble when dry.
9527
Post by: Dinamarth
Wow, everything looks amazing, especially the OOP Forgeworld ruins.
Would love to see a pic of it all on a battlefield.
51505
Post by: suspiratus
Awesome work there, really like the eye for detail on all your pieces.
58669
Post by: Grugknuckle
Could you give a quick run-down on how you make the posters? i'd love to be able to reproduce that little detail.
40217
Post by: Ash 1
The posters are just lifted from the Interweb. I tend to just insert them into Word, as adjusting the size is so easy, then hit the print button . . .
Re the Forge World ruins, after finding a load of suitable basing bits at Salute, I've added bits of grass tufts and Ivy. I think they look a lot better, breaks up all the grey!
|
|


