120215
Post by: StormX
I have another blog thread, but it is a complete disaster, massively untidy, and just awful also most of that blog is my first time ever dealing with any models in any form. So this blog thread is going to be the official Storm Blog Thread.
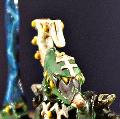
8.04.2019 - Starting to paint the Great Unclean One.
- Priming done - 5 dollar grey spray can called Quick Color.
- Base - Done / Paints used - Catachan Green + 10% of Screaming Skull thinned with Lahmian Medium.
- Wash Done - Paints used - abadon black 10% catachan green 90% with Lahmian Medium
- 1st highlighting to skin done - 15% screamin skull 85% catachan green. It'ss so vague ill probably do that one again.
8
84410
Post by: queen_annes_revenge
Looking good. Keep bringing those highlights up. That model is so large you can get loads of high contrast areas in.
120215
Post by: StormX
 queen_annes_revenge wrote: queen_annes_revenge wrote:Looking good. Keep bringing those highlights up. That model is so large you can get loads of high contrast areas in.
Thanks!
120215
Post by: StormX
2nd and 3d highlights done, i don't know exact measurements, but its just about 15% more screamin each time i think...Also i did some "surgical" selective very dark wash in some areas that needed it. Also had to fix some mistakes i made which luckily have been fixed.
I think maybe one more highlight..? Then move on to all the wounds and all that nasty crap.
.
4
120215
Post by: StormX
Highlights on skin done, not sure if you can tell, just gotta do everything else now.
2
110309
Post by: ListenToMeWarriors
Looking good, are you enjoying painting him? I loved doing my GUO. You are definitely going about it the right way, he rewards lots of gradual highlights and coloured washes. Once the greens are done reds and purples really help. What are you going to arm him with in his left hand?
120215
Post by: StormX
ListenToMeWarriors wrote:Looking good, are you enjoying painting him? I loved doing my GUO. You are definitely going about it the right way, he rewards lots of gradual highlights and coloured washes. Once the greens are done reds and purples really help. What are you going to arm him with in his left hand?
Thanks!.
Well im not bothering to magnetize since i mainly play / collect / paint for looks. So my favorite looking thing is the flail with the chains and skulls hanging off, so i will be attaching that down the road. Yeah this whole things been freaky as hell to be honest. So yeah its gonna be interesting how it turns out that's for sure.. Yeah i was thinking about some purples for some folds of the skin etc, i dont even have purple paint atm so ill see what i do, im doing this whole thing with like 6 paints in total so i might get more if i have too, but there was no way i was going to buy 29 paints like Duncan does in the videos, rather have the most raw experience rather then just knowledge and copying some one so it helps me in the future, because i need to understand gak or my brain freezes and i go in too state where i cant do any painting or any thing until i have figured this one thing out lol.
Have a good day.
Edit - The lips dont look so out of place now lol, i have fixed them, i'll post next time. You should post your GUO, would be neat to see.
Actually make that about 8 paints or so.
1
120215
Post by: StormX
Highlighted it much much more. Dont know if i ruined it or what. Any way not much progess because i have been depressed. Also the horns are done, and i did some layer highlights on some areas instead of just dry brushing.
Have a good day.
3
120215
Post by: StormX
Sloooooow Progress. Hopefully ill finish it later today. I have been going a bit nuts with dry brushing and thinking weather i have stuffed it up or not. I did want it to be pale so i dont know, maybe its fine.
Any way off for the day and back tonight to finish.
2
121268
Post by: Gwyn chan 'r Gwyll
Those wounds look brutal, I love it!
120215
Post by: StormX
Thanks heaps!
Just gotta add some fat etc and they will be done hopefully. But man this has been a dry brushing mess to be honest when it comes to his skin. I have been trying to correct mistakes that i made and doing so i have been making it paler and paler...but that is what i wanted so its kind of working out alright sort of. Any way all mistakes is fine because i will know next time to go about it differently.
Take care and thanks again.
120215
Post by: StormX
Camera is only taking really blury pictures for smoe reason, so this is the best quality i can get at the moment, but will fix it soon, but you can still get a good idea from these ones. Different lighting with bright light, so looks way brighter then it is in reality.
I have done most of the "boils", also i highlighted all the red "muscle", did about 6 coats of every bit of "fat" because im using this really cheap crappy paint that is supposed to be for canvas's i think, but if works fine for this particular part of the model. Also the flesh i highlighted even more then the last photos all over. Washed sword and made a custom wash color for the skulls, none of which has been highlighted yet. Washed the red cloth on his back and that has not been highlighted yet either. Most of the "boils" that dont have "cracks" around them i just highlighted with screaming skull by doing a layer over them.
Any way yeah these boils and all the highlighting im doing is taking ages because im trying to be very careful number 1, number 2 i'm basicly mixing to create most of the colors im using with a limited amont of paints, so since im so noob at this, it takes ages for me to think what color to use and what color to highlight with and how bright or dark etc etc etc. It would be alot easier if i just bought 29 different paints and followed DUncan's GW videoes, but i think its looking alright so far.
The fat needs to be washed, i only just finished doing that, and as i say took alot of time thinking of what color to make that would make sense and since i used that cheap crap paint which i thinned alot it needed about 6 coats on al fat areas lol.
I said i would be finished but under estimated it not realizing i would spend so much time thinking about it.
So to be continued.
edit - Oh yah i washed the teeeth aswell. But no highlight yet, also did some nuln oil the two front boils of his stomach.
5
120215
Post by: StormX
After a while of thinking how to wash the fat. I managed to come up with a color that i think works great. To do this i mixed 5 paints ahaha including medium and tap water. You can see in the picture my mess, its one of the shades of the red you see, which has mostly dissapeared now but some of that color still remains in the center of where the red area is, but yeah worked fine. These pictures are a bit better quality as-well.
Also did some more highlights on his face to make it stick out more since it was too much blended with every thing else n gak. Also some highlights on the boils that have cracks around it.
Also i included a picture of all paints i have used to do this so far. This is such an experiment for me and i'm just doing what ever i think will work.
6
20609
Post by: Tyranid Horde
Your GUO is coming along nicely, I like the muted greens you've gone with and the contrast with the red and yellow is particularly nice.
120215
Post by: StormX
 Tyranid Horde wrote: Tyranid Horde wrote:Your GUO is coming along nicely, I like the muted greens you've gone with and the contrast with the red and yellow is particularly nice.
Hey, thanks heaps!!.
Have a good one.
121677
Post by: mcmattila
Yep, looks like solid progress on the GUO. Still have to do a whole bunch of small boils and other detail work, but it's going to be a great model when finished. I'd also recommend using different washes (red, purple, maybe yellow) on different parts of the skin to create variation. But anyway, don't try to rush it, it's a big model and it's okay to spend more time on it.
120215
Post by: StormX
 mcmattila wrote: mcmattila wrote:Yep, looks like solid progress on the GUO. Still have to do a whole bunch of small boils and other detail work, but it's going to be a great model when finished. I'd also recommend using different washes (red, purple, maybe yellow) on different parts of the skin to create variation. But anyway, don't try to rush it, it's a big model and it's okay to spend more time on it.
Thanks heaps.
Yeah lots of details to finish yet. But as for the washes you mentioned, im a bit worried and not confident about where to put it etc or how to go about it so i dont know what im going to do there really. But yeah it had one major wash at the start with a darkened base color wash, and some nuln oil in some places of the skin, but yeah its a good idea you have said i just dont feel confident about my ability to do it at the moment ahaha. This is my first "complicated" model ever, only other thing i have ever painted thats complicated ish is the heldrakes so if i had more experience i would do that right this second.
Thanks, have a good day.
edit - Its just i have already almost messed this thing up badly already and sort of fixed the issue slightly that i had so now im worried to try new stuff ahaha
120215
Post by: StormX
Done the sword basicly, also the missing arm. But need to do boils and wash n highlight missing arm. ( gold and the red parts is there to try match my Black legion Army )
Automatically Appended Next Post:
mcmattila wrote:Yep, looks like solid progress on the GUO. Still have to do a whole bunch of small boils and other detail work, but it's going to be a great model when finished. I'd also recommend using different washes (red, purple, maybe yellow) on different parts of the skin to create variation. But anyway, don't try to rush it, it's a big model and it's okay to spend more time on it.
Actually i changed my mind and just did some reds, i might have went about it wrong and stuffed it up or some thing who knows ill post picture soon.
Automatically Appended Next Post:
MAN IM FREAKING OUT!!! ( thought i might have completely fethed it up at first ), i cant believe i did it, i think it looks actually way way better man i cant thank you enough, and the other person maybe it was queen, thanks? who also said to use red or some thing like that.
Hope you guys like it and ill tell you how i did it if you think its ok, if i failed then i might just strip it. lol
Messy message because im panicing
120215
Post by: StormX
. I accidently spelt black paint on the pimples near his face so i need to think how to fix them aslo.....I used tap water only to make the wash i used or glaze what ever you want to call it lol, i ran out of medium and yeah. And luckily some magical reason i got purple from the black and red paint, lol i thought i was going to be just dark red but this is even better i think.
NOT FINISHED, will ADD MORE PURPLE/RED, and need to do the teeth still they are not done, and heaps of stuff needs to be done.
EDIT - THESE PICTURES ARE DARK MAKING THINGS SEEM NOT LIKE THEY ARE, REFER TO THE ABOVE PICTURE FOR THE REAL COLORS FOR THINGS LIKE THE FAT ( because i did NOT wash them again or any thing, its just the pictures are darker today for some reason )
2
121677
Post by: mcmattila
I know how it feels to have painted something and then being afraid of messing it up if I go further. But I'm glad you tried the washes, you definitely haven't ruined the model! It looks better now!
And remember, you can always fix stuff by painting over it, as long as you use thin coats (and looks like you have). You should only consider stripping if you have badly obscured detail. If you strip, you need start the whole thing from scratch, not just the one part that you made a mistake on.
120215
Post by: StormX
mcmattila wrote:I know how it feels to have painted something and then being afraid of messing it up if I go further. But I'm glad you tried the washes, you definitely haven't ruined the model! It looks better now!
And remember, you can always fix stuff by painting over it, as long as you use thin coats (and looks like you have). You should only consider stripping if you have badly obscured detail. If you strip, you need start the whole thing from scratch, not just the one part that you made a mistake on.
Thanks for the kind words man. Yeah iv changed it more since that picture to try make gak sort of work, either way this is definitly a unique looking GUO once you see the new pics. But yeah nah i wouldn't strip it after all this work, but i wouldn't mind getting another GUO or the Forgeworld one and trying another method, maybe in the future.
But yeah ill post some more tomorrow probably, have a good one!
Thanks.
120215
Post by: StormX
Colors always changing with each photo, i wish my camera took or i could take what my colors i see with my eyes lol. Still have not finished painting nails and other stuff.
1
120215
Post by: StormX
Edited, ill remove this post photos showing army together since i changed GUO since then and should RETAKE the PHOTOS again another time since its changed.
120215
Post by: StormX
Ok here are new photos, this is last lot of photos for GUO, im just going to do the base and maybe some little touch up things and that's it. All the new pics will be of base making probably. Oh gak yeah i need to do the back cape aswell that has not been done at all yet... But yeah you can notice lots of difference's between the other one if you look close.
Automatically Appended Next Post:
I'll do proper pictures showing all angels in 8 or so days.
4
120215
Post by: StormX
Cant finish nurglings or finish really any thing at all until like 2 more days when im able to get some white paint and nuln wash. In the mean time i have made this base, basicly its cork wood in small peices all bunched together, pva glue / modeling paste all over it. Then cork sprinkled over top, the flat area will be for lava.
2
120215
Post by: StormX
Scrapped that base in the above post and instead tried looking for cork wood, or some thing easy to carve etc but couldn't find any thing. Only could find this foam for gardens, it came in a big brick so i carved this part off. Its very sandy crumbly sort of foam so i have soaked it in paint, and now its covered in varnish and drying. Hopefully that works out, then ill finish base and finally finish this thing. Nurlgings are not done but heres a little picture.
4
120215
Post by: StormX
Done. Except the black base is ruined i had to throw it away and will be some time before i can get another one. So any way this is the rock he stands on which was sitting on the base before it got ruined and i had to take it off.
11
120215
Post by: StormX
Making base again ( my other base is ruined that you see it standing on in the other pictures ), here is the stuff i am making it with, its floral foam or some crap, meant for gardens, but its the dry version not wet version. I cant even start until the new base arrives, so i havn't been doing nothing except just now i did this and thought i should show.
I also soak it in this cheap grey spray paint so it absorbs it and hardens, then varnish it. Also tried to do some texture on the flat surface, but GUO will be taking up most of the space so you wont see the badly done checkereed looking middle area, just some of the outsides of it.
Any way, i much prefer this foam, then my first attempt at this if you scroll up and see that white molding paste mess i tried to do for the first one.
Edit - ALl i have done is spray painted it, nothing else yet, so looks crap atm.
5
20609
Post by: Tyranid Horde
You know, I think the base you did for the painting challenge was very good and the votes you got are a testament to that and the overall paint job!
Keen to see the new base though!
120215
Post by: StormX
Tyranid Horde wrote:You know, I think the base you did for the painting challenge was very good and the votes you got are a testament to that and the overall paint job!
Keen to see the new base though!
Cheers!
I carved it more, didn't like the above picture very much, so now its more rocky looking i think and less obvious that its carved. You cant really tell any way paints wet and pooled hard, once i paint it you will see all the edges and all that.
MIDDLE AREA IS GOING TO BE COVERED, IGNORE CHECKERED PATTERN. The whole thing will probly carved differently again next pictures since i cant make my mind up. I think just the front needs some more work.
5
120215
Post by: StormX
Carved it even more lol. Now its on the base also did some more "damage" on the top to make it look rougher, now im just washing it with black paint, second coat coming. Also made the bubbles with green stuff. Also pva glue and Varnish were put over all the black flat surface areas. Also i should note that i spray painted the gak out of it with cheap grey spray paint ( to try and keep the fragile foam nice and firm ). Then coated it in varnish. It's still wet at the moment from the first wash out of about 3, except some of the side areas.
EDIT - THATS JUST CHEAP 2 DOLLER ORANGE PAINT THAT COMES IN A HUGE BOTTLE YOU SEE IN THE BACKGROUND, DONT PANIC!!!.
Automatically Appended Next Post:
IM a bit freaked out about how im going to do the lava, its been occupying mind for a few days and i cant figure out how to do it, but i have an idea now and hopefully it works....
Edit - That marine in the picture is just inspecting progress to make sure every thing looks great. I told him to feth off a long time ago, but he doesn't want to hear it.
2
120215
Post by: StormX
fethed base up, had to scrap all varnish and pva glue and green stuff off and then peel the rock off because for some reason the lava i was painting started sepereating and acting all wierd and making the dry pva glue wet again causing a big mess, so had to start that part again, at least now i can do bubbles right...Now i just have to wait like 2 days for it to dry.......
1
120215
Post by: StormX
Why has it taken me so long to get to this point?
Because it took like 3 days to dry and ran out of red paint, and i almost decided to throw this one away beause even after the 3 days or so of drying, after me paitning the first few layers of paint it started tearing again and making the pva glue wet again, so honestly to get to this point where i am now has been a real pain in the ass. Also was not happy with the high lighting i did on the rock and also think i stuffed the bubbles up so all this has taken heaps of time. Never paint over PVA GLUE in my opinion people...
Almost finished, just going to add smoe brighter yellows, then clean up base and see how it looks.
1
120215
Post by: StormX
Ok, so this is how i wanted the base to look or closer to how i wanted it when i posted this model for the painting competition on DAKKA. Also these pictures dont have a very bright camera flash ruining it making it look how it would never look in real life. So this is what i would have preferred to enter the competition with but its too late.
So this is completely finished now  im very proud of it.
Thank you all 200% for all your awesomeness you hold within your selves Dakka users.
EDIT - I REMOVED OLD PICTURES SINCE I MADE SOME SMALL CHANGES TO THE MODEL ( Highlights and shade ). So what it looks now can be found a couple of posts down from here.
120215
Post by: StormX
Some things no longer look like they do in the pictures i posted on this post, so i have changed it to the most recent picture.
2
120215
Post by: StormX
I am re doing and removing all trim / ware on tanks, and instead of just very thin lines on the edges using the very edge of brush, i have done fatter lines that i directly brush on with the tip of brush and am going around every thing with it not just sharp edges. Here is just a small picture showing the 1 tank i have almost finished doing this method with. So its metallic steel trim over a black tank.
1
120033
Post by: Excommunicatus
That's really nice.
Good stuff.
120215
Post by: StormX
Some new pics of GUO i made very subtle changes that you most likely wont notice unles you really look hard.
Any way ABADDON THE DISPOILER IS ON HIS WAY TO MY HOUSE!!!!!!!!!!!!!!!!!!!!!!!!!!!!!!!!!!!!!!!!!!!!!!!!!!!!!!!!!!!!!!!! Finally can start a fresh new model.
Automatically Appended Next Post:
Thanks !!!!!
120215
Post by: StormX
He is here to take command finally.
This song is the entrance theme for Abaddon in to my army, it fits well - https://www.youtube.com/watch?v=54W8kktFE_o - Listen to the whole thing.
119289
Post by: Not Online!!!
So you got yourself abbadabadabadabooo...
Now while i don't like the (h)armless i am quite interested in seeing what you can do with him.
120215
Post by: StormX
What does that mean? the harmless part.
Thanks mate.
Primed him with 5$ spray paint!, Why?, because feth spending 30+ dollers on gak that does the same gak ( in my opinion ). Hahaha. ( I recently became a rapper, so that's why i said gak two times in a row. )
2
120215
Post by: StormX
Ok here is me attempting my first ever "glaze" or many thin coats to achieve highlights, i think it looks ok ish? ( Im referring to the LOINCLOTH ).
I would really appreciate HONEST feedback related to this cape.
My hands are sweaty knees weak arms spaghetti is how i am feeling.
EDIT - IM TOUCHING IT UP BECAUSE I CAN SEE SOME ISSUES.
1
120215
Post by: StormX
Ok im going to call this loincloth finished. Its freaking me out doing this mother fether, im so paranoid. I made it a little bit brighter at the top and did some black glazing and blah blah you probly cant tell the difference.
1
119289
Post by: Not Online!!!
Erm? Storms looks decent so far so.
120215
Post by: StormX
Thanks man!.
44899
Post by: squall018
Man, that GUO looks really nice. One of my favorite models in GW's range. You are making me want to paint one!
120215
Post by: StormX
Making me blush!!
Thank you kindly.
120033
Post by: Excommunicatus
Abaddon's metal mini wasn't great and his arms had a habit of falling off.
92012
Post by: Argive
Greta looking stuff. Really like the bases bro!
120215
Post by: StormX
I see, thank you Excommunicatus.
Thank you so much Argive.
120215
Post by: StormX
Smalll update,
CLICK IMAGE TO SEE THE RED BLENDING ON THE BELT BETTER. OTHER WISE IT JUST LOOKS PLAIN RED.
Any way let me finish this gold on the belt and ill put a better picture up in about 2 hours or less. Its so small those arrows, i dont want to get any gold on the red, so its taking me ages to do each arrow lol. Im shaking so much.
2
120215
Post by: StormX
I finished the red part, think it might need another darker part to make it a bit darker around the edges. I have not highlighted any gold yet, and the eye in the middle of the belt is not finished, all i have done is finished the red and base of gold. If i do make it darker around the edges of the red, i dont want to hit that gold, because that took ages to do trying to not hit the red.
EDIT - I can see mistakes with the gold on the belt already, i will fix for the next pictures.
EDIT - That belt has been so far the hardest thing i have ever done in this hobby in regards to paitning. I just want to thank you all from the bttom of my heart for all the help you have givin me. Thank you.
GOLD BLACK AND EVERY THING EXCEPT THE RED IS NOT FINISHED AT ALL OR EVEN CLOSE.
1
120215
Post by: StormX
Gold washed.
1
119289
Post by: Not Online!!!
Well it's abbadon allright, but where is his top knot?
120215
Post by: StormX
Yeah im really wondering if i can put the rest of his Armour on and still get to all the parts that need painting. Wish i had a quick answer lol.
20609
Post by: Tyranid Horde
Keep it up, good job so far.
120215
Post by: StormX
Cheers Tyranid Horde appreciate it.
120215
Post by: StormX
Yes he looks messy, but its fine he will look better eventaully. NOTHING IS HIGHLIGHTED, NOTHING IS EVEN COSE TO BEING FINISHED, Lots to do.
edit - Oh yeah, long story, but i had to paint over the loincloth and i am starting that again....
REMOVED AWFUL PICTURE FROM THIS POST. SORRY DAKKA - EDIT.
120215
Post by: StormX
Ok i washed it a bit and this picture looks better but yeah still messy and a long way to go.
EDIT - I dont know why i painted the "hydralics" between his legs gold. Thinking what to do.
1
119289
Post by: Not Online!!!
He looks like the Poster boy villian uglyness he is supposed too. I' dare say you are doing rather well on him.
Altough you still did not answer where his topknot went
120215
Post by: StormX
Oh i thought topknot meant some thing that i had not attatched to him yet lol. I have no idea what that means .
Thanks man. Im just blending his sword at moment.
119289
Post by: Not Online!!!
120215
Post by: StormX
Yeah i'm not a fan of the way it looks, maybe black hair or purple i think, i was thinking about it.
or more of a dark red
or a dark red blend to bright.
119289
Post by: Not Online!!!
Radium green?
It glows in the dark.
Na red's his common depiction. Maybee a hint of grey, cause i mean the sod is the equivalent of an angry gramps by now.
120215
Post by: StormX
Lol, yeah i just cant stand the look of that, it doesn't match right for me ( the red ). But what ever where does it say he didn't die his hair in the lore any way? lol 
119289
Post by: Not Online!!!
 Stormatious wrote:Lol Stormatious wrote:Lol, yeah i just cant stand the look of that, it doesn't match right for me ( the red ). But what ever where does it say he didn't die his hair in the lore any way? lol
So radiation greens 'back on the men(m)ue?
120215
Post by: StormX
throw me paint green paint now, im standing outside in backyard with hands wide open ready for it. Say whenn.
120215
Post by: StormX
Gotta still edge highlight n gak.
1
120033
Post by: Excommunicatus
Pozhaluysta.
You seem to have a real natural 'knack' for painting, when you compare your minis with what you say about your experience level.
Seriously good stuff.
120215
Post by: StormX
Wow thank you so much.
So appreciate it very much.
120215
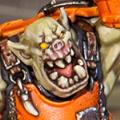
Post by: StormX
Finished .
First id like to mention some things about this.
This was kind of stressful at alot of points, i literally dropped it 5 times in total during this painting process, and i kept accidentally making mistakes, i ended up stripping the sword and cape from the last pictures i posted and did them again, im still not 100% happy with the results of the capes but im happy enough to call it complete. The only thing im not happy with really is his face. I accidentally blobbed a bunch of white paint on his head, and had trouble trying to get it off once it dried, couldn't unglue it so i could strip it, so i just did the best i could with alot of the detail being removed because the blob of white i couldn't completely remove.
Any way, here it is .
EDIT - Yes i know the snow / ICE base is a bit rough, i would do differently if i could do it again ( which i may do )
Edit - I also stuffed the "fur" up, im not happy with that really either. And i just noticed i forgot to do the almost hidden part of his shoulder...
EDITED - THESE ARE NEW PICTURES AFTER HAVING NOTICED THE MISTAKES I MADE FROM MY FIRST POST, I REMOVED OLD ONES, HERE ARE NEW ONES.
119289
Post by: Not Online!!!
It's a Blue haired purple cloak wearing abbadon.
An abbadon that looks cool! 
120215
Post by: StormX
Hahahaha, yeah i didn't plan on it looking like this like every thing i do.
Thanks man.
47845
Post by: vossyvo
Nice one Stormatious.
I like the transition on the sword, solid work.
Also liked that you picked Blue marines to be squashed underfoot, and mounted on the spike
120215
Post by: StormX
Thank you so much vossyvo, and yeah i decided it would make sense for Abaddon to be stomping on Ultramarines lol.
Automatically Appended Next Post:
Omg, i just realised i have not even started to do the gun and ammo, i only based and washed it... gak...completely forgot about that part..
92012
Post by: Argive
Solid work man! Really dig the cloak!
120215
Post by: StormX
Thanks Argive appreciate it!.
3
120215
Post by: StormX
I think these are cool pictures of every thing finished that i own, just took these pictures today. I was going to strip some troops and do them again, but i think its not worth it and should just add on to it etc. So nothing to do at the moment, i might try some terrain building. This is my whole army you see, i used to have 7 rhinos in total, but i down sized on them.
5
119289
Post by: Not Online!!!
Fancy.
120215
Post by: StormX
Thanks!!.
10667
Post by: Fifty
Abaddon's face looks fantastic.
(Mind you, so does the rest. And I love the GUO. So nice to see colours other than green, but it still looks very Nurglesque.)
120215
Post by: StormX
Oh thanks!, i stuffed it up a bit but yeah i guess it is not the worst lol ( just my personal thoughts ) thank you for the nice comment, i appreciate it.
Also the purple trim on his body i would definitely not put that there if i could do him again, but oh well still works out alright so ill call it a win any way.
Thank you.
Edited - Thank you for your edited comment, appreciate that also.
120215
Post by: StormX
Tryingto build terrain for first time. No plan, just some rough idea in my head. This is nothing yet so ill just post these starting pics. I got the cardboard idea off youtube, but i thought of the foam wood idea my self, but im sure its been done before .
8
119289
Post by: Not Online!!!
I am going to wait that out and see what it will become.
120215
Post by: StormX
Yeah looks funny / terrible at the moment lol. But it will get there.
120215
Post by: StormX
Now im going to add things to it, like some wires or some thing coming from it etc etc etc etc. Remember its supposed to look like a 3rd world slum tin shack sort of a thing. Ill put some grass or some sort of grounding around the bottom of the building etc to hide gaps on the bottom. This building is scaled for 40k.
1
92012
Post by: Argive
Its starting to look like something 
Once I have space for storage I cant wait to make some terrain.
120215
Post by: StormX
Yeah lol. Yeah its quite fun, really enjoying this since the thing i',m building allows me to do it in a very un organized messy fashion because that suits it well.
Just finished making some more gak. I made a barrel using 3 bits of paper rolled up, then taped and cut in to the barrel length. Then some dents in it to make it look old etc.
120215
Post by: StormX
I accidently put the door hinges on the wrong side of the fething door, so now theres a mess of glue on it from me trying to rip of gak off. Any way, you cant see the "bin" properly because the whtie is so bright, but it has a nice looking dent in it and a hole. I made it with 3 peices of paper rolled up in to that shape then cut. So im going to make some new door hinges.
The door has a handle and little knob on the side for it to attatch. ( wooden handle, very very very simple one )
Any way when i paint it all it will look good im thinking compared to the disaster it looks now.
I still need to make some sort of eletrical wires coming from the building, and maybe around the side of it. Also maybe a tire or some gak like that. Just thinking how to make it.
Edit - The mess of paint is because i spilt nuln oil more then once all over the place accidentally.
1
119289
Post by: Not Online!!!
You could use an empty paint bottle.
Also there needs to be some dirt piles infront?
Maybee a puddle near the barrel?
120215
Post by: StormX
Yeah i was already going to add grounding. And a puddle was in my mind aswell . But the barrel will look good when its done, cant see it properly at moment. Paint bottles are too big.
Thanks for the advice, appreciate it.
Edit - I mean a puddle crossed my mind, i dont know yet though.
120215
Post by: StormX
Some "scrap" wood inside the barrel. Adding more stuff, just need to let this dry from primer.
Also i added a picture showing the cardboard before and after from the scraping process that takes quite some time. I use a razer blade and scrape up and down along the panels in a very quick manner, seems to work well.
Also i tried to make some things using green stuff and i keep failing, and its soo sticky making every thing annoying lol.
4
120215
Post by: StormX
Going to start adding grounding. I have added some random wire sort of a thing that i might paint red, and some mosqitou netting as wire mesh was added on that side area. Also i found these wheels on this thing had, so i ripped them off it and put that near the wood scraps and barrel. I did a really messy quick primer over those newly added objects, it looks messy and its hard to tell whats there, but when i paint them it should fix that.
Ill show all angels of it when i post next lot.
1
119289
Post by: Not Online!!!
 Stormatious wrote: Stormatious wrote:Going to start adding grounding. I have added some random wire sort of a thing that i might paint red, and some mosqitou netting as wire mesh was added on that side area. Also i found these wheels on this thing had, so i ripped them off it and put that near the wood scraps and barrel.
Starting to look like something usefull.
120215
Post by: StormX
Cheers. I will add grass "weeds" aswell around the outside, i made them with green stuff, just waiting for them to harden. Then door hinges are next, then grounding, then painting it. I might have to skip a puddle for this one i think, not sure yet.
2
120215
Post by: StormX
Ground layed. Now im going to paint it all when its all dried. Also added a little foam wooden "sign" which you can see in black, still have to prime it. I smashed up some white rocks with a hammer in the rain outside to get what you see, then cleaned them untill there was completely clean water coming off them with no cloudiness or any thing other then pure clean see through water.
Oh yeah i got some more weeds im going to add aswell.
1
120215
Post by: StormX
Progress update. Lots of mistakes i notice after taking pictures. I am going to add puddles where you see those patches in the gravel/mud ( not sure ), trying to figure out if the puddles should be a lighter or darker color then the rest of the ground. Have not highlighted any thing except for the wood. Have not painted the wire at all, i just put a little red part at the end randomly, but yeah that has not been touched yet. I only just washed the ground now so its still wet. And i have noticed after taking these pictures there is patches of ground i have missed and need to either paint or add more grounding. The barrel is only painted blue with nothing else done to it yet, i had painted it a rusty color, but i thought that it blended too much in with the building and i wanted it to stand out a bit more, so i will be shading and highlighting it soon. The metal tin has been painted and washed ( took me for ever because every time i took a picture to upload i noticed areas i had missed ), i am not sure what more to do with it yet, i am thinking about some rust or some gak but im not sure. The wood took me a long time also, because i ended up painting it like 3 times, first reason is because the nature of the foam im painting ment that you could see little holes where the paint had not filled, so it needed a few coats, and the second reason is because i kept fething up the brown color i was trying to create by mixing red and black, and 3rd reason is i tried really hard to get the only highlight i did on the wood to not hit the cracks at all, and yeah that was a bit tricky since the nature of the surface of the foam made the brush not flow smoothly along the surface because it was not like hard plastic or metal.
I will post more angels when its finished. Also i noticed i forgot to clean the wash off ( its going to be a bronze or some thing like that color ) the shield thing that i pulled off some old thing i found. So i have since cleaned that off. Im going to keep wasghing it untill its quite dark, then i will dry brush some thing on it to make it rougher, but i dont know what yet.
So yeah, puddles have not been added yet, but you can see the patches where they will be installed.
Wire mesh is not done yet, and blah blah blah blah blah blah blah blah. And i will highlight ground when mistakes are fixed and wash is dry.
edit - Oh and hinges are not done either. And still need to add the weeds, and paint the ones green that are already there.
Edit - So nothings finished in other words.
EDIT - WILL ADD PICTURE OF THE SIDE I FORGOT TO TAKE A PICTURE OF SOON.
3
119289
Post by: Not Online!!!
Has turned out good.
You have a nack for terrain it seems.
120215
Post by: StormX
Thanks so much appreciate it.
---------------------------------------------------------------------------------PAINT IS STILL WET SO LOOKS WAY TOO ORANGE IN SOME AREAS!!!!!!!!!!!!!!!!! NOTE!!!! ---------------------------------------------------------------
Have started to apply rust, but i might need to wash it to make it a bit less orange, but im going to add different colored rust any way ( darker ) in the middle of it. Also im going to need to do a another brighter highlight on all the wood i think. I have added the puddle, its suppose to be oil, but the glaze has made it so you cant see the highlight i did to make it not just black, but still looks good any way i think. Next time if i did it i would add way more highlights too it. Also i highlighted steel, fixed alot of mistakes, but still alot to do, ground not done yet, and wire is not done, wood is not done, barrel is not done etc.
So yeah any suggestions would be great because this is my first time doing all of this stuff, and also its my first time doing any sort of "ware" like real ware, not just some dry brush of steel or what ever like i did oin my first tanks (n first models ever painted ) you might see in the gallery.
---------------------------------------------------------------------------------PAINT IS STILL WET SO LOOKS WAY TOO ORANGE IN SOME AREAS!!!!!!!!!!!!!!!!! NOTE!!!! ---------------------------------------------------------------
2
120215
Post by: StormX
 NOTE - TERRAIN IS ELEVATED HIGHER THEN THE MODEL BECAUSE THE MODEL IS NOT ON THE CARDBOARD( TERRAIN ), BUT IF IT IS STANDING ON THE CARDBOARD ( TERRAIN ), THEN IT IS SCALED 100% CORRECTLY.
Not finished, just showing Size comparison to a regular CSM. Also added bit more rust trying to make it blend it more, but yeah i need to add much darker rust around with what is already there. I may need to make the orange darker all together. I did one highlight of the ground aswell. The wooden doors and the wood in the barrel do not look as good as the rest of the wood because i carved them differently, and i dont want to try carv more in while its already built in because its foam and weak and would be too hard to carv lines with a razd er.
Door hinge's not done, wire not done, wire mesh not done, wood maybe done i dont know. Still alot to do with alot of different things.
edit - i dont know why but in pictures the ground looks like wood chips, which actualy fits i guess, but in real life it looks more like desert colored rocks sort of a thing... And also i would agree with any one who would say i should change the puddle to green or some thing to make it look like a chemical spill or some gak.
3
120215
Post by: StormX
Practically finished, i re did the rust on some areas, and lots of little things are complete. I still need to fix a few small things before i call it fully complete. So this is my first ever terrain peice, and i have been in the modeling / paniting /' wargaming hobby for a bit over 1 year now, i am very happy with it. This was built completely from scratch, you can look back in this blog to see its progression.
I couldn't figure out what to put on the sign, so i just put "UNIT 1", and i guess in the future i can name the next one UNIT 2 lol. Who knows.
**********************************************************************************************************************************************************************************************************************************************************************************************************************************
WHAT MATERIALS I USED
Wire = Headphone wire
Steel mesh = Mosquito netting
Barrel = Rolled up regular white paper.
Tin walls = Middle area of regular cardboard
Wood = Foam from E - vaporiser packaging. ( the only part that is not made by me from scratch is that big shield thing on the side of the building, and that little wooden wheel in the front of building ).
Grass/weeds = Green stuff
Shield / Symbol thing = This part and the wooden wheel at the front was not made by me, it was ripped off s this old model thingi found i had laying around.
Wooden Wheel = This part was ripped off from an old model i found laying around
Door Hinges = Cardboard and green stuff.
Ground = Smashed up rocks using a hammer.
Supposed to look like oil puddle = Glaze varnish and black / brown paint.
7
119289
Post by: Not Online!!!
Seems a bit neat.
And too nice for the neighbourhood there.
The name / sign
120215
Post by: StormX
Yes well i dont want to ruin it up by doing too much to rust/ware it with my in experience with this, so i figure it looks like it was recently put up and thats why there's only light ware / rust.
119289
Post by: Not Online!!!
Stormatious wrote:Yes well i dont want to ruin it up by doing too much to rust/ware it with my in experience with this, so i figure it looks like it was recently put up and thats why there's only light ware / rust.
Have you thought about Grafiti?
120215
Post by: StormX
Yes actually i have lol, but i cant draw at all and i think that's waaaay to risky for me to attempt, but i definitely did think about that because it would look alot more less like a country building and more of a end of the world sort look. But yeah i dont know man.
119289
Post by: Not Online!!!
Stormatious wrote:Yes actually i have lol, but i cant draw at all and i think that's waaaay to risky for me to attempt, but i definitely did think about that because it would look alot more less like a country building and more of a end of the world sort look. But yeah i dont know man.
Don't need to be a neat great one but rather some text, like "feth off", etc.
120215
Post by: StormX
Not Online!!! wrote: Stormatious wrote:Yes actually i have lol, but i cant draw at all and i think that's waaaay to risky for me to attempt, but i definitely did think about that because it would look alot more less like a country building and more of a end of the world sort look. But yeah i dont know man.
Don't need to be a neat great one but rather some text, like "feth off", etc.
Lol, i was going to put feth or some thing on the sign, but i dont know. But yes i could do that, but im not sure because i had a bad experience trying to apply the rust, and after fixing it im not keen on going down that path for this again, because i think i have done the best i can do considering this is my first try.
120215
Post by: StormX
finshed.
5
119289
Post by: Not Online!!!
Well done.
Now I believe you need another 30 of these
120215
Post by: StormX
Hahaha thanks so much bro. Yeah you are right hahaha.
Cheers man.
120215
Post by: StormX
I am building this tower, so ill post all my pictures from the progress here. I posted only a few of the pictures for the Dakka Terrain Challenge, so ill put more pics here.
12
119289
Post by: Not Online!!!
Hmm, i think it's too Smooth.
It would need more spikes.
Faces in the Walls.
4042
Post by: Da Boss
That shack is great, such a variety of textures on the build makes it look really unique.
Nice progress on the tower - is it a chaos sorcerers lair?
92012
Post by: Argive
 Da Boss wrote: Da Boss wrote:That shack is great, such a variety of textures on the build makes it look really unique.
Nice progress on the tower - is it a chaos sorcerers lair?
I foresee some blood sacrifices to the ruinous powers!!
Well done storm. Liking the progress.
|
|
