| Author |
Message |
 |
|
|
|
|
Advert
|
Forum adverts like this one are shown to any user who is not logged in. Join us by filling out a tiny 3 field form and you will get your own, free, dakka user account which gives a good range of benefits to you:
- No adverts like this in the forums anymore.
- Times and dates in your local timezone.
- Full tracking of what you have read so you can skip to your first unread post, easily see what has changed since you last logged in, and easily see what is new at a glance.
- Email notifications for threads you want to watch closely.
- Being a part of the oldest wargaming community on the net.
If you are already a member then feel free to login now. |
|
 |
2010/09/28 17:50:01
Subject: Moltar's WIPs - Side project done, Brother Captain Tonga of the Chimp Fists
|
|

Longtime Dakkanaut
|
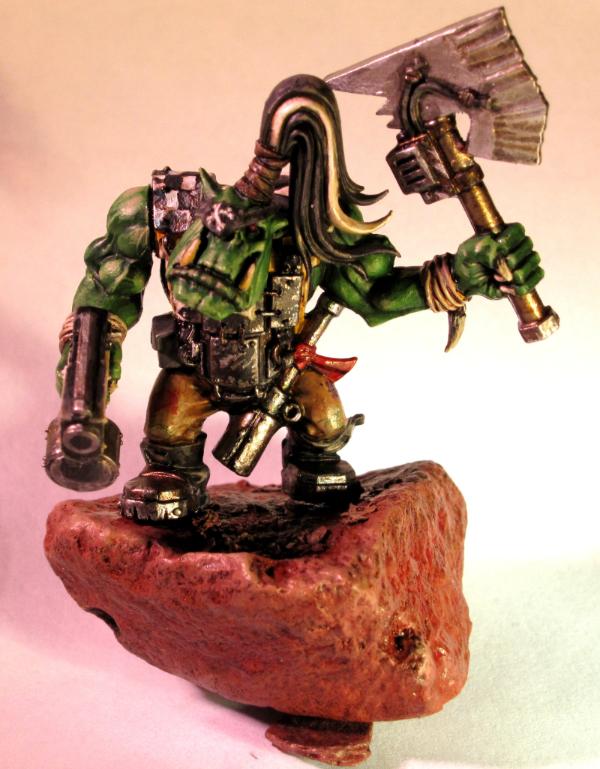
I Finally joined Dakka last week and was excited to get back at painting minis. I've been on about a 3 year break since the last time I painted. To get used to the good 'ole "Brush-in-hand" feeling, I first got at an old OOP Tau Ethereal which quickly bored me, so I moved on to a freebie AoBR ork Nob that game with a plastic termie accompanying an issue of White Dwarf. Unfortunately my cams been on the fritz, so I haven't taken as many photos as I would have liked to. So here is a teaser, until I get my camera back working. This was taken on my cell phone, so I apologize in advance for the poor pic quallity.
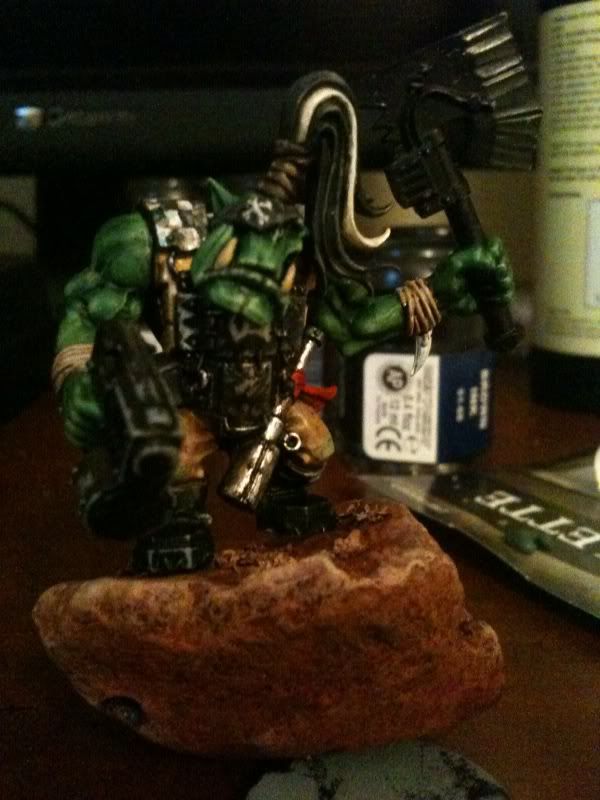
In trying to stay with a color pallete, I have blended up my layers on every color across the mini with GW's Kommando Khaki. The checkers, breastplate designs, and crossbones on the eye patch are all free hand. The red sash on his grenade is clearly there to let him throw it faster. I'm still in the process of building up/balancing his base (rock) and I still have to do his shoota and choppa as well as final touches and probably a few washes here and there.
More (and better) pics will be up soon!
C & C's are Always welcome!
|
|
This message was edited 34 times. Last update was at 2011/08/29 15:24:54
|
|
|
|
2010/09/28 18:51:59
Subject: Re:Back in the Saddle
|
|
Longtime Dakkanaut
|
Thanks, Schank!
I'm hoping to get him totally finished by the end of the day (wishful thinking) and I have to get my cam fixed for this weekend. I'm going out of town for a wedding. Hopefully by Monday, if not sooner, I'll have finished pics of my ork and pics of my next project up.
Major Tom,
Definatly appreciate the advice. I do like my Orks to be mean and green, however I do believe in that "pseudo realism." I'd rather he look green pigmented than green like plastic. I had used a mix of DA green and Goblin green then built that up to just Goblin green and further highlighted him up from Goblin Green to Kommando khaki. He was shaded with a thinned down wash of DA green and some washes of dark brown. I've thought about red, this pic doesn't show it very well, but when I use a wash of red on his lower lip I keep feeling like it's too pink, and thats not what I want. I've thought about washing the skin down with a thinned down old GW Chestnut ink, but have reached the point of no return and don't want to shod it up now. Regardless, I truly like the feedback and advice.
Cheers!
|
|
|
|
2010/10/05 15:28:52
Subject: Re:Back in the Saddle
|
|
Longtime Dakkanaut
|
So after an awesome weekend in the mountains, I'm back home and back to painting. Still don't have my camera up, so I've used the wife's. Finished my Nob so here are the finished pics.
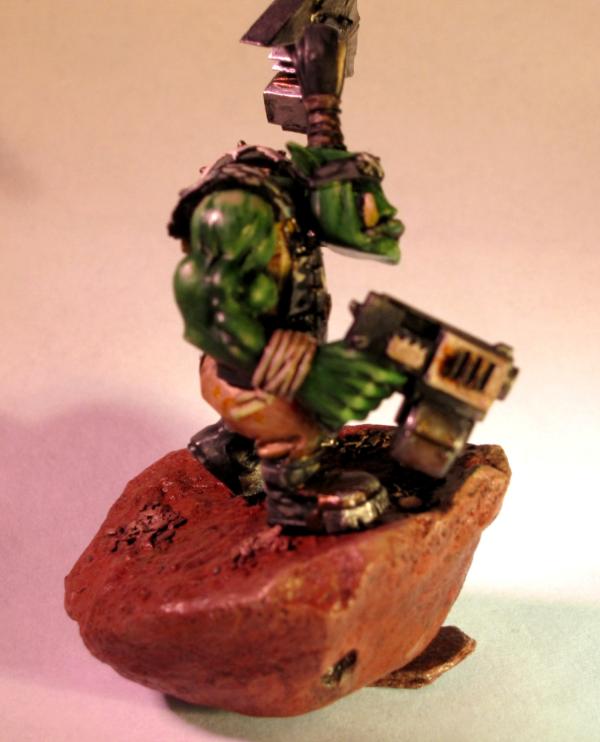
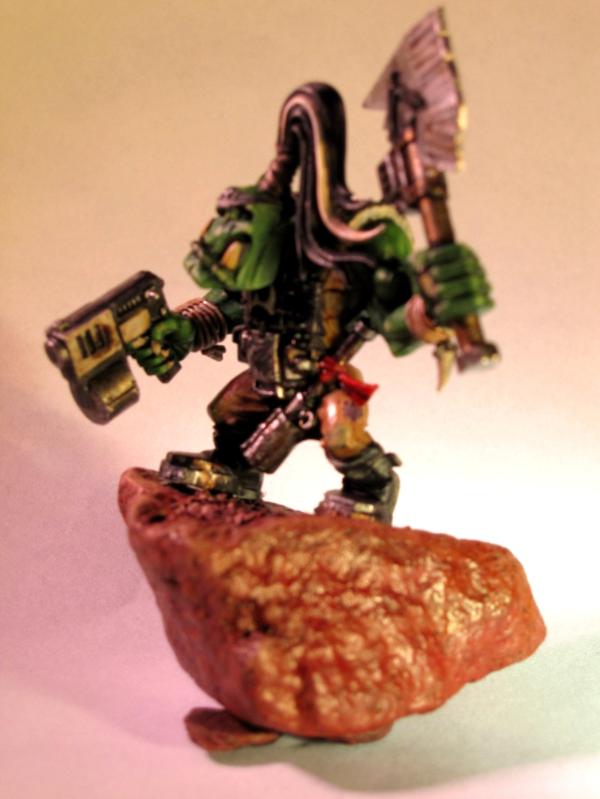
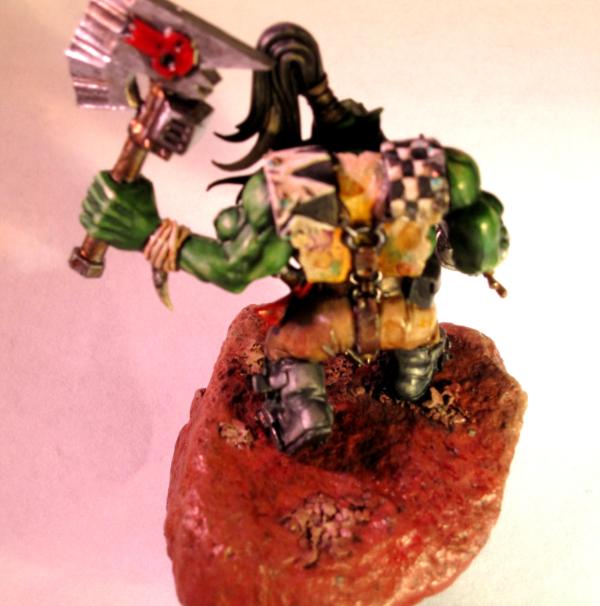
 Please, C & C's are always welcome!!
Here are two of my current WIPs. The first is a Reaper Miniatures " WAR" and the second is a old GW SM Scout.
and the scout...
-Happy Painting!
|
|
|
|
2010/10/17 18:29:24
Subject: Re:Back in the Saddle (Brief Update)
|
|
Longtime Dakkanaut
|
Sorry for the delay...
Neil, I hope I won't let you down.
I would hoped to have had more painting done over the past week, but between being slammed at work and having Medal of Honor come out on my playstation, I've been preoccupied.
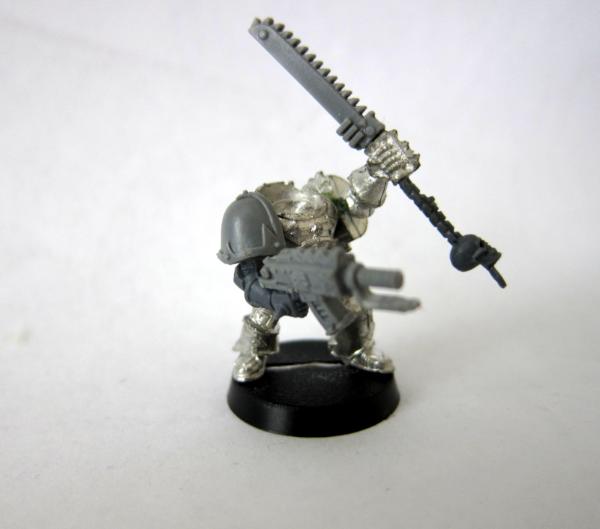
Another apology...my camera is still down, but have ordered what I need to get it operational again. This pic was from my cell phone and actually came out better than I would've thought, but still not great.
Here is the near-finished metallics on both the Reaper " WAR" mini and the SM scout. Just have one final highlight to do on the scouts blade.
I know the pic's not that great and you can't see the detail on the Reaper Mini's axe or the scout's bolt pistol, but I'll have more/better pics up soon.
C & C's are always welcome
|
|
|
|
2010/11/04 21:39:06
Subject: Re:Back in the Saddle (Update: November, 4th)
|
|
Longtime Dakkanaut
|
So, I managed to get a couple things done, like fix my camera, however I haven't had nearly the amount of time to paint that I wish I did. So here is an update on my two current projects.
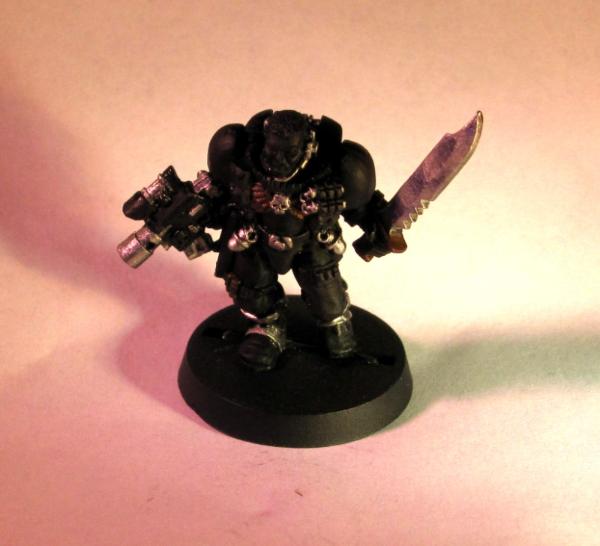
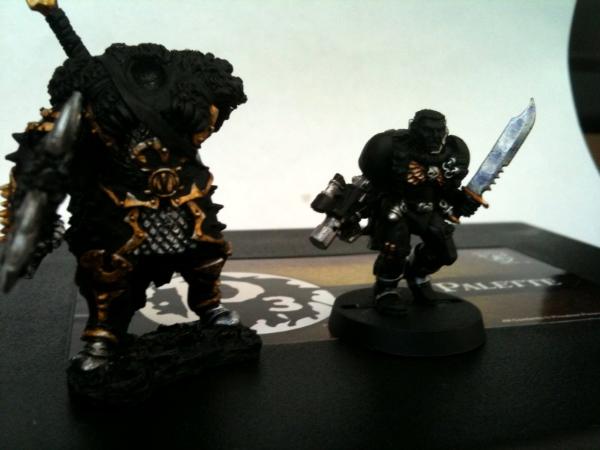
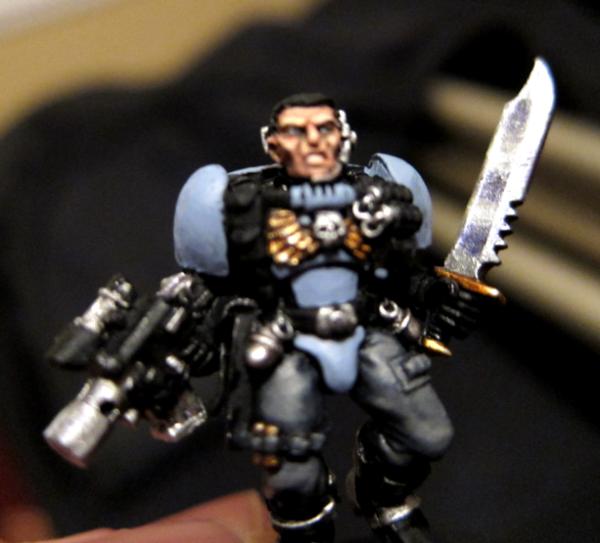
The first mini I've been at is this Space Marine Scout. Managed to finally finish the metallics, his face and his pants. Still have plenty left to do. All black parts are just primer, not black paint. I plan to do the scout in Space Wolf power armor and have begun work on his base.
Front View:
Head On View:
And Side View:
C & C's Welcome
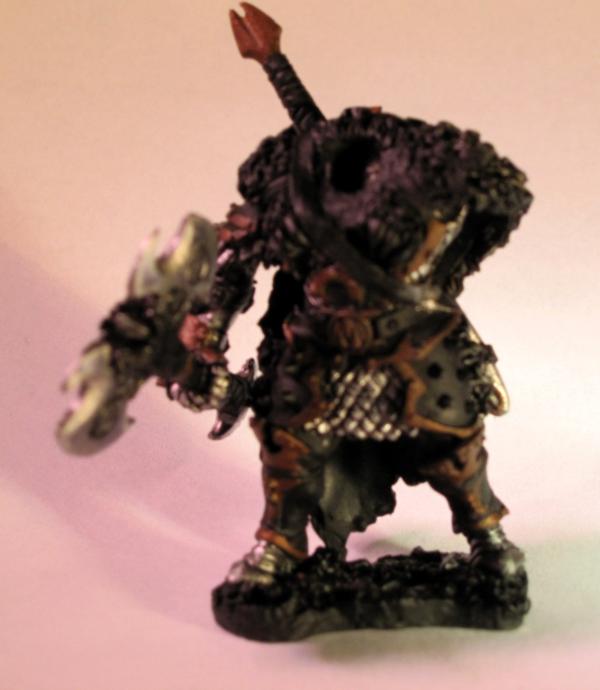
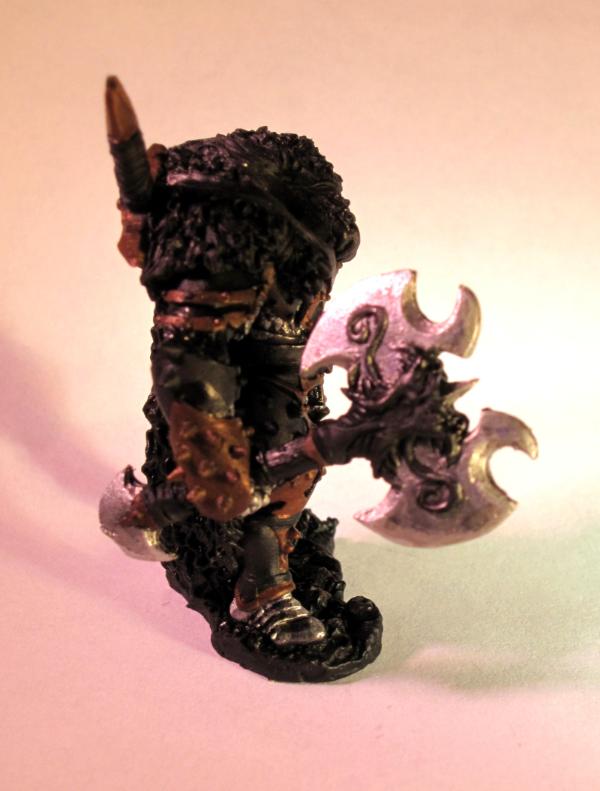
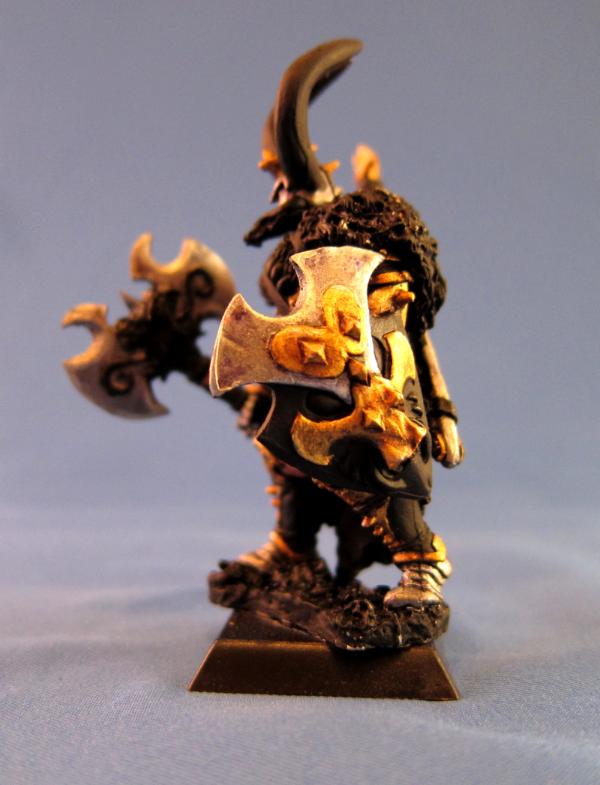
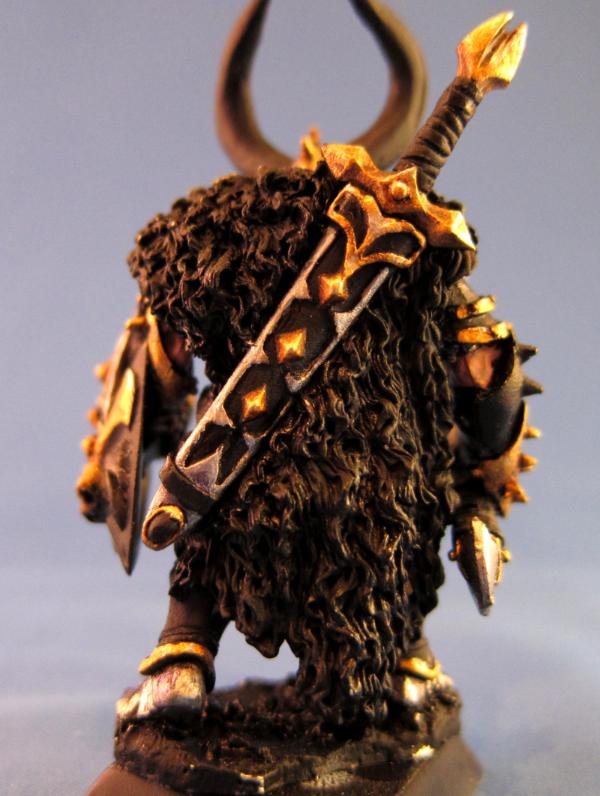
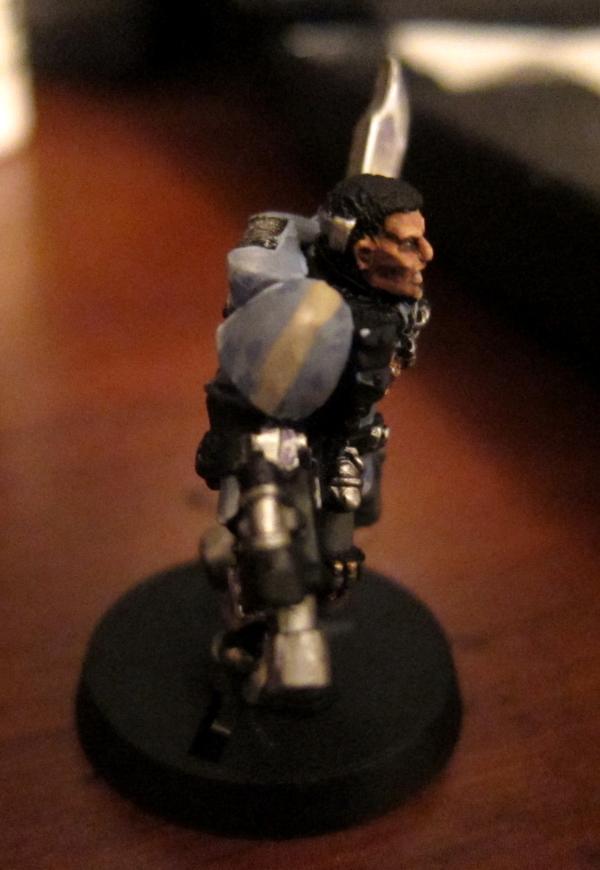
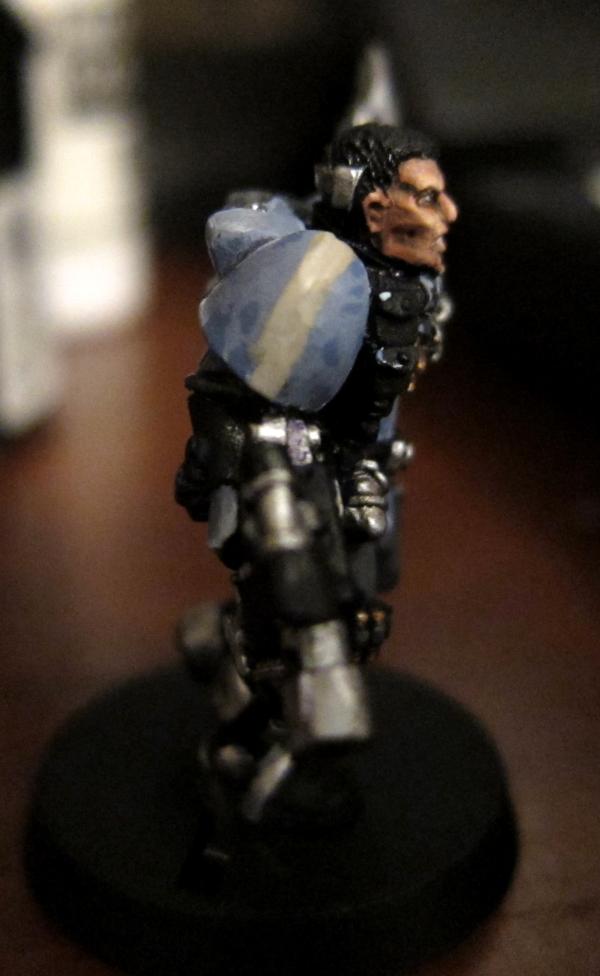
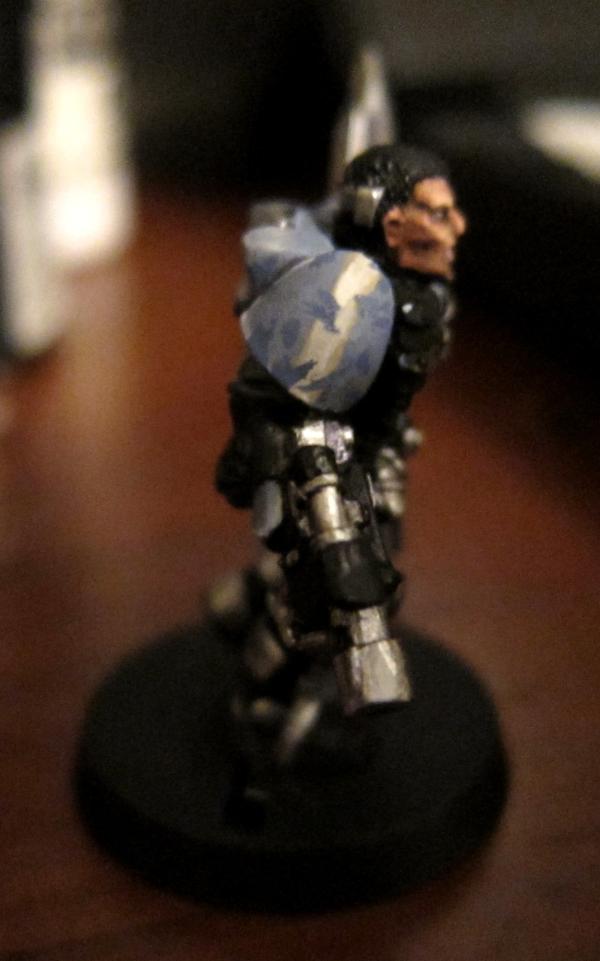
The second mini I've been working on is this " WAR" mini from Reaper miniatures. He's larger sized, still 28mm scale, but a big model. I've got his flesh, and metallics all done. Still have a lot of work left to do on him. All black parts are just primer, not black paint. I've also got him assembled as you can plainly see.
Head On View:
Side, Axe View:
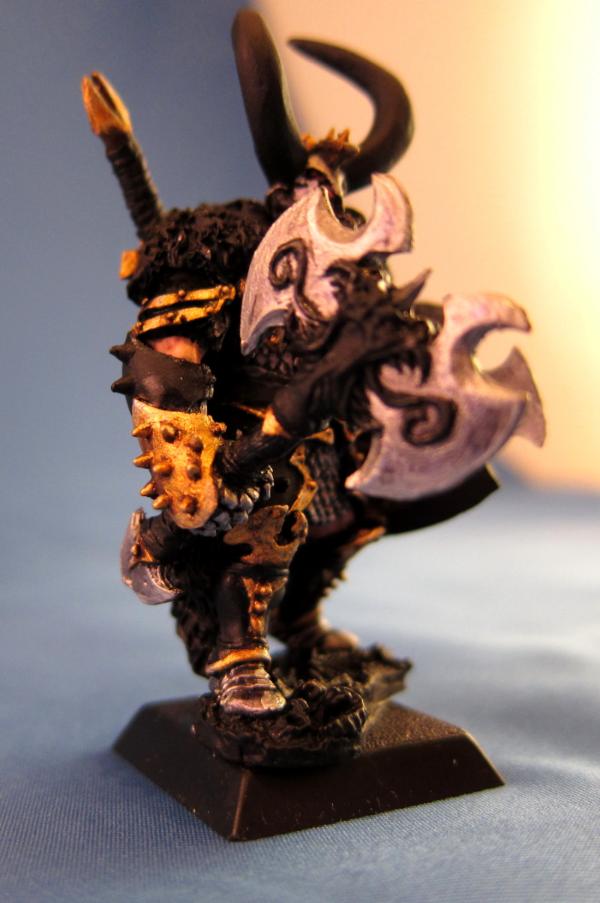
Side, Shield View:
Back View:
C & C's Welcome
|
|
|
|
2010/11/05 13:41:19
Subject: Re:Back in the Saddle (New Pics Oct 5)
|
|
Longtime Dakkanaut
|
I appreciate the compliment, manoknok. I'm out of town this weekend but when I get back I think I still have the blister pack that mini came in. I should be able to get you the item number and/or a link for him.
|
|
|
|
2010/11/09 15:55:50
Subject: Re:Back in the Saddle (New Pics Oct 5)
|
|
Longtime Dakkanaut
|
|
|
|
|
2010/11/09 22:14:20
Subject: Re:Back in the Saddle (New Pics Oct 5)
|
|
Longtime Dakkanaut
|
Thanks, Element. I appreciate the compliment.
|
|
|
|
2010/11/10 15:50:37
Subject: Re:Back in the Saddle (New Pics Oct 5)
|
|
Longtime Dakkanaut
|
Black Ram, I would be happy to tell you the step by step process of how I did the SM Scout's Face. However, as per above, my camera was broken, so I was not able to take photos throughout the process.
It is also important to know that most of my paints are fairly old and the GW paints I often use sometimes go by different names now.
Step One: The face was painted with a 1:1 mix of Dwarf Flesh and Tanned Flesh (now called Tallarn Flesh, I believe)
Step Two: A wash of Flesh Wash was applied fairly liberally to the whole facial area. I believe you can get a GW paint/wash called Dark Flesh, which is similiar.
Step Three: A 1:1 mix of Chaos Black and Scorched Brown was thinned down with water to obtain the consistency of a wash and was applied around the eyes and nose of the SM Scout.
Step Four: The 1:1 mix of Dwarf Flesh and Tanned Flesh was then reapplied to the raised areas of his face.
Step Five: I then slowly began highlighting the raised areas by adding small amounts of Elf Flesh to the previous 1:1 ratio of Dwarf Flesh and Tanned Flesh. The more Elf Flesh that went into the mix, less areas on the face would get painted. Essentially, I'm just building smaller and smaller layers of paint working up to the brightest highlight. Which, at this point, would just be pure Elf Flesh.
Step Six: I then made two seperate glazes. Glazes are like a wash, but thinned down with water even further. One glaze was made from Regal Blue and the other from Scab Red. The blue was applied around the Scout's eyes and the red on his lips.
Step Seven: For the final highlights, I added Skull White to the Elf Flesh a little at a time to just get about only one or two layers out of the Skull White mix.
 Despite the fact that the scout's base will be covered with snow, and I want the color palette to remain somewhat cool in tone, I didn't want to use too much white on his skin. If you use a pure white highlight on skin, one of two things can happen. Either the face can become too white and look gaunt, like a ghost. Or you get this super pale look which, imho, is better for Elves/Eldar.
Step Eight: Pure Skull white was used to fill in the eyeballs and his teeth.
Step Nine: Using a very steady hand (I actually use both hands at this point to steady my brush) I used Chaos Black to dot the eyes. It is IMPORTANT that after getting the black on my brush I dab it on a paper towel to remove excess paint off the brush. You don't want to mess the eyes up at this point as it is the last step in the process.
For future projects I plan to take many more shots with my camera so that tutorials like this can have images that go along with them. I know that helps tremendously.
|
|
|
|
2010/11/10 19:30:59
Subject: Re:Back in the Saddle (New Pics Oct 5)
|
|
Longtime Dakkanaut
|
Definately appreciate the morale boost, Skalk. Thanks!
As for the so-called painter's "Call to Arms" this year, I noticed it too. Not sure what inspired me to actually up and do it, if there was just one thing. I know GW has stepped their game up and really started making more dynamic and inspiring mini's with lots more options that previous years. And other companies like Reaper, Rackham, Soda-Pop, etc. have all really been breaking the mold (No pun intended  ) when it comes to what we expect. I feel like the forum sites (ie. Dakka, obviously, Warseer and B&C) have all grown quite a bit in both users and content over the last year and a half too. So I'm sure any number of reasons could be attributed to the reform to get back into painting. All I know for sure is, it feels great to be back at it again.
...Now if I could just find some real time to get back to actually painting something...
|
|
|
|
2010/11/18 14:51:55
Subject: Re:Back in the Saddle - New Pics Nov. 18th
|
|
Longtime Dakkanaut
|
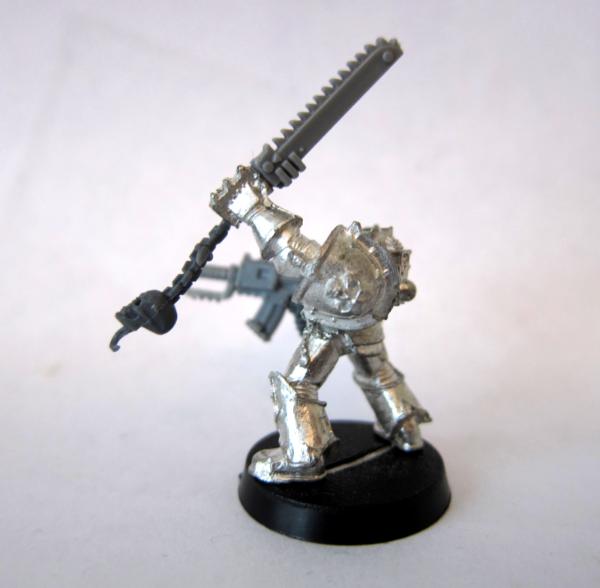
Finally got around to getting some work done on my SM Scout.
Next up, was to paint the scout's power armor.
A 1:1:1 mix of Shadow Grey, Kommando Khaki, and Space Wolves Grey was applied as a base coat to all the power armor on the model.
A little bit of Space Wolves Grey was added to the previous mix and used on the edges of the power armor.
Transfer was applied to left shoulder pad.
Further Highlight applied, more SW grey was added to previous mix.
A mix of Shadow Grey and Scorched Brown was carefully placed in the recesses of the power armor, even though there were not many recesses.

A Wash of Brown Ink was applied.
To achieve the battle damage, I reapplied the original 1:1:1 mix of Shadow Grey, Kommando Khaki, and Space Wolves Grey in small spots across the armor
For the shoulder marking a stripe of Kommando Khaki was painted on the shoulder pad.
This was followed by a mix of Kommando Khaki with Skull white added to highlight.
More white was added to this mix and further applied to the stripe.

Then the original base coat 1:1:1 mix was added to represent battle damage across the stripe.
Underneath the battle damage, over the blue armor, Space wolves grey is applied directly underneath the damage, under the stripe, pure skull white is applied under the damage

Pure skull white is then used to highlight the blue armors battle damage
Next I began work on the bolt pistol. A base coat of Bubonic Brown was applied around the bolter.
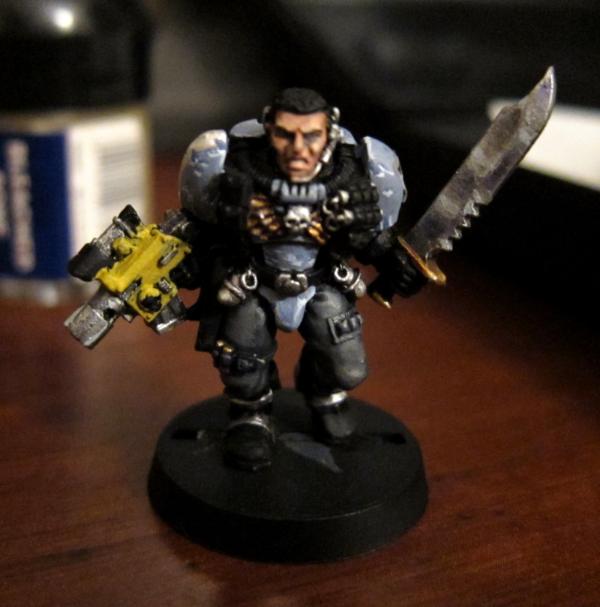
I began to highlight the bolter using a mix of 1:1 Bubonic Brown and Bleached Bone working the color up to pure Bleached Bone:
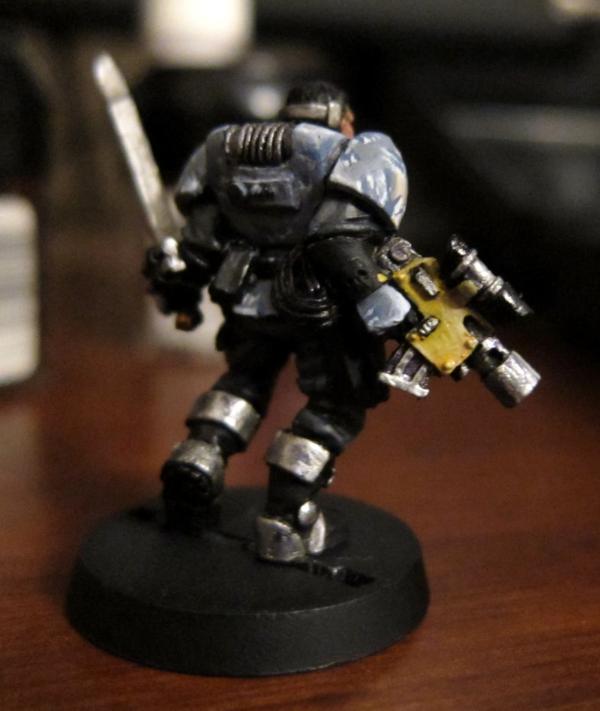
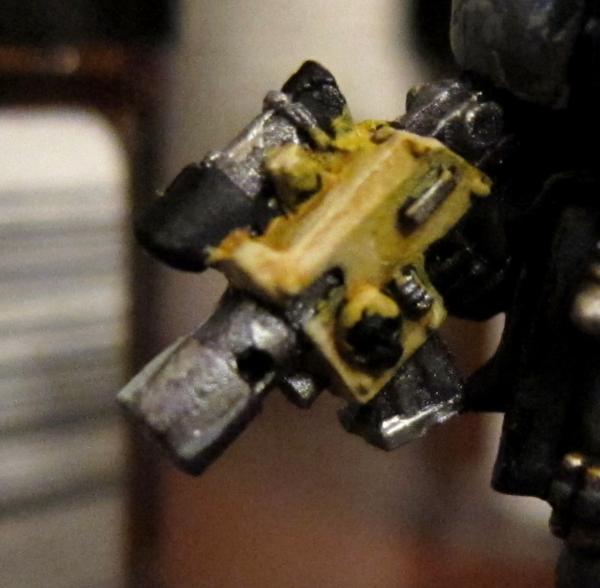
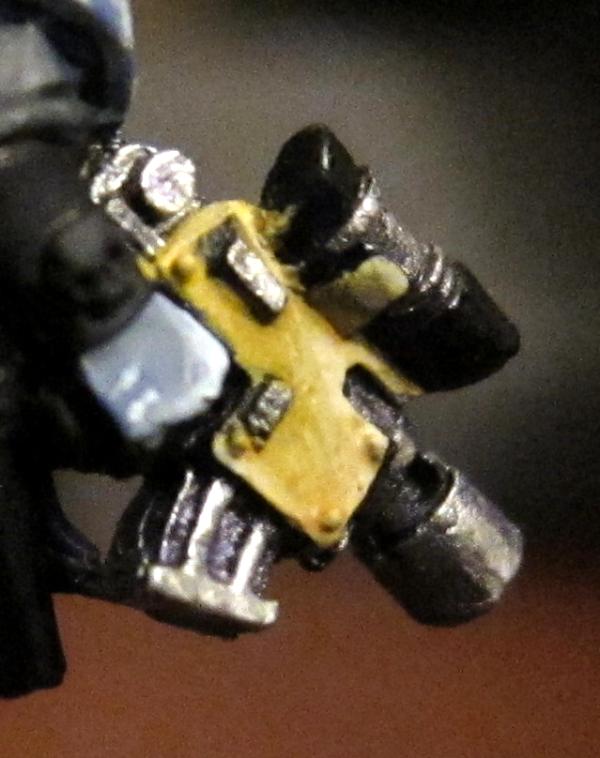
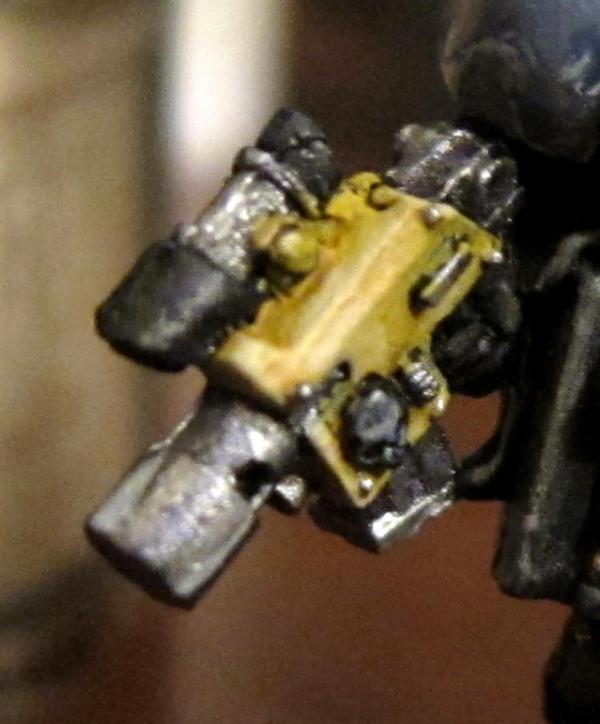
The black areas were done two different ways, the pouches were given a Chaos Black built up to Kommando Khaki and washed with Brown Ink. The grenade, scope and other metal parts that are black were painted with Chaos Black built up to grey with Skull white and washed with Black Ink.
Final pics will be posted later today with the base finished and pics taken in a light box. Hope you all enjoy. C & C's always welcome
|
|
|
|
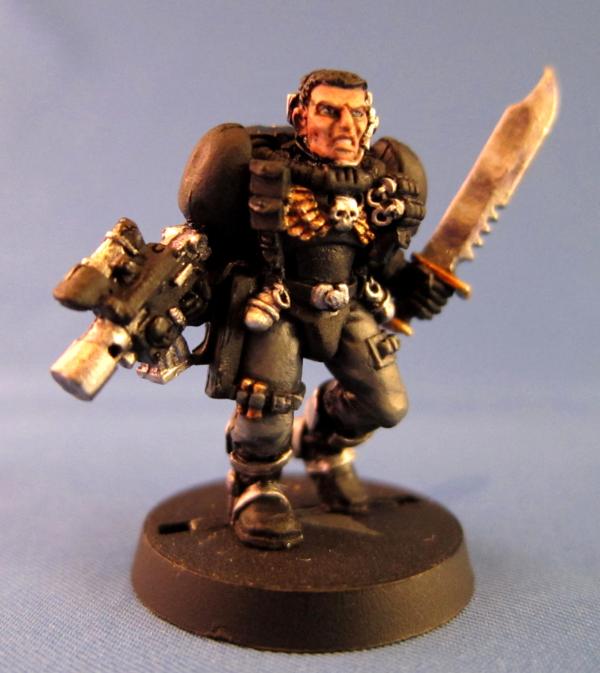
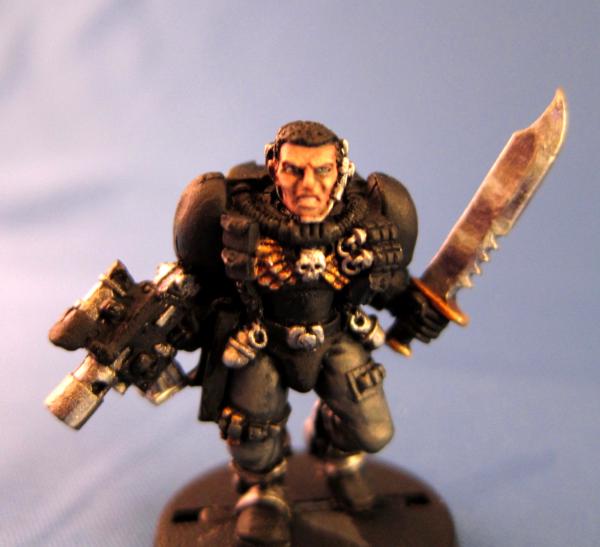
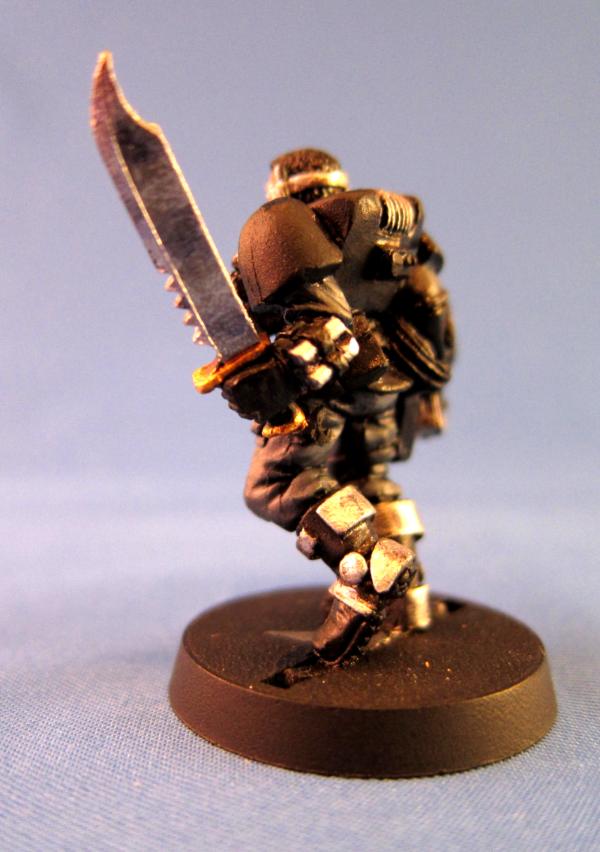
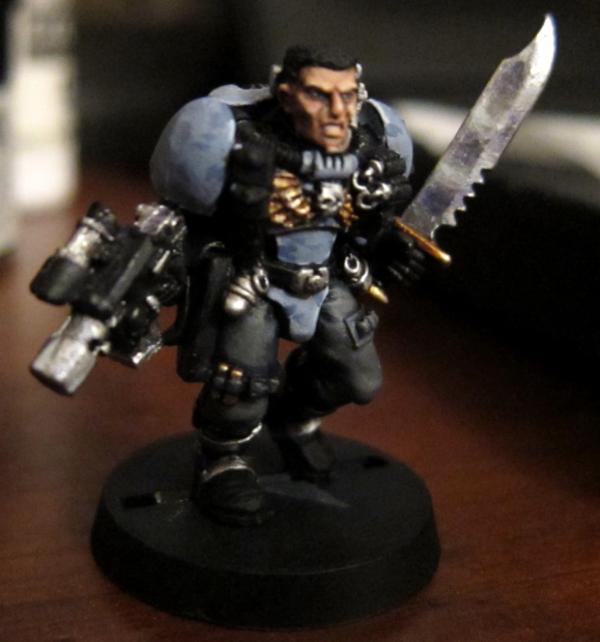
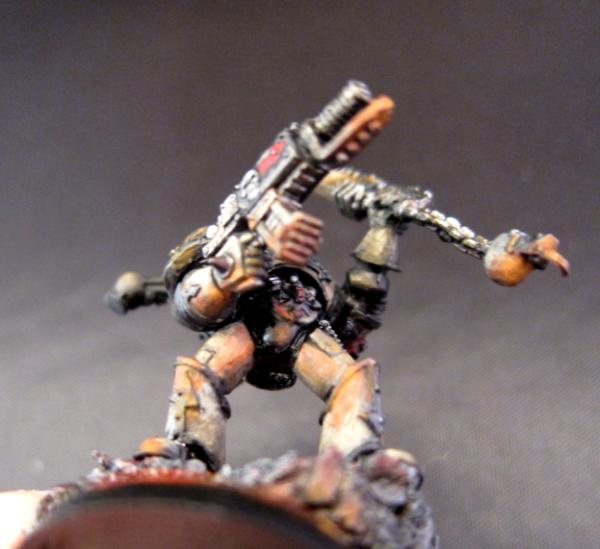
2010/11/18 15:52:49
Subject: Back in the Saddle: Update SM Scout Finished
|
|
Longtime Dakkanaut
|
Thanks, Necanor, I appreciate it!
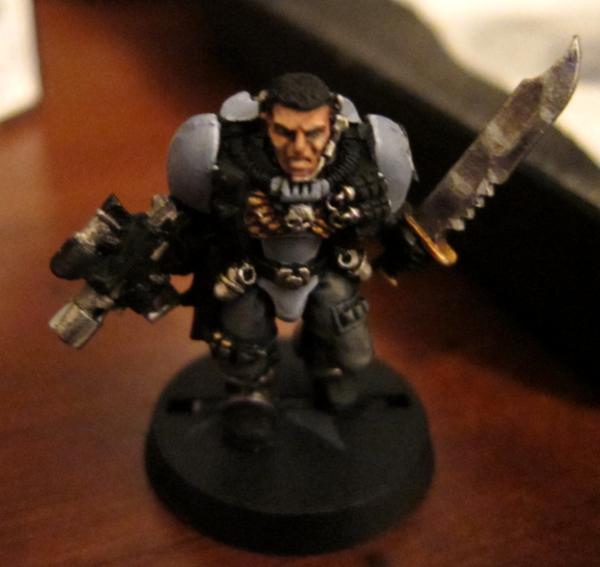
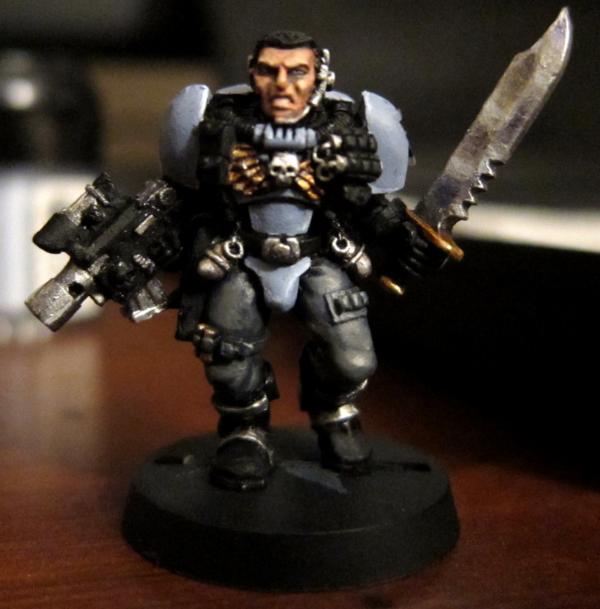
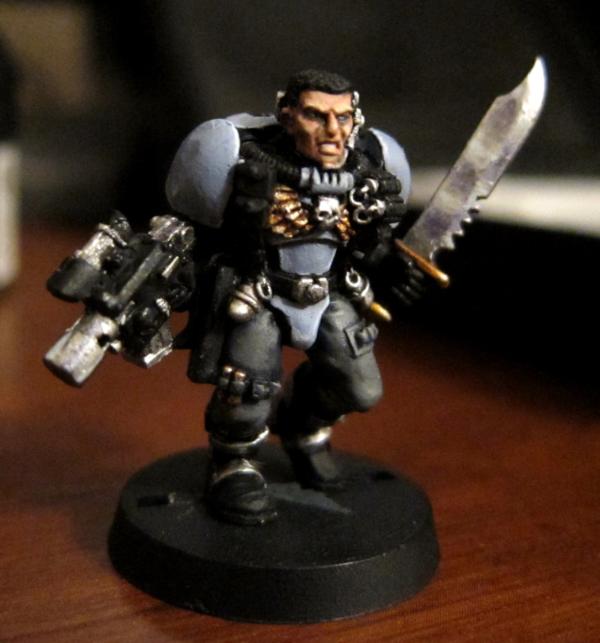
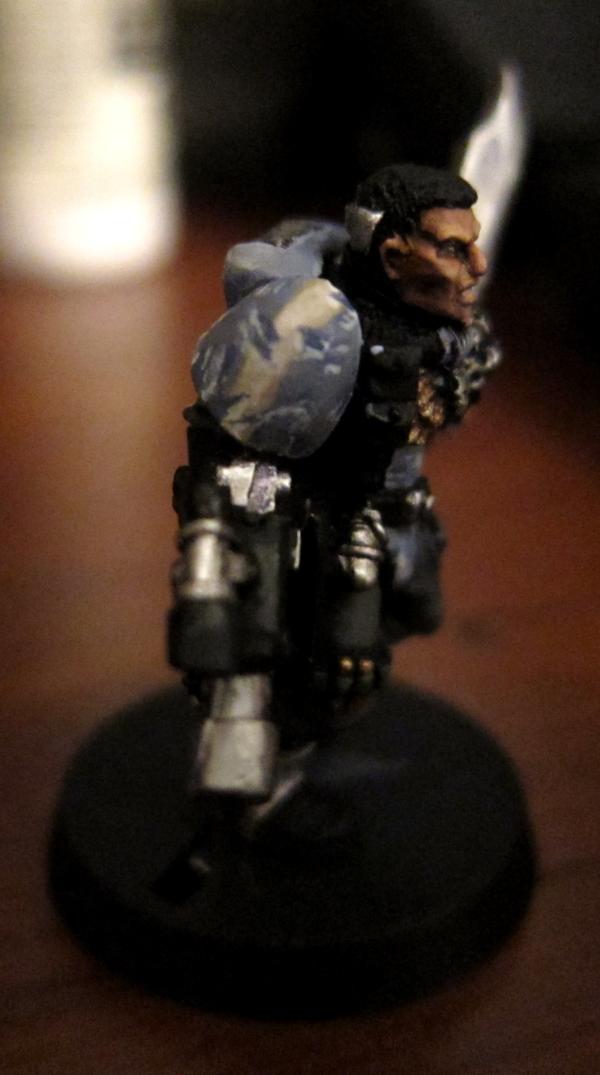
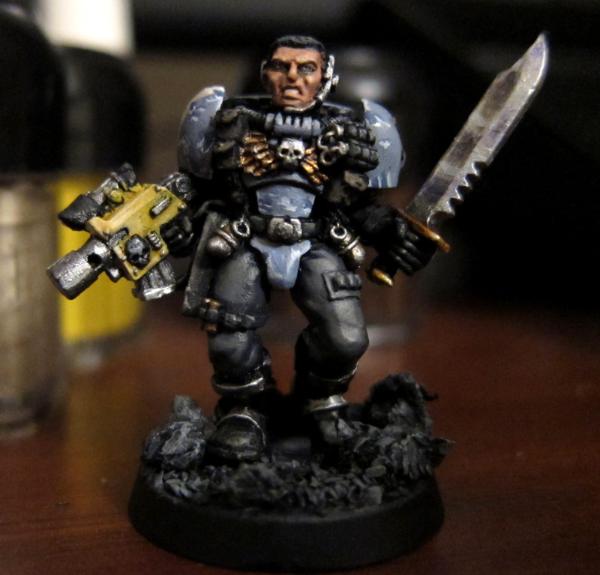
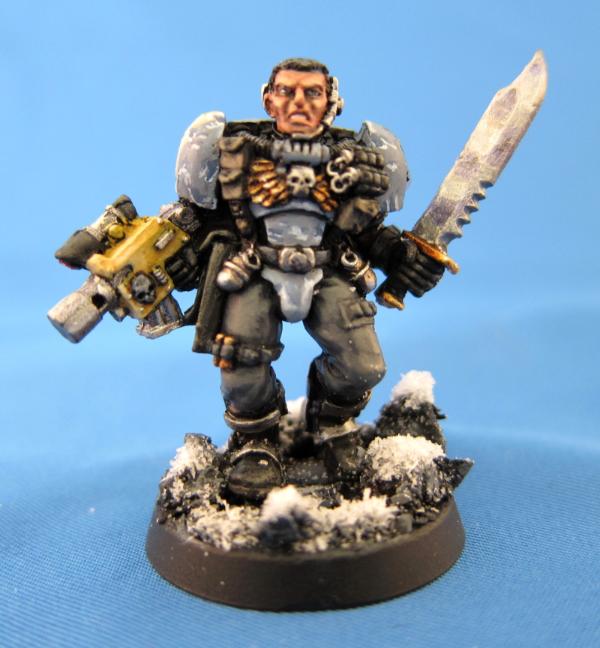
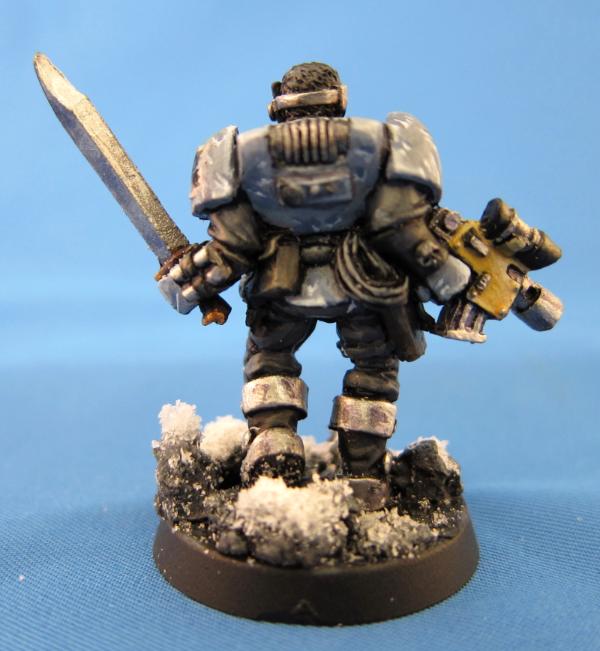
Here is the final images of my completed SM Space Wolf Scout. I wanted to capture the idea that this Scout has been out on his own for quite some time, tracking or doing recon. Unlike other chapters, Space Wolf Scouts, more often than not, work alone and run solo missions. Because of this, I didn't want to give him a generic number or Scout symbol but rather something that could just be his own symbol. Not that it's fancy or anything. It's not supposed to be, imho. It's just a simple stripe.
Overall I'm pretty happy with the way he turned out. I am thoroughly pleased with the way his face came out in the end. I do believe the battle damage could be done to a better degree than what the final product came out as. Particularly at points like his abdomen/stomach guard. I think having the highlights smaller than what they are would help a lot with this. I've heard bigger highlights make the marks look more fresh, but I think it comes off a little sloppy. This is actually my first real attempt at aged battle damage across a mini other than the ork I did at the start of this post, but the orks are fairly minimal.
As always, C & C's are welcome and encouraged!
Front View:
Side View:
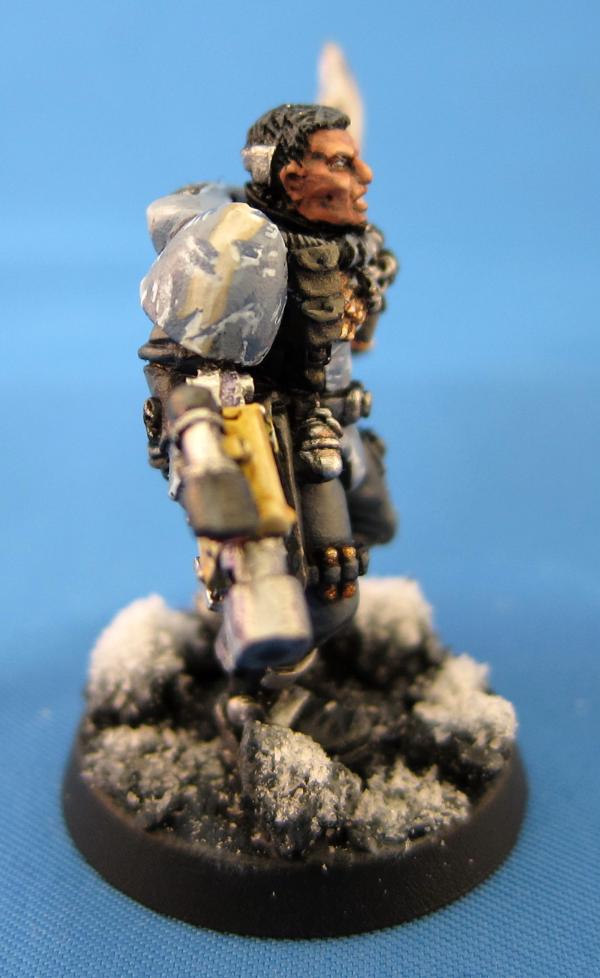
And Rear view:
|
|
|
|
2010/11/20 14:01:05
Subject: Re:Back in the Saddle (New Pics Nov. 18th - SM Scout finished)
|
|
Longtime Dakkanaut
|
Thanks, Skalk! As tedious as the battle damage was, it wasn't that tough to achieve, just time consuming. Definately tried my patience though.
Hopefully, I'll be able to get some work done this weekend and finish another mini or start on another.
|
|
|
|
2010/11/20 15:35:42
Subject: Re:Back in the Saddle (New Pics Nov. 18th - SM Scout finished)
|
|
Longtime Dakkanaut
|
@Brother Heinrich: Thanks! I also believe the face and eyes turned out to be the best part of this model.
@Wolfshadow: Thanks for the compliment. I'm glad to hear you've gotten back into painting. Good luck on your marines, I've often thought of having a small marine force built up heavily with bionics, just haven't gotten around to it. Just a tip, you may want to scoop up a couple other mini's to mix into your paint schedule. After a 7 year absence you may get bored of painting 10+ marines all in the same color scheme. It may be nice to mix in a couple random mini's to change it up and let you work with different colors. Just a thought. I'm sure if you're totally pumped about your marine force you could power through it. -Happy Painting!
|
|
|
|
2010/11/22 16:31:01
Subject: Re:Back in the Saddle (New Pics Nov. 18th - SM Scout finished)
|
|
Longtime Dakkanaut
|
@ WolfShadow: Nice. Mixing it up and breaking up the monotony can be a really good thing.
@ Commander Cain: Thanks for the compliment on the weathering. It's not that hard to achieve once put to practice. Follow my tutorial above and you can easily achieve the same results with some patience.
|
|
|
|
2010/12/13 15:43:16
Subject: Re:Back in the Saddle (New Pics Nov. 18th - SM Scout finished)
|
|
Longtime Dakkanaut
|
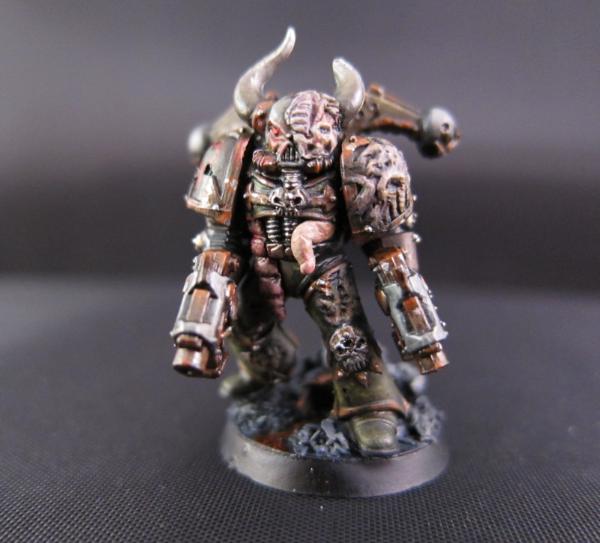
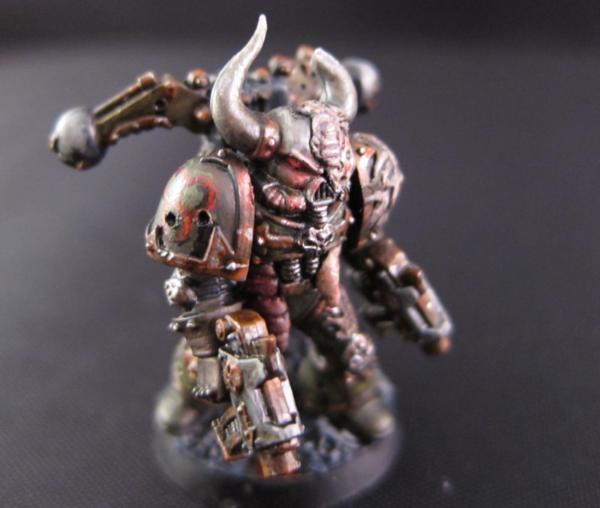
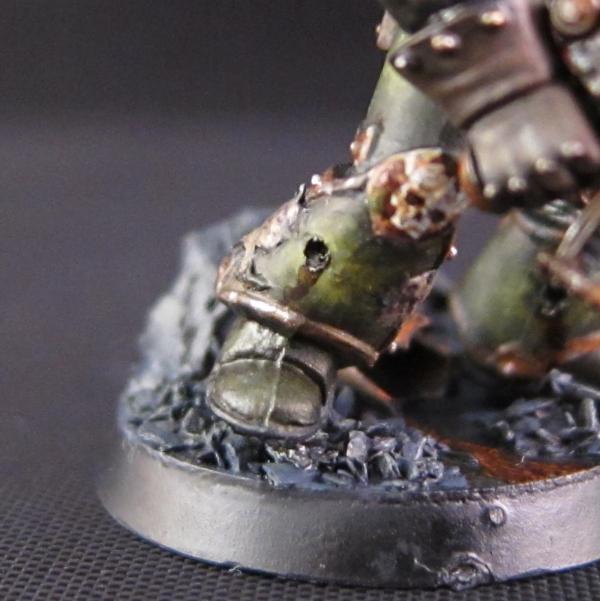
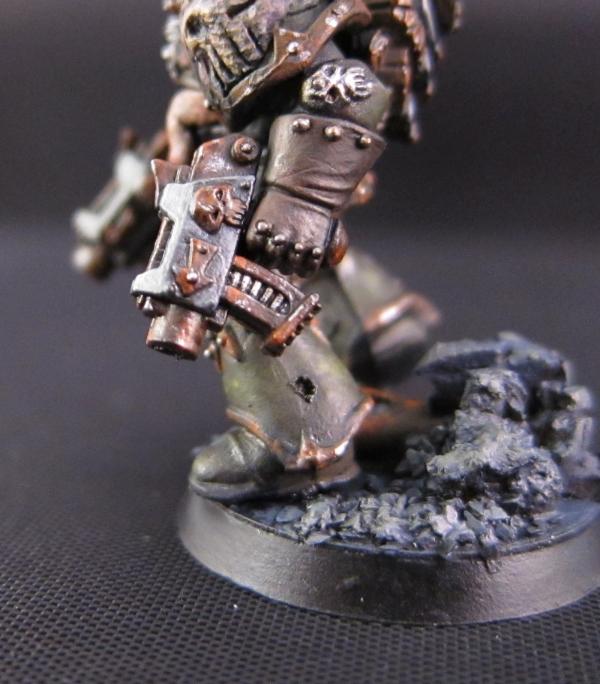
Sorry for such a delay on this thread. I've been super busy, since it's holiday season and all. Regardless, I thought I'd show you that I have been up to a few things.
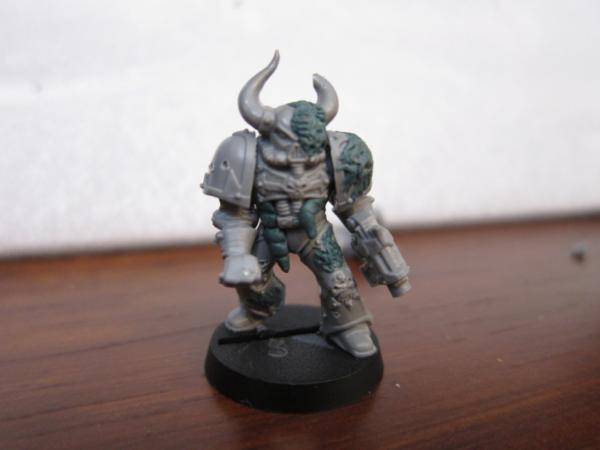
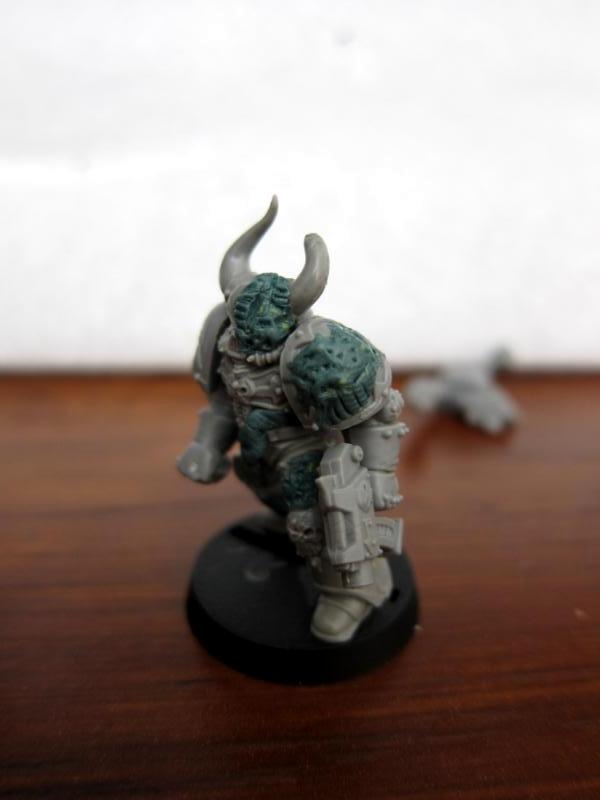
I have an old set of CSM's and thought I could get a chance to mess around with one of them and not feel like it would be a loss if I ended up just scrapping it. I intend to make him typical in Nurgle fashion and this is my first attempt to mold or create any kind of effect with GS, outside of filling gaps. I also had a go at him with my exacto knife to make the holes drilled into his armor.
Let me know what you guys think. C & C's are always appreciated.
|
|
|
|
2010/12/13 21:29:08
Subject: Back in the Saddle - WIPs (Minor Update Dec. 13)
|
|
Longtime Dakkanaut
|
Thanks, wolfshadow! It wasn't as much of a pain to get the desired look I wanted as I thought it would be. Just a lot of poking it with various sharp instruments. I think with some color I can make the GS look nice and gross.
|
|
|
|
2011/01/08 15:42:26
Subject: Re:Back in the Saddle - WIP Nurgle CSM 1/8
|
|
Longtime Dakkanaut
|
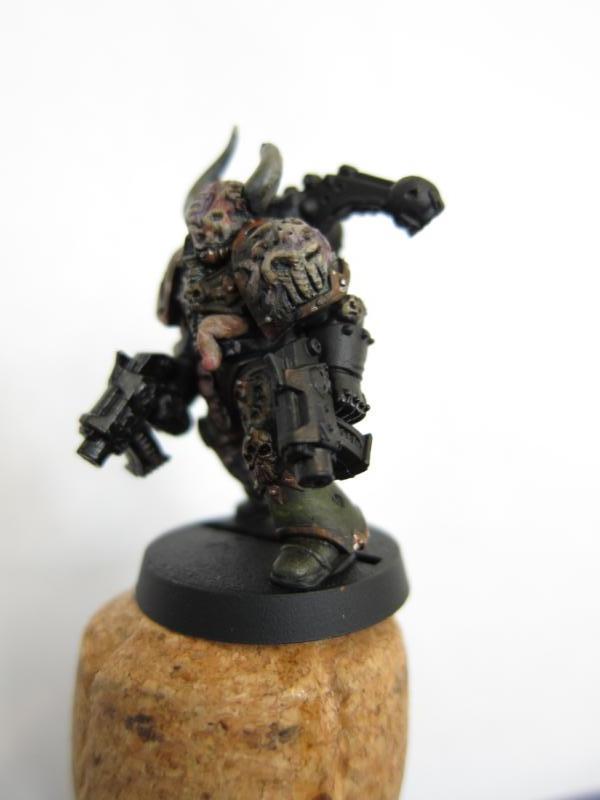
The holiday season has died down and once again, balance is restored. Thankfully, I've gotten a chance to start painting again and have gotten some work done on this Nurgle Marine. Obviously, it's still a WIP, but there should be enough done to get a better idea of the model as a whole. I've actually further painted him past the progress shown in the pics. He now has his guns and his back pack painted. I'm thinking of redoing his horns to be a different color. Once I get pics of his current status, I'll be asking for some feedback on him. Enjoy!
 C & C's appreciated
Front View:

Side View:
 Automatically Appended Next Post: Automatically Appended Next Post: Alright got some up to date pics on my lunch break.
Front:
Right Side:

Left Side:
Back:
I know the images are a little blurry, they'll be better quality for the final photos.
My question to you all on Dakka really is about the horns? How do they look? I think they may not stand out enough due to lack of difference in the colors used to layer up the horns. Should I paint them another color all together? I don't think I really want them to be a focal point of this mini.
What do you think?
|
|
This message was edited 1 time. Last update was at 2011/01/08 19:35:10
|
|
|
|
2011/01/11 20:34:13
Subject: Re:Back in the Saddle - WIP Nurgle CSM 1/8 (Need your opinions plz)
|
|
Longtime Dakkanaut
|
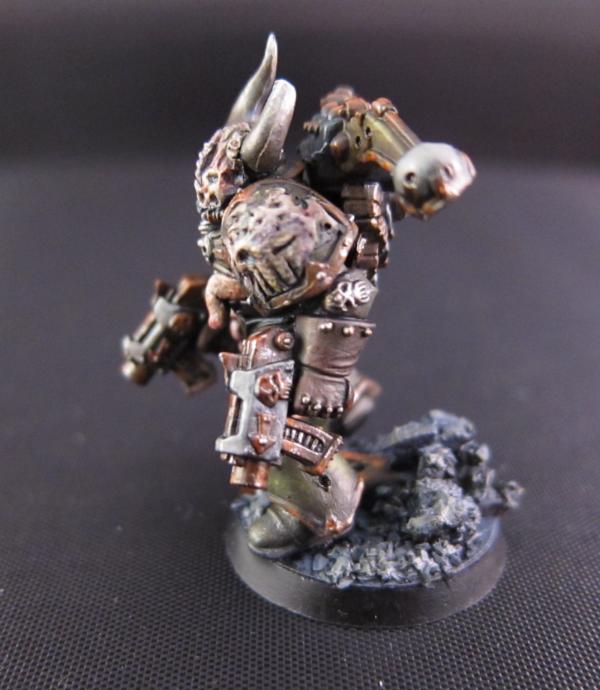
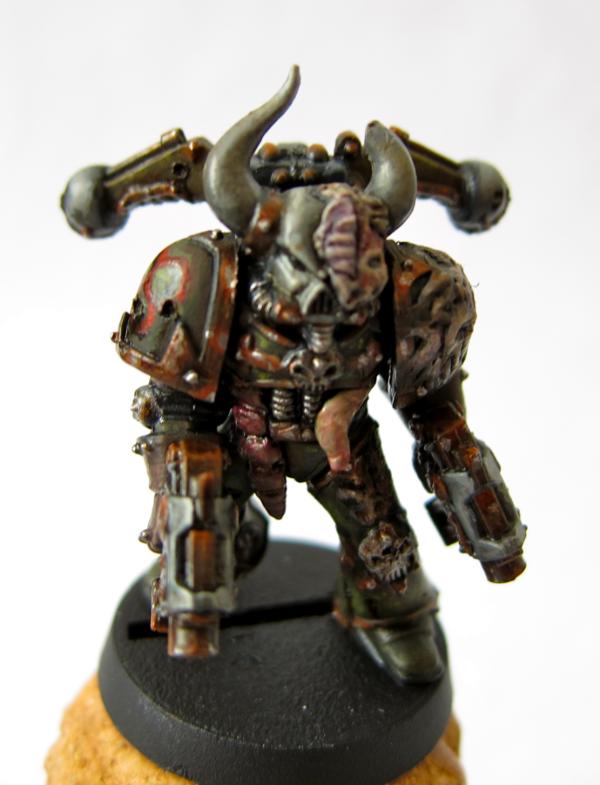
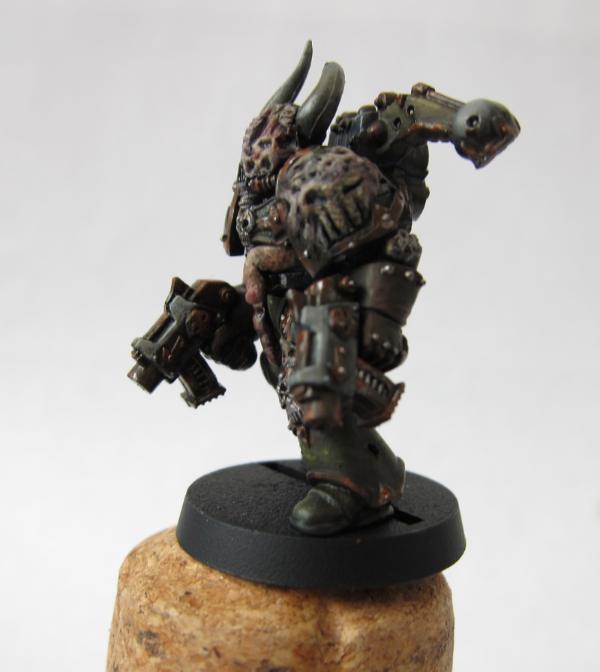
Got some minor things done today. I went back to work on his helmet and added some striping down the horns from the tip, but they didn't show up that well in these photos. A couple washes of Brown Ink were also applied. I also worked on his eye. The glowing effect was done with a wash from the colors used to paint his eye. (Red Gore, Blood Red and Blazing Orange) I think I may go back and soften some of the light toward the bottom of his face mask - towards the piping - to dull down the osl a bit.
-The only difference with the last image is the white background.
Unfortunately, I have no idea how I'm going to base him. I am open to suggestions, but have other projects I can work on in the meantime after I finish this guy up completely.
All C & C's encouraged
|
|
|
|
2011/01/18 16:06:54
Subject: Re:Back in the Saddle - WIP Nurgle CSM Jan 11th
|
|
Longtime Dakkanaut
|
|
|
|
|
2011/01/20 00:45:55
Subject: Re:Moltar's WIPs - Nurgle Plague Marine Finished Jan. 18
|
|
Longtime Dakkanaut
|
Thanks Skotter! Always appreciate a compliment!
Here is my next WIP. Another CSM. This guy will be following (at this point in time, although subject to change) a color scheme similar to the Mortifactors. Lots of Bone and Black. He's got a custom bolter I scrapped together from an old chainsword hilt.
More Pics will come with progress
Please, let me know what you guys think!
|
|
|
|
2011/01/20 05:15:48
Subject: Moltar's WIPs - Nurgle Plague Marine Finished Jan. 18
|
|
Longtime Dakkanaut
|
Thanks, Reecius! I'm overall quite proud of that scout. I really like how his face and sword came out. Glad you like it.
|
|
|
|
2011/01/22 01:00:40
Subject: Re:Moltar's WIPs - Nurgle Plague Marine Finished Jan. 18
|
|
Longtime Dakkanaut
|
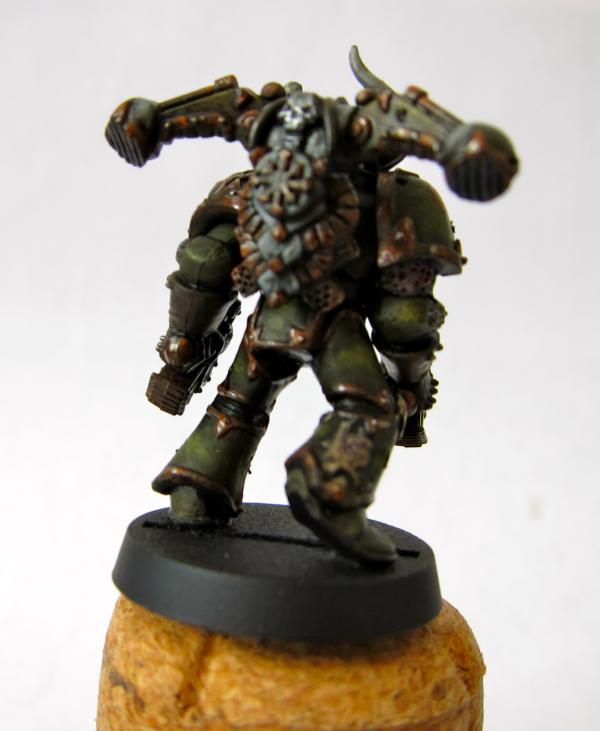
So, moving right along. I'm slowly making forward progress piecing this guy together. I've used the head that comes with a CSM Lord, from some old blister pack I had. The head has not received a base coat yet and is still the original pewter.
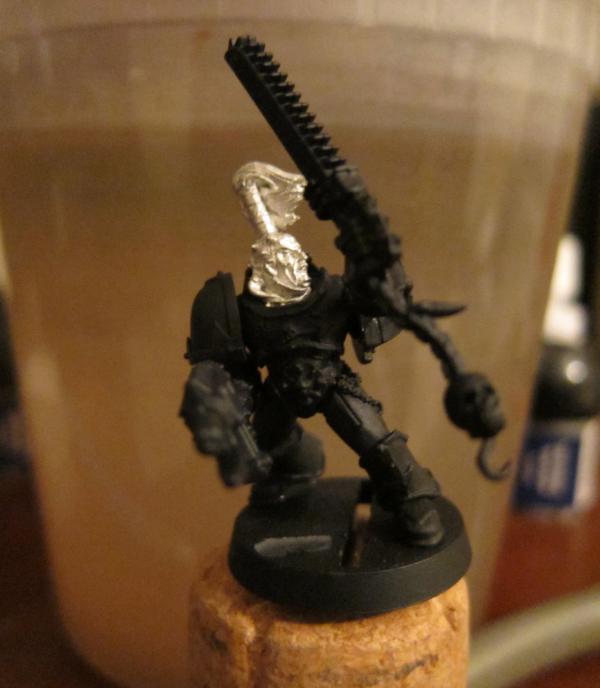
For his base, I've been following a tutorial written by Lemmingspawn over at CMoN. Here is the link to his tutorial: http://www.coolminiornot.com/articles/1750 which is a very big help. If you haven't seen his works, just search his name in the DakkaDakka forums, but here is a link to his ridiculous Iron Warriors blog that implements the lava bases referenced in the CMoN article: http://www.dakkadakka.com/dakkaforum/posts/list/189538.page It's a HUGE thread of Awesome-sauce.
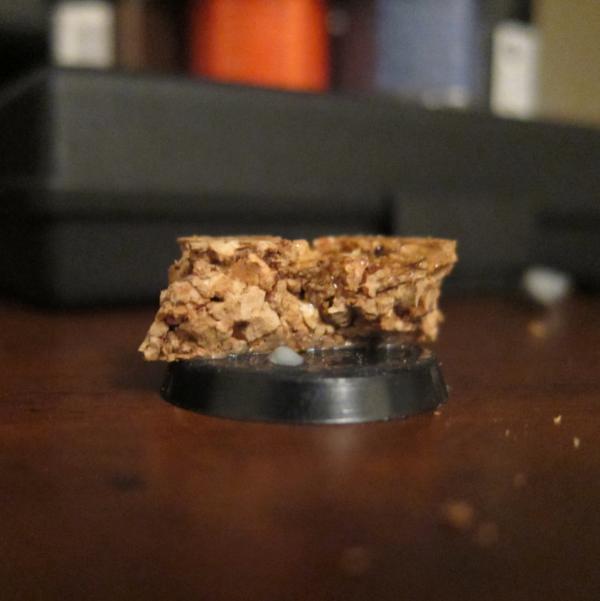
The "rock" is made from a cork trivet (hot pad) that I just ripped up buy hand and then hacked at with a hobby knife. The bubble is cut away from an old CSM bolt pistol handle.
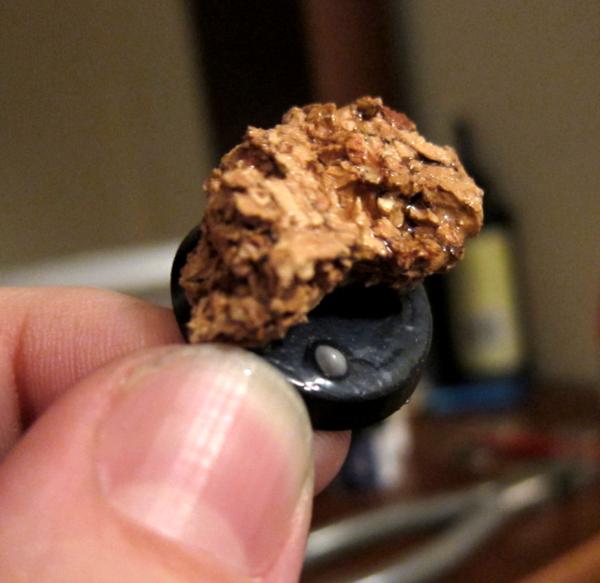
For some reason the "bubble" looks to be a little oblong, but is actually circular. The base was coated on the flat part with regular PVA glue, that is why it looks warped, and the rock had a coat of super glue applied to it to toughen it up and make it more durable.
The PVA glue was dripped over the "bubble" to smooth it out and make it look more like it's rising from the lava.
Wish I had more to show you at this point, but I'll keep updating as I keep working.
 Thanks for looking
|
|
|
|
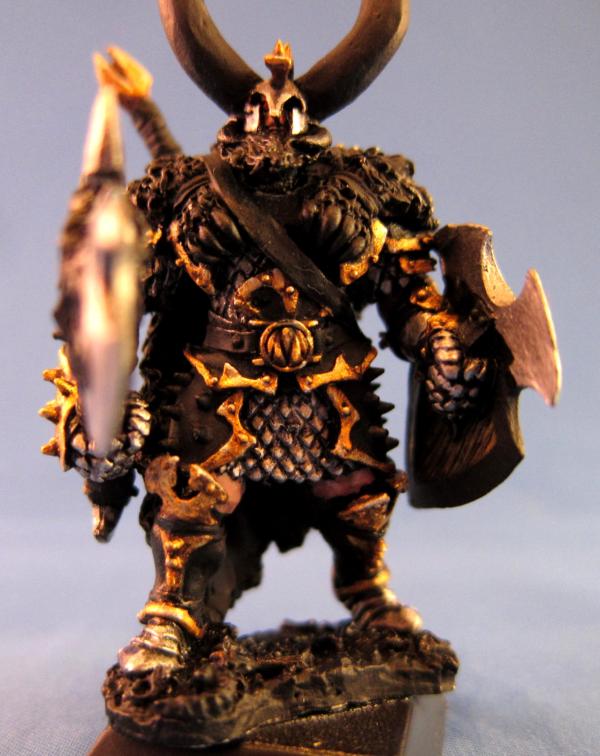
2011/01/31 02:20:27
Subject: Re:Moltar's WIPs
|
|
Longtime Dakkanaut
|
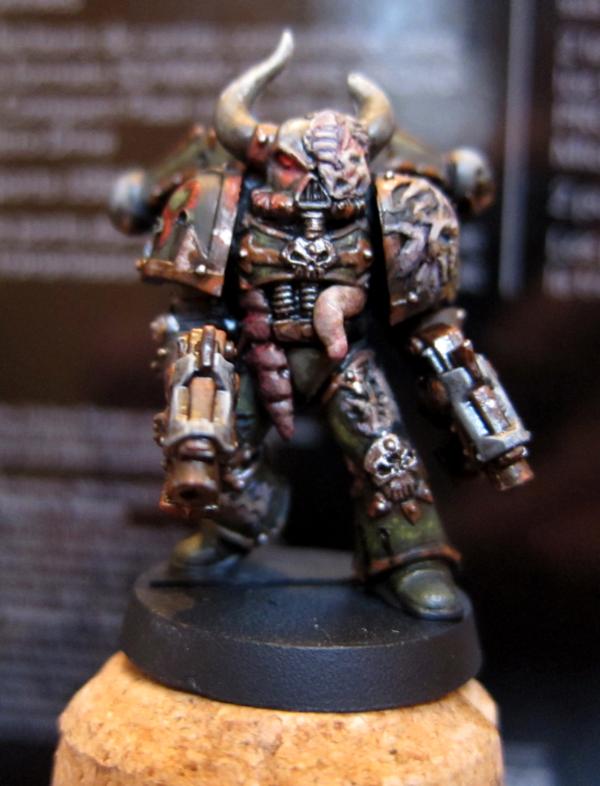
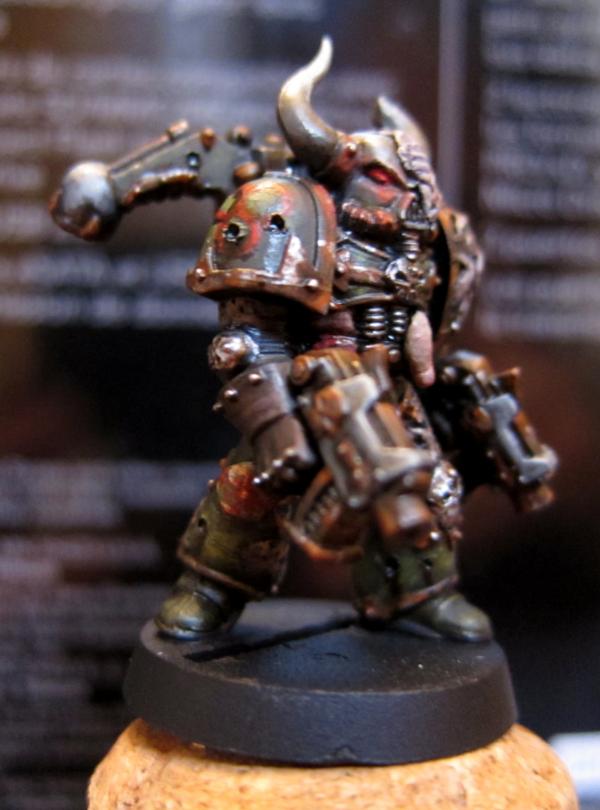
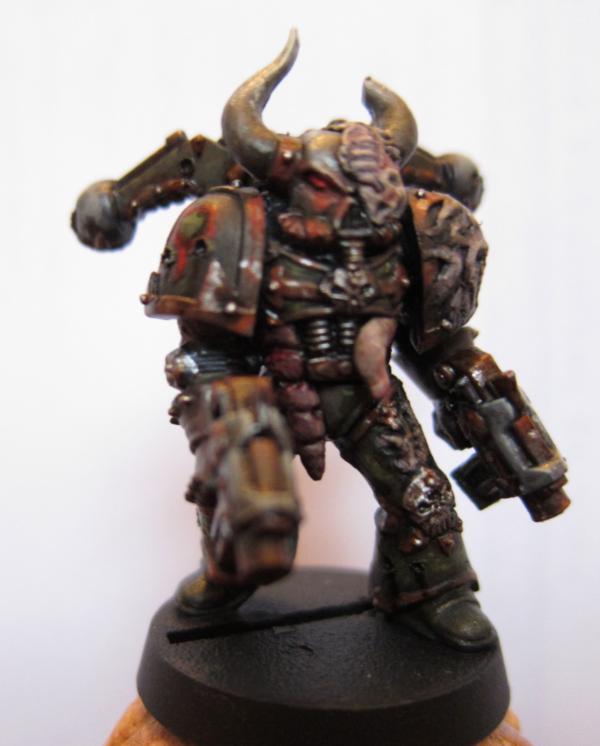
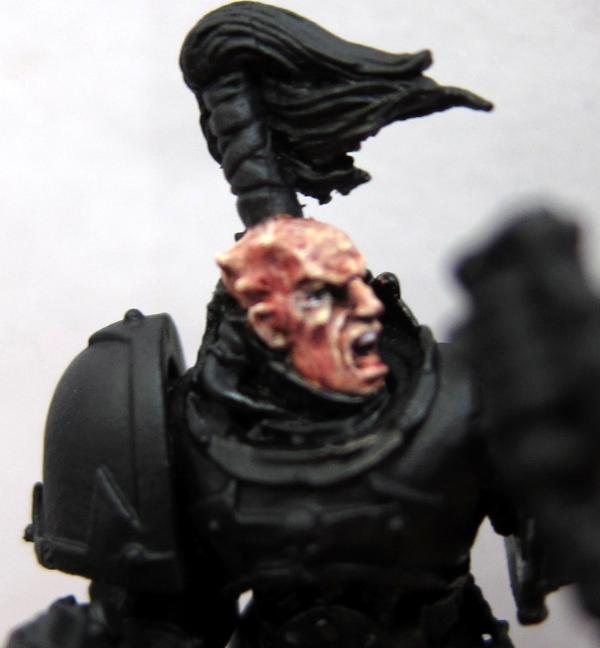
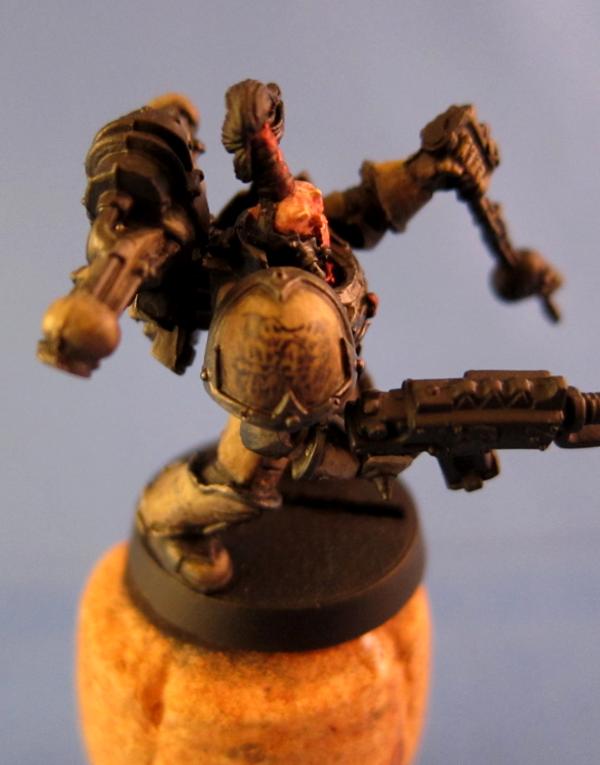
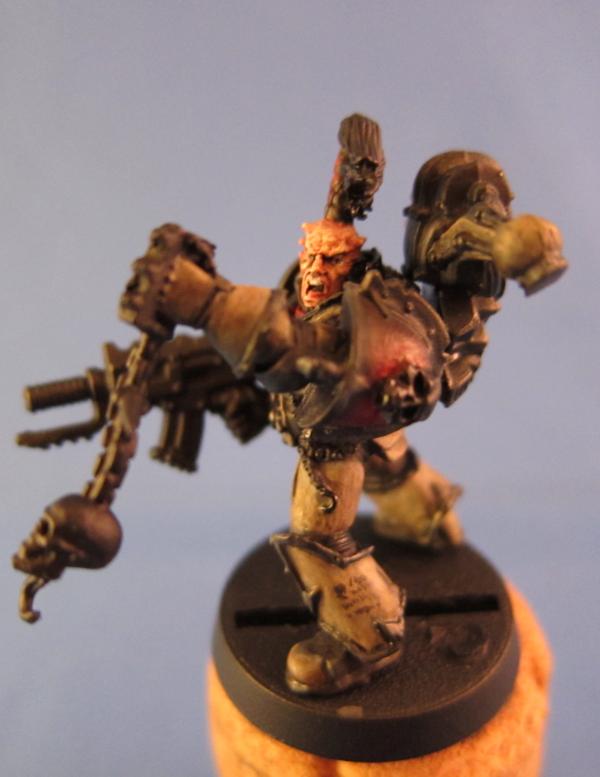
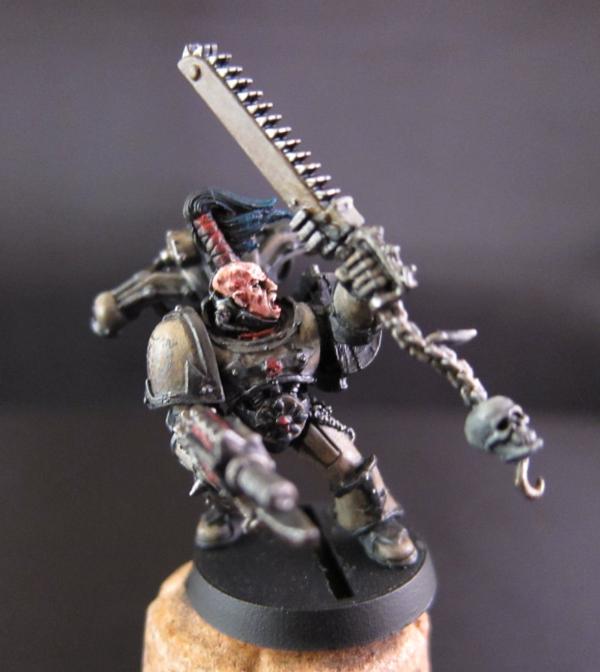
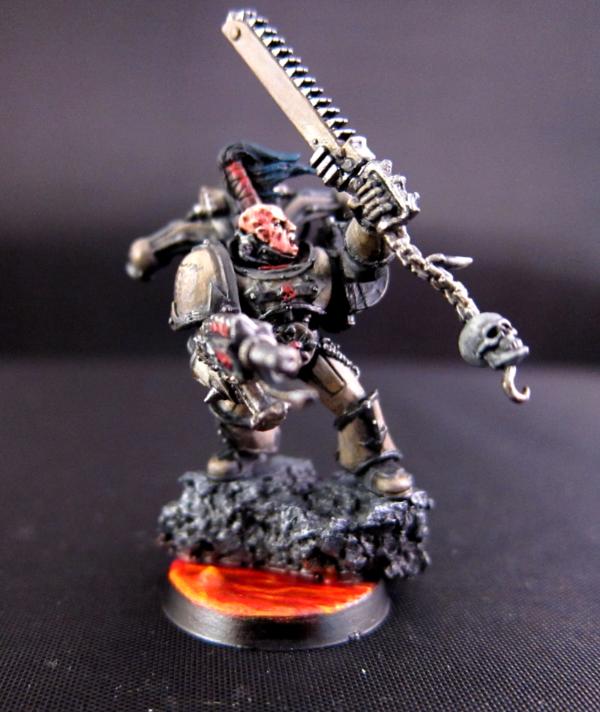
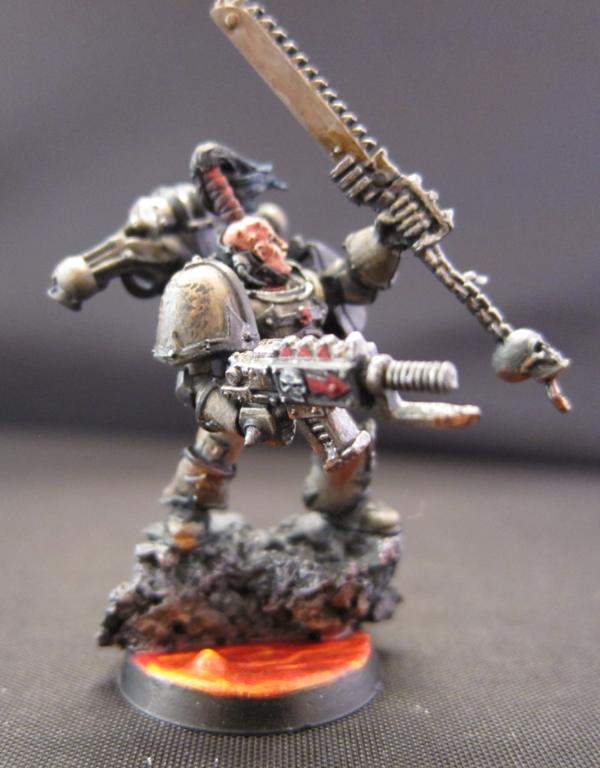
Wow got a whole lot done today. Here are pics of my current work up to this point. I still have a lot of work to do on him, but he's coming along. I ended up removing his chainsword prior to painting as I could tell it would just get in the way.
So, as stated, he will be standing over lava. So, I got the idea to make his face kind of melt-y? Not a word, but whatever....Showing that his armor can withstand almost anything and even though the CSM can't, he won't let something like his face melting off stop him from getting his kill. I'll keep posting as I get more work done.
Anyway, here are the pics. The one's taken in the light box (blue background) came out a little bit orange:
Here's a close up of his face
Front View
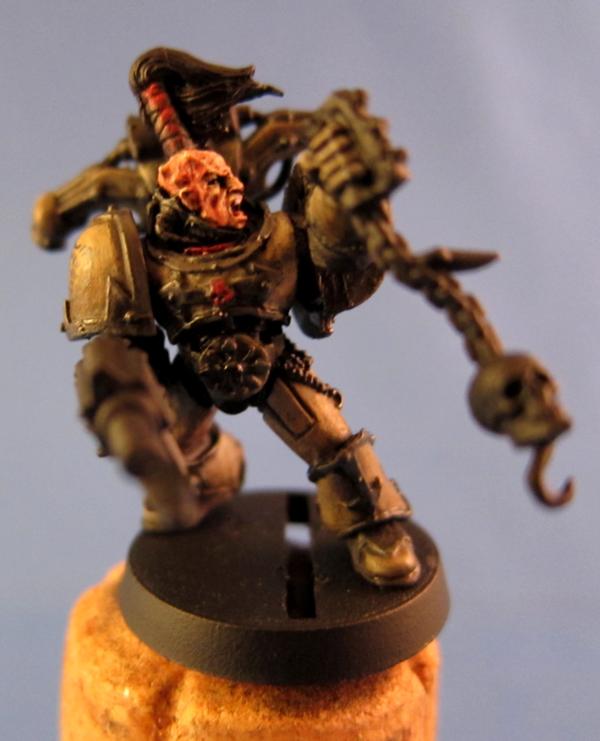
Right Side
Left Side RAAAWWWRRR!
As always, C & C's appreciated!!!
Until my next post, fear his brass knuckle of doom
|
|
This message was edited 1 time. Last update was at 2011/01/31 02:56:36
|
|
|
|
2011/01/31 14:49:27
Subject: Re:Moltar's WIPs - Update Jan 30th
|
|
Longtime Dakkanaut
|
Managed to get a little more work done last night. As you can see, many of this mini (colors wise) was inspired by the last two CSMs done by Yggdrasil. You can follow his awesome plog here: http://www.dakkadakka.com/dakkaforum/posts/list/249588.page
So here is where my CSM stands as of now. I still have to do his metallics, his base, and his small, little details.
Front
Right Side
Left Side
C & C's appreciated
|
|
|
|
2011/01/31 19:41:26
Subject: Moltar's WIPs - Update Jan 31st
|
|
Longtime Dakkanaut
|
Hey, thanks bunnygurl! I always appreciate the feedback. I had a lot of fun painting that nurgle dude. Something comforting about knowing that in no way should he look clean or pristine.
|
|
|
|
2011/02/01 02:02:54
Subject: Re:Moltar's WIPs - Update Jan 31st
|
|
Longtime Dakkanaut
|
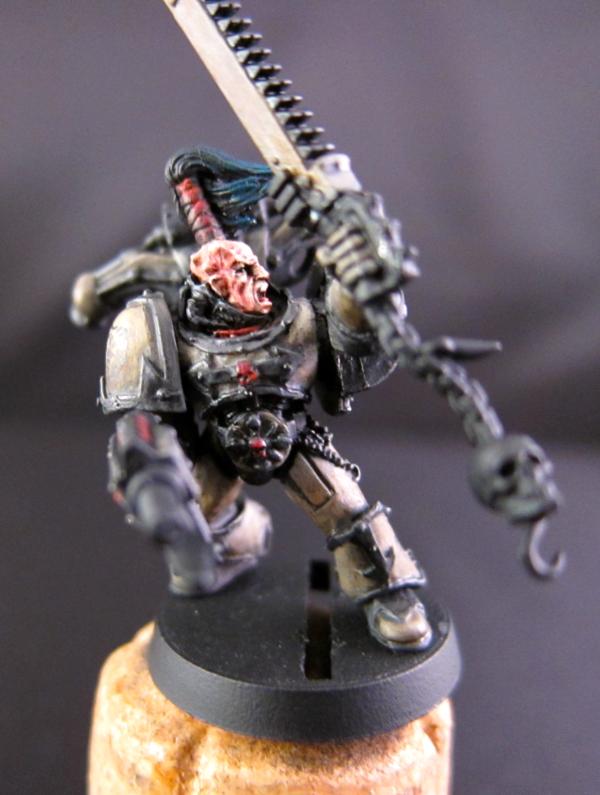
@Bunnygurl: Thanks, again! The GS def helped the overall look and was pretty easy to achieve, since it was my first attempt using GS for anything other than filling gaps. The marks and indents are all made with a simple sculpting tool. I just poked and prodded it how I wanted and for the intestine-looking things I just tried to remember to work small and keep the GS amount used to a minimum. If you have to sculpt a lot, it's best to use vaseline or petroleum jelly on your sculpting tools so the GS doesn't stick to it. Thanks for the kudos!
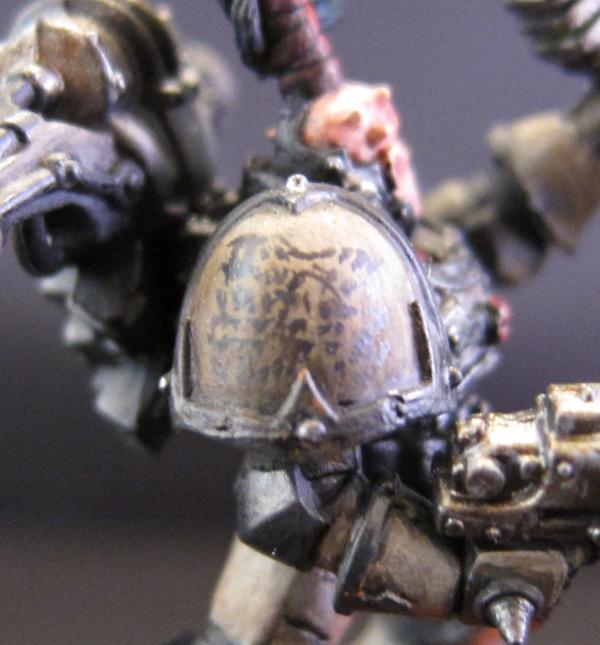
So here is my next update...
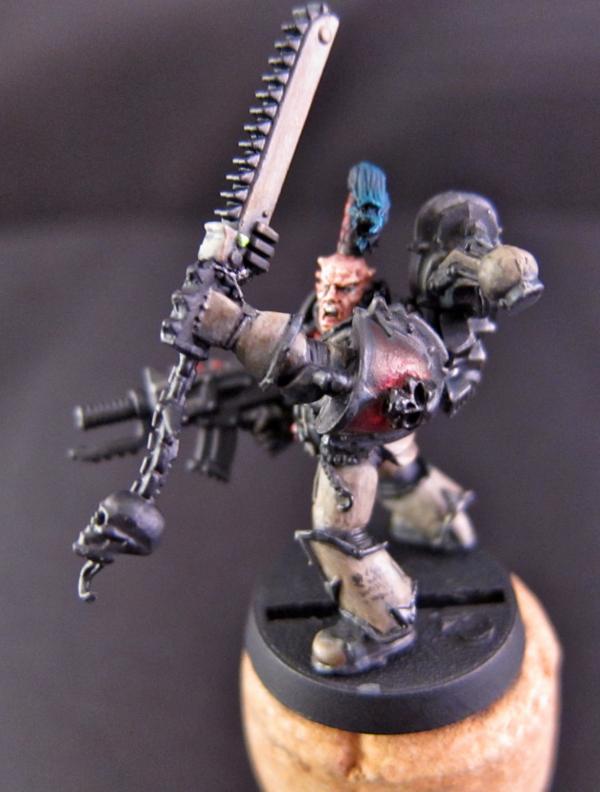
I have finished this CSM up for the most part, aside from his base. There were a couple things I noticed in these pics that I have gone back and fixed (ie: the red on the shoulder trim). These pics should certainly show the inspiration from Yggdrasil, including the OSL.
Front View:
Right Side:

Left Side:
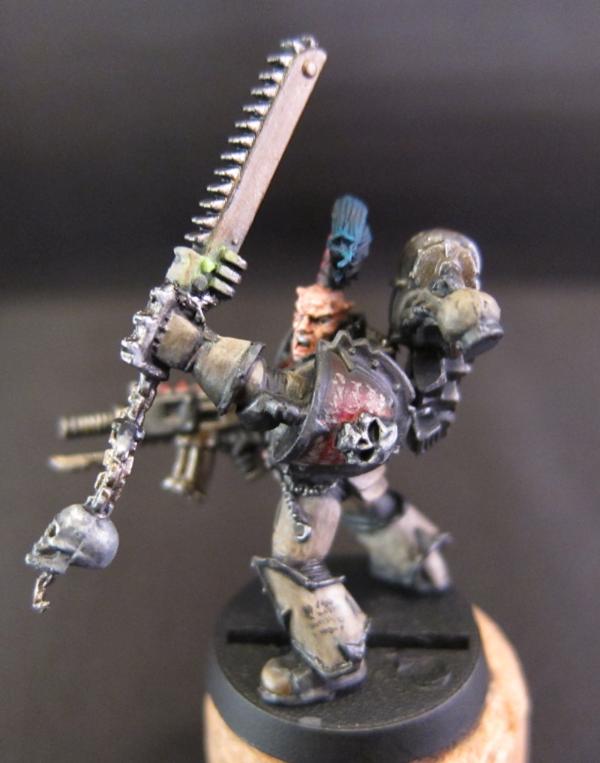
Back:

Shoulder Pad Detail:
 OSL
OSL on Chainsword Detail:
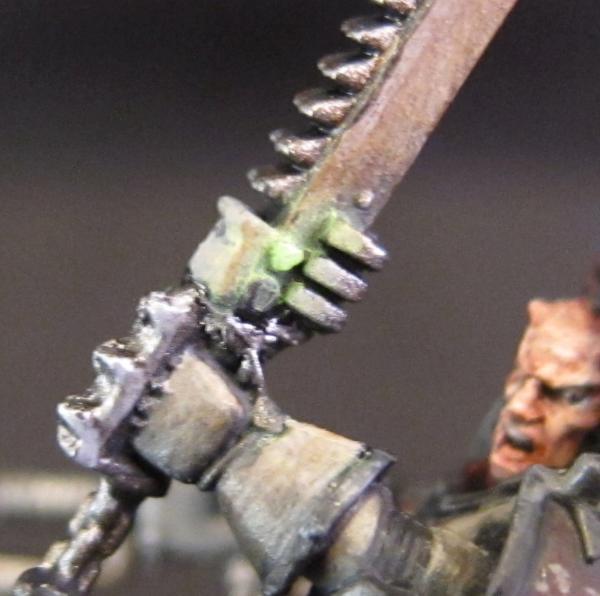
As always, I appreciate any feedback!
Thanks for looking!
|
|
|
|
2011/02/01 02:12:22
Subject: Moltar's WIPs - Update Jan 31st
|
|
Longtime Dakkanaut
|
Haha I have a really old boxed set of a 5 man CSM squad that probably came out around '92 or '93 and that's where that backpack came from. It's also where that old school Nurgley Dude we were talking about in the last few posts came from. I thought it looked awesome with the 3 fans on it. Actually, I like the look of most of the old CSM backpacks.
Automatically Appended Next Post:
Oops didn't see you, Cain. Thanks for the comments! Glad you like it.
|
|
This message was edited 1 time. Last update was at 2011/02/01 02:13:59
|
|
|
|
2011/02/01 14:12:16
Subject: Re:Moltar's WIPs - Update Jan 31st
|
|
Longtime Dakkanaut
|
@Neil101: Thanks, Neil! Those cork hot pads should come pretty cheap. I lucked out and randomly found one in my garage  I figured it was better not to ask my wife where it came from and just ripped it up. It's actually easy to work with and rip up.
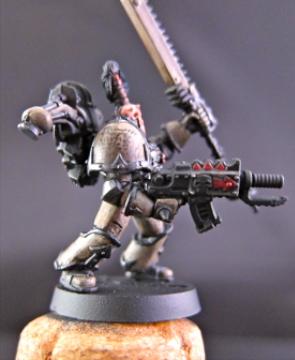
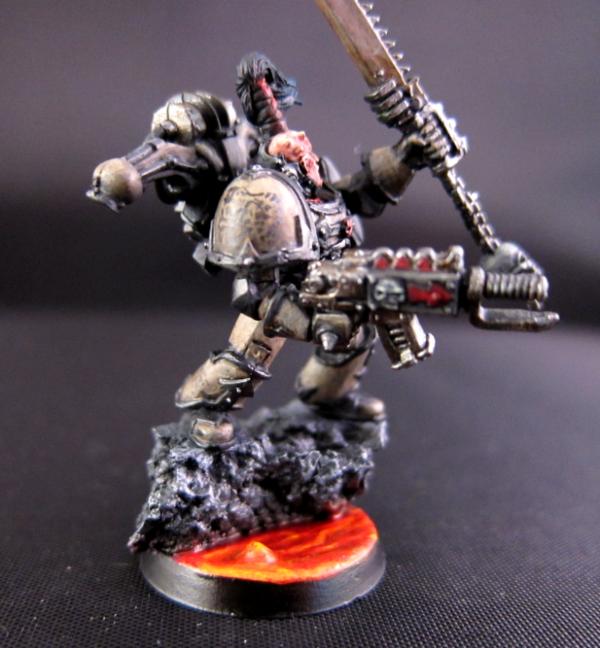
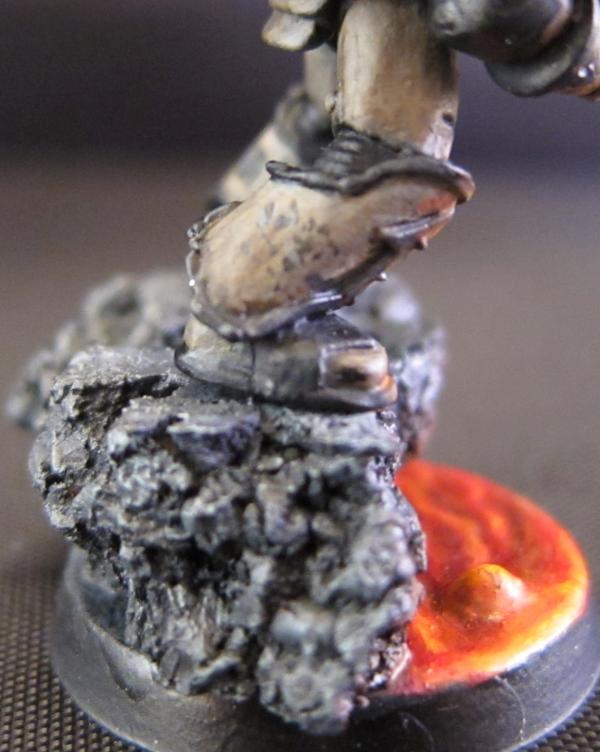
UPDATE:
Last night I got around to finishing off the lava base for this CSM. Although, I'm "happy" with it, I think there are several aspects that I could've pulled off better. I think it could stand to have more yellow, imo. Next, I'll be applying the OSL from the lava to the CSM. Hopefully, I'll pull it off and not destroy the work I've done on this mini.
Well, here it is. As always, I'm open to comments and criticism.
|
|
|
|
2011/02/05 15:00:02
Subject: Re:Moltar's WIPs - Minor Update Feb. 1st
|
|
Longtime Dakkanaut
|
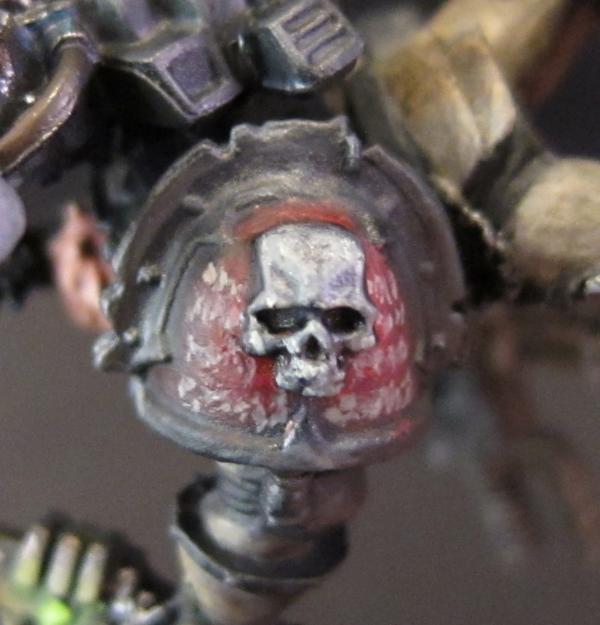
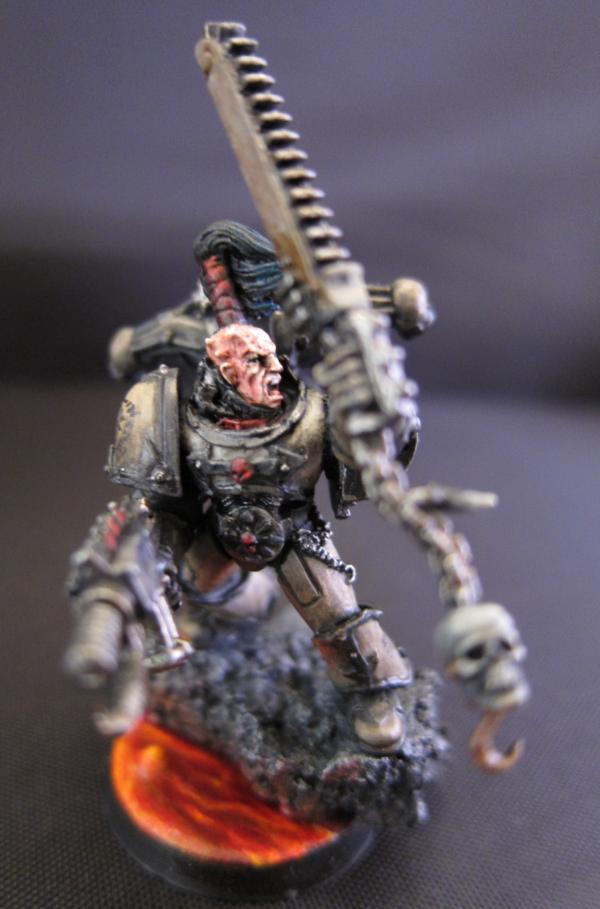
Finally finished this CSM. As said before the overall concept for colors was inspired by Dakka's Yggdrasil and the Lava base was done following Lemmingspawn's tutorial over at CMoN. The OSL turned out maybe a little to faded and not bright enough, but I did not want to over do it. I also didn't want it to appear that my CSM was standing in a volcano but rather next to a lava flow.
Here are the pics:
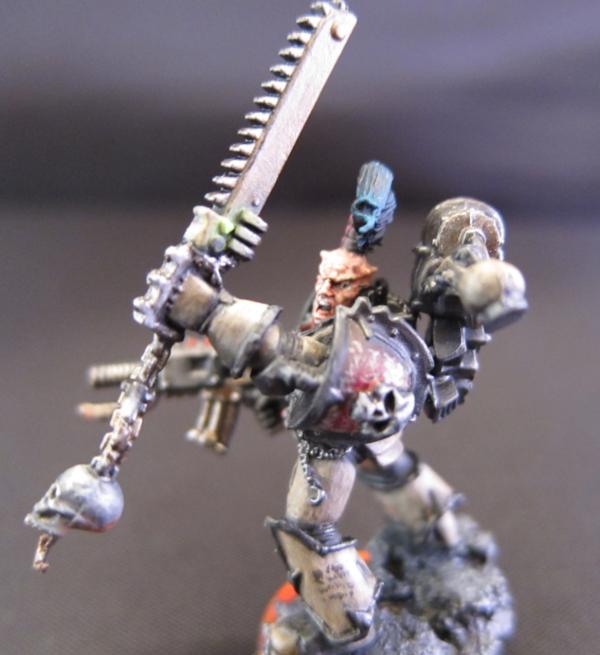
Shoulder Detail
Right Grieve
Left Grieve
 OSL
OSL From Below
His beautiful face... give him kisses before it melts off...

As always, I love feedback, so feel free to drop your C & C's
BIG Thanks to Yggdrasil and Lemmingspawn for the inspiration!!! Thanks guys!
|
|
|
|
|
|