| Author |
Message |
 |
|
|
|
|
Advert
|
Forum adverts like this one are shown to any user who is not logged in. Join us by filling out a tiny 3 field form and you will get your own, free, dakka user account which gives a good range of benefits to you:
- No adverts like this in the forums anymore.
- Times and dates in your local timezone.
- Full tracking of what you have read so you can skip to your first unread post, easily see what has changed since you last logged in, and easily see what is new at a glance.
- Email notifications for threads you want to watch closely.
- Being a part of the oldest wargaming community on the net.
If you are already a member then feel free to login now. |
|
 |
2011/09/20 12:50:46
Subject: Scratchbuilt Buildings and Terrain (9/24 28mm Departmento Munitorum Washing Machine)
|
|

Decrepit Dakkanaut
|
Because I was goaded  Here begins the blog..
________________________________________
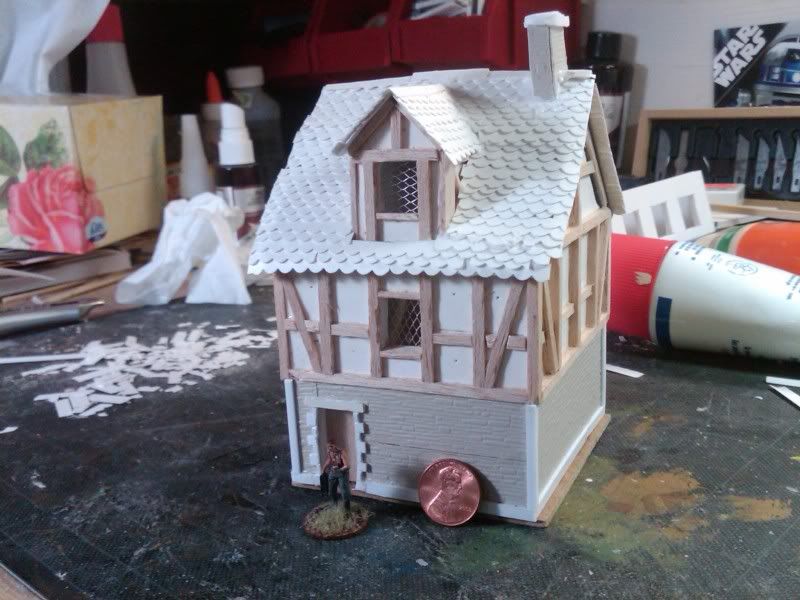
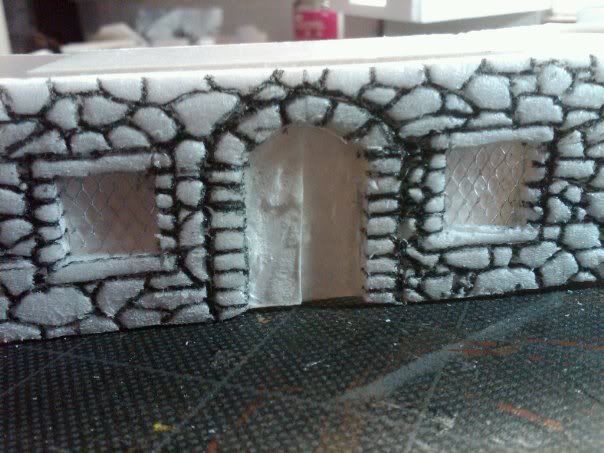
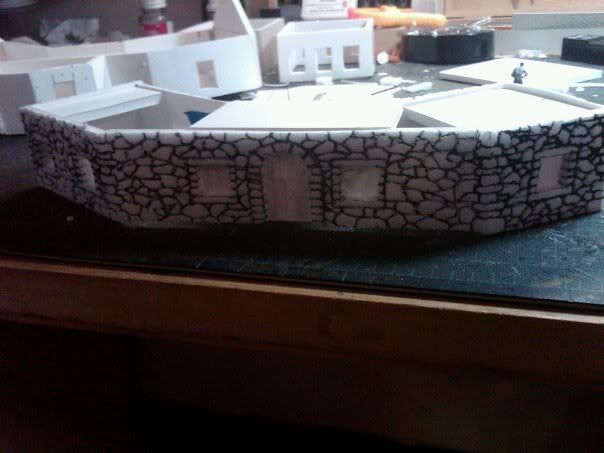
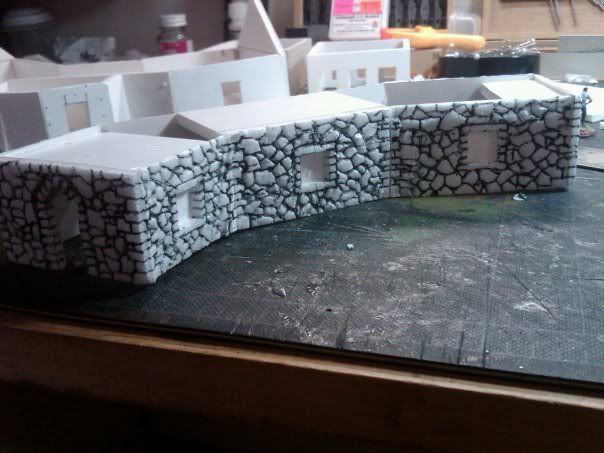
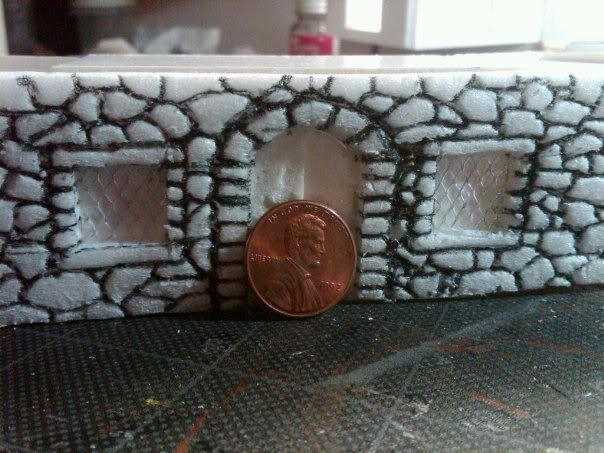
Basic construction and painting technique
example: Country House 1
________________________________________
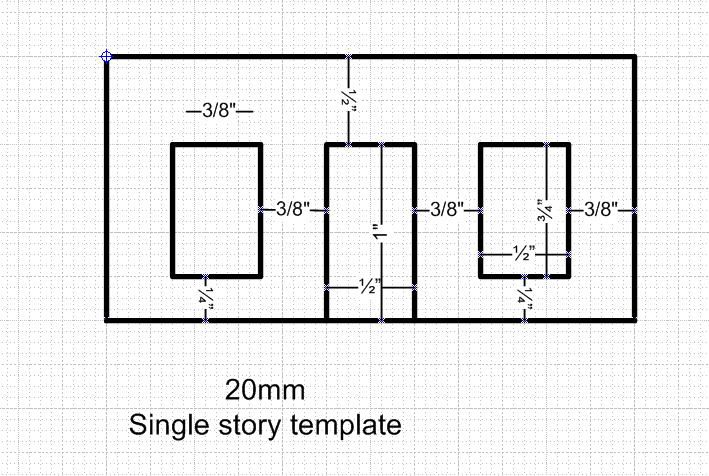
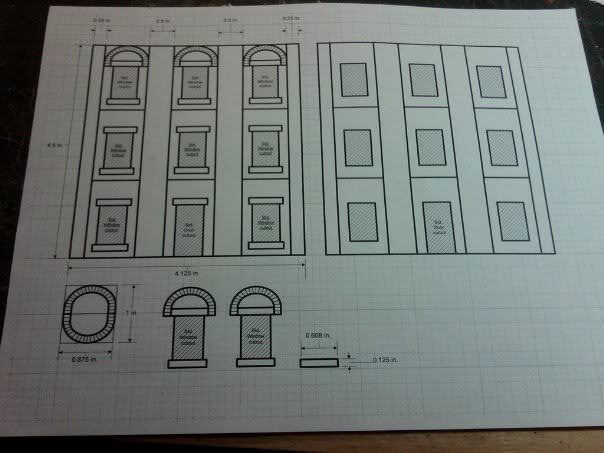
I designed this simple template in Visio to facilitate the uniformity of the storey, door, and window heights needed to support 20mm (or 1/72) miniatures. I made a couple different standard sizes, but the measurements remain consistent. PM me if you would like the Visio file.
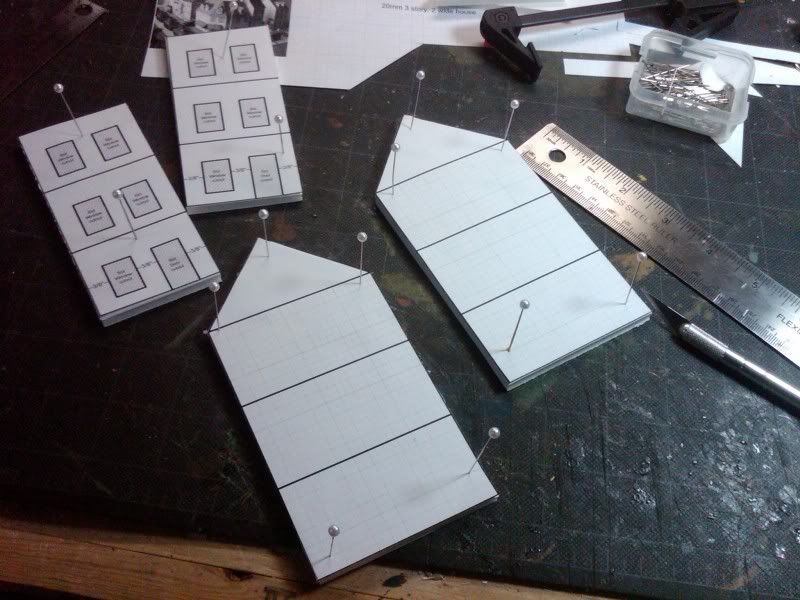
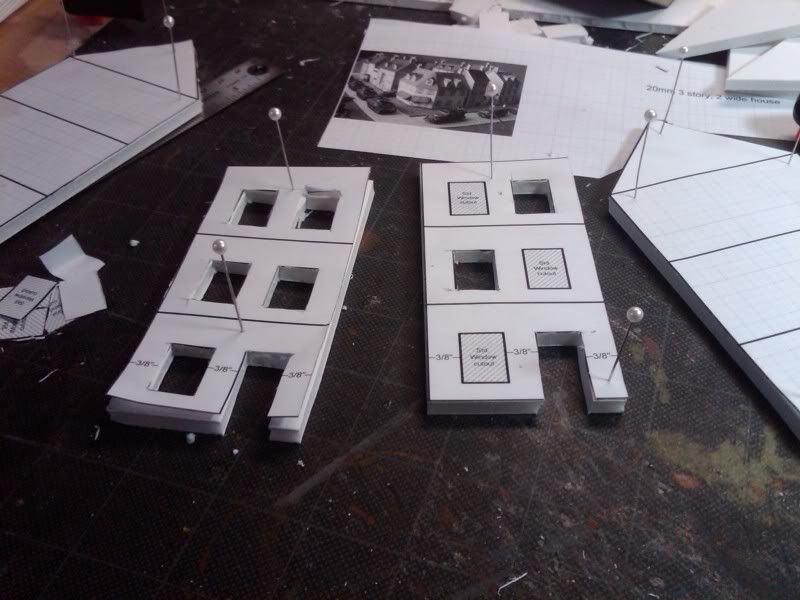
The templates are printed and cut and pinned onto 3" stock of 1/4" foamcore. I used a pin to poke through the corners of the doors and windows so that knife cuts were all nice and straight.
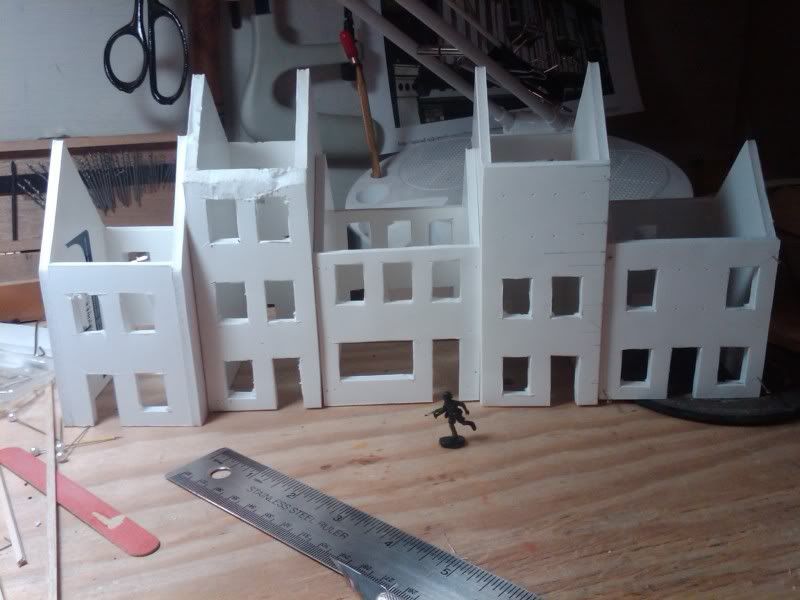
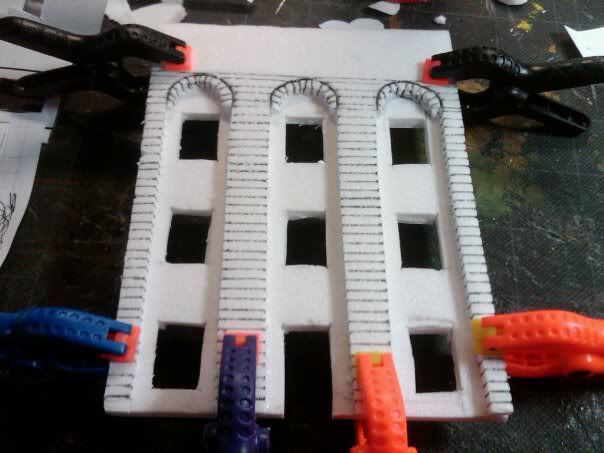
once squared, glued and pinned, you end up with a series of shells like these. 2 ruins or 1 intact building can be made from a single shell
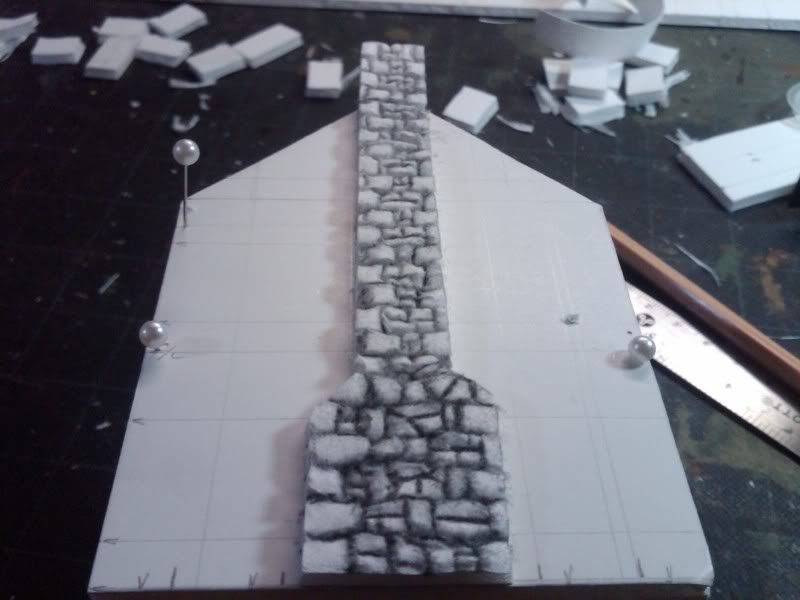
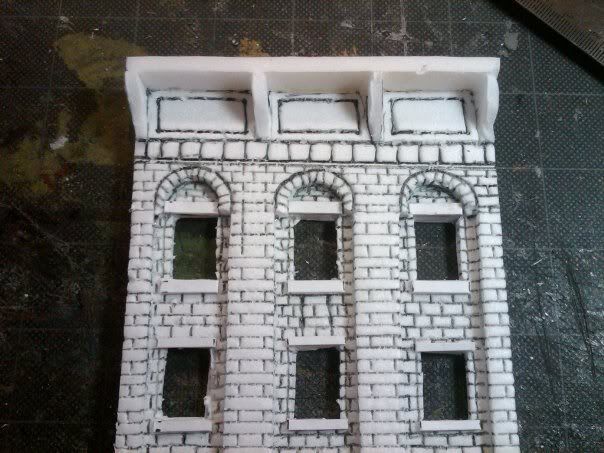
Carving stone or brick texture into foamcore is quite simple, carefully work your sharp knife blade between the cardboard and foam and peel the outer layer off, then I use a sharp Sanford Uni Ball ONYX micro pen for all the carving, it still writes, no matter what punishment you subject the pen to, it still carves and writes!
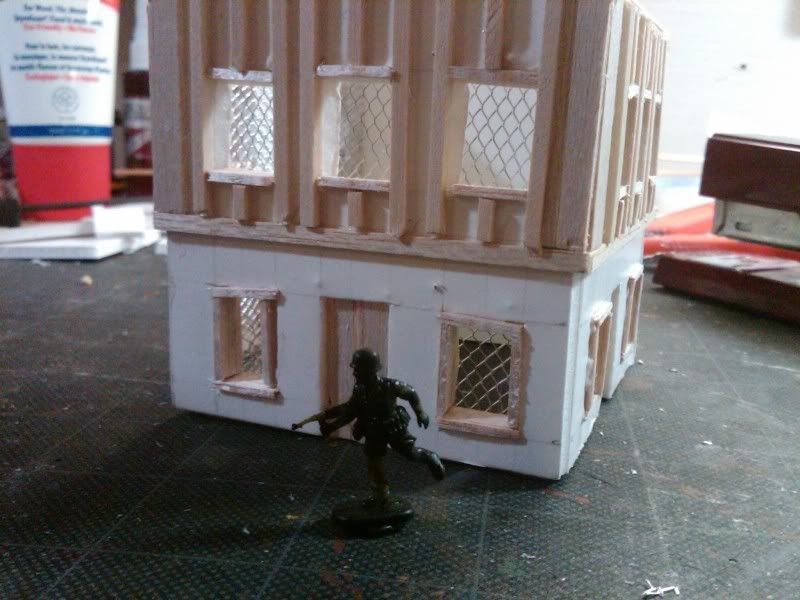
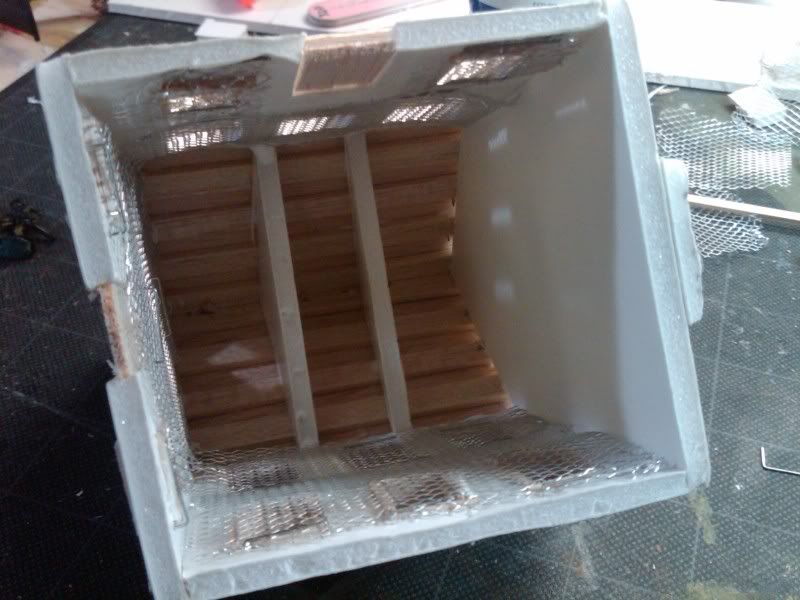
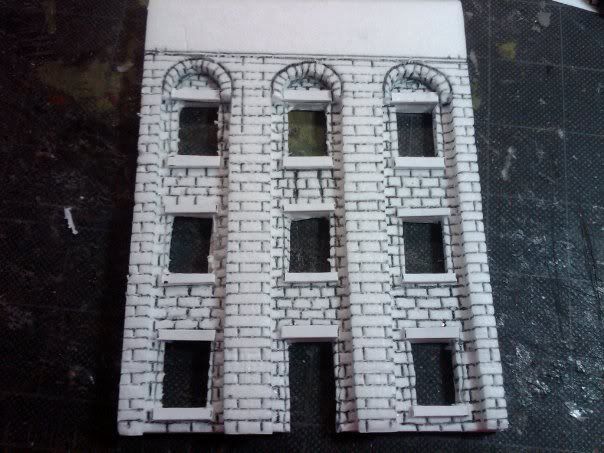
Then I added the Balsa details and roof supports and fitted the open windows with metal mesh found on the clearance rack at a craft store, and carved the 1st floor stonework.
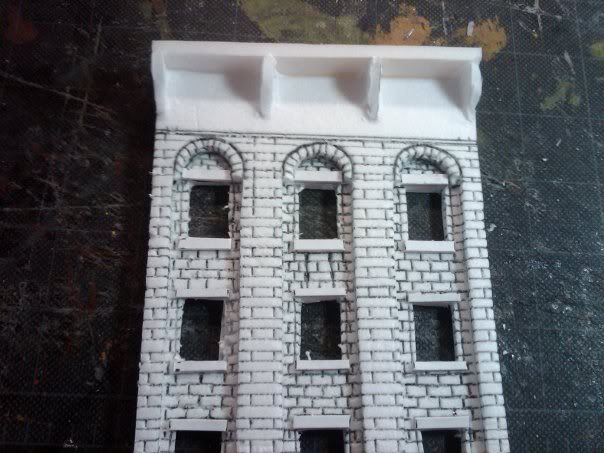
For the roof on this building, I cheated slightly and cut long strips of thin cardstock and roughly cut slits in them to represent individual roofing shingles (but they are all still connected in one strip)
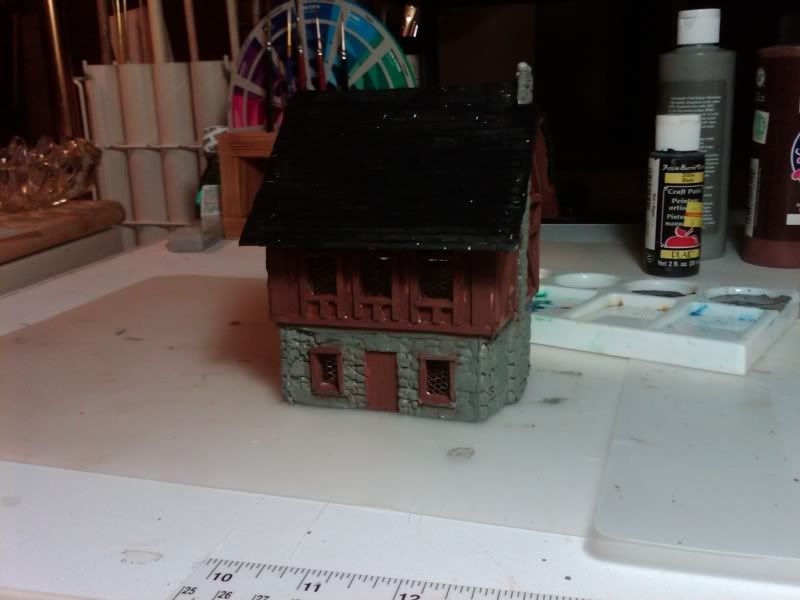
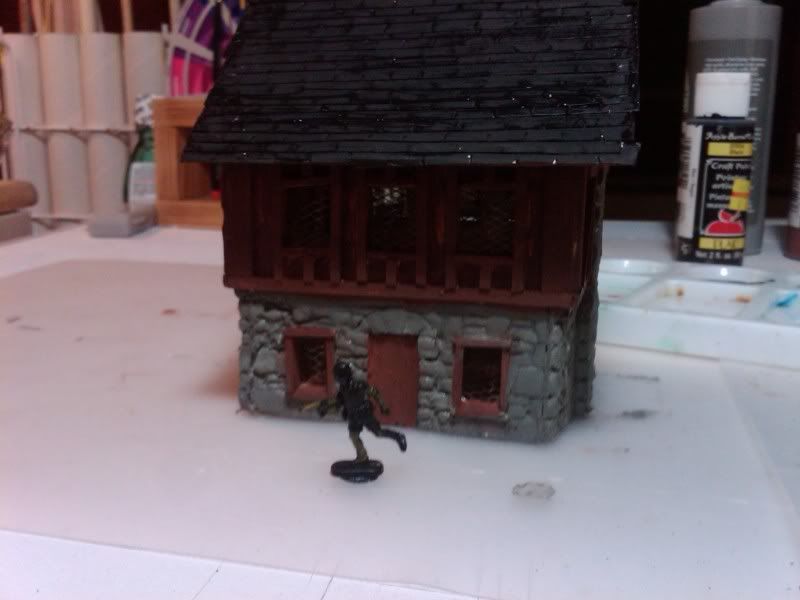
Painting was done first by spraying everything black, then block coloring with simple, cheap craft paints
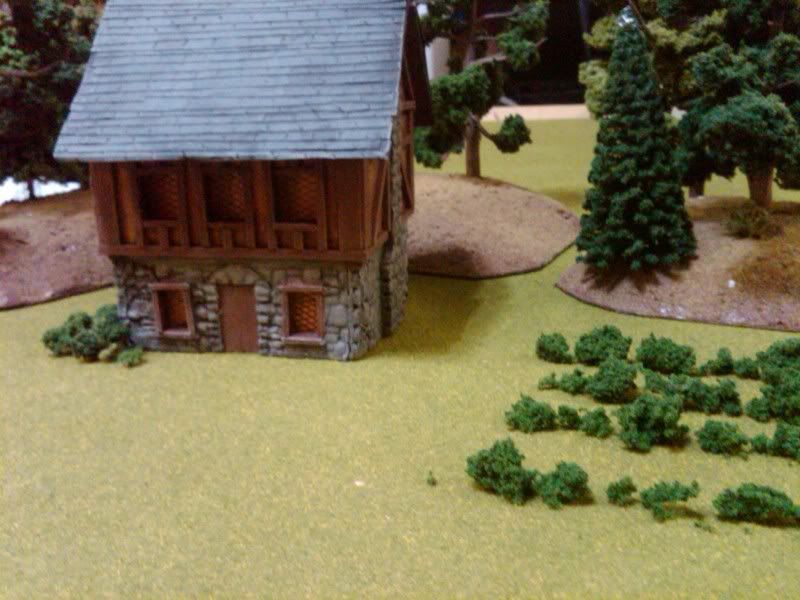
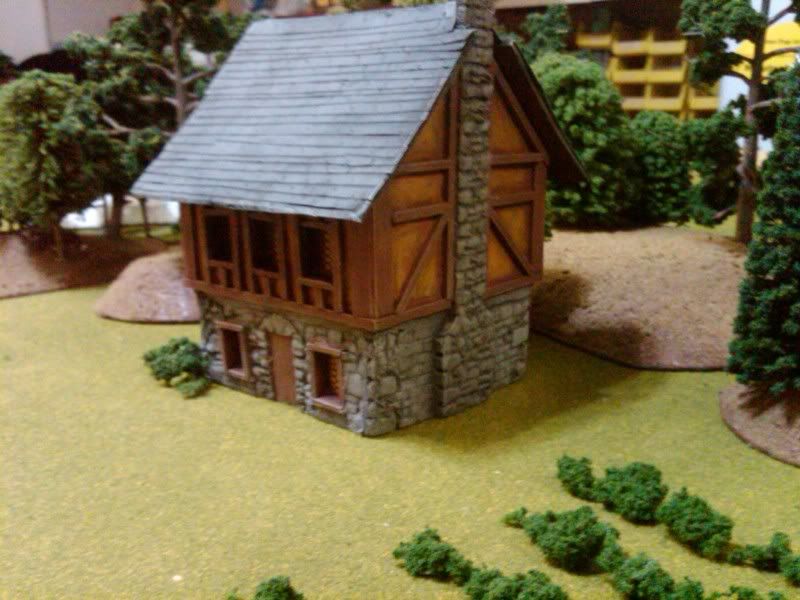
These are the basics. Hope it helps/inspires someone. Next up, advanced techniques...
|
|
This message was edited 8 times. Last update was at 2011/09/24 13:37:45
|
|
|
|
2011/09/20 13:12:15
Subject: Scratchbuilt 20mm building blogness (
|
|
Decrepit Dakkanaut
|
Thank Vik! Well, I sort of took the pictures in this order, so it all works out 
|
|
|
|
2011/09/20 14:06:42
Subject: Re:Scratchbuilt 20mm building blogness (
|
|
Decrepit Dakkanaut
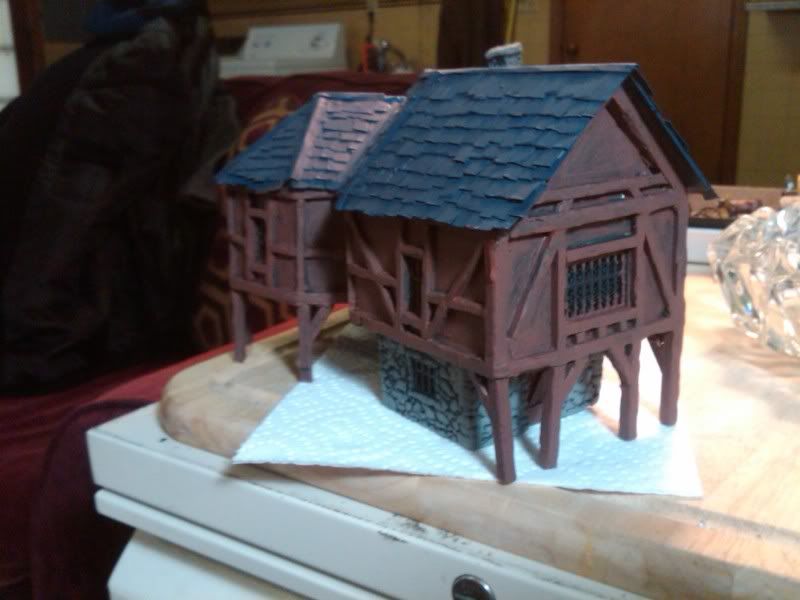
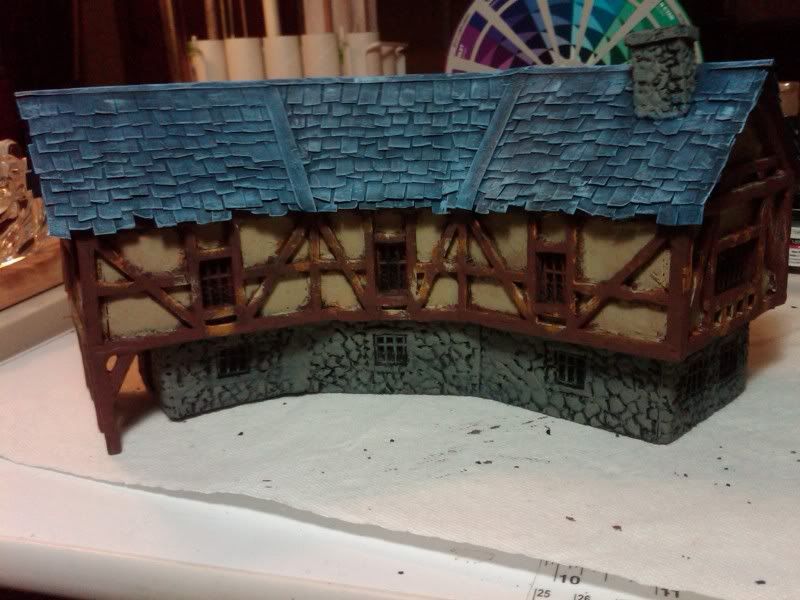
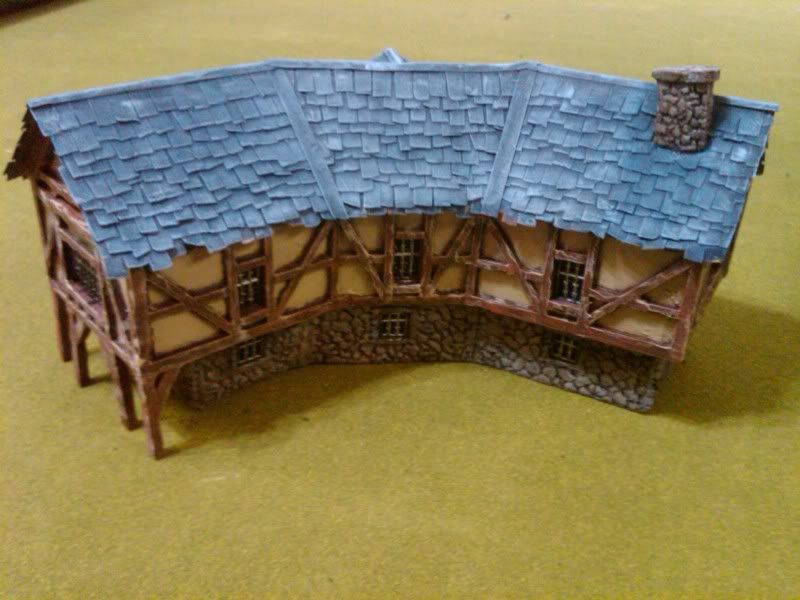
|
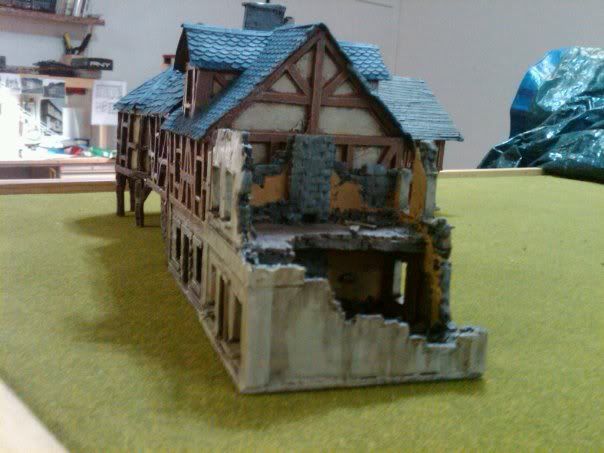
_________________________
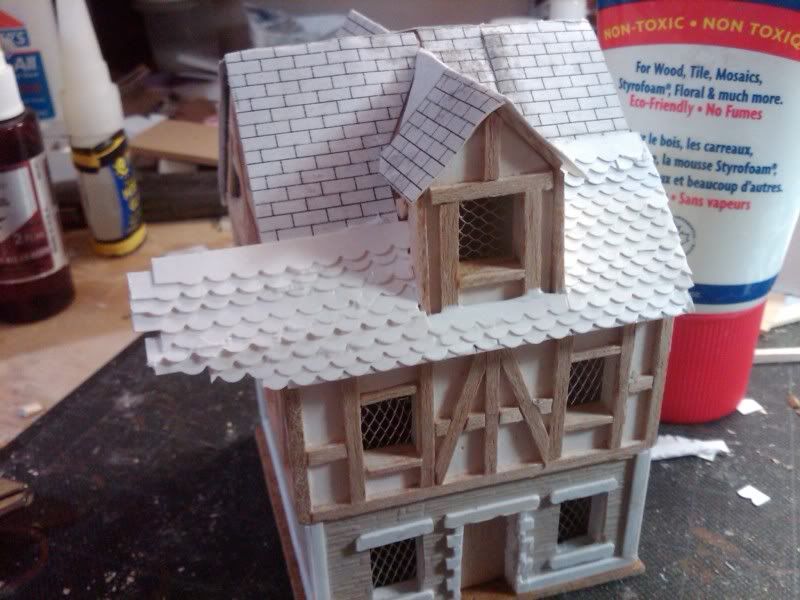
Advanced Roofing
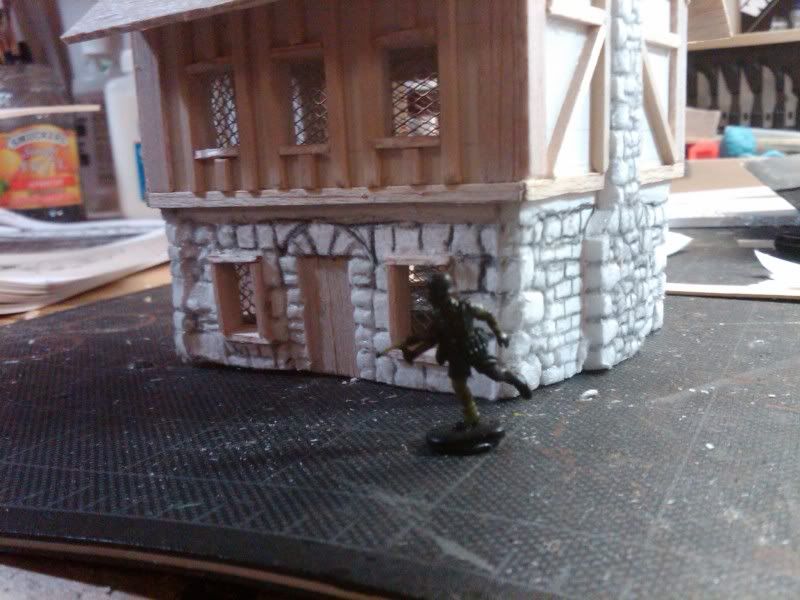
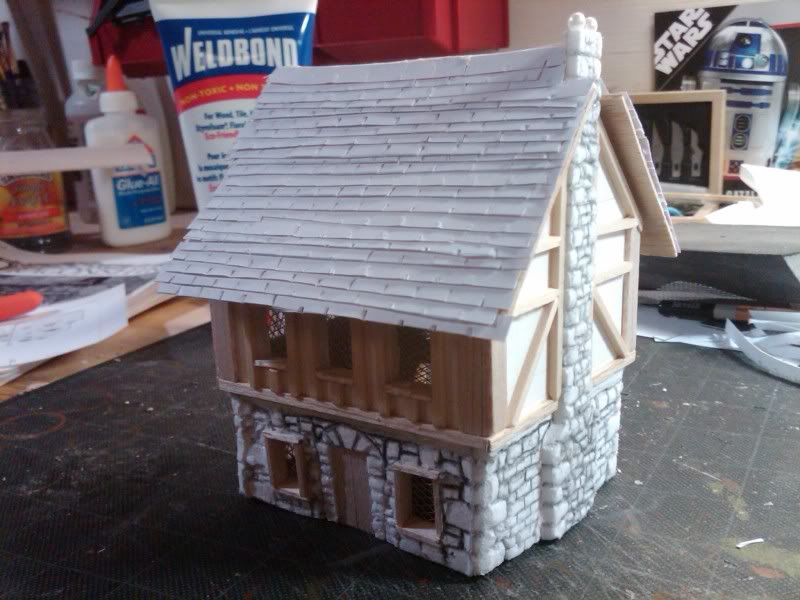
Example: Town House 1
_________________________
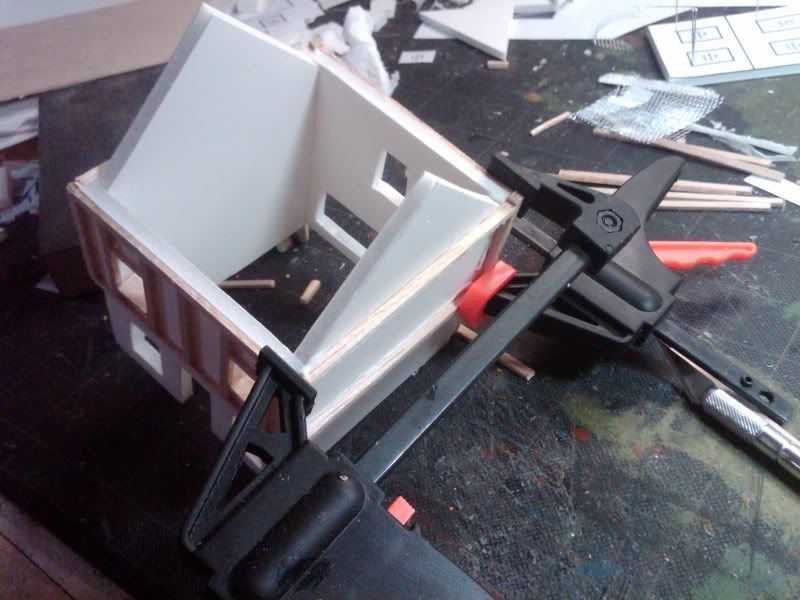
The basic shell construction and balsa detailing is the same

Again, using Visio, I designed a template for the roof dormer
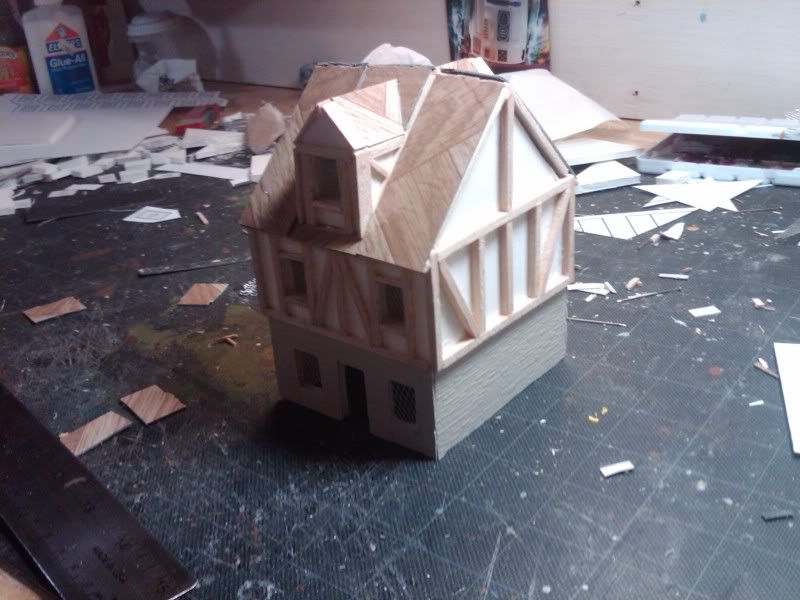
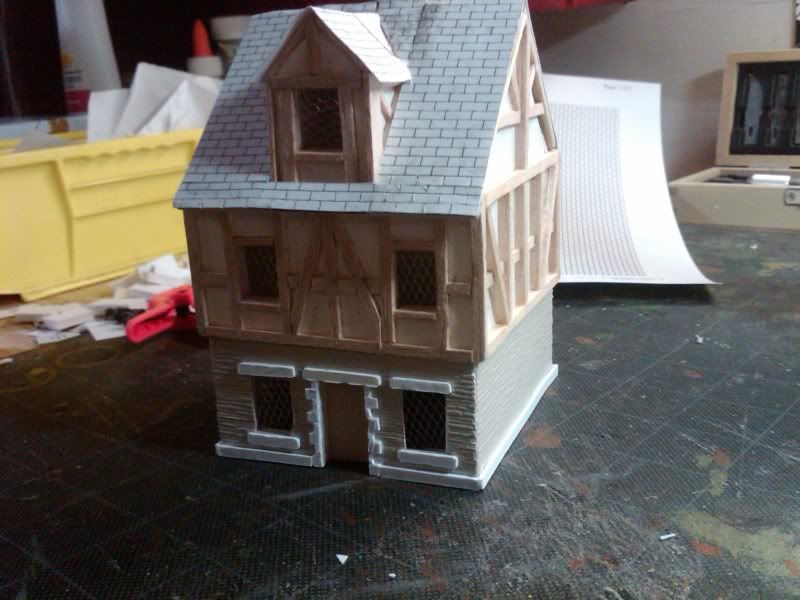
For the roof, I used cheap self-adhesive vinyl floor tile to basically skin the roof bitz, this stuff is great for all kinds of construction work, especially basing, albeit a bit brittle if left unsupported. I didnt carve brick in this one, I used some HO scale textured plasticard, in hindsight, I like the carved look better, and it is much cheaper than the plasticard. The window sills, heads, and brick quions are just plasticard laid to give the details a recessed look, even though both stories are really at the same level.
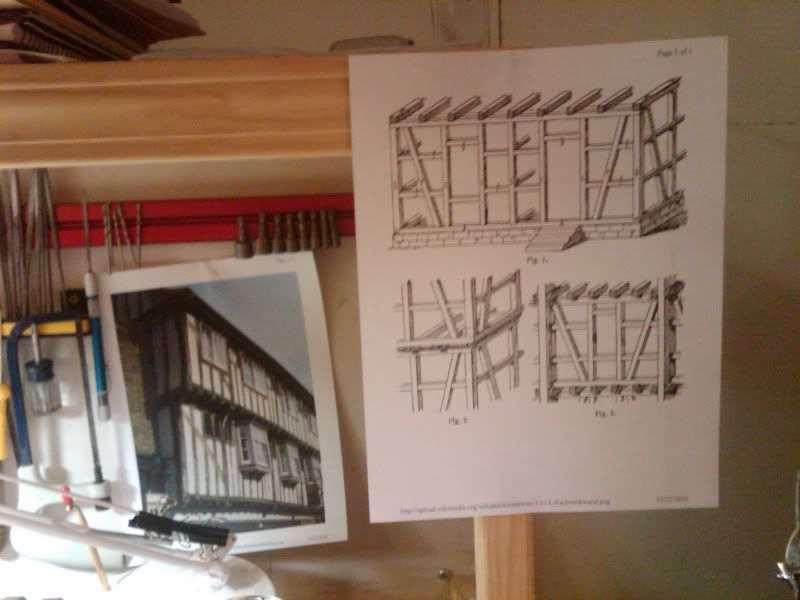
Half-Timbering is approximated from glancing at this drawing from an old German-language architecture manual
http://en.wikipedia.org/wiki/File:L-Fachwerkwand.png
For the roof, I first glued down a piece of paper with a staggered grid printed to line up my rows
and I created these tiles by cutting strips of paper and using plastic scrapbooking pinking-type shears purchased super-cheaply at Michaels in the crackbooking section.
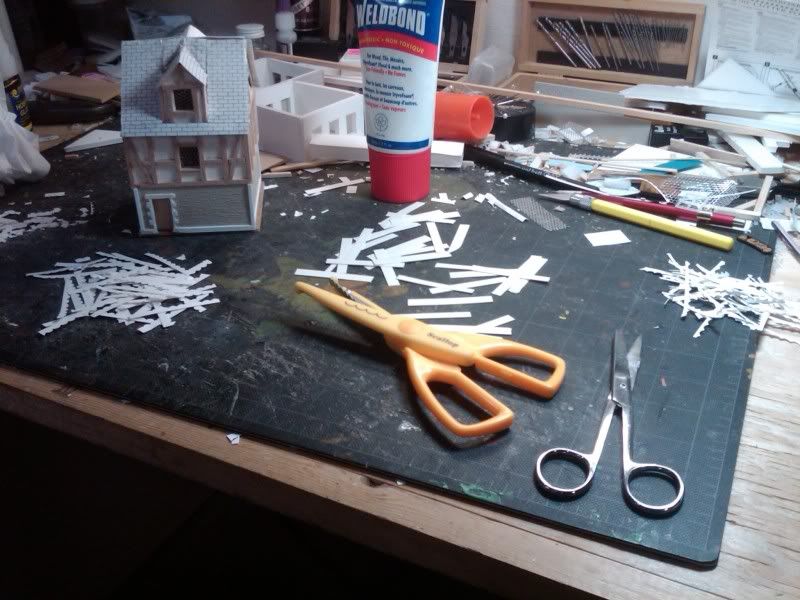
the scissors are pictured here
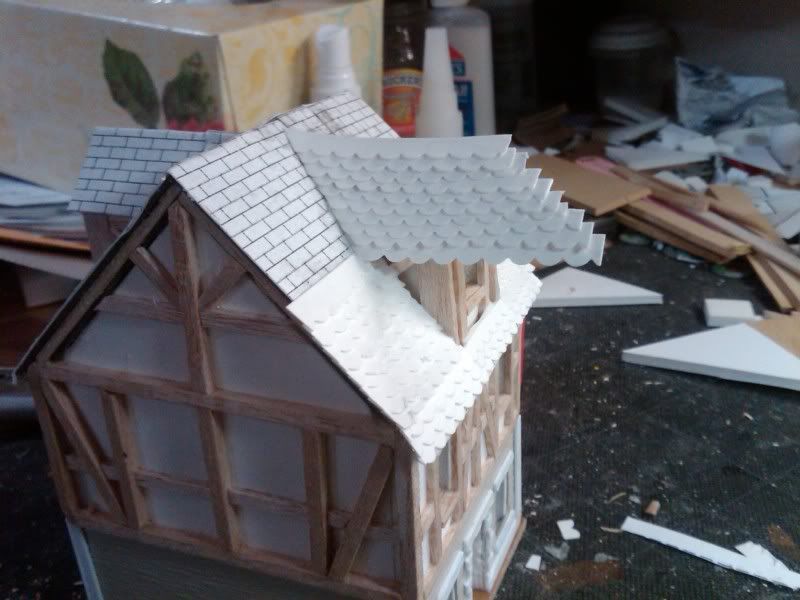
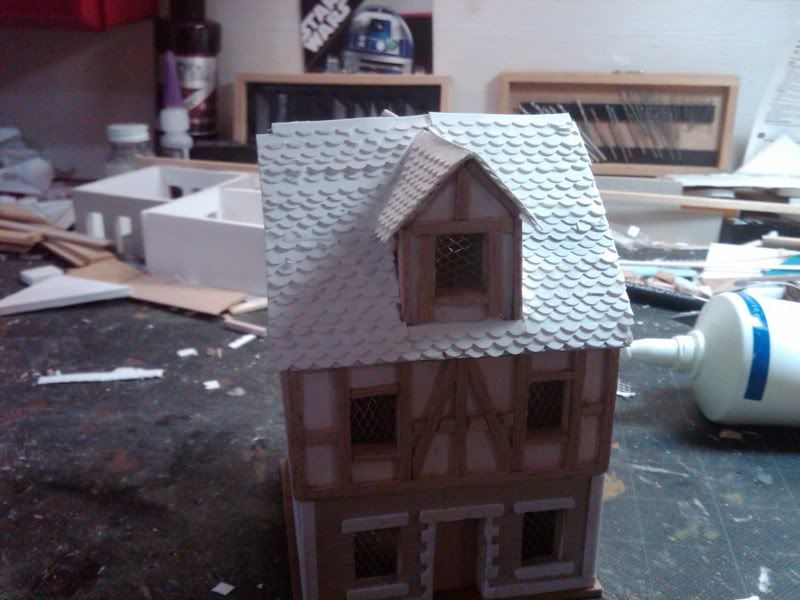
I then just trimmed off the excess. IMO, these tiles are by far the easiest, and fastest way of making a rounded, scalloped shingle look.
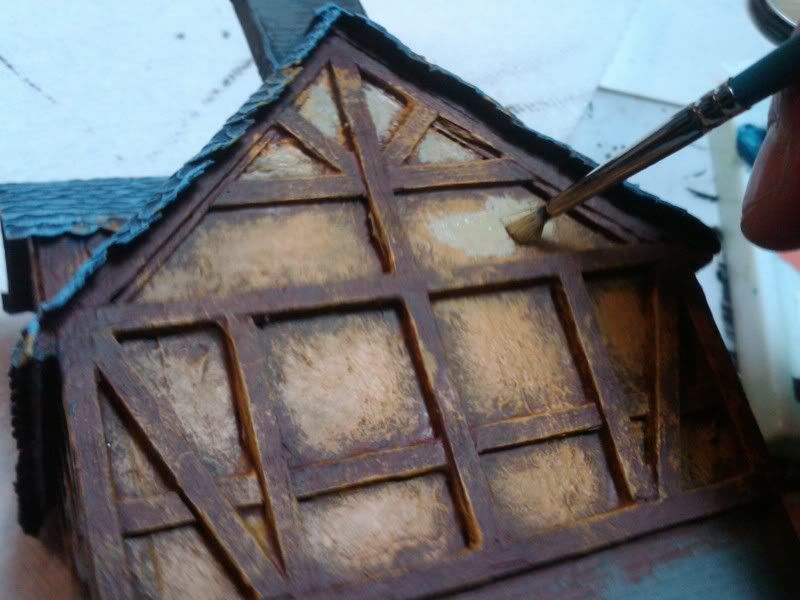
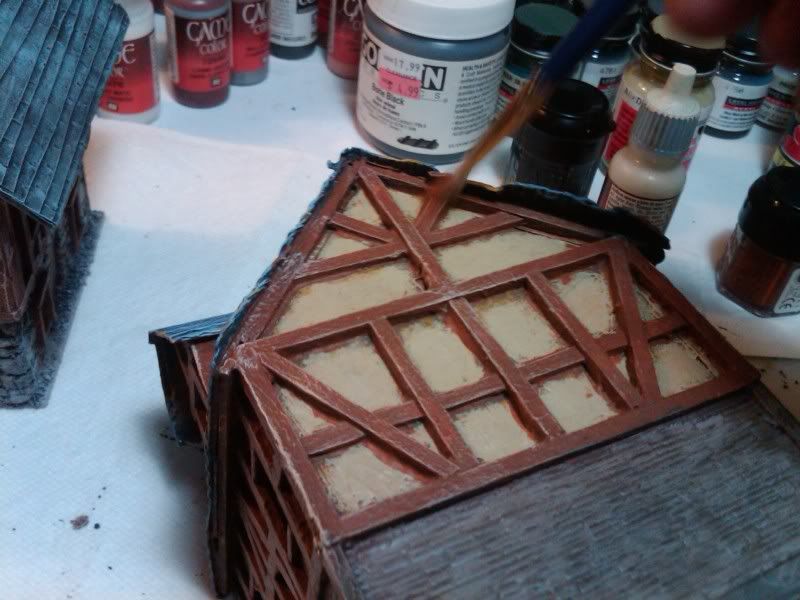
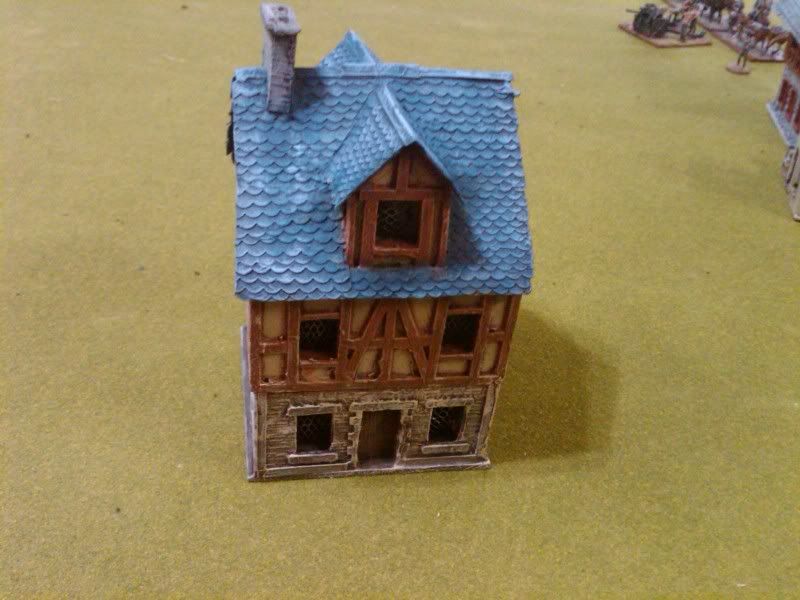
Painting is done in the same way as the first example
Next time: the Haus from Bree
Automatically Appended Next Post: ___________________________
Advanced Construction
Example: Haus from Bree
___________________________
The original design for this belongs to (I think) Wolfgang Jadtke, and I can't seem to find the website anymore, but he built this in 28mm Heroic Scale, mine is in smaller 20mm.
I just gawked at his wonderful pictures and sort of made my templates fit his overall shape. Basically, this is really just a bunch of angles connecting two separate rectangular houses. But was built using all of the previous techniques and incorporating a few new ones, namely individual shingles (which I don't think I'll ever try again)
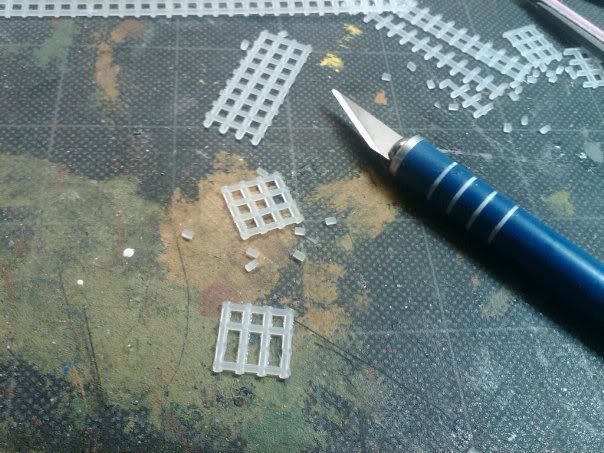
.........and a new way to make window panes Using Granny Grating (or plastic cross-stitch fabric)
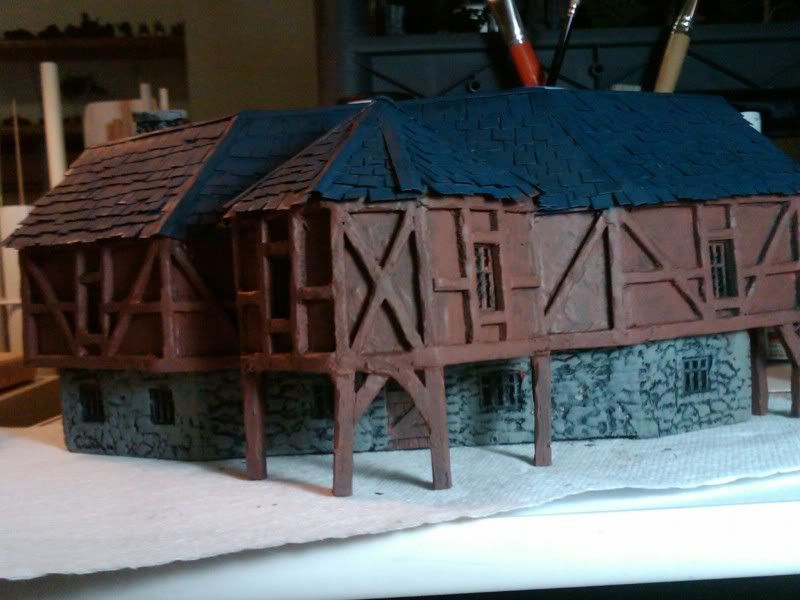
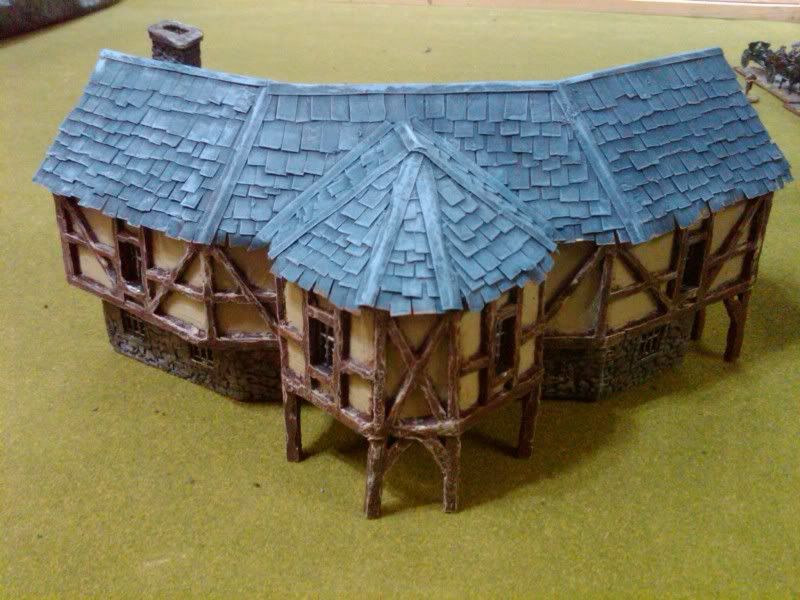
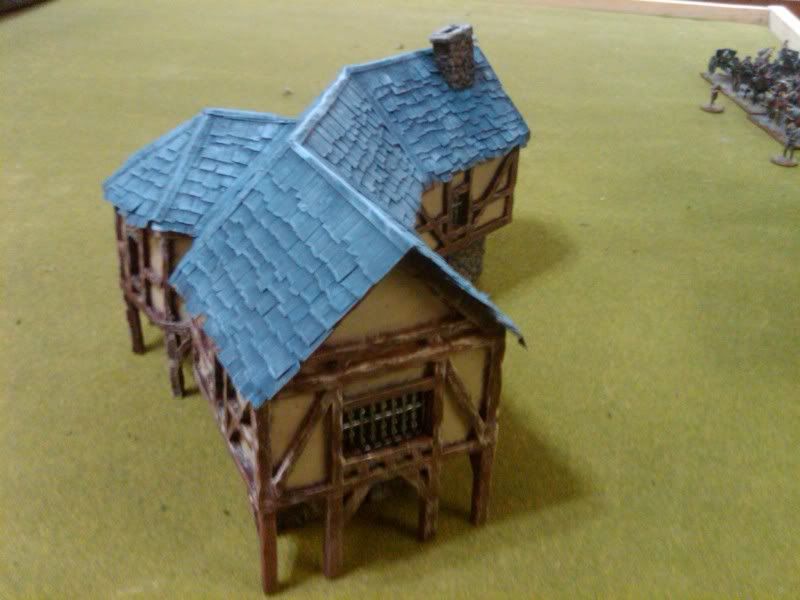
The painting is of course, done in the same manner as the previous examples
questions, comments, words of wisdom? (...ugh my old Government teacher in High School used to say that)
Automatically Appended Next Post: Nightfall wrote:This is GREAT! i'll be here to check for updates all the time!
Thanks! Please do! I hope it is at least entertaining
|
|
This message was edited 4 times. Last update was at 2011/09/20 16:39:23
|
|
|
|
2011/09/20 19:32:32
Subject: Re:Scratchbuilt 20mm building blogness (9/20 European half-timbered houses)
|
|
Decrepit Dakkanaut
|
Foamcore, it's just 1/4" or 3/16" high-density foam sandwiched between two very thin clay-coated paper layers. It is typically sold as presentation board or used to stiffen posters and artwork for framing. (and is usually found close to matte board in the framing section of the stores). I usually buy it in 2x3' sheets, but it comes in a bunch of sizes , and you can get it in colors other than white if you want. I wait until Hobby Lobby or Michael's run a sale on it ($2-$3 a sheet) and buy a dozen sheets or so at a time.
see http://en.wikipedia.org/wiki/Foamcore
and http://www.dickblick.com/products/blick-foamboard/
for buying in bulk
As far as the carving, I used nothing but a pen to do the carving, If you want super-straight lines, then yeah you should probably score it with a knife first, but I wanted the look of stone, so I just attacked it with the pen. This only woks if you first peel off the card layer. If you leave the card layer on and use the pen, you'll only get pen marks, no carving.
|
|
This message was edited 1 time. Last update was at 2011/09/20 19:40:18
|
|
|
|
2011/09/20 20:58:07
Subject: Scratchbuilt 20mm building blogness (9/20 European half-timbered houses)
|
|
Decrepit Dakkanaut
|
When I carve with the pen, I carve bigger stones, then bisect them into smaller stones. It looks funny on the individual stones, but like painting you have to be patient and finally it will pop! to your eyes once you have an entire wall done. Yes Architects used to use it, but I don't know if architects even build models anymore, I think software has that job nowadays.
|
|
|
|
2011/09/20 21:12:28
Subject: Scratchbuilt 20mm building blogness (9/20 European half-timbered houses)
|
|
Decrepit Dakkanaut
|
Thank you sir, really...Vik posted his carved bricks and one thing led to another.....
and BTW, thanks Vik!
|
|
|
|
2011/09/21 00:33:44
Subject: Scratchbuilt 20mm building blogness (9/20 European half-timbered houses)
|
|
Decrepit Dakkanaut
|
I can't wait to see Vik
|
|
|
|
2011/09/21 13:20:07
Subject: Re:Scratchbuilt 20mm building blogness (9/21 old west modular)
|
|
Decrepit Dakkanaut
|
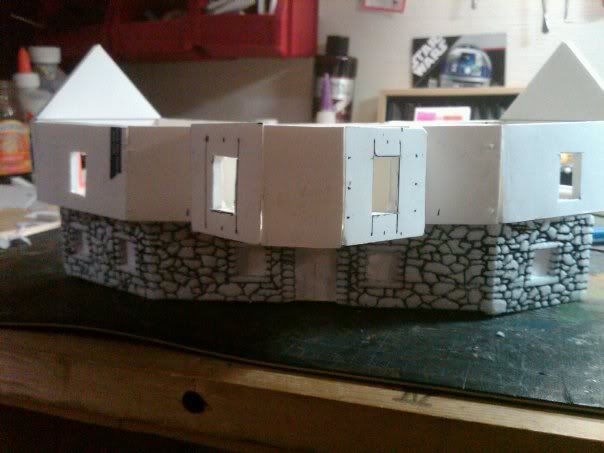
____________________
Advanced construction
Example: Howard Johnson's Ice Cream Parlor, Rock Ridge
____________________
The next installment is an experiment of mine. The previous examples produce some lovely buildings, but as far as wargames go, they are little more than LOS blockers. Good, playable terrain needs to allow for the movement of miniatures, provide cover, and allow for a tactical advantages, at least in a shooty game.
I want to build a set of terrain that has every bit of the Spaghetti Western theme to it for use in Desperado or Flying Lead games.
so, I have started with everyone's favorite Mel Brooks Western Classic comedy, BLAZING SADDLES for research. The set for this film was actually re-used multiple times for other western films before it was used for this epic.
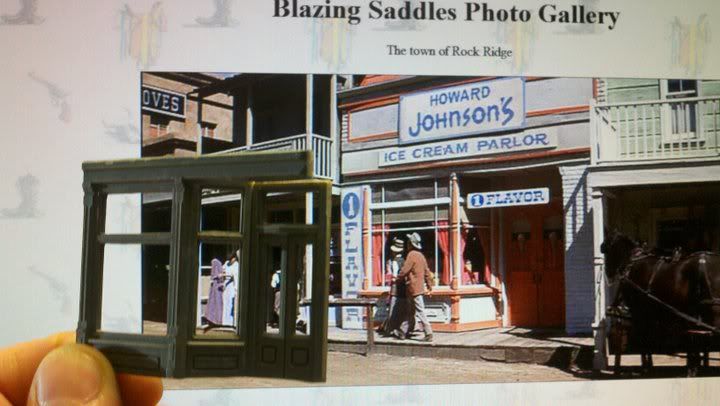
I cut the entryway window and door facia from a HO scale Walthers building kit, it seemed to fit the prototype well.
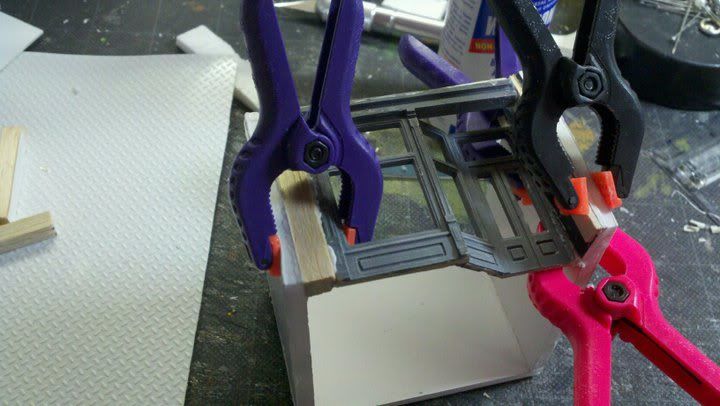
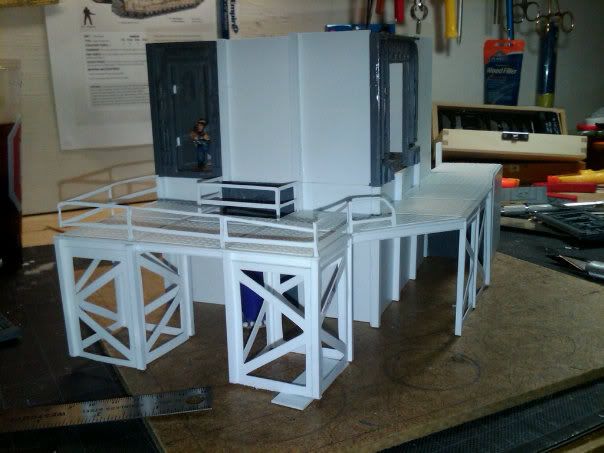
Construction of the building is the same as before, (except the plastic bit) using the single storey templates, however, I want to make the buildings modular with removable roofs, so the first example is a simple 1 storey shop. The foam board shell is built exactly like the previous examples, except it is skinned inside and out.
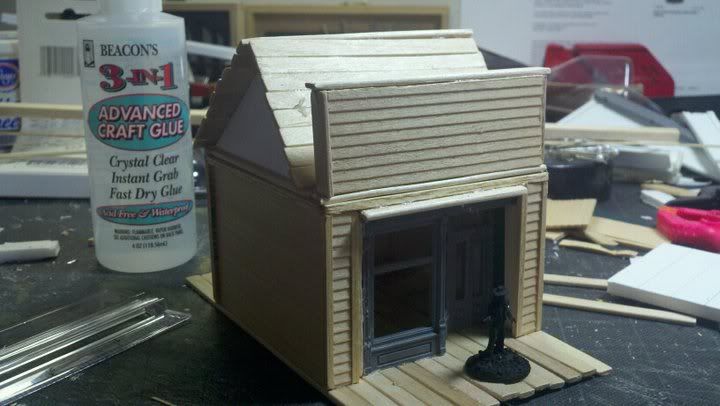
Outside, I used some Basswood sheet that has a clapboard siding pattern milled into one side, and trimmed with matchsticks and balsa, but the really neat-o bit IMHO is the wooden sidewalk. It is built from flat pine stir sticks I found at Michael's in a large bag of 1000 or something like that
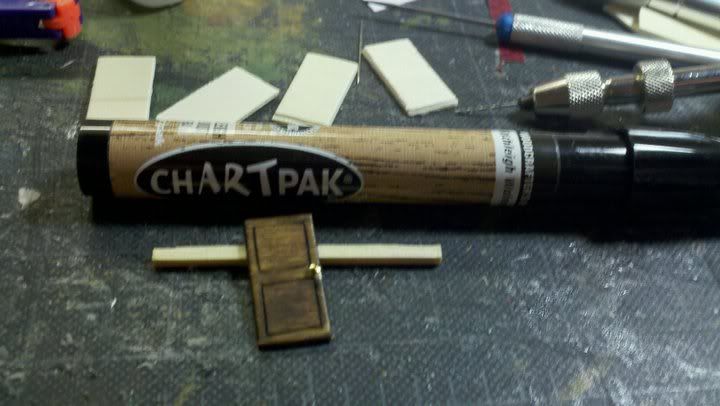
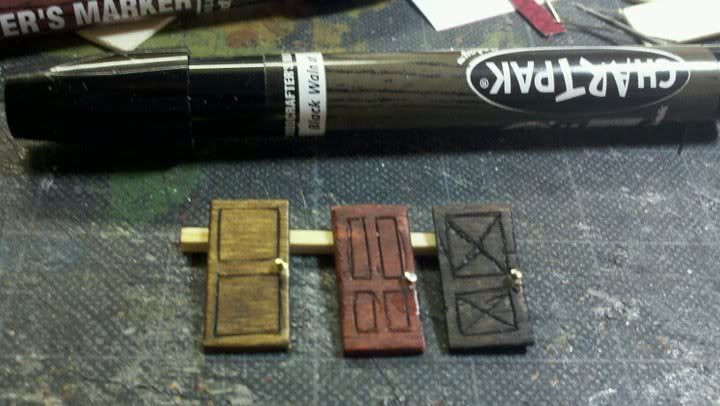
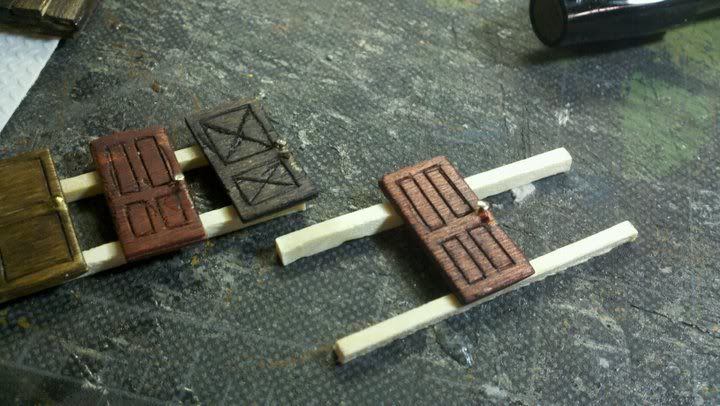
I also found bags of random rectangular wooden offcuts at Michael's, one of the sizes in the bag was 1"x1/2" ...perfect for my standard door dimensions, so I carved panel patterns in them with a scratch awl and stained them with these ChartPak alcohol-based stain markers. The door knobs are just straight pin heads.

Here is the full outside mock-up complete with signage.
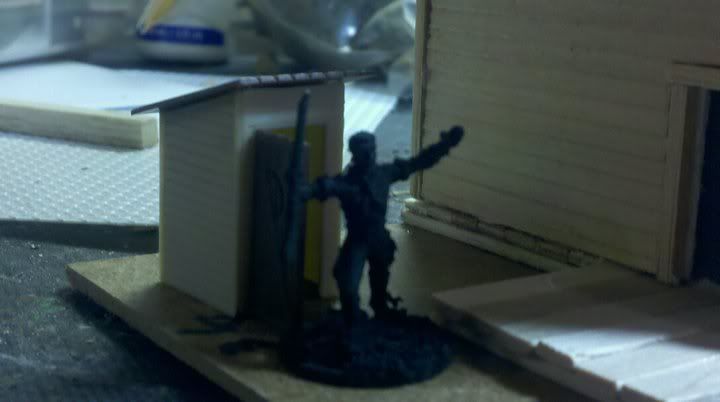
The back of the ice Cream Parlor is film-accurate (in my mind's eye) "Right down to the Orange Roof on Howard Johnson's outhouse" although it isn't painted orange yet.
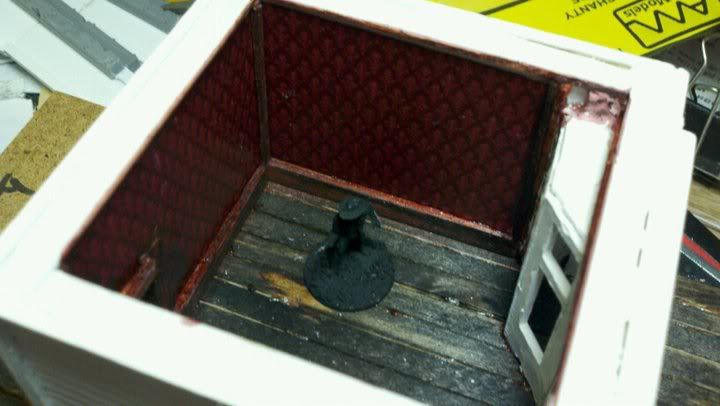
The inside is skinned as well. I found a pic of a repeating wallpaper pattern online and resized it to scale and printed it on a color laser printer. I then trimmed the room simply with more of the stir sticks (corner trim is balsa) and stained them with the markers.
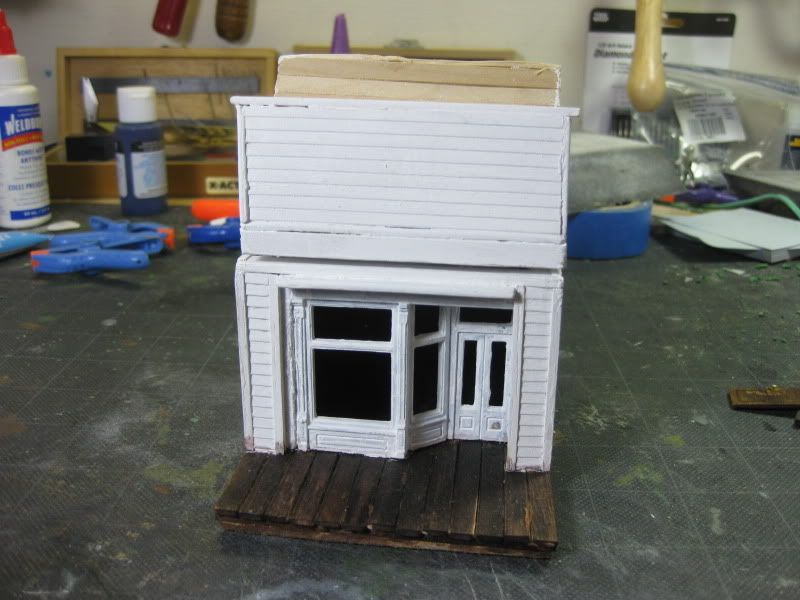
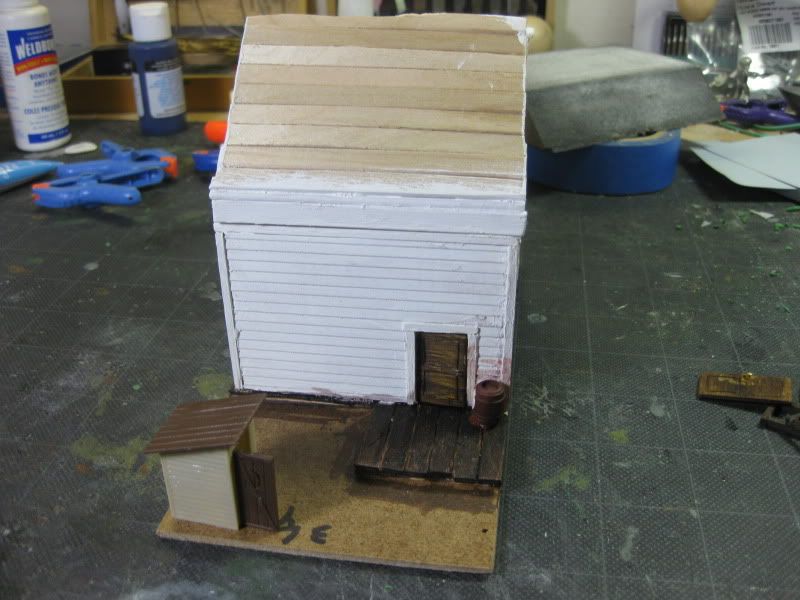
Here it is as it is now, still some work to do though.
|
|
|
|
2011/09/21 15:03:43
Subject: Re:Scratchbuilt 20mm building blogness (9/21 old west modular)
|
|
Decrepit Dakkanaut
|
Thanks for al lthe praise guys, very much appreciated. I didn't know anyone would be interested in this stuff. I hope it does inspire.
|
|
|
|
2011/09/21 15:11:40
Subject: Scratchbuilt 20mm building blogness (9/21 old west modular)
|
|
Decrepit Dakkanaut
|
Oh and I need to mention a little bit about the 3-in-1 advanced craft glue in the pictures...this stuff is amazing, out of the bottle, it is like hot glue, but instead of being activated by heat, it is activated by air. So it works just like hot glue (strings and all) but once it is dried, holds like hot glue.
|
|
|
|
2011/09/21 16:24:16
Subject: Scratchbuilt 20mm building blogness (9/21 old west modular)
|
|
Decrepit Dakkanaut
|
FearPeteySodes wrote:
What are the advantages to the hot glue?
very strong hold, quick set time, and it seems like the only thing that works on spongy things like Woodland Scenics products without falling off the first time you bump it.
|
|
|
|
2011/09/21 20:32:18
Subject: Scratchbuilt 20mm building blogness (9/21 old west modular)
|
|
Decrepit Dakkanaut
|
HAHA, actually I think that figure is supposed to be gettign shot, but I suppose eating nothing but beans and drinking black coffee would do that to a guy lol
No not liquid Nails, it's called Beacon's 3 in 1 Advanced Craft glue
|
|
This message was edited 1 time. Last update was at 2011/09/21 20:33:17
|
|
|
|
2011/09/21 22:58:03
Subject: Scratchbuilt 20mm building blogness (9/21 old west modular)
|
|
Decrepit Dakkanaut
|
lol, I found this glue at Meijer, which is like a Wal-mart type store, groceries, clothes, and a craft/scrapbooking aisle. The really good white glue I use is Weldbond, it is Canadian made, and I can rarely find it. Automatically Appended Next Post: _____________
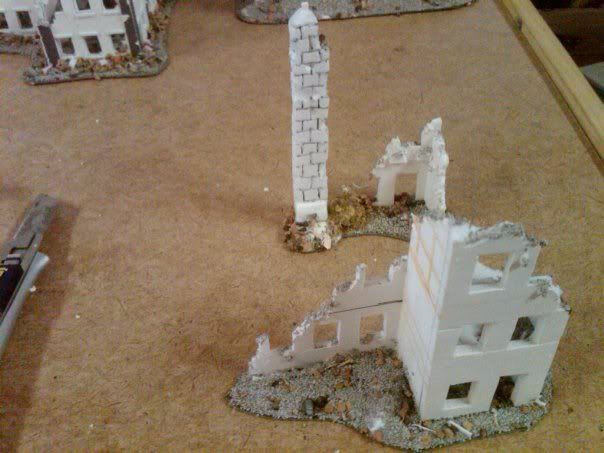
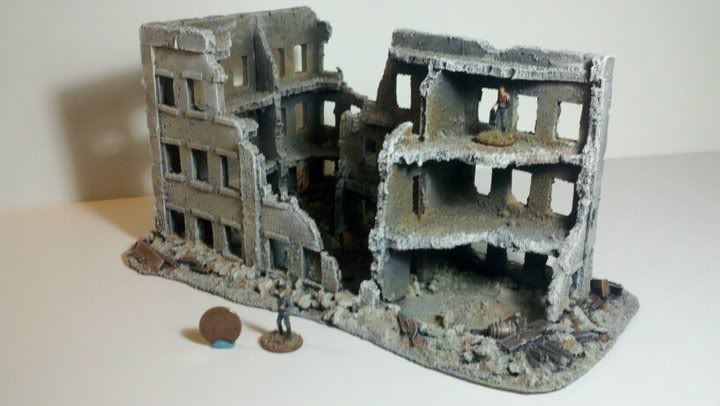
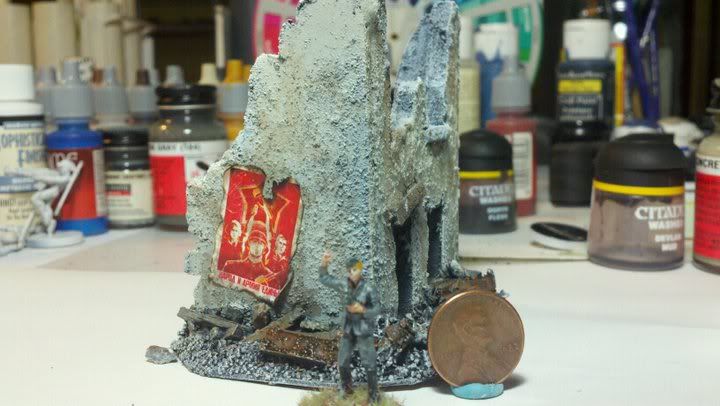
Basic mod
Example: ruined house
_____________
I forgot about this one until I found the photos, but it started the Stalingrad project (which drove me knucking futs by the time it was done).
It is just the basic shell construction, smashed and rubbelized
ANyone interested in seeing Stalingrad?
|
|
This message was edited 1 time. Last update was at 2011/09/22 00:27:06
|
|
|
|
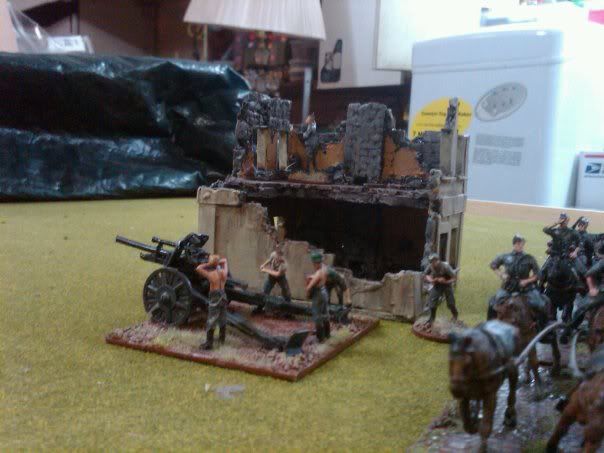
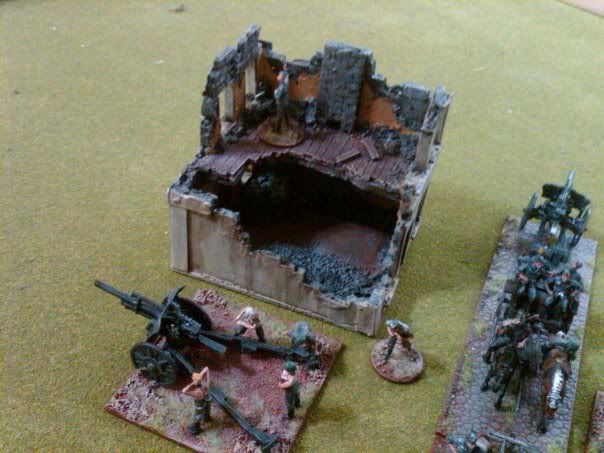
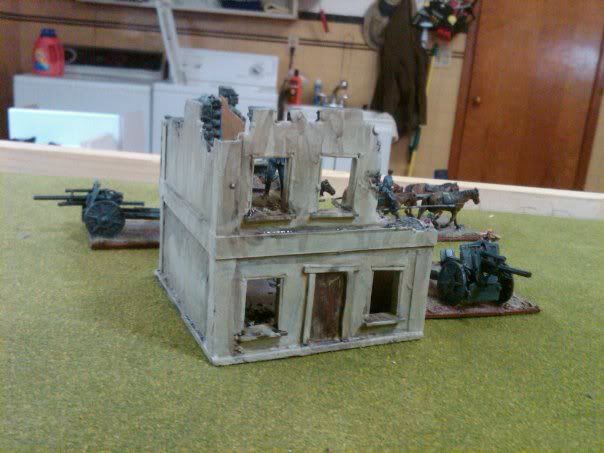
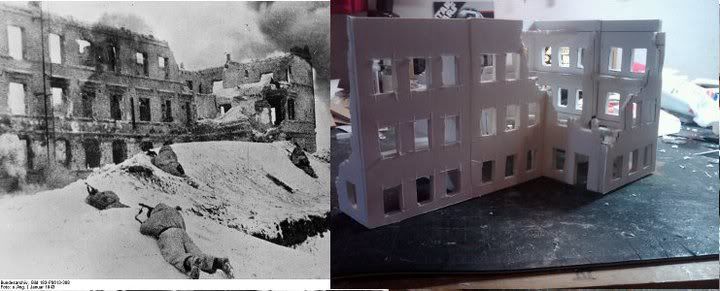
2011/09/22 15:12:29
Subject: Re:Scratchbuilt 20mm building blogness (9/22 Ruins of Stalingrad)
|
|
Decrepit Dakkanaut
|
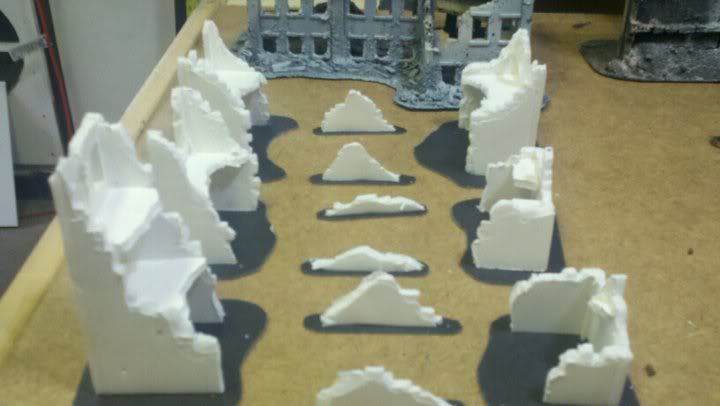
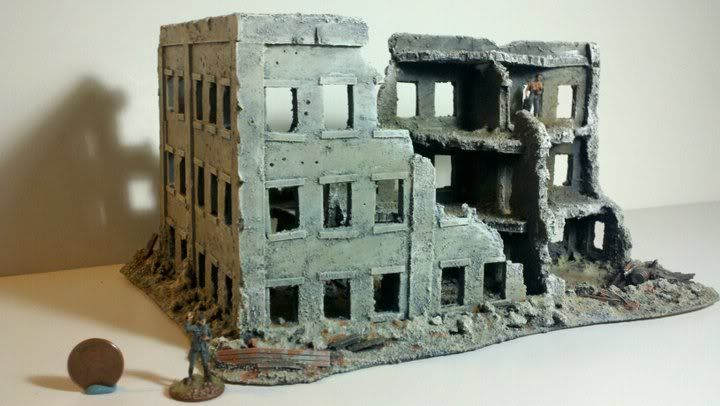
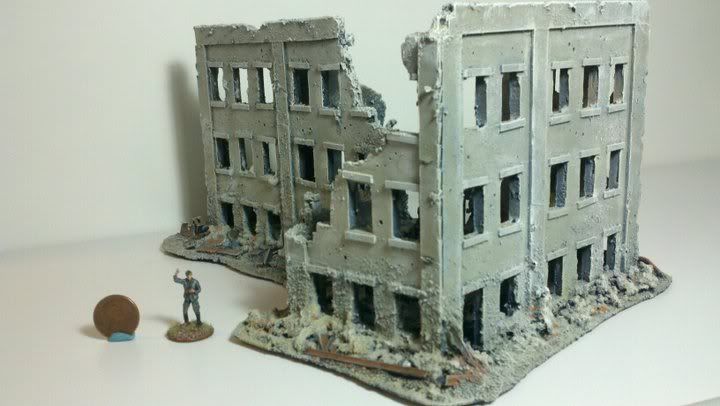
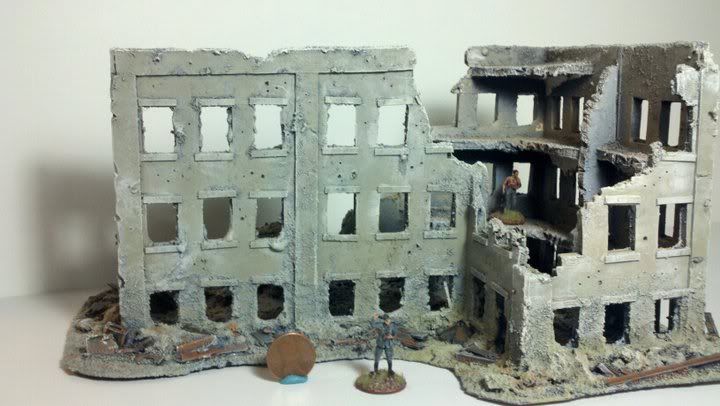
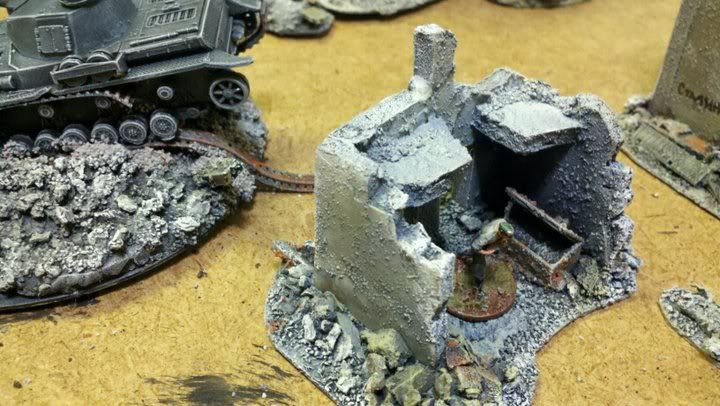
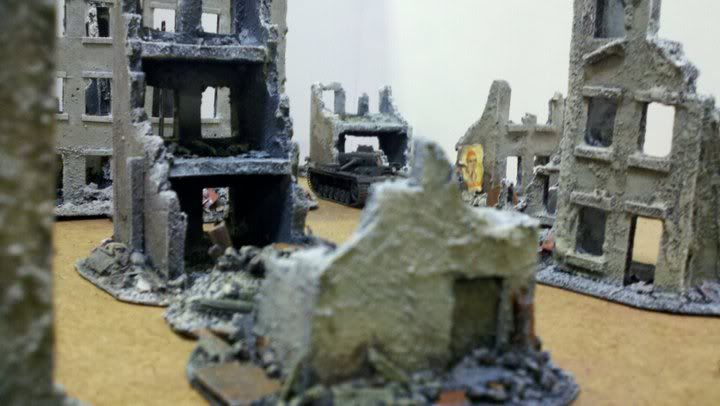
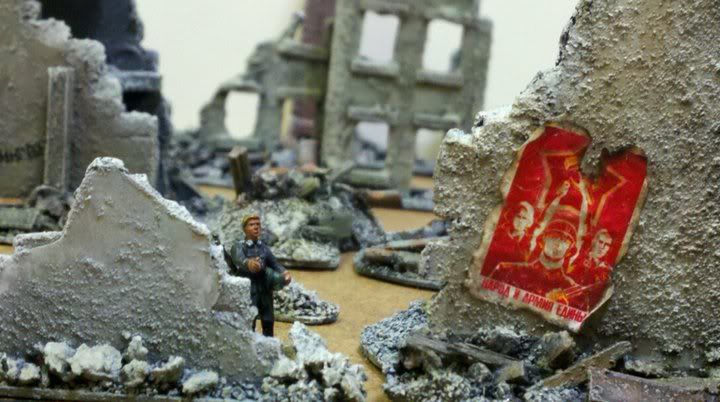
_______________________________
An exercise in repetitive madness
Example: 2x2' Stalingrad table
_______________________________
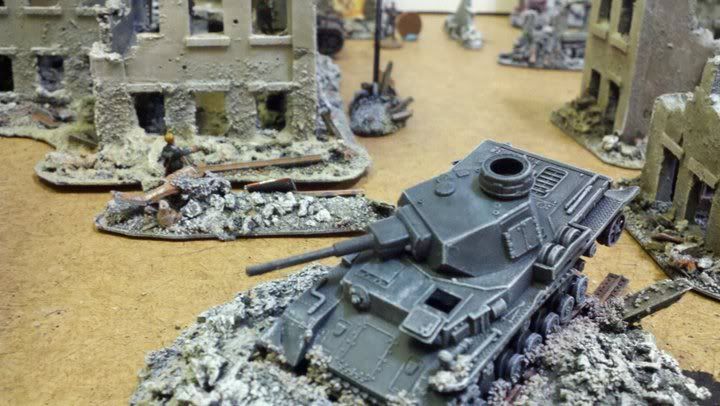
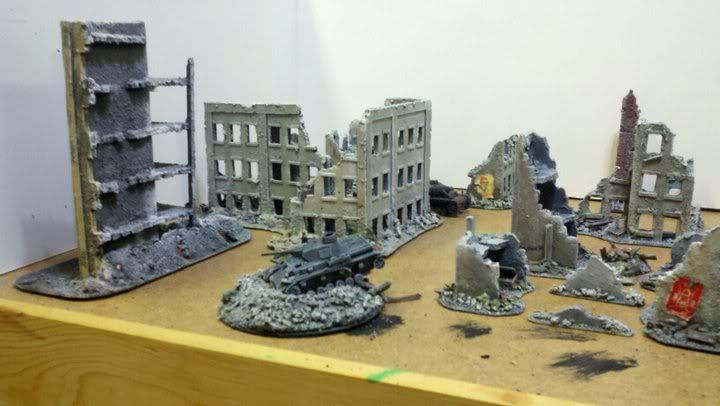
This project was the evolution of the ruins project, but instead of concentrating on making pretty, romantic LOS blocking buildings, these needed to be gaming-functional first and foremost. Good thing, since the real Stalingrad of 1943 was not only bombed repeatedly, but burnt, then the rubble was fortified and booby-trapped and defended. The project began with a lot of research. I wanted the 2x2' table to have 2 main large buildings to become potential strongholds or objectives in any given game. So I looked at pictures of the real Stalingrad and used my templates to approximate the shape in foamcore.

Once constructed, and the sparse architectural details that may have survived bombing and burning were added and more damage added, an unholy mess of sand, dirt, cork, kitty litter, flocks, foam, sprue, railroad gravel, and HO scale bitz were added in multiple layers of strong Weldbond glue. I didn't have time to be repairing loose rubble after the fact, so I used the good stuff.


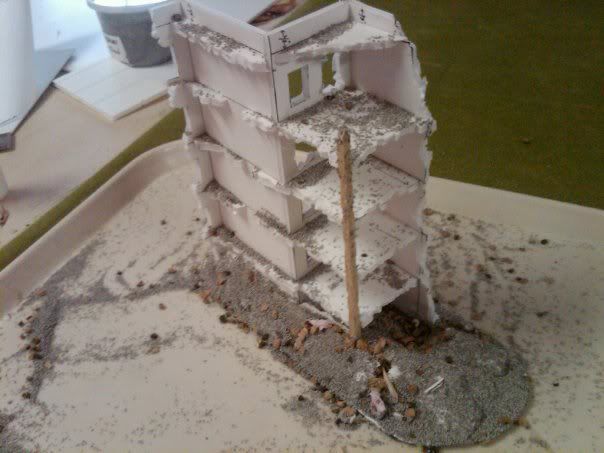
Here are some WIP shots from the smaller, filler ruins.
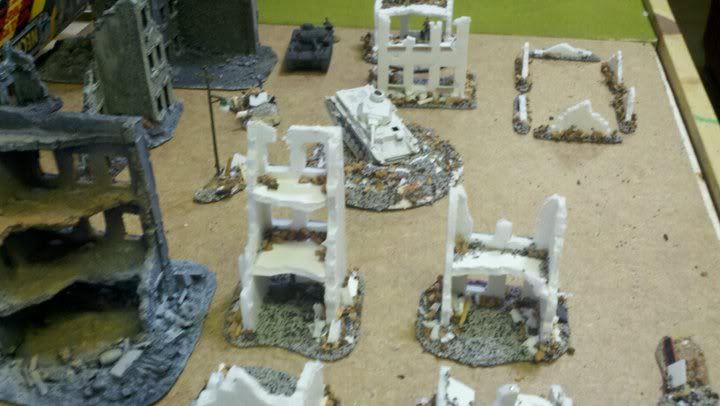
And final, painted shots.

|
|
This message was edited 1 time. Last update was at 2011/09/22 15:13:09
|
|
|
|
2011/09/22 17:18:22
Subject: Re:Re:Scratchbuilt 20mm building blogness (9/22 Ruins of Stalingrad)
|
|
Decrepit Dakkanaut
|
RSJake wrote:  HOLY  ! Your Stalingrad is unbelievable! I don't even know where to begin!
You may begin wherever you like sir! and thank you very much 
|
|
This message was edited 1 time. Last update was at 2011/09/22 17:18:39
|
|
|
|
2011/09/22 18:30:40
Subject: Scratchbuilt 20mm building blogness (9/22 Ruins of Stalingrad)
|
|
Decrepit Dakkanaut
|
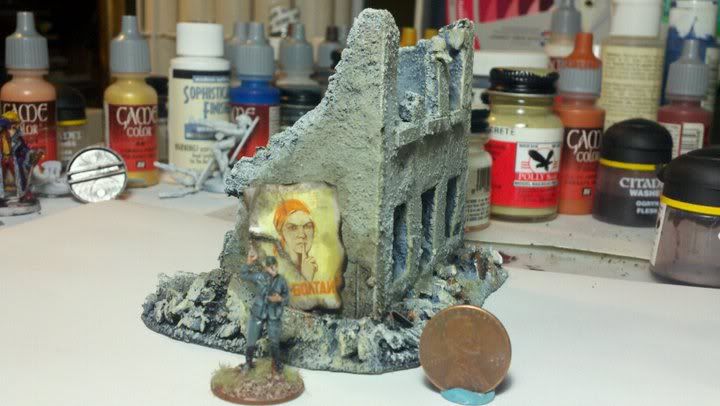
Those were surprisingly easy to do really, just found a real propaganda poster and resized it and printed it. Ruffle the paper, burn the edges with a lighter, and add a little dirty paint water and viola!
|
|
|
|
2011/09/22 19:13:16
Subject: Re:Scratchbuilt 20mm building blogness (9/22 Ruins of Stalingrad)
|
|
Decrepit Dakkanaut
|
Honestly, I'm really not being modest here, but when you spend as much time with a project as I did this one, and really pour effort into it after a while, it all starts to look alike to you. This was my first real commission project too so to speak, I got paid for it, and whenever you are in that position with a customer, they put time and quality pressures on you. It becomes sort of less fun to do when that happens, so what I *wanted" to do was really go over the top like in the European houses, but the customer wanted it on a deadline, and thought the extra detail was unnecessary which forced me to go against my natural creative process. I'm glad it looks great, but this is the first time in months that I have even looked at the pictures, and I can't help but see parts that just look unfinished or hurried to me. I guess the real test is to see what other people see as unfinished or hurried, and if I don't hear of any, well then I guess it's just my own personal neurosis I have to deal with and I just need to learn to "kill my darlings" in the end. Thank you Vik, I really do appreciate it.
|
|
|
|
2011/09/22 19:46:04
Subject: Scratchbuilt 20mm building blogness (9/22 Ruins of Stalingrad)
|
|
Decrepit Dakkanaut
|
OMG Vik, you can't hurt my feelings, I'm pretty thick-skinned. But I am very glad you see that *something* that is lacking too, that means you are being honest with me, and I like that. He wasn't really a jerk about it, but he wanted to show them off for a game he was planning on running with them, so I can understand that. He kept asking when he could pick them up, which made me feel the pressure to cut a few corners here and there (pun intended). He acted as if the extra detail I added to the other buildings was completely unnecessary, that was unnerving.
|
|
This message was edited 1 time. Last update was at 2011/09/22 19:56:37
|
|
|
|
2011/09/22 20:19:08
Subject: Re:Scratchbuilt 20mm building blogness (9/22 Ruins of Stalingrad)
|
|
Decrepit Dakkanaut
|
meh...in the end I got paid to build stuff and the bonus of peeps enjoying the photos. win win
|
|
|
|
2011/09/23 00:53:33
Subject: Re:Scratchbuilt 20mm building blogness (9/22 Ruins of Stalingrad)
|
|
Decrepit Dakkanaut
|
|
|
|
|
2011/09/23 17:34:52
Subject: Re:Scratchbuilt 20mm building blogness (9/22 Ruins of Stalingrad)
|
|
Decrepit Dakkanaut
|
No clairvoyance or magic hat here man, just the ravings of a lunatic taken out on foam Microsoft Visio, it is a handy drawing program that's like a big, interactive pad of graph paper. I've also used it to design and build (but never finished) a modular trench system for 28mm .
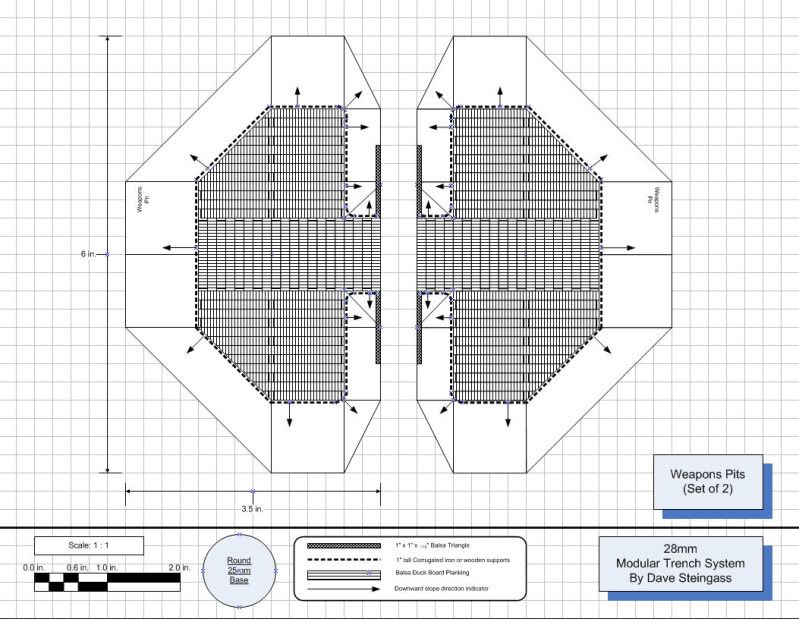
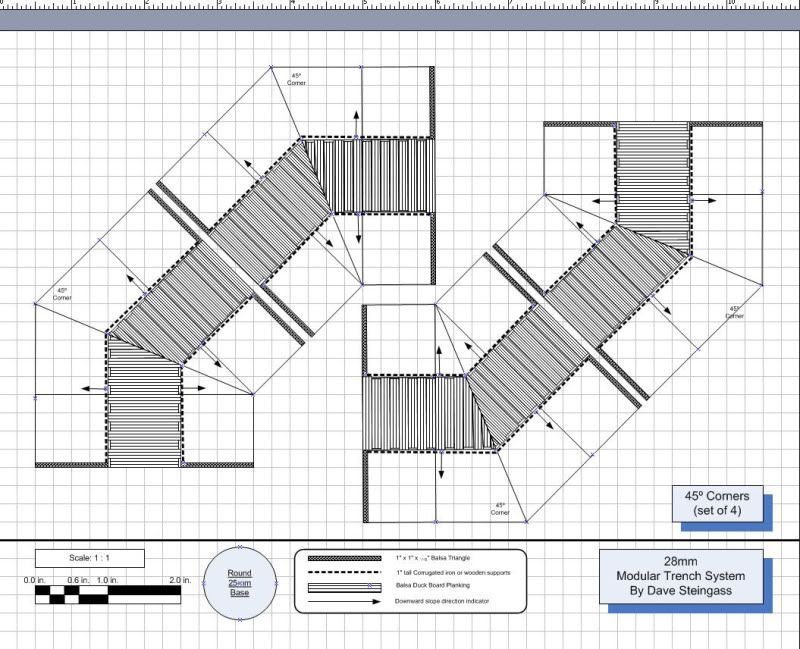
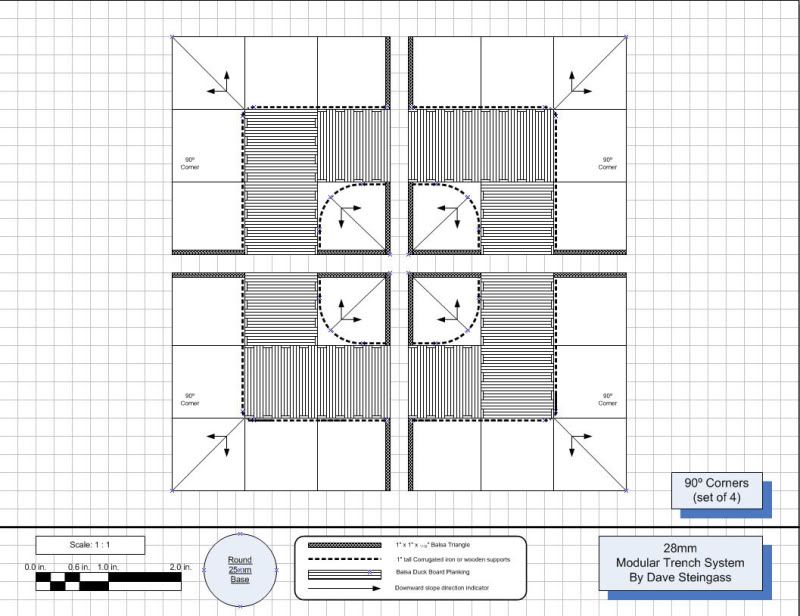
I'll have to dig them out and show pics of how far I got. Most of the sections are built, I just never finished doing the groundwork on them.
I have more unfinished projects and half-baked ideas than I have finished projects though, I've just cunningly shared the few that are actually finished. I don't want to compete with Hirst, their stuff is awesome, I don't know why I didn't buy some of their molds at GenCon when I was there.
|
|
This message was edited 1 time. Last update was at 2011/09/23 17:35:19
|
|
|
|
2011/09/23 19:50:55
Subject: Re:Scratchbuilt 20mm building blogness (9/22 Ruins of Stalingrad)
|
|
Decrepit Dakkanaut
|
|
|
|
|
2011/09/23 20:42:54
Subject: Re:Scratchbuilt 20mm building blogness (9/22 Ruins of Stalingrad)
|
|
Decrepit Dakkanaut
|
It's a Cricut Expressions http://provocraft.com/products/detail.php?cl=cricut&scl=expression&cat&item=29-0300
How I came about it is a rather long story involving an ex-girlfriend that is best told over a few beers
But basically, they sell these little ROM cartridges with different designs but I basically hacked it with some software that lets me cut any vector graphic I can create....another long story.
It works like an inkjet printer, but instead of a printhead it has a sharp knife bit (I bought a couple of the heavy duty blades for it) at this place called Michaels craft store, which I think I've mentioned before, and I think Vik now sees in his head as this wonderland filled with a hobbyists wet dream 
You attach your stock plastic or paper to this sticky cutting mat that holds it as the tray moves in and out. Here is a super-cheesy video
http://www.youtube.com/watch?v=d5r7U5yAOyU&feature=related
Automatically Appended Next Post:
WOOT!
Nothing better than getting home from work on a friday to find that your Micro Mark BOGO sale box on the porch!
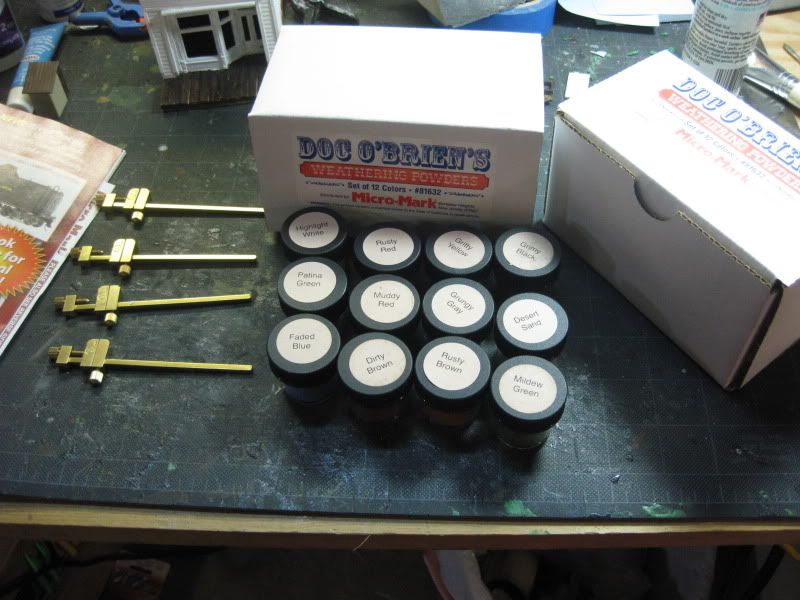
2 boxes of Doc O Brien's weathering powders and 4 brass bar clamps.
 hmmmm...I need to use these this weekend now!
and I guess i'll never be buying any of those fancy MiG powders, I seem to have a lifetime supply here
|
|
This message was edited 2 times. Last update was at 2011/09/23 21:11:30
|
|
|
|
2011/09/23 21:33:03
Subject: Scratchbuilt 20mm building blogness (9/22 Ruins of Stalingrad)
|
|
Decrepit Dakkanaut
|
HAHA, the clamps are just for general gluing duties, gotta have clamps! Yes it connects via USB, but it has a huge learning curve to it, takes some practice to get to cutting exactly what you want. That is why I want to spend more time with it. Sometimes, you still need to use a knife to get thin bits out, the blade might not penetrate through your stock onto the cutting mat if you don't have the depth and pressure set right but the precision is much better than I can repeat whilst wielding a knife as well as the added bonus that it can make perfect duplicate parts (or layers) of detail, like you said Vik.
|
|
|
|
2011/09/23 22:07:32
Subject: Scratchbuilt 20mm building blogness (9/22 Ruins of Stalingrad)
|
|
Decrepit Dakkanaut
|
Just think of the steam castle you can build with one of these Vik!
|
|
This message was edited 1 time. Last update was at 2011/09/23 22:07:52
|
|
|
|
2011/09/23 22:16:11
Subject: Scratchbuilt 20mm building blogness (9/22 Ruins of Stalingrad)
|
|
Decrepit Dakkanaut
|
This is an older model now, you can get ths one for US$150 or so. It's the wider model too, they make a smaller tabled one for le$$.
|
|
|
|
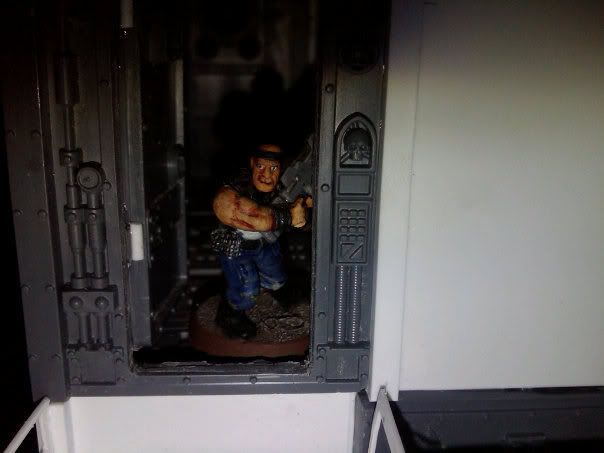
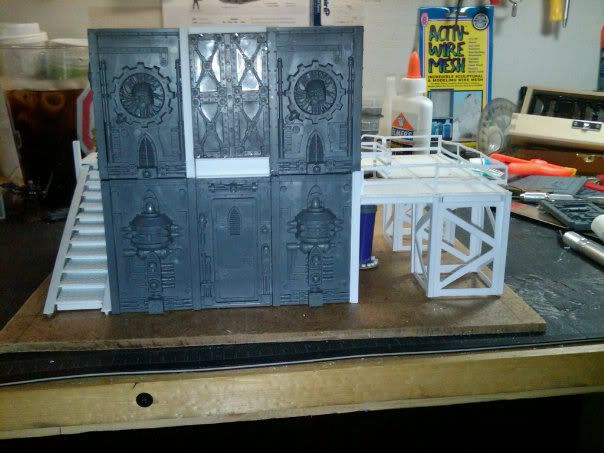
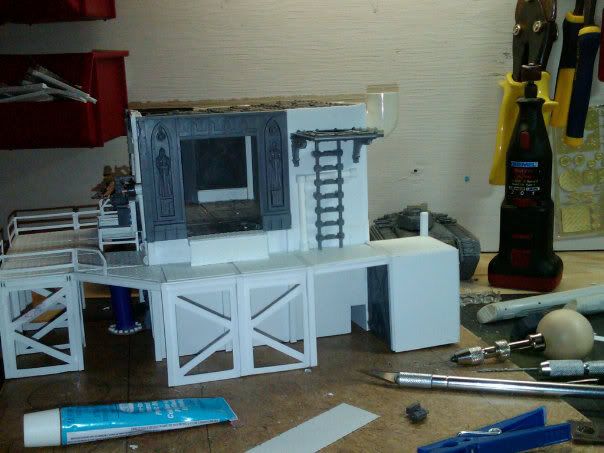
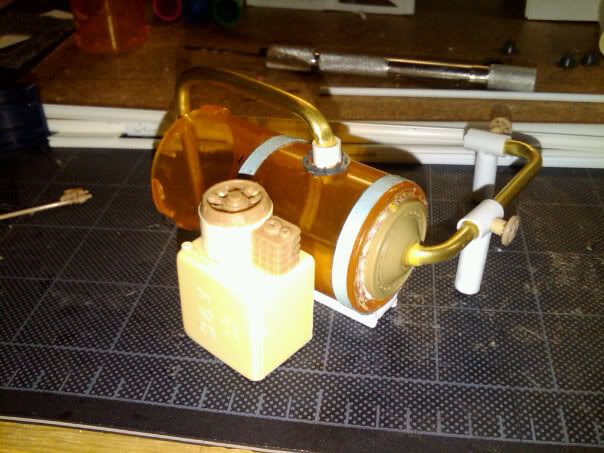
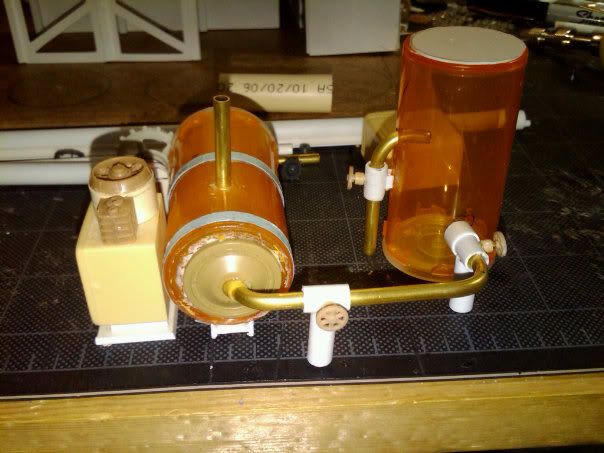
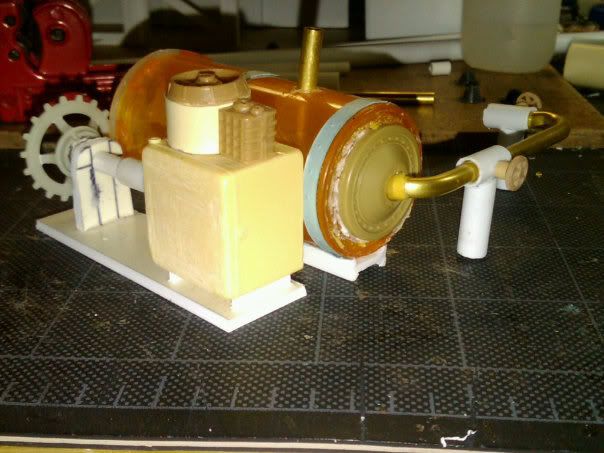
2011/09/24 13:36:44
Subject: Re:Scratchbuilt 20mm building blogness (9/24 Departmento Munitorum Washing Machine)
|
|
Decrepit Dakkanaut
|
|
|
|
|
2011/09/24 15:02:55
Subject: Scratchbuilt Buildings and Terrain (9/24 28mm Departmento Munitorum Washing Machine)
|
|
Decrepit Dakkanaut
|
Thanks, I use either old fashioned testors in the blue tube or Plastic weld. For joining dissimilar materials I use the purple CA (medium gap filling super glue) from my FLHS Phil's Hobby Shop in Fort Wayne, IN (plug em, ya never know)
Vik, do you have anything locally that does framing? Foam core is always in the framing section for me.
|
|
This message was edited 2 times. Last update was at 2011/09/24 15:04:44
|
|
|
|
2011/09/24 15:46:03
Subject: Re:Scratchbuilt Buildings and Terrain (9/24 28mm Departmento Munitorum Washing Machine)
|
|
Decrepit Dakkanaut
|
Maybe this will help Vik? http://www.worldworksgames.com/forum/viewtopic.php?t=7651&sid=1cf845562c548d029fe673968d51ef0c
I use PVA too, I prefer the super-duty stuff though, weldbond. I thin it with water and then brush it over the carved foam, once it dries clear, you can spray it with a rattlecan.
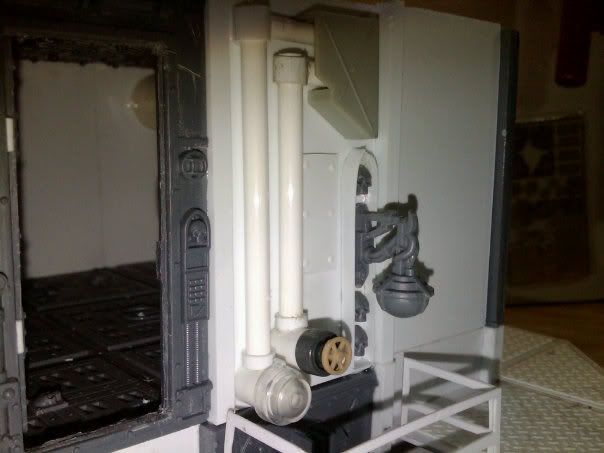
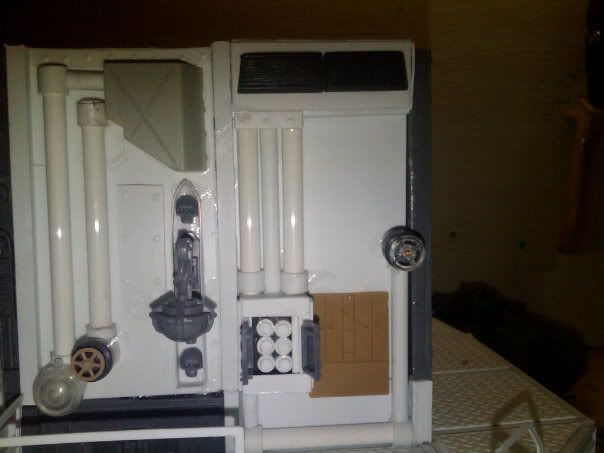
No, not construction framing, but picture framing. Automatically Appended Next Post: Primed.
|
|
This message was edited 3 times. Last update was at 2011/09/24 19:29:38
|
|
|
|
2011/09/24 20:25:21
Subject: Scratchbuilt Buildings and Terrain (9/24 28mm Departmento Munitorum Washing Machine)
|
|
Decrepit Dakkanaut
|
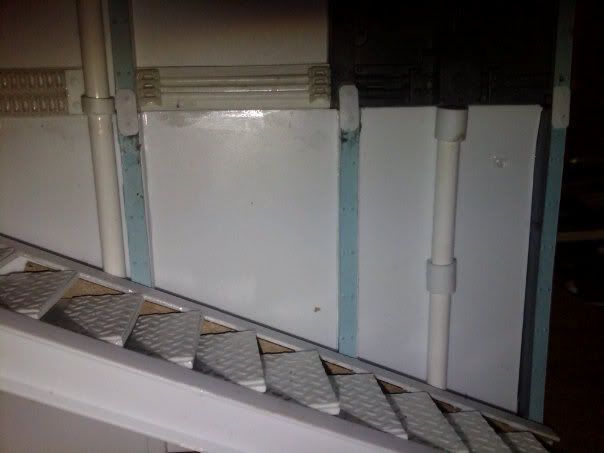
Yes foamcore is usually used as the backer in picture frames.
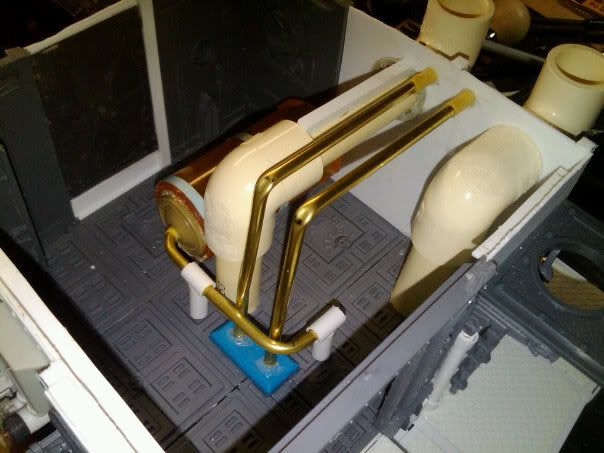
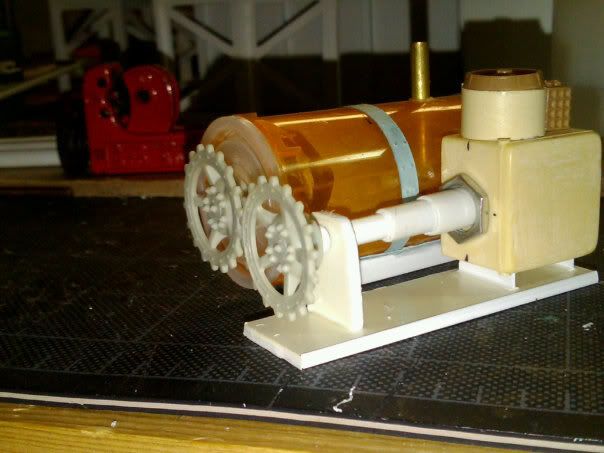
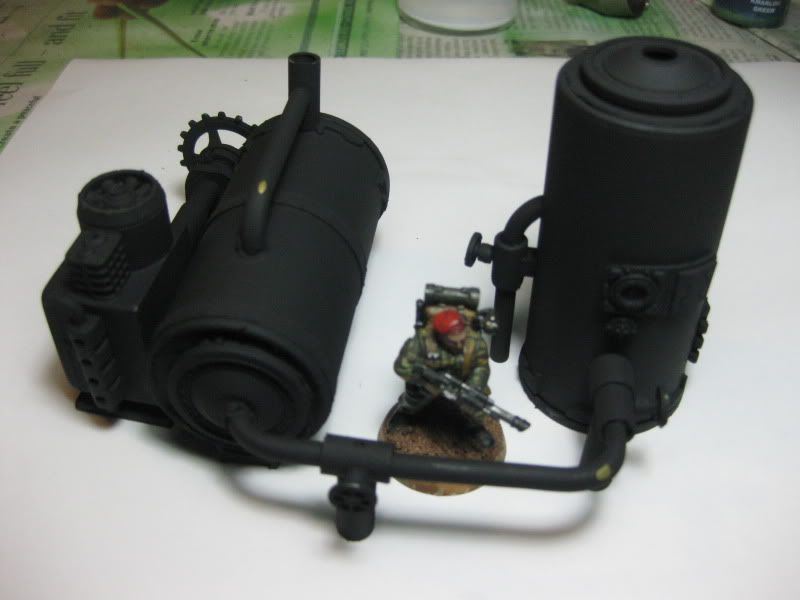
Yep an exhaust pipe from an old rhino.
Automatically Appended Next Post:
The Buckeyes won, it was a long, kind of boring game. I'm sort of uninspired now hobby-wise though.
|
|
This message was edited 2 times. Last update was at 2011/09/24 23:35:54
|
|
|
|
|
|