| Author |
Message |
 |
|
|
|
|
Advert
|
Forum adverts like this one are shown to any user who is not logged in. Join us by filling out a tiny 3 field form and you will get your own, free, dakka user account which gives a good range of benefits to you:
- No adverts like this in the forums anymore.
- Times and dates in your local timezone.
- Full tracking of what you have read so you can skip to your first unread post, easily see what has changed since you last logged in, and easily see what is new at a glance.
- Email notifications for threads you want to watch closely.
- Being a part of the oldest wargaming community on the net.
If you are already a member then feel free to login now. |
|
 |
2012/11/04 06:06:20
Subject: Nowlan's IG force- I made an art! (Updated 5/15, Finished Projects)
|
|

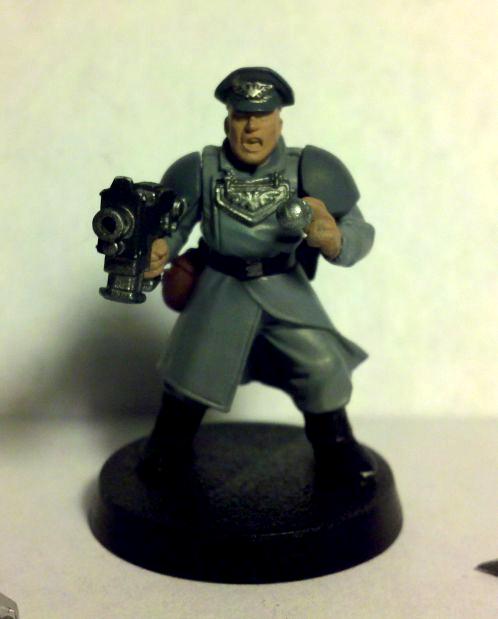
Hurr! Ogryn Bone 'Ead!
|
So I've been working on my force for what seems like an eternity, making little progress as classes, playing on 2 adult hockey teams, and my dogs take up the majority of my time. However, lately I've been able to make some progress, so I'm starting this thread to hopefully get some feedback on what I've done, and maybe keep me on task.
All photos are taken with my phone (droid X) and cropped/resized, so please excuse any lousy quality.
A little background on my force:
I opted for IG because I've always been a fan of combined arms and mechanized forces. I've been into 1/35th scale models off and on since I was a kid, so WH40k isn't my first foray into painting miniatures. That being said, my color schemes are largely based off German WWII camo. I enjoy their uniform and armor/aircraft camoflage schemes, and I'm already have a fair bit of reference material to go off of, so it was a pretty simple choice.
And now, in no particular order: pictures.
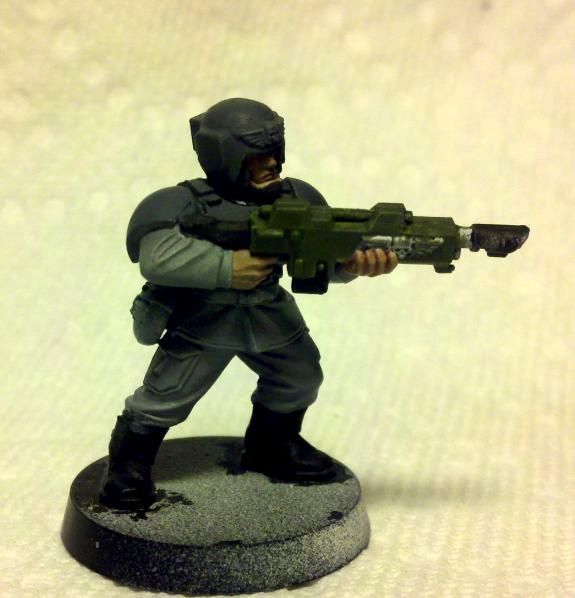
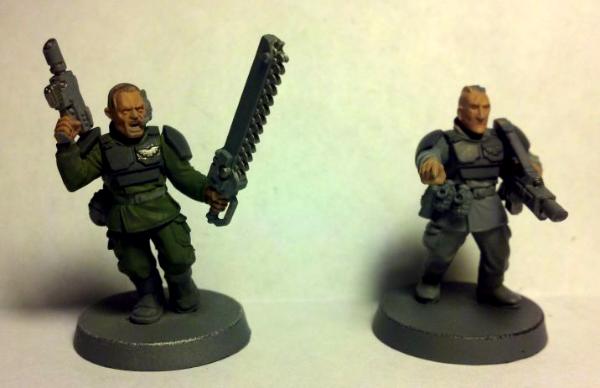
Infantry color scheme.
This was just a quick 10min paint job to try out colors (sloppy painting, no details). This is the scheme that won. Model has since been stripped and is back in the production queue.
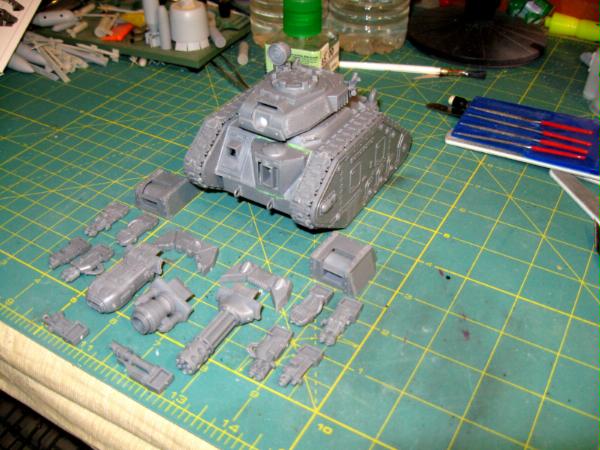
 LR Demolisher
. Status: Assembled, magnetized, not primed.
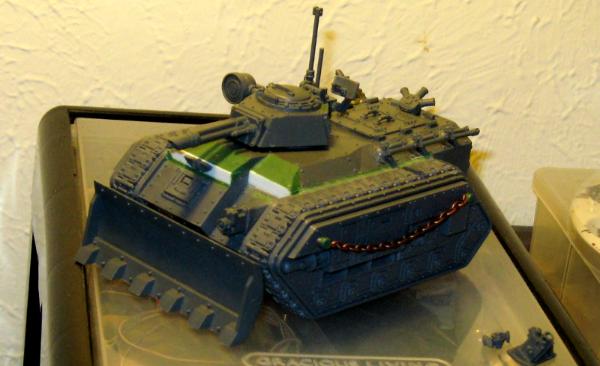
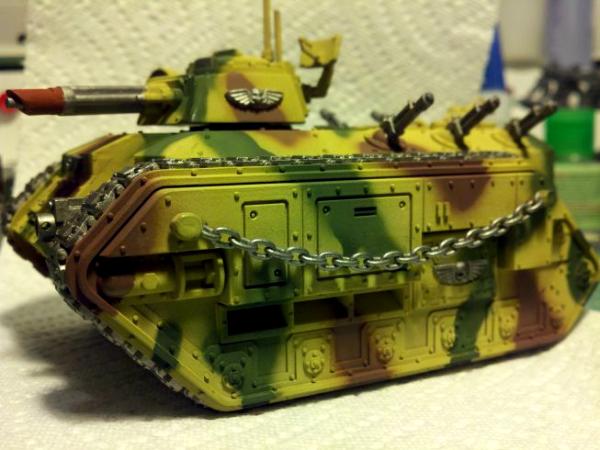
 Chimera
 (assigned to company command squad). Turret weapons magnetized.
Assembled. Can see the slight modification done to the hull. Given how this turned out I'll likely do it to any further chimeras. If anyone is interested, I can give a description of how it was done.
The chain was to make it stand out as the CCS chimera, like the cords on military dress uniforms.
Base color applied. Tamiya XF60 Dark Yellow
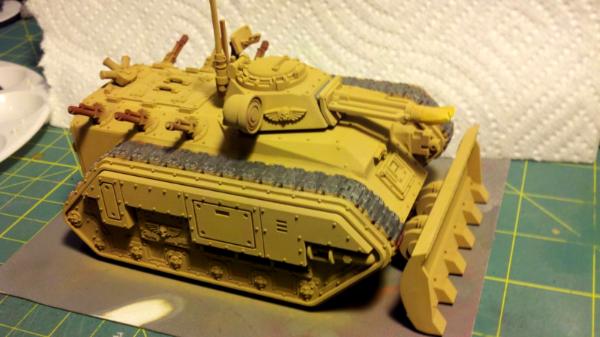
Stage 1 of camo application. Tamiya XF61 Dark Green. Done freehand with airbrush. I later went back and revised it after applying the next color.
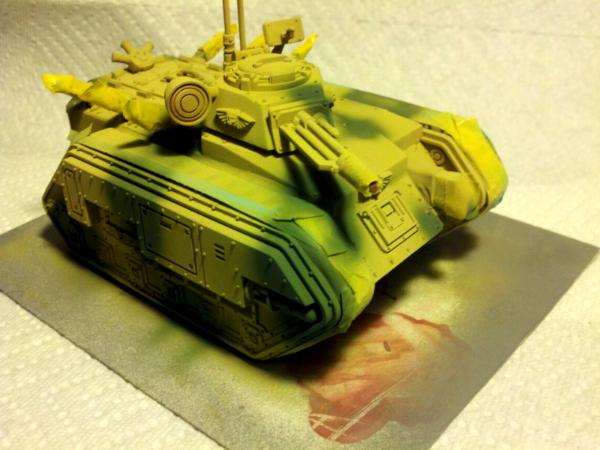
Stage 2 of camo application. Tamiya XF64 Red-Brown

Detailing in progress.
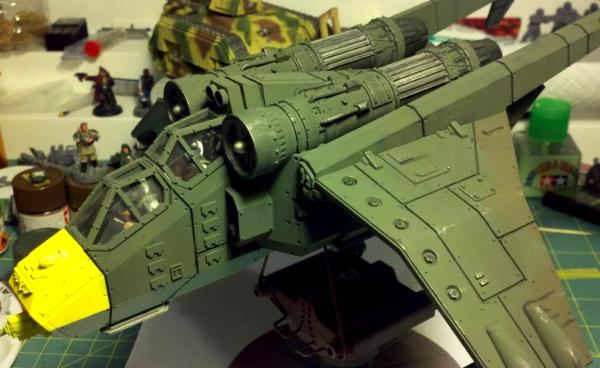
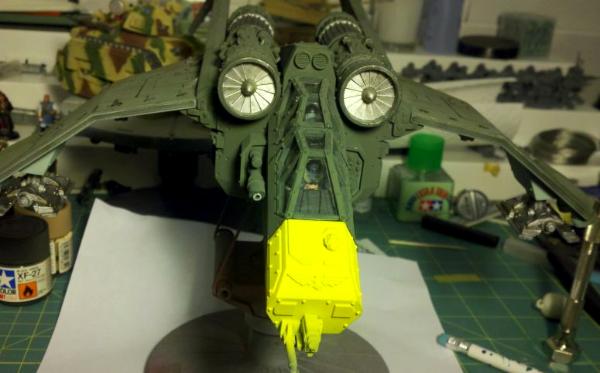
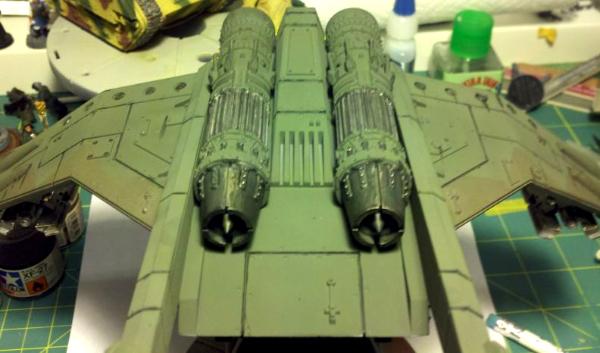
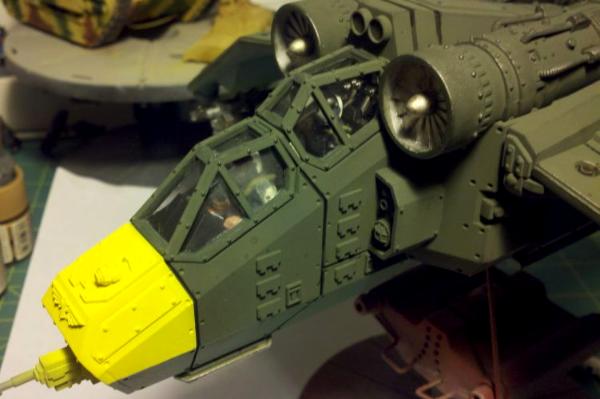
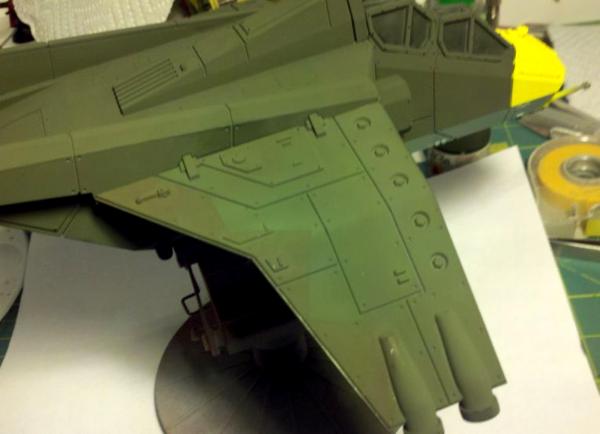
 Valkyrie #1
Cockpit (angle 1). I didn't bother putting too much detail into the cockpit, I don't really plan to remove the canopy much.
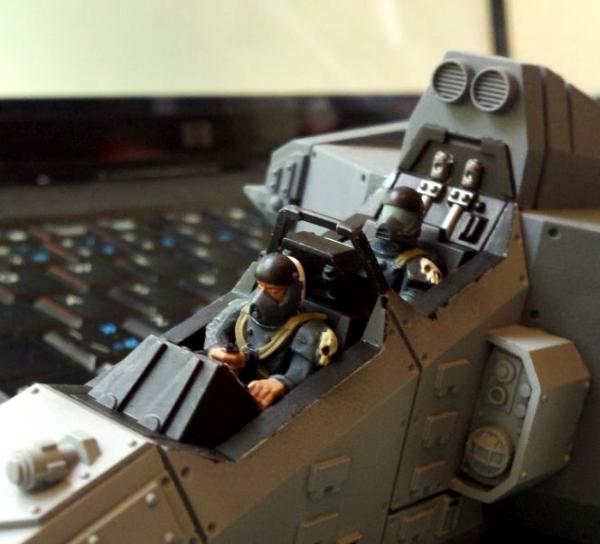
Different angle.
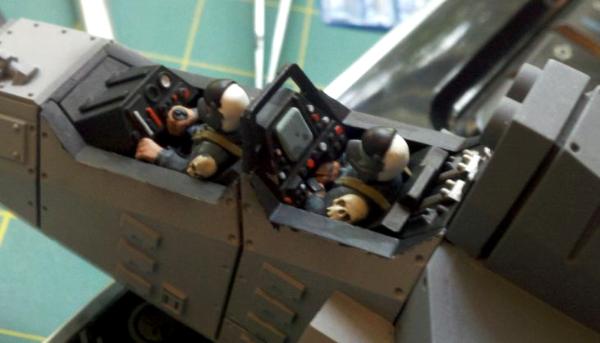
Fuselage assembled and primed. Engines are a different color because I ran out of primer and switched to a different (much less expensive) kind. They're not currently attached for ease of painting. Wings will remain removable for easier storage/transport. Cockpit windows are masked with liquid masking agent.
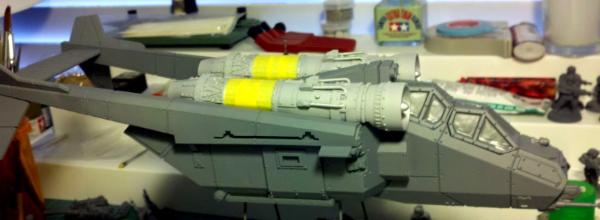
Primary colors complete.
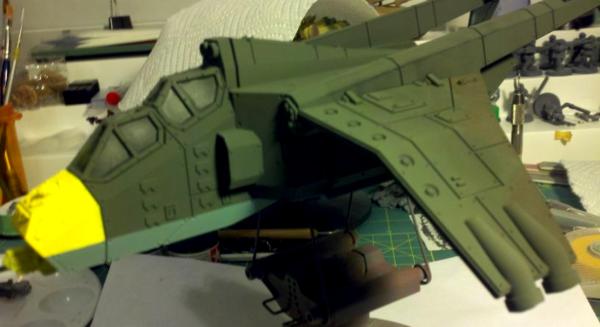
Alternate angle.
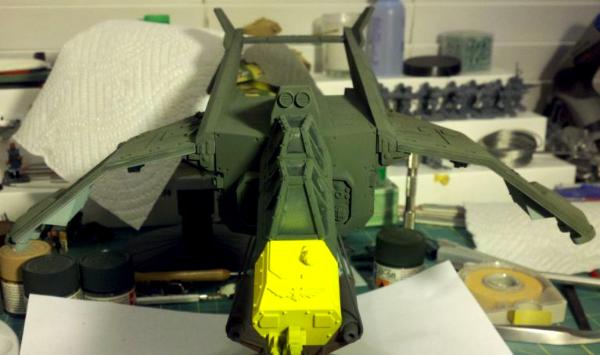
Alternate angle. Shows trailing wing edge camo pattern. Not pleased with the amount of contrast between the colors, but it may change when I put sealer on it. Not sure if I care enough to redo it.
Alternate angle. Underside.
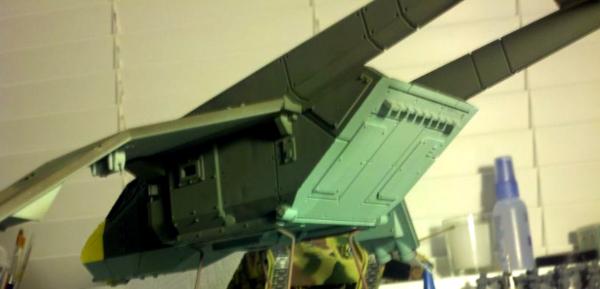
I could've sworn I had taken pictures of the interior before putting the top on. Guess I don't, oh well.
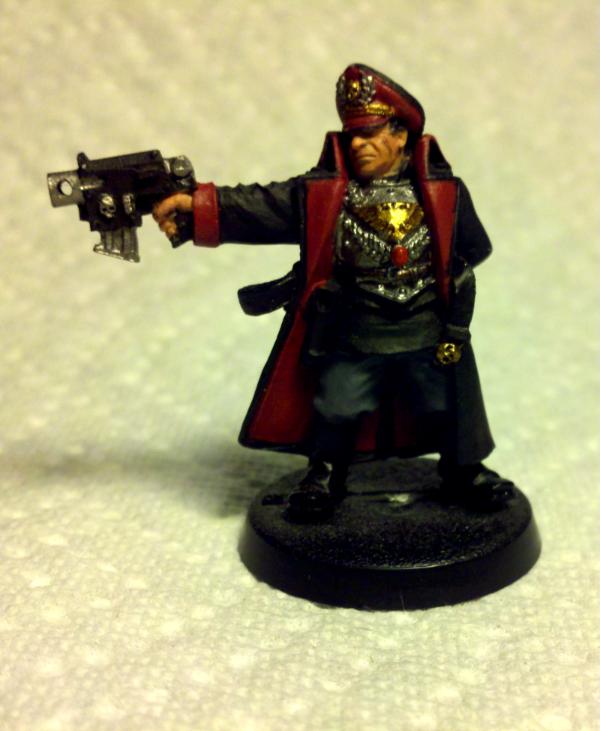
Commissar. Every blob needs an anchor, right?
Still in progress. Needs detailing.
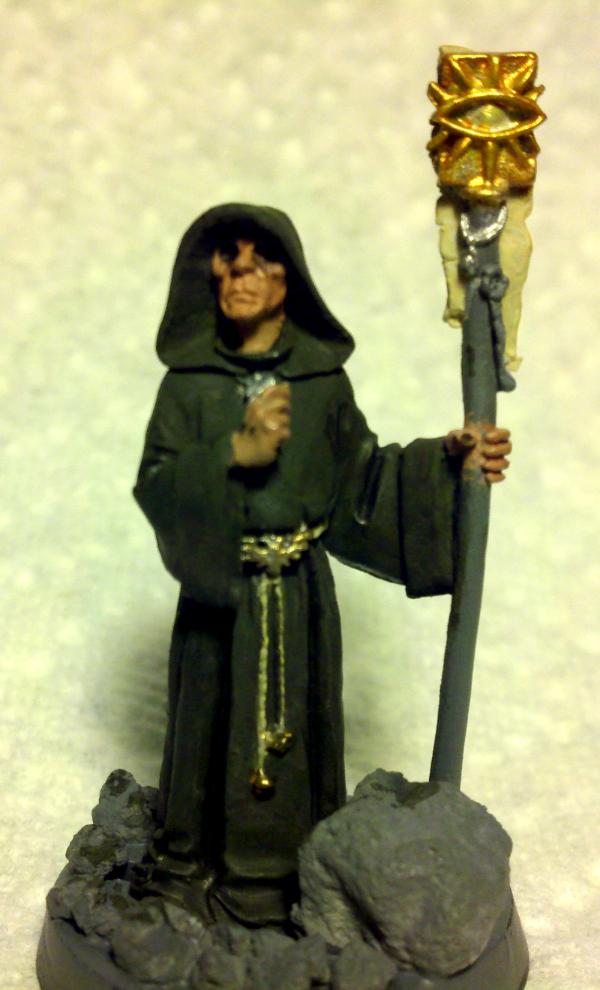
 Astropath.
 Reserves by turn three, or your pizza's free.
WIP. Needs detailing.
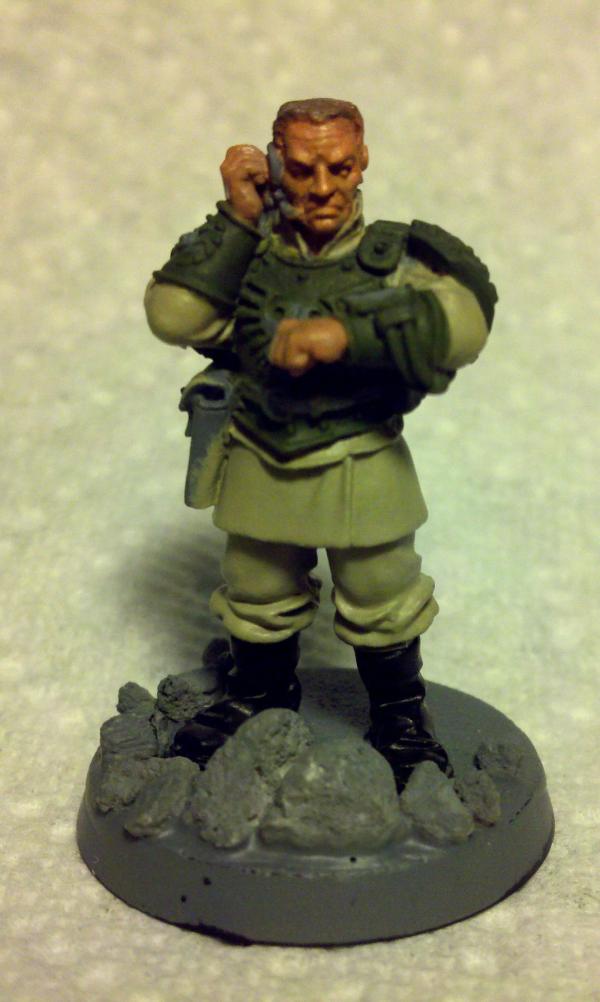
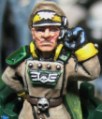
 Master of Ordinance.
 Pie plates for everyone!
Still very WIP.
 Officer of the Fleet.
 You don't need no stinkin' reinforcements.
WIP. Detailing in progress. I like this model, his face has arrogance written all over it.
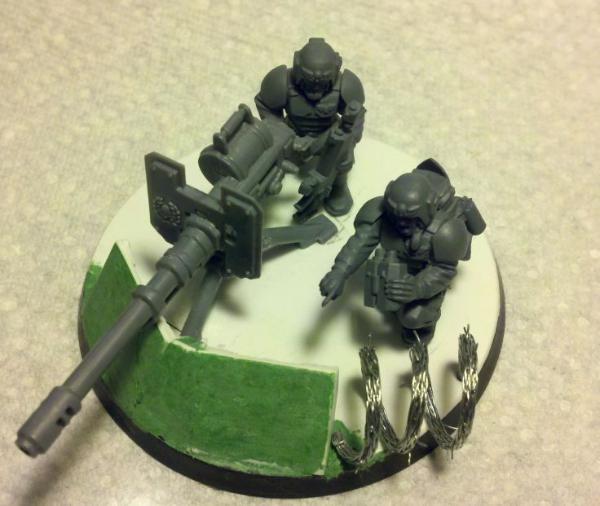
 Heavy Weapons Squad #1
Weapon is swapable between AC, LC, and HB (not that the HB will ever see use). Barbed wire is picture hanging wire, with individual strands cut and bent outwards.
Anyway, that's all I have pictures uploaded for at the moment. Will be updating as I make progress.
Feel free to comment/critique or make suggestions.
|
|
This message was edited 9 times. Last update was at 2013/05/16 00:35:48
 - Assembling first army. - Assembling first army.
 Nowlan's IG Army in progress Nowlan's IG Army in progress
 Thin your paints, drill your gun barrels, remove all mold lines. The Emperor wills it. Thin your paints, drill your gun barrels, remove all mold lines. The Emperor wills it. |
|
|
 |
|
2012/11/06 09:07:41
Subject: Nowlan's IG force (a long time in the making)
|
|

Pyromaniac Hellhound Pilot
|
These are looking great, I'm looking forward to seeing more progress when Hockey permits!
|
My combined Macragge PDF Imperial Guard and Ultramarine 3rd Co. Blog Clicky
My WAB Hundred Years War English Clicky
AlexHolker wrote:At this stage, I'm starting to think GW's CEO was just getting ready for the Rapture
|
|
|
|
|
2012/11/07 23:21:00
Subject: Re:Nowlan's IG force (a long time in the making)
|
|
Hurr! Ogryn Bone 'Ead!
|
|
- Assembling first army.
Nowlan's IG Army in progress
Thin your paints, drill your gun barrels, remove all mold lines. The Emperor wills it. |
|
|
|
|
2012/11/08 03:48:53
Subject: Nowlan's IG force (a long time in the making)
|
|
Rough Rider with Boomstick
Gunblaze West
|
you could put some tyranid bits in the front and model gore flying out the back of the engine
|
 Kilkrazy wrote: Kilkrazy wrote:We moderators often make unwise decisions on Friday afternoons.
 kestril wrote: kestril wrote: Page 1: New guard topic
Page 2: FW debate
Page 3: Ailaros and Peregrine fight. TO THE DEATH
I swear I think those two have a hate-crush on each other sometimes.
|
|
|
|
|
2012/11/08 06:17:13
Subject: Nowlan's IG force (a long time in the making)
|
|

Fixture of Dakka
|
Suscribed! I need motivation too.
I like your color schemes since I am a fan of WWII camo.
Your use of more traditional modelling techniques is rarely seen in the Dakka plogs so I think you will get some questions about your camo airbrush work for the Chimera and the liquid masking on the cockpit glass. One traditional technique you haven't used yet is a filter over your vehicle camo to blend it and tone it down.
I hoping to see some weathering and stowage for the vehicles since I need a good kick in the pants to do that for my Cadians.
The commissar and command advisors are WIP so not much to say yet except that I love the GW sculpts for those figs.
|
The secret to painting a really big army is to keep at it. You can't reach your destination if you never take any steps.
I build IG...lots and lots of IG. |
|
|
|
|
2012/11/08 07:49:07
Subject: Nowlan's IG force (a long time in the making)
|
|
Stoic Grail Knight
|
I love it I will watch this.
|
Hydra Dominatus
World Wide War Winner |
|
|
|
|
2012/11/08 20:23:18
Subject: Nowlan's IG force (a long time in the making)
|
|
Hurr! Ogryn Bone 'Ead!
|
 JB wrote: JB wrote:One traditional technique you haven't used yet is a filter over your vehicle camo to blend it and tone it down.
I don't currently have any filters, and I'm wary of mixing my own and potentially ruining the paint job I've already got done. Perhaps once christmas rolls around I'll have the money to spend on some from MIG (and some of their oils too)
|
- Assembling first army.
Nowlan's IG Army in progress
Thin your paints, drill your gun barrels, remove all mold lines. The Emperor wills it. |
|
|
|
|
2012/11/10 16:21:47
Subject: Nowlan's IG force (a long time in the making)
|
|
Fixture of Dakka
|
 Nowlan wrote: Nowlan wrote: JB wrote:One traditional technique you haven't used yet is a filter over your vehicle camo to blend it and tone it down.
I don't currently have any filters, and I'm wary of mixing my own and potentially ruining the paint job I've already got done. Perhaps once christmas rolls around I'll have the money to spend on some from MIG (and some of their oils too)
Don't use a filter until you have tested it to see if you like the overall effect. I like to use GW's old Gryphonne Sepia as a filter for my IG vehicles. I also wash them with Devlan Mud in certain areas. Any wash that is evenly applied over all of the colors that make up the camo pattern will act as a filter. Just make sure it is a wash color that creates a final effect that meets with your approval.

|
The secret to painting a really big army is to keep at it. You can't reach your destination if you never take any steps.
I build IG...lots and lots of IG. |
|
|
|
|
2012/11/10 21:30:31
Subject: Re:Nowlan's IG force (a long time in the making)
|
|
Hurr! Ogryn Bone 'Ead!
|
Need opinions on this.
As I started putting down base colors on infantry, I wasn't quite satisfied with the level of contrast between Adeptus Battlegray flak armor over codex grey fatigues. (pictured right), so I experimented and tried Battlegray armor over field grey (Tamiya XF-65) fatigues, which is their color for WWII german basic combat uniforms.
Is it an inprovement? (both models are still WIP, obviously)
The field grey takes more coats to build up color over the primer I'm using, but I feel the greater contrast and improved depth adds more and looks better overall. Is it worth it. I've only got about 5 troops with the basic dark grey on grey colors done in their first coats, so it wouldn't be too much effort to switch at this point.
|
- Assembling first army.
Nowlan's IG Army in progress
Thin your paints, drill your gun barrels, remove all mold lines. The Emperor wills it. |
|
|
|
|
2012/11/12 20:15:42
Subject: Nowlan's IG force (a long time in the making)
|
|
Hurr! Ogryn Bone 'Ead!
|
No opinions? Oh well, I consulted with a few friends and decided on the field grey (left).
Currently painting 2 squads of grunts assembly line style while I wait till I get a block of time set aside to clearcoat the valkyrie and chimera in order to put decals on and begin weathering.
Busy hockey week, games Monday & Tuesday night and might be subing Saturday. Don't know how much I'll get done.
|
- Assembling first army.
Nowlan's IG Army in progress
Thin your paints, drill your gun barrels, remove all mold lines. The Emperor wills it. |
|
|
|
|
2012/11/13 10:07:24
Subject: Nowlan's IG force (a long time in the making)
|
|
Pyromaniac Hellhound Pilot
|
I like both colours but I think the body armour would look better in black for extra contrast (but that might just be because thats the colour I painted mine.....).
Good luck with the hockey, don't lose any teeth.....
|
My combined Macragge PDF Imperial Guard and Ultramarine 3rd Co. Blog Clicky
My WAB Hundred Years War English Clicky
AlexHolker wrote:At this stage, I'm starting to think GW's CEO was just getting ready for the Rapture
|
|
|
|
|
2012/11/15 00:09:37
Subject: Nowlan's IG force (a long time in the making)
|
|
Hurr! Ogryn Bone 'Ead!
|
Well, my teeth are intact, but I broke the tip of the ring finger on my left hand in last night's game. Cross-checked from behind and hit in the hand with a slapshot while getting up.
Finger's in a splint for the next while, not sure what this means for painting. I should be able to hold infantry by the base with index finger and thumb without issue, but I wont be making any progress on vehicles for a while.
|
- Assembling first army.
Nowlan's IG Army in progress
Thin your paints, drill your gun barrels, remove all mold lines. The Emperor wills it. |
|
|
|
|
2012/11/15 09:40:12
Subject: Re:Nowlan's IG force (a long time in the making)
|
|
Pyromaniac Hellhound Pilot
|
Well if you will play with sticks......
Ouch, get well soon..
|
My combined Macragge PDF Imperial Guard and Ultramarine 3rd Co. Blog Clicky
My WAB Hundred Years War English Clicky
AlexHolker wrote:At this stage, I'm starting to think GW's CEO was just getting ready for the Rapture
|
|
|
|
|
2012/11/18 09:39:56
Subject: Re:Nowlan's IG force (a long time in the making)
|
|
Hurr! Ogryn Bone 'Ead!
|
A bit of progress over the last few days. Been working on infantry since I can't hold vehicles well enough to paint with a broken finger.
Working on getting basic colors done on the 20 or so grunts I've got on the table at the moment.
3 of the grunts.
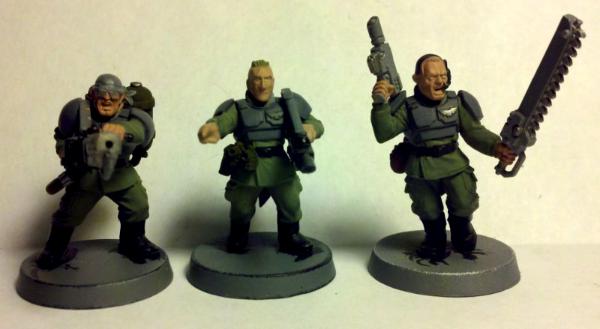
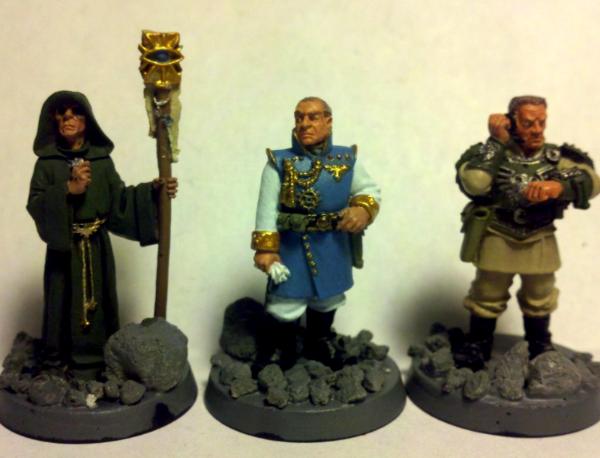
Regimental advisors.
The Officer of the Fleet is awaiting a clearcoat in preparation for weathering. Wont be doing much though, he wouldn't be caught dead in a dirty uniform.
Master Of Ordinance still has his radio unattached for ease of painting.
Astropath just needs a few details on the staff and I'm not satisfied with his eyes yet.
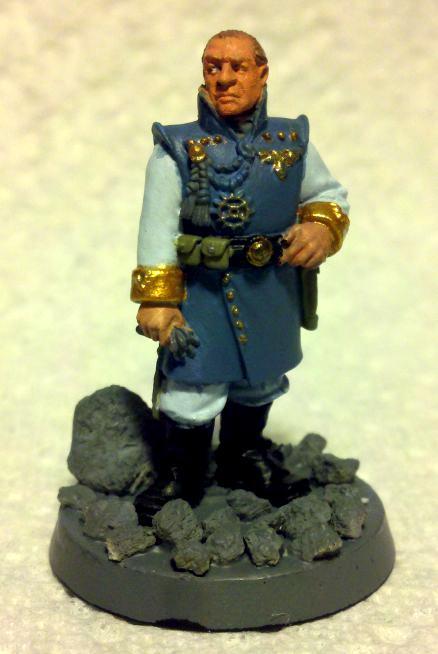
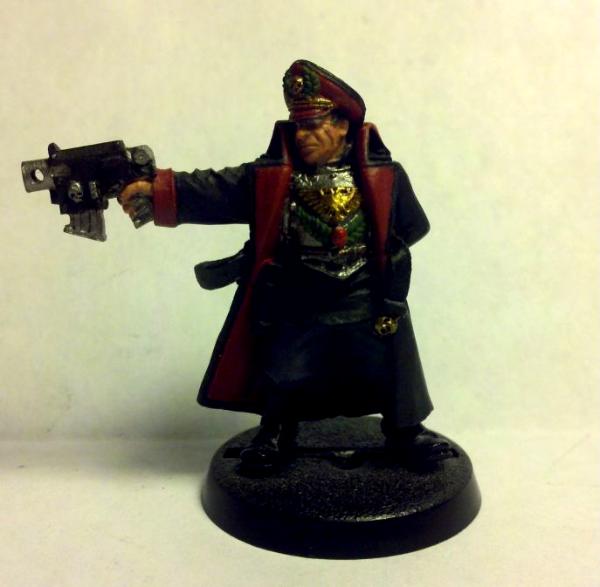
Company Commander.
Not sure I'm satisfied with his coat, might change it. Haven't done anything with his face aside from the base color. Also, his arms are magnetized.
Commissar.
Lighting didn't come out well for this, but I'm too tired to fight with it. Awaits clearcoat and weathering.
Thats it for now.
|
- Assembling first army.
Nowlan's IG Army in progress
Thin your paints, drill your gun barrels, remove all mold lines. The Emperor wills it. |
|
|
|
|
2012/11/19 22:40:02
Subject: Nowlan's IG force (a long time in the making)
|
|
Hurr! Ogryn Bone 'Ead!
|
Observation from painting yesterday:
Painting lasrifles 20 at a time sucks, and takes forever.
|
- Assembling first army.
Nowlan's IG Army in progress
Thin your paints, drill your gun barrels, remove all mold lines. The Emperor wills it. |
|
|
|
|
2012/11/20 12:00:56
Subject: Nowlan's IG force (a long time in the making)
|
|
Pyromaniac Hellhound Pilot
|
Testify!
Looking good, when you say weathering do you mean inkwashes and stuff?
|
My combined Macragge PDF Imperial Guard and Ultramarine 3rd Co. Blog Clicky
My WAB Hundred Years War English Clicky
AlexHolker wrote:At this stage, I'm starting to think GW's CEO was just getting ready for the Rapture
|
|
|
|
|
2012/11/20 15:25:49
Subject: Nowlan's IG force (a long time in the making)
|
|
Hurr! Ogryn Bone 'Ead!
|
Washes, pigments, rust, etc.
|
- Assembling first army.
Nowlan's IG Army in progress
Thin your paints, drill your gun barrels, remove all mold lines. The Emperor wills it. |
|
|
|
|
2012/11/28 11:39:42
Subject: Nowlan's IG force (a long time in the making)
|
|

Pyromaniac Hellhound Pilot
|
So Wehrmach has so many fans outside Germany 
Is there any German war planes with yellow noses exists? meow.
|

http://www.dakkadakka.com/dakkaforum/posts/list/408342.page |
|
|
|
|
2012/11/28 11:51:40
Subject: Nowlan's IG force (a long time in the making)
|
|
Storm Trooper with Maglight
|
 Lone Cat wrote: Lone Cat wrote:So Wehrmach has so many fans outside Germany Is there any German war planes with yellow noses exists? meow.
None currently that I was able to find. Though some of the Panavia Tornados have black noses IIRC. EDIT: But yeah the old like RandyMcStab says the Me 109s did, I derped...
|
|
This message was edited 3 times. Last update was at 2012/11/28 17:29:53
|
|
|
|
|
2012/11/28 16:51:44
Subject: Nowlan's IG force (a long time in the making)
|
|
Pyromaniac Hellhound Pilot
|
Lone Cat wrote:
Is there any German war planes with yellow noses exists? meow.
Jah
Me 109s often had yellow noses.....
|
My combined Macragge PDF Imperial Guard and Ultramarine 3rd Co. Blog Clicky
My WAB Hundred Years War English Clicky
AlexHolker wrote:At this stage, I'm starting to think GW's CEO was just getting ready for the Rapture
|
|
|
|
|
2012/11/28 17:15:54
Subject: Nowlan's IG force (a long time in the making)
|
|
Lone Wolf Sentinel Pilot
|
A-ha! Someone else doing Wehrmacht themed Guard! Got a similar colour scheme on my infantry and tanks actually- I choose Vallejo feldgrau for the uniforms and I've chosen to do the vehicles in normandy pattern. Not quite as efficient as yourself when it comes to painting though. Looking forward to seeing how this progresses!
|
|
|
|
|
2012/11/28 20:27:06
Subject: Re:Nowlan's IG force (a long time in the making)
|
|
Fixture of Dakka
|
German planes with yellow noses?
Look no further...
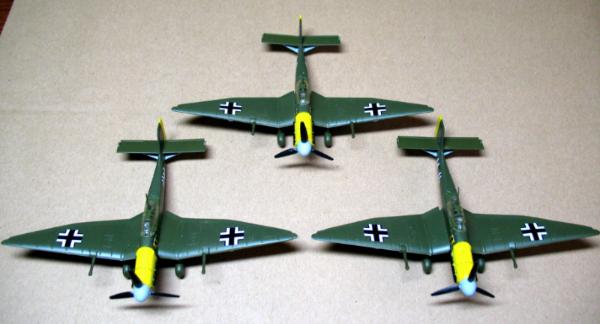
These are the dive bombers that I use for Flames of War.
Apparently the camo scheme comes from a squadron that took part in the invasion of France in 1940.


|
|
This message was edited 1 time. Last update was at 2012/11/28 20:37:41
The secret to painting a really big army is to keep at it. You can't reach your destination if you never take any steps.
I build IG...lots and lots of IG. |
|
|
|
|
2012/11/28 22:32:49
Subject: Nowlan's IG force (a long time in the making)
|
|
Hurr! Ogryn Bone 'Ead!
|
The yellow noses were adopted for easier friendly aircraft identification between german aircraft during the Battle of Britain. They're for the same purpose as the black and white wing/tail stripes on allied aircraft during the invasion of Normandy.
http://www.fritzthefox.com/german_camo_guide.html
http://www.fritzthefox.com/american_camo_guide.html
|
- Assembling first army.
Nowlan's IG Army in progress
Thin your paints, drill your gun barrels, remove all mold lines. The Emperor wills it. |
|
|
|
|
2012/11/29 05:58:24
Subject: Nowlan's IG force (a long time in the making)
|
|
Fixture of Dakka
|
Cool. I like that website. The dive bomber squadron came first though as the Battle for France preceeded the Battle of Britain. In any case, the dive bombers were not really part of the latter campaign as they didn't have the range for it, were very vulnerable to fighter aircraft, and therefore were not likely to survive a flight over the Channel. EDIT: I guess I should say that the Germans tried to use the Stukas but they failed miserably.
The bottom line is that you are well justified in using a yellow nose aircraft in your themed army.
|
|
This message was edited 1 time. Last update was at 2012/11/29 06:04:17
The secret to painting a really big army is to keep at it. You can't reach your destination if you never take any steps.
I build IG...lots and lots of IG. |
|
|
|
|
2012/11/29 11:47:58
Subject: Nowlan's IG force (a long time in the making)
|
|
Pyromaniac Hellhound Pilot
|
^ Tell me about this chain., please 
|
http://www.dakkadakka.com/dakkaforum/posts/list/408342.page |
|
|
|
|
2012/11/29 18:22:30
Subject: Nowlan's IG force (a long time in the making)
|
|
Hurr! Ogryn Bone 'Ead!
|
The chain is something I picked up from a craft store (michaels). Its from the jewlery section. My wife was looking for something there one day and I was looking at the selection of chains/wires/ect and saw that they had copper chains that would be a good scale for 40k minis. So I added it to the side of my command chimera, figuring that it would make for a convincing tow-chain and also serve to distinguish it from rank-and-file chimeras.
Its attached to two styrene rod pins, with greenstuff bolt heads, then I painted it boltgun metal. I intend to rust it up a bit once I get to weathering the vehicle.
Some times you can find good conversion material by looking in unconventional places. Guitar strings make great power cables. Picture hanging wire makes for great braided steel cable (because thats what it is, just small scale). Model railroad and dollhouse accessories (depending on scale) can be used in scenery (things like fences and lamp posts)
|
- Assembling first army.
Nowlan's IG Army in progress
Thin your paints, drill your gun barrels, remove all mold lines. The Emperor wills it. |
|
|
|
|
2012/12/01 06:40:46
Subject: Re:Nowlan's IG force (a long time in the making)
|
|
Hurr! Ogryn Bone 'Ead!
|
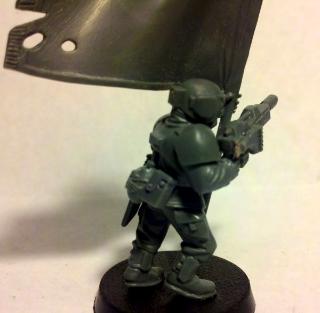
New recruits have been assembled. These 3 will belong to the CCS.
The weapons specialist is magnetized, giving him the option of meltagun or plasmagun (depending on how much the commander values his life).
The standard bearer has a modified lasgun with folding stock for ease of carry.
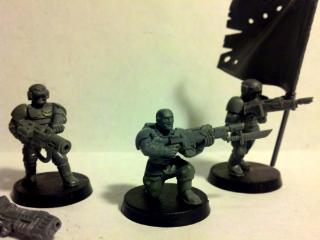
Alternate angle: This time with 100% more plasma gun.

Better view of standard bearer's folding-stock lasgun.
That's all for this update. I've been playing a lot of hockey this week, counting tomorrow I'll have played 8 games since last Saturday.
|
- Assembling first army.
Nowlan's IG Army in progress
Thin your paints, drill your gun barrels, remove all mold lines. The Emperor wills it. |
|
|
|
|
2012/12/01 07:26:47
Subject: Nowlan's IG force (a long time in the making)
|
|
Pyromaniac Hellhound Pilot
|
Nowlan wrote:The chain is attached to two styrene rod pins, with greenstuff bolt heads, then I painted it boltgun metal. I intend to rust it up a bit once I get to weathering the vehicle.
Some times you can find good conversion material by looking in unconventional places. Guitar strings make great power cables. Picture hanging wire makes for great braided steel cable (because thats what it is, just small scale). Model railroad and dollhouse accessories (depending on scale) can be used in scenery (things like fences and lamp posts)
Is it technically 'Rought Terrain Modificaiton' or using the rules of Dozer blade?
|
http://www.dakkadakka.com/dakkaforum/posts/list/408342.page |
|
|
|
|
2012/12/01 22:27:19
Subject: Nowlan's IG force (a long time in the making)
|
|
Hurr! Ogryn Bone 'Ead!
|
Neither, just for looks to make it distinct from other chimeras since its the CCS' ride.
|
- Assembling first army.
Nowlan's IG Army in progress
Thin your paints, drill your gun barrels, remove all mold lines. The Emperor wills it. |
|
|
|
|
2012/12/04 05:28:57
Subject: Re:Nowlan's IG force (a long time in the making)
|
|
Hurr! Ogryn Bone 'Ead!
|
The broken finger is starting to feel better, so I thought I'd ease back into my work on vehicles and airbrushing by painting one of the two sentinels I've got.
This one was given to me by a friend as part of a deal where I gave him the astronomy textbook I no longer needed in exchange for 20 guardsman and a sentinel (and some cash). He had bought them on a whim but never did anything besides assemble them. He primarily plays SM and Eldar, so I struck a deal for the book since he was taking the class I just finished.
The only downside is that the guy wasn't as detail oriented as I am, so I had to strip the minis of the bad primer coat he'd applied, then scrape a bunch of mold lines off pre-assembled models. Ick. Also, this thing is as-is. I magnetized the roof and weapons of the one that came with my battelforce. This guy will be forever-autocannon.
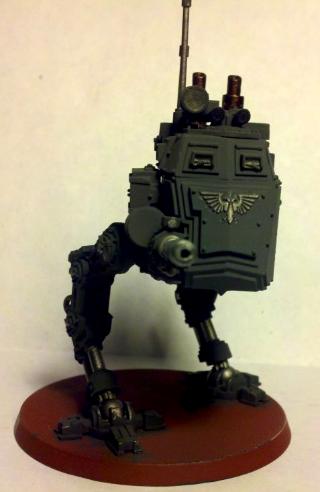 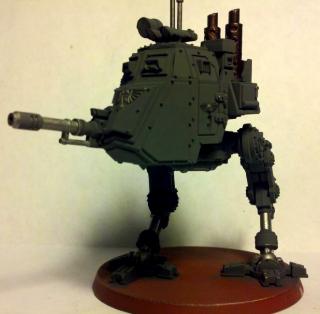
I've decided to go with a different color scheme for my sentinels, as I see them as being more of an urban asset. It also doesn't make much sense for them to have camo as they'll never be stationary long enough to use it, so they just get a coat of Tamiya German Grey (xf-63)
Next week is finals, so I don't know how much progress I'll be making until they're over.
|
- Assembling first army.
Nowlan's IG Army in progress
Thin your paints, drill your gun barrels, remove all mold lines. The Emperor wills it. |
|
|
|
|
|
|