Switch Theme:

Creating a Battlefield: scratch building a fully modular 40k table (pic heavy)  [RSS] Share on facebook Share on Twitter Submit to Reddit
»
Author Message
Advert


Forum adverts like this one are shown to any user who is not logged in. Join us by filling out a tiny 3 field form and you will get your own, free, dakka user account which gives a good range of benefits to you:
  • No adverts like this in the forums anymore.
  • Times and dates in your local timezone.
  • Full tracking of what you have read so you can skip to your first unread post, easily see what has changed since you last logged in, and easily see what is new at a glance.
  • Email notifications for threads you want to watch closely.
  • Being a part of the oldest wargaming community on the net.
If you are already a member then feel free to login now.


Made in nl
Dakka Veteran


Netherlands

When I play a game of 40k terrain and a good table can be as important as the models themselves. In the past I built two 6"x 4"tables, the first a crude 3 part affair which is way too clutered but has some things I still love. At the moment that is the table I play my games on since I sold the second table I've built. Hence it was time for a new one.

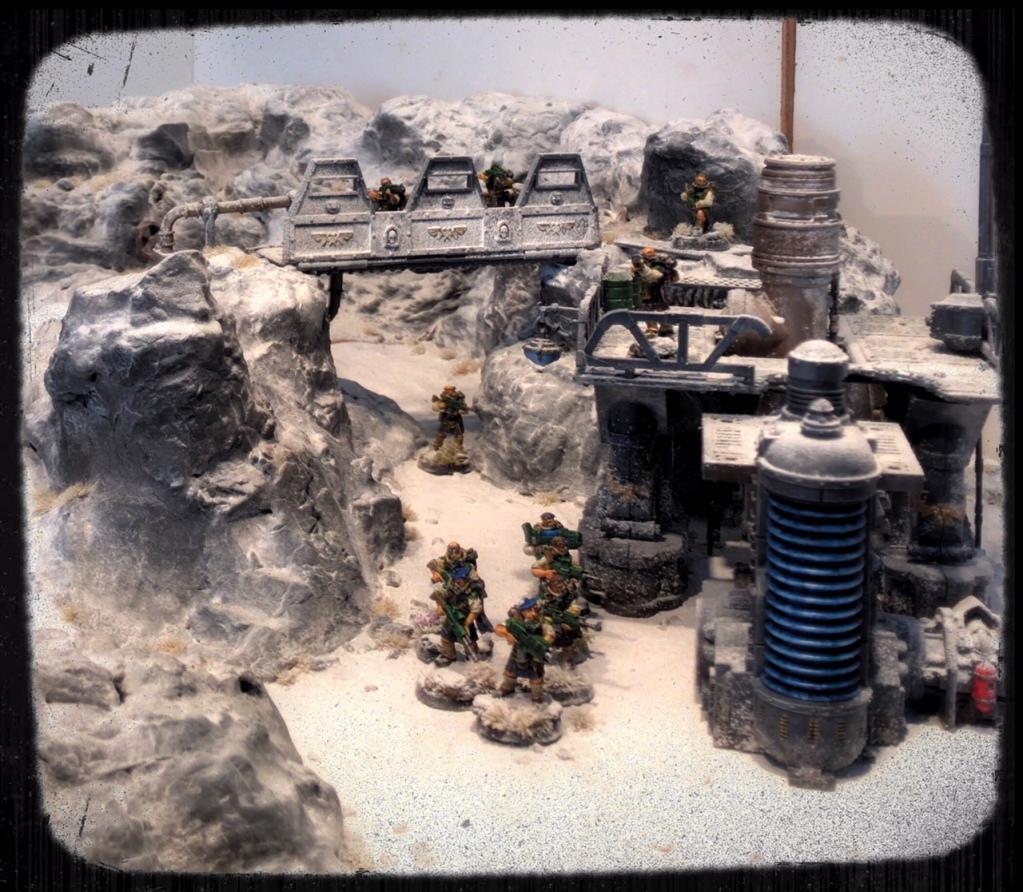
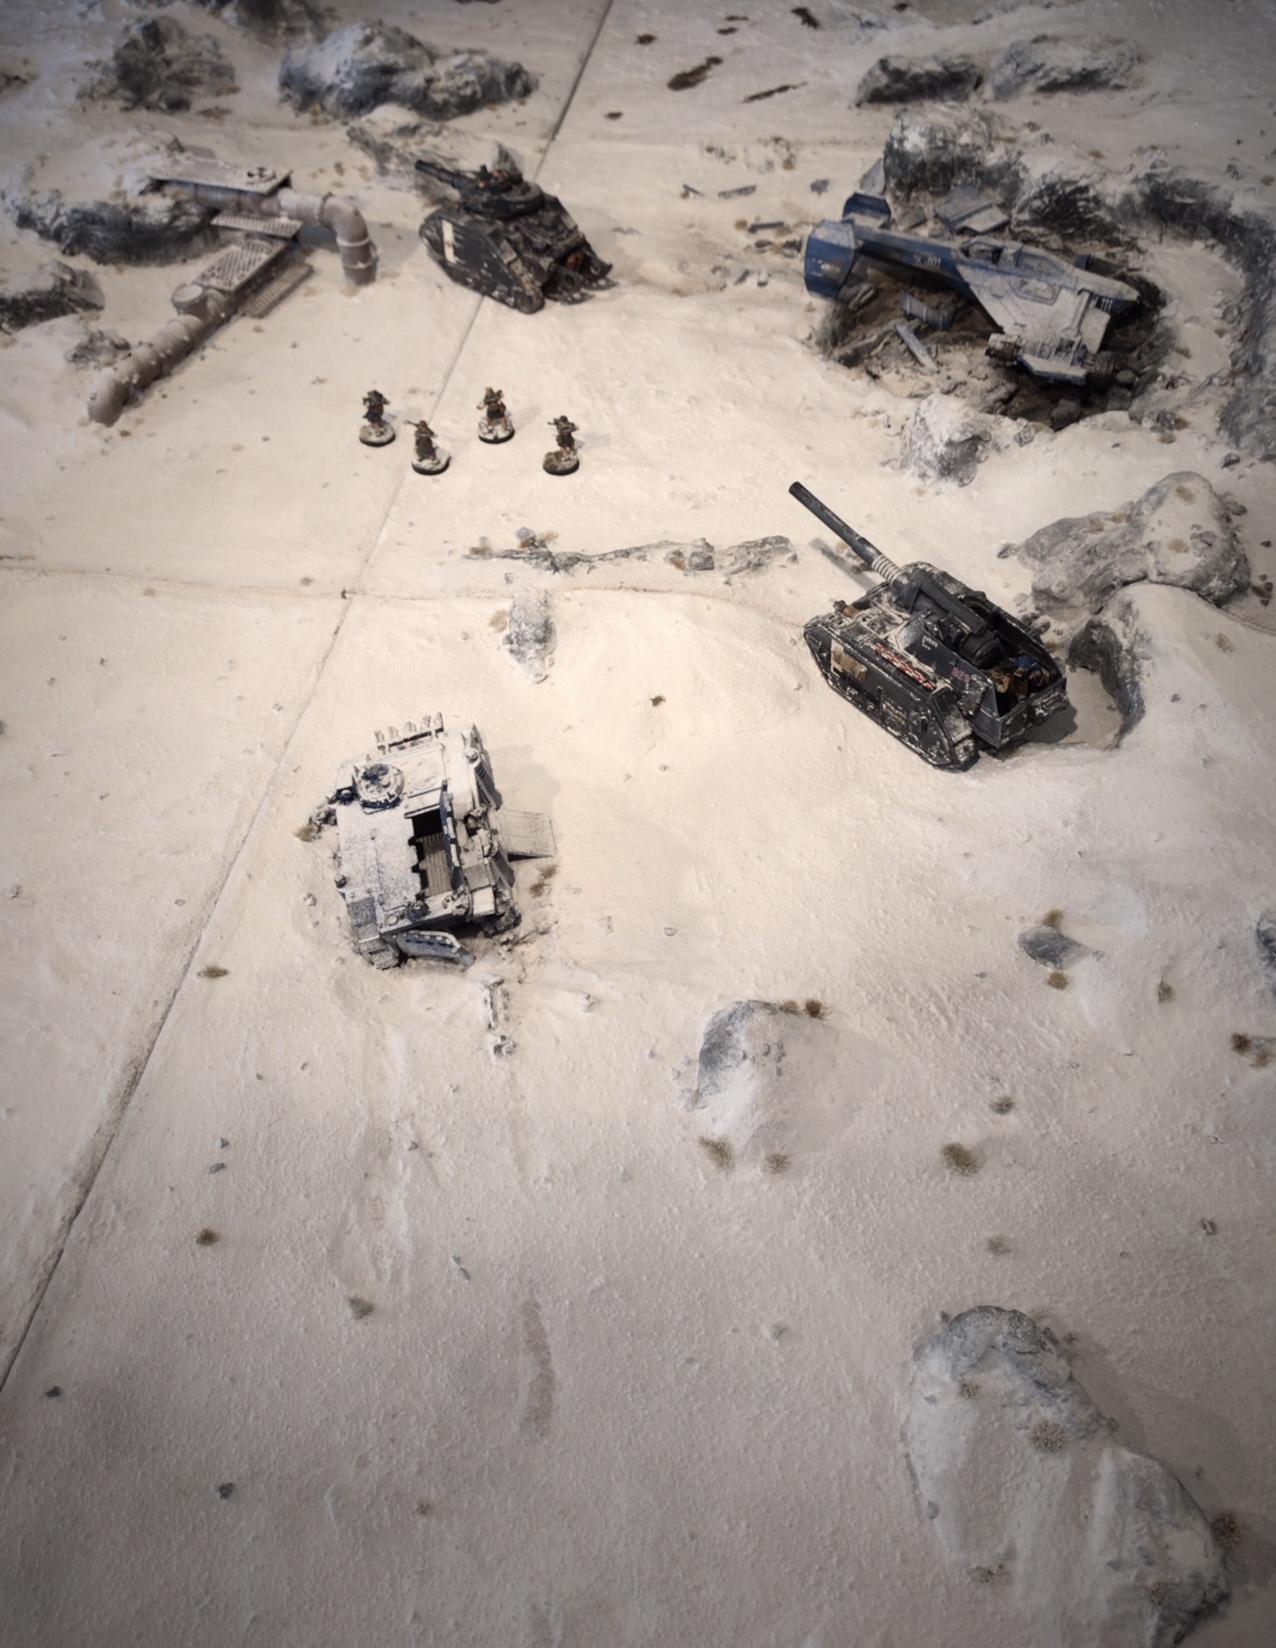
Some pics of the previous table can be found here. It was winter themed and based on the Betalis III which Forgeworld used for Imperial Armour 12. Aweseome for scenic shots as you can imagine. But it had some flaws in the built as well as not being very practical at all for playing a game. Way too few movement options and placement for terrain. The terrain which I built for it wasn't LOS blocking and very practicable. Thus this table was out. Below are some pics and more can be found in my gallery:


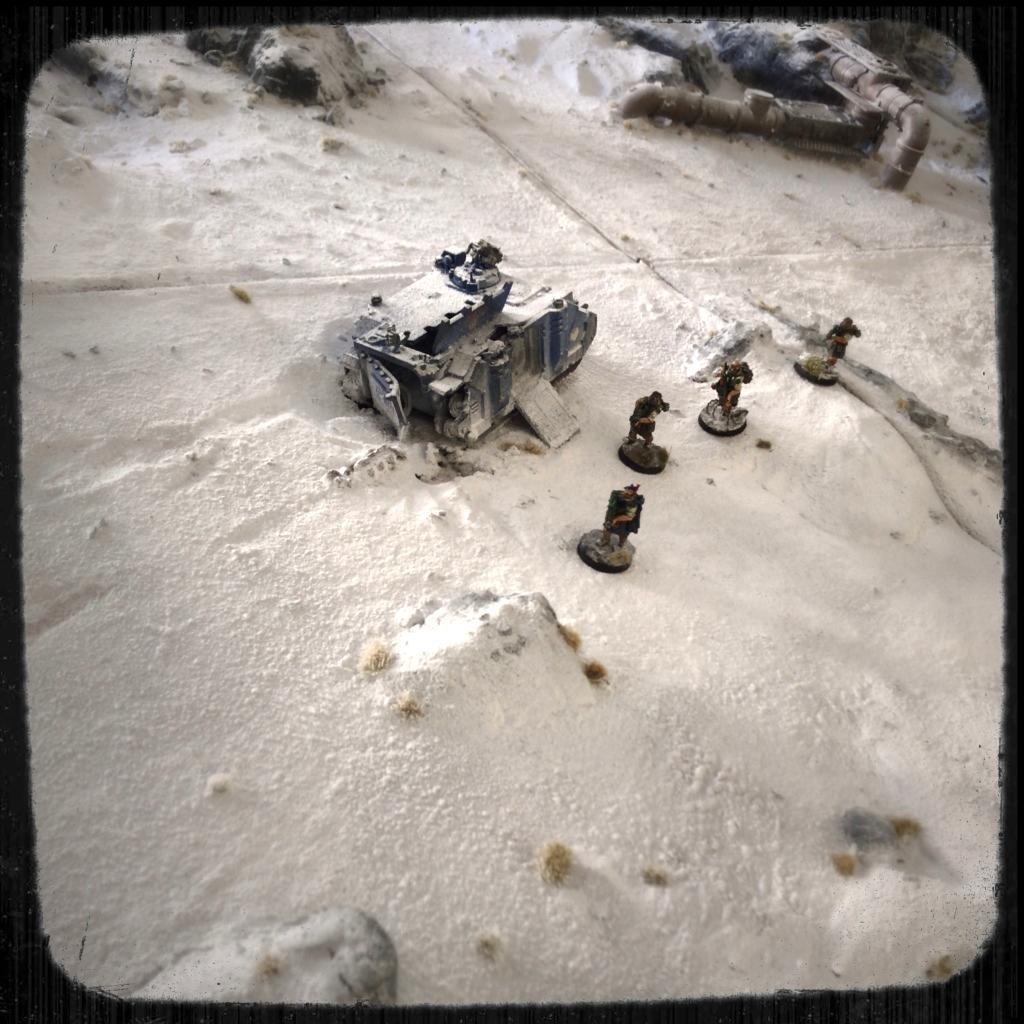
I don't regret selling the table, but it was kinda stupid not to make a full set of pictures of my winter themed Guard army on it before I did.


-----


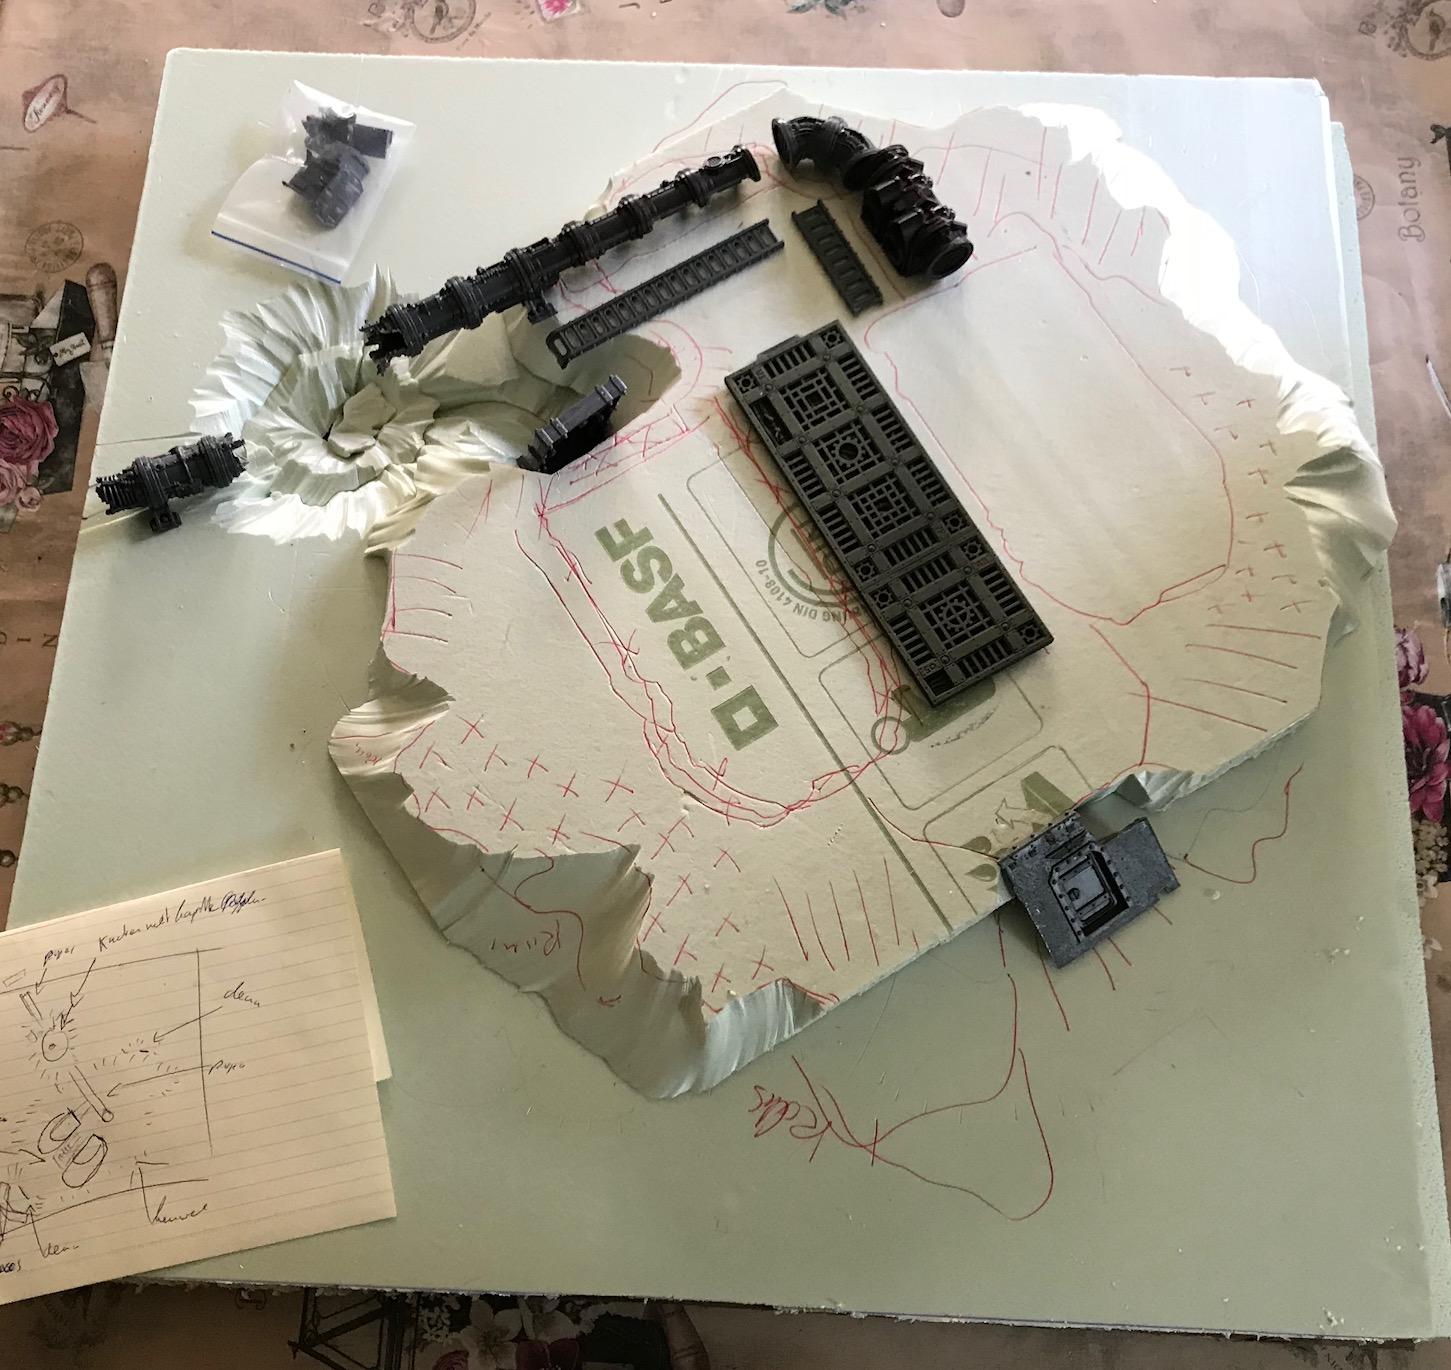
That was then, this is now. This time I set out basing the table on a pic I saw form another Forgeworld table with a desert theme and a lot of fortifications, as well as the setting from Imperial Armour 3. Thus this would be an industrial instalation on the Taros desert world, complete with water treatment plant, industrial buildings and some defences. So far I've built 2 2' x 2' tiles and almost finished painting them up. After this it is time for some vegetation and I can continue on to the next one. The plan is to keep a blog on how I create these tables.

The first tile used a landing pad and an imperial bunker and a set of bunker doors. The idea was to make this into a rocket launch site but I am now vearing of more towards a landing pad since it gives a but more space during a game (almost fell for the same trap again, got to keep things simple!!). When I've finished painting I will make some pictures.

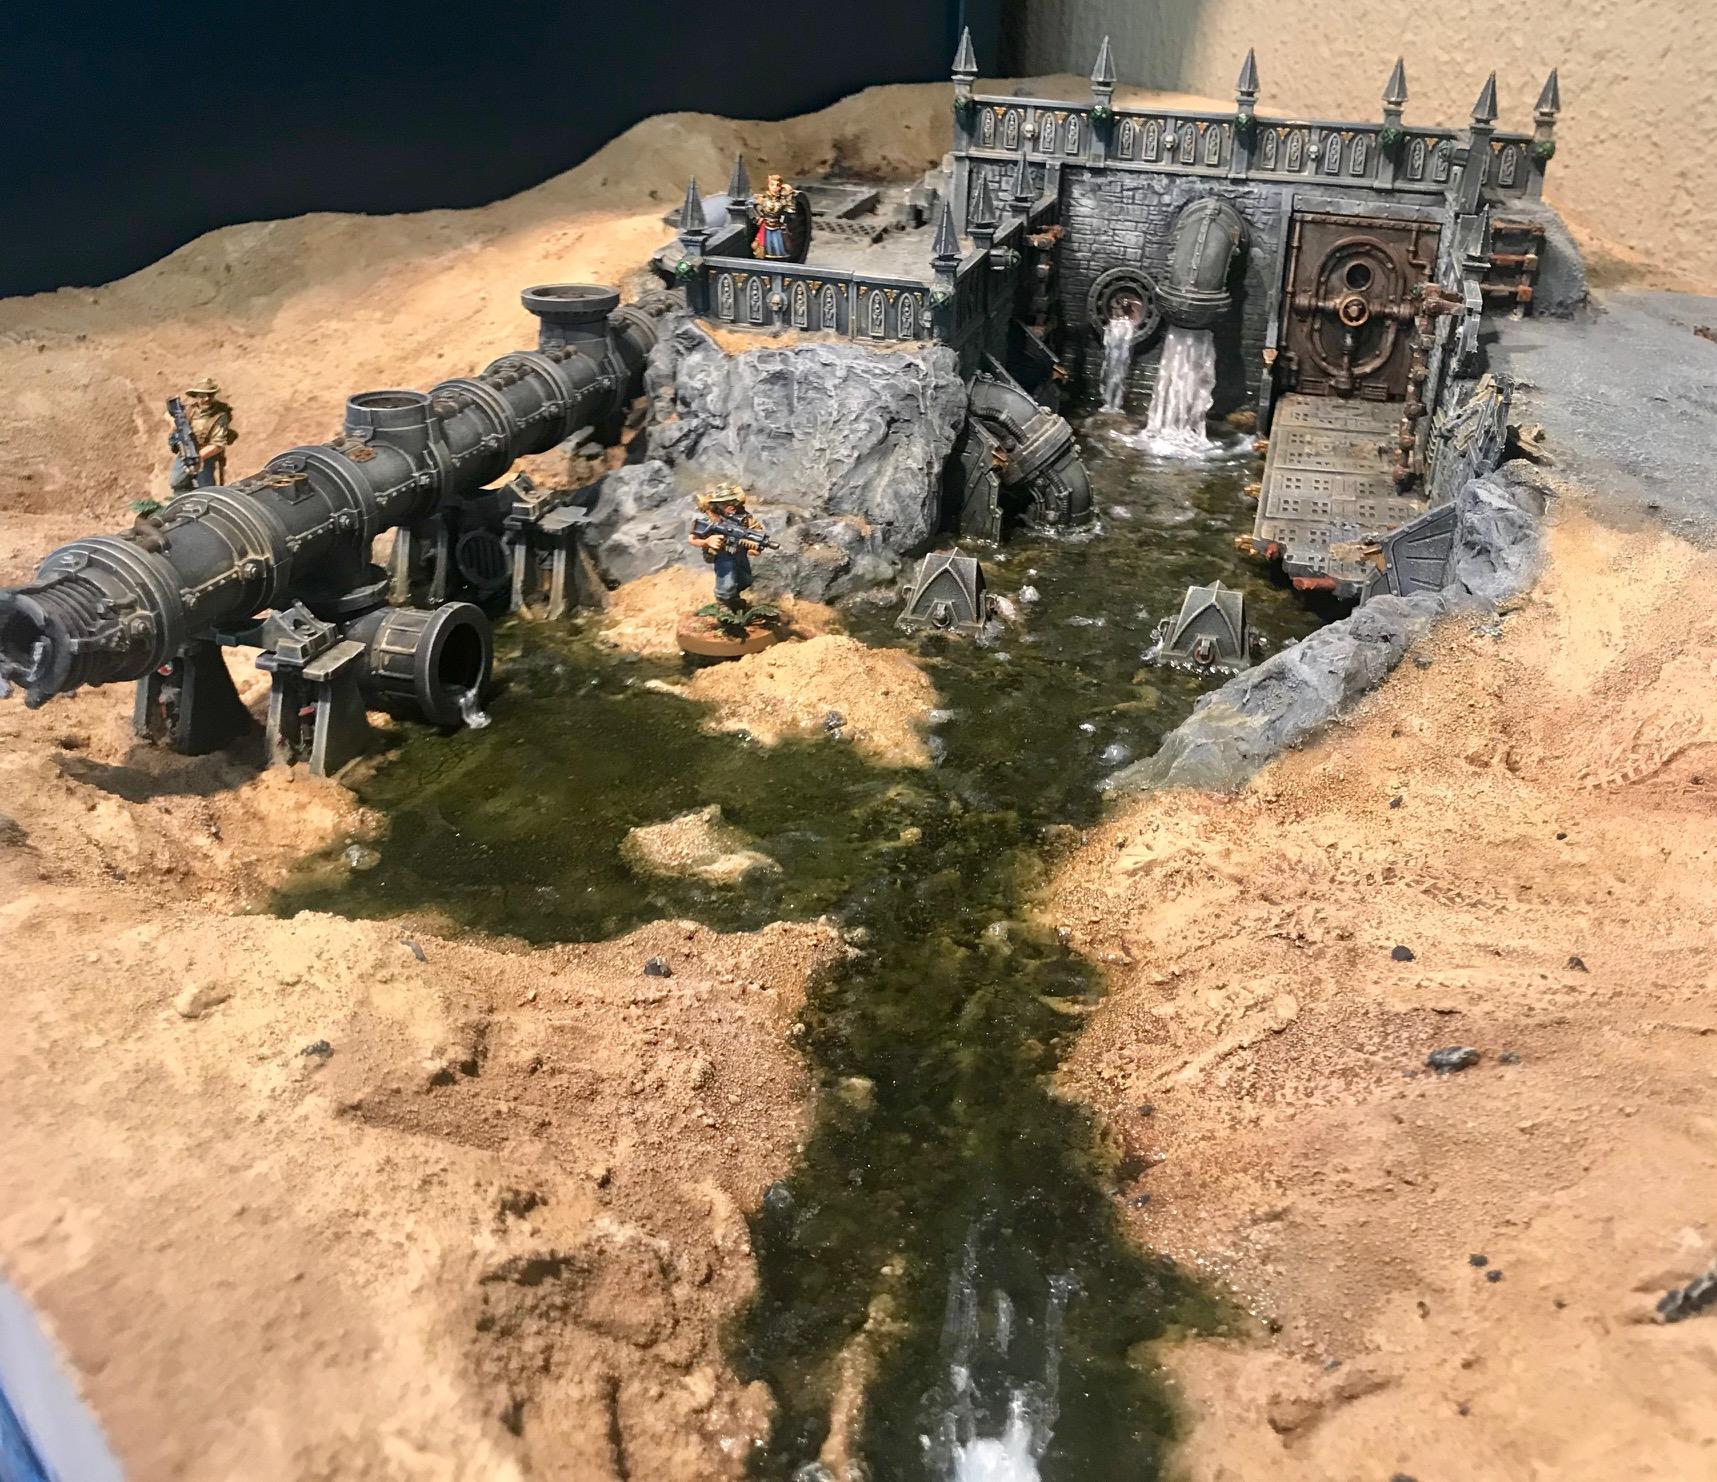
The second tile was the water treatment plant. It features an industrial site, pipes and some buildings where the waste water is dumped into the desert and sucked into a pipe (so I can contiue the water feature on another tile). I tried to use the height in the terrain for blocking LOS as well as movement restrictions for vehicles on some part. A pic:


As you can see the basin is substantial lower, you can hide a vehicle but not scale the walls. Troops can. This of the table it about 10" x 10" so about the size of a building. The pipeline can be taken away and as we played it today vehicles can move through it but infantry is granted cover.


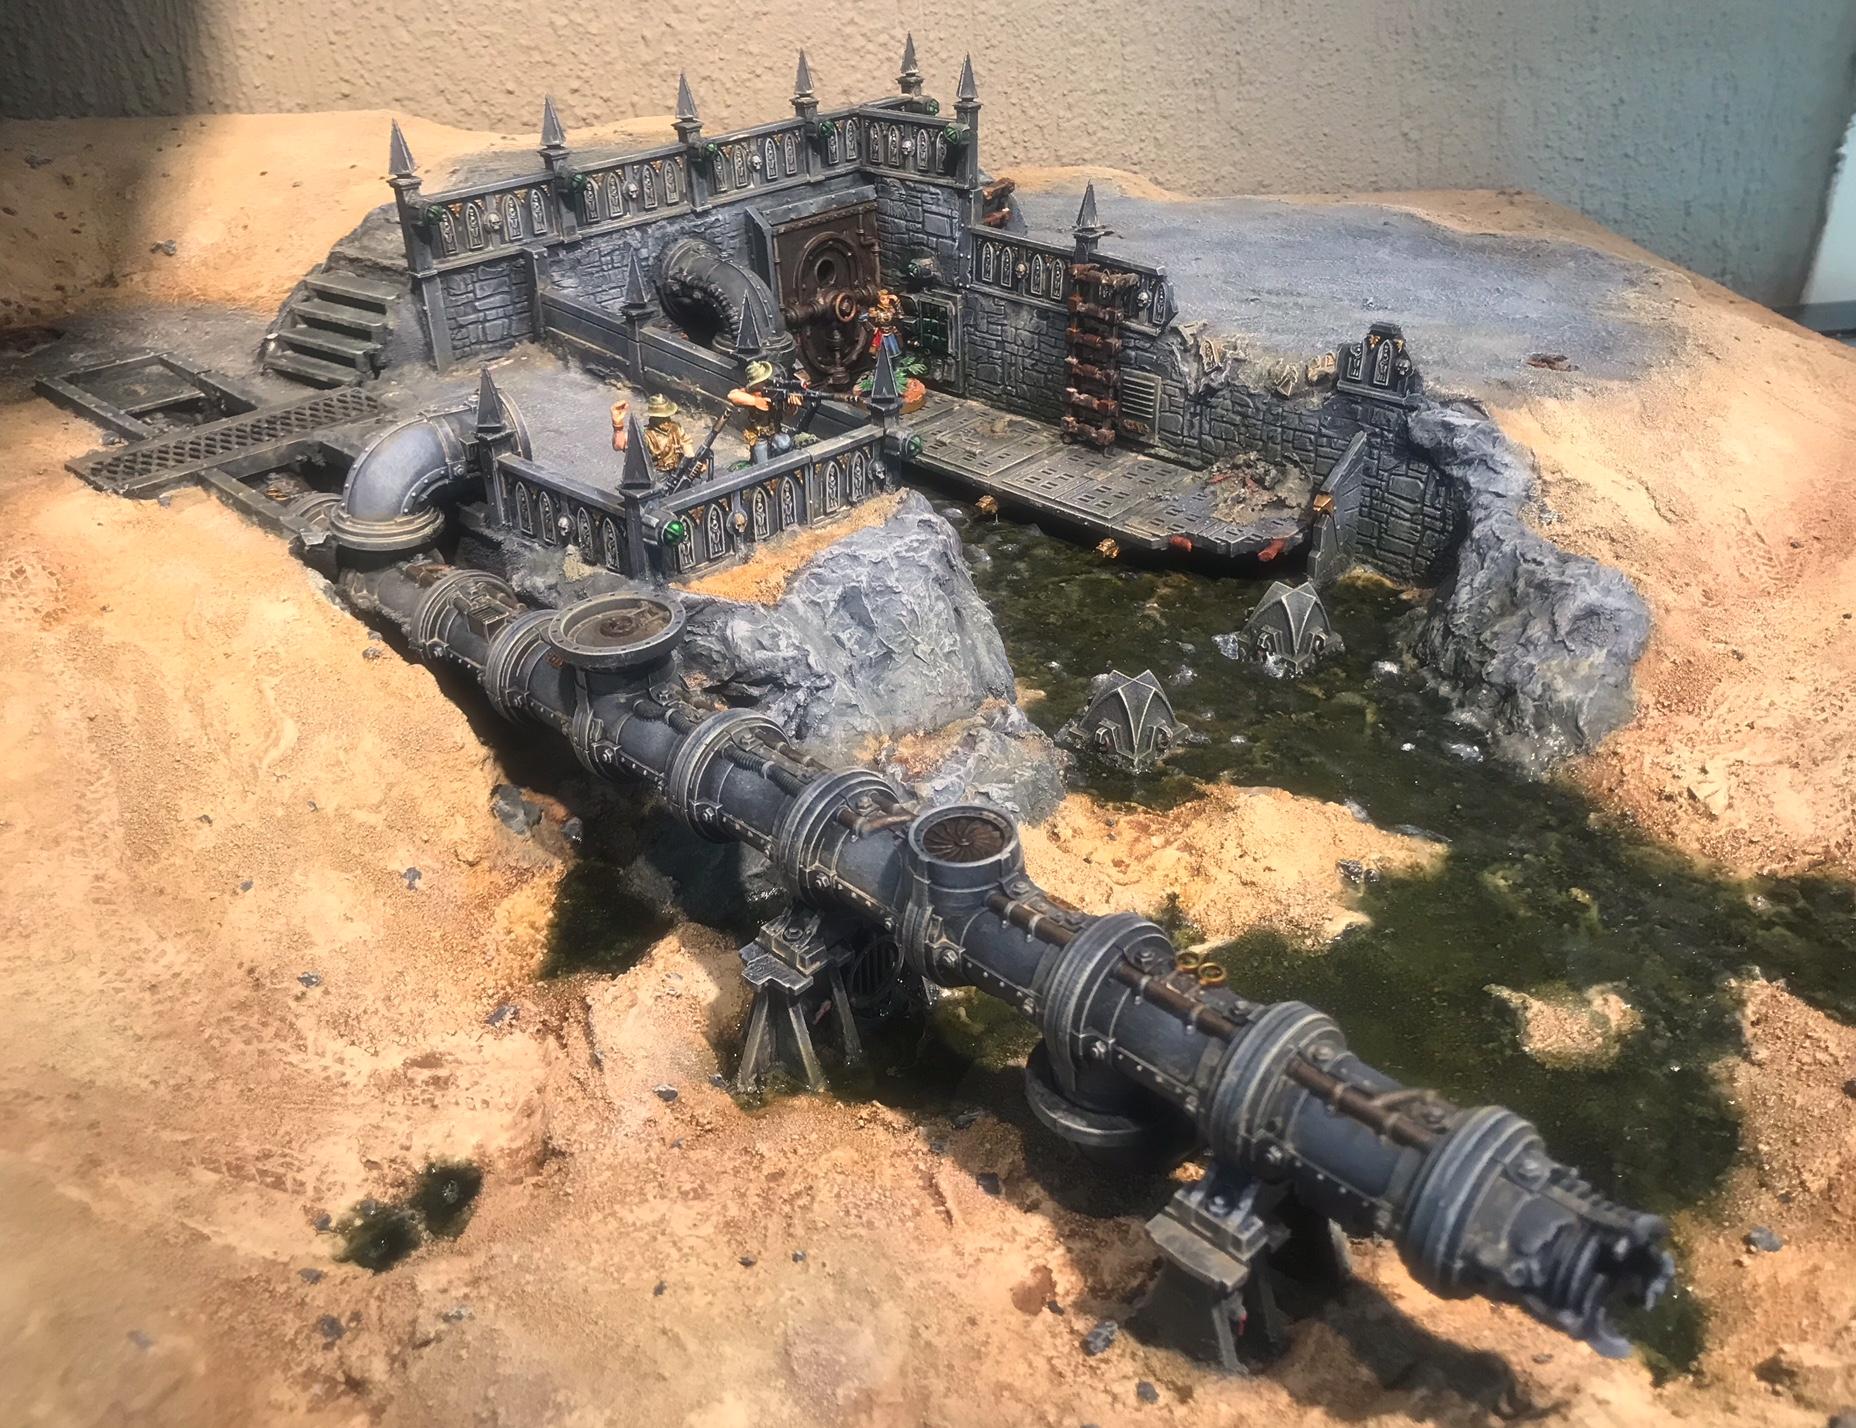
The main visual feature of this tile is the water. First time I use this amount of water and to be frank it was kind daunting thing to do. I use AK interactive Still water and Water effects as well as some water foam. The base beneath the water was painted a bit darker. Then I poured in Still water mixed with green ink. When the water was fully set some cracks had appeared which I filled in again. Sadly you can't completely hide this, it shows in AK's instructional video's as well.

The next step was some rippling effect with the Water effects product which didn't go exaclty as planned. The water became rather dull. This was partly solved with another layer of Still water, this time without ink. Having placed the 'waterfall effect' I put on some more Water effects to get it properly in place. Then some foam on the 'streaming' parts of the water. The effect is nice but not perfect.


Over the past days I've built the set of terrain which can be placed on this tile (or anywhere else). But my lack of focus led me astray and I set out building the third tile instead......


Made in ca
Regular Dakkanaut


awesome work. Cheers!
   
Made in us
Dakka Veteran


Nice winter table and desert section! Nice mini's too. I'm fixing to get some of Victoria's lines myself.
   
Made in nl
Dakka Veteran


Netherlands

SergentSilver wrote:
Nice winter table and desert section! Nice mini's too. I'm fixing to get some of Victoria's lines myself.


Thanks. I love Victoria Miniatures models. Actually replaced my DKOK with them some years ago. First some a regiment of Highlander winter guard and now I am working on 'space cowboys'.

   
Made in us
Dakka Veteran


 Singleton Mosby wrote:
SergentSilver wrote:
Nice winter table and desert section! Nice mini's too. I'm fixing to get some of Victoria's lines myself.


Thanks. I love Victoria Miniatures models. Actually replaced my DKOK with them some years ago. First some a regiment of Highlander winter guard and now I am working on 'space cowboys'.


You mean "Space Australia" with "Space Burgers" and "Space Hulu" yeah? All joking and DBZ Abridged references aside, I love Victoria's minis. They have great attention to detail. As a decent WW1&2 history buff, I was able to immediately recognize the Van Diemen's World Devils as the Australian Imperial Forces. Like most of the official IG lines, their kits are closely based on the uniform of the inspiration army from WW1. The Australian slouch hat is particularly iconic and cool.
   
Made in ca
Grisly Ghost Ark Driver


Those are some beautiful tables!

See what's on my painting table Now painting: Gravis Captain 
   
Made in nl
Dakka Veteran


Netherlands

A couple of days ago I started on the third tile of the table. For this tile I wanted some more LOS blocking terrain as well as a few open spaces on which I could place some small buildings and scatter terrain.

Step 1. Design
First thing I do is go through my boxes of terrain and see what I can come up with. In this case I went for two silos, side by side, from the Prometheum Refinery Sector Mechanicum set. These would be nice for the industrial vibe of the table. And a water treatment plant needs some place to store it's liquids. Whatever chemical purification stuff they contain I decided to place the silos in the ground on a raised hill. Additional parts, like doors and walkways, should create the feel of a complex of connected buildings. Pipes are lined up with the other tile. They shouldn't be connected as I want as much flexibilty as possible when placing the tiles.

Step 2. The baselayer
I use 60,5cm x 60,5 boards of 10mm triplex as a base for the tiles. On top of this I put a first layer of 30 or 50mm (depending on the base hieght) of Styrodur cut so size. In this case I plan to cut into the baselayer as to make a bombcrater and several holes which will facilitate doors. Cutting is mainly done with a hot-wire cutter. They are the most accurate and easy to use. Knives need to be razor sharp to work and give a messy result.

As you can see on the picture below I've cut out the crater and marked the place for the silos. The door below is from an old bunker, the door above the silos is from a Killteam set. Then there are some walkways and pieces of pipes nothing where they will be roughly placed. The first part, from the crater, will be above ground, then the ground will rise and the pipes are submerged in the ground. I plan to cover them, perhaps using the ladders.


Now the markings are as follows. ///// are for places I want to have gentle incline, so these parts will be cut away, ++++ are areas which I plan to rise a bit. Some of the steeper parts will be covered in moulded clay rocks (I use some rockmoulds to create these).

This message was edited 1 time. Last update was at 2020/06/04 18:28:10


Made in gb
Implacable Skitarii


Great stuff mate, subbed!
I love scratchbuilding but sadly due to space limitations i have to limit myself to the bits and pieces on bases.

Keep it up, can't wait to see more!

------------------------------------------------------
Never ride faster than your angel can fly
------------------------------------------------------
"Deus est Machina" - ciuncky's painting blog

"The short life of an Astartes' best friend" - a very short fiction story 
   
 
Forum Index » Dakka P&M Blogs
Go to: