| Author |
Message |
 |
|
|
|
|
Advert
|
Forum adverts like this one are shown to any user who is not logged in. Join us by filling out a tiny 3 field form and you will get your own, free, dakka user account which gives a good range of benefits to you:
- No adverts like this in the forums anymore.
- Times and dates in your local timezone.
- Full tracking of what you have read so you can skip to your first unread post, easily see what has changed since you last logged in, and easily see what is new at a glance.
- Email notifications for threads you want to watch closely.
- Being a part of the oldest wargaming community on the net.
If you are already a member then feel free to login now. |
|
 |
2011/09/22 16:46:28
Subject: Re:Eggroll's Blood Angels
|
|

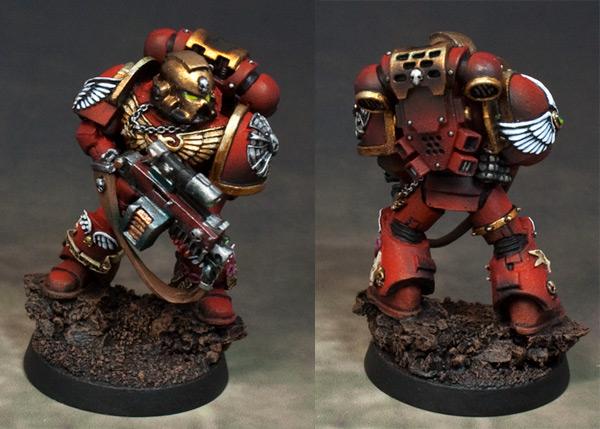
Homicidal Veteran Blood Angel Assault Marine
|
|
|
This message was edited 2 times. Last update was at 2012/07/23 04:46:14
|
|
|
|
2011/09/23 16:09:18
Subject: Re:Eggroll's Blood Angels
|
|
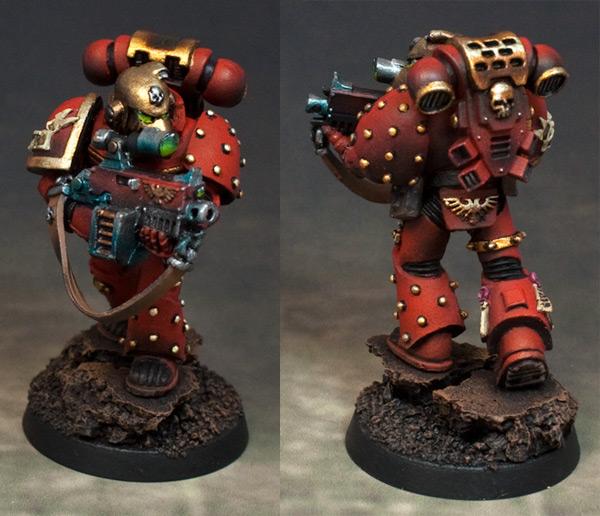
Homicidal Veteran Blood Angel Assault Marine
|
Thanks for all the comments guys!
nerdfest09 wrote:Gah!  awesome as per usual, I sometimes wonder if you tire of hearing positive comments each post!  but it's hard when everything you do manages to look so great! I can't even give you any constructive criticism all 3 look excellent Eggy, the burn marks on the assault cannons are great! and the I particularly like the green shade you use for all the lenses it really stands out with the dark red you use for them, all in all, I wish i could shake your hand this army is so cohesive and looks so good!
keep it up!
Nerdfest09
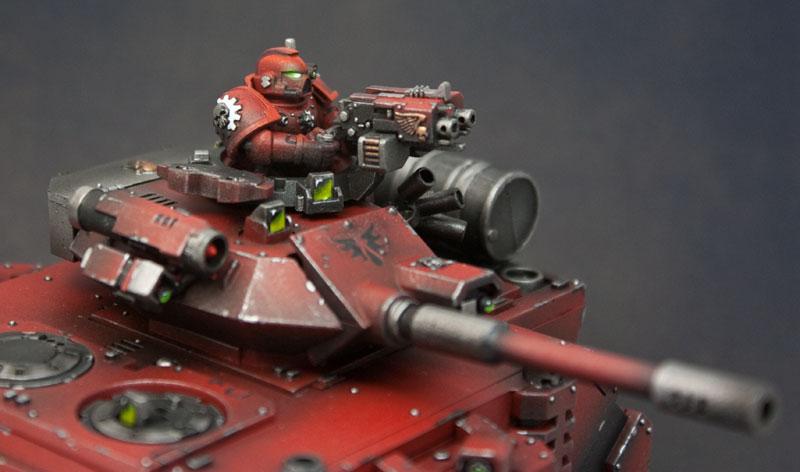
Heh thanks, never get tired of them  . Keeps me motivitated. Burn marks were something I tried after seeing Redscorps do that with his LR. Also, there was a good post by Ron on FromTheWarp regarding the same effect. http://fromthewarp.blogspot.com/2011/09/how-to-paint-heat-stained-gun-barrels.html
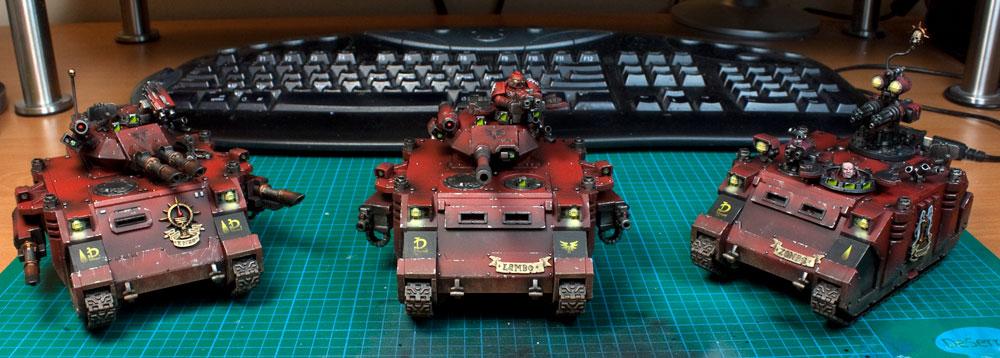
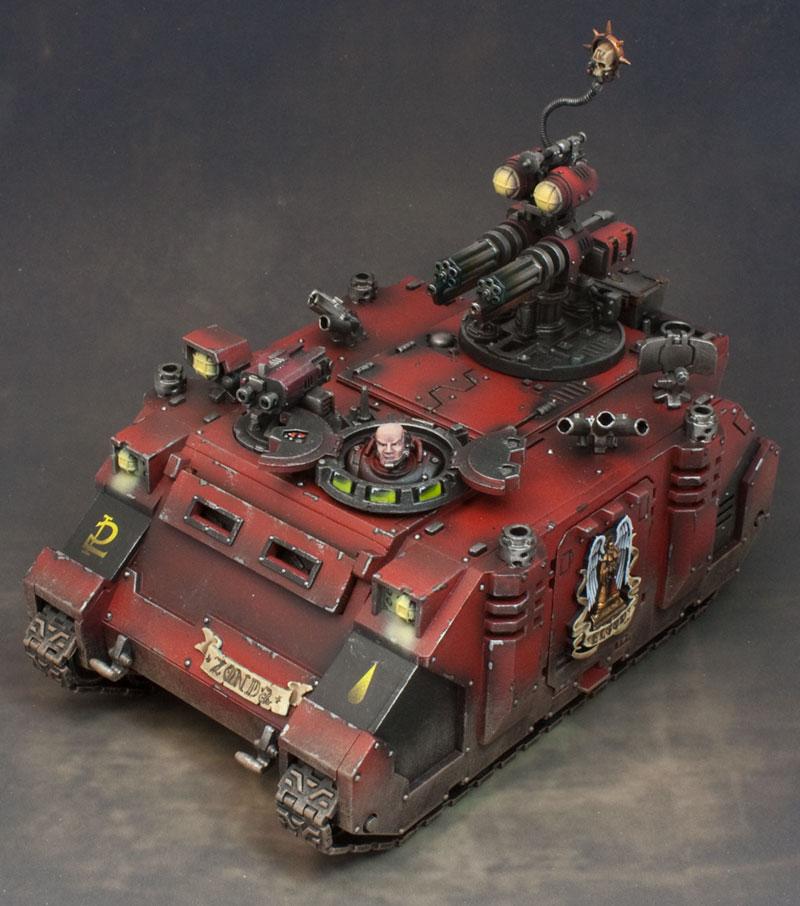
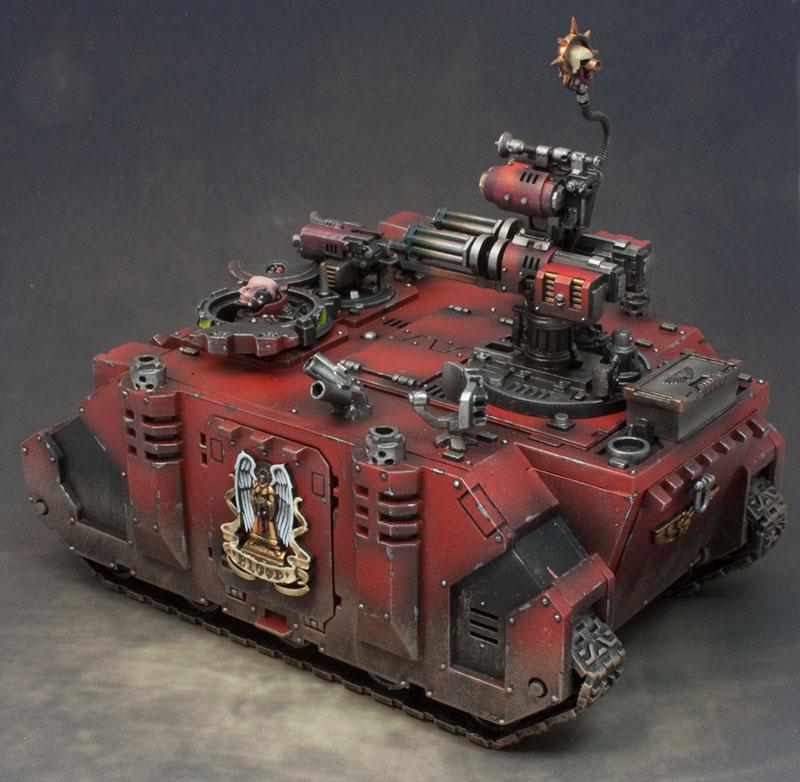
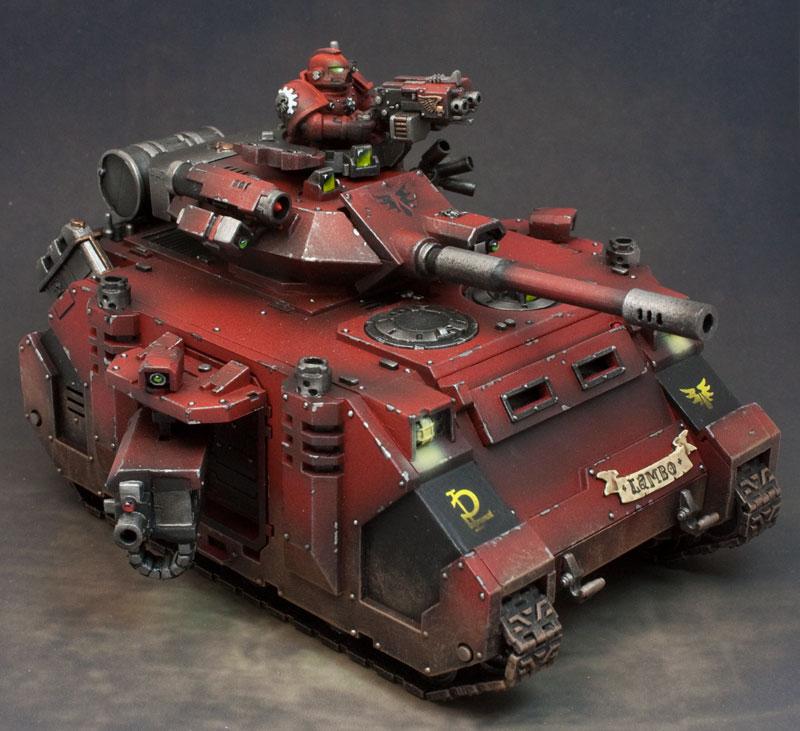
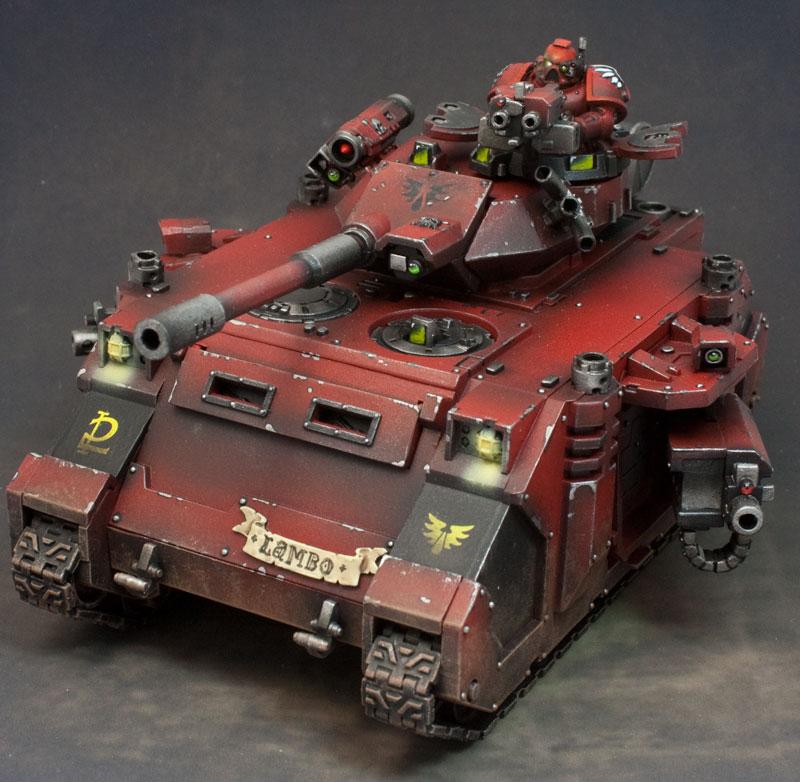
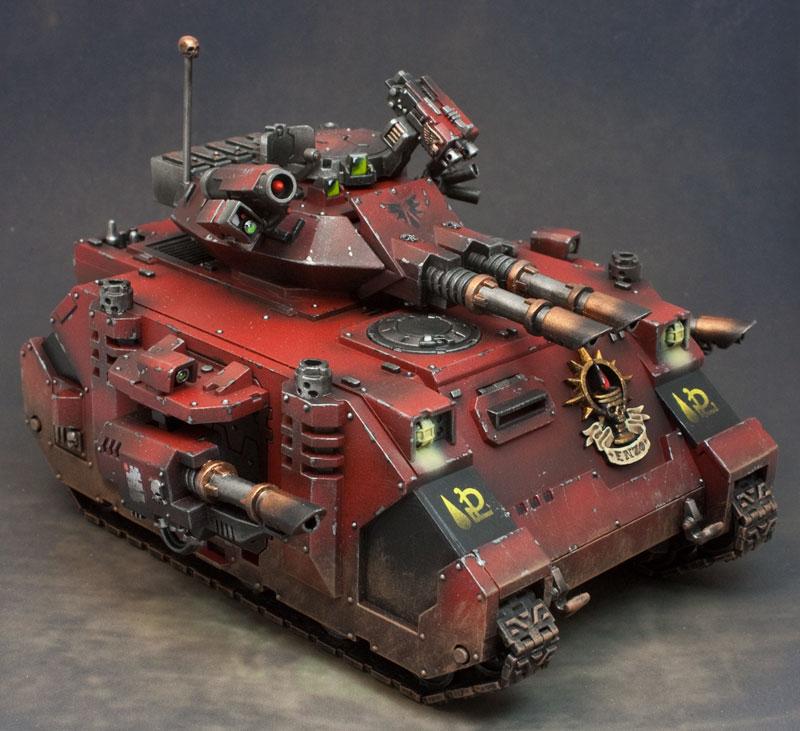
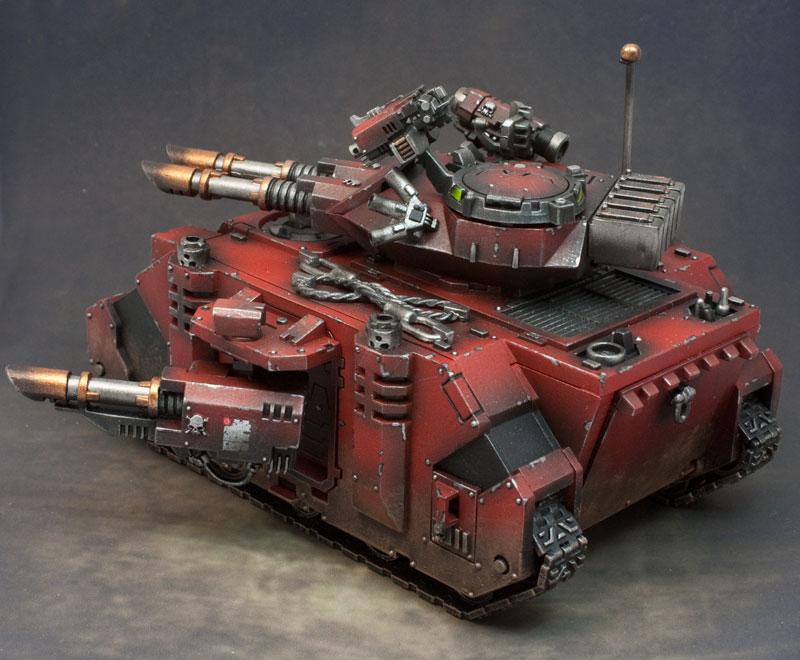
dantay_xv wrote:I see you like your Italian cars, Enzo on the Annhilator, for the Ferrari Enzo, Lambo after Lamborghini, on the predator destructor and Zonda on the Razorback, after the Pagani Zonda.
Nice cars and also your very nice models, the only thing is the guy in the razorback, his face looks a little pale and under detailed compared to the res of the model, is it due to the lighting? All the models are really stunning.
PS how do you do the really nice scriptwork, I am very envious
Good eye dantay! Was wondering if someone would notice. Doing the names was something I had left till the end because I just couldn't figure out good names for them. I watch a lot of Top Gear and eventually figured Italian cars would make the perfect name so I went ahead with it. Since the BA tanks have overcharged engines or something like that it was very fitting 
The driver's face is a bit washed out and not due to the photos. I didn't spend too much time on him as I was rushing in the end to finish up.
For the scriptwork my secret is just having a really good brush that holds a fine tip well and making sure I have proper paint loads in the brush. I've been doing all my painting with a Windsor & Newton Series 7 Size 0 brush for the last few months. The brushes last a very long time and holds a tip very well which comes in handy when doing tiny details. In fact, I'd rather have this brush for fine detail than some of the super tiny 10/0 brushes because the bigger brush size will hold paint better than the tiny ones. With a good brush and making sure you don't overload the brush with paint, you can be very precise with paint placement when painting.
|
|
|
|
2011/09/26 05:56:30
Subject: Eggroll's Blood Angels
|
|
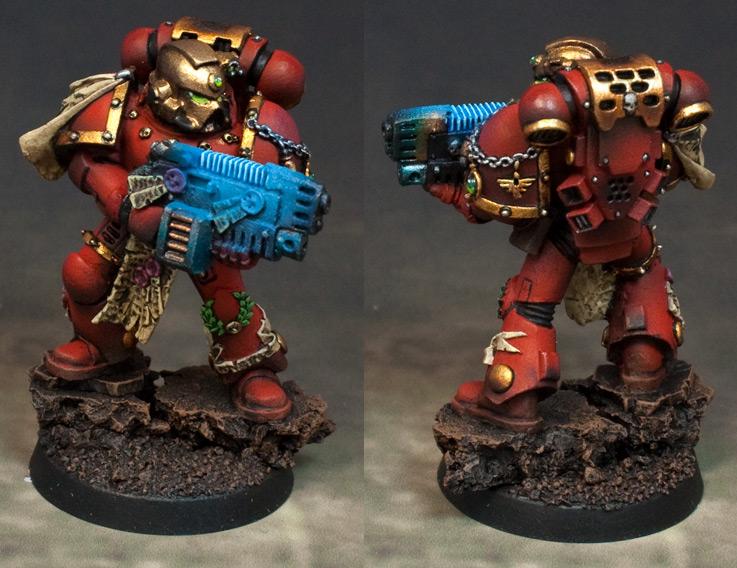
Homicidal Veteran Blood Angel Assault Marine
|
Thanks Hazzer.
Luther - Thanks. I haven't painted any non BA models for over a year now I think. Been slowing collecting some grey knights since they've been released but haven't painted any yet. The witch hunters decal sheet is one of the best decal sheets around
Yes, I shade after I do the primer. I've seen the prime white and "preshade" method...not a fan as it's hard to judge what the final effect will be and correcting any mistakes is difficult as you'd have to repaint the areas white and preshade again and then colour.
|
|
|
|
2011/09/26 15:50:42
Subject: Eggroll's Blood Angels
|
|
Homicidal Veteran Blood Angel Assault Marine
|
LutherMax - I use a 50/50 mix of black/red for shadows for the red areas. Not sure about the Vallejo range as I barely have any of their paints except a few metallics. Varnish is a good way to bring out some of the colour though as you mentioned, I always use gloss on my tanks followed by dull cote. Makes them "pop" a bit more.
|
|
|
|
2011/09/26 19:42:07
Subject: Eggroll's Blood Angels
|
|
Homicidal Veteran Blood Angel Assault Marine
|
bebopdrums - Yes, most of the work is done with an airbrush...including the weathering and OSL. No worries, take a look through the previous pages if you have time...there are lots of pretty pics
Thanks Migs!
|
|
|
|
2011/10/03 04:59:57
Subject: Eggroll's Blood Angels
|
|
Homicidal Veteran Blood Angel Assault Marine
|
veelckoo wrote:Well done. Those tanks look amazingly good.
Whole army is really great looking!
Congrats.
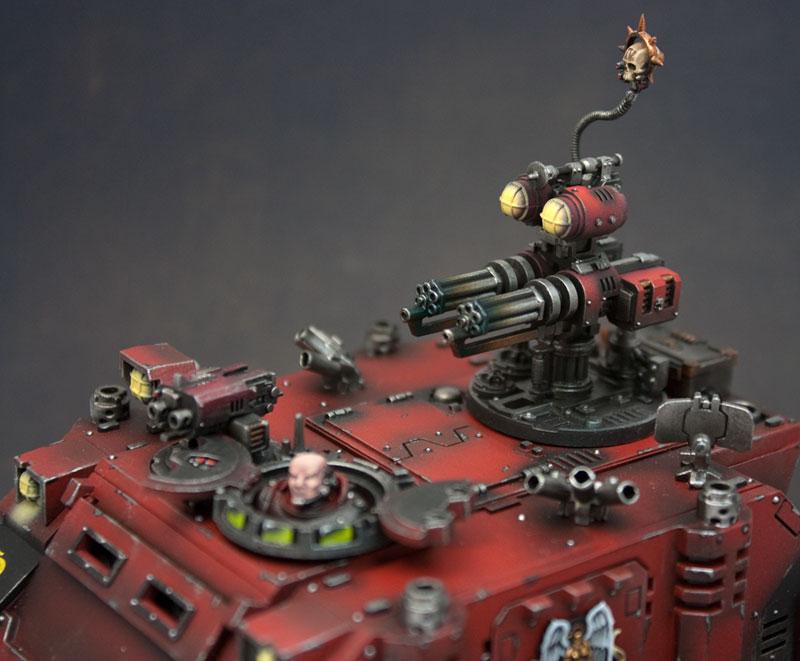
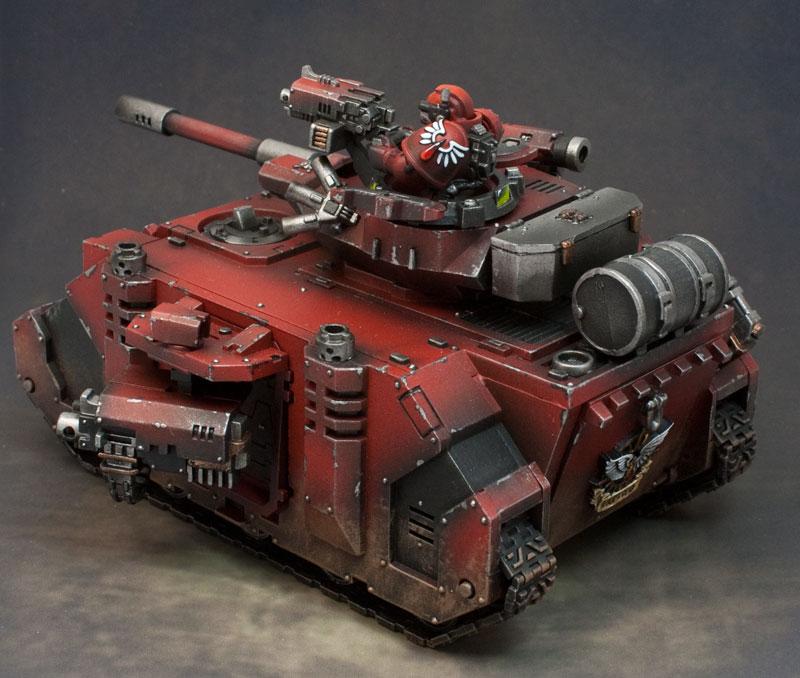
Thanks Veelckoo. Another update, this time with some finished work as well as pics of some work in progress models. Finished these scouts two days ago and snapped a pic today. Actually like these guys quite a bit...my first models that I painted were sniper scouts 3 years ago so might have to buy another box of sniper scouts and paint them up again. 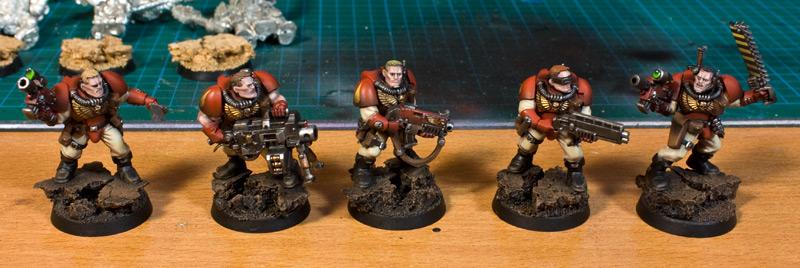 Next up...some work in progress pics. Here's a Baal Pred box with the following: 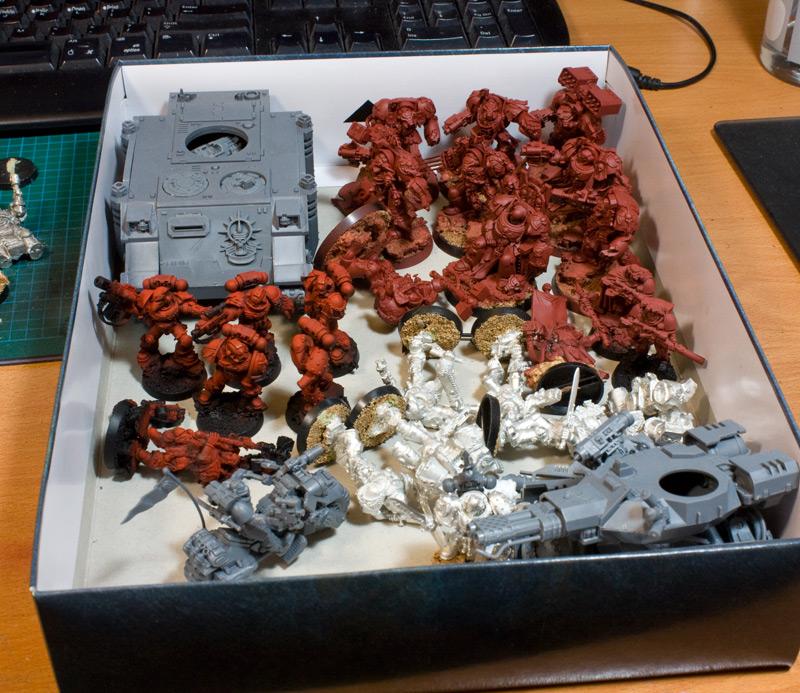 - Fully magnetized Baal Pred - 9 Space Hulk Terminators - 2 metal sniper scouts - Old Space Marine metal captain - Sternguard Squad - Vanguard Squad - Games Day Sergeant - Scout Biker - Librarian with Power Sword And some more stuff... 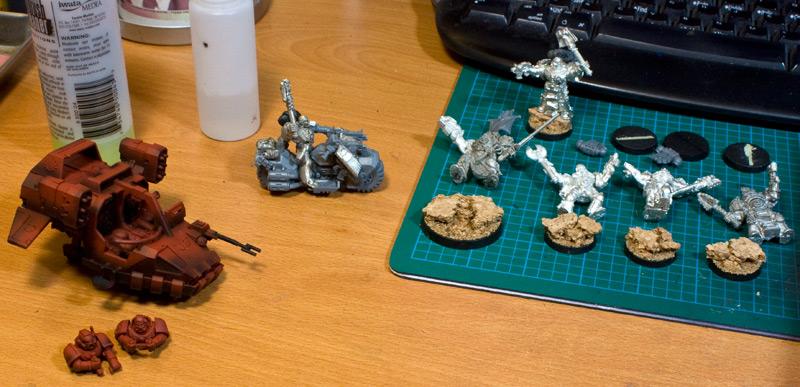 - Terminator Captain - Chaplain with skull mask/bolt pistol - Chaplain with powerfist - Chaplain with plasma pistol - Chaplain on bike - Land speeder I like the chaplains I've got all of the current range of chaplains. Trying to collect all the librarian models too...just missing the one with the power axe. That and Tycho are the only few HQ's left for me to collect from the current range.
|
|
This message was edited 1 time. Last update was at 2012/07/23 04:48:36
|
|
|
|
2011/10/03 16:07:14
Subject: Eggroll's Blood Angels
|
|
Homicidal Veteran Blood Angel Assault Marine
|
Thanks guys!
Tom - I've actually slowed down from the pace I had this summer. If it wasn't for school I'd have a lot more done by now. I also know you've been slacking, been eagerly waiting an update on that space hulk thread of yours though I guess you've got your hands full at the moment with the upcoming Tom Jr.
I haven't thought much about the successor squad yet. I think I'll probably do a simple 5 man tac squad with a Lamenter, Angels Sanguine, Flesh Tearer, Angels Encarmine and Blood Drinker marine all kited out with some decent weaponry and bionics. Almost sort of a deathwatch squad. Oh yeah, I also need to add Seth to my collection too. Soooo many models to paint.
|
|
|
|
2011/10/10 02:16:07
Subject: Eggroll's Blood Angels
|
|
Homicidal Veteran Blood Angel Assault Marine
|
Cheers Farty!
LutherMax - Yeah, my cabinet is filled to the brim. I've got another one though in different colour so my OCD prevents me from placing it right next to it and spreading the models out. I'm gonna look into buying a 3rd that's going to be the same colour so I can put two side by side soon!
About the black lining, I just use black paint and my trusty WN7 brush to do all the details.
|
|
|
|
2011/10/10 17:07:05
Subject: Eggroll's Blood Angels
|
|
Homicidal Veteran Blood Angel Assault Marine
|
Oh, thanks for the heads up Knightley. Like Alpharius said, got a link? Is it one of his vblogs?
|
|
|
|
2011/10/11 07:10:59
Subject: Eggroll's Blood Angels
|
|
Homicidal Veteran Blood Angel Assault Marine
|
Thanks dakkagrot187.
Knightley - Thanks for that. I looked through some of his other vlogs and they were soooo looooooong. Good to have a direct link
|
|
|
|
2011/10/11 22:57:54
Subject: Eggroll's Blood Angels
|
|
Homicidal Veteran Blood Angel Assault Marine
|
dakkagrot187 wrote:i really think you should play im sure you will love it
Probably but at the moment I just don't have the time. Plus, I don't know anyone that does play the game and driving 30 mins to the nearest hobby shop, which has 2 tables to play, to try and get a pick up game as a newbie doesn't appeal to me. I'm happy painting for now.
|
|
|
|
2011/10/14 05:38:19
Subject: Eggroll's Blood Angels
|
|
Homicidal Veteran Blood Angel Assault Marine
|
|
|
This message was edited 1 time. Last update was at 2012/07/23 04:50:23
|
|
|
|
2011/10/14 16:06:39
Subject: Re:Eggroll's Blood Angels
|
|
Homicidal Veteran Blood Angel Assault Marine
|
Northen wrote:Again, super quality models.
This blog is great inspiration for building up an army.
Thanks!
Meph wrote:D00d! Those. Are. Gorgeous!
As the quality is so high, I'll bump up my critiques a level as well. Two minor comments...
The OSL on the plasma gun seems seriously overdone. Those coils have no direct line of sight to the side of the gun so it seems a bit unnatural that the whole gun is coloured so harsly.
And the heat colouraion on the melta gun nozzles is too harsh and too blue. you should slowly layer it up in different colours, some red, some purple, some blue. Applied in thinned layers to gently create a gradient. Now it's just a thick band of blue.
Thanks Meph and I completely agree with you about the plasma gun. I pulled back too much when doing it and made a mess of it...got lazy and didn't want to repaint the whole gun so I left it as is. For the melta, I think it was the lighting and angle, normally you can barely make out the blue and looks mostly black.
Northen wrote:Again, super quality models.
This blog is great inspiration for building up an army.
Thanks Northen!
slice'n'dice wrote:Impressive as always - can't wait to start my marines, though I'm pessimistic about my ability to come close to yours...
I've started toying around with colours (using a brush), but just feel their a bit bright. Looking forward to finding time to purchase an airbrush, and then finding time to learn how to use it, and then finding time to start my marine force...
I'll definitely be 'borrowing' a lot from what I've learnt in your thread - just hope it all comes out somewhere in the vicinity of 'as good'... but won't hold my breath for the first few rounds...
Thanks slice. We all start somewhere so don't worry about matching my or others ability from the start. My first models I attempted looked like crap...bad enough that I almost gave up on airbrushing. Definitely give airbrushing a go if you're interested and keep at it, it's something that requires practice and patience but the end result is worth it.
Dimetry100 wrote:Fine work!
Painting of figures very much impresses!
Dmitry.
Thanks Dmitry!
Nightfall wrote:MY 500th POST!!!
Oh MY... these are AWESOME! I am so getting an airbrush... which model airbrush do you have?
Thanks Nightfall. Congrats on 500, I still have a ways to go before I get there. I normally use my Iwata Revolution BR airbrush though I also have an Infinity 2 in 1 and a Veda from ebay. If you check a few pages back, I go over in detail my setup and includes pics too.
|
|
|
|
2011/10/14 21:20:10
Subject: Re:Eggroll's Blood Angels
|
|
Homicidal Veteran Blood Angel Assault Marine
|
GreyDeathOne wrote:  beautiful! Perfect lighting and shading. . ......Now we wait for the american judges......10. 10. 10. 10 10!!! A perfect score by the Canadian artist!!!!!
(sorry feeling a bit cheeky)
Thanks Grey! I appreciate the cheekyness.
LutherMax wrote:Sternies! Awesome! I agree on the plasma gun comment but otherwise top notch quality as always. I like the little sooty exhaust detail on the back of the legs
I love these models and bought them ages ago in metal but didn't get around to painting them. I then succumbed to the resin versions thinking they'd be a LOT easier to prep but all the gun straps have holes in them! So now I have both and can't decide which to paint and which to stick on eBay...
Did you find these guys a bit of a paint to clean up mould line-wise?
EDIT: Also, how do you rate the Iwata against the H&S? I have the Infinity 2 in 1 also so would be interested to hear how they compare for you.
Thank Luther. I prefer metal to fine cast though I actually don't have any experience with the fine cast stuff. I'm used to working with metal, pinning and filing and from a collector's perspective, metal feels better and more "valuable". Mold lines on the sternguards weren't that bad, standard lines as you would expect to see on any GW metal minis.
As for the airbrush comparison, the Revolution BR is in a different class. The revolution is a cheaper brush that targeted towards beginners with less features. The Infinity is more of a middle of the road kind of airbrush. That being said, I've used my 2 in 1 once since I got it... The iwata and the cheapo Veda airbrush have both done a good job for what I need it to do. However, next time I need to do finer work I'll probably break out the Infinity. The smaller 0.15mm nozzle size means it clogs a lot easier and is also easier to bend.
Emperors_Champion wrote:I knew as soon as I clicked . . . I really shouldn't of looked before finishing my Tau! . . . Darn you Eggroll, darn you! 
Oh well, back to the Blood Angels!
Thanks EC...if these guys get you back on the BA horse then I'm glad! My army is getting pretty big too, you'd better get back to your BA's before you lose the spot of having the biggest painted BA army around here
|
|
|
|
2011/10/18 18:02:08
Subject: Re:Eggroll's Blood Angels
|
|
Homicidal Veteran Blood Angel Assault Marine
|
Thanks Solar_lion.
MakeH wrote:I really enjoy your ability to paint combining multiple tools and techniques.
I found that even the simpler methods in airbrushing can be somewhat difficult for me. Seeing superior stuff like yours motivates me to keep practicing.
Thanks. The airbrush, like any other tool, requires patience and practice. In fact, given the technical complexity of the airbrush/compressor, the ramp up time is usually a lot great than normal methods of brush and paints. I almost gave up when I first started out. The first few models I did I stripped a few times over to get anything decent and I had a hard time getting the right air pressure, paint mix dialed in. In the end the persistence was worth it though so don't give give up and keep practicing!
|
|
|
|
2011/10/18 20:59:37
Subject: Re:Eggroll's Blood Angels
|
|
Homicidal Veteran Blood Angel Assault Marine
|
MakeH wrote:I am starting to think that the tip "consistency of milk" has been my biggest issue My paints have been too thin, but DakkaDakka is the perfect place to find inspiration to keep shooting that paint on minies.
Yup, the tip is a load of bull. I generally shoot paint that's thicker. My general rule of thumb is 50/50 mix for both my airbrush and brush but it varies depending on the application. Milk is way too diluted and unless you're using alcohol to increase drying time, it'll probably end up running/splattering.
|
|
|
|
2011/10/18 23:48:46
Subject: Eggroll's Blood Angels
|
|
Homicidal Veteran Blood Angel Assault Marine
|
Alfndrate wrote:Do you mean alcohol to decrease drying time? As something that has an increased dry time would have more time to run...
Heh, yup, alcohol dries faster so that would be a decrease in drying time...bleh semantics
|
|
|
|
2011/10/20 07:27:18
Subject: Eggroll's Blood Angels
|
|
Homicidal Veteran Blood Angel Assault Marine
|
susejo239 wrote:The quality and detail on these models is immense. Perfect shading, highlighting, layering, and pretty much everything else I can can think of.
Subscribed.
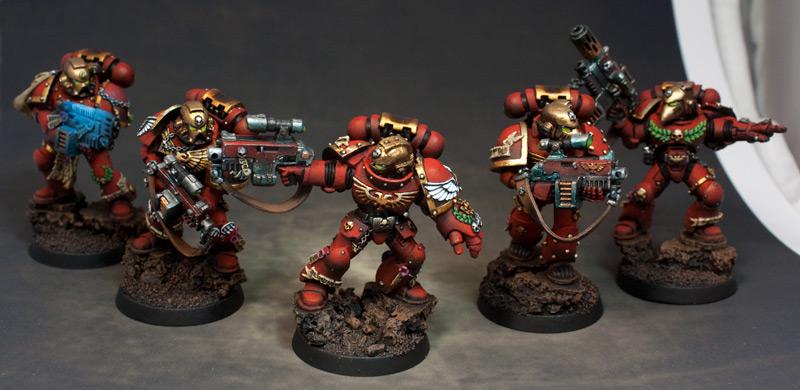
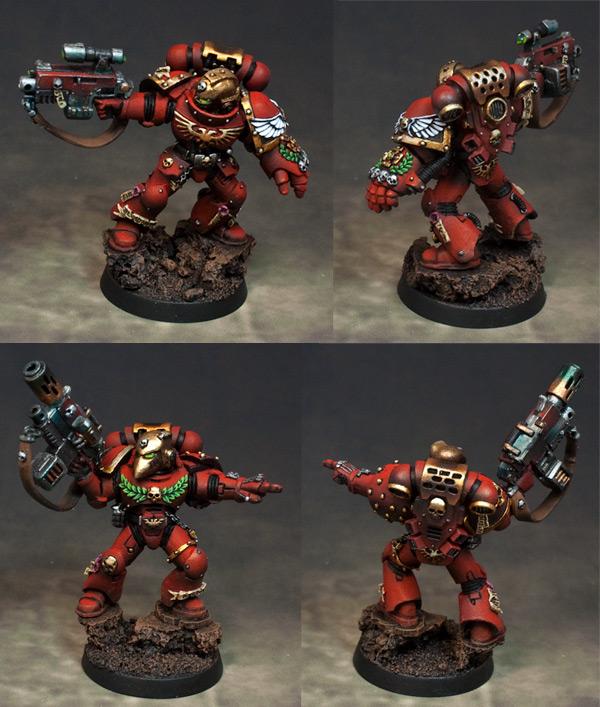
Thanks for the compliments susejo239! Alright, quick update as I just finished off the Games Day Model of the SM Sergeant. In my OCD question to collect one of every model from the current range, I was able to buy this from fellow forum member Bangbangboom. After getting rid of the Ultramarine paintjob I redid this guy in BA colours. I had him painted at the same time as my sternguards but spent extra time on him to pick out more details. 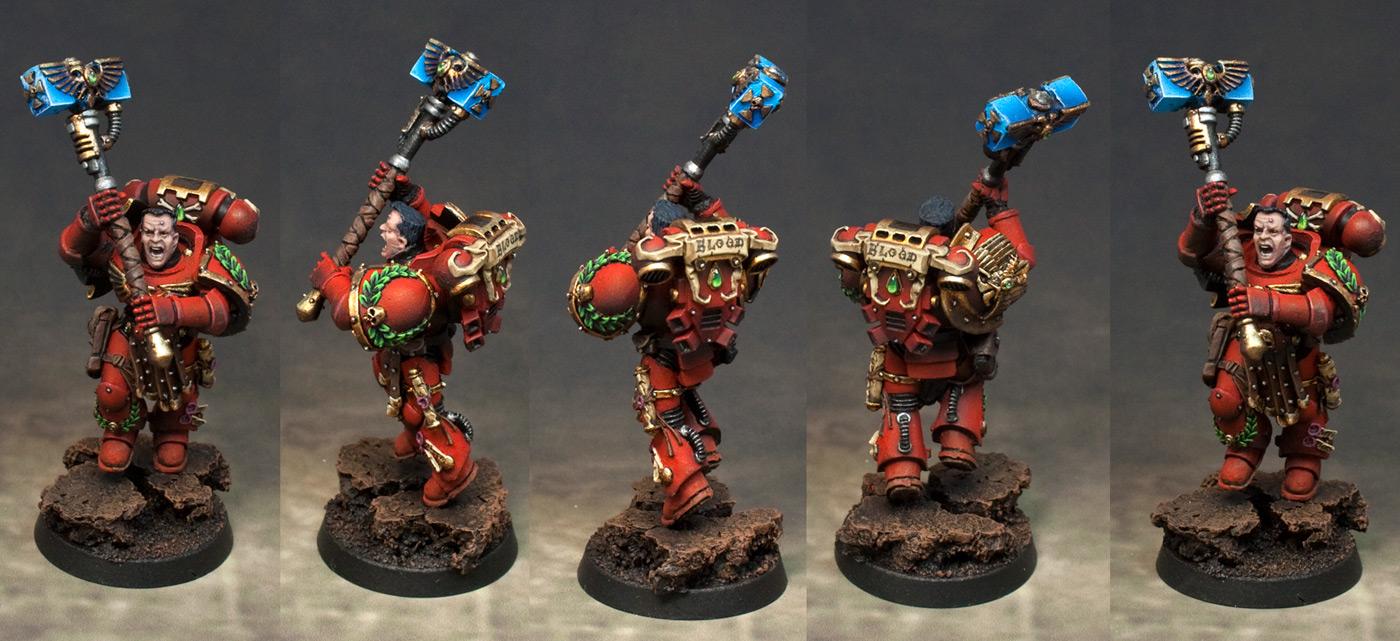
|
|
This message was edited 1 time. Last update was at 2012/07/23 04:51:07
|
|
|
|
2011/10/21 02:09:02
Subject: Eggroll's Blood Angels
|
|
Homicidal Veteran Blood Angel Assault Marine
|
HAZZER wrote:God, those guys must of kept you busy! Love the see the ball pred an SH temies too!
Yup, they take quite awhile and been busier than usual lately so haven't had as much painting time. Will have the baal and SH termies on the desk for painting soon!
GreyDeathOne wrote:Love it as usual!!  . Love that hammer!
Thanks Grey!
Gitsplitta wrote:Holy smokes Egg! Somehow I got unsubbed from your blog and have missed some great stuff!! Shame on me.
I just love the way the vibrant green and blue work against the red, and the gold accents throughout the armor... really outstanding work my friend.
Thanks Gits. I've been falling behind on my subs as well...not enough surfing time at work these days heh...work is too busy
Meph wrote:Wowsers! That looks superb mate! *Applause*
Thanks Meph!
Knightley wrote:That hammer is quite exquisite! and tips on how you got that effect going?
Thanks Knightley. For the hammer, the blue I did with an airbrush: Regal Blue > Enchanted Blue > Ice Blue > 50/50 Ice Blue/White > edge lined with white
The gold is something I'm really happy with on the whole model as well as the hammer. That was done by brush using Tin Bitz base, then Shining Gold and highlighted with Vallejo AB Gold. So happy with the results that I'm going to use that as my gold recipe from now on.
nerdfest09 wrote:Eggy! damn dude, this is by far one of your works i'm most impressed with! as usual the armour and paint are perfect for the BA and you have outdone yourself with the face on this guy, it looks brilliant, so animated and if i can say 'lifelike?' as far as 28mm models go! just amazingly good work, the spot colours of green and gold and executed so well and don't distract from the picture as a whole but just further accentuate the rest of the model! and of course the hammer is beautiful, nicely understated considering how you could have made the it the focal point but it works in perfect harmony with everything else!
top marks for you my friend! 10/10 :-)
Nerdfest09
Thanks as always Nerdfest It's also one of my favorite models that I've painted so far.
Rabid Ferret wrote:That sergeant with the hammer is, in my opinion your best work to date. Absolutely brilliant. It looks like you used a mix of airbrushing and wet blending on this model, is that right? Truly inspired sir.
Thanks Ferret, and yes, it's a mix of airbrushing and brush work. I don't use wet blending as it's not a technique I'm used to. The brush work I do for gradients is all with glazes.
JaydeeV2 wrote:After spending what must of been 2 hours reading through all the comments and viewing all the pictures you've shared in this topic, i'm blown away. I've never seen anyones army look so detailed! I paint BA myself, but nowhere near to the standard you're achieving, it's unreal! lol. Every following picture just raises the bar a little from what you previously done, outstanding work. Really amazing work, subscribed after only the first 2/3pages
Thanks Jaydee! This project has been time consuming but very rewarding for me and sharing it on dakka has helped keep me motivated to keep painting and improving. The hobby side of this wouldn't be the same without the comments and feedback from this forum.
|
|
|
|
2011/10/21 19:21:08
Subject: Re:Eggroll's Blood Angels
|
|
Homicidal Veteran Blood Angel Assault Marine
|
Thanks guys!
LutherMax wrote:
Great work on the Gamesday model Eggroll – I was surprised to hear you used the airbrush for the blue on the hammer – that's very finely detailed work! Did you airbrush the red armour in the way you described at the beginning of your thread, or glaze it up with a traditional brush?
Thanks. The red for the armor was done with airbrush. Brushwork was used for the smaller details.
SilverMK2 wrote:A quick cheeky question - I am wanting to do a half and half scheme on some marines where I airbrush each side with highlights/etc - what would you recommend to mask the models with?
I've tried masking tape in the past but found that on the uneven surface of a model it just lifts up and causes paint to creep under.
Is there any masking agent that you have found good for this?
Many thanks
Actually masking tape would probably be your best beat. Liquid masking agents would be too hard to control to achieve a straight line down the centre. If I was doing it, I would do the whole model as one first as LutherMax mentinoed, though I wouldn't shade/highlight the other half. Then I would use a brush to paint out the distinct line down the centre until it's straight and clean. After, I'd use masking take to follow the line as a mask. Using the airbrush I would do the normal basecoat/highlights/shadows using the masking tape to prevent overspray. I wouldn't actually spray right up to the masking tape since you mentioned it might lift. After the 2nd half is done, I'd go through and clean up the line and 2nd half airbrushed sections.
|
|
|
|
2011/10/24 02:08:04
Subject: Re:Eggroll's Blood Angels
|
|
Homicidal Veteran Blood Angel Assault Marine
|
Thanks for the comments guys! emperors assassin wrote:please tell me how to do the green power weapons on the HG! hope im not repeating someone, cause im way to lazy to reread 25 pages
Start with a black basecoat, airbrushed goblin green, then scorpion green, then 50/50 of scorpion green and sunburst yellow. Bangbangboom wrote:I preferred the old paint job egg Looks great I really like your painting style. I can't explain it, your painting looks a level higher then most whilst still retaining a "this can be done with just a little practise" look to it. Anyway how do you do your bases? I just can't find a mud look I'm happy with and yours are close in colour if not in texture to what I've been trying for.
Heh thanks Bang. The bases are really easy, just torn up cork with basing in between. Then black primer with calthan brown drybrush. Quick update: Finished off my 2nd land speeder. New one is the heavy bolter...old one is the multimelta 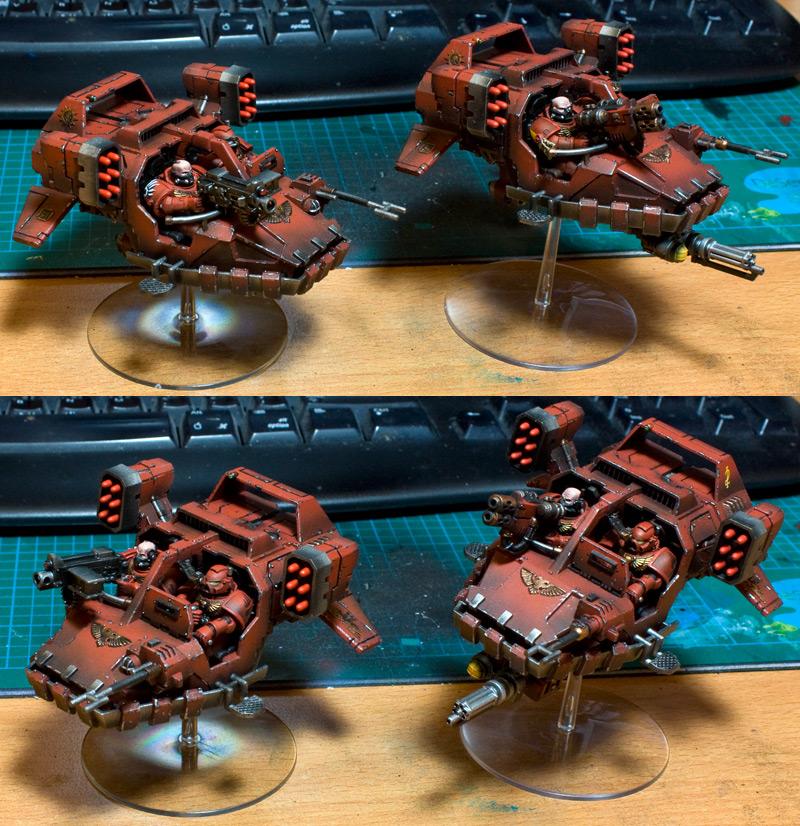
|
|
This message was edited 3 times. Last update was at 2012/07/23 04:54:10
|
|
|
|
2011/10/24 17:26:12
Subject: Eggroll's Blood Angels
|
|
Homicidal Veteran Blood Angel Assault Marine
|
Thanks Northern, Meph and Farty
nerdfest - Huh? Where are you pulling your finger out of and what is a speeder off? I think I'm missing something here...
|
|
|
|
2011/10/25 23:24:55
Subject: Eggroll's Blood Angels
|
|
Homicidal Veteran Blood Angel Assault Marine
|
Unluckyguardsman wrote:The latest speeder looks very good eggroll! Just one small bit here: the heavy bolter looks rather clean, maybe a bit of burn/rust would look good. But, who am I to criticize work that is far beyond my own?
UG
Thanks UG. Your point is certainly valid and you don't need to be a good painter to critique other people's work. I did do some weathering on the bolter with a dry brush of boltgun metal. I would dirty it up more but then it wouldn't fit in with the other weapons I've been painting so far so I'll probably leave it as is. Otherwise it's a very good point.
|
|
|
|
2011/10/26 17:19:57
Subject: Eggroll's Blood Angels
|
|
Homicidal Veteran Blood Angel Assault Marine
|
Thanks Luther. I've done enough tanks and vehicles now that I've gotten so used to my process that it's easier and easier for me to replicate it on new models.
Good to hear both you and google image search held my DC in such high regard Let me know when you have pics posted.
|
|
|
|
2011/10/28 02:55:34
Subject: Eggroll's Blood Angels
|
|
Homicidal Veteran Blood Angel Assault Marine
|
Imperial Monkey wrote:Eggroll wrote:Unluckyguardsman wrote:The latest speeder looks very good eggroll! Just one small bit here: the heavy bolter looks rather clean, maybe a bit of burn/rust would look good. But, who am I to criticize work that is far beyond my own?
UG
Thanks UG. Your point is certainly valid and you don't need to be a good painter to critique other people's work. I did do some weathering on the bolter with a dry brush of boltgun metal. I would dirty it up more but then it wouldn't fit in with the other weapons I've been painting so far so I'll probably leave it as is. Otherwise it's a very good point.
It makes sense for the weaponry to be cleaner than the armour. Were it to be rusted, or to rust up then the weapon would start to malfunction, so it's more realistic to have it "clean" maybe dulling it down from shiny metal would improve it. Besides, fluff suggests that marines particularly take great pride and time in keeping their weapons in order and ship shape, as would (I guess) chapter techmarines and serfs.
Anyway. Great stuff Egg, really impressive. And on both GW site and miniwargaming. Impressive.
Thanks!
Skippy wrote:They are truly amazing, I've always loved Blood Angels and these are the best I've seen!
I have the same airbrush as your first one, the Iwata rev BR. I always seem to have trouble with the flow reducing after a couple of minutes, I have to give it a big blast off the mini and then its back to normal, have you ever found this? It means I often dont know what the flow of paint is going to be like at a certain trigger position.
I keep it very clean, stripping it right down after using it so its not dirty and I use Vallejo or GW thinned with Vallejo thinner.
Yeah, I get in a habit of blowing it with the needle all the way back on an empty area of my workspace to clear off the tip before I move over to the model. I do this everytime I stop/start. I often find that there are small drops left over at the tip and if you don't blow that off before starting out, you'll get big splatters on your model. You sound like you take better care of your AB than me, I used to be good about stripping it down and cleaning it after each use but I"ve gotten lazy and do it only now when it really gums up inside
chrisyella wrote:The laurel wreaths on your armor is outstanding, I can't seem to get my greens so smooth (but I'll keep trying  )
Also the hair on your helm-less marines is great too, little details like that make miniatures really pop out IMHO
Thanks for sharing your work!
Thanks. I've been starting my laurels on a black basecoat and using P3 Gnarls Green as a base, then GW Goblin Green, then Scorpion Green and finally 50/50 mix of Scorpion Green/White at the very tips.
LutherMax wrote:Imperial Monkey wrote:Eggroll wrote:Unluckyguardsman wrote:The latest speeder looks very good eggroll! Just one small bit here: the heavy bolter looks rather clean, maybe a bit of burn/rust would look good. But, who am I to criticize work that is far beyond my own?
UG
Thanks UG. Your point is certainly valid and you don't need to be a good painter to critique other people's work. I did do some weathering on the bolter with a dry brush of boltgun metal. I would dirty it up more but then it wouldn't fit in with the other weapons I've been painting so far so I'll probably leave it as is. Otherwise it's a very good point.
It makes sense for the weaponry to be cleaner than the armour. Were it to be rusted, or to rust up then the weapon would start to malfunction, so it's more realistic to have it "clean" maybe dulling it down from shiny metal would improve it. Besides, fluff suggests that marines particularly take great pride and time in keeping their weapons in order and ship shape, as would (I guess) chapter techmarines and serfs.
Anyway. Great stuff Egg, really impressive. And on both GW site and miniwargaming. Impressive.
Basically, the marines take as good care of their guns as Eggy does of his airbrush
Heh, I actually don't take as good care of my AB as I should be . I only clean it when it jams...really not a good idea for a marine to do to his weapon.
nerdfest09 wrote:Yeah sorry Egg, I forget sayings get confused across the waters! to 'pull your finger out' means to actually do something you need to do or have said you would do and make a concerted effort in doing so! and to have a 'speeder off' is reference we sometimes use as in when you watch a movie and they have a 'dance off' or an 'eat off' or some form of competition against someone, so i was tongue in cheek challenging you to a 'speeder off' competition :-)
to surmise, I need to actually finish my speeders to a level that would hopefully be somewhat close to yours to gain some form of praise!
now keep painting dude! love your work! it makes me want to do more every time i see what you do!
Nerdfest09
Ah, thanks for the explanation Nerdfest.
Ogryn wrote:Nicely done!
Thanks!
|
|
|
|
2011/10/30 04:59:12
Subject: Re:Eggroll's Blood Angels
|
|
Homicidal Veteran Blood Angel Assault Marine
|
Ahx wrote:I just spent the last hour reading this entire blog from start to finish and I just have to say (Like 99.9% of the people in this thread) Wow, just amazing. I'm only just starting my Blood Angels army now, but eventually I think I'll definitely be using your glow and weathering techniques
Hopefully one day I'll be able to paint just like you do! Thanks so much for sharing this with the community.
Thanks Ahx!
HAZZER wrote:They both look really good together It would look even better if you had 2...wait you have 2... how about 4!...Now wait ive go it... how about 3!!! No seriously 3 would look good! BTW how do you do your battledamage it just looks soo good!
HAZZER
Thanks Hazzer. I actually have another speeder still in shrink wrap and a land speeder storm as well .
Battle damage is done with brush, I just blot out all the chips along the edges with black first and then go over them with boltgun metal. Then a light dry brush of boltgun metal.
chrisyella wrote:Eggroll wrote:
Thanks. I've been starting my laurels on a black basecoat and using P3 Gnarls Green as a base, then GW Goblin Green, then Scorpion Green and finally 50/50 mix of Scorpion Green/White at the very tips.
Thanks Eggroll! I totally expected a yellow to be used at the tips.
Again, great work!
Not a problem. Thanks!
|
|
|
|
2011/11/03 15:54:58
Subject: Eggroll's Blood Angels
|
|
Homicidal Veteran Blood Angel Assault Marine
|
Thanks Ogryn.
LutherMax - Nothing new anytime soon. Been too busy lately with work and school. Going to try and get to my space hulk terminators soon though.
|
|
|
|
2011/11/03 17:02:16
Subject: Re:Eggroll's Blood Angels
|
|
Homicidal Veteran Blood Angel Assault Marine
|
MakeH wrote:When I received email that the op has posted again, I had to rush to dakka to take a look (hope to see something new soon but sometimes rl is a bitch)
I know it has been asked before and that you have replied, but I would also like to convey a sincere request for a vehicle and infantry tutorial if you have the will to add one. I am personally interested in your way of airbrushing. Also, your weathering is superb.
Sorry to disappoint . I'll see what I can do about doing a more step by step log of my painting process sometime in the future. No promises though as my painting time is a lot reduced these days and having to pull out the camera and tripod to snap photos is a bit of a hassle.
|
|
|
|
2011/11/04 05:06:34
Subject: Eggroll's Blood Angels
|
|
Homicidal Veteran Blood Angel Assault Marine
|
LutherMax wrote:Eh, I hear ya. I'm in the same boat at the moment. I too have inclinations towards Space Hulk... I have the box, but I'm so stressed about doing the models justice that I bought a single duplicate Scipio to use as a test model before I go at 'em!
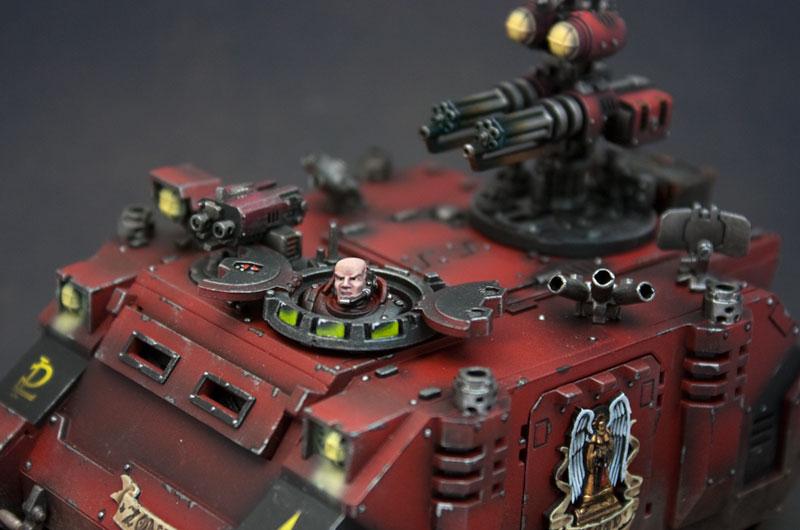
I don't bother trying to save good models for later anymore. Got too many to paint and if I try to save them, I'll probably never get around to it. @GDO - Thanks! Next up are these SH termies. I got around to doing the highlights and shadows with the airbrush tonight. Also been building a land speeder storm which you can see in the background and a command rhino using a few FW kits. 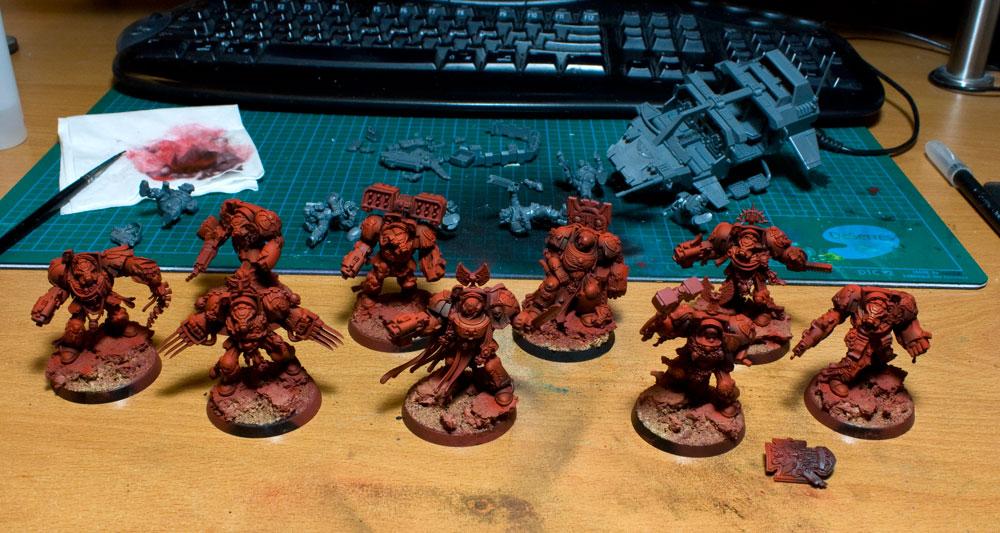 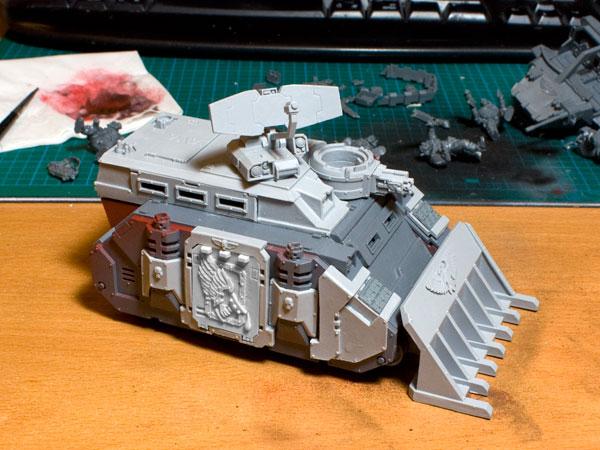
|
|
This message was edited 2 times. Last update was at 2012/07/23 04:55:07
|
|
|
|
2011/11/04 16:04:19
Subject: Re:Eggroll's Blood Angels
|
|
Homicidal Veteran Blood Angel Assault Marine
|
MakeH wrote:Rhino looks really cool, although the dozer blade looks a bit wonky 0o
Yeah, it is quite a bit different from the standard dozer blades. It's magnetized though so it'll be easily removeable once painted.
Gitsplitta wrote:Your airbrushing just looks so effortless Egg... makes me want to bang my head against the wall.
OH, and i wanted to thank you for the inspiration you provide with your fine work. I've been painting my 2 LS Storms and the airbrushing technique I used on them, which worked quite well... was inspired by your speeders. It's not the same approach as yours... but something about your technique flipped a switch in my head and the end result was a couple of nice looking vehicles.
Thanks man! You're a real asset to the Dakka community. Please keep the parade of awesomeness coming!
Thanks Gits! Always happy to hear people are getting something from my hobby log.
DarkStarSabre wrote:Beautiful. I'm now wanting an airbrush but my own style wouldn't mesh well enough with it!
Thanks. Airbrushing does produce a pretty distinct look that does set it apart from hand painted stuff. I know what you mean about it not meshing with other methods. Airbrushing doesn't have to be for the whole model though as you can always use it to just shade your metallics or other smaller pieces.
Miss Dee wrote:get the model air paints
Huh?
Zefig wrote:Whoa, that command rhino is looking really beefy and really awesome. Love the use of all the kits, and I must say that's gotta be one of the most monetarily expensive rhinos I've ever seen, haha. Definitely looking forward to seeing that finished.
Thanks, and yes, the rhino is expensive once you add up the price of all the different kits. Originally I had planned to use them separately as I have two unbuilt rhino chasis but since it was going to be a command rhino, I figured I needed to beef it up with armor and all that.
|
|
|
|
|
|