Switch Theme:

Mini Tabletop Warriors blog post 3/23  [RSS] Share on facebook Share on Twitter Submit to Reddit
»
Author Message
Advert


Forum adverts like this one are shown to any user who is not logged in. Join us by filling out a tiny 3 field form and you will get your own, free, dakka user account which gives a good range of benefits to you:
  • No adverts like this in the forums anymore.
  • Times and dates in your local timezone.
  • Full tracking of what you have read so you can skip to your first unread post, easily see what has changed since you last logged in, and easily see what is new at a glance.
  • Email notifications for threads you want to watch closely.
  • Being a part of the oldest wargaming community on the net.
If you are already a member then feel free to login now.


Made in us
Stalwart Ultramarine Tactical Marine


Seattle, WA


Tonight I am going to start painting on some of the newer models in my collection that I am going to be bringing to TSHFT. In doing so I will go through the process of what I do when I paint them up. If any of you see any real flaws in what I am doing please let me know so that I can change bad habits.

The first thing I do with my minis is clean them, file off the mold lines, and then prime them with black primer. I was thinking about doing white for the scouts but decided against it and went with the black. Once that is done I dry brush the whole mini in boltgun metal. This brings out the details of the mini and let's you know where all the shading details should be. It's like a guide coat for your placement of paint and highlights. Here is an example that I photographed earlier tonight.


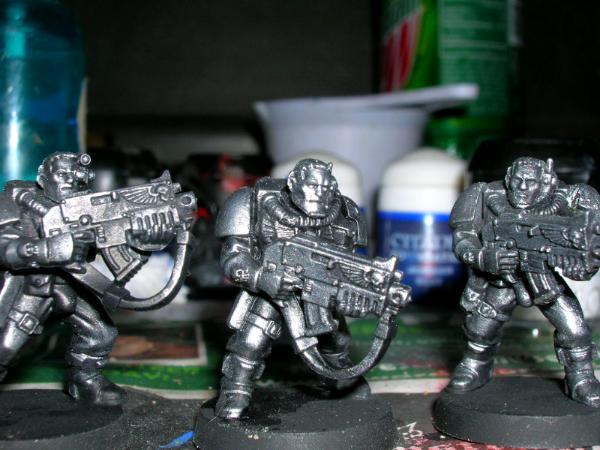
You can see that when you do this the details of highlight and shadow really stand out. Take a look at the pants and the arms, also the highlights and shadows in the face are more defined to. This is a real dry brush to. There is barely any paint on it at all. It is even dryer than a dry brush would normally be. I actually used a bit to much paint for these.

Anyways now when I go to paint the actual colors onto the mini I will be able to make out the highlights that I want to accentuate while keeping brighter colors away from the shadows easily. I was taught this technique by an excellent top notch painter who probably would not want me to expose his name here. His technique is much more precise and expert than mine but I took what he taught me and have tried to batch paint with it. It has worked fairly well so far but the results are far from the master of this technique. You know who you are.

Anyway that sums up the basic steps I go through when starting a model. I will post more techniques as I go through the posts and may even post more tonight. I would not count on it though. I am going to bed soon. LOL. Thanks again for following the blog. I really appreciate it.
   
Made in au
Shas'la with Pulse Carbine


Standing right behind you...

Good luck with that.

'I once tried to kill the World's Greatest Lover...but then I realized there were laws against suicide,' Sideshow Bob. 
   
Made in gb
Ork-Hunting Inquisitorial Xenokiller


If I knew, I'd tell you.

Your pretty screwed now you have base coated the models metallic.....

The oonivers vill burn!  
   
Made in us
Screamin' Stormboy


Indiana

Youve gone a roundabout way of solving a problem that could also be solved by buying a nice desk lamp.

A good light source is all you really need to be able to pick out those details. Some even come with a moveable 'arm' with a magnifying glass on it. Id imagine you can find one at wally world for under 20$ and itll really come in handy for other projects too.

And it wont distort the layers of paint that come after like metallics will.

It could be worse, you could be on fire.  
   
Made in us
Stalwart Ultramarine Tactical Marine


Seattle, WA

FreekyE wrote:Youve gone a roundabout way of solving a problem that could also be solved by buying a nice desk lamp.

A good light source is all you really need to be able to pick out those details. Some even come with a moveable 'arm' with a magnifying glass on it. Id imagine you can find one at wally world for under 20$ and itll really come in handy for other projects too.

And it wont distort the layers of paint that come after like metallics will.


Thanks for your opinion but I don't think it distorted the paint all that much. I will do one without the metal undercoat and see if it comes out any better. Here is one of the minis I did with the metallic undercoat.


I have a desklamp. I uses white light and I use it all the time. Do you think the paint was distorted by looking at this image?
   
Made in us
Focused Dark Angels Land Raider Pilot


585NY

surprisingly, the only really dodgy part i see on this is the face...


and the fact that its an ultramarine

but really, fine work


Made in us
Stalwart Ultramarine Tactical Marine


Seattle, WA

krusty wrote:surprisingly, the only really dodgy part i see on this is the face...


and the fact that its an ultramarine

but really, fine work


Thanks for your kind words. You are right about the face. It is dodgy and I need to clean that up at some point. I let the paint flow a bit to loose on him and the eyes are painted to big. It looks better in person but you can still see the errors around the eyepiece and the face. I does not worry to much though because I know I can make it better. If the metallics warp anything it's the flesh tones.
   
Made in cn
Fresh-Faced New User


NOT when the good-looking color on
   
Made in us
Stalwart Ultramarine Tactical Marine


Seattle, WA

cheapman wrote:NOT when the good-looking color on


I am sorry but I don't understand. What are you trying to say?
   
 
Forum Index » Dakka P&M Blogs
Go to: