| Author |
Message |
 |
|
|
|
|
Advert
|
Forum adverts like this one are shown to any user who is not logged in. Join us by filling out a tiny 3 field form and you will get your own, free, dakka user account which gives a good range of benefits to you:
- No adverts like this in the forums anymore.
- Times and dates in your local timezone.
- Full tracking of what you have read so you can skip to your first unread post, easily see what has changed since you last logged in, and easily see what is new at a glance.
- Email notifications for threads you want to watch closely.
- Being a part of the oldest wargaming community on the net.
If you are already a member then feel free to login now. |
|
 |
2017/01/23 21:30:10
Subject: Realistic Painting
|
|

Cultist of Nurgle with Open Sores
|
So I'm simply looking for advice...
Right now, I tend to paint with a mind to emulate the "GW" style of painting. That is to say, I prime, lay down base color blocks, shade, layer, and highlight. Very little blending (I think the most I've done recently is the hair on some Harlequins). While I like the style of exaggeration in this method, picking out every detail and making it quite noticeable, I can't help but feel it's not my cup of tea. Today, I watched an AoS Battle Report from The Long War that involved Orruks painted by Kenny at Next Level Painting. I don't use an airbrush (not out of choice, but they are too expensive for my current living situation) and I prefer to do everything by brush, including priming. My main thought process is that I want to do more realistic painting. The Orruks in that video were extremely well done, the yellow looked real and only had very selective edge highlights, and the skin didn't have any edge highlights and was very well shaded to look organic rather than...I don't want to say cartoonish, but that's really the best way to put it. I realize each technique has it's place regardless of style, like edge highlights on hard-edged metal/stone, etc.
I suppose my question is...would glazing instead of regular layering go a long ways towards solving my issue? Rather than base coat->optional layer->shade->layer(s)->highlight, would base coating in the primary color I want to end up with and then applying selective shades and glazing on selective, subtle highlights move me towards "realistic" painting? Obviously there are things like daemons or wizards that would require an unnatural brightness or exaggeration of colors and whatnot, but for like the Guard, or Orruks, Flesh Eaters, Seraphon, Nurgle, etc...things that would appear more "grimdark" or imposing without silly looking highlights.
Does this make sense? Or am I terrible at asking this question? 
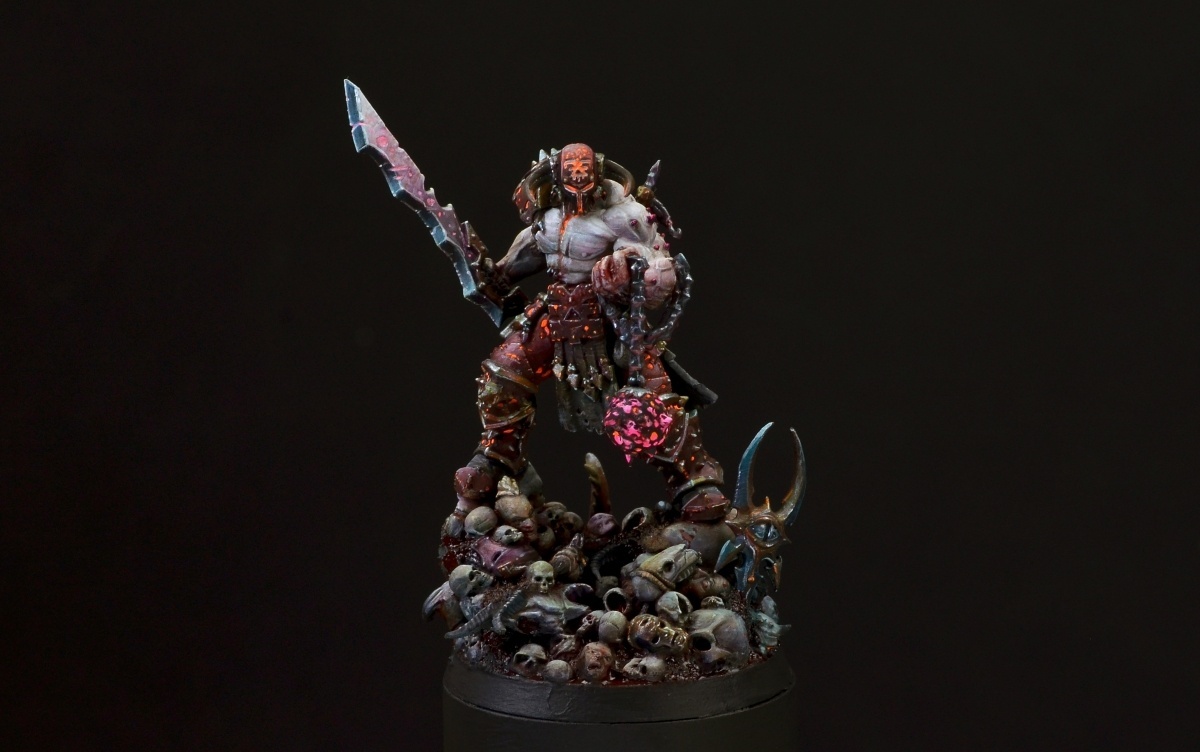
These are not mine, they are from a quick Google Image search, but this is what I mean. Same model, but the GW style is more about pronounced, bright coloration that discloses every little detail in an exaggerated fashion (to my eyes, anyways) and the second (credit to whoever painted that, and I'm sorry if it's frowned upon to grab the image off of Google) is painted in a muted, more realistic kind of scheme. Don't get me wrong, both models are brilliantly done, I just find myself drawn more to the realistic scheme as I can't see Khorne worshippers sitting around polishing their armor and taking baths...and to me, the realistic one looks much more "savage" than the GW one.

I suppose I'm just trying to figure out how the highlighting/shading process goes for the realistic painting style since I've never dabbled in it.
Thanks in advance, guys.
|
 10,000+ points Death Guard, Traitor Guard, and Nurgle Daemons; 10,000+ points Death Guard, Traitor Guard, and Nurgle Daemons;
Sylvaneth |
|
|
 |
|
2017/01/23 21:56:44
Subject: Realistic Painting
|
|

Is 'Eavy Metal Calling?
|
As someone who paints in this kind of style an awful lot, here's a few tips:
1: Start from a black undercoat if you're not already. White or grey undercoats will give you vibrant, bright colours which are often a handicap with this kind of style.
2: Instead of highlighting up, the bulk of your work should be shading down. From your basecoat, use washes and glazes to darken areas rather than layering up to lighter ones. While some highlighting still helps, ideally you don't want to be going more than one shade lighter than your original base colour, or even just using your base as the final highlight. To use a very basic example:
- Base an area in a mid-brown, wash it with Agrax Earthshade all over, wash with Nuln Oil into the recesses and shadowed areas, then retouch the raised areas with your original colour. Done. You still get a strong colour from the final highlight, but it's a very muted finish which is important.
3: Think about texture. With the GW style you mention, SM armour, Eldar Robes and IG tanks all have the same very smooth look, the key to grittier looking models is to work some texture in. For rough textiles, heavily drybrush, for worn metallics, sponge on some chips, for sharp corners, emhpasis the edges, for smooth areas build up layers carefully and get a nice, even finish. So on and so forth. Rather than thinking 'I'm going to paint this coat brown', think 'I'm going to paint this coat as brown leather' and thus apply scratches, worn patches ect to really sell that and bring it to life.
4: Don't fret about neatness if it's not called for. If you're painting a beat-up tank, inconsistency in a colour isn't necessarily a problem; in-universe it was probably painted and re-painted by some Guardsmen who had much more important things to be doing, so they're not going to have done a perfect job either. Take time on the areas that need it, of course, but if in 'reality' an area wouldn't be super-neat or clean then your paintjob needn't be to.
5: Mix your paints rather than going with the GW base/layer/edge system. Mixing gives you much greater control over the colours and tones, and can be very important to getting the look you want. A red highlighted by mixing some light brown in is going to give a warm finish, good for leathers or banners or fatigues, the same red highlighted by mixing in light grey is going to come out colder, maybe better for armour plating or gun casings ect. Using consistent colours for lightening and darkening tie all the tones of a model together, so you can engineer a much more coherent and less garish look if that's what you're going for.
One final note is that model choice does matter for this; you can Grimdark Eldar or Tau, but it's going to bea lot more work that giving the same treatment to some Space Wolves, Orks or Death Korps that suit the style much better.
Hope that's of some help, let me know if you have any questions on it.
|
|
|
|
|
|
2017/01/23 22:30:15
Subject: Re:Realistic Painting
|
|
Cultist of Nurgle with Open Sores
|
Wow! Yes! That is exactly the kind of input I was looking for, thank you.
I can admire the skill involved in the vibrant painting of the GW style, but I feel more drawn to the grittier, down to earth kind of style like you described. I do a bit of "commission" painting for my local shop owner and anyone he directs my way, and they mostly want the GW style, which is perfectly fine and I'd like to think I have a bit of experience in that, but I'm looking to make my own armies quite grimdark. I'm currently painting a Harlequin force for the store, and it's grey primer and bright colors all around. I do prefer to prime in black, though, and the way you've described it makes much more sense. Almost the opposite of the GW method, in that you start bright and darken, rather than start dark and lighten. Simple paraphrasing, but the idea is there. I just want my Nurgle Chaos Marines to look like they crawled through Nurgle's Garden, my Flesh Eater Courts to look like they've been lurking in abandoned castles and feeding out of graveyards, etc. The texture-based way of thinking is something I can't believe never crossed my mind...but for putting it there, thank you 
Also just looked at your profile, realized I've seen your work multiple times on the front page, and that is exactly the style I'm thinking of!
|
|
This message was edited 1 time. Last update was at 2017/01/23 22:51:10
10,000+ points Death Guard, Traitor Guard, and Nurgle Daemons;
Sylvaneth |
|
|
|
|
2017/01/24 00:41:15
Subject: Realistic Painting
|
|
Is 'Eavy Metal Calling?
|
To further the texture thing, a good habit to get into is just looking at real life examples and working out how you'd go about painting that. Next time you see some rusted metal or worn leather or carved wood or basically anything you're likely to paint, just take a quick reference picture if you have a camera handy, then try and emulate it on a mini. Focus on how the light interacts with different surfaces, how they are affected by colour, that sort of stuff. Eventually, you'll build up a 'toolbox' of techniques to apply, mix and match where necessary.
|
|
|
|
|
|
2017/01/24 02:52:48
Subject: Realistic Painting
|
|

Grizzled Space Wolves Great Wolf
|
A lot of it just comes down to shifting your colour palette away from "vibrant" to "realistic" or "gritty" and focusing less on eye-popping edge highlights and more on smoother shadows.
It also depends whether you're going for "realistic" or simply "dark and gritty". I try and do "realistic" on my historic models which isn't necessarily all that dark and gritty.
One technique used by historic modellers to overcome the excessively vibrant problem (aside from just mixing your own duller colours) is to paint the model with the vibrant colours and then use THIN glazes of browns, greys and blacks to knock it back to a more realistic look.
|
|
|
|
|
2017/01/24 13:40:32
Subject: Re:Realistic Painting
|
|
Cultist of Nurgle with Open Sores
|
Whether I choose to go for "realistic" or "dark and gritty" would definitely be a choice made on a mini-by-mini basis, but I would take either of those over the vibrant style, unless it's a mini that would seemingly fare better with that style, like maybe Harlequins or Tzeentch daemons (in my opinion). Either way, I'd like to be able to do all of them, and have the ability to choose at will, because I like the models that are outlandish (some...all...of 40K) but are painted in such a way that you could maybe see them being real.
|
10,000+ points Death Guard, Traitor Guard, and Nurgle Daemons;
Sylvaneth |
|
|
|
|
2017/01/24 21:38:36
Subject: Realistic Painting
|
|
Potent Possessed Daemonvessel
Why Aye Ya Canny Dakkanaughts!
|
I am a bit new to this but what I have found works well is if you always do your final layer as a dry brush: it removes that shiny, almost plastic like, texture you get from bases, washes, detail highlights, etc. and it works quite well as highlight supstitute that is less vivid.
What I have also looked into, and am eager to try, is taking of bits from a layer of paint using a wire brush and a cleaning product: it gives a rusted, battle worn texture. I so want to try it out on my Iron Warriors tank. 
|
Ghorros wrote:The moral of the story: Don't park your Imperial Knight in a field of Gretchin carrying power tools.
 Marmatag wrote: Marmatag wrote:All the while, my opponent is furious, throwing his codex on the floor, trying to slash his wrists with safety scissors.
|
|
|
|
|
|
|
|
