I have been meaning to write this for a fair while now but have not found the time until now.
One of the key parts of building a force in Legion are the Battle Plan cards which determine the deployment, battlefield conditions and victory conditions for the game. Currently there are 8 options available in each category and each player chooses 4 of each to go in their deck whilst building an army, before the game gets setup the Blue player's (the one with fewest points) deck is used to determine how things will play out. 3 cards of each type are placed in a row faceup and players take it in turns to eliminate a card from the leftmost slot. Starting with the blue player and each player gets two turns at it (or may pass).
So far, so good. That is the basics of playing the game but something that does not seem to get talked about a lot is how the deck actually effects your game, plenty of people give advice about list building but the Battle Plan deck is actually much more critical to securing victory. A droid player with Grevious, maximum B1s and commandos is really going to struggle playing Breakthrough, Disarray and Clear conditions for example (in fact it should be an auto loose). So I thought I would give a bit of a breakdown of the cards and how they effect "MY" list building. Please note this is my views on how they effect my army, I am not qualified enough to give an exhaustive breakdown for every army but it should not be hard to infer. For reference I play CIS.
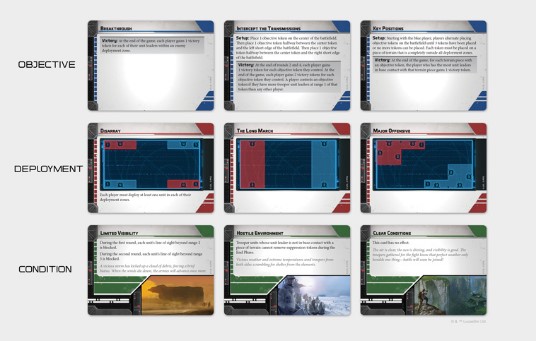
Objectives.
The way to win the game (outside of tabling your opponent).
Recover the supplies- Capture the flag. 5 objective tokens are placed on the battlefield (each beyond range 1 of another and of a deployment zone) and any trooper unit can capture them. Whoever has the most at the end wins. This mission really, really depends upon the army compositions. Against an infiltrating/scouting or fast army army it is really hard to win. Maul, Bane and commandos can play the objectives well enough but a canny opponent will place them in the open meaning you get shot to pieces trying. Whilst that does work in return things like Tauntauns can actually grab objectives whilst STAPs cannot. The alternative is to try and swamp three objectives in bodies which can work in the CIS favour.
Key Positions- Take and hold three static objectives, this is often seen as the default mission and does not really favour any army. Key to winning is generally weight ones attack against the center objective and focus on a second. For CIS swamp the middle in bodies whilst nabbing another with something like Maul/Bane/AAT etc. Worth remembering that any unit leader can score the objective so this does include vehicles.
Intercept the transmissions Take and hold again, three objectives again but this time the scoring is on the 2nd, 4th and 6th turns. Infiltrators and scouts love this mission as to Tauntauns. Slow plodding armies do not. Can only be scored by troopers so no vehicles. For CIS Maul and Bane are great for early grabbing and the fact that you know where the enemy are going to be an when makes setting up Dooku and Grevious' 1 pip cards easier.
Breakthrough Get into your opponents deployment zone at the end of the game, scored by any unit. STAPs and AAT love this, Droideka can be good on a terrain heavy board but it very much depends upon what deployment zone is selected.
Hostage Exchange Have a hostage unit deployed in the center of the battlefield and have it move to your deployment zone by the end of the game, the haostage unit is also immune to enemy attacks and effects on turn 1. My favourite mission by a long shot, use it with B2s, be in range 2 at the start of the game and just delete something! So much fun. Rebels hate this mission with a passion.
Bombing Run Equip three bombs to units at the start of the game and get them into range 1 of the enemies deployment zone and detonate them. Favours fast units (read STAPs) but wave attack can work too. A word of caution though, try and score the mission rather than try to blow enemies up. The fact that you have to drop the bomb and it can still be claimed by an enemy unit if they are able can lead to embarrassing outcomes if you have not thought your way through things!
Payload Get a cart from your deployment zone to a terrain feature nominated by the enemy. This can be very tricky for everyone as the carts are easy to block off and they only move 6x 2 speed manouvers in the game. Worth remembering that the cart also gives units behind it heavy cover.
Sabotage the moisture vaporators Take and hold 4x. With 4 objectives each of which has to be interacted with twice (remember you cannot perform the same action twice) this mission again favours those that can scout or infiltrate. Worth focusing on one objective near the enemy to deploy Bane (and Bomb!) and Maul whilst swamping the closer pair in models.
Deployments
How to setup.
Major Offensive Thumbs up shape in a corner, doesnt really favour any army or mission overly though it can be useful for Payload.
Long March Very much a favourite of CIS and melee armies as it compresses the battlefield to a nice 3x3 neutral ground in the middle.
Disarray Deploying in small blocks in opposing corners, if you rely on order chains or supporting units then burn this card. Before the T series and Maul releases this was pretty much an auto loss for CIS.
Battle lines Vanilla. Great for breakthrough and bombing run as it forces the enemy to cover a longer area.
Advanced positions L shaped deployment zones where every trooper unit gains scout 1 (can perform a 1 speed move after being deployed), great for so many different missions.
Danger close Lovely for stabby armies as well as bombing run and breakthrough. Gunline style armies hate this.
Hemmed in great as blue player for Hostage exchange, payload, bombing run and breakthrough but can lead to a bad experience if your enemy is shooty heavy on an open table.
Roll out Nice fat deployment zone with any vehicle being able to deploy at range 1 of their deployment zone. I have generally found this closer deployment to be a trap and leads to most vehicles being dead on turn 2.
Conditions
Adverse effects on the battlefield.
Rapid reinforcementsSet up 1 or 2 trooper units beyond range 2 of the enemy during turn 1. Very situational but can be fantastic for most take and hold type objectives, also for scaring the enemy when a unit of B2s appear in their back lines!
Minefield Never played it, blowing myself up is something I try to avoid as best as possible. Sure it has utility but not sure when.
Limited Visibility Facing a gunline and have to get across the table? This is the card for you. As a CIS player that doesnt use snipers I would have to say this is my most used card by a long shot.
Hostile Environment Great against low leadership enemies and can really cripple them if not played around. Can be tricky for B1s as well but not as much as for meat bags.
Clear Conditions A beautiful sunny day for a battle. Not always a bad thing to take.
Fortified Positions 8 pieces of mobile hard cover are wonderful, place them so you can cover the retreat of a hostage unit or fortify an objective.
Supply Drop 6 random pieces of equipment scattered around, it can be good or bad depending upon the draw. If your enemy is likely to be mostly static then worth taking otherwise not so much.
War Weary Reduce the command courage bubble by 2, meat bags are not fond of this. B1s neither but if they run away who cares?
So, that is a brief overview of the Battleplan cards. As a practical example here is mine with my list.
I take;
T Series commander, Maul, DRK, stabby commandos, 4x B1, 1x B2, 2x STAPs I also have a 15pt bid so I am almost guaranteed to use my deck.
For Battleplan I take;
Key Positions (I focus my main battleline on the middle objective whilst stabby boys, DRK and STAPs go for another, Maul goes after the one the enemy are likely to focus the most on so he can hack them up).
Hostage Exchange (B2s... Also Maul's infiltrate makes this a fun time!).
Bombing Run (STAPs love it).
Payload (B2s are fairly useful but generally this is a dud card to discard).
Long March (plays into CIS hands by compressing the battlefield, doesnt work so well with bombing run).
Danger Close (works for all the missions bar Hostage exchange and allows turn 2 charges with out issue).
Hemmed In (as outlined above).
Roll out (STAPs can use it but mainly its for the compressed battlefield and baiting any enemy tanks).
Rapid Reinforcements (as above).
Limited Visibility (so as to not get shot to pieces by GAR/Imps whilst setting up to perform missions).
Fortified Positions (bring your own heavy cover! What is not to like. Ever tried to shift B2s out of heavy cover?).
Clear conditions/War Weary (still tossing up between these as they both have utility as well as down sides).
If you have made it to the end here I hope you found it interesting and of some use. Would be delighted to hear how other people view this most vital part of list building.


