Switch Theme:

Lamb's World  [RSS] Share on facebook Share on Twitter Submit to Reddit
»
Author Message
Advert


Forum adverts like this one are shown to any user who is not logged in. Join us by filling out a tiny 3 field form and you will get your own, free, dakka user account which gives a good range of benefits to you:
  • No adverts like this in the forums anymore.
  • Times and dates in your local timezone.
  • Full tracking of what you have read so you can skip to your first unread post, easily see what has changed since you last logged in, and easily see what is new at a glance.
  • Email notifications for threads you want to watch closely.
  • Being a part of the oldest wargaming community on the net.
If you are already a member then feel free to login now.


Made in gb
Sagitarius with a Big F'in Gun


Here's the fruits of my labours for the last army I put together.

The Lamb's World XXVII 'Copper Hornets' were an army constructed and painted in three months for the last Dark Stars campaign weekend.

They did pretty well – winning three, drawing three and losing one of the games (despite my best efforts to get them killed!)


Command HQ: Caef Terentius Dresden. Yep – all are veterans with carapace armour; which despite the flak it gets on these boards saved these guys at quite a few vital moments. Whether it's worth 11pts each is quite another matter...

The only squad to get killed in all seven games. People really don't like lascannons!

'Lucky Sixes' hardened veteran squad. I was pleased with how the dice on their shoulder pads came out and added to the rather drab colour scheme – so I extended the idea to the rest of the army. Each squad's got a unique shoulder pad design – which helps when deploying and packing up, too.

They ended up as the XXVII when I realised I'd left too much space on the banner after completing 'XXVI'. D'oh!

   
Made in gb
Sagitarius with a Big F'in Gun


First Platoon:

Platoon HQ – used quite a few metal and resin parts to vary the look of the army, in particular heads swaps. I think this really breaks up the Cadian look of them.

Ouch, check out the guy on the left's shoulder. This is an old tank driver model. He seems to fit in quite nicely with the army – particularly since his headgear is the same as the sentinel pilot models; and I've used the spare heads elsewhere in the army to add some variety.

You can see a few wee conversions I've done here; and the pictures hopefully illustrate how I gave each squad a particular pose – supporting fire, redeploying, getting shot(!) etc. Quite a number of the heavy weapons are prone – I like the look this gave, and made the guns go further.

Also note the skin tones. I really love painting faces. It's my favourite thing in the whole hobby – hence why the skin on the models is by far the best-painted thing in the whole army. I decided I'd have a 'culturally diverse' world, so there's roughly a third white, a third black and the remainder are other groups: asian, indian, flavistic etc. I like the look this gives, and quite a few people have commented on how the range of skin tones gives a more realistic look to the army, which pleased me.

   
Made in us
Longtime Dakkanaut


looks great!
   
Made in gb
Sagitarius with a Big F'in Gun


Second Platoon:

I like the Lief (junior officer) here. Spiffy sunglasses.

Actually, I think this lot are the first platoon – these cats are certainly the first squad I painted. Whoops. Ah well. I sat down and planned out the little touches I wanted across the army; so this guy is the 'sergeant major' of the company (hence his little hat and boltpistol).

As you can see (hopefully), everyone in the army has a helmet – either wearing it (sensible fellows) or slung on the belt (in traditional action movie-style). Similarly, each sergeant has a set of magnoculars (mmm... gratuitous sci-fi-fication) and other bits.

The prone guys in the third squad were really simple – just a neat trimming of the collar and the belt at the back of the body meant their heads leant back enough to look decent. The squad's really stable – very useful for balancing on hills; and since the squad looks like it's under fire or giving fire support, this looks great on the board.

Both platoons are identical – one squad with heavy bolter and grenade launcher, one with missile launcher and grenade launcher, and one with autocannon and plasma gun. Not 'dakka-approved' choices, but I wanted each platoon to be able to stand alone. This weapons load-out meant that each platoon of the Hornets could a chance against any unit in the grim darkness of the far future...

   
Made in gb
Sagitarius with a Big F'in Gun


Special bits:

'Aiee! Grenadiers! Grenadiers with grenade launchers! Eight-man squads! What is this guy thinking?'

Well, HBMC (and everyone else who kindly offered advice on my army list) was right. Grenadiers do suck. Still, I love the models and they tied in with the command HQ visually – so I had a pseudo platoon, all with carapace armour. They had Chimeras as well, but not piccies of them, I'm afraid.

Sentinels, however, rock bells. Especially when you have six of them!

Each sentinel pilot has his name on the door of the walker – 'Lucky', 'Legs', 'Rag' and so on. I really like the individuality of Sentinel Pilots, so I had fun with these guys, giving them additional or non-standard equipment and so forth. Check out the long-barrelled autocannons and bullpup lasgun sidearms.

   
Made in gb
Sagitarius with a Big F'in Gun


Finally, everyone's favourite useless units, the ogryns.

More complex conversions here, but still pretty quick and easy. The whole unit (from sprue to painted) was done in an evening – I had to use a hairdryer to cure the greenstuff quickly. Not recommended. One of the six melted, and I had to quickly add some more wargear to people to make up the points!

Here are some details:

The guns are simply autocannons with the barrel trimmed off, then the flash suppressor (the bulgy bit on the end) stuck back on. Quick, cheap and simple; and looks sufficiently different to a regular gun that it's not immediately recognisable.

As is traditional, I had to put a tattoo on one of the ogryns – this one loves his muvva (right shoulder).

In fact, he's the sole reason that the regiment now issues sun cream to ogryns:

You can see how pressed I was for time – I had to simply carve out the leadbelcher's gun and botch the ripper gun in. Look at his left hand and you can see how rough it is. Not noticable on the tabletop, thankfully! There's a number of dodgy bits in the army; you can see how rushed the camo on his trousers is, too; but hopefully the overall effect is for people to go 'coo' rather than 'yuck'.

I was dead pleased with this guy's helmet, too.

Anyway, that's the army. Hope you like it! For the record, I went for Close Order Drill, Xeno-Fighters (nids: you can see some nid trophies on the squads if you look closely), Grenadiers, Ogryns and Rough Riders.

Sadly, ran out of time for Rough Riders, but I've got the bits ready to make them up, so keep an eye out.

Comments and critique are welcome. Thanks to my club/support group, the Plastic Crack Rehab Clinic for their help with basing the whole army ten minutes before we set off for Nottingham, and particularly Graham for photographing the lot so nicely.

   
Made in se
Rough Rider with Boomstick


Swerike

Really nice looking, Im going to have a go at prone heavy weapon teams myself.

With the galaxy as large as it is the odds of the average guardsmen seeing and fighting a marine or MEQ are relatively slim. Unfortunately the guardsmen in your (and anyone else who plays IG's) army are the REALLY, REALLY LUCKY ones that fight marines ALL the time... 
   
Made in us
Fresh-Faced New User


Great work!! Are the gasmasks made from Greenstuff?
   
Made in ca
Fixture of Dakka


Canada

They look fantastic. But I have to ask for a favour- I need to have a tutorial on those ogryn The shirtless guy I can do, but the more geared up dudes would benefit from a tutorial

Pretty please?


"Nothing from the outside world can be imported into Canada without first being doused in ranch dressing. Canadian Techs have found that while this makes the internet delicious it tends to hamper the bandwidth potential. Scientists are working furiously to rectify the problem. "

--Glaive Company CO 
   
Made in gb
Sagitarius with a Big F'in Gun


Hey all,

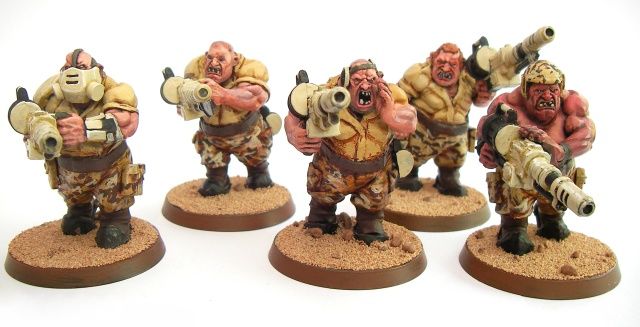
The gasmasks on the troops are a mix of van saar heads from GW and FW resin heads. The ogryn one was made with green stuff by copying the style from a kasrkin model. To get the filters perfectly round, I trimmed discs from the cylindrical bit which holds four bases together.

Good luck with the prone troops. They're dead easy – just cut the collar off, and trim the belt from the back to create a tilt on the body. Using the 'running' legs from the cadian sprue works best – and cutting one of the feet off and reattaching at a flatter angle will help with posing them.

Regarding ogryns:

Many Lamb's World regiments make use of the burly tribes of ogryns that roam the northern continents, valuing their resilience and ability loyalty. For their part, many ogryn tribes are often keen to join up – army fatigues are nice and warm, and far more useful than traditional ogryn loincloths in the planet's wet climate. The promise of free beer and Pot Noodles helps the recruiting sergeants no end.

To convert these ogryns, you will need an ogre bulls box, a leadbelchers sprue, an autocannon from the heavy weapons box, a little greenstuff, a craft knife, 40mm bases.

Additional useful bits are: large pouches from the space marine tactical sprue (for the cargo pockets) an additional autocannon magazine, a cocktail stick, one vox caster backpack from the cadian sprue (for the BONEhead's scrum-cap style vox), the bit that connects four round bases together (for the cylindrical bits on the left-most ogryn's rebreather/gasmask thingy).

1) Take everything off the sprues and clean it up. Cut the flash suppressor off the end of the autocannon barrel neatly, then remove the barrel itself. Glue the flash suppressor to the gun as shown in the piccy below.

2) Cut and scrape out the leadbelcher's original gun from the paired arms as best you can, fitting the ripper gun in as you go to see what bits of plastic you need to remove. I'm lazy (and was short of time), so the guns are just botched in – because I took my time when scraping, there's no gaping holes in the finished ones. You'll find that the leadbelcher left arms touch the ripper gun at a realistic point. Stick the ammo on.

3) De-ogrify the ogre body – remove the nipples (ouch!), scrap away any beard from the selected head etc. This isn't essential, but I wanted to make my ogryns as distinctive and 40k as possible. The difficult bit of this stage is flattening and filling the big hole in the stomach, where the gut plate goes. Follow the curve of the ogre's waist – you'll notice that the camber increases at the gut. Trim this away so the camber remains constant. Again, be neat and careful and you'll save yourself some trouble later on.

4) Make up some green stuff and leave to cure while you fit the boots to the body, trimming away the Aladdin-points. Glue the boots to the body, then glue the body to the base.

5) Dry fit the guns to the arms and the chest, trimming away any plastic from the flesh areas where necessary.

6) Fill the gut-hole with green stuff/plastic cut offs, and lay a thin sheet of green stuff over the hole. Try to follow the curve of the waist. Leave to dry.

7) Roll out a thin sausage of green stuff (approx 2cm long and 3mm thick). Wet your craft knife and use the point of the blade to place it over the stomach to form the belt. Leave to cure for 10min or so, and then use the wet back of the blade to smooth and flatten it.

8) Glue the head on, and use a similar method to place a longer (approx 5–7cm) sausage of green stuff leading up from the belt, around the neck and back around the neck to form the button holes, lapels and collar of the combat shirt. See the fourth ogryn from the left in the pic for reference.

9) Wet the blade and flatten the sausage around this area, pulling it out thin around the lapels.

10) While the green stuff is wet, fit the arms and the gun, and glue into place. Allow everything to dry completely.

11) Use very short, thin sausages of green stuff to form the shirt sleeves just above the elbows, and to give the trousers flies.

12) This essentially completes the ogryn – the rest of the stuff is just for looks. Feel free to personalise and customise the ogryns. Add salt and pepper to taste and serve with a zesty curry.

If you need any other pointers I can help with, feel free to ask.

Thanks for all the kind comments – and keep the critique coming!

   
Made in ca
Fixture of Dakka


Canada

Great tutorial! Thanks man Now I wanna have a go at making some Ogrynn for my guard... if only I had the parts with me here at university... I'll have to try when I'm home for christmas.

"Nothing from the outside world can be imported into Canada without first being doused in ranch dressing. Canadian Techs have found that while this makes the internet delicious it tends to hamper the bandwidth potential. Scientists are working furiously to rectify the problem. "

--Glaive Company CO 
   
Made in gb
Sagitarius with a Big F'in Gun


Always a pleasure.

Anyone got any feedback about the line squads? I'm tempted to expand this army to 3,000 pts; and I'd appreciate any help you guys can offer.

Which squads do you particularly like or dislike?

In terms of the overall look of the army, should I continue 'multiplying up' the platoons (i.e. create further identically armed platoons), or diversify a little?

Does the army lack a centrepiece?


Forum Index » Painting & Modeling
Go to: