Switch Theme:

Working with plasticard CLEANLY. (?)  [RSS] Share on facebook Share on Twitter Submit to Reddit
»
Author Message
Advert


Forum adverts like this one are shown to any user who is not logged in. Join us by filling out a tiny 3 field form and you will get your own, free, dakka user account which gives a good range of benefits to you:
  • No adverts like this in the forums anymore.
  • Times and dates in your local timezone.
  • Full tracking of what you have read so you can skip to your first unread post, easily see what has changed since you last logged in, and easily see what is new at a glance.
  • Email notifications for threads you want to watch closely.
  • Being a part of the oldest wargaming community on the net.
If you are already a member then feel free to login now.


Made in us
Hacking Shang Jí


Folks like Insaniak always impress me with their plasticard work, and periodically I go on a fit to buy some and emulate their conversions. 

For some reason though, I always have problems getting my plasticard designs to come out right.  Mostly, my problem is getting the plastic in the right shape.  Even if I use rulers and draw the shape I want on the plasticard before I cut it, even if I use paper patterns to trace and get the right shape, tiny imperfections always come into play that make two pieces not match, or I get an uneven edge, or something like that.   Most pieces need so much sanding to get them back down to the right size that I lose the straight edges I had.

So for all you plasticard masters, what's your secret for getting such clean-looking conversions?  My upcoming Tau Commander and redesigned Wave Serpents want to know.

"White Lions: They're Better Than Cancer!" is not exactly a compelling marketing slogan. - AlexHolker 
   
Made in in
[MOD]
Otiose in a Niche


Hyderabad, India

I have similar problems and would like to hear ideas.

2 things I found is there are some pre-scored sheets in grid patterns, which is fine so long as you want squares and rectangles. And obviously thinner card and sharper blades are better than thin card and old blades.


Made in ca
Fixture of Dakka


Canada

Well I use Plasticard alot and I've become rather adept at it, so I'll pipe in with some comments. 

In my experience the key is your tools.   When I'm using plasticard I find the following tools indispensible:

1.  A plastic scriber.  Here's a link and a picture so you can see what it looks like-  www.hlj.com/product/TAM74015


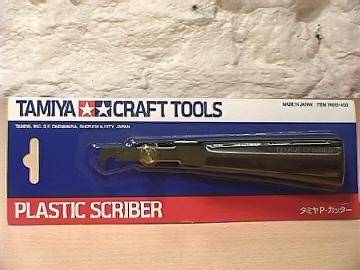
It pulls out a tiny wedge of plastic at a 45 degree angle from the edge of the blade- basically making a little trench that's shaped like this:  |/ except with a 45 degree angle in there   If you're making something with lots of straight lines use this and a metal ruler to trace the pattern.

2.  A pencil.  Yeah, that's right- a pencil.  I always mark my cuts first if it's a piece I've been working on for a while.  It seems simple but when you rush sometimes you don't do it and you end up eyeballing something to disapointing results!

3.  A pair of uber sharp sewing scissors.  I discovered this when I still lived at home (hey- I've been doing this for a while now).  If you trace your pattern out on a piece of plasticard you can carefully cut it out with sharp scissors.  This works for me on everything but the tickest plasticard- but I only rarely use card that thick.  Note that the remaining pieces that you cut away will tend to have a curvature in them as a result of the instrument, so they can kinda ruin a bit of the spare card if you're cutting somethign with lots of curves.

3.  Needle files AND sandpaper.  Sometimes I like to use needle files but othertimes sandpaper is key.  I find that both are very useful.

4.  Time.  Sometimes you're going to have to cut a piece out 4 times before it looks good.  Save the leftover pieces in some ziplock bags.  You'd be surprised how often a former mistake turns out to be perfect for a future project.

5.  Greenstuff or brownstuff.  Sometimes I'll just use greenstuff to add the hard edge to that piece I messed up when I was filing.

6.  My engineering drafting tools.  I'm in mechanical engineering so it might have seemed like I was never gonna use them when I bought this stuff for my first design classes (most of the real drafting we do is done in CAD).  But these pics show some of the drafting stuff I use for modeling:

A 45 and a 60-30 triangle.  These things make drawing squares and certain angles a breeze.  I tired to google some simple instructions but couldn't find nice ones.  If you're confused as to how to use triangles come see me in Fredericton, New Brunswick, Canada.  You can crash in my room and I'll show you the ropes of drafting.  I'll even take you to a few of my classes for some mechanical engineering fun


Drafting templates.  Go buy one of the large (they're about 8x8" templates that look like the one in the middle.  I was useing that for warhammer dioramas before I was using it for homework  


Oh, and when it comes to brand I'm a Staedtler guy- you can't really go wrong with them.  They're expensive but always great for their precision and quality.  All that drafting stuff is easy to buy at any stationary store (I got all of mine at Staples or Business Depo depending on how long ago it was).  The scriber is tougher, but you should be able to find it anywhere that's big on model airplane stuff.

That's all I can think of guys... I hope I've helped.

"Nothing from the outside world can be imported into Canada without first being doused in ranch dressing. Canadian Techs have found that while this makes the internet delicious it tends to hamper the bandwidth potential. Scientists are working furiously to rectify the problem. "

--Glaive Company CO 
   
Made in us
Foul Dwimmerlaik


Minneapolis, MN

The grid idea is a good one for people first starting out. Evergreen makes the best plasticard as the grid is better. The reason why is because it isnt pressure molded as Plastruct's plasticard is. (Plastruct gric card is not a blank flat surface on the inverse side, so you cant use it as a guide if you want one side to be clean)

Your best bet is a drafting table and a good tsquare and french curves that is stable with the straight edge of the table, this helps making objects truly "square" or whatever shape you want. You have to have a base of reference in your angeles and using a true square and a good table helps this immensly.

Building with plasticard is really no different than framing a house or other forms of larger scale construction. measurements have to be even more precise when cutting at the smaller scales we use for modelling.

   
Made in us
40kenthus


Yoor Speeshawl too Gawd!

The resident guru here is EDSK whose stuff is simply amazing.  All he ever uses is a pencil to draw the shape, and exacto knife and patience. 

Only now do I realize how much I prefer Pete Haines' "misprints" to Gav Thorpe's "brainfarts." :Abadabadoobaddon 
   
Made in in
[MOD]
Otiose in a Niche


Hyderabad, India

On triangles and other templates I'm upgrading from plastic to metal, I've scored up my plastic triangles way too much.

And thanks for reminding me about evergreen hellfury, I've been trying to find that grid card agian and had no luck.

The grid stuff is good for armor and vehicles and stuff since it has some texture to it. Even if it has no practical value it looks good.


Made in us
Plastictrees


Amongst the Stars, In the Night

I too only use metal tools & straight edges for scoring as I rather not otherwise damage my acrylic triangles & whatnots. Some other tips are to make sure you have plenty of room and the cutting surface is well lit. When cutting plastic, especially thicker plastic, expect to make many shallow cuts instead of one heavy cut, it only takes a little bit more time and is considerably safer and less likely to end up with a bad cut. Having a self-healing cutting mat is usefull as well.

Also, always use a sharp blade. I buy my x-acto #11 blades in 100 bulk packs, which will usually last me six months to a year. Sharp blades obviously cut better and they're safer than using dull blades as you don't have to exert as much pressure, so when you slip you can better stop & control the blade than accidentally stabbing yourself.

Regardless of what you do, you are still going to need to sand and file edges down after cutting. It's just part of the process. I use a combination of scraping perpendicularly with a sharp x-acto blade, filing with various miniature single and double swiss cut files, and a wide range of sanding implements, from sandpaper to sanding sponges.

Lastly, and most importantly, always, always wear saftey glasses. Those little blades can easily be snapped and I know on more than one occasion they've bounced off my safety glasses.

OT Zone: A More Wretched Hive of Scum and Villany
The Loyal Slave learns to Love the Lash! 
   
Made in de
Regular Dakkanaut


Apart from what has already been said, rather than cutting all the way through, snapping off pieces after you´ve scored the outlines will result in cleaner edges with just some excess material that is easily scraped off. Also when building stuff with right angles, it helps to use rectangular or square profiles as base frame. You benefit both from the precision of the factory made parts as well as from the added surface area for the glue to grab on to.

As I stride knee deep through the dead, all is clear. I know what must be done... 
   
Made in us
Regular Dakkanaut


One of my most often used tools is a large mill file, it has a permanent spot on my work table.  It's a fine toothed flat file about a foot long used for metal and stuff.  

After making a cut I take the piece, hold it perpendicularly to the file (laying flat on the table) and run it along the length.  This eliminates any imperfections in the cut and leaves a crisp edge.  Any fine adjustment to a piece can also be done this way.  If a piece isn't square, run it along the file until it is.

   
Made in us
Regular Dakkanaut


I've found the easiest way to cut plasticard is to just go slowly and do multiple passes with an x-acto. It doesn't work as well for curves, but for straight edges just going slow and doing several passes on a cut is a great way to keep it clean.
   
 
Forum Index » Painting & Modeling
Go to: