I took Farsight out for a spin today against my friends tyranids that he's trying to re-tool for 5e. The lists were roughly:
Tau:
HQ:
Farsight
4x bodyguard with plasma/missile/flamer, HWMT, target locks
3x bodyguard with plasma/fusion/flamer, HWMT, Target locks
2x marker drones
4x gun drones
8x shield drones
One suit has a failsafe detonator. One suit has a Stimm Injector. Suits are all unique due to different drone/wargear combination.
Troops:
2x 9Fireawarriors with shas'ui, bonding knife
1x 9 firewarriors with shas'ui, bonding knife with Devilfish with disruption pods and flechettes
Elites:
1x crisis suit with burst/flamer
1x crisis suit with plasma/missile
FA:
5x pathfinders
devilfish with disruption pod, flechettes
HS:
2x broadsides, team leader with 2x shield drones
Hammerhead with railgun, burst cannons, disruption pod, multitracker
2000 points
The Tyranids:
HQ:
Winged tyrant with twin linked devouers and warp field
Troops:
32 without number spinegaunts
32 hormagaunts with +1
str, +1 I, +1
WS (480 points?!)
9 genestealers with scything talons
8 genestealers with scything talons and implant attack
Elite:
3x 4 warriors with +1
str and +1 ballistic skill and twin linked deathspitters
HS:
2x carnifex with barbed strangler and scything talons (boomfex)
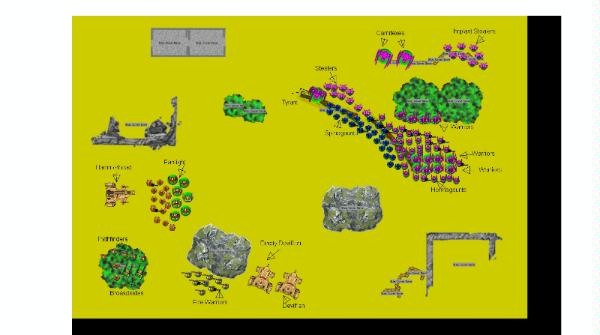
I'm not doing a great job representing it accurately so I am not going to use this to show each move. But it gives a reasonably accurate picture of deployment/terrain
The mission was capture and control, spearhead deployment
Here is a rough map of the deployment. I won the roll and allowed my opponent to choose table quarters and go first. My objective marker is where the fire warriors are behind the hill. My opponents is where the genestealers are behind the barricades. My objective is at least reasonably safe from shooting if I want to sit a squad on it - they probably can't be seen.
I left one squad of firewarriors and both monat crisis suits in reserve - the suits deep striking. Everything else for both sides started on the board
Tyranid turn one:
Everything moves up, including the implant stealers in the back which were placed there to keep farsight from deep striking. Gaunts,
hormagaunts and close genestealers get poor fleet rolls - 2 each. Hormagaunts move kind of south west to use the hill as cover. Tyrant
moves down to the middle of the board waiting for other units to keep up. Carnifexes shoot at farsight and kill a couple drones. Warriors
shoot at farsight but are mostly out of range.
Tau turn one
Farsight moves north and forward, near the ruins. Shoots at the tyrant and the gaunts but has range issues and only Kills a few gaunts.
The Hammerhead blasts the warriors, killing one from one squad and leaving another with a wound and takes out a couple gaunts as
collateral. The firewarriors get in the empty devilfish and both devilfish move directly east. The pathfinders are too far back and don't
mark anything. The broadsides put one wound on the flying tyrant. Farsight then continues to move north and east.
Tyranid turn two:
The gaunts continue to roll poor fleet rolls, but poor placement leaves the gaunts potentially in charge range. The hormagaunts move south
towards the devilfish and behind the hill, along with two squads of warriors backing them up. The third sqaud of warriors hangs out in the
barricade. The carnifexes move south. The genestealers are behind the gaunts. The dakka tyrant, the carnifexes, and the warriors open up
on farsight, but are only able to wound a suit and farsight and kill 2 shield and 2 gun drones (8 left!). The gaunts attempt to charge
through cover needing one 6 on three dice....and fail.
Tau turn two:
None of the tau reserves come in. Having lucked out on not being tied up by the gaunts turn two, farsight moves forward to hopefully
flamers some genestealers and gaunts and take out the tyrant. The devilfish continue to move to the east near the ruins, trying to bait
the hormagaunts into a charge against flechette dischargers. Both gun drone squads leave, one heading into the ruins and the other heading
north and east towards the middle of the board (mistake!). The pathfinders mark up the hive tyrant. Farsight obliterates the hive tyrant
(probably overkill and kills three stealers and 5 gaunts with flamers and plasma. Pretty weak, but I went overkill on the flying tyrant.
I hate that thing. The hammerhead and the broadsides kill two more warriors and two hormagaunts. The warrior squad that is in the
barricade and following the spinegaunts is down to a single warrior, with 3 and 4 in the other squads. Farsight backs up but knows he's
going to get charged next turn...hopefully it's just gaunts and not gaunts and stealers.
Tyranid turn three:
The hormagaunts leap on my mistake and make a beeline for the drones out in the open. They barely get the charge - great, 12 free inches
of movement towards my objective and my broadsides. Awesome. The warriors move behind in the open since they cant keep up with that. The
gaunts move forward leaving spaces for the stealers to charge between...but the stealers wiff their fleet roll and will not make it to the
farsight party. The carnifexes shoot at the devilfish and do nothing. The spinegaunts charge farsight through cover and 11 die, and they
kill one drone. They lose combat by 10 with 9 guys left...farsight might be able to shoot next turn! Of course not, he rolls 4 6s and 3
gaunts stay stuck in with farsight.
Tau turn three:
The hormagaunts are a huge problem now, but my plan has been to try to eliminate the syanpse and this should solve the hormagaunt problem
as well. The plasma/missile crisis suit comes in and scatters onto some genestealers. Dead. I move the devilfish up onto the hill and
the other beyond it and let out the 18 fire warriors. The pathfinders light up the squad of four warriors with 4 hits and 9 firewarriors
rapid fire them at BS5 and reduce their cover save to 6. 7 unsaved wounds later and the hormagaunts still have synapse. The other squad
is worse - 9
FW with no markerlight support manage to put one wound on the warriors. The hammerhead puts another wound on a warrior and
kills some hormagaunts with burst cannons. I expect him to turn around now with his hormagaunts and eat one of the firewarrior squads, but
hopefully I'll still have two scoring units left. The devilfish are between the
FW and the hormagaunts but they can easily get to the
squad on the hill. With a lucky fleet roll he may be able to double charge my
FWs and I'll be screwed. Farsight kills the last of the
gaunts and goes 4" away from the stealers.
Tyranid turn four:
The stupid termagaunts come on near my opponents objectives. To my surprise, the hormagaunts go for the broadsides and pathfinders. I
think he's going for the objective too soon but I guess he expects to stop my firewarriors with shooting (not unreasonable). The gaunts
easily make it into combat with the pathfinders and broadsides and sweep them with only one casualty. The carnifexes and warriors shoot at
the Firwewarriors, killing 6 in one squad and one in another. Both squads stick around. Both squads of genestealers get a charge on
farsight. I have enough drones left to make implant attack unhelpful but still lose combat by 4 - 8 to 4. I'm hoping to fail and run
(failsafe detonator) but roll a 5 and stay stuck in.
Tau turn four:
The flamer/burst cannon crisis suit comes in, and smacks down in front of two warriors. I move up the hammerhead for a clean shot at
another warrior. The three man squad of firewarriors get back into their devilfish, which moves east 12 inches hoping to end around. The
8 firewarriors move up a couple inches as a just in case for the warriors, and their devilfish moves up next to them. The warriors are
blown off the board and he has no more synapse. Farsight and the stealers tie with three unsaved wounds each.
Tyranid turn five:
The termagaunts try to move and run off the board, back again next turn to control the objective. Not sure but he indicated that if they
lurked instead of moving they wouldn't control their objective. The hormagaunts try to charge the hammerhead and break, running 11 inches
north towards their board edge. He had to make a move on the Hammerhead - it would tank shock them off the board otherwise. A carnifex
shoots at the devilfish and the firewarriors next to it and kills 3 fire warriors (5 left). The other carnifex shoots at the burst/flamer
crisis and almost hits itself. The carnifexes charge - crisis suit goes pop, and a devilfish is immobilized (and wounds the carnifex).
Farsight and the stealers tie again 3 to 3 and I think he realizes that the stealers aren't going to win, leaving him out of scoring units.
Tau turn five:
9 firewarriors waltze in from reserve and claim the objective. The 5 firewarriors move up and rapid fire a carnifex, doing another wound.
The hammerhead makes sure to move close to the hormagaunts and puts a third wound on the same carnifex. The other devilfish moves north
and east to try to avoid carnifexes - ends up in a spot that should be able to tank shock termagaunts when they come back, but it will be
close. Farsight finally wins combat with the stealers - in the end it's just farsight with three wounds and one suit with stimm injectors
remaining.
The roll to continue is a 2! No termagaunts coming on to claim the other objective, so the tau win, one objective to zero.

