Magos Apologist’s Mark II (Macragge variant) helm tutorial
Apologies for the slightly dark photographs. Hopefully they should be clear enough.
 You will need:
Sculpting tool –
I use a GW metal sculpting tool
Sculpting putty –
I use ProCreate, but this works nicely with Greenstuff, too.
One or more Space Marine heads –
Virtually any kind with a grille will work.
Clippers
Vaseline or equivalent
You may find useful:
Clay shapers – I use a size 1 chisel and size 1 point, available from Heresy miniatures.
Paperclip and pin vice
Tiny screwdriver with a flat head.
1: Sit comfortably, give praise to the Machine God thrice, and mix your modelling putty. I use equal parts of each colour.
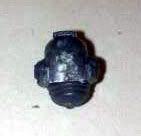
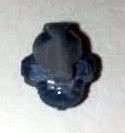
2: Pick up your modelling knife and carefully trim away the cables from the side of the helmet. Work right back to the ‘earpieces’ of the helmet, and ensure the front of the earpieces is flat (i.e. you’ve created a box shape).
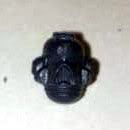
3. Put your clippers on either side of the grille and trim it off.
+++
Tip
At this point, you may wish to drill a hole in the neck with a pin vice and secure the helmet temporarily to a paperclip. You can then hold the paperclip and avoid touching the putty as you work. I’ve smooshed a good couple of these accidentally while I’ve been working!
+++
4. Anoint your sculpting tool with a touch of sacred machine oil (Vaseline will do in a pinch). Put a small piece of modelling putty in the centre of the face as shown, and use your modelling tool to scrape the top part into a rough line the same width as the ridge on top. Join the modelling putty with the ridge.
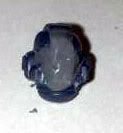
5. Carefully flatten the ridge, then rub the putty into a ridge on the faceplate. Use short, gentle strokes of the tool to ensure you get a smooth surface.
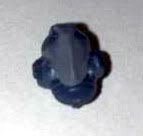
6. Trim away a small piece of putty on the lower left and right of the faceplate, turning the putty blob into a rough cross (+) shape as shown. I gently press the spatula end of the sculpting tool into the recess to ensure a perfect curve every time.
7. Smooth the putty away from the central ridge once more, using hardly any pressure. This stage should gradually pull the new facemask into a perfect shape, so take your time and work gently until you are happy with the shape. Finally, use the pointed end of the tool (or one of those tiny screwdrivers) to make two small hollows for eyes on either side of the face ridge.

8. Leave the putty to cure for at least three hours (preferably overnight), and secure to your miniature.

9. Paint it. Because this is such a small area, it makes a good space to try a simple but effective non-metallic metal technique. The ridge makes it very easy. Simply paint one half of the faceplate and the ridge yellow, and the other half of the faceplate dark brown. Add brown to the yellow and shade the yellow side; and add yellow to the brown and highlight the brown side.


 Deff Gearz 2,000+pts. (50% painted),
  Retribution 57pt.(70% painted),
  FOW
FOW