
+++++++++++++++++++++++++++++++
Friday Quick Tip: Wet Dry Sandpaper
By: grey_death

As many of you might know by now, I've taken some
baby steps into the world of green stuff sculpting. It's a very fickle medium that takes a lot of what you might have learned in clay sculpture and turns it on it's head. The tools are the same, but different at the same time. The methods you need to employ, all the while seeming as though they are familiar, are a different beast entirely! This has led me to solicit help from my friend
CMDante on the subject.
In his Tutorial he has shown a lot of great tools and tips to get everyone off and running. One of those tools is Wet Dry Sandpaper!
I had a heck of a time figuring out just where I should get this essential sculpting tool. Turns out,
Wet Dry Sandpaper is a common automobile painting and touch up tool! So I headed out to my local
PepBoys and picked up a set of 1500 and 2000 grit sand paper for about $8. This set should last me quite a while, and gives me extra options for smoothness.

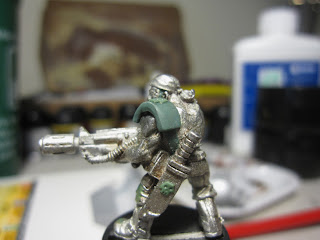
Cutting off a small square and picking out a good project to show it's worth on, I got to work. My original test was on a piece I can't tell you about just yet ( it's for my
Dakka Painting Challenge entry! ), but luckily I had the test model I started working on last week!

As you can see, there is a bit of a dent in the shoulder pad. I want it to be a bit smoother with a more 'finished' look. So I got to sanding it down.

Use the sandpaper lightly as you start and press a bit more as you find the spots you need worked out more. I suggest folding it to fit the section you are working it. Be sure to pull back and see how your sanding is going every so often as you don't want to wear it down too much and damage other areas of the model!

Here you see the results of my initial sanding effort. The lighter areas are raised spots that caught the sandpaper with the darker green areas being recessed still even after a good bit of sanding. I highly suggest you start off like this before moving onto the next step as you can really get a feel for what needs to be filed down more.

Since I don't want to be here all day, I broke out a regular file and used the spotting from above as a guide as I worked the raised areas down and made the putty flush. You really need to watch what you are doing when filing down an area like this. Pull away after every two or three strokes of the file to see where you stand. Then make a decision on angle and hit it again. Do these extremely lightly as this can easily destroy all of your hard work!
To finish the putty off I hit it again with the 1500 grit sandpaper to smooth out any rough file marks that were still showing. A fast light pass over the entire area should do it, but again, it's up to you to watch your progress and pick out the areas that need more attention than others.
All in all, a super easy tool to use with amazing results. You can say bye-bye to all those seams and rough edges from here on out! And don't limit your use of the sandpaper to just putty! You can use it to get rid of mold lines on plastic and metal models too! I'm specifically reminded of a tip
Lunchbox ( a golden demon winner ) shared once, that he uses wet dry sandpaper to remove those difficult and pesky mold lines on his models, like in between a Space Marines fingers.
I'd love to hear others experience in smoothing joins and lines in Green Stuff. If you've got a tip, we want to hear about it!


