The 8th ed
WHFB has bitten me and I've spent most of my time resurrecting and dusting off and playing a few games with my 5th ed era Lizardmen and 6th ed Empire armies....after a hiatus from
WHFB of about 4 years (I skipped 7th ed almost completely)...
But I've still managed to get in a few games of
40k, and because of Spearhead I have finally caved in and bought my first superheavy kit..the awesome shadowsword plastic kit with all the parts to use the variants....I've also bought a Baneblade, and have ordered the eldar Scorpion superheavy....We here find Spearhead awesome and a much easier expansion to incorporate all those huge models into a game of
40K.
Anyway, here is my report on a recent Spearhead game, a tough nail biter, using my trusty 7th Galen
IG army. I went up against Mark's Chaos Space Marine list...
My List
HQ
Col. Fernando and his
CCS, 1 flamer 3 meltaguns, 1 astropath (rides 1 chimera)
1 Priest with Eviscerator
Troops
1st Platoon
1
PCS, 1 flamer, 3 meltas (rides 1 chimera)
2
IG squads, with meltaguns, the sgts with plasma pistol and power weapon, with 1 commissar with a
PW..blobbed (the Priest is attached to the unit) (rides the Doomhammer)
2
SWS, 1 with 2 flamers and a demo charge (rides vendetta), 1 with 3 meltas (rides valkyrie)
1 Veteran squad with 3 meltas (rides 1 chimera)
Fast Attack
1 Vendetta
1 Valkyrie
Crusher spearhead
3 chimeras with multilasers and hull heavy flamers
Tank Hunter Spearhead
3 hydras
Superheavy Spearhead
Doomhammer Superheavy Tank
Mark's Chaos Marines (more or less this is what he had)
HQ
2 winged Daemon princes, Mark of Slaanesh, Lash Whips
1 Summoned Greater Daemon
Elites
3 6 man chosen squads, Aspiring Champion with
PF, 5 meltaguns each
Troops
10 Khorne Zerkers, with Aspiring Champion
Rhino
Ambush Spearhead
3 Defilers, with
TL Lascannon and Heavy Flamer
The Mission was Breakthrough, with the Cauldron setup....
Mark won the roll off, picked his side, then promptly deployed just his Zerkers in the rhino plus the 2 Slaaneshi princes, as all the rest (except the
GD) can infiltrate!
I held back the skimmers (carrying the
SWS) as well as the doomhammer superheavy (carrying the blob)..the skimmers in particular worth 2
VP since I can outflank in his half of the table....
Mark then infiltrated his the chosen plus the defilers...dang they were close.....
I've decided to change the format of my batreps to an overhead view instead of my usual closeup shots...since we now have a tablet writer in the house which works with adobe photoshop, I can now draw movements and write the action points straight onto the pic...started doing this with my
WHFB batreps...hope you guys like it
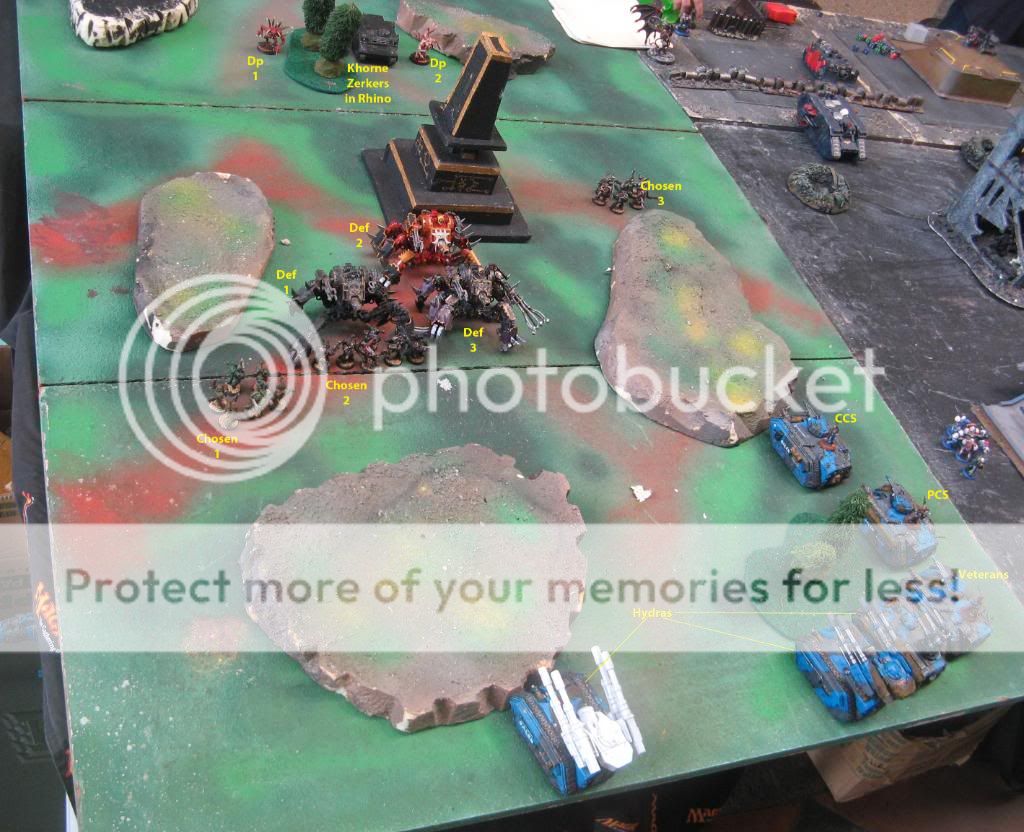
Deployment..Mark bravely deploys in the open....
FYI we decided the forest terrain had more trees, as having just 1 trunk isn't worth calling the terrain a forest!!!
and gets rewarded when I fail to steal the initiative....here we go!!!
CSM turn 1
- As expected, all chaos units move forward, with those elements who could not shoot running.
- The
CSM shooting phase was absolutely fantastic. 1 hydra and the
CCS chimera explodes, while the
PCS chimera is shaken. Follow up incapacitates Col. Fernando, leaving just the astropath and 2 meltagunners ready to fight. They luckily pass their pinning and morale checks, ready to continue fighting.

The
CSM's have a great shooting turn!!!
IG turn 1
- The
IG forces swing to the right, with the angry survivors of the
CCS emerging from the crater, meltaguns aiming for the red defiler who destroyed their chimera.
- However, despite hits from the meltaguns as well as the tank hunting hydras, the defiler shrugs off all shots!!! (damn low penetration as well as damage rolls!!!) One of those critical "I fluff it" shooting turns which all
IG players worth their salt experience once in a while!

The 7th Galen are shaken by the injury to Col. Fernando, and fail to do anything to the chaos forces!! Brace for impact!
CSM turn 2
- The Greater Daemon fails to materialize
- Chaos units converge towards the
IG right, with the berzerkers making a break to the other side in order to score for the breakthrough, it's rhino popping smoke.
- Shooting is not as successful, but
IG fire support takes a critical blow as 1 hydra is shaken while the other has it's autocannons destroyed. Smoke and fast speed protects the
PCS chimera from major damage from Chosen 3's meltaguns, and from the ensuing powerfists and krak grenades, as only the heavy flamer is destroyed.
- The red defiler burns, then eats the remnants of the
CCS.
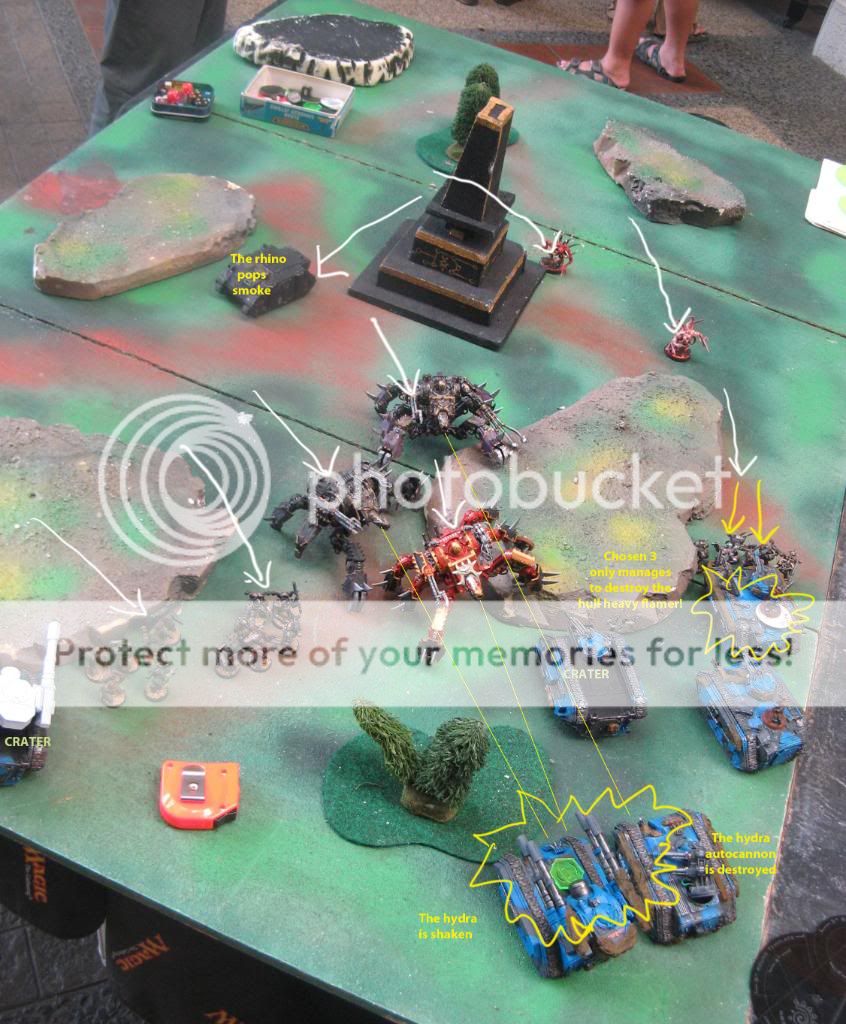
The Chaos forces attempt to cut off the escape route of the 7th Galen!
IG turn 2
- Despite the loss of the astropath, all
IG reserves come into play!
- The
PCS and veterans maneuver into very close melta range of the nearest defilers, while the
IG skimmers have a clear unobstructed view of the defiler's rear. The huge doomhammer enters right in frontof the 2 chosen squads...
- Shooting sees the meltas destroy the nearest defilers, while lascannons and the multilasers strip off the battle cannon and lascannons of the last chaos walker. 2 chosen from squad 3 fall to the heavybolter. multilasers plus heavy flamer shots from the hydra and chimeras.
- The Doomhammer's Magma cannon leaves just the champion of Chosen 2 standing, but chosen 1 manages to shrug off meltagun, palsma pistol, and lasgun shots from the embarked blob squad, with 1 squad sarge burning himself in the process when his plasma pistol overheated, with only 2 chosen falling. All marine squads hold fast in face of the
IG counterattack.
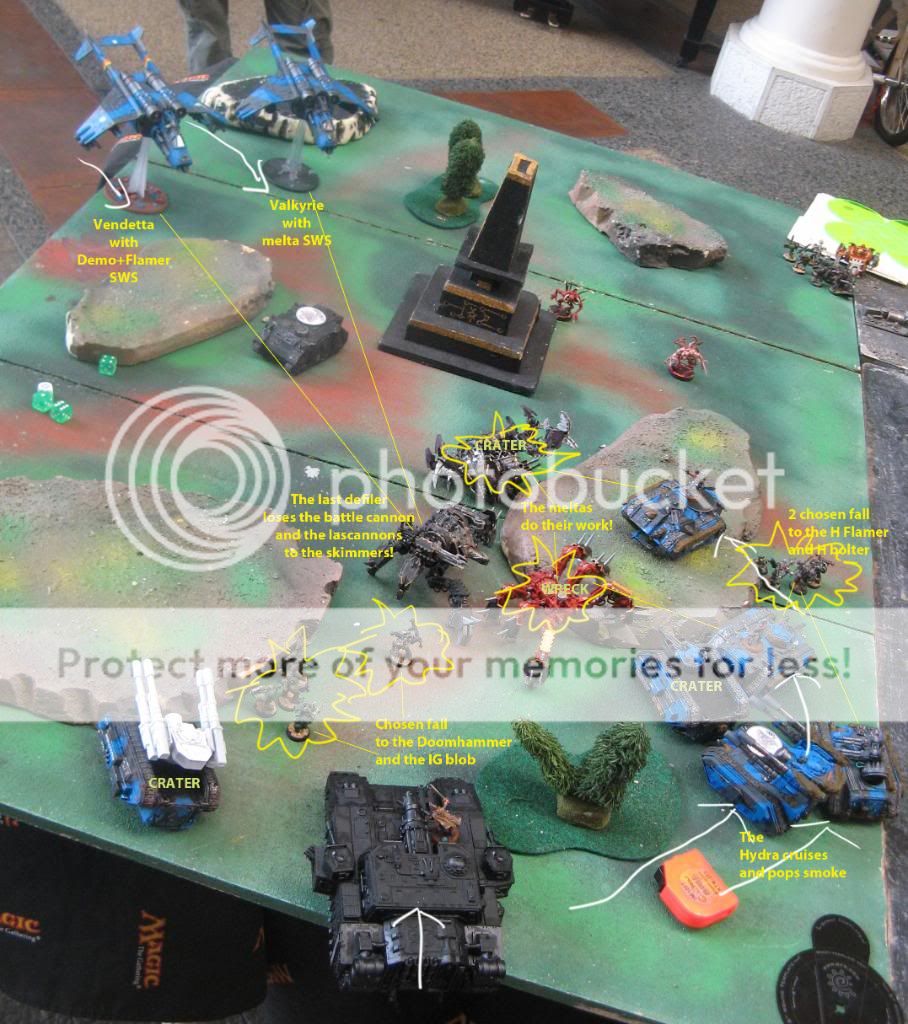 IG
IG reserves come in and blunt the chaos offensive!
CSM turn 3
- With enough blood spilt, the Greater Daemon finally decides to come in and join the fray, as he possesses the last
AC of chosen 2 in a splash of gore, and materializes in front of the Doomhammer.
- Chosen 1 moves in order to shoot at the weaker side armor of the
IG superheavy, and the defiler clicks its giant claws in anticipation of close combat versus the huge tank.
- Daemon Prince 1 flies back in order to deal with the outflanking
IG skimmers, while DP2 flies on top of the hill. Chosen 3 moves forward to seal the noose versus the
IG line of advance.
- Chosen 3 must have been shaken badly, as despite it's meltaguns as well as an assault, all it manages to do is to stun the chimera of the
PCS. DP1 fails to catch the fast moving valkyrie in aerial combat, but it manages to shake it with a well placed swipe...DP2 however punches through the chimera of the veterans, exploding it and leaving 6 alive...who continue to fight....
- The Doomhammer survives the combined attention of Chosen 1, the Graeter Daemon, and the assaulting Defiler, but loses 1 structure point, is drive damaged, driver stunned, loses a lascannon, and the magma cannon and lascannon cannot fire for 1 turn....
With the Greater Daemon finally appearing, the chaos forces continue undaunted and press home their attack!
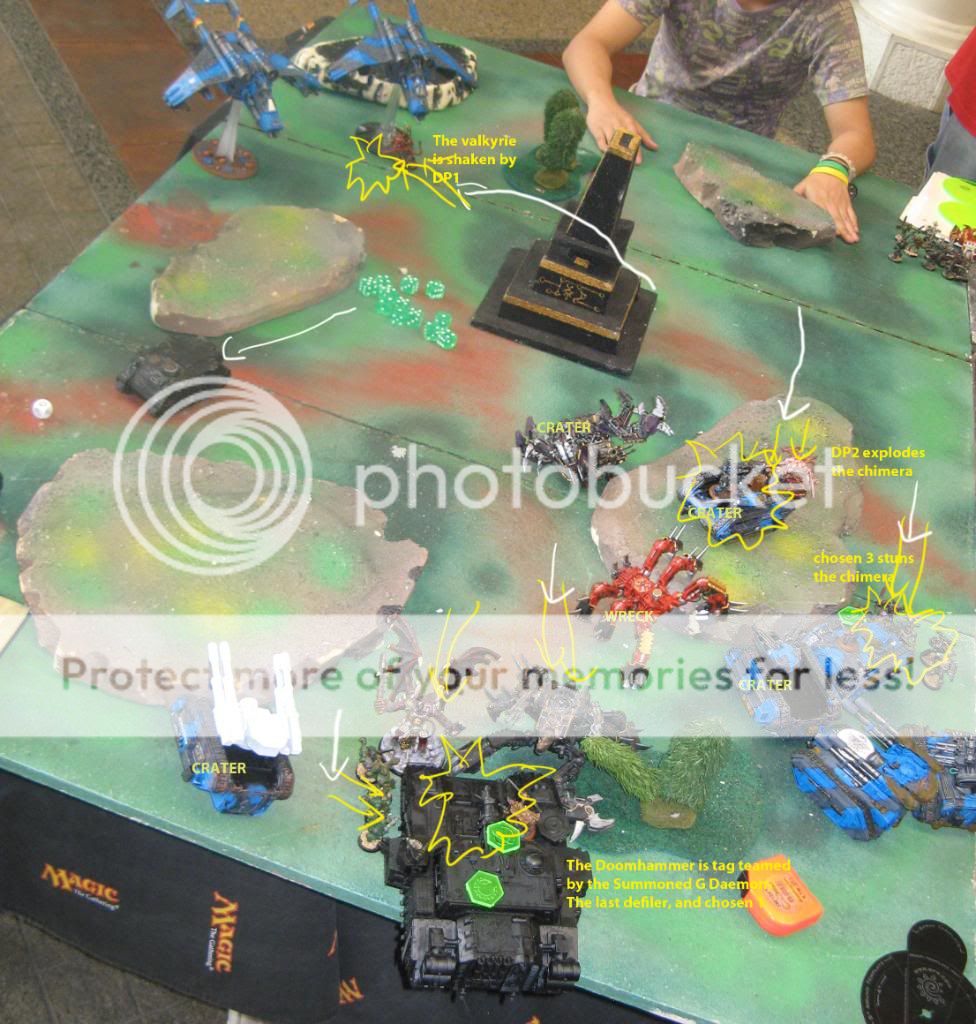
IG turn 3
- The shaken Valkyrie moves flat out in order to escape the Daemon Prince, while the Vendetta spots the Rhino attempting the breakthrough, and moves 12" to avoid DP1, yet shoot at the rhino.
- The
PCS dismounts from their stunned chimera, and go up the hill in order to get a better view of the chosen. 1 hydra moves forward to support them with their heavy bolters, while the other stays put in order to shoot all weapons. The surviving veterans stay in the crater in face of the hulking
DP. The blob decides to stay in the Doomhammer, unwilling to dismount in front of the huge chaos units in front of them (this was a mistake..I should have dismounted and tie up the greater daemon and chosen marines in
hth, but to be honest I wasn't in the mood to unpack all the infantry so I got lazy and decided to stay mounted).
- Shooting sees the vendetta immobilize the rhino, while the heavy bolters of the hydras as well as the
PCS leave only the aspiring champion of chosen 3 alive. DP2 takes only 1 wound from the veterans. The wounded Doomhammer fails to do anything, but a plasma round as well as melta shot causes the last defiler to explode spectacularly....
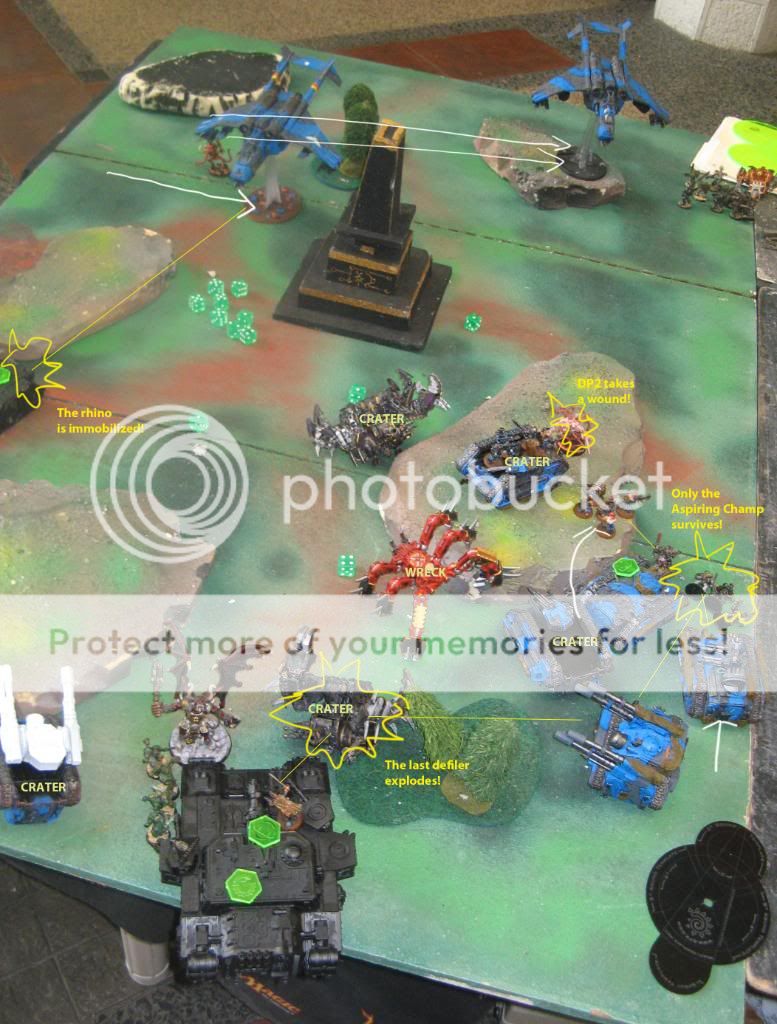
The
IG infantry attempt to breakthrough the chaos noose on foot, while the tanks engage the chaos forces in a close range firefight!!!
CSM turn 4
- DP2 and the
AC of chosen 3 move forward in order to deal with the
IG hydras, while Chosen 1 and the
GD continue to hammer at the Doomhammer....DP1 flaps its wings and swoops to chase after the Vendetta.
- Shooting sees the Doomhammer immobilized.
- The ensuing assault phase sees the
AC explode 1 hydra while the
DP manages to remove the autocannons, immobilize, and stun the other one. DP1 manages to catch the vendetta and destroys 1 engine, immobilizing the skimmer.
- The Doomhammer in swarmed and swamped, and the Greater daemon finally punches through the ammo stores resulting in an...APOCALYPTIC EXPLOSION!!!! All of chosen 1, as well as the mounted blob squad, disappear as a small mushroom cloud forms over the field, from which the Greater daemon emerges, with 1 wound.
IG turn 4
- The 7th Galen see an opportunity, and with the DP2 focusing its attention on the hydras the Veterans board the last chimera, which moves forward and turns around in a rearguard action. The
PCS moves off the hill on foot and moves towards the Chaos side, yet also turn around ready to shoot.
- The last chosen is killed by
IG rearguard, while DP2 takes another wound. The immobilized Vendetta tries to shoot at the rhino, but fails to do anything...

The Chaos monstrous creatures deal more damage, while the
IG infantry break through and the Chosen marines are eliminated, at the cost of the sacrifice of the Doomhammer and blob, plus other
Ig tanks...
CSM turn 5
- Not much left..DP1 drops to the ground, ready to tear the vendetta to shreds....the
GD moves off in order to look at targets, while DP2 moves towards the last chimera.
- No shooting, except that the rhino manages to repair itself...
- In assault, the DP1 explodes the vendetta, and the entire
SWS bar 1 regular guardsman is killed. The survivor cowers in the crater, pinned....DP2 destroys the weapons of the chimera and immobilizes it.
IG turn 5
- The
IG infantry continue to attempt the breakthrough. The valkryie stays put and takes aim at DP1. The
PCS moves, then makes a run for, the chaos side, towards the valkyrie. The veterans bravely stay behind and draw a bead towards the rampaging DP2.
- Shooting sees the veterans prove their worth and take down DP2 in a hail of melta and lasgun shots....
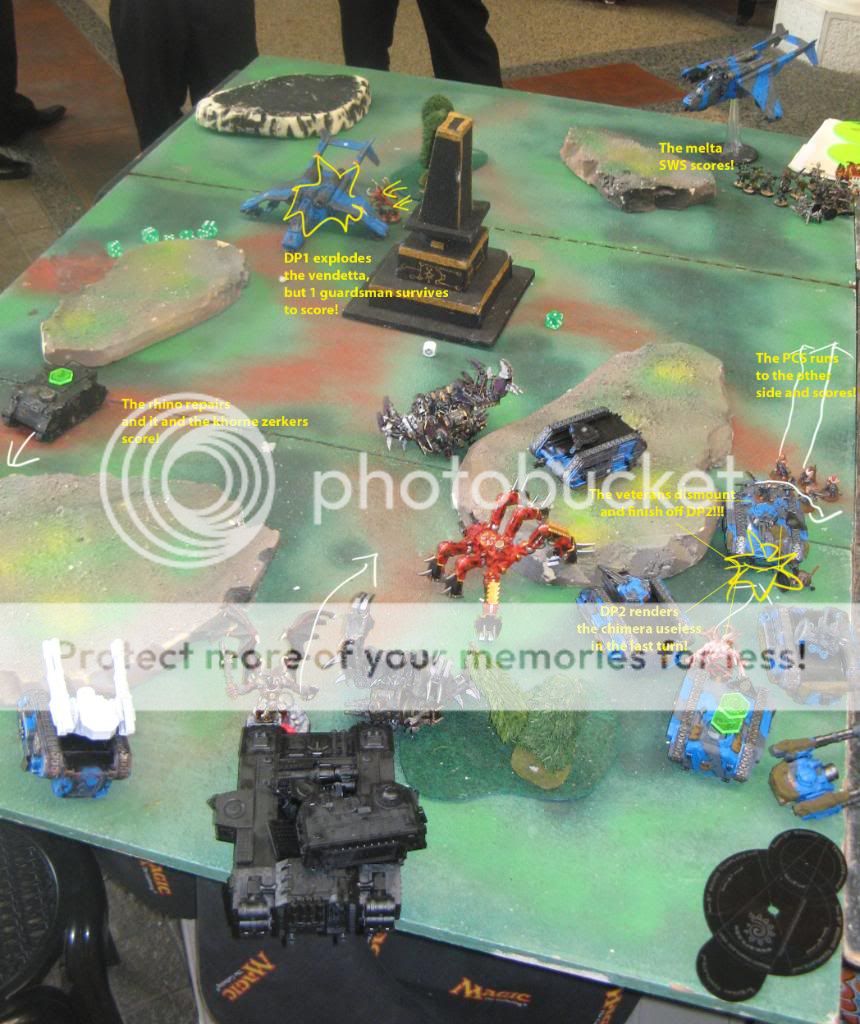
As I forgot to take pics at the end of the game, I labelled the ensuing movement and results after turn 5...the entire battlefield is a charnel house of vehicle craters and wrecks, as well as many, many dead....
With this the die is rolled, and it turns up a 1!!! We count up the scoring units, and 1 had the
PCS as well as the
SWS in the valkyrie, while Mark had the zerkers and their rhino....so it's a draw at 2 all!!!...Oh wait, as I tidy up I notice the pinned survivor of the flamer
SWS, who still counts as scoring!!! The 7th Galen manage to breakthrough with a score of 3-2!!!!
Whew this was a very close game!!! Mark's ambush strategy worked great, and in retrospect maybe I should have deployed just the skimmers plus a
SWS and the
CCS in them, and simply cout moved all over the place, hoping they survive turn 1..but then that would have been 1 less turn to move towards the chaos lines, and the skimmers plus the
SWS are easy "breakthrough" points with their outflanking ability...so I decided to grit it out and face the traitors mano a mano....In the end Mark's choice of having only 5 scoring units proved his undoing, as he did not have enough to breakthrough, although he did have enough to kill a lot of my forces..luckily it wasn't a
KP game!!!
Thanks Mark for the great and intense game!!!


 65/4/6,
  10/2/1,
  10/3/0,
  2/0/1,
  0/1/1
0/1/1
 1/0/0
1/0/0

 .
.


