| Author |
Message |
 |
|
|
|
|
Advert
|
Forum adverts like this one are shown to any user who is not logged in. Join us by filling out a tiny 3 field form and you will get your own, free, dakka user account which gives a good range of benefits to you:
- No adverts like this in the forums anymore.
- Times and dates in your local timezone.
- Full tracking of what you have read so you can skip to your first unread post, easily see what has changed since you last logged in, and easily see what is new at a glance.
- Email notifications for threads you want to watch closely.
- Being a part of the oldest wargaming community on the net.
If you are already a member then feel free to login now. |
|
 |
2018/06/07 20:53:43
Subject: Magnetising. (On IK)
|
|

Twisting Tzeentch Horror
|
So as more and more detail is revealed about the new IK, I am being oh so tempted by the renegade box. I feel however that not magnetising would be a waste if I wanted to run a different type.
So, I have never ever magnetised before and have no proper modelling skills aside from removing mouldlines and sticking it together properly. Can someone give a crash course or link an especially good (helpful) video on how to do it?
|
 insaniak wrote: insaniak wrote:
You can choose to focus on the parts of a hobby that make you unhappy, or you can choose to focus on the parts that you enjoy.
|
|
|
 |
|
2018/06/07 21:02:28
Subject: Magnetising. (On IK)
|
|
Potent Possessed Daemonvessel
Why Aye Ya Canny Dakkanaughts!
|
It's literally just drilling a hole and gluing the magnet into it. Things become slightly more complicated if you want to glue a panel behind the magnet, do a spherical magnet, etc.
The only thing I would make sure you remember is to do the magnets the right way round, I've had to cut out magnets before because I put them in the wrong way without thinking.
|
Ghorros wrote:The moral of the story: Don't park your Imperial Knight in a field of Gretchin carrying power tools.
 Marmatag wrote: Marmatag wrote:All the while, my opponent is furious, throwing his codex on the floor, trying to slash his wrists with safety scissors.
|
|
|
|
|
2018/06/07 21:05:56
Subject: Magnetising. (On IK)
|
|
Twisting Tzeentch Horror
|
Any video guides?
I know it's really easy, I just don't want to make any stupid mistakes and mess up a £95 model.
|
insaniak wrote:
You can choose to focus on the parts of a hobby that make you unhappy, or you can choose to focus on the parts that you enjoy.
|
|
|
|
|
2018/06/07 22:47:36
Subject: Magnetising. (On IK)
|
|
Furious Fire Dragon
|
I can't recommend any video guides because I never used any. I understand how these things can seem somewhat daunting at first but it really is simple. It works best if the magnets are positioned so that they are as close as possible to one another so you get the strongest pull. Always double or triple check that you've got the polarity right so that the things that you want to mate will actually attract and not repel. That's about it really.
Oh, and if you look around on Amazon you can get small neodymium magnets that are perfect for most of your 40k magentising needs from far eastern sellers for peanuts, if you don't mind waiting a couple of weeks for shipping. Some of the smaller sizes can even work out at less than 1p per magnet.
|
|
|
|
|
|
2018/06/07 22:57:35
Subject: Magnetising. (On IK)
|
|
Potent Possessed Daemonvessel
Why Aye Ya Canny Dakkanaughts!
|
 McMagnus Mindbullets wrote: McMagnus Mindbullets wrote:Any video guides?
I know it's really easy, I just don't want to make any stupid mistakes and mess up a £95 model.
Just use common sense when magnetizing your parts, if you do get really stuck and feel anxious about drilling into a part, just search 'Imperial Knight magnetizing'; there's hundreds of different guides that are mostly the same with the odd person who says there's a better way of doing something.
The key bits are:
1. Check the part before you glue it together to decide where you're going to glue the magnet.
1.1. If there is no convenient place to stick the magnet, glue a bit of sprue inside the part before/after you glue it (whichever is easier).
2. Drill/cut a place for the magnet to sit.
3. Check the polarization before you do anything.
4. Glue the Magnet in place.
5. Check the Magnet is in the correct position/the right way up before it is completely stuck.
6. Use Green Stuff to fill holes/cover up the Magnet if need be.
|
Ghorros wrote:The moral of the story: Don't park your Imperial Knight in a field of Gretchin carrying power tools.
Marmatag wrote:All the while, my opponent is furious, throwing his codex on the floor, trying to slash his wrists with safety scissors.
|
|
|
|
|
2018/06/07 23:03:04
Subject: Magnetising. (On IK)
|
|
Rotting Sorcerer of Nurgle
|
My one tip is:
Use a steel, self-tapping screw in all the option bits & a magnet in the main body. This way you save on the cost of magnets & will never have a problem with polarity.
|
Check out my gallery here
Also I've started taking photos to use as reference for weathering which can be found here. Please send me your photos so they can be found all in one place!! |
|
|
|
|
2018/06/08 03:15:30
Subject: Magnetising. (On IK)
|
|

Locked in the Tower of Amareo
|
Only part that will really cause headache is the battle cannon/thermal cannon front part. Still trying to figure good ways to magnetize that. Suggestions welcome. Current solution isn't that stable.
|
2024 painted/bought: 109/109 |
|
|
|
|
2018/06/08 09:30:09
Subject: Re:Magnetising. (On IK)
|
|

Dakka Veteran
|
The swap for thermal/battle is a tough one. The technique I found that works is to put a chunk or two of sprue across the hole in the arm mount, so that it can support a decent sized magnet, and make a similar sort of device on the gun mount. I don't think there's a way not to make it sketchy, but if you stabilize the magnets enough, and use a slightly stronger one on the arm side, it should hold decently.
There's really only four places, aside from the thermal/battle swap, that need magnets.
The first is the top of the carapace, for your missile pods or autocannons option, this is pretty straight forward, as the design isn't massively complex.
The Arms can be made sectional, allowing you to swap the chaingun or fist into place - they both come with their own piece that would mount to the shoulder piece, which gives you some ease with That process. Where the arms magnetize -unless using Forgeworld Weapons- is the part of the arm that allows it to swing on the vertical axis, between the shoulder and the elbow. There is a plug that comes off the shoulder section that you cut off - this normally is the inside of the rotation joint, and we're not using that. It takes a bit of finesse to get a magnet onto the socket on the arm - you'll need something under it to give a bit more hold, and I'd suggest putty around the whole thing. This joint is most certainly where you will want at least a 5x2mm N52 grade magnet on both sides, doubly so if resin guns are involved. I ran some of my pin wire under the magnet to give it something to sit on, and applied putty to the whole thing so it bonded to the metal and plastic and the wire.
The other part to consider is the mounting for the Meltagun/Heavy Stubber weapons. You won't have a lot of space, but a strong 3x2mm magnet will give good hold there. You're joining the elevation joint and the socket for the rotation joint again. I suggest you build the clip first, so you have the whole mount solid, and Then drill for the magnet insertion. There's not a lot of real estate for this part, so it can be a bit fiddly.
There's additional steps if you want to fully magnetize a Forgeworld Knight. The carapace mount isn't built in on those, but it isn't hard to simply drill and fit a magnet for the purpose. If you want to swap weapons, but keep all your options, you have to magnetize at what is in essence the Elbow joint on the mountings and apply some pieces to fix things in place once swapped, as these weapons do not come with their own lower arm piece, but are entirely a solid resin piece and do not need to have the hot-swap for weapon barrels involved. Being a chunk of resin, the gun especially needs strong magnets to hold it in place.
|
|
|
|
|
2018/06/08 17:43:49
Subject: Magnetising. (On IK)
|
|

Longtime Dakkanaut
|
tneva82 wrote:Only part that will really cause headache is the battle cannon/thermal cannon front part. Still trying to figure good ways to magnetize that. Suggestions welcome. Current solution isn't that stable.
I JUST did one of these. I'm at work or I'd take some pics
I used Milliput. I filled in the hole on the main body of the thermal/rfbc. Before it sets, I press a stack of the size of magnets I want into the putty until the one magnet on the end is flush with the hole (I wet the magnets a bit so they dont stick to the milliput). Then I pull out the magnets. You should have a perfectly formed hole to superglue your magnet into once the milliput dries.
Then, I fill the void of the thermal/rfbc barrel end with putty, same as I did for the body of the cannon. Before it sets, I stick a stack of two magnets into the hole I previously made in the body. There's two magnets there so that the one should stick out. Then I press the thermal/rfbc barrel end into place (again, I wet the magnets so they dont stick) and then remove the barrel. You should be left with another hole for your magnet that will perfectly align with the previous hole! Then just repeat the process for the second thermal/rfbc barrel.
This process is great because it ensures your magnets will be perfectly aligned.
It's actually the least labor-intensive way I've found for magnetizing something like this. Only trouble is if you are impatient, because milliput takes at least 3 hours or so to dry to the point where you'd want to glue the magnet.
I may try to use greenstuff in a similar fashion on the next knight kit I get this weekend, but I tend to prefer the way Milliput dries MUCH more than greenstuff. I really only use greenstuff these days if I want something to have a little flex.
For arm weapon magnets I am using 1/4" x 1/16" N52 grade. 1/32" depth would probably also work just fine.
|
|
This message was edited 1 time. Last update was at 2018/06/08 17:47:36
|
|
|
|
|
2018/06/08 19:06:08
Subject: Magnetising. (On IK)
|
|
Longtime Dakkanaut
|
Here are a few pictures to help;
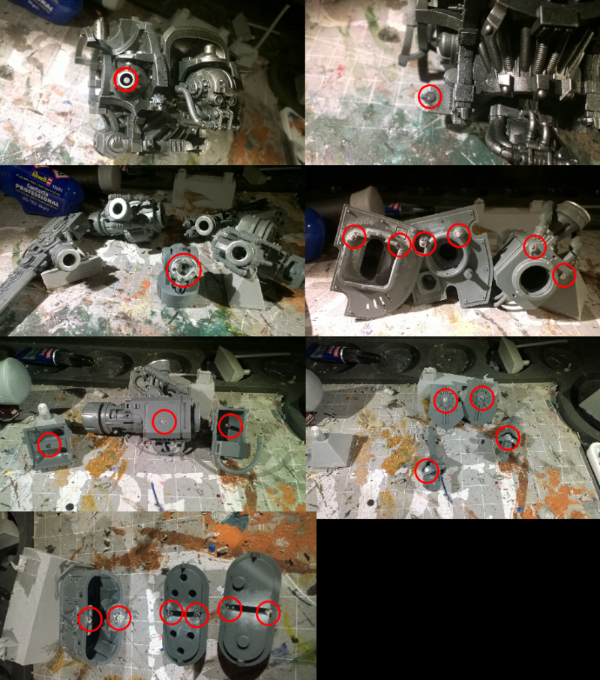
The arms are easy if you cut the connecting rod off (the one that sits in the elbow joint), and glue washers on the arm ends. A few magnets glued to one side and you're done.
|
|
|
|
|
|
2018/06/25 12:04:07
Subject: Magnetising. (On IK)
|
|

Longtime Dakkanaut
|
gonna hijack this thread, hope OP dont mind.
what size of magents are recommended?
allso, is there enugh plastic in the parts to use a standard metal drill bit or do i need to get a wood drill bit?
|
darkswordminiatures.com
gamersgrass.com
Collects: Wild West Exodus, SW Armada/Legion. Adeptus Titanicus, Dust1947. |
|
|
|
|
2018/06/25 14:45:12
Subject: Magnetising. (On IK)
|
|
Lone Wolf Sentinel Pilot
|
There are dozen of videos on youtube that do walk throughs of the Magnatization of a knight.
|
 10000+ 10000+
 10000+ 10000+
 8500+ 8500+
 3000+ 3000+
 8000+ 8000+
 3500+ IK Plus 1x Warhound, Reaver, Warlord Titans 3500+ IK Plus 1x Warhound, Reaver, Warlord Titans
DakkaSwap Successful Transactions: cormadepanda, pretre x3, LibertineIX, Lbcwanabe, privateer4hire, Cruentus (swap), Scatwick2 (swap), boneheadracer (swap), quickfuze (swap), Captain Brown (swap) x2, luftsb, Forgottonson, WillvonDoom, bocatt (swap)
*I'm on Bartertown as Dynas |
|
|
|
|
2018/06/25 15:31:45
Subject: Magnetising. (On IK)
|
|
Potent Possessed Daemonvessel
Why Aye Ya Canny Dakkanaughts!
|
 FrozenDwarf wrote: FrozenDwarf wrote:gonna hijack this thread, hope OP dont mind.
what size of magents are recommended?
allso, is there enugh plastic in the parts to use a standard metal drill bit or do i need to get a wood drill bit?
I'm using 5mm for the arms and 3/2mm for everything else.
I just make a small hole with a hand drill and then use a standard drill bit, no need to go out buying fancy wood drill bits.
|
Ghorros wrote:The moral of the story: Don't park your Imperial Knight in a field of Gretchin carrying power tools.
Marmatag wrote:All the while, my opponent is furious, throwing his codex on the floor, trying to slash his wrists with safety scissors.
|
|
|
|
|
2018/06/25 17:50:46
Subject: Magnetising. (On IK)
|
|
Longtime Dakkanaut
|
Hmm people get hung up on the size a lot for these things, it seems. If you're using el-cheapo magnets off ebay, you might need to use big magnets, because they're probably not N52 (unless stated) so they have a weaker field. I see some of these magnetization videos on Youtube and I see either a lot of overkill or a lot of weak, cheap magnets.
3/8" x 1/16" is the most you'll need for arms and waist. Good, strong 1/4" x 1/16" or 5mm x 2mm will probably be more than enough, though. I personally used a pair of 1/4" x 1/8" N52 magnets for the waist and that was PLENTY. I probably could have used 1/16" thickness, but I wasn't sure how much stuff I'd be putting on the base at the time.
Best advice I can give is buy a variety of sizes of N52 magnets from someone like K&J magnetics and play around with them. I think some people would be surprised on just how little magnet they need. Things like land raider doors with nice flat surfaces for drilling and surface mating, you can easily just use a single magnet on one surface, then scrape the other surface and glue a little strip of steel (flashing from a hardware store). The magnetic bond while they're touching is just as strong as two magnets. If you do this a lot, I'd recommend on buying a very small chisel for cutting the recess for the metal--it makes things much easier.
|
|
|
|
|
2018/06/25 19:25:01
Subject: Magnetising. (On IK)
|
|
Longtime Dakkanaut
|
could you do thouse sizes in metric please?
googled some conversion sites but they dont accept they way you write the imperial size, and i have no clue about that imperial system.
basicly, the biggest magnets i have are 4x1mm N42 grade.
|
|
This message was edited 1 time. Last update was at 2018/06/25 19:26:45
darkswordminiatures.com
gamersgrass.com
Collects: Wild West Exodus, SW Armada/Legion. Adeptus Titanicus, Dust1947. |
|
|
|
|
2018/06/25 19:34:27
Subject: Magnetising. (On IK)
|
|
Potent Possessed Daemonvessel
Why Aye Ya Canny Dakkanaughts!
|
FrozenDwarf wrote:could you do thouse sizes in metric please?
googled some conversion sites but they dont accept they way you write the imperial size, and i have no clue about that imperial system.
basicly, the biggest magnets i have are 4x1mm N42 grade.
1" = 25.4mm, you can do some quick maths from there.
Here's a guide that I'm referring to for some of the more fiddly bits:
https://fromthefang.blogspot.com/2015/06/magnetising-imperial-knight-warden-kit_20.html
|
Ghorros wrote:The moral of the story: Don't park your Imperial Knight in a field of Gretchin carrying power tools.
Marmatag wrote:All the while, my opponent is furious, throwing his codex on the floor, trying to slash his wrists with safety scissors.
|
|
|
|
|
2018/06/25 19:44:28
Subject: Magnetising. (On IK)
|
|
Member of a Lodge? I Can't Say
|
 bubber wrote: bubber wrote:My one tip is:
Use a steel, self-tapping screw in all the option bits & a magnet in the main body. This way you save on the cost of magnets & will never have a problem with polarity.
Fancy. I use the heads of tacks/small nails. They're just the right size that my largest drill bit can make a hole for the shaft of the nail and leave the head exposed.
|
I prefer to buy from miniature manufacturers that *don't* support the overthrow of democracy. |
|
|
|
|
2018/06/25 20:54:04
Subject: Magnetising. (On IK)
|
|
Dakka Veteran
|
I use 5x2mm for arms and top mount, I had a design for my melee arm that needed more magnets so I could swap out the forgeworld claw for a regular chainblade.. but then I went and made the Freeblade game style double-row chainblade and developed a case of free-mount syndrome and undid some magnetizing torecover them.
It's also important to note you want N52 grade magnets, do not accept less than that, because if you start working with FW knights you WILL want that strength involved.
|
|
|
|
|
|
|
