Forum adverts like this one are shown to any user who is not logged in. Join us by filling out a tiny 3 field form and you will get your own, free, dakka user account which gives a good range of benefits to you:
No adverts like this in the forums anymore.
Times and dates in your local timezone.
Full tracking of what you have read so you can skip to your first unread post, easily see what has changed since you last logged in, and easily see what is new at a glance.
Email notifications for threads you want to watch closely.
Being a part of the oldest wargaming community on the net.
If you are already a member then feel free to login now.
I have been attempting to apply decals to my Space Marines and the decals never seem to stay. I have tried the way the Warhammer YouTube Channel shows by using only water. I have tried even applying it with a vinegar/water mixture too. I've let them site for up to 48 hours after applying and nothing seems to be working. Am I missing something or is there a better way to ensure that the decals stay?
"There is rational thought here. It's just swimming through a sea of stupid and is often concealed from view by the waves of irrational conclusions." - Railguns
Apply a very watered down PVA mixture to the surface before you put down your decal. Add a varnish after the glue has dried. Should be pretty much impossible to remove the decal after that.
That said I usually don't need either glue or even varnish (just lahmian medium). It depends on the surface really: is it curved? Is the paint finish smooth or 'gloopy'? Any sort of roughness to the surface makes it that much more difficult to secure the decals.
1-Apply gloss varnish and let dry as even as possible.
2-apply decal. Move in place with brush , knife tip
3-if surface is curved, apply decal softener(available at hobby lobby), 2 coats and let dry fully for 30 min; you can skip this if surface is flat. Roll a dry soft(make up brushes)brush tip to rid of wrinkles and air pockets.
4-apply lahmian medium and let dry as even as possible; if air pocket still visible, poke a hole with xacto knife tip, apply another coat of lahmian medium to seal the pot hole.
I actually find Matt varnish works just as well as gloss (I didn’t like the change in surface gloss gave, even after finishing with matt varnish), the important part is to have a super smooth surface (paint is actually rough).
Trim the decal as close as you can and for double curved surfaces like shoulder pads you may need to slit the decal, if you can. For example I cut part way down the centre of the U for my Ultramarines, to allow the decal to conform better.
Don’t over-soak the decal (I.e. until it floats), it can wash the adhesive off. I find it best to dip the thing in the water, to break surface contact and get the whole thing wet and the drag it to the edge, so that the water can soak up through the backing, but the decal is not submerged.
Use a decal solution on the surface of the model to help soften and slide the decal.
Once dry, overcoat with Matt varnish, to obscure the edges and prevent the decal wearing off. You can put multiple decals on between layers of varnish if you want to get cool effects (e.g, overlaid squad numbers, etc.)
This message was edited 1 time. Last update was at 2018/10/02 06:30:40
Zed wrote: *All statements reflect my opinion at this moment. if some sort of pretty new model gets released (or if I change my mind at random) I reserve the right to jump on any bandwagon at will.
For Space marines it's important to cut the decals as well or they will not curve around the shoulder pads.
So for applying decals to marines (shoulder pads and knees):
Step 1 - apply gloss varnish to surface decal will be placed. I use Citadel 'Ard Coat for this but any acrylic gloss varnish will do. Allow the gloss varnish to fully dry. If you can leave for 24 hours. This will prevent "fogging" later.
Step 2: Trim your decal from the sheet using a sharp knife. Try to trim as close to the decal as possible to remove as much of the carrier film as you can. Then if you are applying the decal to a rounded/curved surface use a sharp knife to make 3 tiny cuts to the decal.
These should only be about 1mm and scoring is enough but it doesn't matter if you cut right through, just be careful not to damage the decal.
The scores/cuts should be at the 12 O'Clock, 4 O'Clock and 8 O'Clock positions.
Step 3: Then apply your decal as usual and gently remove excess water once it's in position.
Step 4: Apply decal softener to the decal. I use Micro Sol for this and personally haven't found a better one but any decal softener will do. The decal softener might move your decal out of position but be careful not to tear it at this point as it will now be "soft" Let the softener work for a few minutes and then very gently push the air bubbles out, you'll find most of them will come out via the cuts made earlier.
Step 5: Apply decal fixer to the decal. This will then draw the decal to the curved surface, get rid of wrinkles and set it in place. Again the best decal fixer I have found is Micro Set. Apply it fairly liberally over the decal and leave to work its magic. Don't panic if the decal suddenly goes wrinkly, once it dries it will straighten out.
Step 6: Check the decal for any remaining wrinkles or air bubbles. You can either apply a tiny bit of decal softener and push them out or pop them with a sharp knife but if you cut the decal correctly you shouldn't have any at this stage.
Step 7: Once the decals are dry, again I would give 24 hours if you can to prevent "fogging" but a few hours should be enough, apply a coat of Gloss varnish.
Step 8: Once the Gloss varnish is dry (again leave as long as you can) apply a layer of Matt Varnish. I use Lahmian Medium but any matt varnish will do - Vallejo matt varnish is very good.
And that should give you perfectly smooth "painted on" decals.
The reason for allowing so much time for the stages to dry is to ensure all of the moisture has fully dried before going on to the next stage.
If you get moisture trapped between stages (layers of varnish) this will create fogging. If you do get foggy deals at any stage this can normally rectified by applying another coat of varnish. This "eats into" the previous layer and normally lets the moisture escape.
Sounds long winded but gets good results.
Automatically Appended Next Post:
Jadenim wrote: I actually find Matt varnish works just as well as gloss (I didn’t like the change in surface gloss gave, even after finishing with matt varnish), the important part is to have a super smooth surface (paint is actually rough).
Trim the decal as close as you can and for double curved surfaces like shoulder pads you may need to slit the decal, if you can. For example I cut part way down the centre of the U for my Ultramarines, to allow the decal to conform better.
Don’t over-soak the decal (I.e. until it floats), it can wash the adhesive off. I find it best to dip the thing in the water, to break surface contact and get the whole thing wet and the drag it to the edge, so that the water can soak up through the backing, but the decal is not submerged.
Use a decal solution on the surface of the model to help soften and slide the decal.
Once dry, overcoat with Matt varnish, to obscure the edges and prevent the decal wearing off. You can put multiple decals on between layers of varnish if you want to get cool effects (e.g, overlaid squad numbers, etc.)
Using Gloss Varnish disguises the carrier film though, so if you don't use gloss varnish first you will sometimes get "silvering" and you will still sometimes be able to see the carrier film.
Having said that most decal softeners will get rid of the carrier film any way but the gloss varnish is kind belt and braces.
This message was edited 4 times. Last update was at 2018/10/02 08:54:25
StraightSilver wrote: Using Gloss Varnish disguises the carrier film though, so if you don't use gloss varnish first you will sometimes get "silvering" and you will still sometimes be able to see the carrier film.
That's not what causes decal silvering.
d-usa wrote: "When the Internet sends its people, they're not sending their best. They're not sending you. They're not sending you. They're sending posters that have lots of problems, and they're bringing those problems with us. They're bringing strawmen. They're bringing spam. They're trolls. And some, I assume, are good people."
StraightSilver wrote: Using Gloss Varnish disguises the carrier film though, so if you don't use gloss varnish first you will sometimes get "silvering" and you will still sometimes be able to see the carrier film.
That's not what causes decal silvering.
Silvering is caused by air trapped between layers of varnish.
Gloss varnish will initially prevent this because it makes the surface the decal being applied to flat - paint actually isn't flat.
Gloss varnish applied over the top will eat through the previous layer of varnish and release any trapped air and will also do the same for trapped moisture - fogging.
I don't think matt varnish does the same thing? It might but I have always used gloss.
Also the carrier film is sometimes more visible if you don't have gloss under and over it.
This message was edited 2 times. Last update was at 2018/10/02 11:15:46
StraightSilver wrote: Using Gloss Varnish disguises the carrier film though, so if you don't use gloss varnish first you will sometimes get "silvering" and you will still sometimes be able to see the carrier film.
That's not what causes decal silvering.
That was very "useful"... and wrong...
Matt paint or varnish is matt because of the rough surface it forms (among other things). Applying decals to this surface will cause air bubble to be trapped below the carrier film. This air has a different refraction rate compared to flat paint areas which will cause part of the light to reflect differently and cause a different appearance of the mentioned carrier film which is seen as silvering. Applying a gloss coat over the matt paint will even out the roughness providing for a much smoother surface reducing the effect. So, gloss varnish is what takes away silvering, in the end.
Also - how old are the decals?
They do age & should carry a best before date IMO!!
Check out my gallery here Also I've started taking photos to use as reference for weathering which can be found here. Please send me your photos so they can be found all in one place!!
StraightSilver wrote: Using Gloss Varnish disguises the carrier film though, so if you don't use gloss varnish first you will sometimes get "silvering" and you will still sometimes be able to see the carrier film.
That's not what causes decal silvering.
That was very "useful"... and wrong...
Matt paint or varnish is matt because of the rough surface it forms (among other things). Applying decals to this surface will cause air bubble to be trapped below the carrier film. This air has a different refraction rate compared to flat paint areas which will cause part of the light to reflect differently and cause a different appearance of the mentioned carrier film which is seen as silvering. Applying a gloss coat over the matt paint will even out the roughness providing for a much smoother surface reducing the effect. So, gloss varnish is what takes away silvering, in the end.
That was very useful...and correct! Silvering is the microbubbles of air caught underneath the clear decal film when applied over a matte surface
You always should apply decals over a gloss varnish. Micro-sol has been the standard setting solution for decades in the modelmaking community, vallejo also makes decal setting solution. The solution softens the clear film that the decals are printed on so they conform to the shape of the part better. You let the first gloss varnish dry completely, wet the decal in water till it slides off the backing paper and slide it into place with a brush/knifetip/toothpick. I'll usually blot away the water with a q-tip at this point, start in the center of the decal and roll it to the edge to push the water out from underneath the decal. Then brush on a generous amount of the setting solution so that you have a small puddle of it completely covering the decal. Do not blot away the setting solution, leave it alone and let it air-dry. The decal will wrinkle and shrivel a bit and look awful after 10 minutes but this is absolutely NORMAL, the wrinkles will self-level out again as it dries. You may need to do the setting solution step again for really complex curves (like a Space Marine Shoulderpad) or if the film is really thick (like GW decals). Once dry, apply a second coat of gloss varnish to seal in the decal, this second agloss varnish will help to fill in and hide the edge of the clear decl film. Then you can use matte or satin varnish/dullcoat to kill any shine from the gloss varnish. Done properly the decal and film edge will be completely invisible, hidden within the varnish and your model will be well protected as well. No silvering, no bubbling, no lifted or wrinkled edges. You can then paint or weather over the decal to grunge it up with the rest of the model
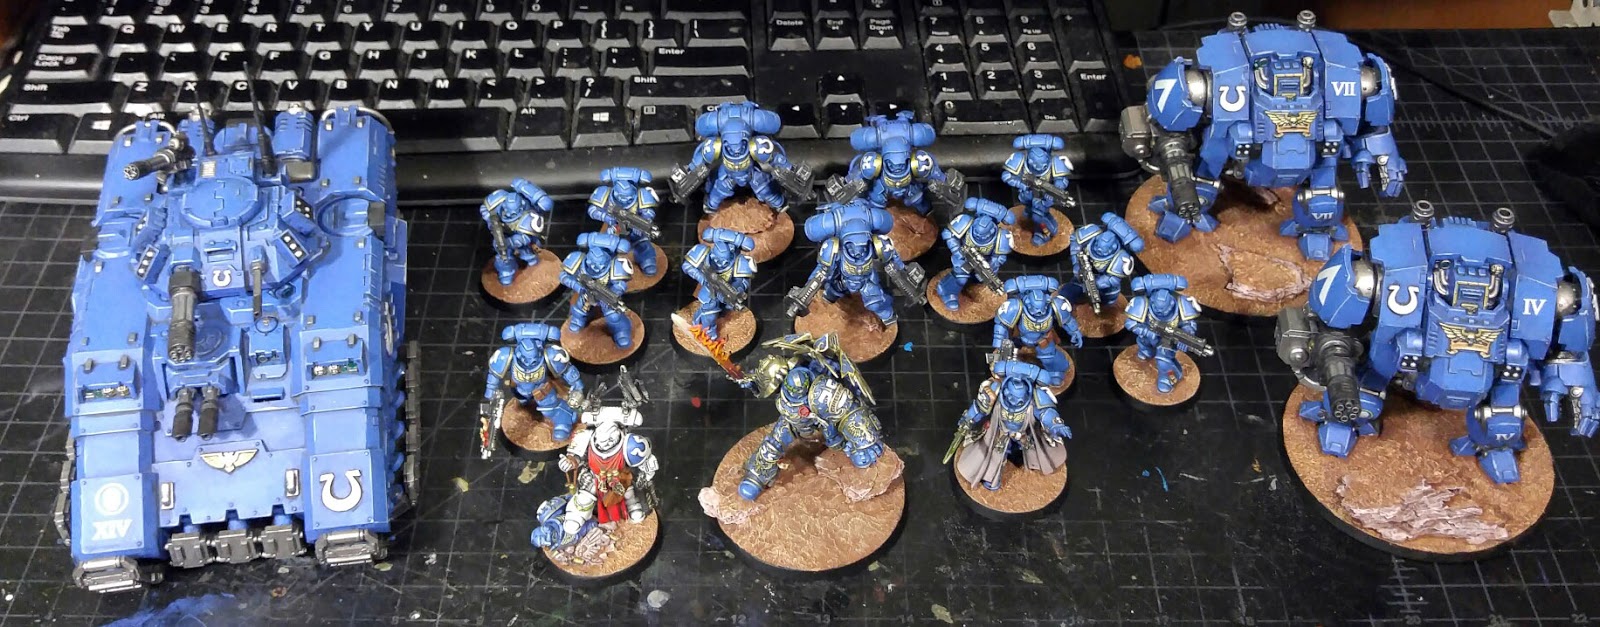
The models below had decals applied that way: gloss varnish -->apply decal w/ setting solution --> gloss varnish again --> matte varnish to kill the shine. Ultramarine symbols are molded and painted, but all the squad markings are decals as well as the chevrons on the dreadnought shoulders and numerals on the kneepads/chestplate.
Spoiler:
This message was edited 3 times. Last update was at 2018/10/02 18:23:11
You can do either/or. I tend to gloss the entire model for protection anyways if it's a gaming piece. Then I'll do any decals and regloss. Oil/enamel washes/weathering pigments go over that so they affect the decals too. I'll finish by airbrushing on a matte medium instead of a varnish just because it gives me more control over exactly how shiny/flat of a finish I want, and they already have a layer or 2 of gloss for protection, but I'll also sometimes just brush on gloss and matte varnish just on the applicable areas depending on the model and the decal in question. Once you understand the basics of why decals do what they do (silvering, lifting etc), they're actually fairly forgiving. I've even used really old, torn decals that lost their adhesive that I set into wet gloss coat to "glue" them in place. It's one of those things where understanding how to do it properly lets you know when you can get away with cutting corners at times. Like the guy up-thread that says he uses matte-varnish under the decals, it probably works fine most of the time for him, but it's going to be frustrating when it doesn't work and you don't know why it isn't working
StraightSilver wrote: Using Gloss Varnish disguises the carrier film though, so if you don't use gloss varnish first you will sometimes get "silvering" and you will still sometimes be able to see the carrier film.
That's not what causes decal silvering.
Silvering is caused by air trapped between layers of varnish.
Gloss varnish will initially prevent this because it makes the surface the decal being applied to flat - paint actually isn't flat.
Gloss varnish applied over the top will eat through the previous layer of varnish and release any trapped air and will also do the same for trapped moisture - fogging.
I don't think matt varnish does the same thing? It might but I have always used gloss.
Also the carrier film is sometimes more visible if you don't have gloss under and over it.
Literally none of this is true, save for what the definition of what silvering is. Gloss varnish doesn't "prevent" silvering on rough texture in the slightest and gloss varnish won't "eat" through anything, especially if it's acrylic.
StraightSilver wrote: Using Gloss Varnish disguises the carrier film though, so if you don't use gloss varnish first you will sometimes get "silvering" and you will still sometimes be able to see the carrier film.
That's not what causes decal silvering.
That was very "useful"... and wrong...
Matt paint or varnish is matt because of the rough surface it forms (among other things). Applying decals to this surface will cause air bubble to be trapped below the carrier film. This air has a different refraction rate compared to flat paint areas which will cause part of the light to reflect differently and cause a different appearance of the mentioned carrier film which is seen as silvering. Applying a gloss coat over the matt paint will even out the roughness providing for a much smoother surface reducing the effect. So, gloss varnish is what takes away silvering, in the end.
Again, none of this is actually true. In fact, it's more painting dogma that is endless repeated by people on the internet. A rough surface that has gloss over it is still rough, unless the gloss is so thick that it completely obscures any detail (it should never be like this and if it is, you've done it wrong). A decal will bed down over a matte surface just as easily as it does a gloss surface, as evidenced by people like me (and other scale modelers) that apply decals directly onto painted surfaces, even over Tamiya XF paint, which is much flatter than anything produced by Vallejo or GW or just about anyone.
Take some time and watch this video if you don't believe me:
This message was edited 1 time. Last update was at 2018/10/03 14:43:19
d-usa wrote: "When the Internet sends its people, they're not sending their best. They're not sending you. They're not sending you. They're sending posters that have lots of problems, and they're bringing those problems with us. They're bringing strawmen. They're bringing spam. They're trolls. And some, I assume, are good people."
I'm not sure that arguing over the semantics of "silvering" and "fogging" is entirely helpful to the OP.
He asked for help applying decals to Space Marines which we have given and the methods outlined above definitely work and are recommended by almost every experienced mini painter online.
It's well known that a gloss varnish will prevent silvering and you definitely don't need a very thick coat to prevent it.
I can imagine that Scale Modellers do it differently and may indeed achieve better results but for the OP's benefit we have provided a method that definitely works using easily available materials.
I have been painting for 35 years and have used the methods outlined and had success every time but obviously there are different ways to do it but I know mine works well and is the recommended method by most mini painters.
The above posters have it right... You simply cannot effectively apply decals to a paint surface that is in any way rough, like basic acrylic paint. Lightly brush on some sort of gloss - I use acrylic clear semi-gloss, which works for me. Use a decal set solution to help blend and adhere the decal to the surface and then go lightly over the decal to set it - I use the same semi-gloss or even a matte - at this point it just needs to blend in with the rest of your painting
I'm surprised no one has mentioned MicrolSol/Microset yet.
I just put on some decals the other day with it, then decided i didn't want those decals there, so tried to remove them. I pretty much had to scrape them off and lost some paint along with it. They weren't varnished either.
The stuff is pretty cheap and lasts forever and besides making decals stay, it also soften them so they will mold over curved surfaces easily.
This message was edited 1 time. Last update was at 2018/10/03 20:05:32
StraightSilver wrote:I'm not sure that arguing over the semantics of "silvering" and "fogging" is entirely helpful to the OP.
He asked for help applying decals to Space Marines which we have given and the methods outlined above definitely work and are recommended by almost every experienced mini painter online.
It's well known that a gloss varnish will prevent silvering and you definitely don't need a very thick coat to prevent it.
I can imagine that Scale Modellers do it differently and may indeed achieve better results but for the OP's benefit we have provided a method that definitely works using easily available materials.
I have been painting for 35 years and have used the methods outlined and had success every time but obviously there are different ways to do it but I know mine works well and is the recommended method by most mini painters.
It's recommended by "most" mini painters because of threads like this. Inexperienced person asks a question, a bunch of people chime in to repeat the incorrect information they heard, and then the cycle continues (as evidenced by this very thread).
MDSW wrote:The above posters have it right... You simply cannot effectively apply decals to a paint surface that is in any way rough, like basic acrylic paint.
No, they don't have it right at all. A decal will go down over "basic" acrylic paint just fine, especially with the use of softening and setting solutions.
It's important to note that using a gloss varnish first isn't wrong, it's just not necessary. A matte surface doesn't mean it will silver and what most people call silvering, isn't actually silvering (like in that Winterdyne tutorial), it's just being able to see the carrier film because it's thick or has a different finish than the underlying paint (or both). What is wrong is that gloss means a decal won't silver, which is just plain untrue, and I've seen it happen with crappy thick decals (like some of the ones in Battlefront boxes).
This message was edited 2 times. Last update was at 2018/10/04 18:18:01
d-usa wrote: "When the Internet sends its people, they're not sending their best. They're not sending you. They're not sending you. They're sending posters that have lots of problems, and they're bringing those problems with us. They're bringing strawmen. They're bringing spam. They're trolls. And some, I assume, are good people."
StraightSilver wrote: Using Gloss Varnish disguises the carrier film though, so if you don't use gloss varnish first you will sometimes get "silvering" and you will still sometimes be able to see the carrier film.
That's not what causes decal silvering.
That was very "useful"... and wrong...
Matt paint or varnish is matt because of the rough surface it forms (among other things). Applying decals to this surface will cause air bubble to be trapped below the carrier film. This air has a different refraction rate compared to flat paint areas which will cause part of the light to reflect differently and cause a different appearance of the mentioned carrier film which is seen as silvering. Applying a gloss coat over the matt paint will even out the roughness providing for a much smoother surface reducing the effect. So, gloss varnish is what takes away silvering, in the end.
That was very useful...and correct! Silvering is the microbubbles of air caught underneath the clear decal film when applied over a matte surface
You always should apply decals over a gloss varnish. Micro-sol has been the standard setting solution for decades in the modelmaking community, vallejo also makes decal setting solution. The solution softens the clear film that the decals are printed on so they conform to the shape of the part better. You let the first gloss varnish dry completely, wet the decal in water till it slides off the backing paper and slide it into place with a brush/knifetip/toothpick. I'll usually blot away the water with a q-tip at this point, start in the center of the decal and roll it to the edge to push the water out from underneath the decal. Then brush on a generous amount of the setting solution so that you have a small puddle of it completely covering the decal. Do not blot away the setting solution, leave it alone and let it air-dry. The decal will wrinkle and shrivel a bit and look awful after 10 minutes but this is absolutely NORMAL, the wrinkles will self-level out again as it dries. You may need to do the setting solution step again for really complex curves (like a Space Marine Shoulderpad) or if the film is really thick (like GW decals). Once dry, apply a second coat of gloss varnish to seal in the decal, this second agloss varnish will help to fill in and hide the edge of the clear decl film. Then you can use matte or satin varnish/dullcoat to kill any shine from the gloss varnish. Done properly the decal and film edge will be completely invisible, hidden within the varnish and your model will be well protected as well. No silvering, no bubbling, no lifted or wrinkled edges. You can then paint or weather over the decal to grunge it up with the rest of the model
The models below had decals applied that way: gloss varnish -->apply decal w/ setting solution --> gloss varnish again --> matte varnish to kill the shine. Ultramarine symbols are molded and painted, but all the squad markings are decals as well as the chevrons on the dreadnought shoulders and numerals on the kneepads/chestplate.
Spoiler:
Did you varnish the entire model or only the areas where the decal was applied? I've tried varnishing only where the decal sits but afterwards it's always really obvious that the finish is different there to the rest of the model.
Creeping, you can gloss the whole model if you like, but you really only need to do a light coat in the areas the decals will be. Once they are totally set and dry, you hit the whole model with whatever matte finish you prefer and the finish will even out so it's invisible.
I do both, but for those models specifically I glossed just the panels for the decals and then airbrushed vallejo matte medium to de-shine those specific areas. Once the entire army was done and based I gave everything an all-over coat of vallejo satin varnish, but I don't think I had done that satin varnish yet in those pictures
I've had mixed (mostly not great) results brushing matte varnish and matte medium over gloss to kill the shine. Brush on matte varnish is always uneven with how well it de-shines even after multiple coats. An all-over coat of rattle-can dullcoat is much better, while airbrushing matte medium (not matte varnish) is best since it gives you absolute control over how shiny you leave it.
This message was edited 1 time. Last update was at 2018/10/05 17:56:23
I recommend using Mr. Mark Setter. You apply it to the surface as you're putting the decal on and then just use paper towel or a cotton bud to soak up the extra Mark Setter. Then be sure to varnish the area to make sure the decal won't come off.


 Legio Suturvora 2000 points (painted)
 Daemonhunters 1000 points (painted)
 Flesh Tearers 2000+ points (painted) - Balt GT '02 52nd; Balt GT '05 16th
 Kabal of the Tortured Soul 2000+ points (painted) - Balt GT '08 85th; Mechanicon '09 12th
 Greenwing 1000 points (painted) - Adepticon Team Tourny 2013

 7000+
7000+
 3500
3500
 2000
2000