|
|
 |
Hive Guard Pinning Tutorial | Created by wyomingfox |
| Paintjob Rating: Voting Disabled | Number of Views: 1647 |
| Coolness Rating: Voting Disabled | Number of Votes: - |
|
|

|
Image Description:
OK, so a bit of a discussion and how to guide for easily pinning Hive Guard (for those of us with metal Hive Guard still unassembled :P).
Basically, the traditional method of pinning which revolves around drilling holes in each of metal parts separately, glueing a pin, and then trying to allign the two parts doesn't work to well with the complex beast that is the Hive Guard - Largely due to teh poor fit of the joins coupled with the multiple attachment points. Fortunately, there is not alot of detail (as in none) on teh shoulder areas, which lends itself well to another simpler method.
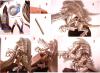
Step 1: Get your tools. a) Super Glue b) bent needle nose pliers c) clippers d) router and drill bit for which I used a 3/64" drill bit e) pinning material for which I used 18 gauge aluminum wire you can readily pick up at a True value Store (in the US) f) pin vise and a 1/16" drill bit f) File.
Step 2: Assemble your model with superglue. Don't worry about pinning at this point, just make sure that the parts are lined up as best as you can.
Step 3: Start by using the pin vise to put a small hole (1/64" deep or so) on the shoulder to be pinned to mark the point of entry. Next get the router and drill a hole about 1/2" deep. You will be penetrating through the arm and into the body. Trying to drill a 1/2" hole through metal with a normal pin vise sucks.
Step 4: Cut a length of wire about 3/4". One end should be cut at an angle to facilitate entry into the hole you made with the router.
Step 5: Place a drop of glue (non-gel if possible) into the hole. Place the pin into the hole and allow the glue to set, a 1/4" .
Step 6: Snip the pin allowing 1/64" to stick out.
Step 7: File the pin down. Due to the softness of aluminum, the extra metal will fill in the edges of the hole, filling in the seams perfectly.
|
|
Comments:
No comments have been added yet. Be the first! People love to hear what others think about their projects so please let them know.
You must be logged in to post comments.
|
| Image Details: |
| Resolution: | 1129x830 |
| Uploaded: | 2011-06-02 03:42:41 |
|
|
|
|
|
|