Creating Banners
When I paint banners, I try to make the actual banners interchangeable - my making separate banner bearers and banners. By doing this, I can try different banners as I paint them and it makes them easier to transport if I have to put them into a flat box or something. Of course, if the standard bearer already has a pole, I tend to stay with it.
Overview
A socketed banner is really two pieces, 1) the standard bearer figure which is converted to holding an empty standard pole made of brass tubing, and 2) a banner that is wrapped around a larger piece of tubing that fits over the standard pole.
Why make banners that you can slide on and off the banner poles? Here are a couple of reasons:
- Makes it easier to transport standard bearers for travel, especially if you use the slotted foam cases where figures lie down horizontally.
- Lets you add variety to your army without having to paint up a new banner bearer for every occasion - great if you're playing in a campaign and have lots of different units running around.
- Allows you swap out old banners for newer improved designs as you get better at making them.
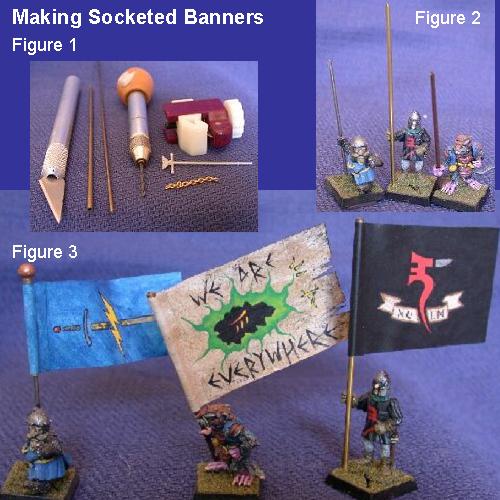
What you'll need (figure 1)
- 1mm (1/16) brass tubing or 1mm brass rod
- 2mm (1/8) brass tubing
- Miniature pipe cutter
- Pin vice with a 1mm drill bit
- General purpose knife
- Some miniature chain (for horizontal banners - optional)
- A BB or some other banner pole decoration
- Natually a figure that can be converted to look like it's carrying a banner pole
How you make them
Standard Bearer
- First, take the figure you plan to use as a standard-bearer and snip off any stuff in the hand that will hold the banner pole.
- Use your pin vice to drill a hole down the center of the now empty hand.
- Use the pipe cutter cut off a length of 1mm pipe that is about 3 inches long. I prefer to use a pipe cutter instead of metal snips because metal snips will deform or crush the pipe resulting in flattened ends. The pipe cutter will leave you with a nice smooth cut at the end. If you use brass wire, then wire cutters are fine. Cut the brass wire to the length desired then use a file to round off the edges.
- Insert the banner pole through the hole in the bearer's hand; glue the banner pole in place; and paint to your normal standard. I tend not to paint the banner pole, but if you do, leave the top 1-inch free of paint - we want to make sure the banner can easily slide on and off.
See figure 2 for a picture of the complete standard bearer without banner.
Banner
- Use the pipe cutter and cut a piece of 2mm pipe that is approximately 1 inch long. I use 1-inch sections because my flag type banners are 1" x 2" when completed.
- When you have your socket, use a file or your wire cutters to slightly ream out the end that will be on the bottom of your banner. This is necessary because the tube cutter will slightly crimp the end that was cut. Make sure you have cleaned the cut completely by trying to slide the cut piece of pipe over an extra length of 1mm pipe.
- For the one sided, front view only, banners that Games Workshop seems to prefer, I use a similar technique but with a horizontal crosspiece. For these I use 1mm brass tubing then cap the ends with a pin. Before the pin gets glued in however, it gets threaded through a length of fine chain that you can buy from any hobby store that has supplies for model ships. This chain now can now be supported by threading another pin through it and the standard pole (again using 1/16 inch brass tubing).
- Draw or paint your banner. I paint mine before I glue onto the pipe but you could do it the other way too.
- Once done, take your finger, smear some white glue on the plain side of the banner, and then blue the banner around your 1 inch piece of 4mm pipe.
- Find a BB or banner topper and glue it onto the top end of the 4mm length of pipe. You could dig into an extra box of Brettonian plastics for a bunch of bits that would make create banner toppers.
- Slide over your banner pole and you're done.
- See figure 3 for a picture of the completed product.
Where do I get banners?
While I won't specifically cover how to make the actual banner, there are lots of places you can go for banners or to learn how to make your own:
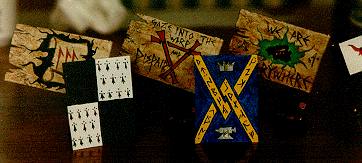
Here are some of my banners. None of them are attached to a standard bearer now but can all be interchanged as my mood sees fit.