| Author |
Message |
 |
|
|
|
|
Advert
|
Forum adverts like this one are shown to any user who is not logged in. Join us by filling out a tiny 3 field form and you will get your own, free, dakka user account which gives a good range of benefits to you:
- No adverts like this in the forums anymore.
- Times and dates in your local timezone.
- Full tracking of what you have read so you can skip to your first unread post, easily see what has changed since you last logged in, and easily see what is new at a glance.
- Email notifications for threads you want to watch closely.
- Being a part of the oldest wargaming community on the net.
If you are already a member then feel free to login now. |
|
 |
2007/01/02 14:55:44
Subject: Stormguard Hellhound #2
|
|

The Last Chancer Who Survived
|
Despite some resin cleaning mishaps, I was able to get my 2nd Hellhound finished tonight. Looks a lot like the first only different nicks & scratches and a different number  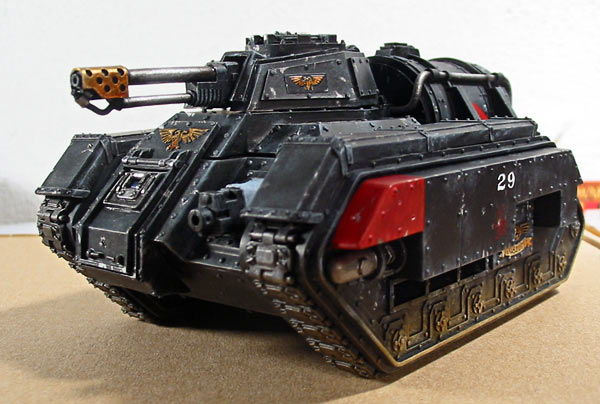  Seeing em side by side, it looks like the new one isn't as beat up .. maybe the higher # means it's a little newer? Next on the list, my 2 5-man vet squads
|
|
|
|
 |
|
2007/01/02 15:14:27
Subject: RE: Stormguard Hellhound #2
|
|
Thunderhawk Pilot Dropping From Orbit
The wilds of Pennsyltucky
|
That is some lovely work. Keep it up. ender502
|
"Burning the aquila into the retinas of heretics is the new black." - Savnock
"The ignore button is for pansees who can't deal with their own problems. " - H.B.M.C. |
|
|
|
|
2007/01/02 16:06:53
Subject: RE: Stormguard Hellhound #2
|
|
[MOD]
Madrak Ironhide
|
I'm always jealous of people who can paint a good tank. Those little bits
of weathering help pull it off. I think the only thing that sticks out for me
is the part that attaches the heavy bolter/flamer to the front of the hull.
Is the coloring off, incomplete, or is it supposed to be a plain gray?
|
|
|
|
|
|
2007/01/02 16:09:35
Subject: RE: Stormguard Hellhound #2
|
|
The Last Chancer Who Survived
|
Well I figured that part of the gun is covered in fabric, so I made it gray like the fabric on the guardsmen uniforms.. but, it's not really that bright, in fact the red isn't that bright either.. guess it was just the lighting I used, which sucks
|
|
|
|
|
|
2007/01/02 21:08:05
Subject: RE: Stormguard Hellhound #2
|
|

Regular Dakkanaut
|
Hey Necros Lovely Tank. I really like that Hellhound variant and have been considering getting one for awhile. With regard to your Washing resin problem. What primer did you use? Was it Citadel Chaos black spray? I had similar problems with my valkyrie, it turns out that it isn't due to mould release agent. The problem isn't washing the problem is the solvent strength of the paint. Most modeling paints dont have the solvent strength to bond to resin nicely. Hence they flake away easily. The best way around this is to undercoat your resin kits with car paint. Just get a plain matt black car spray. Be careful when you apply it and you can get a decent strong coating that will not obscure the detials. Alternatively if you prefer to use modeling spray you can prime the model first in purity seal to give the paint a better surface to stick to, then once the purity seal has dried you can coat it with citadel spray. I know a guy who used to work at GW that uses this technique and swears by it, although I've never tried it myself the science stands up.
|
|
|
|
|
2007/01/02 21:43:24
Subject: RE: Stormguard Hellhound #2
|
|

Been Around the Block
|
Nice work! The FW hellhound is truely looking much better then the GW one, maybe I should get some for my IG too...
|
|
|
|
|
|
2007/01/06 04:02:14
Subject: RE: Stormguard Hellhound #2
|
|
The Last Chancer Who Survived
|
I added some smelly primer to the spot where the paint was coming off and that seemed to do the trick. Wish they'd make that in black though I'll remember that spray varnish idea for next time I do some resin stuff, seems like a good trick. Is the GW varnish any good? I want to coat these models good just to be safe, i've used Testors before for my tyranids and it seemed good, just never tried the GW kind. I'd rather not use Testors if I can help it, there's a warning on the can that basically says you'll get cancer if you breathe while you spray it, or something like that
|
|
|
|
|
|
2007/01/03 11:56:40
Subject: RE: Stormguard Hellhound #2
|
|

Fixture of Dakka
Canada
|
I like it alot. Here's where I think you could improve the tank's paintjob- the track guards and fuel tank. Adding some colour, even if muted, would make the tank seem less monotone. As it stands it's a bit too black (a critisism I think I've made before  ). I know you like that, but I think adding some darker grey on the tank and even on limited portions of the track guards. I'd make the clothe on the gun the same tone of grey. And on that note- I think the heavy bolter could use a bit more of a picking out Anyway, I'm sure you know you've got a great looking army thus far and I'm hoping I can help point you toward some improvements.
|
"Nothing from the outside world can be imported into Canada without first being doused in ranch dressing. Canadian Techs have found that while this makes the internet delicious it tends to hamper the bandwidth potential. Scientists are working furiously to rectify the problem. "
--Glaive Company CO |
|
|
|
|
2007/01/03 15:46:25
Subject: RE: Stormguard Hellhound #2
|
|
The Last Chancer Who Survived
|
I agree that the tanks need something... I just don't know what it is... Not sure about adding the gray, what do you mean exactly, maybe the tank guards all gray? Or adding racing stripes? At first I had the red corner going all the way up and across the front of the tank guards, but I didn't like it. It could maybe use some more emblems and detail but then I'm not confident enough with my freehand painting, and I don't like using transfers too much. I also didn't really want to go with any kind of camo pattern. And I also didn't want to add too much red. I wanted to use all black, mostly because I remember reading something about the Inquisition using black vehicles/ships in I think the Eisenhorn books.. so I was trying to go for that mysterious CIA black helicopter feel
|
|
|
|
|
|
2007/01/03 16:15:05
Subject: RE: Stormguard Hellhound #2
|
|
Fixture of Dakka
Canada
|
I was thinking of having some of the panels being dark grey... but what about a large brass =][= from the FW sheets? OR an identification flag thingy laying across the track guards so airsupport knows they're friendies? (like they did in WWII)
|
"Nothing from the outside world can be imported into Canada without first being doused in ranch dressing. Canadian Techs have found that while this makes the internet delicious it tends to hamper the bandwidth potential. Scientists are working furiously to rectify the problem. "
--Glaive Company CO |
|
|
|
|
2007/01/03 21:46:02
Subject: RE: Stormguard Hellhound #2
|
|
Regular Dakkanaut
|
If these are inquisition tanks then why not add some of the FW inquisition symbols? They have smaller discreet ones that aren't too huge. I think the main body of the tank is fine and very nice but I would say 2 things. 1. Work on that canvas covering the Heavy Bolter. At present it looks woefully under painted. Maybe some more shading and or highlighting. 2. Work on the tracks. Some detailing, this can be easyily done with an ink wash and some neat fine dry brushing on the edges. Right now they look underpainted also and far too clean. If this is a guard tank maybe consider more squad / company/ regimental features. Ie Colour banding or numbers as these are easy to do free hand. You can always make a stencil out of card for the large numbers or the imperial aquila. I've know people to do this before and get good results although to be honest if you want to do this its best to use spray and do it before the drybrushing/ weathering/ and highlights. If its a guard tank i think at the moment it looks a little too much like a Commissar Tank.
|
|
|
|
|
2007/01/03 21:54:44
Subject: RE: Stormguard Hellhound #2
|
|
Regular Dakkanaut
|
Had some more ideas, actually i've been thinking about tanks alot recently as I'm starting a death korp of Krieg army. How about three stripes banding at the front for company markings? Right now that red bit looks a bit out of place. Why not use red stripe, white stripe, red stripe? You can put it at the front of the tank chasis by the treads. Also how about something in that red pyramid shape by the fuel tank. Like a flame symbol for a flammable warning sign? As Drake said you can also add the friendly symbol on the tank. I think these little things will really help it stand out and look like an in service tank. Right now its a bit too Adeptus Mechanicus Showroom. "And now we have the new seasons Hellhound pattern... Complete with huge promethieum tanks and air con..."
|
|
|
|
|
2007/01/04 02:13:25
Subject: RE: Stormguard Hellhound #2
|
|
The Last Chancer Who Survived
|
those are some good ideas.. right now I'm working on some more guys, so once they're done I'll go back to these tanks and add some more stuff. One thing I wanted to get away from is the WWII idea.. I mean, they look cool when done right, but for some reason I just don't think backpacks and sleeping bags need to be stuck on tanks in a game full of laser cannons and aliens. I'm thinking, if I go with some gray on there... I could do maybe a diagonal line at about a 45 degree angle along the front half of both sides... about an inch thick... or maybe from about 1/4 of the way back and just solid gray? I almost bought some railroad decals when i got these tanks, of different warning cards like the diamond shaped ones you see on big trucks.. but there was only 1 that said flamable  hehe One thing I would really like to do is make the tanks look a lot more beat up, but not just paint silver and chainmail scratches all over. I had a good idea for laser burns that I used on my marine tanks, where I took a heated thin metal rod and melted it into the plastic, then when I painted it I painted black around the edges so it looked burned.. but since the tank is black, you won't really notice that too much... and another thing I'd like to try is real dirt on the treads and bottom of the tank. There's pics of one of the forge world superheavies on their site that had really good looking dirty treads, i forget which one it was.. I'm kind of afraid though if I do that it'll just look like I glued flock to the treads, which is what I don't want it to look like... I could try painting stuff on top, but there isn't a whole lot of room except maybe the top of the tank... no big rhino door to paint stuff on
|
|
|
|
|
|
2007/01/04 04:45:03
Subject: RE: Stormguard Hellhound #2
|
|
Wicked Warp Spider
|
About the "dirty" tracks idea - WD had an article quite awhile back (it's been at least a year & 1/2 since I actually bought one) about "slumming out" your IG tanks. If I remember correctly, they used modeling putty (Tamiya makes some. it's like a combo of GS and putty), mixed with static grass and some sort of fibrous material (NOT static grass, as it was colored red & blue). Looked very funky unpainted, but finished it seemed to work well (although there was an easy chance you could "over-do" it.)
This is a good tutorial abotu weathering techniques (I ALWAYS use the pencil/graphite edge weathering technique - very simple and very effective):
http://ipmsstockholm.org/magazine/2003/01/stuff_eng_tech_afv_weathering.htm
If you're really interested in detailing, kitbashing, weathering and such, I highly recommend picking up any one of Shep Paine's tutorial books (most are available from Kalmbach books). Excellent ideas, great effects, and you wouldn't believe the everyday stuff that can really affect a good model.
|
|
|
|
|
2007/01/04 08:42:39
Subject: RE: Stormguard Hellhound #2
|
|
Regular Dakkanaut
|
<!--StartFragment --> Hello Necros
Definately I understand your concerns about making them look too WW2. But remember that even modern tanks stow weapons, ammo, crates and supplies on the exterior. As well as rigging etc. I think if you are careful you can make a Tank look like its been on Campaign without making it look WW2. Use modern accessories, fuel drums, Heavy bolter magazines, radios, auspexes, and other high tech 40k specific accessories. For example Warick Kinkade's Basilisk. http://www.forgeworld.co.uk/Imperial%20Guard/armabasilisk3.jpg http://www.forgeworld.co.uk/Imperial%20Guard/armabasilisk6.jpg For weathering or dirt that looks more natural without having to use flock, sand, or putty, why not try modelling weathering powders. You can get these from most historical and modern Tank kit companies, I believe Vallejo also have a range of these? These can give great effects if used nicely. This is what Warrick used on his tank, check the forgeworld website for better pics. Now onto the Banding markings, check the following links. There are two styles you could use. One thats similar to the current red block you have on the front of the chasis, please see the salamander tank on the top right.http://www.forgeworld.co.uk/imperialarmourbooks/Spread3.jpg Theres also the wider version as on this Baneblade, again top right Baneblade tank http://www.forgeworld.co.uk/imperialarmourbooks/Spread7.jpg With regard to the extra markings on the fuel drums, why not paint the fire symbol onto the red shape? If your not confident with free hand (I don't see why not your highlighting and paint chip affects are very nice) why not draw the shape first with a sharp hard pencil or fine graphic marker, then paint onto it. This will be easy enough and will really add to the current symbol i think. These little things will really make your tank look fantastic. The key is not to go to over board, less is more. You want it to be noticable but not a distraction from the main tank or painting (much like a good camo pattern it should add to the tank and blend nicely without drawn attention to it). I hope these ideas help and I'm looking forward to seeing the colour scheme for your infantry!
|
|
|
|
|
2007/01/04 08:51:29
Subject: RE: Stormguard Hellhound #2
|
|
Regular Dakkanaut
|
One thing I would really like to do is make the tanks look a lot more beat up, but not just paint silver and chainmail scratches all over. I had a good idea for laser burns that I used on my marine tanks, where I took a heated thin metal rod and melted it into the plastic, then when I painted it I painted black around the edges so it looked burned.. but since the tank is black, you won't really notice that too much... and another thing I'd like to try is real dirt on the treads and bottom of the tank. There's pics of one of the forge world superheavies on their site that had really good looking dirty treads, i forget which one it was.. I'm kind of afraid though if I do that it'll just look like I glued flock to the treads, which is what I don't want it to look like...
Okay I don't think your tank needs the burns, it looks really good to me as it is. The weathering is well done and natural. Don't go over board, as you said it won't notice much on black anyway. With regard to the section in bold... absolutely mate! Stay away from gluing flock and PVA onto treads it looks horrible and will not work. In my opinion it will really ruin the work you've put in. Try the weathering powders, or just use ink washes and neat fine drybrushing to get a good effect. Really I can't stress enough please don't stick clumps of flock and PVA onto the tank!
|
|
|
|
|
2007/01/04 13:43:14
Subject: RE: Stormguard Hellhound #2
|
|
Fixture of Dakka
Canada
|
Posted By Necros on 01/04/2007 7:13 AM I almost bought some railroad decals when i got these tanks, of different warning cards like the diamond shaped ones you see on big trucks.. but there was only 1 that said flamable  hehe
Oh yeah, well hows about I find you some brass etched alternatives? hasslefreeminiatures.co.uk/pack.php Marcus loves ya baby  Edit: Here are some cool decals to look through: hasslefreeminiatures.co.uk/range.php
|
"Nothing from the outside world can be imported into Canada without first being doused in ranch dressing. Canadian Techs have found that while this makes the internet delicious it tends to hamper the bandwidth potential. Scientists are working furiously to rectify the problem. "
--Glaive Company CO |
|
|
|
|
2007/01/04 15:38:21
Subject: RE: Stormguard Hellhound #2
|
|
The Last Chancer Who Survived
|
I like the gray stripe in the red on that one pic.. i'm wondering if the black for the rest of the tank will make that all seem too bright though.. i could possibly repeat the gray stripe on the back part of the tank too
thanks for all the ideas, once I get my vets done I'll go back to these tanks and see what else I can come up with. I'll hit my hobby store and see what kind of weathering stuff they have, they have a full line of woodland scenics stuff and a really big model train area so I should be able to find something. I also read somewhere that pastels work great for weathering and always wanted to try it, but I don't think that would work, i don't want it to rub off when I play...
|
|
|
|
|
|
2007/01/04 20:44:52
Subject: RE: Stormguard Hellhound #2
|
|
Regular Dakkanaut
|
Hello mate I've also heard about using pastels. It can work if you spray it afterwards with a purity seal the pastel shouldn't ware off. Did anyone manage to see the pic on my last post? It worked okay on my home computer but i cant seem to see it on my work one? I'll post a link instead. By the way, if you want the tank to be more realistic I'd say go for banding at the front only, front and back isn't really accurate and would be quite busy. With regard to the brightness, company markings (banding) normally stand out from a tanks main paint job so i don't think it would be too bright. If your worried about that why not weather the banding section with inks to make it look faded?
|
|
|
|
|
2007/01/04 21:48:12
Subject: RE: Stormguard Hellhound #2
|
|
Regular Dakkanaut
|
Drake are these hasslefree decals waterslide or the rub off kind?
|
|
|
|
|
2007/01/05 14:54:58
Subject: RE: Stormguard Hellhound #2
|
|
Fixture of Dakka
Canada
|
Posted By Gundammecha on 01/05/2007 2:48 AM Drake are these hasslefree decals waterslide or the rub off kind?
I haven't used Hasslefree decals myself, but I've heard great things about them and I'm 95% sure they're waterslide
|
"Nothing from the outside world can be imported into Canada without first being doused in ranch dressing. Canadian Techs have found that while this makes the internet delicious it tends to hamper the bandwidth potential. Scientists are working furiously to rectify the problem. "
--Glaive Company CO |
|
|
|
|
|
|
