19931
Post by: BLACKHAND
In the past I have had several people ask for an explanation of how I make molds and resin cast of my models and Ihave finally folded and decided to post a tutorial ( this is for you mwnciboo!)
Now this is by no means a definitive guide to resin casting, this is just MY method and for the purposes of the tutorial I will only cover open sided casting which basically means that the top of the mold is open and eventually becomes the bottom of the cast peice. This is a much simpler and tidier method than two-sided casting which requires a lot more thought when setting up the mold and is something to tackle when you have had a bit of practice.
Edit : Thanks to Whalemusic’s excellent suggestion here is a list of sites you can find casting products according to country.
In New Zealand I suggest emailing www.Topmark.co.nz and getting their opinion, its where I get the products I use in this tutorial.
American buyers you can get Oomoo 25 1:1 resin from www.theengineerguy.com.
You can also get Smooth Cast 300 resin there as well. Product specs are here at www.smooth-on.com
Dakka DCM JB has also suggested trying "Alumnite" http://www.alumilite.com/index.cfm
He has used it in his great tutorial here http://www.dakkadakka.com/wiki/en/Simple%20Two-Piece%20Mold%20for%20Casting%20with%20Resin
and MicroMark is in the United States. They sell a lot of modelling tools as well as casting materials.
http://www.micromark.com/TEN-TO-ONE-and-HIGH-TEAR-STRENGTH-MOLD-RUBBER-28-FL-OZ,8155.html
Australian buyers (Perth specifically), try Kirkside in Osborne Park for pinkasyl and easycast. www.kirkside.com.au
UK buyers start with Tomps.com, very helpful and knowledgeable, will really help you get what you need. www.tomps.com
Or we have had this site mentioned as www.modelshop.co. uk Worth emailing them for advice as well
For Dakkites in Canada Styrofoam04 suggests giving Sculpture Supplies Canada a go. www.sculpturesupply.com
Gilljoy has also suggested this site http://www.sylmasta.com/acatalog/Casting_Kits.html
If any one else has a suggestion feel free to PM me or post to the blog and I will add it to the list
Edit : Fellow Dakkite Aerethan would also like to add....
I'd also like to plug myself for a mold maker.
If you don't have the resources or skill to make molds or casts, PM me and we can work something out. I can either sell you a mold or sell you casts.
I figure this will save cost for people who just want copies of that one shoulder they designed or head or whatever without the cost of buying entire batches of resin and silicone. I always stock both so I can make a mold any time.
Back to the tutorial!
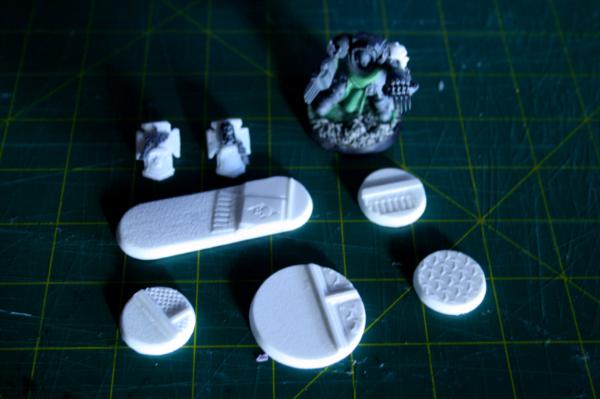
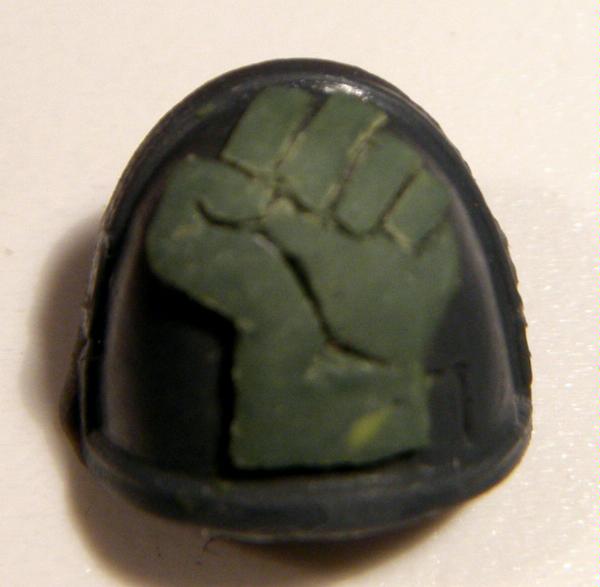
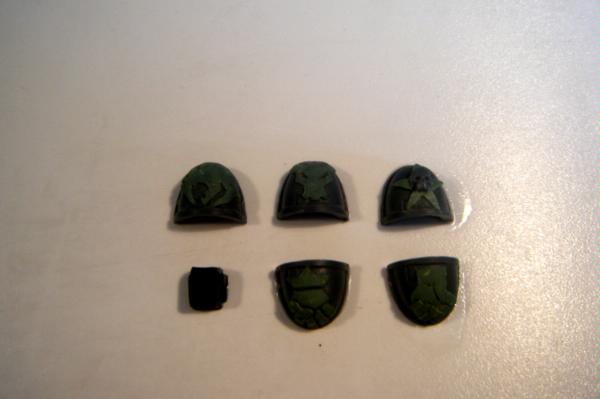
Since one of the things I get a lot of comments on is my custom Marine shoulderpads I thought I would show how I cast them. These will not be the big 3d lion pads I have used on my Sabre Legion marines but are flatter, more traditional pads that are used more.
To start with you will want your Master Copies, in this case I used a bunch of plain marine pads and GSd a few chapter symbols on them like so....
Brazen Minotaurs
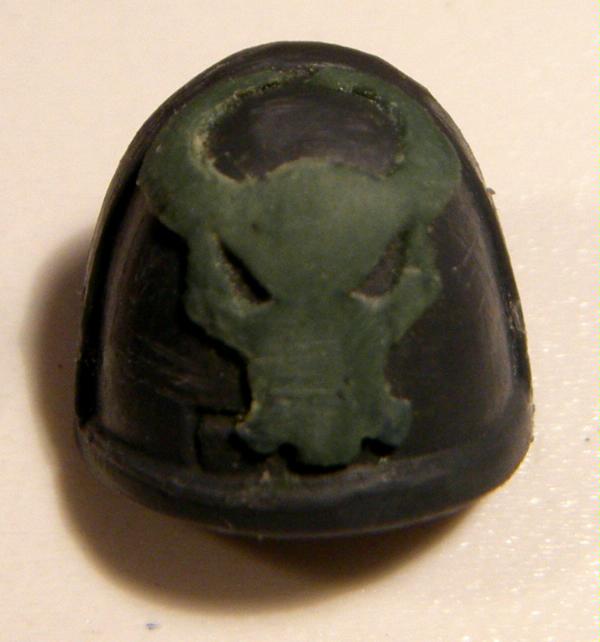
Invaders
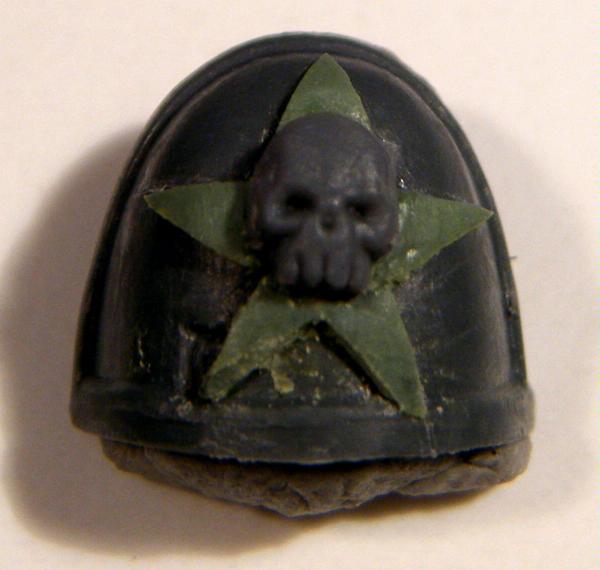
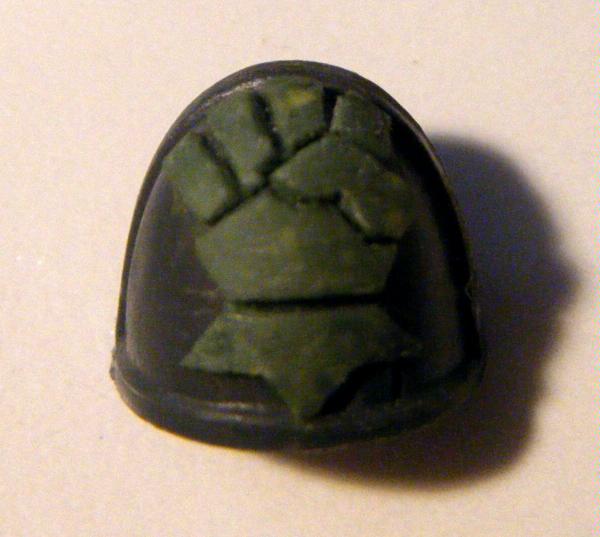
Iron Fists
A test for an alternate Sabre Legion Pad
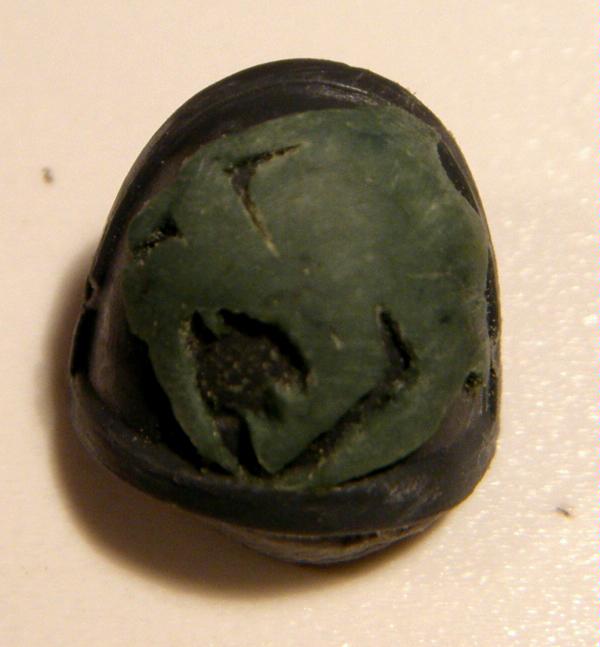
And another test for a pad based on my Avatar pic
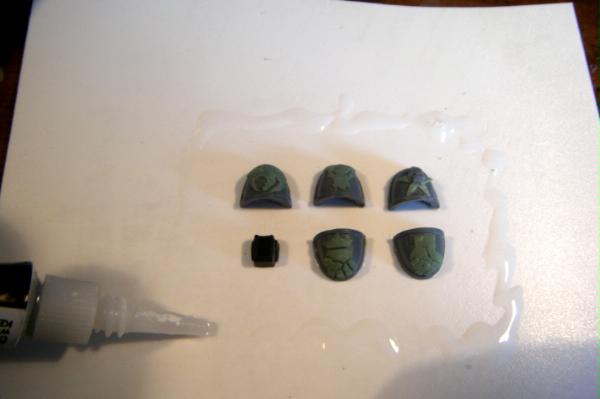
So you have your Master Copies and now you need your casting materials,
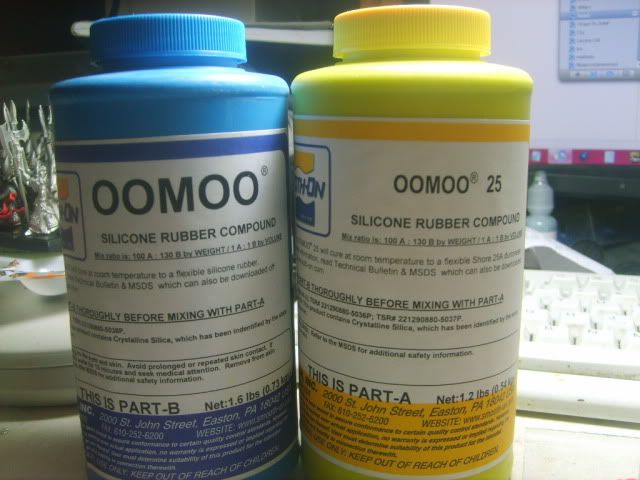
For the molds I use a two-part silicone called Pinkasyl I get it from a special effects and modelling shop in NZ but I'm sure its available elsewhere,
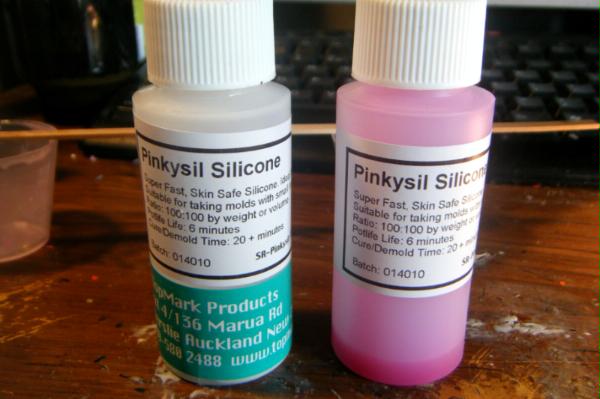
These are not the original bottles so I am not sure what they look like but the name what you need, I use Pinkasyl because of the low temperature when curing ( your master copies won't deform), the incredibly quick curing time ( 15-20 mins, less if you sit it under a lamp and heat it up) and lastly because of it's high flexibility which increase the life time of the mold.
For the resin I use "Easycast" it comes form the same company as the Pinkasyl and was recommended by them as they demold without the use of a release spray or oils. This is really handy when it comes to painting as you will not need to wash the resin casts woot!.
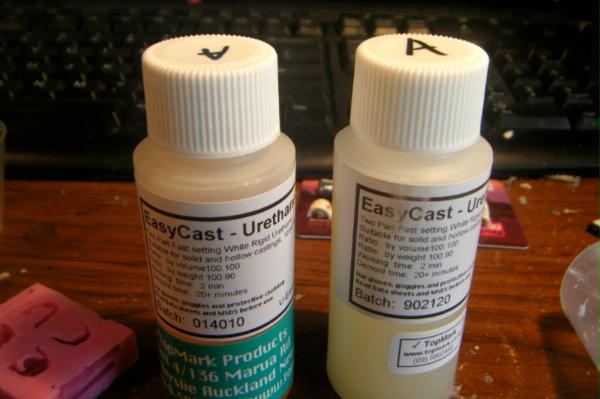
Same as the Pinkasyl, Easycast is a quick curing and simple to use product, they are both 1:1 mixtures which means they use equal parts A and B so they are simple to mix and usually only need one mixing cup. Another fun fact is that once you have mixed and poured the rubber and resin out of the mixing cup and then cured you can just yank out the remnants and the cup is ready use again!
Ok so the most important part of the process is setting up the mold properly. If the master copy moves in the mold box then the wall of the mold can be too thin and may break letting resin spill everwhere and basically ruining your day so to begin with...
Step 1 : the mold base
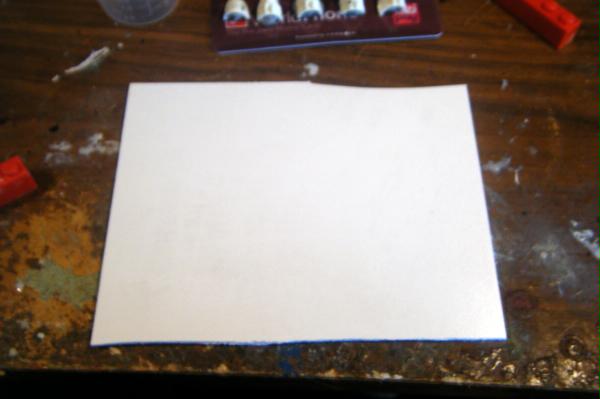
Basically a piece of plasticard big enough to hold the master copy or copies and the mold box material in this case lego
Step 2 : glue master copies to base
Use a minute amount of superglue to fix the pads to the base, just enough to keep them from shifting when you pour in the silicone mixture but not so much that you cant break them off the base later.
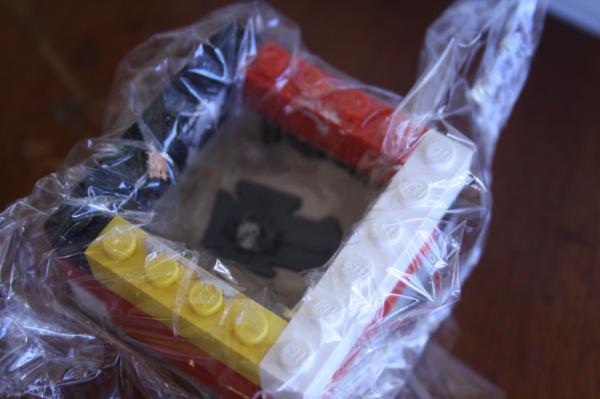
Step 3 : make up a lego box around your master copies and superglue it down
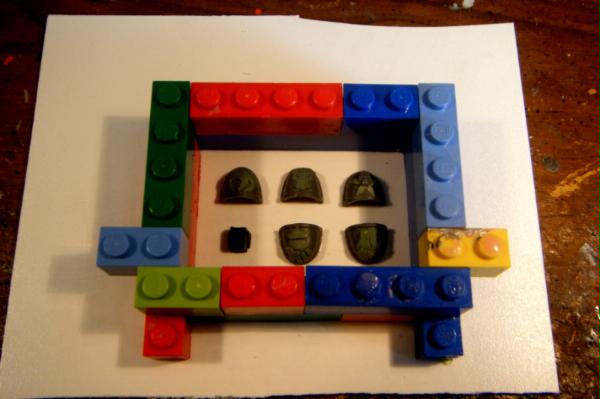
In this case don't be stingy with the glue as it will keep the silicone from leaking out the bottom and again, ruining your day.
Make sure to leave about a 5mm gap around the edge of the mold and between all the pieces in the mold, this will give the walls enough strength that they will flex but not break again extending the life of the mold.
Step 4 : mixing the silicone.
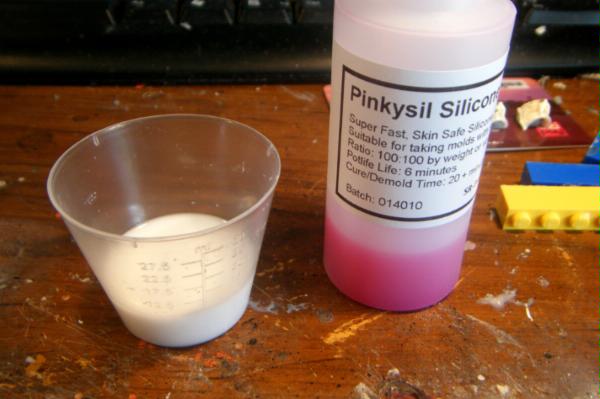
I usually use one mixing cup and pour either part A or part B into the cup up to say the 5ml mark then pour the other part into the same cup up to the 10ml mark.
This saves making a mess in two cups and when you pour from one cup into another there is often wastage and a loss of some of the liquid. The main thing is to make sure you get hold of a decent clear plastic measuring cup with highly visible measure marks medicine cups are the best.
Step 5 : pouring the silicone
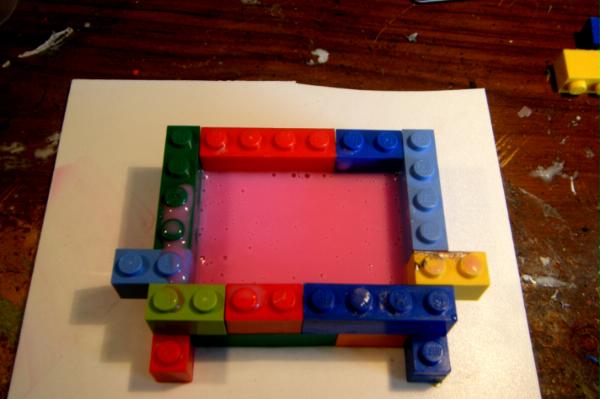
Pretty straightforward, can be messy but use your mixing stick to lay a bit of the mixture over the most detaiedl parts of the master copies so that all the cracks and details get covered properly, then pour in the rest of the rubber making sure to cover them completely you want about 5mm of rubber above the top of the masters in the mold so that there is a solid base to the mold. I also like to stir the rubber slowly with a toothpick to get rid of bubbles which can screw your model up, especially with shoulderpads as the inside of the pad is a notorious bubble trap and having to carve this area out really sucks.
Step 6 : let it cure or be impatient like me!
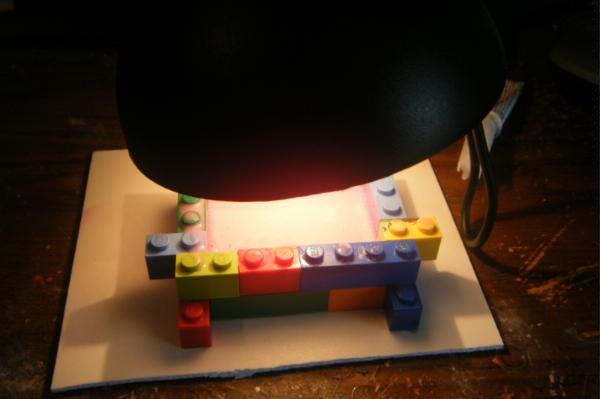
O,k so you can wait 20mins to let it cure or put it under a heat lamp and it will cure in like 10mins or less, I do this because I hate waiting but there is a downside! bubbles that would have usually rise to the top will get stuck in the mold and could potentially ruin it, again stirring slowly with a toothpick should break up the worst of this.
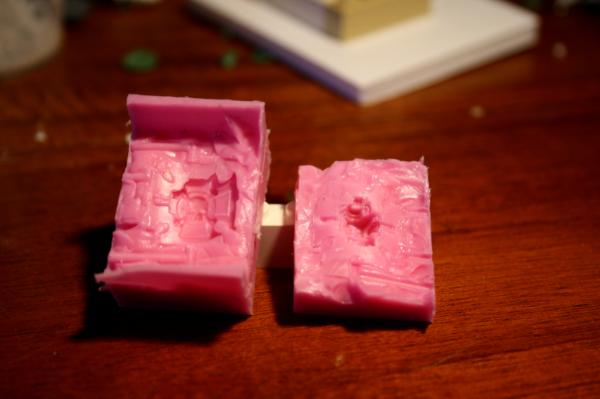
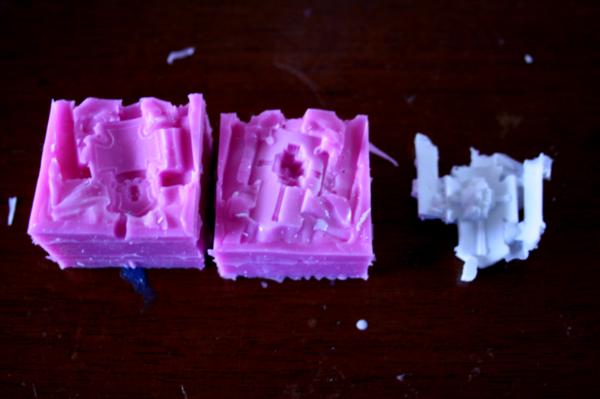
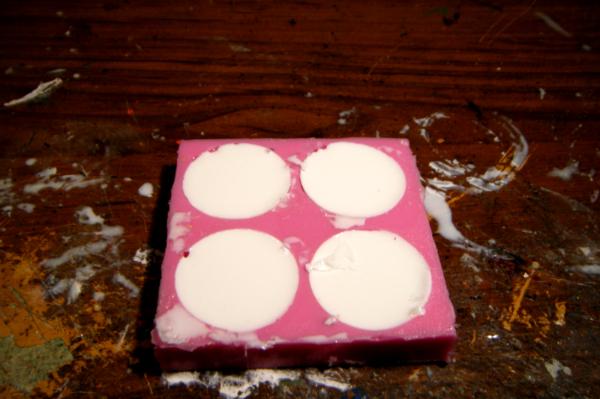
Step 7 : You have your mold!
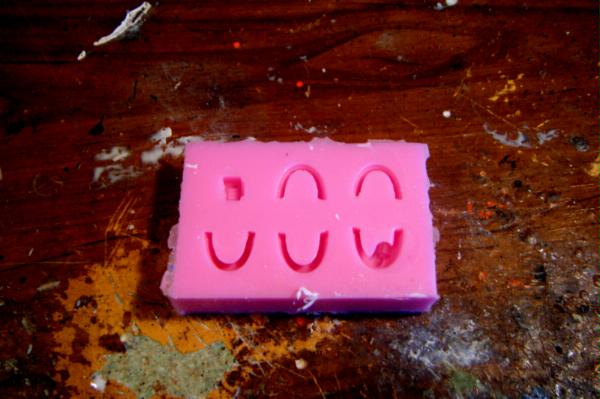
You should end up with something like this, as you can see on the bottom right hand corner there is a large void in under the shoulderpad where a bubble formed, Doh!
Step 8 : mix up some resin
Didn't take a pic as this is exactly the same process as mixing the silicone, at this point I just wish I had a mixing cup with a spout on the lip as pouring the resin into the mold is always messy!.
Step 9 : pouring the resin
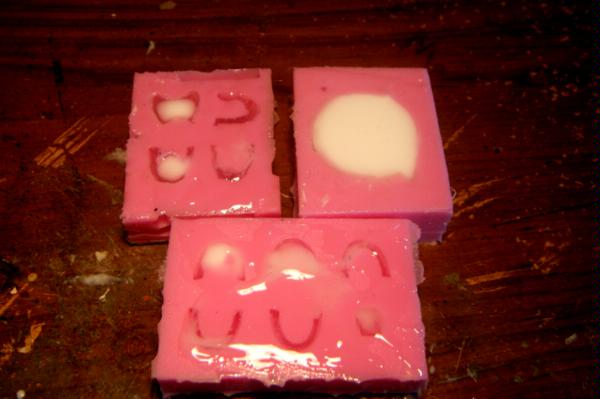
Having poured the resin you will end up with something like the above pic, now fortunately shoulderpads use a minute amount of resin so it would be wise to make a few different molds so that you have them on hand when doing your first pour so that you can use the extra for something productive, in this case I poured the 5 pads, a special ammo clip, a muscle torso , 3 lion pads and a custom base with 5mls of resin, not too bad  Again you can use a heat lamps to cure the resin quicker, and demolding before the pieces are completely hard will allow you to carve off flash and bubbles a lot easier.
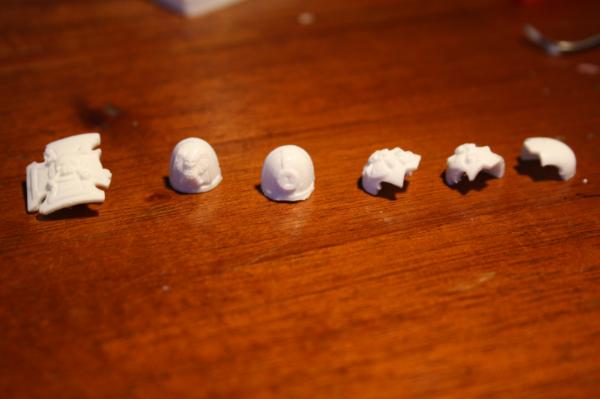
Step 10 : Demolding and flash removal
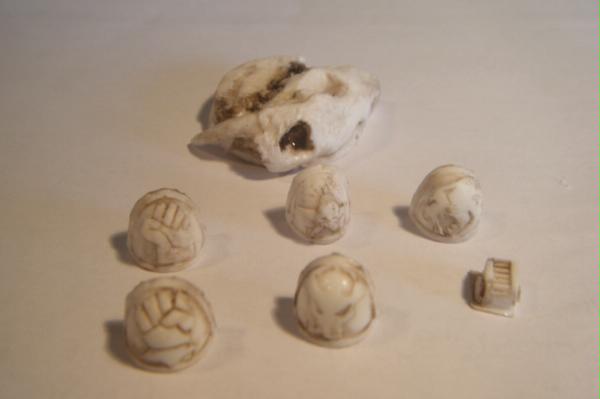
After you pop out the resin casts and cut off the flash you should end up with something like the above, I have washed them in devlan mud to pick out the details in this pic.
Several of these had bubbles along the edges which I will have to fill in with GS but thems the breaks.
So there it is my method for resin casting, hopefully this makes sense to everyone and helps to get your creative juices flowing!
Feel free to post questions I will attempt to answer them in a helpful non-confusing way
Cheers
BLACKHAND
17923
Post by: Asherian Command
Thank you good sir
19143
Post by: IceAngel
Very nice tutorial. You make it look so easy.
4003
Post by: Nurglitch
There was a project log about some guy whose dad was helping him build and cast a set of six or so Warhound Titans and they used a vaccuum seal to suck the bubbles out of their molds. Not sure how to implement one on the scale you're doing it though.
23589
Post by: Sageheart
this looks dope makes me wanna try it!
19931
Post by: BLACKHAND
@nurglitch - I have heard a fish bowl with a sealed lid and a vacuum cleaner attached to it will act a as a makeshift vacuum chamber but hell when you are working with such tiny amounts a wrecked cast still hasn't cost much
28730
Post by: Captain Klaw
Nice, quick tutorial.
Not to mention it's exactly what I was looking for when I came on Dakka this morning.
Kudos
22413
Post by: mwnciboo
BLACKHAND many thanks for putting this up, i know it was a cheeky request but the possibilities are almost endless. You are the Resin Godfather!
30256
Post by: Brotherjulian
Pouring the resin out of the mix cups is easier if you hold your mixing stick against the rim and over the mold. Your resin will flow down the stick and not the side of the cup.
28730
Post by: Captain Klaw
I should be attempting this in the next couple of days (have just finished the greens for some squad-specific shoulder pads), so hopefully I can post my results/ problems here.
What level of detail is available with this method? I have numerals embossed into green stuff in some of my shoulder pads, and am planning on recasting the terminator-honours shoulder pad, any clues whether these will turn out ok?
19931
Post by: BLACKHAND
@mwnciboo -No probs, though I 'm not sure I am the resin godfather...maybe just a resin mobster @brotherjulien - thanks for the tip, I will give it a go next time I cast some pads! @captain claw - I have had a lot of luck with fine detail, in the past I have copied the FW daemonhunter rhino back door and front plate both of which have superfine embossed words and with these products I have managed to cast the deathwatch pads with some success, always comes done to popping air bubbles with a toothppick to catch every detail though
22192
Post by: whalemusic360
How many molds do you get from a 500gm pack of pinky?
BTW to everyone else, Ive found it stateside from 500gm to 10kg, just needed a bit of google digging.
20650
Post by: Pyriel-
Thats a very nice ironfist pad (my favorite).
Say, do you by any chance know the shear strenght value on that silicone rubber?
I want to see what you use compared to myself.
28730
Post by: Captain Klaw
@Pyriel-: I'm looking for the same stuff too, and stumbled upon the technical data sheet for both on the net. The links are below.
BTW, this is for a Perth (Western Australia) supplier, close to me thankfully, but it seems like an easily findable product.
@BLACKHAND: Thanks for the tutorial man. As I said I should be trying this soon and I'll post pics of the finished product. Did you bother with a release agent? Going to order online and might as well figure out what else I need. Also, where did you get the measuring cups?
KLAW
19931
Post by: BLACKHAND
@nirvana69 - Good luck with a full marine cast, If I thought I could pull it off consistantly I would try it but I'm pretty sure I would waste a lot of resin! just remember that by buying silicone and resin you have still paid for the marines.
@whalemusic - Its hard to judge but from the 100gm I get in my kits (50gm part A + 50gm part B) I get enough silicone to make molds for around 20 shoulderpads, if your make molds of objects with a higher volume you may get more out of the bottle , thought the flipside of this is that you have to construct a bigger mold box so maybe the net gain would be minimal.
@pyriel - Thanks I was happy with how the fist came out as well, I'm not sure on the strength though I do find it much stretchier and softer than other products I have used while not snapping or cracking as much.
@captain Klaw - Welcome for the tut, can't wait to see the pics. No i don't use a release agent, the retailer said it wasn't necessary an I havn't needed to use one yet. The measuring cups came in the "starterkit" I buy it in, 100gm of pinkasyl, 100gm of easycast, measuring cups, stirrers, gloves and modelling clay all for $20 + postage!
thanks again for all the questions
28730
Post by: Captain Klaw
28825
Post by: Gamble
Great tutorial Blackhand. I'll be trying this technique out soon.
I found this review of the product used.
http://worldinminiature.blogspot.com/2009/05/product-review-barnes-pinkysil-molding.html
Too bad I can't locate a local supplier...
30785
Post by: Styrofoam04
Nice tut! But it was a bit late for me. After I read ur sabers blog and Sersi's Slaaneshi Themed Daemon Army blog. So I started to google it and found a great place in Toronto called Sculpture Supply Canada. They were very helpful and I bought a starter kit for $45+tax. Going to make my first cast this weekend. Their site also has alot of how to and other information if anyone is interested
19931
Post by: BLACKHAND
Hey styrofoam04, I have used "smooth on"as well and still have and use the molds I poured with it about 5 years ago, I find the pinkasyl simpler to use but quality wise they are on a par, good luck!
26790
Post by: Gitsplitta
Nice tutorial, I may have need of this technique in the future...
30785
Post by: Styrofoam04
I'm not sure where to find that here. I like this kit because of the price. I would also like to try the pewter kit as well.
I like the lego idea. I used foam core and a messy hot glue gun. Is the lego water tight? or do you add glue to each level? I've read that some people use a vibration table to get the bubbles up. have you tried this?
13109
Post by: Hobofisherman
I'm in NZ too, where did you get the resin etc from??
21574
Post by: Mewiththeface
How do you remove the shoulderpads from the mould?
19931
Post by: BLACKHAND
@gitsplitta - feel free to PM any questions or post em here so everyone can benefit i guess
@styro - Sorry I mistyped I meant that I had used the product in you kit (smooth cast not smooth on) and that it worked well, the only thing was waiting overnight for the rubber to cure but patience is not one of my virtues
As for the lego yep they click togther tight enough the only bit you need to glue is the bottom row to the plasticard you are using as a base, havn't used a vibration table but glueing bits of sprue to extremeties as bubble traps can help to preserve details.
@hobofisherman - Search on Google for "topmark" they are a special fx and modelling supply distributor. ask for the pinkasyl starter kit for $20, they charge like $8 postage due to the nature of the chemicals and I have found that getting a couple of kits at the time spreads out the cost of that postage, you can buy bigger bottles of botht the silicone and the rubber as well of course.
@mew the face - At which point? the originals? I flex the base and crack them off the plasticard (this is how I remove the lego as well) If you line up the originals in the same way then you could theoretically pull the mold the opposite way and it will slide up and sideways, leaving the originals stuck to the plastic if you want. I prefer cracking the pads off the base then removing them from the silicone one at a time. As to how to remove the casts from the silicone then just lever them out with a knife or something similar, the silicone is very flexible so they pop right out.
26386
Post by: hungryp
Styrofoam04 wrote:Nice tut! But it was a bit late for me. After I read ur sabers blog and Sersi's Slaaneshi Themed Daemon Army blog. So I started to google it and found a great place in Toronto called Sculpture Supply Canada. They were very helpful and I bought a starter kit for $45+tax. Going to make my first cast this weekend. Their site also has alot of how to and other information if anyone is interested
lol, I've totally got those guys bookmarked, but haven't made the trip downtown to pick any up yet. Lemme know how you like the kit. 
24182
Post by: Ultra mortalitas
Nice tutorial Blackhand.  
17349
Post by: SilverMK2
Pretty cool. I've been thinking of casting up some pretty small scale bits (some scartch built IG backpacks/grav chutes) and it is good to know it is fairly easy to cast such small items.
I've actually got my first mould curing at home right now (for some pannels for an IG single occupant orbital pod [ie drop pod  ]), and judging by how sticky the mould was I think I will have trouble with removing it from the moulding clay I used to form the walls and base of my template 
Good to see an alternate (and probably better) method
30785
Post by: Styrofoam04
I don't mean to hijack your thread. But I poured the OOMOO 30 rubber mix last night! i'm trying my hand on a single-piece mould. I'm not sure if it's too advance, but oh well.
My box wasn't that great, so next time I'll use lego. In this kit you have to use a sealer. A few sprays and then brush with a soft brush into the detail. Either I'm too rough or my brush was not soft enough, because I kept breaking the pieces off my 'sprue'. Then you have to wait 10 min then apply another coat (of course another piece fell off and I had to re-glue). After the second coat you have to wait 20 minutes to dry before you add a coat of release agent(thank Jebus, nothing broke).
I finally get to mix the rubber! But I wasn't sure how much I needed. So I filled my box with water then poured it into a measuring cup 150ml exactly. Thats 75ml each part. Ok now what?! How do i measure each part without putting it in my (cooking) measuring cup? Bingo I remembered that I bought a children's Medical Measuring Syringe for like $2 to mix paint, but never used it. I didn't want this ruined either so i used it to pour exactly 80ml of water into a cup and i drew a line in it and repeated for a second cup. filled the cups up to the lines of part 'A' and 'B'. mixed for 3 min, then poured it into another cup and mixed for another 3 min. Yes! Time to pour. I slowly pour it to the lowest point and let the liquid envelope the model. All thats left to do was watch it cure...for 6 hours.
I cant wait to get home after work and take it apart. Cutting it open will take alot of effort. I'll let you know what happened.
19931
Post by: BLACKHAND
Sounds like you have a fair idea of what you are doing Styro,
TBH I have never thought of using water to find out how much rubber I would need it has always been a have a go and see process for me but its a genius move!
One suggestion would be to mark the 75mls on the side of the cup then pour in the other 75mls on the SAME cup. You can then pour in Part A up to the line and pour Part B into part A directly, this way you will not leave a residue of part B behind in a second cup, the amounts will be spot on and when the rubber left in the measuring cup cures you can just pull it out and the cup is clean and ready to use again
When you cut out the original cut in a zig zag motion not a straight line, the two halves will mesh back togther better and will make the mold line up as oipposed to a straight cut which can slip when you pour in the resin.
This is where the lego box is so handy as it makes a uniform shape which you can build back around the mold prior to pouring the resin , the lego bricks hold the two halves togther neatly and saves on using rubber bands to keep it togther during curing.
Good luck!
30785
Post by: Styrofoam04
BLACKHAND wrote:One suggestion would be to mark the 75mls on the side of the cup then pour in the other 75mls on the SAME cup. You can then pour in Part A up to the line and pour Part B into part A directly, this way you will not leave a residue of part B behind in a second cup, the amounts will be spot on and when the rubber left in the measuring cup cures you can just pull it out and the cup is clean and ready to use again
Thank I'll try this next time. In the instructions recommend mixing then pouring into another cup then mixing again. So I poured it back in cup 'B' to mix up that leftover residue
BLACKHAND wrote:When you cut out the original cut in a zig zag motion not a straight line, the two halves will mesh back togther better and will make the mold line up as oipposed to a straight cut which can slip when you pour in the resin.
yes in Sersi's blog he mention that too thanks
BLACKHAND wrote:This is where the lego box is so handy as it makes a uniform shape which you can build back around the mold prior to pouring the resin , the lego bricks hold the two halves togther neatly and saves on using rubber bands to keep it togther during curing.
I really wish i did this. Gonna have to tear up my box and use the rubber bands. Tho I'm worried the rubber bands might cause it to warp
ooo still cant wait to get home
19931
Post by: BLACKHAND
sandwhich the mold between two flat peices of plastcard or thick cardboard THEN use rubber bands, should keep it from warping
30785
Post by: Styrofoam04
LOL! Thanks. Maybe I should have checked the forums before I started.
So I tore up the box to get it out and I did a horrible job cutting the rubber in half.  My first pour didn't turn out that well either. The rubber bands ended up warping the mould and the resin couldn't get all the way into the mould. But I didn't give up. The second pour I didn't use the rubber bands. I let the resin leak through. Then I held it closed with my hands until the resin stopped being as fluid. 20 mins later I opened it up and it worked! had a bit of trimming to do but that came out pretty good. now that the test is over I can cast the model i wanted. This time using what I learned. I had tons of fun and I want to cast everything I own! Thanks for your help Blackhand!
22413
Post by: mwnciboo
The amount of information i've gathered off this Thread and Google is astonishing. I need to make some masters of the Shoulder Pads so I can copy and cast them. If anyone has any tips on making originals from green stuff let know (Trying to do a Bear Claw design on a Pauldron see below.)

Although i will only do the top one and possibily attempt my own Bear Head at some point, the Shaman one is way beyond my skills!!!!!
Anyone with any pics of moulding / Casting/ pouring etc please post. This thread is very good.
19931
Post by: BLACKHAND
Awesome Styro! glad to here you have caught the casting bug, I'm telling you now it can consume your modelling time but you will end up with armies that are truly unique as well.
@mwnciboo - I sanded the shoulderpad a bit to flatten it out and give the GS something to grip to then just went to town, I guess marking the pattern out first with pencil or markers may help but GS is an art as much as a skill so it may take a while to get them looking how you want. When you have one that you like, cast it then use the original and the cast replica to make another mold, this gives you three molds, cast them again then mak a third mold with the four copies and the original, this means you can then make a sweet 8 replica in one cast which should be enough for anyone!
I agree with Mwnciboo btw, anyone doing their own casting is very welcome to post to this thread, even pics of disasters or people wanting advice please feel free to post as I'm hoping to attract the attention of Dakka's veteran casters to this thread so that we can all share our knowledge and tips and tricks
Cheers
BLACKHAND
13109
Post by: Hobofisherman
Thanks heaps for that BLACKHAND
28730
Post by: Captain Klaw
@mwnciboo: good luck with the sculpting!
I'm busy making up some master sculpts for casting at the moment, and it's pretty difficult even with basic shapes!
So I wish you luck with the afforementioned bear claw, post pics of what you end up doing!
28730
Post by: Captain Klaw
Just poured my first pinkisyl casts! Look great, now to mix up some resin after uni.
19931
Post by: BLACKHAND
Sweet!, remember a little resin goes a long way
28730
Post by: Captain Klaw
Yeah I went and got myself some pinkisyl and some easycast this morning and the smallest batches i could get were 500grams. I've poured a one part shoulderpad mould using Lego and foamcore board (the foamcore was an experiment resulting in very moulds getting stuck to them) and am half way through a two part storm shield mould. I may just post some pics up. Love the pinkisyl btw, great material!
19931
Post by: BLACKHAND
Yeah, luckily the store I buy mine off does a "starter kit" with a 100gm of each which is enough to use at my speed without it going off.
By all means post pics of what you are doing, would be great to see some other bits being cast and might even inspire some other Dakkites to try casting
28730
Post by: Captain Klaw
Yeah this mythical starter kit doesn't exist on the dark side of the moon that is Perth. Your thread definitely inspired me to cast so if it helps I'll post up!
22192
Post by: whalemusic360
I cant get the barnes silicone over here (cost a bizillion bucks to ship), but they pointed me at a place in PA that makes a similar product, so once they get back to me and I get an order in, I'll let ya know how it goes.
28730
Post by: Captain Klaw
Something tells me that being in the U.S you shouldn't have any trouble finding a replacement. All you need is a low-viscosity quick-drying silicone-based moulding compound (bit of a mouthful).
Also, bit of news on the casts: the two-part mould didn't really work too well, but it was my first cast, and I know what I did wrong- not enough injection points.
The easycast is remarkably quick to set, although it's warpable for about 10mins after it appears to have set, so don't be tempted to pull them out too quickly!
My squad shoulderpads have turned out nicely (not so the terminator pads, something I have to sort out).
26790
Post by: Gitsplitta
I'd be really interested in seeing what you come up with for US-available materials...
22192
Post by: whalemusic360
Well the location recommended by Nicole Barnes (of the company that makes BHs stuff) is Polytek in PA. I emailed them on Saturday eve and havent heard back yet (not a big supprise). I'm not really sure what stuff is the stuff I need, so if someone can point me in the right direction, that'd be great.
http://www.polytek.com/
32260
Post by: Tazay
Can this technique be used on other parts of the modle, and other armies as well?
19931
Post by: BLACKHAND
@captain Klaw - Funny how it all starts to make sense once you start casting. And yeah on two part molds you need lots of injection points and will probably need a couple of channels on the bottom edge to catch bubbles. If the mold is keying together well ( the places where you cut to get the master out after the rubber set have a nice fit) then you can squeeze the mold after the resin is poured in and often you can get bubbles out that way as well. Post up a pic of the terminator pads if you like and we can see what went wrong, I am looking at casting a deathwatch terminator pad from the inquisitor range and don't want to goof that up @whalemusic and Gitsplitta - Looking at the polytek website you will probably want the "platsil 73-75" and the "easyflo" but goddamn they are expensive! and since the bottles are so large for the resin you may need a can of dry air to spray into the bottle to stop moisture from ruining it. @Tazay - For sure, I have cast marine feet , chestplates dread missile launchers decorative bases and once most of a space wolves dreadnaught. As long as you can visualize how the resin will flow into the shape you are casting and are prepared to spend some cash ( casting is as expensive as plastic kits themselves) you can cast just about anything.
20739
Post by: Lennysmash
Thanks BH, another great contribution. Not quite ready to start my casting just yet, lack of space in uni rooms a real downer for certain aspects of the hobby,
Will try and find the product here in the UK and post any links that I find for it.
Thanks again BH.
13109
Post by: Hobofisherman
Can't wait to see Klaw's results
23050
Post by: Terraformer
I didn't see it posted anywhere, but here are a couple of very important tips when working with resin:
1: After pouring your mixed resin into your flat-backed mold, press a sheet of plexiglass or a CD case against the back, not so much to deform the mold, but enough to squeeze out the excess resin while the resin cures. This will make the "flash" minimal to nearly non-existent. The con: you may need mold release on your plexiglass or CD case to detach it from the hardened resin. The awesome trick: Polypropylene. You know those smooth glossy plastic bags they use at software stores and department stores? (not crinkly thin plastic grocery bags) those are made of Polypropylene, a material that won't stick to resin at all. Staple a sheet onto a piece of wood or cardboard and use that to press off the excess resin while it hardens.
2. Dust the inside of your mold with talcum powder, commonly called baby-powder. (not cornstarch!) This will greatly reduce bubbles. Also, after pouring the resin but before it cures, you can insert a toothpick into the molds to release any small bubbles that are sticking. Always wear safety glasses since your face will be close to liquid resin that may splatter if your hand slips.
28730
Post by: Captain Klaw
Hobofisherman wrote:Can't wait to see Klaw's results
Alright alright lol.
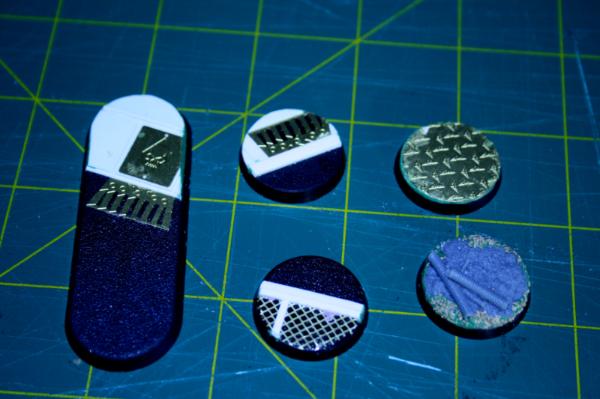
They'll be up in the next hour (I need to start fulfilling promises) Automatically Appended Next Post: Here's the first batch of moulds, including shoulderpads in the big and small blocks, and a storm shield in the two-part mould.

This would be my third pour or so, but I'll show you the results of the first pour.

Sorry about the image quality, I couldn't be bothered setting up the camera properly (just supressed flash, stand used, external lighting)
The white resin is a bit hard to look at in the pics but the quality is amazing.
@BLACKHAND: The terminator shoulderpads are in the second photo, and you can see the air bubbles that formed in the corners and prevented them from forming properly.
I know why this is: when you lay the terminator pads on the plastic card to do the initial pinkisyl pour, the little corner cut-out that allows for the shield badge to be placed means it doesn't contact the card, and therefore isn't open when you invert and do the resin pour. Just try laying a pad flat and you'll see what I mean.
I eventually got past this by pouring in the resin very slowly and mixing it with a dental tool to remove bubbles in the pocket. The 3rd batch I did turned out fine.
13109
Post by: Hobofisherman
Ah cool they look great Hopefully I'll be trying this out the next week or so. Pretty exciting stuff though
19931
Post by: BLACKHAND
Thanks for all the comments guys, I'm stoked that this tut has been of so much interest.
@terraformer - Both your tips are great! I will definitely start flattening the excess resin, though do you wit till its started curing so that there isn't any shrinkage or is that not an issue?
I have heard about the talcum powder trick and will give it a try with my next casts.
Thanks again!
@captain Klaw - Awesome stuff, I can imagine the storm sheild would be a real bugger to get cast right. Glad to know you are getting some decent casts of your pads it can be hard when you have so many small casts to pop all the bubbles before the resin cures.
Apparently you can also refrigerate the resin compounds to slow down the curing time . I have pondered refrigerating the molds too but I'm worried about moisture.
Oh and don't worry too much about miscasts, they can always be cleaned up with GS or used as basing scenery
I see the crossbones on the terminator crux in the second pic didn't cast well, thats the problem I have with my deathwatch pads as well, I guess it comes down to poking the bubbles properly and not rushing it, though perhaps talcum powder will do the trick
Cheers
BLACKHAND
28730
Post by: Captain Klaw
BLACKHAND wrote:
Oh and don't worry too much about miscasts, they can always be cleaned up with GS or used as basing scenery
Haha I think my next army will have had to have battled several first companies with the amount of terminator shoulderpad miscasts incorporated into their bases.
23050
Post by: Terraformer
BLACKHAND wrote:
though do you wit till its started curing so that there isn't any shrinkage or is that not an issue?
With the resin and silicon I use, there is never any shrinkage, I don't know about the materials you're using however. I press my backing against the mold immediately after pouring unless I have some little bubbles to poke out, because while it still has very low viscosity it will sandwich out easier. Then sometimes weigh the backing down with something to keep air from seeping under it while the resin cures, a real issue if the surface of your mold is even slightly uneven. If it works right, you should have just the thinnest traces of flash around the edges, and barely need to trim the pieces at all.
22192
Post by: whalemusic360
Do you have links for the stuff your using Terra? I'd like to get something that I know other people have used with success.
23050
Post by: Terraformer
Most of our stuff I order from http://www.smooth-on.com/ including their Moldmax series silicone, and their Smoothcast 300 resins. Some of their products can be a bit expensive but for the amount of casting we do lately I have to order large quantities of the highest quality stuff available. Also it should be noted that Urethane resin can be a pain in the rear to prime and paint, and in my experience auto-primers work best, so resin cast parts should be primed separately from the rest of a model.
19931
Post by: BLACKHAND
Thanks again terraformer for adding to the info on this tutorial, its really starting to feel like a decent resource for dakkites.
BTW love your realm of battle board!
26790
Post by: Gitsplitta
Absolutely, I agree with blackhand. Have been itching to do some casting myself but have been hesitant as I have no experience. Hat's off to you guys for adding your knowledge and experience to the mix so the rest of us can benefit.
28730
Post by: Captain Klaw
Don't worry Gitsplitta, this was my first attempt and with the success I'm lining up some more projects, including heresy-era terminators etc.
14070
Post by: SagesStone
This is a pretty cool tutorial. @Captain Klaw: Any idea if that site will ship out material to Sydney. Also looking through the resins there, what would be a good one? I got a crazy idea for a custom Necron army and this would really help it
28730
Post by: Captain Klaw
@n0t_u:
I'm not entirely sure if they'll ship to sydney, but the website has their email, and they are just a supplier for barnes (who make the product) so you should be able to find it somewhere.
As far as resins go, this is pretty excellent, though BLACKHAND might want to lend some wisdom too. Nice and easy to use, specifically intended for miniatures, however very quick drying, so little work time!
14070
Post by: SagesStone
Thanks
28730
Post by: Captain Klaw
No worries. A good thing about this material is that there is no mould release needed, as the pinkysil is still flexible once set.
BLACKHAND: any news on the two-parts? I'm attempting another storm shield mould now (didn't mix up last batch properly and it hasn't set completely firm)
22192
Post by: whalemusic360
I'd email Barnes themself n0t, I did and they are very responsive.
28730
Post by: Captain Klaw
whalemusic360 wrote:I'd email Barnes themself n0t, I did and they are very responsive.
Exactly.  Craft suppliers are usually very responsive due to the small number of customers they serve, and most will suggest local suppliers.
15776
Post by: Space Marine
Thanks for the tutorial its just what i was looking for
19931
Post by: BLACKHAND
@captain klaw - I will be attemptning a two part mold at some point with my 40k skaven army but am only in the early design stages. When I do I will post up pics for sure, in the meantime keep posting your pics man!
28730
Post by: Captain Klaw
If you're lucky I might be able to post up some picks of my storm shield mould and some casts. They've been pretty successful actually! Automatically Appended Next Post: As said, here are some pics of my storm shield 2-part mould and one of the test casts.
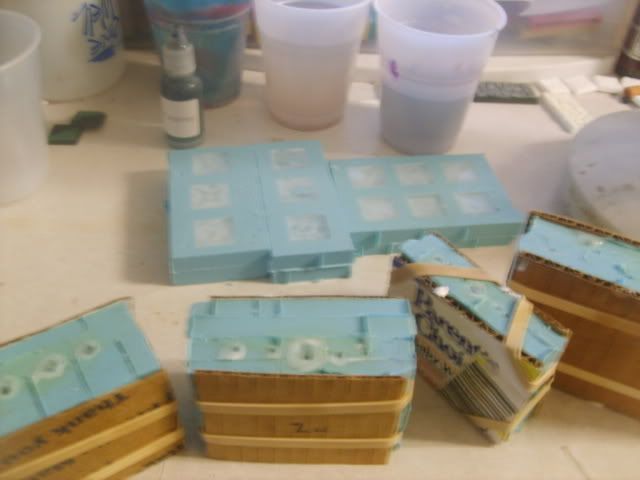
Here's the mould in progress. I made a basic square box out of lego (not legos, but lego. Think sheep logic.) then filled the base with a bit of paper clay, although anything clay-like will do. This is just to create a basic form for the mould. I then got a layer of glad-wrap (cling film) and pressed it into the mould and then placed the storm shield and pressed it into the clay. This was so I didn't end up with any residue from the clay on the mould.
Then I poured in a batch of Pinkysil and let it set.
Once dried, I inverted it, removed the clay, added some mould channels with bits of sprue glued to the edges of the shield and poured the 2nd batch of pinkisyl in.
I thought I wouldn't need a release agent, but the first half of the mould hadn't completely dried when I poured the 2nd batch in, and they stuck together  .
So with a few careful cuts with a knife I separated the 2 halves.
Here's the finished halves with my test cast.
TIP: Note the number of input channels at the top of the mould: I used three, and poured into the outer ones, which filled the mould from the base up. This meant that the central hole at the top could vent the bubbles that formed.

The cleaned up cast, with some bubbles to be filled with greenstuff.
I wanted my terminators to have the larger shields so sculpted off the details for the base cast, and am going to gs some individual details later 
19931
Post by: BLACKHAND
And so the Apprentice has surpassed the Master....
....just please don't kill me and take over my evil empire (I've spent ages on it )
Nice work Klaw, the cast was came out really clean and the glad wrap was a nice touch.
TBH I am far lazier and usually pour the rubber in one go then cut down both sides and along the top to free the master copy, leaving the base in one piece to keep the two sides lined up. This method works best with basic shapes but I have a feeling your two part mold method is better for more complicated pieces.
Thanks for posting your pics, I'm thinking I may have to change the name of the thread to reflect the more general casting info it has now.
28730
Post by: Captain Klaw
Haha don't worry I'm under no disillusions about surpassing you. I'm just replicating what I've seen you do.
Pretty happy with the way the casting's been going, my brother seems to think I'll be starting up a forge-world rival or something, despite me only having done some shoulder pads and storm shields.
30785
Post by: Styrofoam04
BLACKHAND wrote:
TBH I am far lazier and usually pour the rubber in one go then cut down both sides and along the top to free the master copy, leaving the base in one piece to keep the two sides lined up. This method works best with basic shapes but I have a feeling your two part mold method is better for more complicated pieces.
I did mine this way. I find it easier and less steps but you have to be careful on the cut line. My rubber takes 6 hours to cure so its better for me to do it in 1 pour
22849
Post by: IronfrontAlex
Do you think this would work for heads? for LEGS maybe????
19931
Post by: BLACKHAND
@ironfrontalex - With the products that I use you can definitely do heads and legs, It can be complicated but doing legs but with planning it is doable and well worth it to get custom armour and uniforms. If you are just wanting more assault marine legs or something like that I would jsu t buy them and save a bit of work but for a custom army it is just the thing.
20880
Post by: loki old fart
Good going. Realy nice work
Got some good tutorials on you tube, for this sort of thing. Thinking of trying it myself.
28730
Post by: Captain Klaw
BLACKHAND wrote:@ironfrontalex - With the products that I use you can definitely do heads and legs, It can be complicated but doing legs but with planning it is doable and well worth it to get custom armour and uniforms. If you are just wanting more assault marine legs or something like that I would jsu t buy them and save a bit of work but for a custom army it is just the thing.
I've personally just tried it with some corvus heads as a little experiment, and with the Pinkysil it works great.
Instead of gluing the shoulderpad to the plasticard at the base of your mould, shave off the bottom of the neck attachment a little bit so it's flat and glue that to the base.
This is just so that there is a proper vent for the resin to flow in.
Any bubbles that might occur are usually covered up in any case as they are at the glue point when you assemble the model.
19931
Post by: BLACKHAND
Cheers for the tips Captain Klaw, I haven't quite got to casting heads yet, haven't found a head that I like enough to cast I suppose
If you guys want to post pics of the process you used for casting heads up here I'm sure the other readers would appreciate it!
20739
Post by: Lennysmash
A little help from our very own dakka. Found this in the Article section, thought I'd re-post it here for anyone that may have missed it.
http://www.dakkadakka.com/wiki/en/Simple%20Two-Piece%20Mold%20for%20Casting%20with%20Resin
19931
Post by: BLACKHAND
Thanks Lennysmash, It's a nice tutorial lots of clear pictures...and they use lego!
22849
Post by: IronfrontAlex
Leg would be complicated? has anyone ever tried before?
32222
Post by: protomane0
Hi guys, im based in the UK, and having read this tut, I've been inspired to start making my own should pads, and maybe other bits too (too start though i've gotta get good with green stuff =p) I've been frantically searching around the web looking for suppliers of resin... before i realised i haven't really got a clue what I was looking for, although i have found a site which seems to sell casting materials including resin and silicone.
So I was wondering if i where to put a link to said site, if anyone could look through and point out a decent product (ill post a link directly to the casting section for free =D)
http://www.modelshop.co.uk/category/Cast___Mould,l.html
thank you in advance, and hope it helps other people in the UK find a source for resin and other such things 
28730
Post by: Captain Klaw
IronfrontAlex wrote:Leg would be complicated? has anyone ever tried before?
I thought about it for a while, But decided against it, as two-part moulds are far harder to pull off than simple pour-in one part moulds.
I guess you could attempt it by gluing the feet to the base plasticard which would act as the top vents, and cut between the legs in the mould with a hobby knife to ease in pouring and importantly allow you to remove them.
However as you can see this is getting slightly complicated.
Automatically Appended Next Post: protomane0 wrote:Hi guys, im based in the UK, and having read this tut, I've been inspired to start making my own should pads, and maybe other bits too (too start though i've gotta get good with green stuff =p) I've been frantically searching around the web looking for suppliers of resin... before i realised i haven't really got a clue what I was looking for, although i have found a site which seems to sell casting materials including resin and silicone.
So I was wondering if i where to put a link to said site, if anyone could look through and point out a decent product (ill post a link directly to the casting section for free =D)
http://www.modelshop.co.uk/category/Cast___Mould,l.html
thank you in advance, and hope it helps other people in the UK find a source for resin and other such things
I took a quick look, and they have a very extensive range with a large price range to boot.
Personally, I would suggest emailing the supplier.
I have found suppliers to be more than pleasant and very helpful and straightforward. Just tell them the types of casting/ moulding you wish to do, ask about viscosity (related to the detail you want), flexibility once dried, curing and working times etc.
They should point you in the right direction!
Hope I helped
19931
Post by: BLACKHAND
What Captain Klaw said!
I started out with no knowledge of the products and without an email and subsequent phone call to the retailer I would have ended up with the wrong thing. The supplier will probably have sold these products to modellers before and will have the knowledge to help.
Would really appreciate it if you could post any info you get from the supplier as to what people in the UK could use to do their own resin casting. So far we have details of similar products to the one I use in Australia and the US posted up and it would be great to have a supplier in the UK posted as well!
28730
Post by: Captain Klaw
BLACKHAND wrote:What Captain Klaw said!
I started out with no knowledge of the products and without an email and subsequent phone call to the retailer I would have ended up with the wrong thing. The supplier will probably have sold these products to modellers before and will have the knowledge to help.
Would really appreciate it if you could post any info you get from the supplier as to what people in the UK could use to do their own resin casting. So far we have details of similar products to the one I use in Australia and the US posted up and it would be great to have a supplier in the UK posted as well!
Agreed: In time this thread might need a name change too. Maybe BLACKHAND'S Comprehensive Casting Tutorial.
32215
Post by: Ninjabiscuit
I always wondered how some did their shoulder pads. This helps a ton as I'm thinking of dumping a lot of time and money into my next marine chapter and don't like a lot of the metal ones GW makes.
19931
Post by: BLACKHAND
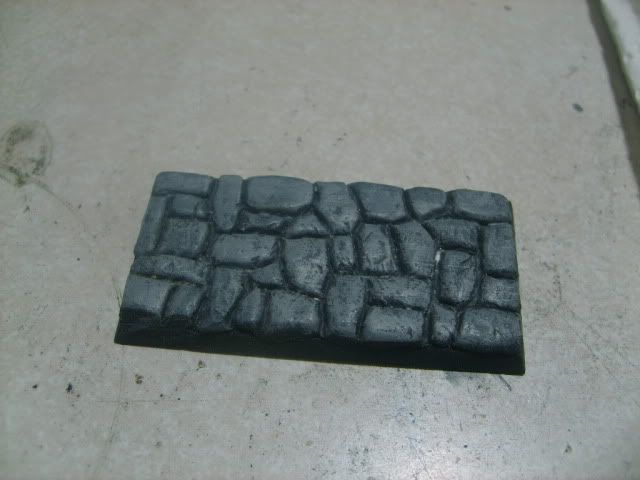
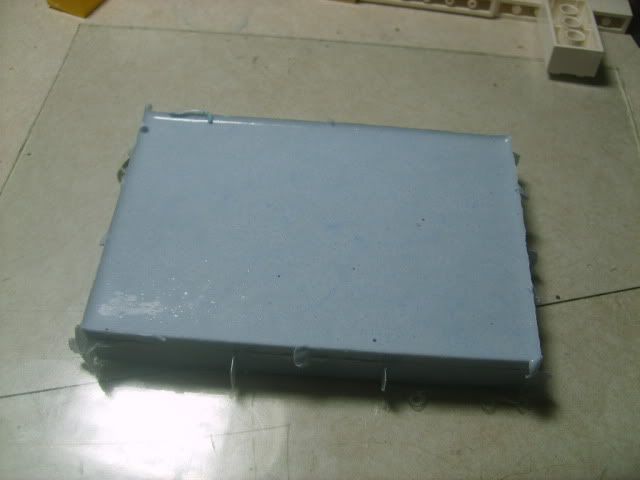
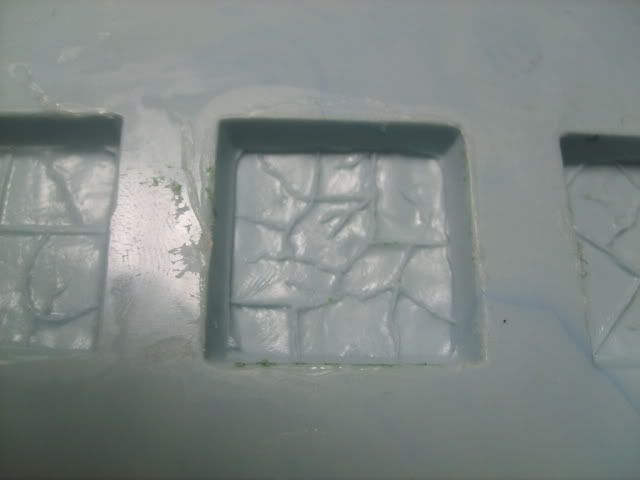
Thought I would post up some pics of the process I m using for some custom bases I sculpted up for my skaven
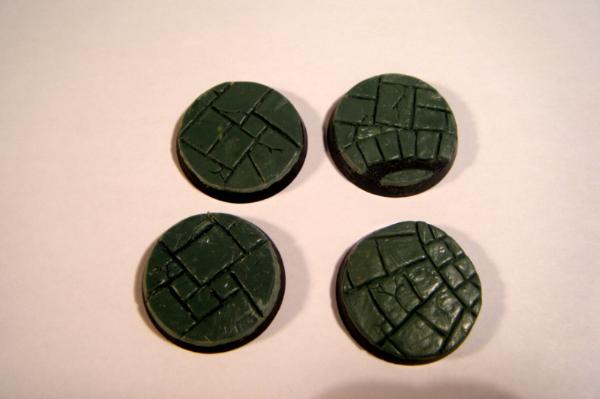
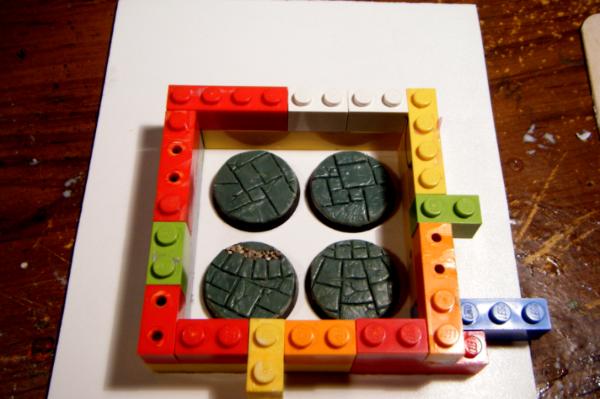

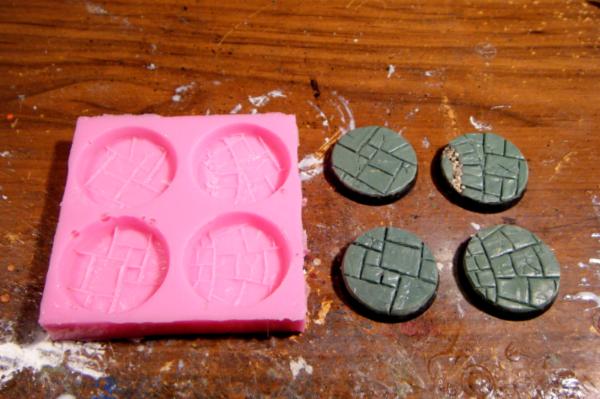

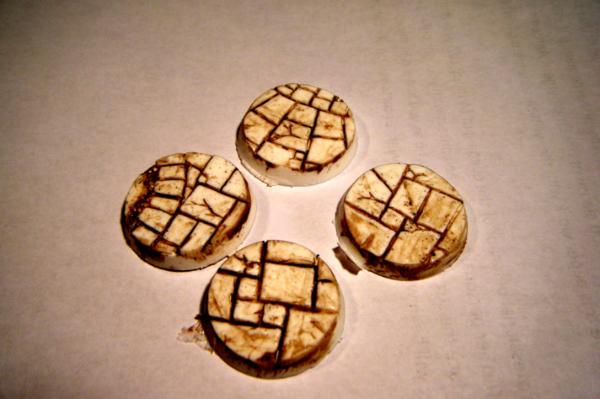
Pretty similar process to the shoulderpads, its handy that the bases have a big flat area on the bottom as its easy to pour into The last pic is of the cast bases with a wash of devlan mud to bring out the details. The main issues I ran into were bubbles as usual, I painted on a layer of silicon to begin with, but bubbles still formed and mean I have had to do a bit of clean up around the edges with GS but hey thems the breaks.
Hope this helps someone out there, or inspires someone to try custom bases..they look damn nice with my rats on em!
Cheers
BLACKHAND
28730
Post by: Captain Klaw
I love pinkysil. Many thanks for bringing it to my attention. Again.
My terminators are almost all assembled complete with cast storm shields: I'll throw some images up if I can.
19307
Post by: Liquidice281
Right handed dreadnought CCW here I come.
26790
Post by: Gitsplitta
Now THAT.... is something I've been contemplating for a long, time. Think I have an approach to make it, even bought the parts... but it's a ways down on the priority list.
20739
Post by: Lennysmash
Came across this in my research, thought it might benefit someone.
http://www.youtube.com/watch?v=LSH19G_6Yeo&feature=related
5386
Post by: sennacherib
This is awsome. Great job and thanks.
28730
Post by: Captain Klaw
@Blackhand: Just bought a citadel basing kit (the 40k edition), and am strongly considering doing some casts of urban bases so I can get some mileage out of the etched brass and excess plasticard I have.
My question is, How do you ensure the bottom of the bases (at the top of the mould when you pour them) is clean enough and doesn't spill over the edges and leave you with messy edges?
Also, how do they sit on terrain? I find having a hollow base really helps in keeping my broadsides from prematurely nosediving off ruins before they get dark-lanced, so a flush base sounds problematic.
Thanks Blackhand!
19931
Post by: BLACKHAND
Being careful to pour only just enough? the surface tension of the resin will usually keep it from spilling out of the edges of the mould. This may leave you with a rounded bottom so I then put a sheet of medium grit sandpaper on my desk and run the basae back and forth till the bottom is flat.
When I have flash on the bottom edges of the base I run a knife around it, following the angle of the sides and then sand it as above.
One the posts above suggests using pvc plastic laid flat on the mould to reduce flash but I haven't tried it yet.
TBH I have been casting most of my bases with the remnants of liquid resin left over from other castings so I have some bases that are normal size and some that are shallow, its not so bad as it adds some variety to the height of the rats without a ton of converting ( I hate a whole unit of models all exactly the same size!, they're not clone troopers!)
I have'nt tried em out on terrain yet...I guess it might help that they are heavier, but only slightly.
One tip when superglueing models to resin bases is to use a knife to slice a crosshatch pattern on the two surfaces that are going to have the glue on them before sticking them together. It increases the surface area that the superglue can grip on to and makes them really secure without pinning(thanks to The Painting Corps blog for this tip!)
hope some of these ideas help
Cheers
BLACKHAND
28730
Post by: Captain Klaw
Thanks blackhand, the sandpaper is probably the way I'll go, I was just curious abouthow it goes with the easycast but sounds fine from what you said.
Will post up some pics of assembled resin casts later if I can.
Cheers, Klaw
19931
Post by: BLACKHAND
Oh and don't breathe the dust, its nasty stuff
20739
Post by: Lennysmash
19931
Post by: BLACKHAND
I would definitely go with the polyurethane, It looks like its liquid enough to reproduce detail and cures fast which is always nice.
I'm not so sure about the rtv rubber, I personally like a 1:1 mix which is simpler to use and means less chance of a mistake which could waste a whole mold. Might be worth looking for a simpler to use silicone rubber.
Hope this helps!
20739
Post by: Lennysmash
Ok well I'll keep looking into the silicone then. On another note does anyone know the weight comparison between plaster and resin. I only ask because I found the most amazing thread on warseer and it has rekindled my passion for some Hirst Arts molds. You guys should take a look, I'll post the link below when I get the chance. Automatically Appended Next Post: http://www.warseer.com/forums/showthread.php?t=260498
And just incase you want to expand beyond bases and shoulder pads, here's a little inspiration.
http://www.warseer.com/forums/showthread.php?t=177095
28730
Post by: Captain Klaw
Yeah blackhands right. The 1:1 ratio for resin and mould compounds is something you should look for, very handy.
I've mucked up a batch or two just by adding a small amount too much of one component which prevented the pinkysil from hardening, and I can see this happening more easily with the small and frequent batch mixes you'd expect to use when starting out.
20739
Post by: Lennysmash
Yeah fair point. I really don't want to waste this stuff either at £35 + P+P its not cheap. I think I'll look into getting a few Hirst moulds first anyway, cheating I know, buying ready made moulds but I've wanted them for a long time anyway.
19931
Post by: BLACKHAND
Hirst arts rock Lenny no shame in them at all
I am borrowing a set off my friend to cast up a bunch of castle ruins for my 40skaven and in reality its the only way I could achieve the look I'm going for.
Not sure about the weight differences of plaster and resin but it would be negligible I think.
For the project I am working on I bought a really hard plaster called Supercal 3 , In theory it is harder than dental plaster and should mean my casts will last the distance.
20739
Post by: Lennysmash
Yeah I heard of supercal, I think it may be the stuff Fireman Tim uses, it's supposed to be dead good.
19148
Post by: Aerethan
Silicone Rubber will stand up to the abuses of Resin casting much better than polyurethane. Keep in mind that resin leeches certain properties out of the rubber each time you cast, so mold degradation is guaranteed, it just depends how quickly it happens.
The standard difference between Polyurethane and silicone is the ratio. Smooth On makes a 1:1 silicone that I use and am in love with. Other brands will require use of a scale to use silicone rubbers.
As for plasters, having done the whole Hirst Arts bit, dental plaster and supercal or anything like that is more or less the same at the high end. Hardness doesn't mean better. It may hold less detail, and after a certain PSI the hardness is negligible.
Plaster is a less hard set rule for mixing as it's difficult to mix up exact similar batches. The consistency you want for plaster is a lump free milkshake.
Hit me up if you want some pointers on casting plaster.
19931
Post by: BLACKHAND
Thanks for the tips Aerethan! I will definitely be contacting you when I get to casting some of the Hirst arts stuff I am borrowing.
I have used Smooth On in the past and I agree that it's ease of use is a big drawcard.
28730
Post by: Captain Klaw
26790
Post by: Gitsplitta
Those turned out great CK! Love the look too!
17349
Post by: SilverMK2
Lennysmash wrote:Yeah I heard of supercal, I think it may be the stuff Fireman Tim uses, it's supposed to be dead good.
Since you are in the UK, try talking to the guys at Tomps (online store). From what I have heard, they are pretty good at helping people out if they are not quite sure what they want/need. Their prices also seem pretty reasonable.
20739
Post by: Lennysmash
Ok so I've just checked out the website and it has helped a ton. As suggested by some I think I'll be going for a Silicone rubber. However I first need some more advice on the differences between condensation cure and addition cure RTV's. Atm I am leaning towards an addition RTV due to the simpler mix ratios and its lower viscosity but anyone with first hand knowledge of one or both of these products would be heartily welcomed. @aerethan, thanks for the tips and the offer. You seem to have experience with both plaster and resin would you be able to tell me which is the lighter. I'm looking to get some Hirsts in the near future and was wondering if casting them in resin might be lighter than plaster. Sorry would someone be able to assess this product for me also. It wouldn't be my final choice just something to play around with until I can get a better grade of silicone. Sorry I know I'm asking loads of things here but I promise I'm doing my homework on this stuff too. http://www.tomps.com/shop/value-rtv-silicone-05kg-p-247.html
19931
Post by: BLACKHAND
@Captain Klaw -Very nice bases, I may have to make some similar ones for my necromunda gang.
@lennysmash - Sorry bud I am not sure what the difference is between condensation and addition cure RTVs maybe wiki it?
Having a look at the link I can only think the product has the same problem as the others you found which is the 20:1 mix ratio, but as a cheap trial product it looks fine.
And don't worry about asking questions that's the whole reason I started the tutorial!
19148
Post by: Aerethan
Resin is by far lighter. Just keep in mind that it degrades molds where plaster does not.
What I did with my hirst arts molds is cast in resin once, then use that pull as masters for a second mold that I used for resin casting, keeping my Hirst mold as a master.
Lenny, I really recommend finding the Smooth On 1:1 silicone if you can as it's the single best product for resin casting as it doesn't require a scale and resists resin damage alot better than polyurethane. Automatically Appended Next Post: As requested from a PM, here is the resin that I use. For Hirst Molds I'd use the fast demold time, for 2 part molds I'd suggest a higher demold time as they have a higher pot time, which lets you pour more steadily.
I also use 10cc syringes. As soon as I start a non illegal project I'll post pics of how I do them. Automatically Appended Next Post: http://www.smooth-on.com/Urethane-Plastic-a/c5_1120_1209/index.html
17349
Post by: SilverMK2
I'm about to cast (almost finished sculpting/creating) some heads (10 of them) and was wondering what the best way of arranging them in the mould would be? They each have a rimmed helmet and fixation for a gas mask, so they are slightly overhung in places (basically I'm sculpting heads with helmets and masks similar to this image. I was thinking of casting them in a line, all facing in the same direction (so like a line of people standing one behind the other in a cue), with the neck towards the top of the mould (each head is currently on a wire rod for sculpting, so I would suspend them all in my mould area, then pour the mould agent) to make a single piece mould, then when it was set I would carefully cut between the heads along the line to create a 2 piece mould (although still try to keep the mould joined at the base to provide stability and ensure it is shut at the bottom - don't want all my resin to run out the bottom ). Any thoughts on this? It will be the first small scale casting I will do (I've made one mould previous to this and the first which is not just an "open topped" flat mould- the parts to build a small one person drop pod that I built), so I am just wanting to know how people more experienced would choose to do it.
19148
Post by: Aerethan
|...|....|
0...|...0
|__|__|
this is the best way I can describe your mold layout, ignoring the dots.
The middle is a straight channel that then turns out in one or 2 directions. then you turn back up, add in your piece, then add more channel to allow air to escape.
When you pour, you use the middle and slowly pour until resin comes out each side hole.
The other option is:
___________
|....|....|
0....0...0
With this setup you need to be very careful about air bubbles as there is no vent on each piece to let air out.
More than anything, trial and error. See what works for you, and never expect your first mold to work quite as intended.
EDIT: just saw that you intend to use a single piece mold, in which case the second diagram is the one you want.
19931
Post by: BLACKHAND
SilverMK2 wrote:I was thinking of casting them in a line, all facing in the same direction (so like a line of people standing one behind the other in a cue), with the neck towards the top of the mould (each head is currently on a wire rod for sculpting, so I would suspend them all in my mould area, then pour the mould agent) to make a single piece mould, then when it was set I would carefully cut between the heads along the line to create a 2 piece mould (although still try to keep the mould joined at the base to provide stability and ensure it is shut at the bottom - don't want all my resin to run out the bottom ).
I would go with this plan but how thick is the wire the heads are sculpted on? you may want to thicken it up with Gs or modelling clay so that you have a larger channel to pour the resin into, Oh and try and add a few bits of sprue to your helmets to trap bubbles of air away from the resin! other than that just have a go!
17349
Post by: SilverMK2
The wire is pretty thick, about 2-3 times as thick as a regular paperclip. Will that be thick enough?
And when you say add in some sprue, what do you mean?
I could always chop the wire down, drill some holes in a bit of sprue, then mount the heads on the sprue so the base of the neck is touching the sprue? It would be easier to thicken the join as well...
Then I could use the same technique as you used in your tutorial of then sticking the sprue to some backing and pouring in the mould material normally, rather than suspending the whole thing as I was planning.
19148
Post by: Aerethan
resin channels should be as thick as sprue as much as possible. Heads can always have their necks filed down after being pulled.
Automatically Appended Next Post:
I should also mention that if anyone decides to go with 10:1 silicone, you can get a digital scale on ebay for about $9 shipped from hong kong. just make sure it measures down to 1/10th of a gram.
Found out this morning that my part A of oomoo 25 set itself after sitting for about a year so I ended up using some 10:1 silicone I had sitting around that apperently has infinite shelf life.
Being that this project is legal I'll post pics of the mold tomorrow after it is fully cured.
19931
Post by: BLACKHAND
I would mount them on sprue and then on backing board, it means you don't have to be so accurate with the amount of silicone you make up, as long as you have enough to cover the heads with a fair amount as a "base" for later when you flip it you will be fine. Suspending the model and having to pour up to cover the sprue can mean you end up with silicone left over or not enough and you have to scramble to mix more and get it in the mould before it sets...hope that makes sense
By glueing on bits of sprue I mean looking at the heads and thinking about what will be the lowest parts of the mould, this is where the bubbles will form. Get some thin sprue or plastic rod, cut small section of it then glue them to the place where you think bubbles will form. When you pour in the resin instead of bubbles forming in the head they will be forced down the channel the sprue formed in the mould. It may mean a bit of cleaning up once you pull the cast but that is preferable to cleaning up bubble voids with GS.
@Aerethen - Will be very cool to see pics of your mould , I have the distinct feeling you have done this more than I have and will be cool to see how a more expereinced caster sets up their moulds.
19148
Post by: Aerethan
For my molds, the first thing is setup of the masters. I use glass from a picture frame to make one piece molds on as it is perfectly flat and easy to remove silicone from.
For this mold today I used regular PVA glue to secure the masters onto the glass.
Once the masters are in place I then use lego bricks to form a rectangle around the pieces with at least 1/4" clearance on each side, the same clearance that the masters have from each other.
For a single piece mold of 20mm bases I only went 2 bricks high which was plenty.
I then secured my lego form to the glass with PVA glue. Once the glue had dried, I mixed up my silicone. Today I had to use 10:1 stuff as my 1:1 apperently expired it's shelf life and set itself inside the bottle.
I used 124.5 grams of silicone which then required 12.4 grams of setting agent.
I poured the rubber in from a corner, letting it ribbon over itself. I hold the cup high enough that only a thin stream of rubber falls in, which causes most major bubbles to pop on the way down.
We pour from corners where there are no parts of the masters present. You want the rubber to envelope the masters as if a wave was washing over it from the shore.
Provided you are doing this on a level surface, the rubber will even itself out on it's own, giving you a near perfect flat bottom.
The demold time for this rubber was 4 hours, I let it sit for about 6. Interesting sidge note, non dried PVA glue will cause rubber to not set, so my corners are now drying properly after the mold was taken out.
To remove the mold, disassemble your legos until the mold is sitting on the glass alone. Then, flip the glass over and carefully pull one corner of the mold off until you can see it start to let go thru the glass. Do this
in small sections and slowly so that you don't tear the mold.
Once the mold is off the glass, it's time to remove the masters. Carefully flex the mold in each direction for each master so that the sides come loose. Then for my bases I used surgical pliers to pull out the masters.
Now that your eyes have gone crossed from reading all that, here's some pictures of todays last minute decision project:


These are ruined temple bases that I will be using for my upcoming High Elves project. I will also be offering them for sale after I build up a small inventory of them. Casting takes time to build numbers.
19931
Post by: BLACKHAND
Wow, never thought of using glass as a base, do you glue down your legos? it doesn't seem like you do by the pictures, do you ever have silicone leak out from underneath them?
I've got to say I am a lot more impatient than you, I use superglue to hold down my masters a then sand them to tidy them up afterwards, but I think thats a result of having a silicone and resin that both have a demold time of 20 mins. the attraction of going from master to mould to casting in one night is too much and I tend to rush it Result? bubbles!
I will definitely copy your method of pouring silicone to reduce the bubbles though, it makes a lot more sense then my method of using an old brush to paint on a a layer of silicone then pouring the rest in, I have found that it just ends up making slightly submerged bubbles that pop after the master is taken out of the mold and ends up filling every time I cast.
20739
Post by: Lennysmash
19148
Post by: Aerethan
I use PVA glue to glue down the legos yes. My resin is 5 minute demold, although for 2 part molds I'll be switching to 30 minute demold resin for the increased pot life.
26386
Post by: hungryp
aerethan wrote:
To remove the mold, disassemble your legos until the mold is sitting on the glass alone. Then, flip the glass over and carefully pull one corner of the mold off until you can see it start to let go thru the glass. Do this in small sections and slowly so that you don't tear the mold.
Would this part of the process be made easier by a quick shot of mold release on the glass and masters, or would that affect the mold compound differently than it does resin?
12186
Post by: Sersi
aerethan wrote:
There's allot of wasted silicon in that mold. A centimeter spacing between the parts and the sides of the mold box is plenty for minatures. When I make open face molds like that I try to cram in as much as possilbe to elimiate wasted space. Both found objects and chopped up styrene model kits are great for this.
19931
Post by: BLACKHAND
BLACKHAND wrote:
This is the amount I usually leave around the masters, probably not enough but the silicone I use is pretty flexible plus I am cheap as they come and don't want to use more silicone then I have to Automatically Appended Next Post: edit : Oh and hungryp, I personally don't use mould release as most of these silicons have so much flex that they peel of things like glass and plastic pretty easily
19148
Post by: Aerethan
hungryp wrote:
Would this part of the process be made easier by a quick shot of mold release on the glass and masters, or would that affect the mold compound differently than it does resin?
I use mold release on the glass and masters but not the legos as they pry right off.
Yes I wasted alot of silicone, it's been about a year since I've made a mold, and I was using backup silicone anyway so I wasn't worried about it and didn't measure out my volume first. Todays mold was a last minute decision.
Keep in mind that resin WILL stick to glass quite strongly, so use a release if resin will contact it while curing.
Tomorrow I'll post pics of how I do single side casts with perfectly flat bottoms.
20739
Post by: Lennysmash
Awesome looking forward to it .
I've ordered some linka molds of ebay for link 99p so hopefully I'll win them and then I'll have some interesting stuff to add to bases and the like. I also took a look at Hirst again, unfortunately its just an expense I can't afford atm  so it'll have to be shelved for now, along with my dreams of a battlefoam case. Whoever said students had it easy obviously wasn't a gamer . Automatically Appended Next Post: Ok so the good news is that I won one of the Linka molds , the bad news is that I also bought a LR, a thunderfire cannon, a ten man assault squad and a bits box including two tanks in it . Something tells me I'm going to be a bit busy for the next few weeks .
26386
Post by: hungryp
aerethan wrote:hungryp wrote:
Would this part of the process be made easier by a quick shot of mold release on the glass and masters, or would that affect the mold compound differently than it does resin?
I use mold release on the glass and masters but not the legos as they pry right off.
BLACKHAND wrote:
I personally don't use mould release as most of these silicons have so much flex that they peel of things like glass and plastic pretty easily
So, needing it will depend on the mold compound, but it can't hurt I guess?
Also: Loving the advice in this thread. Good job guys!
19148
Post by: Aerethan
I use mold release on masters out of habit and it also helps prevent the silicone from bonding with the master.
On low detail items like bases it shouldn't be a problem, but on something like a model you will NEED to use release when making the mold and when casting resin.
20739
Post by: Lennysmash
SilverMK2 wrote:Since you are in the UK, try talking to the guys at Tomps (online store). From what I have heard, they are pretty good at helping people out if they are not quite sure what they want/need. Their prices also seem pretty reasonable.
Thank you so much for this tip Silver, I just got of the phone with these guys they're absolutely brilliant. The chap I talked to really took the time to help me understand which products might be good for me and which ones certainly weren't, in addition he wasn't pushy about me buying the most expensive products. All in all a 10/10 customer experience for me.
17349
Post by: SilverMK2
No problem I've ordered casting stuff from them before on the advice of endtransmission, who said they were very helpful, so I'm glad that you found them so too
28730
Post by: Captain Klaw
Nice to see you changed the name of the thread blackhand.
19931
Post by: BLACKHAND
Hehe, I am still considering changing it to "Dakka's general casting tutorial" I am only one voice in a large discussion now.
19148
Post by: Aerethan
You get credit for it as I've always just been too lazy to start a thread and post WiP pics lol
22192
Post by: whalemusic360
Might be a good idea to make the 1st post have a list of Silicone, Resin and Mold release in each country (or area) that has been used successfully.
26790
Post by: Gitsplitta
I agree with WM... good idea....
28730
Post by: Captain Klaw
Yep. It'd be good if we could have like a sidebar in the threads to show important stuff and what page it's on. Thanks BLACKHAND for starting this and keeping it and my hobby going. Kudos up to wazoo.
19148
Post by: Aerethan
For American buyers you can get Oomoo 25 1:1 resin from www.theengineerguy.com. You can also get Smooth Cast 300 resin there as well.
28730
Post by: Captain Klaw
Australian buyers (Perth specifically), try Kirkside in Osborne Park. The links are on the first page of this thread.
20739
Post by: Lennysmash
UK buyers start with Tomps.com, very helpful and knowledgeable, will really help you get what you need.
19931
Post by: BLACKHAND
There you go guys I have added a list to the first post with your suggestions, thanks for reposting them so they were easy to find, I still trawled through the blog to find any other ones PM me if I have missed anything
19148
Post by: Aerethan
I'd also like to plug myself for a mold maker.
If you don't have the resources or skill to make molds or casts, PM me and we can work something out. I can either sell you a mold or sell you casts.
I figure this will save cost for people who just want copies of that one shoulder they designed or head or whatever without the cost of buying entire batches of resin and silicone. I always stock both so I can make a mold any time.
19931
Post by: BLACKHAND
Very cool Aerethan I will add that to the OP
19148
Post by: Aerethan
Perhaps after I sell enough I can buy a nice little vacuum setup. Long pit life+ vacuum chamber= no more bubbles ever!
33060
Post by: TheGiantPeanut
Nice tutorial, does anyone know where to get moulding quality silicone in the UK?
19931
Post by: BLACKHAND
check the first post giant peanut all the details are there
20737
Post by: Ravenum
Great Tutorial!!
quick question whats a good releasing agent that wont break the bank??? 
like pinkysil and easycast do i need a releasing agent for the oomoo 25 and smooth cast resin 300?
19148
Post by: Aerethan
I use both of those products and I don't use release for it.
The oomoo will degrade over time as that is the nature of resin, but the resin won't stick to silicone so you don't need releaser.
20737
Post by: Ravenum
is there a shop that sells pinkysil and easycast here in the US??
19148
Post by: Aerethan
easycast is utter crap if it's the one I'm thinking of. 24 hour demold time and I have yet to get rigid pulls. A waste of money.
Either go with Smooth On's smooth cast 300 series or get the Micro Mark resin. Only bummer about Micro Mark is that they don't take paypal(unless that changed recently, been a while since I've ordered from them).
19931
Post by: BLACKHAND
Might be something different you are thinking of Aerethan, the easycast I use demolds in about 10 mins or less if you use a heat lamp, 25 mins if you don't
19148
Post by: Aerethan
I used Easy Cast clear casting resin
http://www.tapplastics.com/shop/product.php?pid=386
Can't get this stuff to work worthwhile for anything besides bases.
Automatically Appended Next Post:
And smooth cast has a nice short 5 minute demold anyway.
19931
Post by: BLACKHAND
It's a different product, the easycast I use is white not clear. I do have a clear resin from the same suppliers but it cured all right, after 2 days!
I'm pretty sure I have used Smooth Cast a few years back and I had a lot of success with it so if you are in the states it is definitely a good option.
20737
Post by: Ravenum
Thanks alot for the tips!!!
19148
Post by: Aerethan
Got a new batch of Oomoo in today, but none of my projects can be posted here. Someone send me something original to do a 2 part mold tutorial on.
19931
Post by: BLACKHAND
LOL, if I wasn't so far away I would definitely do it!
19148
Post by: Aerethan
Today I'm doing the second part of my custom base mold, which is taking a set of pulls from my original mold of 3 and using them with the masters to make a mold of 6 bases.
This is beneficial in 2 ways:
1st you can now cast up to 9 at a time instead of just 3.
2nd you can save your master mold to make future pulls to make subsequent molds from. The more you cast resin, the more compounds are leeched from the silicone and eventually the mold needs to be replaced.
I also recommend using a higher quality silicone for master molds such as the one I did last week using GE RTV662a which is a 10:1 rubber. It has a VERY high strength and thus doesn't flex nearly as much as Oomoo 25.
I'll get pics up in a few hours, just waiting for this mold to cure.
Automatically Appended Next Post:
So today I made my expanded mold for my ruined flagstone bases. I used Oomoo 25 which
is a 1:1 RTV silicone.
As always I glued my masters down onto glass.

I then made my form around it with Legos. Sidenote: this mold is the same size as the
original mold, but has twice as many bases on it.
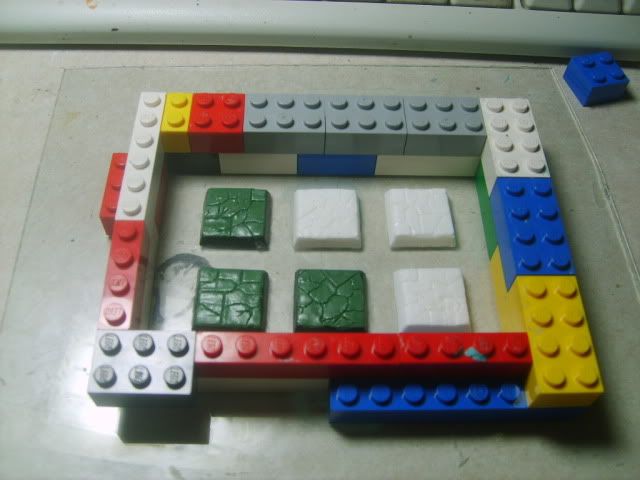
I used Alumilite Rubber to Rubber mold release, which technically isn't for this application,
but I find it works just as well. Mold release is more or less low viscosity grease and will
make your masters look wet.

After my form was ready and glued in place, I mixed up my silicone by eyeballing it.
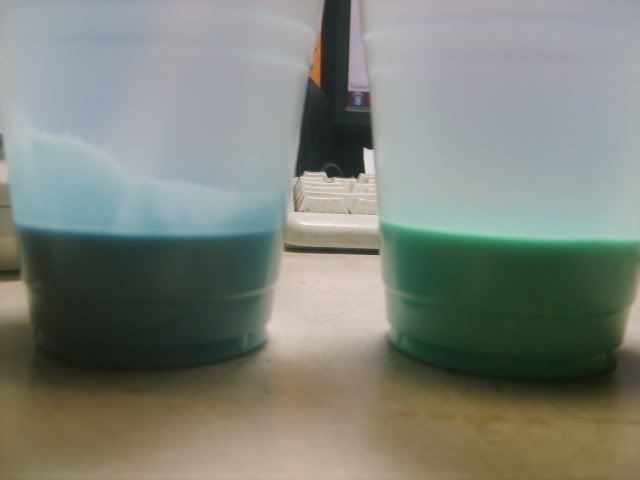
For best results, mix by pouring one into the others cup. Mix as well as you can, then pour
the silicone out into the other cup. This is to help the unmixed parts on the side of the cups
get mixed in and helps with the overall strength of your mold.
Once you are ready to pour, pound the cup on your desk for a few minutes to force out as
many bubbles as possible. Oomoo 25 has a 15 minute pot life, which is plenty long enough to
get bubbles out before it cures in the cup.
Now we are ready to pour. I hold the cup about 10-12 inches above the form and only let a
very thin stream of silicone touch down in a corner of the form. We want the silicone to
cover itself over the masters, and to prevent bubbles we never pour directly onto the pieces.

The reason we use a thin stream is to continue breaking apart bubbles as they fall. The silicone
stretches and the bubbles are forced to pop.
The silicone will naturally settle itself level as long as it's on a level surface. Oomoo 25 has a 75
minute demold time, so to err on the side of caution I gave mine 3 hours to cure before using
it.
Once everything is cured, pull the mold off the glass, pull out the masters, and mix up some
resin. With resin you don't need to go from one cup to the other as it is generally thin enough
to not need such rigorous mixing. My Smooth Cast 300 only has a 2 minute pot life, so I have
to work fast, and any mistakes are likely going to be a miscast.
Here's both molds from this past week together.

And a finished tile.
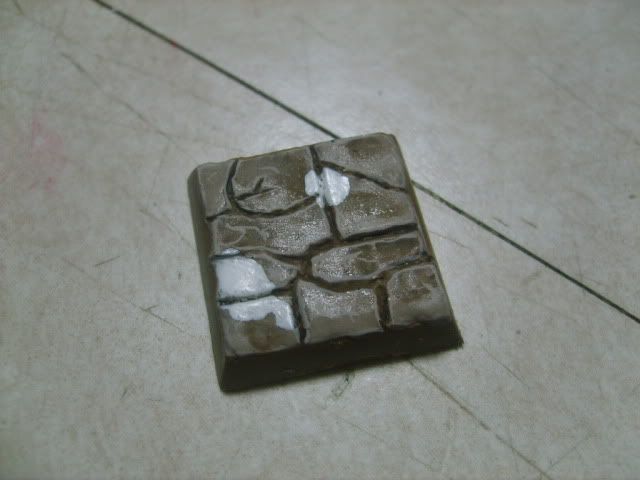
This was a learning experience as I forgot to wash it off before priming.
If you don't wash the parts in soapy water then paint will slide right off after a little bit of
handling.
Now that I can make enough at one time, I'll be offering these bases in sets of 5. I am still
sculpting the 25x50mm bases. If I get a big enough order I'll do other sizes as well. $.50 per
base is what I'm thinking at the moment. Perhaps a wee discount with larger orders.
19931
Post by: BLACKHAND
Fantastic Aerethan! Thanks for another great tutorial, OOMOO looks like a great product, 3 hours is a decent demold time for a silicone.
Hope you get some orders for your bases!
26790
Post by: Gitsplitta
Wow, that's really cool aerethan, thanks for taking the time... and really neat tiles!
19148
Post by: Aerethan
As soon as I find something worthy of my time that I'm allowed to post(meaning not illegal) I'll put a 2 part mold tutorial up.
9496
Post by: DaHedd
This is a great little bit. A long time ago i cast up some of my own bases, craters and armour bits for tanks using Silicon from a little (now closed hobbyshop) and Car body work repair resin id bought from Halfords.
That resin got very hot and in the end damaged the moulds. Does the stuff you recommend get hot as it sets ?
You reckon you can get the stuff to do this from Hobbycraft ? as a new one has opened up in Aberdeen.
Also for bigger terrain pieces could a bigger version of these moulds work with say Plaster? or maybe even modelling Clay ?
19148
Post by: Aerethan
Clay wouldn't likely work. Plaster would work quite well. I refer you to www.hirstarts.com for plaster technique. His molds are far superior to anything I'm making as well.
All resin will cause some heat when mixed and curing. Large pieces of resin will have much higher temperatures. Slower cure times may help with this although I am not 100% sure.
For larger pieces I'd recommend using plaster despite the weight issue.
20739
Post by: Lennysmash
For bigger pieces I would probably pour in sections with resin as it adheres to itself well from what I gather. Depending on the size and application of the piece though I don't see why you couldn't use plaster or clay, though I'm not sure what the times for it curing/going off would be.
19148
Post by: Aerethan
Clay is too thick to be very useful at casting, and it would be too brittle in such small items. Gypsum Plaster is what you want.
28730
Post by: Captain Klaw
@DaHedd: Speaking on behalf of BLACKHAND and myself, as we both use the same products, the heat issues are negligible.
As you could find we use Pinkysil for moulds and Easycast for the actual pours.
I have noticed with some deeper pours like the bases there can be a bit of heat generated, although it does not warp the pinysil as it either does not expand enough or expands at a contained rate with heat.
In any case the heat is not enough to cause problems with pours of less than 5mm thick. Haven't tried any thicker.
Klaw
19931
Post by: BLACKHAND
I personally pour the resin themn sit a heat lamp about 5cm away and heat up the resin, it make sit cure faster!
I have yet to notice any degradation in the pinkasyil moulds but over time I gues I will find out.
Nothing like a 5 minute demould time for a resin addict
29585
Post by: AvatarForm
Thanks. This has been very insightful.
28730
Post by: Captain Klaw
How I love the speed of pinkysil and easycast. I'd rather greenstuff a piece, mould it, cast it, then see if it's any good rather than wait for greenstuff to cure.
19931
Post by: BLACKHAND
Lol, patience Klaw! I know what you mean though, I have sped through many a casting in a night.
I am currently working on yet another shoulderpad and chest piece combo for my Sabre Legion Terminators so I will try and remember to take pics and post em up....
...and as soon as a little project arrives at a friend's house and he posts pics of the finished product up here on his painting blog I will be able to post pics of the casting process for that.
Wow I'm not sure if that last bit made a lot of sense but you'll get the idea.
28730
Post by: Captain Klaw
Looking forward to it. With....patience.
22192
Post by: whalemusic360
Just poured my first mold. I however completely forgot to spray it with release agent, so not sure how its going to come out.
19931
Post by: BLACKHAND
Depending on the product you should be fine, next time spray or use talcum powder!
22192
Post by: whalemusic360
It came off the plastic bits fine, but stuck to the Plexiglas I used as the foundation.
Question for you casting vets. How do I prevent the bubble inside the shoulder pads? I couldn't get a tooth pick in there. I don't think it will ruin anything, as I can just cut the resin out when cast.
19148
Post by: Aerethan
talcum powder or degassing.
9230
Post by: Trasvi
Edit: nothing new to add
28730
Post by: Captain Klaw
Does talcum powder work with pinkysil?
19931
Post by: BLACKHAND
@Captain Klaw - yep talcum works, usually don't need it though
@whalemusic - Can you post some pics of your mould so we can get an idea of your setup?
28730
Post by: Captain Klaw
Sorry, should have specified: does it help in reducing bubbles? With pinkysil moulds it isn't such a problem as you can manipulate them when you pour the resin to get some bubbles out, but still there is a high rate of miscasts in shoulderpads due to bubbles...
19148
Post by: Aerethan
If you are miscasting it may be due to how fast you are filling the mold and if you are flexing it while you pour.
Also the type of resin you are using can make a difference. Smooth Cast 300 is self degassing, so as it sets the bubbles make their way to the top. The only trouble I have is with very fine detail molds which I'm hoping to remedy with my longer cure time resin.
19931
Post by: BLACKHAND
Sorry guys I don't have too much of a problem any more, I just poke (pretty viciously) into the areas I know will be a problem, the edges of the mould and such, and I get most of the bubbles.
Without seeing how you have set up the mould I can't really give you a good idea how to fix the issue.
28730
Post by: Captain Klaw
My mould is the same as yours, I think I posted pics earlier. I'm thinking I need some eye-droppers so I can make smaller batches and focus on each pour more without worrying about the resin drying before I can use it.
19148
Post by: Aerethan
I use 10cc syringes for my 2 part molds. You may want to try those out.
19931
Post by: BLACKHAND
Lol, sorry I wasn't clear I was meaning Whalemusic's mould, I saw yours and it looks right to me,
If you use talc make sure to shake the daylights out of the mould before pouring the resin so clumps of talc don't ruin the cast.
Aerethan, when you use a syringe to inject resin does it ruin it or can you just pull out the cured resin?
22192
Post by: whalemusic360
I'll get some pics of em up some time this week.
19148
Post by: Aerethan
Each cast costs me a syringe, but cost on them is about 10 cents. The added pressure makes 2 part casting a lot easier.
4003
Post by: Nurglitch
Basically anything to force bubbles out eh? Somebody (maybe me) should find the thread where someone showed off their Warhound castings where they used a vacuum bell to draw the bubbles out of the liquid resin.
19148
Post by: Aerethan
That is degassing. I'd do it but a vacuum rig runs a few hundred dollars. It also works on rubber to get bubbles out when making molds.
20739
Post by: Lennysmash
I think I remember seeing that set up on the warhounds. IIRC it was a custom rig, if not then it was someone else's rig but it was definitely a custom rig for degassing.
I'll see if I can find it in my saved listed.
19148
Post by: Aerethan
If I had a vacuum setup I'd be doing alot more less than legal casting I'm sure. Waiting for my Smooth Cast 305 to show up in the mean time for my base project.
If people need molds made I can offer them as well. Single side ones would of course cost less than 2 piece.
28730
Post by: Captain Klaw
Thanks Aerethan
22192
Post by: whalemusic360
Any joy on a 2 piece mold tutorial?
19148
Post by: Aerethan
I'll make one as soon as I have something legal to cast.
19931
Post by: BLACKHAND
Sorry WM, I havn't had the chance to make any 2 parts lately..Maybe I can do one of the Soul Drinkers peices as a two part
22192
Post by: whalemusic360
So I poured some resin this morning, and I dont know if its because I forgot to shake the bottles, or if I got the mixture wrong, but my 10 min set resin was still soft and in some spots clear when I left for work, 4 hours after I poured it.
This is resin pour #2 btw, 1st one worked great!
Any ideas?
19931
Post by: BLACKHAND
I have ended up with soft clearish pours before and I thought it might be due to the age of the resin compounds,
If there are only areas of clear resin it is probably due to mixing though :(
19148
Post by: Aerethan
I've had both age and mix cause miscasts. The plastic side of the resin does have a shelf life of under 1 year if not shaken regularly. Parts of it will set on its own and cause a gritty milkshake of resin.
22192
Post by: whalemusic360
Well the resin is like 3 weeks old, so I doubt that's it. Must just screwed to pooch on that one.
19931
Post by: BLACKHAND
Thanks Aerethan , that explains why some of my bottles have chunks in em!
I still use the old bottles if I am casting large bits for my own use but I certainly don't send anyone pieces made out of it
19148
Post by: Aerethan
What I noticed with my year old Smooth Cast 300 is that after it went gritty, casting still went fine(shake well to make the chuncks smaller) but the resin would sweat and pieces have to be cleaned with soapy water(which you should be doing anyway) before anything will stick to them.
19931
Post by: BLACKHAND
Yeah I had problems with paint sticking before I remembered to wash the pieces...I tend to forget these things as I steam ahead to the next stage
19148
Post by: Aerethan
Here is a link to the first video in a series done on how to cast 2 part molds and also where I got the idea to use syringes.
http://www.youtube.com/watch?v=jFfXT_Cjpuk
14677
Post by: TheRhino
All great info on resin casting.
Myself, I use Alumilite RTV silicone for making my moulds, using the wealth of tutorials they have on their site (alumilite.com).
Thing is, I'm a pewter-caster, not a resin-caster. I find pewter more forgiving of screwups. I can simply recast everything that doesn't come out right, plus the material is readily available from the sprue tabs from my models, plus a tankard or plate here and there from the local thrift shop.
Any other folks invested in pewter casting equipment and materials? I'm having a heck of a time getting fine detail to stay sharp in my molds.
30785
Post by: Styrofoam04
I finally bought some Lego. It wasn't easy either(well, because I'm Cheap). First I tried my nephews and not one of the little buggers would part with it. Then I tried craigslist, classifieds and WOW Lego is expensive! And it's hard to find just bricks. All of them nowadays are like star wars kits or Bionicle kits. So I decided to buy retail. $25 for 250 pieces, $36 for 500 pieces (I'm still too cheap to buy those)
Then finally I find what I'm looking for. 250 pieces for $12!!! ... Mega Bloks!
It's so much easier to make boxes. I made 4 moulds last night and now i can continue working on my projects.
220
Post by: millest
Blackhand - nice tutorial and some nice tips for my next projects. was wondering if you had any pics of the custom bolter magazine at all? interesting to see how that turned out.
cheers
22192
Post by: whalemusic360
They look alot like Storm bolter mags cut in half, but white instead of gray
One of BH's mags on this guy:
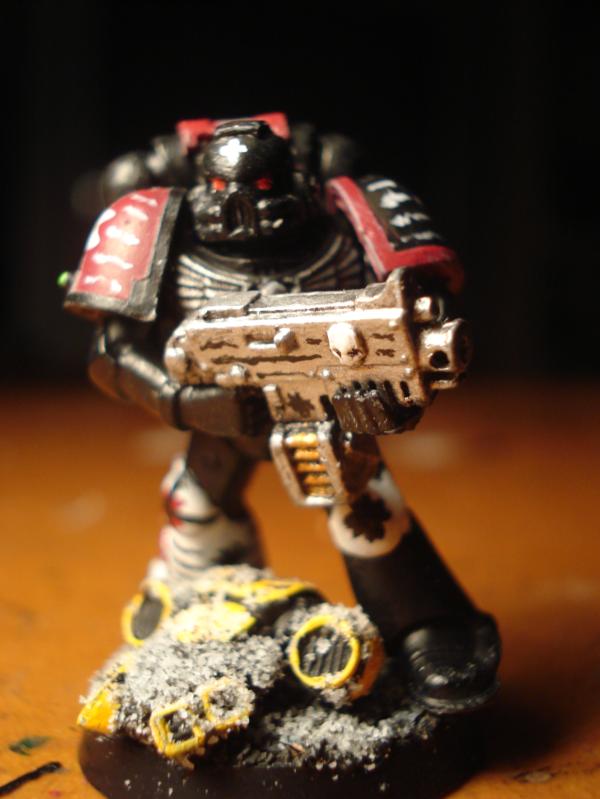
And this guy:
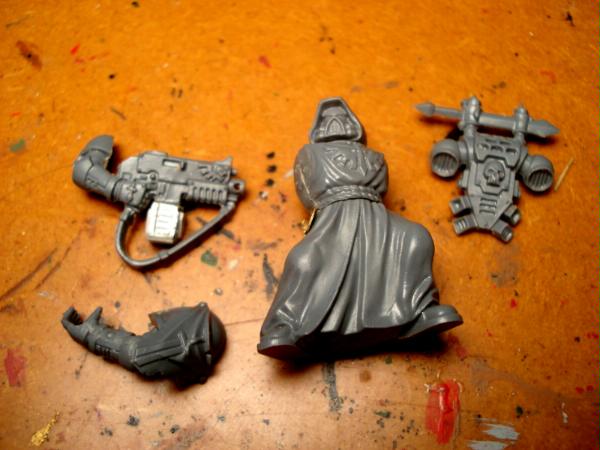
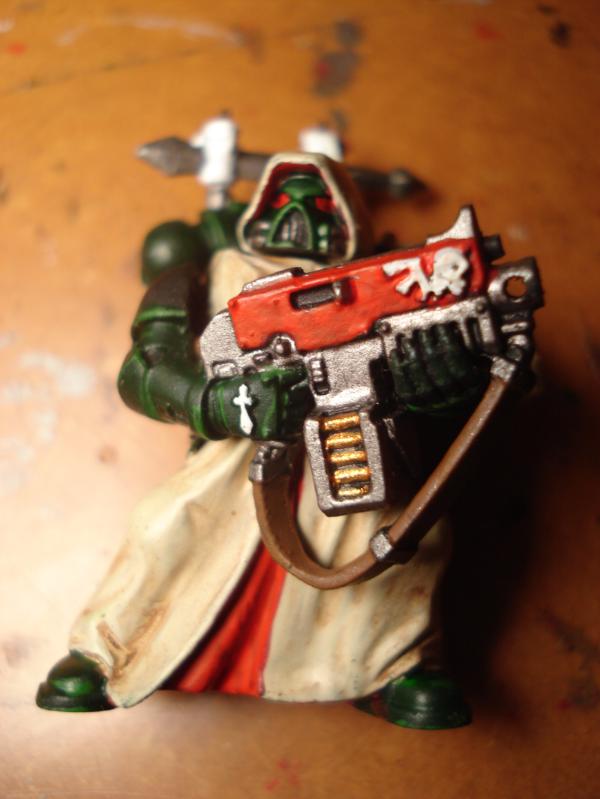
220
Post by: millest
hmm look good, might have to talk nicely to BH about getting a couple from him
cheers
33374
Post by: Ixajin
First I would like to say thank you to all who have contributed to this thread! it has answered many of the questions I have had bouncing around my head on this topic.
@aerethan - Thanks for posting the link to this video series. I just finished watching all nine parts and it really simplifies how a 2-part mould is done, and makes it a lot less scary.
Ixajin
34709
Post by: misfit
awsome thread i'm going to have to make some custom SM shoulders, thanks.
430
Post by: wolfshadow
I'm guessing something like a sword/tulwar would need a 2 part mould?
I'm thinking about trying to make myself some power weapons and custome 'chain' weapons.
19931
Post by: BLACKHAND
Yep, they would need a two part, and something as fine as a chain or sword blade could be tricky to cast consistently...but you never know till you try bro!
35059
Post by: aekold
I have read this entire thread and I must say it looks great.
I do have one question however. Where can I order pinkysil and resin? I live in the Netherlands, Europe. Does anyone have s link of a company that can help me? Thanks in advance.
19931
Post by: BLACKHAND
Have a look at the original post for places to buy casting products, I know there is an entry for the UK but not the netherlands.
If anyone could help Aekold it would be greatly appreciated and I will add the company and products to the original post.
35059
Post by: aekold
Thanks for the advice. I found the following products on the site if The Modelshop.
I intend to use this for the mould:
http://www.modelshop.co.uk/product/Smooth-on_Mold_Max_20_CL10028
And this for the resin:
http://www.modelshop.co.uk/product/Smooth-on_Feather_Lite%C2%99_resin_1kg_kit_CR20028
If I am correct these are the same products you are using. Could you please confirm this.
Onze again thanks for this great thread. Owh and I found your space skaven thread, really awesome.
19931
Post by: BLACKHAND
They may not be exactly the same products but they do look like they will do the job, If and when you order them and do some casting can you post whether or not they worked out and what the service was like from "the modelshop" it's always great to add another place to purchase casting gear to the original post.
Cheers
BLACKHAND
25762
Post by: LeBaron
An amazing tutorial with a ton of helpful things. I was wondering how to make a full cast, such as the Nids attached to the bottom of your scratch built Tervigon. I was going to use this method to make some pilots and a few custom builds for different projects I have lined up (save me tons, instead of having to buy boxes of guys to cut up. ).
19931
Post by: BLACKHAND
Check about halfway down this page it shows most of the process for the termagaunt, hope it helps!
http://www.dakkadakka.com/dakkaforum/posts/list/30/276630.page
35987
Post by: Marathon
I live in Vancouver, BC and after google-fu, have failed to locate any special effect, modeling or hobby stores that sell the silicon and urethane I need D : Does anyone from the Vancouver area know where to find it? Also using the above method can you cast marine heads, torsos, legs ect.?
19148
Post by: Aerethan
recasting of Copyrighted works is not allowed for discussion here.
That being said, I don't know of anyone who buys silicone and resin at a physical store. I use The Engineer Guy who I think is based in Georgia. Decent prices and fast delivery.
26386
Post by: hungryp
aerethan wrote:
That being said, I don't know of anyone who buys silicone and resin at a physical store.
I did that very thing just a couple hours ago!
I think the difficulty of finding it in most areas probably has something to do with your observation though. I'm pretty sure the only reason the shop I bought it from even carries it is because the owner's a caster himself.
As for places to order it from in Canada, I'd refer you to the list on the first page, Marathon. SSC has all kinds of product available.
3802
Post by: chromedog
An interesting tutorial.
I'm wishing I had this 20 years ago - heh. I learned all that in my first 6 months back then.
Still, that was all metal casting (heat resistant RTV) so the miscasts went back into the pot. It set me up for resin casting though.
I've been using Ultrasil (I prefer it over pinkysil) and easycast myself - got put onto Barnes by a mate in the FX industry many years ago (we all used to use Dow Corning stuff through a local distributor back in the day).
43214
Post by: jirc
Aesome work dude, really like it!
19931
Post by: BLACKHAND
Good to hear you guys are still finding the tut helpful!
6013
Post by: Xelkireth
How would you go about casting a head?
19931
Post by: BLACKHAND
When I do helmets I cut the neck a few neck rings below the helmet (I am talking a marine here) and glue it to the plasticard I am using as the bottom of the casting box. Once I have poured the silicone I just pop him out and pour the resin as normal, as long as you use a silicone with a decent amount of flex you will be able to pull the cast pretty easy. I find some of my older moulds have split a little at the edges but they still cast a decent helmet and are actually easier to pull the resin cast from
Hope this helps!
42508
Post by: Dahl Corp.
Hey BLACKHAND
Would casting tank treads be impossible? Also i heard from people that white resin isn't good for detailed pieces.
19931
Post by: BLACKHAND
As long as you designed the back of the tank tread to be flat it would be simple to cast. And as for white resin not taking detail I have never had a problem, couple of tips though.
Pour the resin as soon as it is mixed, letting it sit for more than 10 seconds or so will lower the viscosity a lot and it will not reach the crevices of the mould or allow trapped bubbles to release. At least this is the case with the quick curing resin I use.
Always dust your moulds with talc powder, the granules force bubbles away from the surface of the cast so that they rise to the top (the flat edge which in a tank tread will be hidden). just shake a bit of talc in the mould then blow it out making sure the talc isn't trapped in corners.
Hope this helps, post some pics of the treads if you do them!
26245
Post by: cosmid
Recently made some very small castings to produce some infantry weapons.
Anyhow what I did to make a couple two piece molds for really tiny bits:
1) build lego box and place it on a nice smooth surface (part of a CD case for me)
2) Fill the box about 1.5 standard lego bricks high with clay.
3) Press bits into the clay to about half depth. I tried to orient them so that there were as few "diving bell" type pockets for air to stick in as possible.
4) Pressed a bit of sprue into what was to the the top of the mold to serve as a resin reservoir.
5 - later cut) On my first try I also pressed bits of wire into the clay to form channels for the resin to enter and the air to escape, however a somewhat easier method occurred to me later.
6) Mix silicone rubber. I'm using smooth-on OOMO-30, from their starter kit. Nice thing is it is a 1:1 mix, so you can do it by eye in a cup. My only degassing was to wait a minute or so for some bubbles to rise. I have since read that the pouring in a thinnish stream also debubbles to some degree. Wear gloves. Have ventilation.
7) Pour over the mold. I just poured it on in one location allowing it to flow everywhere else. Made the mold half about 1 lego brick height thick.
8) Wait all day. The stuff stays sticky for some hours. So just leave it all day or overnight.
9) Disassemble lego box & remove rubber mold half. Peer at it, it's pretty cool. Get rid of the clay.
10) With a very sharp knife you can now remove any silicone you don't want to be in this mold half. I had a few places where the silicone had got under the bits into some gap between them and the clay. I'm about to make a mold for that half of the bit, so I can just cut that part off and the second mold half will get that part. Shouldn't be much if any of this.
11) Cut some registration holes into the mold. Just some nice wedges down into it around the edges and where you can fit them. Use a very sharp blade (eg new hobby knife blade).
12) Reassemble the lego box around the mold half.
13) Paint the mold half with a thin coating of petroleum jelly (Vaseline). You want it to cover the entire mold, but with a very thin coat. I used a cheap paint brush I had (now dedicated for this purpose).
14) Press the items you are making a mold of & the sprue for the reservoir back into their mold cavities. The petroleum jelly will help suction them in there so they stay put nicely.
15) Mix & pour more silicone. Wait 6 hours or so again.
16) Disassemble lego box.
17) Separate mold halves. Be careful. They might stick some. If you didn't get enough petroleum jelly they might be stuck. Maybe you could rescue that with some careful knife work? Depends how bad it is. There is a method to making molds where you cast one big block mold then cut it into a two part mold, but seems unlikely to work with these fiddly tiny bits.
18) Remove the bits & sprue and examine the mold. Cool!
19) Using a super sharp knife remove any little bits of silicone you don't want in there. Might be a bit of flashing type stuff in a few places. Remember you aren't making another mold half now though, unlike in step 10, so whatever you remove is going to be part of your casting. Should be very little of this though.
20) With a super sharp knife cut channels for resin to enter and air to escape or clean up any channels you molded in. Just little V shaped grooves. Try not to cut to much deeper than you want, but it doesn't have to be perfect. Lots of images of roughly how to do this. You can also take a look at a finecast model for tips. Basically you want to try to get a channel into any "diving bell" type geometry, and out of the end of any dead end. The channels for air escape can all connect together into a channel which runs out the top or side of our mold someplace (not inside the resin reservoir!). Just try to envision the resin pouring down the little tubes and air being pushed out and where a bubble might form. The resin channels I tried to make close to 1mm in diameter. The air ones can be really thin, but you want to make sure they are actually open channels. You can cut into just one mold half or both. I did a bit of both because some bits were easier to cut into one side or the other, but most of my air channels were all in one side. Would be a bit tough to make sure they were lining up perfectly.
21) Dust the mold halves with talc (baby powder). Knock off the excess. People say it helps the resin get into the details and tend to cause small bubbles to be internal rather than at the surface. I didn't try it the other way, but had no surface bubble problems so perhaps it did.
22) Put the mold halves together. Secure them somehow, but gently. My molds ended up being about 1 inch thick, 1.5 inches high, and 1.5 inches wide. Fit 2 guns in one mold and for close combat type weapons in the other. I secured them with a rubber band which was the right size to hold them together, but not squeeze them out of shape.
23) Assemble resin supplies. Resin parts, mixing vessel, stir stick, garbage bag, paper towels to clean up, chemical stopping gloves (not latex, latex is porous and is not good protection against chemicals), I used a cardboard box lid as a disposable surface to do the operation on, a small syringe is useful, could probably get by with a disposable spoon. I did this outside. The resin chemicals are fairly nasty.
24) The next steps you want to do quickly. The resin (at least the kind I have) starts increasing in viscosity in only a minute or two, and the more fluid it is the better.
25) Mix the resin (I was using smooth-on resin from their kit... kind of which I had a slower curing version). Go ahead and mix a bit more than you need, the amounts I was using were so small (probably less than 2ml) that it would be difficult to measure them out without real tools to do so (eg disposable syringes). I think I made about 10ml each time, but at the rate I'm going I expect the resin components to go bad before I use it up anyway and it isn't that expensive ($25 for a pound of resin). Pour part A, make a mark to double the height (my cup had pretty straight sides, so I could just assume it was a cylinder) pour in part b. Stir it up with your stick (eg a chopstick). Try not to put tons of bubbles in. Try to go quick. Try not to keep the resin part containers open long and close them tight. The stuff goes off by sucking water out of the air.
26) Get the resin into the reservoir on your mold. I used a little plastic syringe left over from a bottle of infant ibuprofen. That worked very well, if you can get one. Those things can be rather expensive to just buy one at a time though. It ought to be running down into the mold. Best case you will soon see it show up in the vent holes as it has gone all through the mold. However most likely there are still bubbles in there. You might even see some trying to get out of the resin channels or air vents.
27) Gently squeeze the mold to coax those bubbles up and out. Add resin as necessary if more is going into the mold. With this size of mold the whole thing is still rather flexible, but the bits are so tiny that the resin and bubbles get trapped very easily. I did this out of desperation on seeing those bubbles, but it worked fantastically. You will see the resin get gooier and gooier.
28) Wait a good hour or two for the resin to harden. You can demold much quicker (15 min for the resin I'm using), but the castings are fairly bendy. If you wait they will get much harder and won't bend.
29) Carefully peel off a mold half and extract your castings. Look for bubble problems, see if maybe some of your vents/channels aren't working well enough.
30) Do more castings! It is likely that the next few will work a bit better as you can go quicker having just done it.
31) Put everything with unpolymerized resin parts in the garbage bag for disposal. If there are a few items you want to reuse (I'm reusing the syringe) you can often pop the resin off once it is hard... or just leave it. But any such item should be considered contaminated. I'm keeping all this stuff in a box in my garage.
32) Let it sit even longer to really really finish hardening. Mine seemed still slightly bendy until I left them all day/overnight. Hard enough to demold and to hold their shape, but maybe not quite good for cleaning them up.
33) cut off flash/channels/vents
34) sand seams underwater (to catch the dust)
I was really surprised at how well this worked. Good castings of the guns first try, the swords & soforth took two tries (more bubble problems).
Makes no financial sense, probably cost me $80. But it was fun and I have only used about 10% of the rubber and resin so far.
19148
Post by: Aerethan
Dahl Corp. wrote:Hey BLACKHAND
Would casting tank treads be impossible? Also i heard from people that white resin isn't good for detailed pieces.
I think you misunderstood the white resin bit. The problem with white resin is that the details don't show up in pictures or much to the naked eye even though they are there. A simple wash with a black ink or wash will show all of the detail so that pics will be clear and it makes it easier to see if there are any bubbles or defects. The resin itself(in my case Smooth Cast 305 from Smooth On) picks up detail 1:1 with the original.
42508
Post by: Dahl Corp.
BLACKHAND wrote:As long as you designed the back of the tank tread to be flat it would be simple to cast. And as for white resin not taking detail I have never had a problem, couple of tips though.
Pour the resin as soon as it is mixed, letting it sit for more than 10 seconds or so will lower the viscosity a lot and it will not reach the crevices of the mould or allow trapped bubbles to release. At least this is the case with the quick curing resin I use.
Always dust your moulds with talc powder, the granules force bubbles away from the surface of the cast so that they rise to the top (the flat edge which in a tank tread will be hidden). just shake a bit of talc in the mould then blow it out making sure the talc isn't trapped in corners.
Hope this helps, post some pics of the treads if you do them!
Thanks for the tip Blackhand!
19931
Post by: BLACKHAND
Wow, nice breakdown Cosmid thanks for posting!
@Aerethan - Hey your still watching! And yeah I always need to wash my bitz before I post pics on Dakka.
@Dahl - No worries!
42508
Post by: Dahl Corp.
aerethan wrote:Dahl Corp. wrote:Hey BLACKHAND
Would casting tank treads be impossible? Also i heard from people that white resin isn't good for detailed pieces.
I think you misunderstood the white resin bit. The problem with white resin is that the details don't show up in pictures or much to the naked eye even though they are there. A simple wash with a black ink or wash will show all of the detail so that pics will be clear and it makes it easier to see if there are any bubbles or defects. The resin itself(in my case Smooth Cast 305 from Smooth On) picks up detail 1:1 with the original.
Oh I see now
30785
Post by: Styrofoam04
BLACKHAND wrote:
Always dust your moulds with talc powder, the granules force bubbles away from the surface of the cast so that they rise to the top (the flat edge which in a tank tread will be hidden). just shake a bit of talc in the mould then blow it out making sure the talc isn't trapped in corners.
Hope this helps, post some pics of the treads if you do them!
Hey BlackHand, do you use a release agent? or does the talc powder do that for you? or both?
I normally use Ease Release 205
19931
Post by: BLACKHAND
The Pinkysil I use is really flexible and I can twist and flex the mould to pop out the resin.Part of it may be because the Easycast resin is made by the same company to specifically work with it.
That said the Talc powder does seem to create a surface to the resin which separates well.
I used to worry when I used release agent that it was going to obscure details by pooling if I sprayed on too much, has anyone ever experienced this?
30785
Post by: Styrofoam04
See thats why I was asking I find i get alot bubbles and lose some tiny detail when the release agent pools.
I just worried about the mould, if I dont use the release agent.
if what you say is true about talc powder that that should reduce my bubbles
19931
Post by: BLACKHAND
I found my casting changed drastically once I started using Talc, I went from spending hours GSing voids and bubbles to getting about a 90% success rate on my casts, the 10% failures where pretty much pouring the resin too late and losing viscosity or not suqeezing the mould to dislodge bubbles from tricky overhangs.
When it comes down to it, reducing the lifespan of your moulds by a few pulls is worth doing if your casting success rate goes up.. if that makes sense
1021
Post by: AesSedai
I've used both talc or release agent or talc and release agent together.
I didn't like the results with just talc. It made the surfaces a tad grainy. Mould release works best, just a thin film works wonders. I use it primarily to exend the life of a mould by preventing the resin from leeching oils from the silicone. It's a little expensive, but it goes a long way.
@ Blackhand -- how do you deal with the resin fumes after mixing in the catalyst, while pouring. It feels like 1-2 minutes of noxious death. I'm ordering a 3m respirator for my airbrushing, I think it may be something to use for casting too.
19931
Post by: BLACKHAND
@AesSedai - I havn't had a problem with resin fumes at all, what products are you using?
Again, because the products I use are designed to work together (I don't get paid to plug them by the way, honest!) I havn't noticed a degredation of the silicone due to the leeching by the resin, but it may also be the limited number of casts I am doing.
The eayscast I use is a 1:1 mixture not base:catalyst so that might be why yours produces fumes where mine doesn't, not sure?
But hey I am so desensitised that I don't even where a mask when I sand resin, will probably come back to haunt me though....
19148
Post by: Aerethan
If you are using SILICONE rubber molds, then no release agent is needed. If you are using URETHANE molds, then you need a mold release. Keep in mind this is strictly for resin. If you are casting dental plaster or the like, then no mold release is ever needed as it's a water based cure.
Smooth Cast does not give off any fumes at all. I cannot comment on other products as I stick to what works for me.
If you are using Oomoo(a Smooth On product that is a 1:1 mix RTV silicone rubber) and Smooth Cast products such as Smooth Cast 300 or 305 then all will work well right out of the box.
If your resin involves fumes, I'd look for a new resin. But that's just me.
I'd also add that I haven't once covered my face when working with resin or rubber. I'm smart enough to hold my breath if I'm sanding or sawing resin.
1021
Post by: AesSedai
Whoa, your resin doesn't produce any smells? Are you serious?
I too have only used 1:1 compounds. Resin and hardener. I called the hardener a catalyst but that might not be the correct term. I'd like to link some products but, I can't pull up good websites do to searching in English for Japanese products. I have been using basic polyurethane systems.
I have used multiple kinds of resin. Each compound has smelled like toxic death post mixing. In the case of a very rare soft cure, the smell lasts more than a year.
Blackhand wrote
But hey I am so desensitised that I don't even where a mask when I sand resin, will probably come back to haunt me though
Dude, please don't take gambles with your health. You and aerethan are my resin casting heroes, so don't develop respiratory problems, okay? Masks are cheap.
aerethan wrote
I'm smart enough to hold my breath if I'm sanding or sawing resin.
Those dust particles are light and stay suspended in the air for a a minute or two. Then they settle on surfaces and get kicked up into the air again. Eventually, they are sucked up one way or another. Vacuum or nostrils. You can sand in a tub of water or you can wear a mask. aerethan you beast, you airbrush too! You must have a mask already, don't you? It's a 20 dollar investment for peace of mind/convenience (you can take a breath now) at the least and a sensible health precaution at best.
19148
Post by: Aerethan
I don't use a mask for airbrushing either.
26245
Post by: cosmid
I didn't notice any smell but I did the casting and one hour cure outside to avoid any fumes... and I was using very small amounts.
If I didn't get a hard cure I would throw the castings away. Don't want unpolymerized plastic seeping out.
Sanding in water was very easy.
1021
Post by: AesSedai
Yeah, I think I'm going to do all my sanding in water from here on out.
In the case of soft cures, I keep one example to see what would happen over time. For educational purposes only.
19148
Post by: Aerethan
I've found soft cures to be a result of an improper mix. I had this issue with a batch of what I assure you were NOT illegal combi meltas.
I'd be fine with sanding in water, but as my main source of casting these days is bases, it doesn't come up often.
And I also tend to use an xacto knife for some 99% of my mold line cleaning. The only thing recently that kicked up some dust was adding slots to some bases for my phoenix guard.
19931
Post by: BLACKHAND
Ok AesSedai, Ok! I will start sanding underwater already!
Honestly I hate masks because they always seem to fog up my glasses but sanding a bowl of water is not too much of a hassle so I will endeavor to do it in the future.
And yeah man I really can't imagine having to put up with fumes during casting, I would look for new products as there are definitely ones out there that don't have such a nasty byproduct.
43225
Post by: Nightfall
THANK YOU ALL MIGHTY SAGE!!
19931
Post by: BLACKHAND
Thanks guys, I think I speak for all the tipmasters who have posted advice on this thread when I say "just glad to help!"
26386
Post by: hungryp
A little late to the talc-talk, but using Smooth-On in an Ooo-Moo mould, I found that although it's not necessary, it does help to get into smaller areas, especially pointy bits like noses. You also have to be very careful to get all the excess talc out of said area before pouring though, or it will only make things worse by blocking the resin from filling in.
19148
Post by: Aerethan
This thread is easily my favorite here on Dakka. The possibilities for what you can do are endless. With minimal sculpting I've made custom bases for my High Elves that I'm able to mass produce and with enough variation so that every model appears unique in it's own unit. This is only the tip of the iceberg however, as once you have the basics down you can move on to producing things like custom torsos, weapons, upgrades etc. This is the only thread beside airbrush advice where I'm not a negative person in some way. IMO every person in the hobby should have the capacity for casting and an airbrush. Glad to be of help in this thread.
19931
Post by: BLACKHAND
@Hungryp - Never too late to add a comment bud, and yes Talc has been the singlemost important tip I have ever come across, it saves sooooo much time in filling voids and bubbles with GS.
@Aerethan - Glad to see you are still watching! I have to say it's been good to have more than one caster contributing advice and suggestions to the thread, wouldn't have been the same without you bud!
1021
Post by: AesSedai
I totally agree with you Aerethan. Casting and airbrushing definately add another dimension to this hobby that we all enjoy. Eventually, when my sculpting skills progress enough, I'll be able to produce whole custom armies. I am so psyched to begin airbrushing later this month too.
More to the point, I think every hobbyist of average ability and means can cast resin bases for every figure they have. Airbrushing as a skill can eventually develop into something jaw dropping, however I think that the abovementioned average hobbyist can learn to lay nice thin, smooth basecoats and prime models without really too much of a struggle.
43225
Post by: Nightfall
thanks for this/ It will make my shoulder pads much easier to put on the Shadow Legion symbol
40803
Post by: theQuanz
How would you do something like a helmet or torso?
19931
Post by: BLACKHAND
@Nightfall - Thanks and good luck!
@the Quanz -I cut the neck of a helmet/head flat and glue it to a base plate, I then pour the silicone over it and once it sets pul it off. You will then have a mould where you pour the resin into the necks of the helmets/heads.
For torsos I would do a front and a back as separate pieces in the mould and glue them together after casting.
19148
Post by: Aerethan
Generally 2 part molds are used for torsos as you generally need to fully envelope the piece to get all the detail properly. Keep in mind that creating and casting from a 2 part mold is easily 3-4 times harder than doing single side mold pieces.
If the torsos are relatively cylindrical in shape then they can be molded and cast in the same manner as single mold heads, where the resin is poured into the bottom of the torso.
19148
Post by: Aerethan
My secret to pouring resin in precise amounts is to use 10ml syringes. This works wonders on 2 part molds as it adds some pressure to the pour, and for single side molds it allows you to precisely add or subtract resin so that you get flush bases every time.
Syringes run maybe $.10 a piece and if you are using a longer pot life resin like Smooth Cast 305 then you can get alot of casts done with the same syringe before it's no longer useable.
1021
Post by: AesSedai
Syringes to add, I knew about. I hadn't considered syringes to subtract. Could save some sanding time. I wish I had access to the breadth of products you all have.
19148
Post by: Aerethan
Ebay my good man. That is where I got the syringes at least. I'm sure there is some Japanese site that sells them.
36940
Post by: Anvildude
So what's this about Talc keeping bubbles from forming? I've got a custom base with a few spires in it, worried about the bubbles.
19931
Post by: BLACKHAND
Dusting the mould has helped immensely with bubbles in my experience, it may alter the finish by adding a slight grain to the resin but this is immediatley hidden by paint.
Just shake a small amount of talc into the mould, swish it around and blow it out, make sure to get it out of the recess completely and you should find an immediate improvement
20677
Post by: NuggzTheNinja
AesSedai wrote:Syringes to add, I knew about. I hadn't considered syringes to subtract. Could save some sanding time. I wish I had access to the breadth of products you all have.
Sometimes you can get oral syringes for free from the pharmacy. They give them out with prescriptions for younger children so they have a lot on hand. The CVS by me is staffed by a very homely girl who always caves to a little flirting. Be creative.
46087
Post by: yamgrenade
Nice Tut, Thanks very much!
5394
Post by: reds8n
Several posts have been deleted from this blog. Users are reminded that whilst showing casts of ones own models and sculpts is fine, we do not allow or support the illegal casting of the works of others on this site. Such posts will be removed and persistent offenders will lose their posting privileges on this site.
1021
Post by: AesSedai
Hey Reds8n, could you go into more detail regarding dakka's policy? I hadn't considered that posting a picture of what appeared to be recasts, which someone else had taken a picture of for another site, was a violation of dakka rules.
To be fair, I have seen very detailed guides on dakka (with pictures no less) on how to recast GW parts. Some of which I can still access on this site easily. Whatever the policy, it seems that there are some telling inconsistencies in how it is enforced. Please excuse my confusion. In another ongoing thread, you have people saying things like "I recast GW products and I know it's wrong, but I don't care". How is allowing such posts to remain uncensored not contrary to your position. I don't like grey areas when bans are being threatened. I will of course remove myself from any discussion on the topic of casting to remain on the safe side.
Blackhand, please forgive me for bringing the heat into your thread.
5394
Post by: reds8n
AesSedai wrote:
To be fair, I have seen very detailed guides on dakka (with pictures no less) on how to recast GW parts. Some of which I can still access on this site easily.
Please flag/report them and if they breach the rules and they'll go.
Whatever the policy, it seems that there are some telling inconsistencies in how it is enforced. Please excuse my confusion. In another ongoing thread, you have people saying things like "I recast GW products and I know it's wrong, but I don't care". How is allowing such posts to remain uncensored not contrary to your position.
I don't see how allowing people to express their opinions or beliefs on a subject is contrary to us not allowing how-to guides and the like on this site. To this end, pictures of illegally cat models shown for the purposes of " look how cool this is" and the like aren't appropriate.
1021
Post by: AesSedai
What if the (re)caster lives in Korea, China,Thailand, Taiwan, or Singapore for example?
Illegally cast models? Whose laws?
To this end, pictures of illegally cat models shown for the purposes of " look how cool this is" and the like aren't appropriate.
If I posted pictures of some recasts, slamming them for being of shoddy quality, would that be okay?
60
Post by: yakface
AesSedai wrote:What if the (re)caster lives in Korea, China,Thailand, Taiwan, or Singapore for example?
Illegally cast models? Whose laws?
To this end, pictures of illegally cat models shown for the purposes of " look how cool this is" and the like aren't appropriate.
If I posted pictures of some recasts, slamming them for being of shoddy quality, would that be okay?
In general, recasting of copyrighted models is illegal and therefore we frown upon the posting of content that would help guide others towards breaking the law.
The posting of information and guides on how to recast your own works is perfectly fine and acceptable, but the moment you bring copyrighted works into the mix then it becomes unacceptable.
Not only would allowing such material to remain on Dakka place us in potential legal hot water that we are not interested in being in, but it also goes against what the owners of the site (myself and Legoburner) personally believe to be morally acceptable, and therefore is not something we want on Dakka.
If you are unsure of whether or not something you are interested in posting on the subject will be acceptable or unacceptable, please feel free to PM any mod before posting it and they can give you some guidance on the matter.
1021
Post by: AesSedai
That is crystal clear. I get an inordinate amount of enjoyment from this site, so I'm not interested in rocking the boat. The topic of casting is full of snags, I'll just err on the side of caution and stick to less muddy waters.
Thanks for the clarification guys.
19931
Post by: BLACKHAND
@AesSedai - No worries at all bud, your post was not malicious and I know you just sharing something you had seen and getting some feedback. TBH Me or some of the experienced casters should have thought about it more and suggested that it be removed, my bad
@reds8n & Yakface - Sorry fellas! Had no intention of advocating recasting GW parts, no matter how I feel about them as a company ( I live in NZ ) I will endeavor to be more vigilant with the pics that are posted on the blog.
This does help explain people, why I don't have a large amount of actual pics or a tutorial for a two sided mould up on here. While I am happy enough to cast a shoulder pad that I need 60 copies of or a bunch of custom bases that I designed I rarely have a use for two sided moulds except for making copies of a whole model or a weapon.
I have had this question asked of me dozens of times, "Do you have any tips for casting a Melta/splinter cannon/shoota etc?"
And my answer is the same every time. The amount of time (and your time is worth something!) and money for materials spent on casting a weapon is far better utilized on a bitz site or ebay. You will end up with a far nicer product, a cleaner workspace and a happier wife/girlfriend/mother/alternate life partner!
Casting in resin is really only cost/time effective for custom built, hand sculpted parts that are mindnumbingly boring or hideously intricate to produce again by hand.
Trust me, I have tried casting everything under the sun and even I now scrounge the internet for bits before I turn to resin.
Rant over, continue with the questions!
19148
Post by: Aerethan
I agree 100% with Blackhand. Resin casting is tricky work and there is a steep learning curve that costs time and money to overcome. Certainly not worth doing if you are just trying to save $50 on a certain bit.
For every one of my casting projects I look at cost of time and materials versus just buying said item. My High Elves bases for example. The mold was very simple, and casting them would be easy and virtually free of miscasts. So I sculpted 3 unique bases(giving me 12 total facing options) and made the mold. This was worth the time as I needed about 100 of them which IF I had found ones I liked that were already made would have cost me about $140 from a site like Micro Art Studios. My total investment since I know what I'm doing was only about $15 after rubber, resin and casting costs(cups, syringes etc.).
Now keep in mind that the learning curve for 2 part molds to do things like 40k weapons properly is easily 3-4 times harder than single side molds and you watch your cost of learning go up dramatically over wasted resin and rubber.
Yes, I admit to recasting, BUT I do not post public pics of that work, nor do I outline how to do it, which is why I haven't posted here about how to do 2 part molds as I don't have any personally sculpted stuff to demonstrate this with. And trust me when I say that if I could simply find some 6th edition Empire infantry for sale that I'd much rather buy them than recast them as making 100 decent full body casts is a daunting task when they are multi part models.
Hopefully I will pick up this Mangler Squig commission for casting an original sculpt and if so I will post a 2 part mold tutorial then.
115
Post by: Azazelx
Firstly, great thread guys. I'm hoping to put together some custom bases in the next few weeks once I order in a bunch of supplies.
aerethan wrote:Ebay my good man. That is where I got the syringes at least. I'm sure there is some Japanese site that sells them.
Where on eBay? I've just had a look and under syringe there's lots for like $2 a pop, or novelty syringe-shaped pens. Can you PM me a link to your seller?
thanks!
25069
Post by: Toban
hi all guys.
I'm in trouble.
I've searched a way to buy the pinksil and easycast combo at human prices but it looks at something impossible for an european citizen.
The price of the products aren't really problematic, the shipping, inevitably by express courrier, just insane.
I would still like to make some experiment at home so I'm here asking you if someone have all ready used and tested these following materials:
Smooth-On - OOMOO 25 Silicone Rubber (mold material)
Smooth-On - SMOOTH CAST 305 (resin)
I all ready found a lot of retailers close to me, one even really close to me (even if they doesn't replyed to my e-mails due to August vacations).
My questions are:
Have you found these products worth? Some counter-indication?
Besides, had been you forced to use a release agent?
I would really like to find a combo of material that wouldn't need it. Just like pinksil and easycast.
I really need your help, I've too much projects waiting on the desk.
Thank you, Ivan.
39783
Post by: theunicorn
the smooth on products you listed will work great, as an added bonus I think that both of those are self de-gassing which means fewer airbubbles in th emold and resin pours
17244
Post by: The Good Green
I don't usually comment on tuts, but I have been thinking more and more about doing this. Thanks for making a very straightforward set of instructions.
19148
Post by: Aerethan
I use Smooth Cast and Oomoo for every casting project I do. They work wonderfully.
19931
Post by: BLACKHAND
@thegoodgreen - Thanks!
@theunicorn & Aerethan - One of the questions Ivan asked me in a PM was do the Smooth On products need a release agent.
Is this something that is necessary?
25069
Post by: Toban
Thank you Blackhand, I were ready to ask the same thing.
In fact, not being exactly an expert I would like to start with some "easy" products. Something that in fact wouldn't need too much pro-touches.
2 bi-component material that I could use without nothing else would be perfect.
If Smooth-on products unfortunately need a release agent may you name me something else?
39783
Post by: theunicorn
I would recommend a release agent with just about any of the resin&silicon products. if you are making a 2 part mold it is critical, if making an open pour mold like for custom bases it is still highly recommended. Most distributors that carry smooth on will have release agents (cheap).
http://www.smooth-on.com/Release-Agents-and/c9_1123_1226/index.html?catdepth=1
45990
Post by: gilljoy
Anyone know a good place to get some casting supplies in the uk?
Want to cast a few custom bases im going to scupt for my grey knights army
19931
Post by: BLACKHAND
TBH Ivan I think Theunicorn is right, nearly all products need a release agent. Even with the pinkysil I use talcum powder, and used sparingly the release agent will not effect the detail of the casts.
Think of it like spraying cooking oil on a baking tin before you bake a cake, its that easy.
@Gilljoy - Check the OP, I beleive there is a uk supplier of casting products that was suggested by another Dakka user.
19148
Post by: Aerethan
Oomoo and smooth cast require no release agent.
Silicone RTV doesn't generally need it, whereas Urethane RTV does.
And talcum powder is always recommended.
19931
Post by: BLACKHAND
Cheers, Aerethan!
25069
Post by: Toban
Well, you already helped me a lot.
During August I will certainly, finally, start one of my projects. I mean, seriously.
For the moment, starting from little things, I will try with just a little amount of talcum powder. Trying bigger pieces, I will eventually try a spray release agent.
Now it's time for the second question.
Does you know a TRANSPARENT resin that will work with OOMOO silicone molds? This is, of course, another important part of this project.
39783
Post by: theunicorn
http://www.smooth-on.com/Urethane-Plastic-C/c1120_1156/index.html
read the info on the page, this stuff has hazardous fumes and a much longer cure time, also it uses a differnent grade depending on the thickness of the cast.
25069
Post by: Toban
wow.. thank you.
I don't really mind about hazardous fumes 'cause I alwais work in a very very good ventilated area. Almost outdoor thanks to the Italian clima.
By the way, you that for sure are better chemistry connoisseurs, may tell me if about what explained in the product page it could be compatible with OOMOO molds?
http://www.smooth-on.com/Urethane-Plastic-C/c1120_1156/index.html
Sry guys but really I never liked chemistry... and I alwais had a lot of very beautiful girls at school..
19931
Post by: BLACKHAND
Toban wrote:
Sry guys but really I never liked chemistry... and I alwais had a lot of very beautiful girls at school..
Dude, that is not something that you need to apologize for
In my experiments with clear resin I have had some fantastic success and some very ho hum results, just be patient and perhaps leave the cast in the mould for a while longer than suggested so that you know it is definitely cured before you pull it.
Oh and when you have some stuff cast make sure to link to your P&M blog (and you had better make one!) so that we can all see what you have done
25069
Post by: Toban
I'm waiting for materials.
I already have 1 multi-part hull almost finished for the reproduction, some little accessory, marines open hands, left shoulders etc.
I will certainly try to start taking pictures now, with most of things still in the w-i-p process.
As I already mentioned in our PM Blackhand, you're gonna see something I hope original in the 40k re-interpretations ideas.
Thanks to you all for the precious informations about casting and materials combos. I will certainly keep you on touch once I'll put on-line some pics.
Ivan
PS: in the same time I would like to try Istant Mold for some little, tiny, cilindric kind of stuff like weapons etc.
Someone of you had already tryed it out?
On youtube there's a video from the cmon page. Apparently the guy could replicate a sword amazingly easy.. any feedback?
39783
Post by: theunicorn
Toban, check out my blog in my signature. I have a instamold review and quick tutorial. Alot of people have said it waas helpful.
26386
Post by: hungryp
Not to discourage you, aerethan, since you've been a great source of help here in this thread, but there is a pretty good article here on Dakka on 2-part molds: http://www.dakkadakka.com/wiki/en/Simple_Two-Piece_Mold_for_Casting_with_Resin
It would be good to see your take on it though, not to mention seeing this Mangler Squig you speak of. Just figured it could tide some beginners over until then
12271
Post by: JB
gilljoy wrote:Anyone know a good place to get some casting supplies in the uk?
Want to cast a few custom bases im going to scupt for my grey knights army
Most of the UK casters have mentioned a place called Tomps.

20739
Post by: Lennysmash
Yes Yes and Yes. Tomps is the place to go. The chaps answered all my questions and really took the time to understand not only what I wanted or was looking for but also what my expertise was. This for me was great as a first time caster, the sales guys actually found me cheaper alternative products and didnt force the upsale.
Great chaps, check them out!
44654
Post by: Lone Cat
I'll keep checking the local providers for a brand of silicone so I can make a mold for my future terrain projects =^.^=
but lemme check the pricing please =^.^=
45990
Post by: gilljoy
Bit of a thread necro.
But I've been recommended this place
http://www.sylmasta.com/acatalog/Casting_Kits.html
19931
Post by: BLACKHAND
Never feel bad for necro-ing this thread, we can always use more hints and tips!
I've added the site to the OP
45990
Post by: gilljoy
BLACKHAND wrote:Never feel bad for necro-ing this thread, we can always use more hints and tips!
I've added the site to the OP
Hopefully its useful to someone. I'm just ordering up the stuff I need to cast my rough-rider's legs I've converted. Be handy for making new guys
5394
Post by: reds8n
In circumstances like this a bit of necro is fine
12271
Post by: JB

BlackHand, can you add Alumilite to your OP? They are a US company based in Kalamazoo, Michigan.
I used their starter kit for my casting tutorial. It's not as good as using silicone rubber molds but is easy for beginners and readily available in US craft stores.
I will also put a link at the bottom of the article back to this thread since some readers might see the article before they see this thread.
Looking forward to more casting updates. Please post (anyone) if you have done something recently.
49738
Post by: Fewk
holy gak nice onw
19931
Post by: BLACKHAND
@Red8n - I figure this thread will get necroed every few months for a fair long while!
@JB - OP has been edited with the link, thanks for that, oh and bloody nice tutorial too
@Fewk - Cheers!
47319
Post by: RebelThunder
thanks for this tutorial.
I checked local shops for the resins and silicon but to no avail. will try my luck online.
|
|