| Author |
Message |
 |
|
|
|
|
Advert
|
Forum adverts like this one are shown to any user who is not logged in. Join us by filling out a tiny 3 field form and you will get your own, free, dakka user account which gives a good range of benefits to you:
- No adverts like this in the forums anymore.
- Times and dates in your local timezone.
- Full tracking of what you have read so you can skip to your first unread post, easily see what has changed since you last logged in, and easily see what is new at a glance.
- Email notifications for threads you want to watch closely.
- Being a part of the oldest wargaming community on the net.
If you are already a member then feel free to login now. |
|
 |
2009/05/31 17:26:27
Subject: How to build A Thunderhawk Gunship for around $25, Warning LOTS of Pictures, Free Template!
|
|

Executing Exarch
|
This post still under construction, I am just posting now so I don't lose my data if it crashes...
So you want a Thunderhawk gunship but don't feel like shelling out the $700 to get one, let alone a couple thousand for a small fleet? Join the club! Over the last couple months I have been toying around with making the best looking thunderhawk I can for under $30. Truth be told I made one for under $25! well by now I am sure you are foaming at the mouth so I should get on with the substantive part of the post...
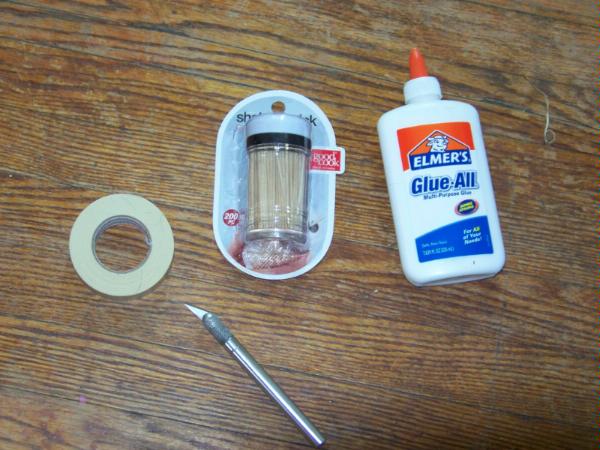
Materials and tools
PVC Glue $2
Foam board 20" X 30" x 3/16" $1.50 (for all you folks that use the metric system I will get up alternate measurements shortly after I finish the main post)
Plasti-Card
Masking Tape
Razor Knife
Toothpicks $1
4 Twin-Linked Heavy Bolters $8 (ebay)
2 Lascannons $4 (ebay)
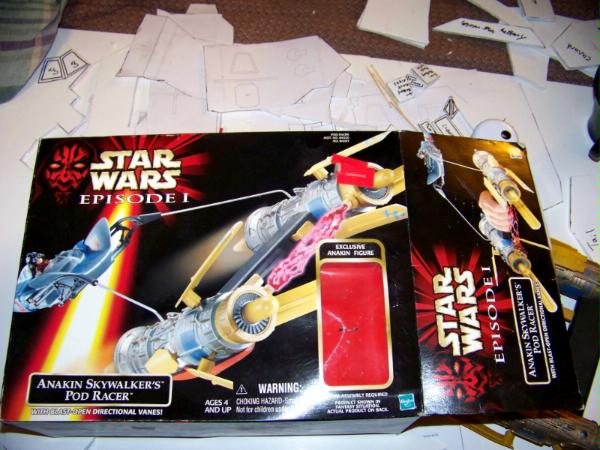
1 Star Wars Episode One -The Phantom Menace, Anakin Skywalker's podracer $8 (ebay)
1 Leather punch $5
3-4 empty Blister Packs Free
Thunderhawk Templates FREE!!! (these will be available for download at the bottom of the page as soon as legoburner gets back to me)
 Construction
Step 1:
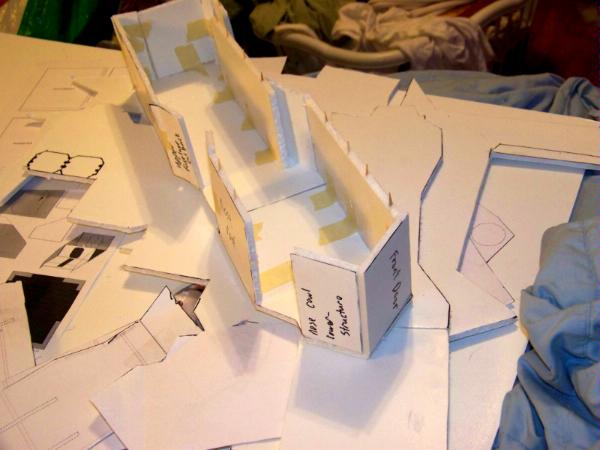
Print out the templates at the bottom of the page, and trace them on to one sheet of Foam board.
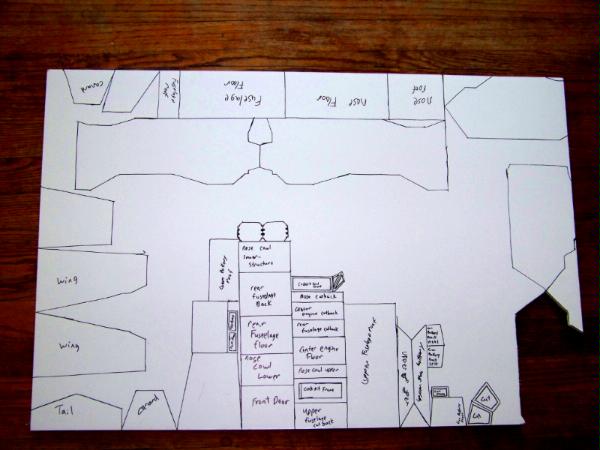
This is just a general idea of how I laid out mine, as you can see I have some pieces that did not make it into the final templates so don't copy my sheet exactly.
Step 2:
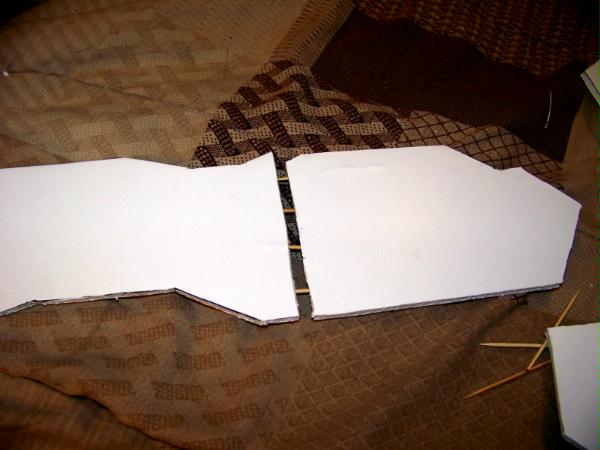
Cut out your pieces using a razor knife. I found scoring them then snapping them to be an efficient way to cut out anything with flat edges. For everything else I kept tracing the lines with the razor until I had cut all the way through.
Step 3:
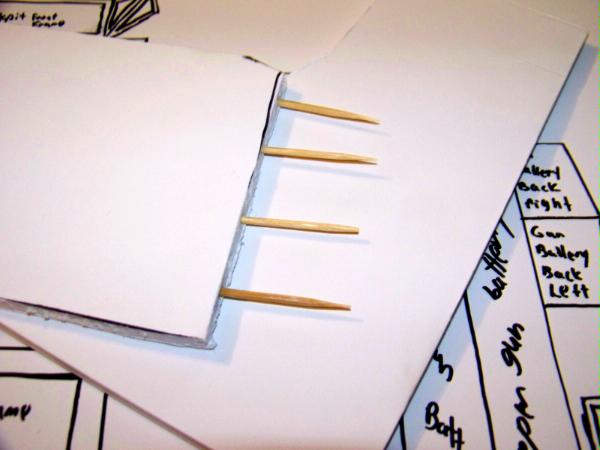
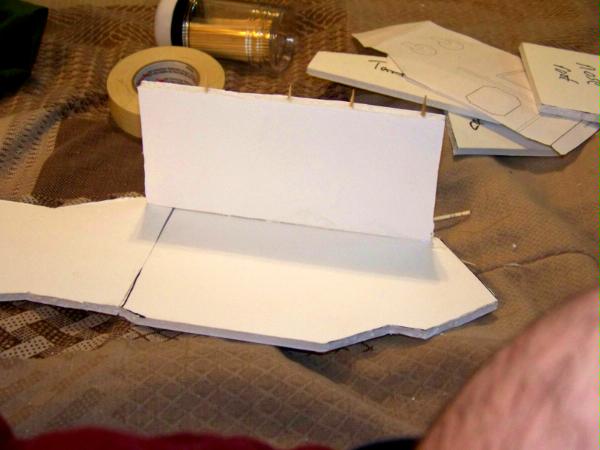
Take your two nose pieces and insert a few toothpicks in them to act as pins.
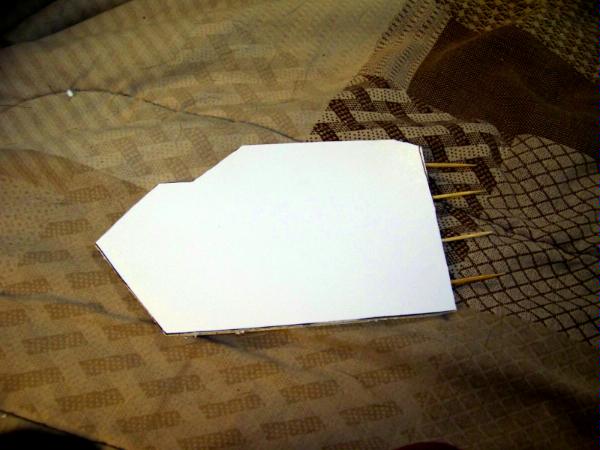
 TIP Here is were my trial and error experience will help. I used full length toothpicks that had only one sharp end. I was a royal pain in the ass trying to get the flat end into the foam. Then after I had assembled most of the model I realised that I need to cut some access points into the side of the T.Hawk, to my dismay the thoothpicks i used were so long that they blocked my ability to cut wholes in it.
My original plan was to have some internal room to store models, and maybe to detail it later in the future. Since I was an idiot and didn't break the thoothpicks in half I can no longer do that. So keep checking back, I am in the process of making T.Hawk version 2.0 with moving parts and internal structures.
Ok back on topic, here is a closer look at the pins.
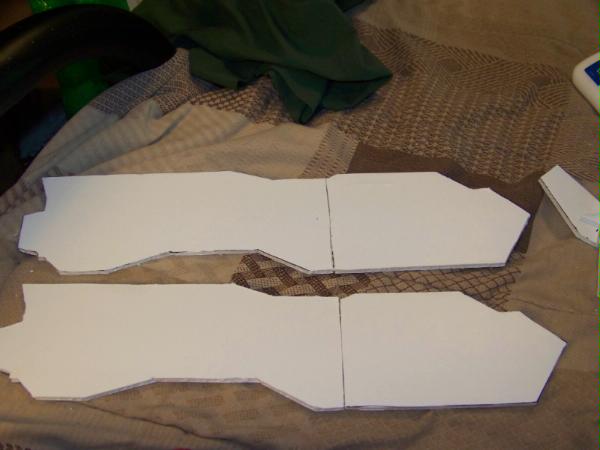
Step 4:
Next attach the nose to the body by pushing the two together, when they are about a 1/2 inch apart add a bead of PVA Glue then finish squeezing them together. If some glue leaks out just take your finger and smooth it down.
Finish both sides.
Step 5:
Now use the same pinning technique for the sides of the fuselage floor.
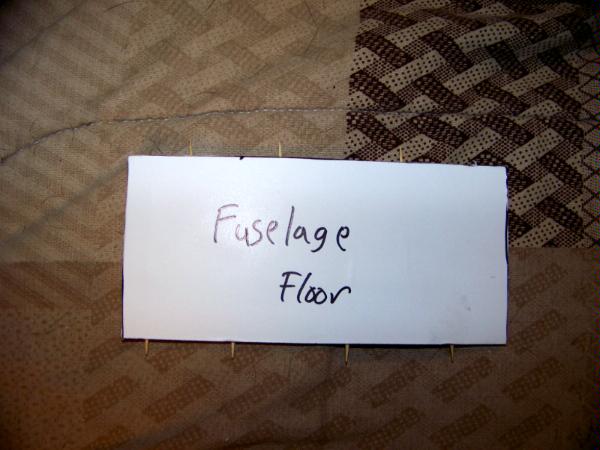
After you have that done you can attack it to one of the sides.
Step 6:
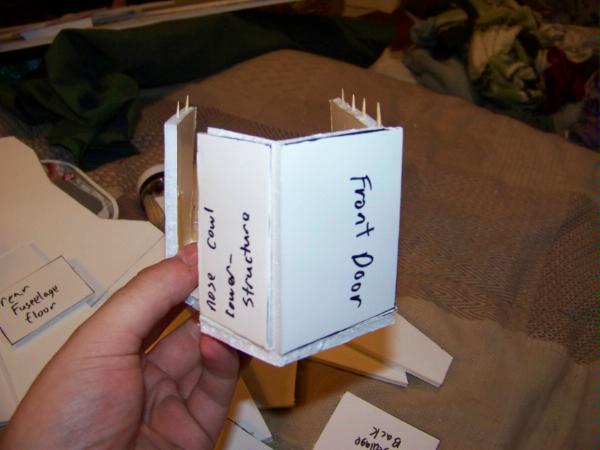
Start working your way around one side of the T.Hawk until you have the body completely done.
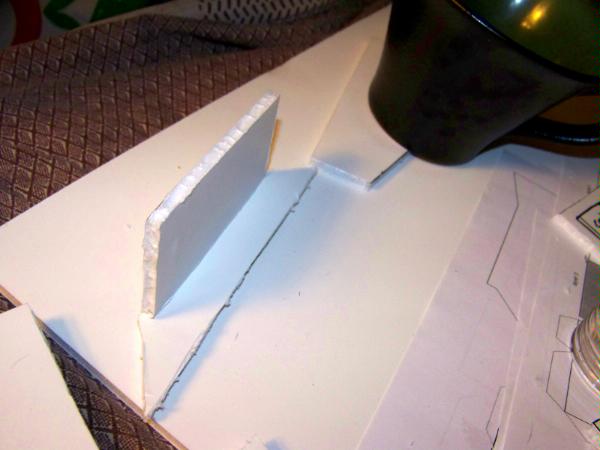
TIP Use your masking tape to hold the ship in position while the glue dries

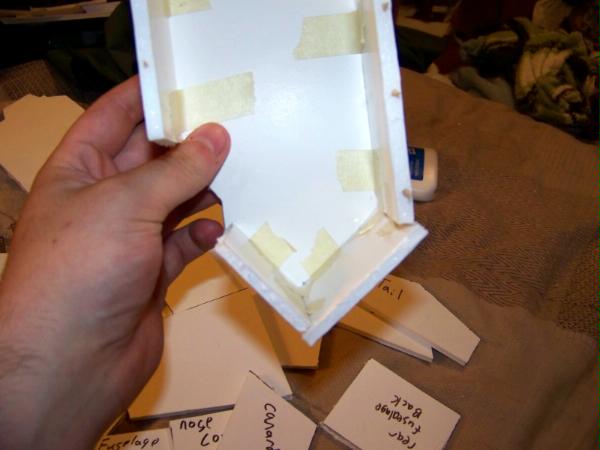
TIP When you get to an angled joint take your knife and cut into the paper about 1/8 of an inch in on one side only. Then take your knife and run it at an angle on the side of the foam, making sure the most foam you remove is closest to the edge. When you are done you should have something that looks like these.
Fast Forward an hour or so...
Tip Make sure you leave the cockpit area open, There is a special canopy that goes there later.
Step 7:
Put the other side of the body on. It will take a lot of tap to hold it in place while it dries.
Tip I originally used toothpicks in every piece to hold the side on, but I realised some of the plates were sagging, not to mention it was hard work poking the toothpicks through the paper part of the foam board. So I ended up only using the pins in the fuselage floor and tapping the rest of the plates.
Step 8:
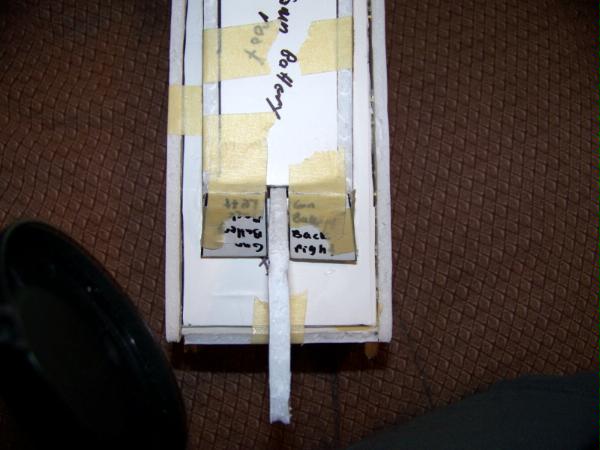
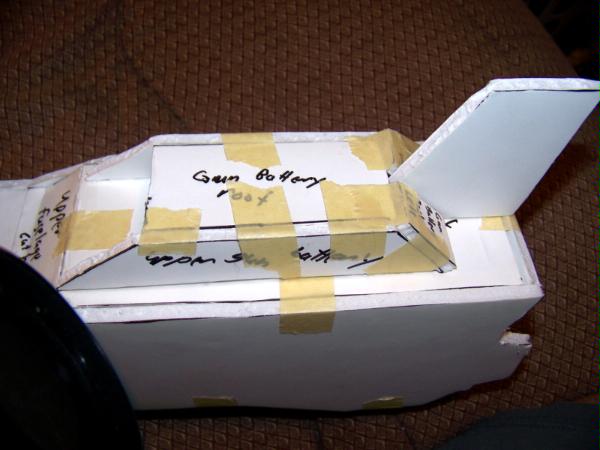
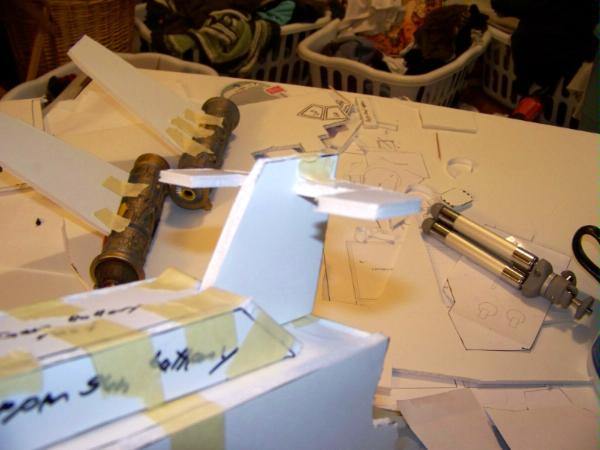
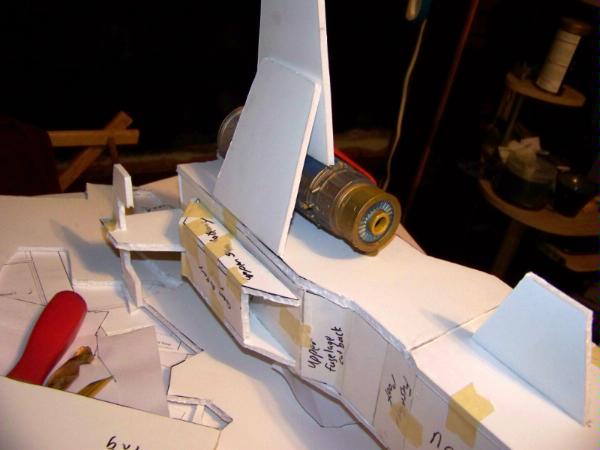
Start putting together the gun deck.
Once you get the battery built you can slide the tail piece in.
Step 9:
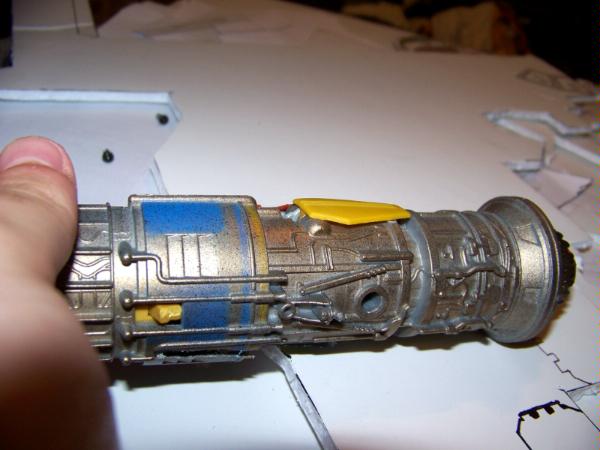
Next take your pod racer out of its box and set about cutting off the middle area.
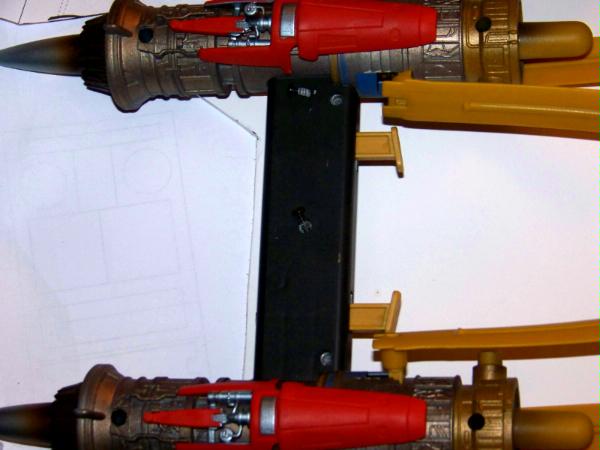
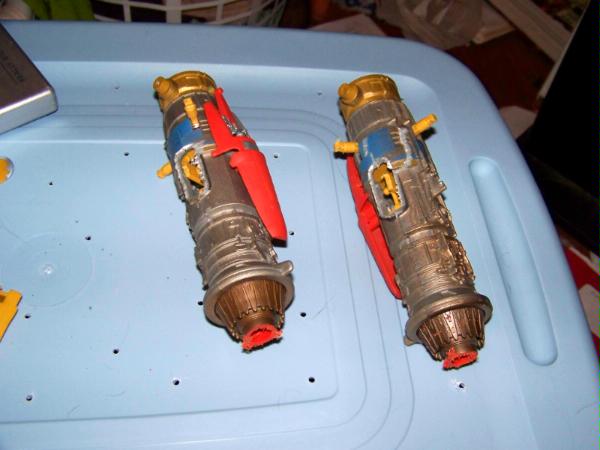
Then glue remove the tabs that stick out and glue down the one small wing, also glue the orange plating into the engine. I also removed the pointy features on the intake and outtake of the engine, but this is all a matter of preference.
After that glue the lager wing on each of them. Make sure to have the armor plating facing down, and the power cord facing in.
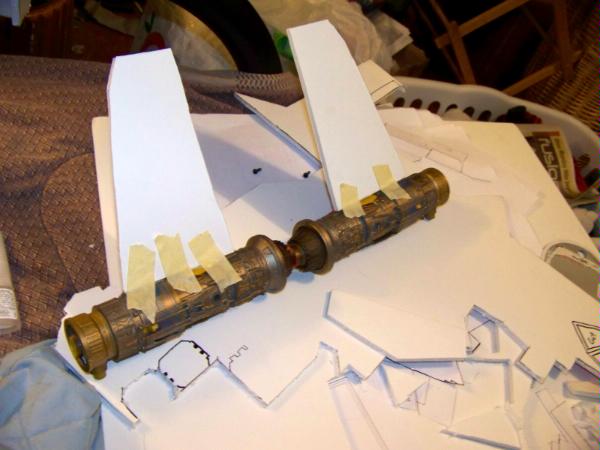
Step 10:
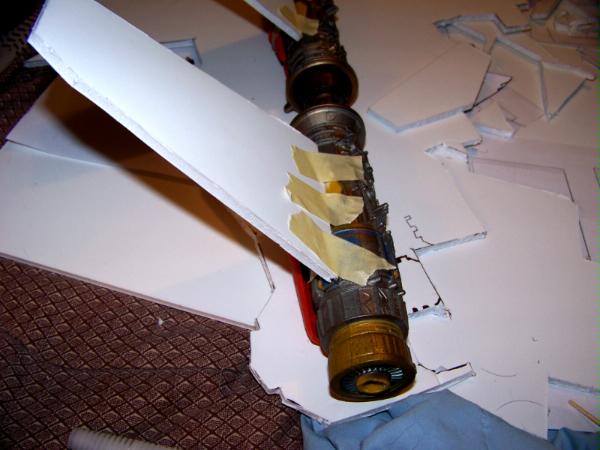
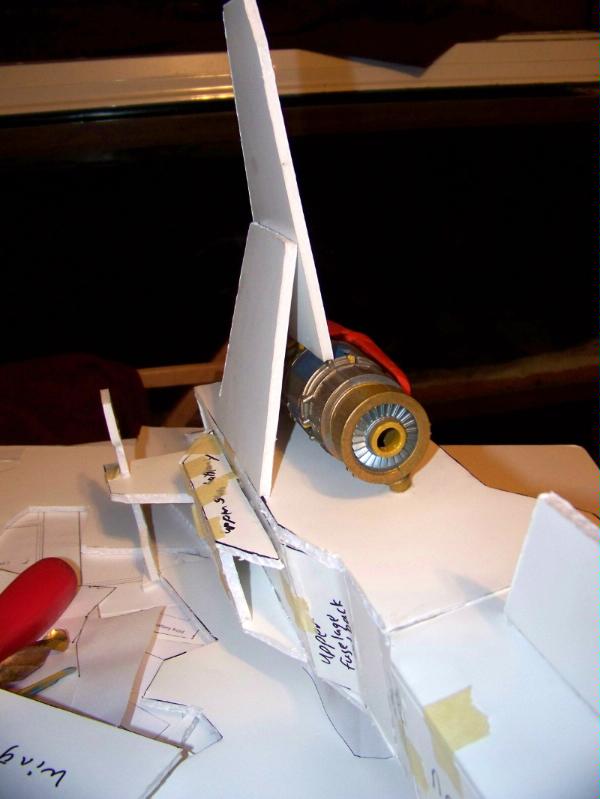
By now the tail should be dry enough to put the side parts on.
Next add the canard piece to the Nose, put them slightly higher than the midpoint of the nose. Also you can attack A single wing at a time. I found that the Wings will take at least 2 days each to dry, I am considering trying hot glue on the next one I build but I am not sure if it will melt the foam inside the paper. Any Thoughts?
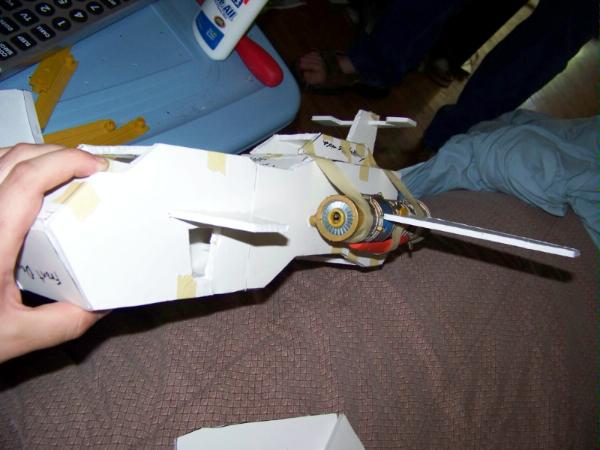
Ignore the hole in the nose here, as I mentioned earlier I messed up and figured out that the long toothpick were inhibiting my ability to make a nice interior.
Step 11:
Once the Wings are on you can glue the second smaller set of wings on. These wings can be in any position since they move when the T.Hawk is firing its Lascannons.

Step 12:
Add the weapons
Step 13:
Add the cockpit
Step 14:
Details
Step 15:
Paint
![[Thumb - thawkTemplate1.GIF]](/s/i/at/2009/6/1/1dfaeda156d51315971497d395a7b01c_9644.gif__thumb)
|
![[Thumb - thawkTemplate2.GIF]](/s/i/at/2009/6/1/62d7e6c69c2863880173bc2336211496_9644.gif__thumb)
|
![[Thumb - thawkTemplate3.GIF]](/s/i/at/2009/6/1/63b8c6b6c65c4dd89d2bae622a39ae29_9644.gif__thumb)
|
![[Thumb - thawkTemplate4.GIF]](/s/i/at/2009/6/1/edcdd3d19558829f547d4995a976ed7d_9644.gif__thumb)
|
![[Thumb - thawkTemplate5.GIF]](/s/i/at/2009/6/1/a9fd1052bf35768b9f684be0552dec1a_9644.gif__thumb)
|
![[Thumb - thawkTemplate6.GIF]](/s/i/at/2009/6/1/192c84cda39bf43887d1624d9d435583_9644.gif__thumb)
|
![[Thumb - thawkTemplate7.GIF]](/s/i/at/2009/6/1/55cb82f49ca0bc6f42cb49b35991d6c4_9644.gif__thumb)
|
![[Thumb - thawkTemplate8.GIF]](/s/i/at/2009/6/1/2d43a1cf8044c9e6c1c5fe00221db5bc_9644.gif__thumb)
|
|
|
This message was edited 12 times. Last update was at 2009/06/01 22:53:51
|
|
|
 |
|
2009/05/31 17:28:07
Subject: This post still under construction, I am just posting now so I don't lose my data if it crashes...
|
|

Kinebrach-Knobbling Xeno Interrogator
|
Cool wil do that then and good luck.
|

Follow me on Twitter too! @Jake_TooTall |
|
|
|
|
2009/06/01 04:41:32
Subject: How to build A Thunderhawk Gunship for around $25, Warning LOTS of Pictures
|
|
Executing Exarch
|
Well as soon as legoburner gets I will get the last pictures up. For some reason they are not showing up in the gallery. Unfortunately the templates are in that group. Since I imagine this is what most people want I uploading it to a another server, and will supply the Dakka link when it is available.
Thanks for waiting,
Chris
|
|
|
|
|
2009/06/01 04:54:02
Subject: Re:How to build A Thunderhawk Gunship for around $25, Warning LOTS of Pictures
|
|
Nasty Nob on Warbike with Klaw
|
It looks like a winner so far. So much for Forgeworld, eh?
|
WAAAAAAAAAAAAAAAAAAAAAAAGGGGGHHHHH!!!!!!!!!! |
|
|
|
|
2009/06/01 17:22:04
Subject: How to build A Thunderhawk Gunship for around $25, Warning LOTS of Pictures, Free Template!
|
|
Executing Exarch
|
The templates are in the rar file at the bottom of the Original Post. It was done this way at the request of lego to reduce clutter and save some space.
There are 8 pages in the template, 7 are for the basic frame, and the last is for the cock pit and some accessories.
To print them out all you have to do is select fit to page and click the button for "landscape" printing, and change the margins to Zero (its ok if the printer puts a decimal in instead of a Zero). They were made for use with 8 1/2" by 11" printing (American Standard Size)
The rest of the pictures are coming soon, it seems either my camera or my computer is having problems, I am going to reformat and see if that works. So check back in a few hours if you need pictures of the last couple steps.
Thanks,
Chris
|
|
|
|
|
2009/06/01 17:40:01
Subject: How to build A Thunderhawk Gunship for around $25, Warning LOTS of Pictures, Free Template!
|
|
[ARTICLE MOD]
Huge Hierodule
|
I believe that hot glue will melt the foam inside the paper. For additional strength, you can also glue some 1/8" sticks where pieces meet at right angles to provide some additional adhesive surface.
|
|
|
|
|
|
2009/06/01 18:05:57
Subject: How to build A Thunderhawk Gunship for around $25, Warning LOTS of Pictures, Free Template!
|
|
Executing Exarch
|
I will have to try that on T.Hawk 2.0
I was also considering cutting only one engine off the bar it comes with, then using plastic glue to re-attach it after I passed it through the Body.
|
|
|
|
|
2009/06/01 22:04:06
Subject: How to build A Thunderhawk Gunship for around $25, Warning LOTS of Pictures, Free Template!
|
|
Bounding Assault Marine
|
Clthomps wrote:The templates are in the rar file at the bottom of the Original Post. It was done this way at the request of lego to reduce clutter and save some space.
The file download isn't working! I just get a blank webpage. Help!! Should you get a prompt asking you where to save the file?
|
|
This message was edited 1 time. Last update was at 2009/06/01 22:09:08
|
|
|
|
|
2009/06/01 22:10:01
Subject: How to build A Thunderhawk Gunship for around $25, Warning LOTS of Pictures, Free Template!
|
|
Executing Exarch
|
OK I will host them in a different place.
The quick fix is this link, but i can only be downloaded 10 times so please use the Dakka link if you can.
http://rapidshare.com/files/239739940/t.hawk.rar.html
I am looking for a better file hosting site as we speak, if you know of one please let me know.
|
|
|
|
|
2009/06/01 22:16:06
Subject: How to build A Thunderhawk Gunship for around $25, Warning LOTS of Pictures, Free Template!
|
|
Bounding Assault Marine
|
Clthomps wrote:...I am looking for a better file hosting site as we speak, if you know of one please let me know.
Cheers matey. Can the admins not host it on Dakkadakka?
|
|
|
|
|
2009/06/01 22:49:47
Subject: How to build A Thunderhawk Gunship for around $25, Warning LOTS of Pictures, Free Template!
|
|
[ADMIN]
Decrepit Dakkanaut
|
Rar files are locked out by a security filter to prevent the risk of viruses, etc being uploaded and infecting our users (along with many, many other file types). Just attach the contents of the rar instead and it should be fine (assuming the contents are a series of images or a ppt or something like that)
|
Check out our new, fully plastic tabletop wargame - Maelstrom's Edge, made by Dakka!
|
|
|
|
|
2009/06/01 22:54:26
Subject: How to build A Thunderhawk Gunship for around $25, Warning LOTS of Pictures, Free Template!
|
|
Executing Exarch
|
OK can everyone see that?
|
|
This message was edited 4 times. Last update was at 2009/06/03 05:05:42
|
|
|
|
|
2009/06/03 05:05:30
Subject: How to build A Thunderhawk Gunship for around $25, Warning LOTS of Pictures, Free Template!
|
|
Executing Exarch
|
Some people are having a little trouble with the templates,
You have to click the template to go to a page with its full size, then right click and select "Save As"
If you don't I can not guarantee that it will come out in the right proportions.
|
|
|
|
|
2009/06/03 20:44:02
Subject: How to build A Thunderhawk Gunship for around $25, Warning LOTS of Pictures, Free Template!
|
|
Enginseer with a Wrench
|
Thanks for the templates, I have some of my own but I will incorporate some of your style to my version when I get around to it. Will keep a look-out on this build with interest.
|
Strength and Honor
Silveroxide |
|
|
|
|
2009/06/04 00:05:40
Subject: How to build A Thunderhawk Gunship for around $25, Warning LOTS of Pictures, Free Template!
|
|
Bounding Assault Marine
|
Might have to try this out of plasticard!
|
|
|
|
|
|
2009/06/04 03:49:04
Subject: Re:How to build A Thunderhawk Gunship for around $25, Warning LOTS of Pictures, Free Template!
|
|

Regular Dakkanaut
|
yep thats the way to do it i build two myself check it out
http://www.youtube.com/watch?v=59hJZMZ5ahQ
nice one keep us posted. 
|
|
|
|
|
|
2009/06/16 15:44:34
Subject: How to build A Thunderhawk Gunship for around $25, Warning LOTS of Pictures, Free Template!
|
|
Winter Guard
|
If you don't want any gaps showing in between the foamcore, you could try covering everything with a layer of plasticard.
|
The man who smiles when things go wrong has thought of someone to blame it on.
|
|
|
|
|
2009/06/16 16:39:09
Subject: How to build A Thunderhawk Gunship for around $25, Warning LOTS of Pictures, Free Template!
|
|
[DCM]
Dankhold Troggoth
|
Wow! Great work 
How soon do you think you'll get to step 15 (painting)?
|
|
|
|
|
2009/06/16 22:55:40
Subject: Re:How to build A Thunderhawk Gunship for around $25, Warning LOTS of Pictures, Free Template!
|
|
Executing Exarch
|
I am working on it now, I have not had a chance to mess with the other pictures yet, my brother just got married and the wedding soaked up a lot of my fun time 
|
|
|
|
|
2009/07/01 12:21:12
Subject: Re:How to build A Thunderhawk Gunship for around $25, Warning LOTS of Pictures, Free Template!
|
|
Blood Angel Neophyte Undergoing Surgeries
|
Any update ? really can't wait to see how the rest pans out (and yes it was a shameless bump to stop this disappearing into the ether!)
|
|
|
|
|
2009/07/01 15:25:03
Subject: Re:How to build A Thunderhawk Gunship for around $25, Warning LOTS of Pictures, Free Template!
|
|
Hungry Little Ripper
Ohio, United States.
|
Nice Thunderhawk. Looks like a winner to me. That's foamboard correct?
|
"Don't let da oomies know bout our weakness.
What weakness boss?, we aint got a weakness.
Yes we duz. worm milk makes us go ta sleep"
 
"Scary monsters don't have plaque"
95% of teens would go into a panic attack if the Jonas brothers were about to jump off the empire state building. Copy and paste this if you are the 5% who would pull up a lawn chair grab some popcorn and yell, JUMP BITCHES!!!!!!!!!!!!!
Michael Jackson isn't really dead, he just went back to the warp.
|
|
|
|
|
2009/07/01 16:31:53
Subject: How to build A Thunderhawk Gunship for around $25, Warning LOTS of Pictures, Free Template!
|
|
Executing Exarch
|
yup I chose it because it is $2 a sheet, instead of $50 for the same amount of plasti-card.
I completed it but I still need to paint it, the battery on my camera will no longer charge so I am waiting on a new battery to arrive (from china  )
|
|
|
|
|
2009/08/04 12:44:35
Subject: Re:How to build A Thunderhawk Gunship for around $25, Warning LOTS of Pictures, Free Template!
|
|
Blood Angel Neophyte Undergoing Surgeries
|
Shameless bump to inspire an update....
|
|
|
|
|
2009/08/10 17:33:41
Subject: How to build A Thunderhawk Gunship for around $25, Warning LOTS of Pictures, Free Template!
|
|
Adolescent Youth on Ultramar
|
Great tip on using the podracer for engines, as I was stuck on what to use for them on the T-Hawk i'm fully scratch building
|
95% of teens would go into a panic attack if the jonas brothers were about to jump off the empire state building copy and paste this if you are the 5% who would pull up a lawn chair grab some popcorn and yell DO A BACKFLIP!!!!!!
Ultramarines: Some call them stupid smurfs, but eight of mine faced down a 'nid army and won, so not so stupid after all!!! 
When you are cursing green stuff at the top of your voice and stabbing your models with a hobby knife, you know that you are trying too hard...
Only losers call it cheating.
Winners call it effective use of unconventional tactics.
Scratch building Thunderhawk 'Annhilator' Patter Gunship |
|
|
|
|
2009/08/14 05:05:48
Subject: Re:How to build A Thunderhawk Gunship for around $25, Warning LOTS of Pictures, Free Template!
|
|

Bounding Assault Marine
|
Right click, save as........squirrelled away until the current project pile has dimished.
Nice simple tutorial
Have you tried using thinner foamcore?
|
.. Black Forest .. Red Sea .. |
|
|
|
|
2009/08/14 09:50:47
Subject: How to build A Thunderhawk Gunship for around $25, Warning LOTS of Pictures, Free Template!
|
|
Lone Wolf Sentinel Pilot
|
Nice
sA
|
My Loyalist P&M Log, Irkutsk 24th
"And what is wrong with their life? What on earth is less reprehensible than the life of the Levovs?"
- American Pastoral, Philip Roth
Oh, Death was never enemy of ours!
We laughed at him, we leagued with him, old chum.
No soldier's paid to kick against His powers.
We laughed - knowing that better men would come,
And greater wars: when each proud fighter brags
He wars on Death, for lives; not men, for flags. |
|
|
|
|
2009/08/20 00:16:01
Subject: How to build A Thunderhawk Gunship for around $25, Warning LOTS of Pictures, Free Template!
|
|
Outraged Witness
|
So the Pod reacer parts are up to $20.00+ on Ebay. Does any one have any ideas of how to make the engine sections?
What did you use Converter?
|
|
|
|
|
2009/08/20 02:22:50
Subject: How to build A Thunderhawk Gunship for around $25, Warning LOTS of Pictures, Free Template!
|
|

Veteran Wolf Guard Squad Leader
Princedom of Buenos Aires
|
Wow O_O this is something I might try to do on the future.
|
|
|
|
|
|
2009/08/21 11:03:45
Subject: How to build A Thunderhawk Gunship for around $25, Warning LOTS of Pictures, Free Template!
|
|
Blood Angel Neophyte Undergoing Surgeries
|
That is really good and im going to try and make it probably ill break while trying to.
|
 95% of teens would go into a panic attack if the jonas brothers were about to jump off the empire state building copy and paste this if you are the 5% who would pull up a lawn chair grab some popcorn and yell JUMP BITCHES!!!!!!!!!!!!! 92% of teens have moved on to rap. If you are one of the 8% who still listen to real music, copy and paste this into your sig. 95% of teens would go into a panic attack if the jonas brothers were about to jump off the empire state building copy and paste this if you are the 5% who would pull up a lawn chair grab some popcorn and yell JUMP BITCHES!!!!!!!!!!!!! 92% of teens have moved on to rap. If you are one of the 8% who still listen to real music, copy and paste this into your sig.
2000 points and growing...
Thou shall not use chainsword as a backscratcher.
|
|
|
|
|
2009/08/24 19:01:04
Subject: How to build A Thunderhawk Gunship for around $25, Warning LOTS of Pictures, Free Template!
|
|
Brainy Zoanthrope
Chesapeake, VA / D.C. area
|
i want to see this painted.
|
 4000 all painted 4000 all painted
Tau 3000 paints base coated
Tyranids 16k - 75% painted
Orks - 5000k - 30% painted? |
|
|
|
|
|
|