| Author |
Message |
 |
|
|
|
|
Advert
|
Forum adverts like this one are shown to any user who is not logged in. Join us by filling out a tiny 3 field form and you will get your own, free, dakka user account which gives a good range of benefits to you:
- No adverts like this in the forums anymore.
- Times and dates in your local timezone.
- Full tracking of what you have read so you can skip to your first unread post, easily see what has changed since you last logged in, and easily see what is new at a glance.
- Email notifications for threads you want to watch closely.
- Being a part of the oldest wargaming community on the net.
If you are already a member then feel free to login now. |
|
 |
2012/12/11 01:31:09
Subject: 40k Emperor Titan Project
|
|

Brainless Servitor
|
This is my Emperor Titan Project for Warhammer 40K.
|
|
This message was edited 13 times. Last update was at 2014/07/04 17:04:16
|
|
|
 |
|
2012/12/11 01:56:34
Subject: 40k Emperor Titan Project
|
|

Phanobi
Canada,Prince Edward Island
|
In your gallery you will see a little URL on the right hand side that says "Blog view". Simply copy and paste it into your blog and you are done!
I took the liberty of checking it out in your gallery and it looks pretty big I have to say! Just make sure you rotate them before posting it, don't want to injure our necks now do you? 
|
|
|
|
|
|
2012/12/11 02:32:49
Subject: Legs and Feet
|
|
Brainless Servitor
|
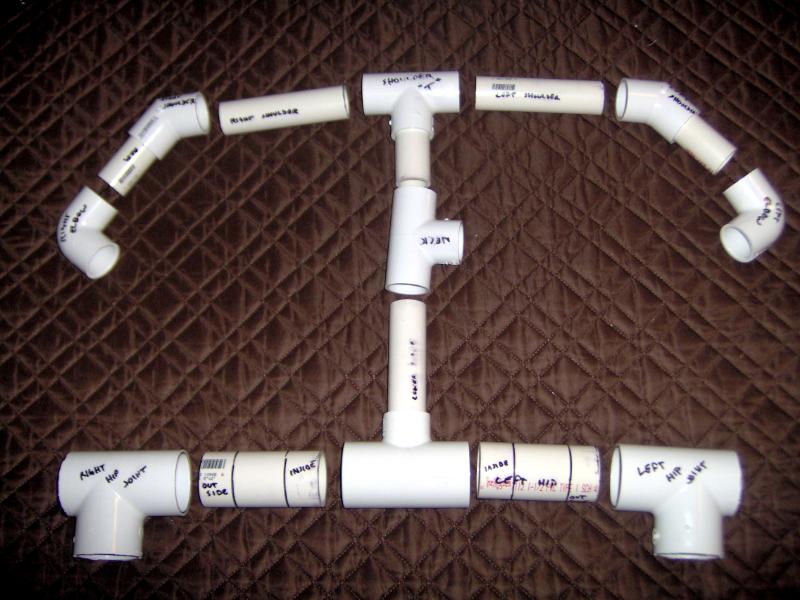
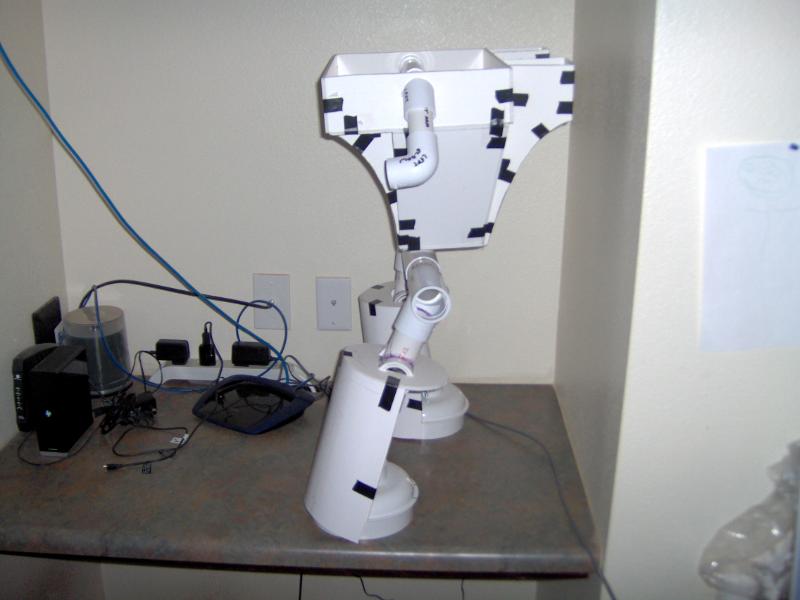
OK, so thanks to some help from Commander Cain, I have figured out how to work the internet machine and can not correctly post pictures? (I hope) So on to the next post, legs and feet.
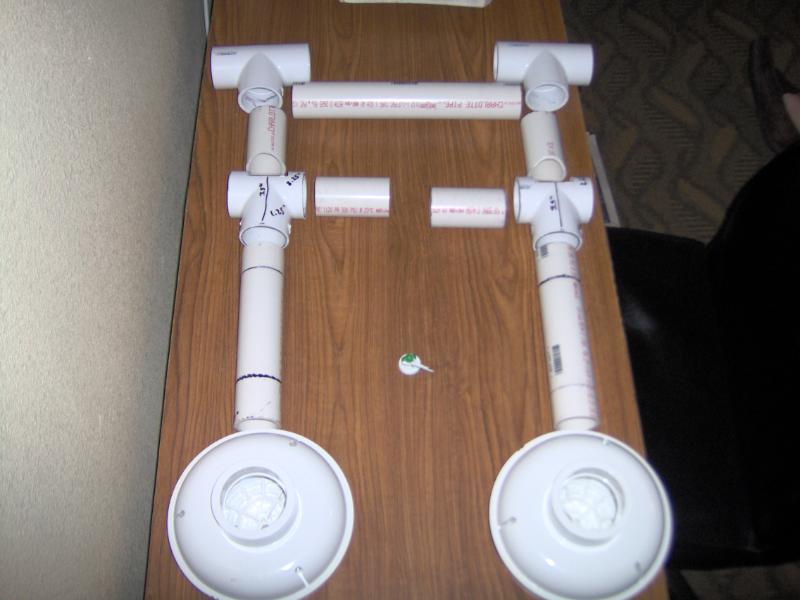
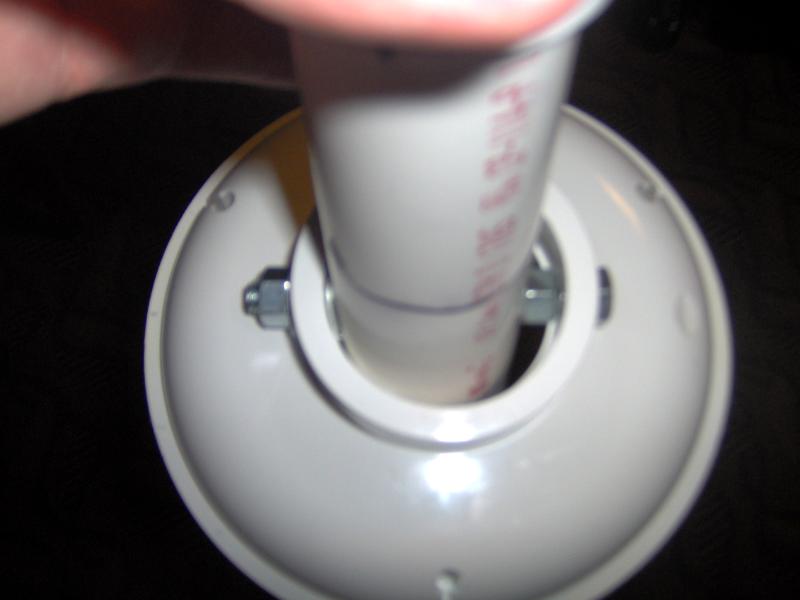
It turned out to be way easier than I thought it would be. Whew. At this point I have used two 2' lengths of 1 1/2'' PVC, four 1 1/2" PVC "T" joints, and two 2" PVC floor drains. I based the articulated knee off of an (abandoned?) scratch-built Reaver Titan project by ptlangley.
Picture after cutting but before assembly. I have them put out from the feet up to the hip, with a guardsman for size comparison. You can see all of the guides and references that I used for cutting. I got too excited to start actually getting it together and forgot to take pictures before I hit it with saw.
So the two smaller pieces in the middle will fit inside the "T" knee joints and then the thigh piece above has a circular cut on one end to make it fit flush with the inside of the knee. This will make more sense with the assembled picture. Then the thigh goes into a hip "T" joint and then the connecting piece in the middle there. Here is the pic, assembled but not glued.
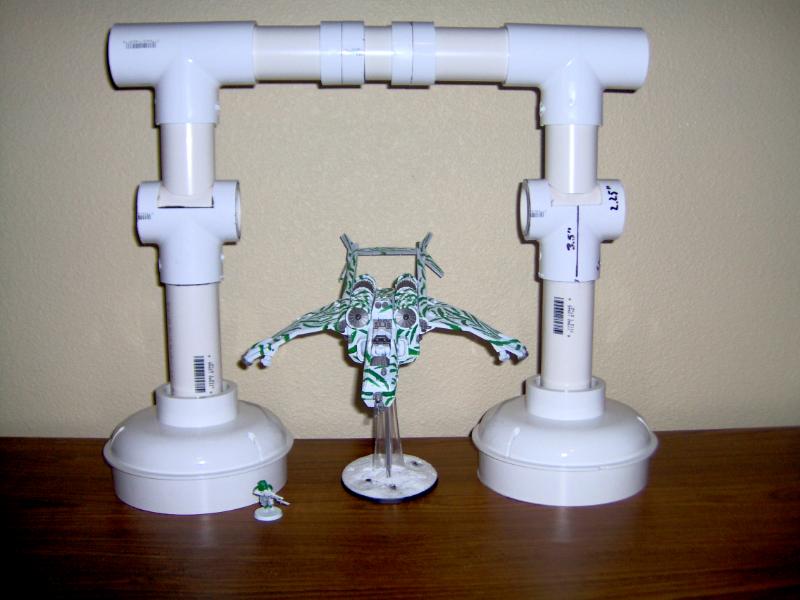
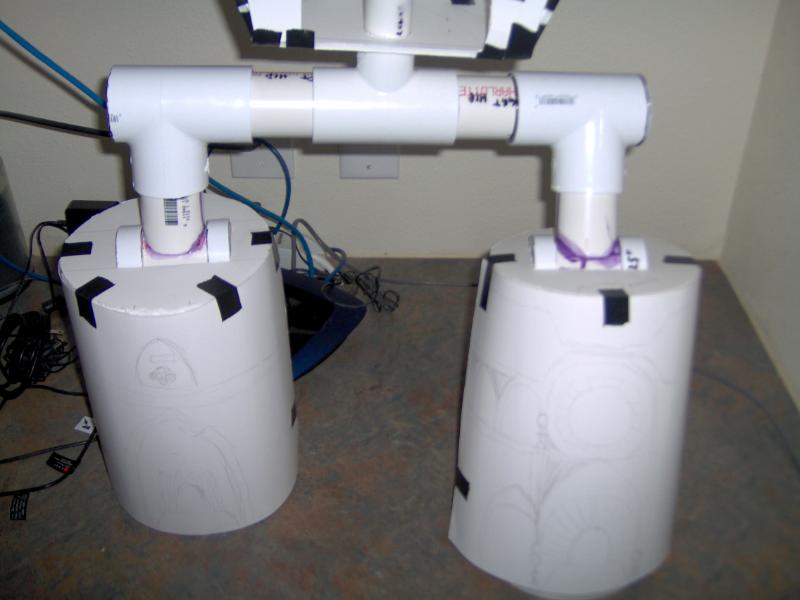
I thought it was cool to see the Vendetta there flying though the middle. Still with the guardsman for size, I measured to the top of the hip at 16 1/2". So far he is going to be just a bit over my aim for 36" overall, but I am OK with any size between about 34" and 40".
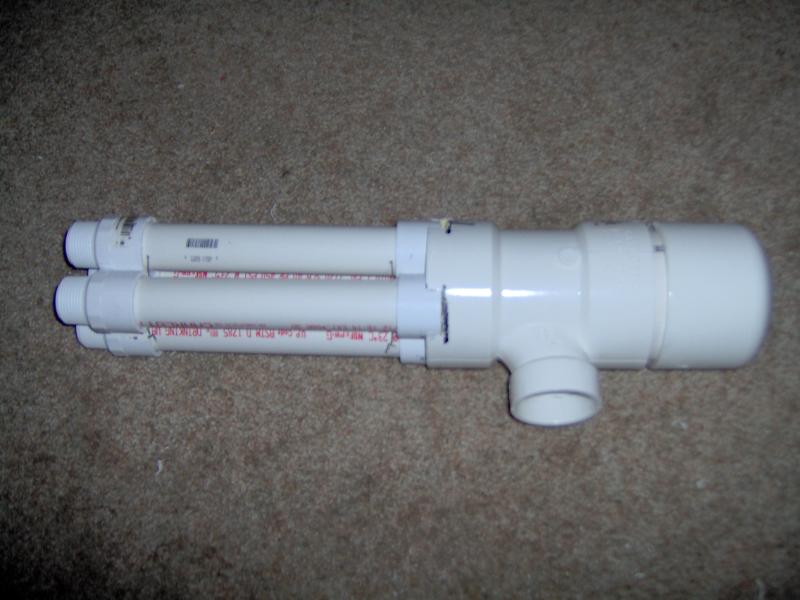
The ring around the foot just above the guardsman's head is where I will attach the armor for the shin. Based on my measurements, I will be able to place about 30 seats around the inside of the armor and another 10 around the central tube (Elevator Shaft). Automatically Appended Next Post: Let me start with the hips. First thing is a cut off the "extra" inch or so from the outside of the hip "T" joint to flush it up. Then using 2 4" lengths of 1 1/2" pipe, I connected the hip joints to the pelvis reducing 1 1/2" X 1 1/2" X 1" "T". I then used a 5" length of 1" pipe for the lower spine up to a 1" "T" joint for the neck, then a 3" length of 1" pipe for the upper spine to get up the the shoulder "T" joint. From there a 5" length of 1" pipe goes to each 45 degree bend shoulder joint. Another 3" length to a 90 degree elbow makes up the arm and elbow to which the guns will attach.
Here is the picture before assembly:
Assembled:
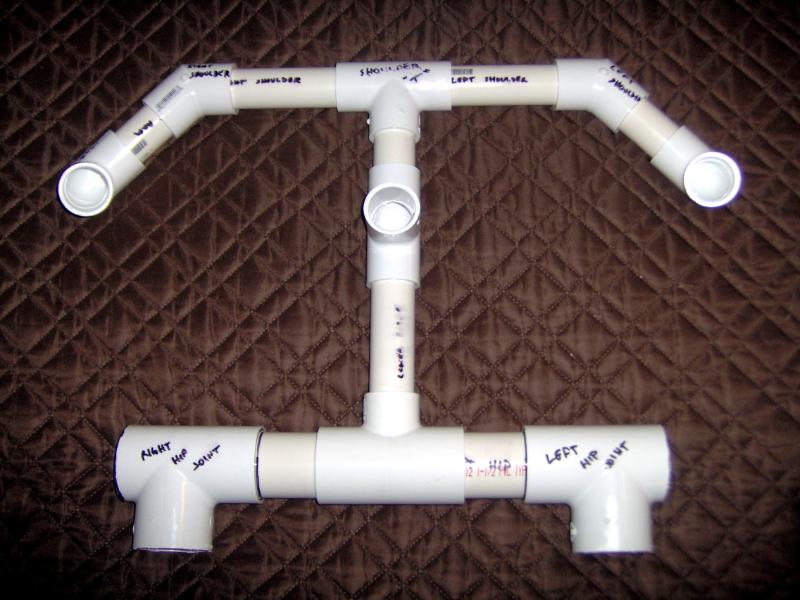
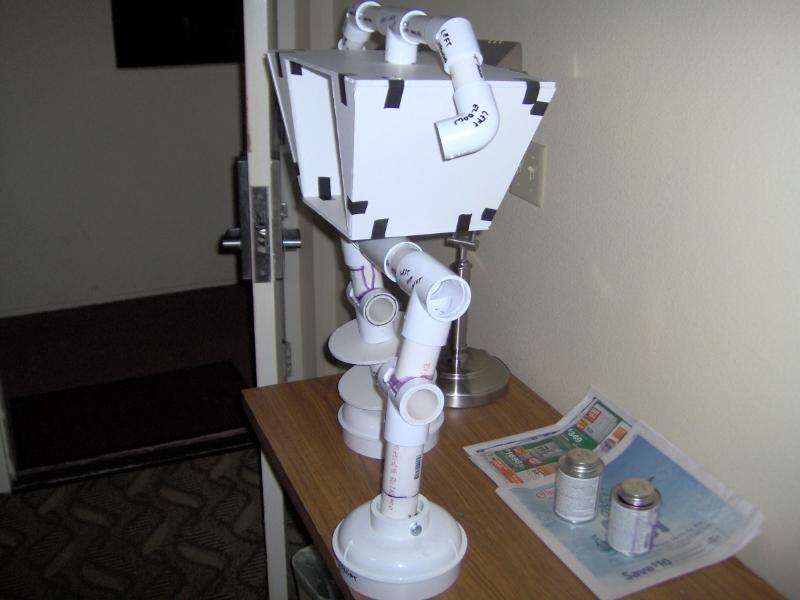
And placed on the legs:
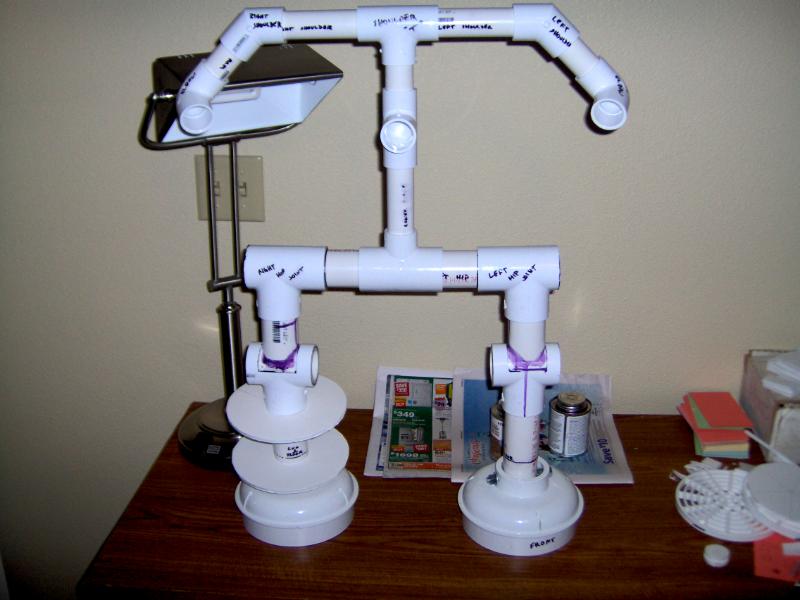
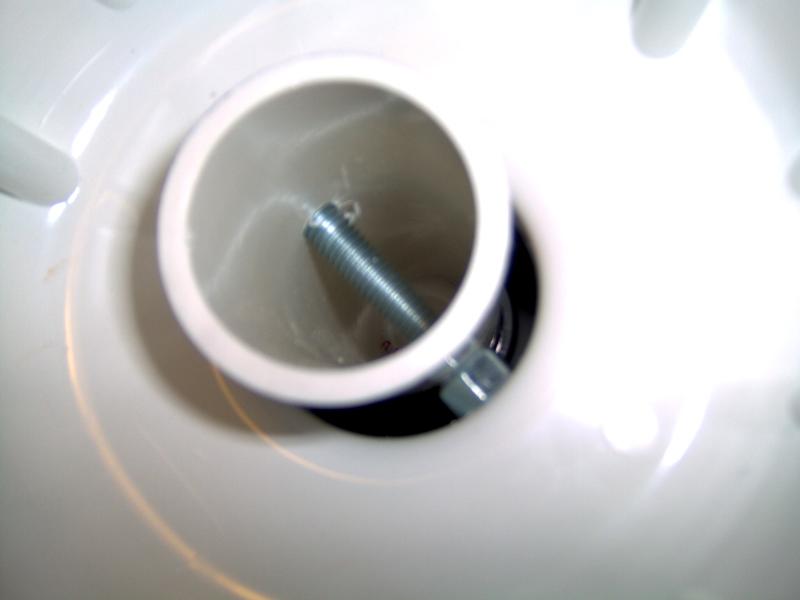
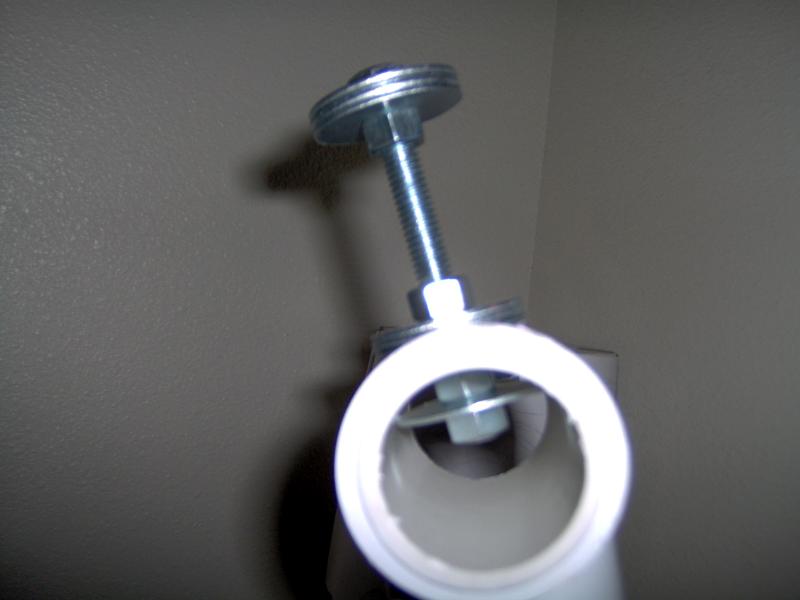
You may have noticed that there is a bolt going through the foot where it attaches to the lower leg. This is how the foot will articulate. Gives me about 45 degrees of movement, and is just a bolt going through the coupling and the leg both, secured with washers and nuts. Sounds really simple, but turned out to be a bit of a pain to get the nut to fit inside the coupling. By tightening down the nuts it makes the joint really stiff so it wont move, then just loosen it a bit to pose it.
Here is a picture of the assembly:
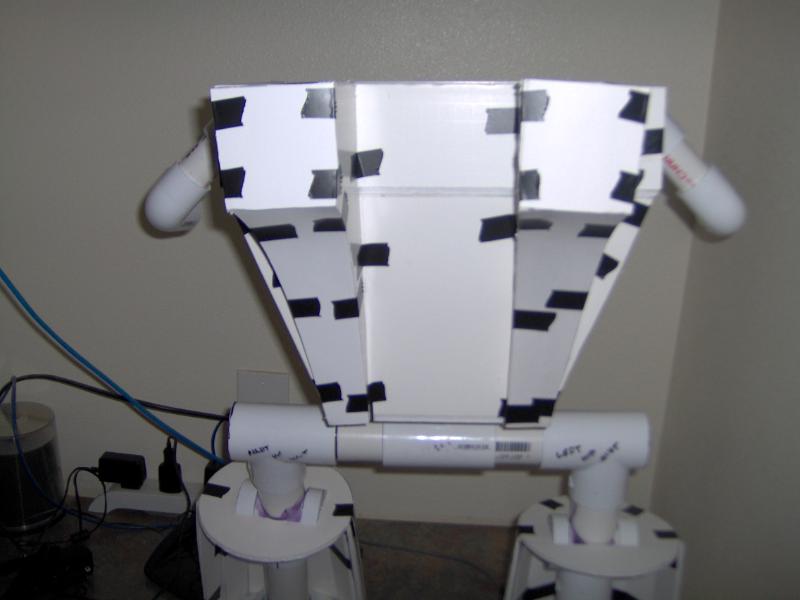
The other thing that I did was start to make the chest box. Pretty simple here, just foam board cut to the right sizes and taped together. The frost has been left open because I will have to make a recess for the head to fit in. The head wont be completely recessed, but it will be back in there a little bit.
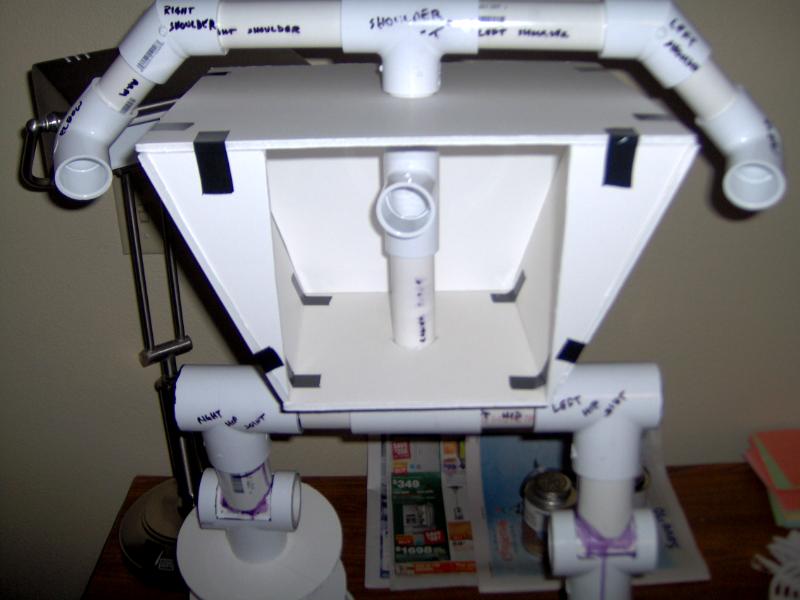
And all together:
Final notes, the knees are not working out how I had hoped. Turns out that PVC glue is crap for making a bond and I will probably need to fill the thighs with something that dries very hard and then secure them to the knee joint with bolts and nuts. More research is required, but for now it will balance on there OK. Automatically Appended Next Post: First up is the knees, with the collective brain power of myself and 2 of my classmates we figured out a way to reinforce the knees to a point where they could probably hold a small child. It is just a bunch of 1 1/2" washers secured by a 3/8" bolt that I drilled a hole in the knee pin for. Pictures make it make sense.
Next was some texture to the upper body. Pretty easy to make, just some poster board to make the curved face.
The front:

The back:
The side:
Also figured out finally what I will do with the head. At the very least it will house the array for the void shields. May also put a weapon in the mouth, but more to come with that.
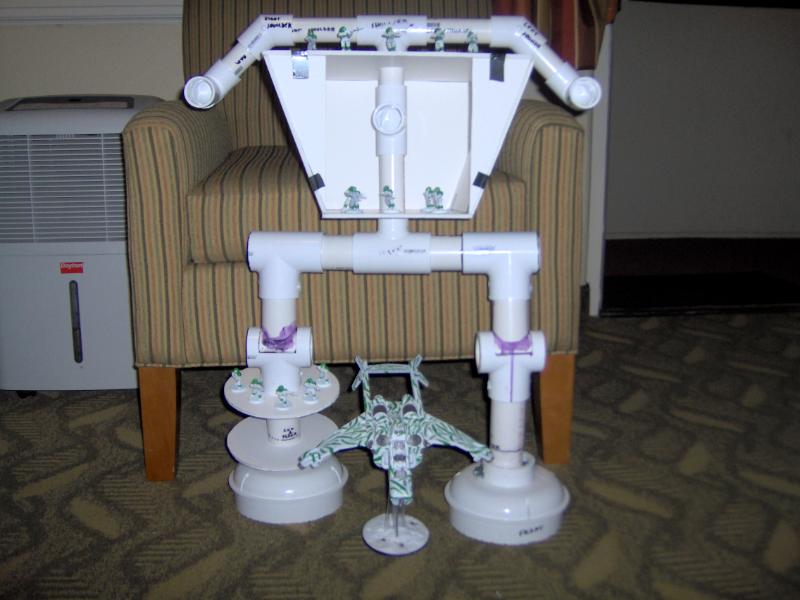
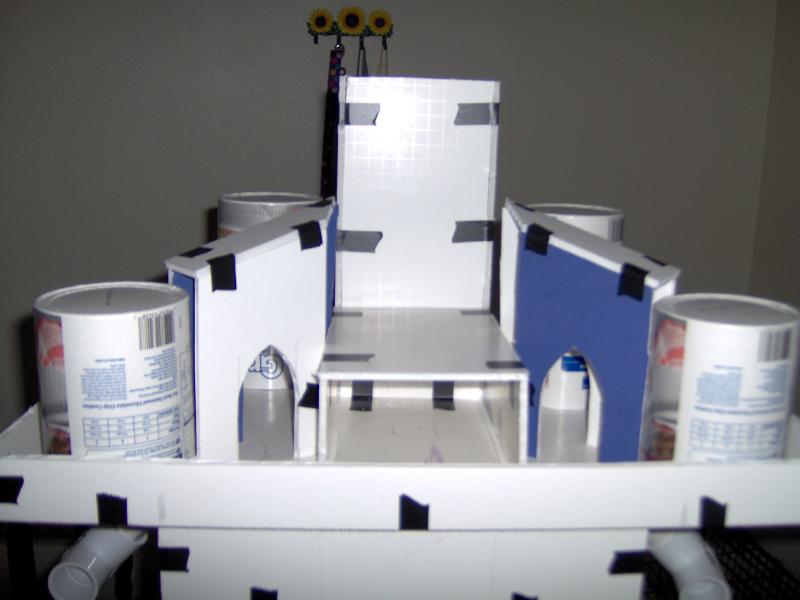
Next is the castle. This part was a lot of cutting and taping. The idea for the towers came from my wife, and they turned out perfectly.
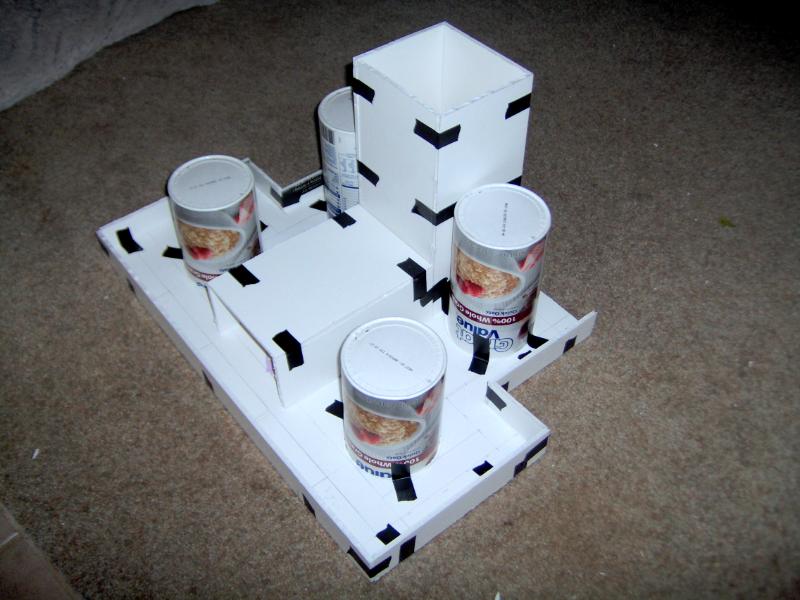
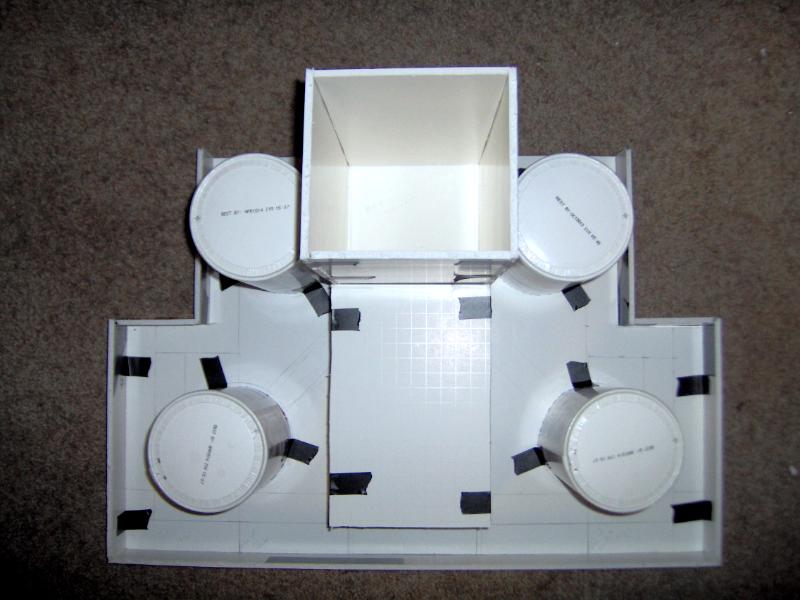
And here is the whole thing:
 Automatically Appended Next Post: Automatically Appended Next Post: OK, so this is what I have so far. I usually get some work done on it on the weekends, but no promises. Feel free to post suggestions or criticisms or compliments here.
Next up I plan to build the back of the legs along with the first 2 main weapons... Vengeance Cannons!!!!
|
|
This message was edited 3 times. Last update was at 2012/12/11 03:02:28
|
|
|
|
|
2012/12/11 10:38:20
Subject: 40k Emperor Titan Project
|
|

Pauper with Promise
|
structure beginning to look good cant wait to see more
|
|
|
|
|
|
2012/12/20 04:30:22
Subject: Cleaning and Castle Section
|
|
Brainless Servitor
|
It really doesn't look like I did much overall this week, but I did a lot of small improvements, like cleaner lines around the body. I also fixed a small problem with the legs not moving correctly with the armor on. With that fixed I was able to start outlining and cutting for the interior of the legs which will include 2 levels and 51 seats for each leg. I also started to fill out the castle section a bit a built the first 2 of the 4 arches that will connect the gun towers to the center command section.
Here is the picture:
I want to start some work on the head, but I do not know where to start and don't really want to just start cutting. However, with the rest of this project that tactic has actually worked out well for me, "cut first, think later." Anywho I hope anyone reading this has a Merry/Happy Holiday and I will see you all on the other side of the end of the world.
|
|
|
|
|
2013/01/01 18:36:13
Subject: More Cleaning, Head, and Weapons
|
|
Brainless Servitor
|
Alright, so now that the holidays are over I think I am ready to start up again with this guy. My next step is going to be finishing of the structure and building of the head and weapons. Once the finishing is done, I can start detail work.
Some of the finishing things that I am talking about are more cleaning up of lines and edges, as well as fully bonding it together. Up till now I have had the whole thing held together by tape as a temporary hold so that I can see what it will look like. Wife had the good idea to actually use the tape in the finished model as support texture. I think that this is a great idea, although I will have to re-do all the tape to make it symmetrical.
-The castle section arches need to be trimmed down by about and inch.
-The castle section command deck needs to by trimmed down by about an inch.
-Red Solo cups for the tops of the rear towers for the castle section.
-Main tower needs to be just a bit thinner and maybe taller.
-Torso thinner? Maybe? Will have to see how much work it will add.
-Gun deck a bit taller, enough that a sentinel can walk around on it.
And the BIG one; figure out how to make all of the sections viewable.
-Command Deck -- probably just have the roof pull off, wont be very difficult.
-Gun Deck -- if I use pins for the castle section to slide onto, I can just remove the castle section.
-Engineering Deck -- Either the font, or the rear... or the sides (lol) will have to be removable. Sides...?
-Transport Sections -- maybe cut the top piece so that I can remove it while holding the shape? Will try.
While all that is going on I will be building the weapons and head. Ugh, the head - we will come back to that. I plan on making a trip to Home Depot today to get the parts to build the first weapons. Vengeance Cannons for the arms (Titan-Destroyer weapons), Laser Blasters on the front towers (Heavy Vehicle Destroyers), Apocalypse Missile Launchers on the rear towers (Anti Massed Infantry), a Quake Cannon on the very front (Medium Vehicle Destroyer), and a Vortex Support Missile on the main tower (Nuclear Missile).
All in all, they shouldn't be too hard to build, a bit time consuming maybe. Instead of making the Apoc Missile Launchers as addition attachments, I will build the towers so that they are more like a silo. The top of the tower (which will be flat) I will be able to remove and flip upside down and place so that it is inset into the tower section. Hard to describe in text, but should look awesome. Also, will leave it easy to put a different weapon up there later on.
Laser Blasters and Quake Cannon are fairly straight forward, and for the Vortex, I already have a Deathstrike Missile Launcher for my IG so I can just use that missile and build a launcher for it.
Ok, the head. "Steampunk" is the word here. I am going to try and build a "Steampunk" skull with mecendrites attached to the rear and top that will look like hair? We will see about the mecandrites, but the rest should look good. If you type "Steampunk Skull" into amazon it will give you an idea of what I am going for.
There may have been something else, but I cannot remember.
|
|
|
|
|
2013/01/02 00:04:18
Subject: 40k Emperor Titan Project
|
|
Hurr! Ogryn Bone 'Ead!
|
very good work! Keep it up! 
|
You know what they say kids, drive it like its a rental.
|
|
|
|
|
2013/01/02 03:54:55
Subject: 40k Emperor Titan Project
|
|

Frenzied Berserker Terminator
|
Why does your titan have hair and a dress? Seriously though, awesome work!
|
Veteran Sergeant wrote:In the grim darkness of the far future, the guy with a rifle is the weakest man on the battlefield, left to quake in terror, hoping the two or three shots he gets do the job before somebody runs screaming across the battlefield to hit him with an energized stick.
http://www.dakkadakka.com/dakkaforum/posts/list/440996.page
|
|
|
|
|
2013/01/02 04:13:07
Subject: 40k Emperor Titan Project
|
|
Stalwart Veteran Guard Sergeant
|
 JohnnoM wrote: JohnnoM wrote:Why does your titan have hair and a dress? Seriously though, awesome work!
If you wanted to take the easy route you could always give your daughter (I am assuming she's your daughter) two nerf guns and have her stomp around an apocalypse table 
Seriously though it seems to be coming on very well! Looks very sturdy.
|
 2000 ultrasmurfs 4th 2000 ultrasmurfs 4th
Starting Rolanders 2nd Rifles 
"Oh Benson, you are so mercifully spared of the ravages of intelligence"
|
|
|
|
|
2013/01/05 01:49:24
Subject: 40k Emperor Titan Project
|
|
Longtime Dakkanaut
|
Best of luck with the build! The only thing that is paramount is making it solid/steady enough to be A.Transported(You WILL want to game at other venues, guaranteed!) and B. Able to withstand a touch of vibration and the odd bump. As strange as it seems, some gaming tables do get bumped, and not all are immune to shaking from said bumps for a few seconds.
The reason I mention this is because all of the weight of the model is on the knee/hip/foot joints, and with not only the weight of the model itself - you have to consider the weight of the paint, and embellishments/bling. It really does add up. Combine said considerations with bumps/joint fatigue, and you really do start to see the design required for a sturdy Titan.
Looking forward to the progress!
|
"Dakkanaut" not "Dakkaite"
Only with Minatures, does size matter...
"Only the living collect a pension"Johannes VII
"If the ork codex and 5th were developed near the same time, any possible nerf will be pre-planned."-malfred
"I'd do it but the GW Website makes my eyes hurt. "Gwar
"That would be page 7 and a half. You find it by turning your rulebook on its side and slamming your head against it..." insaniak
MeanGreenStompa - The only chatbot I ever tried talking to insisted I take a stress pill and kept referring to me as Dave, despite my protestations.
insaniak "So, by 'serious question' you actually meant something entirely different? "
Frazzled[Mod] On Rule #1- No it literally means: be polite. If we wanted less work there would be no OT section.
Chowderhead - God no. If I said Pirates Honor, I would have had to kill him whether he won or lost. |
|
|
|
|
2013/01/06 16:34:40
Subject: 40k Emperor Titan Project
|
|
Brainless Servitor
|
I appreciate the words of encouragement. Also no worries on the sturdy. I have started gathering the parts to build the castle weapons and you are very right, they are heavy... comparatively. I do not expect the load bearing surfaces to have any problem. Also, once I put in all the lighting, the batteries and control boxes will be in the feet so that will bring down his CoG quite a bit.
|
|
|
|
|
2013/01/06 16:51:45
Subject: 40k Emperor Titan Project
|
|
Unhealthy Competition With Other Legions
York, North Yorkshire, United Kingdom
|
Looking great so far" Good luck with finishing it! It will be spectacular when its complete I would imagine.
Keep up the good work"
|
Imperial guard: Because quantity has a quality of it's own.
Sisters of Battle can be used in any game, with the exception of chess, Monopoly and of course, Warhammer 40,000.
After 8 editions, you might have thought that GW could get fantasy right. |
|
|
|
|
2013/01/27 15:36:06
Subject: 40k Emperor Titan Project Update
|
|
Brainless Servitor
|
Being sick sucks. And makes it really hard to do any work on a model. But I am mostly better now and decided to get off the couch and take some pictures. Here is the Titan base coated black, only took 3 whole cans. The upside the the basing is that now its really easy to see the new work I have done on it.
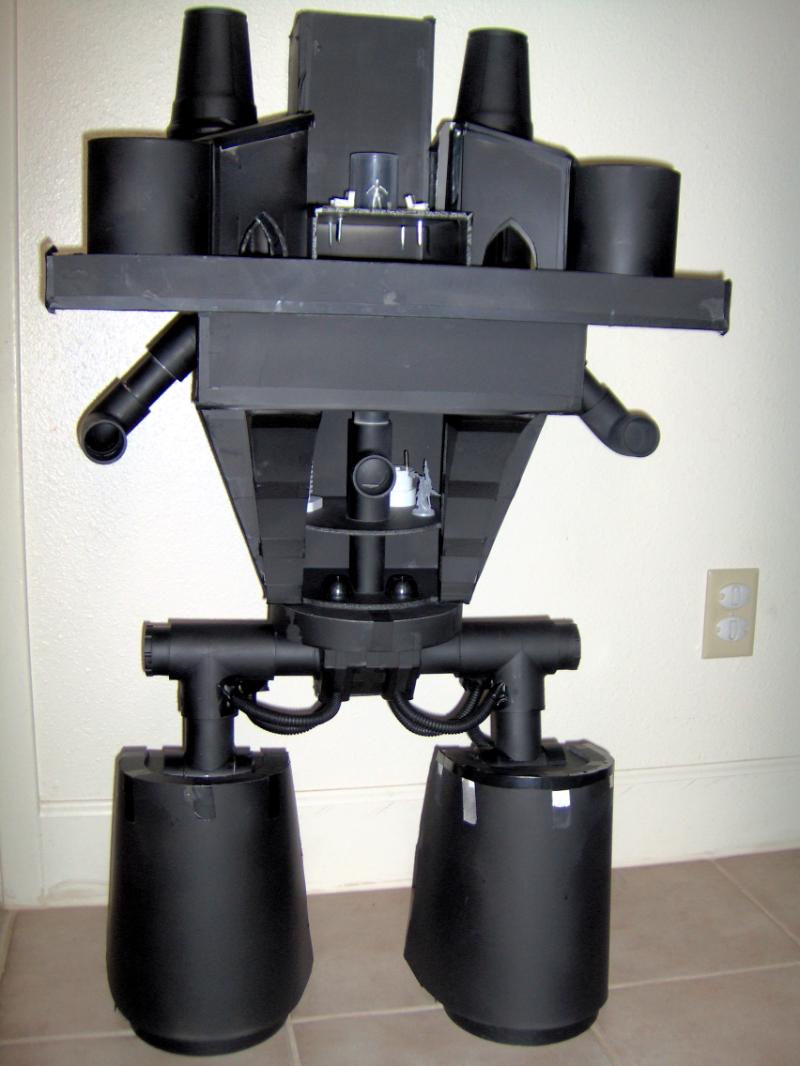
You can see the re-taping that I did in this picture, makes the whole thing look more deliberate. The legs are still in work with the taping... :( Anyway, I think it looks awesome.
So I will start from the ground. Did a ton of work on the right leg interior (left leg will come after right is total finished). Each leg can transport 51 guys, so I made 2 levels with 40 seats on the bottom and 11 seats on the top. I figure its 5 10-man squads and an officer of some type. So all the grunts are on the bottom level while the squad leaders and the officer are on top.
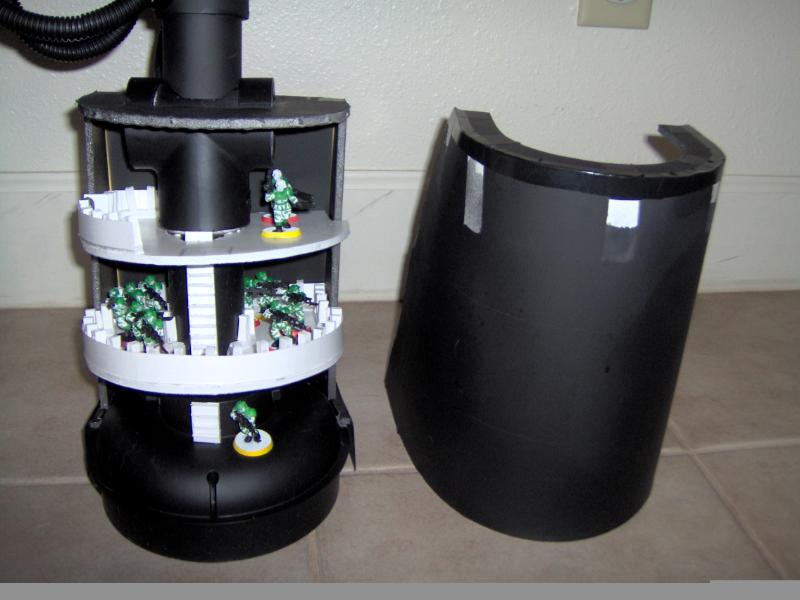
Closer up of the leg, there are 10 Imperial Guardsmen on the bottom level and 2 sergeants on the top as a scale. Also you can see the ladder there, was fairly easy, just cut out a whole bunch of thin pieces from the poster board and then put them into notches I made in a long strip of foam board.
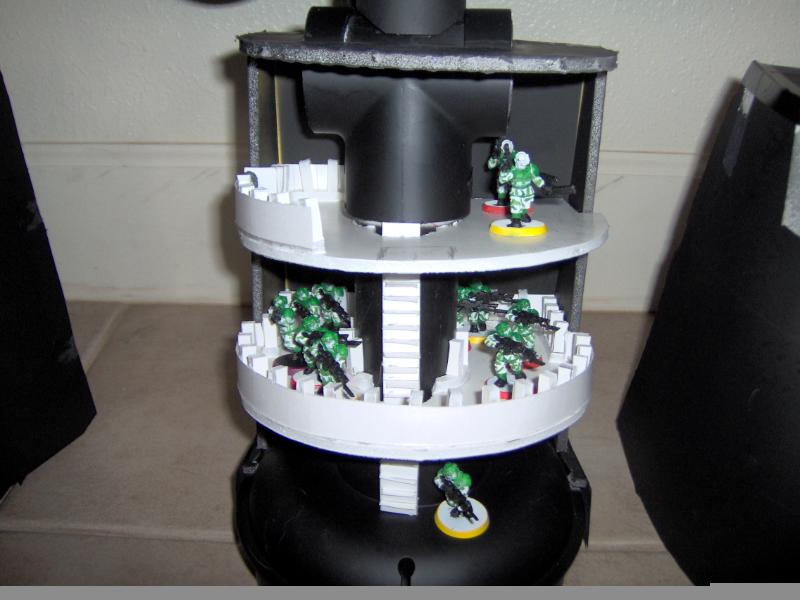
Here is a bit better view of the top level. You can see a sentinel driver there in one of the seats. My idea is to have the officer in the middle (where the sentinel driver is) surrounded by the sergeants. I am going to build some type of a tactical display that they will all be able to see. There are fire-points at the 12, 3 and 6 o'clock positions that I will have to put in later.... thinking I might do autocannons.

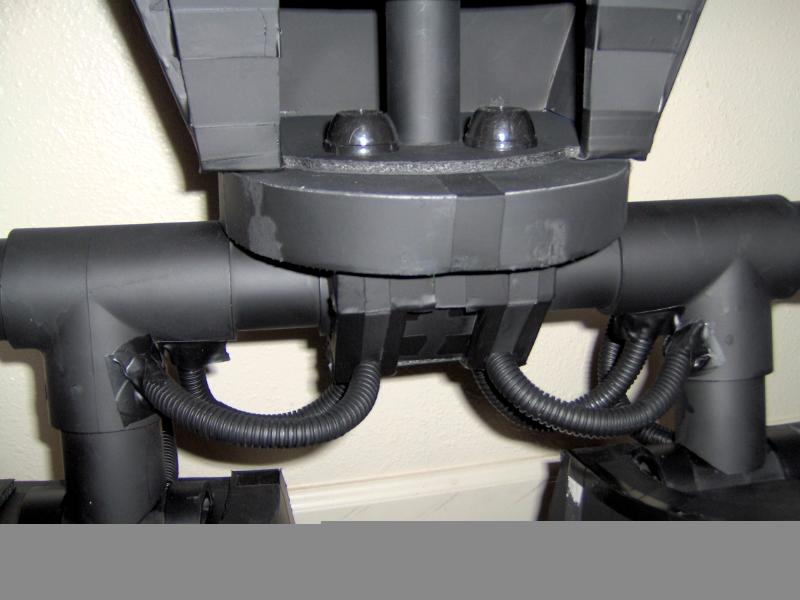
Here is the crotch section and this tubing. The tubes are just electrical weather wrap that I got from Auto-Zone. When all is said and done there wont be any tape holding the tubes to anything, they will just go straight into the legs. Also picked up a good end piece for the hips.
Moving up we see the engineering deck. Not really anything done here, I got in my forge-world order and have placed the Titan Tech Priest in there, also a bunch of junk because I really don't know what I am going to do yet for the core.
Then up to the gun deck, here are the sentinel power lifters. They FIT!!! just had to chop down their exhaust stacks... I want to have the two of them in there, moving the massive shells to loaders on the walls where the arms come out. Also on the walls there will be two hard-wired servitors for each gun-arm. And I think there will be an IG mechanic directing each of the loaders and one tech priest overseeing it all. Also, racks on racks on racks of ordnance.

So then we move on to the princeps command chamber. Didn't get too much done here, just built some swivel chairs and found what will probably be the princeps model.
A few other things have been started but aren't even close to being ready to put on the titan yet. I made some real head-way on the laser blaster... sort of. Its just a 3 barrel cannon but its giving me a hard time as far as building a mount. Also, there has been something bugging me about proportion since I got the thing together and finally figured it out. Its the arms! They are too skinny, so I cut out a section of 3" PVP that can fit over the arms already installed and it looks great. Don't have it cut to the right size yet or anything, but when I get to it I will get to it.
Next up will probably be some computer terminals for the 4 swivel chairs on the command deck, and start thinking about a way to have some easy cut outs in the back for viewing of internal compartments. Magnets will probably be my friend. OH! also, wall hangers will be perfect fixtures for the lights, all I will have to do is just dangle the LED off them and it will look excellent.
|
|
This message was edited 1 time. Last update was at 2013/01/29 22:23:00
|
|
|
|
|
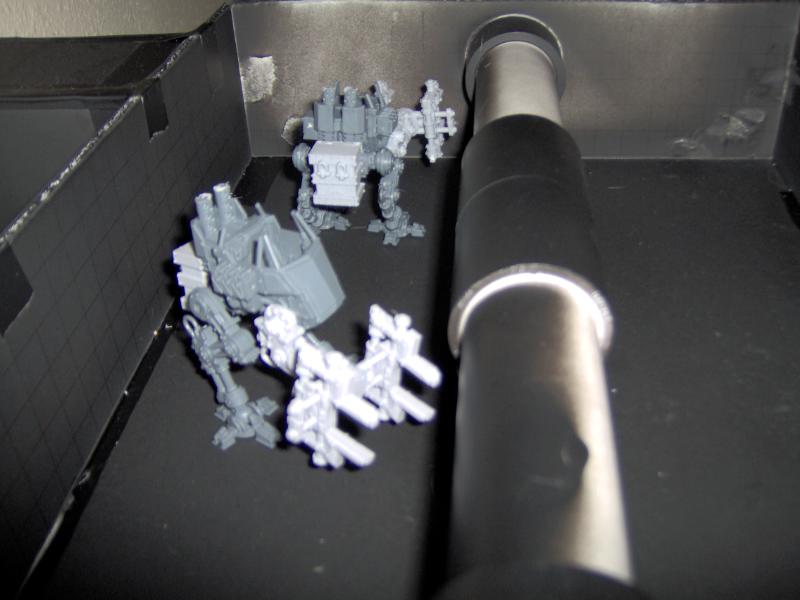
2013/02/12 00:25:08
Subject: Teaser Pics
|
|
Brainless Servitor
|
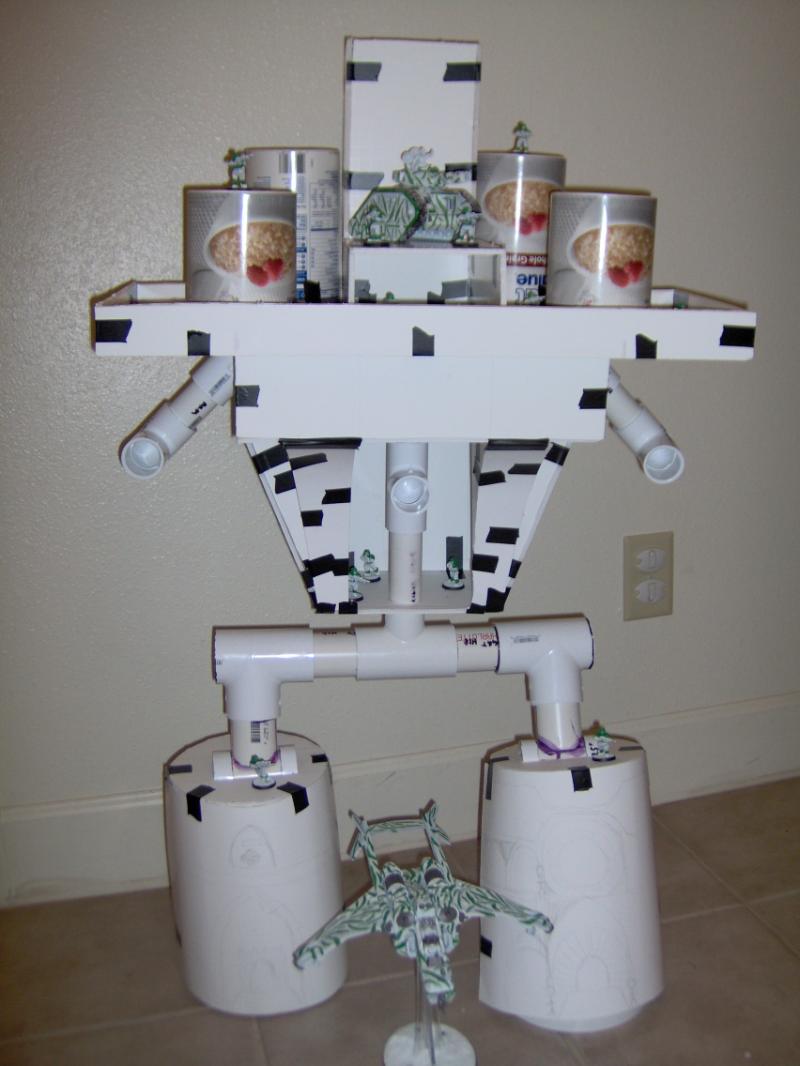
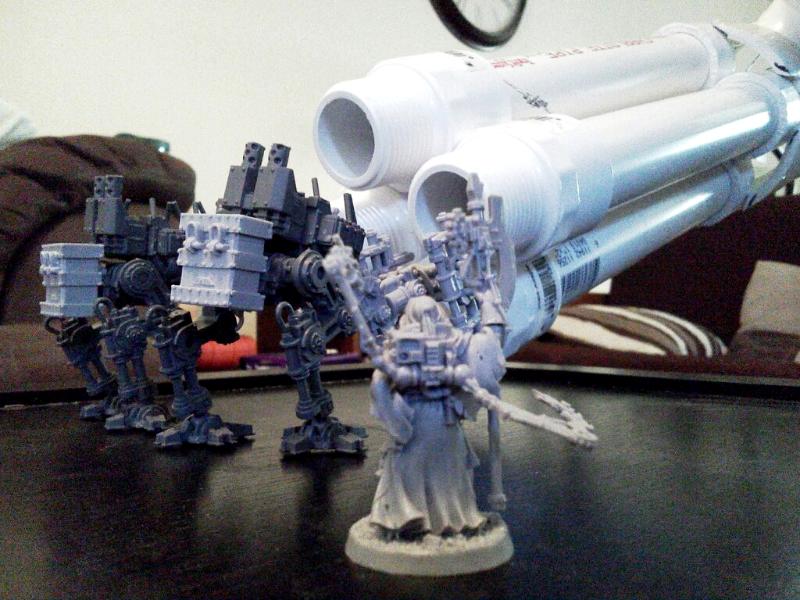
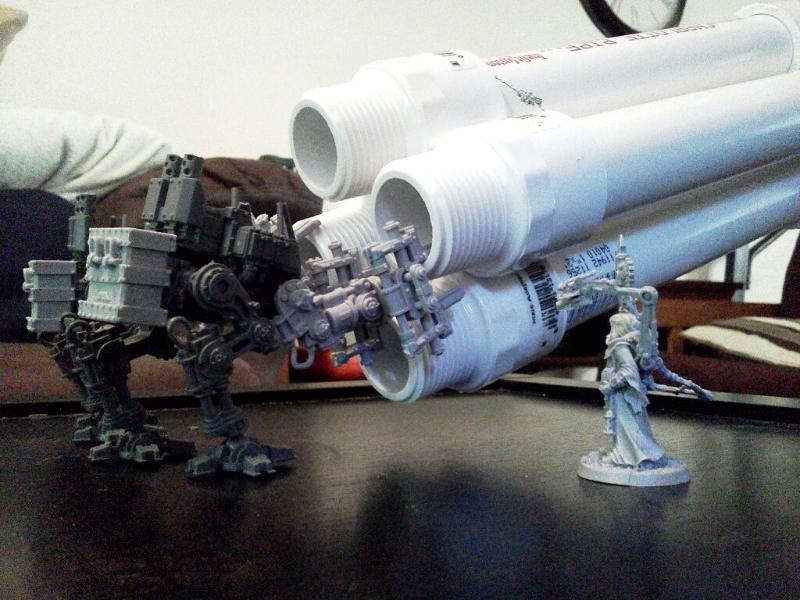
Here are some teaser pics of the Power Lifters installing the new Vengeance Cannon with the Tech Priest overseeing it all.
|
|
|
|
|
2013/02/12 00:39:25
Subject: 40k Emperor Titan Project
|
|
Perfect Shot Dark Angels Predator Pilot
|
DANG...
|
|
|
|
|
|
2013/02/12 00:43:11
Subject: 40k Emperor Titan Project
|
|

Regular Dakkanaut
Cividale del Friuli (UD) Italy
|
Well, I don't want to ruin your project, but the command deck of the titan is in its head, like all the other titans. I don't know why GW put that misleading information on the Imperator sheet.
|
Professional armourer, artist, blacksmith.
http://www.magisterarmorum.com
|
|
|
|
|
2013/02/15 02:24:32
Subject: 40k Emperor Titan Project
|
|
Brainless Servitor
|
Oh my! Well, I think that I like the command deck on top. What source tells you this?
|
|
|
|
|
2013/02/15 02:33:06
Subject: 40k Emperor Titan Project
|
|
Twisted Trueborn with Blaster
|
 SirSpokomo wrote: SirSpokomo wrote:Oh my! Well, I think that I like the command deck on top. What source tells you this?
Don't think they ever said specifics for an Emperor Titan, however I know that in Mechanicus the command decks are all in the heads of the titans.
|
|
|
|
|
2013/02/15 05:08:51
Subject: 40k Emperor Titan Project
|
|
Bounding Ultramarine Assault Trooper
|
I love how this is turning out. I love the ingenuity of using power loaders to build a titan makes it so much cooler to see the way you're presenting the build. And its good to see the thought you put into this build.
I honestly cannot wait to see more of this monster.
|
|
|
|
|
|
2013/02/15 14:32:12
Subject: 40k Emperor Titan Project
|
|
Twisting Tzeentch Horror
|
Wow... this looks like it will be amazing...
|
|
|
|
|
|
2013/02/15 14:39:09
Subject: 40k Emperor Titan Project
|
|

Sneaky Sniper Drone
Norway
|
Agreed, this looks awesome indeed...
Love the Vengeance Cannon, looks good and proper like an incredibly oversized minigun
|
 Tau sucks at Close Quarter? Meet the Fish Of Fury! Tau sucks at Close Quarter? Meet the Fish Of Fury! |
|
|
|
|
2013/02/15 17:46:45
Subject: 40k Emperor Titan Project
|
|
Hurr! Ogryn Bone 'Ead!
|
It's..... Beautiful! My only criticism is that the backpacks on the powerlifter sentinels are upside down.
|
|
This message was edited 1 time. Last update was at 2013/02/15 17:47:45
You know what they say kids, drive it like its a rental.
|
|
|
|
|
2013/02/15 20:48:22
Subject: 40k Emperor Titan Project
|
|
Longtime Dakkanaut
|
Whoah, nice project! Keep it up!
|
|
|
|
|
2013/03/07 01:50:26
Subject: 40k Emperor Titan Project
|
|
Brainless Servitor
|
Goodness, who is running this project? Almost a month without updates? Scandalous! My apologies, stand by for pictures
Automatically Appended Next Post:
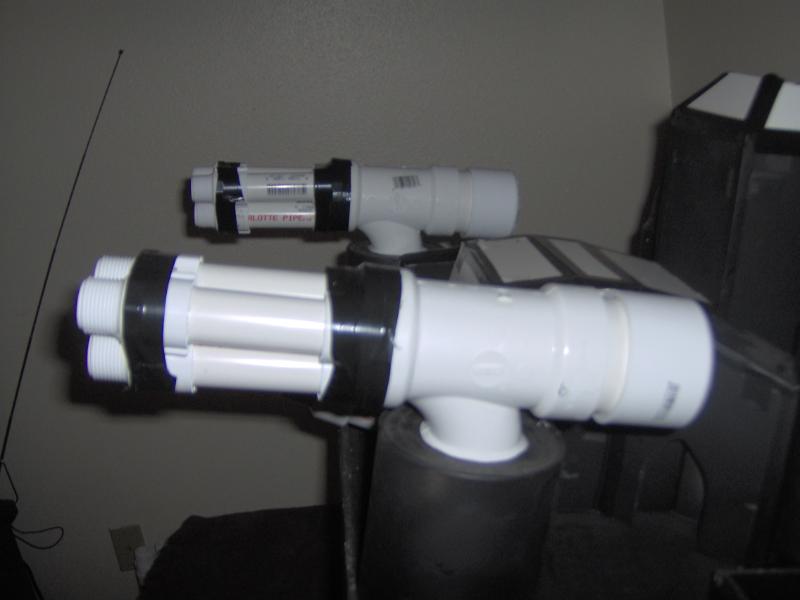
Alright, so here is what I have. Was lucky enough that we had an Apoc game that was 4k point to a player, *guess how many point an emperor titan is...* Anyway, I have a few pics that I uploaded from that in my gallery, but I am awaiting more from a guy with a better camera than me. Anyway, back to the project, here are a bunch of the weapons. Also, sorry about the state of some of the pictures here, my regular camera is having issues, and my phone camera is not super great.
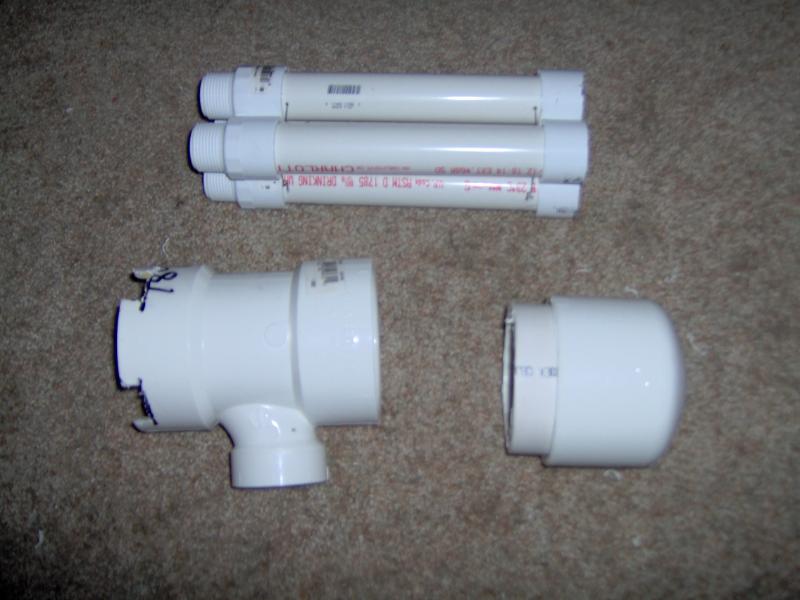
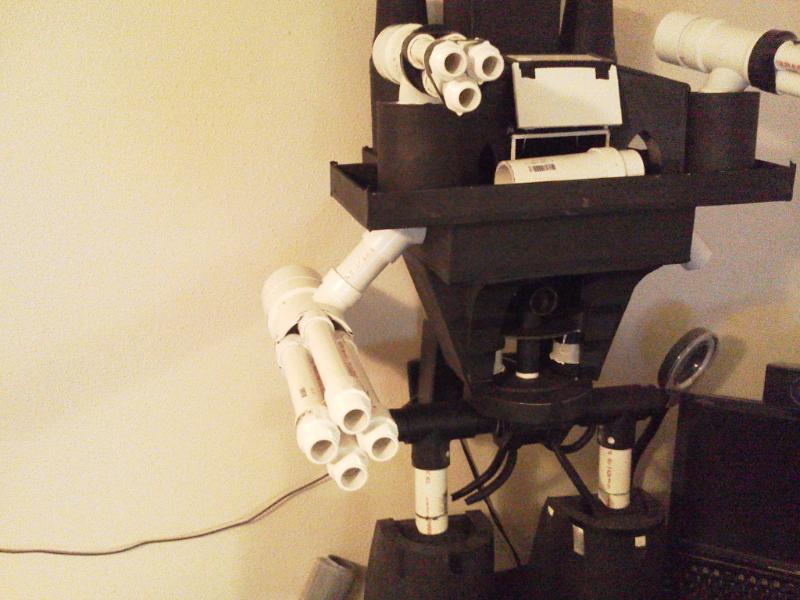
This is the build for the Vengeance Cannons, I used the same technique for the laser blasters on the castle section that are pictured later.


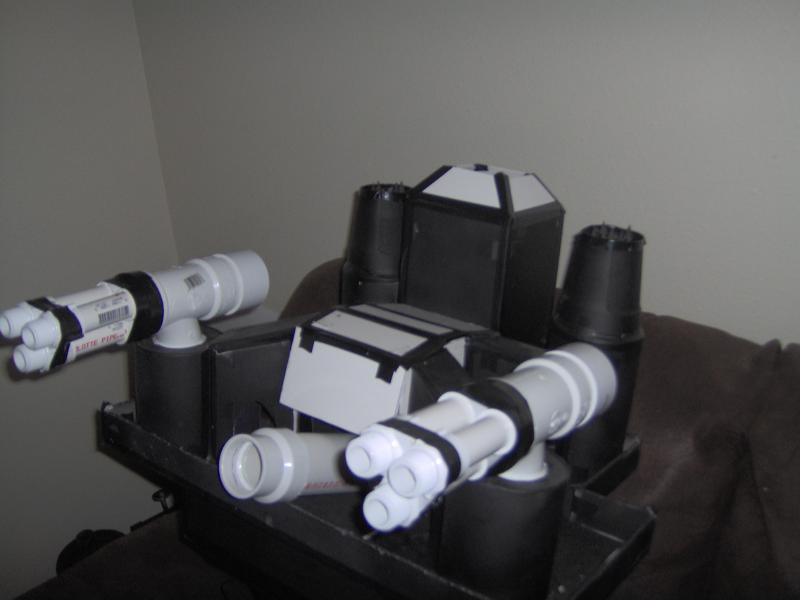
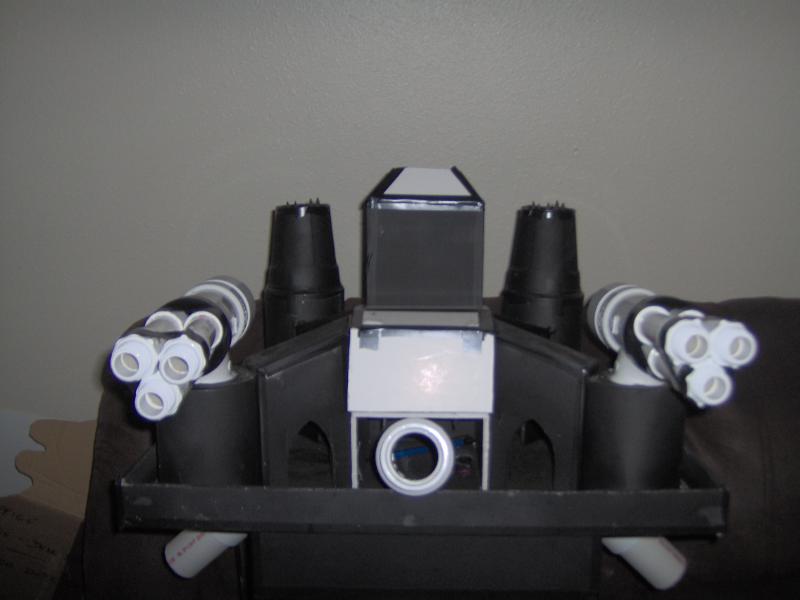
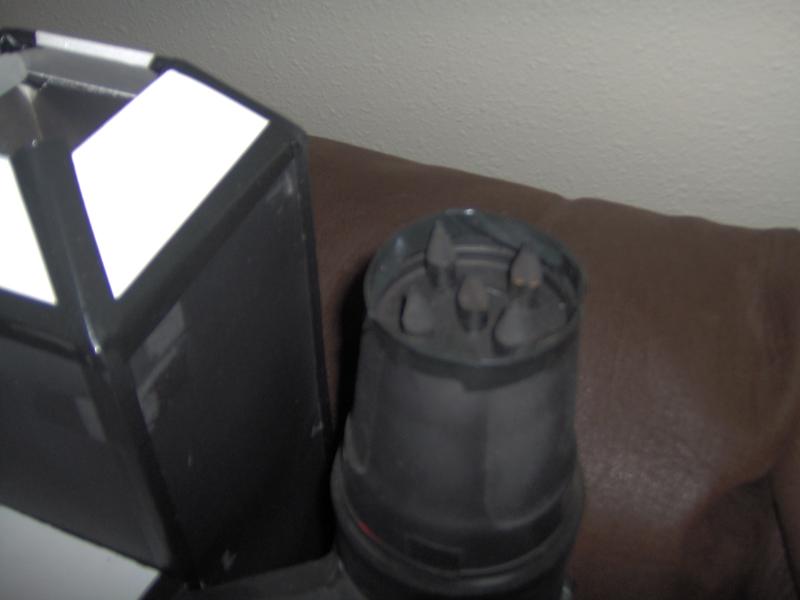
Here is the castle section sporting two Laser Blasters, a Volcano Cannon, two Apoc Missile Launchers, and the main tower is a launch tower for a vortex missile. (Yes, the missiles are pencils)
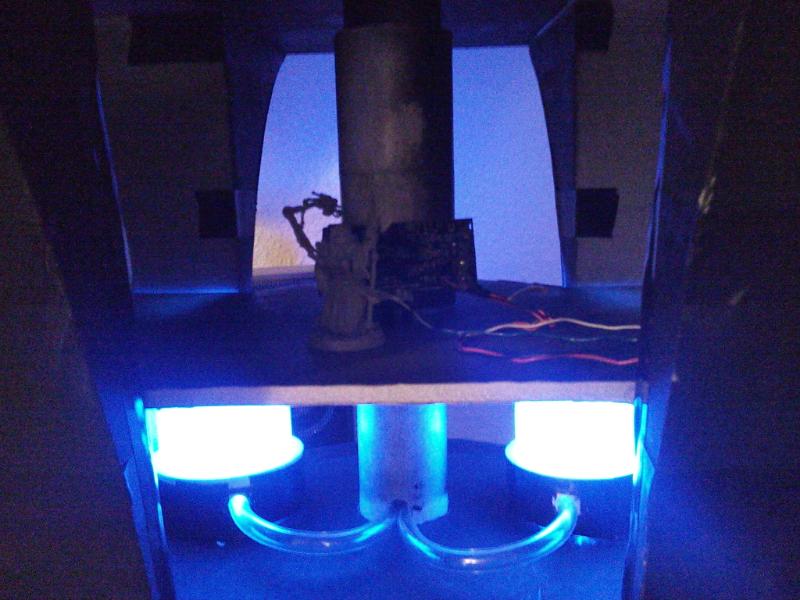
And here is the preview for the next post. The Techpriest is overseeing the initial waking of the machine spirit through the initialization of the reactor core.
|
|
This message was edited 2 times. Last update was at 2013/03/07 02:45:35
|
|
|
|
|
2013/03/07 05:41:05
Subject: 40k Emperor Titan Project
|
|
Steadfast Ultramarine Sergeant
|
This is insane. Brilliance of epic proportions, can't wait to see it finished.
|
|
|
|
|
2013/03/07 06:31:53
Subject: 40k Emperor Titan Project
|
|
Mutilatin' Mad Dok
|
And to think some poor sod is gonna have to verse that one day, send him my regards.
|
|
|
|
|
|
2013/03/07 09:11:55
Subject: 40k Emperor Titan Project
|
|
Bounding Ultramarine Assault Trooper
|
Good to see this project didn't die, I was getting worried for a bit there. As for the build, it's coming along well the ever present techpriest 'doing up the wires' is a great touch as ever. I'd like to see a full frontal picture to get a better idea of the scale. I get the feeling it's about 3 feet tall? but it'd still be nice to see a picture of it from the front with all those guns on it.
As ever, the project is freaking sweet. Maintain quotas, this pleases the machine god.
|
|
|
|
|
|
2013/03/07 15:08:34
Subject: 40k Emperor Titan Project
|
|
Brainless Servitor
|
The Apoc game that I mentioned in which my army consisted of only the emperor titan itself, It was a 4 v 4 with 160000 point per side. Our enemies got turn one, and managed to bring down all void shields and all but 3 structure points.
In our turn I blew up 2 2/3 necron pylons, a baneblade, and crippled a stompa. Also took down 18 (or 19) bloodletters and again 18 (or 19) daemonettes.
In the next turn a squad of crons jumped out of their flyer and glanced me to death, in the resulting cataclysmic explosion, all of the crons (including the flyer) that jumped out. As well as a triarch stalker, 1 crisis suit (my team), 4 fire warriors (my team), Bjorn (my team), 4 Space Wolves (my team), 1 hammerhead and 2 devilfish took a hull point (also my team).
All told, the titan killed about 4000 points (minus the 800 or so that I killed of my own team) in just the one shooting phase. Imagine if we had seized the initiative.
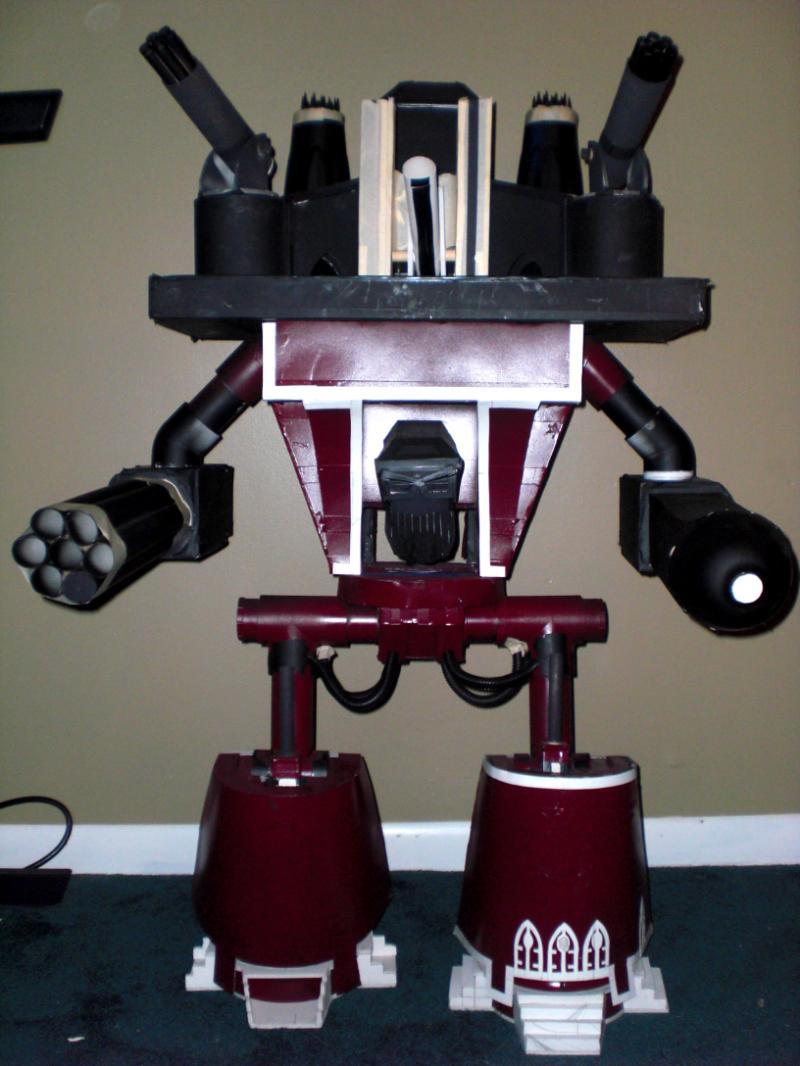
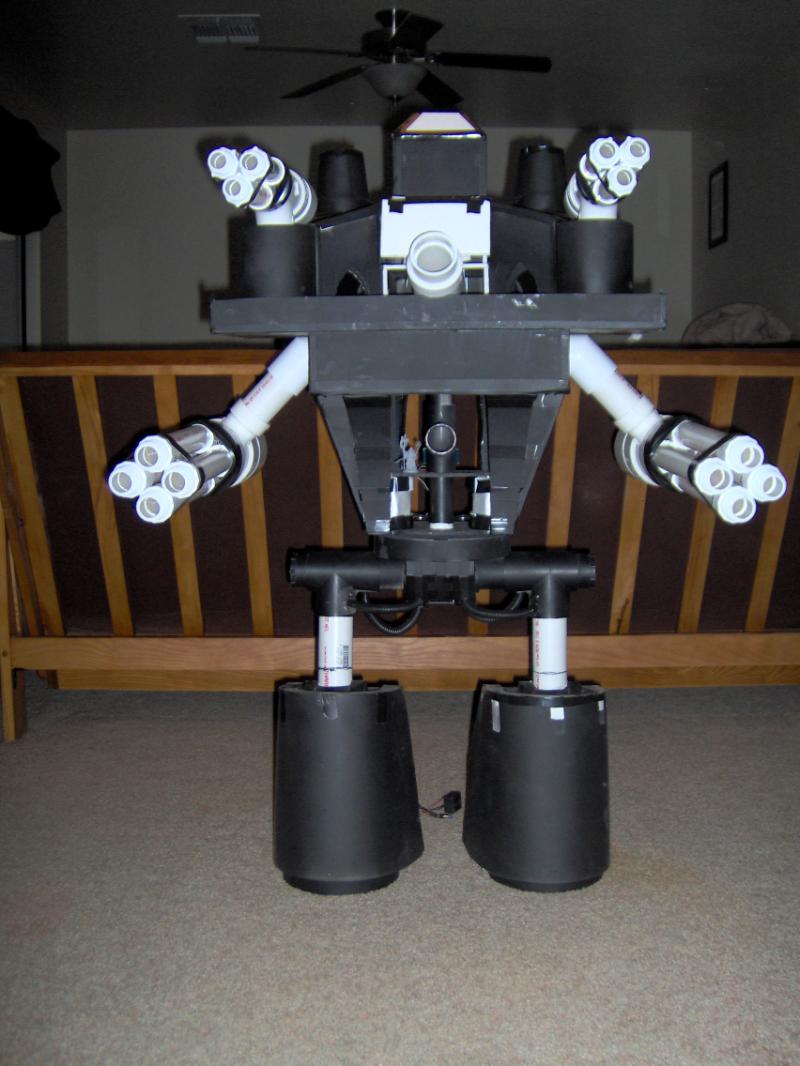
I will get you that "Full Monty" picture after work today. As for the size, it is 44" to the top of the tower. Automatically Appended Next Post: Here is the Full Titan as of today.
|
|
This message was edited 2 times. Last update was at 2013/03/08 01:21:39
|
|
|
|
|
2013/04/14 16:05:24
Subject: 40k Emperor Titan Project
|
|
Brainless Servitor
|
Update - only a month late. I haven't done a whole ton. Trying to think of how to build the head has been taking up my "titan time." The few things I have done is put the doors on the back of the titan for viewing of interior. Also, I figured a neat way to track structure points and void shields. I will try and post pics this week.
|
|
|
|
|
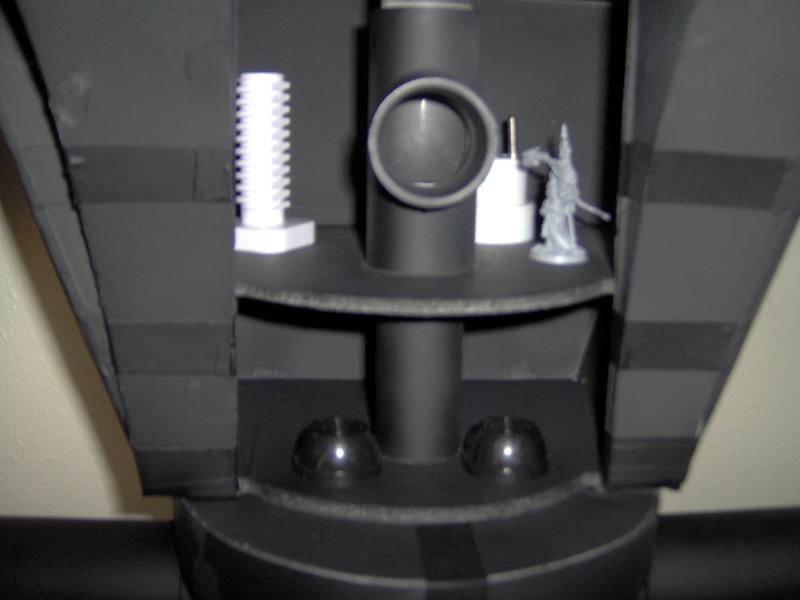
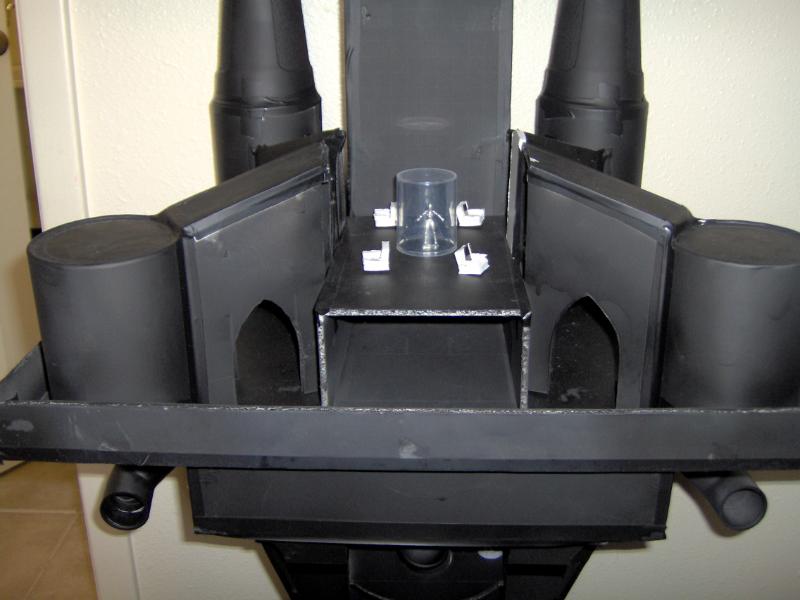
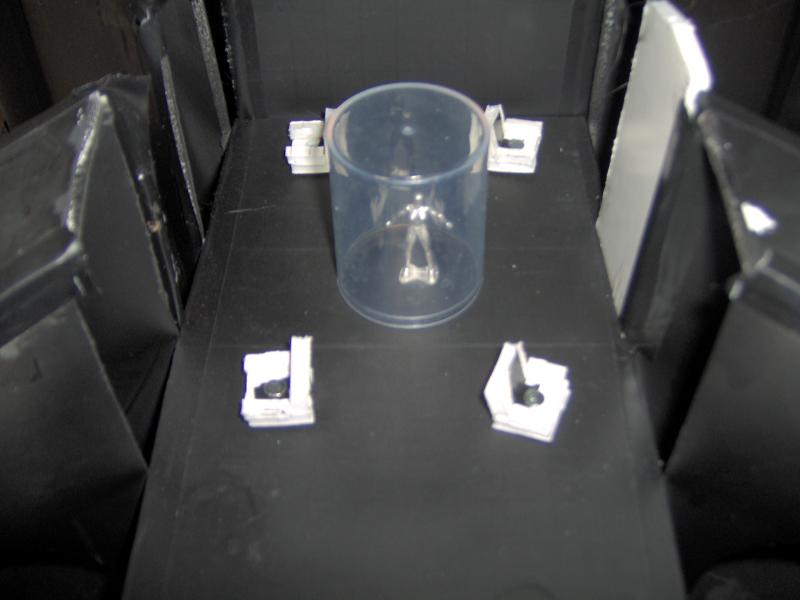
2013/04/25 12:00:45
Subject: Re:40k Emperor Titan Project
|
|
Brainless Servitor
|
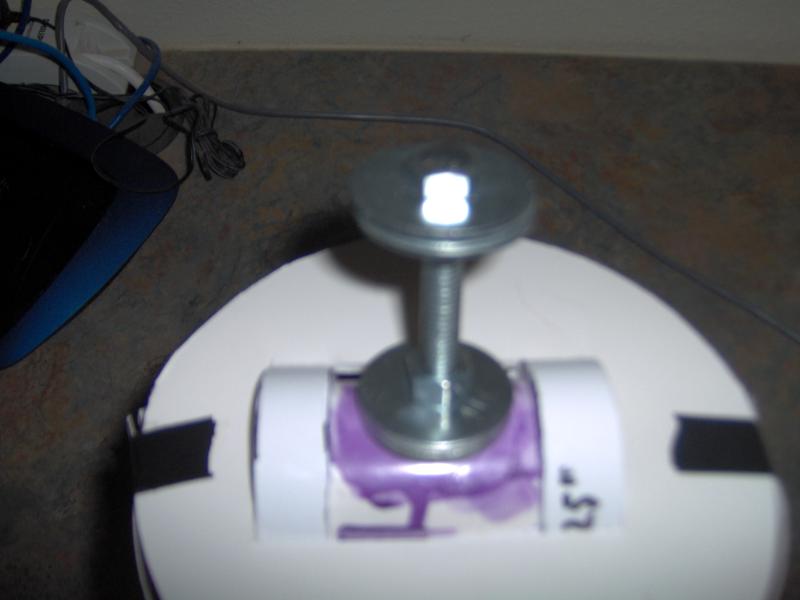
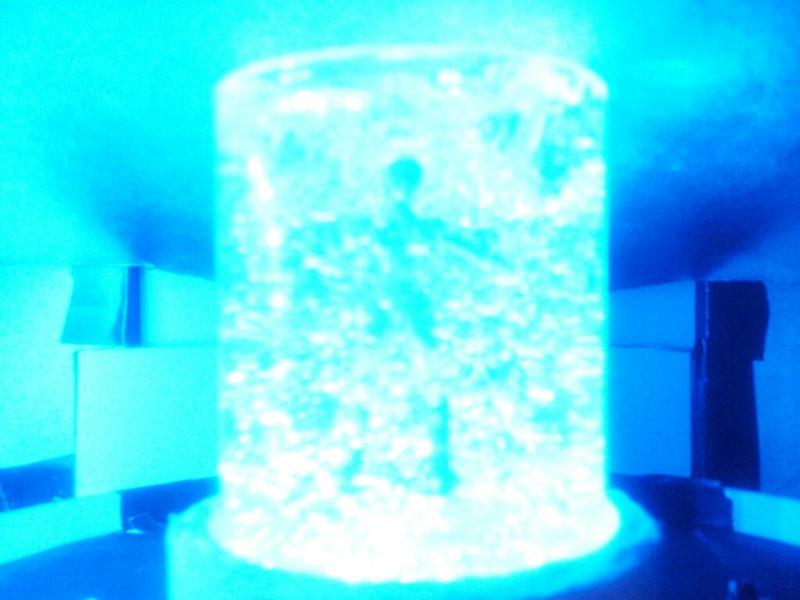
I am going to level with you guys. The head terrifies me. I cannot seem to get it right building it myself (using plasticard/foam board/poster board). And I cannot find a suitable one to just buy and modify. So what do I do when things scare me? Avoid it. YA! So for now, the Titan remains headless while I cower from it in fear. However, I have mustered up a bit of creativity and set my sights on the bridge/command deck. Here is the teaser picture of the test run for the amniotic tank. Hair gel. Believe it, its got the bubbles already in it, and is thick enough that the model will stay where it has been put. Any who, on the to the picture.
I feel it is important to note that I do recognize that the person is difficult to see and am working on a fix. Also, that is not the model that I will be using for the final, just wanted to get a wag of what it would look like.
|
|
|
|
|
|
|